【AI学习从零至壹】AI调用MCP抓包分析pcap原始报文
AI调用MCP抓包分析pcap原始报文
- MCP
- 为什么出现MCP
- AI调用MCP抓包分析pcap原始报文
- 背景:
- 问题方案:
- 本地部署:
- 代码实现逻辑
MCP
为什么出现MCP
假如你开发了一个AI应用,无论是ChatBot还是复杂的Agent,都不会再局限于简单的LLM对话,很多时候你需要与外部世界连接,以访问数据源或使用工具。比如:
操控浏览器实现自动化;访问本地文件
访问数据库结构,以更好的让AI做编程
调用CRM的API以驱动智能客服流程
那么,你需要连接不同的对象,使用不同的接口协议;你需要熟悉SQL、HTTP调用、Playwright等接口;可能你还需要使用搜索引擎、访问云存储、调用第三方开放API…这都需要做大量的“粘合”工作:
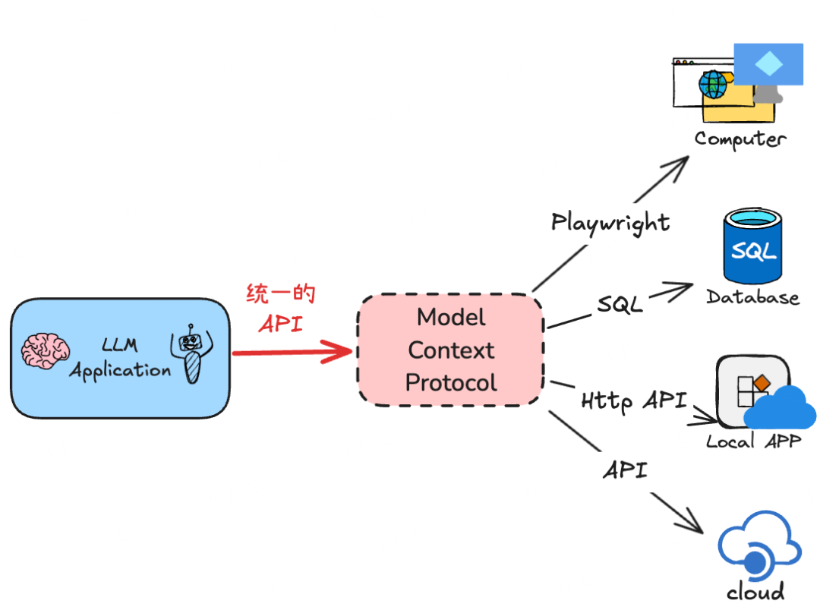
MCP就是用来帮助简化LLM应用与这些外部资源间的集成。它允许LLM应用使用统一的协议来连接到这些外部资源,而不必逐个适配:
MCP的做法是增加了一个中间层:LLM应用通过统一的MCP协议连接中间层(称为MCP Server),而这个中间层会处理与外部资源的对接。
【MCP有哪些好处】
其实在软件系统中这是一种常见设计范式(比如一些大模型API网关把不同厂家的大模型协议转化成统一的OpenAI兼容协议,以方便应用接入)。它的具体意义体现在:
-
LLM应用的简化:不用适配各种私有协议,你只需要知道怎么连接MCP server
-
LLM应用的快速扩展:随时“插拔”新的MCP Server即可,一个不够就再来一个
-
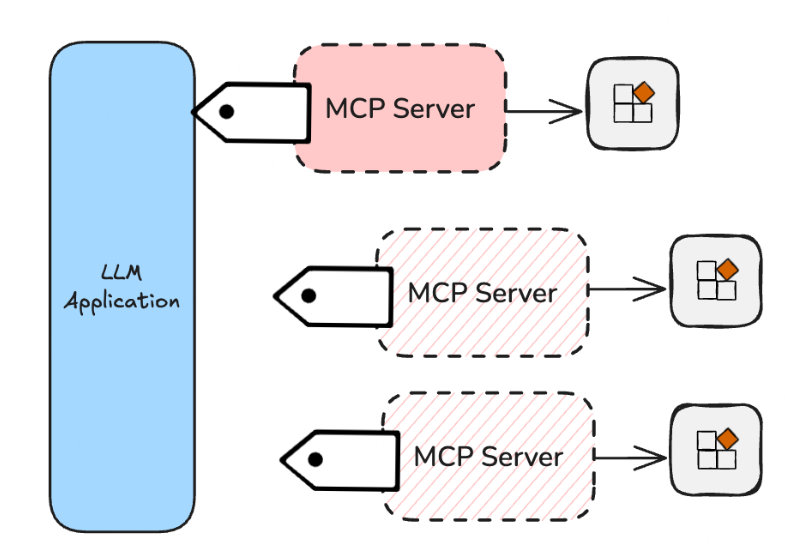
MCP的提出者Anthropic旗下的Claude Desktop就可以通过这种方式扩充能力。
快速的适应变化:想象下,如果一个外部资源的接口发生变化,只需要访问它的MCP Server做修改,所有的LLM应用就可无缝适应。
新的AI能力共享生态:通过MCP Server的共享,新的LLM应用可以快速获得各种工具,形成了一种新的合作体系,提高整体效用。
MCP Server有哪些“服务”? -
Tools:提供给LLM应用特别是Agent使用的工具。
-
Resoures:提供给LLM应用一些额外的结构化数据。
-
Prompts:提供给LLM应用的一些Prompt模板。比如你的应用是一个Chatbot,可以从MCP Server中取出这些模板,让使用者选择使用。
AI调用MCP抓包分析pcap原始报文
背景:
在当今网络技术场景中,协议解析与流量分析是我们的必备技能。PCAP(Packet Capture)作为标准网络数据包格式,常用于存储Wireshark、tcpdump等工具捕获的原始数据。但如何高效调用工具、解析协议层信息,一直是技术痛点。
问题方案:
通过某大模型平台Deepseek调用Model Context Protocol(MCP)实现网络抓包,并结合Wireshark工具解析PCAP原始报文
本地部署:
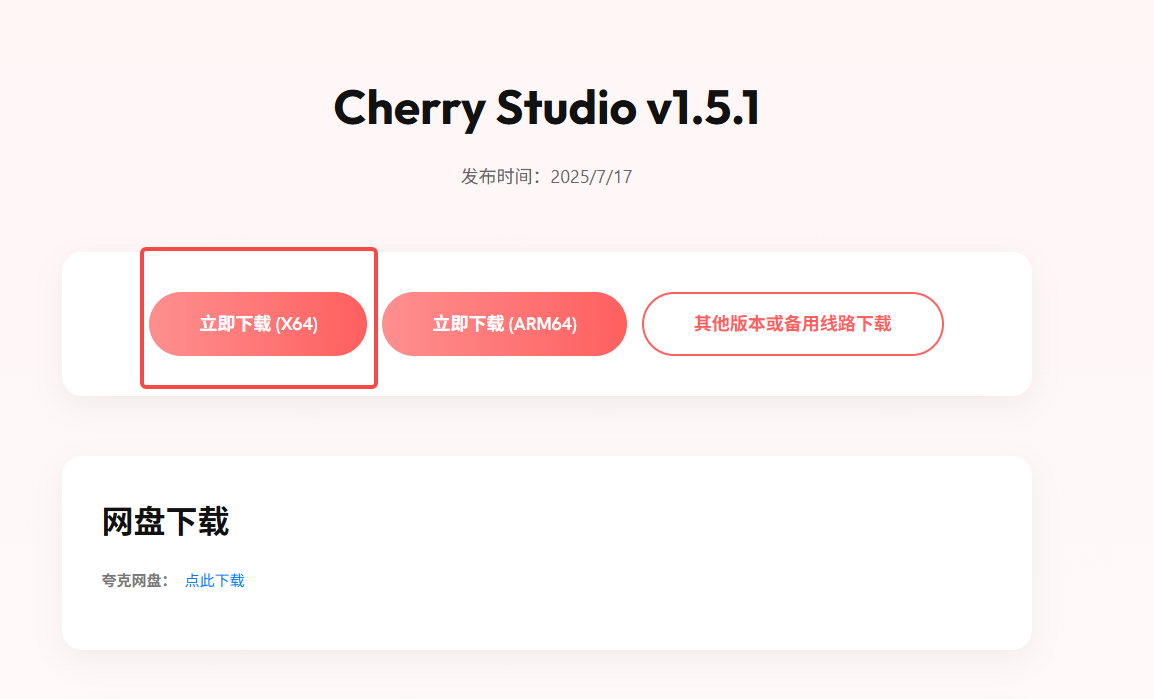
一、下载Cherry Studio
关于 Cherry Studio
Cherry Studio 是一款集多模型对话、知识库管理、AI 绘画、翻译等功能于一体的全能 AI 助手平台。 Cherry Studio 高度自定义的设计、强大的扩展能力和友好的用户体验,使其成为专业用户和 AI 爱好者的理想选择。无论是零基础用户还是开发者,都能在 Cherry Studio 中找到适合自己的 AI 功能,提升工作效率和创造力。
- 浏览器访问官网:https://www.cherry-ai.com/ 找到对应的电脑版本直接下载。
- 配置大模型
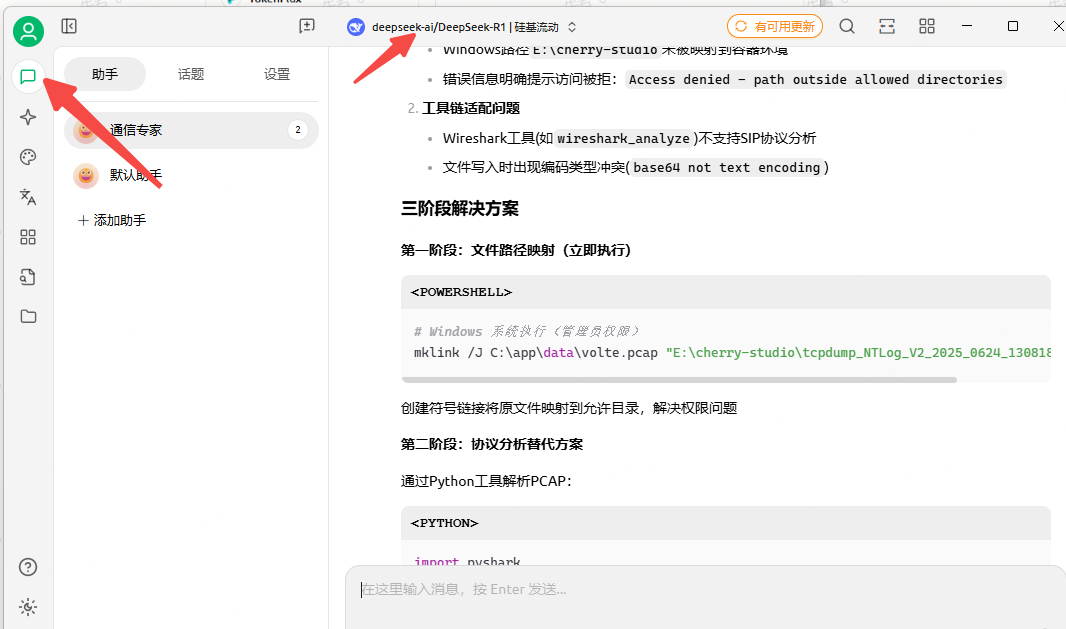
打开 Cherry Studio 进入设置(1) --> 模型服务(2) --> 硅基流动(3) --> 粘贴 API 密钥 (4) -->检测(5),检测通过后右上角的开关自动打开变绿。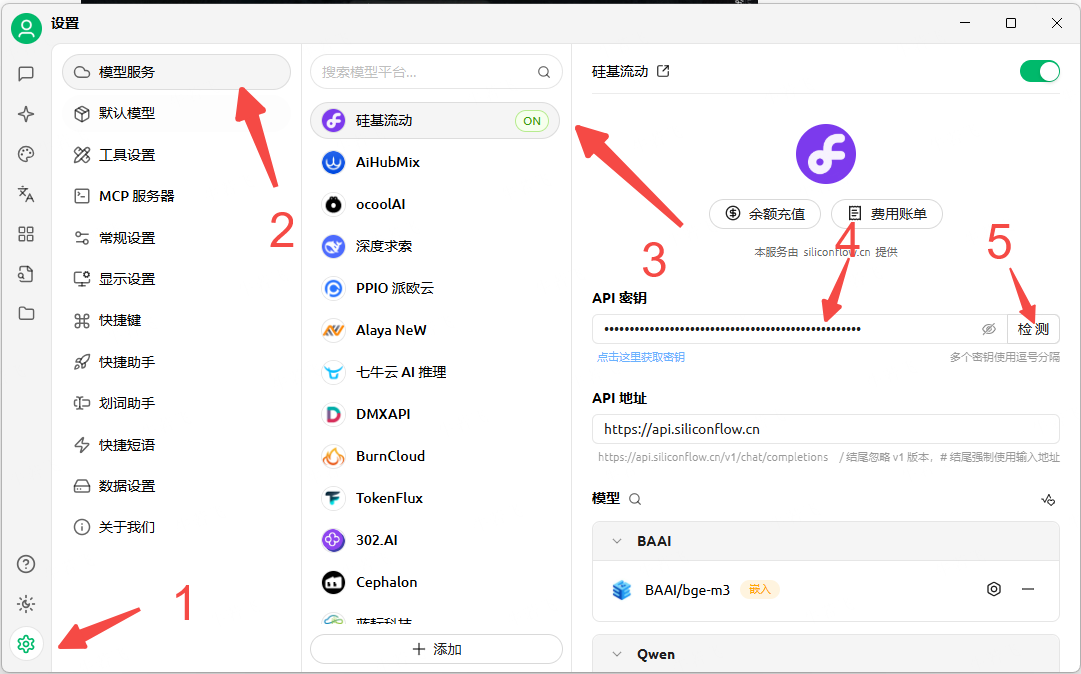
第三步:
邀请码:IgsAarpJ
https://cloud.siliconflow.cn/i/IgsAarpJ
左侧菜单点击 “API密钥”,点击"新建 API 密钥",描述可以不填,就是个备注。生成后需要复制密钥,以备使用时粘贴过去。复制的方法是鼠标悬停时出现个提示“复制”,这时候鼠标点一下密钥就复制好了。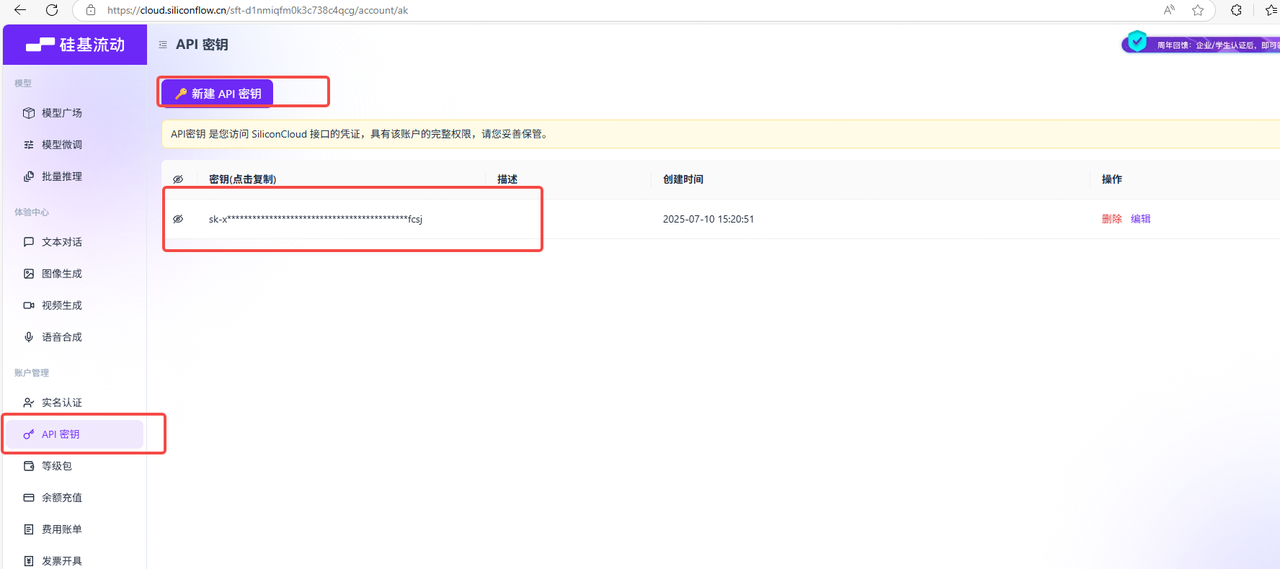
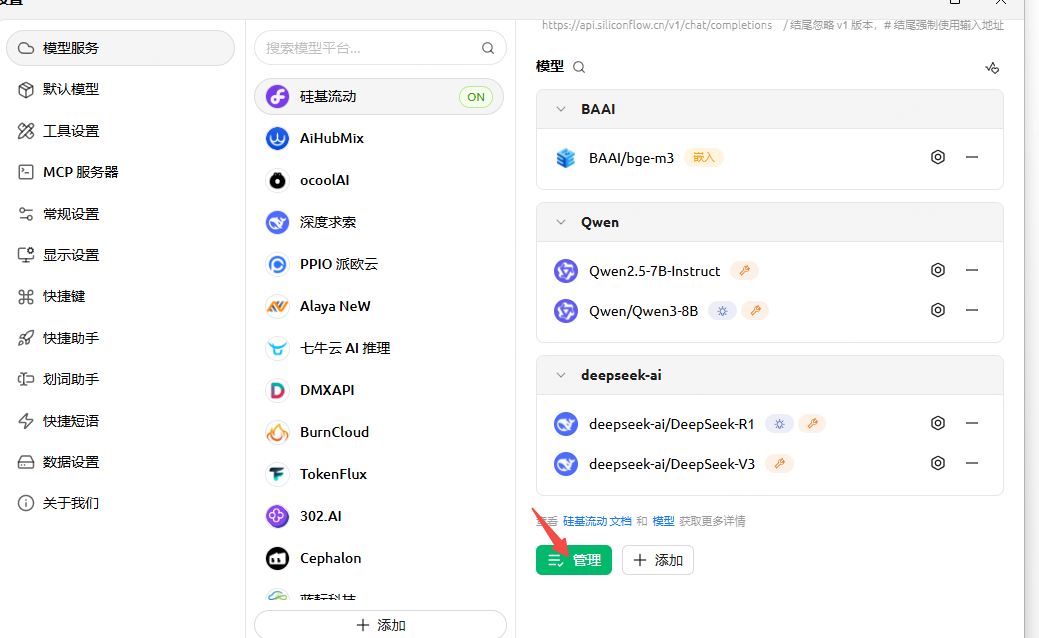

关闭后转到聊天窗口,在列表中选刚才添加的Deepseek-R1
二、Cherry studio安装MCP 服务器
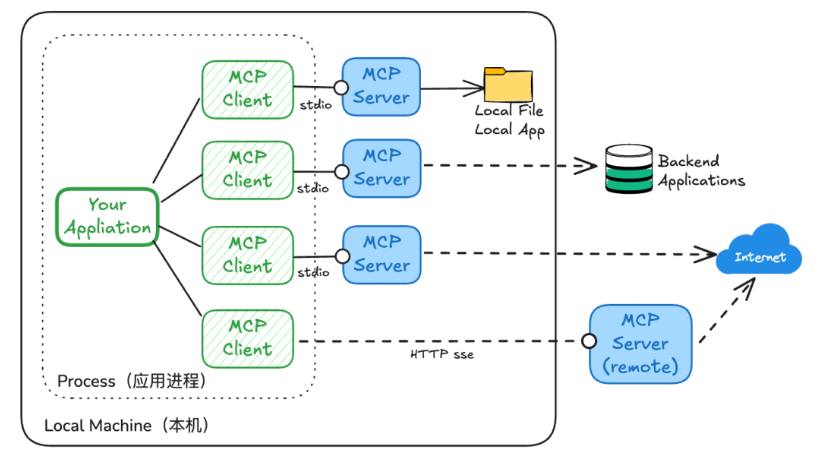
MCP Server(Model Context Protocol Server)是一种基于Model Context Protocol(MCP)的标准化服务,旨在为AI模型和工具提供统一的接口,实现与外部资源的安全、高效交互。MCP Server的核心功能包括资源暴露、工具提供和动态通知,支持多种传输协议(如STDIO和SSE),并具备良好的安全性和可扩展性。 - 准备工作:安装 uv、bun
uv 是一个快速的 Python 包安装和依赖解析器。 它可以显著提升 Python 项目 的依赖管理速度。
Bun 是一个快速的全面的 JavaScript 工具包,可以用来进行 JavaScript 和 TypeScript 项目的打包、测试和运行。
手动创建目录,把手工下载的可执行文件放到目录即可
C:\Users.cherrystudio\bin
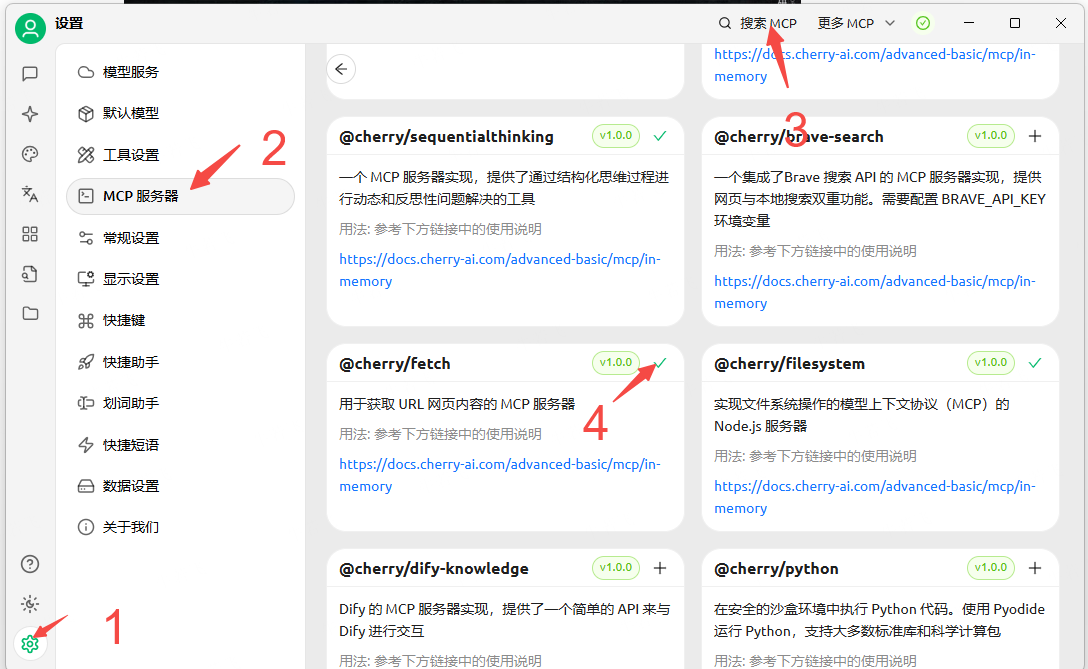
uv的工具 - 安装 fetch MCP Server
fetch-mcp 能够帮助大语言模型检索和处理网页内容,将HTML转换为markdown格式,以便于更轻松地使用。
按下图顺序操作,点搜索MCP,缺省的搜索内容就是 @cherry 内置的 MCP,点➕即可。
- 手工添加 MCP 服务器
刚才那个是 cherry studio 内置的,有些需要手工安装,eg:python-interpreter
- 先搭建虚拟环境,要在uv工具的路径下创建 uv venv my_env(名字自己命名)
- 激活环境 my_env1\Scripts\activate
- pip install mcp-python-interpreter
超时提醒,安装清华大学镜像源的版本
pip install mcp-python-interpreter -i https://pypi.tuna.tsinghua.edu.cn/simple/
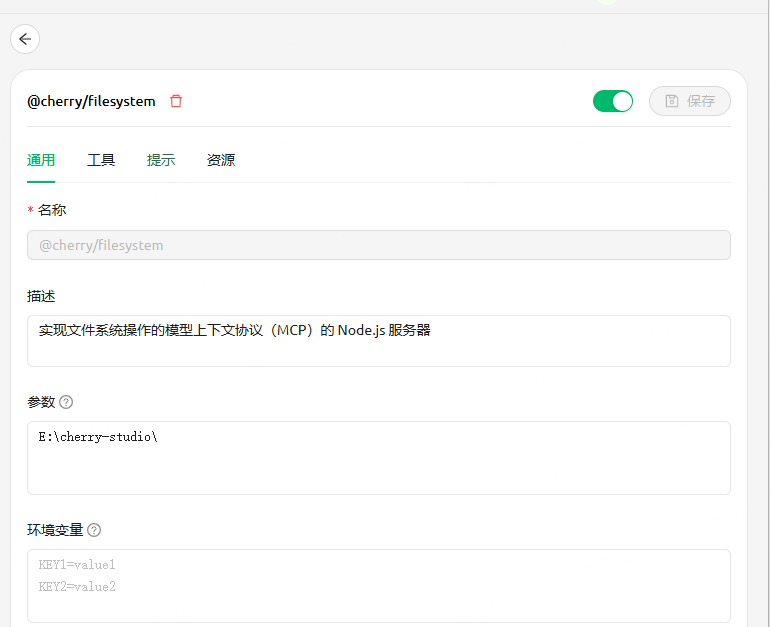
然后回到 cherry studio,进入设置 --> MCP 服务器 --> 点击添加服务器。将 MCP Server 的相关参数填入,可能需要填写的内容包括,python路径是自己python的所在路径
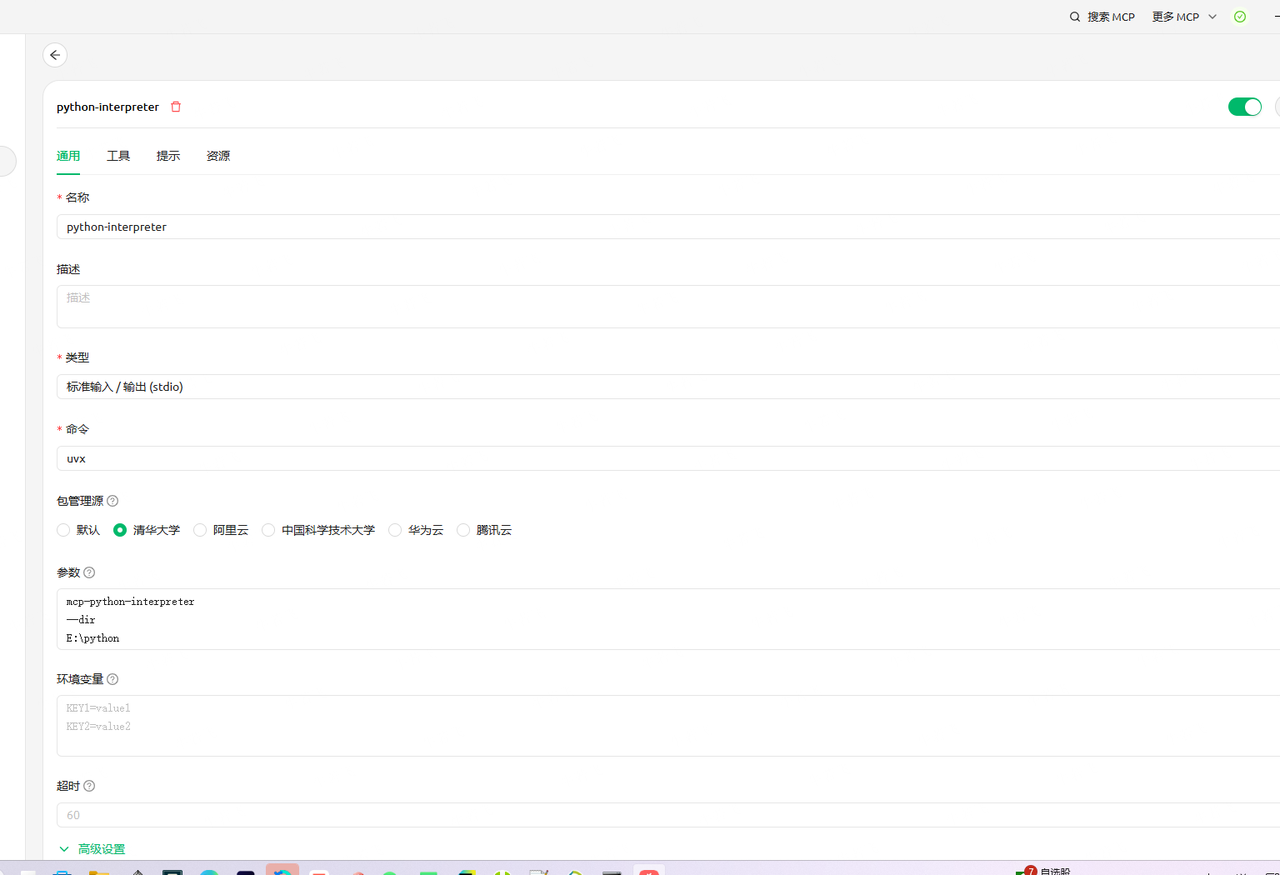
点击保存完成配置,检查通过后右上角变绿点亮
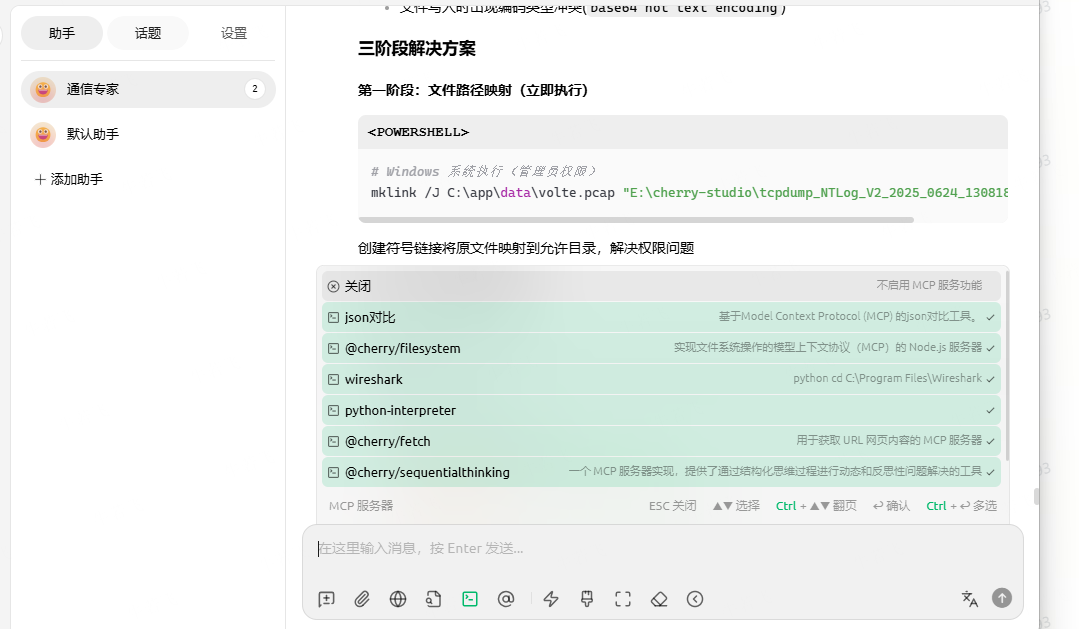
4. 使用 MCP 服务器
我们回到聊天界面,在敲入对话内容时点下面工具栏中的 “MCP 服务器” 就可以在列表中选择你希望使用的 MCP 服务器了。
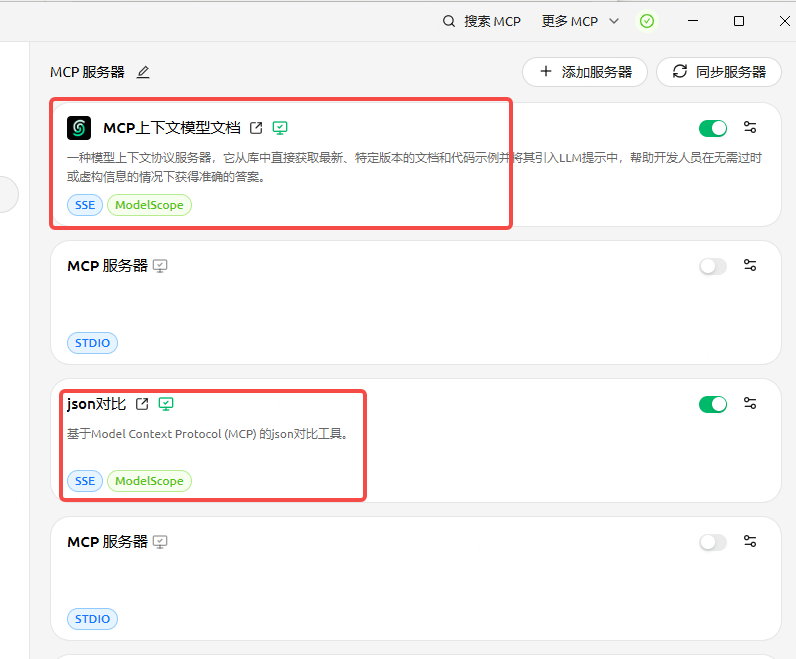
5. 通过 ModelScope 添加 MCP 服务器
Cherry Studio 与 ModelScope 魔搭建立了官方合作,简化了MCP服务器添加的操作步骤,避免配置过程出错,而且可以在 ModelScope 社区发现海量 MCP 服务器。通过 API 令牌建立 Cherry Studio 和 ModelScope 的通信,在ModelScope 网站选择和创建 MCP-Server,然后在 Cherry Studio点同步服务器,就可以自动添加该 MCP-Server 到 Cherry Studio 中,但只仅限于host类型的。
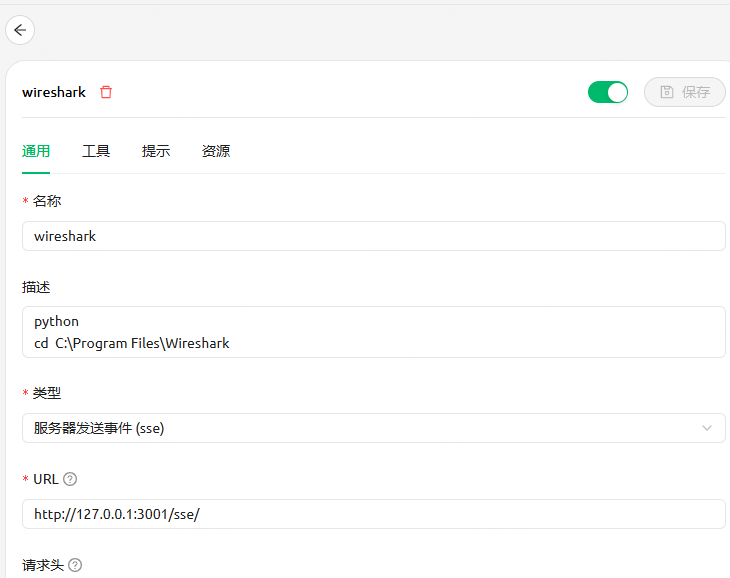
注意:wireshark要安装在C:\Program Files\Wireshark否则cherry studio解析的时候会报权限问题
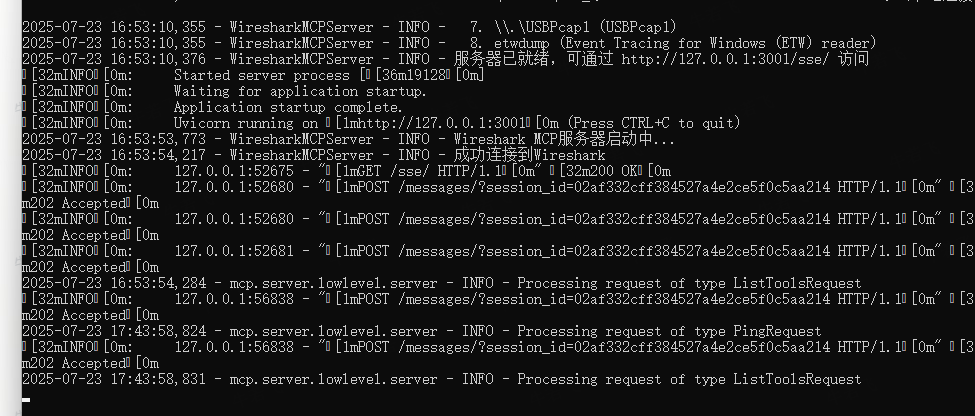
6.启动服务器
python C:\Users.cherrystudio\bin\wireshark_mcp-master\wireshark_mcp-master\wireshark_mcp\wireshark_mcp_server.py
服务器将启动一个SSE应用,监听在http://127.0.0.1:3001,可以通过支持MCP的LLM客户端连接。
7… 启动MCP服务器,在cherrstudio中启用
代码实现逻辑
#!/usr/bin/env python3
# -*- coding: utf-8 -*-"""
Wireshark MCP服务器
提供连接Wireshark工具的MCP实现
"""import os
import sys
import subprocess
import json
import pyshark
import time
from typing import Dict, List, Optional, Any
import logging
from contextlib import asynccontextmanager
from typing import AsyncIterator
from starlette.applications import Starlette
from starlette.routing import Mount, Route
from starlette.middleware import Middleware
from starlette.middleware.cors import CORSMiddleware
from starlette.responses import JSONResponse, HTMLResponse# 修改导入语句,使用新版本MCP
from mcp.server.fastmcp import FastMCP# 配置日志
logging.basicConfig(level=logging.INFO, format='%(asctime)s - %(name)s - %(levelname)s - %(message)s')
logger = logging.getLogger("WiresharkMCPServer")class WiresharkPromptStore:"""Wireshark相关提示的存储类"""def __init__(self):"""初始化提示存储"""self._prompts = {"wireshark_filters": {"id": "wireshark_filters","text": ("常用Wireshark过滤器:\n""- IP地址过滤: ip.addr == 192.168.1.1\n""- 端口过滤: tcp.port == 80 或 udp.port == 53\n""- 协议过滤: http 或 dns 或 tcp\n""- HTTP请求过滤: http.request.method == \"GET\"\n""- DNS过滤: dns.qry.name contains \"example.com\"\n""- 数据包大小过滤: frame.len > 1000\n""- 多条件组合: (ip.src == 192.168.1.1) && (tcp.port == 80)\n")},"wireshark_analysis": {"id": "wireshark_analysis","text": ("网络分析基本步骤:\n""1. 应用适当的过滤器缩小分析范围\n""2. 查找关键连接 (SYN, SYN-ACK等TCP握手)\n""3. 分析响应时间和延迟情况\n""4. 检查错误包和重传包\n""5. 对特定协议深入分析其字段\n""6. 导出重要会话为单独文件\n")},"wireshark_commands": {"id": "wireshark_commands","text": ("有用的Wireshark命令行命令:\n""- 捕获数据包: tshark -i <interface> -w <output.pcap>\n""- 读取捕获文件: tshark -r <input.pcap>\n""- 应用过滤器: tshark -r <input.pcap> -Y \"<display filter>\"\n""- 提取特定字段: tshark -r <input.pcap> -T fields -e <field>\n""- 统计信息: tshark -r <input.pcap> -q -z <statistics>\n")}}def get(self, prompt_id: str) -> Optional[Dict[str, str]]:"""获取特定ID的提示"""return self._prompts.get(prompt_id)def list(self) -> List[Dict[str, str]]:"""列出所有提示"""return list(self._prompts.values())class WiresharkTools:"""Wireshark工具类"""@staticmethoddef check_wireshark_installed() -> bool:"""检查Wireshark是否已安装"""try:# 检查tshark是否可用subprocess.run(["tshark", "--version"], stdout=subprocess.PIPE, stderr=subprocess.PIPE, check=True)return Trueexcept (subprocess.SubprocessError, FileNotFoundError):return False@staticmethoddef get_available_interfaces() -> List[Dict[str, str]]:"""获取可用的网络接口列表"""try:result = subprocess.run(["tshark", "-D"], stdout=subprocess.PIPE, stderr=subprocess.PIPE,encoding = 'utf-8',errors = 'replace',text=True, check=True)interfaces = []for line in result.stdout.strip().split('\n'):if line:# 格式通常为: "1. en0 (Wi-Fi)"parts = line.split(' ', 1)if len(parts) > 1:index = parts[0].rstrip('.')description = parts[1]interfaces.append({"index": index,"interface": description})return interfacesexcept subprocess.SubprocessError:return []@staticmethoddef capture_packets(interface: str, duration: int = 10, filter_str: str = None, output_file: str = None) -> Dict[str, Any]:"""捕获网络数据包"""try:cmd = ["tshark", "-i", interface, "-a", f"duration:{duration}"]if filter_str:cmd.extend(["-f", filter_str])if output_file:cmd.extend(["-w", output_file])result = subprocess.run(cmd,stdout=subprocess.PIPE,stderr=subprocess.PIPE,text=True)return {"success": result.returncode == 0,"stdout": result.stdout,"stderr": result.stderr,"output_file": output_file if output_file else None}except subprocess.SubprocessError as e:return {"success": False,"error": str(e)}@staticmethoddef read_capture_file(file_path: str, filter_str: str = None, limit: int = 100) -> Dict[str, Any]:"""读取捕获的数据包文件"""try:cmd = ["tshark", "-r", file_path]if filter_str:cmd.extend(["-Y", filter_str])if limit:cmd.extend(["-c", str(limit)])result = subprocess.run(cmd,stdout=subprocess.PIPE,stderr=subprocess.PIPE,text=True)return {"success": result.returncode == 0,"stdout": result.stdout,"stderr": result.stderr}except subprocess.SubprocessError as e:return {"success": False,"error": str(e)}@staticmethoddef analyze_capture(file_path: str, analysis_type: str) -> Dict[str, Any]:"""分析捕获文件并提供统计数据"""supported_types = {"conversations": "conv,ip","endpoints": "endpoints,ip","protocols": "io,phs","http": "http,tree","dns": "dns,tree"}if analysis_type not in supported_types:return {"success": False,"error": f"不支持的分析类型: {analysis_type}. 支持的类型: {list(supported_types.keys())}"}try:cmd = ["tshark", "-r", file_path, "-q", "-z", supported_types[analysis_type]]result = subprocess.run(cmd,stdout=subprocess.PIPE,stderr=subprocess.PIPE,text=True)return {"success": result.returncode == 0,"stdout": result.stdout,"stderr": result.stderr}except subprocess.SubprocessError as e:return {"success": False,"error": str(e)}@asynccontextmanager
async def server_lifespan(server: FastMCP) -> AsyncIterator[Dict[str, Any]]:"""管理服务器启动和关闭生命周期"""try:logger.info("Wireshark MCP服务器启动中...")# 验证Wireshark可用性if not WiresharkTools.check_wireshark_installed():logger.error("Wireshark未安装或tshark命令不可用")raise Exception("Wireshark未安装或tshark命令不可用")logger.info("成功连接到Wireshark")yield {}finally:logger.info("Wireshark MCP服务器关闭")# 创建MCP服务器
app = FastMCP("wireshark", description="通过Model Context Protocol连接Wireshark",lifespan=server_lifespan
)
prompt_store = WiresharkPromptStore()# 注册工具
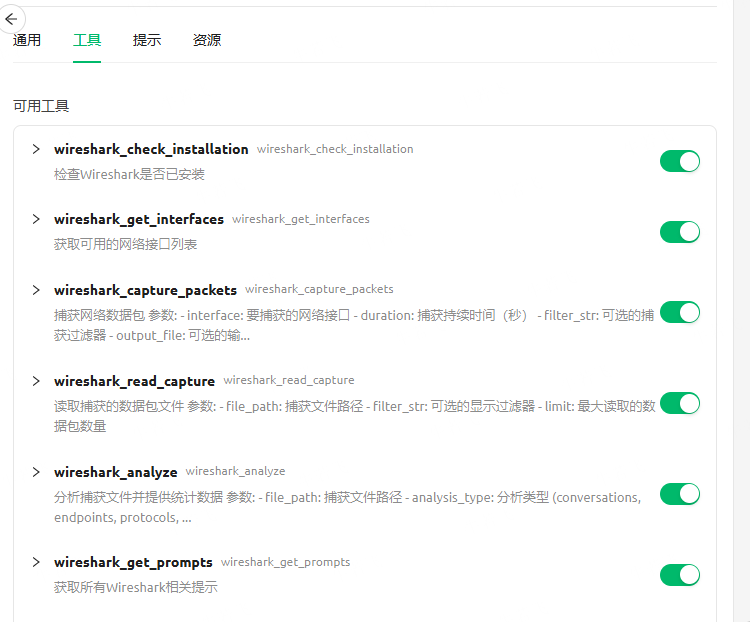
@app.tool()
def wireshark_check_installation() -> Dict[str, bool]:"""检查Wireshark是否已安装"""is_installed = WiresharkTools.check_wireshark_installed()return {"installed": is_installed}@app.tool()
def wireshark_get_interfaces() -> Dict[str, List[Dict[str, str]]]:"""获取可用的网络接口列表"""interfaces = WiresharkTools.get_available_interfaces()return {"interfaces": interfaces}@app.tool()
def wireshark_capture_packets(interface: str,duration: int = 10,filter_str: str = None,output_file: str = None
) -> Dict[str, Any]:"""捕获网络数据包参数:- interface: 要捕获的网络接口- duration: 捕获持续时间(秒)- filter_str: 可选的捕获过滤器- output_file: 可选的输出文件路径"""try:logger.info(f"开始在接口 {interface} 上捕获数据包 (持续 {duration} 秒)")if not output_file:output_file = f"capture_{int(time.time())}.pcap"result = WiresharkTools.capture_packets(interface=interface,duration=duration,filter_str=filter_str,output_file=output_file)if result["success"]:logger.info(f"成功捕获数据包,保存到 {output_file}")else:logger.error(f"捕获数据包失败: {result.get('error', '未知错误')}")return resultexcept Exception as e:logger.error(f"捕获数据包时发生错误: {str(e)}")return {"success": False,"error": str(e)}@app.tool()
def wireshark_read_capture(file_path: str,filter_str: str = None,limit: int = 100
) -> Dict[str, Any]:"""读取捕获的数据包文件参数:- file_path: 捕获文件路径- filter_str: 可选的显示过滤器- limit: 最大读取的数据包数量"""result = WiresharkTools.read_capture_file(file_path=file_path,filter_str=filter_str,limit=limit)return result@app.tool()
def wireshark_analyze(file_path: str,analysis_type: str
) -> Dict[str, Any]:"""分析捕获文件并提供统计数据参数:- file_path: 捕获文件路径- analysis_type: 分析类型 (conversations, endpoints, protocols, http, dns)"""result = WiresharkTools.analyze_capture(file_path=file_path,analysis_type=analysis_type)return result@app.tool()
def wireshark_get_prompts() -> Dict[str, List[Dict[str, str]]]:"""获取所有Wireshark相关提示"""prompts = prompt_store.list()return {"prompts": prompts}@app.tool()
def wireshark_get_prompt(prompt_id: str
) -> Dict[str, Any]:"""获取特定的Wireshark提示参数:- prompt_id: 提示ID"""prompt = prompt_store.get(prompt_id)if prompt:return {"success": True,"prompt": prompt}else:return {"success": False,"error": f"未找到ID为'{prompt_id}'的提示"}@app.tool()
def wireshark_health_check() -> Dict[str, Any]:"""检查Wireshark服务状态返回Wireshark安装状态和可用网络接口数量"""try:is_installed = WiresharkTools.check_wireshark_installed()interfaces = WiresharkTools.get_available_interfaces() if is_installed else []return {"status": "ok" if is_installed else "error","wireshark_installed": is_installed,"interface_count": len(interfaces),"timestamp": time.time()}except Exception as e:logger.error(f"健康检查失败: {str(e)}")return {"status": "error","error": str(e),"timestamp": time.time()}@app.prompt()
def wireshark_filter_guide() -> str:"""提供Wireshark过滤器使用指南"""return """常用Wireshark过滤器:
- IP地址过滤: ip.addr == 192.168.1.1
- 端口过滤: tcp.port == 80 或 udp.port == 53
- 协议过滤: http 或 dns 或 tcp
- HTTP请求过滤: http.request.method == "GET"
- DNS过滤: dns.qry.name contains "example.com"
- 数据包大小过滤: frame.len > 1000
- 多条件组合: (ip.src == 192.168.1.1) && (tcp.port == 80)过滤器示例用例:
1. 查找特定主机通信: ip.addr == 10.0.0.1
2. 查找HTTP GET请求: http.request.method == "GET"
3. 查找DNS查询: dns && dns.flags.response == 0
4. 查找TCP重传: tcp.analysis.retransmission
5. 通过端口过滤特定服务: tcp.port == 443 或 udp.port == 53
"""@app.prompt()
def wireshark_analysis_guide() -> str:"""提供Wireshark网络分析方法指南"""return """网络分析基本步骤:
1. 应用适当的过滤器缩小分析范围
2. 查找关键连接 (SYN, SYN-ACK等TCP握手)
3. 分析响应时间和延迟情况
4. 检查错误包和重传包
5. 对特定协议深入分析其字段
6. 导出重要会话为单独文件分析方法:
- 查看统计信息: Statistics > Protocol Hierarchy / Endpoints / Conversations
- 跟踪TCP流: 右键点击包 > Follow > TCP Stream
- 查看协议分布: 使用wireshark_analyze工具的"protocols"分析类型
- 识别异常延迟: 使用"tcp.time_delta > 1"过滤器查找响应慢的包
- 识别错误包: 使用"http.response.code >= 400"查找HTTP错误
"""# 修改SSE服务器创建代码
from mcp.server.sse import SseServerTransport
from starlette.applications import Starlette
from starlette.routing import Mount, Route
from starlette.responses import JSONResponse, HTMLResponse
from starlette.middleware import Middleware
from starlette.middleware.cors import CORSMiddlewaredef create_sse_server(mcp_server):"""创建处理SSE连接和消息的Starlette应用"""transport = SseServerTransport("/messages/")# 定义处理函数async def handle_sse(request):async with transport.connect_sse(request.scope, request.receive, request._send) as streams:await mcp_server.run(streams[0], streams[1], mcp_server.create_initialization_options())async def index(request):"""提供简单的索引页面"""return HTMLResponse("""<html><head><title>Wireshark MCP服务器</title></head><body><h1>Wireshark MCP服务器</h1><p>Wireshark MCP服务器已成功启动。</p><p>连接端点: <code>/sse/</code></p></body></html>""")async def health(request):"""提供简单的健康检查端点"""is_installed = WiresharkTools.check_wireshark_installed()return JSONResponse({"status": "healthy" if is_installed else "unhealthy","wireshark_installed": is_installed,"server_time": time.time()})# 创建Starlette路由routes = [Route("/", endpoint=index),Route("/health", endpoint=health),Route("/sse/", endpoint=handle_sse),Mount("/messages/", app=transport.handle_post_message),]# 添加CORS中间件middleware = [Middleware(CORSMiddleware,allow_origins=["*"],allow_methods=["*"],allow_headers=["*"],)]# 创建Starlette应用return Starlette(routes=routes, middleware=middleware)if __name__ == "__main__":try:# 启动MCP服务器port = int(os.environ.get("MCP_PORT", 3001))host = os.environ.get("MCP_HOST", "127.0.0.1")# 显示基本信息logger.info(f"启动Wireshark MCP服务器在 {host}:{port}")if WiresharkTools.check_wireshark_installed():logger.info("Wireshark已安装并可用")interfaces = WiresharkTools.get_available_interfaces()logger.info(f"检测到 {len(interfaces)} 个网络接口:")for interface in interfaces:logger.info(f" {interface['index']}. {interface['interface']}")else:logger.error("Wireshark未安装或tshark命令不可用")logger.error("请安装Wireshark并确保tshark命令可用")sys.exit(1)# 使用自定义函数创建SSE服务器应用sse_app = create_sse_server(app._mcp_server)# 启动服务器import uvicornlogger.info(f"服务器已就绪,可通过 http://{host}:{port}/sse/ 访问")uvicorn.run(sse_app, host=host, port=port)except Exception as e:logger.error(f"启动服务器时发生错误: {str(e)}")import tracebacktraceback.print_exc()sys.exit(1)