【Netty】一行简单的writeAndFlush都做了哪些事(十八)
文章目录
- 前言
- 一、源码分析
- 1.1 ctx.writeAndFlush 的逻辑
- 1.2 writeAndFlush 源码
- 1.3 ChannelOutBoundBuff 类
- 1.4 addMessage 方法
- 1.5 addFlush 方法
- 1.6 AbstractNioByteChannel 类
- 总结
前言
回顾Netty系列文章:
- Netty 概述(一)
- Netty 架构设计(二)
- Netty Channel 概述(三)
- Netty ChannelHandler(四)
- ChannelPipeline源码分析(五)
- 字节缓冲区 ByteBuf (六)(上)
- 字节缓冲区 ByteBuf(七)(下)
- Netty 如何实现零拷贝(八)
- Netty 程序引导类(九)
- Reactor 模型(十)
- 工作原理详解(十一)
- Netty 解码器(十二)
- Netty 编码器(十三)
- Netty 编解码器(十四)
- 自定义解码器、编码器、编解码器(十五)
- Future 源码分析(十六)
- Promise 源码分析(十七)
对于使用netty的小伙伴来说,我们想通过服务端往客户端发送数据,通常我们会调用ctx.writeAndFlush(数据)的方式。那么它都执行了那些行为呢,是怎么将消息发送出去的呢。
一、源码分析
下面的这个方法是用来接收客户端发送过来的数据,通常会使用ctx.writeAndFlush(数据)来向客户端发送数据。
@Override
public void channelRead(ChannelHandlerContext ctx, Object msg) throws Exception {System.out.println(" 接收到消息:" + msg);String str = "服务端收到:" + new Date() + msg;ctx.writeAndFlush(str);
}
1.1 ctx.writeAndFlush 的逻辑
private void write(Object msg, boolean flush, ChannelPromise promise) {//...AbstractChannelHandlerContext next = this.findContextOutbound(flush ? 98304 : '耀');Object m = this.pipeline.touch(msg, next);EventExecutor executor = next.executor();if (executor.inEventLoop()) {if (flush) {next.invokeWriteAndFlush(m, promise);} else {next.invokeWrite(m, promise);}} else {Object task;if (flush) {task = AbstractChannelHandlerContext.WriteAndFlushTask.newInstance(next, m, promise);} else {task = AbstractChannelHandlerContext.WriteTask.newInstance(next, m, promise);}if (!safeExecute(executor, (Runnable)task, promise, m)) {((AbstractChannelHandlerContext.AbstractWriteTask)task).cancel();}}}
从上述源码我们可以知道,WriteAndFlush()相对于Write(),它的flush字段是true。
- write:将需要写的 ByteBuff 存储到 ChannelOutboundBuffer中。
- flush:从ChannelOutboundBuffer中将需要发送的数据读出来,并通过 Channel 发送出去。
1.2 writeAndFlush 源码
public ChannelFuture writeAndFlush(Object msg) {return this.writeAndFlush(msg, this.newPromise());
}public ChannelPromise newPromise() {return new DefaultChannelPromise(this.channel(), this.executor());
}
writeAndFlush方法里提供了一个默认的 newPromise()作为参数传递。在Netty中发送消息是一个异步操作,那么可以通过往hannelPromise中注册回调监听listener来得到该操作是否成功。
在发送消息时添加监听
ctx.writeAndFlush(str,ctx.newPromise().addListener(new ChannelFutureListener(){@Overridepublic void operationComplete(ChannelFuture channelFuture) throws Exception{channelFuture.isSuccess();}
}));
继续向下一层跟进代码,AbstractChannelHandlerContext中的invokeWriteAndFlush的源码。
private void invokeWriteAndFlush(Object msg, ChannelPromise promise) {if (this.invokeHandler()) {this.invokeWrite0(msg, promise);this.invokeFlush0();} else {this.writeAndFlush(msg, promise);}}
从上述源码我们可以能够知道:
1、首先通过invokeHandler()判断通道处理器是否已添加到管道中。
2、执行消息处理 invokeWrite0方法:
- 首先将消息内容放入输出缓冲区中 invokeFlush0;
- 然后将输出缓冲区中的数据通过socket发送到网络中。
分析invokeWrite0执行的内容,源码如下:
private void invokeWrite0(Object msg, ChannelPromise promise) {try {((ChannelOutboundHandler)this.handler()).write(this, msg, promise);} catch (Throwable var4) {notifyOutboundHandlerException(var4, promise);}}
((ChannelOutboundHandler)this.handler()).write是一个出站事件ChannelOutboundHandler,会由ChannelOutboundHandlerAdapter处理。
@Skip
public void write(ChannelHandlerContext ctx, Object msg, ChannelPromise promise) throws Exception {ctx.write(msg, promise);
}
接下来会走到ChannelPipeline中,来执行网络数据发送;我们来看DefaultChannelPipeline 中HeadContext的write方法源码
public void write(ChannelHandlerContext ctx, Object msg, ChannelPromise promise) {this.unsafe.write(msg, promise);
}
unsafe是构建NioServerSocketChannel或NioSocketChannel对象时,一并构建一个成员属性,它会完成底层真正的网络操作等。
我们跟进HenderContext的write() ,而HenderContext的中依赖的是unsafe.wirte()。所以直接去 AbstractChannel的Unsafe 源码如下:
public final void write(Object msg, ChannelPromise promise) {this.assertEventLoop();ChannelOutboundBuffer outboundBuffer = this.outboundBuffer;if (outboundBuffer == null) {// 缓存 写进来的 bufferthis.safeSetFailure(promise, this.newWriteException(AbstractChannel.this.initialCloseCause));ReferenceCountUtil.release(msg);} else {int size;try {// buffer Dirct化 , (我们查看 AbstractNioByteBuf的实现)msg = AbstractChannel.this.filterOutboundMessage(msg);size = AbstractChannel.this.pipeline.estimatorHandle().size(msg);if (size < 0) {size = 0;}} catch (Throwable var6) {this.safeSetFailure(promise, var6);ReferenceCountUtil.release(msg);return;}//  插入写队列  将 msg 插入到 outboundBuffer//  outboundBuffer 这个对象是 ChannelOutBoundBuff 类型的,它的作用就是起到一个容器的作用//  下面看, 是如何将 msg 添加进 ChannelOutBoundBuff 中的outboundBuffer.addMessage(msg, size, promise);}
}
从上述源码中,我们可以看出,首先调用 assertEventLoop 确保该方法的调用是在reactor线程中;然后,调用 filterOutboundMessage() 方法,将待写入的对象过滤。下面我们来看看filterOutboundMessage方法的源码。
protected final Object filterOutboundMessage(Object msg) {if (msg instanceof ByteBuf) {ByteBuf buf = (ByteBuf)msg;return buf.isDirect() ? msg : this.newDirectBuffer(buf);} else if (msg instanceof FileRegion) {return msg;} else {throw new UnsupportedOperationException("unsupported message type: " + StringUtil.simpleClassName(msg) + 																											EXPECTED_TYPES);}
}
从上述源码可以看出,只有ByteBuf以及 FileRegion可以进行最终的Socket网络传输,其他类型的数据是不支持的,会抛UnsupportedOperationException异常。并且会把堆 ByteBuf 转换为一个非堆的 ByteBuf 返回。也就说,最后会通过socket传输的对象时非堆的 ByteBuf 和 FileRegion。
在发送数据时,我们需要估算出需要写入的 ByteBuf 的size,我们来看看 DefaultMessageSizeEstimator 的HandleImpl类中的size()方法。
public final class DefaultMessageSizeEstimator implements MessageSizeEstimator {private static final class HandleImpl implements Handle {private final int unknownSize;private HandleImpl(int unknownSize) {this.unknownSize = unknownSize;}public int size(Object msg) {if (msg instanceof ByteBuf) {return ((ByteBuf)msg).readableBytes();} else if (msg instanceof ByteBufHolder) {return ((ByteBufHolder)msg).content().readableBytes();} else {return msg instanceof FileRegion ? 0 : this.unknownSize;}}}
}
通过ByteBuf.readableBytes()判断消息内容大小,估计待发送消息数据的大小,如果是FileRegion的话直接返回0,否则返回ByteBuf中可读取字节数。
接下来我们来看看是如何将 msg 添加进 ChannelOutBoundBuff 中的。
1.3 ChannelOutBoundBuff 类
ChannelOutboundBuffer类主要用于存储其待处理的出站写请求的内部数据。当 Netty 调用 write时数据不会真正地去发送而是写入到ChannelOutboundBuffer 缓存队列,直到调用 flush方法 Netty 才会从ChannelOutboundBuffer取数据发送。每个 Unsafe 都会绑定一个ChannelOutboundBuffer,也就是说每个客户端连接上服务端都会创建一个 ChannelOutboundBuffer 绑定客户端 Channel。
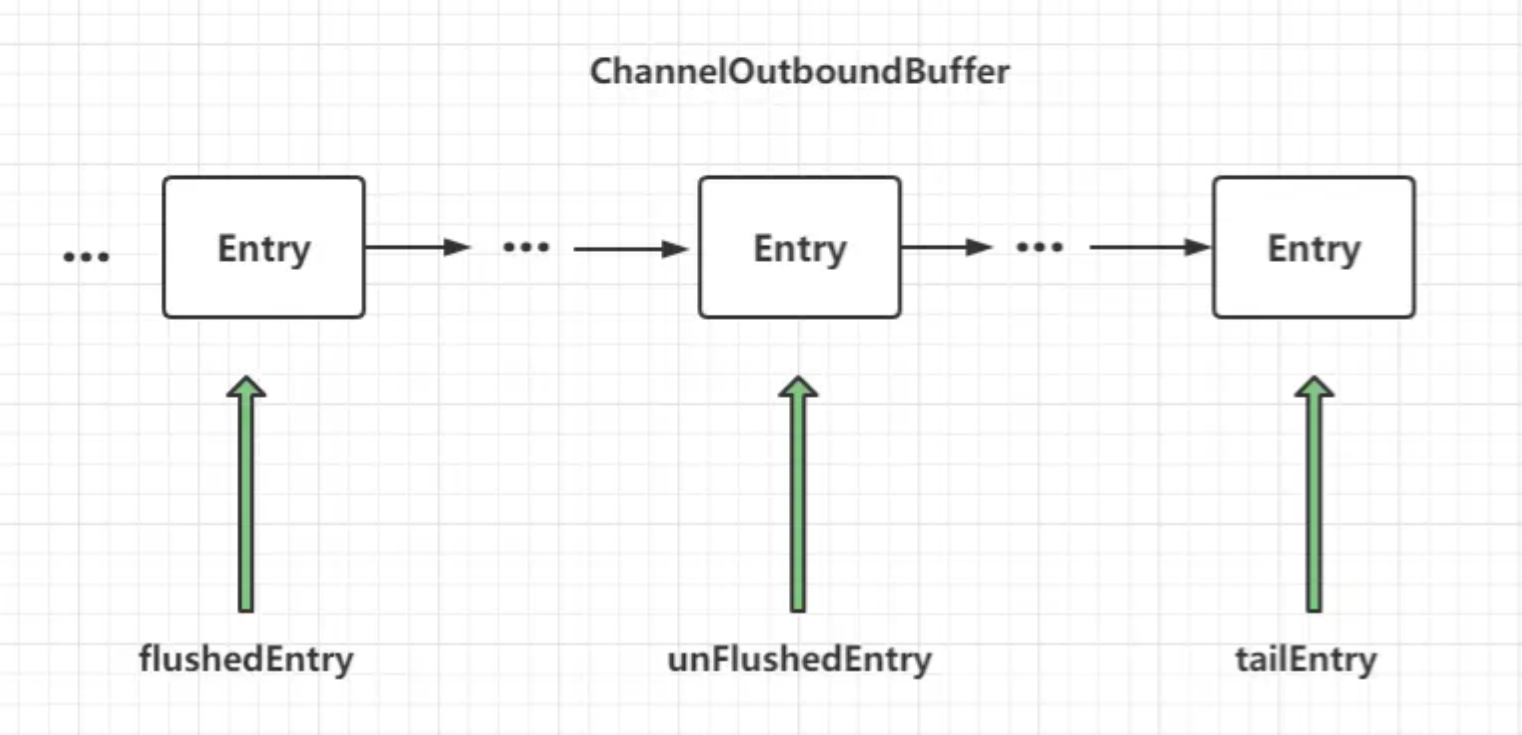
观察 ChannelOutBoundBuff 源码,可以看到以下四个属性:
public final class ChannelOutboundBuffer {//...private ChannelOutboundBuffer.Entry flushedEntry;private ChannelOutboundBuffer.Entry unflushedEntry;private ChannelOutboundBuffer.Entry tailEntry;private int flushed;//...}
-
flushedEntry :指针表示第一个被写到操作系统Socket缓冲区中的节点;
-
unFlushedEntry:指针表示第一个未被写入到操作系统Socket缓冲区中的节点;
-
tailEntry:指针表示ChannelOutboundBuffer缓冲区的最后一个节点。
-
flushed:表示待发送数据个数。
下面分别是三个指针的作用,示意图如下:
- flushedEntry 指针表示第一个被写到操作系统Socket缓冲区中的节点;
- unFlushedEntry指针表示第一个未被写入到操作系统Socket缓冲区中的节点;
- tailEntry指针表示ChannelOutboundBuffer缓冲区的最后一个节点。
初次调用 addMessage 之后,各个指针的情况为:
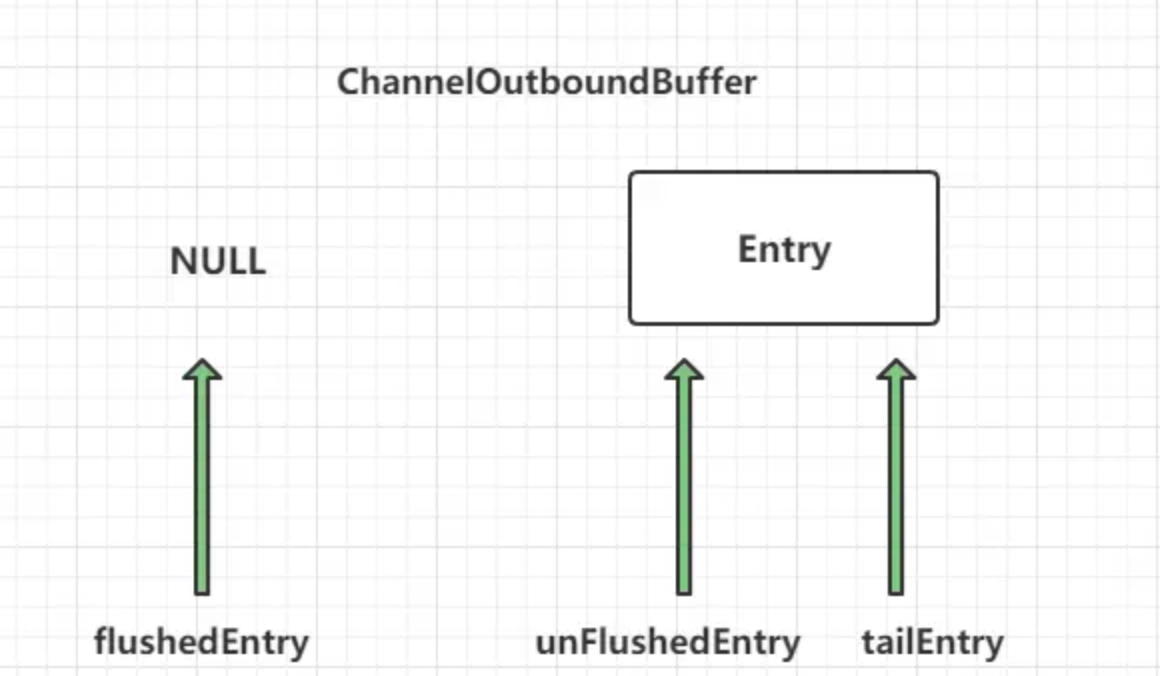
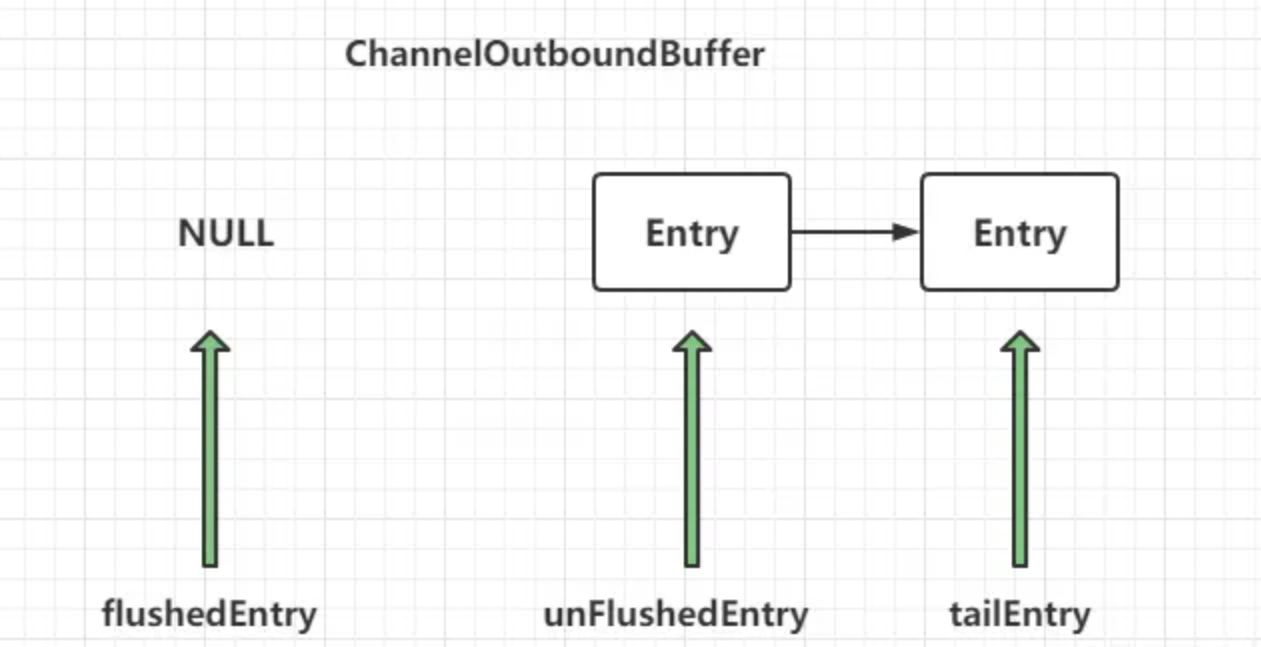
fushedEntry指向空,unFushedEntry和 tailEntry 都指向新加入的节点。第二次调用 addMessage之后,各个指针的情况为:
第n次调用 addMessage之后,各个指针的情况为:
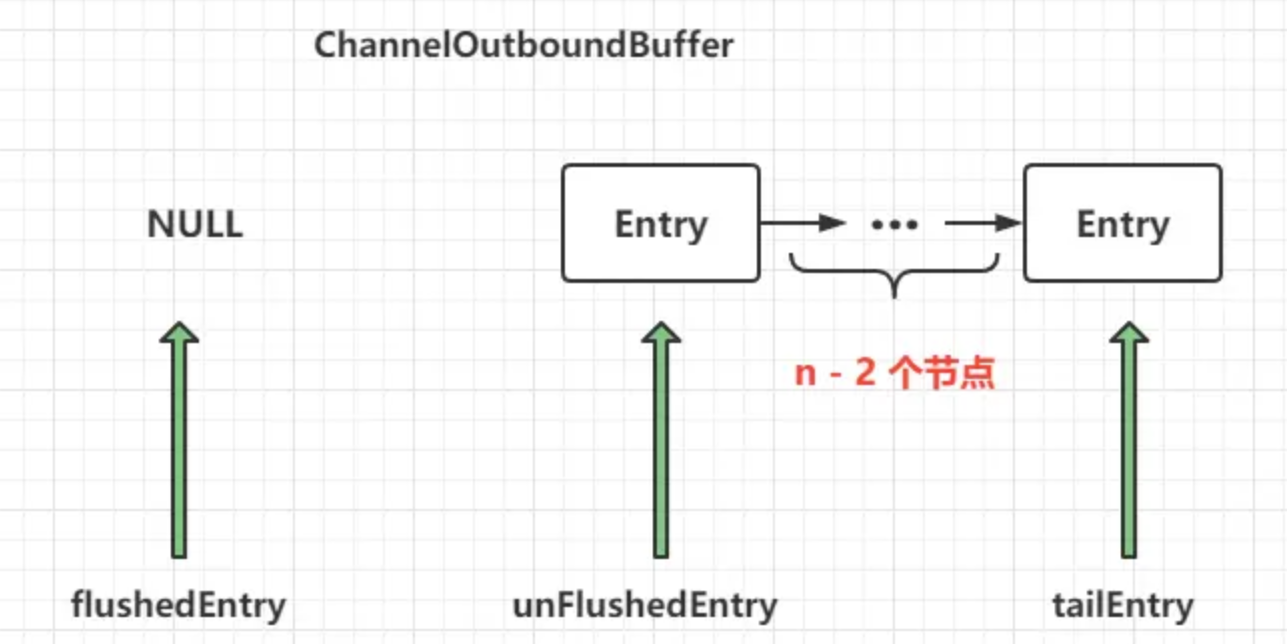
可以看到,调用n次addMessage,flushedEntry指针一直指向NULL,表示现在还未有节点需要写出到Socket缓冲区。
ChannelOutboundBuffer 主要提供了以下方法:
- addMessage方法:添加数据到对列的队尾;
- addFlush方法:准备待发送的数据,在 flush 前需要调用;
- nioBuffers方法:用于获取待发送的数据。在发送数据的时候,需要调用该方法以便拿到数据;
- removeBytes方法:发送完成后需要调用该方法来删除已经成功写入TCP缓存的数据。
1.4 addMessage 方法
addMessage 方法是系统调用write方法时调用,源码如下。
public void addMessage(Object msg, int size, ChannelPromise promise) {ChannelOutboundBuffer.Entry entry = ChannelOutboundBuffer.Entry.newInstance(msg, size, total(msg), promise);if (this.tailEntry == null) {this.flushedEntry = null;} else {ChannelOutboundBuffer.Entry tail = this.tailEntry;tail.next = entry;}this.tailEntry = entry;if (this.unflushedEntry == null) {this.unflushedEntry = entry;}this.incrementPendingOutboundBytes((long)entry.pendingSize, false);
}
上述源码流程如下:
将消息数据包装成 Entry 对象;
如果对列为空,直接设置尾结点为当前节点,否则将新节点放尾部;
unflushedEntry为空说明不存在暂时不需要发送的节点,当前节点就是第一个暂时不需要发送的节点;
将消息添加到未刷新的数组后,增加挂起的节点。
这里需要重点看看第一步将消息数据包装成 Entry 对象的方法。
static final class Entry {private static final Recycler<ChannelOutboundBuffer.Entry> RECYCLER = new Recycler<ChannelOutboundBuffer.Entry>() {protected ChannelOutboundBuffer.Entry newObject(Handle<ChannelOutboundBuffer.Entry> handle) {return new ChannelOutboundBuffer.Entry(handle);}};// ...static ChannelOutboundBuffer.Entry newInstance(Object msg, int size, long total, ChannelPromise promise) {ChannelOutboundBuffer.Entry entry = (ChannelOutboundBuffer.Entry)RECYCLER.get();entry.msg = msg;entry.pendingSize = size + ChannelOutboundBuffer.CHANNEL_OUTBOUND_BUFFER_ENTRY_OVERHEAD;entry.total = total;entry.promise = promise;return entry;}// ...}
其中Recycler类是基于线程本地堆栈的轻量级对象池。这意味着调用newInstance方法时 ,并不是直接创建了一个 Entry 实例,而是通过对象池获取的。
下面我们看看incrementPendingOutboundBytes方法的源码。
private void incrementPendingOutboundBytes(long size, boolean invokeLater) {if (size != 0L) {// TOTAL_PENDING_SIZE_UPDATER 当前缓存中 存在的代写的 字节// 累加long newWriteBufferSize = TOTAL_PENDING_SIZE_UPDATER.addAndGet(this, size);// 判断 新的将被写的 buffer的容量不能超过  getWriteBufferHighWaterMark() 默认是 64*1024  64字节if (newWriteBufferSize > (long)this.channel.config().getWriteBufferHighWaterMark()) {// 超过64 字节,进入这个方法this.setUnwritable(invokeLater);}}
}
在每次添加新的节点后都调用incrementPendingOutboundBytes((long)entry.pendingSize, false)方法,这个方法的作用是设置写状态,设置怎样的状态呢?我们看它的源码,可以看到,它会记录下累计的ByteBuf的容量,一旦超出了阈值,就会传播channel不可写的事件。
1.5 addFlush 方法
addFlush 方法是在系统调用 flush 方法时调用的,addFlush 方法的源码如下。
public void addFlush() {ChannelOutboundBuffer.Entry entry = this.unflushedEntry;if (entry != null) {if (this.flushedEntry == null) {this.flushedEntry = entry;}do {++this.flushed;if (!entry.promise.setUncancellable()) {int pending = entry.cancel();this.decrementPendingOutboundBytes((long)pending, false, true);}entry = entry.next;} while(entry != null);this.unflushedEntry = null;}}
以上方法的主要功能就是暂存数据节点变成待发送节点,即flushedEntry 指向的节点到unFlushedEntry指向的节点(不包含 unFlushedEntry)之间的数据。
上述源码的流程如下:
先获取unFlushedEntry指向的暂存数据的起始节点;
将待发送数据起始指针flushedEntry 指向暂存起始节点;
通过promise.setUncancellable()锁定待发送数据,并在发送过程中取消,如果锁定过程中发现其节点已经取消,则调用entry.cancel()取消节点发送,并减少待发送的总字节数。
下面我们看看decrementPendingOutboundBytes方法的源码。
private void decrementPendingOutboundBytes(long size, boolean invokeLater, boolean notifyWritability) {if (size != 0L) {// 每次 减去 -sizelong newWriteBufferSize = TOTAL_PENDING_SIZE_UPDATER.addAndGet(this, -size);//  默认 getWriteBufferLowWaterMark() -32kb//  newWriteBufferSize<32 就把不可写状态改为可写状态if (notifyWritability && newWriteBufferSize < (long)this.channel.config().getWriteBufferLowWaterMark()) {this.setWritable(invokeLater);}}
}
1.6 AbstractNioByteChannel 类
在这个类中,我们主要看doWrite(ChannelOutboundBuffer in)方法,源码如下。
protected void doWrite(ChannelOutboundBuffer in) throws Exception {int writeSpinCount = this.config().getWriteSpinCount();do {Object msg = in.current();if (msg == null) {this.clearOpWrite();return;}writeSpinCount -= this.doWriteInternal(in, msg);} while(writeSpinCount > 0);this.incompleteWrite(writeSpinCount < 0);
}
通过一个无限循环,保证可以拿到所有的节点上的ByteBuf,通过这个函数获取节点,Object msg = in.current();
我们进一步看它的实现,如下,它只会取出我们标记的节点。
public Object current() {ChannelOutboundBuffer.Entry entry = this.flushedEntry;return entry == null ? null : entry.msg;
}
下面我们看下doWriteInternal(in, msg)的方法源码。
private int doWriteInternal(ChannelOutboundBuffer in, Object msg) throws Exception {if (msg instanceof ByteBuf) {ByteBuf buf = (ByteBuf)msg;if (!buf.isReadable()) {in.remove();return 0;}int localFlushedAmount = this.doWriteBytes(buf);if (localFlushedAmount > 0) {in.progress((long)localFlushedAmount);if (!buf.isReadable()) {in.remove();}return 1;}} else {if (!(msg instanceof FileRegion)) {throw new Error();}FileRegion region = (FileRegion)msg;if (region.transferred() >= region.count()) {in.remove();return 0;}long localFlushedAmount = this.doWriteFileRegion(region);if (localFlushedAmount > 0L) {in.progress(localFlushedAmount);if (region.transferred() >= region.count()) {in.remove();}return 1;}}return 2147483647;
}
使用 jdk 的自旋锁,循环16次,尝试往 jdk 底层的ByteBuffer中写数据,调用函数doWriteBytes(buf);他具体的实现是客户端 channel 的封装类NioSocketChannel实现的源码如下:
protected int doWriteBytes(ByteBuf buf) throws Exception {int expectedWrittenBytes = buf.readableBytes();// 将字节数据, 写入到 java 原生的 channel中return buf.readBytes(this.javaChannel(), expectedWrittenBytes);
}
这个readBytes()依然是抽象方法,因为前面我们曾经把从 ByteBuf 转化成了 Dirct 类型的,所以它的实现类是PooledDirctByteBuf 继续跟进如下:
public int readBytes(GatheringByteChannel out, int length) throws IOException {this.checkReadableBytes(length);// 关键的就是 getBytes()  跟进去int readBytes = this.getBytes(this.readerIndex, out, length, true);this.readerIndex += readBytes;return readBytes;
}private int getBytes(int index, GatheringByteChannel out, int length, boolean internal) throws IOException {this.checkIndex(index, length);if (length == 0) {return 0;} else {ByteBuffer tmpBuf;if (internal) {tmpBuf = this.internalNioBuffer();} else {tmpBuf = ((ByteBuffer)this.memory).duplicate();}index = this.idx(index);// 将netty 的 ByteBuf 塞进 jdk的 ByteBuffer tmpBuf;tmpBuf.clear().position(index).limit(index + length);// 调用jdk的write()方法return out.write(tmpBuf);}
}
被使用过的节点会被remove()掉, 源码如下。
private void removeEntry(ChannelOutboundBuffer.Entry e) {if (--this.flushed == 0) { // 如果是最后一个节点,把所有的指针全部设为nullthis.flushedEntry = null;if (e == this.tailEntry) {this.tailEntry = null;this.unflushedEntry = null;}} else { // 如果不是最后一个节点, 把当前节点,移动到最后的节点this.flushedEntry = e.next;}}
总结
- 调用write方法并没有将数据写到 Socket 缓冲区中,而是写到了一个单向链表的数据结构中,flush才是真正的写出。
- writeAndFlush等价于先将数据写到netty的缓冲区,再将netty缓冲区中的数据写到Socket缓冲区中,写的过程与并发编程类似,用自旋锁保证写成功。