【iOS】内存管理
目录
前言
内存模型
内存管理方案
小对象(taggedPointer)
taggedPoint总结
nonpointer_isa
SideTable
MRC内存管理方法底层
retain
release
retainCount
dealloc
弱引用
NSTimer中的循环引用
解决NSTimer的循环引用
思路一:pop时在其他方法中销毁timer
思路二:中介者模式,不使用self而依赖于其他对象
思路三:自定义封装timer(使用包装者)
AutoReleasePool自动释放池
AutoReleasePool池的结构
AutoreleasePoolPage分析
objc_autoreleasePoolPush
autoreleaseNewPage创建新页
AutoreleasePoolPage的构造方法
查看自动释放池内存结构
哨兵对象
autoreleaseFast压栈
autoreleaseFullPage方法
add方法
autorelease底层分析
objc_autoreleasePoolPop
popPage
releaseUntil方法
kill方法
前言
之前寒假在小蓝书上有看过有关内存管理的知识,那个时候看得特别痛苦,因为大部分内容都看不懂,看得迷迷糊糊,现在把有关内存管理的知识重新梳理一遍
内存模型
除了之前学习过的内存五大区之外,内存中还有保留字段和内核区:
-
内核区:以4GB手机为例,系统将其中的3GB给了
五大区+保留区,剩余的1GB给内核区使用,它主要是系统用来进行内核处理操作的区域 -
保留字段:保留一定的区域给保留字段,进行一些存储或预留给系统处理
nil等
这里五大区的最后内存地址是从0x00400000开始的,因为0x00000000表示nil,不能直接用nil表示一个段,所以单独给了一段内存用于处理nil等情况
用两张图来直观地理解一下内存的分布:

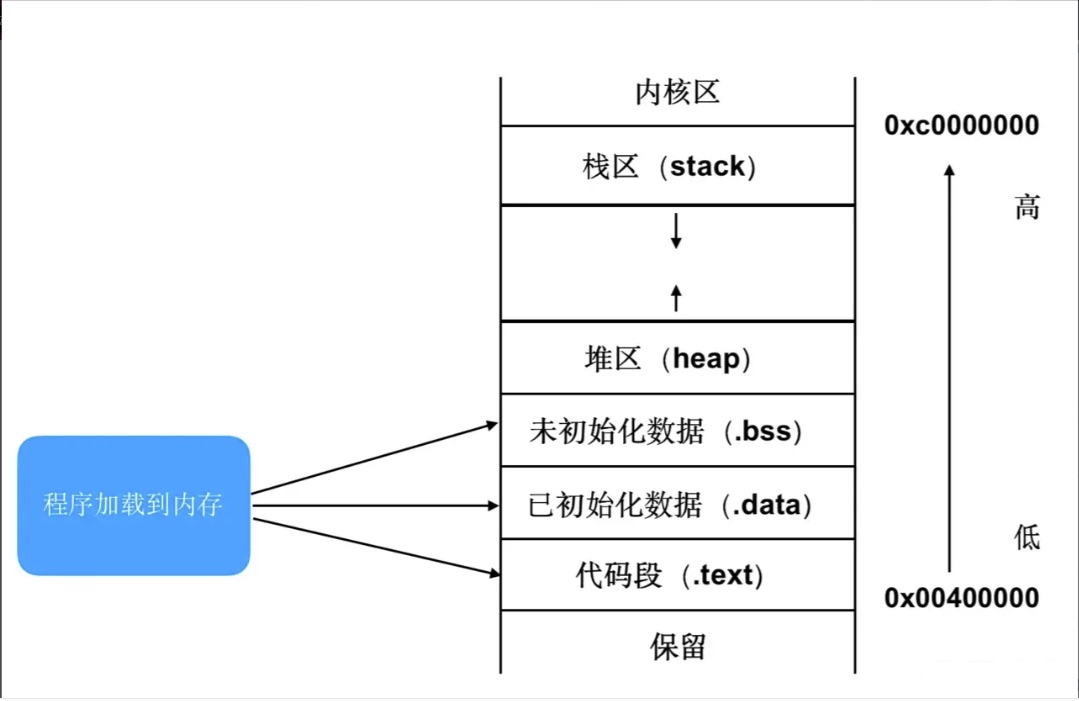
在使用app的过程中,栈区就会向下增长,堆区向上增长
内存管理方案
小对象(taggedPointer)
小对象是xcode对较小的对象进行的一种优化,一般对象在调用alloc方法后在堆区分配内存单元,而小对象由于比较小,可以直接由指针来体现对象的值,因此不在堆区分配内存单元,而是保存在常量区
以NSString为例:
-
一般的
NSString对象指针,都是string值+指针地址,两者是分开的 -
对于
Tagged Pointer指针,其指针 + 值,都能在小对象中体现.所以Tagged Pointer既包含指针,也包含值
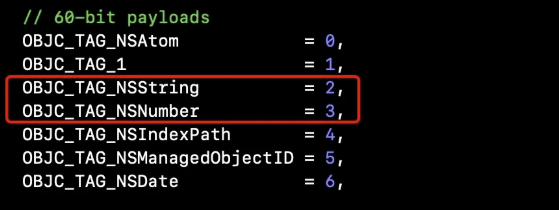
在底层,在类的加载时,_read_images中有方法会对小对象进行处理,编码后的小对象最高位为0xa、0xb等等,这个最高位主要是用来判断是否是小对象。
比如:0xa转换为二进制是1010,第64位为1,表示是小对象,63~61位表示对象类型,从0~6七个枚举值,010为2,表示NSString类型
全部枚举量如下图:
回顾一下NSString的三种实现方式:
__NSCFConstantString:字符串常量,是一种编译时常量,retainCount值很大,对其操作,不会引起引用计数变化,存储在字符串常量区使用@""初始化时获得
__NSCFString:是在运行时创建的NSString子类,创建后引用计数会加1,存储在堆上使用withFormat时获得
NSTaggedPointerString:标签指针,是苹果在64位环境下对NSString、NSNumber等对象做的优化。对于NSString对象来说
当
字符串是由数字、英文字母组合且长度小于等于9时,会自动成为NSTaggedPointerString类型,存储在常量区当有
中文或者其他特殊符号时,会直接成为__NSCFString类型,存储在堆区。
taggedPoint总结
-
Tagged Pointer小对象类型(用于存储NSNumber、NSDate、小NSString),小对象指针不再是简单的地址,而是地址 + 值,即真正的值,所以,实际上它不再是一个对象了,它只是一个披着对象皮的普通变量而已。所以可以直接进行读取。优点是占用空间小,节省内存 -
Tagged Pointer小对象,,不会进入 retain 和 release,而是直接返回了,意味着不需要ARC进行管理,所以可以直接被系统自主的释放和回收 -
Tagged Pointer的内存并不存储在堆中,而是在常量区中,也不需要malloc和free,所以可以直接读取,相比存储在堆区的数据读取,效率上快了3倍左右.创建的效率相比堆区快了近100倍左右 -
taggedPointer的内存管理方案,比常规的内存管理,要快很多 -
Tagged Pointer的64位地址中,前4位代表类型,后4位主要适用于系统做一些处理,`中间56位用于存储值 -
优化内存建议:对于
NSString来说,当字符串较小时,建议直接通过@""初始化,因为存储在常量区,可以直接进行读取。会比WithFormat初始化方式更加快速
nonpointer_isa
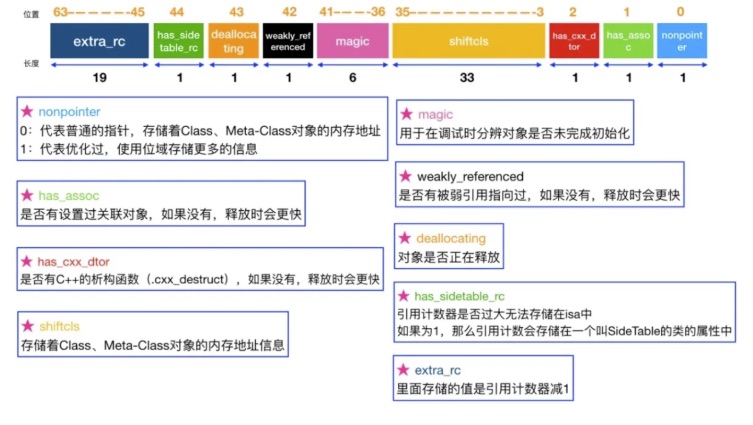
nonpointer_isa在之前分析类的结构时就有遇到过,这是苹果优化内存的一种方案: isa是个8字节(64位)的指针,仅用来isa指向比较浪费,所以isa中就掺杂了一些其他数据来节省内存
SideTable
SideTable是一个散列表,当引用计数存储到一定值时,并不会再存储到Nonpointer_isa的位域的extra_rc中,而是会存储到 SideTables 散列表中
在操作对象时,会对相应的散列表进行开锁操作,真机中散列表最多存在8张
MRC内存管理方法底层
在MRC模式下,需要用retain/release来管理引用计数,我们来看看相关方法的底层
retain

retain在底层调用objc_retain,objc_retain先判断是否是小对象,是就直接返回,否则调用obj->retain

objc_object::retain 通过 fastpath 大概率调用 rootRetain(),小概率通过消息发送调用对外提供的 SEL_retain
ALWAYS_INLINE id
objc_object::rootRetain(bool tryRetain, objc_object::RRVariant variant)
{if (slowpath(isTaggedPointer())) return (id)this;
bool sideTableLocked = false;bool transcribeToSideTable = false;
//为什么有isa?因为需要对引用计数+1,即retain+1,而引用计数存储在isa的bits中,需要进行新旧isa的替换isa_t oldisa;isa_t newisa;
oldisa = LoadExclusive(&isa.bits);
if (variant == RRVariant::FastOrMsgSend) {// These checks are only meaningful for objc_retain()// They are here so that we avoid a re-load of the isa.if (slowpath(oldisa.getDecodedClass(false)->hasCustomRR())) {ClearExclusive(&isa.bits);if (oldisa.getDecodedClass(false)->canCallSwiftRR()) {return swiftRetain.load(memory_order_relaxed)((id)this);}return ((id(*)(objc_object *, SEL))objc_msgSend)(this, @selector(retain));}}
if (slowpath(!oldisa.nonpointer)) {// a Class is a Class forever, so we can perform this check once// outside of the CAS loopif (oldisa.getDecodedClass(false)->isMetaClass()) {ClearExclusive(&isa.bits);return (id)this;}}
do {transcribeToSideTable = false;newisa = oldisa;//判断是否为nonpointer isaif (slowpath(!newisa.nonpointer)) {//如果不是 nonpointer isa,直接操作散列表sidetableClearExclusive(&isa.bits);if (tryRetain) return sidetable_tryRetain() ? (id)this : nil;else return sidetable_retain(sideTableLocked);}// don't check newisa.fast_rr; we already called any RR overridesif (slowpath(newisa.isDeallocating())) {ClearExclusive(&isa.bits);if (sideTableLocked) {ASSERT(variant == RRVariant::Full);sidetable_unlock();}if (slowpath(tryRetain)) {return nil;} else {return (id)this;}}uintptr_t carry;//执行引用计数+1操作,即对bits中的 1ULL<<45(arm64) 即extra_rc,用于该对象存储引用计数值newisa.bits = addc(newisa.bits, RC_ONE, 0, &carry); // extra_rc++//判断extra_rc是否满了,carry是标识符if (slowpath(carry)) {// newisa.extra_rc++ overflowedif (variant != RRVariant::Full) {ClearExclusive(&isa.bits);return rootRetain_overflow(tryRetain);}// Leave half of the retain counts inline and // prepare to copy the other half to the side table.if (!tryRetain && !sideTableLocked) sidetable_lock();sideTableLocked = true;transcribeToSideTable = true;//如果extra_rc满了,则直接将满状态的一半拿出来存到extra_rcnewisa.extra_rc = RC_HALF;//给一个标识符为YES,表示需要存储到散列表newisa.has_sidetable_rc = true;}} while (slowpath(!StoreExclusive(&isa.bits, &oldisa.bits, newisa.bits)));
if (variant == RRVariant::Full) {if (slowpath(transcribeToSideTable)) {// Copy the other half of the retain counts to the side table.//将另一半存在散列表的rc_half中,即满状态下是8位,一半就是1左移7位,即除以2/* 这么操作的目的在于提高性能,因为如果都存在散列表中,当需要release-1时,需要去访问散列表,每次都需要开解锁,比较消耗性能。extra_rc存储一半的话,可以直接操作extra_rc即可,不需要操作散列表。性能会提高很多*/sidetable_addExtraRC_nolock(RC_HALF);}
if (slowpath(!tryRetain && sideTableLocked)) sidetable_unlock();} else {ASSERT(!transcribeToSideTable);ASSERT(!sideTableLocked);}
return (id)this;
}rootRetain内部其实是一个循环:
-
先判断是不是优化的指针nonpointer_isa,如果不是就直接操作散列表
-
判断是不是正在释放,如果正在释放,就执行dealloc流程
-
调用addc函数来extra_rc+1,也就是引用计数+1,并且给一个标识carry,用来标识isa中的extra_rc是不是满了
-
如果满了的话,就要拿一半出来放到散列表去(这么做的原因是因为如果都存储在散列表,每次对散列表操作都需要开解锁,操作耗时,消耗性能大,这么对半分操作的目的在于提高性能)
release
release与retain相似,会在底层调用objc_release
-
objc_release先判断是否为isTaggedPointer,是就直接返回不需要处理,不是在调用obj->release() -
objc_object::release通过fastpath大概率调用rootRelease(),小概率通过消息发送调用对外提供的SEL_release -
rootRelease调用rootRelease(true, false) -
rootRelease内部实现也有个do-while循环-
先判断是否为
nonpointer_isa(小概率事件)不是的话则直接对散列表中的引用计数进行-1操作 -
如果是
Nonpointer isa,则对extra_rc中的引用计数值进行-1操作,并存储此时的extra_rc状态到carry中 -
如果此时的状态
carray为0,则走到underflow流程-
判断
散列表中是否存储了一半的引用计数 -
如果
是,则从散列表中取出存储的一半引用计数,进行-1操作,然后存储到extra_rc中 -
如果此时
extra_rc没有值,散列表中也是空的,则直接进行析构,即dealloc操作,属于自动触发
-
-
ALWAYS_INLINE bool
objc_object::rootRelease(bool performDealloc, objc_object::RRVariant variant)
{if (slowpath(isTaggedPointer())) return false;
bool sideTableLocked = false;
isa_t newisa, oldisa;
oldisa = LoadExclusive(&isa.bits);
if (variant == RRVariant::FastOrMsgSend) {// These checks are only meaningful for objc_release()// They are here so that we avoid a re-load of the isa.if (slowpath(oldisa.getDecodedClass(false)->hasCustomRR())) {ClearExclusive(&isa.bits);if (oldisa.getDecodedClass(false)->canCallSwiftRR()) {swiftRelease.load(memory_order_relaxed)((id)this);return true;}((void(*)(objc_object *, SEL))objc_msgSend)(this, @selector(release));return true;}}
if (slowpath(!oldisa.nonpointer)) {// a Class is a Class forever, so we can perform this check once// outside of the CAS loopif (oldisa.getDecodedClass(false)->isMetaClass()) {ClearExclusive(&isa.bits);return false;}}
retry:do {newisa = oldisa;//判断是否是Nonpointer isaif (slowpath(!newisa.nonpointer)) {//如果不是,则直接操作散列表-1ClearExclusive(&isa.bits);return sidetable_release(sideTableLocked, performDealloc);}if (slowpath(newisa.isDeallocating())) {ClearExclusive(&isa.bits);if (sideTableLocked) {ASSERT(variant == RRVariant::Full);sidetable_unlock();}return false;}
// don't check newisa.fast_rr; we already called any RR overridesuintptr_t carry;//进行引用计数-1操作,即extra_rc-1newisa.bits = subc(newisa.bits, RC_ONE, 0, &carry); // extra_rc--//如果此时extra_rc的值为0了,则走到underflowif (slowpath(carry)) {// don't ClearExclusive()goto underflow;}} while (slowpath(!StoreReleaseExclusive(&isa.bits, &oldisa.bits, newisa.bits)));
if (slowpath(newisa.isDeallocating()))goto deallocate;
if (variant == RRVariant::Full) {if (slowpath(sideTableLocked)) sidetable_unlock();} else {ASSERT(!sideTableLocked);}return false;
underflow:// newisa.extra_rc-- underflowed: borrow from side table or deallocate
// abandon newisa to undo the decrementnewisa = oldisa;//判断散列表中是否存储了一半的引用计数if (slowpath(newisa.has_sidetable_rc)) {if (variant != RRVariant::Full) {ClearExclusive(&isa.bits);return rootRelease_underflow(performDealloc);}
// Transfer retain count from side table to inline storage.
if (!sideTableLocked) {ClearExclusive(&isa.bits);sidetable_lock();sideTableLocked = true;// Need to start over to avoid a race against // the nonpointer -> raw pointer transition.oldisa = LoadExclusive(&isa.bits);goto retry;}
// Try to remove some retain counts from the side table.//从散列表中取出存储的一半引用计数auto borrow = sidetable_subExtraRC_nolock(RC_HALF);
bool emptySideTable = borrow.remaining == 0; // we'll clear the side table if no refcounts remain there
if (borrow.borrowed > 0) {// Side table retain count decreased.// Try to add them to the inline count.bool didTransitionToDeallocating = false;//进行-1操作,然后存储到extra_rc中newisa.extra_rc = borrow.borrowed - 1; // redo the original decrement toonewisa.has_sidetable_rc = !emptySideTable;
bool stored = StoreReleaseExclusive(&isa.bits, &oldisa.bits, newisa.bits);
if (!stored && oldisa.nonpointer) {// Inline update failed. // Try it again right now. This prevents livelock on LL/SC // architectures where the side table access itself may have // dropped the reservation.uintptr_t overflow;newisa.bits =addc(oldisa.bits, RC_ONE * (borrow.borrowed-1), 0, &overflow);newisa.has_sidetable_rc = !emptySideTable;if (!overflow) {stored = StoreReleaseExclusive(&isa.bits, &oldisa.bits, newisa.bits);if (stored) {didTransitionToDeallocating = newisa.isDeallocating();}}}
if (!stored) {// Inline update failed.// Put the retains back in the side table.ClearExclusive(&isa.bits);sidetable_addExtraRC_nolock(borrow.borrowed);oldisa = LoadExclusive(&isa.bits);goto retry;}
// Decrement successful after borrowing from side table.if (emptySideTable)sidetable_clearExtraRC_nolock();
if (!didTransitionToDeallocating) {if (slowpath(sideTableLocked)) sidetable_unlock();return false;}}else {// Side table is empty after all. Fall-through to the dealloc path.}}
deallocate://此时extra_rc中值为0,散列表中也是空的,则直接进行析构,即自动触发dealloc流程// Really deallocate.// 触发dealloc的时机ASSERT(newisa.isDeallocating());ASSERT(isa.isDeallocating());
if (slowpath(sideTableLocked)) sidetable_unlock();
__c11_atomic_thread_fence(__ATOMIC_ACQUIRE);
if (performDealloc) {//发送一个dealloc消息((void(*)(objc_object *, SEL))objc_msgSend)(this, @selector(dealloc));}return true;
}retainCount
alloc创建对象时,会在底层调用rootRetainCount,引用计数默认+1了,但是这里只有对引用计数的读取操作,是没有写入操作的,简单来说就是:为了防止alloc创建的对象被释放(引用计数为0会被释放),所以在编译阶段,程序底层默认进行了+1操作.(新版objc源码)
-
alloc创建对象时没有retain和release -
alloc创建对象的引用计数为0,会在编译时期,程序默认加1,所以读取引用计数时为1
dealloc
在之前retain和release的实现中都有提及dealloc析构函数,接下来分析一下这个函数:

dealloc会调用_objc_rootDealloc:

_objc_dealloc会调用rootDealloc
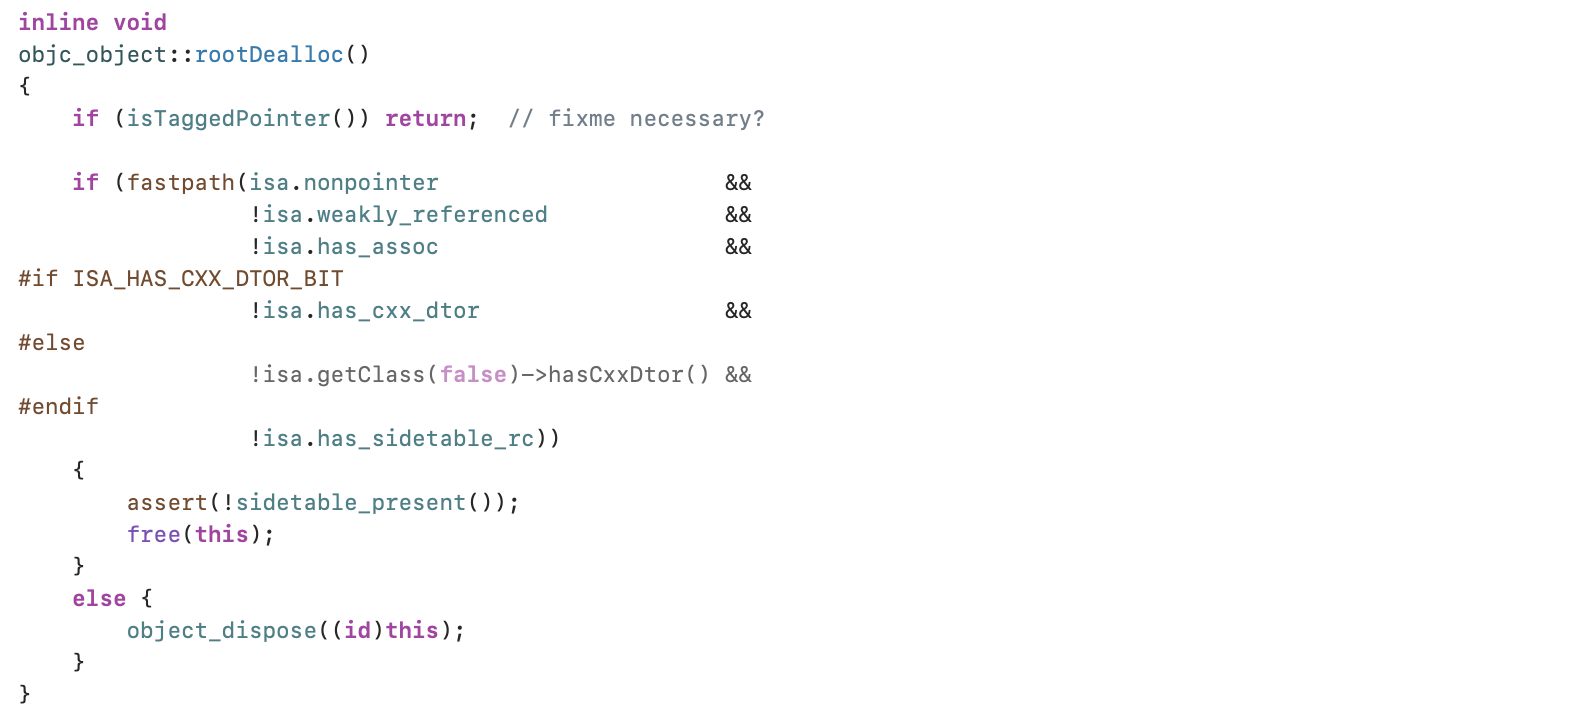
可以看到,在dealloc方法中:
-
判断是否为
isTaggedPointer,是的话直接返回,不是的话继续往下走 -
判断
isa标识位中是否有弱引用、关联对象、c++析构函数、额外的散列表,有的话调用object_dispose,否则直接free
这个object_dispose函数底层是这样的:
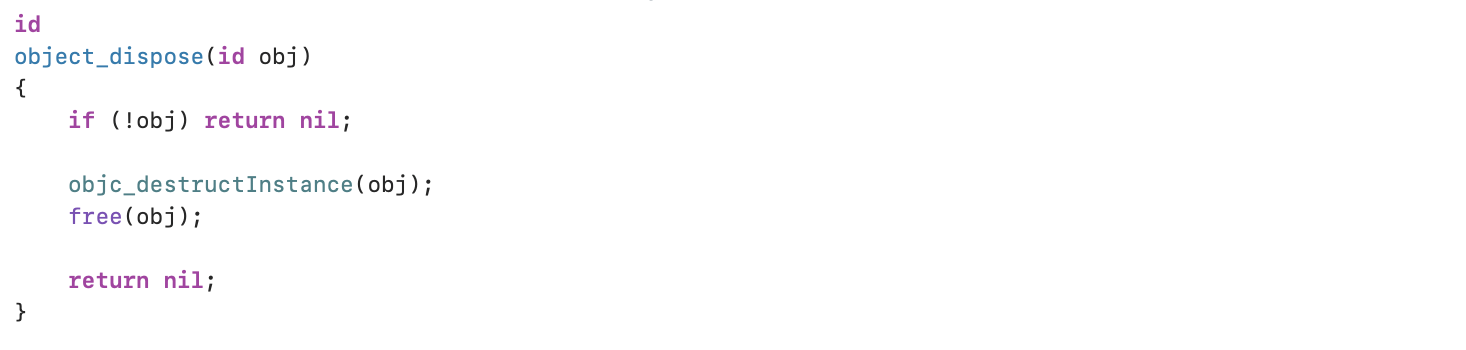
objc_destructInstance:

-
判断
是否有c++析构函数和关联对象,有的话分别调用object_cxxDestruct、_object_remove_assocations进行处理 -
然后再调用
clearDeallocating
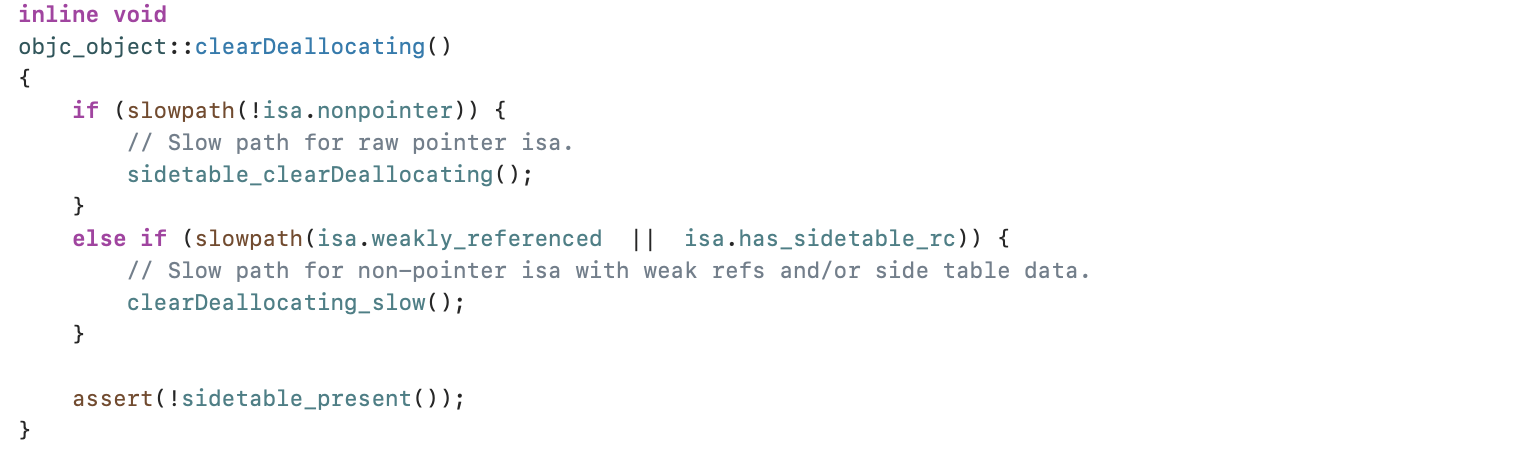
clearDeallocating中:
-
判断是否是
nonpointer,是的话调用sidetable_clearDeallocating清空散列表 -
判断
是否有弱引用和额外的引用计数表has_sidetable_rc,是的话调用clearDeallocating_slow进行弱引用表和引用计数表的处理
综上,dealloc的流程可以总结为:
-
1:根据当前对象的状态是否直接调⽤
free()释放 -
2:是否存在
C++的析构函数、移除这个对象的关联属性 -
3:将指向该对象的弱引⽤指针置为
nil -
4:从弱引⽤表中擦除对该对象的引⽤计数
弱引用
NSTimer中的循环引用
我们来看一段代码:
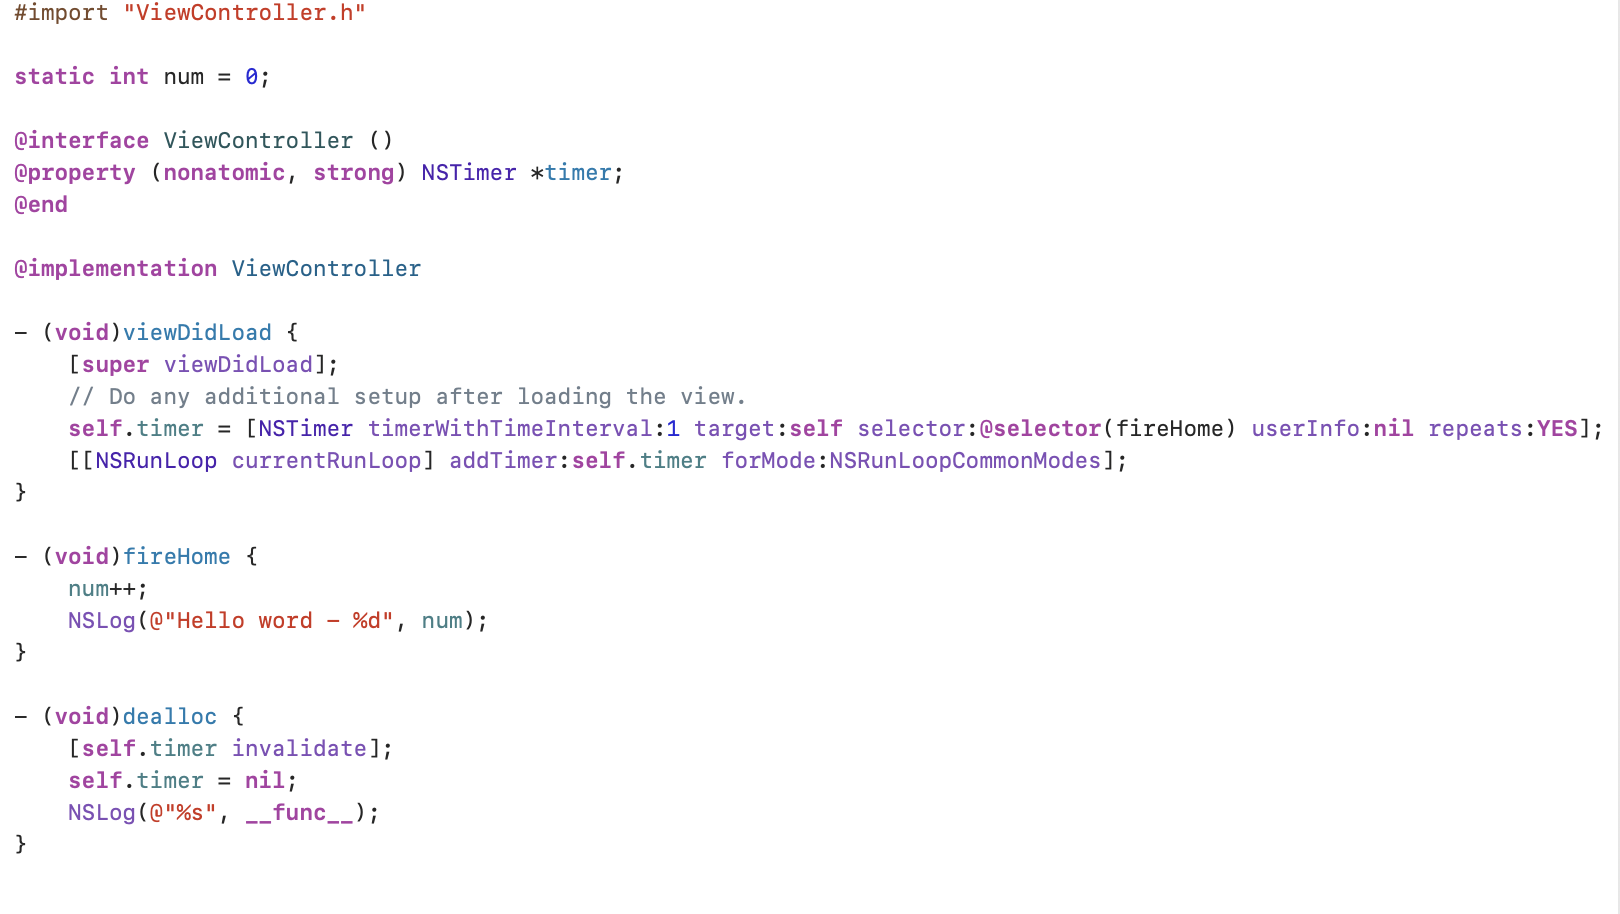
这段代码的问题是:B界面 pop到 A界面 时不会触发 B 界面的 dealloc函数.主要原因是B界面没有释放,即没有执行dealloc方法,导致timer也无法停止和释放
release在引用计数为0时会调用dealloc消息发送,现在没触发dealloc肯定是出现了循环引用,至于为什么会出现循环引用,就是因为NSTimer的API是被强持有的,直到Timer invalidated
也就是说现在timer持有self,self持有timer。
像解决block的循环引用一样的方法无法解决这个问题
原因是:
-
block在截获weakSelf时,截获的是对象的指针地址,也就是说block持有的是weakSelf的指针
-
而time持有的是weakSelf的指针指向的对象,因此间接地持有了self,所以仍然存在循环引用导致是放不掉
解决NSTimer的循环引用
总体的思路就是要打破这层强持有-self
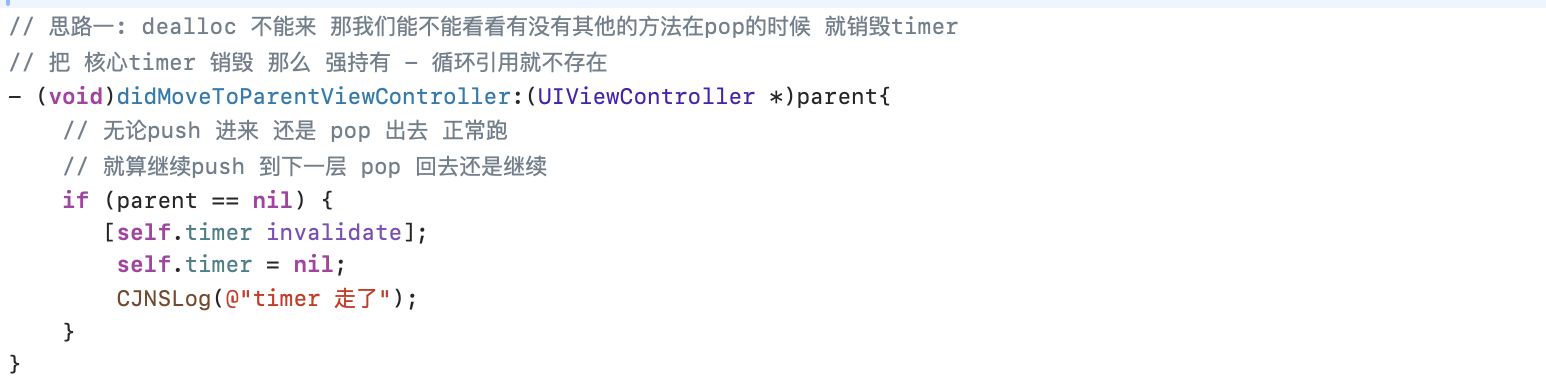
思路一:pop时在其他方法中销毁timer
-
刚才的问题是dealloc不被调用,那就在dealloc调用前解决掉强引用
-
可以在viewWillDisappear、viewDidDisappear中处理NSTimer,但这样效果不好,因为就算是跳到下一页,也会触发方法,计时器停止工作
-
可以使用
didMoveToParentViewController来解决这个问题,这个方法是当一个视图控制器中添加或者移除viewController后必须调用的方法,是为了告诉iOS已经完成添加/删除子控制器的操作。 -
在
B界面中重写didMoveToParentViewController方法
思路二:中介者模式,不使用self而依赖于其他对象
-
使用其他全局变量,此时
timer持有全局变量,self也持有全局变量,只要页面pop,self因为没有被持有就能正常走dealloc,在dealloc中再去处理timer -
此时的持有链分别是
runloop->timer->target->timer、self->target、self->timer

-
思路三:自定义封装timer(使用包装者)
-
类似于方案二,但是使用更便捷
-
如果传入的响应者
target能响应传入的响应事件selector,就使用runtime动态添加方法并开启计时器 -
fireWapper中如果有wrapper.target,就让wrapper.target(外界响应者)调用wrapper.aSelector(外界响应事件) -
fireWapper中没有了wrapper.target,意味着响应者释放了(无法响应了),此时定时器也就可以休息了(停止并释放)
//*********** .h文件 ***********
@interface TCJTimerWapper : NSObject
- (instancetype)cj_initWithTimeInterval:(NSTimeInterval)ti target:(id)aTarget selector:(SEL)aSelector userInfo:(nullable id)userInfo repeats:(BOOL)yesOrNo;
- (void)cj_invalidate;
@end
//*********** .m文件 ***********
#import "TCJTimerWapper.h"
#import <objc/message.h>
@interface TCJTimerWapper ()
@property(nonatomic, weak) id target;
@property(nonatomic, assign) SEL aSelector;
@property(nonatomic, strong) NSTimer *timer;
@end
@implementation TCJTimerWapper
- (instancetype)cj_initWithTimeInterval:(NSTimeInterval)ti target:(id)aTarget selector:(SEL)aSelector userInfo:(nullable id)userInfo repeats:(BOOL)yesOrNo{if (self == [super init]) {//传入vcself.target = aTarget;//传入的定时器方法self.aSelector = aSelector;if ([self.target respondsToSelector:self.aSelector]) {Method method = class_getInstanceMethod([self.target class], aSelector);const char *type = method_getTypeEncoding(method);//给timerWapper添加方法class_addMethod([self class], aSelector, (IMP)fireHomeWapper, type);//启动一个timer,target是self,即监听自己self.timer = [NSTimer scheduledTimerWithTimeInterval:ti target:self selector:aSelector userInfo:userInfo repeats:yesOrNo];}}return self;
}
//一直跑runloop
void fireHomeWapper(TCJTimerWapper *wapper){//判断target是否存在if (wapper.target) {//如果存在则需要让vc知道,即向传入的target发送selector消息,并将此时的timer参数也一并传入,所以vc就可以得知`fireHome`方法,就这事这种方式定时器方法能够执行的原因//objc_msgSend发送消息,执行定时器方法void (*cj_msgSend)(void *,SEL, id) = (void *)objc_msgSend;cj_msgSend((__bridge void *)(wapper.target), wapper.aSelector,wapper.timer);}else{//如果target不存在,已经释放了,则释放当前的timerWrapper[wapper.timer invalidate];wapper.timer = nil;}
}
//在vc的dealloc方法中调用,通过vc释放,从而让timer释放
- (void)cj_invalidate{[self.timer invalidate];self.timer = nil;
}
- (void)dealloc
{NSLog(@"%s",__func__);
}
@end
#ifdef DEBUG
#define CJNSLog(format, ...) printf("%s\n", [[NSString stringWithFormat:format, ## __VA_ARGS__] UTF8String]);
#else
#define CJNSLog(format, ...);
#endif
#import "TCJTimerViewController.h"
#import "TCJTimerWapper.h"
static int num = 0;
@interface TCJTimerViewController ()
@property (nonatomic, strong) NSTimer *timer;
@property (nonatomic, strong) TCJTimerWapper *timerWapper;
@end
@implementation TCJTimerViewController
- (void)viewDidLoad {[super viewDidLoad];self.timerWapper = [[TCJTimerWapper alloc] cj_initWithTimeInterval:1 target:self selector:@selector(fireHome) userInfo:nil repeats:YES];
}
- (void)fireHome{num++;CJNSLog(@"hello word - %d",num);
}
- (void)dealloc{[self.timerWapper cj_invalidate];CJNSLog(@"%s",__func__);
}AutoReleasePool自动释放池
自动释放池是OC中的一种内存自动回收机制,在MRC中可以用AutoReleasePool来延迟内存的释放,在ARC中可以用AutoReleasePool将对象添加到最近的自动释放池,不会立即释放,会等到runloop休眠或者超出autoreleasepool作用域{}之后才会被释放
自动释放池的机制可以用下图表示:
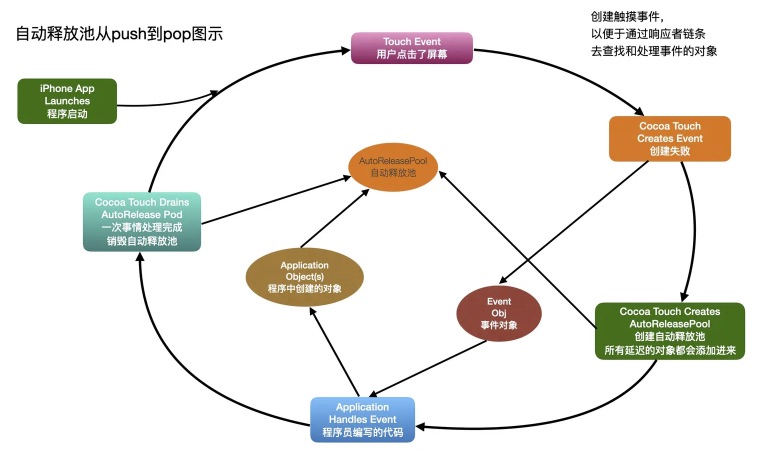
1.从程序启动到加载完成,主线程对应的runloop会处于休眠状态,等待用户交互来唤醒runloop
2.用户的每一次交互都会启动一次runloop,用于处理用户的所有点击、触摸事件等
3.runloop在监听到交互事件后,就会创建自动释放池,并将所有延迟释放的对象添加到自动释放池中
4.在一次runloop结束后,会向自动释放池中所有对象发送release消息,然后销毁自动释放池
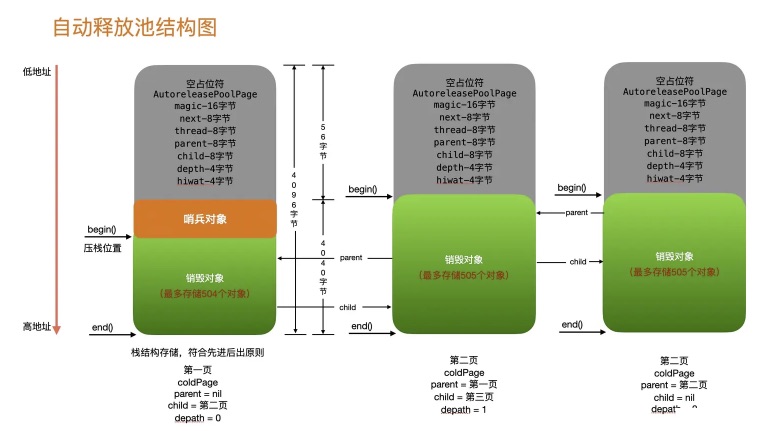
AutoReleasePool池的结构
在OC源码中有一段对AutoReleasePool池的注释
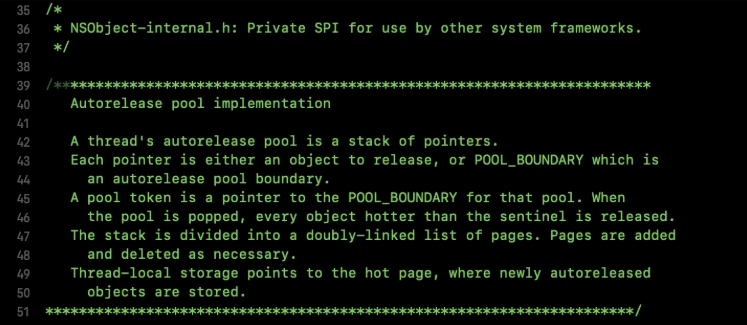
从这段注释可以总结出来几点:
1.自动释放池是一个指针的栈
2.这里面的指针是指向要释放的对象或者pool_boundary哨兵
3.自动释放池是一个页的结构,并且这个页是一个双向链表
4.自动释放池与线程池有关
AutoreleasePoolPage分析
自动释放池底层调用的其实是objc_autoreleasePoolPush和objc_autoreleasePoolPop这两个方法
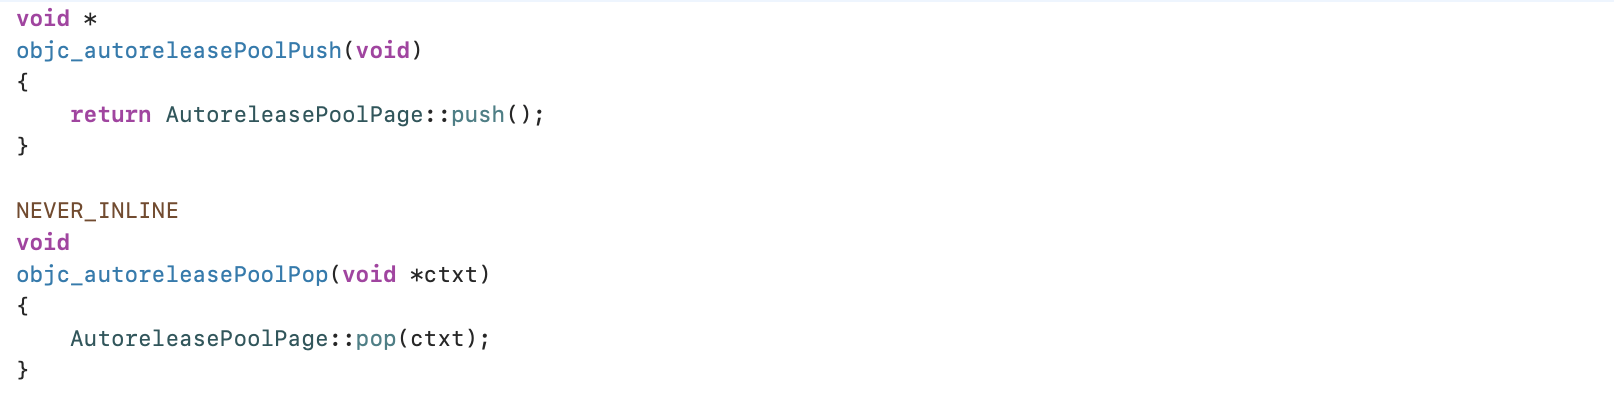
可以看到这两个函数底层是调用AutoreleasePoolPage的push和pop方法,objc_autoreleasePoolPage这个类的实现代码很长,这里就不放出来了,总之可以看出来的是:
-
自动释放池是一个页,大小是4096字节,同时也是个对象
-
AutoreleasePoolPage继承自AutoreleasePoolPageData
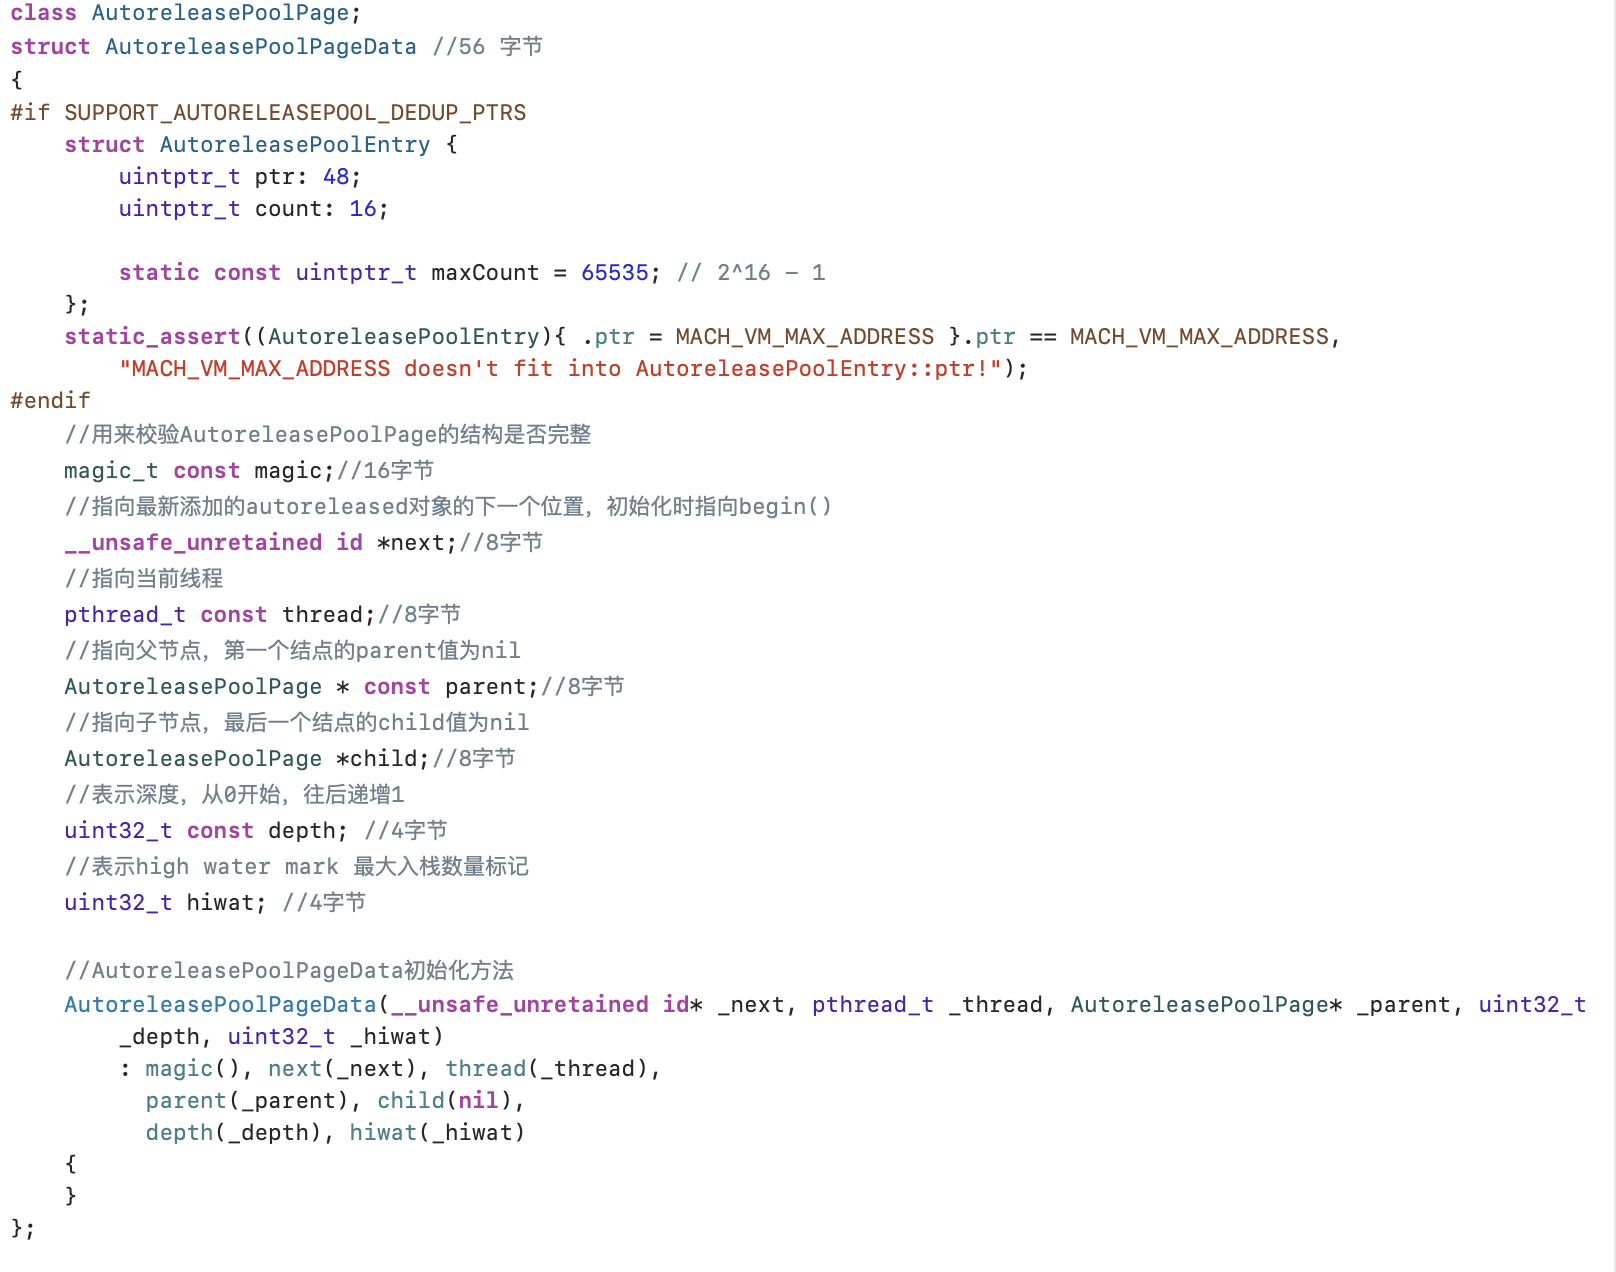
可以看到这里面的关系链父节点和字节点都是AutoreleasePoolPage,也就是说自动释放池是一个双向链表结构
objc_autoreleasePoolPush
看完这个结构体,我们再回来看objc_autoreleasePoolPush这个方法
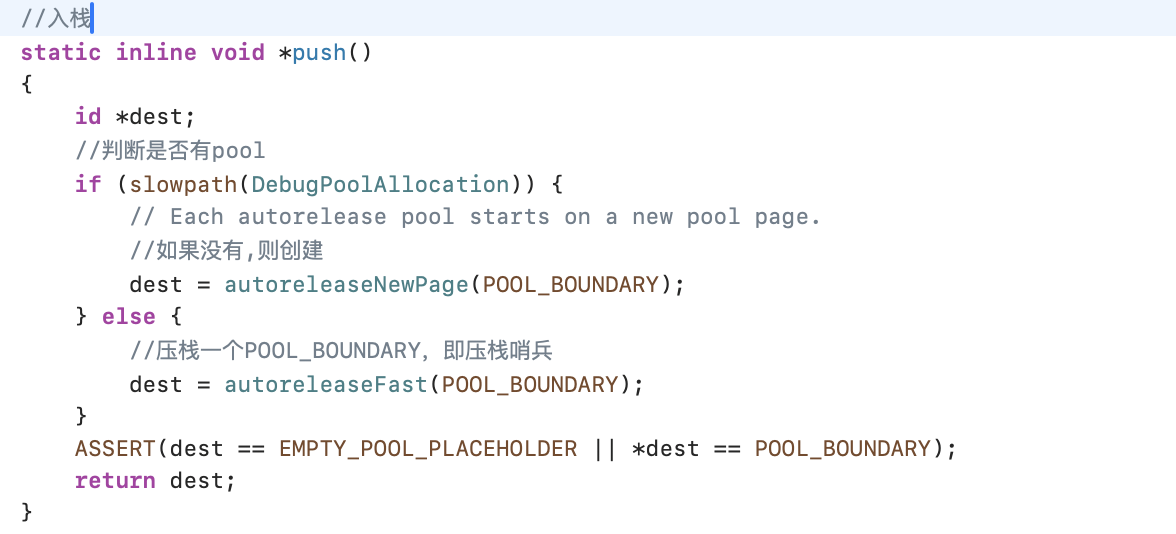
流程是:先判断是否存在pool,如果不存在就通过autoreleaseNewPage方法创建,存在的话就通过autoreleaseFast压栈哨兵对象
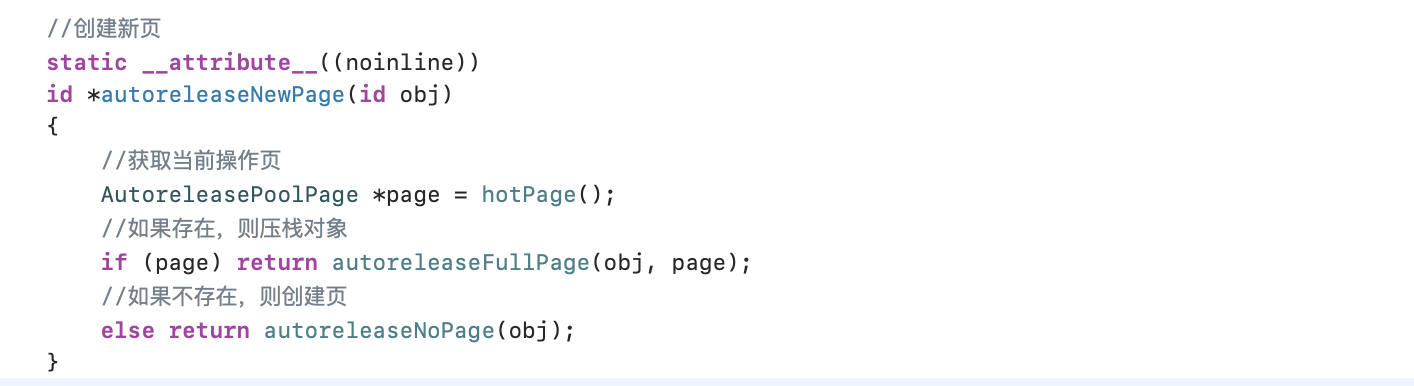
autoreleaseNewPage创建新页
那到这里我们就正好看看autoreleaseNewPage是怎么实现的
//添加自动释放对象,当没页的时候调用这个方法static __attribute__((noinline))id *autoreleaseNoPage(id obj){// "No page" could mean no pool has been pushed// or an empty placeholder pool has been pushed and has no contents yetASSERT(!hotPage());
bool pushExtraBoundary = false;//判断是否是空占位符,如果是,则压栈哨兵标识符置为YESif (haveEmptyPoolPlaceholder()) {// We are pushing a second pool over the empty placeholder pool// or pushing the first object into the empty placeholder pool.// Before doing that, push a pool boundary on behalf of the pool // that is currently represented by the empty placeholder.pushExtraBoundary = true;}//如果对象不是哨兵对象,且没有Pool,则报错else if (obj != POOL_BOUNDARY && DebugMissingPools) {// We are pushing an object with no pool in place, // and no-pool debugging was requested by environment._objc_inform("MISSING POOLS: (%p) Object %p of class %s ""autoreleased with no pool in place - ""just leaking - break on ""objc_autoreleaseNoPool() to debug", objc_thread_self(), (void*)obj, object_getClassName(obj));objc_autoreleaseNoPool(obj);return nil;}//如果对象是哨兵对象,且没有申请自动释放池内存,则设置一个空占位符存储在tls中,其目的是为了节省内存else if (obj == POOL_BOUNDARY && !DebugPoolAllocation) {// We are pushing a pool with no pool in place,// and alloc-per-pool debugging was not requested.// Install and return the empty pool placeholder.return setEmptyPoolPlaceholder();//设置空的占位符}
// We are pushing an object or a non-placeholder'd pool.
// Install the first page.//初始化第一页AutoreleasePoolPage *page = new AutoreleasePoolPage(nil);//设置page为当前聚焦页setHotPage(page);// Push a boundary on behalf of the previously-placeholder'd pool.//压栈哨兵的标识符为YES,则压栈哨兵对象if (pushExtraBoundary) {page->add(POOL_BOUNDARY);}// Push the requested object or pool.//压栈对象return page->add(obj);}可以得出以下结论:
-
1.获取当前操作页,
-
2.如果当前操作页存在,则通过
autoreleaseFullPage方法进行压栈对象 -
3.如果当前操作页不存在,则通过
autoreleaseNoPage方法创建页-
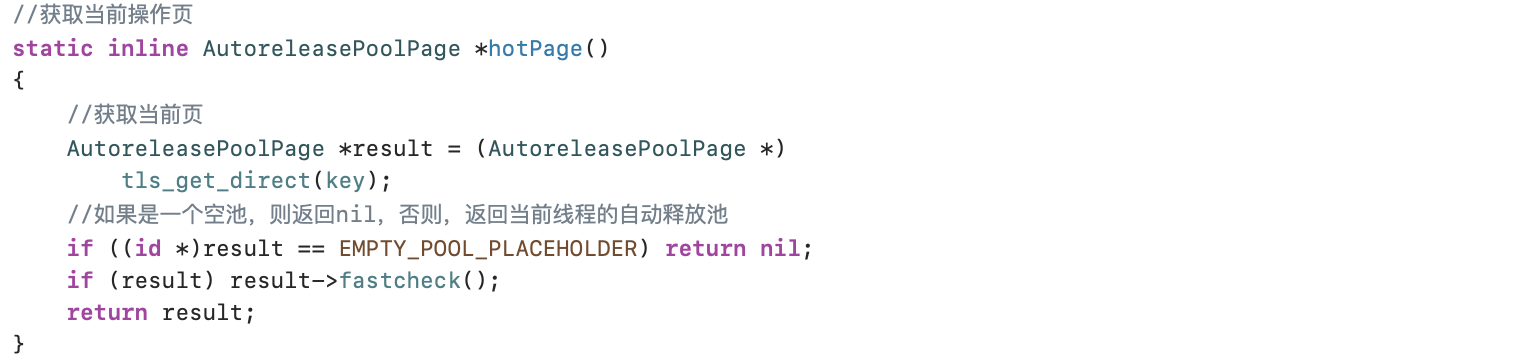
在
autoreleaseNoPage方法中可知当前线程的自动释放池是通过AutoreleasePoolPage创建 -
AutoreleasePoolPage的构造方法是通过实现父类AutoreleasePoolPageData的初始化方法实现的
-
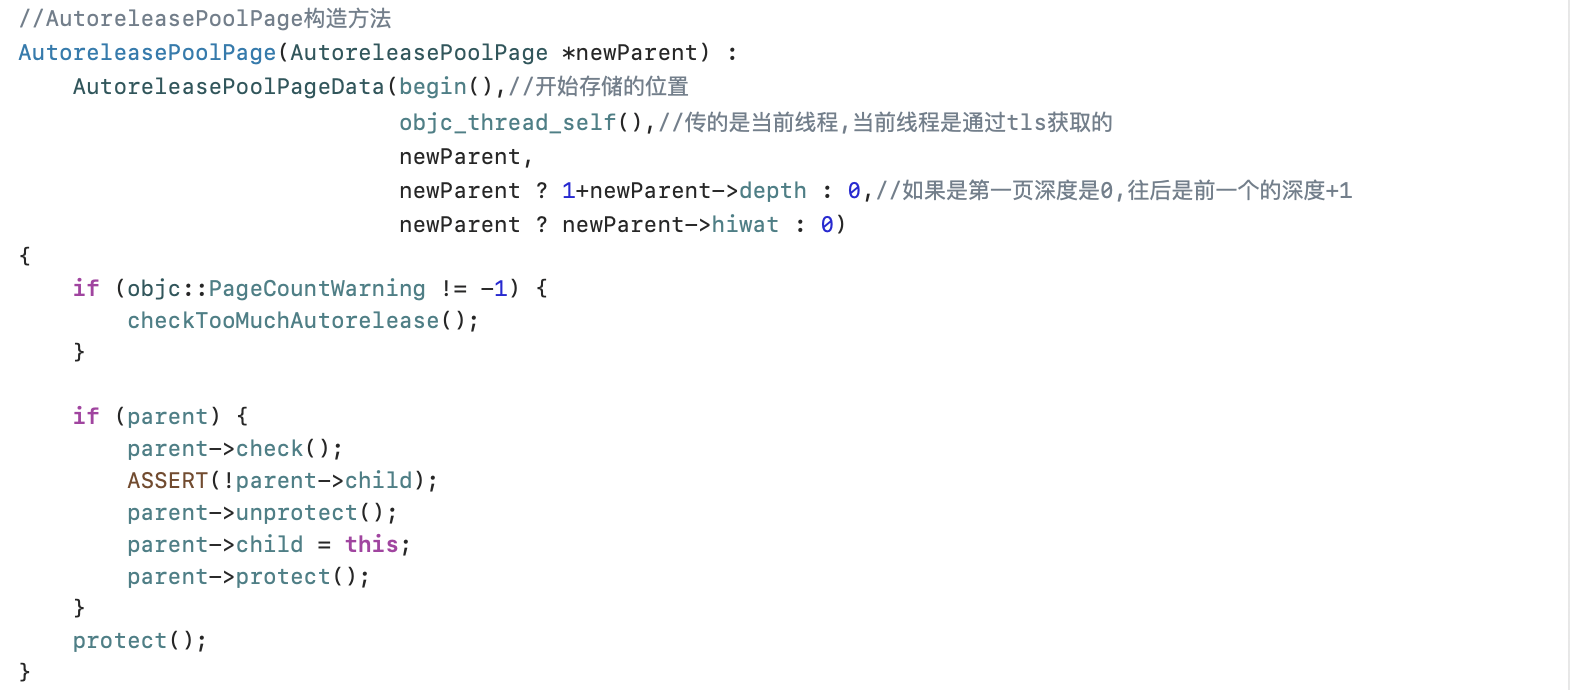
AutoreleasePoolPage的构造方法
刚刚说到了AutoreleasePoolPage方法,接下来看看他的构造方法

查看自动释放池内存结构
使用_objc_autoreleasePoolPrint函数打印自动释放池的相关信息,可以发现release是6个,但是我们压栈的对象其实只有5个,其中的POOL表示哨兵对象,即边界,其目的是为了防止越界
要注意不能无限往AutoreleasePool中添加对象:
-
第一页可以存放
504个对象,且只有第一页有哨兵对象,当一页压栈满了,就会开辟新的一页 -
第二页开始,
最多可以存放505个对象 -
一页的大小等于
505 * 8 = 4040
关于AutoreleasePoolPage,一页的大小是4096字节,而在其构造函数中对象的压栈位置,是从首地址+56字节开始的,所以一页中实际可以存储4096-56 = 4040字节,转换成对象是 4040 / 8 = 505个,即一页最多可以存储505个对象,其中第一页有哨兵对象(由于自动释放池在初始化时会把POOL_BOUNDARY哨兵对象push到栈顶,所以第一页只能存放504个对象,接下来每一页都能存放505个对象)只能存储504个
哨兵对象
![]()
哨兵对象被定义为nil,它的作用在调用objc_autoreleasePoolPop时体现:
-
根据传入的哨兵对象地址找到哨兵对象所在的
page -
在当前
page中,将晚于哨兵对象插入的所有autorelese对象都发送一次release消息,并移动next指针到正确位置 -
从最新加入的对象一直
向前清理,可以向前跨越若干个page,直到哨兵对象所在的page
也就是说它是一个告诉编译期当前页的对象被release完了的标志
autoreleaseFast压栈
在之前的源码中,我们看到是通过autoreleaseFast将对象压入栈中的,看一下这个方法是如何实现的:
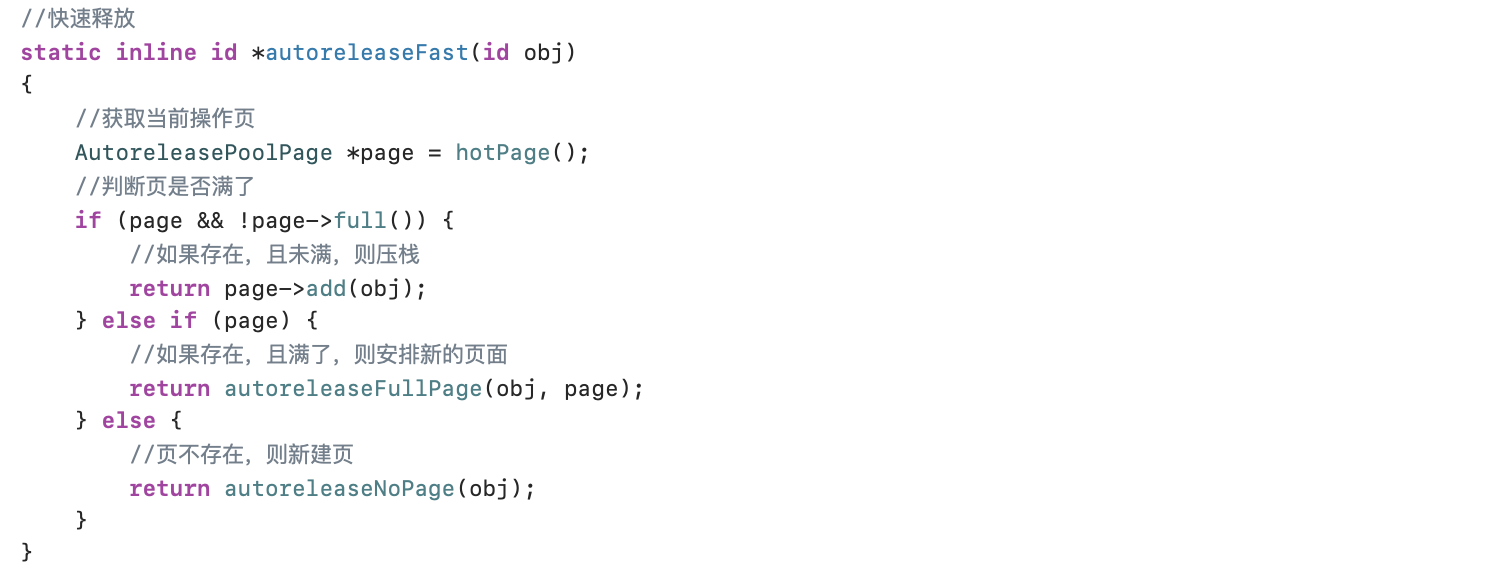
可以看到这个方法就是以下几步:
-
首先通过hotPage获取当前操作的那一页
-
然后判断当前页是否存在以及是否满了
-
如果页存在,且未满,就使用add方法压栈
-
如果页存在,且满了,就通过autoreleaseFullPage方法安排新的页面
-
如果页不存在,就通过autoreleaseNoPage方法创建新页
-
autoreleaseFullPage方法
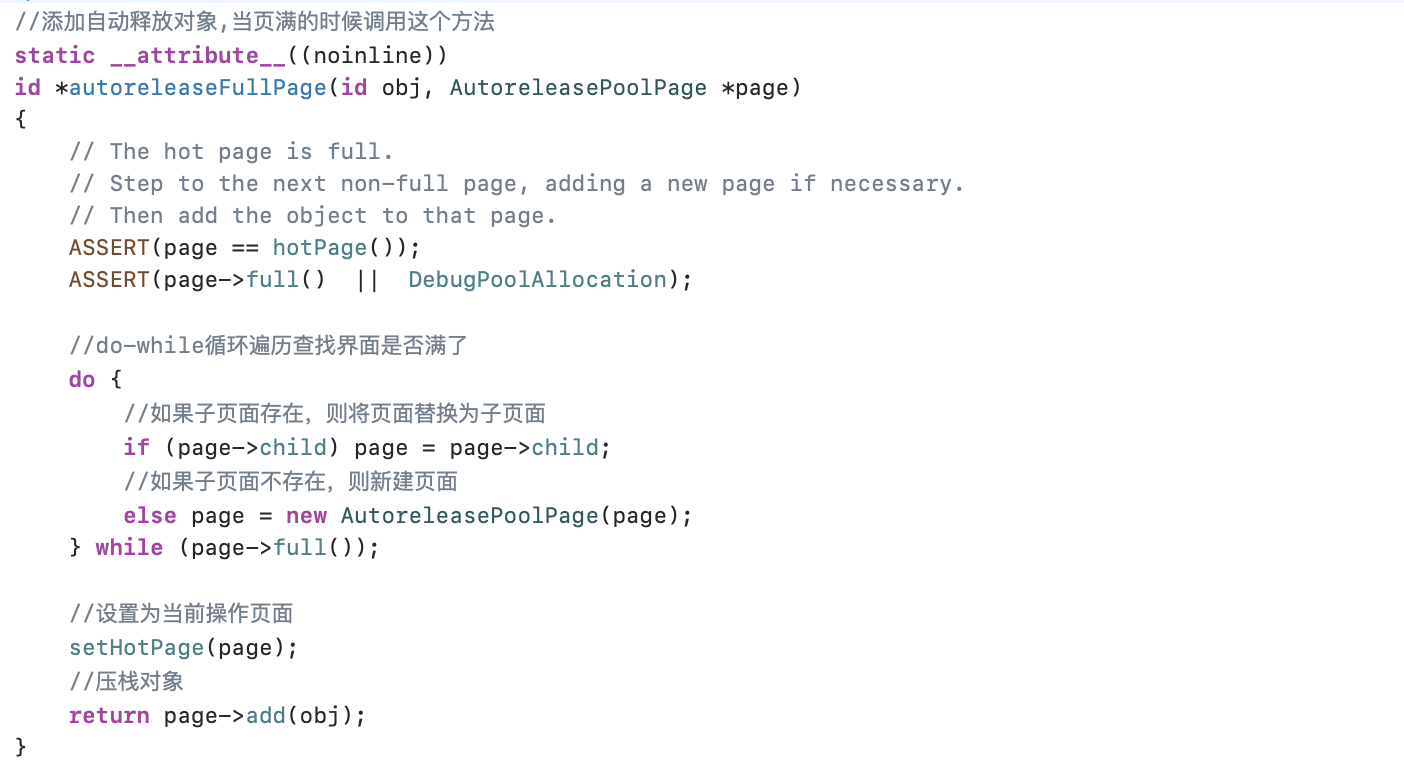
这个方法会先检查当前页是不是满了,如果满了就通过do-while循环查找子节点对应的页,如果字节点不存在,说明每一页都满了,就开辟新的AutoreleasePoolPage并设为HotPage,然后把对象压入栈
add方法
看到压栈对象最核心的一步是通过add方法实现的
//添加释放对象,next指向下一个存对象的地址id *add(id obj){ASSERT(!full());unprotect();id *ret;
#if SUPPORT_AUTORELEASEPOOL_DEDUP_PTRSif (!DisableAutoreleaseCoalescing || !DisableAutoreleaseCoalescingLRU) {if (!DisableAutoreleaseCoalescingLRU) {if (!empty() && (obj != POOL_BOUNDARY)) {AutoreleasePoolEntry *topEntry = (AutoreleasePoolEntry *)next - 1;for (uintptr_t offset = 0; offset < 4; offset++) {AutoreleasePoolEntry *offsetEntry = topEntry - offset;if (offsetEntry <= (AutoreleasePoolEntry*)begin() || *(id *)offsetEntry == POOL_BOUNDARY) {break;}if (offsetEntry->ptr == (uintptr_t)obj && offsetEntry->count < AutoreleasePoolEntry::maxCount) {if (offset > 0) {AutoreleasePoolEntry found = *offsetEntry;memmove(offsetEntry, offsetEntry + 1, offset * sizeof(*offsetEntry));*topEntry = found;}topEntry->count++;ret = (id *)topEntry; // need to reset retgoto done;}}}} else {if (!empty() && (obj != POOL_BOUNDARY)) {AutoreleasePoolEntry *prevEntry = (AutoreleasePoolEntry *)next - 1;if (prevEntry->ptr == (uintptr_t)obj && prevEntry->count < AutoreleasePoolEntry::maxCount) {prevEntry->count++;ret = (id *)prevEntry; // need to reset retgoto done;}}}}
#endif//传入对象存储的位置ret = next; // faster than `return next-1` because of aliasing//将obj压栈到next指针位置,然后next进行++,即下一个对象存储的位置*next++ = obj;
#if SUPPORT_AUTORELEASEPOOL_DEDUP_PTRS// Make sure obj fits in the bits available for itASSERT(((AutoreleasePoolEntry *)ret)->ptr == (uintptr_t)obj);
#endifdone:protect();return ret;}这个方法其实就是添加释放对象,底层实现是通过next指针存储释放池对象,并将next指针递增,表示下一个释放对象存储的位置
autorelease底层分析
在MRC模式下,通过autorelease方法会将对象压栈到自动释放池,下面分析一下底层如何实现的:

可以看到这里return时调用了对象的autorelease方法,下面我们看看autorelease实现:
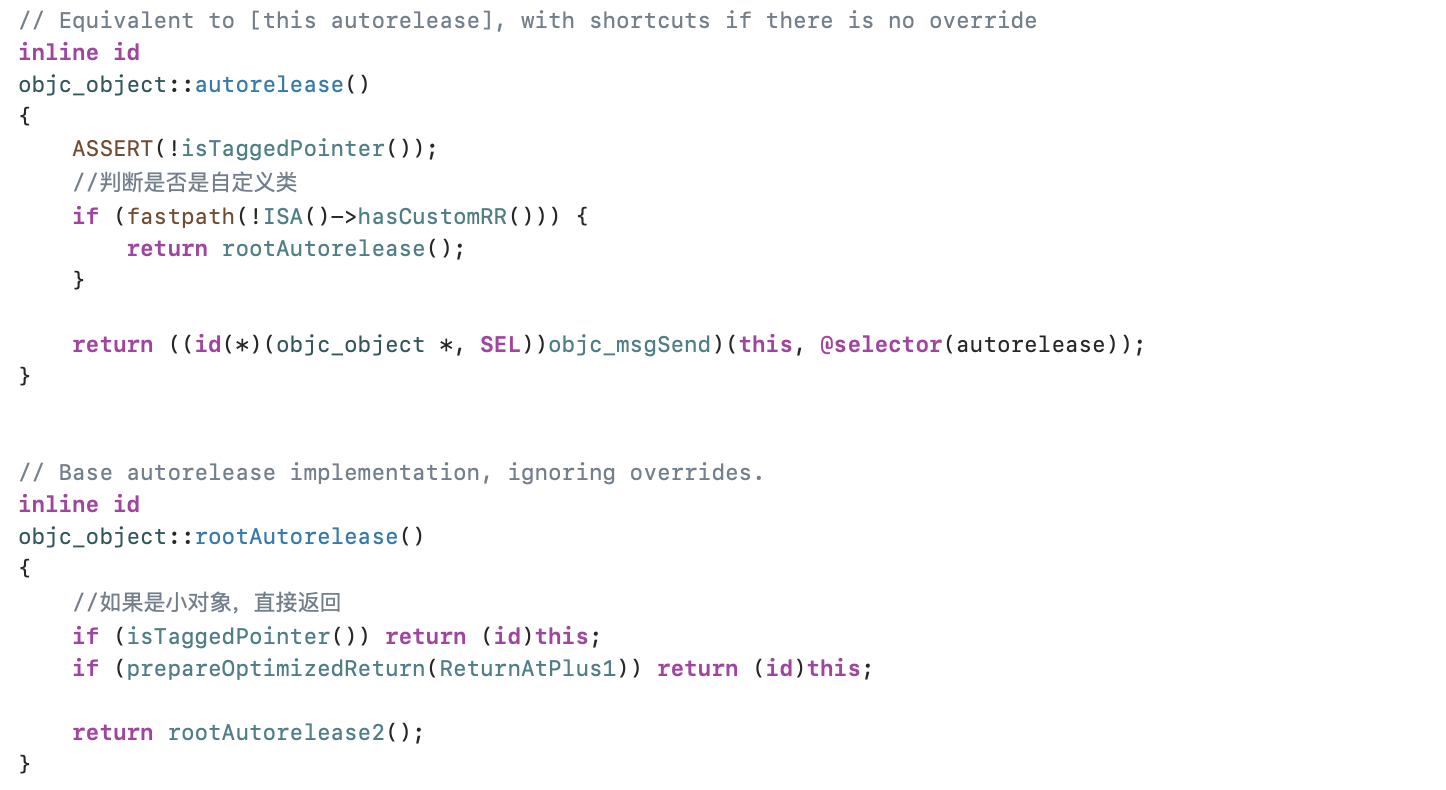

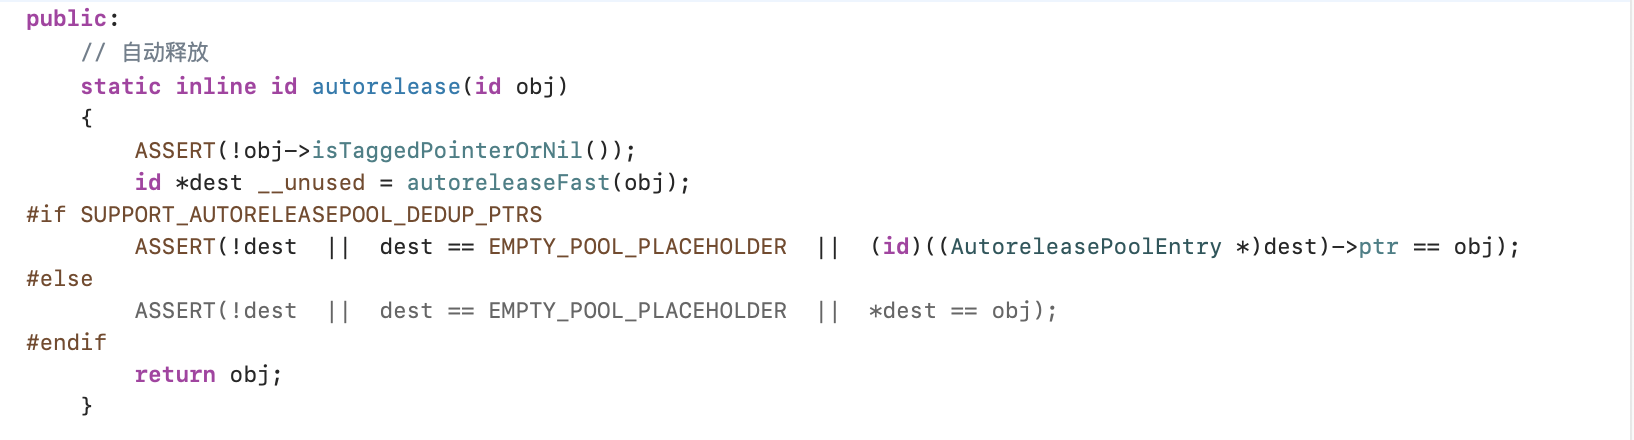
可以看出来无论是压栈哨兵对象还是普通对象,都会来到autoreleaseFast方法,只是区别标识不同
objc_autoreleasePoolPop

前面看了objc_autoreleasePoolPush方法,现在来看看相对应的objc_autoreleasePoolPop方法,这里传的参数ctxt,其实是push压栈后返回的哨兵对象,目的是为了避免出栈混乱,防止将别的对象出栈。这个方法内部是调用了AutoreleasePoolPage的pop方法:
//出栈static inline voidpop(void *token){AutoreleasePoolPage *page;id *stop;//判断对象是否是空占位符if (token == (void*)EMPTY_POOL_PLACEHOLDER) {//如果当是空占位符// Popping the top-level placeholder pool.//获取当前页page = hotPage();if (!page) {// Pool was never used. Clear the placeholder.//如果当前页不存在,则清除空占位符return setHotPage(nil);}// Pool was used. Pop its contents normally.// Pool pages remain allocated for re-use as usual.//如果当前页存在,则将当前页设置为coldPage,token设置为coldPage的开始位置page = coldPage();token = page->begin();} else {//获取token所在的页page = pageForPointer(token);}
stop = (id *)token;//判断最后一个位置,是否是哨兵if (*stop != POOL_BOUNDARY) {//最后一个位置不是哨兵,即最后一个位置是一个对象if (stop == page->begin() && !page->parent) {//如果是第一个位置,且没有父节点,什么也不做// Start of coldest page may correctly not be POOL_BOUNDARY:// 1. top-level pool is popped, leaving the cold page in place// 2. an object is autoreleased with no pool} else {//如果是第一个位置,且有父节点,则出现了混乱// Error. For bincompat purposes this is not // fatal in executables built with old SDKs.return badPop(token);}}
if (slowpath(PrintPoolHiwat || DebugPoolAllocation || DebugMissingPools)) {return popPageDebug(token, page, stop);}//出栈页return popPage<false>(token, page, stop);}pop的流程概括如下:
-
处理空页面
-
根据token获取page
-
容错处理
-
通过popPage出栈页
popPage
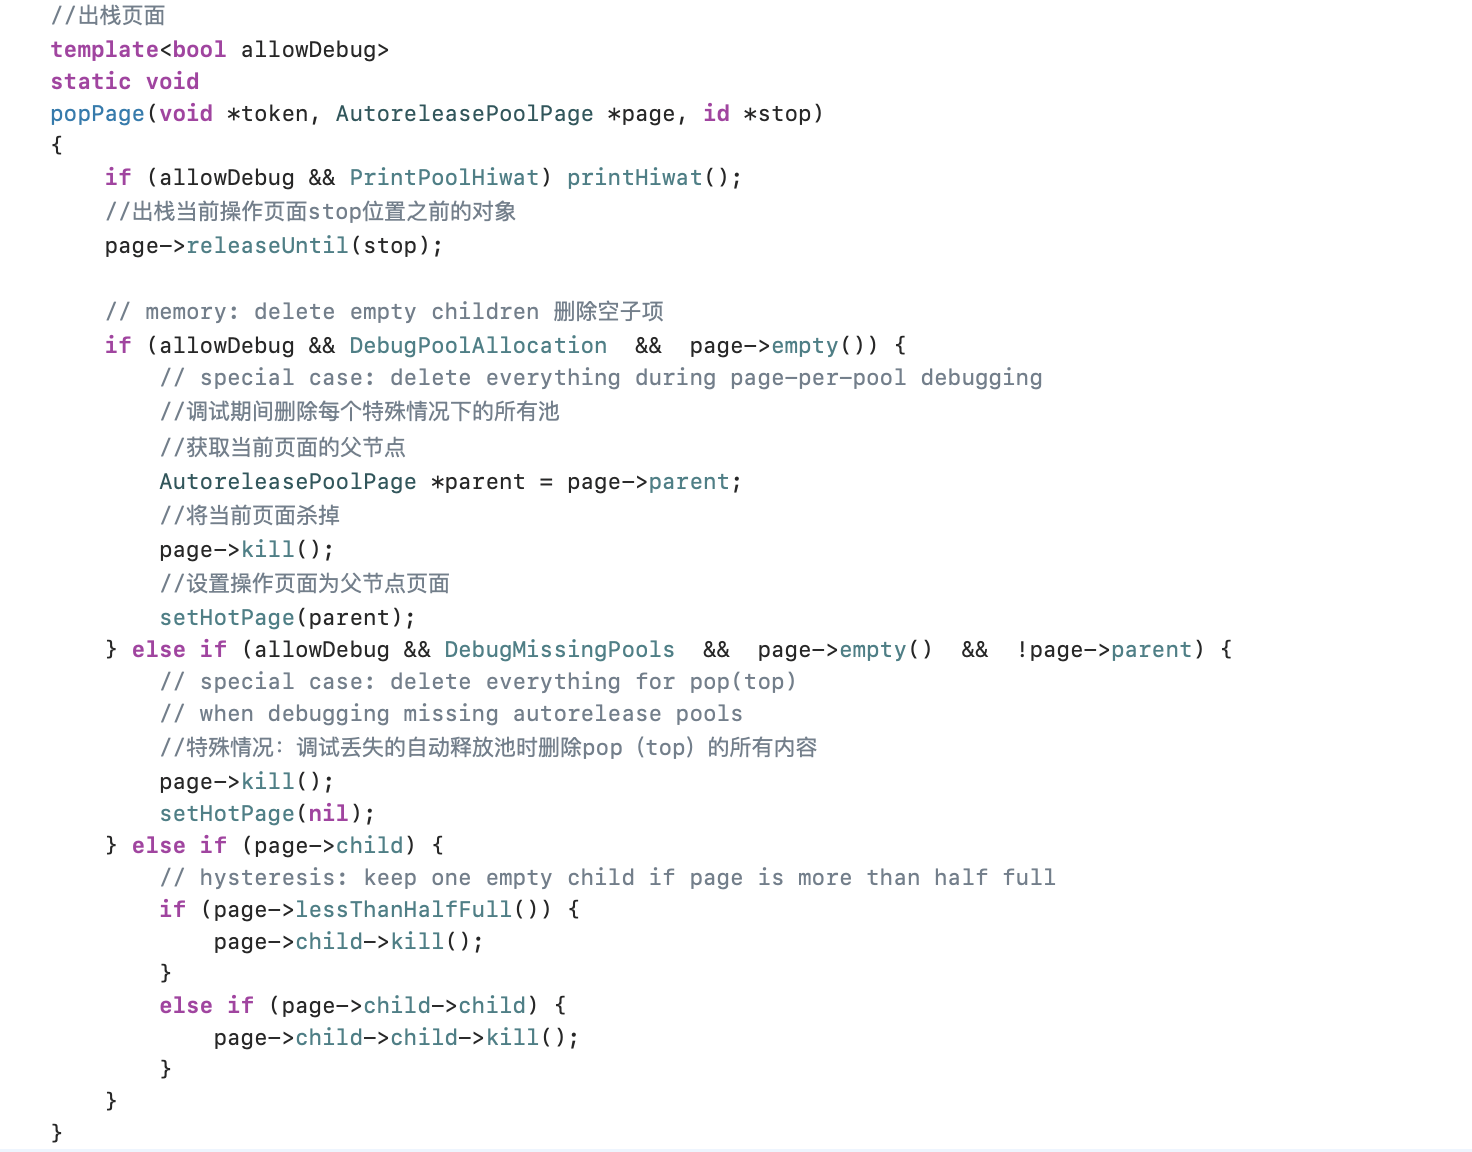
popPage源码中传入的allowDebug为false,就通过releaseUntil出栈当前页stop位置之前的所有对象,即向栈中的对象发送release消息,直到遇到传入的哨兵对象
releaseUntil方法
//释放到stop位置之前的所有对象void releaseUntil(id *stop) {// Not recursive: we don't want to blow out the stack // if a thread accumulates a stupendous amount of garbage//判断下一个对象是否等于stop,如果不等于,则进入while循环while (this->next != stop) {// Restart from hotPage() every time, in case -release // autoreleased more objects//获取当前操作页面,即hot页面AutoreleasePoolPage *page = hotPage();
// fixme I think this `while` can be `if`, but I can't prove it//如果当前页是空的while (page->empty()) {//将page赋值为父节点页page = page->parent;//并设置当前页为父节点页setHotPage(page);}
page->unprotect();
#if SUPPORT_AUTORELEASEPOOL_DEDUP_PTRSAutoreleasePoolEntry* entry = (AutoreleasePoolEntry*) --page->next;
// create an obj with the zeroed out top byte and release thatid obj = (id)entry->ptr;int count = (int)entry->count; // grab these before memset
#else//next进行--操作,即出栈id obj = *--page->next;
#endif//将页索引位置置为SCRIBBLE,表示已经被释放memset((void*)page->next, SCRIBBLE, sizeof(*page->next));page->protect();
if (obj != POOL_BOUNDARY) {
#if SUPPORT_AUTORELEASEPOOL_DEDUP_PTRS// release count+1 times since it is count of the additional// autoreleases beyond the first onefor (int i = 0; i < count + 1; i++) {objc_release(obj);}
#else//释放objc_release(obj);
#endif}}//设置当前页setHotPage(this);
#if DEBUG// we expect any children to be completely emptyfor (AutoreleasePoolPage *page = child; page; page = page->child) {ASSERT(page->empty());}
#endif}这个函数的实现就是循环遍历判断对象是否等于stop,目的是释放stop之前的所有对象。首先通过获取page的next释放对象,并对next进行递减,获取上一个对象。判断该对象是否是哨兵对象,如果不是就调用objc_release释放
kill方法
//杀掉void kill() {// Not recursive: we don't want to blow out the stack // if a thread accumulates a stupendous amount of garbageAutoreleasePoolPage *page = this;//获取最后一个页while (page->child) page = page->child;
AutoreleasePoolPage *deathptr;do {deathptr = page;//子节点 变成 父节点page = page->parent;if (page) {page->unprotect();page->child = nil;page->protect();}delete deathptr;} while (deathptr != this);}//释放本地线程存储空间static void tls_dealloc(void *p) {if (p == (void*)EMPTY_POOL_PLACEHOLDER) {// No objects or pool pages to clean up here.return;}
// reinstate TLS value while we worksetHotPage((AutoreleasePoolPage *)p);
if (AutoreleasePoolPage *page = coldPage()) {if (!page->empty()) objc_autoreleasePoolPop(page->begin()); // pop all of the poolsif (slowpath(DebugMissingPools || DebugPoolAllocation)) {// pop() killed the pages already} else {page->kill(); // free all of the pages}}// clear TLS value so TLS destruction doesn't loopsetHotPage(nil);}//获取AutoreleasePoolPagestatic AutoreleasePoolPage *pageForPointer(const void *p) {return pageForPointer((uintptr_t)p);}在kill的实现中主要就是销毁当前页,并把当前页赋给父节点,再把父节点的child设为空