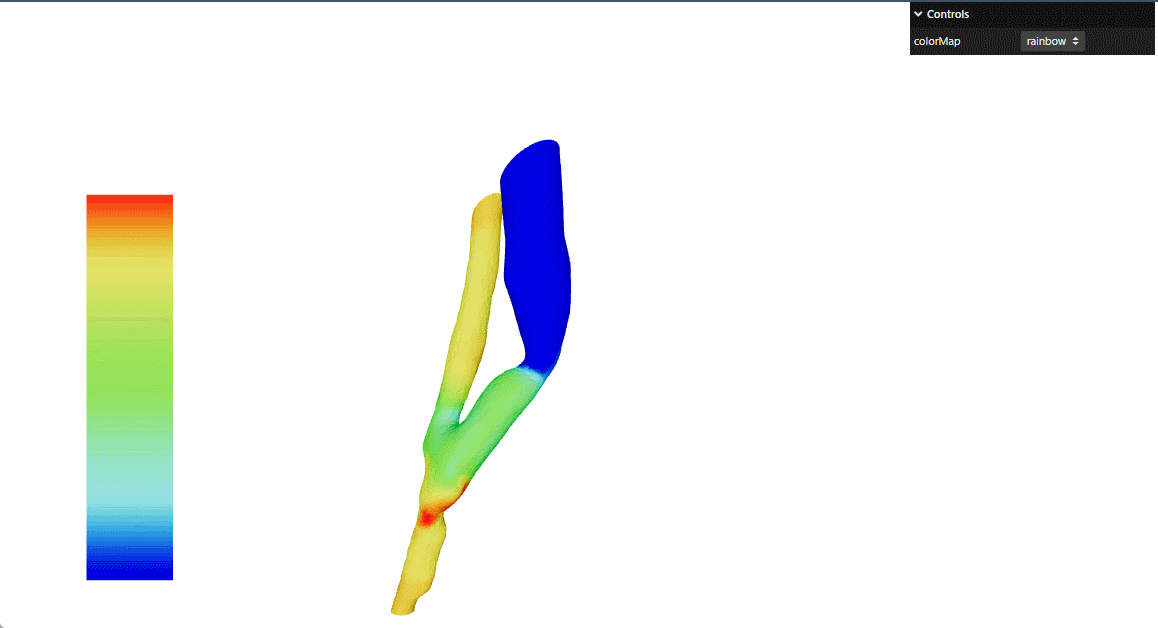
React+Three.js实现3D场景压力/温度/密度分布可视化
本文介绍了一个基于React和Three.js的3D压力可视化解决方案,该方案能够:
加载并渲染3D压力模型数据
提供动态颜色映射功能,支持多种颜色方案:彩虹-rainbow,冷暖-cooltowarm,黑体-blackbody,灰度-grayscale
实现固定位置的颜色图例显示
通过GUI界面实现交互式控制
这个解决方案特别适用于工程仿真、科学计算可视化、医疗成像等需要展示3D压力/温度/密度分布的场景。

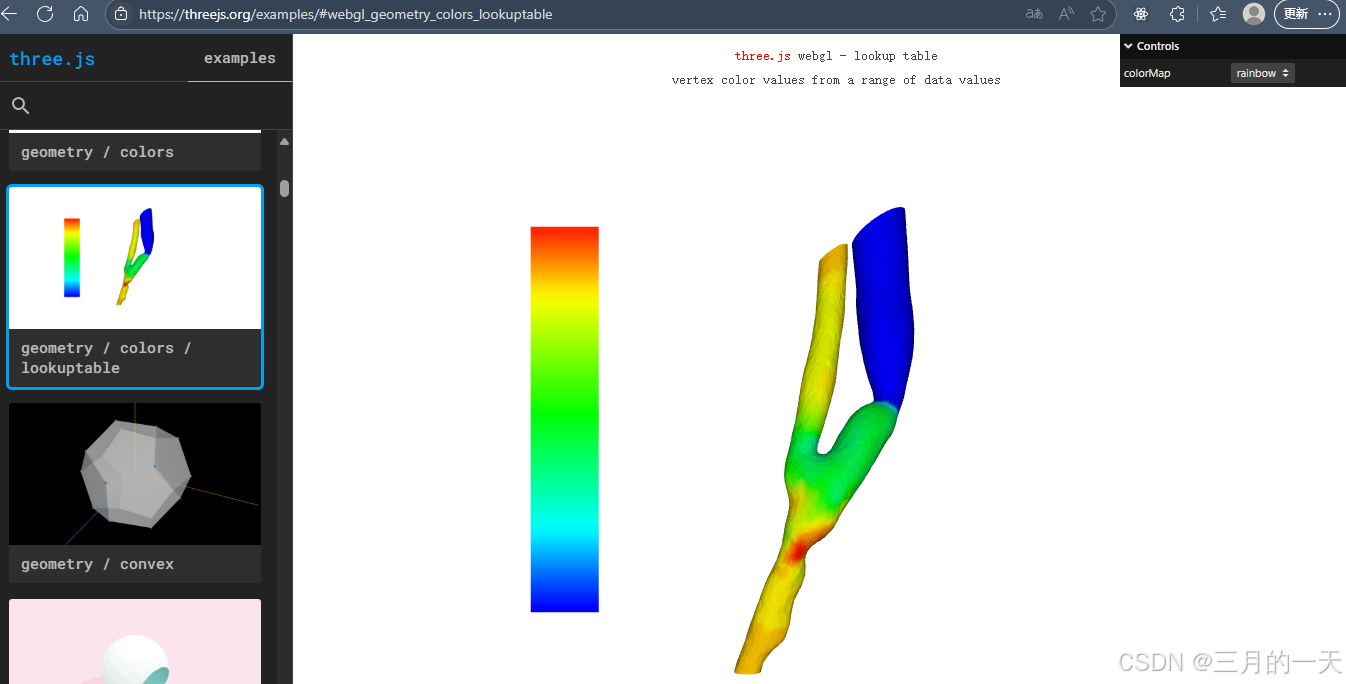
本文参考threejs官网 的例子进行了react重构
three.js examples
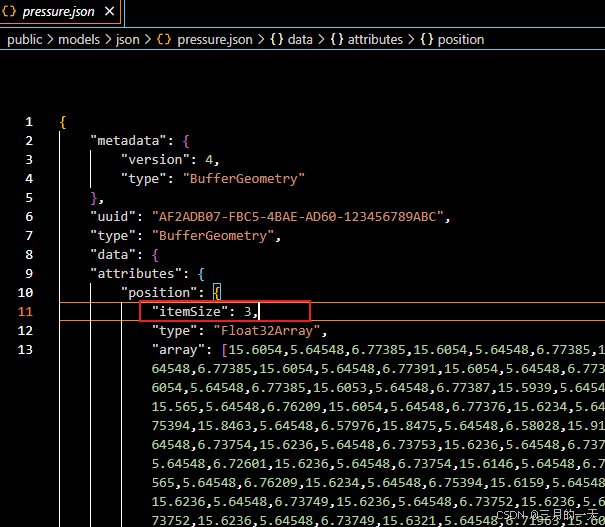
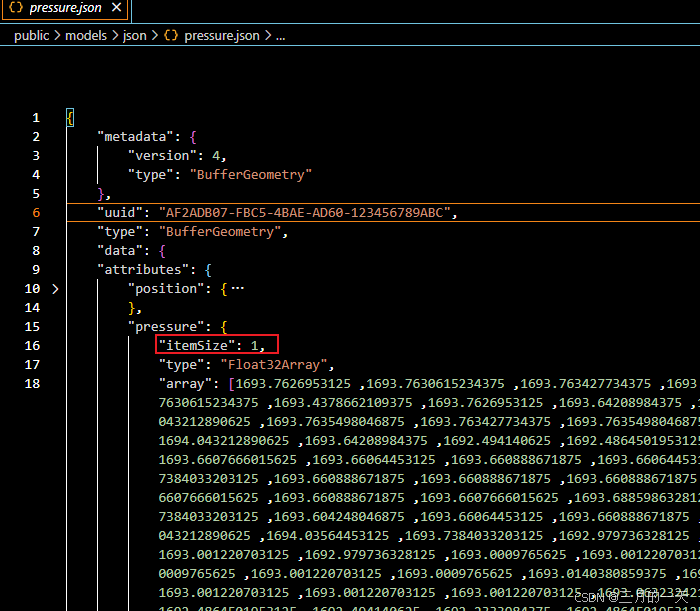
几何模型数据分析
首先,下载threejs的源码,找到该例子中需要的模型文件
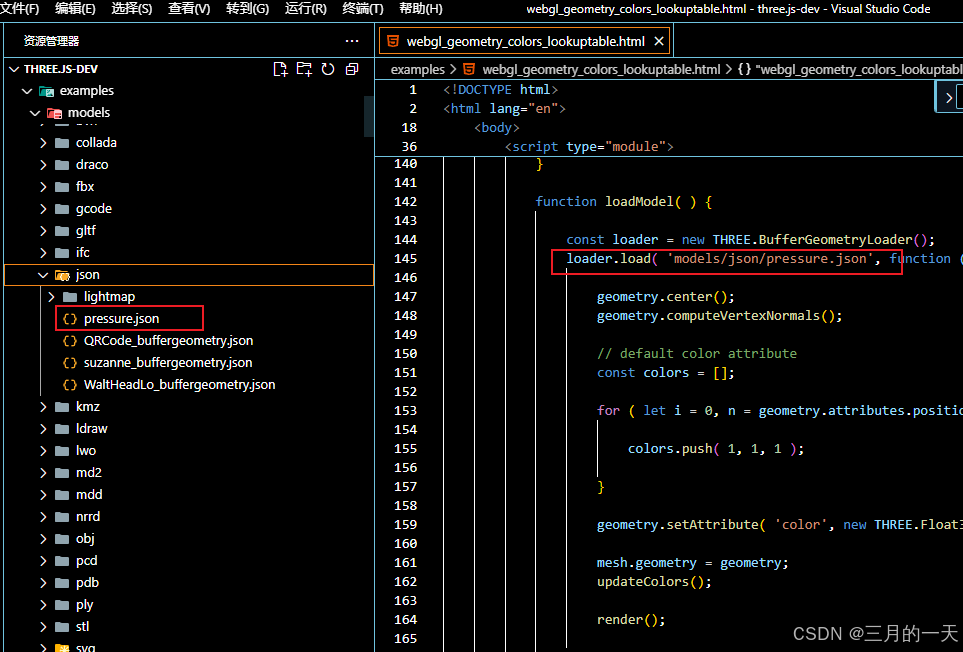
分析模型数据,可以看到模型是BufferGeometry类型的,有两个属性position位置信息,pressure压力信息
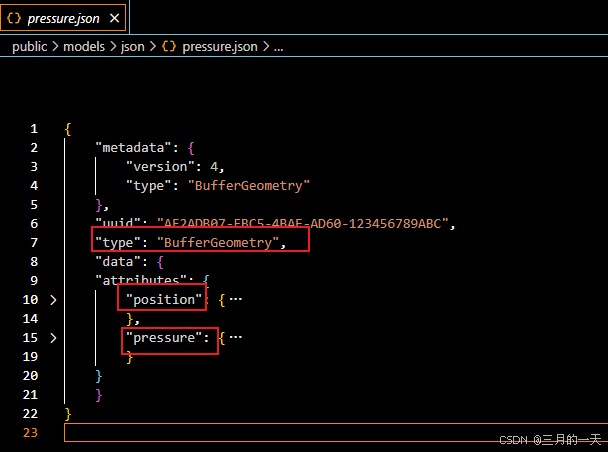
展开position可以看到具体位置属性的参数,itemSize=3表示,每三个表示一个顶点的xyz坐标。
展开pressure可以看到itemSize=1,每一个数值对应一个顶点的压力值
我们现在要做的两件事,首先,根据这个位置信息将几何绘制出来,通过THREE.BufferGeometryLoader()完成;其次,根据每个顶点的压力值,绘制该顶点的颜色。
第一个很容易。
加载几何
export const Model3D = () => {const meshRef = useRef<THREE.Mesh>(null)const [geometry, setGeometry] = useState<PressureGeometry | null>(null)useEffect(() => {const loader = new THREE.BufferGeometryLoader()loader.load('models/json/pressure.json', (geometry) => {const geometry2 = geometry as unknown as PressureGeometrygeometry.center();      // 确保模型居中geometry.computeVertexNormals(); // 计算法线以正确显示光照const colors = []for (let i = 0, n = geometry.attributes.position.count; i < n; ++i) {colors.push(1, 1, 1)}geometry.setAttribute('color',new THREE.Float32BufferAttribute(colors, 3),)setGeometry(geometry2)})}, [])if (!geometry) return nullreturn (<mesh ref={meshRef} geometry={geometry}><meshLambertMaterialside={THREE.DoubleSide}color={0xf5f5f5}vertexColors={true}/></mesh>)
}
1. geometry.center():几何体居中
将几何体的顶点坐标重新计算,使其中心点移动到坐标系原点 (0, 0, 0)。
默认情况下,加载的 3D 模型可能不在场景中心,导致旋转/缩放时出现偏移问题。
底层原理
-
计算几何体的包围盒(BoundingBox),获取
min和max坐标。 -
计算几何体的中心点:
const centerX = (min.x + max.x) / 2; const centerY = (min.y + max.y) / 2; const centerZ = (min.z + max.z) / 2; -
将所有顶点坐标减去中心点值,使模型中心对齐到
(0, 0, 0)。
适用场景
加载外部 3D 模型(如
.json、.gltf)时,确保模型位于场景中心。避免因模型偏移导致的相机对焦问题或交互异常。
2. geometry.computeVertexNormals():计算顶点法线
自动计算每个顶点的法线向量(用于光照计算)。
如果几何体没有法线数据,或修改了顶点位置后未更新法线,模型的光照会显示不正确(如全黑或闪烁)。
底层原理
遍历所有三角形面(
faces或index缓冲数据)。对每个三角形,计算其面法线(垂直于三角形平面的向量)。
对共享同一顶点的所有面法线取加权平均,得到该顶点的平滑法线。
为什么需要?
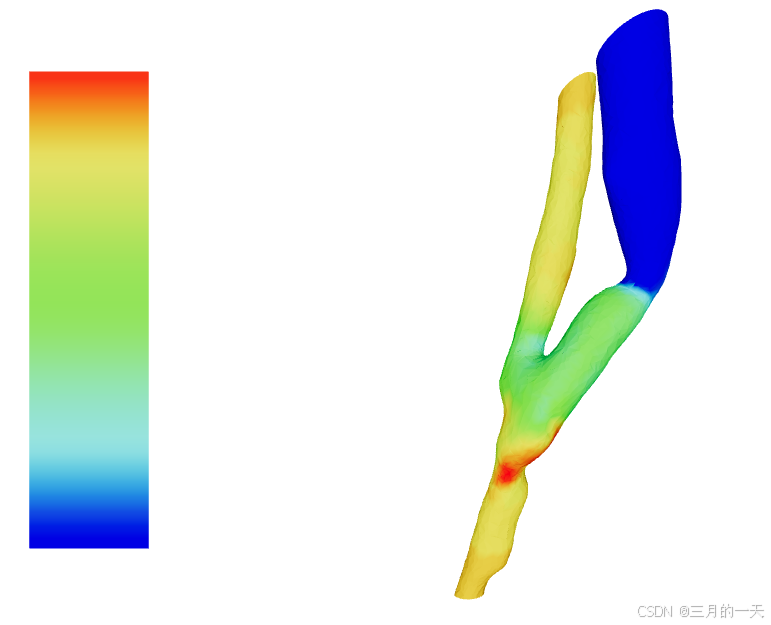
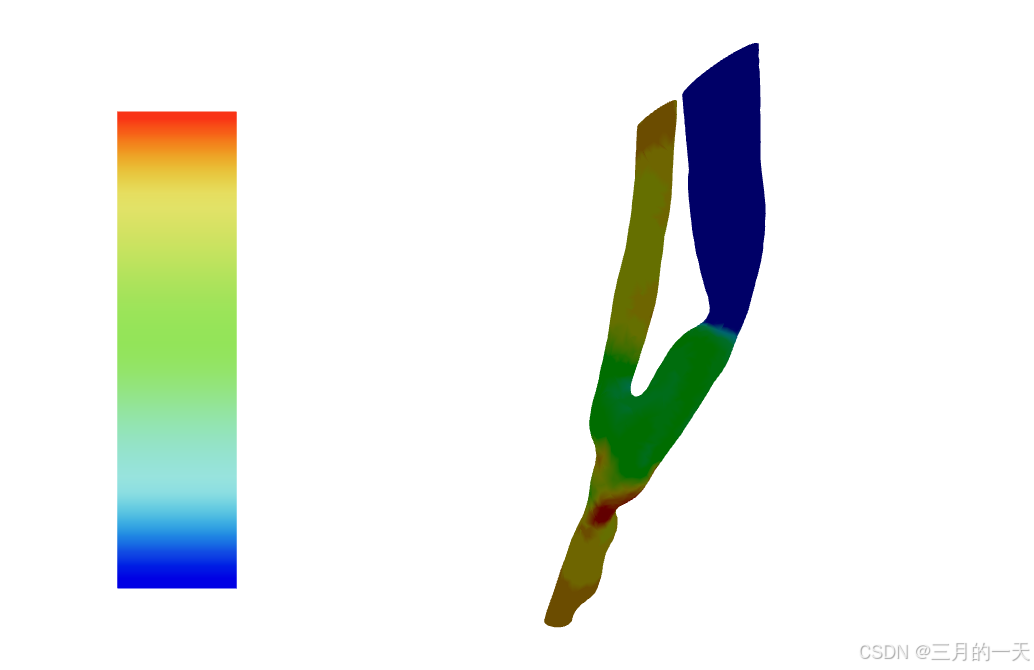
Three.js 的光照(如
MeshLambertMaterial、MeshPhongMaterial)依赖法线数据。如果未提供法线,模型会失去立体感(如下图对比):
✅ 有法线 → 平滑光照
❌ 无法线 → 平坦或异常着色
思考:如何绘制顶点颜色?
如何绘制顶点颜色呢?
如果我们想绘制一个彩虹色[红,黄,**,绿,蓝],并且指定一个数值区间[min,max],然后将颜色在指定区间内进行均匀采样,那么对于给定的数值,我们就能得到对应的颜色值。这个如何实现呢?
颜色映射
在 3D 科学可视化(如压力、温度、密度分布)中,颜色映射(Color Mapping) 是关键步骤,它通过将数值数据映射到颜色,直观地表达数据的分布和变化趋势。
1. 数值到颜色的映射原理
(1)数据归一化(Normalization)
由于数值范围可能很大(如压力 0~2000Pa),而颜色查找表(LUT)通常使用 **0~1 范围**,因此需要先归一化:
normalizedValue =(value-minValue)/(maxValue - minValue)例如:
压力范围
[0, 2000],当前值800归一化后:
(800 - 0) / (2000 - 0) = 0.4
(2)颜色查找(Color Lookup)
归一化后的值(0~1)通过 颜色查找表(LUT) 找到对应的 RGB 颜色:
LUT 存储了一系列颜色渐变(如
rainbow、cooltowarm、grayscale)。例如,
0.4可能对应rgb(100, 200, 50)。
2. Three.js 的 Lut 类
Three.js 提供了
Lut(Lookup Table) 工具类(位于three/examples/jsm/math/Lut.js),用于数值到颜色的映射。
(1)基本用法
import { Lut } from 'three/examples/jsm/math/Lut.js';// 初始化 LUT
const lut = new Lut();// 设置颜色映射方案(内置多种预设)
lut.setColorMap("rainbow"); // "cooltowarm", "blackbody", "grayscale"...// 设置数值范围
lut.setMin(0);   // 最小值
lut.setMax(2000); // 最大值// 获取颜色
const color = lut.getColor(800); // 返回 THREE.Color 对象
console.log(color.r, color.g, color.b); // 例如: (0.2, 0.8, 0.5)
(2)内置颜色映射方案
| 名称 | 效果 | 适用场景 |
|---|---|---|
rainbow | 彩虹色(红→紫) | 通用科学可视化 |
cooltowarm | 冷色(蓝)→暖色(红) | 温度场、正负值 |
blackbody | 黑体辐射(黑→红→黄→白) | 高温场、热力学 |
grayscale | 灰度(黑→白) | 简单数据对比 |
(3)自定义颜色映射
可以手动定义渐变颜色:
lut.setColorMap("custom", [new THREE.Color(0x0000ff), // 蓝(最小值)new THREE.Color(0x00ff00), // 绿(中间值)new THREE.Color(0xff0000), // 红(最大值)
]);
3. 在 React + Three.js 中的实际应用
如本文将使用Lut用于动态更新 3D 模型的顶点颜色:
useEffect(() => {if (!geometry) return;const lut = lutRef.current;lut.setColorMap(colorMap); // 设置颜色方案(如 "rainbow")lut.setMax(2000); // 最大值lut.setMin(0);    // 最小值const pressures = geometry.attributes.pressure.array;const colors = geometry.attributes.color;for (let i = 0; i < pressures.length; i++) {const value = pressures[i];const color = lut.getColor(value); // 获取颜色colors.setXYZ(i, color.r, color.g, color.b); // 设置顶点颜色}colors.needsUpdate = true; // 通知 Three.js 更新颜色
}, [colorMap, geometry]);
关键点
lut.getColor(value)自动归一化并返回THREE.Color。
colors.setXYZ()修改顶点颜色属性。
needsUpdate = true确保 GPU 缓冲区更新。
4. 颜色映射的应用场景
| 场景 | 数据类型 | 典型颜色方案 |
|---|---|---|
| 工程仿真 | 结构应力、流体压力 | cooltowarm(区分高低压) |
| 科学计算 | 温度场、密度场 | blackbody(高温可视化) |
| 医疗成像 | CT/MRI 数据 | grayscale(传统医学影像) |
绘制固定色卡ColorMap
在我们场景中ColorMap不会跟着模型一起移动,而是固定在页面的左侧,这是如何做到的呢?
这里使用的是独立渲染Scene,与渲染模型的主Scene分离,并且对ColorMap使用正交相机而不是透视相机
正交相机的作用
在 Three.js 中,正交相机(OrthographicCamera)与透视相机(PerspectiveCamera)不同,它不会根据物体距离相机的远近来缩放物体,所有物体无论远近看起来大小都一样。在本文的代码中,正交相机的作用是:
固定 UI 元素的位置:通过正交相机渲染的元素会固定在屏幕上的某个位置,不会随着主相机的移动而移动,非常适合实现 HUD (平视显示器)、UI 面板等固定元素。
独立的渲染空间:正交相机创建了一个独立的 2D 渲染空间,坐标系统从 - 1 到 1,便于精确控制 UI 元素的位置和大小。
彩色图例的绘制过程
彩色图例的绘制主要通过以下步骤实现:
-
创建颜色映射纹理:
useEffect(() => {const lut = new Lut()lut.setColorMap(colorMap)lut.setMax(2000)lut.setMin(0)const canvas = lut.createCanvas()const newTexture = new THREE.CanvasTexture(canvas)newTexture.colorSpace = THREE.SRGBColorSpacesetTexture(newTexture)return () => newTexture.dispose()
}, [colorMap])
这部分代码使用
Lut(Lookup Table) 类创建一个颜色映射表,并将其转换为 Canvas 纹理。 -
创建 Sprite 元素:
return (<sprite ref={spriteRef} scale={[0.125, 1, 1]}><spriteMaterial map={texture} /></sprite>
)
Sprite 是 Three.js 中始终面向相机的 2D 元素,非常适合用于 UI 显示。这里将前面创建的颜色映射纹理应用到 Sprite 上。
-
使用正交相机渲染:
const orthoCamera = new THREE.OrthographicCamera(-1, 1, 1, -1, 1, 2)
orthoCamera.position.set(0.5, 0, 1)const tempScene = new THREE.Scene()
if (spriteRef.current) {tempScene.add(spriteRef.current)
}gl.render(tempScene, orthoCamera)
这部分代码创建了一个临时场景,只包含图例 Sprite 元素,并使用正交相机进行渲染。由于正交相机的特性,无论主相机如何移动,图例都会固定在屏幕上的相同位置。
图例不随模型移动的原理
图例不随模型移动的关键在于:
-
独立的渲染流程:代码中通过
useFrame钩子手动控制渲染过程,先渲染主场景,再单独渲染图例:gl.render(scene, camera) // 渲染主场景(使用透视相机) gl.render(tempScene, orthoCamera) // 渲染图例(使用正交相机) -
分离的场景管理:图例被添加到一个临时场景
tempScene中,与主场景scene分离,避免受到主场景中相机控制和模型变换的影响。 -
固定的正交相机设置:正交相机的位置和投影参数被固定设置:
const orthoCamera = new THREE.OrthographicCamera(-1, 1, 1, -1, 1, 2)
orthoCamera.position.set(0.5, 0, 1)
这种设置使得图例在屏幕上的位置不会随着主相机的移动而改变,始终保持在固定位置。
固定图例代码
export const FixedLegend = () => {const { gl } = useThree()const spriteRef = useRef<THREE.Sprite>(null)const { colorMap } = useContext(ColorMapText) as ColorMapTextTypeconst [texture, setTexture] = useState<THREE.CanvasTexture | null>(null)// 创建和更新颜色图例纹理useEffect(() => {const lut = new Lut()lut.setColorMap(colorMap)lut.setMax(2000)lut.setMin(0)const canvas = lut.createCanvas()const newTexture = new THREE.CanvasTexture(canvas)newTexture.colorSpace = THREE.SRGBColorSpacesetTexture(newTexture)return () => newTexture.dispose()}, [colorMap])// 使用useFrame控制渲染过程useFrame(() => {// 清除自动清除标志,我们将手动控制清除gl.autoClear = false// 渲染图例(使用正交相机)const orthoCamera = new THREE.OrthographicCamera(-1, 1, 1, -1, 1, 2)orthoCamera.position.set(0.5, 0, 1)// 创建一个临时场景只包含图例const tempScene = new THREE.Scene()if (spriteRef.current) {tempScene.add(spriteRef.current)}gl.render(tempScene, orthoCamera)})if (!texture) return nullreturn (<sprite ref={spriteRef} scale={[0.125, 1, 1]}><spriteMaterial map={texture} /></sprite>)
}
GUI切换colorMap
这里快速说一下, 通过这个方法const gui = new GUI()可以快速创建一个位于右上角的可视化操作面板,通过配置相关参数,可以动态控制threejs中的参数
export const ColorMapGUI = () => {
const { setColorMap} = useContext(ColorMapText) as ColorMapTextTypeconst guiRef = useRef<GUI | null>(null)useEffect(() => {const gui = new GUI()guiRef.current = guiconst params = {colorMap: 'rainbow',}gui.add(params, 'colorMap', ['rainbow','cooltowarm','blackbody','grayscale',]).onChange((value: string) => {setColorMap(value)})return () => {if (guiRef.current) {guiRef.current.destroy()}}}, [])return (<></>)
}
完整代码
Model3D组件:负责加载 3D 模型并处理顶点颜色映射。它使用
useEffect钩子来加载模型数据,并在颜色映射变化时更新顶点颜色。FixedLegend组件:创建颜色条 UI,显示当前使用的颜色映射。它使用正交相机单独渲染,确保在场景中始终可见。
ColorMapGUI:切换colorMap类型
ColorMapProvider:提供共享colorMap数据
import { useRef, useState, useEffect, createContext, useContext, type ReactNode } from 'react'
import {  useFrame, useThree } from '@react-three/fiber'
import * as THREE from 'three'
import { Lut } from 'three/examples/jsm/math/Lut.js'
import { GUI } from 'three/examples/jsm/libs/lil-gui.module.min.js'interface PressureGeometry extends THREE.BufferGeometry {attributes: {position: THREE.BufferAttributenormal?: THREE.BufferAttributepressure: THREE.BufferAttributecolor: THREE.BufferAttribute}
}export const Model3D = () => {const meshRef = useRef<THREE.Mesh>(null)const [geometry, setGeometry] = useState<PressureGeometry | null>(null)const { colorMap } = useContext(ColorMapText) as ColorMapTextTypeconst lutRef = useRef<Lut>(new Lut())useEffect(() => {const loader = new THREE.BufferGeometryLoader()loader.load('models/json/pressure.json', (geometry) => {const geometry2 = geometry as unknown as PressureGeometrygeometry.center();      // 确保模型居中geometry.computeVertexNormals(); // 计算法线以正确显示光照const colors = []for (let i = 0, n = geometry.attributes.position.count; i < n; ++i) {colors.push(1, 1, 1)}geometry.setAttribute('color',new THREE.Float32BufferAttribute(colors, 3),)setGeometry(geometry2)})}, [])useEffect(() => {if (!geometry) returnconst lut = lutRef.currentlut.setColorMap(colorMap)lut.setMax(2000)lut.setMin(0)const pressures = geometry.attributes.pressureconst colors = geometry.attributes.colorconst color = new THREE.Color()for (let i = 0; i < pressures.array.length; i++) {const colorValue = pressures.array[i]color.copy(lut.getColor(colorValue)).convertSRGBToLinear()colors.setXYZ(i, color.r, color.g, color.b)}colors.needsUpdate = true}, [colorMap, geometry])if (!geometry) return nullreturn (<mesh ref={meshRef} geometry={geometry}><meshLambertMaterialside={THREE.DoubleSide}color={0xf5f5f5}vertexColors={true}/></mesh>)
}export const FixedLegend = () => {const { gl } = useThree()const spriteRef = useRef<THREE.Sprite>(null)const { colorMap } = useContext(ColorMapText) as ColorMapTextTypeconst [texture, setTexture] = useState<THREE.CanvasTexture | null>(null)// 创建和更新颜色图例纹理useEffect(() => {const lut = new Lut()lut.setColorMap(colorMap)lut.setMax(2000)lut.setMin(0)const canvas = lut.createCanvas()const newTexture = new THREE.CanvasTexture(canvas)newTexture.colorSpace = THREE.SRGBColorSpacesetTexture(newTexture)return () => newTexture.dispose()}, [colorMap])// 使用useFrame控制渲染过程useFrame(() => {// 清除自动清除标志,我们将手动控制清除gl.autoClear = false// 渲染图例(使用正交相机)const orthoCamera = new THREE.OrthographicCamera(-1, 1, 1, -1, 1, 2)orthoCamera.position.set(0.5, 0, 1)// 创建一个临时场景只包含图例const tempScene = new THREE.Scene()if (spriteRef.current) {tempScene.add(spriteRef.current)}gl.render(tempScene, orthoCamera)})if (!texture) return nullreturn (<sprite ref={spriteRef} scale={[0.125, 1, 1]}><spriteMaterial map={texture} /></sprite>)
}
export const ColorMapGUI = () => {
const { setColorMap} = useContext(ColorMapText) as ColorMapTextTypeconst guiRef = useRef<GUI | null>(null)useEffect(() => {const gui = new GUI()guiRef.current = guiconst params = {colorMap: 'rainbow',}gui.add(params, 'colorMap', ['rainbow','cooltowarm','blackbody','grayscale',]).onChange((value: string) => {setColorMap(value)})return () => {if (guiRef.current) {guiRef.current.destroy()}}}, [])return (<></>)
}
type ColorMapTextType = {colorMap: string,setColorMap: (value: string) => void,
}
const ColorMapText = createContext<ColorMapTextType|undefined>(undefined)export const ColorMapProvider = ({ children }: { children: ReactNode }) => {const [colorMap, setColorMap] = useState<string>('rainbow')const value={colorMap,setColorMap,}return (<ColorMapText.Provider value={value}>{children}</ColorMapText.Provider>)
}
提供Canvas、光源、并加载模型和图例组件
import { OrbitControls } from '@react-three/drei'
import { Canvas } from '@react-three/fiber'
import { ColorMapGUI, FixedLegend, ColorMapProvider, Model3D } from './ColorMap'export const ThreeJsExample = () => {return (<ColorMapProvider><div style={{ width: '100vw', height: '100vh' }}><Canvascamera={{ position: [0, 0, 10], fov: 60 }}gl={{ antialias: true }}><ambientLight intensity={0.5} /><directionalLight position={[0, 0, 1]} intensity={3} /><pointLight position={[3, 0, 0]} /><Model3D /><FixedLegend /><ColorMapGUI /><OrbitControls /></Canvas></div></ColorMapProvider>)
}
总结
这个项目展示了如何结合React-Three-Fiber和Three.js创建专业的科学可视化应用。关键点包括:
正确处理自定义几何属性
实现不随场景旋转的固定UI元素
构建灵活的颜色映射系统
优化渲染性能
这种模式可以扩展到其他科学可视化场景,如温度场、流速场等的可视化。