「iOS」————UITableView性能优化
iOS学习
- UITableView性能优化
- 卡顿产生原因
- CPU层面优化
- **1.使用轻量级对象**
- **2.不要频繁地调用UIView的相关属性,不要动态添加View**
- **3.提前计算好布局**
- estimatedRowHeight计算时机
- **缓存失效机制**
- **4. 直接设置frame**
- **5.图片尺寸合适**
- **6. 控制最大并发数量**
- **7.把耗时操作放到子线程**
- **8.异步绘制加载图片**
- GPU层面
- **5.避免离屏渲染**
- **下面的情况或操作会引发离屏渲染**
- (1)圆角优化
- (2)阴影优化
- (3)强制开启光栅化
- (4)优化建议
UITableView性能优化
UITableView的优化本质在于提高滚动性能和减少内存使用,保证流畅的用户体验。计算机层面来说,优化的核心本质为降低 CPU和GPU 的工作来提升性能
CPU:对象的创建和销毁、对象属性的调整、布局计算、文本的计算和排版、图片的格式转换和解码、图像的绘制
GPU:接收提交的纹理和顶点描述、应用变换、混合并渲染、输出到屏幕
卡顿产生原因
App主线程在CPU中显示计算内容,比如视图的创建,布局的计算,图片解码,文本绘制,然后我们的CPU会将计算好的内容提交到GPU中进行变换、合成、渲染、其中也包括了离屏渲染
就是CPU负责计算,GPU负责渲染。
CPU层面优化
1.使用轻量级对象
在一些不用事件处理的地方,可以使用CALayer代替UIVIew。CALayer相比于UIView更加接近底层
CALayer 更接近于底层的渲染引擎。UIView 的渲染最终也是由底层的 CALayer 来完成的,但直接使用 CALayer 可以减少一些由于 UIView 带来的额外计算和抽象层次。
CALayer * imageLayer = [CALayer layer];
imageLayer.bounds = CGRectMake(0,0,200,100);
imageLayer.position = CGPointMake(200,200);
imageLayer.contents = (id)[UIImage imageNamed:@"xx.jpg"].CGImage;
imageLayer.contentsGravity = kCAGravityResizeAspect;
[tableCell.contentView.layer addSublayer:imageLayer];
2.不要频繁地调用UIView的相关属性,不要动态添加View
比如 frame、bounds、transform 等属性,尽量减少不必要的修改
- 不读取文件/写入文件
- 不要给
UITableViewCell动态添加subView,可以在初始化UITableViewCell的时候就将所有需要展示的添加完毕,然后根据需要来设置hidden属性显示和隐藏
3.提前计算好布局
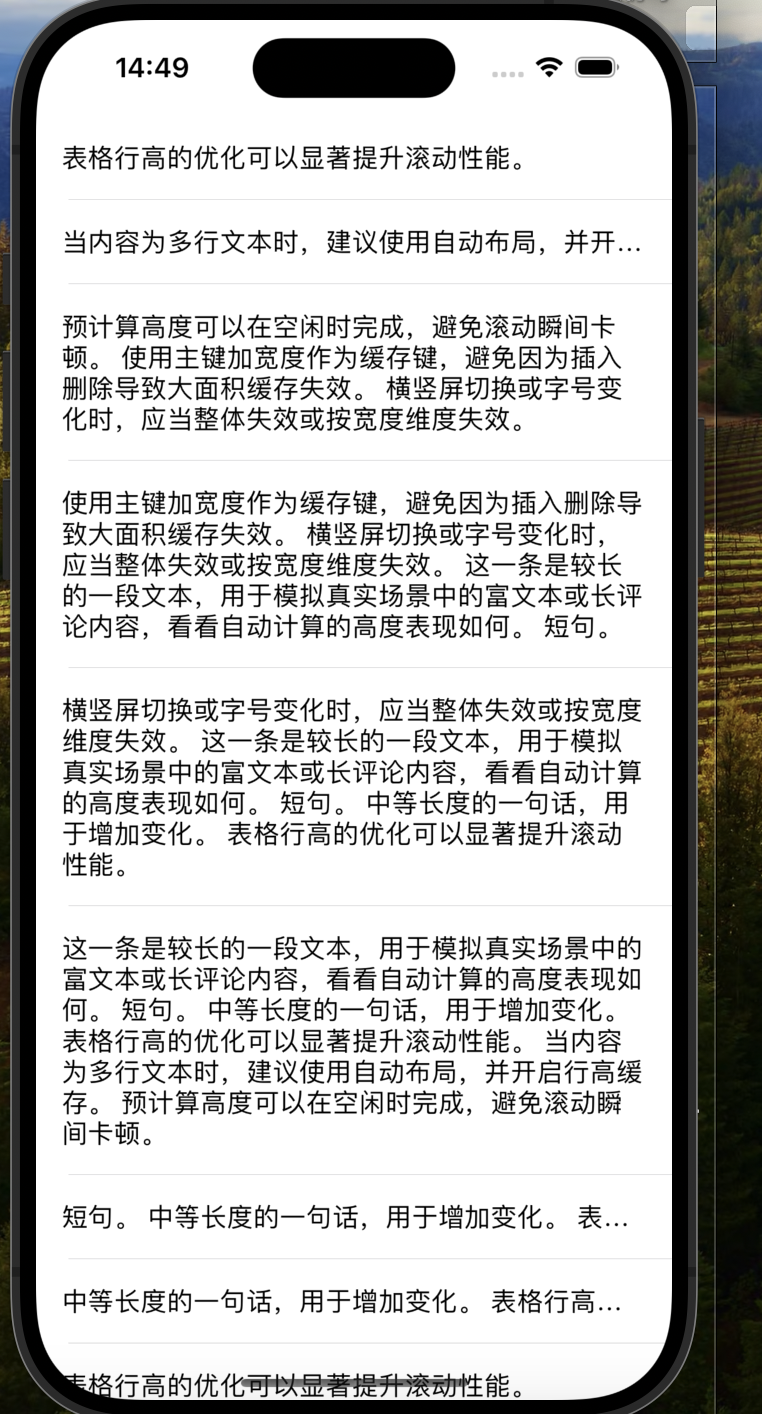
在滑动时,会不断调用heightForRowAtIndexPath:,当Cell高度需要自适应时,每次回调都要计算高度,会导致UI卡顿。为了避免重复无意义的计算,需要缓存高度。 UITableViewCell高度计算主要有两种,一种固定高度,另外一种动态高度。
固定高度: rowHeight高度默认44 对于固定高度直接采用self.tableView.rowHeight = 77比tableView:heightForRowAtIndexPath:更高效
动态高度:
采用tableView:heightForRowAtIndexPath:这种代理方式,设置这种代理之后rowHeight则无效,需要满足以下三个条件(自适应行高条件)
- 使用Autolayout进行UI布局约束(要求
cell.contentView的四条边都与内部元素有约束关系) - 指定TableView的
estimatedRowHeight属性的默认值 - 指定TableView的
rowHeight属性为UITableViewAutomaticDimension
self.tableView.rowHeight = UITableViewAutomaticDimension;
self.tableView.estimatedRowHeight = 44;
对于已经计算好的cell高度,要进行缓存。
还设计一个调用顺序问题。首先如果没有设定estimatedRowHeight,会先调用多次heightForRow,遍历一次每个cell的tableView:heightForRowAtIndexPath:获取总的高度值 ,之后,每调用一次cellForRow,会再调用一次对应的heightForRow。
也就是说我们的Tableview一定是先调用
cellForRow方法,然后再调用heightForRow方法
estimatedRowHeight计算时机
计算时机:有两个相关的阶段:
估算阶段:通过设置 estimatedRowHeight,UITableView 使用这个估算值来快速计算整个表格的滚动范围。这个估算值不需要精确匹配每个 cell 的实际高度,但应接近平均高度以优化性能。
精确计算阶段:当 cell 即将显示在屏幕上时,UITableView 根据 Auto Layout 约束来计算 cell 的实际高度。这通常发生在滚动过程中,当新的 cell 即将进入可视区域时。
这个阶段通常发生在-tableView:heightForRowAtIndexPath:方法之后,tableView:willDisplayCell:forRowAtIndexPath:之前。
这里再介绍一下如何实现高度缓存。
原理:存储每个cell经过计算过的高度值,并在表格请求高度时重用。
这里涉及到下面三个实现方法:
- (UITableViewCell *)tableView:(UITableView *)tableView cellForRowAtIndexPath:(NSIndexPath *) indexPath- (CGFloat)tableView:(UITableView *)tableView heightForRowAtIndexPath:(NSIndexPath *)indexPath- (void)tableView:(UITableView *)tableView willDisplayCell:(UITableViewCell *)cell forRowAtIndexPath:(NSIndexPath *)indexPath;
这三个方法按顺序执行。因此,我可以在第二个方法中获取缓存高度,在第三个方法中缓存cell的高度。
第三个方法调用的时候我们的cell已经配置完毕,因此我们可以直接在方法中得到cell高度进行缓存,缓存之后下一次再碰到相同的cell直接从我们的缓存中将高度取出来即可
实现:
设置高度时先检查缓存,如果没有缓存的话返回UITableViewAutomaticDimension来自动计算行高
- (CGFloat)tableView:(UITableView *)tableView heightForRowAtIndexPath:(NSIndexPath *)indexPath {if (indexPath.section == 0) {return 140;} else {NSString *cacheKey = [NSString stringWithFormat:@"%ld-%ld", (long)indexPath.section, (long)indexPath.row];// 检查缓存NSNumber *cachedHeight = [self.heightCache objectForKey:cacheKey];if (cachedHeight) {NSLog(@"存在缓存%@", cacheKey);return cachedHeight.doubleValue;} else {// 缓存行高return UITableViewAutomaticDimension;}}
}
然后我们在willDisplayCell中获取行高并将其加入缓存,当我们滑动到已经加载过的cell时我们的heightForRowAtIndexPath方法就会先检查缓存中是否有已经存入的高度,从而避免了重新计算导致内存开销
- (void)tableView:(UITableView *)tableView willDisplayCell:(UITableViewCell *)cell forRowAtIndexPath:(NSIndexPath *)indexPath {CGFloat cellHeight = cell.frame.size.height;//添加缓存NSString *cacheKey = [NSString stringWithFormat:@"%ld-%ld", (long)indexPath.section, (long)indexPath.row];[self.heightCache setObject:@(cellHeight) forKey:cacheKey];
}
缓存失效机制
如果我们删除数据时,由于cell的顺序会跟着移动,导致缓存值也需要跟着移动,这一步就非常复杂。
对于评论区:
可以改成使用评论id之类的缓存高度而不是易变动的index
@interface TableViewHeightCache : NSObject
@property (nonatomic, strong) NSMutableDictionary<NSString *, NSNumber *> *heightMap;
@end@implementation TableViewHeightCache
- (instancetype)init { if (self = [super init]) { _heightMap = [NSMutableDictionary dictionary]; } return self; }- (NSString *)keyForItemId:(NSString *)itemId width:(CGFloat)width {return [NSString stringWithFormat:@"%@|%.0f", itemId, width];
}- (NSNumber *)heightForItemId:(NSString *)itemId width:(CGFloat)width {return self.heightMap[[self keyForItemId:itemId width:width]];
}- (void)setHeight:(CGFloat)height forItemId:(NSString *)itemId width:(CGFloat)width {self.heightMap[[self keyForItemId:itemId width:width]] = @(height);
}- (void)invalidateForItemIds:(NSArray<NSString *> *)itemIds width:(CGFloat)width {for (NSString *itemId in itemIds) {[self.heightMap removeObjectForKey:[self keyForItemId:itemId width:width]];}
}- (void)invalidateAll { [self.heightMap removeAllObjects]; }
@end
Cell中使用
// 假设 model 有 itemId,table 宽度用 self.tableView.bounds.size.width
- (CGFloat)tableView:(UITableView *)tableView heightForRowAtIndexPath:(NSIndexPath *)indexPath {MyModel *m = self.dataSource[indexPath.row];NSNumber *h = [self.heightCache heightForItemId:m.itemId width:CGRectGetWidth(tableView.bounds)];return h ? h.doubleValue : UITableViewAutomaticDimension;
}// 系统算完高度后在 willDisplay 里回填缓存
- (void)tableView:(UITableView *)tableView willDisplayCell:(UITableViewCell *)cell
forRowAtIndexPath:(NSIndexPath *)indexPath {MyModel *m = self.dataSource[indexPath.row];CGFloat h = CGRectGetHeight(cell.frame);[self.heightCache setHeight:h forItemId:m.itemId width:CGRectGetWidth(tableView.bounds)];
}// 数据变更时精确失效
- (void)applyUpdates:(NSArray<MyModel *> *)changed {CGFloat width = CGRectGetWidth(self.tableView.bounds);[self.heightCache invalidateForItemIds:[changed valueForKey:@"itemId"] width:width];[self.tableView reloadData];
}// 横竖屏/宽度变化
- (void)viewWillTransitionToSize:(CGSize)sizewithTransitionCoordinator:(id<UIViewControllerTransitionCoordinator>)coordinator {[super viewWillTransitionToSize:size withTransitionCoordinator:coordinator];[self.heightCache invalidateAll];
}
预缓存
这个就很高级了,通过RunLoop,在页面空闲时执行计算,对还未显示的cell的高度进行缓存。
-
选择:
-
轻量/可后台线程:纯文本 boundingRect + 常量边距计算,适合内容简单的 cell。
-
准确/需主线程:使用“测量 cell”(sizing cell)配合 Auto Layout 的 systemLayoutSizeFittingSize:。可放在主线程 RunLoop 空闲阶段执行,避免卡顿。
-
时机:数据加载后,按照“当前可视区下方的 N 条”创建任务;滚动到一定阈值时继续投喂任务。
一个 RunLoop 空闲任务队列(主线程 idle 执行)demo:
typedef void(^IdleTask)(void);@interface IdleTaskQueue : NSObject
- (void)addTask:(IdleTask)task;
- (void)start;
- (void)stop;
@end@implementation IdleTaskQueue {CFRunLoopObserverRef _observer;NSMutableArray<IdleTask> *_tasks;BOOL _started;
}
- (instancetype)init { if (self=[super init]) { _tasks=[NSMutableArray array]; } return self; }
- (void)addTask:(IdleTask)task { if (task) [_tasks addObject:[task copy]]; }static void RunLoopIdleCallback(CFRunLoopObserverRef observer, CFRunLoopActivity activity, void *info) {IdleTaskQueue *queue = (__bridge IdleTaskQueue *)info;// 控制单次处理任务数,避免长时间占用NSInteger burst = 3;while (burst-- > 0 && queue->_tasks.count > 0) {IdleTask t = queue->_tasks.firstObject;[queue->_tasks removeObjectAtIndex:0];t();}
}- (void)start {if (_started) return;_started = YES;CFRunLoopObserverContext ctx = {0, (__bridge void *)self, NULL, NULL, NULL};_observer = CFRunLoopObserverCreate(kCFAllocatorDefault,kCFRunLoopBeforeWaiting, // 即将休眠时true, INT_MAX, RunLoopIdleCallback, &ctx);CFRunLoopAddObserver(CFRunLoopGetMain(), _observer, kCFRunLoopCommonModes);
}
- (void)stop {if (!_started) return;_started = NO;if (_observer) {CFRunLoopRemoveObserver(CFRunLoopGetMain(), _observer, kCFRunLoopCommonModes);CFRelease(_observer);_observer = nil;}[_tasks removeAllObjects];
}
@end
基于 sizing cell 的预计算(主线程空闲执行,精度高)
// 复用一个测量用的 cell
- (UITableViewCell *)sizingCell {static UITableViewCell *cell;if (!cell) cell = [self.tableView dequeueReusableCellWithIdentifier:@"MyCellIdentifier"];return cell;
}- (CGFloat)heightForModel:(MyModel *)m width:(CGFloat)width {UITableViewCell *cell = [self sizingCell];// 配置内容[cell prepareForReuse];[self configureCell:cell withModel:m];// 设定测量宽度cell.bounds = (CGRect){CGPointZero, {width, CGFLOAT_MAX}};[cell setNeedsLayout];[cell layoutIfNeeded];CGSize size = [cell.contentView systemLayoutSizeFittingSize:UILayoutFittingCompressedSize];return ceil(size.height);
}// 数据加载后,给“屏幕外的下一批”建任务
- (void)prefetchHeightsAroundIndex:(NSInteger)start count:(NSInteger)count {CGFloat width = CGRectGetWidth(self.tableView.bounds);for (NSInteger i = 0; i < count; i++) {NSInteger row = start + i;if (row >= self.dataSource.count) break;MyModel *m = self.dataSource[row];if ([self.heightCache heightForItemId:m.itemId width:width]) continue; // 已缓存__weak typeof(self) weakSelf = self;[self.idleQueue addTask:^{CGFloat h = [weakSelf heightForModel:m width:width];[weakSelf.heightCache setHeight:h forItemId:m.itemId width:width];}];}
}
综合用法小结
-
列表展示前:[idleQueue start],对首屏附近 30 条做 prefetchHeightsAroundIndex:count:。
-
滚动中:在 scrollViewDidScroll: 判断接近底部时继续预缓存下一批。
-
数据更新:对变更的模型主键做精确失效;横竖屏切换/宽度大变→清空。
-
不要把“测量 cell”挪到后台线程;如果要后台线程,优先用“文本 boundingRect + 常量边距”的近似公式。

4. 直接设置frame
Autolayout 会比直接设置 frame 消耗更多的 CPU 资源,因为使用AutoLayout或是Masonry进行布局时会消耗更多CPU资源去计算尺寸
5.图片尺寸合适
图片的 size 最好刚好跟 UIImageView 的 size 保持一致 图片通过contentMode处理显示,对tableview滚动速度同样会造成影响 从网络下载图片后先根据需要显示的图片大小切/压缩成合适大小的图,每次只显示处理过大小的图片,当查看大图时在显示大图。 服务器直接返回预处理好的小图和大图以及对应的尺寸最好
/// 根据特定的区域对图片进行裁剪
+ (UIImage*)kj_cutImageWithImage:(UIImage*)image Frame:(CGRect)cropRect{return ({CGImageRef tmp = CGImageCreateWithImageInRect([image CGImage], cropRect);UIImage *newImage = [UIImage imageWithCGImage:tmp scale:image.scale orientation:image.imageOrientation];CGImageRelease(tmp);newImage;});
}
把原图按给定的矩形 cropRect 裁剪出一块子图,返回新的 UIImage。
6. 控制最大并发数量
控制一下线程的最大并发数量,当下载线程数超过2时,会显著影响主线程的性能。可以用一个NSOperationQueue来维护下载请求,并设置其最大线程数maxConcurrentOperationCount。 当然在不需要响应用户请求时,也可以增加下载线程数来加快下载速度:
- (void)scrollViewDidEndDragging:(UIScrollView *)scrollView willDecelerate:(BOOL)decelerate{if (!decelerate) self.queue.maxConcurrentOperationCount = 5;
}
- (void)scrollViewDidEndDecelerating:(UIScrollView *)scrollView{self.queue.maxConcurrentOperationCount = 5;
}
- (void)scrollViewWillBeginDragging:(UIScrollView *)scrollView{self.queue.maxConcurrentOperationCount = 2;
}
7.把耗时操作放到子线程
尽量把耗时的操作放到子线程
- 文本处理(尺寸计算、绘制)
- 图片处理(解码、绘制)
8.异步绘制加载图片
SDWebImage异步加载图片
(1)使用异步子线程处理,然后再返回主线程操作;
(2)图片缓存处理,避免多次处理操作;
(3)图片圆角处理时,设置 layer 的 shouldRasterize 属性为 YES,可以将负载转移给 CPU;
异步绘制,就是异步在画布上绘制内容,将复杂的绘制过程放到后台线程中执行,然后在主线程显示。
// 异步绘制,切换至子线程
dispatch_async(dispatch_get_global_queue(0, 0), ^{UIGraphicsBeginImageContextWithOptions(size, NO, scale);CGContextRef context = UIGraphicsGetCurrentContext();// TODO:draw in context...CGImageRef imgRef = CGBitmapContextCreateImage(context);UIGraphicsEndImageContext();dispatch_async(dispatch_get_main_queue(), ^{self.layer.contents = imgRef;});
});

GPU层面
1.避免短时间内大量显示图片
尽可能将多张图片合成一张进行显示
2.控制尺寸
GPU能处理的最大纹理尺寸是4096x4096,超过这个尺寸就会占用CPU资源进行处理,所以纹理尽量不要超过这个尺寸。
3. 减少图层混合操作
当多个视图叠加,放在上面的视图是半透明的,那么这个时候GPU就要进行混合,把透明的颜色加上放在下面的视图的颜色混合之后得出一个颜色再显示在屏幕上,这一步是消耗GPU资源
UIView的backgroundColor不要设置为clearColor,最好设置和superView的backgroundColor颜色一样- 图片避免使用带
alpha通道的图片
4.透明处理
减少透明的视图,不透明的就设置opaque = YES
5.避免离屏渲染
离屏渲染就是在当前屏幕缓冲区以外,新开辟一个缓冲区进行操作。离屏渲染的整个过程,需要多次切换上下文环境,先是从当前屏幕切换到离屏;等到离屏渲染结束以后,将离屏缓冲区的渲染结果显示到屏幕上,又需要将上下文环境从离屏切换到当前屏幕。所以,离屏渲染的代价主要体现在:
- 创建新缓冲区:要想进行离屏渲染,首先要创建一个新的缓冲区。
- 上下文切换:离屏渲染的整个过程,需要多次切换上下文环境:先是从当前屏幕(On-Screen)切换到离屏(Off-Screen);等到离屏渲染结束以后,将离屏缓冲区的渲染结果显示到屏幕上有需要将上下文环境从离屏切换到当前屏幕。而上下文环境的切换是要付出很大代价的。
下面的情况或操作会引发离屏渲染
- 光栅化,
layer.shouldRasterize = YES - 遮罩,
layer.mask - 圆角,同时设置
layer.masksToBounds = YES和layer.cornerRadius > 0 - 阴影,
layer.shadow layer.allowsGroupOpacity = YES和layer.opacity != 1- 重写
drawRect方法
(1)圆角优化
这里主要其实就是解决同时设置layer.masksToBounds = YES 和 layer.cornerRadius > 0就会产生的离屏渲染。其实我们在使用常规视图切圆角时,可以只使用view.layer.cornerRadius = 3.0,这时是不会产生离屏渲染。但是UIImageView有点特殊,切圆角时必须上面2句同时设置,则会产生离屏渲染,所以我们可以考虑通过 CoreGraphics 绘制裁剪圆角,或者叫美工提供圆角图片。
- (UIImage *)billy_ellipseImage {UIGraphicsBeginImageContextWithOptions(self.size, NO, 0.0);CGContextRef ctx = UIGraphicsGetCurrentContext();CGRect rect = CGRectMake(0, 0, self.size.width, self.size.height);CGContextAddEllipseInRect(ctx, rect);CGContextClip(ctx);[self drawInRect:rect];UIImage *image = UIGraphicsGetImageFromCurrentImageContext();UIGraphicsEndImageContext();return image;
}
此外,还可以通过贝塞尔曲线画圆角:
- (void)clipCornerWithImageView:(UIImageView *)originViewandTopLeft:(BOOL)topLeftandTopRight:(BOOL)topRightandBottomLeft:(BOOL)bottomLeftandBottomRight:(BOOL)bottomRightcornerRadius:(CGFloat)radius
{CGRect rect = originView.bounds;UIBezierPath *maskPath = [UIBezierPath bezierPathWithRoundedRect:rect cornerRadius:radius];// 创建遮罩层CAShapeLayer *maskLayer = [[CAShapeLayer alloc] init];maskLayer.frame = rect;maskLayer.path = maskPath.CGPath;   // 轨迹originView.layer.mask = maskLayer;
}- (void)clipCornerWithImageView:(UIImageView *)originViewcornerRadius:(CGFloat)radius {CGRect rect = originView.bounds;UIBezierPath *maskPath = [UIBezierPath bezierPathWithRoundedRect:rect byRoundingCorners:UIRectCornerAllCorners cornerRadii:CGSizeMake(radius, radius)];// 创建遮罩层CAShapeLayer *maskLayer = [[CAShapeLayer alloc] init];maskLayer.frame = rect;maskLayer.path = maskPath.CGPath;   // 轨迹originView.layer.mask = maskLayer;
}
这样还可以控制特定角是否设置圆角。这种情况有个弊端,就是切割角度有限,所以实现大角度圆角只能采取自己画线的方式来操作。
(2)阴影优化
对于shadow,如果图层是个简单的几何图形或者圆角图形,我们可以通过设置shadowPath来优化性能,能大幅提高性能。
imageView.layer.shadowColor = [UIColor grayColor].CGColor;
imageView.layer.shadowOpacity = 1.0;
imageView.layer.shadowRadius = 2.0;
UIBezierPath *path = [UIBezierPath bezierPathWithRect:imageView.frame];
imageView.layer.shadowPath = path.CGPath;
(3)强制开启光栅化
注意:需要复用的时候才开启光栅化
当图像混合了多个图层,每次移动时,每一帧都要重新合成这些图层,十分消耗性能,这时就可以选择强制开启光栅化layer.shouldRasterize = YES。 当我们开启光栅化后,会在首次产生一个位图缓存,当再次使用时候就会复用这个缓存,但是如果图层发生改变的时候就会重新产生位图缓存。 所以这个功能一般不能用于UITableViewCell中,复用反而降低了性能。最好用于图层较多的静态内容的图形。
(4)优化建议
- 使用中间透明图片蒙上去达到圆角效果
- 使用ShadowPath指定layer阴影效果路径
- 使用异步进行layer渲染
- 将UITableViewCell及其子视图的opaque属性设为YES,减少复杂图层合成
- 尽量使用不包含透明alpha通道的图片资源
- 尽量设置layer的大小值为整形值
- 背景色的alpha值应该为1,例如不要使用clearColor
- 直接让美工把图片切成圆角进行显示,这是效率最高的一种方案
- 很多情况下用户上传图片进行显示,可以让服务端处理圆角
