【YOLO学习笔记】YOLOv8详解解读
文章目录
- 一、网络结构
- yolov8.yaml文件解读
- 网络结构图
- 二、模块代码与结构拆解
- parse_model()
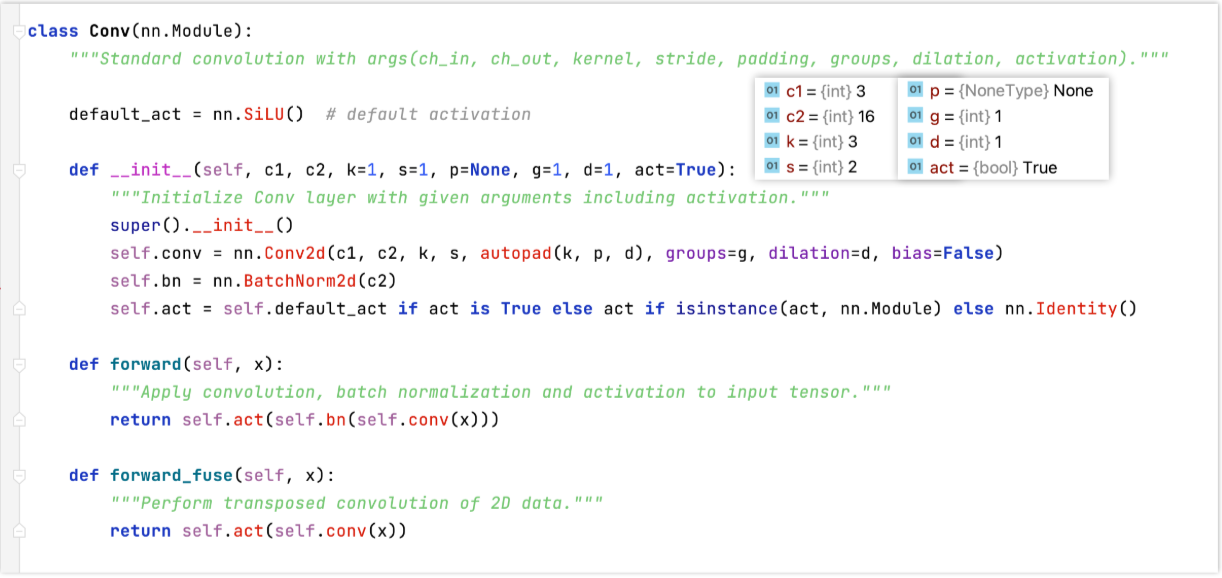
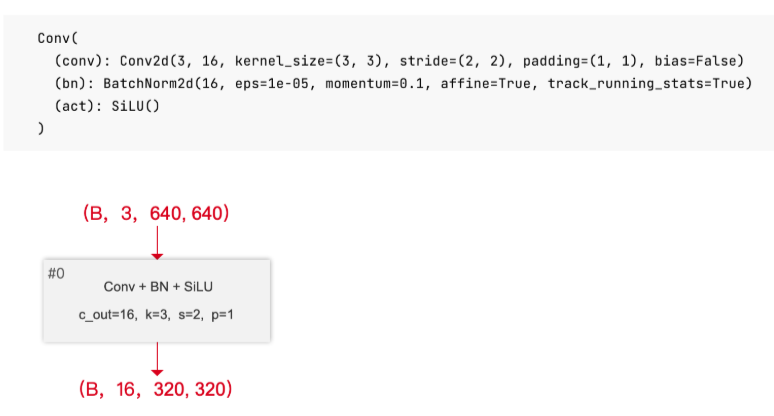
- Conv
- C2f
- SPPF
- Concat
- Detect
- 三、损失函数详解
一、网络结构
yolov8.yaml文件解读
ultralytics/ultralytics/cfg/models/v8/yolov8.yaml下。
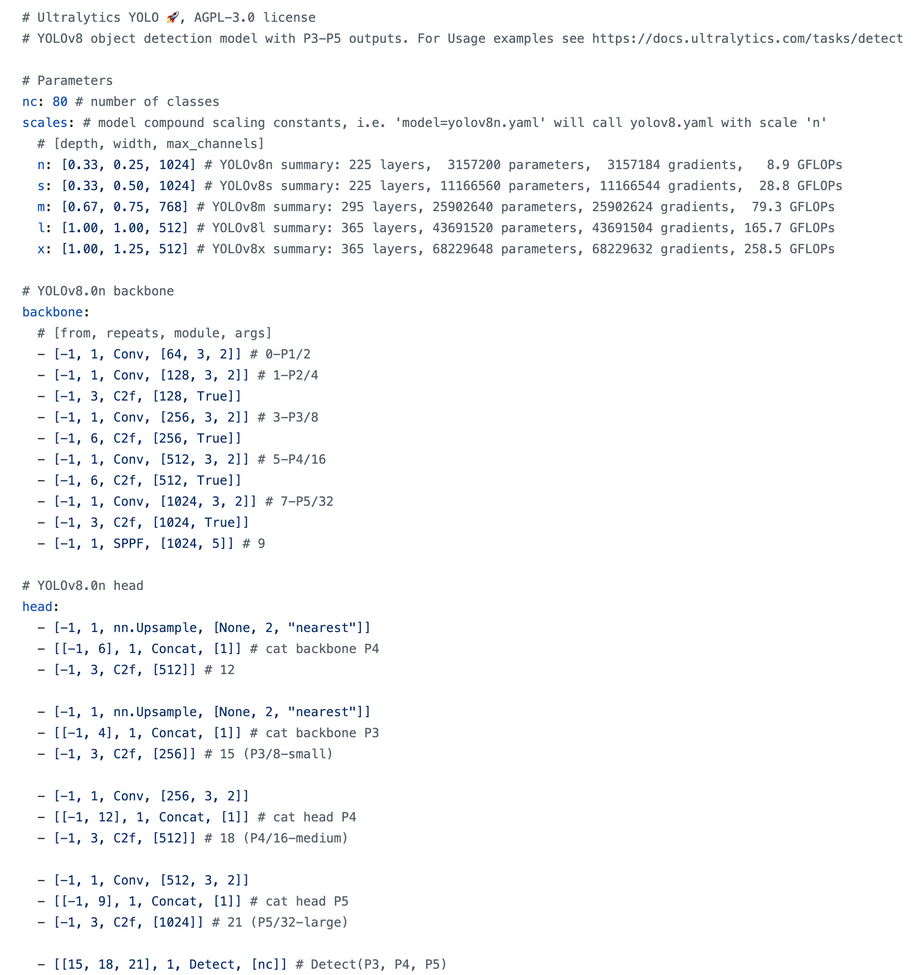
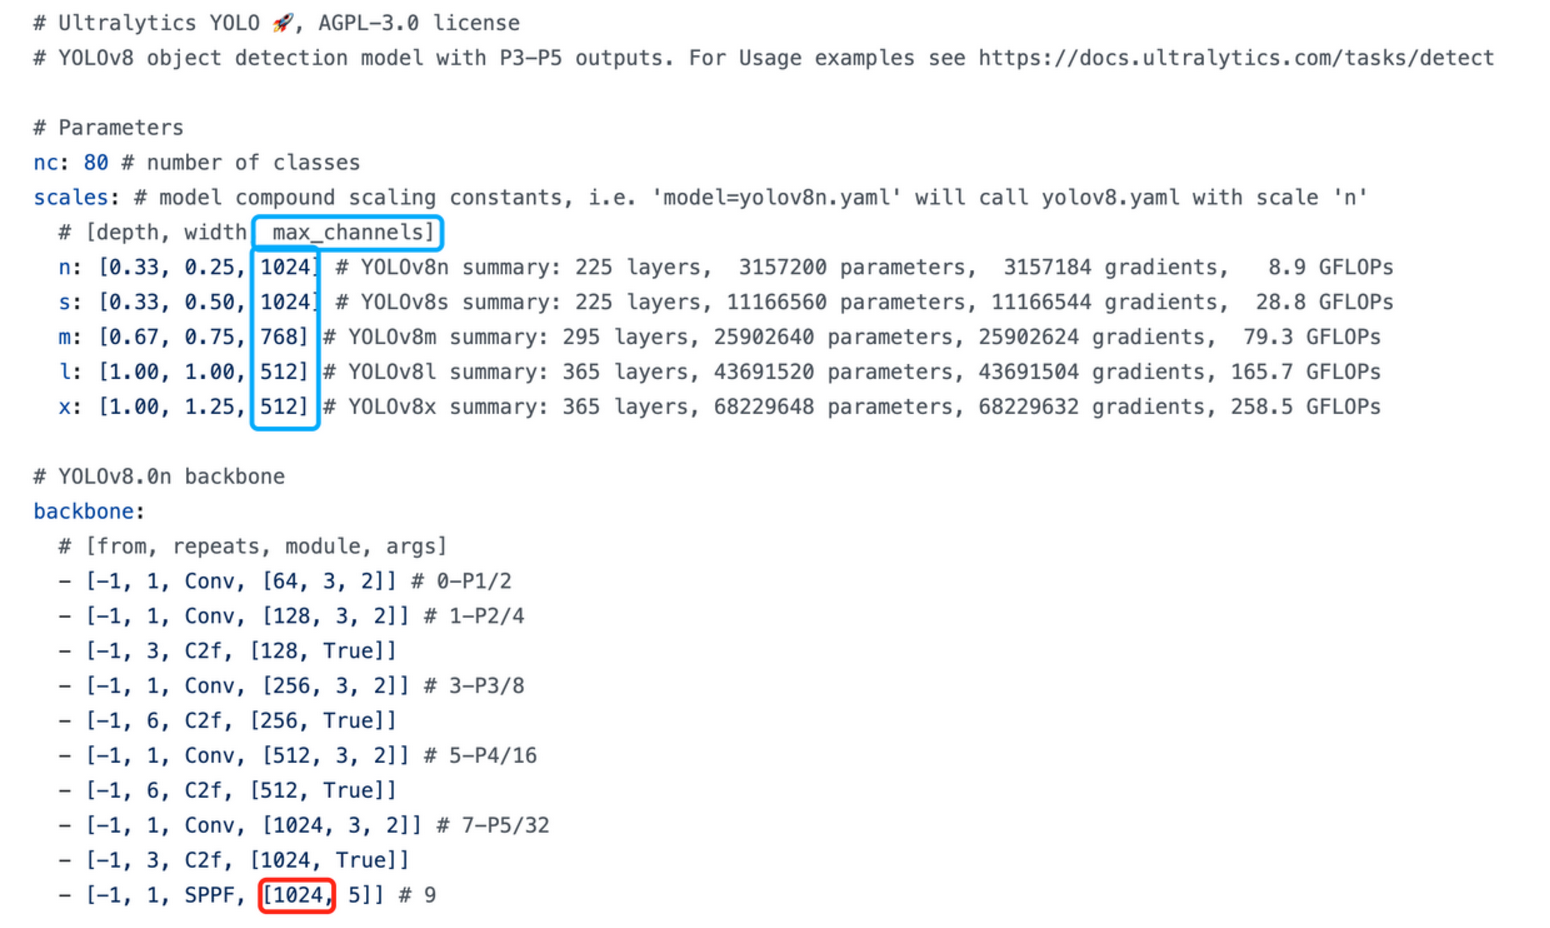
与 yolov5 类似,yolov8 官方提供了5个目标检测的网络版本 :yolov8n、yolov8s、yolov8m、yolov8l、yolov8x 各版本的网络结构都是类似的, 只是他们有不同的 depth、width、max_channels 。在参数scale这个列表里记录。
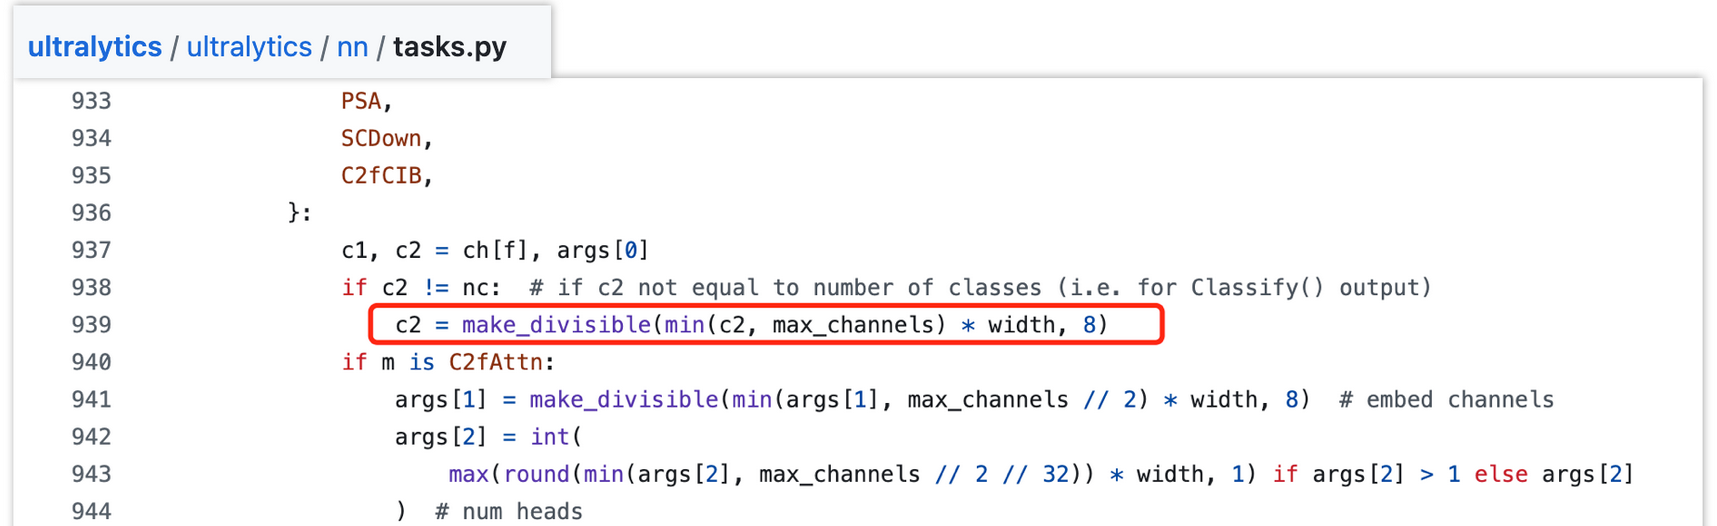
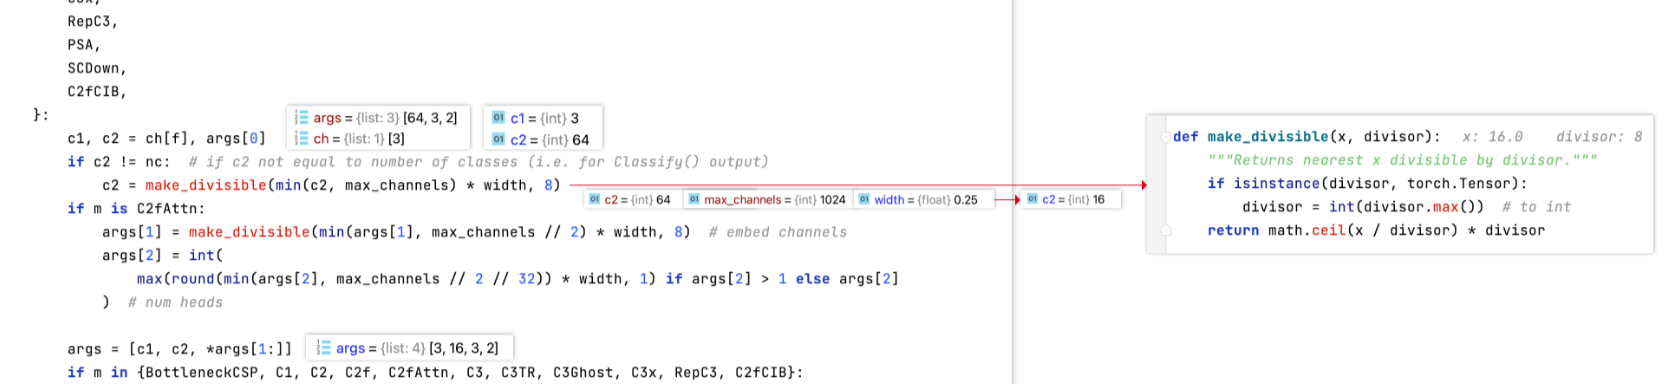
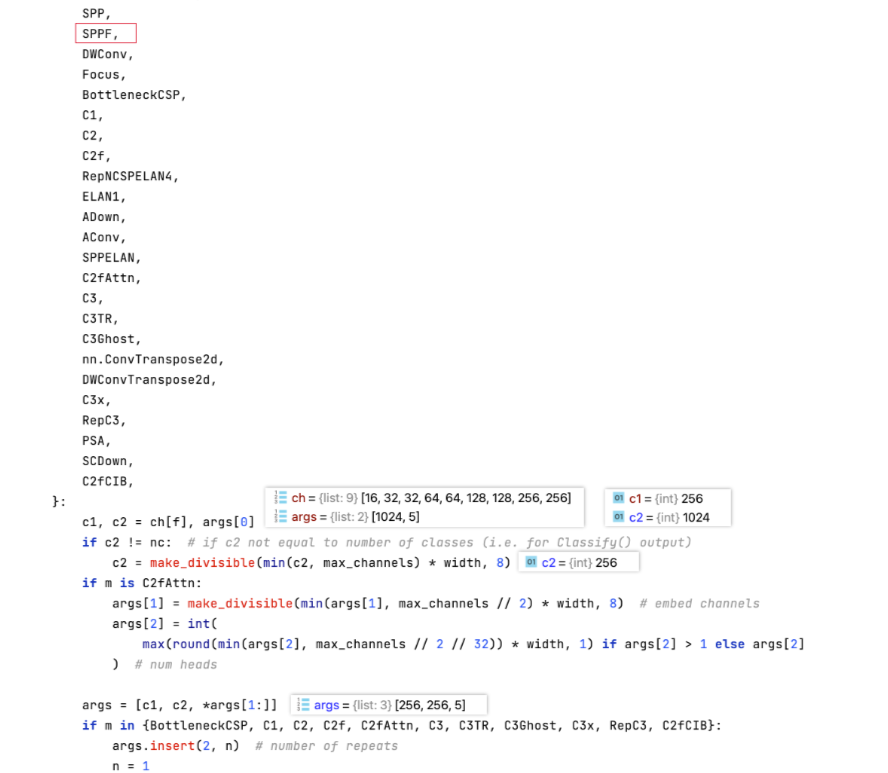
depth:用于控制模块重复次数,假设模块默认重复次数为n,会通过depth_multiple * n控制该模块重复次数,达到控制网络深度的作用width:用于控制模块channel数,假设模块默认channel数为c,会通过width_multiple * c控制该模块channel数,达到控制网络宽度的作用max_channel:用于控制网络的大小,各版本中模块的channel数不能大于其对应的max_channel以控制网络大小。若模块的channel数大于max_channel,则截断取max_channel,对应代码片段如下(c2为模块输出channel数):
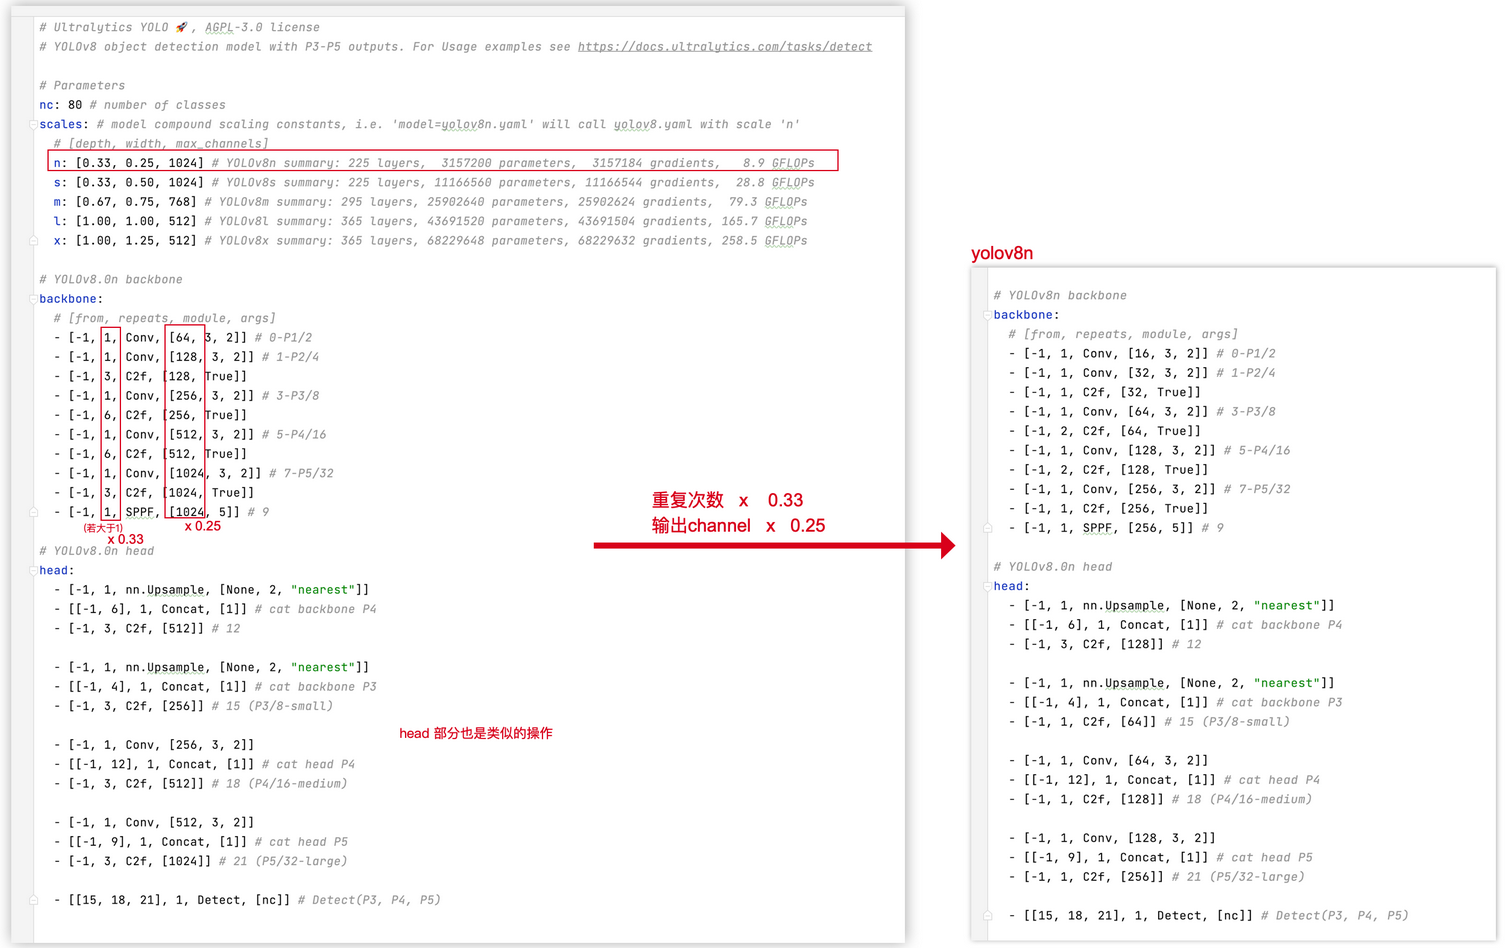
举例 yolov8n举例,网络配置[0.33, 0.25, 1024]为 :
- 输出 channel 数 乘以 0.25
- 如果网络中某模块重复次数大于1 ,则该模块重复次数 乘以 0.33 ,若模块重复次数等于 1,则保持为 1
- 如果网络中 任意一层的 channel 大于
max_channels,则取max_channels。
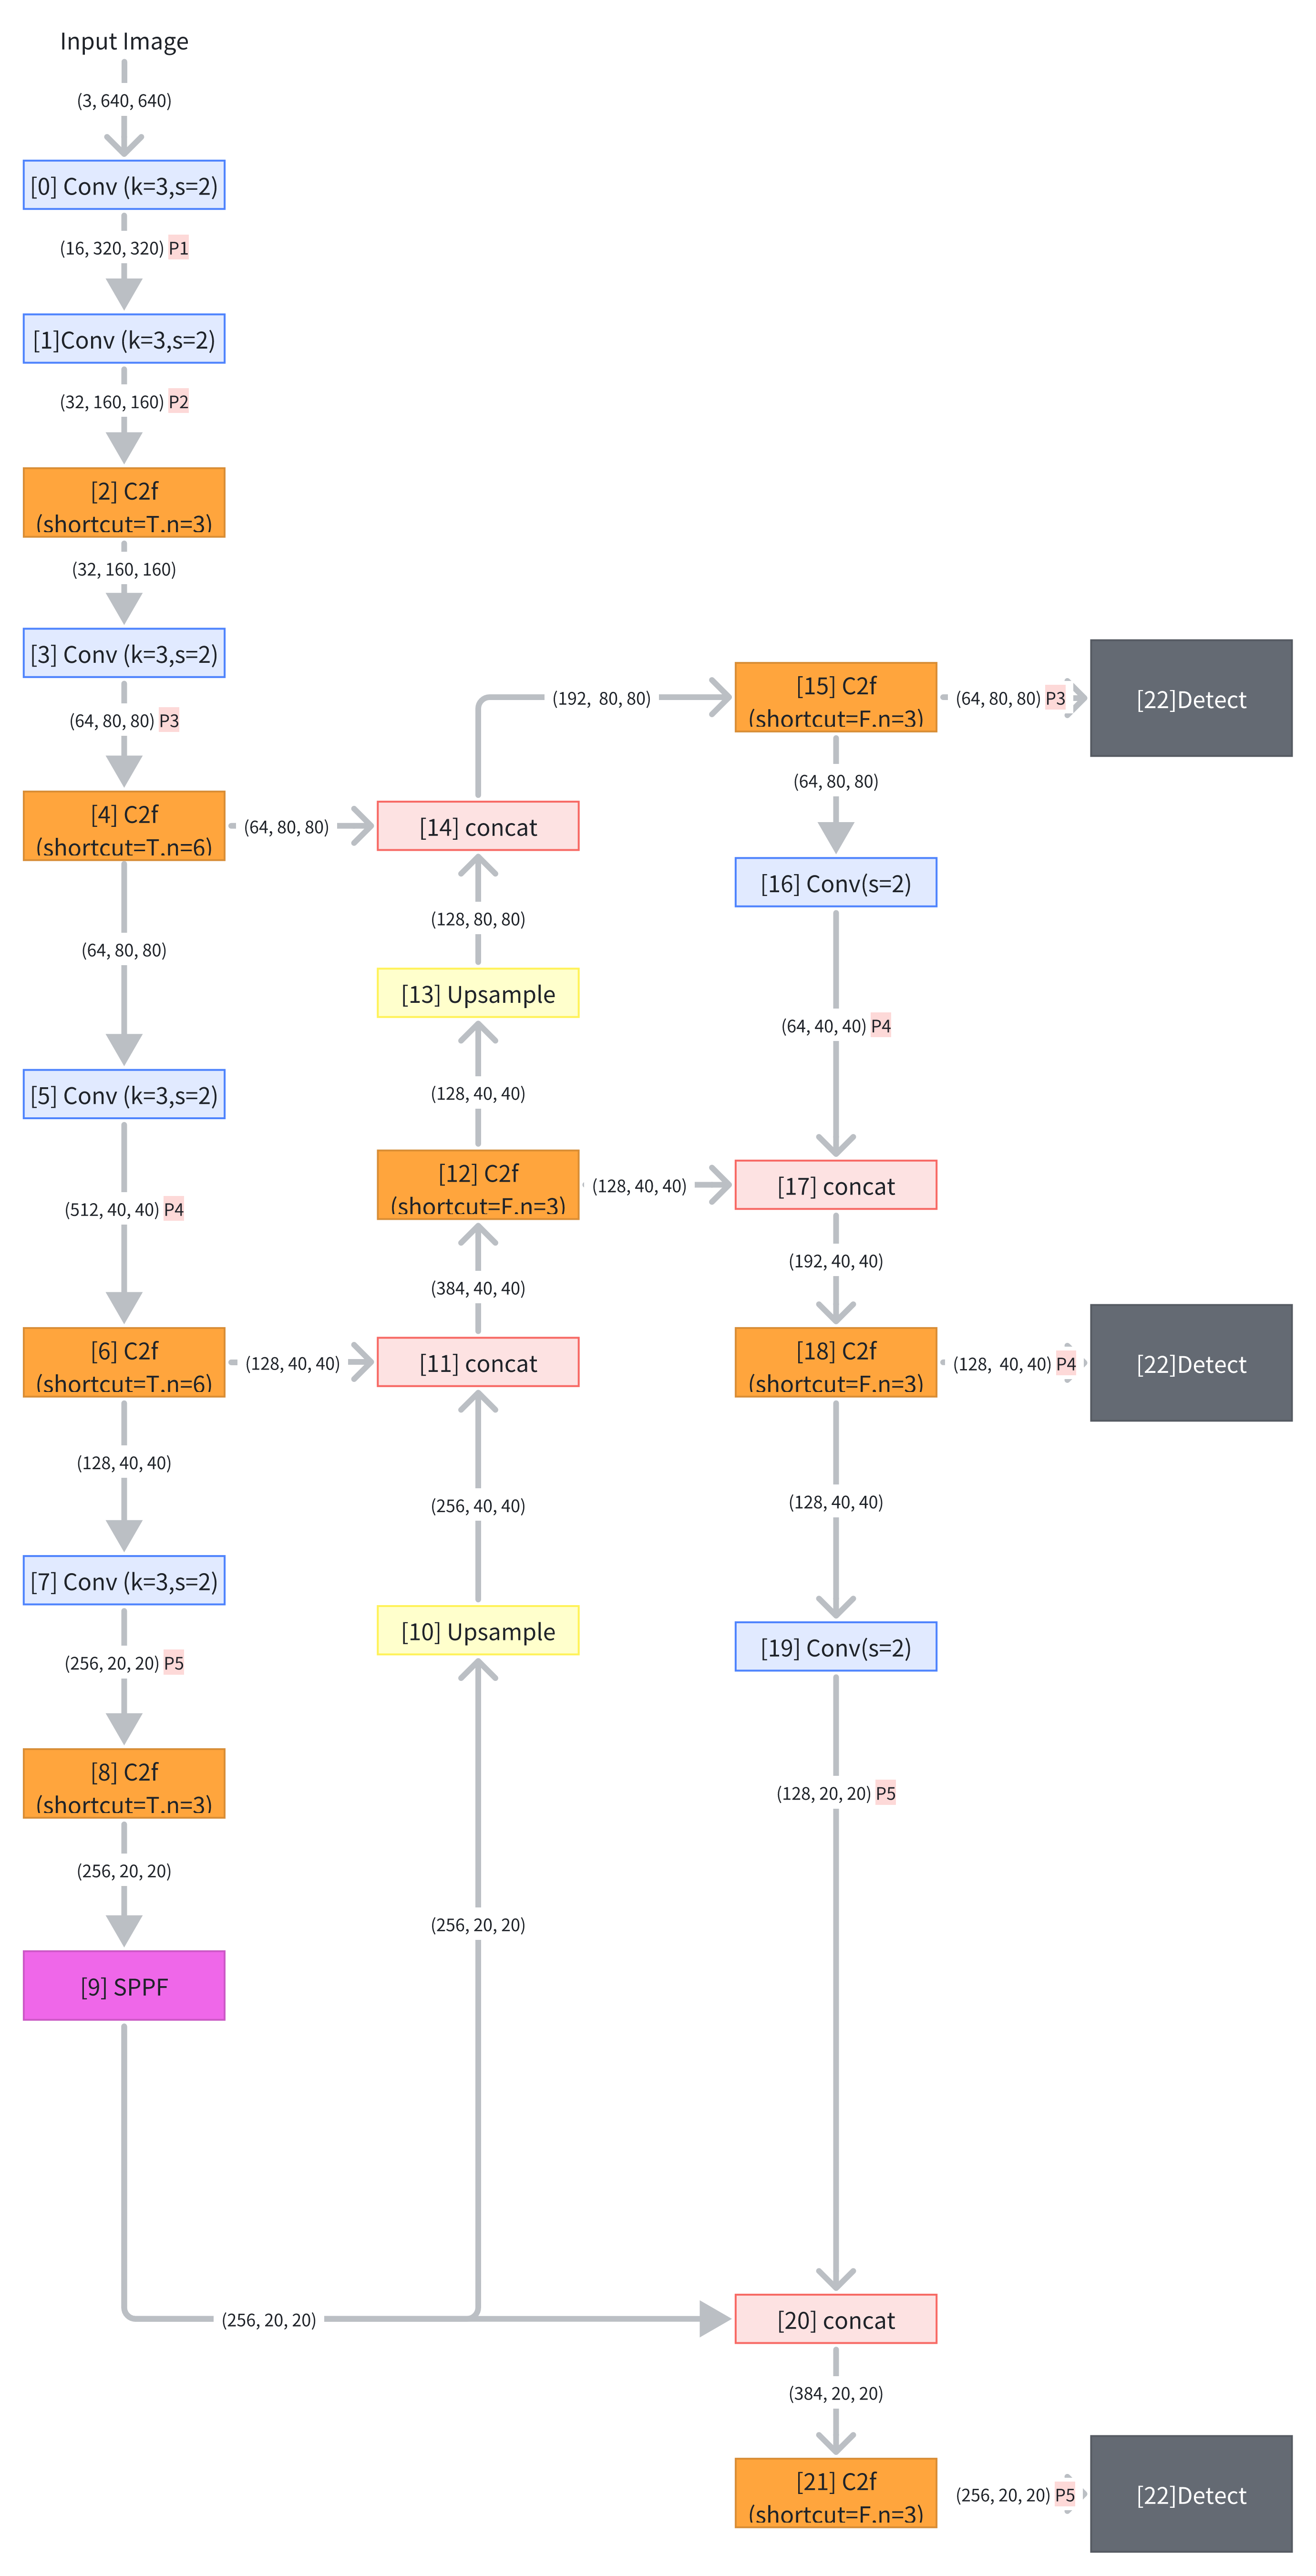
网络结构图
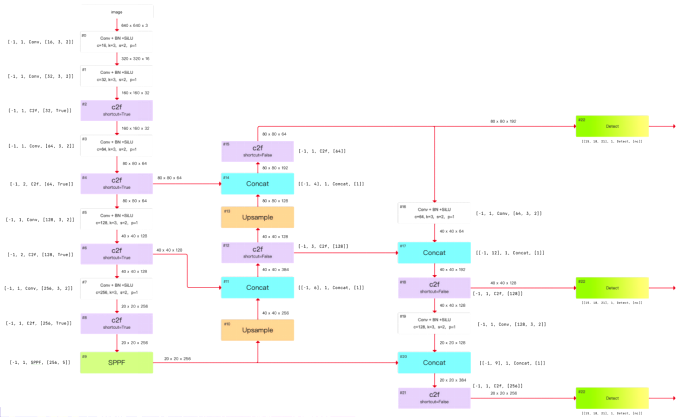
yolov8l:
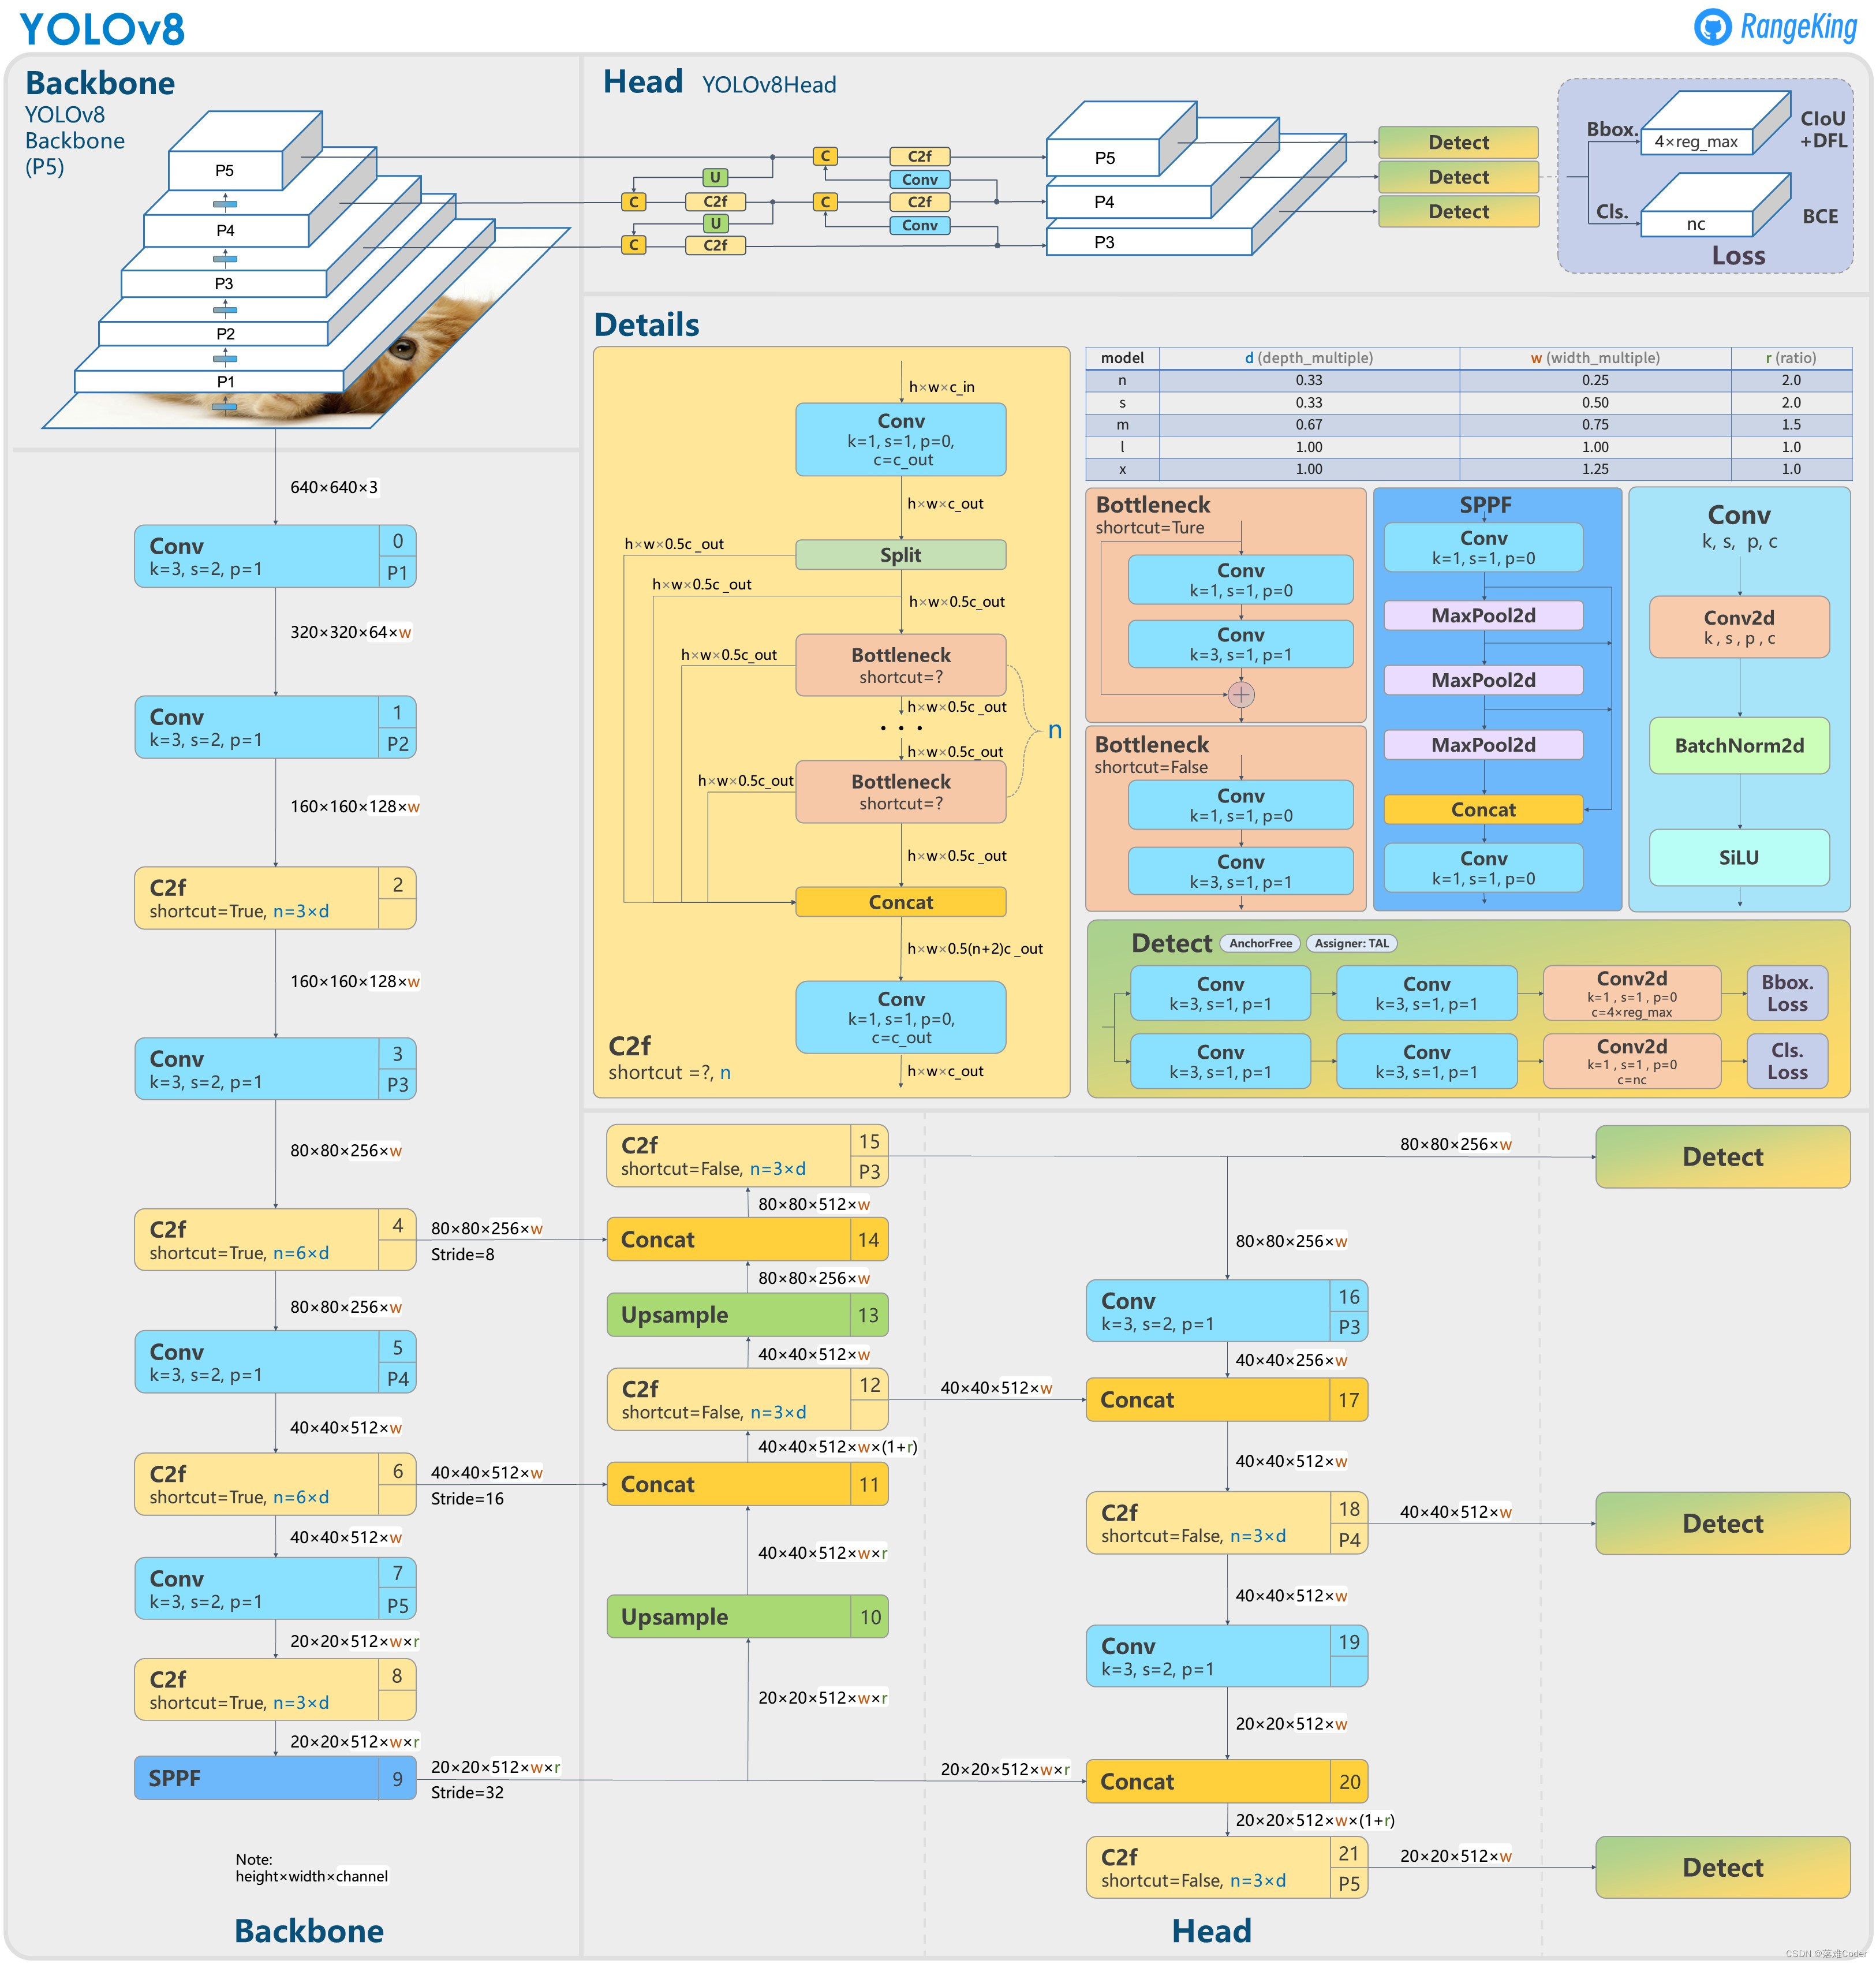
注意:yolov8l 配置中,SPPF 的输出 channel 数设置的是 1024 ,为什么 网络结构图中画出来是 512。因为 每个配置都有设置 max_channels,如果网络中 任意一层的 channel 大于 max_channels,则取 max_channels。
yolov8n自己绘制版本
二、模块代码与结构拆解
parse_model()
ultralytics/nn/tasks.py里的函数parse_model()
def parse_model(d, ch, verbose=True):"""Parse a YOLO model.yaml dictionary into a PyTorch model.Args:d (dict): Model dictionary.ch (int): Input channels.verbose (bool): Whether to print model details.Returns:model (torch.nn.Sequential): PyTorch model.save (list): Sorted list of output layers."""import ast# Argslegacy = True # backward compatibility for v3/v5/v8/v9 modelsmax_channels = float("inf")nc, act, scales = (d.get(x) for x in ("nc", "activation", "scales"))depth, width, kpt_shape = (d.get(x, 1.0) for x in ("depth_multiple", "width_multiple", "kpt_shape"))if scales:scale = d.get("scale")if not scale:scale = tuple(scales.keys())[0]LOGGER.warning(f"no model scale passed. Assuming scale='{scale}'.")depth, width, max_channels = scales[scale]if act:Conv.default_act = eval(act) # redefine default activation, i.e. Conv.default_act = torch.nn.SiLU()if verbose:LOGGER.info(f"{colorstr('activation:')} {act}") # printif verbose:LOGGER.info(f"\n{'':>3}{'from':>20}{'n':>3}{'params':>10} {'module':<45}{'arguments':<30}")ch = [ch]layers, save, c2 = [], [], ch[-1] # layers, savelist, ch outbase_modules = frozenset({Classify,Conv,ConvTranspose,GhostConv,Bottleneck ,Bottleneck_DBB,GhostBottleneck,SPP,SPPF,C2fPSA,C2PSA,DWConv,Focus,BottleneckCSP,C1,C2,C2f,C3k2, C3k2_WT ,C3k2_DBB ,RepNCSPELAN4,ELAN1,ADown,AConv,SPPELAN,C2fAttn,C3,C3TR,C3Ghost,torch.nn.ConvTranspose2d,DWConvTranspose2d,C3x,RepC3,PSA,SCDown,C2fCIB,A2C2f,})repeat_modules = frozenset( # modules with 'repeat' arguments{BottleneckCSP,C1,C2,C2f,C3k2, C3k2_WT ,C3k2_DBB,C2fAttn,C3,C3TR,C3Ghost,C3x,RepC3,C2fPSA,C2fCIB,C2PSA,A2C2f,})for i, (f, n, m, args) in enumerate(d["backbone"] + d["head"]): # from, number, module, argsm = (getattr(torch.nn, m[3:])if "nn." in melse getattr(__import__("torchvision").ops, m[16:])if "torchvision.ops." in melse globals()[m]) # get modulefor j, a in enumerate(args):if isinstance(a, str):with contextlib.suppress(ValueError):args[j] = locals()[a] if a in locals() else ast.literal_eval(a)n = n_ = max(round(n * depth), 1) if n > 1 else n # depth gainif m in base_modules:c1, c2 = ch[f], args[0]if c2 != nc: # if c2 not equal to number of classes (i.e. for Classify() output)c2 = make_divisible(min(c2, max_channels) * width, 8)if m is C2fAttn: # set 1) embed channels and 2) num headsargs[1] = make_divisible(min(args[1], max_channels // 2) * width, 8)args[2] = int(max(round(min(args[2], max_channels // 2 // 32)) * width, 1) if args[2] > 1 else args[2])args = [c1, c2, *args[1:]]if m in repeat_modules:args.insert(2, n) # number of repeatsn = 1if m is C3k2: # for M/L/X sizeslegacy = Falseif scale in "mlx":args[3] = Trueif m is A2C2f:legacy = Falseif scale in "lx": # for L/X sizesargs.extend((True, 1.2))if m is C2fCIB:legacy = Falseelif m is AIFI:args = [ch[f], *args]elif m in frozenset({HGStem, HGBlock}):c1, cm, c2 = ch[f], args[0], args[1]args = [c1, cm, c2, *args[2:]]if m is HGBlock:args.insert(4, n) # number of repeatsn = 1elif m is ResNetLayer:c2 = args[1] if args[3] else args[1] * 4elif m is torch.nn.BatchNorm2d:args = [ch[f]]elif m is Concat:c2 = sum(ch[x] for x in f)elif m in frozenset({Detect, WorldDetect, YOLOEDetect, Segment, YOLOESegment, Pose, OBB, ImagePoolingAttn, v10Detect}):args.append([ch[x] for x in f])if m is Segment or m is YOLOESegment:args[2] = make_divisible(min(args[2], max_channels) * width, 8)if m in {Detect, YOLOEDetect, Segment, YOLOESegment, Pose, OBB}:m.legacy = legacyelif m is RTDETRDecoder: # special case, channels arg must be passed in index 1args.insert(1, [ch[x] for x in f])elif m is CBLinear:c2 = args[0]c1 = ch[f]args = [c1, c2, *args[1:]]elif m is CBFuse:c2 = ch[f[-1]]elif m in frozenset({TorchVision, Index}):c2 = args[0]c1 = ch[f]args = [*args[1:]]else:c2 = ch[f]m_ = torch.nn.Sequential(*(m(*args) for _ in range(n))) if n > 1 else m(*args) # modulet = str(m)[8:-2].replace("__main__.", "") # module typem_.np = sum(x.numel() for x in m_.parameters()) # number paramsm_.i, m_.f, m_.type = i, f, t # attach index, 'from' index, typeif verbose:LOGGER.info(f"{i:>3}{str(f):>20}{n_:>3}{m_.np:10.0f} {t:<45}{str(args):<30}") # printsave.extend(x % i for x in ([f] if isinstance(f, int) else f) if x != -1) # append to savelistlayers.append(m_)if i == 0:ch = []ch.append(c2)return torch.nn.Sequential(*layers), sorted(save)
parse_model() 是 Ultralytics YOLO 框架中用于解析模型yaml配置文件并构建 PyTorch 模型的核心函数,主要功能是将 model.yaml 配置文件中定义的字典结构(网络架构、参数等)转换为可执行的 PyTorch 模型(torch.nn.Sequential)。
-
解析模型配置参数
从输入的模型字典d中提取关键参数,包括:- 网络深度控制(
depth_multiple)、宽度控制(width_multiple):用于按比例调整网络模块的重复次数和通道数(与 YOLO 系列中通过这两个参数控制模型规模的逻辑一致)。 - 类别数(
nc)、激活函数(activation)、尺度参数(scales)等:为网络层初始化提供基础配置。
- 网络深度控制(
-
动态构建网络层
遍历配置文件中backbone(主干网络)和head(检测头)定义的每一层结构(格式为(from, number, module, args)),逐一生成对应的 PyTorch 模块:- 模块解析:根据
module名称(如Conv、C2f、Detect等)加载对应的类(如Conv卷积层、C2f残差模块、Detect检测头)。 - 参数调整:
- 基于
depth_multiple调整模块重复次数(n),控制网络深度; - 基于
width_multiple调整通道数(c2),并通过make_divisible确保通道数为 8 的倍数(优化 GPU 计算效率); - 针对特殊模块(如注意力模块、检测头)补充特定参数(如注意力头数、输入通道列表等)。
- 基于
- 模块解析:根据
-
管理网络层连接与输出
- 跟踪每一层的输入输出通道(
ch列表),确保层与层之间的通道匹配; - 记录需要保存的中间层索引(
save列表),用于后续特征融合或调试。
- 跟踪每一层的输入输出通道(
-
输出构建结果
最终返回:-
由所有层组成的
torch.nn.Sequential模型(可直接用于训练或推理);m_ = torch.nn.Sequential(*(m(*args) for _ in range(n))) if n > 1 else m(*args) # module -
排序后的
save列表(包含需要保留输出的层索引)。
-
Conv
C2f

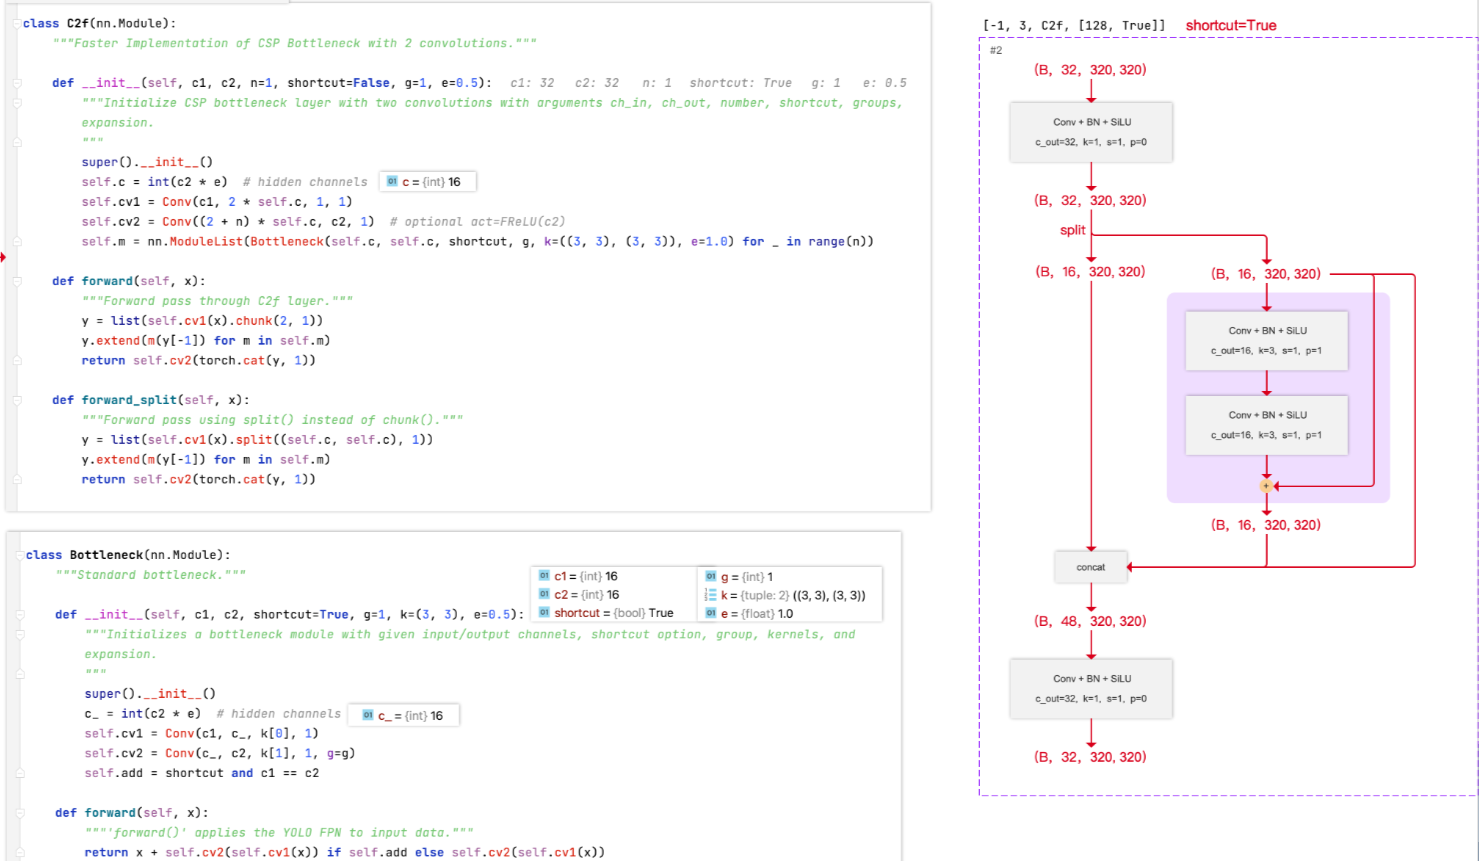
另举例如下 :
yolov8n的Bottleneck 重复次数 n=1 ,shortcut =False。

yolov8l 的 Bottleneck 重复次数 n=3 , shortcut =True

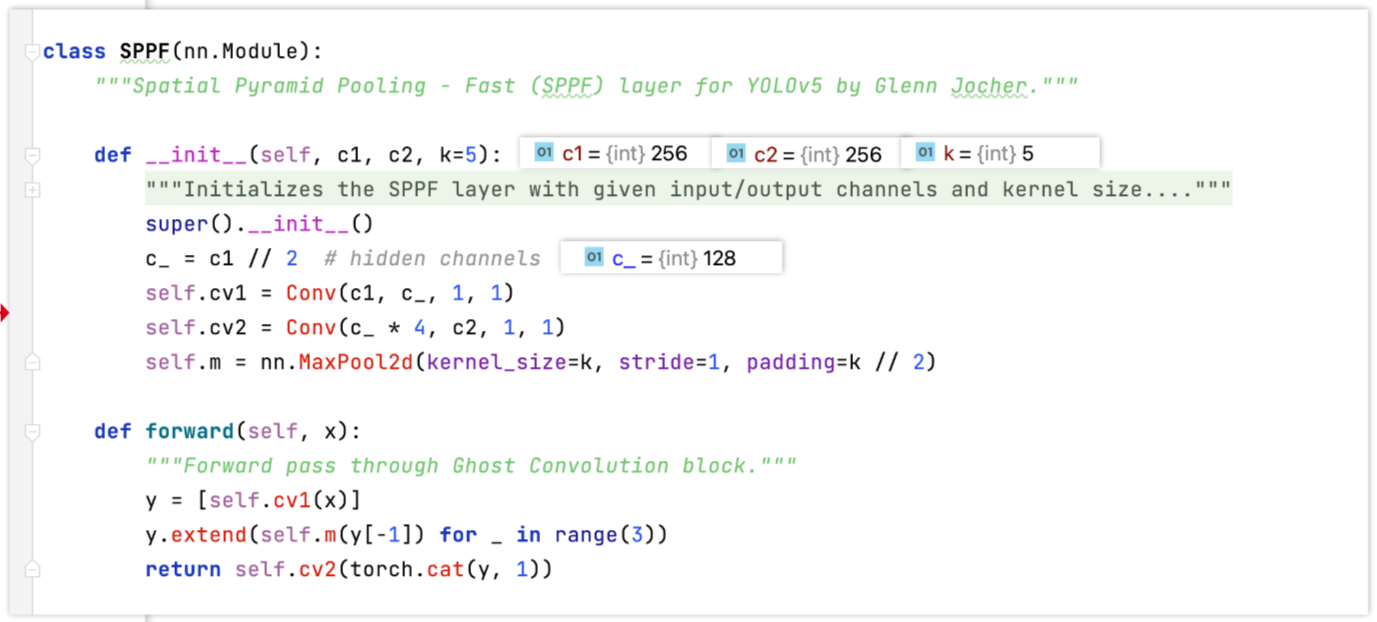
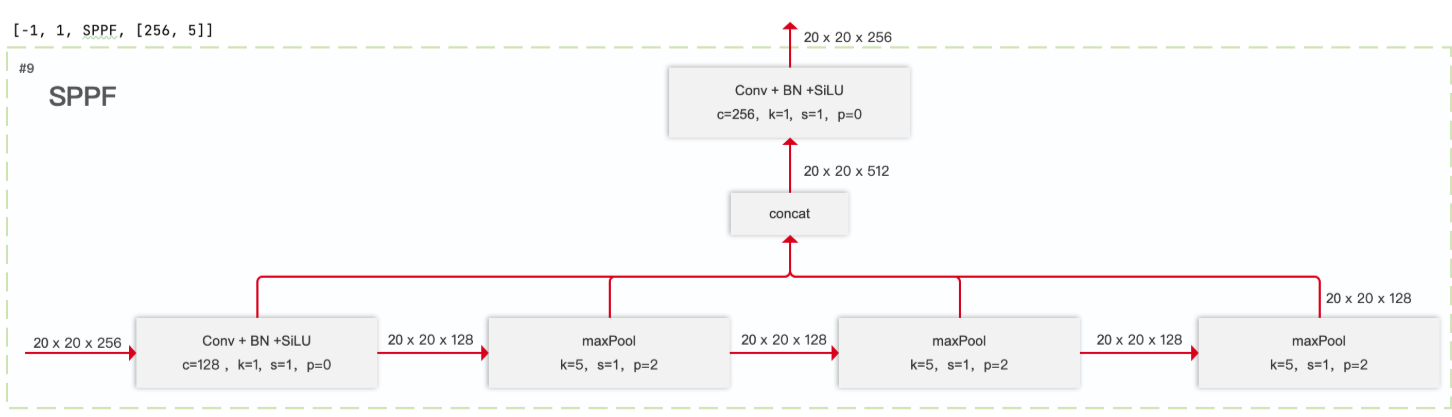
SPPF
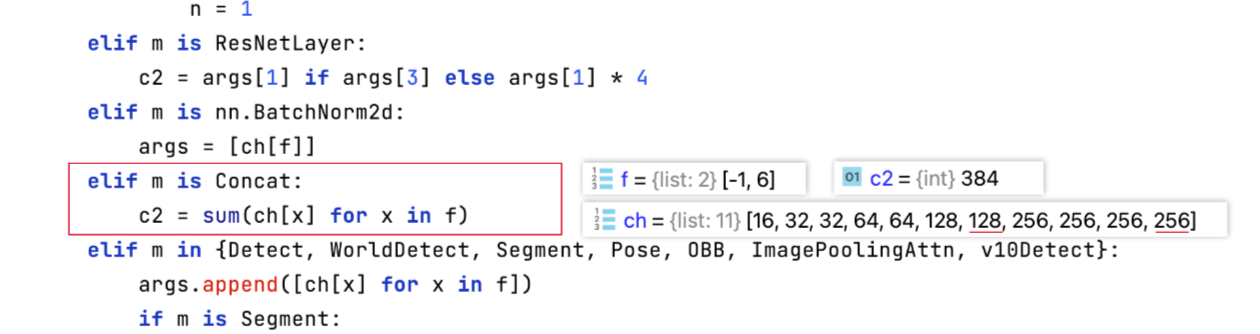
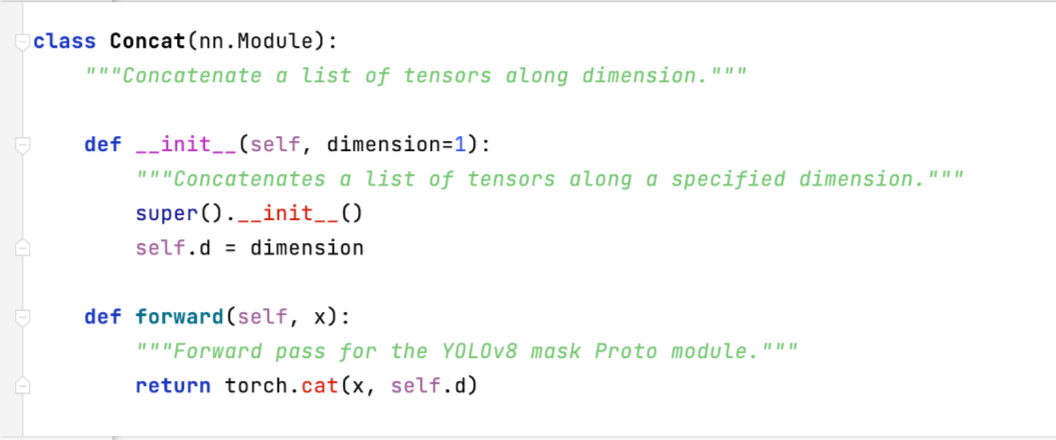
Concat
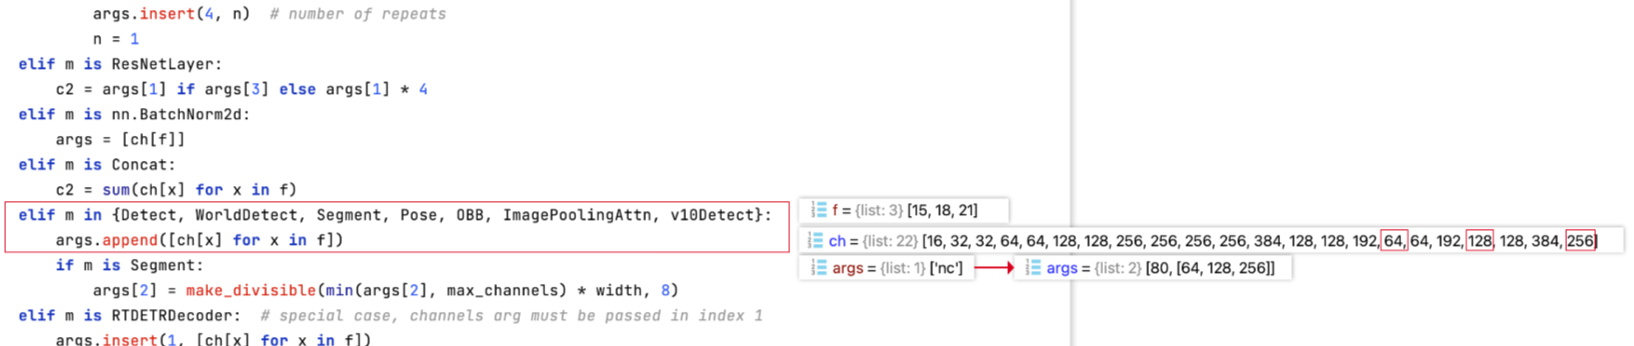
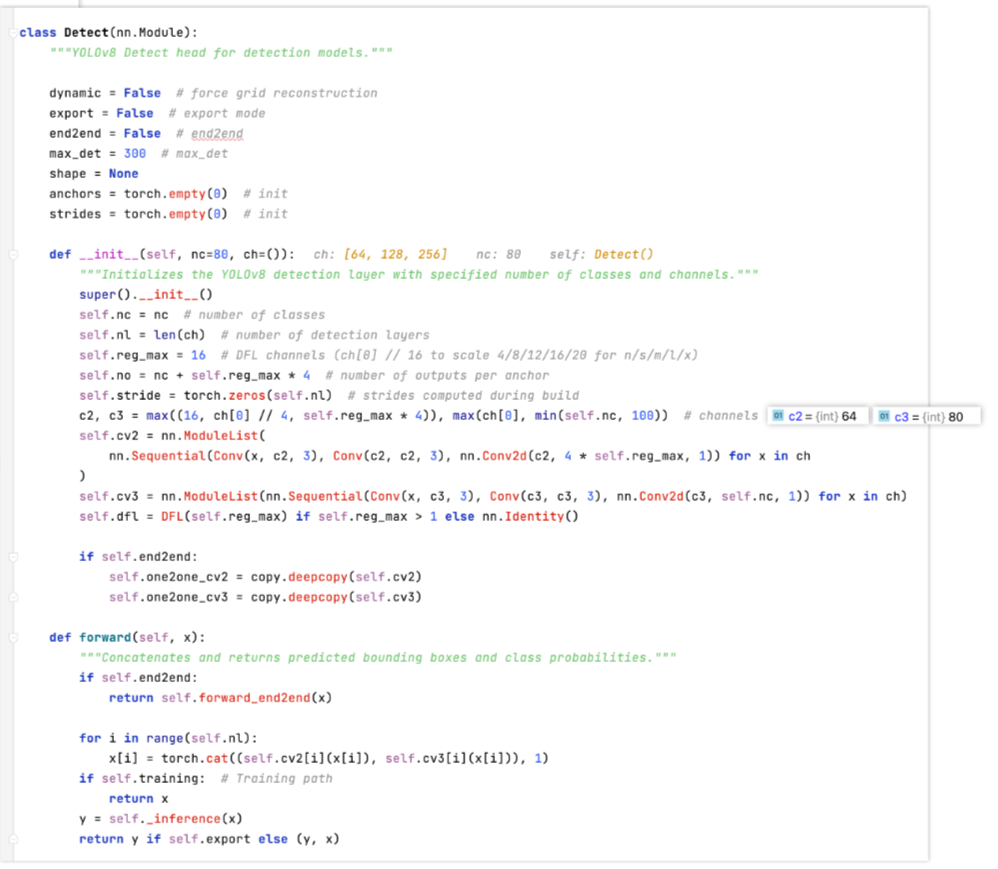
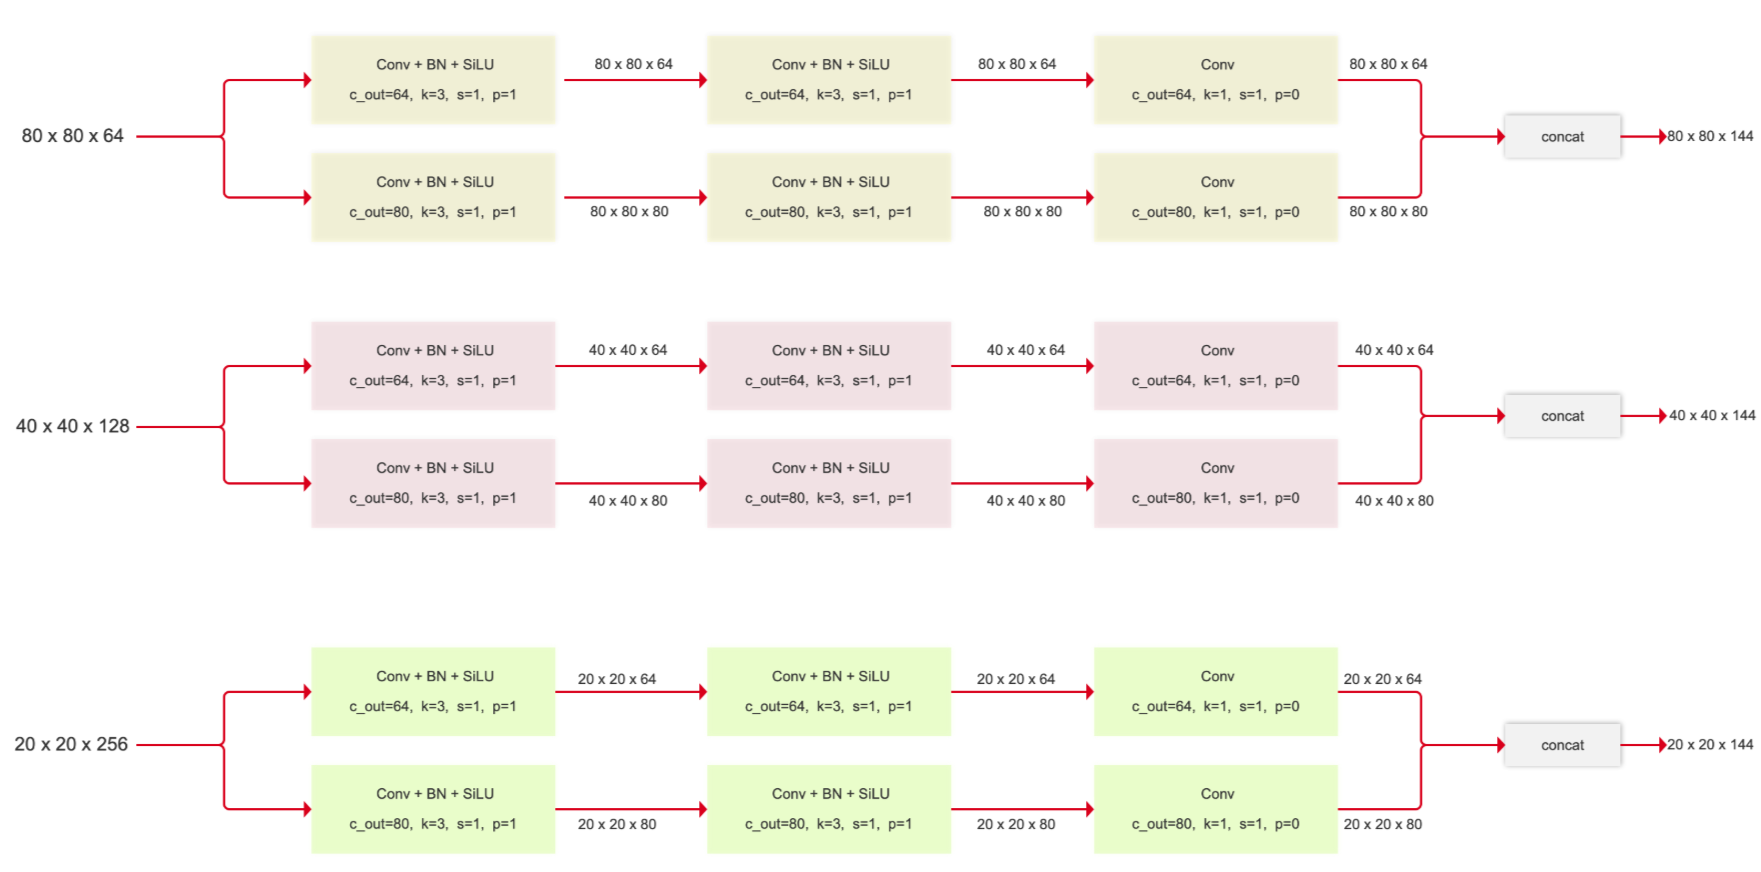
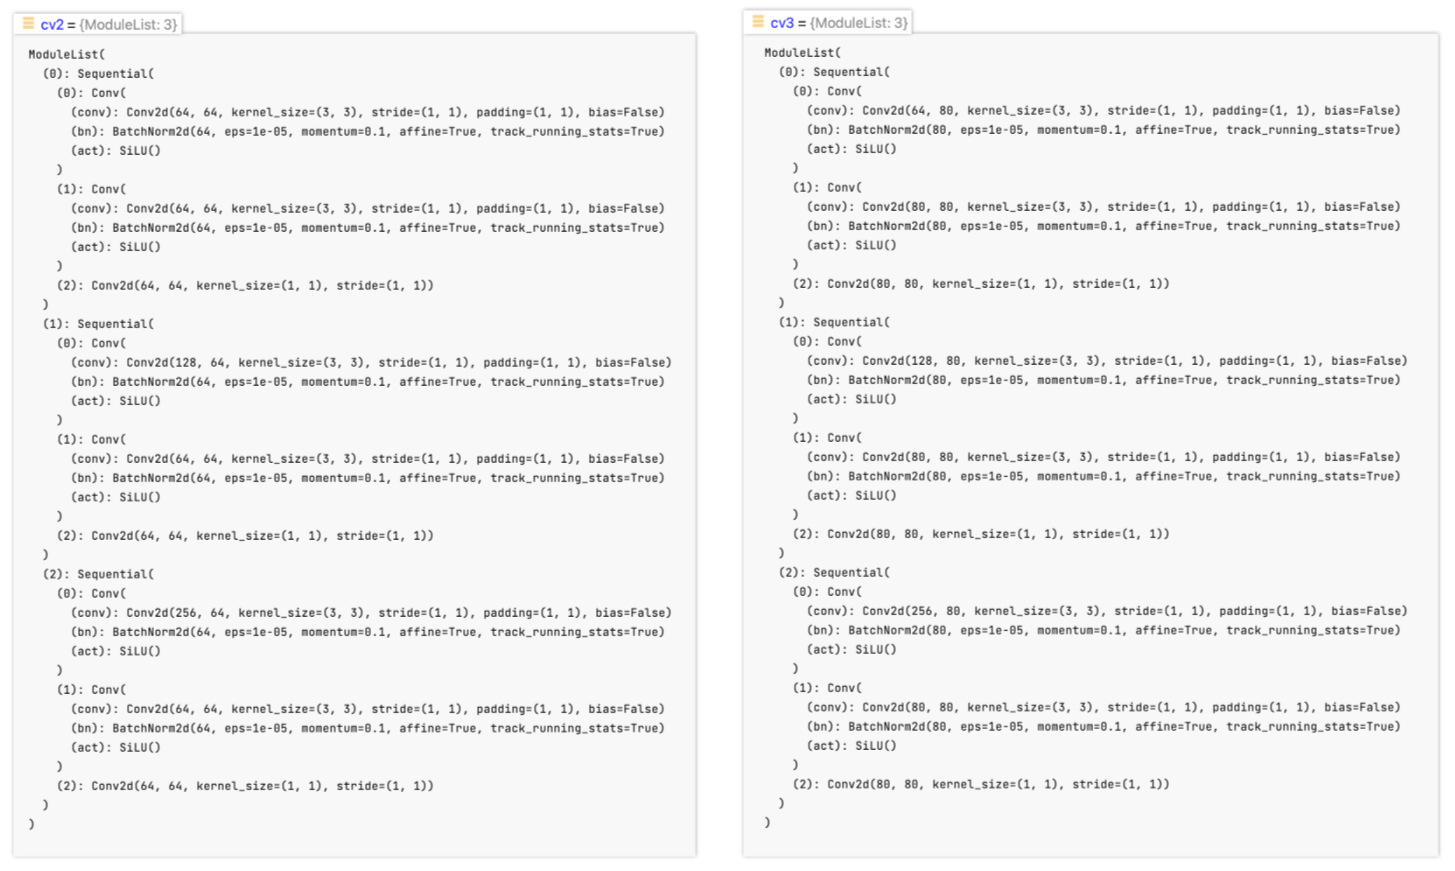
Detect