《Java 程序设计》第 14 章 - JavaFX 基础

大家好!今天我们来学习《Java 程序设计》中的第 14 章 ——JavaFX 基础。JavaFX 是用于构建富互联网应用程序的 Java 库,它提供了一套完整的图形界面(GUI)工具包,让我们能够创建美观、交互性强的桌面应用。本章将从 JavaFX 的基本概念讲起,逐步深入到布局、控件、特效等内容,并通过丰富的代码示例帮助大家快速上手。
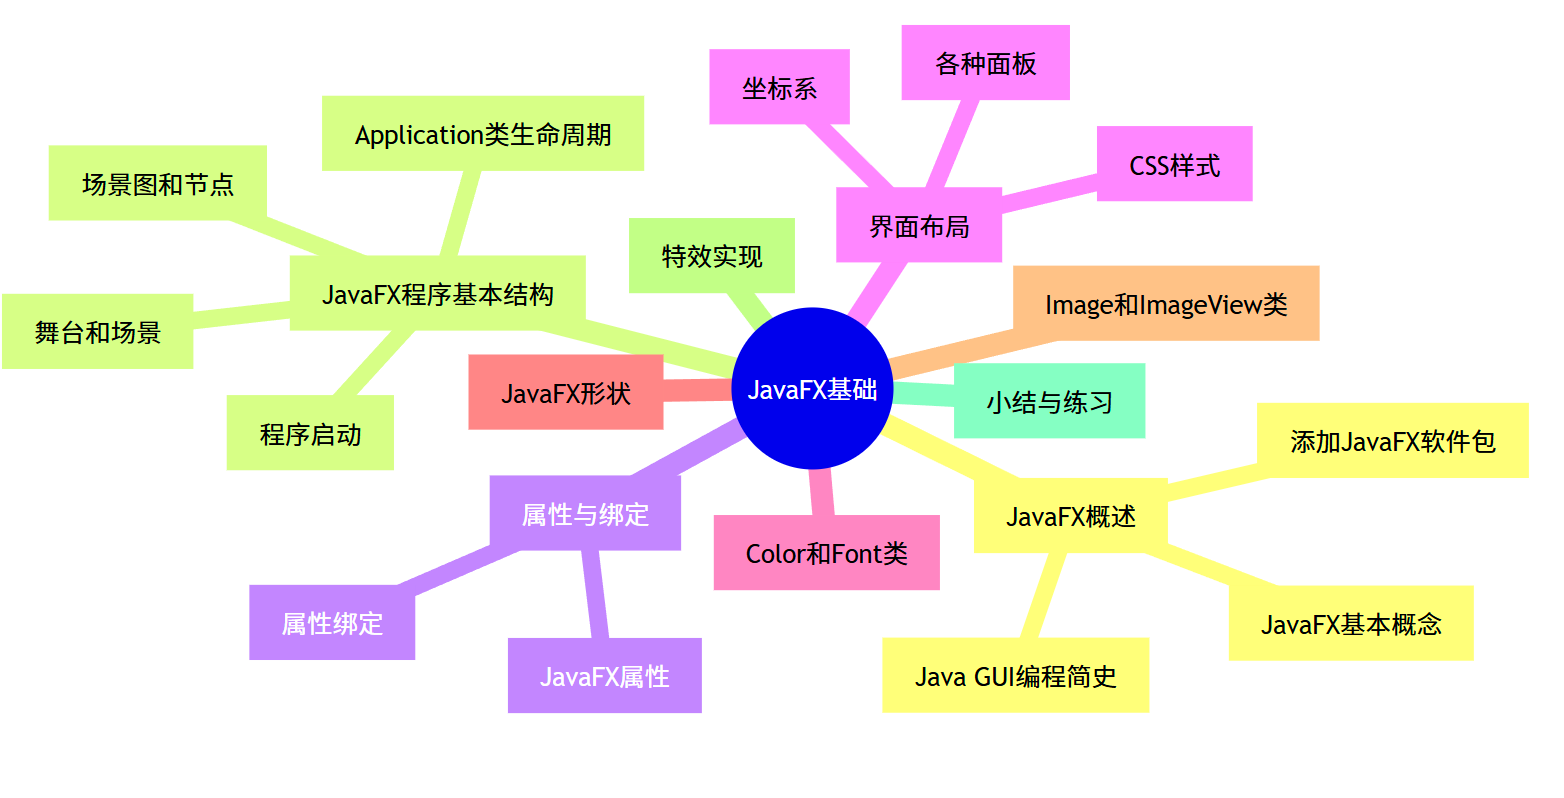
思维导图
14.1 JavaFX 概述
14.1.1 Java GUI 编程简史
Java 的 GUI 编程发展经历了几个重要阶段:
- AWT(Abstract Window Toolkit):Java 最早的 GUI 工具包,依赖于底层操作系统的 GUI 组件,跨平台性有限,外观在不同系统上差异较大。
- Swing:纯 Java 实现的 GUI 工具包,不依赖底层操作系统,真正实现了跨平台的统一外观,提供了更丰富的组件。
- JavaFX:作为 Swing 的继任者,提供了更现代、更强大的 GUI 编程能力,支持 2D/3D 图形、动画、多媒体等,采用了 MVC 架构,更适合构建复杂的富客户端应用。
14.1.2 JavaFX 基本概念
JavaFX 引入了一些核心概念:
- 舞台(Stage):代表应用程序的窗口,是 JavaFX 应用的顶级容器。
- 场景(Scene):包含在舞台中,是所有 UI 元素的容器。一个舞台可以切换多个场景。
- 场景图(Scene Graph):由节点(Node)组成的树形结构,代表了应用程序的所有 UI 元素。
- 节点(Node):场景图中的基本元素,可以是控件、形状、图像等,分为可视节点和容器节点。
14.1.3 添加 JavaFX 软件包
在 Java 8 到 Java 10 中,JavaFX 是 JDK 的一部分。但从 Java 11 开始,JavaFX 被从 JDK 中分离出来,成为一个独立的库。
添加 JavaFX 的方法:
- 手动下载:从OpenJFX 官网下载对应版本的 JavaFX SDK,然后在项目中添加库引用。
- Maven/Gradle 依赖:在项目的 pom.xml(Maven)或 build.gradle(Gradle)中添加 JavaFX 的依赖。
Maven 配置示例:
<dependencies><dependency><groupId>org.openjfx</groupId><artifactId>javafx-controls</artifactId><version>17.0.2</version></dependency><dependency><groupId>org.openjfx</groupId><artifactId>javafx-fxml</artifactId><version>17.0.2</version></dependency>
</dependencies><build><plugins><plugin><groupId>org.openjfx</groupId><artifactId>javafx-maven-plugin</artifactId><version>0.0.8</version><configuration><mainClass>com.example.Main</mainClass></configuration></plugin></plugins>
</build>
14.2 JavaFX 程序基本结构
14.2.1 舞台和场景
- Stage:JavaFX 应用程序的主窗口,由 JavaFX 系统创建,我们通常在 start () 方法中接收这个舞台对象并进行设置。
- Scene:场景包含了所有的 UI 元素,需要设置场景的根节点、宽度和高度,然后通过 stage.setScene () 方法将场景设置到舞台上。
14.2.2 场景图和节点
场景图(Scene Graph) 是一个树状结构,由各种节点组成,它是 JavaFX 应用程序的视觉呈现。场景图的每个元素都是一个节点(Node)。
节点分为两类:
- 可视节点:如按钮(Button)、文本(Text)、形状(Shape)等,能够在界面上显示。
- 容器节点:如面板(Pane),用于组织和布局其他节点。
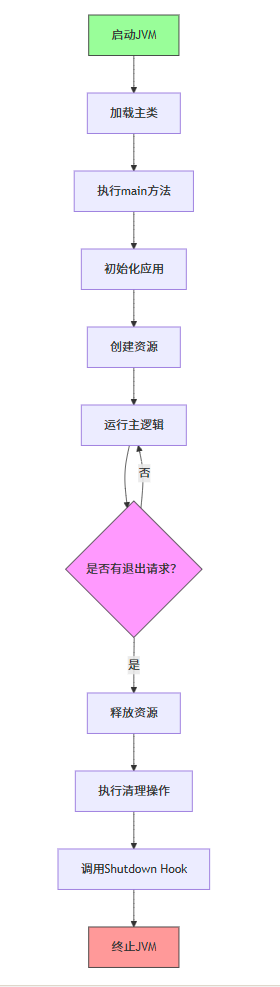
14.2.3 Application 类生命周期方法
JavaFX 应用程序需要继承 Application 类,并重写其生命周期方法:
- init():初始化方法,在应用程序启动时调用,在 start () 方法之前执行,通常用于初始化资源。
- start(Stage primaryStage):应用程序的主要入口点,在这里创建 UI 并展示舞台,是必须重写的方法。
- stop():在应用程序关闭时调用,通常用于释放资源。
生命周期流程图:
14.2.4 JavaFX 程序启动
JavaFX 程序的启动有两种方式:
- 通过 main 方法启动:在 main 方法中调用 Application.launch ()。
- 直接运行 Application 子类:许多 IDE 支持直接运行继承自 Application 的类,自动调用 launch () 方法。
示例代码:第一个 JavaFX 程序
import javafx.application.Application;
import javafx.scene.Scene;
import javafx.scene.control.Label;
import javafx.scene.layout.StackPane;
import javafx.stage.Stage;public class FirstJavaFXApp extends Application {// 程序入口点public static void main(String[] args) {// 启动JavaFX应用launch(args);}// 初始化方法@Overridepublic void init() throws Exception {super.init();System.out.println("应用程序初始化中...");}// 启动方法,设置UI并显示舞台@Overridepublic void start(Stage primaryStage) {// 创建一个标签Label label = new Label("Hello, JavaFX!");// 创建一个布局面板,并将标签添加到面板中StackPane root = new StackPane();root.getChildren().add(label);// 创建场景,设置根节点和尺寸Scene scene = new Scene(root, 300, 200);// 设置舞台标题primaryStage.setTitle("我的第一个JavaFX应用");// 设置舞台的场景primaryStage.setScene(scene);// 显示舞台primaryStage.show();}// 停止方法@Overridepublic void stop() throws Exception {super.stop();System.out.println("应用程序正在关闭...");}
}
运行上述代码,会显示一个窗口,中间有 "Hello, JavaFX!" 的文字。这个简单的程序展示了 JavaFX 应用的基本结构:创建 UI 元素,将它们组织到布局中,创建场景并设置到舞台上,最后显示舞台。
14.3 JavaFX 属性与绑定
14.3.1 JavaFX 属性
JavaFX 引入了一种新的属性机制,与普通的 Java 字段不同,JavaFX 属性可以被观察和绑定。这意味着当属性的值发生变化时,依赖该属性的其他对象可以自动得到通知并做出相应的处理。
JavaFX 为基本数据类型提供了对应的属性类:
- IntegerProperty
- DoubleProperty
- BooleanProperty
- StringProperty
- 等等
示例:JavaFX 属性的使用
import javafx.beans.property.IntegerProperty;
import javafx.beans.property.SimpleIntegerProperty;public class PropertyExample {public static void main(String[] args) {// 创建一个整数属性IntegerProperty number = new SimpleIntegerProperty(10);// 打印初始值System.out.println("初始值: " + number.get());// 添加监听器,当属性值变化时触发number.addListener((observable, oldValue, newValue) -> {System.out.println("值从 " + oldValue + " 变为 " + newValue);});// 修改属性值number.set(20);number.setValue(30); // 与set()方法效果相同// 通过绑定获取属性值System.out.println("当前值: " + number.getValue());}
}
14.3.2 属性绑定
属性绑定允许我们将一个属性与另一个属性或表达式关联起来,当被绑定的属性发生变化时,绑定的属性会自动更新。
JavaFX 提供了两种主要的绑定方式:
- 单向绑定:一个属性的值跟随另一个属性的值变化,但反之则不成立。
- 双向绑定:两个属性的值相互影响,任何一个的变化都会导致另一个也发生变化。
示例:属性绑定
import javafx.application.Application;
import javafx.beans.binding.Bindings;
import javafx.beans.property.DoubleProperty;
import javafx.beans.property.SimpleDoubleProperty;
import javafx.scene.Scene;
import javafx.scene.control.Label;
import javafx.scene.control.Slider;
import javafx.scene.layout.VBox;
import javafx.stage.Stage;public class BindingExample extends Application {@Overridepublic void start(Stage primaryStage) {// 创建两个数值属性DoubleProperty a = new SimpleDoubleProperty(10);DoubleProperty b = new SimpleDoubleProperty(20);// 单向绑定:c的值始终是a + bDoubleProperty c = new SimpleDoubleProperty();c.bind(a.add(b));System.out.println("a = " + a.get() + ", b = " + b.get() + ", c = " + c.get());// 修改a的值,c的值会自动更新a.set(15);System.out.println("a = " + a.get() + ", b = " + b.get() + ", c = " + c.get());// 修改b的值,c的值会自动更新b.set(25);System.out.println("a = " + a.get() + ", b = " + b.get() + ", c = " + c.get());// 创建UI演示绑定效果Slider slider = new Slider(0, 100, 50);Label label = new Label();// 将标签的文本绑定到滑块的值label.textProperty().bind(Bindings.format("滑块值: %.2f", slider.valueProperty()));VBox root = new VBox(10);root.getChildren().addAll(slider, label);Scene scene = new Scene(root, 300, 100);primaryStage.setTitle("属性绑定示例");primaryStage.setScene(scene);primaryStage.show();}public static void main(String[] args) {launch(args);}
}
运行上述代码,会显示一个滑块和一个标签。当拖动滑块时,标签的文本会实时显示滑块的当前值,这就是属性绑定的效果。
14.4 JavaFX 界面布局
14.4.1 JavaFX 坐标系
JavaFX 使用二维坐标系来定位节点:
- 原点 (0, 0) 位于左上角
- X 轴向右为正方向
- Y 轴向下为正方向
- 坐标单位为像素
14.4.2 Pane 面板
Pane 是最简单的布局面板,它不对子节点进行任何布局管理,子节点的位置需要通过设置其 layoutX 和 layoutY 属性来指定。
示例:Pane 面板的使用
import javafx.application.Application;
import javafx.scene.Scene;
import javafx.scene.control.Button;
import javafx.scene.layout.Pane;
import javafx.stage.Stage;public class PaneExample extends Application {@Overridepublic void start(Stage primaryStage) {Pane pane = new Pane();// 创建按钮并设置位置Button btn1 = new Button("按钮1");btn1.setLayoutX(20);  // X坐标btn1.setLayoutY(30);  // Y坐标Button btn2 = new Button("按钮2");btn2.setLayoutX(120);btn2.setLayoutY(80);// 将按钮添加到面板pane.getChildren().addAll(btn1, btn2);Scene scene = new Scene(pane, 300, 200);primaryStage.setTitle("Pane面板示例");primaryStage.setScene(scene);primaryStage.show();}public static void main(String[] args) {launch(args);}
}
14.4.3 HBox 面板
HBox(水平盒)面板将子节点在水平方向上排列。
示例:HBox 面板的使用
import javafx.application.Application;
import javafx.geometry.Insets;
import javafx.scene.Scene;
import javafx.scene.control.Button;
import javafx.scene.layout.HBox;
import javafx.stage.Stage;public class HBoxExample extends Application {@Overridepublic void start(Stage primaryStage) {// 创建HBox面板,设置子节点之间的间距为10像素HBox hbox = new HBox(10);// 设置内边距(上、右、下、左)hbox.setPadding(new Insets(10, 10, 10, 10));// 创建按钮Button btn1 = new Button("按钮1");Button btn2 = new Button("按钮2");Button btn3 = new Button("按钮3");// 将按钮添加到HBoxhbox.getChildren().addAll(btn1, btn2, btn3);Scene scene = new Scene(hbox, 300, 100);primaryStage.setTitle("HBox面板示例");primaryStage.setScene(scene);primaryStage.show();}public static void main(String[] args) {launch(args);}
}
14.4.4 VBox 面板
VBox(垂直盒)面板将子节点在垂直方向上排列。
示例:VBox 面板的使用
import javafx.application.Application;
import javafx.geometry.Insets;
import javafx.scene.Scene;
import javafx.scene.control.Button;
import javafx.scene.layout.VBox;
import javafx.stage.Stage;public class VBoxExample extends Application {@Overridepublic void start(Stage primaryStage) {// 创建VBox面板,设置子节点之间的间距为10像素VBox vbox = new VBox(10);// 设置内边距vbox.setPadding(new Insets(10));// 创建按钮Button btn1 = new Button("按钮1");Button btn2 = new Button("按钮2");Button btn3 = new Button("按钮3");// 将按钮添加到VBoxvbox.getChildren().addAll(btn1, btn2, btn3);Scene scene = new Scene(vbox, 150, 200);primaryStage.setTitle("VBox面板示例");primaryStage.setScene(scene);primaryStage.show();}public static void main(String[] args) {launch(args);}
}
14.4.5 BorderPane 面板
BorderPane 将容器分为 5 个区域:上(top)、下(bottom)、左(left)、右(right)和中心(center),分别用于放置不同的子节点。
示例:BorderPane 面板的使用
import javafx.application.Application;
import javafx.geometry.Insets;
import javafx.scene.Scene;
import javafx.scene.control.Button;
import javafx.scene.layout.BorderPane;
import javafx.stage.Stage;public class BorderPaneExample extends Application {@Overridepublic void start(Stage primaryStage) {BorderPane borderPane = new BorderPane();// 设置内边距borderPane.setPadding(new Insets(10));// 创建各个区域的按钮Button topBtn = new Button("顶部");Button bottomBtn = new Button("底部");Button leftBtn = new Button("左侧");Button rightBtn = new Button("右侧");Button centerBtn = new Button("中心");// 将按钮放置到BorderPane的对应区域borderPane.setTop(topBtn);borderPane.setBottom(bottomBtn);borderPane.setLeft(leftBtn);borderPane.setRight(rightBtn);borderPane.setCenter(centerBtn);Scene scene = new Scene(borderPane, 400, 300);primaryStage.setTitle("BorderPane面板示例");primaryStage.setScene(scene);primaryStage.show();}public static void main(String[] args) {launch(args);}
}
14.4.6 FlowPane 面板
FlowPane 会根据面板的大小自动排列子节点,当一行(或一列)放不下时,会自动换行(或换列)。默认是水平流动,也可以设置为垂直流动。
示例:FlowPane 面板的使用
import javafx.application.Application;
import javafx.geometry.Insets;
import javafx.scene.Scene;
import javafx.scene.control.Button;
import javafx.scene.layout.FlowPane;
import javafx.stage.Stage;public class FlowPaneExample extends Application {@Overridepublic void start(Stage primaryStage) {// 创建FlowPane,设置水平方向流动,水平和垂直间距都是10FlowPane flowPane = new FlowPane(10, 10);// 设置内边距flowPane.setPadding(new Insets(10));// 创建多个按钮for (int i = 1; i <= 10; i++) {flowPane.getChildren().add(new Button("按钮 " + i));}Scene scene = new Scene(flowPane, 300, 200);primaryStage.setTitle("FlowPane面板示例");primaryStage.setScene(scene);primaryStage.show();}public static void main(String[] args) {launch(args);}
}
运行程序后,尝试调整窗口大小,会看到按钮会根据窗口宽度自动重新排列。
14.4.7 GridPane 面板
GridPane(网格面板)将容器划分为行和列的网格,子节点可以放置在指定的单元格中,也可以跨多行或多列。
示例:GridPane 面板的使用
import javafx.application.Application;
import javafx.geometry.Insets;
import javafx.scene.Scene;
import javafx.scene.control.Button;
import javafx.scene.layout.GridPane;
import javafx.stage.Stage;public class GridPaneExample extends Application {@Overridepublic void start(Stage primaryStage) {GridPane gridPane = new GridPane();// 设置内边距gridPane.setPadding(new Insets(10));// 设置行列间距gridPane.setHgap(5);  // 水平间距gridPane.setVgap(5);  // 垂直间距// 创建按钮并放置到网格的指定位置for (int row = 0; row < 3; row++) {for (int col = 0; col < 3; col++) {Button btn = new Button("(" + row + "," + col + ")");// 将按钮添加到网格的第row行,第col列GridPane.setRowIndex(btn, row);GridPane.setColumnIndex(btn, col);gridPane.getChildren().add(btn);}}// 创建一个跨列的按钮Button wideBtn = new Button("跨两列");GridPane.setRowIndex(wideBtn, 3);GridPane.setColumnIndex(wideBtn, 0);// 设置跨2列GridPane.setColumnSpan(wideBtn, 2);gridPane.getChildren().add(wideBtn);Scene scene = new Scene(gridPane, 300, 250);primaryStage.setTitle("GridPane面板示例");primaryStage.setScene(scene);primaryStage.show();}public static void main(String[] args) {launch(args);}
}
14.4.8 StackPane 面板
StackPane(栈面板)将子节点堆叠在一起,默认情况下,所有子节点都居中对齐。后添加的节点会覆盖在先添加的节点上面。
示例:StackPane 面板的使用
import javafx.application.Application;
import javafx.scene.Scene;
import javafx.scene.control.Label;
import javafx.scene.layout.StackPane;
import javafx.scene.paint.Color;
import javafx.scene.shape.Circle;
import javafx.stage.Stage;public class StackPaneExample extends Application {@Overridepublic void start(Stage primaryStage) {StackPane stackPane = new StackPane();// 创建一个圆形作为背景Circle circle = new Circle(100);circle.setFill(Color.LIGHTBLUE);// 创建一个标签Label label = new Label("我在圆形上面");label.setTextFill(Color.DARKBLUE);// 添加到栈面板,先添加的在下面,后添加的在上面stackPane.getChildren().addAll(circle, label);Scene scene = new Scene(stackPane, 300, 300);primaryStage.setTitle("StackPane面板示例");primaryStage.setScene(scene);primaryStage.show();}public static void main(String[] args) {launch(args);}
}
14.4.9 AnchorPane 面板
AnchorPane(锚点面板)允许子节点锚定到面板的边缘或中心,可以设置子节点与面板边缘的距离。
示例:AnchorPane 面板的使用
import javafx.application.Application;
import javafx.scene.Scene;
import javafx.scene.control.Button;
import javafx.scene.layout.AnchorPane;
import javafx.stage.Stage;public class AnchorPaneExample extends Application {@Overridepublic void start(Stage primaryStage) {AnchorPane anchorPane = new AnchorPane();// 创建按钮Button topLeftBtn = new Button("左上");Button topRightBtn = new Button("右上");Button bottomLeftBtn = new Button("左下");Button bottomRightBtn = new Button("右下");Button centerBtn = new Button("居中");// 设置按钮的锚点// 左上按钮:锚定到顶部和左侧AnchorPane.setTopAnchor(topLeftBtn, 10.0);AnchorPane.setLeftAnchor(topLeftBtn, 10.0);// 右上按钮:锚定到顶部和右侧AnchorPane.setTopAnchor(topRightBtn, 10.0);AnchorPane.setRightAnchor(topRightBtn, 10.0);// 左下按钮:锚定到底部和左侧AnchorPane.setBottomAnchor(bottomLeftBtn, 10.0);AnchorPane.setLeftAnchor(bottomLeftBtn, 10.0);// 右下按钮:锚定到底部和右侧AnchorPane.setBottomAnchor(bottomRightBtn, 10.0);AnchorPane.setRightAnchor(bottomRightBtn, 10.0);// 居中按钮:同时设置左右和上下锚点,会自动居中AnchorPane.setLeftAnchor(centerBtn, 100.0);AnchorPane.setRightAnchor(centerBtn, 100.0);AnchorPane.setTopAnchor(centerBtn, 100.0);AnchorPane.setBottomAnchor(centerBtn, 100.0);// 添加按钮到面板anchorPane.getChildren().addAll(topLeftBtn, topRightBtn, bottomLeftBtn, bottomRightBtn, centerBtn);Scene scene = new Scene(anchorPane, 300, 250);primaryStage.setTitle("AnchorPane面板示例");primaryStage.setScene(scene);primaryStage.show();}public static void main(String[] args) {launch(args);}
}
14.4.10 使用 CSS 设置控件样式
JavaFX 支持使用 CSS(层叠样式表)来设置控件的外观,这使得界面美化更加灵活和高效。
示例:使用 CSS 设置控件样式
import javafx.application.Application;
import javafx.scene.Scene;
import javafx.scene.control.Button;
import javafx.scene.layout.VBox;
import javafx.stage.Stage;public class CSSExample extends Application {@Overridepublic void start(Stage primaryStage) {VBox root = new VBox(10);root.setStyle("-fx-padding: 20; -fx-background-color: #f0f0f0;");// 创建按钮Button btn1 = new Button("普通按钮");// 直接设置样式btn1.setStyle("-fx-font-size: 14px; -fx-padding: 8px 16px;");Button btn2 = new Button("带样式类的按钮");// 添加样式类btn2.getStyleClass().add("custom-button");Button btn3 = new Button("悬停效果按钮");btn3.getStyleClass().add("hover-button");root.getChildren().addAll(btn1, btn2, btn3);Scene scene = new Scene(root, 300, 200);// 添加CSS样式表scene.getStylesheets().add(getClass().getResource("style.css").toExternalForm());primaryStage.setTitle("CSS样式示例");primaryStage.setScene(scene);primaryStage.show();}public static void main(String[] args) {launch(args);}
}
在项目的相同包下创建一个名为style.css的文件,内容如下:
/* 自定义按钮样式 */
.custom-button {-fx-background-color: #4CAF50; /* 绿色背景 */-fx-text-fill: white; /* 白色文字 */-fx-font-size: 14px;-fx-padding: 8px 16px;-fx-border-radius: 4px;
}/* 悬停效果按钮 */
.hover-button {-fx-background-color: #2196F3; /* 蓝色背景 */-fx-text-fill: white;-fx-font-size: 14px;-fx-padding: 8px 16px;-fx-border-radius: 4px;-fx-transition: all 0.3s ease;
}/* 鼠标悬停时的样式 */
.hover-button:hover {-fx-background-color: #0b7dda; /* 深蓝色背景 */-fx-scale-x: 1.05;-fx-scale-y: 1.05;
}
布局面板综合案例
下面是一个综合使用多种布局面板的案例,模拟一个简单的应用程序界面:
import javafx.application.Application;
import javafx.geometry.Insets;
import javafx.scene.Scene;
import javafx.scene.control.*;
import javafx.scene.layout.*;
import javafx.stage.Stage;public class Layout综合案例 extends Application {@Overridepublic void start(Stage primaryStage) {// 主面板使用BorderPaneBorderPane mainPane = new BorderPane();mainPane.setPadding(new Insets(10));// 顶部:标题栏HBox topBar = new HBox();topBar.setPadding(new Insets(10));topBar.setStyle("-fx-background-color: #336699;");Label titleLabel = new Label("我的应用程序");titleLabel.setStyle("-fx-text-fill: white; -fx-font-size: 18px; -fx-font-weight: bold;");topBar.getChildren().add(titleLabel);mainPane.setTop(topBar);// 左侧:导航菜单VBox leftNav = new VBox(10);leftNav.setPadding(new Insets(10));leftNav.setStyle("-fx-background-color: #f0f0f0;");leftNav.setPrefWidth(150);Button homeBtn = new Button("首页");Button dataBtn = new Button("数据管理");Button settingBtn = new Button("设置");Button helpBtn = new Button("帮助");// 设置按钮宽度为100%homeBtn.setMaxWidth(Double.MAX_VALUE);dataBtn.setMaxWidth(Double.MAX_VALUE);settingBtn.setMaxWidth(Double.MAX_VALUE);helpBtn.setMaxWidth(Double.MAX_VALUE);leftNav.getChildren().addAll(homeBtn, dataBtn, settingBtn, helpBtn);mainPane.setLeft(leftNav);// 中心:主要内容区域,使用GridPaneGridPane contentPane = new GridPane();contentPane.setPadding(new Insets(20));contentPane.setHgap(10);contentPane.setVgap(15);// 添加标题Label contentTitle = new Label("用户信息");contentTitle.setStyle("-fx-font-size: 16px; -fx-font-weight: bold;");GridPane.setColumnSpan(contentTitle, 2); // 跨两列contentPane.add(contentTitle, 0, 0);// 添加表单控件Label nameLabel = new Label("姓名:");TextField nameField = new TextField();Label ageLabel = new Label("年龄:");TextField ageField = new TextField();Label genderLabel = new Label("性别:");HBox genderBox = new HBox(10);RadioButton maleBtn = new RadioButton("男");RadioButton femaleBtn = new RadioButton("女");ToggleGroup genderGroup = new ToggleGroup();maleBtn.setToggleGroup(genderGroup);femaleBtn.setToggleGroup(genderGroup);maleBtn.setSelected(true);genderBox.getChildren().addAll(maleBtn, femaleBtn);Label hobbyLabel = new Label("爱好:");VBox hobbyBox = new VBox(5);CheckBox readingBox = new CheckBox("阅读");CheckBox sportsBox = new CheckBox("运动");CheckBox musicBox = new CheckBox("音乐");hobbyBox.getChildren().addAll(readingBox, sportsBox, musicBox);// 放置控件到网格中contentPane.add(nameLabel, 0, 1);contentPane.add(nameField, 1, 1);contentPane.add(ageLabel, 0, 2);contentPane.add(ageField, 1, 2);contentPane.add(genderLabel, 0, 3);contentPane.add(genderBox, 1, 3);contentPane.add(hobbyLabel, 0, 4);contentPane.add(hobbyBox, 1, 4);// 添加按钮区域,使用HBoxHBox buttonBox = new HBox(10);Button saveBtn = new Button("保存");Button cancelBtn = new Button("取消");saveBtn.setStyle("-fx-background-color: #4CAF50; -fx-text-fill: white;");cancelBtn.setStyle("-fx-background-color: #f44336; -fx-text-fill: white;");buttonBox.getChildren().addAll(saveBtn, cancelBtn);GridPane.setColumnSpan(buttonBox, 2);contentPane.add(buttonBox, 0, 5);mainPane.setCenter(contentPane);// 底部:状态栏HBox statusBar = new HBox();statusBar.setPadding(new Insets(5));statusBar.setStyle("-fx-background-color: #e0e0e0; -fx-font-size: 12px;");Label statusLabel = new Label("当前用户: admin | 版本: 1.0.0");statusBar.getChildren().add(statusLabel);mainPane.setBottom(statusBar);Scene scene = new Scene(mainPane, 800, 500);primaryStage.setTitle("布局综合案例");primaryStage.setScene(scene);primaryStage.show();}public static void main(String[] args) {launch(args);}
}
14.5 Color 和 Font 类
14.5.1 Color 类
Color 类用于表示颜色,可以通过多种方式创建颜色:
- 使用预定义的颜色常量(如 Color.RED, Color.BLUE)
- 使用 RGB 值(红、绿、蓝)
- 使用 RGBA 值(红、绿、蓝、透明度)
- 使用 HSB 值(色相、饱和度、亮度)
14.5.2 Font 类
Font 类用于表示字体,可以设置字体名称、大小和样式(如粗体、斜体)。
示例:Color 和 Font 类的使用
import javafx.application.Application;
import javafx.scene.Scene;
import javafx.scene.control.Label;
import javafx.scene.layout.VBox;
import javafx.scene.paint.Color;
import javafx.scene.text.Font;
import javafx.scene.text.FontWeight;
import javafx.scene.text.FontStyle;
import javafx.stage.Stage;public class ColorAndFontExample extends Application {@Overridepublic void start(Stage primaryStage) {VBox root = new VBox(20);root.setPadding(new Insets(20));// 1. 使用预定义颜色和默认字体Label label1 = new Label("1. 红色文本(默认字体)");label1.setTextFill(Color.RED);// 2. 使用RGB颜色和指定字体Label label2 = new Label("2. 蓝色文本(Arial字体,16号)");label2.setTextFill(new Color(0, 0, 1, 1)); // RGBA,最后一个参数是透明度label2.setFont(new Font("Arial", 16));// 3. 使用HSB颜色和粗体字体Label label3 = new Label("3. 绿色文本(粗体,18号)");label3.setTextFill(Color.hsb(120, 1, 0.8)); // HSB颜色label3.setFont(Font.font("SimSun", FontWeight.BOLD, 18));// 4. 使用半透明颜色和斜体字体Label label4 = new Label("4. 紫色文本(斜体,20号,半透明)");label4.setTextFill(new Color(0.5, 0, 0.5, 0.7)); // 半透明紫色label4.setFont(Font.font("Times New Roman", FontStyle.ITALIC, 20));root.getChildren().addAll(label1, label2, label3, label4);Scene scene = new Scene(root, 400, 300);// 设置背景颜色scene.setFill(new Color(0.95, 0.95, 0.95, 1));primaryStage.setTitle("Color和Font示例");primaryStage.setScene(scene);primaryStage.show();}public static void main(String[] args) {launch(args);}
}
14.6 JavaFX 形状
JavaFX 提供了多种预定义的形状类,可以用来绘制各种图形。
14.6.1 Line 类
Line 类用于绘制直线,需要指定起点和终点坐标。
14.6.2 Rectangle 类
Rectangle 类用于绘制矩形,可以指定位置、宽度、高度,还可以设置圆角。
14.6.3 Circle 类
Circle 类用于绘制圆形,需要指定圆心坐标和半径。
14.6.4 Ellipse 类
Ellipse 类用于绘制椭圆,需要指定中心坐标和 x、y 方向的半径。
14.6.5 Arc 类
Arc 类用于绘制圆弧,需要指定中心坐标、半径、起始角度和弧长。
14.6.6 Polygon 类
Polygon 类用于绘制多边形,需要指定多个顶点的坐标。
14.6.7 Text 类
Text 类用于绘制文本,可以设置字体、颜色等属性。
示例:各种形状的使用
import javafx.application.Application;
import javafx.scene.Scene;
import javafx.scene.layout.Pane;
import javafx.scene.paint.Color;
import javafx.scene.shape.*;
import javafx.scene.text.Font;
import javafx.scene.text.Text;
import javafx.stage.Stage;public class ShapesExample extends Application {@Overridepublic void start(Stage primaryStage) {Pane pane = new Pane();// 1. 直线Line line = new Line(50, 50, 250, 50);line.setStroke(Color.BLACK);line.setStrokeWidth(2);// 2. 矩形Rectangle rect = new Rectangle(50, 70, 200, 60); // x, y, width, heightrect.setFill(Color.LIGHTBLUE);rect.setStroke(Color.BLUE);rect.setStrokeWidth(2);rect.setArcWidth(10); // 圆角宽度rect.setArcHeight(10); // 圆角高度// 3. 圆形Circle circle = new Circle(150, 220, 40); // centerX, centerY, radiuscircle.setFill(Color.PINK);circle.setStroke(Color.RED);circle.setStrokeWidth(2);// 4. 椭圆Ellipse ellipse = new Ellipse(150, 320, 80, 40); // centerX, centerY, radiusX, radiusYellipse.setFill(Color.LIGHTGREEN);ellipse.setStroke(Color.GREEN);ellipse.setStrokeWidth(2);// 5. 圆弧Arc arc = new Arc(150, 420, 60, 40, 0, 180); // centerX, centerY, radiusX, radiusY, startAngle, lengtharc.setFill(Color.YELLOW);arc.setStroke(Color.ORANGE);arc.setStrokeWidth(2);arc.setType(ArcType.OPEN); // 圆弧类型:OPEN, CHORD, ROUND// 6. 多边形(五角星)Polygon polygon = new Polygon();polygon.getPoints().addAll(300.0, 100.0,320.0, 160.0,380.0, 160.0,330.0, 200.0,350.0, 260.0,300.0, 230.0,250.0, 260.0,270.0, 200.0,220.0, 160.0,280.0, 160.0);polygon.setFill(Color.PURPLE);polygon.setStroke(Color.DARKVIOLET);polygon.setStrokeWidth(2);// 7. 文本Text text = new Text(250, 320, "JavaFX形状");text.setFont(Font.font("SimHei", 20));text.setFill(Color.BROWN);// 将所有形状添加到面板pane.getChildren().addAll(line, rect, circle, ellipse, arc, polygon, text);Scene scene = new Scene(pane, 450, 500);scene.setFill(Color.WHITE);primaryStage.setTitle("JavaFX形状示例");primaryStage.setScene(scene);primaryStage.show();}public static void main(String[] args) {launch(args);}
}
14.7 Image 和 ImageView 类
JavaFX 提供了 Image 和 ImageView 类来处理和显示图像。Image 类用于加载图像数据,ImageView 类用于在界面上显示图像。
示例:Image 和 ImageView 类的使用
import javafx.application.Application;
import javafx.geometry.Insets;
import javafx.scene.Scene;
import javafx.scene.image.Image;
import javafx.scene.image.ImageView;
import javafx.scene.layout.HBox;
import javafx.stage.Stage;public class ImageExample extends Application {@Overridepublic void start(Stage primaryStage) {HBox root = new HBox(20);root.setPadding(new Insets(20));try {// 1. 加载本地图片// 假设图片文件位于项目的resources目录下Image localImage = new Image(getClass().getResourceAsStream("/image1.jpg"));ImageView localImageView = new ImageView(localImage);// 设置图片视图的尺寸,保持比例localImageView.setFitWidth(200);localImageView.setPreserveRatio(true);// 2. 加载网络图片Image networkImage = new Image("https://picsum.photos/200/300");ImageView networkImageView = new ImageView(networkImage);// 3. 调整图片视图的属性ImageView scaledImageView = new ImageView(localImage);scaledImageView.setFitWidth(150);scaledImageView.setFitHeight(150);scaledImageView.setPreserveRatio(false); // 不保持比例,可能会变形scaledImageView.setOpacity(0.7); // 设置透明度root.getChildren().addAll(localImageView, networkImageView, scaledImageView);} catch (Exception e) {e.printStackTrace();System.out.println("图片加载失败: " + e.getMessage());}Scene scene = new Scene(root, 650, 350);primaryStage.setTitle("Image和ImageView示例");primaryStage.setScene(scene);primaryStage.show();}public static void main(String[] args) {launch(args);}
}
注意:加载本地图片时,需要确保图片文件的路径正确。如果使用 IDE(如 IntelliJ IDEA 或 Eclipse),通常将图片放在src/main/resources目录下,然后使用getClass().getResourceAsStream()方法加载。
14.8 特效实现
JavaFX 提供了多种特效类,可以为节点添加各种视觉效果。
14.8.1 阴影效果
DropShadow 类用于为节点添加阴影效果。
14.8.2 模糊效果
BlurEffect 类用于为节点添加模糊效果,有高斯模糊、运动模糊等类型。
14.8.3 倒影效果
Reflection 类用于为节点添加倒影效果。
14.8.4 发光效果
Glow 类用于为节点添加发光效果。
示例:各种特效的使用
import javafx.application.Application;
import javafx.scene.Scene;
import javafx.scene.control.Label;
import javafx.scene.effect.*;
import javafx.scene.image.Image;
import javafx.scene.image.ImageView;
import javafx.scene.layout.HBox;
import javafx.scene.layout.VBox;
import javafx.scene.paint.Color;
import javafx.scene.text.Font;
import javafx.stage.Stage;public class EffectsExample extends Application {@Overridepublic void start(Stage primaryStage) {HBox root = new HBox(30);root.setStyle("-fx-padding: 30; -fx-background-color: #f0f0f0;");// 1. 阴影效果VBox shadowBox = new VBox(20);Label shadowLabel = new Label("阴影效果");shadowLabel.setFont(Font.font(20));// 创建阴影效果DropShadow dropShadow = new DropShadow();dropShadow.setColor(Color.GRAY);dropShadow.setRadius(10);dropShadow.setOffsetX(5);dropShadow.setOffsetY(5);shadowLabel.setEffect(dropShadow);// 给图片添加阴影ImageView shadowImage = new ImageView(new Image("https://picsum.photos/200/150?random=1"));shadowImage.setEffect(dropShadow);shadowBox.getChildren().addAll(shadowLabel, shadowImage);// 2. 模糊效果VBox blurBox = new VBox(20);Label blurLabel = new Label("模糊效果");blurLabel.setFont(Font.font(20));// 创建高斯模糊效果GaussianBlur gaussianBlur = new GaussianBlur(8); // 模糊半径blurLabel.setEffect(gaussianBlur);ImageView blurImage = new ImageView(new Image("https://picsum.photos/200/150?random=2"));blurImage.setEffect(gaussianBlur);blurBox.getChildren().addAll(blurLabel, blurImage);// 3. 倒影效果VBox reflectionBox = new VBox(20);Label reflectionLabel = new Label("倒影效果");reflectionLabel.setFont(Font.font(20));// 创建倒影效果Reflection reflection = new Reflection();reflection.setFraction(0.8); // 倒影比例reflectionLabel.setEffect(reflection);ImageView reflectionImage = new ImageView(new Image("https://picsum.photos/200/150?random=3"));reflectionImage.setEffect(reflection);reflectionBox.getChildren().addAll(reflectionLabel, reflectionImage);// 4. 发光效果VBox glowBox = new VBox(20);Label glowLabel = new Label("发光效果");glowLabel.setFont(Font.font(20));glowLabel.setTextFill(Color.BLUE);// 创建发光效果Glow glow = new Glow(0.8); // 发光强度glowLabel.setEffect(glow);ImageView glowImage = new ImageView(new Image("https://picsum.photos/200/150?random=4"));glowImage.setEffect(glow);glowBox.getChildren().addAll(glowLabel, glowImage);root.getChildren().addAll(shadowBox, blurBox, reflectionBox, glowBox);Scene scene = new Scene(root, 900, 300);primaryStage.setTitle("JavaFX特效示例");primaryStage.setScene(scene);primaryStage.show();}public static void main(String[] args) {launch(args);}
}
14.9 小结
本章介绍了 JavaFX 的基础知识,包括:
- JavaFX 概述:了解了 Java GUI 编程的发展历史,JavaFX 的基本概念和如何添加 JavaFX 库。
- JavaFX 程序基本结构:学习了舞台(Stage)、场景(Scene)、场景图(Scene Graph)和节点(Node)的概念,以及 Application 类的生命周期。
- JavaFX 属性与绑定:掌握了 JavaFX 属性的特点和绑定机制,能够实现属性之间的自动同步。
- JavaFX 界面布局:学习了多种布局面板的使用,包括 Pane、HBox、VBox、BorderPane 等,能够根据需要选择合适的布局。
- Color 和 Font 类:了解了如何使用 Color 类设置颜色,使用 Font 类设置字体。
- JavaFX 形状:学习了如何绘制各种基本形状,如直线、矩形、圆形等。
- Image 和 ImageView 类:掌握了加载和显示图像的方法。
- 特效实现:了解了如何为节点添加阴影、模糊、倒影和发光等特效。

通过本章的学习,我们已经掌握了 JavaFX 的基础知识,能够创建简单的 JavaFX 应用程序。JavaFX 提供了丰富的 API 和组件,能够帮助我们开发出美观、交互性强的桌面应用。
编程练习
-
练习 1:创建一个简单的计算器界面
要求:使用 GridPane 布局,创建一个包含数字键和基本运算符的计算器界面。
练习 1 参考代码:
import javafx.application.Application;
import javafx.geometry.Insets;
import javafx.scene.Scene;
import javafx.scene.control.Button;
import javafx.scene.control.TextField;
import javafx.scene.layout.GridPane;
import javafx.stage.Stage;public class Calculator练习 extends Application {@Overridepublic void start(Stage primaryStage) {GridPane grid = new GridPane();grid.setPadding(new Insets(10));grid.setHgap(5);grid.setVgap(5);// 创建显示框TextField display = new TextField();display.setEditable(false);display.setAlignment(javafx.geometry.Pos.CENTER_RIGHT);display.setStyle("-fx-font-size: 18px;");GridPane.setColumnSpan(display, 4); // 跨4列grid.add(display, 0, 0);// 按钮文本String[][] buttons = {{"7", "8", "9", "/"},{"4", "5", "6", "*"},{"1", "2", "3", "-"},{"0", ".", "=", "+"}};// 创建清除按钮Button clearBtn = new Button("C");clearBtn.setStyle("-fx-background-color: #ff9999;");GridPane.setColumnSpan(clearBtn, 2); // 跨2列grid.add(clearBtn, 0, 1);// 创建删除按钮Button deleteBtn = new Button("←");deleteBtn.setStyle("-fx-background-color: #ffff99;");GridPane.setColumnSpan(deleteBtn, 2); // 跨2列grid.add(deleteBtn, 2, 1);// 创建数字和运算符按钮for (int i = 0; i < 4; i++) {for (int j = 0; j < 4; j++) {Button btn = new Button(buttons[i][j]);btn.setStyle("-fx-font-size: 16px;");// 设置按钮大小btn.setPrefSize(60, 60);// 位置从第2行开始grid.add(btn, j, i + 2);// 为按钮添加点击事件btn.setOnAction(e -> {String text = btn.getText();if (text.equals("=")) {// 计算逻辑,这里简化处理try {// 使用JavaScript引擎计算表达式javax.script.ScriptEngine engine = new javax.script.ScriptEngineManager().getEngineByName("JavaScript");Object result = engine.eval(display.getText());display.setText(result.toString());} catch (Exception ex) {display.setText("错误");}} else {display.appendText(text);}});}}// 清除按钮事件clearBtn.setOnAction(e -> display.clear());// 删除按钮事件deleteBtn.setOnAction(e -> {String text = display.getText();if (!text.isEmpty()) {display.setText(text.substring(0, text.length() - 1));}});Scene scene = new Scene(grid, 280, 350);primaryStage.setTitle("简易计算器");primaryStage.setScene(scene);primaryStage.show();}public static void main(String[] args) {launch(args);}
}
希望本章的内容能够帮助大家快速掌握 JavaFX 的基础知识。如果有任何疑问或建议,欢迎在评论区留言讨论!