【Rust线程】Rust高并发编程之线程原理解析与应用实战

✨✨ 欢迎大家来到景天科技苑✨✨
🎈🎈 养成好习惯,先赞后看哦~🎈🎈
🏆 作者简介:景天科技苑
🏆《头衔》:大厂架构师,华为云开发者社区专家博主,阿里云开发者社区专家博主,CSDN全栈领域优质创作者,掘金优秀博主,51CTO博客专家等。
🏆《博客》:Rust开发,Python全栈,Golang开发,云原生开发,PyQt5和Tkinter桌面开发,小程序开发,人工智能,js逆向,App逆向,网络系统安全,数据分析,Django,fastapi,flask等框架,云原生K8S,linux,shell脚本等实操经验,网站搭建,数据库等分享。所属的专栏:Rust高性能并发编程
景天的主页:景天科技苑

文章目录
- 线程
- 1、创建线程
- 2、Thread Builder
- 3、当前的线程
- 4、并发数和当前线程数
- 5、affinity线程亲和性
- 6、num_cpus
- 8、sleep 和 park
- 9、scoped thread
- 10、ThreadLocal
- 11、Move
- 12、设置线程优先级
- 13、Panic
- 14、Rayon scoped thread
- 15、Go 风格的启动线程
线程
线程(英语:thread)是操作系统能够进行运算和调度的最小单位。
大部分情况下,它被包含在进程之中,是进程中的实际运作单位,所以说程序实际运行的时候是以线程为单位的,
一个进程中可以并发多个线程,每条线程并行执行不同的任务。
线程是独立调度和分派的基本单位,并且同一进程中的多条线程将共享该进程中的全部系统资源,如虚拟地址空间,文件描述符和信号处理等等。
但同一进程中的多个线程有各自的调用栈(call stack),自己的寄存器上下文(register context),自己的线程本地存储(thread-local storage)。
一个进程可以有很多线程来处理,每条线程并行执行不同的任务。
如果进程要完成的任务很多,这样需很多线程,也要调用很多核心,在多核或多 CPU,或支持 Hyper-threading 的 CPU 上使用多线程程序设计可以提高了程序的执行吞吐率。
在单 CPU 单核的计算机上,使用多线程技术,也可以把进程中负责 I/O 处理、人机交互而常被阻塞的部分与密集计算的部分分开来执行,从而提高 CPU 的利用率。
线程在以下几个方面与传统的多任务操作系统进程不同:
• 进程通常是独立的,而线程作为进程的子集存在
• 进程携带的状态信息比线程多得多,而进程中的多个线程共享进程状态以及内存和其他资源
• 进程具有单独的地址空间,而线程共享其地址空间
• 进程仅通过系统提供的进程间通信机制进行交互
• 同一进程中线程之间的上下文切换通常比进程之间的上下文切换发生得更快线程与进程的优缺点包括:
1、创建线程
Rust 标准库std::thread crate 提供了线程相关的函数。
正如上面所说,一个 Rust 程序执行的会启动一个进程,这个进程会包含一个或者多个线程,
Rust 中的线程是纯操作的系统的线程,拥有自己的栈和状态。
线程之间的通讯可以通过 channel,就像 Go 语言中的 channel 的那样,也可以通过一些同步原语)。
pub fn start_one_thread() {let handle = thread::spawn(|| {println!("Hello from a thread!");});handle.join().unwrap();}
这段代码我们通过 thread.spawn 在当前线程中启动了一个新的线程,新的线程简单的输出 Hello from a thread 文本。
如果在 main 函数中调用这个 start_one_thread 函数,控制台中会正常看到这段输出文本,
但是如果注释掉 handle.join.unwrap(); 那一句的话,有可能期望的文本可能不会被输出,原因是当主程序退出的时候,即使这些新开的线程也会强制退出,
所以有时候你需要通过 join 等待这些线程完成。
如果忽略 thread::spawn 返回的 JoinHandle值,那么这个新建的线程被称之为 detached ,通过调用 JoinHandle 的 join 方法,调用者就不得不等待线程的完成了。
这段代码我们直接使用 handle.join().unwrap() , 事实上 join() 返回的是 Result类型,
如果线程 panicked 了,那么它会返 Err , 否则它会返回 Ok(_) , 这就有意思了,调用者甚至可以得到线程最后的返回值:
pub fn start_one_thread_result() {let handle = thread::spawn(|| {println!("Hello from a thread!");200
});match handle.join() {Ok(v) => println!("thread result: {}", v),Err(e) => println!("error: {:?}", e),}
}
下面这段代码是启动了多个线程:
pub fn start_two_threads() {let handle1 = thread::spawn(|| {println!("Hello from a thread1!");});let handle2 = thread::spawn(|| {println!("Hello from a thread2!");
});handle1.join().unwrap();handle2.join().unwrap();}
但是如果启动 N 个线程呢?可以使用一个 Vector 保存线程的 handle:
pub fn start_n_threads() {const N: isize = 10;let handles: Vec<_> = (0..N).map(|i| {thread::spawn(move || {println!("Hello from a thread{}!", i);})}).collect();for handle in handles {handle.join().unwrap();}
}
2、Thread Builder
通过 Builder 你可以对线程的初始状态进行更多的控制,比如设置线程的名称、栈大大小等等。
use std::thread;//通过Builder创建线程
fn start_one_thread_by_builder() {// 创建线程构建器let builder = thread::Builder::new().name("foo".into()) // set thread name.stack_size(32 * 1024); // set stack size// 通过构建器创建线程let handler = builder.spawn(|| {println!("Hello from a thread!");}).unwrap();// 等待线程执行完毕handler.join().unwrap();
}
fn main() {start_one_thread_by_builder();
}
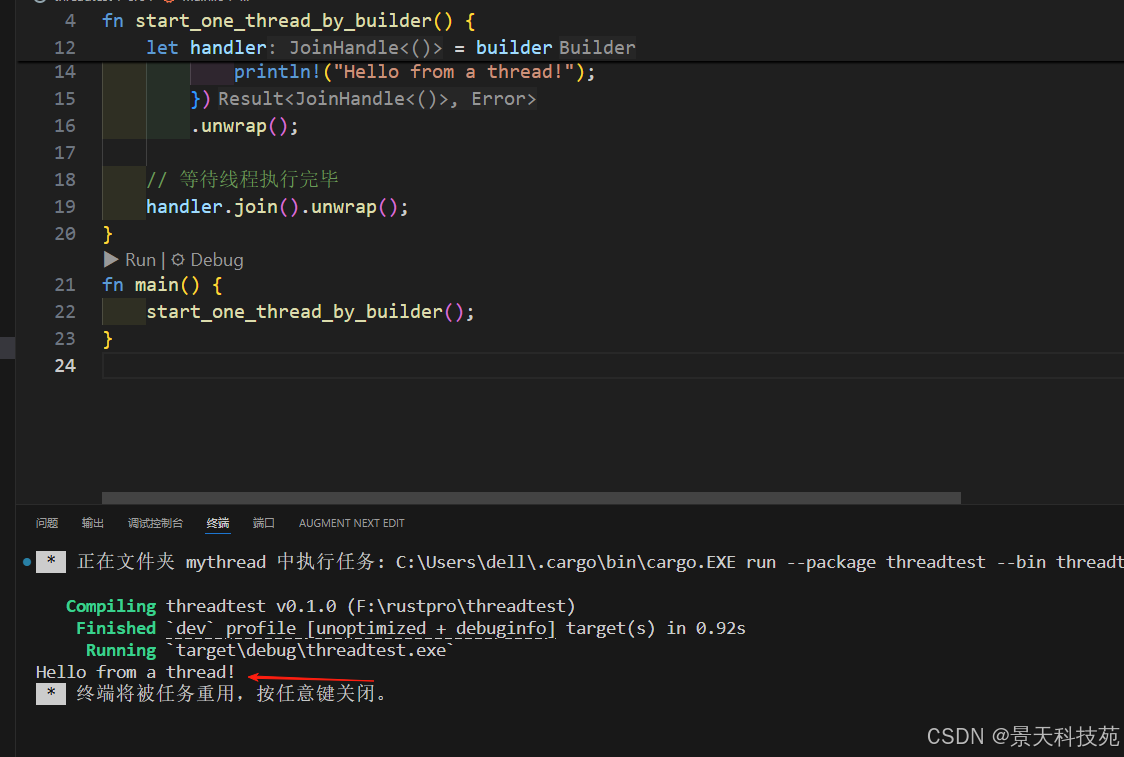
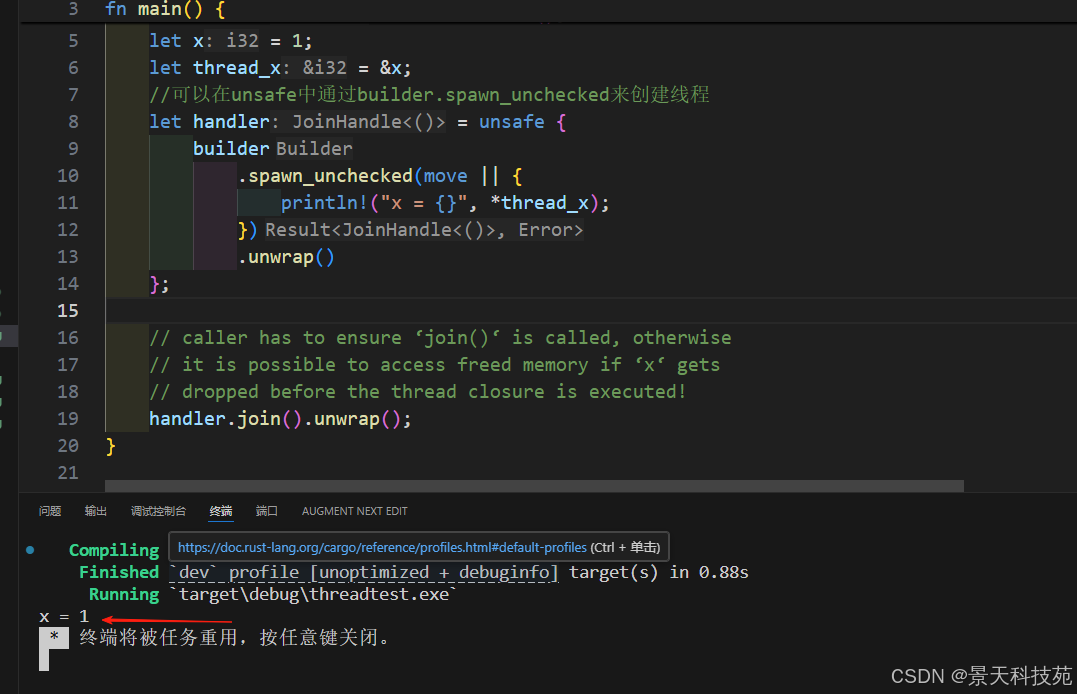
它提供了 spawn 开启一个线程,同时还提供了 spawn_scoped 开启 scoped thread(下面会讲),
一个实验性的方法 spawn_unchecked , 提供更宽松的声明周期的绑定,调用者要确保引用的对象丢弃之前线程的 join 一定要被调用,
或者使用 ‘static 声明周期,因为是实验性的方法,我们不做过多介绍,一个简单的例子如下
use std::thread::Builder;fn main() {let builder = Builder::new();let x = 1;let thread_x = &x;//可以在unsafe中通过builder.spawn_unchecked来创建线程let handler = unsafe {builder.spawn_unchecked(move || {println!("x = {}", *thread_x);}).unwrap()};// caller has to ensure ‘join()‘ is called, otherwise// it is possible to access freed memory if ‘x‘ gets// dropped before the thread closure is executed!handler.join().unwrap();
}
3、当前的线程
因为线程是操作系统最小的调度和运算单元,所以一段代码的执行隶属于某个线程。
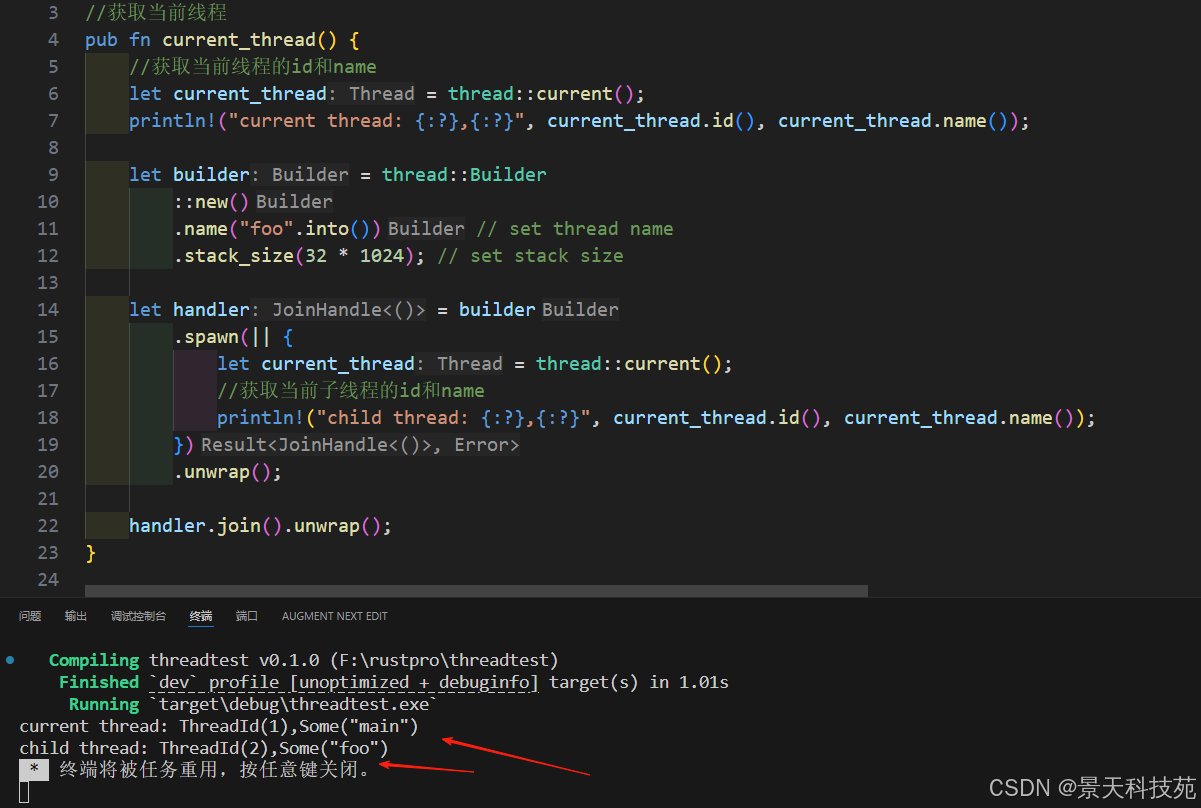
如何获得当前的线程呢?通过 thread::current() 就可以获得,它会返回一个 Thread对象,你可以通过它获得线程的 ID 和 name:
use std::thread;//获取当前线程
pub fn current_thread() {//获取当前线程的id和namelet current_thread = thread::current();println!("current thread: {:?},{:?}", current_thread.id(), current_thread.name());let builder = thread::Builder::new().name("foo".into()) // set thread name.stack_size(32 * 1024); // set stack sizelet handler = builder.spawn(|| {let current_thread = thread::current();//获取当前子线程的id和nameprintln!("child thread: {:?},{:?}", current_thread.id(), current_thread.name());}).unwrap();handler.join().unwrap();
}fn main() {current_thread();
}
甚至,你还可以通过它的 unpark 方法,唤醒被阻塞 (parked) 的线程:
use std::thread;
use std::time::Duration;fn main() {//创建一个packed的线程let parked_thread = thread::Builder::new().spawn(|| {println!("Parking thread");//通过thread::park()来阻塞线程thread::park();println!("Thread unparked");}).unwrap();//等待线程阻塞一段时间println!("Sleeping in the main thread for 2 seconds");thread::sleep(Duration::from_secs(2));println!("Unpark the thread");//通过thread::unpark()来唤醒线程parked_thread.thread().unpark();parked_thread.join().unwrap();
}
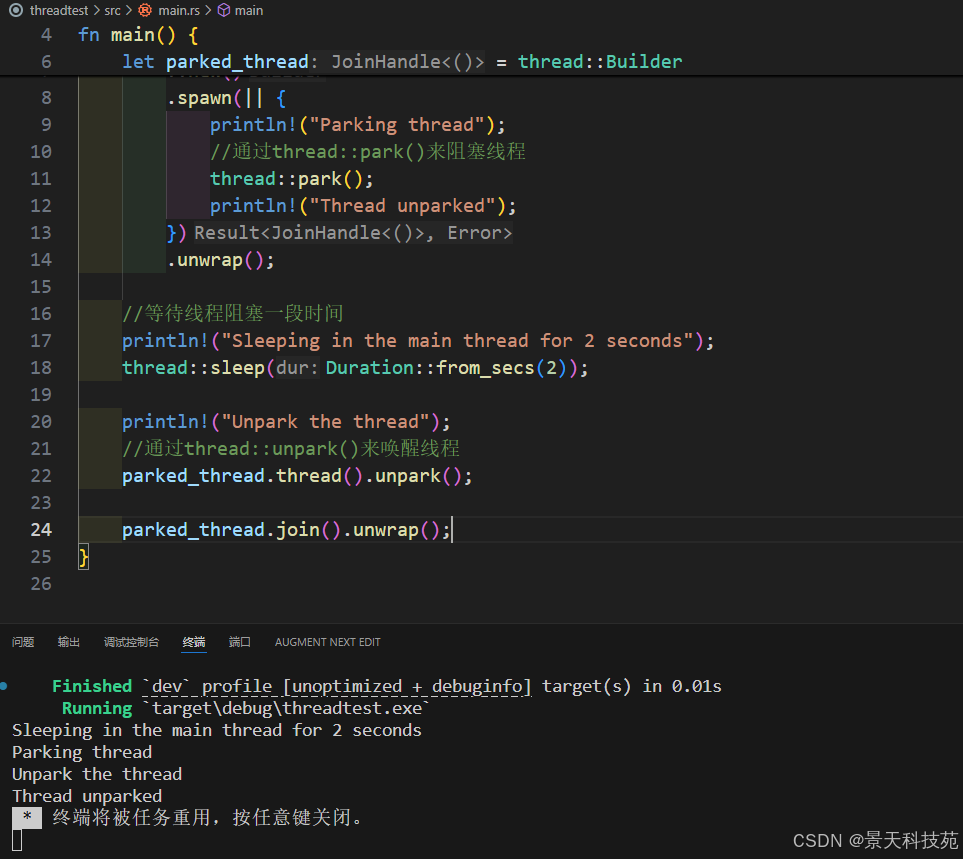
park 和 unpark 用来阻塞和唤醒线程的方法,利用它们可以有效的利用 CPU, 让暂时不满足条件的线程暂时不可执行。
4、并发数和当前线程数
并发能力是一种资源,一个机器能够提供并发的能力值,这个数值一般等价于计算机拥有的 CPU 数(逻辑的核数),
但是在虚机和容器的环境下,程序可以使用的 CPU 核数可能受到限制。你可以通过
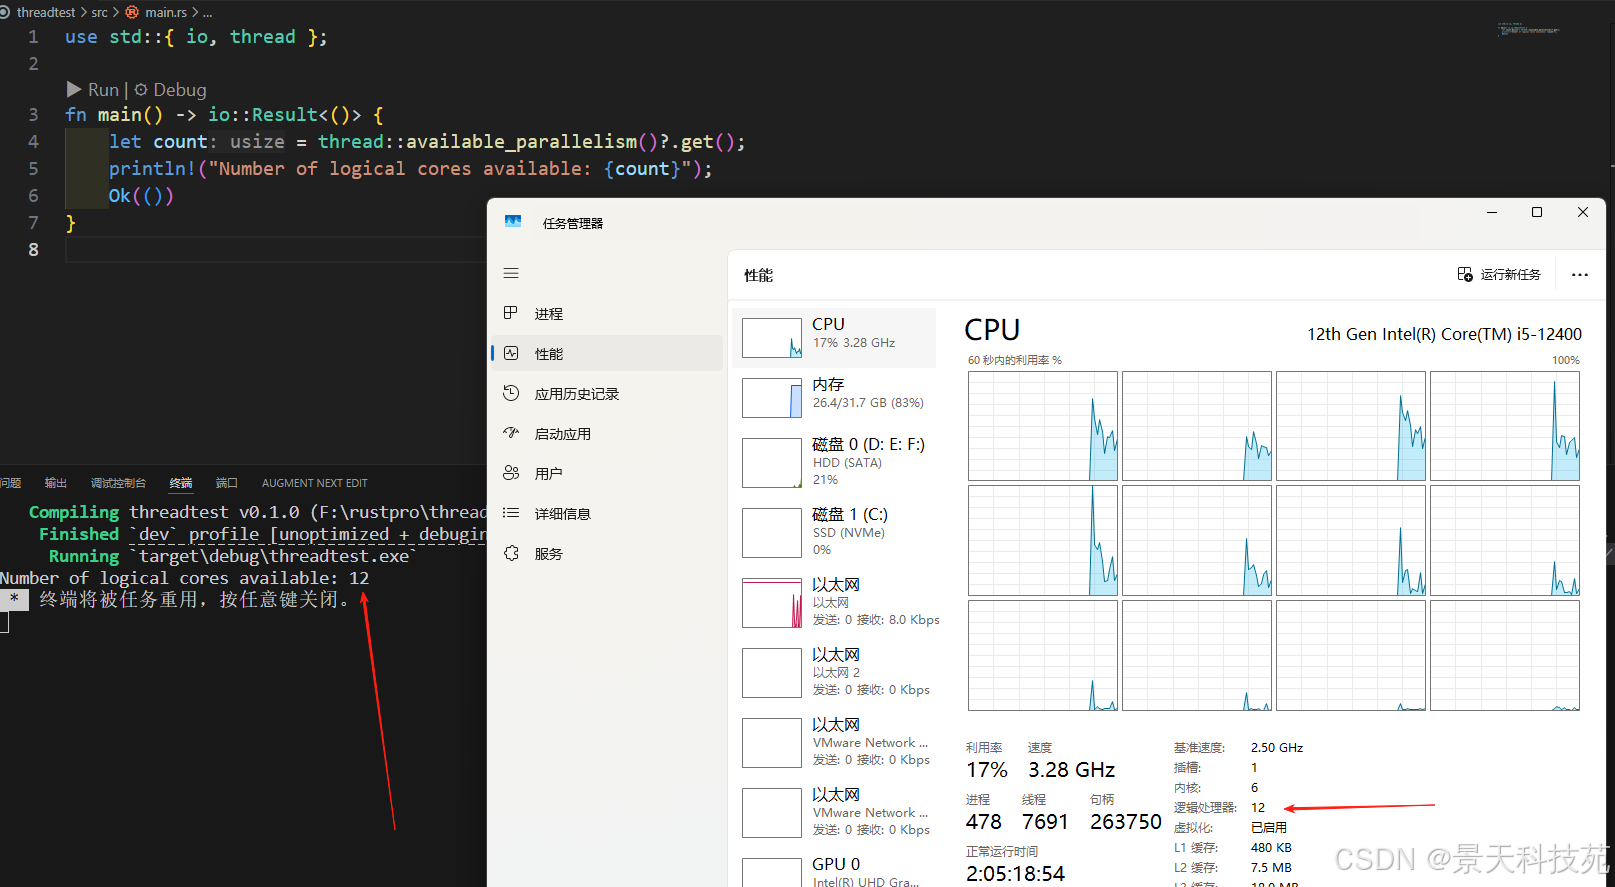
available_parallelism 获取当前的并发数:
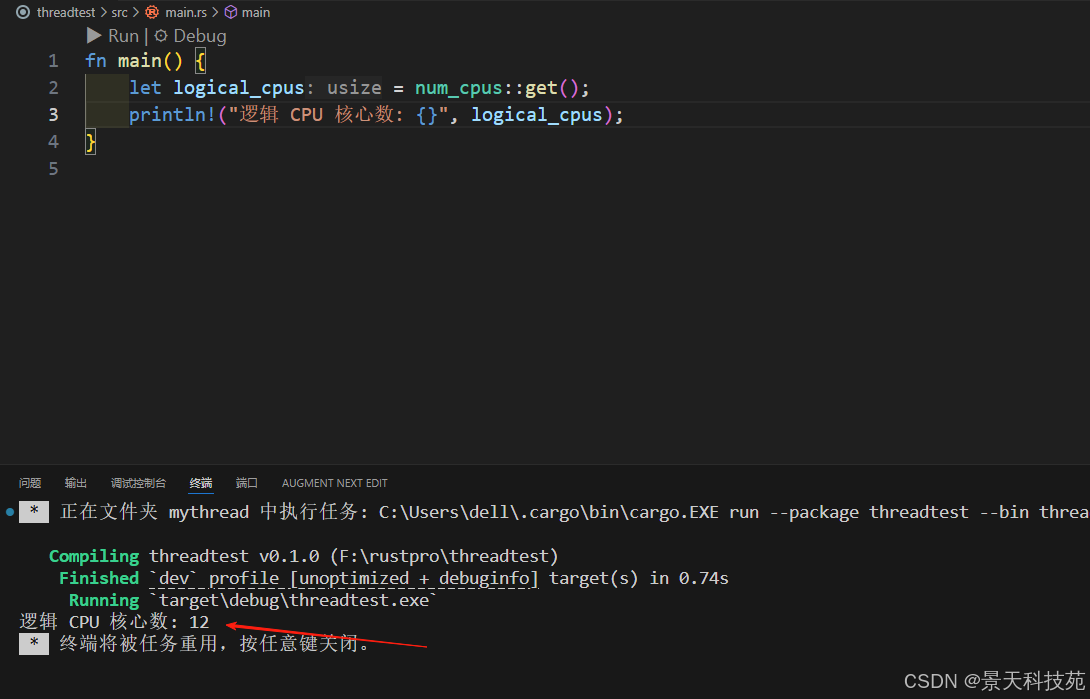
use std::{ io, thread };fn main() -> io::Result<()> {let count = thread::available_parallelism()?.get();println!("Number of logical cores available: {count}");Ok(())
}
可以看到当前逻辑处理器数量是12
5、affinity线程亲和性
Rust 的 affinity 第三方库用于设置和获取线程的 CPU 亲和性(CPU affinity),即限制线程运行在哪些 CPU 上。它可用于性能调优、NUMA 优化或特定核心负载控制等场景。
一、安装方法
在 Cargo.toml 中添加依赖:
[dependencies]
affinity = "0.1.2"
二、基本概念
CPU 亲和性是指将线程或进程绑定到特定的 CPU 核心上运行。affinity 库封装了这部分 OS 提供的接口,支持:
设置当前线程只能在哪些核心上运行。
获取当前线程的 CPU 核心绑定状态。
查询系统中可用的 CPU 核心数量。
三、常用 API 介绍
use affinity::{get_core_num, set_thread_affinity, get_thread_affinity};
- 获取系统中可用的 CPU 核心列表
fn main() {//获取系统中可用核心let cores = affinity::get_core_num();println!("系统可用核心数:{cores}");
}

- 设置和获取当前线程的 CPU 亲和性
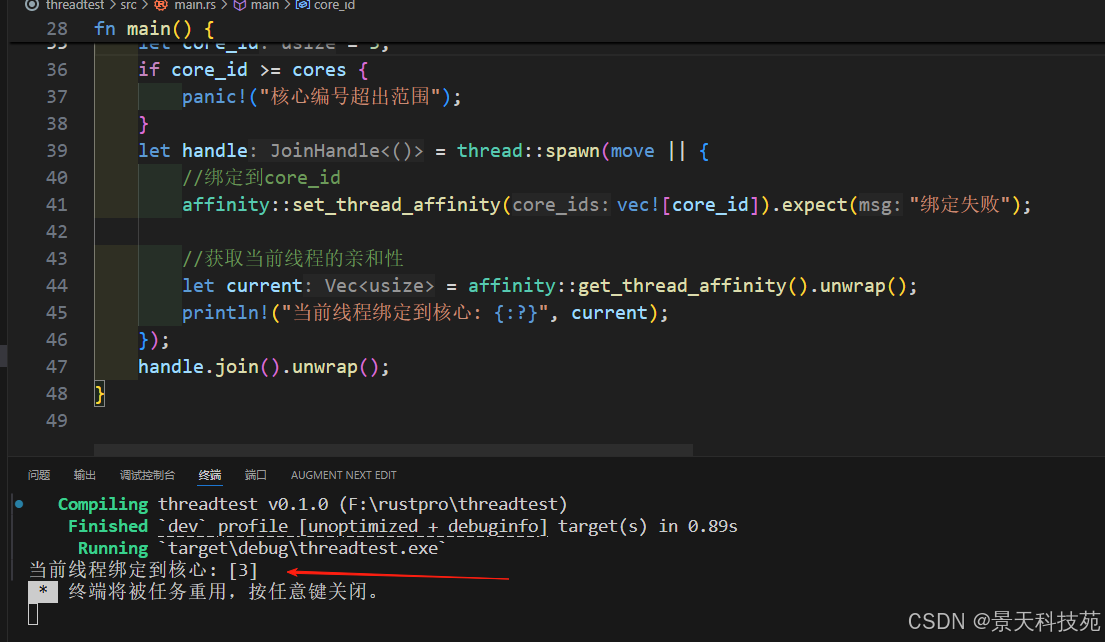
fn main() {use std::thread;//获取系统中可用核心let cores = affinity::get_core_num();// 设置为第 3 个 CPUlet core_id = 3;if core_id >= cores {panic!("核心编号超出范围");}let handle = thread::spawn(move || {//绑定到core_idaffinity::set_thread_affinity(vec![core_id]).expect("绑定失败");//获取当前线程的亲和性let current = affinity::get_thread_affinity().unwrap();println!("当前线程绑定到核心: {:?}", current);});handle.join().unwrap();
}
四、完整示例
use affinity::{ self, set_thread_affinity, get_thread_affinity, get_core_num };
use std::thread;
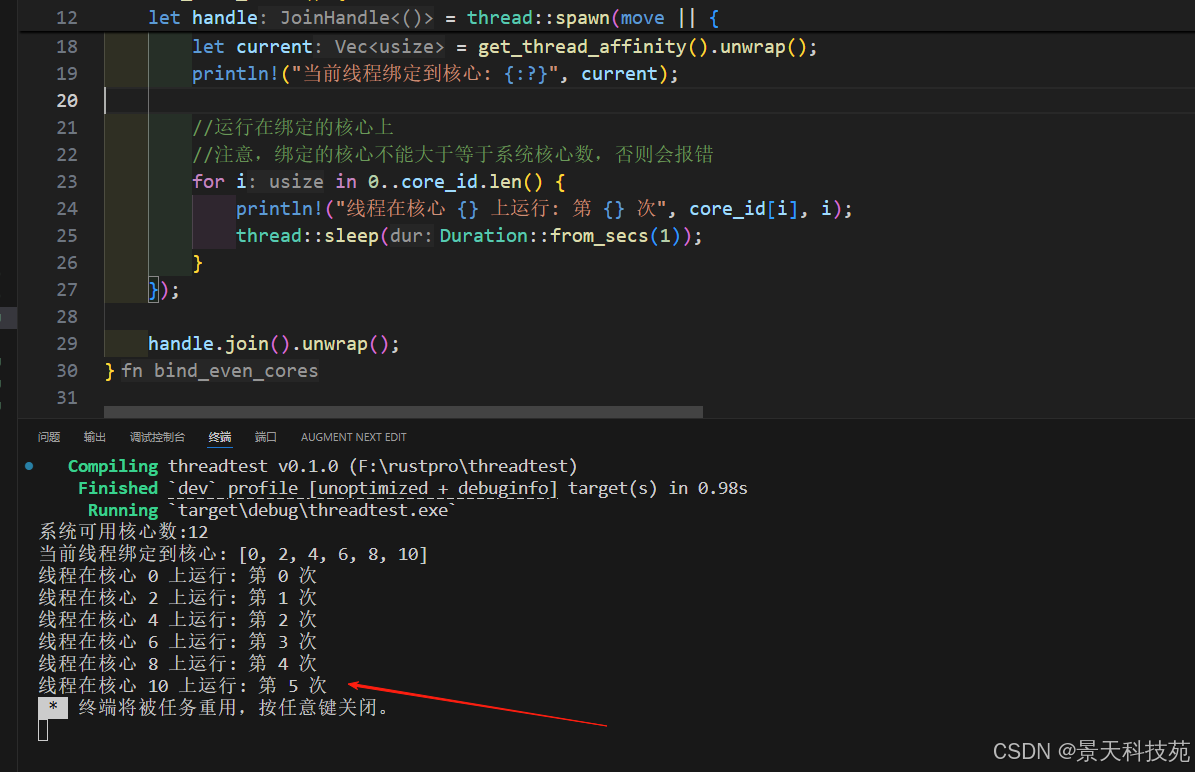
use std::time::Duration;fn bind_even_cores() {let cores = affinity::get_core_num();println!("系统可用核心数:{cores}");//绑定到偶数核心let core_id: Vec<usize> = (0..get_core_num()).step_by(2).collect();//设置亲和性和获取亲和性// 启动线程并绑定let handle = thread::spawn(move || {//绑定到core_id//这里set_thread_affinity()获取了core_id的所有权,后面core_id就不能再使用了,所以需要clone一下set_thread_affinity(core_id.clone()).expect("绑定失败");//获取当前线程的亲和性let current = get_thread_affinity().unwrap();println!("当前线程绑定到核心: {:?}", current);//运行在绑定的核心上//注意,绑定的核心不能大于等于系统核心数,否则会报错for i in 0..core_id.len() {println!("线程在核心 {} 上运行: 第 {} 次", core_id[i], i);thread::sleep(Duration::from_secs(1));}});handle.join().unwrap();
}fn main() {bind_even_cores();
}
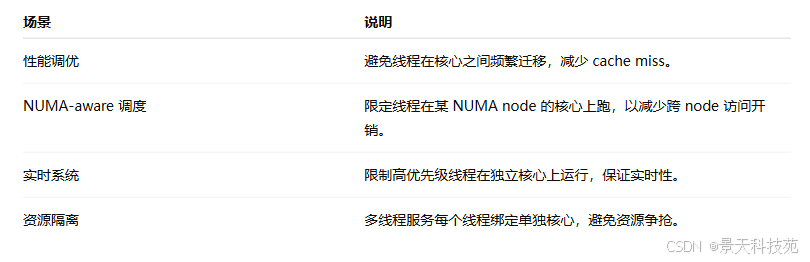
五、实用场景
六、调试技巧
使用 htop 查看线程运行在哪些核心上。
在 Linux 下用 taskset -c 启动程序强制绑定进程(可配合库对比)。
numactl 查看/控制 NUMA 分布情况。
七、注意事项
设置线程亲和性不保证线程只运行在指定核心上,操作系统仍有一定调度权(尤其是负载高时)。
与 Tokio 这类 async runtime 混用时需特别小心,可能一个线程运行多个任务时不适合绑定特定 CPU。
在多线程场景中,避免多个线程绑定到相同核心,否则反而降低性能。
6、num_cpus
num_cpus 是 Rust 中一个轻量级、跨平台的第三方库,用于获取系统的 CPU 核心数,常用于多线程编程中,帮助你合理地配置线程池大小或并发任务数量。
下面是对 num_cpus 库的详细用法介绍,包括安装方法、核心函数、典型应用场景,以及注意事项。
📦 一、安装
在你的 Cargo.toml 中添加:
[dependencies]
num_cpus = "1.17.0"
🧠 二、核心 API 说明
num_cpus 提供两个最核心的函数:
fn get() -> usize
fn get_physical() -> usize
- num_cpus::get()
返回 逻辑 CPU 数量(即包含超线程技术的线程总数)。
通常用于线程池大小设置。
let logical_cpus = num_cpus::get();
println!("逻辑 CPU 核心数: {}", logical_cpus);
- num_cpus::get_physical()
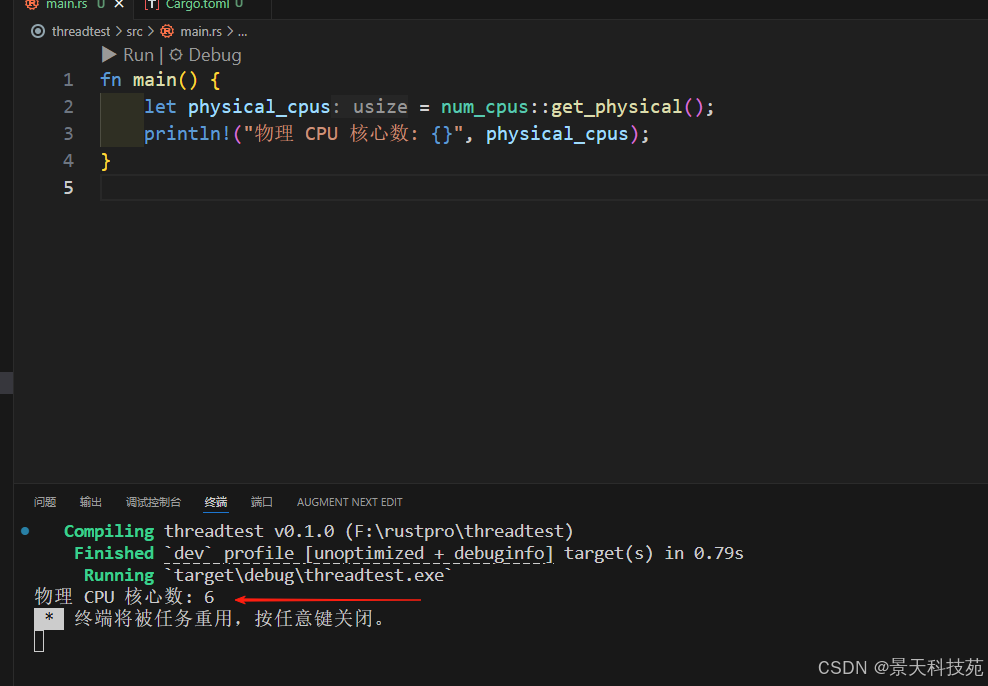
返回 物理核心数量(不包含超线程)。
fn main() {let physical_cpus = num_cpus::get_physical();println!("物理 CPU 核心数: {}", physical_cpus);
}
🛠 三、常见用途
- 配置 Rayon 线程池
use rayon::ThreadPoolBuilder;fn main() {let threads = num_cpus::get();let pool = ThreadPoolBuilder::new().num_threads(threads).build().unwrap();pool.install(|| {// 并行任务代码});
}
- 配置 Tokio Runtime
use tokio::runtime::Builder;fn main() {let threads = num_cpus::get();let runtime = Builder::new_multi_thread().worker_threads(threads).enable_all().build().unwrap();runtime.block_on(async {// async 任务代码});
}
- 控制并发任务数量
let max_concurrent_tasks = num_cpus::get(); // 或 get() - 1,给系统保留资源
⚠️ 四、注意事项
get() 返回的是逻辑核心数,通常用于并发线程数的上限。
如果你希望避免 CPU 过载,可以设置 max(num_cpus::get() - 1, 1)。
在容器中运行(如 Docker),返回值可能是宿主机的核心数,除非 --cpuset 限制了可用核心。
没有异步功能或线程控制功能,它仅仅返回一个数字。
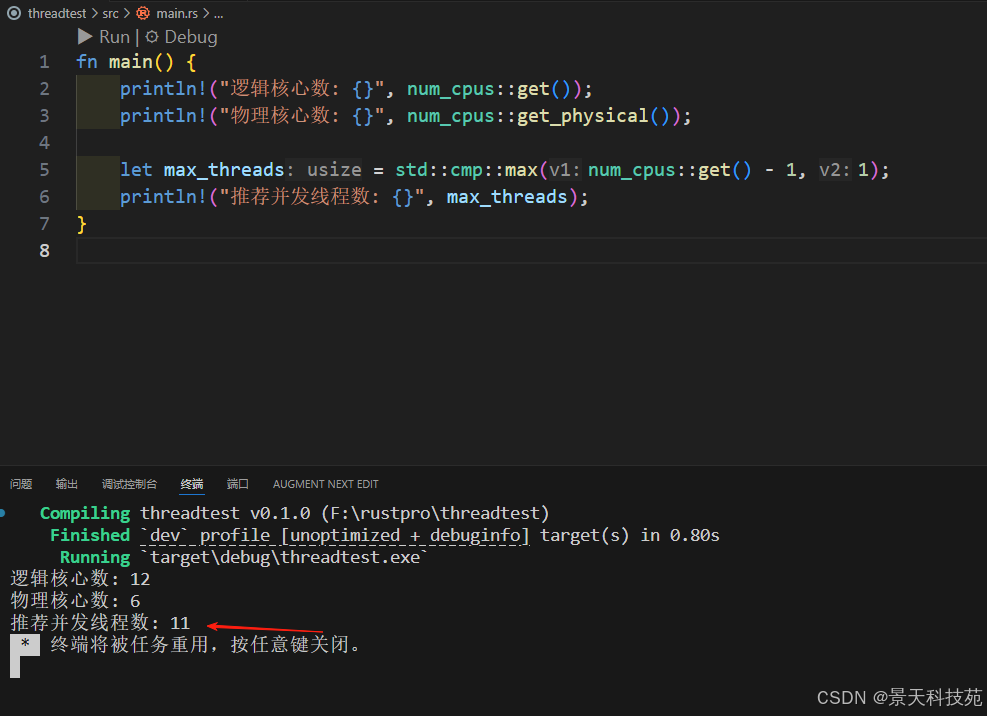
📚 五、完整示例
fn main() {println!("逻辑核心数: {}", num_cpus::get());println!("物理核心数: {}", num_cpus::get_physical());let max_threads = std::cmp::max(num_cpus::get() - 1, 1);println!("推荐并发线程数: {}", max_threads);
}
8、sleep 和 park
有时候我们我们需要将当前的业务暂停一段时间,可能是某些条件不满足,
比如实现spinlock, 或者是想定时的执行某些业务,如 cron 类的程序,这个时候我们可以调用thread::sleep 函数:
use std::thread;
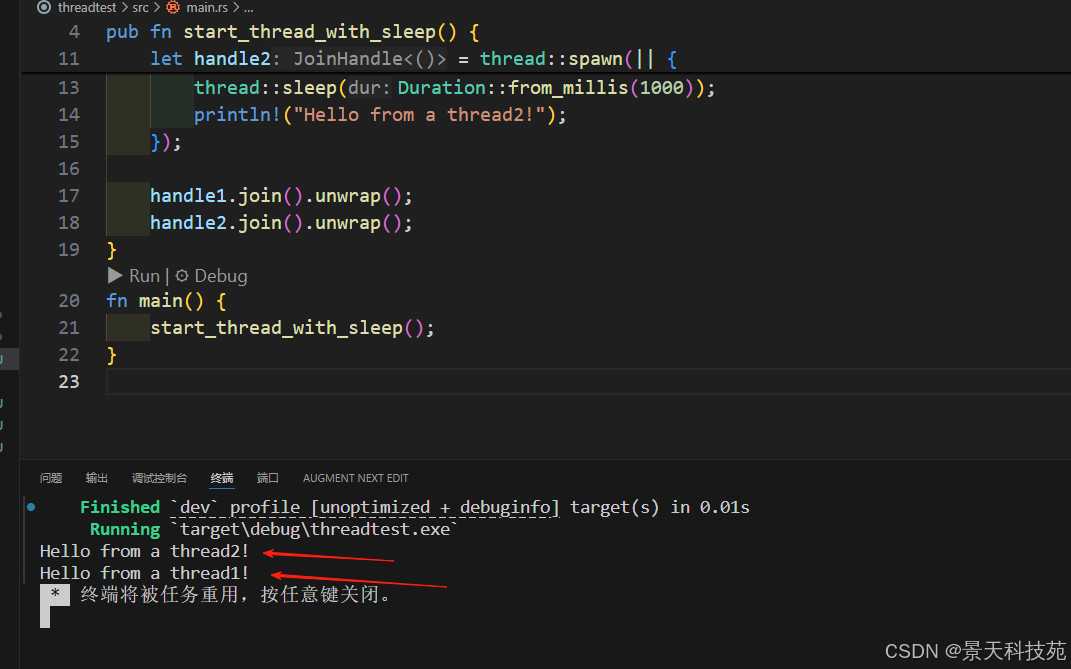
use std::time::Duration;pub fn start_thread_with_sleep() {let handle1 = thread::spawn(|| {//暂停2秒thread::sleep(Duration::from_millis(2000));println!("Hello from a thread1!");});let handle2 = thread::spawn(|| {//暂停1秒thread::sleep(Duration::from_millis(1000));println!("Hello from a thread2!");});handle1.join().unwrap();handle2.join().unwrap();
}
fn main() {start_thread_with_sleep();
}
它至少保证当前线程 sleep 指定的时间。因为它会阻塞当前的线程,所以不要在异步的代码中调用它。
如果时间设置为 0, 不同的平台处理是不一样的,Unix 类的平台会立即返回,不会调用 nanosleep 系统调用,而 Windows 平台总是会调用底层的 Sleep系统调用。
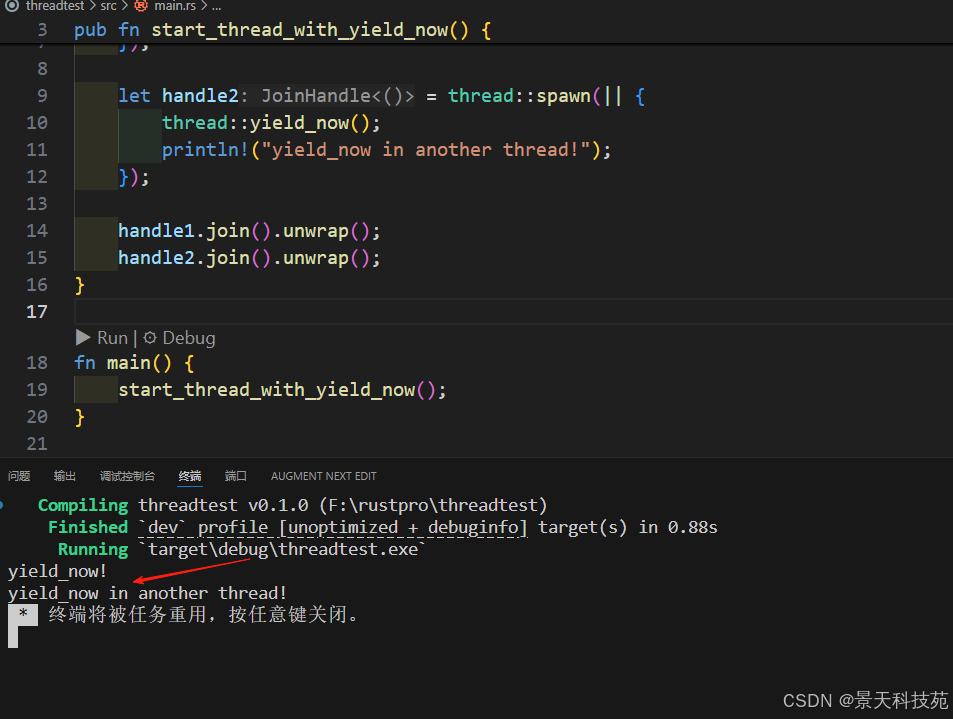
如果你只是想让出时间片,你不用设置时间为 0,而是调用 yield_now 函数即可:
use std::thread;pub fn start_thread_with_yield_now() {let handle1 = thread::spawn(|| {thread::yield_now(); // 让出时间片println!("yield_now!");});let handle2 = thread::spawn(|| {thread::yield_now();println!("yield_now in another thread!");});handle1.join().unwrap();handle2.join().unwrap();
}fn main() {start_thread_with_yield_now();
}
如果在休眠时间不确定的情况下,我们想让某个线程休眠,将来在某个事件发生之后,
我们再主动的唤醒它,那么就可以使用我们前面介绍的 park 和 unpark 方法了。
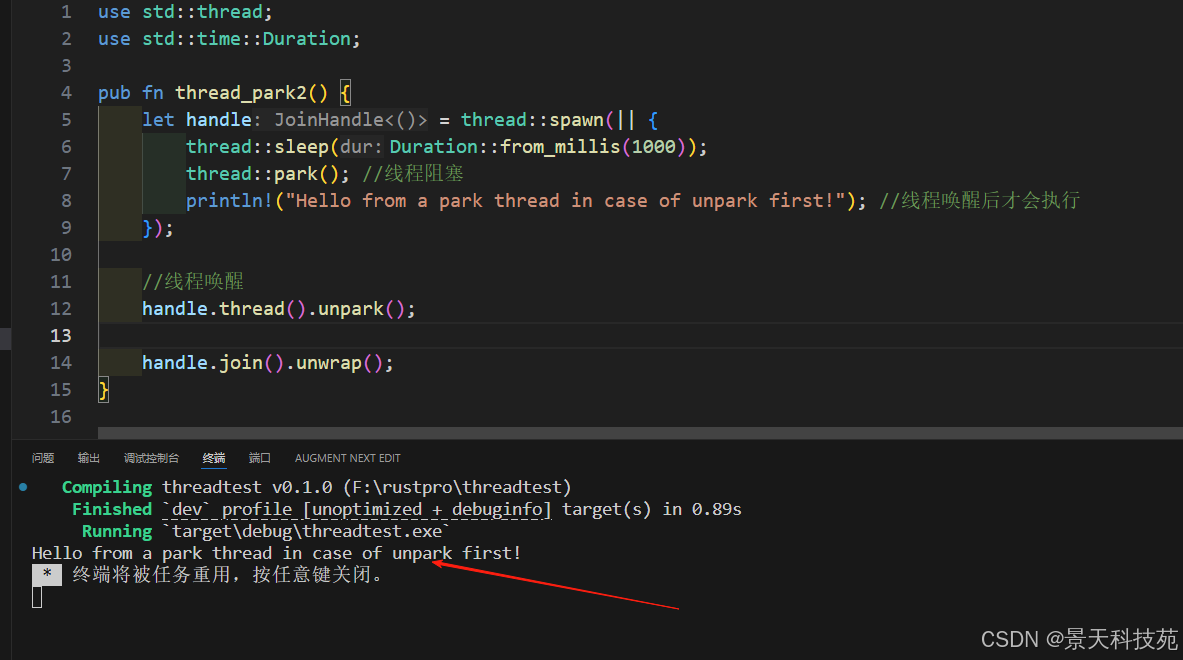
你可以认为每个线程都有一个令牌 ( token ), 最初该令牌不存在:
• thread::park 将阻塞当前线程,直到线程的令牌可用。
此时它以原子操作的使用令牌。thread::park_timeout 执行相同的操作,但允许指定阻止线程的最长时间。和 sleep 不同,它可以还未到超时的时候就被唤醒。
• thread.upark 方法以原子方式使令牌可用(如果尚未可用)。由于令牌初始不存在,unpark 会导致紧接着的 park 调用立即返回。
use std::thread;
use std::time::Duration;pub fn thread_park2() {let handle = thread::spawn(|| {thread::sleep(Duration::from_millis(1000));thread::park(); //线程阻塞println!("Hello from a park thread in case of unpark first!"); //线程唤醒后才会执行});//线程唤醒handle.thread().unpark();handle.join().unwrap();
}fn main() {thread_park2();
}
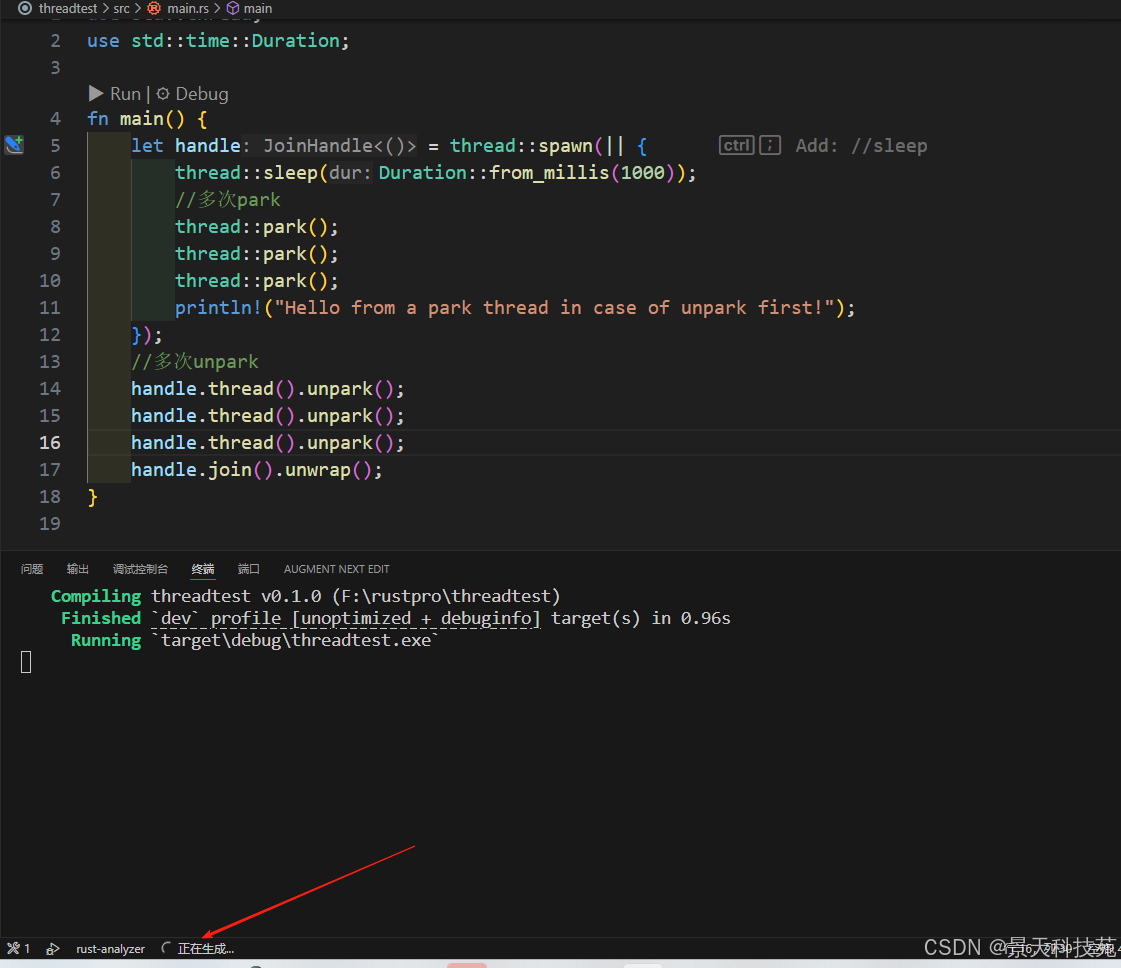
如果先调用 unpark , 接下来的那个 park 会立即返回:
如果预先调用一股脑的 unpark 多次,然后再一股脑的调用 park 行不行,如下所示:
use std::thread;
use std::time::Duration;fn main() {let handle = thread::spawn(|| {thread::sleep(Duration::from_millis(1000));//多次parkthread::park();thread::park();thread::park();println!("Hello from a park thread in case of unpark first!");});//多次unparkhandle.thread().unpark();handle.thread().unpark();handle.thread().unpark();handle.join().unwrap();
}
答案是不行。因为一个线程只有一个令牌,这个令牌或者存在或者只有一个,多次调用unpark 也是针对一个令牌进行的的操作,上面的代码会导致新建的那个线程一直处于parked 状态。
依照官方的文档,park 函数的调用并不保证线程永远保持 parked 状态,调用者应该小心这种可能性。
程序一直处于阻塞状态
9、scoped thread
thread::scope 函数提供了创建 scoped thread 的可能性。
scoped thread 不同于上面我们创建的 thread, 它可以借用 scope 外部的非 ‘static’ 数据。
使用thread::scope 函数提供的 Scope 的参数,可以创建 (spawn) scoped thread。
创建出来的 scoped thread 如果没有手工调用 join , 在这个函数返回前会自动 join 。
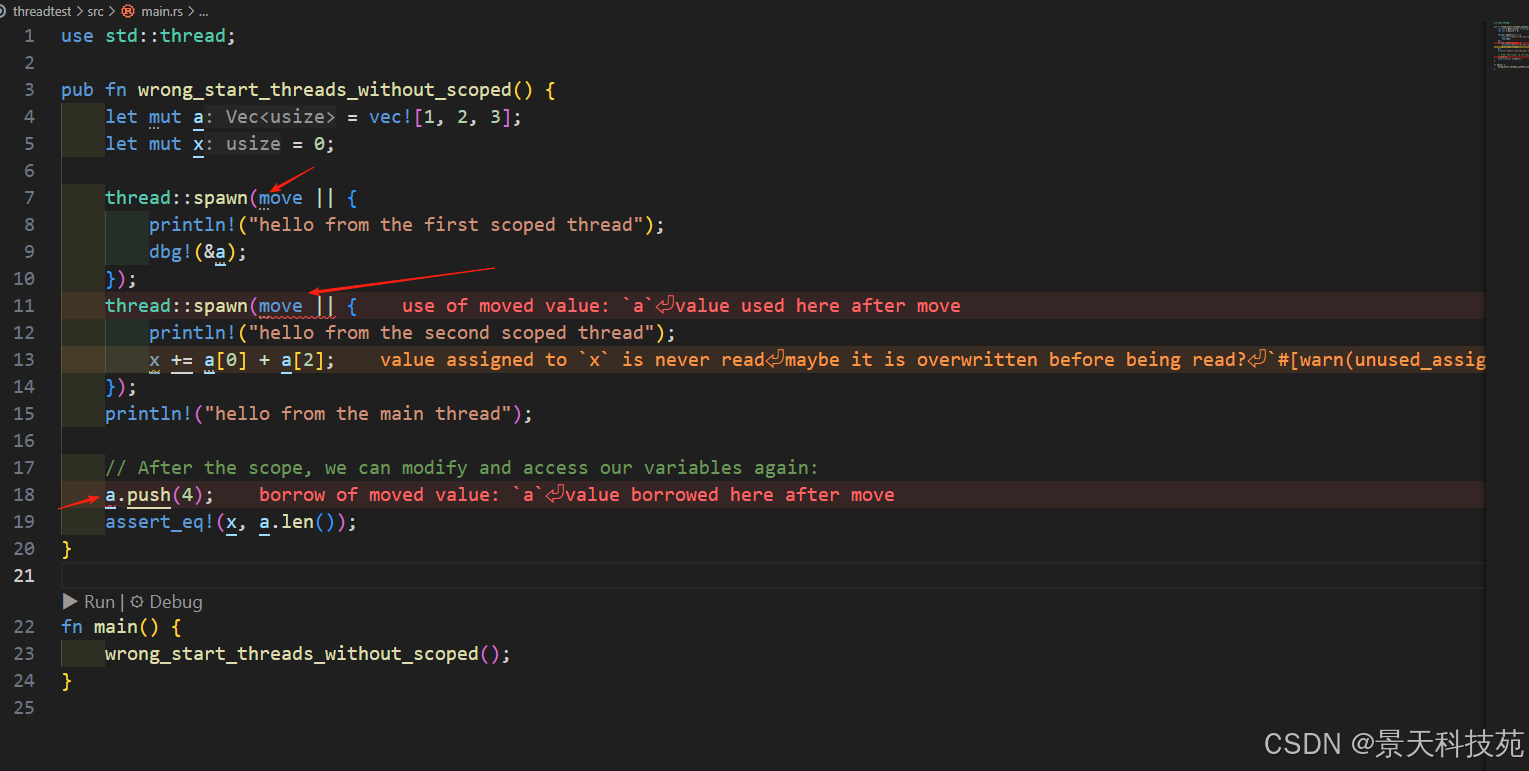
use std::thread;pub fn wrong_start_threads_without_scoped() {let mut a = vec![1, 2, 3];let mut x = 0;thread::spawn(move || {println!("hello from the first scoped thread");dbg!(&a);});thread::spawn(move || {println!("hello from the second scoped thread");x += a[0] + a[2];});println!("hello from the main thread");// After the scope, we can modify and access our variables again:a.push(4);assert_eq!(x, a.len());
}fn main() {wrong_start_threads_without_scoped();
}
这段代码是无法编译的,因为线程外的 a 没有办法 move 到两个 thread 中,即使 move到一个 thread, 外部的线程也没有办法再使用它了。
为了解决这个问题,我们可以使用scoped thread:
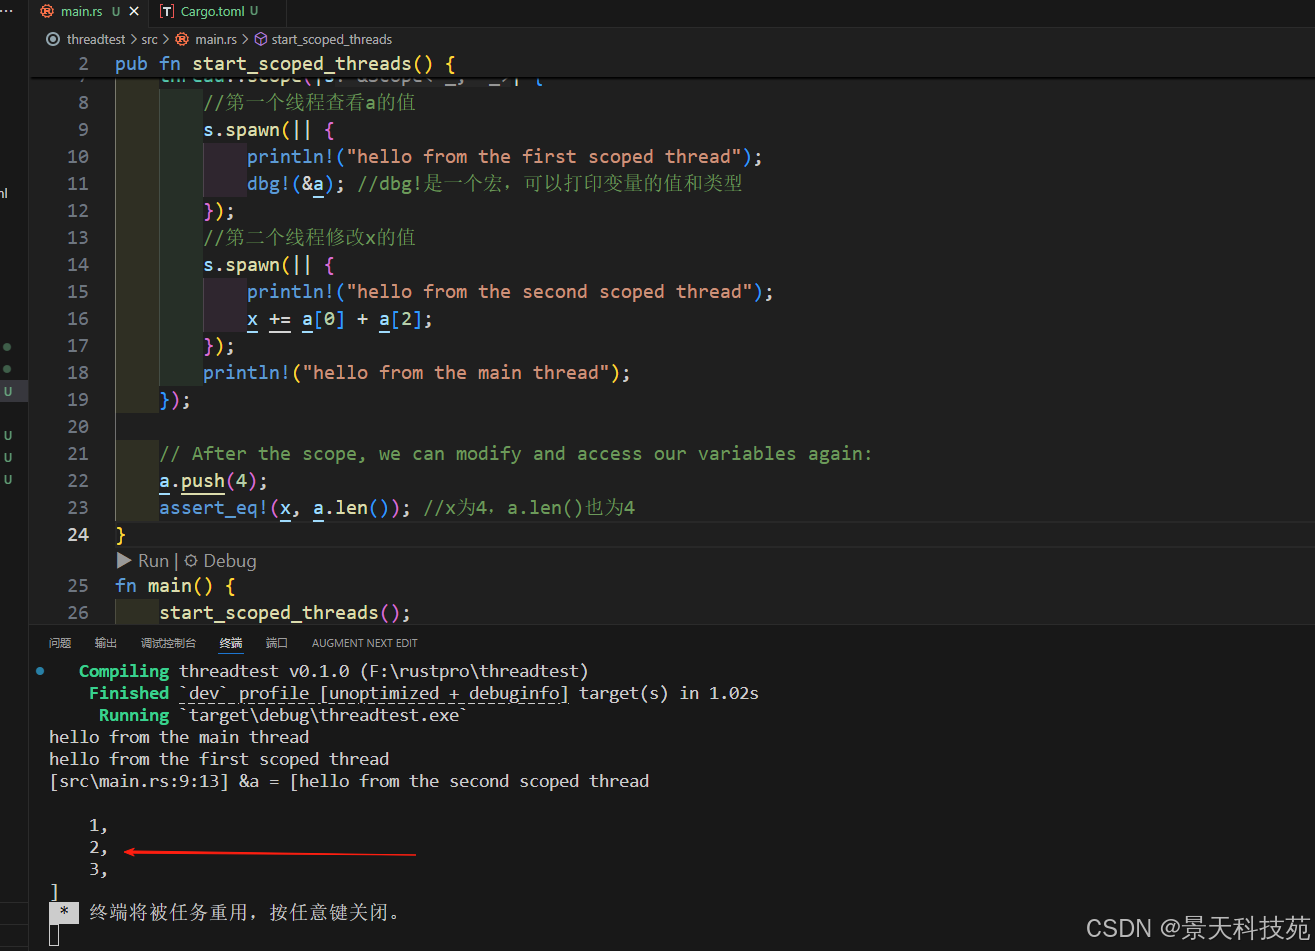
use std::thread;
pub fn start_scoped_threads() {let mut a = vec![1, 2, 3];let mut x = 0;//使用线程作用域//里面启动两个线程thread::scope(|s| {//第一个线程查看a的值s.spawn(|| {println!("hello from the first scoped thread");dbg!(&a); //dbg!是一个宏,可以打印变量的值和类型});//第二个线程修改x的值s.spawn(|| {println!("hello from the second scoped thread");x += a[0] + a[2];});println!("hello from the main thread");});// After the scope, we can modify and access our variables again:a.push(4);assert_eq!(x, a.len()); //x为4,a.len()也为4
}
fn main() {start_scoped_threads();
}
这里我们调用了 thread::scope 函数,并使用 s 参数启动了两个 scoped thread, 它们使用了外部的变量 a 和 x 。
因为我们对 a 只是读,对 x 只有单线程的写,所以不用考虑并发问题。
thread::scope 返回后,两个线程已经执行完毕,所以外部的线程又可以访问变量了。
标准库的 scope 功能并没有进一步扩展,事实上我们可以看到,在新的scoped thread, 我们是不是还可以启动新的 scope 线程? 这样实现类似 java 一样的Fork-Join 父子线程。
不过如果你有这个需求,可以通过第三方的库实现。
10、ThreadLocal
ThreadLocal 为 Rust 程 序 提 供 了 thread-local storage 的实现。
TLS(thread-local storage) 可以存储数据到全局变量中,每个线程都有这个存储变量的副本,
线程不会分享这个数据,副本是线程独有的,所以对它的访问不需要同步控制。
Java 中也有类似的数据结构,但是 Go 官方不建议实现 goroutine-localstorage。
thread-local key 拥有它的值,并且在线程退出此值会被销毁。
我们使用 thread_local!宏创建 thread-local key, 它可以包含’static 的值。它使用 with 访问函数去访问值。
如果我们想修值,我们还需要结合 Cell 和 RefCell , 这两个类型我们后面同步原语章节中再介绍,当前你可以理解它们为不可变变量提供内部可修改性。
一个 ThreadLocal 例子如下:
use std::thread;
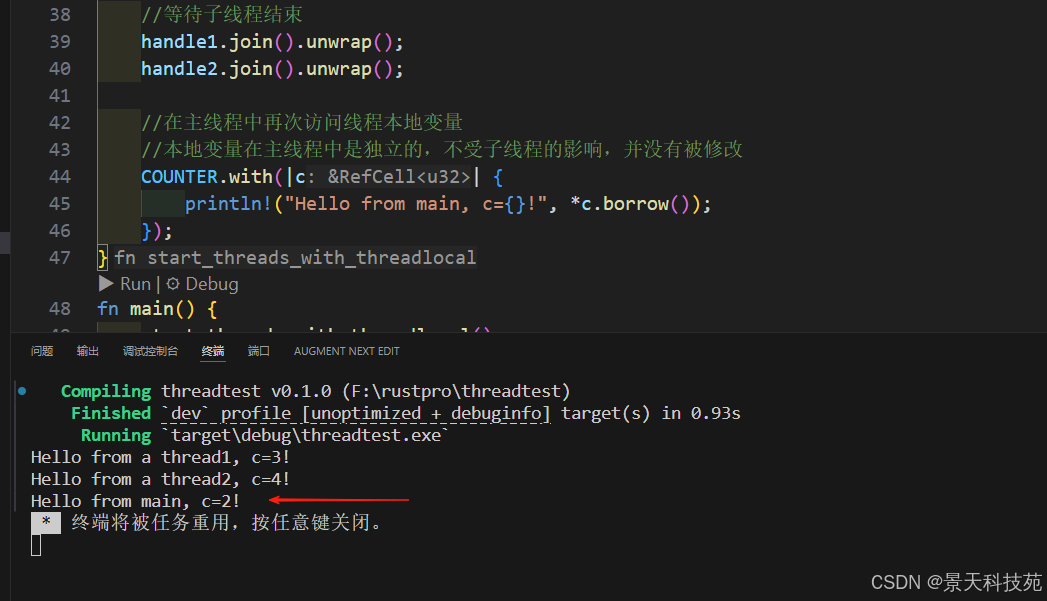
use std::cell::RefCell;pub fn start_threads_with_threadlocal() {//使用thread_local!宏定义线程本地变量thread_local! {static COUNTER: RefCell<u32> = RefCell::new(1);}//在主线程中修改线程本地变量的值COUNTER.with(|c| {*c.borrow_mut() = 2;});//在子线程中修改线程本地变量的值//修改只在当前子线程中有效let handle1 = thread::spawn(move || {COUNTER.with(|c| {*c.borrow_mut() = 3;});COUNTER.with(|c| {println!("Hello from a thread1, c={}!", *c.borrow());});});//在另一个子线程中也修改线程本地变量的值let handle2 = thread::spawn(move || {COUNTER.with(|c| {*c.borrow_mut() = 4;});COUNTER.with(|c| {println!("Hello from a thread2, c={}!", *c.borrow());});});//等待子线程结束handle1.join().unwrap();handle2.join().unwrap();//在主线程中再次访问线程本地变量//本地变量在主线程中是独立的,不受子线程的影响,并没有被修改COUNTER.with(|c| {println!("Hello from main, c={}!", *c.borrow());});
}
fn main() {start_threads_with_threadlocal();
}
在这个例子中,我们定义了一个 Thread_local key: COUNTER。
在外部线程和两个子线程中使用 with 修改了 COUNTER, 但是修改 COUNTER 只会影响本线程。
可以看到最后外部线程输出的 COUNTER 的值是 2,尽管两个子线程修改了 COUNTER 的值为 3 和 4。
11、Move
在前面的例子中,我们可以看到有时候在调用 thread::spawn 的时候,有时候会使用move ,有时候没有使用 move 。
使不使用 move 依赖相应的闭包是否要获取外部变量的所有权。
如果不获取外部变量的所有权,则可以不使用 move , 大部分情况下我们会使用外部变量,所以这里 move 更常见:
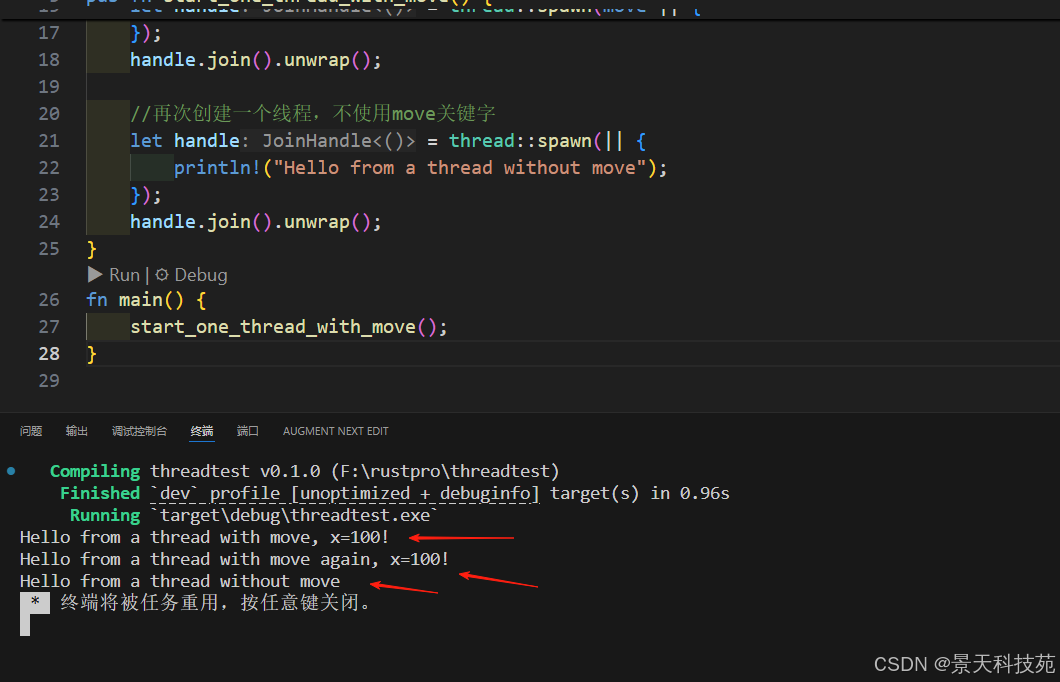
use std::thread;pub fn start_one_thread_with_move() {//创建一个i32的变量let x = 100;//创建一个线程,使用move关键字将x移动到线程中let handle = thread::spawn(move || {println!("Hello from a thread with move, x={}!", x);});handle.join().unwrap();//再次创建一个线程,使用move关键字将x移动到线程中let handle = thread::spawn(move || {println!("Hello from a thread with move again, x={}!", x);});handle.join().unwrap();//再次创建一个线程,不使用move关键字let handle = thread::spawn(|| {println!("Hello from a thread without move");});handle.join().unwrap();
}
fn main() {start_one_thread_with_move();
}
当我们在线程中引用变量 x 时,我们使用了 move , 当我们没引用变量,我们没使用 move。
这里有一个问题,move 不是把 x 的所有权交给了第一个子线程了么,为什么第二个子线程依然可以 move 并使用 x 呢?
这是因为 x 变量是 i32 类型的,它实现了 Copy trait, 实际 move 的时候实际复制它的的值,
如果我们把 x 替换成一个未实现 Copy 的类型,类似的代码就无法编译了,因为x 的所有权已经转移给第一个子线程了:
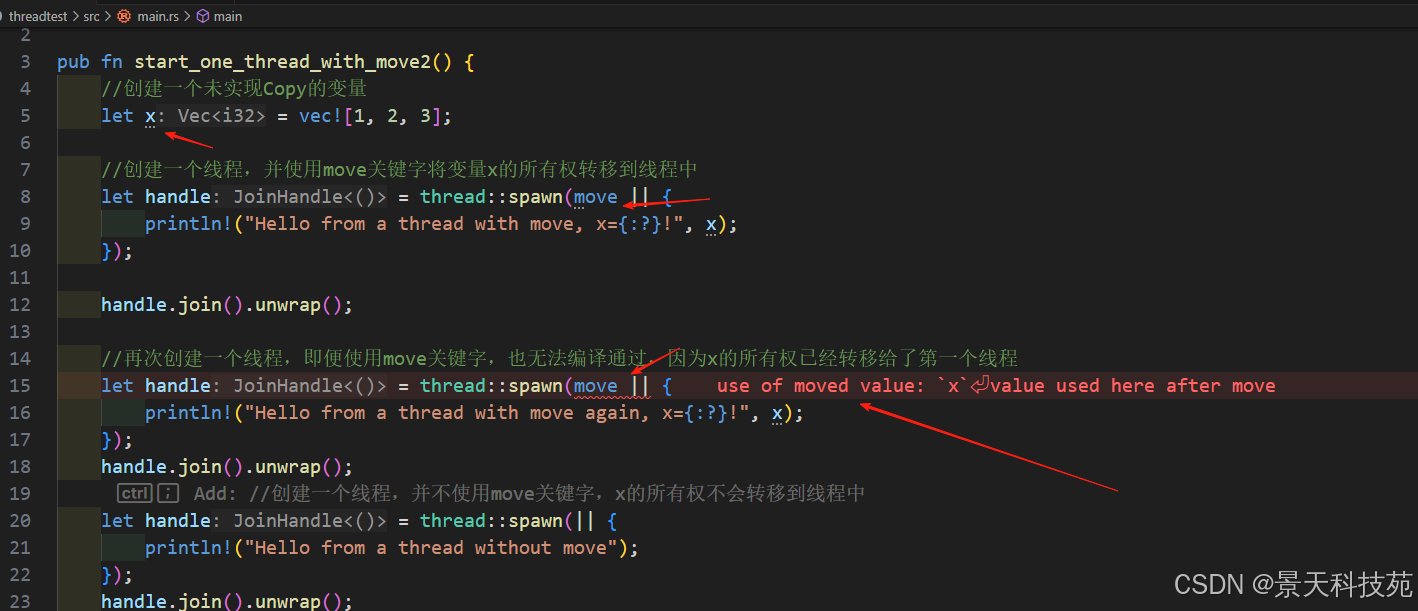
use std::thread;pub fn start_one_thread_with_move2() {//创建一个未实现Copy的变量let x = vec![1, 2, 3];//创建一个线程,并使用move关键字将变量x的所有权转移到线程中let handle = thread::spawn(move || {println!("Hello from a thread with move, x={:?}!", x);});handle.join().unwrap();//再次创建一个线程,即便使用move关键字,也无法编译通过,因为x的所有权已经转移给了第一个线程let handle = thread::spawn(move || {println!("Hello from a thread with move again, x={:?}!", x);});handle.join().unwrap();let handle = thread::spawn(|| {println!("Hello from a thread without move");});handle.join().unwrap();
}
fn main() {start_one_thread_with_move2();
}
12、设置线程优先级
通过 crate thread-priority 可以设置线程的优先级。
因为 Rust 的线程都是纯的操作系统的优先级,现代的操作系统的线程都有优先级的概念,所以可以通过系统调用等方式设置优先级,
唯一一点不好的就是各个操作系统的平台的优先级的数字和范围不一样。当前这个库支持以下的平台:
Linux
Android
DragonFly
FreeBSD
OpenBSD
NetBSD
macOS
iOS
Windows
在 Rust 中使用 thread_priority crate 可以设置线程的优先级,支持 Windows、Linux 和 macOS 系统(macOS 支持有限)。
可选的优先级和调度策略
ThreadPriority:
Min:最低
Crossplatform(i8):-15 到 15
Specific(i32):平台特定
Max:最高
ThreadSchedulePolicy:
Realtime(RealtimeThreadSchedulePolicy):实时策略(如 Fifo,RoundRobin)
Normal(NormalThreadSchedulePolicy):普通策略(如 Normal,Batch,Idle)
基本使用示例
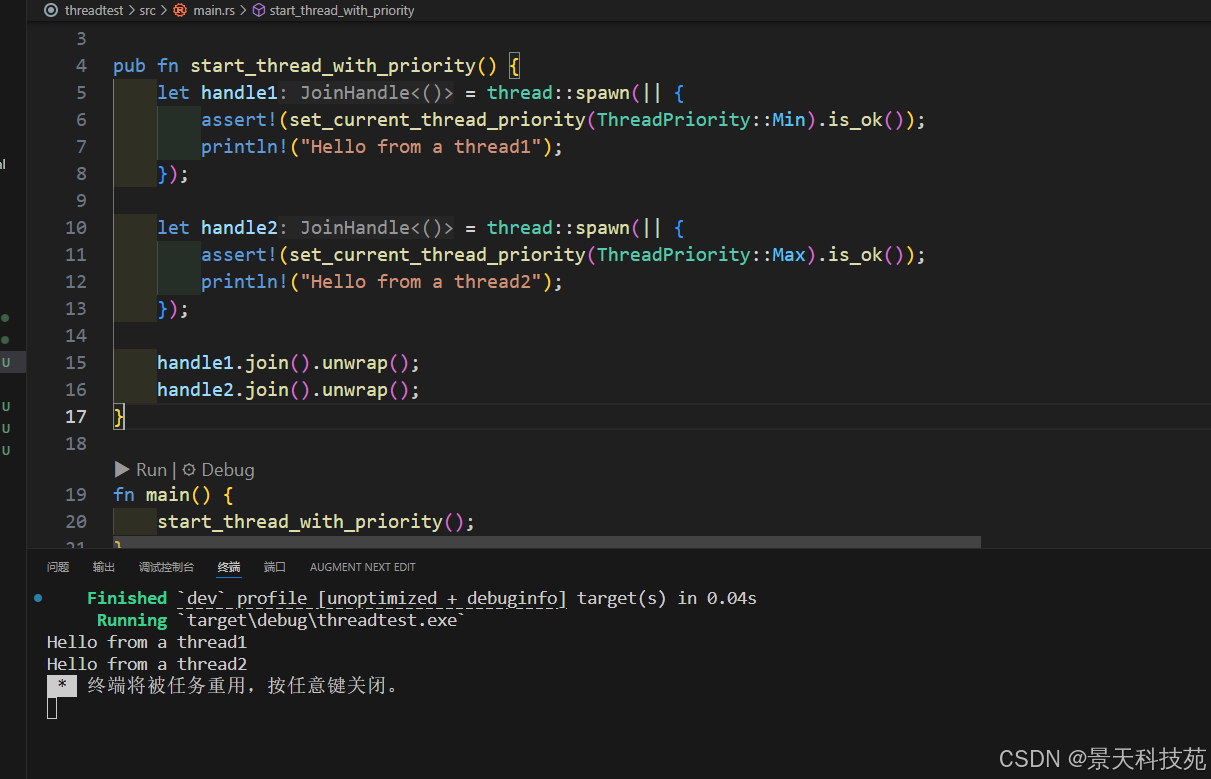
use thread_priority::*;
use std::thread;pub fn start_thread_with_priority() {let handle1 = thread::spawn(|| {assert!(set_current_thread_priority(ThreadPriority::Min).is_ok());println!("Hello from a thread1");});let handle2 = thread::spawn(|| {assert!(set_current_thread_priority(ThreadPriority::Max).is_ok());println!("Hello from a thread2");});handle1.join().unwrap();handle2.join().unwrap();
}fn main() {start_thread_with_priority();
}
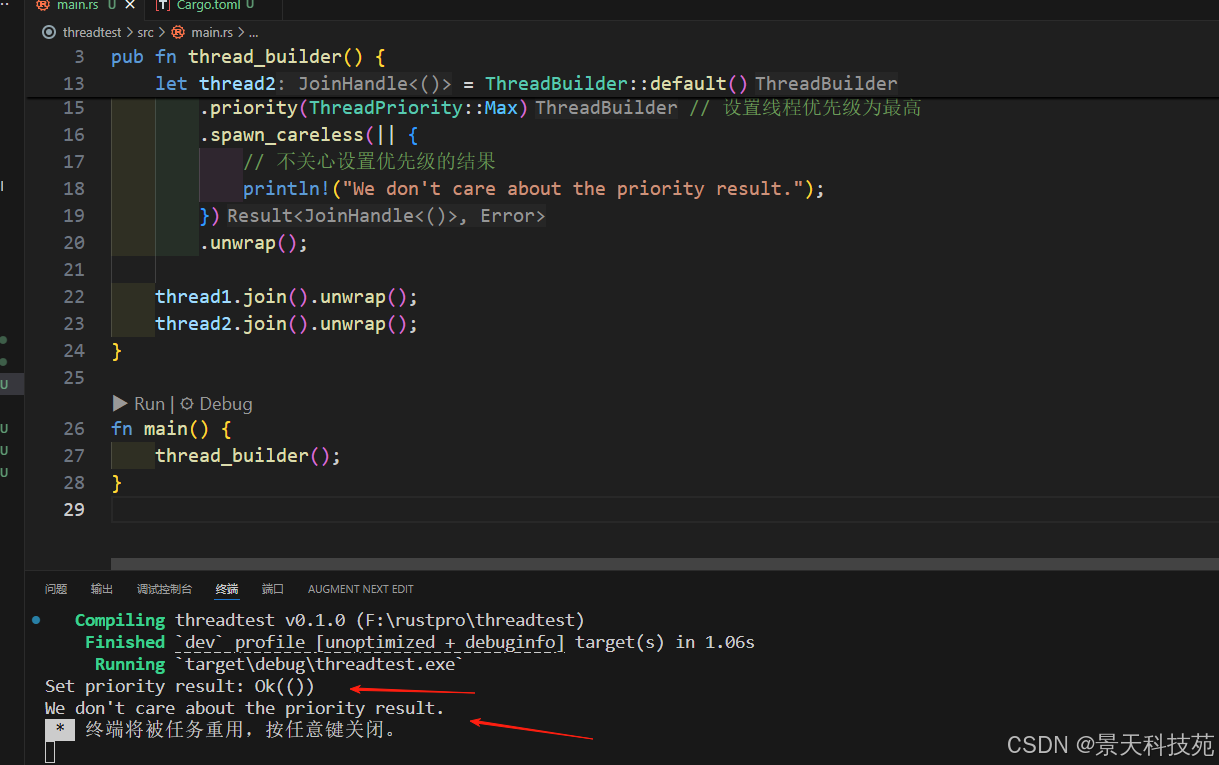
它还提供了一个 ThreadBuilder, 类似标准库的 ThreadBuilder, 只不过增加设置优先级的能力:
use thread_priority::*;pub fn thread_builder() {let thread1 = ThreadBuilder::default().name("MyThread").priority(ThreadPriority::Max) // 设置线程优先级为最高.spawn(|result| {println!("Set priority result: {:?}", result);assert!(result.is_ok());}).unwrap();let thread2 = ThreadBuilder::default().name("MyThread").priority(ThreadPriority::Max) // 设置线程优先级为最高.spawn_careless(|| {// 不关心设置优先级的结果println!("We don't care about the priority result.");}).unwrap();thread1.join().unwrap();thread2.join().unwrap();
}fn main() {thread_builder();
}
13、Panic
Rust 中致命的逻辑错误会导致线程 panic, 出现 panic 是线程会执行栈回退,运行解构器以及释放拥有的资源等等。
Rust 可以使用 catch_unwind 实现类似 try/catch 捕获panic 的功能,或者 resume_unwind 继续执行。
如果 panic 没有被捕获,那么线程就会退出,通过 JoinHandle 可以检查
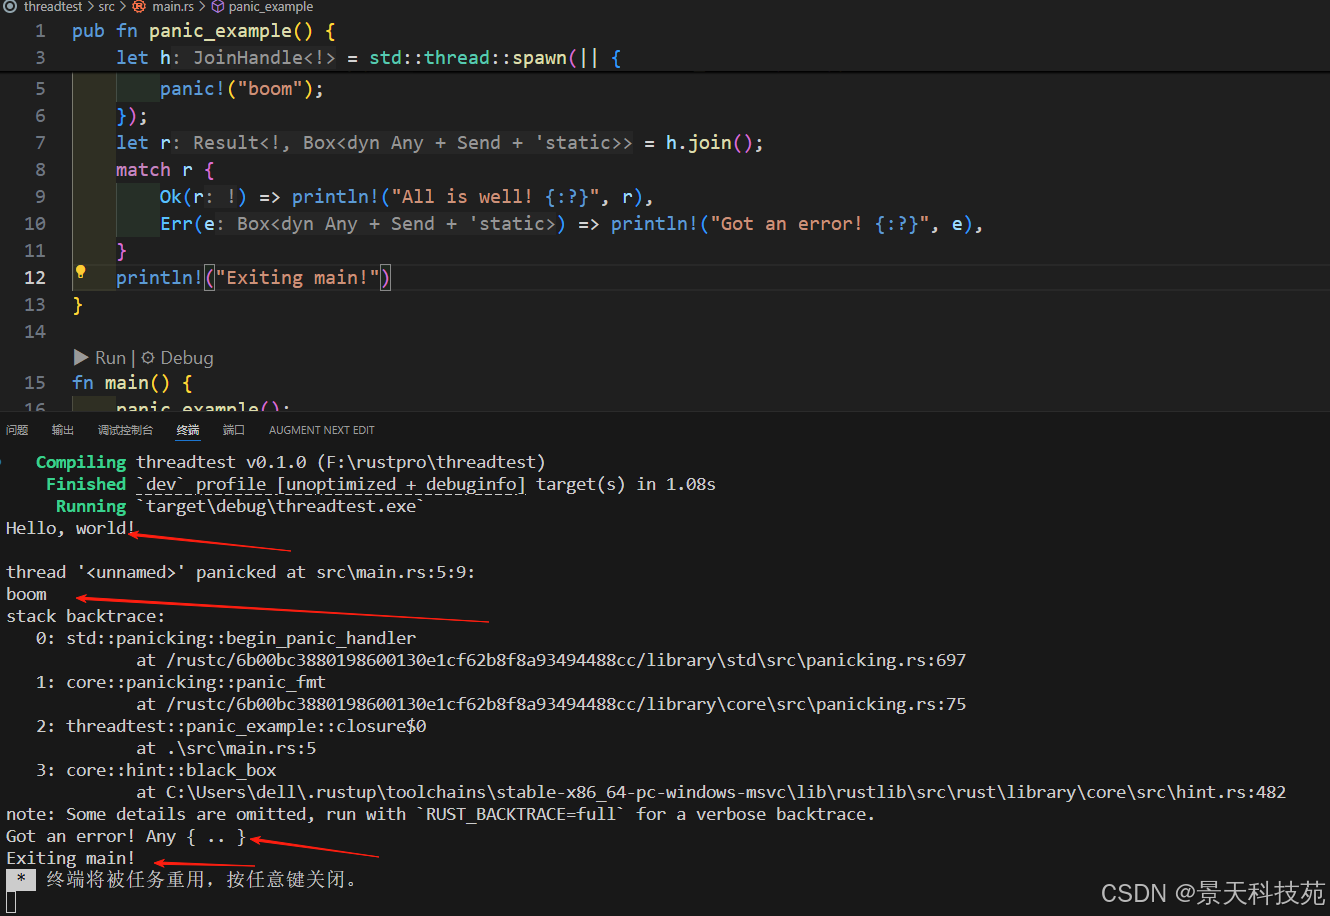
这个错误,如下面的代码:
pub fn panic_example() {println!("Hello, world!");let h = std::thread::spawn(|| {std::thread::sleep(std::time::Duration::from_millis(1000));panic!("boom");});let r = h.join();match r {Ok(r) => println!("All is well! {:?}", r),Err(e) => println!("Got an error! {:?}", e),}println!("Exiting main!")
}fn main() {panic_example();
}
如果被捕获,外部的 handle 是检查不到这个 panic 的:
pub fn panic_caught_example() {println!("Hello, panic_caught_example !");let h = std::thread::spawn(|| {std::thread::sleep(std::time::Duration::from_millis(1000));//这里通过catch_unwind来捕获paniclet result = std::panic::catch_unwind(|| {panic!("boom");});println!("panic caught, result = {}", result.is_err()); // true});let r = h.join();//panic被捕获,外部检查不到这个线程的panicmatch r {Ok(r) => println!("All is well! {:?}", r), // hereErr(e) => println!("Got an error! {:?}", e),}println!("Exiting main!")
}fn main() {panic_caught_example();
}

通过 scope 生成的 scope thread,任何一个线程 panic, 如果未被捕获,那么 scope 返回是就会返回这个错误。
14、Rayon scoped thread
Rayon crate可以创建子子孙孙的线程
pub fn rayon_scope() {let mut a = vec![1, 2, 3];let mut x = 0;//通过rayon::scope创建一个作用域,其中可以并发执行多个任务rayon::scope(|s| {// 在作用域内,我们可以通过s.spawn来并发执行多个任务//此线程查看a的值s.spawn(|_| {println!("hello from the first rayon scoped thread");dbg!(&a);});//此线程修改x的值s.spawn(|_| {println!("hello from the second rayon scoped thread");x += a[0] + a[2];});println!("hello from the main thread");});// 出了作用域,两个线程都执行完毕//可以发现x的值已经修改了a.push(4);assert_eq!(x, a.len());
}fn main() {rayon_scope();
}

15、Go 风格的启动线程
你了解过 Go 语言吗?如果你稍微看过 Go 语言,就会发现它的开启新的 goroutine 的方法非常的简洁,
通过 go func() {…}() 就启动了一个 goroutine,貌似同步的代码,却是异步的执行。
有一个第三方的库 go-spawn,可以提供 Go 类似的便利的方法:
通过宏 go! 启动一个线程,使用 join! 把最近 go_spawn 创建的线程 join 起来,看起来
也非常的简洁。虽然关注度不高,但是我觉得它是一个非常有趣的库。
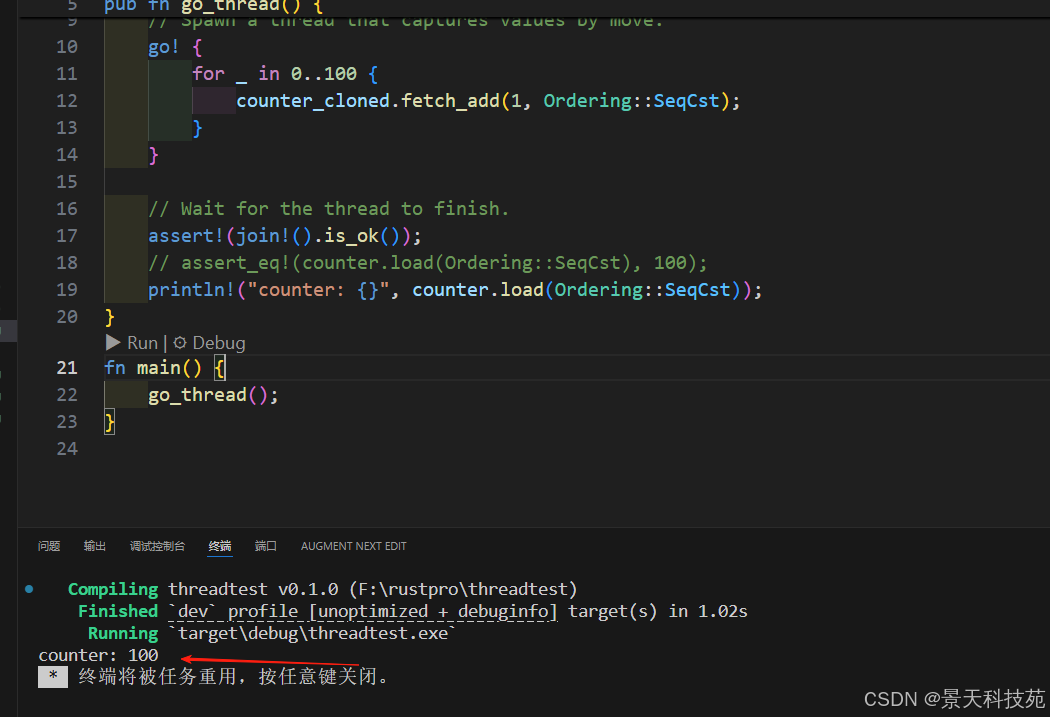
use std::sync::atomic::{ AtomicI64, Ordering };
use std::sync::Arc;
use go_spawn::{ go, join };pub fn go_thread() {let counter = Arc::new(AtomicI64::new(0));let counter_cloned = counter.clone();// Spawn a thread that captures values by move.go! {for _ in 0..100 {counter_cloned.fetch_add(1, Ordering::SeqCst);}}// Wait for the thread to finish.assert!(join!().is_ok());// assert_eq!(counter.load(Ordering::SeqCst), 100);println!("counter: {}", counter.load(Ordering::SeqCst));
}
fn main() {go_thread();
}