我的SSM框架自学2
一、FactoryBean(掌握)
传统的方式是创建工厂对象,通过工厂对象调用创建对象的方法。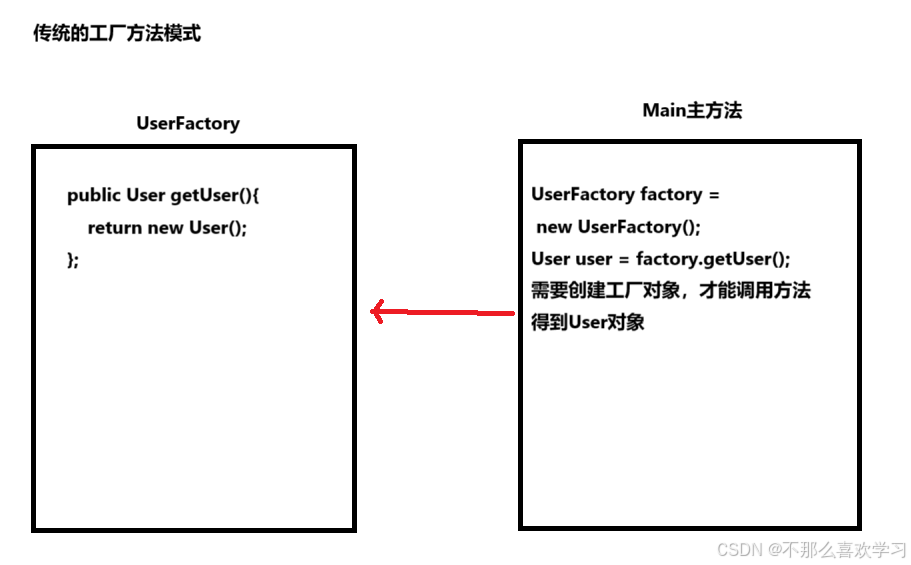
使用FactoryBean的方式,就是直接获得工厂所创建的对象
FactoryBean<T>是一个接口,需要创建一个类实现该接口
有三个方法:
1.getObject();返回一个对象交给IOC容器管理
2.getObjectType();设置所提供对象的类型
3.isSingleton();所提供的对象是否单例,默认单例
public class UserFactory implements FactoryBean<User> {@Overridepublic User getObject() throws Exception {return new User();}@Overridepublic Class<?> getObjectType() {return User.class;}
}当FactoryBean的实现类配置bean时,会将实现类当中的getObject()所返回的对象交给IOC容器管理
<bean id="userFactory" class="com.demo.factory.UserFactory"></bean>IOC容器获取对象,通过所返回的对象的类型来获取,而不是工厂类型来获取bean
ApplicationContext ioc = new ClassPathXmlApplicationContext("applicationContext.xml");User user = ioc.getBean(User.class);二、IOC容器如何创建对象?(理解)
通过bean的class所设置的类型来获取这个class类型的对象(所以class类型不能为接口,接口不能实例化) 然后再通过new instance方法用无参构造方法来创建的对象。
三、bean的作用域(理解)
bean标签添加属性scope,
scope=singleton(单例对象,默认):表示获取该bean所对应的对象是同一个
scope=prototype(多例对象):表示获取该bean所对应的对象不是同一个
<bean id="user" class="com.demo.pojo.User"><property name="username" value="小新"/><property name="phone" value="18509994567"/>
</bean><bean id="user" class="com.demo.pojo.User" scope="prototype"><property name="username" value="小新"/><property name="phone" value="18509994567"/>
</bean>
@Testpublic void test2(){//1.获取IOC容器ApplicationContext ioc = new ClassPathXmlApplicationContext("applicationContext.xml");//2.获取对象User user1 = ioc.getBean(User.class);User user2 = ioc.getBean(User.class);System.out.println(user1 == user2);}返回的结果为:true,说明获取的两个对象是同一个;
添加了scope=prototype,返回结果:false,说明获取的两个对象不是同一个;
四、MyBatis的查询功能
若sql语句查询的结果为多条时,一定不能以实体类类型作为方法的返回值,否则抛出异常:TooManyResultsException
若sql语句查询的结果为1条时,可以使用实体类类型或list集合类型作为方法的返回值
//返回对象为一个可用实体类类型,也可用list类型
User user = userMapper.getUserByName("admin");
List<User> userList = userMapper.getAllUser();
<select id="selectCount" resultType="Integer">select count(*) from t_user
</select>
<!-- List<User> getAllUser();   -->
<!-- 查询所有数据为什么是返回单个对象,因为底层为list,会将查询的单个对象添加进底层的list集合中 -->
<select id="getAllUser" resultType="com.demo.pojo.User">select * from t_user;
</select>
MyBatis为Java中常用的类型设置类型别名
Integer:Integer,int
int:_int,_integer
String:string
Map:map(如果查询的结果不是实体类类型,可以使用map集合,键为字段名,值为字段名的值)
1.模糊查询
like '%${查询参数}%';
字符拼接函数:like concat('%',#{查询参数},'%');
like "%"#{查询参数}"%";
2.MyBatis动态SQL标签
2.1 where标签
2.1.1 若where标签中有任意条件成立,会自动生成where关键字;
2.1.2 自动将where标签的内容前多余的and或or去掉,但是内容后多余的and或or无法去掉;
2.1.3 若where标签中没有任何一个条件成立,则where没有任何功能(不会生成where关键字);
<select id="selectUserByInfo" resultType="com.demo.pojo.User">select * from t_user<where><if test="username != null and username !=''">and username like concat('%',#{username},'%')</if><if test="role != null and role != ''">and role = #{role}</if></where>
</select>
2.2 if标签
通过test属性中的表达式判断标签中的内容是否有效(是否拼接到sql中),username != null 表示没有选,username != ' '表示选了但是什么都没写

<if test="username != null and username !=''">and username like concat('%',#{username},'%')
</if>
<if test="role != null and role != ''">and role = #{role}
</if>
2.3 trim标签
2.3.1 preifx添加前缀
2.3.2 prefixOverrides 去掉前缀多余的内容
2.3.3 suffix添加后缀
2.3.4 suffixOverrides 去掉后缀多余的内容
<select id="selectUserByInfo" resultType="com.demo.pojo.User">select * from t_user<trim prefix="where" prefixOverrides="and" ><if test="username != null and username !=''">and username like concat('%',#{username},'%')</if><if test="role != null and role != ''">and role = #{role}</if></trim>
</select>
2.4 choose、when、otherwise标签
when标签可以有多个,otherwise标签只能有一个。相当与if....else,只能满足一个符合条件的when标签。
<select id="selectUserByInfo" resultType="com.demo.pojo.User">select * from t_user where 1 = 1<choose><when test="username != null">and username like concat('%',#{username},'%')</when><when test="role != null ">and role = #{role}</when><otherwise><!--否则的条件--></otherwise></choose></select>2.5 foreach标签
collection 待遍历的集合
item 遍历集合的变量
separator 分隔符
open 以什么开始
close 以什么结束
批量删除功能:前端给后端传送Ids数组
第一种:
<!--delete from t_user where uid in (6,7,8)-->
<delete id="deleteByIds" >delete from t_user where uid in <foreach collection="Ids" item="id" separator="," open="(" close=")">#{uid}</foreach>
</delete>
第二种:
<!--delete from t_user where uid = 6 or uid = 7 or uid = 8-->
<delete id="deleteByIds" >delete from t_user where <foreach collection="Ids" item="id" separator="or">uid = #{uid}</foreach>
</delete>
2.7 sql标签
可以记录一段sql,在需要用的地方使用<include>标签引用,可以提高程序的编译效率
<sql id="userColumns">uid,username,password,name,phone,address,role
</sql><select id="selectUserByInfo" resultType="com.demo.pojo.User">select <include refid="userColumns"> </include> from t_user<where><if test="username != null and username !=''">and username like concat('%',#{username},'%')</if><if test="role != null and role != ''">and role = #{role}</if></where>
</select>
五、MyBatis缓存
1.什么是缓存?
浏览器缓存也就是用户在访问浏览器的页面时,会把页面的资源保存在本地缓存中,下一次在访问相同的页面时,不会从服务器中重新获取,而是从本地缓存中获取;
那MyBatis的缓存就是把MyBatis所查询的数据存储在缓存中,如果下一次查询还是相同的数据则从缓存中取;
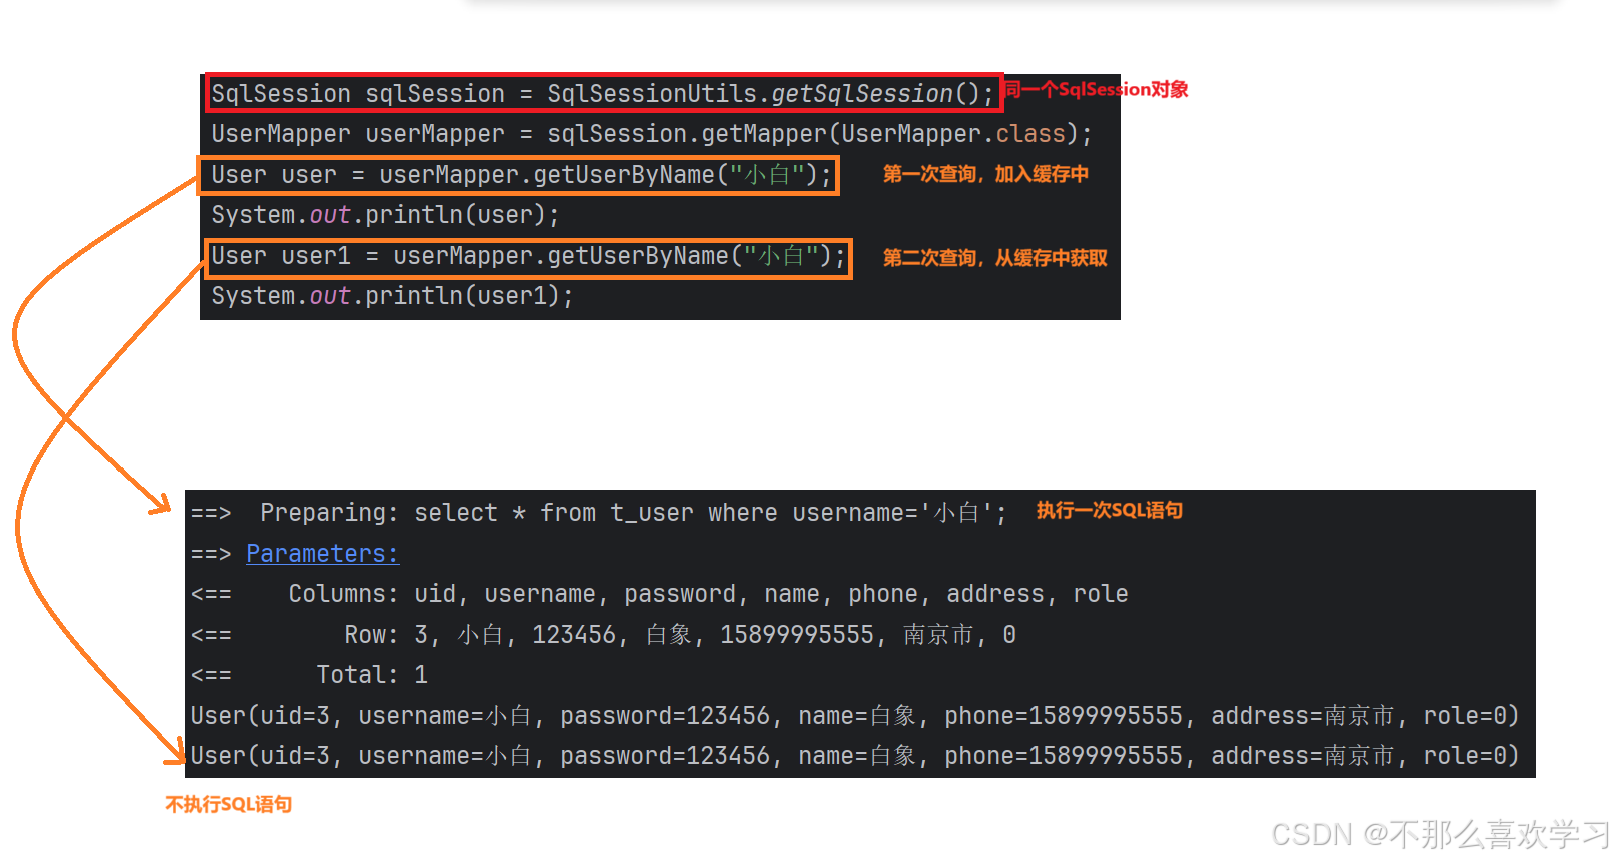
2.MyBatis的一级缓存(默认开启)
一级缓存为SqlSession级别的,即通过同一个SqlSession查询的数据会被缓存。再次使用同一个SqlSession查询同一条数据,会从缓存中获取;
2.2 使一级缓存失效的情况
a.不同的SqlSession对应不同的一级缓存
b.同一个SqlSession但是查询条件不同
c.同一个SqlSession两次查询期间执行了任何一次增删改(即使不影响查询的数据,也会自动清空)操作
d.同一个SqlSession两次查询期间通过clearCache()手动清空了缓存
3.MyBatis的二级缓存
二级缓存为SqlSessionFactory级别的,即通过同一个SqlSessionFactory所获取的SqlSession对象查询的数据会被缓存,通过同一个SqlSessionFactory所获取的SqlSession查询相同的数据会从缓存中获取
3.1 开启二级缓存条件
a. 设置全局配置属性cacheEnabled=“true”,默认为true,不需要设置;
b.Mapper接口的映射文件中,设置标签<cache/>;
c.二级缓存必须在SqlSession关闭或提交之后有效;
d.查询的数据所转换的实体类类型必须实现序列化的接口
3.2 使二级缓存失效的情况
两次查询期间执行了任何一次增删改(自动清空)操作
六、AOP面向切面编程(掌握)
1.概述
底层是代理模式,把非核心业务代码抽取出来交给切面类管理,并不是抽取出来就完了,而是要把它套在抽取出来的位置,也就是在不修改源代码的情况下给程序动态统一添加额外功能的一种技术。
2.AOP场景模拟
这是一个具有日志功能的计算器,加减乘除是核心功能,日志功能是非核心功能。
存在问题:
1.核心代码和非核心代码混合在一起(对核心业务功能有干扰,导致程序员在开发核心业务功能时分散精力)
2.非核心代码不好抽出来封装(不连续,因为面向对象是纵向继承机制,只能封装一段连续的代码) 附加功能分散在各个业务功能方法中,不利于统一维护
解决问题的思路:
解耦:把附加功能从核心业务功能中抽取出来
困难:
由于附加功能不是连续存在的代码,靠以前把子类中的重复代码抽取到父类的方式没法实现,这时引入新技术:代理模式

public interface Calculator {int add(int x,int y);int sub(int x,int y);int mul(int x,int y);int div(int x,int y);
}
public class CalculatorImpl implements Calculator {@Overridepublic int add(int x, int y) {int result = x + y;System.out.println("方法内部体:"+result);return result;}@Overridepublic int sub(int x, int y) {int result = x - y;System.out.println("方法内部体");return result;}@Overridepublic int mul(int x, int y) {int result = x * y;System.out.println("方法内部体");return result;}@Overridepublic int div(int x, int y) {int result = x / y;System.out.println("方法内部体");return result;}
}
静态代理:一对一的,一个代理类负责一个目标对象;实现了解耦,但是代码写死了,不具备任何灵活性,比如修改日志功能的方法名时,需要一个个修改。目标对象和代理对象固定;
public class CalculatorStaticProxy implements Calculator {//目标对象private final Calculator target;public CalculatorStaticProxy(Calculator target) {this.target = target;}@Overridepublic int add(int x, int y) {//附加功能1System.out.println("日志=>方法:add=>参数:"+x+","+y);//目标对象的方法int result = target.add(x, y);//附加功能2System.out.println("日志=>方法:add=>结果:"+result);return result;}@Overridepublic int sub(int x, int y) {System.out.println("日志=>方法:sub=>参数:"+x+","+y);int result = target.sub(x, y);System.out.println("日志=>方法:sub=>结果:"+result);return result;}@Overridepublic int mul(int x, int y) {System.out.println("日志=>方法:mul=>参数:"+x+","+y);int result = target.mul(x,y);System.out.println("日志=>方法:mul=>结果:"+result);return result;}@Overridepublic int div(int x, int y) {System.out.println("日志=>方法:div=>参数:"+x+","+y);int result = target.div(x,y);System.out.println("日志=>方法:div=>结果:"+result);return result;}
}
@Test
public void test7(){//1.创建代理对象CalculatorStaticProxy staticProxy = new CalculatorStaticProxy(new CalculatorImpl());//2.调用代理方法(代理对象->目标对象->目标方法)staticProxy.sub(5,7);
}
动态代理:根据目标对象来动态生产代理类 ,代理类和目标对象的实现相同接口。目标对象类型不确定,代理对象类型不确定;
public class ProxyFactory {//1.创建目标对象,目标类型是不确定的private Object target;public ProxyFactory(Object target) {this.target = target;}/*** ClassLoader loader: 指定加载动态生成的代理类的类加载器* Class<?> interfaces: 获取目标对象实现的所有接口的class对象的数组* InvocationHandler h: 设置代理类的抽象方法如何重写**///2.生产动态代理,不知道代理类什么类型public Object getProxy(){//1.创建类加载器ClassLoader classLoader = this.getClass().getClassLoader();//2.获取目标对象实现的接口数组Class<?>[] interfaces = target.getClass().getInterfaces();//3.重写抽象方法InvocationHandler h = new InvocationHandler() {//匿名内部类//proxy:代理对象  method:要执行的方法 args:要执行的方法的参数列表//外层的invoke是代理对象如何执行方法(调用目标对象的方法)@Overridepublic Object invoke(Object proxy, Method method, Object[] args) throws Throwable {Object result = null;try {System.out.println("日志=>方法:"+method.getName()+"=>参数:"+ Arrays.toString(args));//内层的invoke是目标对象执行的方法//target:目标对象result = method.invoke(target, args);System.out.println("日志=>方法:"+method.getName()+"=>结果:"+ result);} catch (Exception e) {throw new RuntimeException(e);}finally {System.out.println("日志=>方法:"+method.getName()+"=>方法执行完毕");}return result;}};//创建代理实例return Proxy.newProxyInstance(classLoader,interfaces,h);}
}
@Test
public void test8(){ProxyFactory proxyFactory = new ProxyFactory(new CalculatorImpl());//不知道创建动态代理类的类型,但是知道代理类实现的接口//这里获取的代理对象不知道什么类型Calculator proxy = (Calculator) proxyFactory.getProxy();proxy.mul(3,5);
}
3.作用
简化代码:把方法中固定位置的重复的代码抽取出来,让被抽取的方法更专注于自己的核心功能,提高内聚性;
代码增强:把特定的功能封装到切面类中,哪里有需要,就往上套,被套用了切面逻辑的方法就被切面给增强了。
4.相关术语
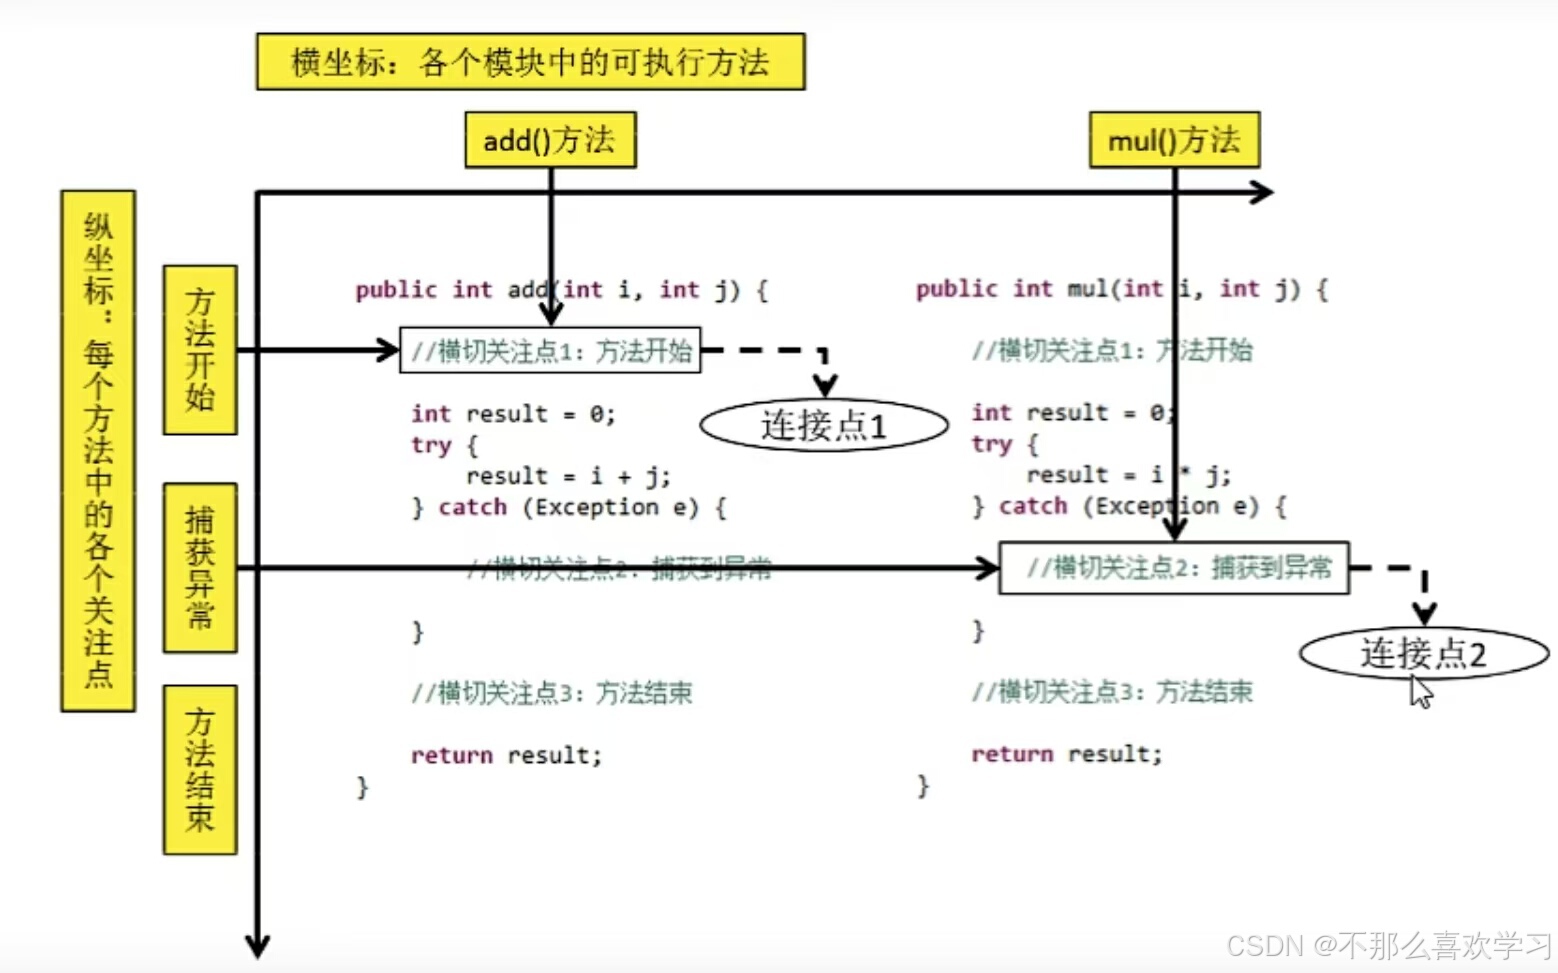
(1)横切关注点
从目标对象中的核心业务代码抽取出来的非核心业务代码,一个方法可以有很多横切关注点。
(2)通知
把横切关注点封装在一个类中,这个类就叫做切面类,当前的横切关注点在切面中就是表示为一个通知方法。
a>前置通知:被代理的目标方法前执行;
b>返回通知:被代理的目标方法成功结束后执行;
c>异常通知:被代理的目标方法异常结束后执行;
d>后置通知:被代理的目标方法在finally字句中执行;
e>环绕通知:使用try...catch...finally结构围绕整个被代理的目标方法,包括上面四种通知的所有位置;
(3)连接点(纯逻辑概念)
抽取横向关注点的位置就叫连接点;
(4)切入点(表达式)
定位连接点的方式;从哪里提取出的横向关注点就要套回去;
七、基于注解实现动态代理
切面类:封装横切关注点,将横切关注点作为一个通知方法的类;
@Component
@Aspect //标识为一个切面组件
public class LoggerAspect {//声明公共的切入点表达式@Pointcut("execution(* com.demo.service.impl.CalculatorImpl.*(..))")public void pointCut(){}@Before("pointCut()")public void beforeAdviceMethod(JoinPoint joinPoint){//获取连接点所对应方法的签名信息  签名信息(方法的声明信息)Signature signature = joinPoint.getSignature();//获取连接点所对应方法的参数Object[] args = joinPoint.getArgs();System.out.println("日志,方法:"+signature.getName()+",参数:"+ Arrays.toString(args));}@After("execution(* com.demo.service.impl.CalculatorImpl.*(..))")public void afterAdviceMethod(JoinPoint joinPoint){//获取连接点所对应方法的方法名Signature signature = joinPoint.getSignature();//获取连接点所对应方法的参数Object[] args = joinPoint.getArgs();System.out.println("日志,方法:"+signature.getName()+",执行完毕");}//returning属性:用来设置接收目标对象的方法的返回值的参数名@AfterReturning(value = "pointCut()",returning = "result")public void afterReturning(JoinPoint joinPoint,Object result){//获取连接点所对应方法的方法名Signature signature = joinPoint.getSignature();//获取连接点所对应方法的参数Object[] args = joinPoint.getArgs();System.out.println("日志,方法:"+signature.getName()+",返回结果:"+result);}//throwing属性:用来设置接收目标对象的方法出现异常的参数名@AfterThrowing(value = "pointCut()",throwing = "ex")public void afterThrowingAdviceMethod(JoinPoint joinPoint,Throwable ex){//获取连接点所对应方法的方法名Signature signature = joinPoint.getSignature();System.out.println("日志,方法:"+signature.getName()+",异常:"+ex);}}
1.切入表达式

定位到具体的方法:execution(public int com.demo.service.impl.CalculatorImpl.add(int,int))
定位到类下的所有方法:execution(* com.demo.service.impl.CalculatorImpl.*(..))
第一个*表示任意的访问修饰符和返回值类型
第二个*表示类中任意的方法
..表示任意的参数列表
2.通知
a> @Before前置通知:目标对象方法执行之前执行;
b> @After后置通知:在目标的对象方法的finally字句中执行的;
c> @AfterReturning返回通知:在目标对象方法返回值之后执行,如果没有返回值或出现异常在不会通知;
d> @AfterThrowing异常通知:目标方法出现异常时执行;
e> @Around环绕通知:目标对象方法的返回值和环绕通知的返回值要一致
3.通知的顺序
Spring5.3.1版本之前:
前置->目标操作->后置通知->返回通知或异常通知
Spring5.3.1版本之后:
前置->目标操作->返回通知或异常通知->后置通知
4.环绕通知
一个环绕通知可以代替四个通知;
@Component
@Aspect //标识为一个切面组件
public class LoggerAspect {//声明公共的切入点表达式@Pointcut("execution(* com.demo.service.impl.CalculatorImpl.*(..))")public void pointCut(){}//ProceedingJoinPoint:可执行的连接点对象//要将目标对象的方法的返回值返回@Around("pointCut()")public Object aroundAdviceMethod(ProceedingJoinPoint joinPoint){Object result = null;try {System.out.println("环绕通知->前置通知");//表示目标对象方法的执行result = joinPoint.proceed();System.out.println("环绕通知->返回通知");} catch (Throwable e) {e.printStackTrace();System.out.println("环绕通知->异常通知");}finally {System.out.println("环绕通知->后置通知");}return result;}}
5.切面类优先级
使用注解:@Order(value)
切面的优先级通过@Order注解的value属性设置,默认值Integer的最大值
value属性值越小,优先级越高也就是先执行级别高的切面类的通知方法;
6.IOC容器要引入标签
<!--  开启基于注解的AOP     -->
<aop:aspectj-autoproxy/>
八、基于@Transactional注解的声明式事务
<!-- 配置事务管理器(不用手动配置切面类,本身是一个切面类) --><bean id="transactionManager" class="org.springframework.jdbc.datasource.DataSourceTransactionManager"><property name="dataSource" ref="dataSource"/></bean>
<!-- 开启事务的注解驱动 将事务管理器的通知作用于连接点使用@Transactional注解所标识的方法或类中所有的方法将使用事务进行管理--><tx:annotation-driven transaction-manager="transactionManager"/>