QT----简单的htttp服务器与客户端
HTTP协议学习
协议的相关学习可以参考这篇 csdn学习连接
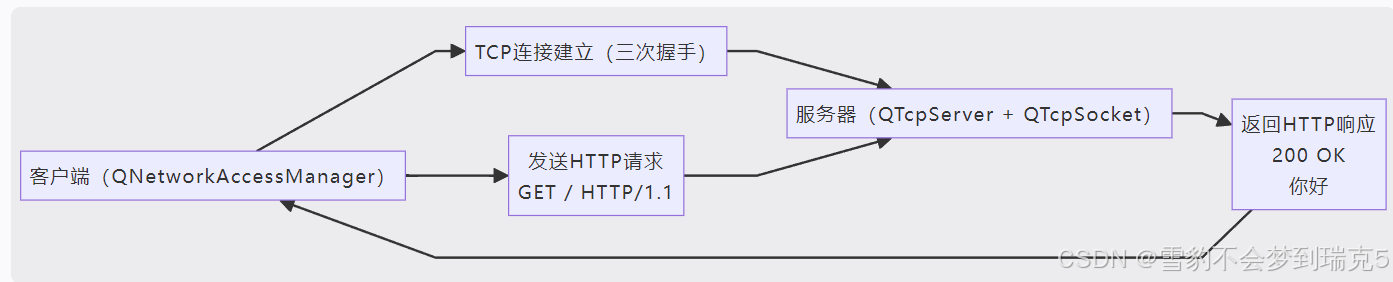
总体流程如下
HTTP服务器
监听ip和端口,有连接时接收请求,发送回复
server.h
#pragma once
#include <QtWidgets/QMainWindow>
#include "ui_httpServer.h"
#include <QTcpServer>
#include <QTcpSocket>
#include <QtNetwork>
#include <QNetworkAccessManager>
#include <QDebug>
#include <QJsonObject>
#include <QJsonDocument>
#include <QDateTime>class httpServer : public QMainWindow
{Q_OBJECTpublic:httpServer(QWidget *parent = nullptr);~httpServer();// 启动 HTTP 服务器,默认监听 8080 端口void start(quint16 port = 8080);public slots:// 当有新的 TCP 连接到来时,处理连接的槽函数void onNewConnection();private:Ui::httpServerClass ui;
};
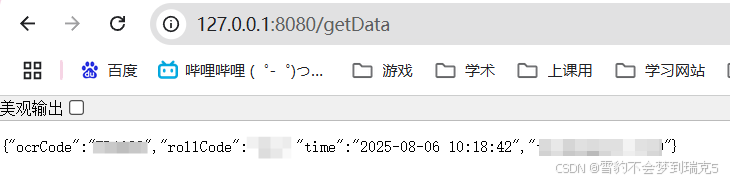
回应使用json构建,我这边是添加了url的判断,需要在url里有/getData我才会回复对应的数据
server.cpp
#include "httpServer.h"httpServer::httpServer(QWidget *parent): QMainWindow(parent)
{ui.setupUi(this);}httpServer::~httpServer()
{}void httpServer::start(quint16 port)
{//创建TCP服务器实例监听QTcpServer* server = new QTcpServer(this);//有新链接时connect(server, &QTcpServer::newConnection, this, &httpServer::onNewConnection);//启动监听if (!server->listen(QHostAddress::Any, port)) {qDebug() << "Server failed to start:" << server->errorString();}else {qDebug() << "Server started at port" << port;}
}void httpServer::onNewConnection()
{//获取当前触发的server对象QTcpServer* server = qobject_cast<QTcpServer*>(sender());//获取客户端的socket连接QTcpSocket *clientSocket = server->nextPendingConnection();connect(clientSocket, &QTcpSocket::readyRead, [clientSocket](){//读取客户端发来的请求(完整的http请求)QByteArray request = clientSocket->readAll();qDebug() << "Request received:\n" << request;//构建Json对象QJsonObject json;json["time"] = QDateTime::currentDateTime().toString("yyyy-MM-dd HH:mm:ss");json["ocrCode"] = "ABC123456";json["rollCode"] = "ROLL7890";QJsonDocument doc(json);QByteArray body = doc.toJson(QJsonDocument::Compact);//压缩格式(无缩进)//构建http响应头// 构造 HTTP 响应头QByteArray response;response.append("HTTP/1.1 200 OK\r\n");response.append("Content-Type: application/json; charset=utf-8\r\n");response.append("Content-Length: " + QByteArray::number(body.size()) + "\r\n");response.append("Connection: close\r\n");response.append("\r\n");response.append(body);  // 加上 JSON 内容//发送HTTP响应clientSocket->write(response);//断开连接clientSocket->disconnectFromHost();});
}
最后在main.cpp里调用m_pServer.start(8080);启动监听端口
在HTTP头上添加上
response.append("Access-Control-Allow-Origin: *\r\n"); // 如果前端跨域请求,添加上这个网页访问也能看到可以直接用浏览器去访问查看结果
客户端
发送http请求,对服务器的回应做出json解析
client.h#pragma once#include <QtWidgets/QMainWindow>
#include "ui_httpclient.h"
#include <QObject>
#include <QNetworkAccessManager>
#include <QNetworkReply>
#include <QTimer>
#include <QJsonObject>
#include <QJsonDocument>
#include <QJsonParseError>class httpclient : public QMainWindow
{Q_OBJECTpublic:httpclient(QWidget *parent = nullptr);~httpclient();// 发起 GET 请求void get(const QUrl &url);private slots:// 网络请求完成后的处理槽函数void onFinished(QNetworkReply *reply);private:Ui::httpclientClass ui;// Qt 的网络访问管理器,支持异步 HTTP 请求QNetworkAccessManager m_manager;QTimer* m_pTimer;
};
客户端实例通过get()函数发起请求
client.cpp#include "httpclient.h"httpclient::httpclient(QWidget *parent): QMainWindow(parent)
{ui.setupUi(this);// 请求完成后触发 onFinished()connect(&m_manager, &QNetworkAccessManager::finished, this, &httpclient::onFinished);m_pTimer = new QTimer(this);m_pTimer->setInterval(10000);m_pTimer->start();connect(m_pTimer, &QTimer::timeout, [=]() {this->get(QUrl("http://192.168.1.168:8080/getData")); });
}httpclient::~httpclient()
{}//发起get请求
void httpclient::get(const QUrl & url)
{QNetworkRequest request(url);	//构造请求m_manager.get(request);			//异步发送get请求
}//收到服务器响应后调用
void httpclient::onFinished(QNetworkReply *reply)
{if (reply->error() == QNetworkReply::NoError){//读取服务器返回的内容QByteArray data = reply->readAll();qDebug() << "Response:" << data; QJsonParseError err;QJsonDocument doc = QJsonDocument::fromJson(data, &err);if (err.error == QJsonParseError::NoError && doc.isObject()){QJsonObject obj = doc.object();QString time = obj["time"].toString();QString ocrCode = obj["ocrCode"].toString();QString rollCode = obj["rollCode"].toString();qDebug() << "Parsed JSON:";qDebug() << "  Time:" << time;qDebug() << "  OCR Code:" << ocrCode;qDebug() << "  Roll Code:" << rollCode;ui.textEdit->append(time);ui.textEdit->append(ocrCode);ui.textEdit->append(rollCode);}else {qDebug() << "Invalid JSON:" << err.errorString();ui.textEdit->append("Invalid JSON:");}}else {qDebug() << "Error:" << reply->errorString(); // 网络错误ui.textEdit->append("Error:"+reply->errorString());}reply->deleteLater();	//释放资源
}