FasrCGI
CGI的由来:
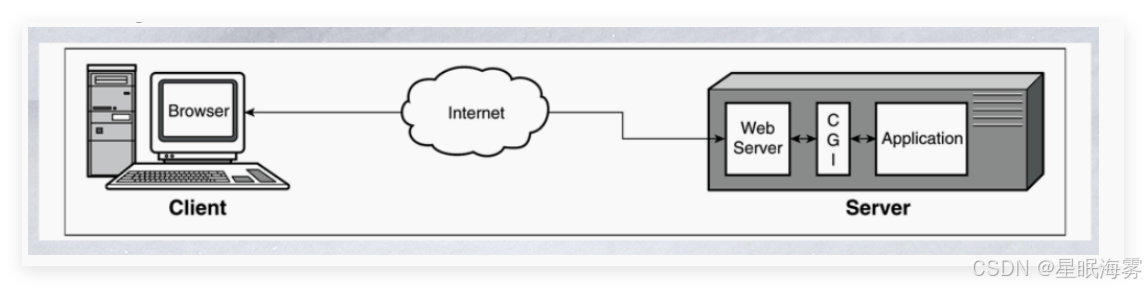
最早的Web服务器只能简单地响应浏览器发来的HTTP请求,并将存储在服务器上的HTML文件返回给浏览器,也就是静态html文件,但是后期随着网站功能增多网站开发也越来越复杂,以至于出现动态技术,比如像php(1995年)、java(1995)、python(1991)语言开发的网站,但是nginx/apache服务器并不
能直接运行 php、java这样的文件,apache实现的方式是打补丁,但是nginx缺通过与第三方基于协议实现,即通过某种特定协议将客户端请求转发给第三方服务处理,第三方服务器会新建新的进程处理用户的请求,处理完成后返回数据给Nginx并回收进程,最后nginx在返回给客户端,那这个约定就是通用网关接口(common gateway interface,简称CGI),CGI(协议) 是web服务器和外部应用程序之间的接口标准,是cgi程序和web服务器之间传递信息的标准化接口。
为什么会有FastCGI?
CGI协议虽然解决了语言解析器和 Web Server 之间通讯的问题,但是它的效率很低,因为 Web Server每收到一个请求都会创建一个CGI进程,PHP解析器都会解析php.ini文件,初始化环境,请求结束的时候再关闭进程,对于每一个创建的CGI进程都会执行这些操作,所以效率很低,而FastCGI是用来提高CGI性
能的,FastCGI每次处理完请求之后不会关闭掉进程,而是保留这个进程,使这个进程可以处理多个请求。这样的话每个请求都不用再重新创建一个进程了,大大提升了处理效率。
什么是PHP-FPM?
PHP-FPM(FastCGI Process Manager:
FastCGI进程管理器)是一个实现了Fastcgi的程序,并且提供进程管理的功能。
进程包括master进程和worker进程。master进程只有一个,负责监听端口,接受来自web server
的请求worker进程一般会有多个,每个进程中会嵌入一个PHP解析器,进行PHP代码的处理。
6.3.1 FastCGI**配置指令**
fastcgi_pass address:port;
#转发请求到后端服务器,address为后端的fastcgi server的地址,可用位置:location, if in
location
fastcgi_index name;
#fastcgi默认的主页资源,示例:fastcgi_index index.php;
fastcgi_param parameter value [if_not_empty];
#设置传递给FastCGI服务器的参数值,可以是文本,变量或组合,可用于将Nginx的内置变量赋值给自定义
key
fastcgi_param REMOTE_ADDR $remote_addr; #客户端源IP
fastcgi_param REMOTE_PORT $remote_port; #客户端源端口
fastcgi_param SERVER_ADDR $server_addr; #请求的服务器IP地址
fastcgi_param SERVER_PORT $server_port; #请求的服务器端口
fastcgi_param SERVER_NAME $server_name; #请求的server name
Nginx默认配置示例:
location ~ \.php$ {
root /scripts;
fastcgi_pass 127.0.0.1:9000;
fastcgi_index index.php;
fastcgi_param SCRIPT_FILENAME /scripts$fastcgi_script_name; #默认脚本路径
#fastcgi_param SCRIPT_FILENAME $document_root$fastcgi_script_name;
include fastcgi_params; #此文件默认系统已提供,存放的相对路径为
prefix/conf
}
6.3.2 FastCGI**实战案例** : Nginx**与php-fpm在同一服务器**
解压包:
[root@webserver ~]# tar xzf php-8.3.9.tar.gz
安装依赖:
[root@webserver ~]# yum install -y bzip2 systemd-devel libxml2-devel sqlite-devel libpng-devel libcurl-devel
[root@webserver mnt]# dnf install oniguruma-6.9.6-1.el9.6.x86_64.rpm
[root@webserver mnt]# dnf install oniguruma-devel-6.9.6-1.el9.6.x86_64.rpm -y
[root@webserver php-8.3.9]#
./configure \
--prefix=/usr/local/php \ #安装路径
--with-config-file-path=/usr/local/php/etc \ #指定配置路径
--enable-fpm \ #用cgi方式启动程序
--with-fpm-user=nginx \ #指定运行用户身份
--with-fpm-group=nginx \
--with-curl \ #打开curl浏览器支持
php相关配置优化
--with-iconv \ #启用iconv函数,转换字符编码
--with-mhash \ #mhash加密方式扩展库
--with-zlib \ #支持zlib库,用于压缩http压缩传输
--with-openssl \ #支持ssl加密
--enable-mysqlnd \ #mysql数据库
--with-mysqli \
--with-pdo-mysql \
--disable-debug \ #关闭debug功能
--enable-sockets \ #支持套接字访问
--enable-soap \ #支持soap扩展协议
--enable-xml \ #支持xml
--enable-ftp \ #支持ftp
--enable-gd \ #支持gd库
--enable-exif \ #支持图片元数据
--enable-mbstring \ #支持多字节字符串
--enable-bcmath \ #打开图片大小调整,用到zabbix监控的时候用到了这个模块
--with-fpm-systemd #支持systemctl 管理cgi编译安装
[root@webserver php-8.3.9]# make && make install
配置优化
[root@Nginx ~]# cd /usr/local/php/etc
[root@Nginx etc]# cp php-fpm.conf.default php-fpm.conf
[root@Nginx etc]# vim php-fpm.conf
#去掉注释
pid = run/php-fpm.pid #指定pid文件存放位置[root@Nginx etc]# cd php-fpm.d/
[root@Nginx php-fpm.d]# cp www.conf.default www.conf#生成主配置文件
[root@Nginx php-fpm.d]# cd /root/php-8.3.9/
[root@Nginx php-8.3.9]# cp php.ini-production  /usr/local/php/etc/php.ini
[root@Nginx ~]# vim /usr/local/php/etc/php.ini
[Date]
; Defines the default timezone used by the date functions
; https://php.net/date.timezone
date.timezone = Asia/Shanghai #修改时区
#生成启动文件
[root@Nginx ~]# cd /root/php-8.3.9/
[root@Nginx php-8.3.9]# cp sapi/fpm/php-fpm.service /lib/systemd/system/
[root@Nginx ~]# vim /lib/systemd/system/php-fpm.server# Mounts the /usr, /boot, and /etc directories read-only for processes invoked by
this unit.
#ProtectSystem=full #注释该内容#启动服务
[root@Nginx php-8.3.9]# systemctl start php-fpm.service#查看端口
[root@Nginx php-8.3.9]# netstat -antlupe | grep php
tcp 0 0 127.0.0.1:9000 0.0.0.0:* LISTEN 0
820758 176202/php-fpm: mas
测试页面
[root@webserver ~]# cat /web/php/index.php
<?php
phpinfo();
?>
Nginx配置转发
[root@webserver ~]# cat /usr/local/nginx/conf.d/vhosts.conf
server {listen 80;server_name timilee.org;root /web/php;location  ~ \.php$ {fastcgi_pass 127.0.0.1:9000;fastcgi_index index.php;include fastcgi.conf;}
}重启nginx
测试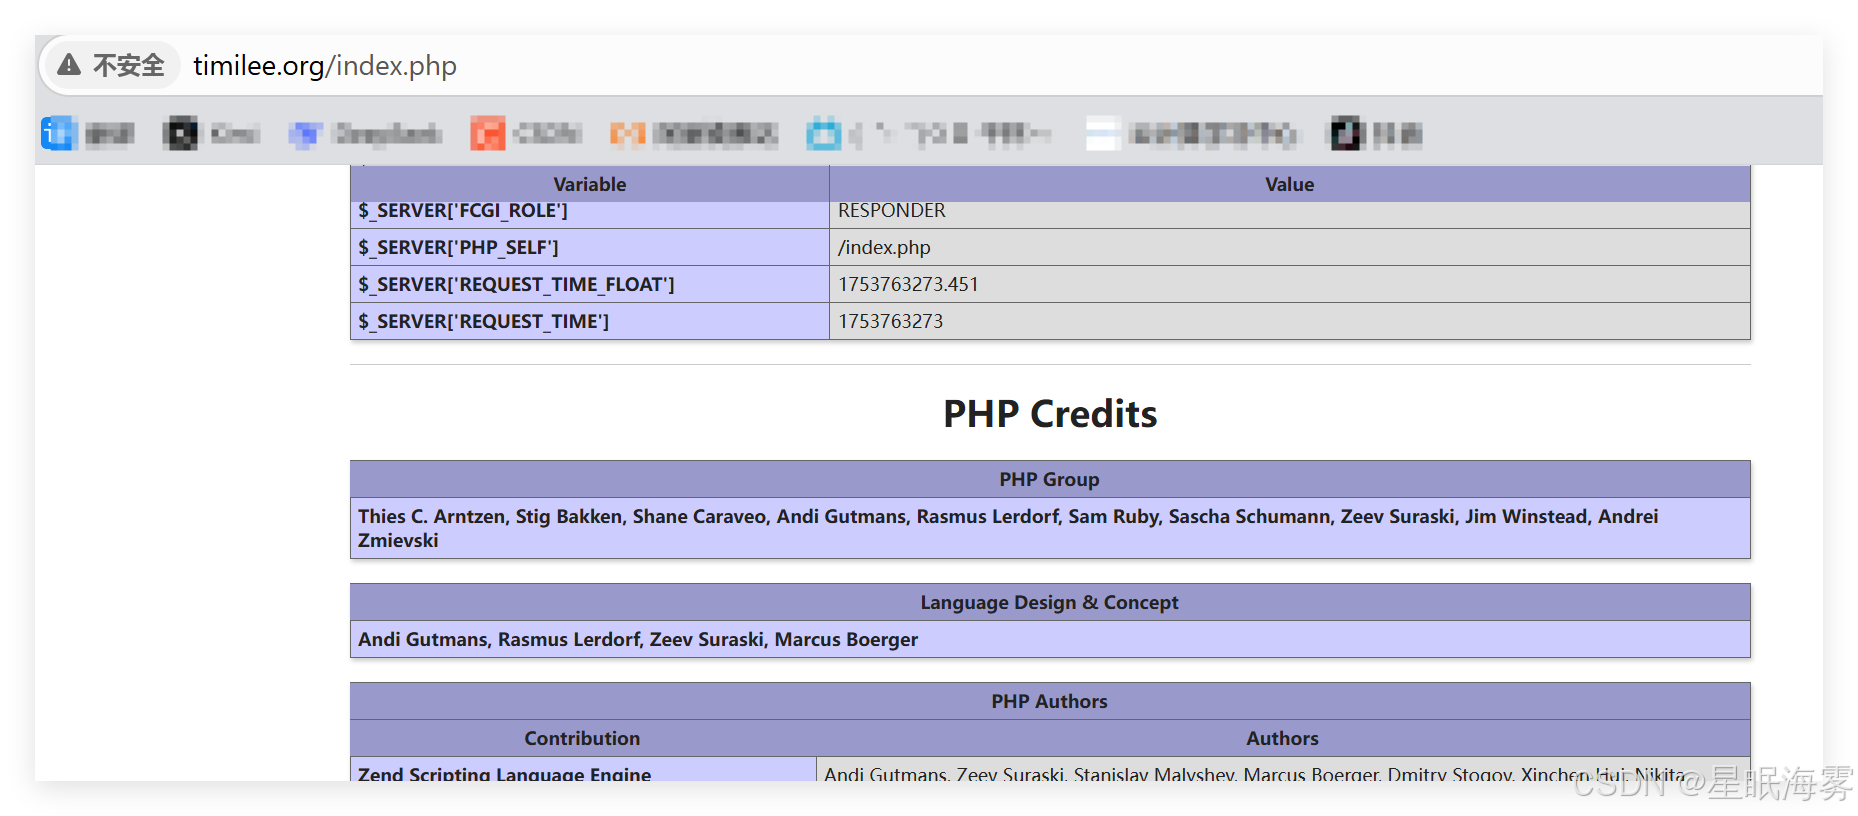
配置环境变量
[root@webserver ~]# cat .bash_profile
# .bash_profile# Get the aliases and functions
if [ -f ~/.bashrc ]; then. ~/.bashrc
fi# User specific environment and startup programs
export PATH=$PATH:/usr/local/nginx/sbin:/usr/local/php/bin
[root@webserver ~]#                     ##配置立即生效
source .bash_profile
6.3.3 php**的动态扩展模块(php的缓存模块)**
安装memcache模块
[root@Nginx ~]# tar zxf memcache-8.2.tgz
[root@Nginx ~]# cd memcache-8.2/
[root@Nginx memcache-8.2]# yum install autoconf
[root@Nginx memcache-8.2]# phpize
[root@Nginx memcache-8.2]# ./configure && make && make
[root@Nginx ~]# cd memcache-8.2/
#复制测试文件到发布目录
[root@Nginx memcache-8.2]# cp example.php memcache.php /web/php/
[root@Nginx ~]# vim /web/php/memcache.php
define('ADMIN_USERNAME','admin'); // Admin Username #设置登录名
define('ADMIN_PASSWORD','lee'); // Admin Password #和密码
define('DATE_FORMAT','Y/m/d H:i:s');
define('GRAPH_SIZE',200);
define('MAX_ITEM_DUMP',50);
$MEMCACHE_SERVERS[] = '127.0.0.1:11211'; // add more as an array #写上IP和端口
#$MEMCACHE_SERVERS[] = 'mymemcache-server2:11211'; // add more as an array #注释这一行
配置php加载memcache模块
[root@Nginx ~]# vim /usr/local/php/etc/php.ini
;extension=zip
extension=memcache          #加入这一行,启用名为memcache的PHP扩展
;zend_extension=opcache
[root@Nginx ~]# systemctl reload php-fpm     刷新配置
[root@Nginx no-debug-non-zts-20230831]# php -m | grep mem  #查看
memcache
部署memcache
[root@Nginx ~]# yum install memcached -y      安装memcache
[root@Nginx ~]# systemctl enable --now memcached.service   启动服务
[root@Nginx1 ~]# netstat -antlupe | grep memcache    查看端口
tcp 0 0 127.0.0.1:11211 0.0.0.0:* LISTEN
976 1037243 186762/memcached
测试
访问 http://timilee.org/example.php 不断刷新
访问 http://timilee.org/memcache.php 查看命中效果
memcache.php测试页面
 性能测试
性能测试
查看失败的请求数:Failed requests:
[root@client ~]# ab -n500 -c10 http://php.timinglee.org/index.php
[root@client ~]# ab -n500 -c10 http://php.timinglee.org/memcache.php
6.3.4 php**高速缓存** 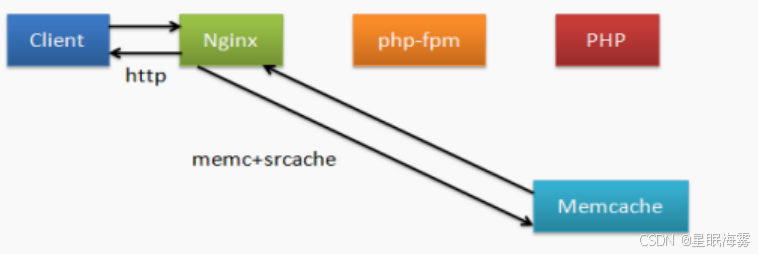
部署方法:
在我们安装的nginx中默认不支持memc和srcache功能,需要借助第三方模块来让nginx支持此功能,所
以nginx需要重新编译
#可以先做一个备份:
[root@Nginx ~]# cp -r /usr/local/nginx/ /tmp/
#删除重新编译:
[root@Nginx ~]# rm -rf /usr/local/nginx/
下载导入解压相关的包
[root@Nginx ~]# tar zxf srcache-nginx-module-0.33.tar.gz
[root@Nginx ~]# tar zxf memc-nginx-module-0.20.tar.gz
[root@Nginx ~]# cd nginx-1.26.1/
[root@Nginx nginx-1.26.1]# ./configure --prefix=/usr/local/nginx --user=nginx
--group=nginx --with-http_ssl_module --with-http_v2_module --with-http_realip_module
--with-http_stub_status_module --with-http_gzip_static_module
--with-pcre --with-stream --with-stream_ssl_module --with-stream_realip_module
--add-module=/root/memc-nginx-module-0.20 --add-module=/root/srcache-nginx-module-0.33
[root@Nginx nginx-1.26.1]# make && make install
[root@Nginx ~]# vim /apps/nginx/conf.d/php.conf
upstream memcache {server 127.0.0.1:11211;keepalive 512;
}
server {listen 80;server_name php.timinglee.org;root /web/php; #测试目录location /memc {internal;memc_connect_timeout 100ms; #连接超时时间memc_send_timeout 100ms; memc_read_timeout 100ms;set $memc_key $query_string; #使用内置变量$query_string来作为keyset $memc_exptime 300; #缓存失效时间300秒memc_pass memcache;}location ~ \.php$ {set $key $uri$args; #设定key的值srcache_fetch GET /memc $key; #检测mem中是否有要访问的phpsrcache_store PUT /memc $key; #缓存为加载的php数据fastcgi_pass 127.0.0.1:9000;fastcgi_index index.php;include fastcgi.conf;}
}
[root@Nginx ~]# systemctl start nginx.service测试:
ab -n500 -c10 http://php.timinglee.org/index.php
Concurrency Level: 10
Time taken for tests: 0.255 seconds
Complete requests: 500
Failed requests: 0