Flutter实战·第二版-第三章 基础组件笔记
第三章:基础组件
3.1文本及样式
3.1.1 Text
Text("Hello world",textAlign: TextAlign.left,
);Text("Hello world! I'm Jack. "*4,maxLines: 1,overflow: TextOverflow.ellipsis,
);Text("Hello world",textScaleFactor: 1.5,
);
3.1.2 TextStyle
Text("Hello world",style: TextStyle(color: Colors.blue,fontSize: 18.0,height: 1.2,fontFamily: "Courier",background: Paint()..color = Colors.yellow,decoration: TextDecoration.underline,decorationStyle: TextDecorationStyle.dashed),)
3.1.3 TextSpan
Text.rich(TextSpan(children: [TextSpan(text: "Home:"),TextSpan(text: "https://flutterchina.club",style: TextStyle(color: Colors.blue),// recognizer: _tapRecognizer)]))
3.1.4 DefaultTextStyle
DefaultTextStyle(style: TextStyle(color: Colors.red,fontSize: 20.0,),textAlign: TextAlign.start,child: Column(crossAxisAlignment: CrossAxisAlignment.start,children: <Widget>[Text("hello world"),Text("I am Jack"),Text("I am Jack",style: TextStyle(inherit: false, color: Colors.grey),),],))
3.1.5字体
- 先将文字资源打包到应用,然后再pubspec.yaml中指定位置
根目录/assets(fonts)
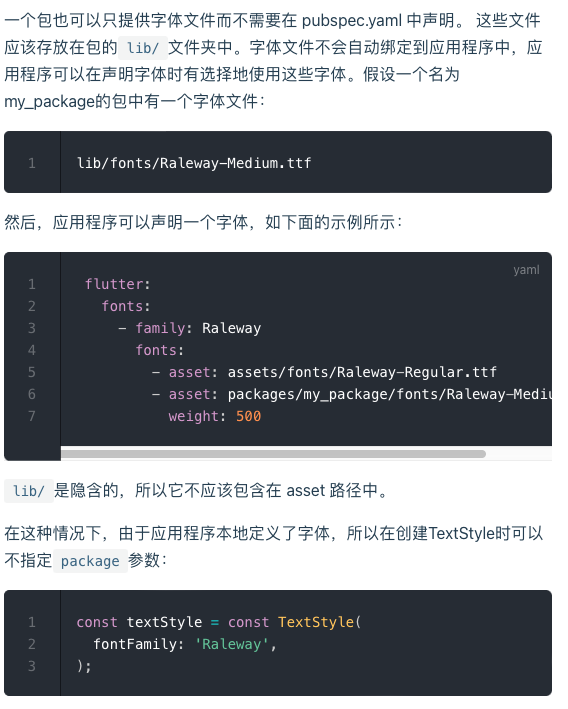
flutter:fonts:- family: Ralewayfonts:- asset: assets/fonts/Raleway-Regular.ttf- asset: assets/fonts/Raleway-Medium.ttfweight: 500- asset: assets/fonts/Raleway-SemiBold.ttfweight: 600- family: AbrilFatfacefonts:- asset: assets/fonts/abrilfatface/AbrilFatface-Regular.ttf
- 使用字体
// 声明文本样式
const textStyle = const TextStyle(fontFamily: 'Raleway',
);// 使用文本样式
var buttonText = const Text("Use the font for this text",style: textStyle,
);
- Package中的字体
lib/fonts/Raleway-Medium.ttf
const textStyle = const TextStyle(fontFamily: 'Raleway',package: 'my_package', //指定包名
);
3.2按钮
3.2.1 ElevatedButton
ElevatedButton(onPressed: () {}, child: Text("normal"))
3.2.2 TextButton
TextButton(child: Text("normal"),onPressed: () {},)
3.2.3 OutlinedButton
OutlinedButton(child: Text("normal"),onPressed: () {},),
3.2.4 IconButton
IconButton(onPressed: () {}, icon: Icon(Icons.thumb_up))
3.2.5 带图标的按钮
ElevatedButton.icon(onPressed: () {},icon: Icon(Icons.send),label: Text("发送"),),OutlinedButton.icon(onPressed: () {}, label: Text("添加"), icon: Icon(Icons.add)),TextButton.icon(onPressed: () {}, icon: Icon(Icons.info), label: Text("详情"),)3.3图片及ICON
3.3.1 图片
- 从asset中加载图片
- 根目录创建images目录,将图片拷贝到该目录
- 在pubspec.yaml中的flutter部分添加如下内容:
assets:- images/<图片名>.png
- 加载图片
Image(image: AssetImage("images/avatar.png"),width: 100.0
);Image.asset("images/avatar.png",width: 100.0,
)
- 从网络加载图片
Image(image: NetworkImage("https://avatars2.githubusercontent.com/u/20411648?s=460&v=4"),width: 100.0,),Image.network("https://avatars2.githubusercontent.com/u/20411648?s=460&v=4",width: 100.0,)
- 参数
const Image({...this.width, //图片的宽this.height, //图片高度this.color, //图片的混合色值this.colorBlendMode, //混合模式this.fit,//缩放模式this.alignment = Alignment.center, //对齐方式this.repeat = ImageRepeat.noRepeat, //重复方式...
})
-
fit
- fill:会拉伸填充满显示空间,图片本身长宽比会发生变化,图片会变形。
- cover:会按图片的长宽比放大后居中填满显示空间,图片不会变形,超出显示空间部分会被剪裁。
- contain:这是图片的默认适应规则,图片会在保证图片本身长宽比不变的情况下缩放以适应当前显示空间,图片不会变形。
- fitWidth:图片的宽度会缩放到显示空间的宽度,高度会按比例缩放,然后居中显示,图片不会变形,超出显示空间部分会被剪裁。
- fitHeight:图片的高度会缩放到显示空间的高度,宽度会按比例缩放,然后居中显示,图片不会变形,超出显示空间部分会被剪裁。
- none:图片没有适应策略,会在显示空间内显示图片,如果图片比显示空间大,则显示空间只会显示图片中间部分。
-
color和colorBlendMode
Image(image: AssetImage("images/avatar.png"),width: 100.0,color: Colors.blue,colorBlendMode: BlendMode.difference,
);
- repeat
Image(image: AssetImage("images/avatar.png"),width: 100.0,height: 200.0,repeat: ImageRepeat.repeatY ,
)
import 'package:flutter/material.dart';class ImageAndIconRoute extends StatelessWidget {@overrideWidget build(BuildContext context) {var img=AssetImage("imgs/avatar.png");return SingleChildScrollView(child: Column(children: <Image>[Image(image: img,height: 50.0,width: 100.0,fit: BoxFit.fill,),Image(image: img,height: 50,width: 50.0,fit: BoxFit.contain,),Image(image: img,width: 100.0,height: 50.0,fit: BoxFit.cover,),Image(image: img,width: 100.0,height: 50.0,fit: BoxFit.fitWidth,),Image(image: img,width: 100.0,height: 50.0,fit: BoxFit.fitHeight,),Image(image: img,width: 100.0,height: 50.0,fit: BoxFit.scaleDown,),Image(image: img,height: 50.0,width: 100.0,fit: BoxFit.none,),Image(image: img,width: 100.0,color: Colors.blue,colorBlendMode: BlendMode.difference,fit: BoxFit.fill,),Image(image: img,width: 100.0,height: 200.0,repeat: ImageRepeat.repeatY ,)].map((e){return Row(children: <Widget>[Padding(padding: EdgeInsets.all(16.0),child: SizedBox(width: 100,child: e,),),Text(e.fit.toString())],);}).toList()),);}
}
3.3.2 ICON
- 使用Material Design字体图标
- pubspec.yaml中配置
flutter:uses-material-design: true
- 查看所有icon
String icons = "";
// accessible: 0xe03e
icons += "\uE03e";
// error:  0xe237
icons += " \uE237";
// fingerprint: 0xe287
icons += " \uE287";Text(icons,style: TextStyle(fontFamily: "MaterialIcons",fontSize: 24.0,color: Colors.green,),)
Row(mainAxisAlignment: MainAxisAlignment.center,children: <Widget>[Icon(Icons.accessibility,color: Colors.green,),Icon(Icons.error,color: Colors.green,),Icon(Icons.fingerprint,color: Colors.green,)],)
- 使用自定义字体图标
- iconfont.cn中选择icon,使用ttf格式
- 将多个icon加入购物车,下载代码,几个icon会下载到一起,本地有ttf
- 导入图标文件 fonts/iconfont.ttf
- fonts要和pubspec.yaml同级
fonts:- family: myIcon #指定一个字体名fonts:- asset: fonts/iconfont.ttf
import 'package:flutter/cupertino.dart';class MyIcons{static const IconData book = const IconData(0xf00a1,fontFamily: 'myIcon',matchTextDirection: true);static const IconData wechat = const IconData(0xe607,fontFamily: 'myIcon',matchTextDirection: true);
}
Row(mainAxisAlignment: MainAxisAlignment.center,children: <Widget>[Icon(MyIcons.book,color: Colors.purple,),Icon(MyIcons.wechat,color: Colors.green,)],)
3.4单选开关和复选框
3.4.1.简介
class SwitchAndCheckBoxTestRoute extends StatefulWidget {@override_SwitchAndCheckBoxTestRouteState createState() => _SwitchAndCheckBoxTestRouteState();
}class _SwitchAndCheckBoxTestRouteState extends State<SwitchAndCheckBoxTestRoute> {bool _switchSelected=true; //维护单选开关状态bool _checkboxSelected=true;//维护复选框状态@overrideWidget build(BuildContext context) {return Column(children: <Widget>[Switch(value: _switchSelected,//当前状态onChanged:(value){//重新构建页面  setState(() {_switchSelected=value;});},),Checkbox(value: _checkboxSelected,activeColor: Colors.red, //选中时的颜色onChanged:(value){setState(() {_checkboxSelected=value;});} ,)],);}
}
- 使用
SwitchAndCheckBoxTestRoute()
3.4.2 属性及外观
无代码
3.4.3 注意
无代码
3.5输入框及表单
3.5.1 TextField
const TextField({...TextEditingController controller, FocusNode focusNode,InputDecoration decoration = const InputDecoration(),TextInputType keyboardType,TextInputAction textInputAction,TextStyle style,TextAlign textAlign = TextAlign.start,bool autofocus = false,bool obscureText = false,int maxLines = 1,int maxLength,this.maxLengthEnforcement,ToolbarOptions? toolbarOptions,ValueChanged<String> onChanged,VoidCallback onEditingComplete,ValueChanged<String> onSubmitted,List<TextInputFormatter> inputFormatters,bool enabled,this.cursorWidth = 2.0,this.cursorRadius,this.cursorColor,this.onTap,...
})
-
controller:编辑框的控制器,通过它可以设置/获取编辑框的内容、选择编辑内容、监听编辑文本改变事件。大多数情况下我们都需要显式提供一个controller来与文本框交互。如果没有提供controller,则TextField内部会自动创建一个。
-
focusNode:用于控制TextField是否占有当前键盘的输入焦点。它是我们和键盘交互的一个句柄(handle)。
-
InputDecoration:用于控制TextField的外观显示,如提示文本、背景颜色、边框等。
-
keyboardType:用于设置该输入框默认的键盘输入类型,取值如下:
TextInputType枚举值 含义
-
text 文本输入键盘
-
multiline 多行文本,需和maxLines配合使用(设为null或大于1)
-
number 数字;会弹出数字键盘
-
phone 优化后的电话号码输入键盘;会弹出数字键盘并显示“* #”
-
datetime 优化后的日期输入键盘;Android上会显示“: -”
-
emailAddress 优化后的电子邮件地址;会显示“@ .”
-
url 优化后的url输入键盘; 会显示“/ .”
-
textInputAction:键盘动作按钮图标(即回车键位图标),它是一个枚举值,有多个可选值,全部的取值列表读者可以查看API文档,下面是当值为TextInputAction.search时,原生Android系统下键盘样式如图3-18所示:
-
style:正在编辑的文本样式。
-
textAlign: 输入框内编辑文本在水平方向的对齐方式。
-
autofocus: 是否自动获取焦点。
-
obscureText:是否隐藏正在编辑的文本,如用于输入密码的场景等,文本内容会用“•”替换。
-
maxLines:输入框的最大行数,默认为1;如果为null,则无行数限制。
-
maxLength和maxLengthEnforcement :maxLength代表输入框文本的最大长度,设置后输入框右下角会显示输入的文本计数。maxLengthEnforcement决定当输入文本长度超过maxLength时如何处理,如截断、超出等。
-
toolbarOptions:长按或鼠标右击时出现的菜单,包括 copy、cut、paste 以及 selectAll。
-
onChange:输入框内容改变时的回调函数;注:内容改变事件也可以通过controller来监听。
-
onEditingComplete和onSubmitted:这两个回调都是在输入框输入完成时触发,比如按了键盘的完成键(对号图标)或搜索键(🔍图标)。不同的是两个回调签名不同,onSubmitted回调是ValueChanged类型,它接收当前输入内容做为参数,而onEditingComplete不接收参数。
-
inputFormatters:用于指定输入格式;当用户输入内容改变时,会根据指定的格式来校验。
-
enable:如果为false,则输入框会被禁用,禁用状态不能响应输入和事件,同时显示禁用态样式(在其decoration中定义)。
-
cursorWidth、cursorRadius和cursorColor:这三个属性是用于自定义输入框光标宽度、圆角和颜色的。
1)布局
Column(children: <Widget>[TextField(autofocus: true,decoration: InputDecoration(labelText: "用户名",hintText: "用户名或邮箱",prefixIcon: Icon(Icons.person)),),TextField(decoration: InputDecoration(labelText: "密码",hintText: "您的登录密码",prefixIcon: Icon(Icons.lock)),obscureText: true,),],
);
2)获取输入内容
TextEditingController _unameController = TextEditingController();TextField(autofocus: true,controller: _unameController,)
print(_unameController.text)
3)监听文本变化
TextField(autofocus: true,onChanged: (v){print("onChange:$v");},)
设置默认值,并从第三个字符开始选中后面的字符
TextEditingController _selectionController =  TextEditingController();
_selectionController.text="hello world!";
_selectionController.selection=TextSelection(baseOffset: 2,extentOffset: _selectionController.text.length
);
TextField(controller: _selectionController,
)
4)控制焦点
class FocusTestRoute extends StatefulWidget {@override_FocusTestRouteState createState() => _FocusTestRouteState();
}class _FocusTestRouteState extends State<FocusTestRoute> {FocusNode focusNode1 = FocusNode();FocusNode focusNode2 = FocusNode();FocusScopeNode? focusScopeNode;@overrideWidget build(BuildContext context) {return Padding(padding: EdgeInsets.all(16.0),child: Column(children: <Widget>[TextField(autofocus: true, focusNode: focusNode1,//关联focusNode1decoration: InputDecoration(labelText: "input1"),),TextField(focusNode: focusNode2,//关联focusNode2decoration: InputDecoration(labelText: "input2"),),Builder(builder: (ctx) {return Column(children: <Widget>[ElevatedButton(child: Text("移动焦点"),onPressed: () {//将焦点从第一个TextField移到第二个TextField// 这是一种写法 FocusScope.of(context).requestFocus(focusNode2);// 这是第二种写法if(null == focusScopeNode){focusScopeNode = FocusScope.of(context);}focusScopeNode.requestFocus(focusNode2);},),ElevatedButton(child: Text("隐藏键盘"),onPressed: () {// 当所有编辑框都失去焦点时键盘就会收起  focusNode1.unfocus();focusNode2.unfocus();},),],);},),],),);}}
5)监听焦点状态改变事件
...
// 创建 focusNode
FocusNode focusNode = FocusNode();
...
// focusNode绑定输入框
TextField(focusNode: focusNode);
...
// 监听焦点变化    ,需要写在initState方法里,build不行
focusNode.addListener((){print(focusNode.hasFocus);
});
6)自定义样式
TextField(decoration: InputDecoration(labelText: "请输入用户名",prefixIcon: Icon(Icons.person),// 未获得焦点下划线设为灰色enabledBorder: UnderlineInputBorder(borderSide: BorderSide(color: Colors.grey),),//获得焦点下划线设为蓝色focusedBorder: UnderlineInputBorder(borderSide: BorderSide(color: Colors.blue),),),
),
Container(child: TextField(keyboardType: TextInputType.emailAddress,decoration: InputDecoration(labelText: "Email",hintText: "电子邮件地址",prefixIcon: Icon(Icons.email),border: InputBorder.none //隐藏下划线)),decoration: BoxDecoration(// 下滑线浅灰色,宽度1像素border: Border(bottom: BorderSide(color: Colors.grey[200], width: 1.0))),
)
3.5.2 表单Form
- Form
Form({required Widget child,bool autovalidate = false,WillPopCallback onWillPop,VoidCallback onChanged,
})
- autovalidate:是否自动校验输入内容;当为true时,每一个子 FormField 内容发生变化时都会自动校验合法性,并直接显示错误信息。否则,需要通过调用FormState.validate()来手动校验。
- onWillPop:决定Form所在的路由是否可以直接返回(如点击返回按钮),该回调返回一个Future对象,如果 Future 的最终结果是false,则当前路由不会返回;如果为true,则会返回到上一个路由。此属性通常用于拦截返回按钮。
- onChanged:Form的任意一个子FormField内容发生变化时会触发此回调。
- FormField
const FormField({...FormFieldSetter<T> onSaved, //保存回调FormFieldValidator<T>  validator, //验证回调T initialValue, //初始值bool autovalidate = false, //是否自动校验。
})
- FormState
- FormState.validate():调用此方法后,会调用Form子孙FormField的validate回调,如果有一个校验失败,则返回false,所有校验失败项都会返回用户返回的错误提示。
- FormState.save():调用此方法后,会调用Form子孙FormField的save回调,用于保存表单内容
- FormState.reset():调用此方法后,会将子孙FormField的内容清空。
- 示例
import 'package:flutter/material.dart';class FormTestRoute extends StatefulWidget {@override_FormTestRouteState createState() => _FormTestRouteState();
}class _FormTestRouteState extends State<FormTestRoute> {TextEditingController _unameController = TextEditingController();TextEditingController _pwdController = TextEditingController();GlobalKey _formKey = GlobalKey<FormState>();@overrideWidget build(BuildContext context) {return Form(key: _formKey, //设置globalKey,用于后面获取FormStateautovalidateMode: AutovalidateMode.onUserInteraction,child: Column(children: <Widget>[TextFormField(autofocus: true,controller: _unameController,decoration: InputDecoration(labelText: "用户名",hintText: "用户名或邮箱",icon: Icon(Icons.person),),// 校验用户名validator: (v) {return v!.trim().isNotEmpty ? null : "用户名不能为空";},),TextFormField(controller: _pwdController,decoration: InputDecoration(labelText: "密码",hintText: "您的登录密码",icon: Icon(Icons.lock),),obscureText: true,//校验密码validator: (v) {return v!.trim().length > 5 ? null : "密码不能少于6位";},),// 登录按钮Padding(padding: const EdgeInsets.only(top: 28.0),child: Row(children: <Widget>[Expanded(child: ElevatedButton(child: Padding(padding: const EdgeInsets.all(16.0),child: Text("登录"),),onPressed: () {// 通过_formKey.currentState 获取FormState后,// 调用validate()方法校验用户名密码是否合法,校验// 通过后再提交数据。if ((_formKey.currentState as FormState).validate()) {//验证通过提交数据}},),),],),)],),);}
}
3.6进度指示器
3.6.1 LinearProgressIndicator
LinearProgressIndicator({double value,Color backgroundColor,Animation<Color> valueColor,...
})
// 模糊进度条(会执行一个动画)
LinearProgressIndicator(backgroundColor: Colors.grey[200],valueColor: AlwaysStoppedAnimation(Colors.blue),
),
//进度条显示50%
LinearProgressIndicator(backgroundColor: Colors.grey[200],valueColor: AlwaysStoppedAnimation(Colors.blue),value: .5,
)
3.6.2 CircularProgressIndicator
CircularProgressIndicator({double value,Color backgroundColor,Animation<Color> valueColor,this.strokeWidth = 4.0,...
})
CircularProgressIndicator(backgroundColor: Colors.grey,valueColor: AlwaysStoppedAnimation(Colors.blue),),CircularProgressIndicator(backgroundColor: Colors.grey,valueColor: AlwaysStoppedAnimation(Colors.blue),value: .5,)
3.6.3自定义尺寸
SizedBox(height: 3,child: LinearProgressIndicator(backgroundColor: Colors.grey,valueColor: AlwaysStoppedAnimation(Colors.blue),value: .5,),)SizedBox(height: 100,width: 100,child: CircularProgressIndicator(backgroundColor: Colors.grey,valueColor: AlwaysStoppedAnimation(Colors.blue),value: .7,),)
// 宽高不等,椭圆
SizedBox(height: 100,width: 130,child: CircularProgressIndicator(backgroundColor: Colors.grey[200],valueColor: AlwaysStoppedAnimation(Colors.blue),value: .7,),
),
3.6.3进度色动画
import 'package:flutter/material.dart';class ProgressRoute extends StatefulWidget {@override_ProgressRouteState createState() => _ProgressRouteState();
}class _ProgressRouteState extends State<ProgressRoute>with SingleTickerProviderStateMixin {AnimationController _animationController;@overridevoid initState() {//动画执行时间3秒  _animationController = AnimationController(vsync: this, //注意State类需要混入SingleTickerProviderStateMixin(提供动画帧计时/触发器)duration: Duration(seconds: 3),);_animationController.forward();_animationController.addListener(() => setState(() => {}));super.initState();}@overridevoid dispose() {_animationController.dispose();super.dispose();}@overrideWidget build(BuildContext context) {return SingleChildScrollView(child: Column(children: <Widget>[Padding(padding: EdgeInsets.all(16),child: LinearProgressIndicator(backgroundColor: Colors.grey[200],valueColor: ColorTween(begin: Colors.grey, end: Colors.blue).animate(_animationController), // 从灰色变成蓝色value: _animationController.value,),);],),);}
}
3.6.4自定义进度指示器样式
第三方库