前端技术Vue学习笔记--002
前端技术Vue学习笔记
文章目录
- 前端技术Vue学习笔记
- 1、指令修饰符
- 2、v-bind对于样式控制的增强
- 2.1、v-bind对于样式控制的增强--class
- 2.2、v-bind对于样式控制的增强--操作style
- 3、v-model应用于其他表单元素
- 4、计算属性
- 4.1、**computed计算属性 vs methods方法的区别**
- 4.2、计算属性的完整写法
- 4.3、成绩添加案例
- 5、watch 监视器
1、指令修饰符
通过 “.” 指明一些指令后缀,不同后缀封装了不同的处理操作 —>简化代码
- 按键修饰符
@keyup.enter --> 键盘回车监听
-
v-model修饰符
v-model.trim --> 去除首尾空格
v-model.number --> 转数字 -
事件修饰符
@事件名.stop --> 阻止冒泡
@事件名.prevent --> 阻止默认行为
练习代码
<body><div id="app" ><!-- 键盘回击事件绑定处理 --><h3>键盘回击事件绑定处理</h3>用户名:<input type="text" v-model="username" @keyup.enter="fn"/><br/><!-- v-model修饰符 v-model.trim(去除首尾空格) v-model.number(转数字) --><h3>v-model修饰符</h3>年龄:<input type="text" v-model.number="age" /><br/>英文名:<input type="text" v-model.trim="usName" /><br/><!-- 事件修饰符:@事件名.stop(阻止冒泡) @事件名.prevent(阻止默认行为)--><h3> 事件修饰符</h3><div class="father" @click="f"><div class="son" @click.prevent="s"></div></div><!-- @click.prevent阻止默认跳转到百度首页--><a href="https:www.baidu.com" @click.prevent>点击跳转到百度</a></div><script>const app = new Vue({el : '#app',data : {username : '',usName : '',age : ''},methods : {fn(e){//e.key === 'Enter' 等价于@keyup.enter// if(e.key === 'Enter'){}console.log("键盘回车事件触发"+this.username)},f(){alert("这是父元素盒子")},s(){alert("这是子元素盒子")} }})</script></body>
2、v-bind对于样式控制的增强
为了方便开发者进行样式控制,Vue拓展了v-bind的语法,可以针对class类名和style行内样式进行控制。
2.1、v-bind对于样式控制的增强–class
语法 :class=“对象/数组”
-
对象–>建就是类名,值是布尔值。如果值为true,有这个类,否则没有这个类

适用场景:一个类来回切换 -
数组–>数组中的所有类,都会添加到盒子上,本质就是一个class列表

适用场景:批量添加或删除类
案例练习:京东秒杀tab导航高亮

<body><!-- 案列:京东秒杀tab导航高亮 gezi是一个样式类--><div id="app" ><h3>v-bind对于样式控制的增强--class</h3><ul><li v-for="(item,index) in list" @click="activeIndex = index " ><a :class="{gezi : index === activeIndex}" href="#">{{ item.name }}</a></li> </ul><hr></div><script>const app = new Vue({el : '#app',data : {activeIndex : 0,list : [{id : 1,name : '京东秒杀'},{id : 2,name : '京东抢购'}, {id : 3,name : '京东商场'}]},methods : {}})</script></body>
2.2、v-bind对于样式控制的增强–操作style
语法 :style = “样式对象”
适用场景:某个具体属性的动态设置
注意:
- 当遇到像background-color这样带横杠的属性名必须以驼峰命名或者以引号处理
- 在{}中是以json的格式写的,所以键值要加引号
模版语法

案列:进度条实现
<html><head><title> 进度条--style </title><script src="../../vue.js"></script><style>.progress{height: 25px;width: 400px;border-radius: 15px;background-color: black;border: 3px solid black;box-sizing: border-box;margin-bottom: 30px;}.inner{height: 20px;border-radius: 10px;text-align: right;position: relative;background-color: blueviolet;background-size: 20px 20px;box-sizing: border-box;transition: all 1s;}</style></head><body><!-- <div class="box" :style="{width : '400px',height : '400px','background-color': 'red' }"> --><!-- <div class="box" :style="{width : '400px',height : '400px',backgroundColor: 'red' }"> --><!-- 案列:京东秒杀tab导航高亮 --><div id="app" ><h3>进度条--style</h3><div class="progress"><div class="inner" :style="{width: count+'%'}"></div><span :style="{ 'padding-left': count + '%' }">{{ count }}%</span></div> <button @click="count--" v-show="count>0">-</button><button  @click="count++" v-show="count<100">+</button></div><script>const app = new Vue({el : '#app',data : {count : 50 //默认为50%},methods : {}})</script></body>
</html>
3、v-model应用于其他表单元素
常见的表单元素都可以用v-model绑定关联 -->快速获取或设置表单元素的值
它会根据控件类型自动选取正确的方法来更新元素
例如:输入框(input:text)、文本域(textarea)、复选框(input:checkbox)、单选框(input:radio)、下拉菜单(select)等等。
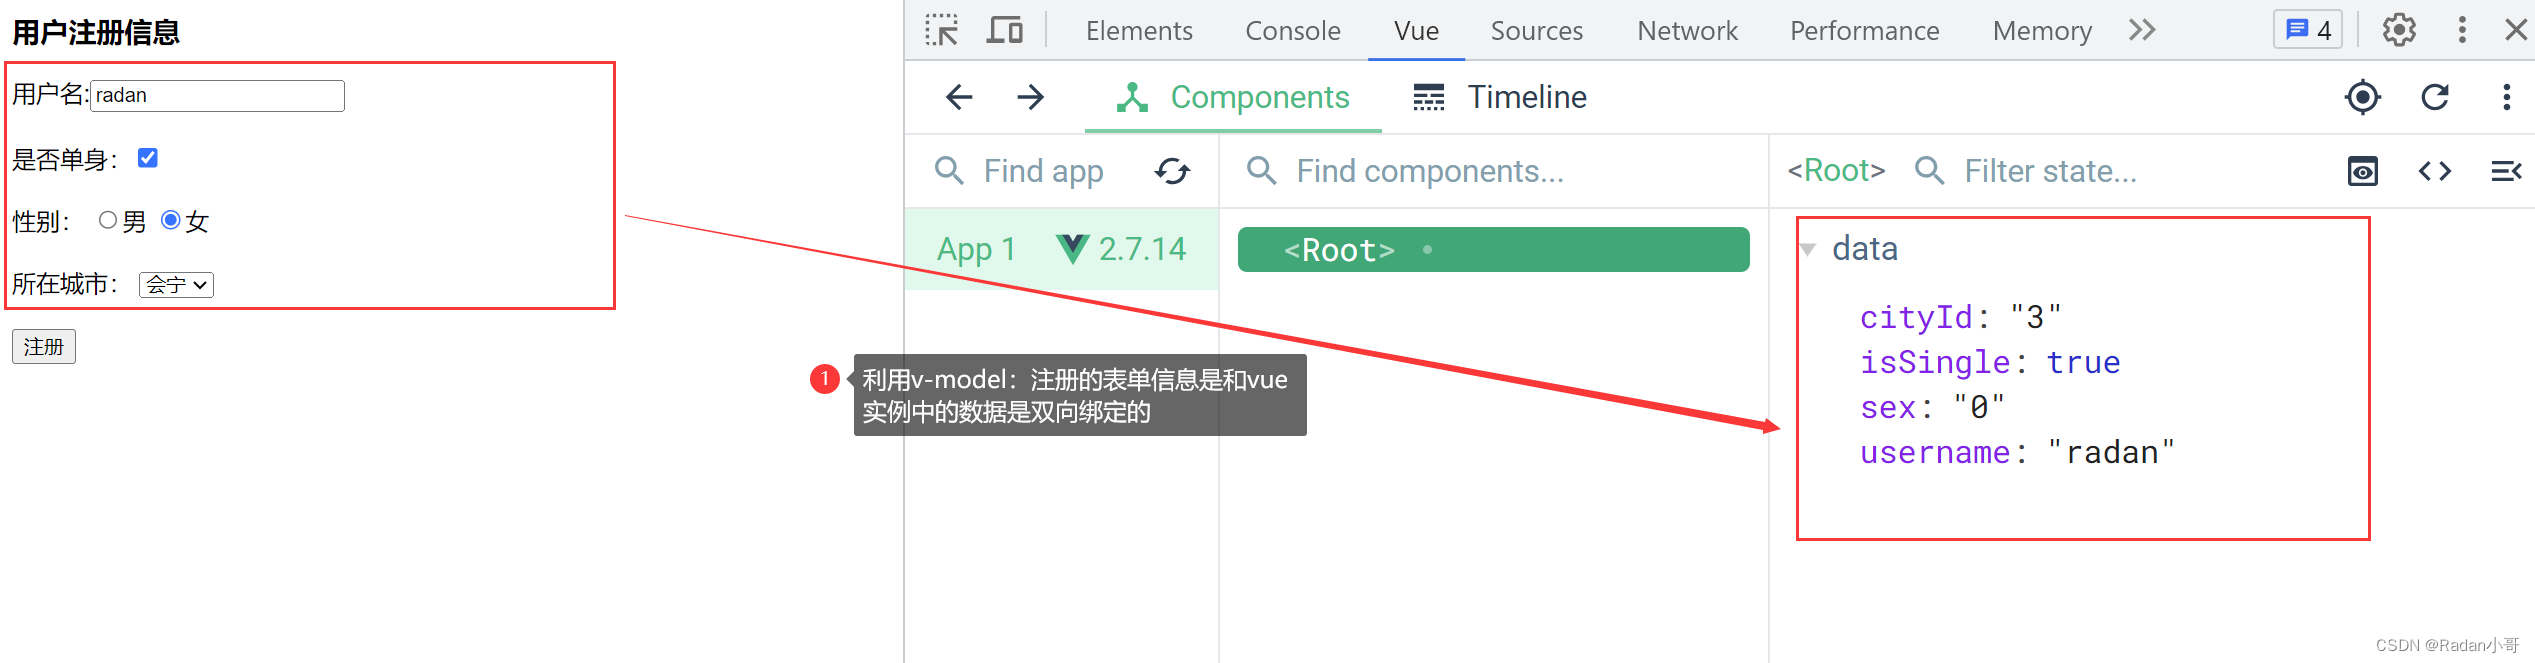
案例:注册案例
<body><div id="app"><div :class="['register']"><h3>用户注册信息</h3><!-- 输入框 -->用户名:<input type="text" v-model.trim="username" name="username"/><br><br>是否单身:<input type="checkbox" v-model="isSingle"/><br><br><!-- 单选框 (前置理解)1.name:给单选框加上name属性,可以分组--- >统一组互相互斥2.value:给单选框加上value属性,用于提交给后台的数据结合Vue使用 --》v-model -->性别: <input type="radio" name="sex" value="1" v-model="sex">男<input type="radio" name="sex" value="0" v-model="sex">女<br><br><!-- 下拉框 (前置理解)1.option 需要设置 value值,提交给后台2.select 的 value值,关联了选中的 option 的 value值结合Vue使用 --》v-model 结合$0.value进行查看-->所在城市: <select v-model="cityId"><option value="1">白银</option><option value="2">靖远</option><option value="3">会宁</option><option value="4">景泰</option></select><br><br><button>注册</button></div></div><script>const app = new Vue({el : '#app',data : {username : '',sex : 1,isSingle : true,cityId : 4}})</script></body>
测试结果
4、计算属性
概念:基于现有的数据,计算出来的新属性。依赖的数据变化,自动重新计算
语法:
- 声明在computed配置项中,一个计算属性对应一个函数
- 和普通属性一样使用{{计算属性名}}
计算属性:换言之,就是将一段求值的代码进行封装。
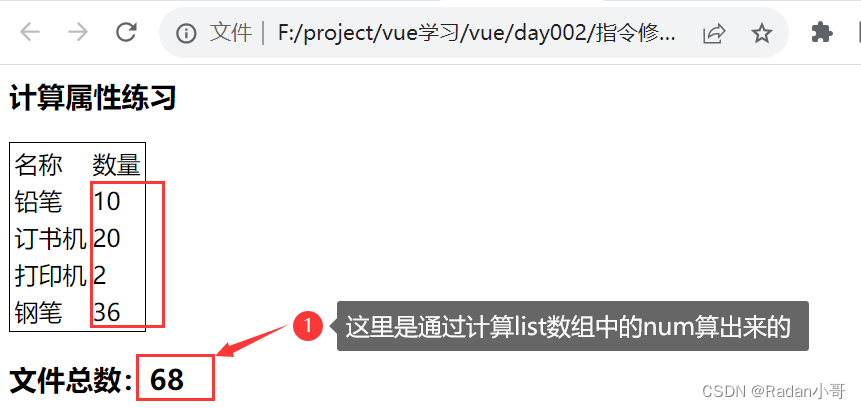
小黑笔城
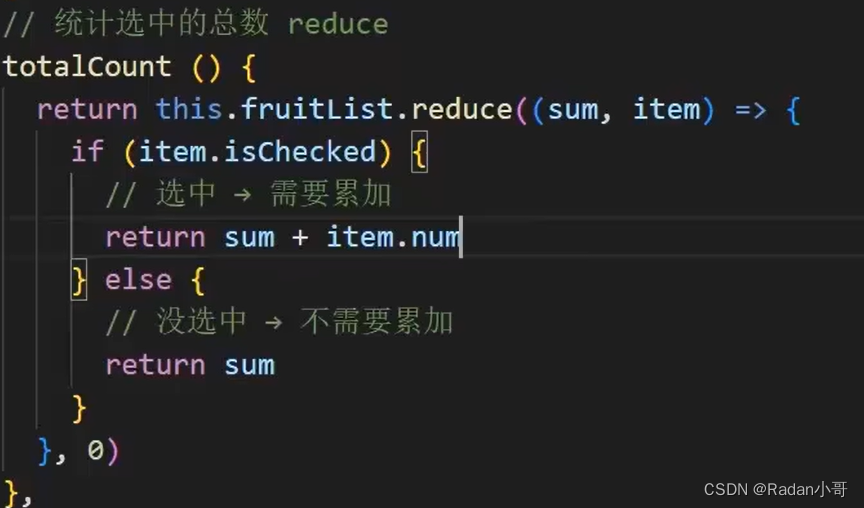
<body><div id="app"><h3>计算属性练习</h3> <table class="bordered-table"><tr><td>名称</td><td>数量</td></tr><tr v-for="(item,index) in list"> <td>{{item.name}}</td><td>{{item.num}}</td></tr></table><h3>文件总数:{{totalNum}}</h3></div><script>const app = new Vue({el : '#app',data : {list : [{id : 1,name : '铅笔',num : 10},{id : 2,name : '订书机',num : 20},{id : 2,name : '打印机',num : 2},{id : 2,name : '钢笔',num : 36}]},computed : {totalNum(){//基于现有数据,编写求值逻辑//计算属性函数内部,可以直接通过 this 访问到 vue 实例//需求:对this.list数组里面的 num 进行求和 --》reducelet total=this.list.reduce((sum,item) => sum +item.num,0) return total}}})</script></body>测试结果
4.1、computed计算属性 vs methods方法的区别
- computed计算属性:
- 作用:封装一段对于数据的处理,求得一个结果
- 语法:写在computed 配置项中;作为属性,直接使用–>this.计算属性 {{计算属性名}}
- 缓存特性(提升性能):计算属性会对计算出来的结果缓存,再次使用直接读取缓存,依赖项变化,会自动重新计算 -->并再次使用缓存
- methods方法:
- 作用:给实例提供一个方法,调用以处理业务逻辑
- 语法:写在methods配置项中; 作为方法:需要调用 —>this.方法名() {{方法名()}} @事件名=“方法名”
使用计算属性(缓存特性)
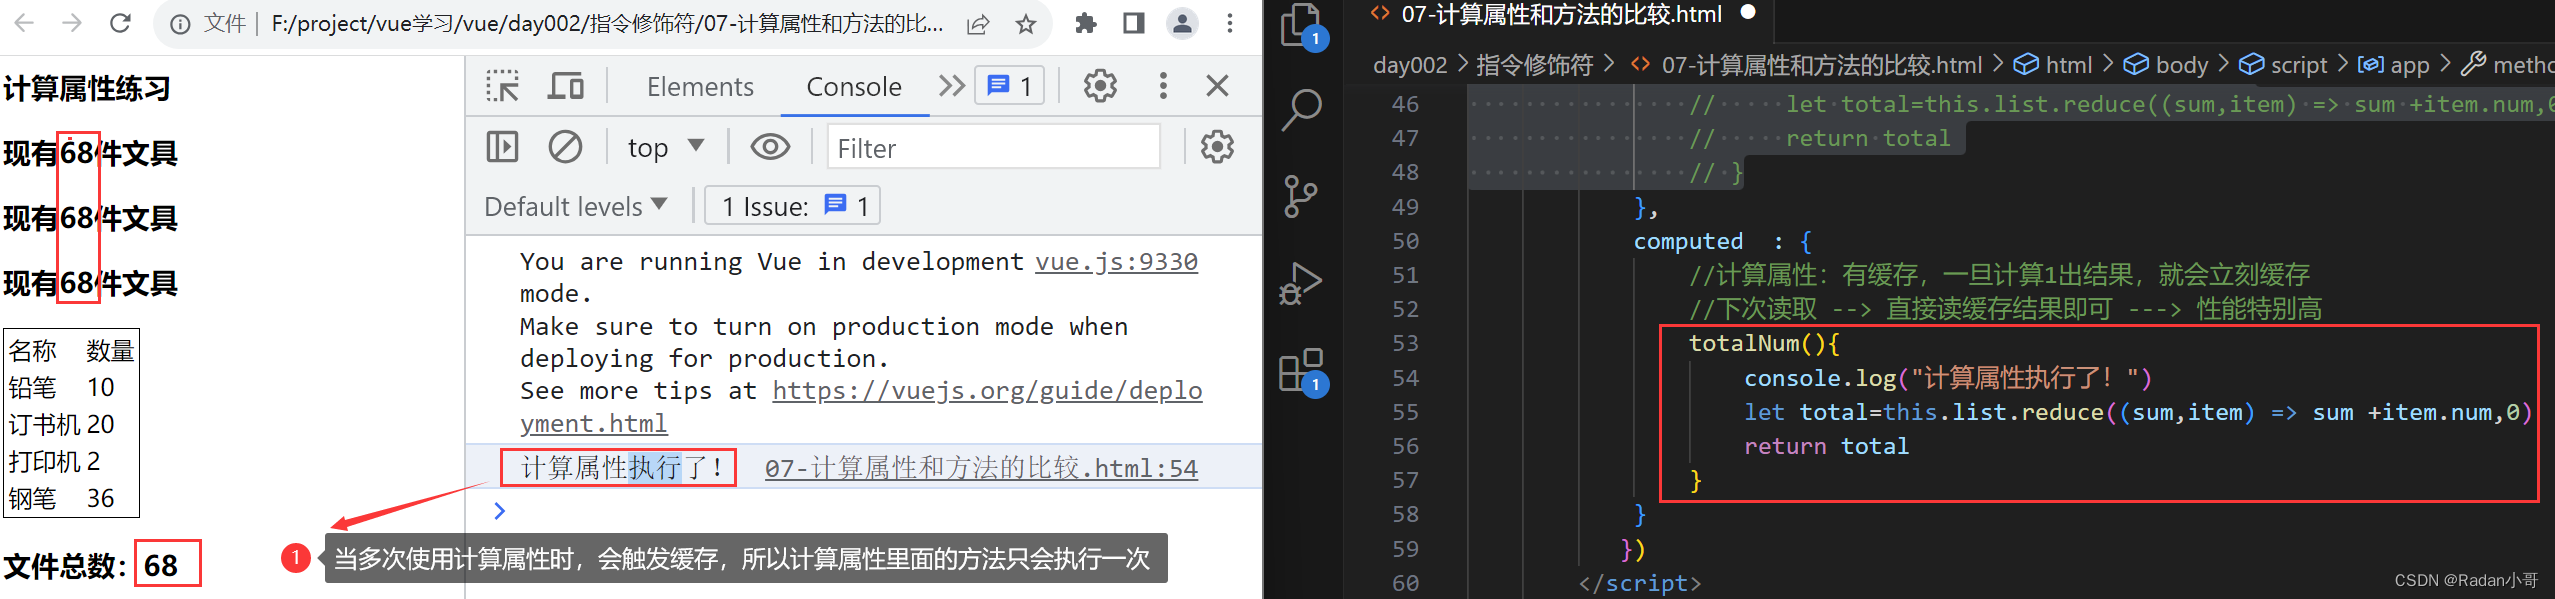
使用methods方法中的函数时

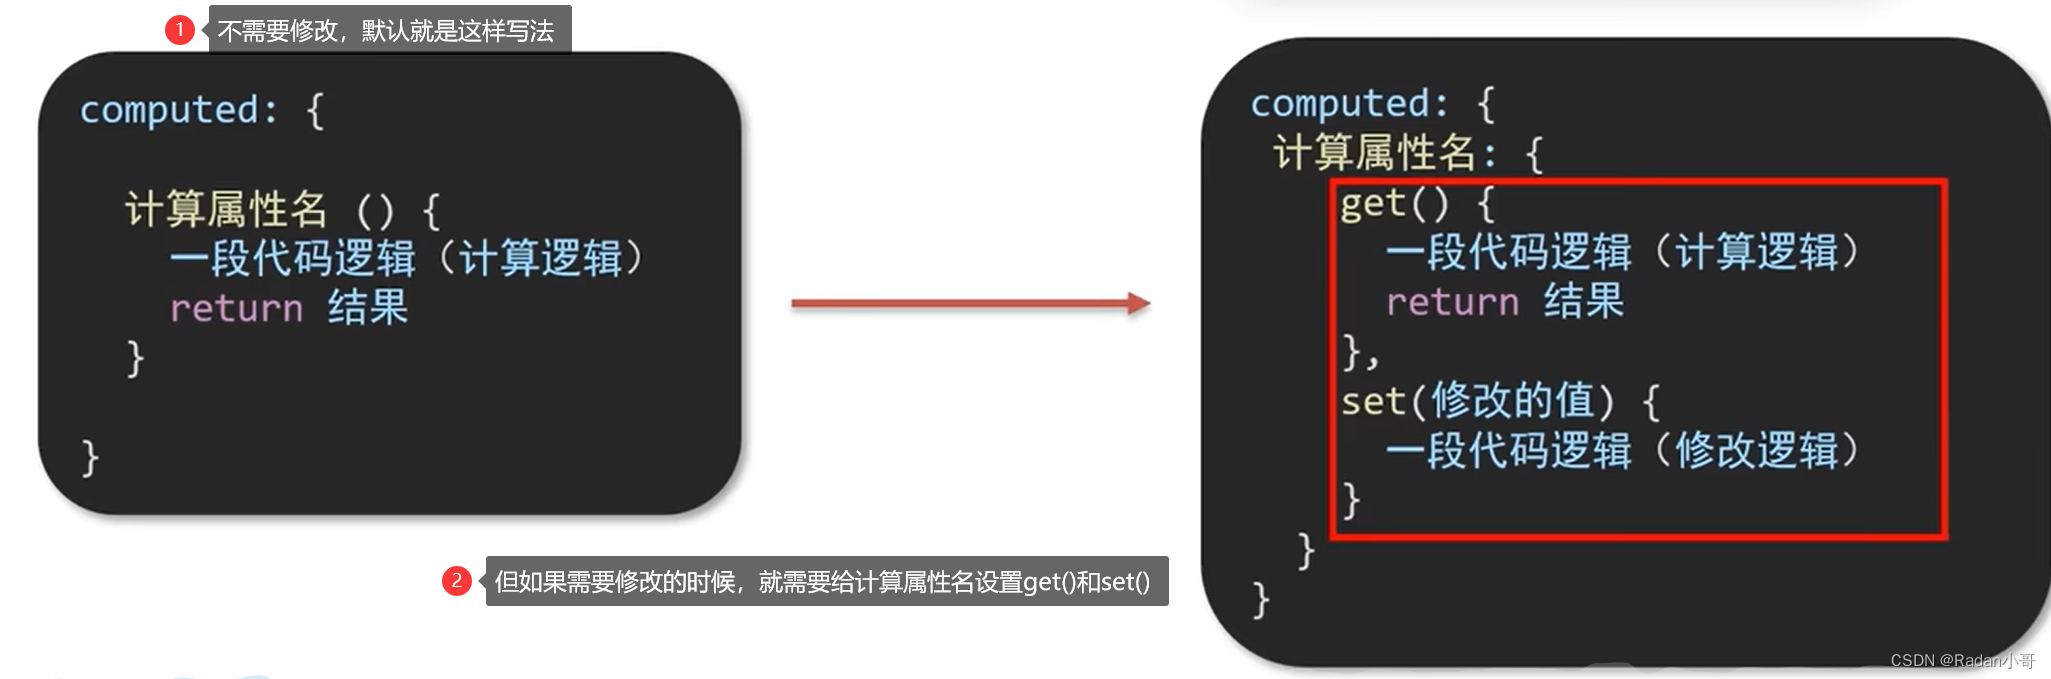
4.2、计算属性的完整写法
计算属性默认的简写,只能读取访问,不能“修改”
如果需要“修改” --> 需要写计算属性的完整写法"
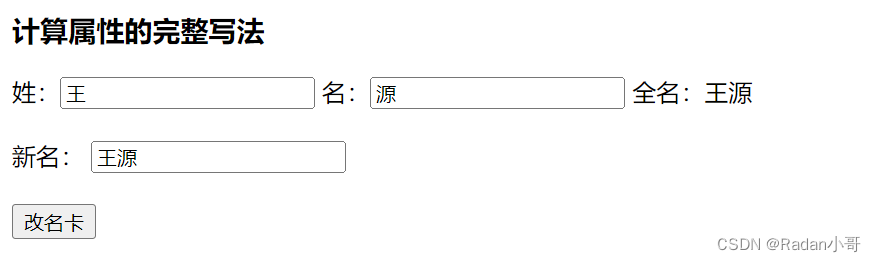
案例:改名卡的练习
<body><div id="app"><h3>计算属性的完整写法</h3> 姓:<input type="text" v-model.trim="xing"/>名:<input type="text" v-model.trim="ming"/>全名:{{fullName}}<br><br>新名: <input type="text" v-model.trim="newName"><br><br><button @click="modify">改名卡</button></div><script>const app = new Vue({el : '#app',data : {xing : '张',ming : '飞',newName : ''},methods : {modify(){//通过this.计算属性进行修改计算属性的值this.fullName = this.newName}},computed : {//简写 -->获取,没有配置设置的逻辑// fullName(){// return this.xing + this.ming// }//完整写法 --> 获取 + 设置fullName : {// 1. 当fullName计算属性,被获取求值时,执行get(有缓存时,从缓存中获取数据)// 会将返回值作为,求值的结果get(){return this.xing + this.ming},// 2. 当fullName计算属性,被修改赋值时,执行set// 修改的值,传递给set方法的形参set(value){this.xing = value.slice(0,1)this.ming = value.slice(1)}}}})</script></body>
测试结果
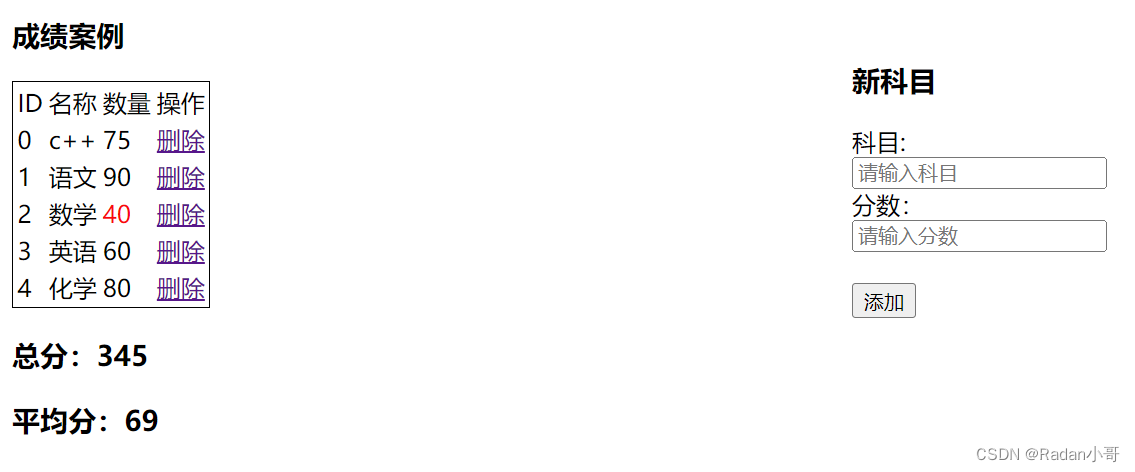
4.3、成绩添加案例
题目要求

代码完成
<html><head><title>计算属性</title><script src="../../vue.js"></script><style>.bordered-table {border: 1px solid #000; /* 设置表格边框样式 */}.right{float: left;width: 200px;height: 200px;padding-left: 300px;padding-top: 30px;}.left{float: left;width: 260px;height: 400px;}.low60{color : red}</style></head><body><div id="app"><div class="left"><h3>成绩案例</h3> <table class="bordered-table"><tr><td>ID</td><td>名称</td><td>数量</td><td>操作</td></tr><tr v-for="(item,index) in list">          <td>{{index}}</td><td>{{item.name}}</td><td :class="{low60 : item.score < 60}" >{{item.score}}</td>
<!-- 让低于60分的爆红 --><td><a href="https:www.baidu.com" @click.prevent="del(item.id)">删除</a></td></tr></table><h3>总分:{{totalScore}}</h3><h3>平均分:{{averageScore}}</h3></div><div class="right"><h3>新科目</h3>科目: <input type="text" placeholder="请输入科目" v-model.trim="newProject" /><br>分数:<input type="text" placeholder="请输入分数" v-model.number="newScore" /><br><br> <button @click="addProject">添加</button></div></div><script>const app = new Vue({el : '#app',data : {list : [{id : 1,name : '语文',score : 90},{id : 2,name : '数学',score : 40},{id : 3,name : '英语',score : 60},{id : 4,name : '化学',score : 80}],newProject : '',newScore : ''},methods :{del(id){//通过id删除数组的指定元素this.list = this.list.filter(item => item.id !== id);},addProject(){//数组中添加元素    元素值为this.projectInfoif(this.newProject.trim() === ''){alert('添加的内容不能为空')}else if(this.newScore === ''){alert('添加的内容不能为空')}else if(typeof this.newScore !== 'number'){alert("请输入正确的成绩")}else{//向数组添加一个元素this.list.unshift({id  : +new  Date(),name : this.newProject,score : this.newScore})}this.newProject=''this.newScore=''console.log(this.newProject+"      "+this.newScore)}},computed  : {totalScore : {get(){let a = this.list.reduce((sum,item) => sum +item.score,0)// console.log("总分数:"+ a)return a},set(value){}},averageScore : {get(){let a = 0if(this.list.length === 0){console.log("11111")return 0}else{a = this.list.reduce((sum,item) => sum +item.score,0) / this.list.length// console.log("平均分"+ a)return a}                      },set(value){}}}})</script></body>
</html>
测试结果
技术使用

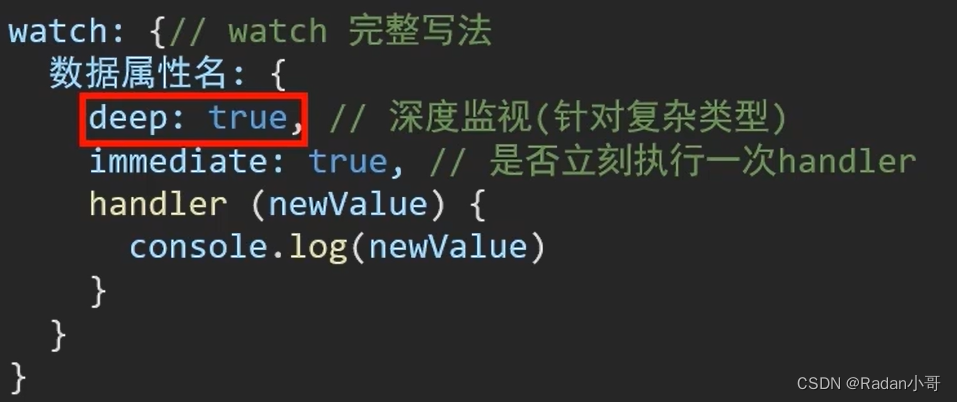
5、watch 监视器
作用:监视数据变化,执行一些业务逻辑 或 异步操作。(当数据发生改变时,触发)
语法:
- 简单写法 --> 简单类型数据,直接监视

- 完整写法 --> 添加额外配置项
- deep: true 对复杂类型深度监视(监视的是一个数据对象,而非单个数据)
- immediate:true 初始化立即执行一次handler方法
统计求和