【EasyX】实时时钟
目录
- 实时时钟
- 1. 绘制静态秒针
- 2. 秒针的转动
- 3. 根据实际时间转动
- 4. 添加时针和分针
- 5. 添加表盘刻度
实时时钟
本博客介绍利用EasyX实现一个实时钟表的小程序,同时学习时间函数的使用。
本文源码可从github获取
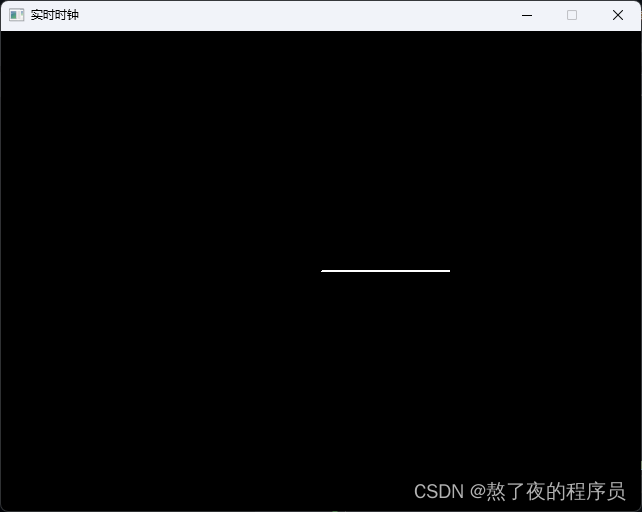
1. 绘制静态秒针
第一步定义钟表的中心坐标center,它也是秒针的起点;定义秒针的长度secondLength、秒针的终点坐标secondEnd;利用setlinestyle函数设定线的型号和宽度,调用line函数绘制秒针。
#include <graphics.h>
#include <conio.h>
#include <cmath>using namespace std;struct Point
{int x;int y;
};#define High 480
#define Width 640int main(void)
{initgraph(Width, High);Point center, secondEnd;center.x = Width / 2;center.y = High / 2;int sencondLenth = Width / 5;secondEnd.x = center.x + sencondLenth;secondEnd.y = center.y;// 画秒针setlinestyle(PS_SOLID, 2); // 画实线,宽度为2个像素setcolor(WHITE);line(center.x, center.y, secondEnd.x, secondEnd.y);_getch();closegraph();return 0;
}
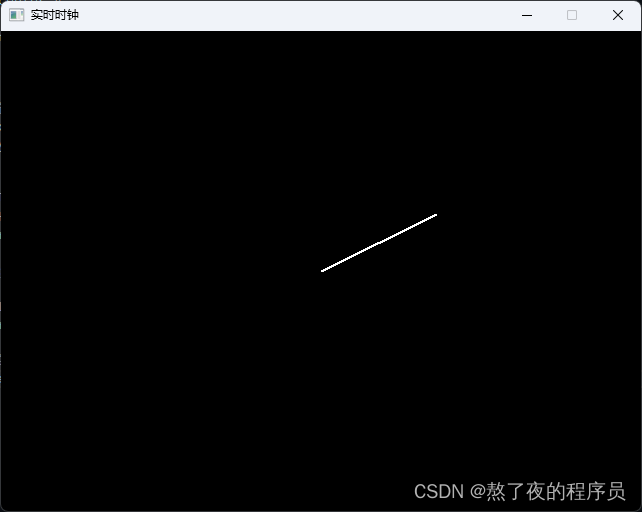
2. 秒针的转动
第二步实现秒针的转动,定义secondAngle为秒针对应的角度,利用三角几何知识求出秒针的终点坐标:
secondEnd.x = center.x + secondLenth * sin(secondAngle);
secondEnd.y = center.y - secondLenth * cos(secondAngle);
让角度循环变化,则实现了秒针转动的动画效果。
#include <graphics.h>
#include <conio.h>
#include <cmath>using namespace std;struct Point
{int x;int y;
};#define High 480
#define Width 640
#define PI 3.1415926int main(void)
{initgraph(Width, High);Point center, secondEnd;center.x = Width / 2;center.y = High / 2;int secondLenth = Width / 5;secondEnd.x = center.x + secondLenth;secondEnd.y = center.y;double secondAngle = 1.0; while (true){// 由角度决定终点坐标secondEnd.x = center.x + secondLenth * sin(secondAngle);secondEnd.y = center.y - secondLenth * cos(secondAngle);// 画秒针setlinestyle(PS_SOLID, 2); // 画实线,宽度为2个像素setcolor(WHITE);line(center.x, center.y, secondEnd.x, secondEnd.y);Sleep(100);setcolor(BLACK);line(center.x, center.y, secondEnd.x, secondEnd.y);// 秒针角度变化secondAngle = secondAngle * 2 * PI / 60 + 1;}_getch();closegraph();return 0;
}
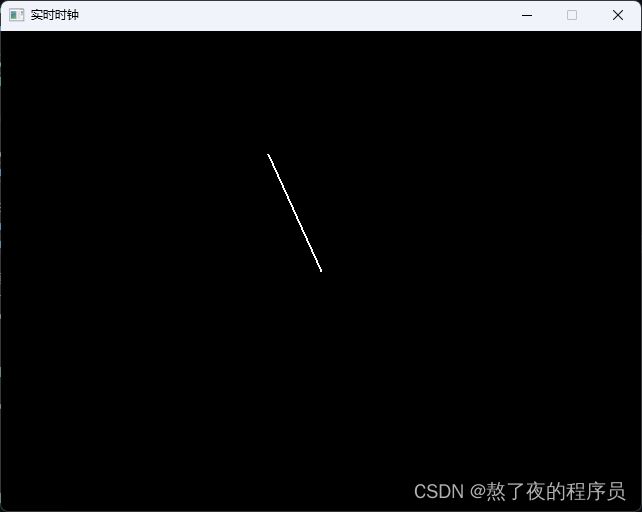
3. 根据实际时间转动
第三步定义系统变量(SYSTEMTIME ti),通过GetLocalTime(&ti)获取当前时间,秒针的角度由实际时间决定,即secondAngle = ti.wSecond * 2 * PI/60。
#include <graphics.h>
#include <conio.h>
#include <cmath>using namespace std;struct Point
{int x;int y;
};#define High 480
#define Width 640
#define PI 3.1415926int main(void)
{initgraph(Width, High);Point center, secondEnd;center.x = Width / 2;center.y = High / 2;int secondLenth = Width / 5;secondEnd.x = center.x + secondLenth;secondEnd.y = center.y;double secondAngle;SYSTEMTIME ti;while (true){GetLocalTime(&ti);secondAngle = ti.wSecond * 2 * PI / 60;// 由角度决定终点坐标secondEnd.x = center.x + secondLenth * sin(secondAngle);secondEnd.y = center.y - secondLenth * cos(secondAngle);// 画秒针setlinestyle(PS_SOLID, 2); // 画实线,宽度为2个像素setcolor(WHITE);line(center.x, center.y, secondEnd.x, secondEnd.y);Sleep(100);setcolor(BLACK);line(center.x, center.y, secondEnd.x, secondEnd.y);}_getch();closegraph();return 0;
}
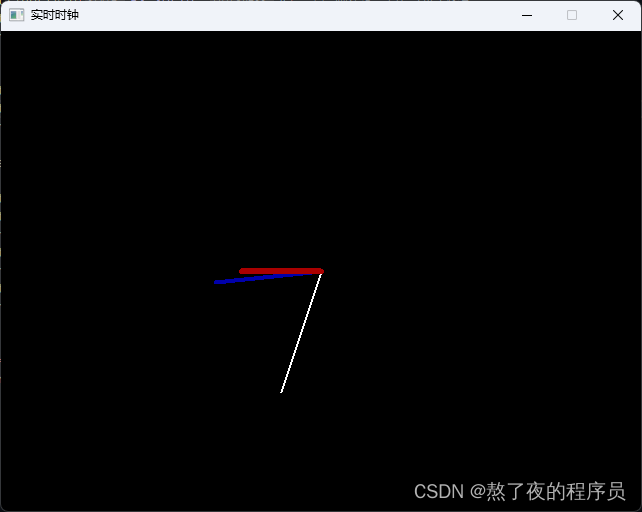
4. 添加时针和分针
第四步添加时针、分针,和秒针变化相比,他们的长度、宽度、颜色、旋转速度有一定的不同。
#include <graphics.h>
#include <conio.h>
#include <cmath>using namespace std;struct Point
{int x;int y;
};#define High 480
#define Width 640
#define PI 3.1415926int main(void)
{initgraph(Width, High);Point center, secondEnd, minuteEnd, hourEnd;center.x = Width / 2;center.y = High / 2;int secondLenth = Width / 5;int minuteLenth = Width / 6;int hourLenth = Width / 8;double secondAngle;double minuteAngle;double hourAngle;SYSTEMTIME ti;while (true){GetLocalTime(&ti);secondAngle = ti.wSecond * 2 * PI / 60;minuteAngle = ti.wMinute * 2 * PI / 60;hourAngle = (ti.wHour % 12) * 2 * PI / 12;// 由角度决定秒针终点坐标secondEnd.x = center.x + secondLenth * sin(secondAngle);secondEnd.y = center.y - secondLenth * cos(secondAngle);// 由角度决定分针终点坐标minuteEnd.x = center.x + minuteLenth * sin(minuteAngle);minuteEnd.y = center.y - minuteLenth * cos(minuteAngle);// 由角度决定时针终点坐标hourEnd.x = center.x + hourLenth * sin(hourAngle);hourEnd.y = center.y - hourLenth * cos(hourAngle);// 画秒针setlinestyle(PS_SOLID, 2); // 画实线,宽度为2个像素setcolor(WHITE);line(center.x, center.y, secondEnd.x, secondEnd.y);// 画分针setlinestyle(PS_SOLID, 4); // 画实线,宽度为4个像素setcolor(BLUE);line(center.x, center.y, minuteEnd.x, minuteEnd.y);// 画时针setlinestyle(PS_SOLID, 6); // 画实线,宽度为6个像素setcolor(RED);line(center.x, center.y, hourEnd.x, hourEnd.y);Sleep(10); // 延时10毫秒setcolor(BLACK);setlinestyle(PS_SOLID, 2); // 画实线,宽度为2个像素line(center.x, center.y, secondEnd.x, secondEnd.y);setlinestyle(PS_SOLID, 4); // 画实线,宽度为4个像素line(center.x, center.y, minuteEnd.x, minuteEnd.y);setlinestyle(PS_SOLID, 6); // 画实线,宽度为6个像素line(center.x, center.y, hourEnd.x, hourEnd.y);}int c = _getch();closegraph();return 0;
}
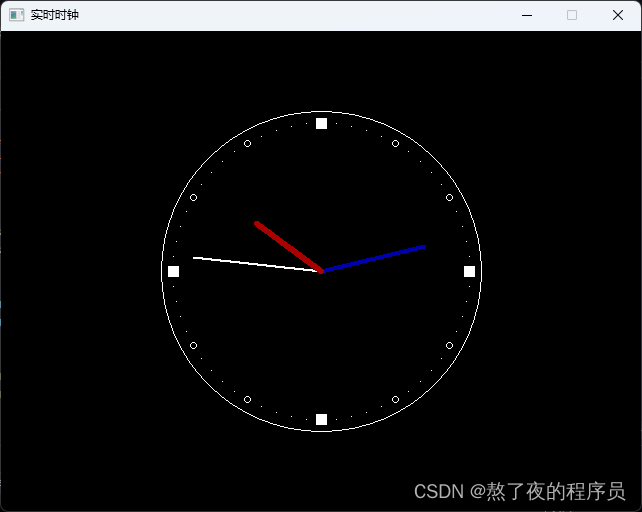
5. 添加表盘刻度
第五步绘制表盘,并可以利用outtextxy()函数在画面中输出文字,为了让时针、分针的转动更自然,对求解时针、分针的角度进行了改进。
#include <graphics.h>
#include <conio.h>
#include <cmath>using namespace std;struct Point
{int x;int y;
};#define High 480
#define Width 640
#define PI 3.1415926int main(void)
{initgraph(Width, High);Point center, secondEnd, minuteEnd, hourEnd;center.x = Width / 2;center.y = High / 2;int secondLenth = Width / 5;int minuteLenth = Width / 6;int hourLenth = Width / 8;double secondAngle;double minuteAngle;double hourAngle;SYSTEMTIME ti;BeginBatchDraw();while (true){// 绘制一个简单的表盘setlinestyle(PS_SOLID, 1); // 画实线,宽度为1个像素setcolor(WHITE);circle(center.x, center.y, Width / 4);// 画刻度int x, y, i;for (i = 0; i < 60; i++){x = center.x + int(Width/4.3*sin(PI*2*i/60));y = center.y - int(Width/4.3*cos(PI*2*i/60));if (i % 15 == 0) {bar(x - 5, y -5, x + 5, y + 5);}else if (i % 5 == 0) {circle(x, y, 3);}else {putpixel(x, y, WHITE);}}GetLocalTime(&ti);secondAngle = ti.wSecond * 2 * PI / 60;minuteAngle = ti.wMinute * 2 * PI / 60 + secondAngle / 60;hourAngle = ti.wHour*2*PI/12 + minuteAngle / 12;// 由角度决定秒针终点坐标secondEnd.x = center.x + secondLenth * sin(secondAngle);secondEnd.y = center.y - secondLenth * cos(secondAngle);// 由角度决定分针终点坐标minuteEnd.x = center.x + minuteLenth * sin(minuteAngle);minuteEnd.y = center.y - minuteLenth * cos(minuteAngle);// 由角度决定时针终点坐标hourEnd.x = center.x + hourLenth * sin(hourAngle);hourEnd.y = center.y - hourLenth * cos(hourAngle);// 画秒针setlinestyle(PS_SOLID, 2); // 画实线,宽度为2个像素setcolor(WHITE);line(center.x, center.y, secondEnd.x, secondEnd.y);// 画分针setlinestyle(PS_SOLID, 4); // 画实线,宽度为4个像素setcolor(BLUE);line(center.x, center.y, minuteEnd.x, minuteEnd.y);// 画时针setlinestyle(PS_SOLID, 6); // 画实线,宽度为6个像素setcolor(RED);line(center.x, center.y, hourEnd.x, hourEnd.y);FlushBatchDraw();Sleep(10); // 延时10毫秒setcolor(BLACK);setlinestyle(PS_SOLID, 2); // 画实线,宽度为2个像素line(center.x, center.y, secondEnd.x, secondEnd.y);setlinestyle(PS_SOLID, 4); // 画实线,宽度为4个像素line(center.x, center.y, minuteEnd.x, minuteEnd.y);setlinestyle(PS_SOLID, 6); // 画实线,宽度为6个像素line(center.x, center.y, hourEnd.x, hourEnd.y);}EndBatchDraw();int c = _getch();closegraph();return 0;
}
至此完成。