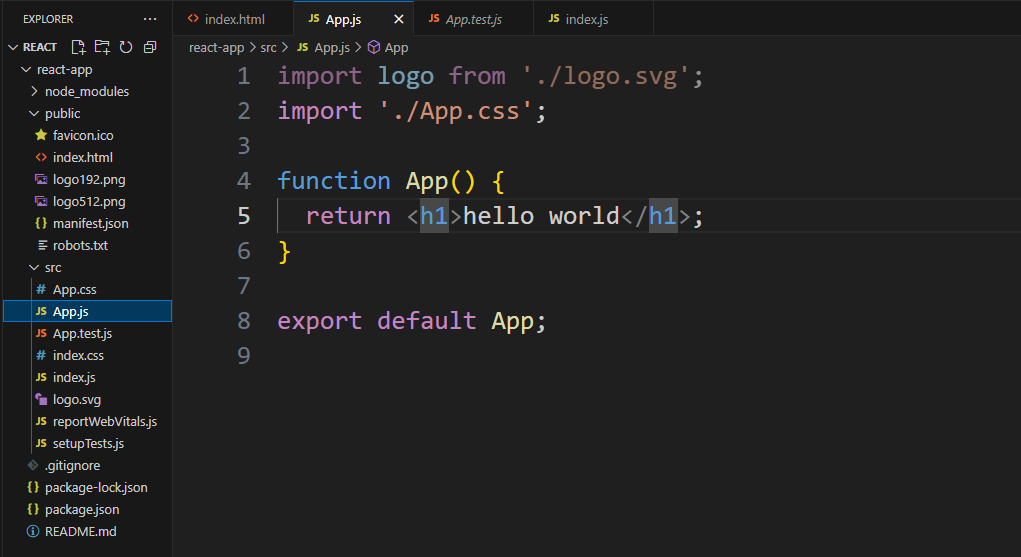
React框架超详细入门到实战项目演练【前端】【React】
React框架
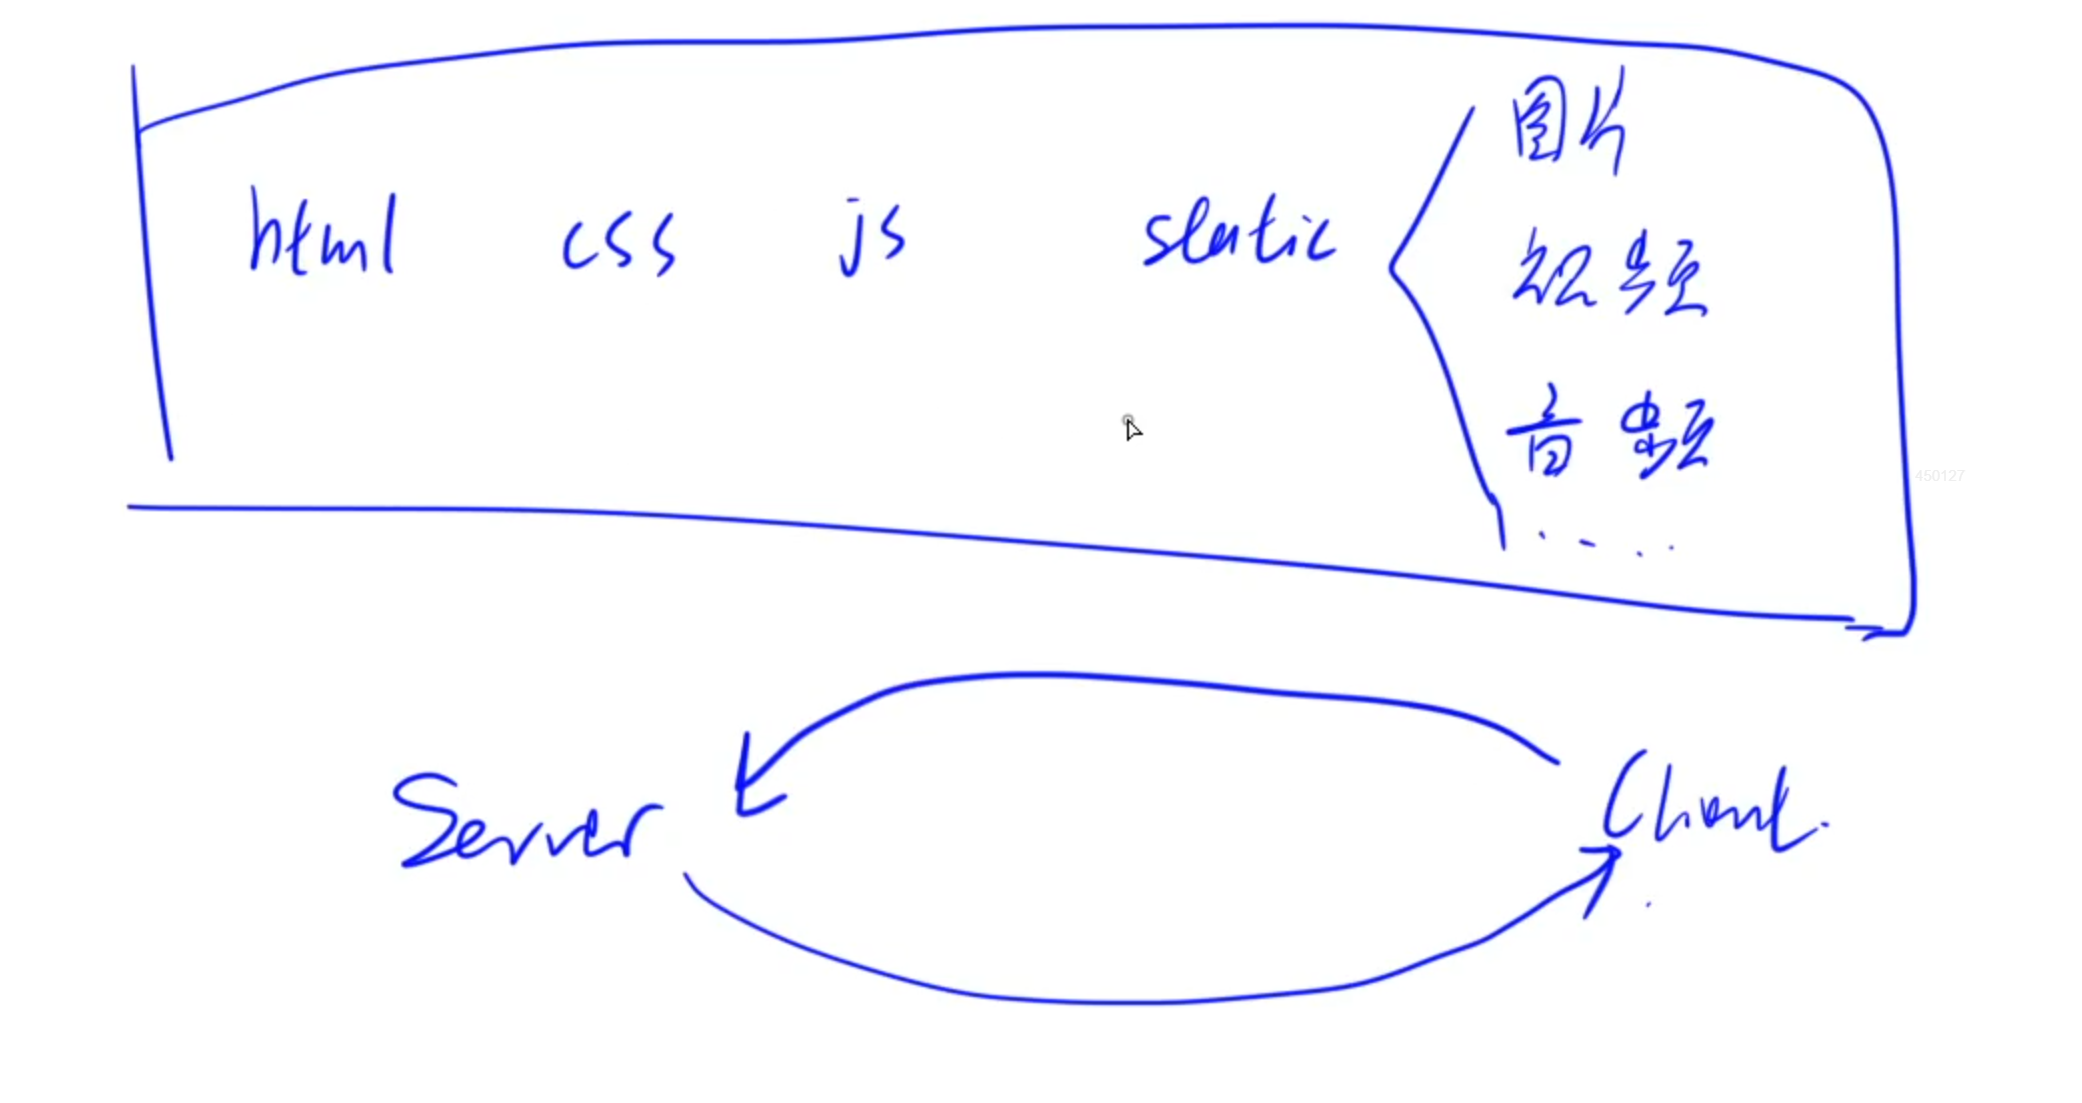
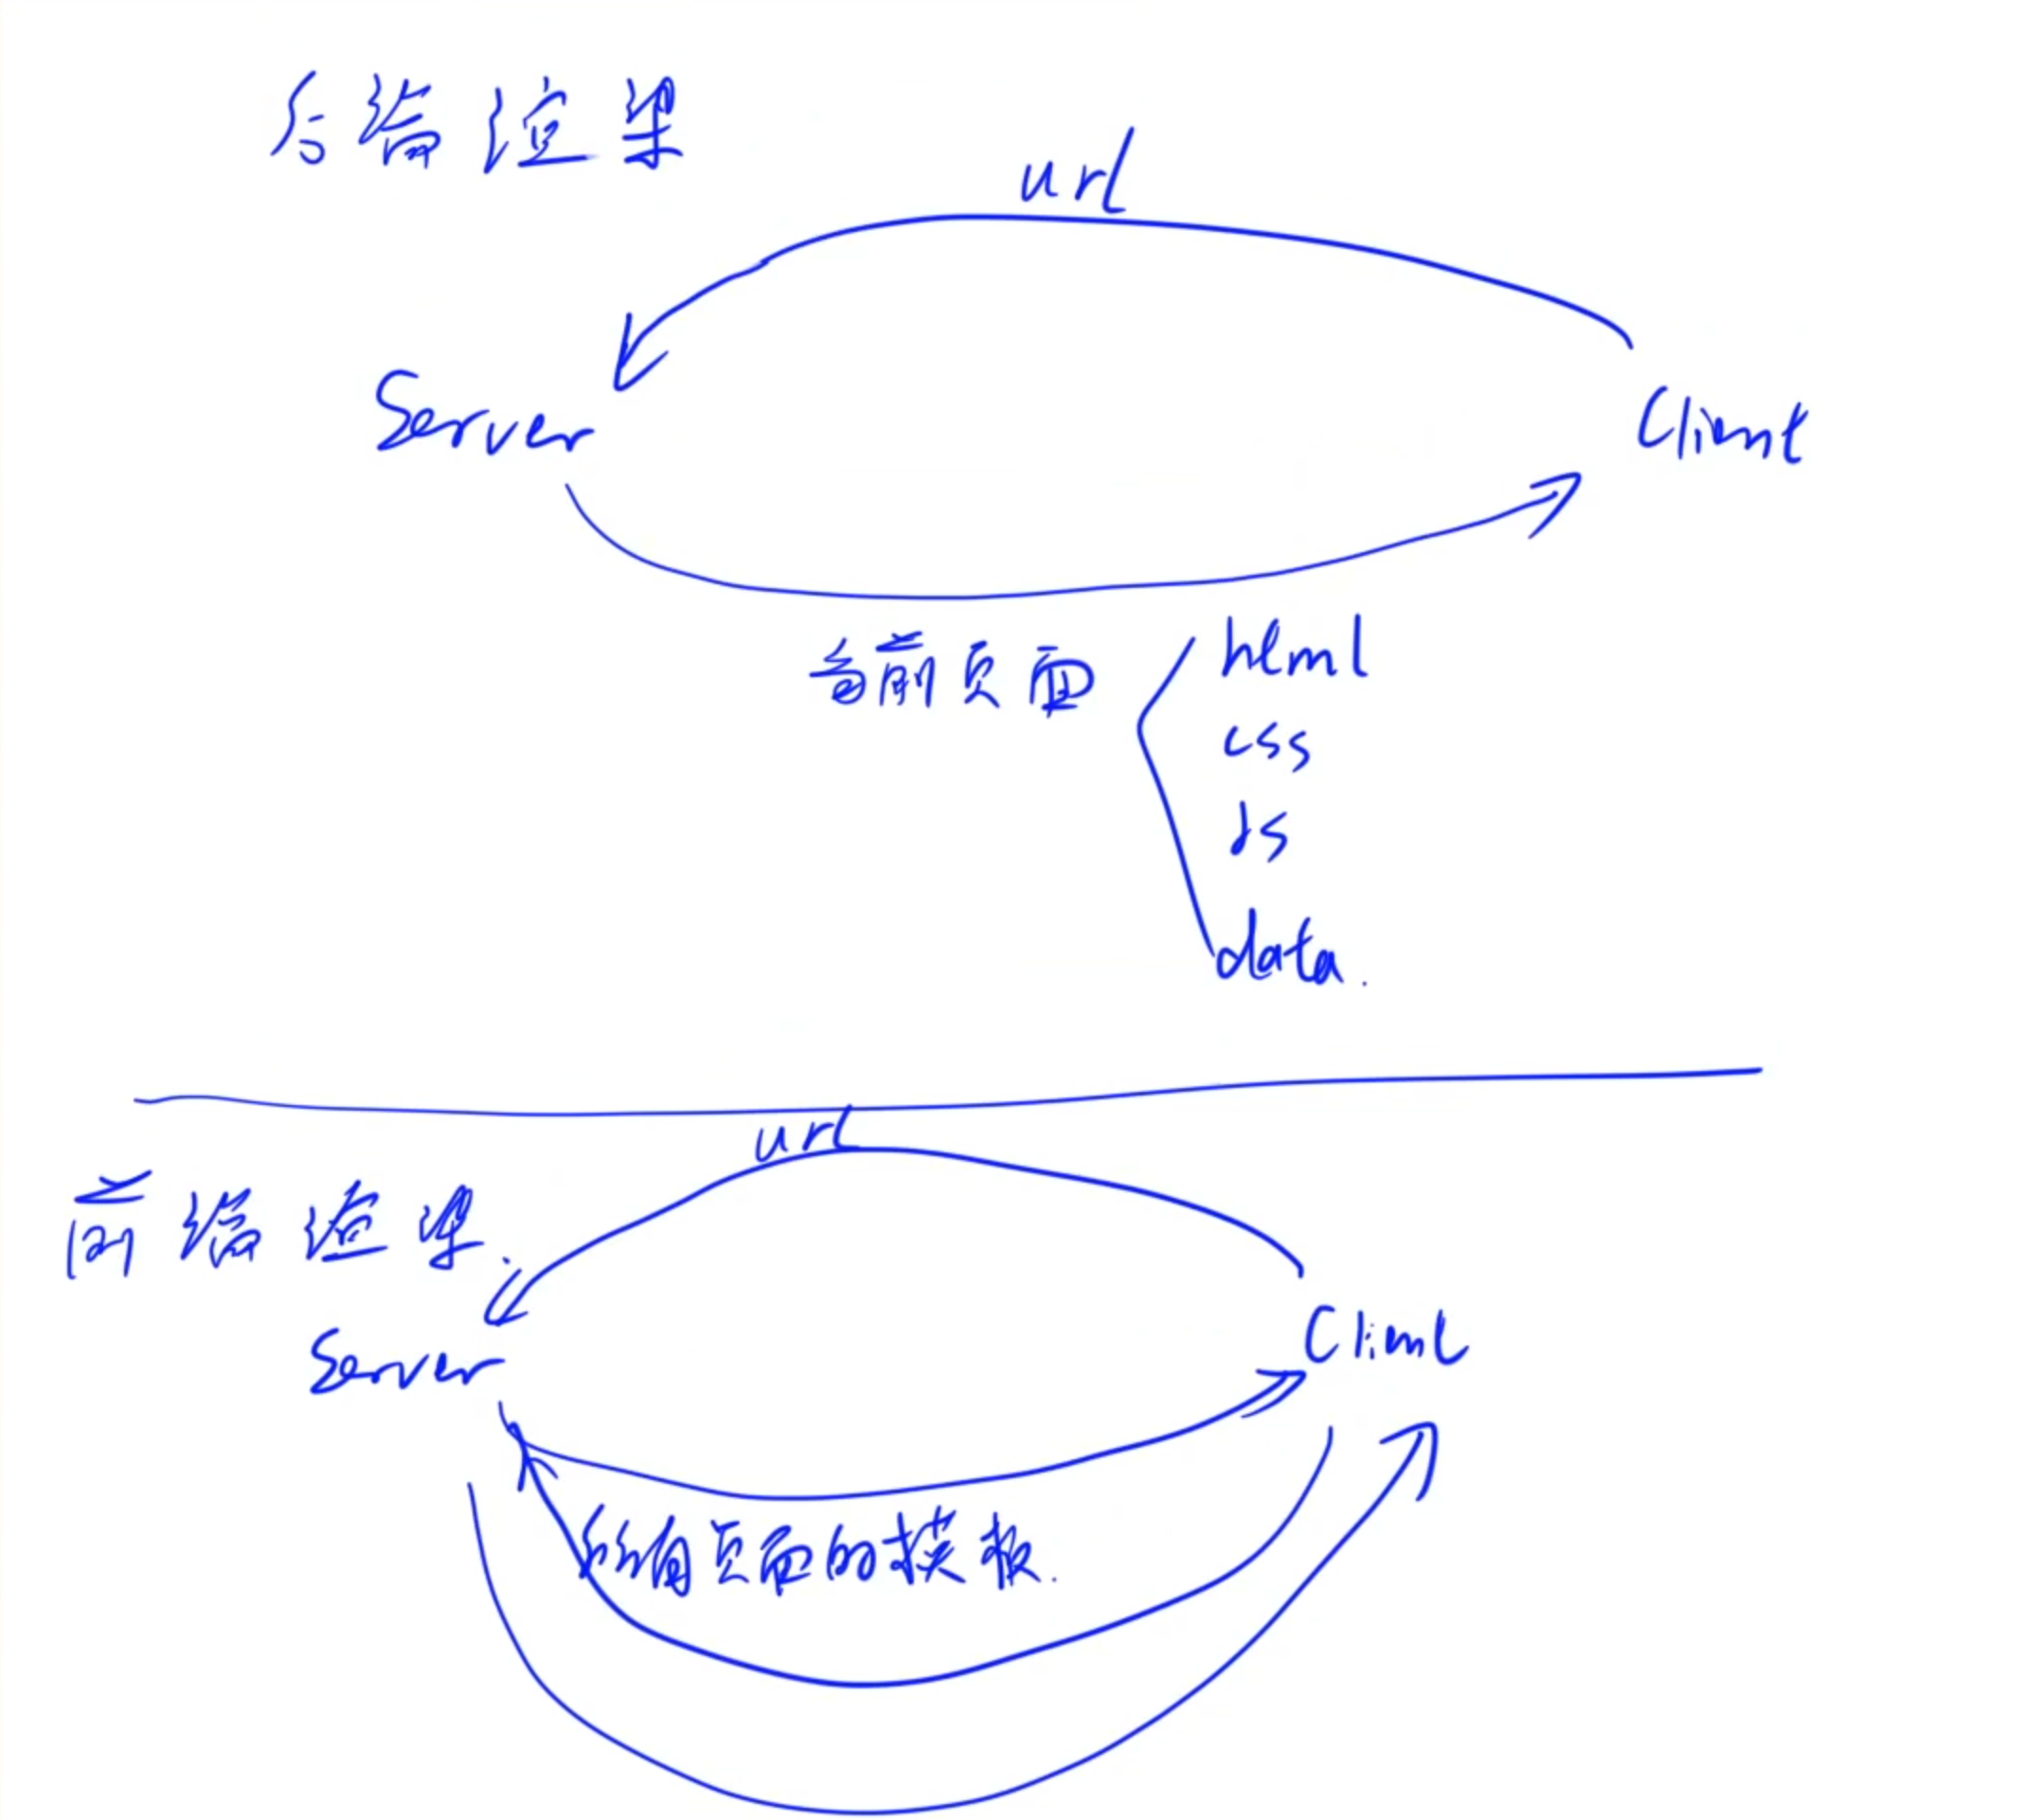
1.前端展示解释
当客户端访问服务器时,会从服务器中下载很多静态文件到本地,比如css、js等前端渲染文件
下载完成之后浏览器会将这些文件组合形成前端页面渲染出来。
2.React概述
React是一个专注于构建用户界面的JavaScript库,它采用声明式编程范式,使得代码更加易于阅读和理解。React的核心思想是组件化,即将用户界面划分为独立的、可复用的组件。每个组件都有自己的状态和生命周期,方便开发者进行维护和复用。
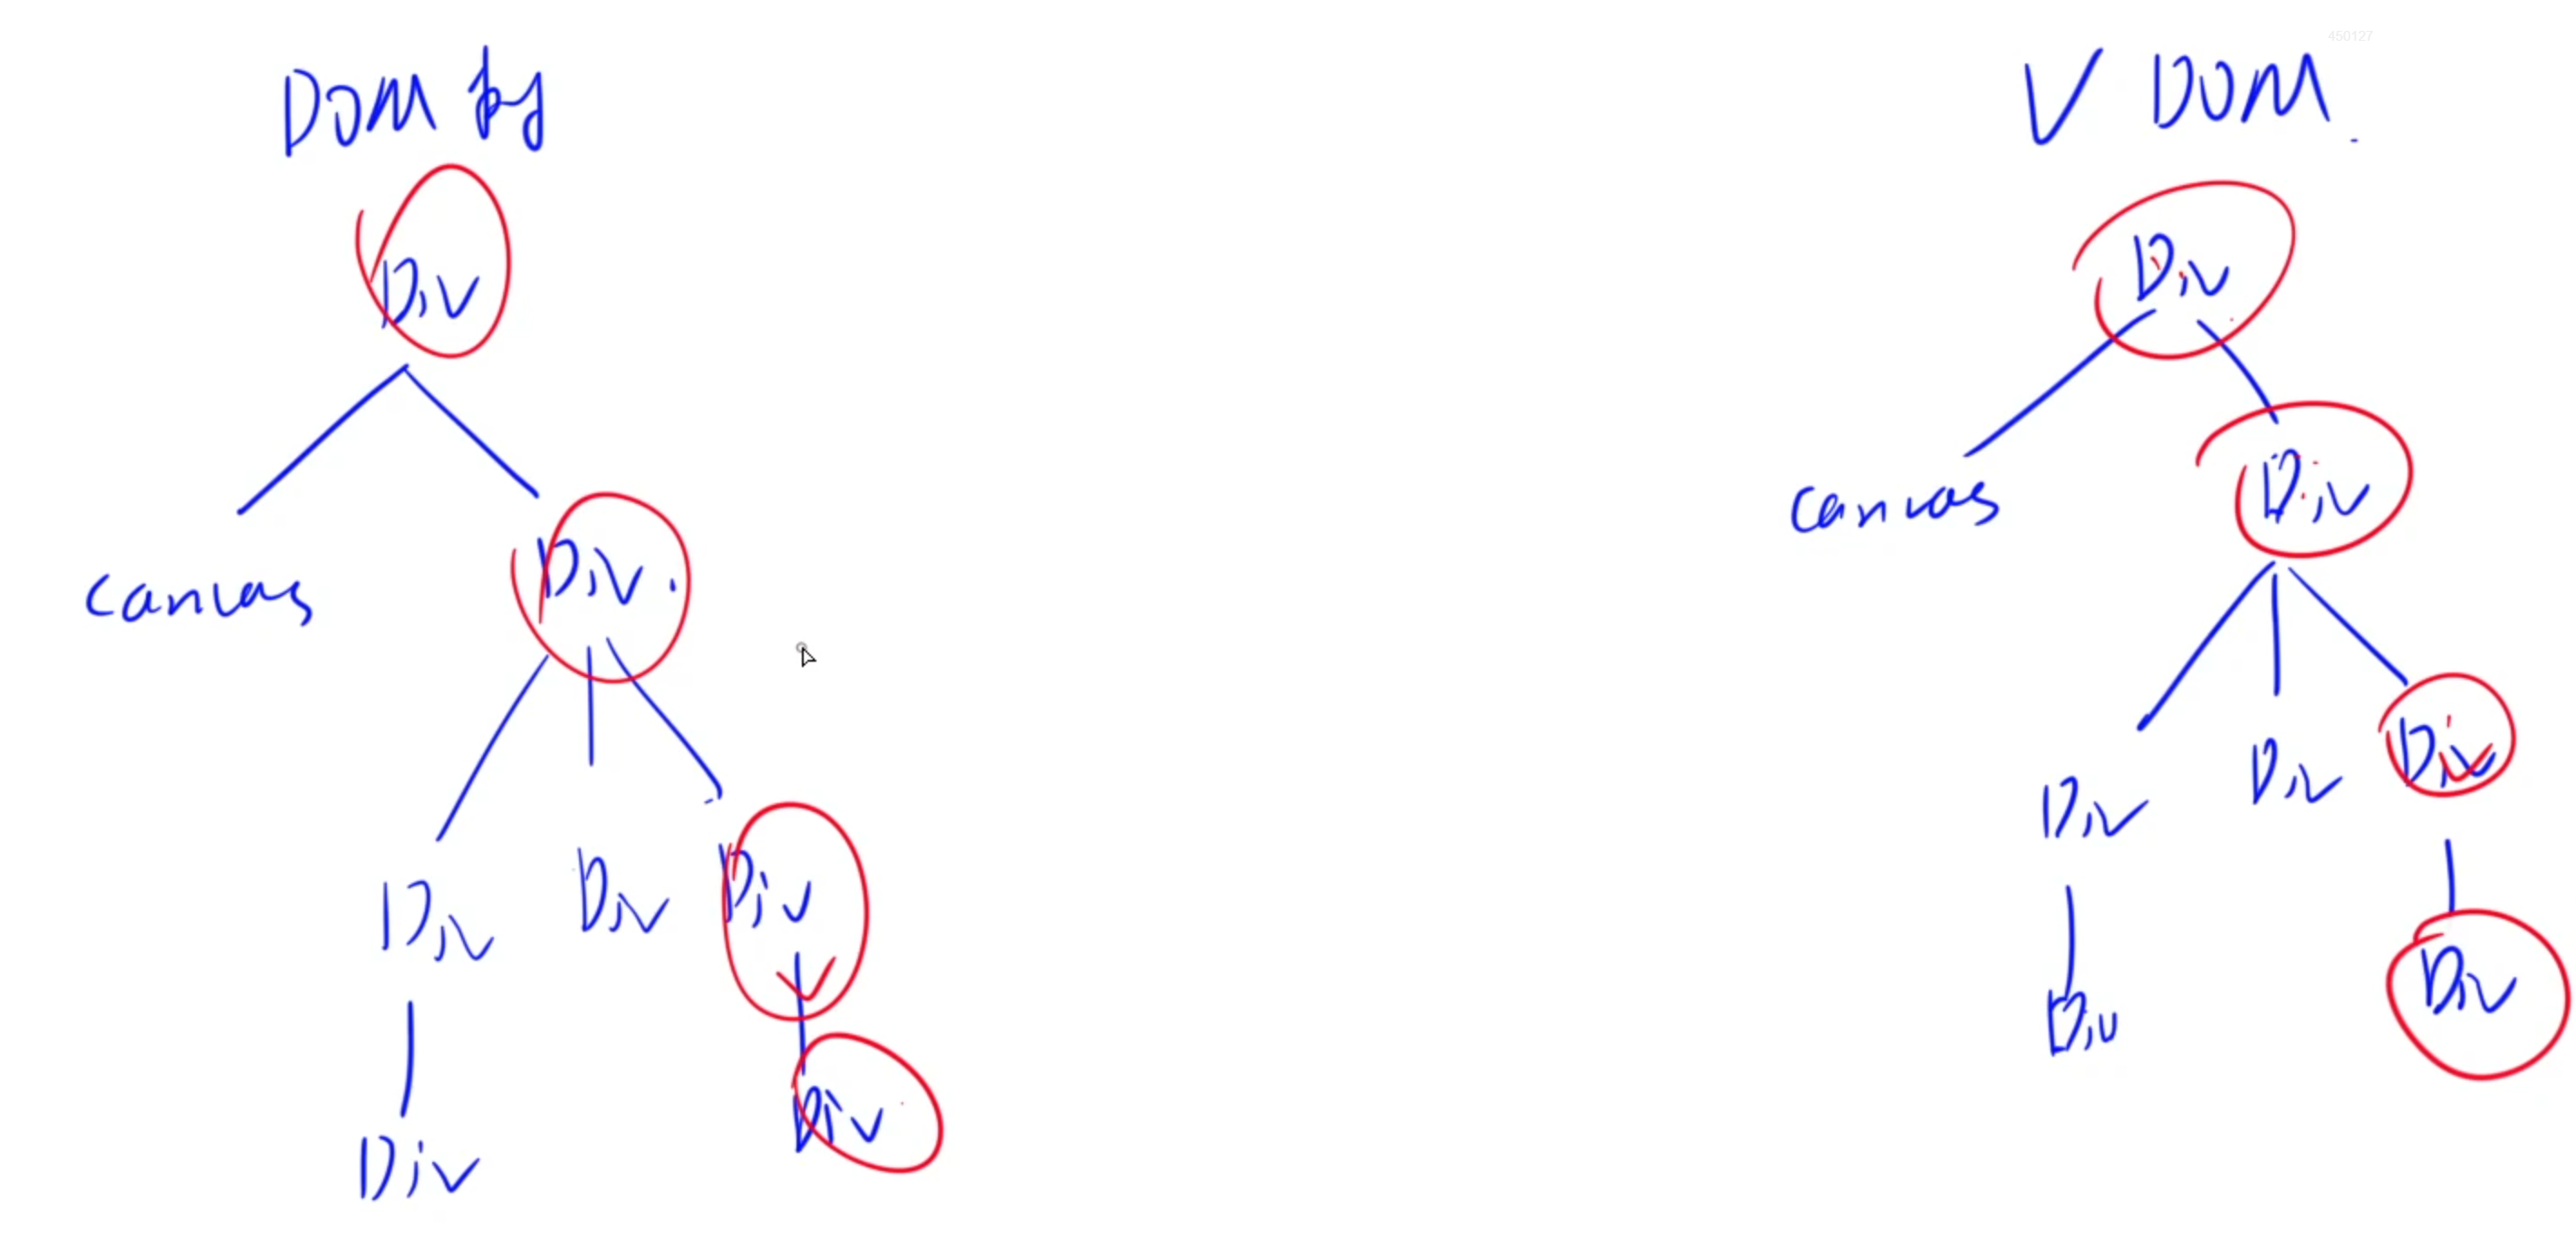
React特性1:虚拟DOM树
DOM树:是集中保存一个网页中所有内容的树形结构
而React框架会在内存中维护一个虚拟的DOM树,它是实际DOM的轻量级内存表示。当网页源代码中网页内容状态或者属性发生变化时,React会重新计算虚拟DOM树,并通过比较新旧虚拟DOM树的差异(Diffing),找出需要更新的部分。最后,将这些变化批量应用到实际DOM上,从而减少不必要的重绘和回流,提高性能。
React特性2:JSX语法扩展
React引入了JSX(JavaScript XML)语法扩展,允许在JavaScript中编写类似HTML的结构。这种语法使得开发者可以更加直观地描述用户界面,同时保持代码的灵活性和可维护性。
JSX编译成JS,编写JSX的语法更加简单灵活。
编译通过React提供的Babel编译器将JSX代码编译成JS代码。

3.环境配置
1.按照终端Git Bash
安装地址:Git Bash官网(windows)
2.安装Nodejs
安装地址:Nodejs
3.安装create-react-app
打开Git Bash,执行:
npm i -g create-react-app
4.安装VSCode插件
Simple React Snippets:提供一些react常用命令的自动补全Prettier - Code formatter:代码高亮
5.创建React App
当需要使用React开发一个App时
在目标目录下打开Git Bash,执行:
create-react-app react-app #可以替换为其他名称cd react-app
npm start #启动应用
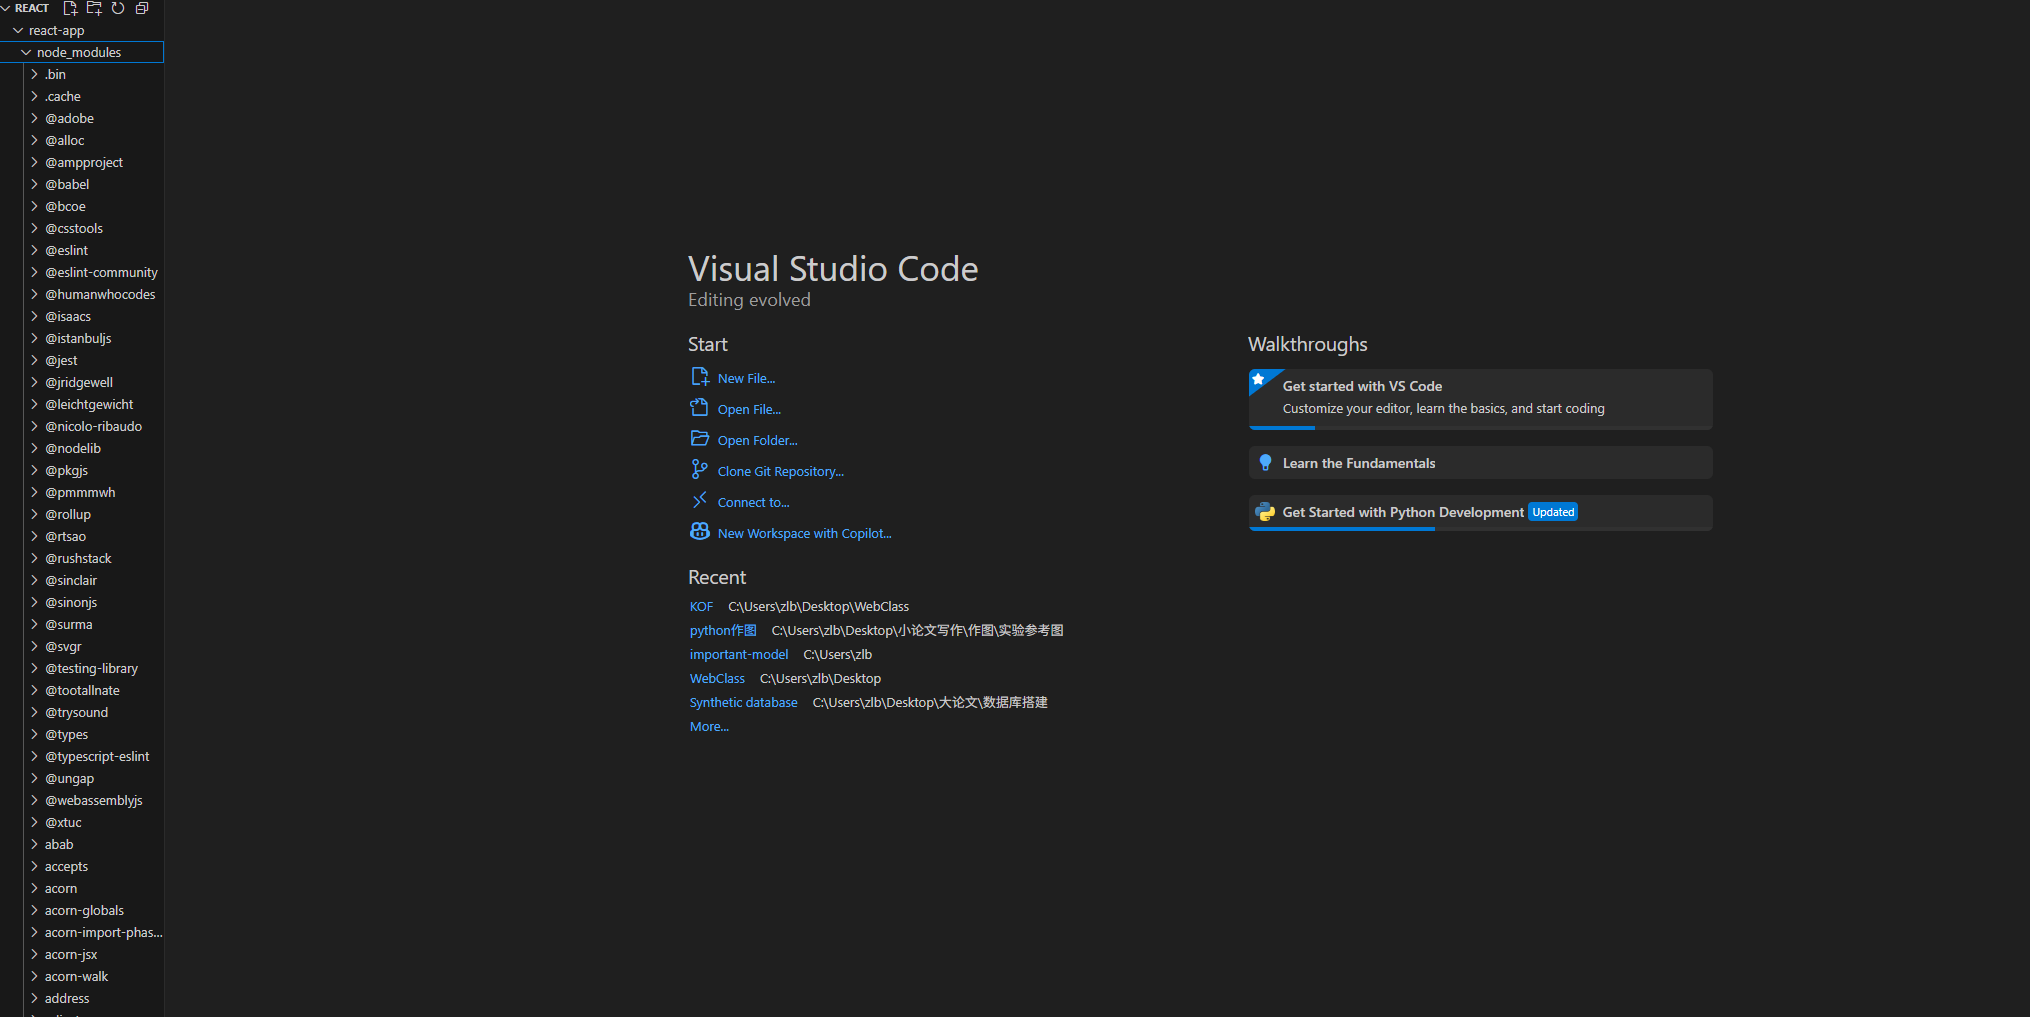
4.React初始项目结构
1.node_modules
负责维护JS库:各种JS相关的轮子
2.public
index.html:主页面的渲染
以及一些静态文件
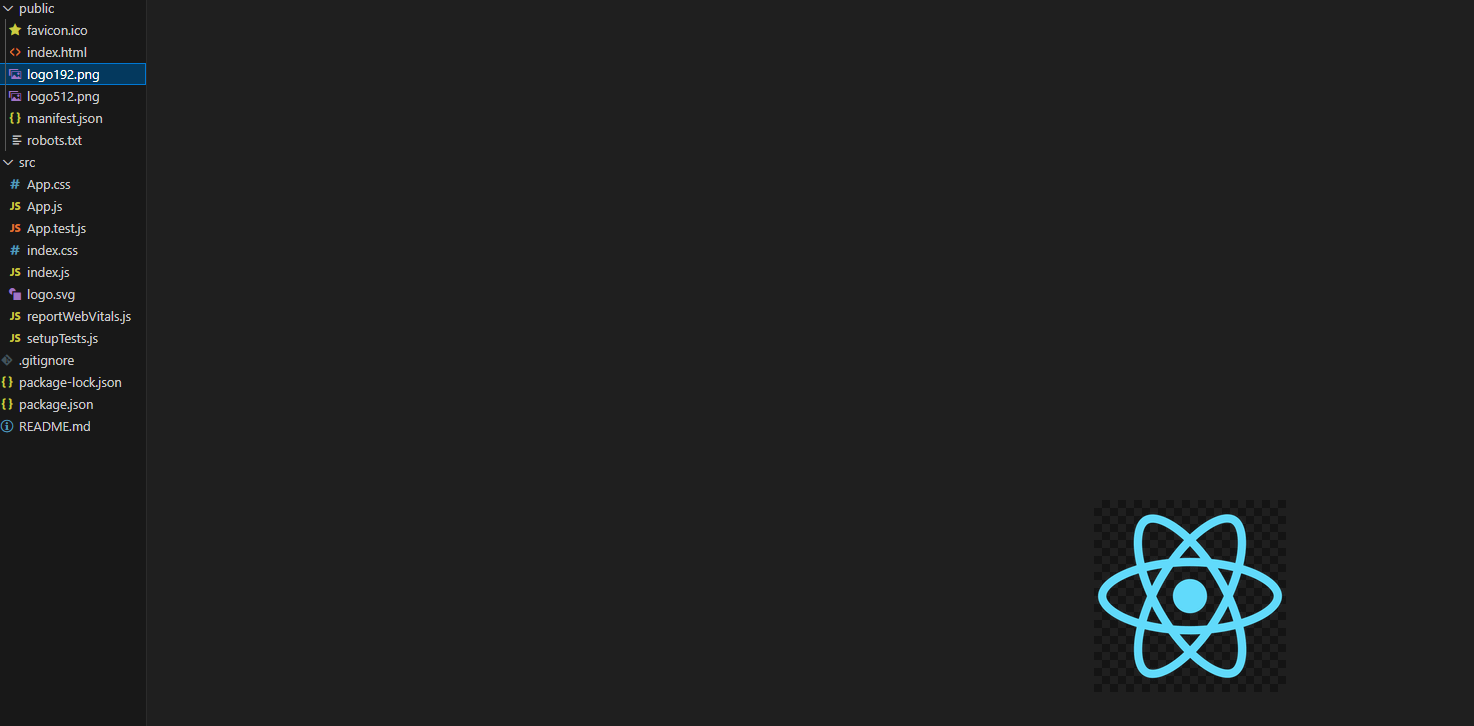
3.src
主界面以及其他组件内容的css和js文件
5.ES6语法
1.使用bind()函数绑定this取值
在JavaScript中,函数里的this指向的是执行时的调用者,而不是定义时所在的对象。
例如:
const animal = {name: "dog",talk: function() {console.log(this);}
}animal.talk();const talk = animal.talk;
talk();
运行结果是:
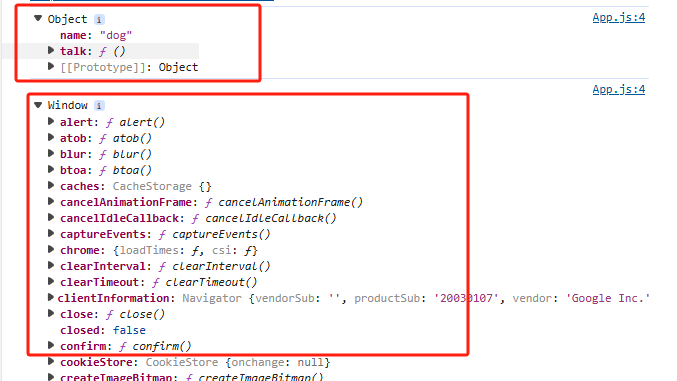
animal.talk()它会根据调用的对象来给talk()里面的this赋值
而将animal.talk()赋值给当前文件的成员,再执行该成员调用talk()方法时,由于当前文件是由window调用的,那么talk()里面的this就变成了Window。
而为了避免这种情况,使用bind()函数,可以绑定this的取值,例如:
const talk = animal.talk.bind(animal);
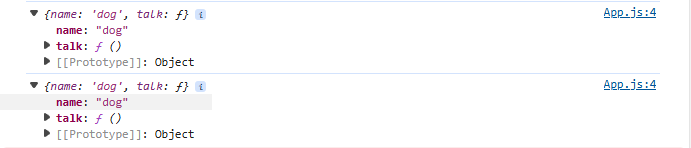
就可以将该对象绑定到重新赋值的成员上,不会导致错误的取值。
2.箭头函数的简写
const f = (x) => {return x * x;
}
const f1 = x => x * x;console.log(f(3), f1(3));
运行结果:
9 9
3.通过箭头函数绑定this的取值
const animal = {talk: function() {setTimeout(function() {console.log(this);}, 1000);}
};animal.talk();
在上述代码中虽然talk()函数是由animal调用的,但是里面的function函数其实还是Window执行的,所以里面的函数取的this是当前Window。

为避免这种情况,一般的写法是:
const animal = {talk: function() {let outer = this;setTimeout(function() {console.log(outer);}, 1000);}
};animal.talk();
让里层的outer指向外层的animal对象。
而使用箭头函数可以直接规避这种情况:
const animal = {talk: function() {setTimeout(() => {console.log(this);}, 1000);}
};animal.talk();
运行结果:

4.对象的解构
例如:
const animal = {name: "dog",age: 12,height: 100,
};const {name : new_name, age} = animal; //new_name是name的别名console.log(new_name, age);
打印结果:

5.数组和对象的展开
let a = [1, 2, 3];
let b = [4, 5, 6];
let c = [...a]; //c是a的复制let d = [...c, ...b]; //将c和b展开放到d中console.log(d);const A = {name: "dog"};
const B = {age: 12};
const C = {...A, ...B, heigth: 100};  //将对象元素展开并放入C中console.log(C);
打印结果:

6.Named 与 Default exports
- Named Export:可以export多个,import的时候需要加大括号,名称需要匹配
- Default Export: 最多export一个,import的时候不需要加大括号,可以直接定义别名
export default class Player {constructor() {console.log("new Player");}
}
import MyPlayer from './Player' //默认值不能加大括号let player = new MyPlayer();console.log(player);
打印结果:

6.Component
示例项目:实现两个按钮控制一个box左右移动
1)创建box-app项目:
crete-react-app box-app
cd box-app
npm start //启动box-app
2)安装bootstrap库:
npm i bootstrap
在项目中导入bootstrap库:
import 'bootstrap/dist/css/bootstarp.css'
3)创建Component
一般将组件全部维护在一个component文件夹下
先创建component文件夹,然后创建box.jsx文件。
4)创建按钮
当子节点数量大于1个时,需要用<div>或<React.Fragment>将其括起来。
同时整个部分用()括起来return
import React, { Component } from 'react'class Box extends Component {state = {  } render() { return (/* <div><h1>hello world</h1><button>left</button><button>right</button></div> */<React.Fragment><h1>hello world</h1><button>left</button><button>right</button></React.Fragment>);}
}export default Box;
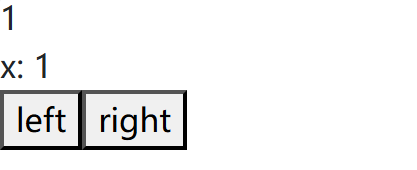
5)内嵌表达式
JSX中使用{}嵌入表达式:
import React, { Component } from 'react'class Box extends Component {state = { x: 1,};render() { return (/* <div><h1>hello world</h1><button>left</button><button>right</button></div> */<React.Fragment><div>{this.state.x}</div><div>{this.toString()}</div><button>left</button><button>right</button></React.Fragment>);}toString() {return `x: ${this.state.x}`;}
}export default Box;
页面展示:
6) 设置属性
- 通过设置
className来对应属性
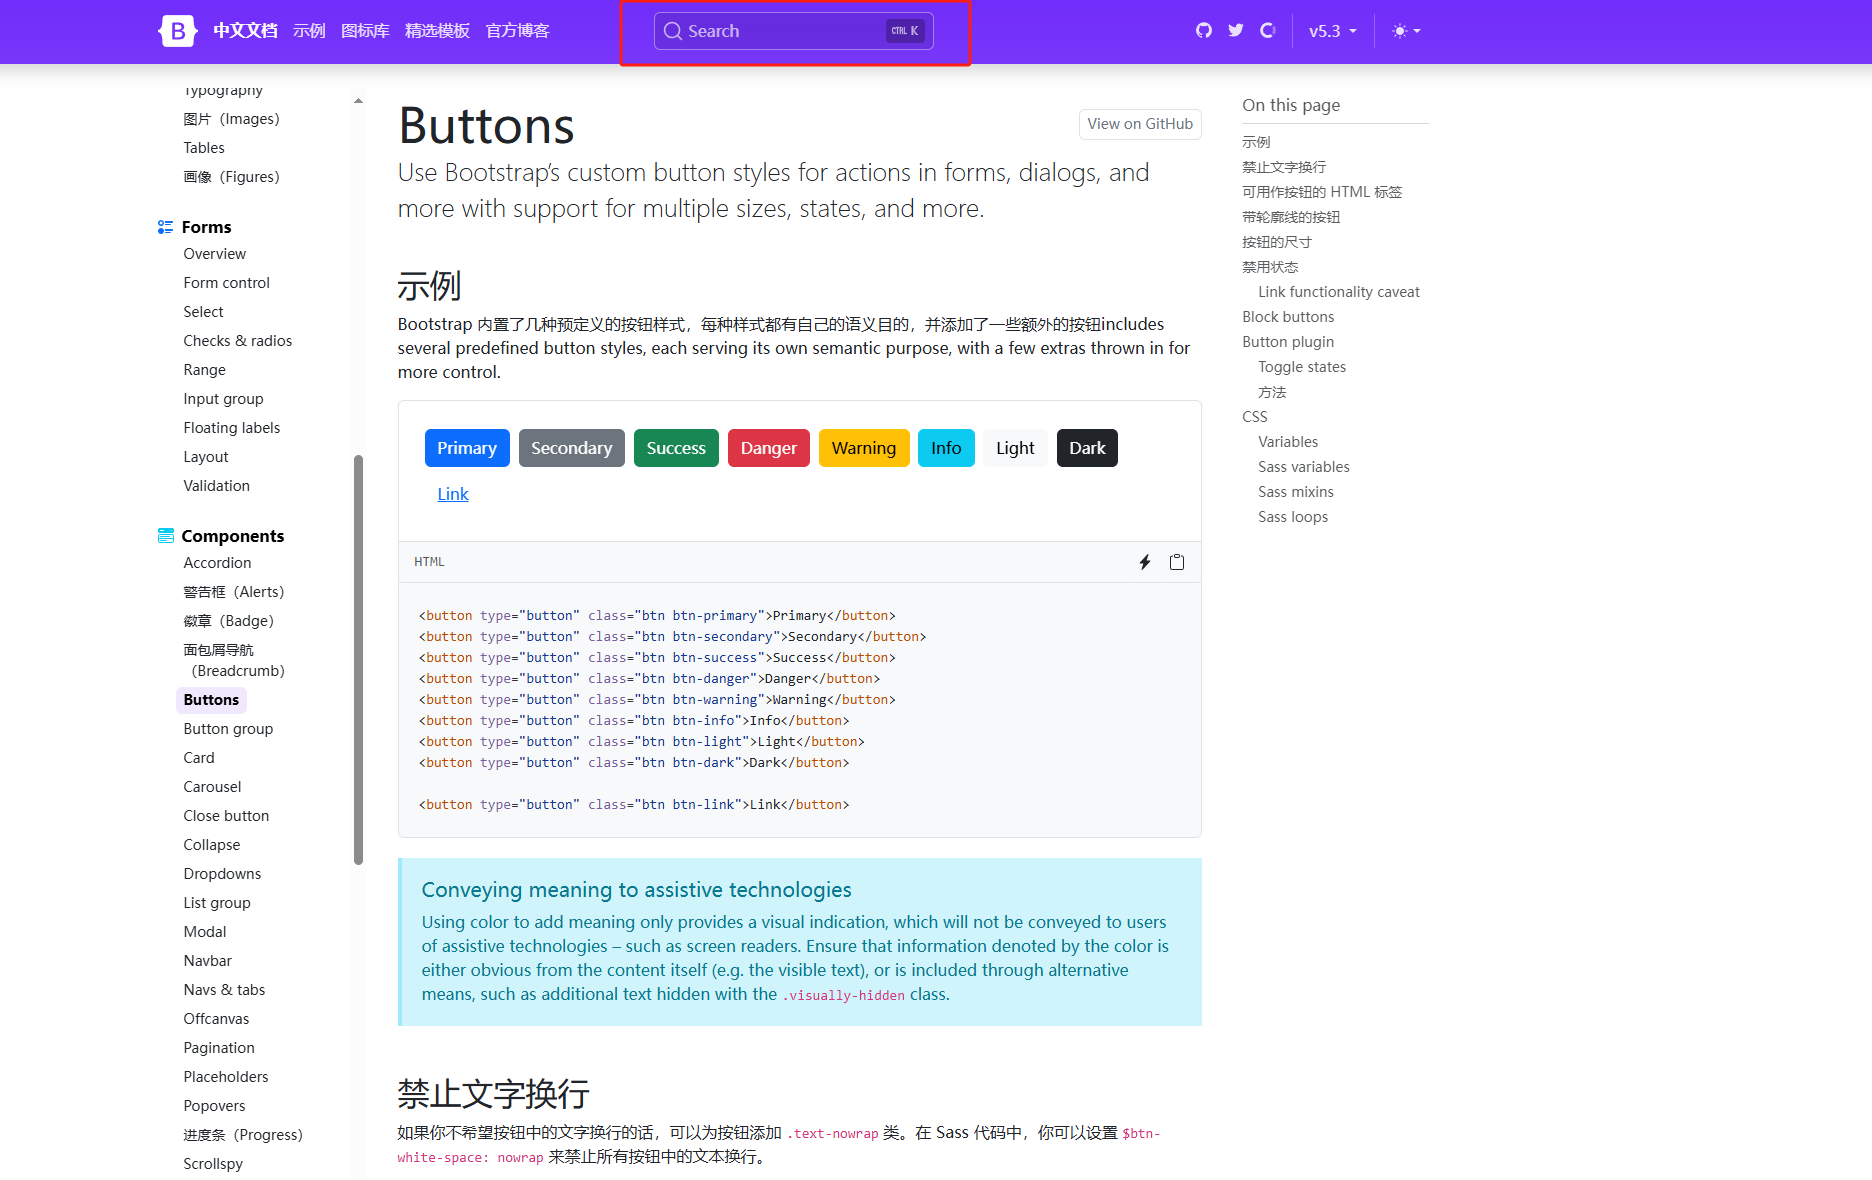
通过bootstrap找到已经设计好的属性类进行渲染。
bootstrap官网搜索需要的示例样式:
- CSS属性:不同于普通css,React中要求:中间使用
-连接的属性需要改成驼峰命名,比如:background-color:backgrounColor,其他属性类似。
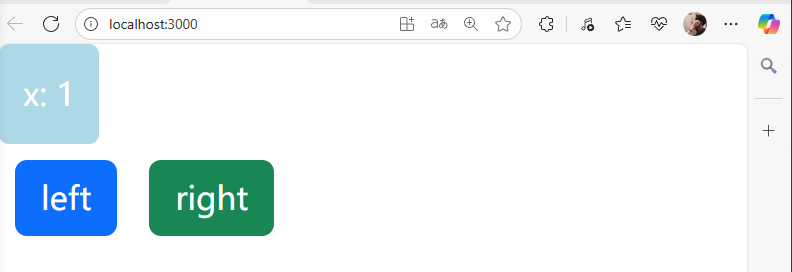
设置属性:
import React, { Component } from 'react'class Box extends Component {state = { x: 1,};styles = {width: "50px",height: "50px",backgroundColor: "lightblue"}render() { return (/* <div><h1>hello world</h1><button>left</button><button>right</button></div> */<React.Fragment><div style={this.styles}>{this.toString()}</div><button className='btn btn-primary m-2'>left</button><button className='btn btn-success m-2'>right</button></React.Fragment>);}toString() {const x = this.state.x;return `x: ${x}`;}
}export default Box;
简写方式:将属性以数组的形式传入style中
import React, { Component } from 'react'class Box extends Component {state = { x: 1,};render() { return (/* <div><h1>hello world</h1><button>left</button><button>right</button></div> */<React.Fragment><div style={{width: "50px",height: "50px",color: "white",textAlign: "center",lineHeight: "50px",borderRadius: "5px",backgroundColor: "lightblue"}}>{this.toString()}</div><button className='btn btn-primary m-2'>left</button><button className='btn btn-success m-2'>right</button></React.Fragment>);}toString() {const x = this.state.x;return `x: ${x}`;}
}
export default Box;
页面展示:
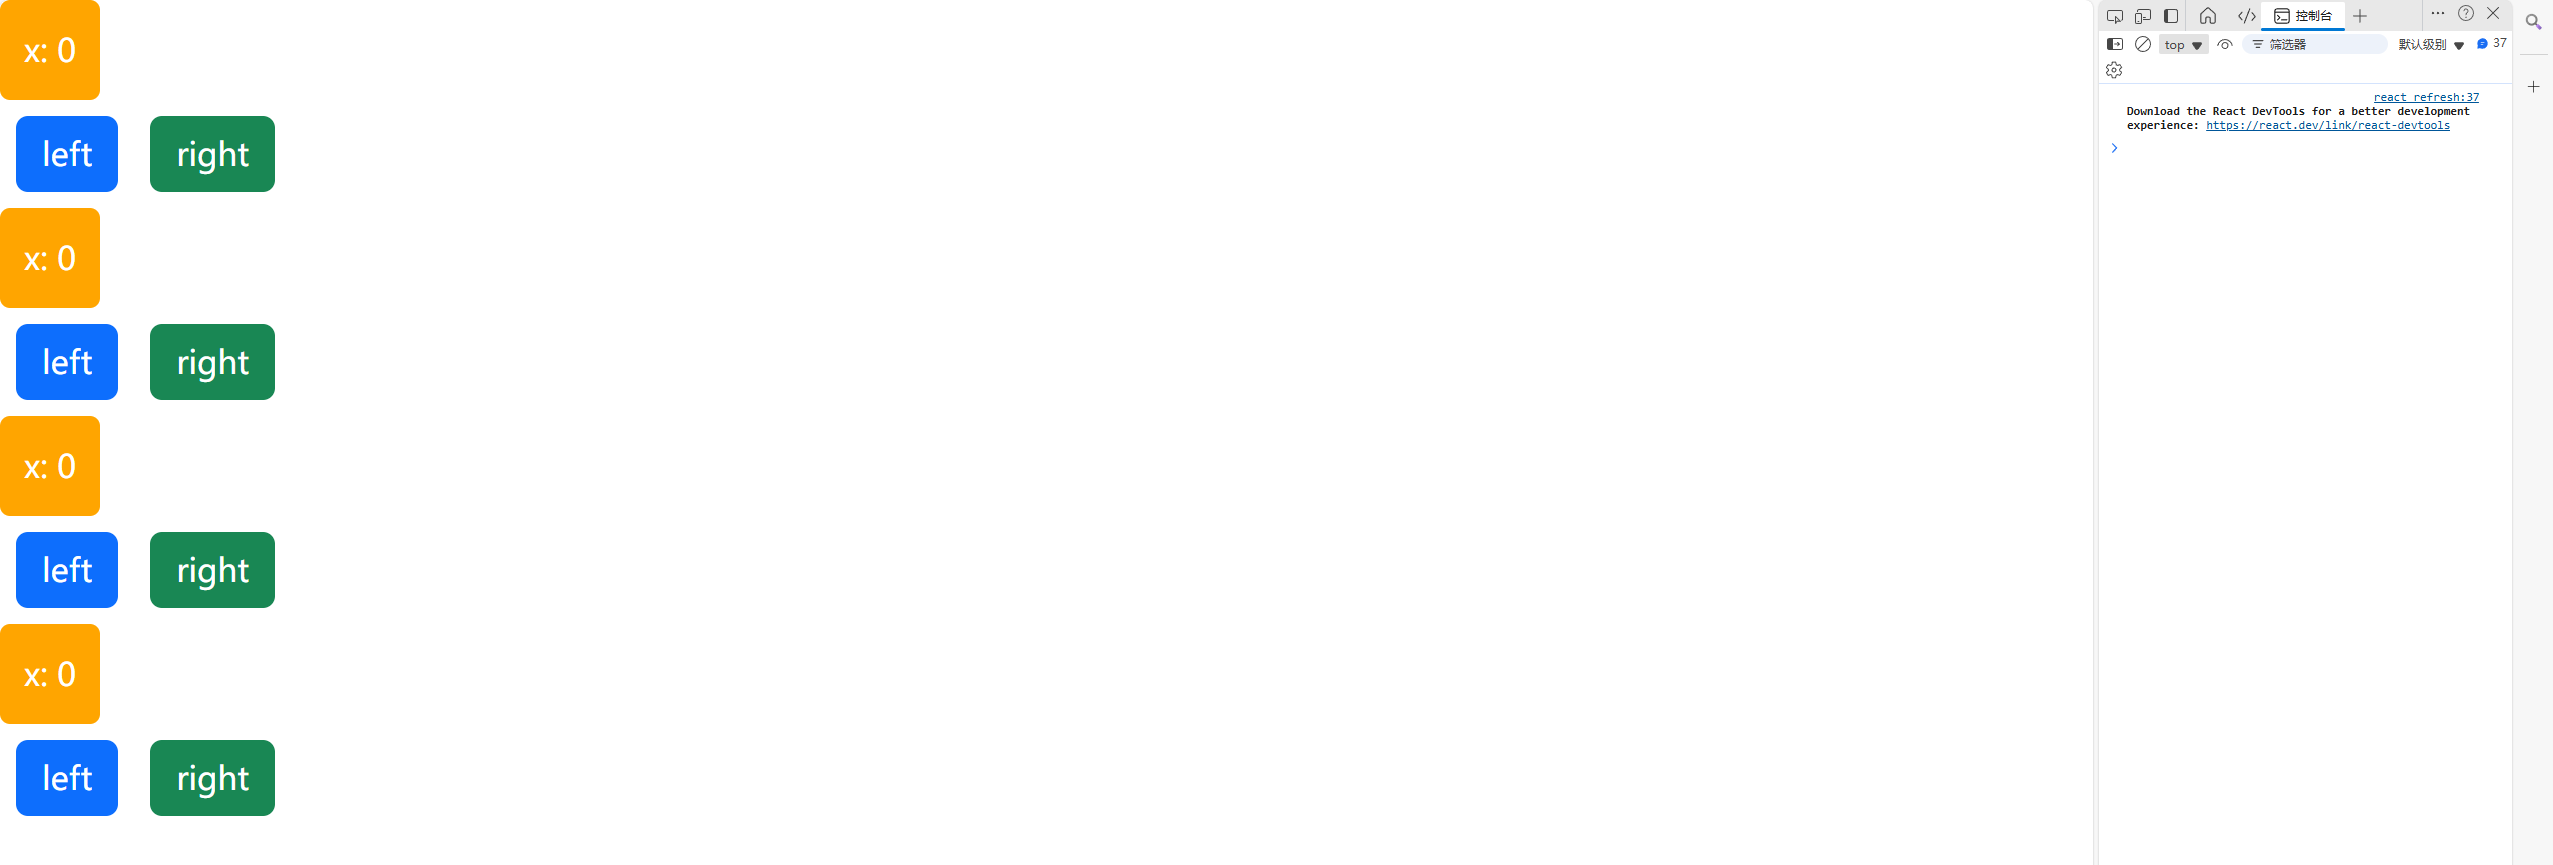
7)数据驱动改变Style
通过改变一个变量的值从而改变组件的style样式:
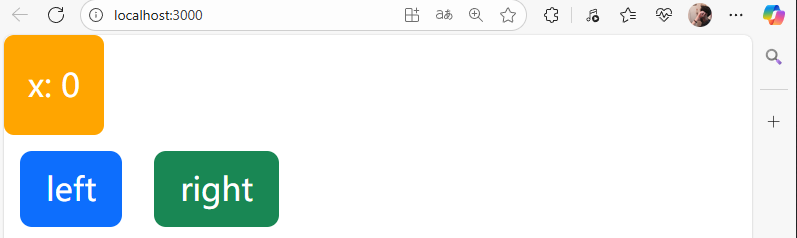
import React, { Component } from 'react'class Box extends Component {state = { x: 0,};render() { return (/* <div><h1>hello world</h1><button>left</button><button>right</button></div> */<React.Fragment><div style={this.getStyles()}>{this.toString()}</div><button className='btn btn-primary m-2'>left</button><button className='btn btn-success m-2'>right</button></React.Fragment>);}getStyles() {let styles = {width: "50px",height: "50px",color: "white",textAlign: "center",lineHeight: "50px",borderRadius: "5px",backgroundColor: "lightblue"}if (this.state.x === 0) {styles.backgroundColor = "orange";}return styles;}toString() {const x = this.state.x;return `x: ${x}`;}
}
export default Box;
页面展示: 当改变x的值时,<div>对应的样式会发生改变。
8)渲染列表
- 使用map函数
- 每个元素需要具有唯一的
key属性,用来帮助React快速找到被修改的DOM元素。
关于key的面试题:
面试题:react、vue中的key有什么作用?(key的内部原理)
虚拟DOM中key的作用:
key是虚拟DOM对象的标识,当数据发生变化时,Vue会根据【新数据】生成【新的虚拟DOM】
随后Vue进行【新虚拟DOM】与【旧虚拟DOM】的差异比较,比较规则如下:
在旧虚拟DOM中找到与新虚拟DOM相同的key:
若虚拟DOM元素内容没变, 直接使用之前的真实DOM元素!
若虚拟DOM元素内容变了, 则生成新的真实DOM元素,随后替换掉页面中之前的真实DOM元素。
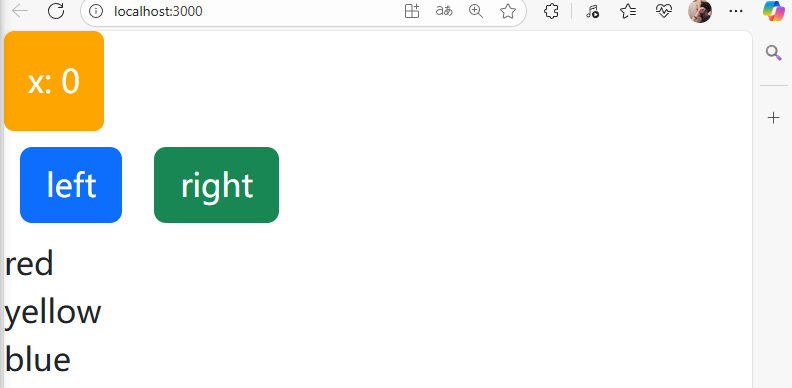
列表渲染示例: 使用map函数将列表中的元素内容渲染依次渲染出来。
import React, { Component } from 'react'class Box extends Component {state = { x: 0,colors: ['red', 'yellow', 'blue'],};render() { return (/* <div><h1>hello world</h1><button>left</button><button>right</button></div> */<React.Fragment><div style={this.getStyles()}>{this.toString()}</div><button className='btn btn-primary m-2'>left</button><button className='btn btn-success m-2'>right</button>{this.state.colors.map(color => (<div key={color}>{color}</div>))}</React.Fragment>);}getStyles() {let styles = {width: "50px",height: "50px",color: "white",textAlign: "center",lineHeight: "50px",borderRadius: "5px",backgroundColor: "lightblue"}if (this.state.x === 0) {styles.backgroundColor = "orange";}return styles;}toString() {const x = this.state.x;return `x: ${x}`;}
}
export default Box;
页面展示:
9)绑定事件
在添加绑定事件时需要注意:
这里同样会发生this的值变成其他不明的指代,这就导致我们无法知道React在实现的时候是在什么东西调用的click函数,但是我们希望它在调用click时指向的是当前的结构体(box class).
于是跟之前补充的ES6语法一致,要么通过箭头函数(推荐),因为箭头函数不会重新给this赋值,也就是说在调用箭头函数实现的click函数时,它指向的this就是原本我们赋给它的this。
另外一种方法就是利用bind函数绑定this。
import React, { Component } from 'react'class Box extends Component {state = { x: 0,colors: ['red', 'yellow', 'blue'],};handleClickLeft() {console.log("click left", this);}handleClickRight() {    console.log("click right", this);}render() { return (/* <div><h1>hello world</h1><button>left</button><button>right</button></div> */<React.Fragment><div style={this.getStyles()}>{this.toString()}</div><button onClick={this.handleClickLeft} className='btn btn-primary m-2'>left</button><button onClick={this.handleClickRight} className='btn btn-success m-2'>right</button>{this.state.colors.map(color => (<div key={color}>{color}</div>))}</React.Fragment>);}getStyles() {let styles = {width: "50px",height: "50px",color: "white",textAlign: "center",lineHeight: "50px",borderRadius: "5px",backgroundColor: "lightblue"}if (this.state.x === 0) {styles.backgroundColor = "orange";}return styles;}toString() {const x = this.state.x;return `x: ${x}`;}
}
export default Box;
这里打印this值会发现当前的this值是未定义的,也就是说确实不是当前结构体(box class)
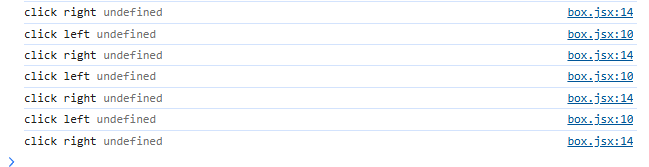
两种方式绑定this值不发生改变:
import React, { Component } from 'react'class Box extends Component {state = { x: 0,colors: ['red', 'yellow', 'blue'],};handleClickLeft = () => {console.log("click left", this);}handleClickRight() {    console.log("click right", this);}render() { return (/* <div><h1>hello world</h1><button>left</button><button>right</button></div> */<React.Fragment><div style={this.getStyles()}>{this.toString()}</div><button onClick={this.handleClickLeft} className='btn btn-primary m-2'>left</button><button onClick={this.handleClickRight.bind(this)} className='btn btn-success m-2'>right</button>{this.state.colors.map(color => (<div key={color}>{color}</div>))}</React.Fragment>);}getStyles() {let styles = {width: "50px",height: "50px",color: "white",textAlign: "center",lineHeight: "50px",borderRadius: "5px",backgroundColor: "lightblue"}if (this.state.x === 0) {styles.backgroundColor = "orange";}return styles;}toString() {const x = this.state.x;return `x: ${x}`;}
}
export default Box;
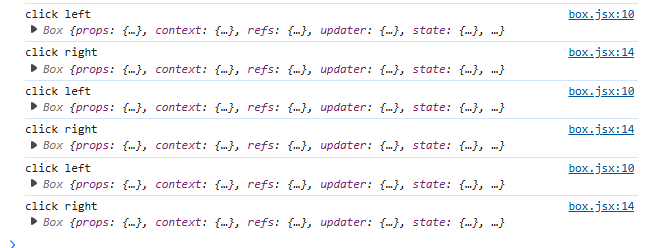
打印展示:
10)修改state
- 需要使用
this.setState()函数 - 每次调用
this.setState()函数后,会重新调用this.render()函数,用来修改虚拟机DOM树。React只会修改不同步的实际DOM树节点。
当我们直接修改state里面的某个变量值时,虽然该变量确实发生改变,但是react无法将该变量的改变同步渲染,只有通过调用this.setState()函数来修改,react才会重新调用this.render()函数来修改虚拟DOM树,从而修改不同步的实际DOM树节点。
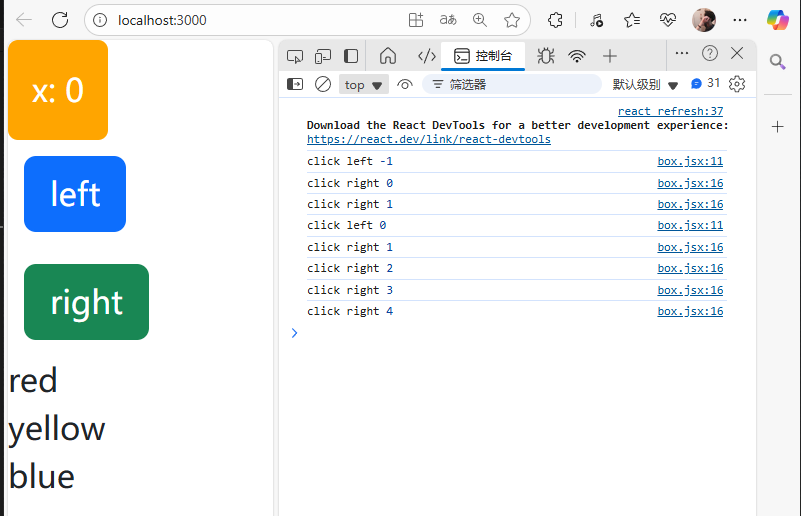
** 不调用this.setState()函数时:**
import React, { Component } from 'react'class Box extends Component {state = { x: 0,colors: ['red', 'yellow', 'blue'],};handleClickLeft = () => {this.state.x--;console.log("click left", this.state.x);}handleClickRight = () => {    this.state.x++;console.log("click right", this.state.x);}render() { return (/* <div><h1>hello world</h1><button>left</button><button>right</button></div> */<React.Fragment><div style={this.getStyles()}>{this.toString()}</div><button onClick={this.handleClickLeft} className='btn btn-primary m-2'>left</button><button onClick={this.handleClickRight} className='btn btn-success m-2'>right</button>{this.state.colors.map(color => (<div key={color}>{color}</div>))}</React.Fragment>);}getStyles() {let styles = {width: "50px",height: "50px",color: "white",textAlign: "center",lineHeight: "50px",borderRadius: "5px",backgroundColor: "lightblue"}if (this.state.x === 0) {styles.backgroundColor = "orange";}return styles;}toString() {const x = this.state.x;return `x: ${x}`;}
}
export default Box;
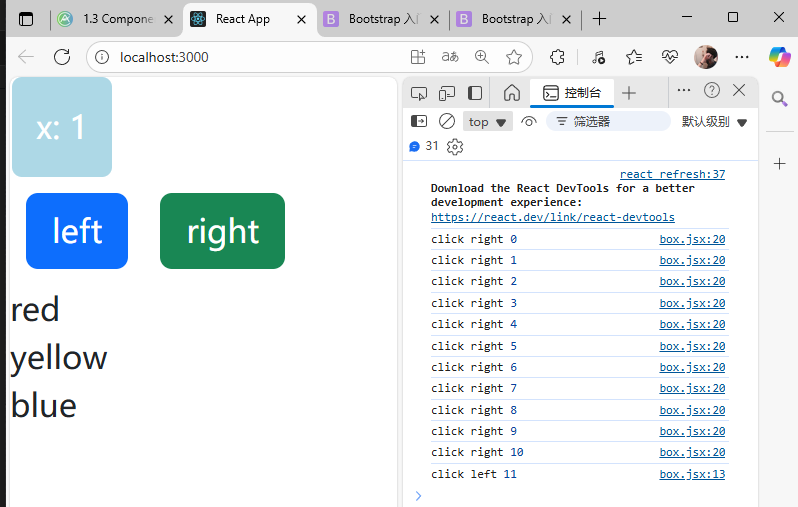
通过调用this.setState()函数来修改state:
import React, { Component } from 'react'class Box extends Component {state = { x: 0,colors: ['red', 'yellow', 'blue'],};handleClickLeft = () => {this.setState({x: this.state.x - 1,});console.log("click left", this.state.x);}handleClickRight = () => {    this.setState({x: this.state.x + 1,});console.log("click right", this.state.x);}render() { return (/* <div><h1>hello world</h1><button>left</button><button>right</button></div> */<React.Fragment><div style={this.getStyles()}>{this.toString()}</div><button onClick={this.handleClickLeft} className='btn btn-primary m-2'>left</button><button onClick={this.handleClickRight} className='btn btn-success m-2'>right</button>{this.state.colors.map(color => (<div key={color}>{color}</div>))}</React.Fragment>);}getStyles() {let styles = {width: "50px",height: "50px",color: "white",textAlign: "center",lineHeight: "50px",borderRadius: "5px",backgroundColor: "lightblue"}if (this.state.x === 0) {styles.backgroundColor = "orange";}return styles;}toString() {const x = this.state.x;return `x: ${x}`;}
}
export default Box;

将marginLeft设置为当前this.state.x,这样每次点击左右就会改变this.state.x的值,通过this.setState()就会每次改变都会重新调用this.render()函数,而此时marginLeft的值与this.state.x相关,就能实现点击right按钮时,box块往右移动(marginLeft变大),点击left按钮时,box块往左移动(marginLeft变小)。
import React, { Component } from 'react'class Box extends Component {state = { x: 0,colors: ['red', 'yellow', 'blue'],};handleClickLeft = () => {this.setState({x: this.state.x - 1,});console.log("click left", this.state.x);}handleClickRight = () => {    this.setState({x: this.state.x + 1,});console.log("click right", this.state.x);}render() { return (/* <div><h1>hello world</h1><button>left</button><button>right</button></div> */<React.Fragment><div style={this.getStyles()}>{this.toString()}</div><button onClick={this.handleClickLeft} className='btn btn-primary m-2'>left</button><button onClick={this.handleClickRight} className='btn btn-success m-2'>right</button>{this.state.colors.map(color => (<div key={color}>{color}</div>))}</React.Fragment>);}getStyles() {let styles = {width: "50px",height: "50px",color: "white",textAlign: "center",lineHeight: "50px",borderRadius: "5px",backgroundColor: "lightblue",marginLeft: this.state.x,}if (this.state.x === 0) {styles.backgroundColor = "orange";}return styles;}toString() {const x = this.state.x;return `x: ${x}`;}
}
export default Box;
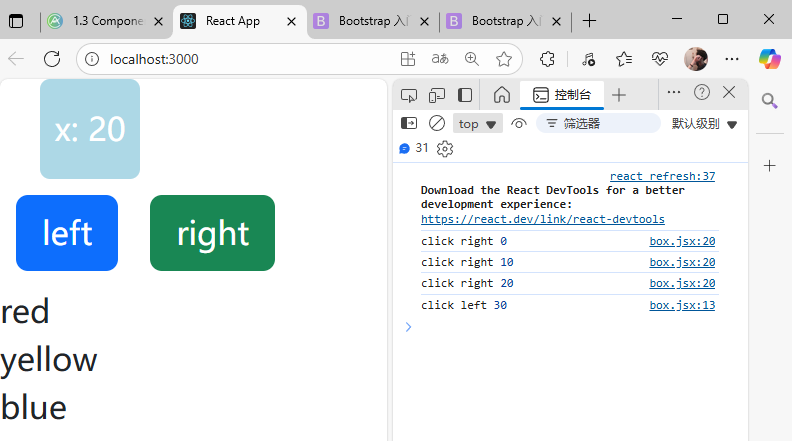
11)给事件函数添加参数
import React, { Component } from 'react'class Box extends Component {state = { x: 0,colors: ['red', 'yellow', 'blue'],};handleClickLeft = (step) => {this.setState({x: this.state.x - step,});console.log("click left", this.state.x);}handleClickRight = () => {    this.setState({x: this.state.x + 1,});console.log("click right", this.state.x);}handleClickLeftTmp = () => {return this.handleClickLeft(10);}render() { return (/* <div><h1>hello world</h1><button>left</button><button>right</button></div> */<React.Fragment><div style={this.getStyles()}>{this.toString()}</div><button onClick={this.handleClickLeftTmp} className='btn btn-primary m-2'>left</button><button onClick={this.handleClickRight} className='btn btn-success m-2'>right</button>{this.state.colors.map(color => (<div key={color}>{color}</div>))}</React.Fragment>);}getStyles() {let styles = {width: "50px",height: "50px",color: "white",textAlign: "center",lineHeight: "50px",borderRadius: "5px",backgroundColor: "lightblue",marginLeft: this.state.x,}if (this.state.x === 0) {styles.backgroundColor = "orange";}return styles;}toString() {const x = this.state.x;return `x: ${x}`;}
}
export default Box;
页面结果展示:
匿名函数写法:
import React, { Component } from 'react'class Box extends Component {state = { x: 0,colors: ['red', 'yellow', 'blue'],};handleClickLeft = (step) => {this.setState({x: this.state.x - step,});console.log("click left", this.state.x);}handleClickRight = (step) => {    this.setState({x: this.state.x + step,});console.log("click right", this.state.x);}render() { return (/* <div><h1>hello world</h1><button>left</button><button>right</button></div> */<React.Fragment><div style={this.getStyles()}>{this.toString()}</div><button onClick={() => this.handleClickLeft(10)} className='btn btn-primary m-2'>left</button><button onClick={() => this.handleClickRight(10)} className='btn btn-success m-2'>right</button>{this.state.colors.map(color => (<div key={color}>{color}</div>))}</React.Fragment>);}getStyles() {let styles = {width: "50px",height: "50px",color: "white",textAlign: "center",lineHeight: "50px",borderRadius: "5px",backgroundColor: "lightblue",marginLeft: this.state.x,}if (this.state.x === 0) {styles.backgroundColor = "orange";}return styles;}toString() {const x = this.state.x;return `x: ${x}`;}
}
export default Box;
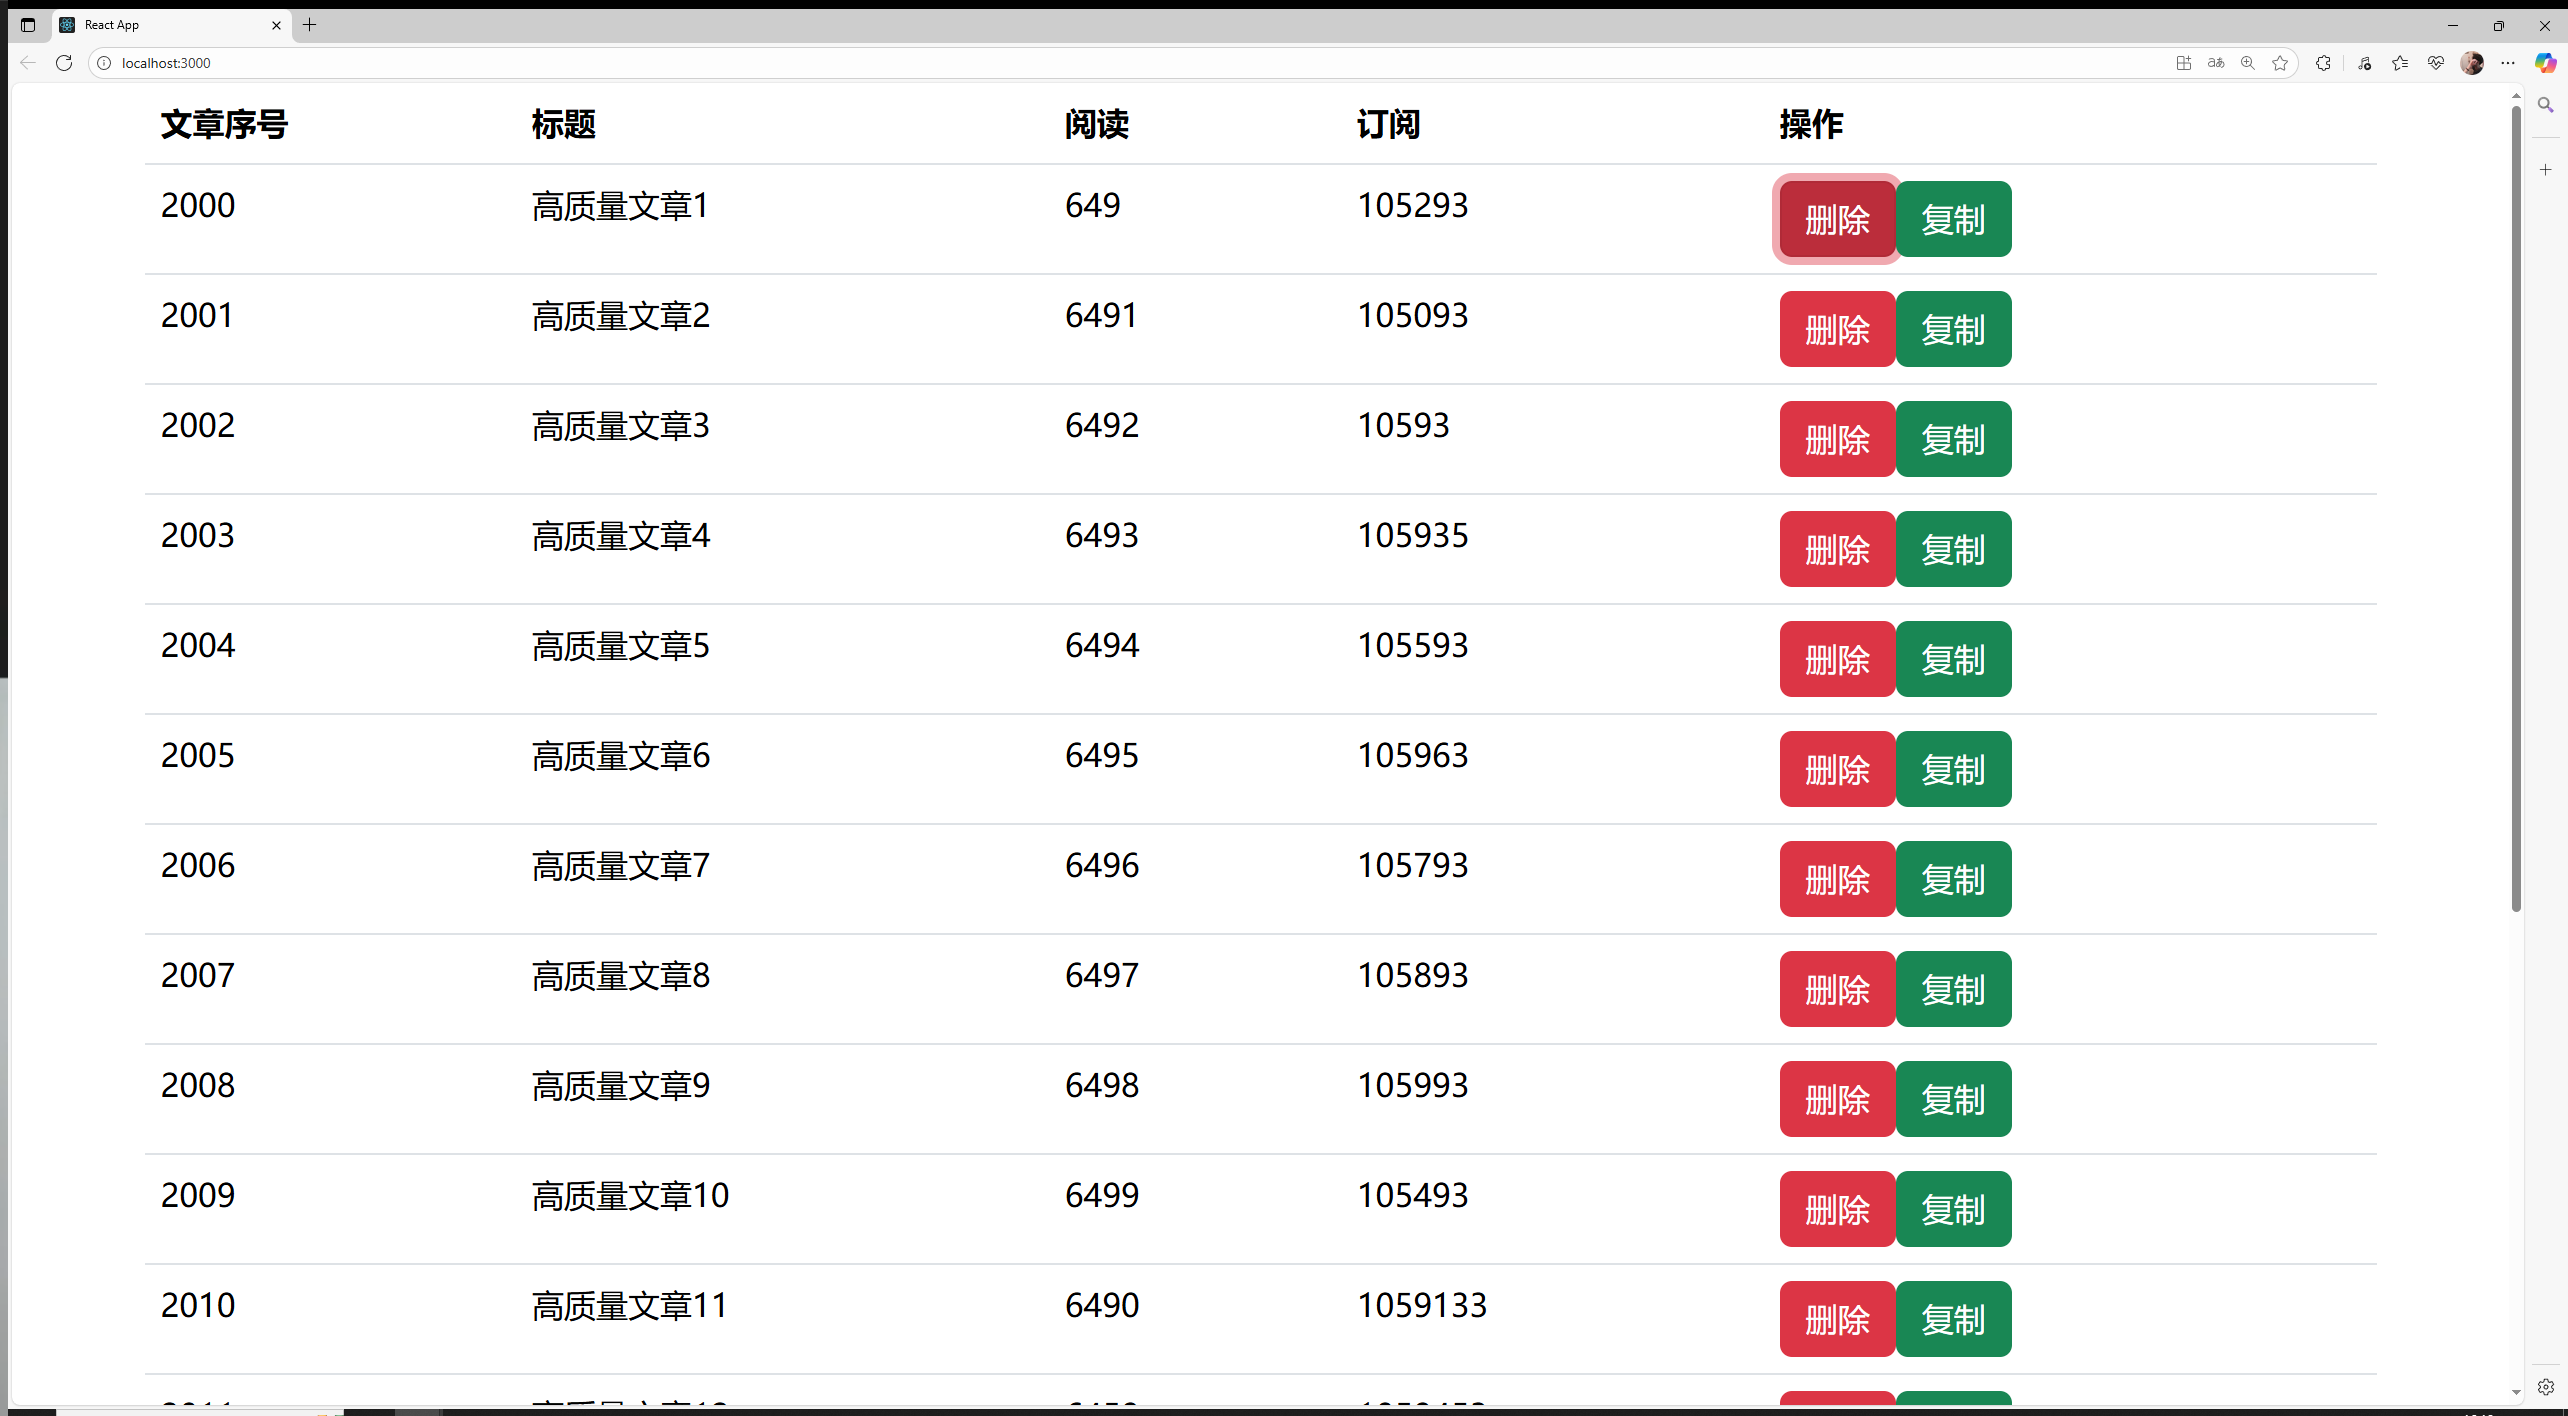
7.React组件化实现表格
实现表格的删除和复制功能:将对应的元素删除或者复制。
主要知识点:
- 1.使用map函数遍历数组中的元素进行表格内容的填充
- 2.点击事件的绑定
- 3.使用箭头函数进行参数的传递
- 4.使用
this.setState()函数更新
注意事项:每个组件需要唯一的key进行标识,这里使用单独设定的key,其他场景可以另外指代
import React, { Component } from 'react';class Solution extends Component {state = { solutions: [{key: 51, number: 2000, title: "高质量文章1", views: 649, subscribes: 105293},{key: 52, number: 2001, title: "高质量文章2", views: 6491, subscribes: 105093},{key: 53, number: 2002, title: "高质量文章3", views: 6492, subscribes: 10593},{key: 54, number: 2003, title: "高质量文章4", views: 6493, subscribes: 105935},{key: 55, number: 2004, title: "高质量文章5", views: 6494, subscribes: 105593},{key: 56, number: 2005, title: "高质量文章6", views: 6495, subscribes: 105963},{key: 57, number: 2006, title: "高质量文章7", views: 6496, subscribes: 105793},{key: 58, number: 2007, title: "高质量文章8", views: 6497, subscribes: 105893},{key: 59, number: 2008, title: "高质量文章9", views: 6498, subscribes: 105993},{key: 60, number: 2009, title: "高质量文章10", views: 6499, subscribes: 105493},{key: 61, number: 2010, title: "高质量文章11", views: 6490, subscribes: 1059133},{key: 62, number: 2011, title: "高质量文章12", views: 6459, subscribes: 1059453},{key: 63, number: 2012, title: "高质量文章13", views: 64945, subscribes: 10594853}]} handleDelete = (s) => {console.log("delete");//将跟s不一样的元素都保留下来,过滤掉sconst solutions = this.state.solutions.filter(solution => solution !== s);this.setState({solutions: solutions, //将当前的key更新为value: key:value});}handleIncrease = (s) => {const solutions = [...this.state.solutions, {key: s.key + 1, number: s.number, title: s.title, views: 0, subscribes: 0}]this.setState({solutions: solutions,})}render() { if (this.state.solutions.length == 0) {return <p>没有文章啦~</p>}return (<table className="table"><thead><tr><th>文章序号</th><th>标题</th><th>阅读</th><th>订阅</th><th>操作</th></tr></thead><tbody>{this.state.solutions.map(solution => (<tr key={solution.key}><td>{solution.number}</td><td>{solution.title}</td><td>{solution.views}</td><td>{solution.subscribes}</td><td><button onClick={() => this.handleDelete(solution)} className="btn btn-danger">删除</button><button onClick={() => this.handleIncrease(solution)} className="btn btn-success">复制</button></td></tr>))}</tbody></table>);}
}export default Solution;
页面展示:
8.组合Components
1)创建Boxes组件
在Boxes组件中包含一系列Box组件: 将Box导入到Boxes中,然后在Boxes中创建多个Box组件
import React, { Component } from 'react';import Box from './box';class Boxes extends Component {state = { boxes: [{id: 1, x: 0},{id: 2, x: 0},{id: 3, x: 0},{id: 4, x: 0},]} render() { return (<React.Fragment>{this.state.boxes.map(box => (<Box key={box.id}/>))}</React.Fragment>);}
}export default Boxes;
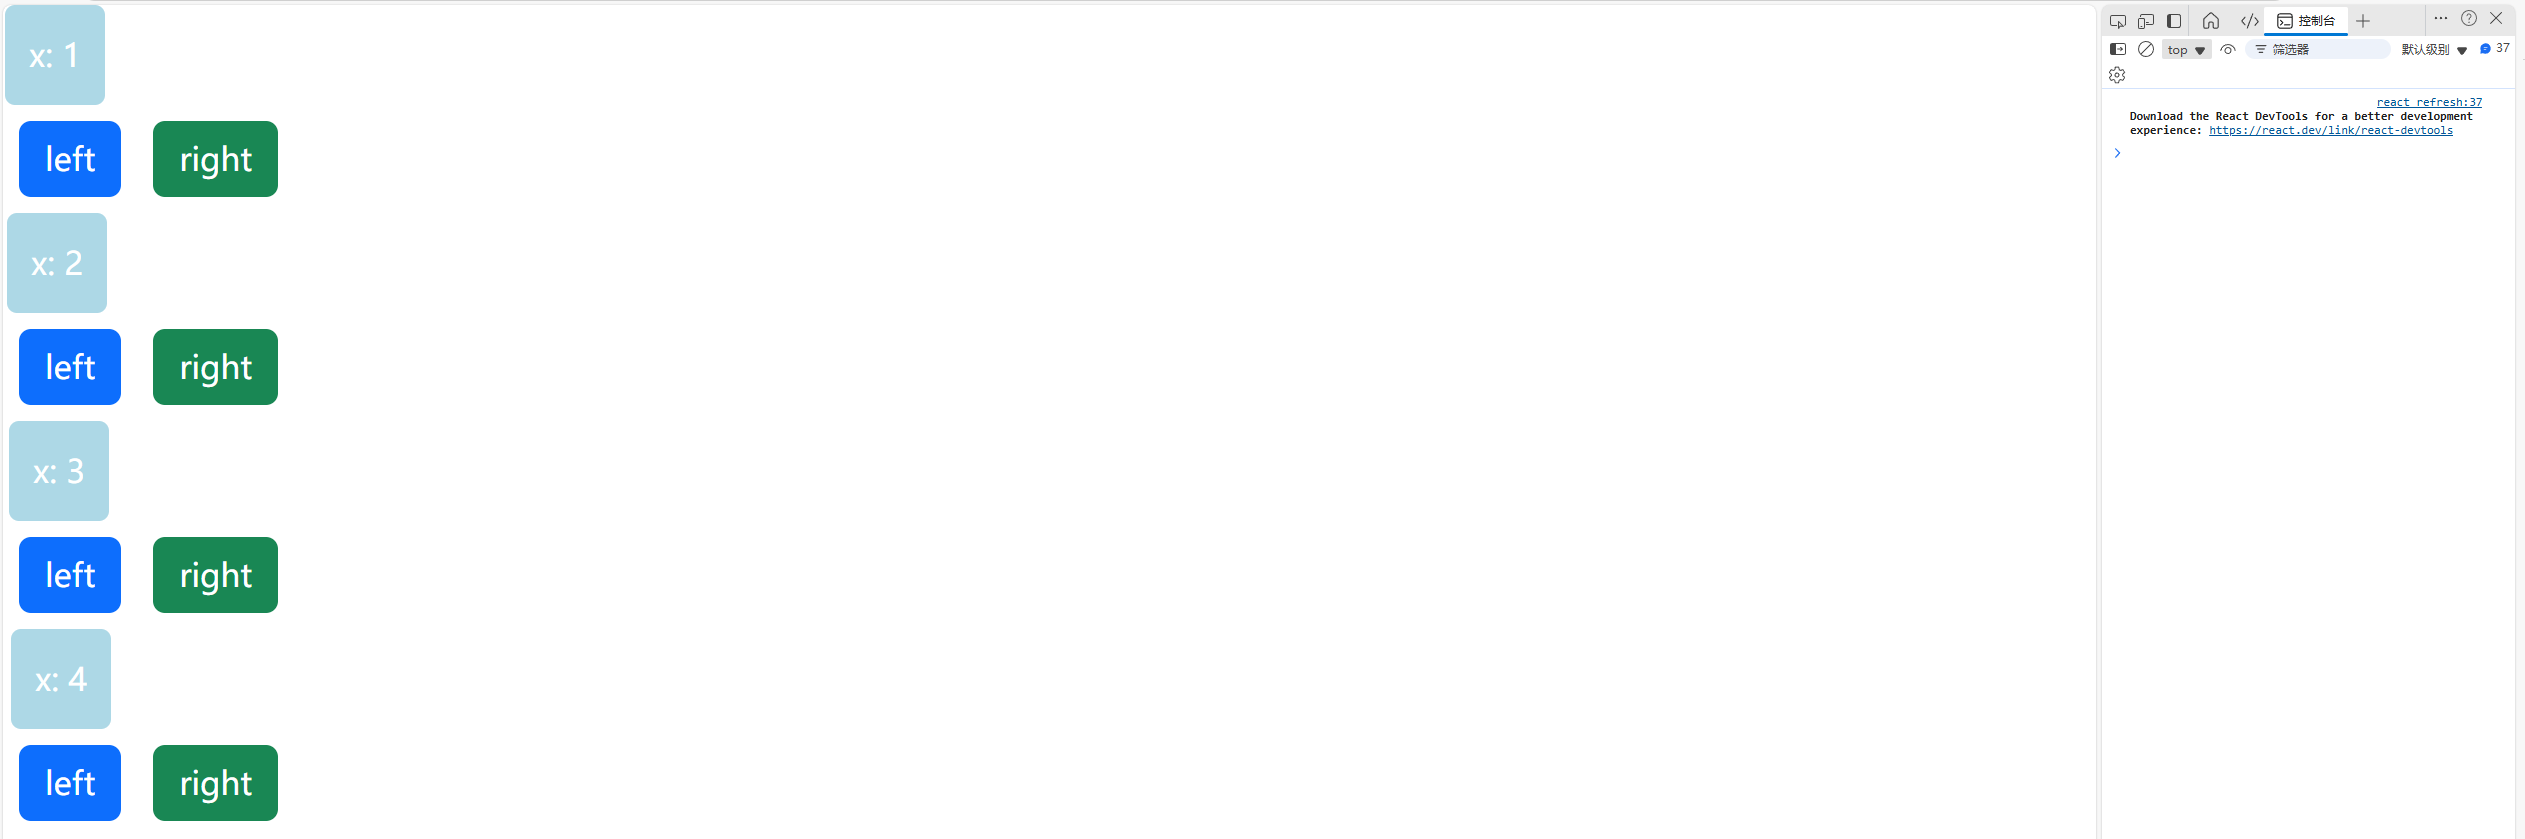
2)从上往下传递数据
- 通过
this.props属性可以从上到下传递数据
boxes.jsx:
import React, { Component } from 'react';import Box from './box';class Boxes extends Component {state = { boxes: [{id: 1, x: 1},{id: 2, x: 2},{id: 3, x: 3},{id: 4, x: 4},]} render() { return (<React.Fragment>{this.state.boxes.map(box => (<Box key={box.id}x={box.x}/>))}</React.Fragment>);}
}export default Boxes;
box.jsx:
import React, { Component } from 'react'class Box extends Component {state = { x: this.props.x,};handleClickLeft = (step) => {this.setState({x: this.state.x - step,});console.log("click left", this.state.x);}handleClickRight = (step) => {    this.setState({x: this.state.x + step,});console.log("click right", this.state.x);}render() { return (<React.Fragment><div style={this.getStyles()}>{this.toString()}</div><button onClick={() => this.handleClickLeft(10)} className='btn btn-primary m-2'>left</button><button onClick={() => this.handleClickRight(10)} className='btn btn-success m-2'>right</button></React.Fragment>);}getStyles() {let styles = {width: "50px",height: "50px",color: "white",textAlign: "center",lineHeight: "50px",borderRadius: "5px",backgroundColor: "lightblue",marginLeft: this.state.x,}if (this.state.x === 0) {styles.backgroundColor = "orange";}return styles;}toString() {const x = this.state.x;return `x: ${x}`;}
}
export default Box;
页面展示:
在主组件中传入参数,使得子组件的参数发生对应变化:
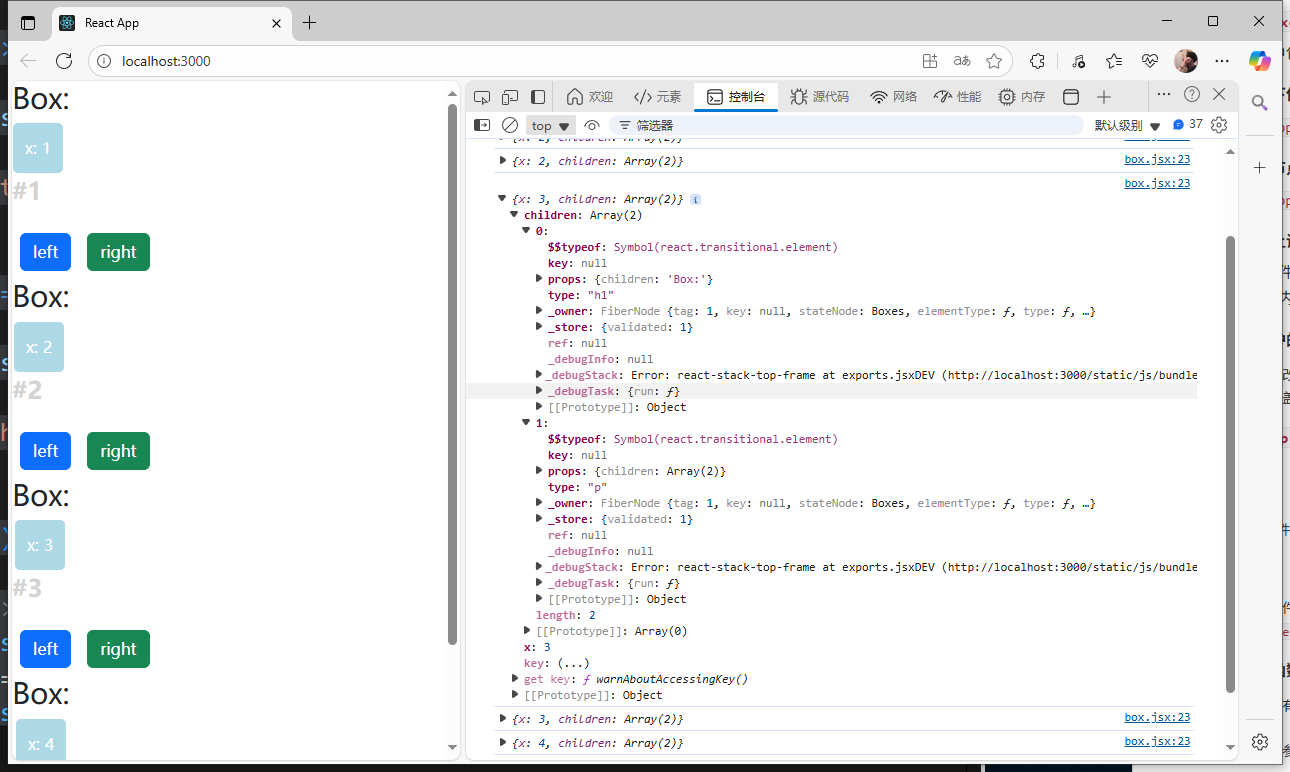
3)传递子节点
通过this.props.children属性传递子节点
boxes.jsx:
import React, { Component } from 'react';import Box from './box';class Boxes extends Component {state = { boxes: [{id: 1, x: 1},{id: 2, x: 2},{id: 3, x: 3},{id: 4, x: 4},]} render() { return (<React.Fragment>{this.state.boxes.map(box => (<Box key={box.id}x={box.x}><h1>Box:</h1><p>#{box.id}</p></Box>))}</React.Fragment>);}
}export default Boxes;
box.jsx:
import React, { Component } from 'react'class Box extends Component {state = { x: this.props.x,};handleClickLeft = (step) => {this.setState({x: this.state.x - step,});console.log("click left", this.state.x);}handleClickRight = (step) => {    this.setState({x: this.state.x + step,});console.log("click right", this.state.x);}render() { console.log(this.props);return (<React.Fragment>{this.props.children[0]}<div style={this.getStyles()}>{this.toString()}</div>{this.props.children[1]}<button onClick={() => this.handleClickLeft(10)} className='btn btn-primary m-2'>left</button><button onClick={() => this.handleClickRight(10)} className='btn btn-success m-2'>right</button></React.Fragment>);}getStyles() {let styles = {width: "50px",height: "50px",color: "white",textAlign: "center",lineHeight: "50px",borderRadius: "5px",backgroundColor: "lightblue",marginLeft: this.state.x,}if (this.state.x === 0) {styles.backgroundColor = "orange";}return styles;}toString() {const x = this.state.x;return `x: ${x}`;}
}
export default Box;
页面展示:
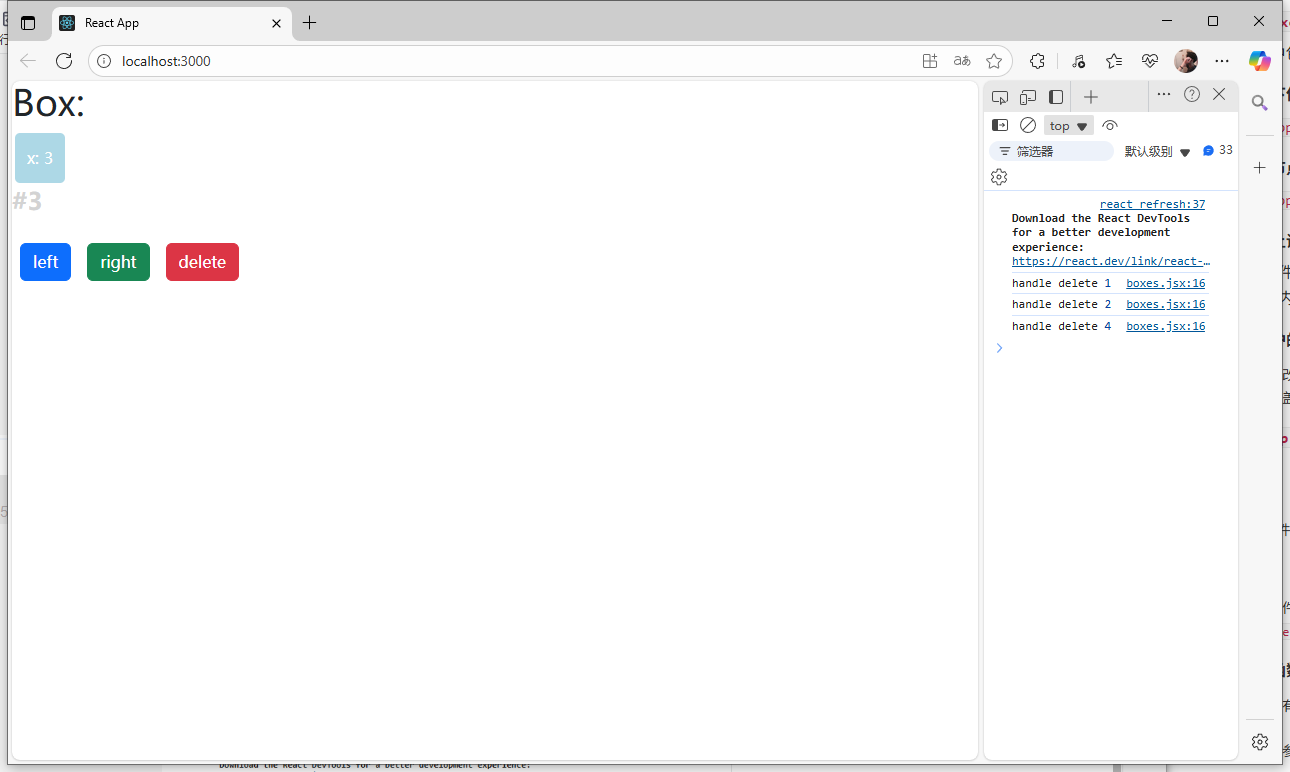
4)从下往上调用函数
- 注意:每个组件的
this.state只能在组件内部修改,不能在其他组件内修改
相当于私有组件,只能由自己调用和修改
子组件调用父组件的方法:通过this.props属性将父组件的函数指代传递给子组件,当子组件获取到父组件的函数指代后,可以通过该指代以及传递下来的参数去调用父组件的函数。
boxes.jsx:
import React, { Component } from 'react';import Box from './box';class Boxes extends Component {state = { boxes: [{id: 1, x: 1},{id: 2, x: 2},{id: 3, x: 3},{id: 4, x: 4},]} handleDelet = (boxId) => {console.log("handle delete", boxId);const boxes = this.state.boxes.filter(b => b.id !== boxId);this.setState({boxes: boxes});}render() { return (<React.Fragment>{this.state.boxes.map(box => (<Box key={box.id}x={box.x}//将函数以及函数需要用到的参数传递给子组件id={box.id}onDelete={this.handleDelet} //子组件在获取到onDelete时,实际是获取到了父组件的handleDelete方法的指代><h1>Box:</h1><p>#{box.id}</p></Box>))}</React.Fragment>);}
}export default Boxes;
box.jsx:
import React, { Component } from 'react'class Box extends Component {state = { x: this.props.x,};handleClickLeft = (step) => {this.setState({x: this.state.x - step,});console.log("click left", this.state.x);}handleClickRight = (step) => {    this.setState({x: this.state.x + step,});console.log("click right", this.state.x);}render() { return (<React.Fragment>{this.props.children[0]}<div style={this.getStyles()}>{this.toString()}</div>{this.props.children[1]}<button onClick={() => this.handleClickLeft(10)} className='btn btn-primary m-2'>left</button><button onClick={() => this.handleClickRight(10)} className='btn btn-success m-2'>right</button><button //拿着父组件传过来的参数去调用父组件传的函数onClick={() => this.props.onDelete(this.props.id)} className='btn btn-danger m-2'>delete</button></React.Fragment>);}getStyles() {let styles = {width: "50px",height: "50px",color: "white",textAlign: "center",lineHeight: "50px",borderRadius: "5px",backgroundColor: "lightblue",marginLeft: this.state.x,}if (this.state.x === 0) {styles.backgroundColor = "orange";}return styles;}toString() {const x = this.state.x;return `x: ${x}`;}
}
export default Box;
页面展示:
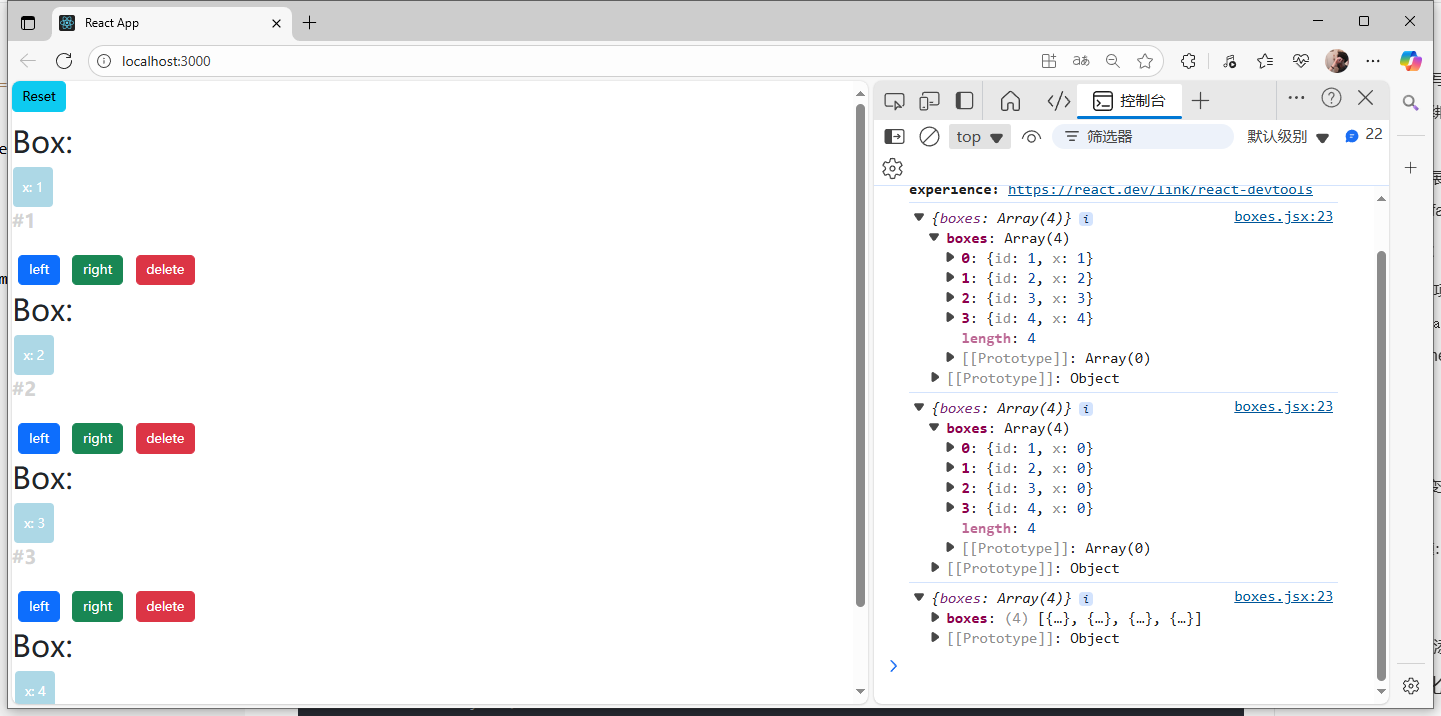
5)每个维护的数据仅能保存在一个this.state中
- 不要直接修改
this.state的值,因为setState函数可能会将修改覆盖掉
例如:
1.在boxes.jsx中添加一个handleReset函数,通过reset按钮触发,来将四个子组件的值都变回初始值0,id则保持不变。
2.这时会发现,当点击reset按钮后,打印的boxes中的x值都变成0了,但是页面的每个子组件的x渲染还是原来的值。
3.因为通过handleReset函数中的this.setState更新的是this.state.boxes里面的x,在实际渲染中,是通过box.jsx中的this.state.x来获取,而该过程只会在初始化的时候执行一次,通过this.props.x传过来的值获取,后面每次修改的时候,该过程不会重复执行,所以不管怎么修改this.props.x的值,box.jsx里的x都不会发生变化了,因此实际的x渲染不会发生改变。
相当于在两个地方存了同一个数据,在一边修改可能无法影响两边的数据
boxes.jsx:
import React, { Component } from 'react';import Box from './box';class Boxes extends Component {state = { boxes: [{id: 1, x: 1},{id: 2, x: 2},{id: 3, x: 3},{id: 4, x: 4},]} handleReset = () => {const boxes = this.state.boxes.map(b => {return {id: b.id,x: 0,}});this.setState({boxes});console.log(this.state);}handleDelet = (boxId) => {console.log("handle delete", boxId);const boxes = this.state.boxes.filter(b => b.id !== boxId);this.setState({boxes: boxes});}render() { return (<React.Fragment><button style={{marginBottom: "15px"}} className='btn btn-info'onClick={this.handleReset}>Reset</button>{this.state.boxes.map(box => (<Box key={box.id}x={box.x}//将函数以及函数需要用到的参数传递给子组件id={box.id}onDelete={this.handleDelet} //子组件在获取到onDelete时,实际是获取到了父组件的handleDelete方法的指代><h1>Box:</h1><p>#{box.id}</p></Box>))}</React.Fragment>);}
}export default Boxes;
box.jsx:
import React, { Component } from 'react'class Box extends Component {state = { x: this.props.x,};handleClickLeft = (step) => {this.setState({x: this.state.x - step,});console.log("click left", this.state.x);}handleClickRight = (step) => {    this.setState({x: this.state.x + step,});console.log("click right", this.state.x);}render() { return (<React.Fragment>{this.props.children[0]}<div style={this.getStyles()}>{this.toString()}</div>{this.props.children[1]}<button onClick={() => this.handleClickLeft(10)} className='btn btn-primary m-2'>left</button><button onClick={() => this.handleClickRight(10)} className='btn btn-success m-2'>right</button><button //拿着父组件传过来的参数去调用父组件传的函数onClick={() => this.props.onDelete(this.props.id)} className='btn btn-danger m-2'>delete</button></React.Fragment>);}getStyles() {let styles = {width: "50px",height: "50px",color: "white",textAlign: "center",lineHeight: "50px",borderRadius: "5px",backgroundColor: "lightblue",marginLeft: this.state.x,}if (this.state.x === 0) {styles.backgroundColor = "orange";}return styles;}toString() {const x = this.state.x;return `x: ${x}`;}
}
export default Box;
页面展示:
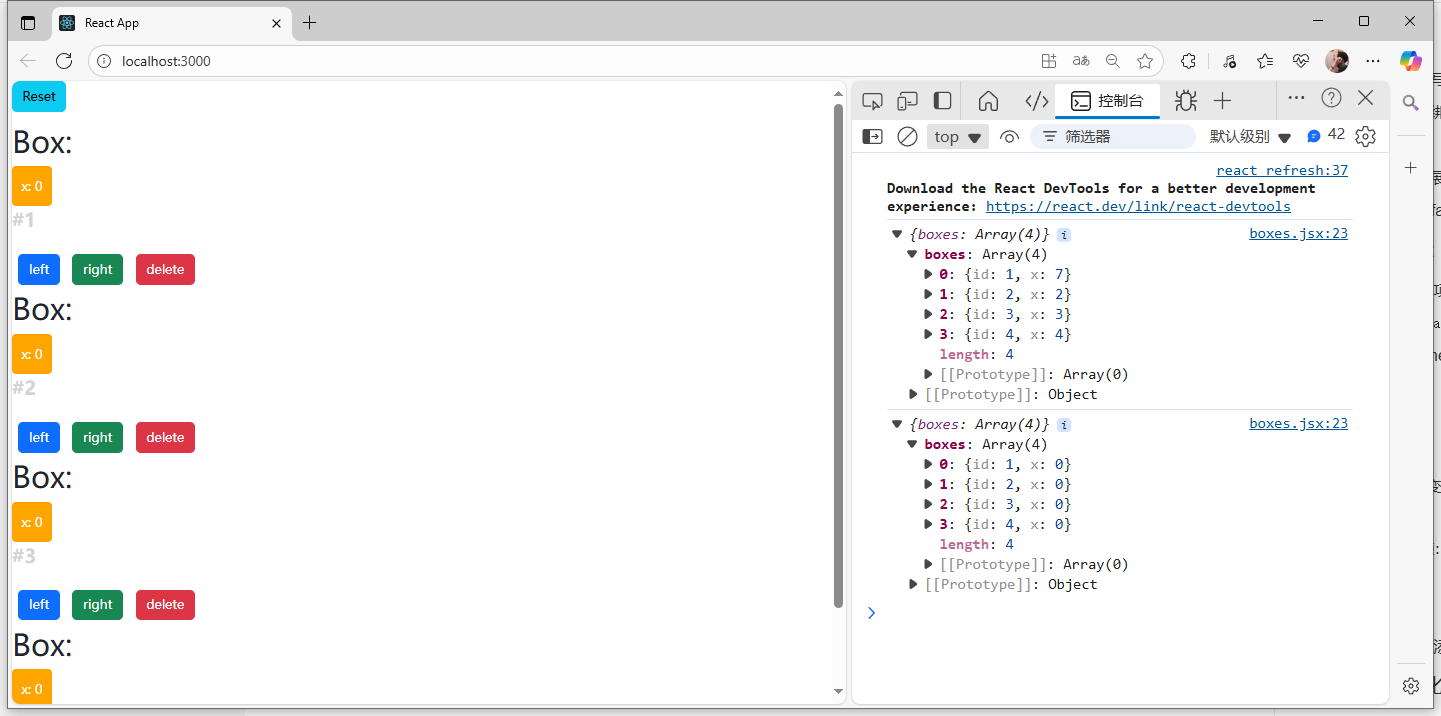
怎么使得子组件的x渲染能在外面进行修改呢?
1.将内部的state.x删除
2.把x放到外部组件的this.state.boxes里面: 也就是只存一份x数据,然后两边都从这一份数据中读取,就不会产生覆盖的问题
如:
boxes.jsx:
import React, { Component } from 'react';import Box from './box';class Boxes extends Component {state = { boxes: [{id: 1, x: 1},{id: 2, x: 2},{id: 3, x: 3},{id: 4, x: 4},]} handleReset = () => {const boxes = this.state.boxes.map(b => {return {id: b.id,x: 0,}});this.setState({boxes});console.log(this.state);}handleDelet = (boxId) => {console.log("handle delete", boxId);const boxes = this.state.boxes.filter(b => b.id !== boxId);this.setState({boxes: boxes});}handleClickLeft = (box) => {const boxes = [...this.state.boxes];const k = boxes.indexOf(box);  //在当前boxes数组中找到当前元素的下标boxes[k] = {...boxes[k]};boxes[k].x --;this.setState({boxes});//console.log("click left", this.boxes[k].x);}handleClickRight = (box) => {    const boxes = [...this.state.boxes];const k = boxes.indexOf(box);  //在当前boxes数组中找到当前元素的下标boxes[k] = {...boxes[k]};boxes[k].x ++;this.setState({boxes});//console.log("click right", this.boxes[k].x);}render() { return (<React.Fragment><button style={{marginBottom: "15px"}} className='btn btn-info'onClick={this.handleReset}>Reset</button>{this.state.boxes.map(box => (<Box key={box.id}//将函数以及函数需要用到的参数传递给子组件id={box.id}box={box}onDelete={this.handleDelet} //子组件在获取到onDelete时,实际是获取到了父组件的handleDelete方法的指代onClickLeft={() => this.handleClickLeft(box)}onClickRight={() => this.handleClickRight(box)}><h1>Box:</h1><p>#{box.id}</p></Box>))}</React.Fragment>);}
}export default Boxes;
box.jsx:
import React, { Component } from 'react'class Box extends Component {render() { return (<React.Fragment>{this.props.children[0]}<div style={this.getStyles()}>{this.toString()}</div>{this.props.children[1]}<button onClick={() => this.props.onClickLeft(10)} className='btn btn-primary m-2'>left</button><button onClick={() => this.props.onClickRight(10)} className='btn btn-success m-2'>right</button><button //拿着父组件传过来的参数去调用父组件传的函数onClick={() => this.props.onDelete(this.props.id)} className='btn btn-danger m-2'>delete</button></React.Fragment>);}getStyles() {let styles = {width: "50px",height: "50px",color: "white",textAlign: "center",lineHeight: "50px",borderRadius: "5px",backgroundColor: "lightblue",marginLeft: this.props.box.x,}if (this.props.box.x === 0) {styles.backgroundColor = "orange";}return styles;}toString() {const x = this.props.box.x;return `x: ${x}`;}
}
export default Box;
页面展示:
6)创建App组件
包含:
- 导航栏组件
Boxes组件
文件创建快捷缩写(自动补全):
imrc + Tab = import React, { Component } from ‘react’;
cc + Tab =
class  extends Component {state = {  } render() { return ();}
}export default ;
注意:
- 要将多个组件共用的数据存放到最近公共祖先的
this.state中 - 比如:我们需要在另外一个组件中维护当前x不为0的组件个数,那我们则需要将当前组件(
Boxes)和另外一个组件(Navbar)放到新建的公共祖先组件(App)中
- 这里就需要将维护数据的state全部往上移,移动到公共祖先中维护。然后两边的节点通过公共祖先使用
props传输获取数据。
app.jsx:
import React, { Component } from 'react';
import NavBar from './navbar';
import Boxes from './boxes';class App extends Component {state = { boxes: [{id: 1, x: 1},{id: 2, x: 2},{id: 3, x: 3},{id: 4, x: 4},]} handleReset = () => {const boxes = this.state.boxes.map(b => {return {id: b.id,x: 0,}});this.setState({boxes});console.log(this.state);}handleDelet = (boxId) => {console.log("handle delete", boxId);const boxes = this.state.boxes.filter(b => b.id !== boxId);this.setState({boxes: boxes});}handleClickLeft = (box) => {const boxes = [...this.state.boxes];const k = boxes.indexOf(box);  //在当前boxes数组中找到当前元素的下标boxes[k] = {...boxes[k]};boxes[k].x --;this.setState({boxes});//console.log("click left", this.boxes[k].x);}handleClickRight = (box) => {    const boxes = [...this.state.boxes];const k = boxes.indexOf(box);  //在当前boxes数组中找到当前元素的下标boxes[k] = {...boxes[k]};boxes[k].x ++;this.setState({boxes});//console.log("click right", this.boxes[k].x);}render() { return (<React.Fragment><NavBar boxesCount={this.state.boxes.filter(b => b.x !== 0).length}/><div className='container'><Boxes boxes={this.state.boxes}onReset={this.handleReset}onClickLeft={this.handleClickLeft}onClickRight={this.handleClickRight}onDelete={this.handleDelet}/></div></React.Fragment>);}
}export default App;
navbar.jsx:
import React, { Component } from 'react';class NavBar extends Component {state = {  } render() { return (<nav className='navbar navbar-light bg-light'><div className='container-fluid'><a className='navbar-brand' href = "/">Navbar <span>Boxes Count: {this.props.boxesCount} </span></a></div></nav>);}
}export default NavBar;
boxes.jsx:
import React, { Component } from 'react';import Box from './box';class Boxes extends Component {render() { return (<React.Fragment><button style={{marginBottom: "15px"}} className='btn btn-info'onClick={this.props.onReset}>Reset</button>{this.props.boxes.map(box => (<Box key={box.id}//将函数以及函数需要用到的参数传递给子组件box={box}onDelete={this.props.onDelete}onClickLeft={() => this.props.onClickLeft(box)}onClickRight={() => this.props.onClickRight(box)}><h1>Box:</h1><p>#{box.id}</p></Box>))}</React.Fragment>);}
}export default Boxes;
box.jsx文件则保持不变
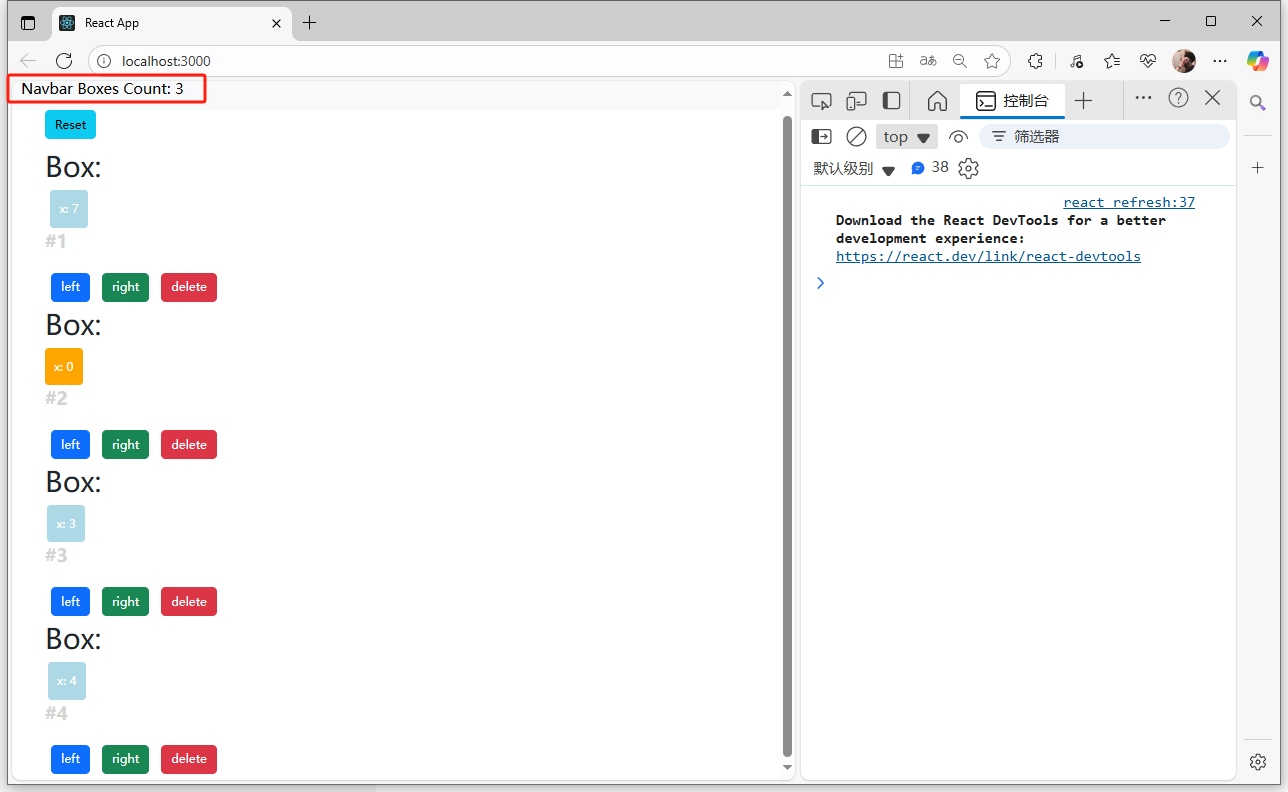
页面展示:
7)无状态函数组件
- 当组件中没有用到
this.state时,可以简写为无状态的函数组件 - 使用
sfc+Tab键补全:
const  = () => {return (  );
}export default ;
- 函数的传入参数为
props对象
比如上一小节中的boxes.jsx中没有state属性,那么可以修改为无状态的函数组件:相当于只有render函数
boxes.jsx:
import React, { Component } from 'react';import Box from './box';const Boxes = (props) => {return (<React.Fragment><button style={{marginBottom: "15px"}} className='btn btn-info'onClick={props.onReset}>Reset</button>{props.boxes.map(box => (<Box key={box.id}//将函数以及函数需要用到的参数传递给子组件box={box}onDelete={props.onDelete}onClickLeft={() => props.onClickLeft(box)}onClickRight={() => props.onClickRight(box)}><h1>Box:</h1><p>#{box.id}</p></Box>))}</React.Fragment>);
}export default Boxes;
同样的,navbar.jsx中也是没有state属性的,也可以转换成无状态函数组件:
navbar.jsx:
import React, { Component } from 'react';const  NavBar = (props) => {return (<nav className='navbar navbar-light bg-light'><div className='container-fluid'><a className='navbar-brand' href = "/">Navbar <span>Boxes Count: {props.boxesCount} </span></a></div></nav>);
}export default NavBar;
- 补充回忆:
解构也可以在参数里面解构(直接将props解构成参数列表):
boxes.jsx:
import React, { Component } from 'react';import Box from './box';const Boxes = ({onReset, onDelete, onClickLeft, onClickRight, boxes}) => {return (<React.Fragment><button style={{marginBottom: "15px"}} className='btn btn-info'onClick={onReset}>Reset</button>{boxes.map(box => (<Box key={box.id}//将函数以及函数需要用到的参数传递给子组件box={box}onDelete={onDelete}onClickLeft={() => onClickLeft(box)}onClickRight={() => onClickRight(box)}><h1>Box:</h1><p>#{box.id}</p></Box>))}</React.Fragment>);
}export default Boxes;
8)组件的生命周期
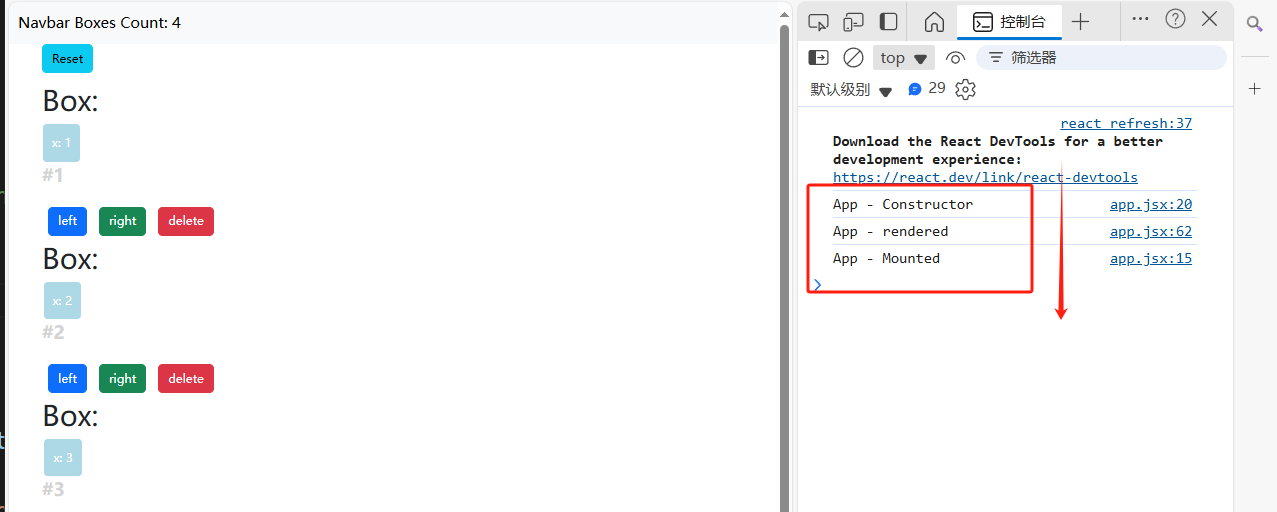
Mount周期(挂载:第一次加载执行的函数),执行顺序:
constructor() -> render() -> componentDisMount()
示例:
app.jsx:
import React, { Component } from 'react';
import NavBar from './navbar';
import Boxes from './boxes';class App extends Component {state = { boxes: [{id: 1, x: 1},{id: 2, x: 2},{id: 3, x: 3},{id: 4, x: 4},]} componentDidMount() {console.log("App - Mounted");}constructor() {super();console.log("App - Constructor");}handleReset = () => {const boxes = this.state.boxes.map(b => {return {id: b.id,x: 0,}});this.setState({boxes});console.log(this.state);}handleDelet = (boxId) => {console.log("handle delete", boxId);const boxes = this.state.boxes.filter(b => b.id !== boxId);this.setState({boxes: boxes});}handleClickLeft = (box) => {const boxes = [...this.state.boxes];const k = boxes.indexOf(box);  //在当前boxes数组中找到当前元素的下标boxes[k] = {...boxes[k]};boxes[k].x --;this.setState({boxes});//console.log("click left", this.boxes[k].x);}handleClickRight = (box) => {    const boxes = [...this.state.boxes];const k = boxes.indexOf(box);  //在当前boxes数组中找到当前元素的下标boxes[k] = {...boxes[k]};boxes[k].x ++;this.setState({boxes});//console.log("click right", this.boxes[k].x);}render() { console.log("App - rendered");return (<React.Fragment><NavBar boxesCount={this.state.boxes.filter(b => b.x !== 0).length}/><div className='container'><Boxes boxes={this.state.boxes}onReset={this.handleReset}onClickLeft={this.handleClickLeft}onClickRight={this.handleClickRight}onDelete={this.handleDelet}/></div></React.Fragment>);}
}export default App;
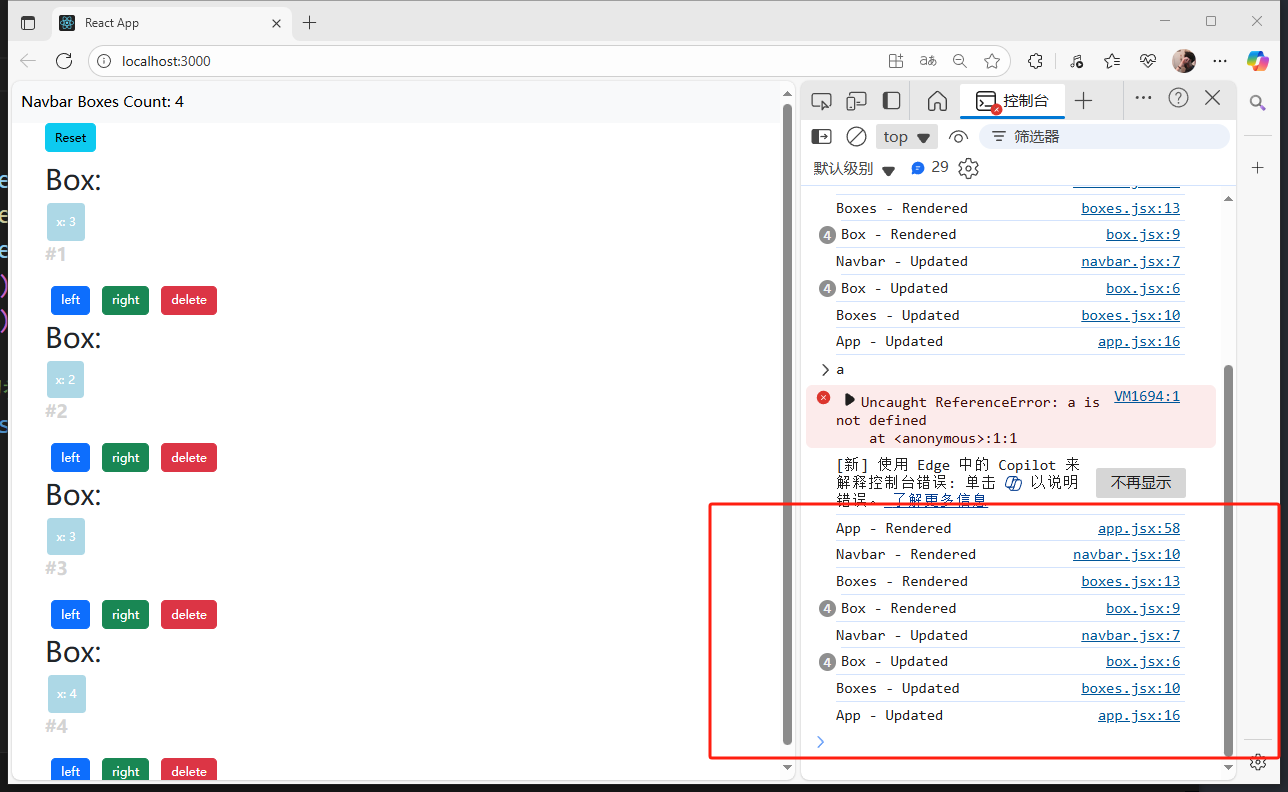
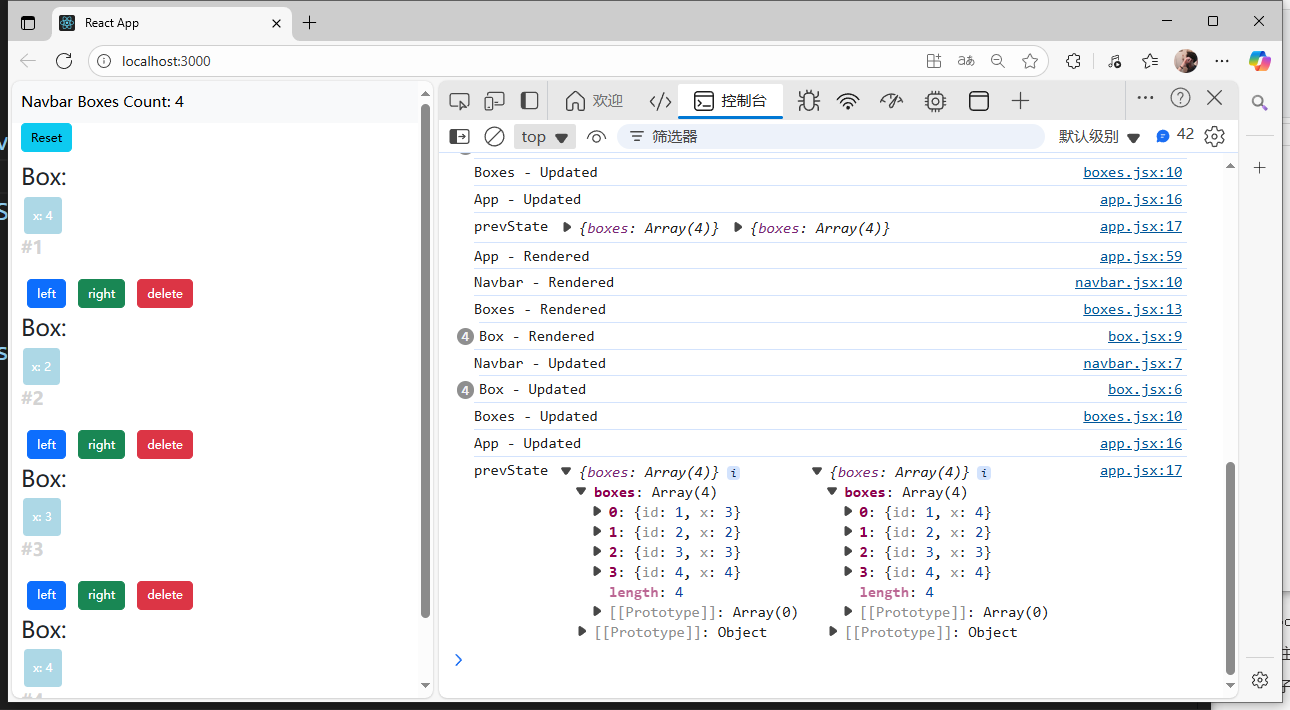
Update周期(修改),执行顺序:
render() -> componentDidUpdate()
示例:
分别在box.jsx,boxes.jsx,navbar.jsx,app.jsx中的加入componentDidUpdate()函数,并在render()和更新函数中加入打印语句,观察不同层级之间的执行顺序:
结果如下:
componentDidUpdate()中还有prevProps,prevState两个参数:
componentDidUpdate(prevProps, prevState) {console.log("App - Updated");console.log("prevState", prevState, this.state);}
可以通过这两个参数,得到上一个状态的state值。
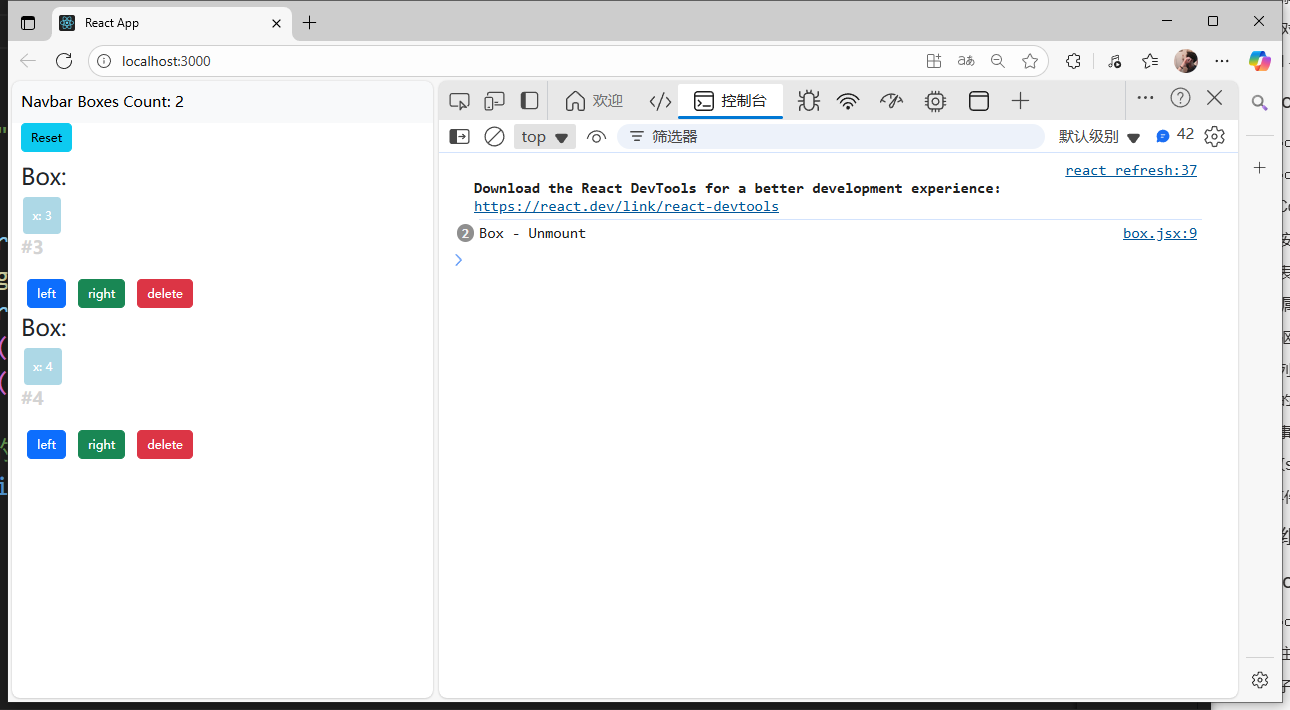
Unmount周期(删除),执行顺序:
componentWillUnmount()
每次删除当前元素时会执行一次:
box.jsx:
import React, { Component } from 'react'class Box extends Component {// componentDidUpdate() {//     console.log("Box - Updated");// }componentWillUnmount() {console.log("Box - Unmount");}render() { //console.log("Box - Rendered");return (<React.Fragment>{this.props.children[0]}<div style={this.getStyles()}>{this.toString()}</div>{this.props.children[1]}<button onClick={() => this.props.onClickLeft(10)} className='btn btn-primary m-2'>left</button><button onClick={() => this.props.onClickRight(10)} className='btn btn-success m-2'>right</button><button //拿着父组件传过来的参数去调用父组件传的函数onClick={() => this.props.onDelete(this.props.box.id)} className='btn btn-danger m-2'>delete</button></React.Fragment>);}getStyles() {let styles = {width: "50px",height: "50px",color: "white",textAlign: "center",lineHeight: "50px",borderRadius: "5px",backgroundColor: "lightblue",marginLeft: this.props.box.x,}if (this.props.box.x === 0) {styles.backgroundColor = "orange";}return styles;}toString() {const x = this.props.box.x;return `x: ${x}`;}
}
export default Box;
9.路由
1.Web分类
- 静态页面:页面里的数据是写死的
- 动态页面:页面里的数据是动态填充的
- 后端渲染:数据在后端填充
- 前端渲染:数据在前端填充
2.安装环境
- VsCode安装插件:
Auto Import - ES6, TS, JSX, TSX - 安装
Route插件:npm i react-router-dom
3.Route组件介绍
BrowserRouter:所有需要路由的组件,都需要包裹在BrowserRouter组件内Link:跳转到某个链接,to属性表示跳转到的链接Routes:类似于C++中的switch,匹配第一个路径Route:路由,path属性表示路径,element属性表示路由到的内容
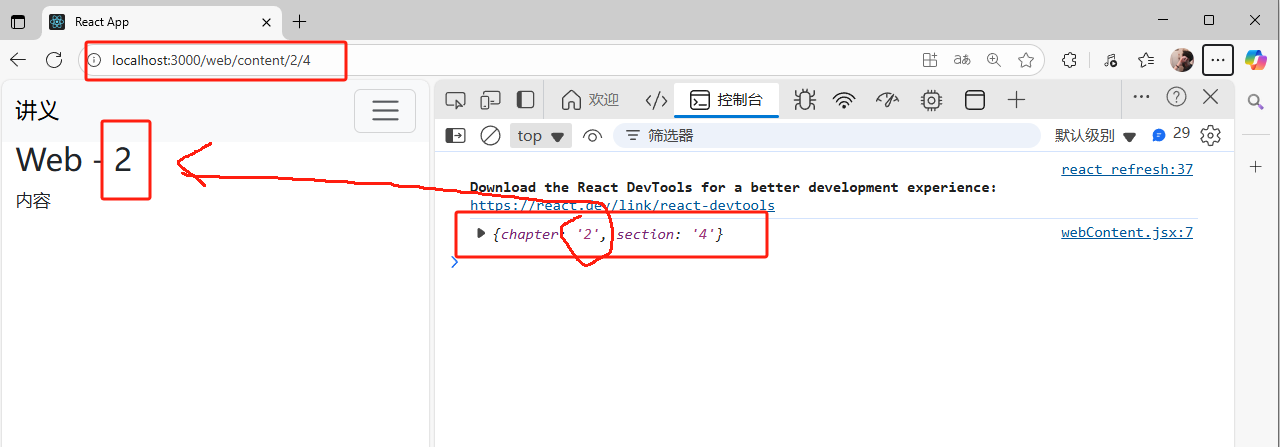
4.URL中传递参数
- 把URL中的某些部分变成变量读取到组件中。
解析URL:
<Route path="/web/content/:chapter/:section/" element={<WebContent/>} />
类组件获取参数:
web.jsx:
import React, { Component } from 'react';
import { Link } from 'react-router-dom';class Web extends Component {state = { webs: [{id: 1, title: "HTML"},{id: 2, title: "CSS"},{id: 3, title: "JavaScript"},{id: 4, title: "拳皇"},{id: 5, title: "React"},]} render() { return (<React.Fragment><h1>Web</h1><div>{this.state.webs.map(web => (<div key={web.id}><Link to={`/web/content/${web.id}`}>{web.id + "." + web.title}</Link></div>))}</div></React.Fragment>);}
}export default Web;
webContent.jsx:
import React, { Component } from 'react';
import { useParams } from 'react-router-dom';class WebContent extends Component {state = {  } render() { console.log(this.props.params);return (<React.Fragment><h1>Web - {this.props.params.chapter}</h1><div>内容</div></React.Fragment>);}
}export default (props) => (<WebContent {...props}params={useParams()}/>
);app.jsx:
import React, { Component } from 'react';
import NavBar from './navbar';
import Home from './home';
import Linux from './linux';
import Django from './django';
import Web from './web';
import WebContent from './webContent';
import NotFound from './notFound';
import { Route, Routes } from 'react-router-dom';class App extends Component {state = {  } render() { return (<React.Fragment><NavBar /><div className='container'><Routes><Route path="/" element={<Home/>} /><Route path="/linux" element={<Linux/> } /><Route path="/django" element={<Django/> } /><Route path="/web" element={<Web/>} /><Route path="/web/content/:chapter/:section/" element={<WebContent/>} /></Routes></div></React.Fragment>);}
}export default App;
参数打印:
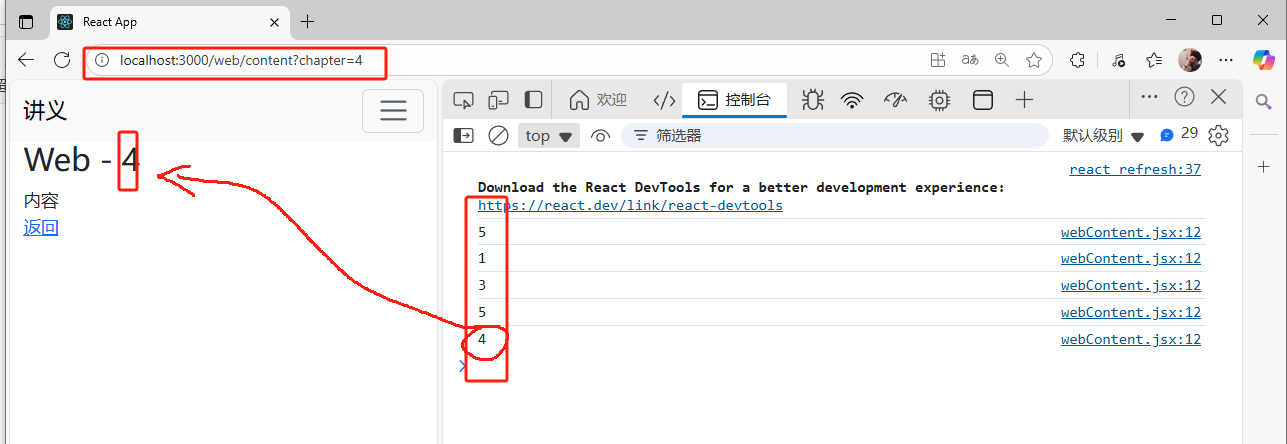
5.Search Param 传递参数
web.jsx:
import React, { Component } from 'react';
import { Link } from 'react-router-dom';class Web extends Component {state = { webs: [{id: 1, title: "HTML"},{id: 2, title: "CSS"},{id: 3, title: "JavaScript"},{id: 4, title: "拳皇"},{id: 5, title: "React"},]} render() { return (<React.Fragment><h1>Web</h1><div>{this.state.webs.map(web => (<div key={web.id}><Link to={`/web/content?chapter=${web.id}`}>{web.id + "." + web.title}</Link></div>))}</div></React.Fragment>);}
}export default Web;
webContent.jsx:
import React, { Component } from 'react';
import { useSearchParams } from 'react-router-dom';
import { Link } from 'react-router-dom';class WebContent extends Component {state = { searchParams: this.props.params[0],setSearchParams: this.props.params[1],};render() { console.log(this.state.searchParams.get('chapter'));return (<React.Fragment><h1>Web - {this.state.searchParams.get('chapter')}</h1><div>内容</div><Link to="/web">返回</Link></React.Fragment>);}
}export default (props) => (<WebContent {...props}params={useSearchParams()}/>
);app.jsx:
import React, { Component } from 'react';
import NavBar from './navbar';
import Home from './home';
import Linux from './linux';
import Django from './django';
import Web from './web';
import WebContent from './webContent';
import NotFound from './notFound';
import { Route, Routes } from 'react-router-dom';class App extends Component {state = {  } render() { return (<React.Fragment><NavBar /><div className='container'><Routes><Route path="/" element={<Home/>} /><Route path="/linux" element={<Linux/> } /><Route path="/django" element={<Django/> } /><Route path="/web" element={<Web/>} /><Route path="/web/content" element={<WebContent/>} /></Routes></div></React.Fragment>);}
}export default App;
参数提取:
6.重定向
- 使用
Navigate组件可以重定向,Navigate是react实现好的组件。
<Route path="*" element={ <Navigate replace to="/404" /> } />
app.jsx:
import React, { Component } from 'react';
import NavBar from './navbar';
import Home from './home';
import Linux from './linux';
import Django from './django';
import Web from './web';
import WebContent from './webContent';
import NotFound from './notFound';
import { Route, Routes, Navigate} from 'react-router-dom';class App extends Component {state = {  } render() { return (<React.Fragment><NavBar /><div className='container'><Routes><Route path="/" element={<Home/>} /><Route path="/linux" element={<Linux/> } /><Route path="/django" element={<Django/> } /><Route path="/web" element={<Web/>} /><Route path="/web/content" element={<WebContent/>} /><Route path="/404" element={<NotFound/>} /><Route path="*" element={<Navigate replace to="/404"/>} /></Routes></div></React.Fragment>);}
}export default App;
notFound:
import React, { Component } from 'react';class NotFound extends Component {state = {  } render() { return (<h1>NotFound</h1>);}
}export default NotFound;
7.嵌套路由
linux.jsx:
import React, { Component } from 'react';
import { Outlet } from 'react-router-dom';class Linux extends Component {state = {  } render() { return (<React.Fragment><h1>Linux</h1><hr /> <Outlet /></React.Fragment>);}
}export default Linux;
app.jsx:
import React, { Component } from 'react';
import NavBar from './navbar';
import Home from './home';
import Linux from './linux';
import Django from './django';
import Web from './web';
import WebContent from './webContent';
import NotFound from './notFound';
import { Route, Routes, Navigate} from 'react-router-dom';class App extends Component {state = {  } render() { return (<React.Fragment><NavBar /><div className='container'><Routes><Route path="/" element={<Home/>} /><Route path="/linux" element={<Linux/> }><Route path="homework" element={<h4>homework</h4>}></Route><Route path="terminal" element={<h4>terminal</h4>}></Route><Route path="*" element={<h4>其他</h4>}></Route></Route><Route path="/django" element={<Django/> } /><Route path="/web" element={<Web/>} /><Route path="/web/content" element={<WebContent/>} /><Route path="/404" element={<NotFound/>} /><Route path="*" element={<Navigate replace to="/404"/>} /></Routes></div></React.Fragment>);}
}export default App;
页面展示:
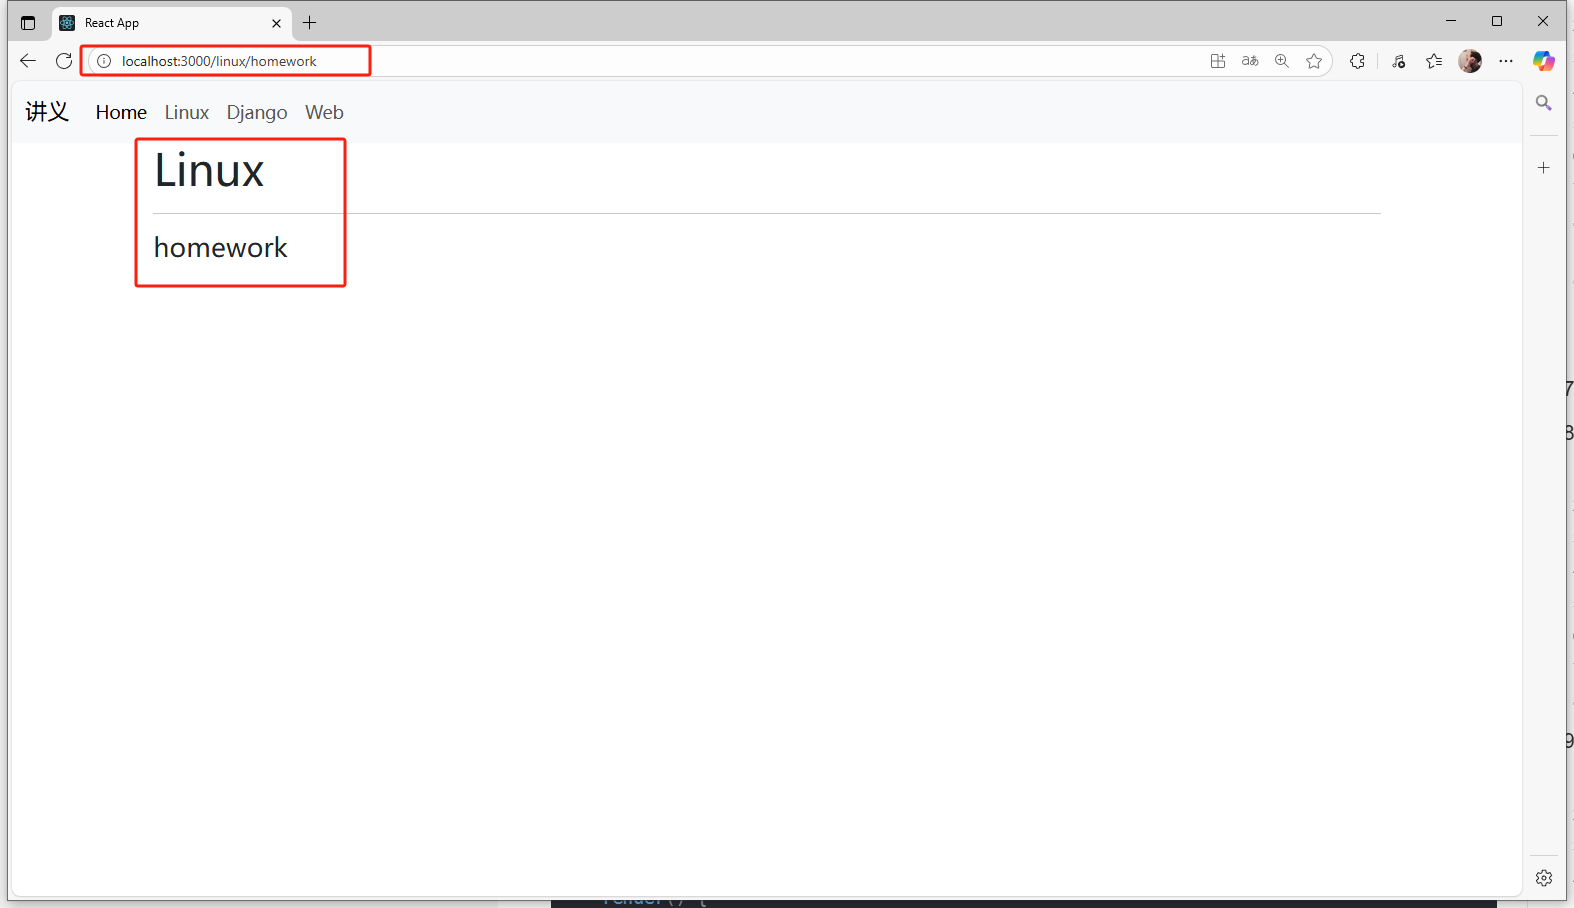
- 注意:需要在父组件中添加
<Outlet />组件,用来填充子组件的内容。
10.Redux
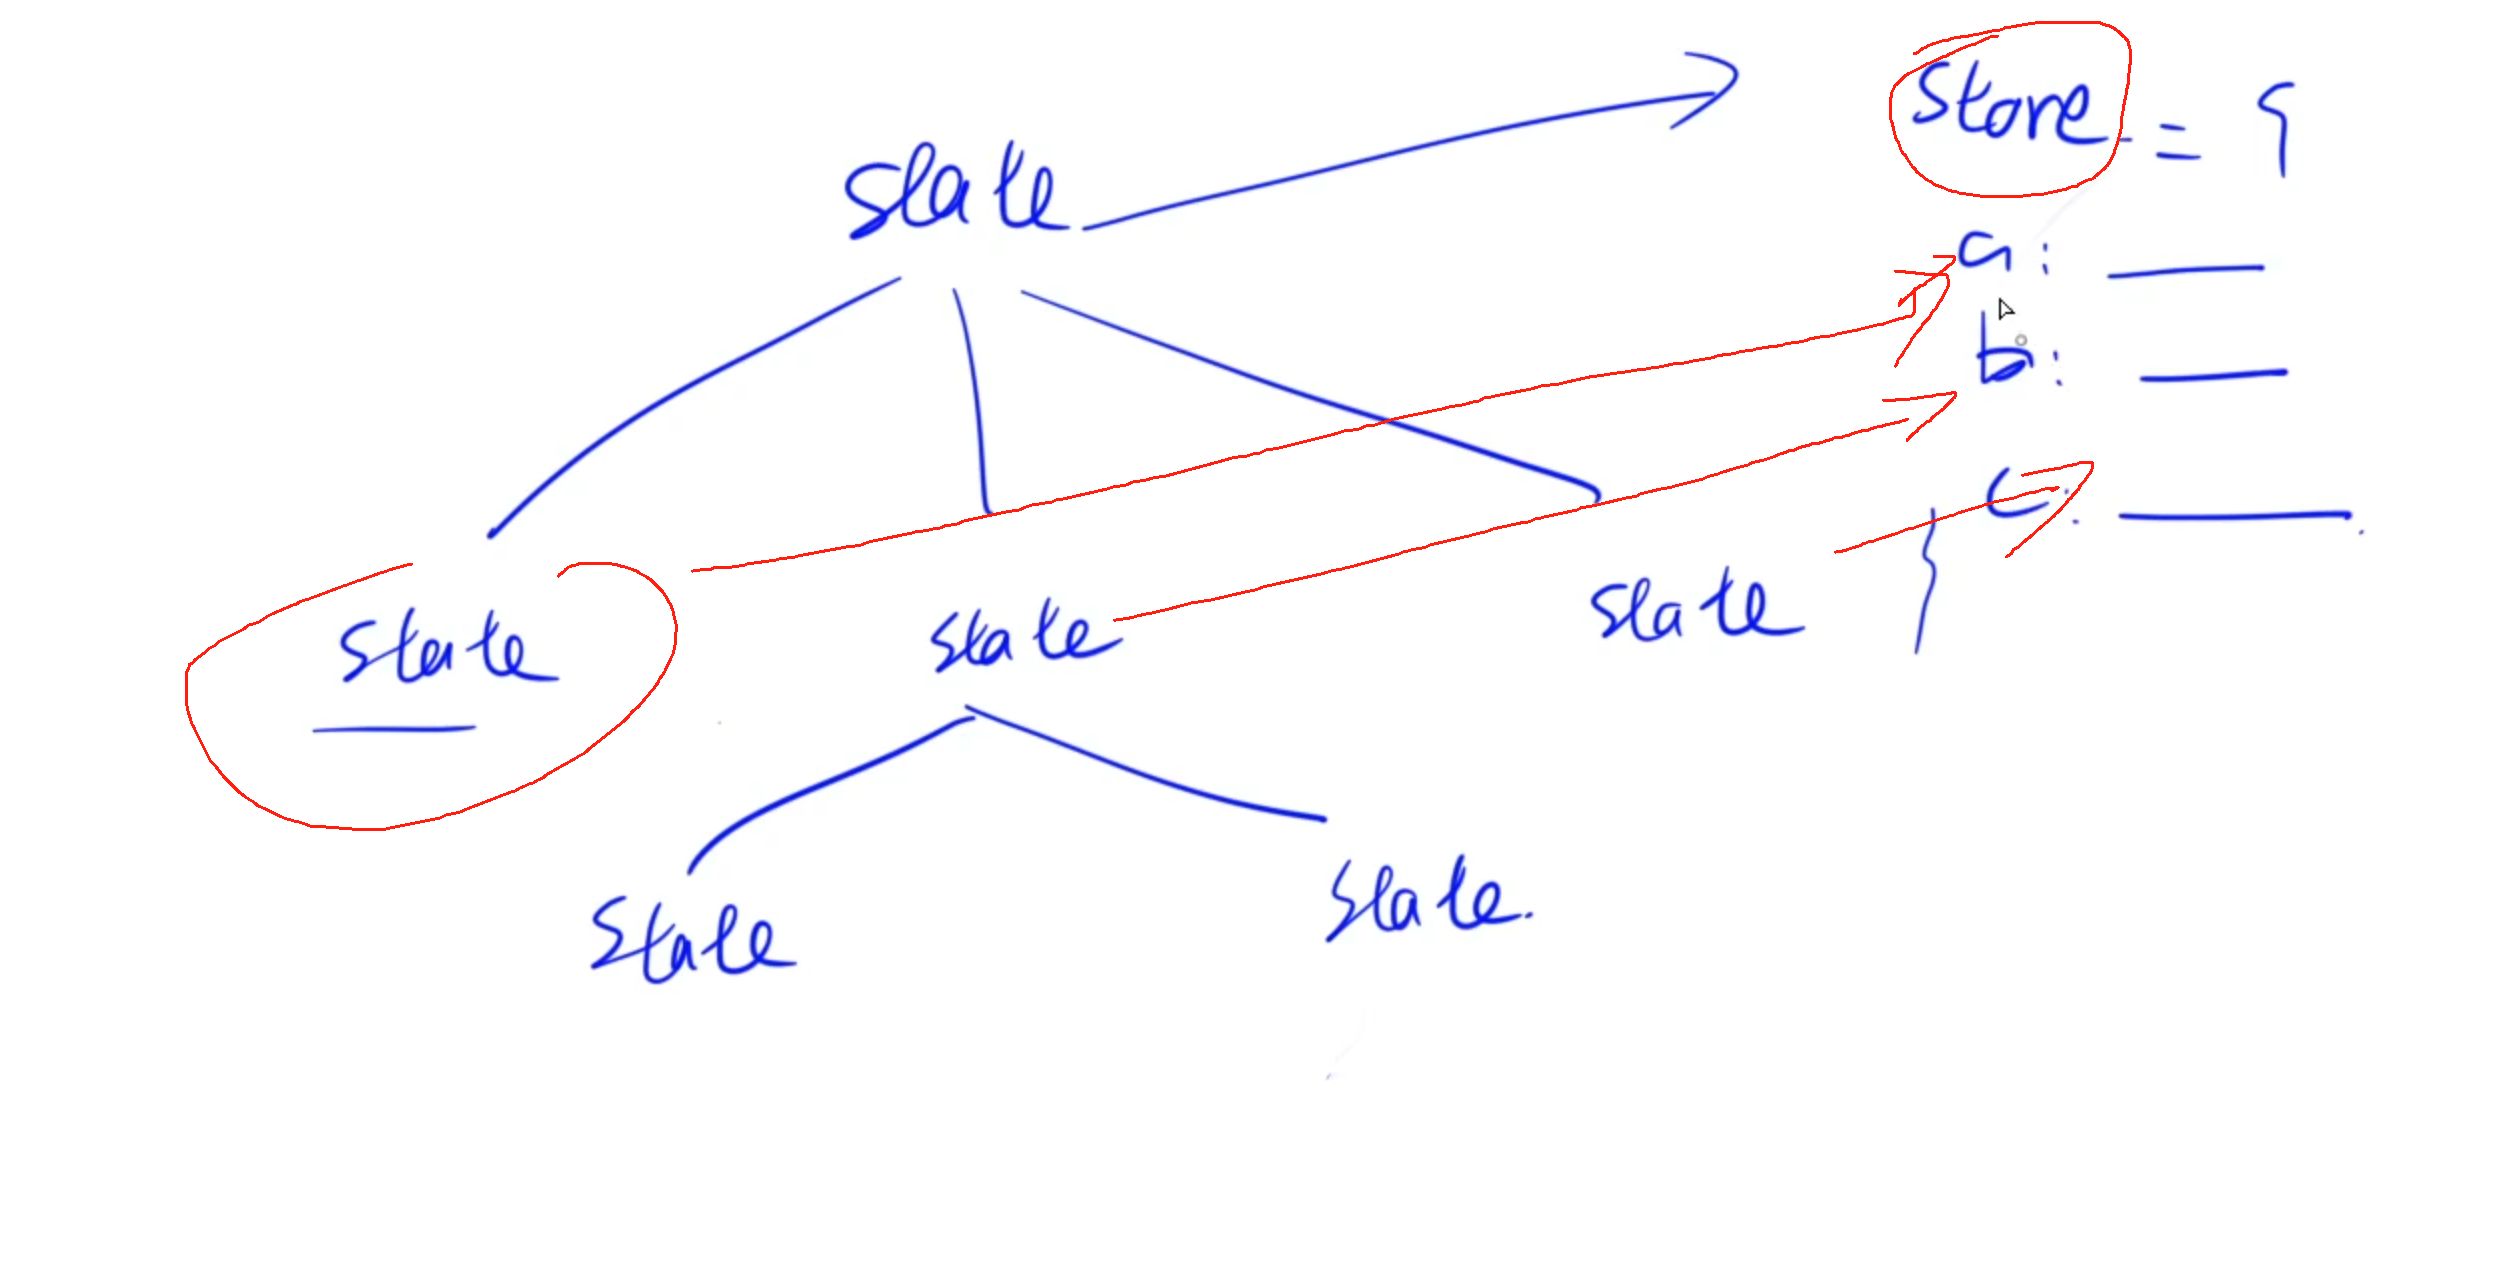
redux将所有数据存储到树中,并且树是唯一的。
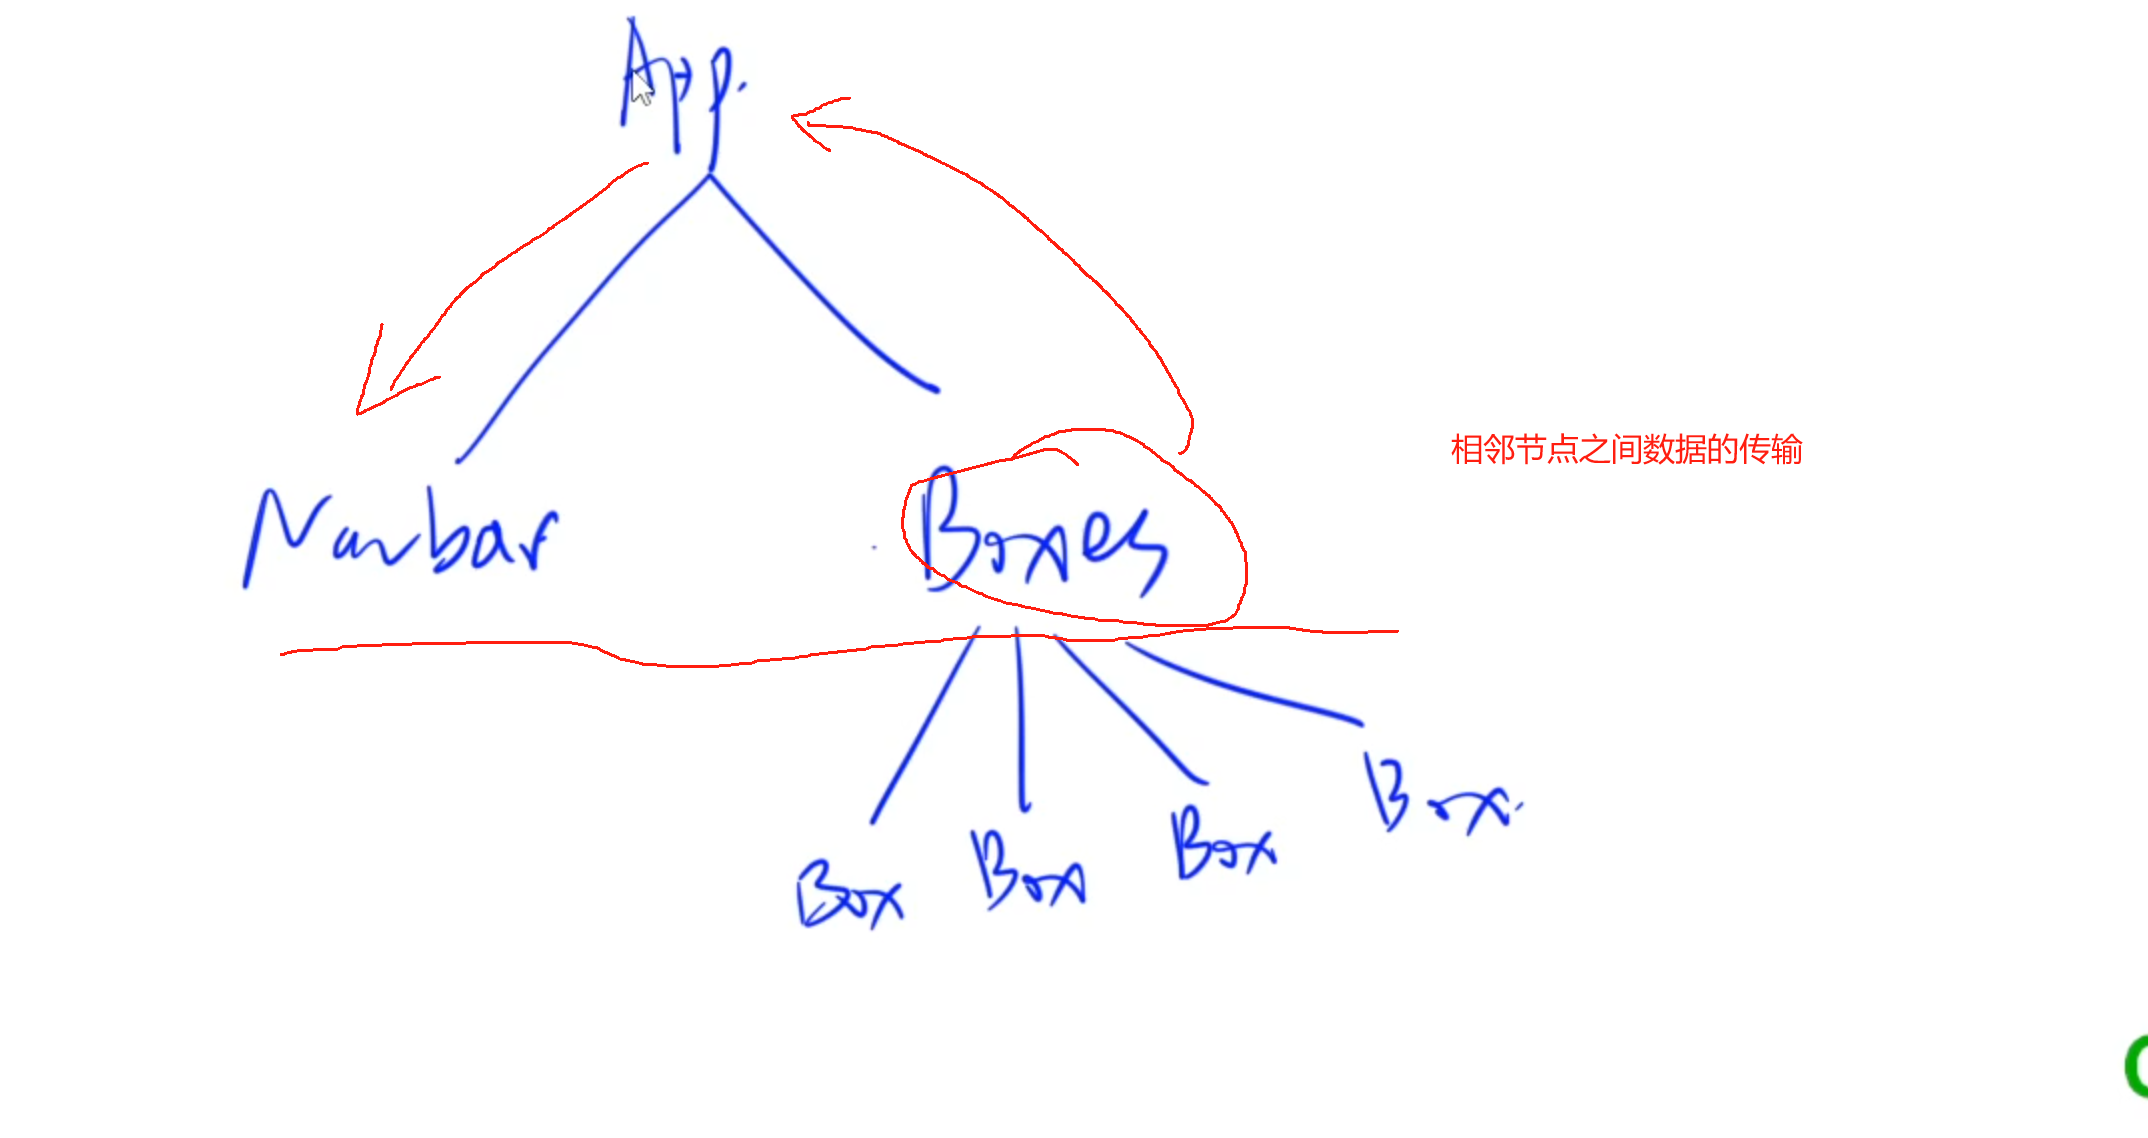
原本的DOM树中,比如两个组件之间的公共数据需要修改时,A组件修改数据使得B组件发生相应变化,需要将state数据提取到两个组件的最近公共祖先,然后两个组件同时绑定公共祖先内的state对应的数据,当层级较多时,这个关系维护起来就很麻烦:
比如这里想要在1号组件内修改数据使得2号组件的状态发生改变,就需要一步一步往上提取到APP中,整个公共数据的维护就很冗余和麻烦。
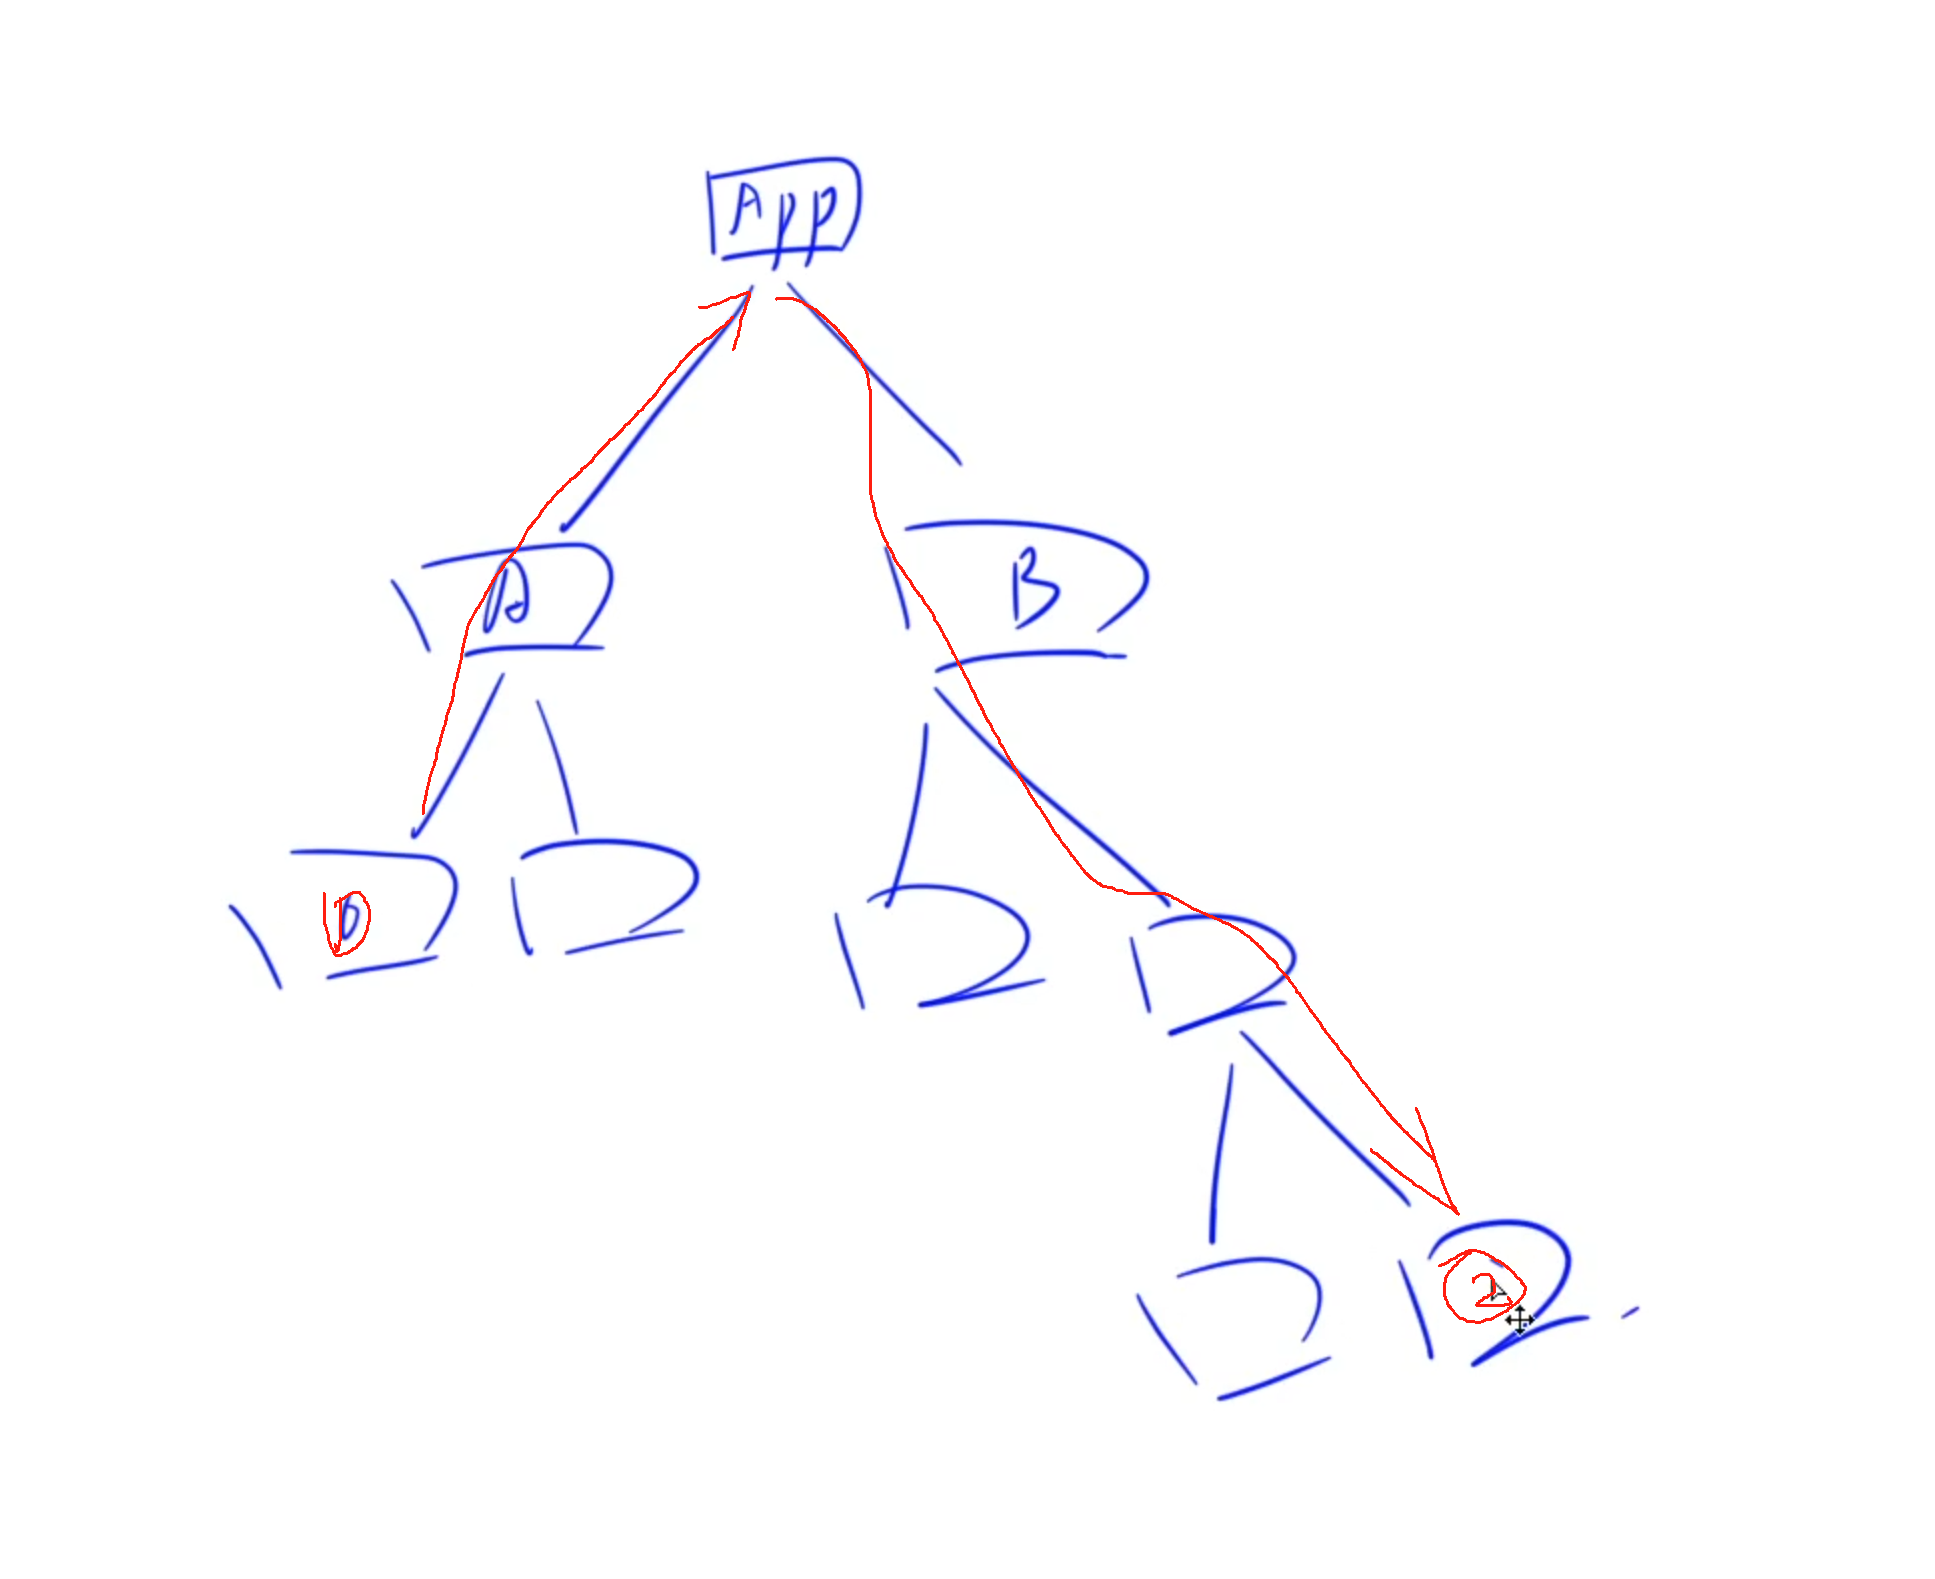
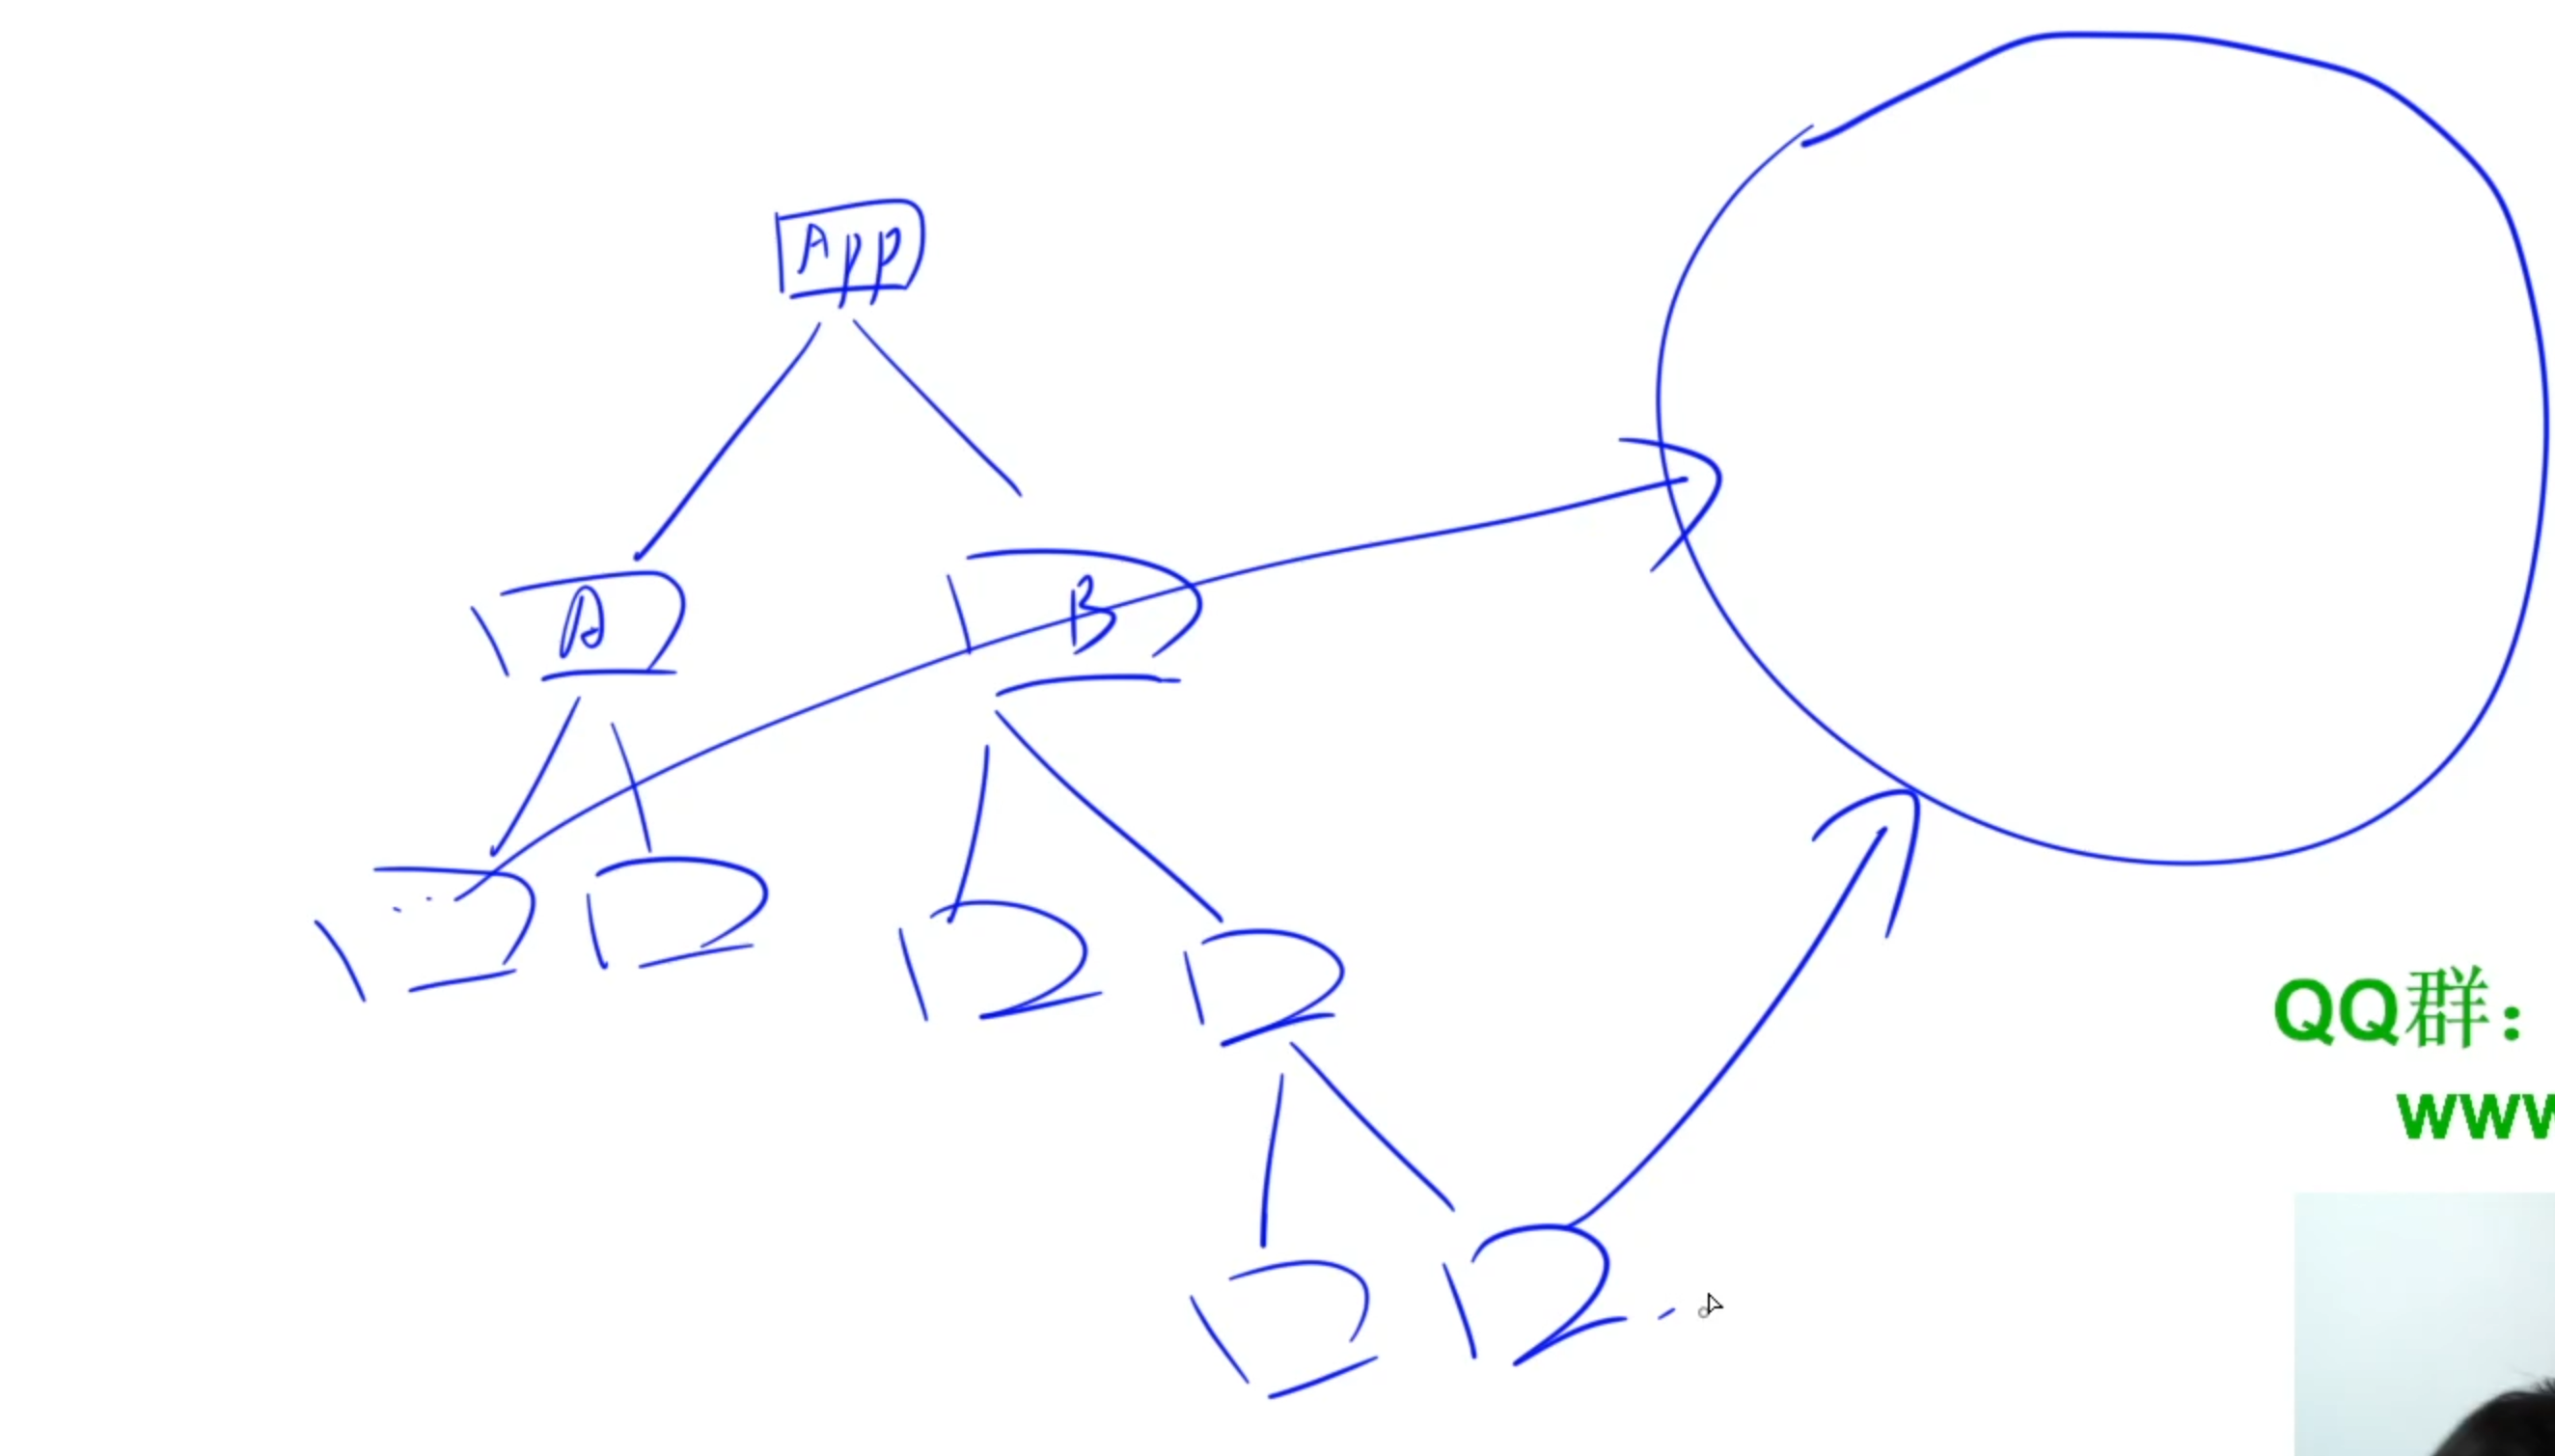
Redux的作用就是在整个DOM树之外,用一个专门的地方存放类似于全局变量的数据,也就是将不同组件之间可能需要交互的数据放到全局变量中。当两个组件需要交互时,就只需要这两个组件单独向该组件访问即可。
1)Redux基本概念
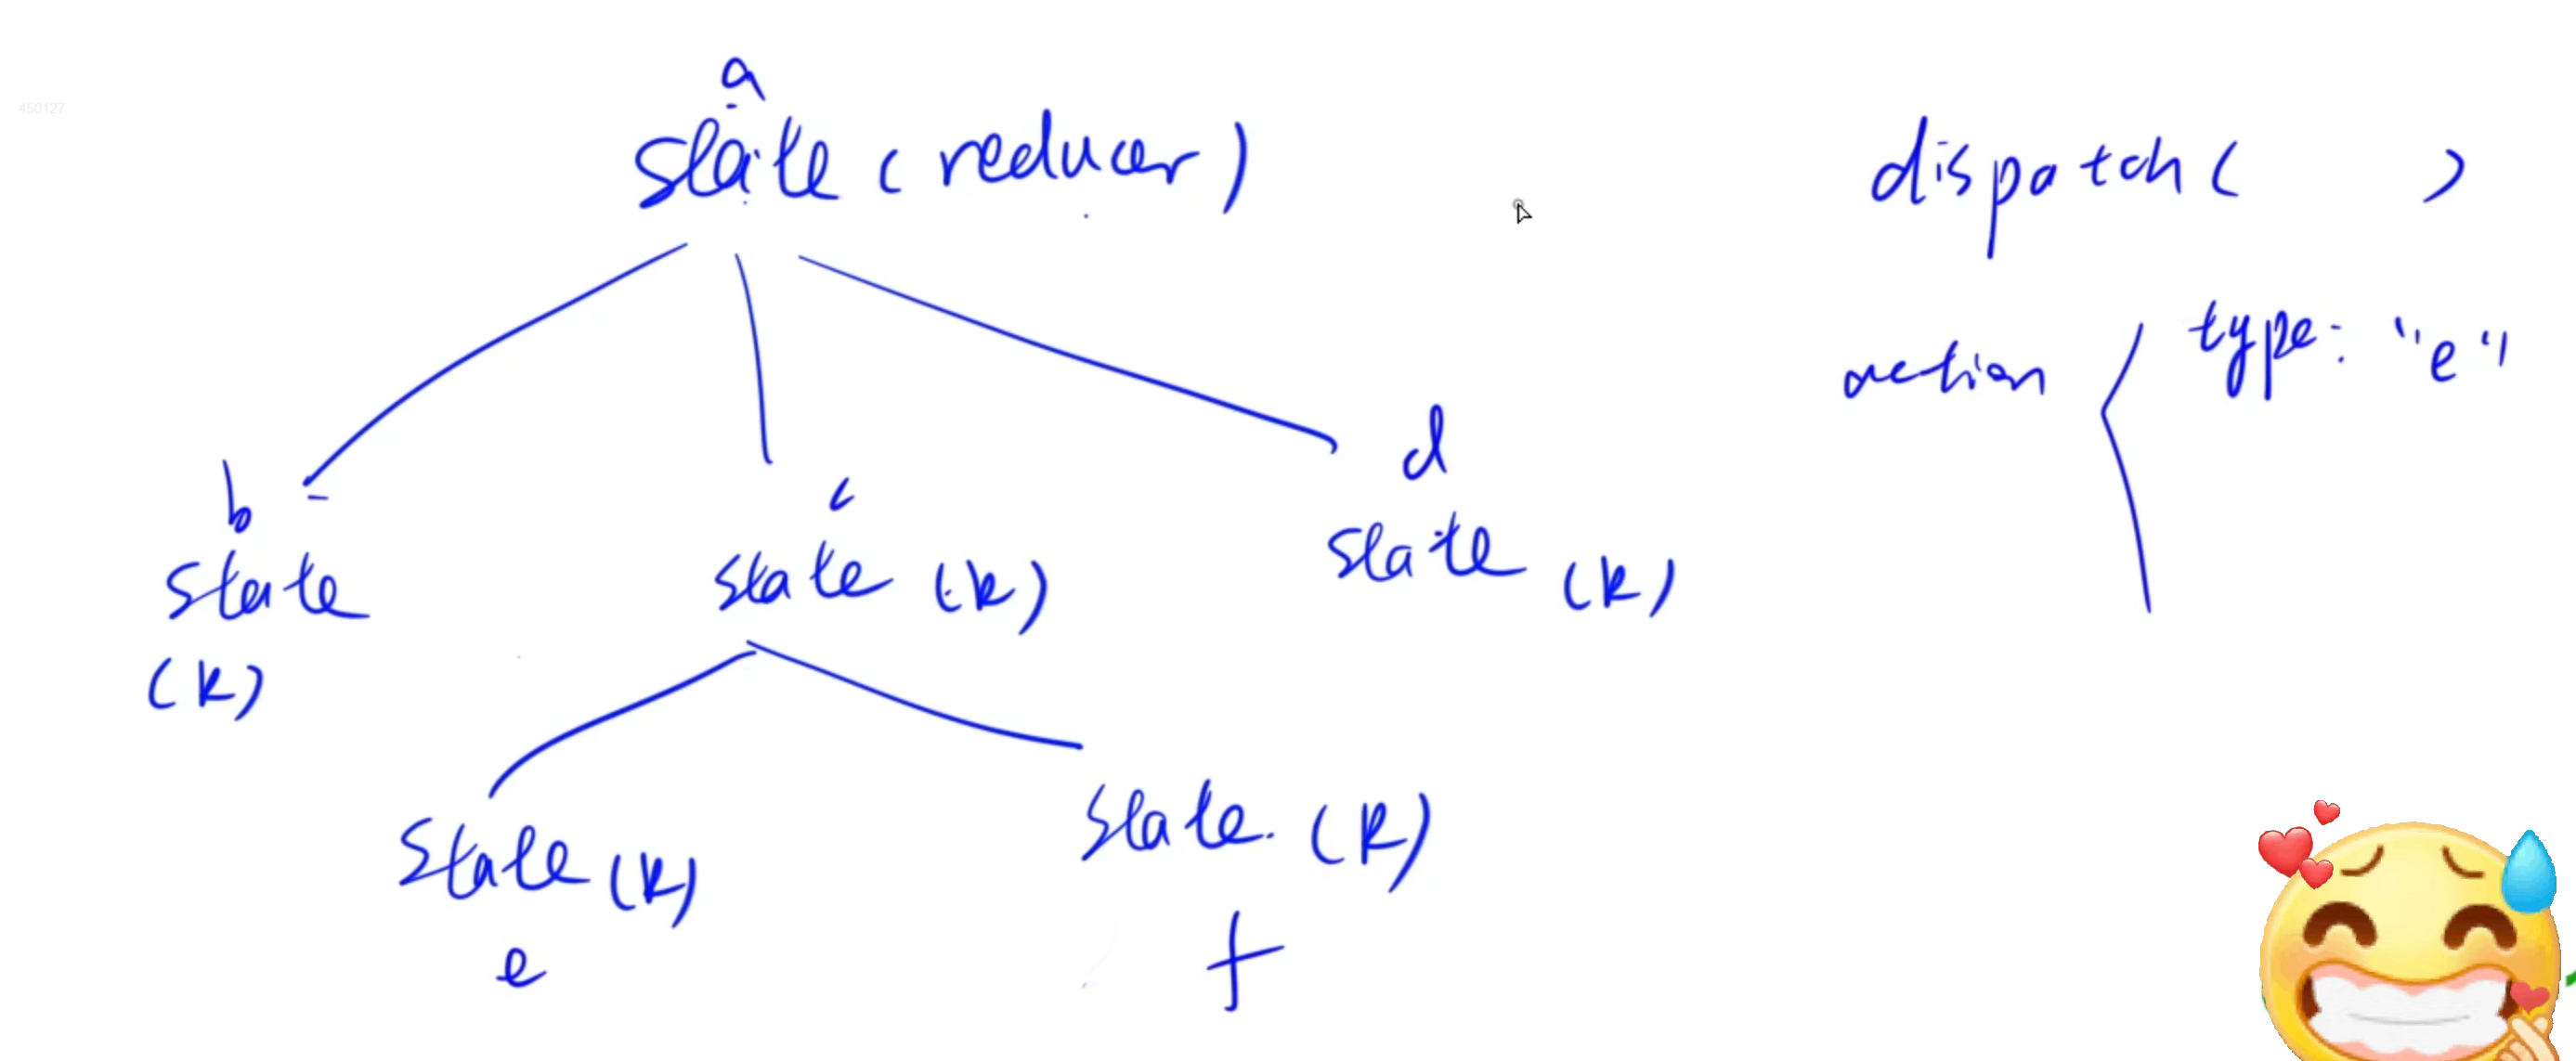
store:存储树结构state:维护的数据,一般维护成树的结构。reducer: 对state进行更新的函数,每个state绑定一个reducer。传入两个参数:当前state和action,返回新的state。action:一个普通对象,存储reducer的传入参数,一般描述对state的更新类型。dispatch:传入一个参数action,对整颗state树操作一遍。
当我们想要修改某个state的值时,会递归调用所有的reducer,同时根据action中对state的更新类型作对比,如果是当前节点对应类型则会更新当前节点的state的值。
2)React-Redux基本概念
Provider:用来包裹整个项目,其store属性用来存储redux的store对象connect(mapStateToProps, mapDispatchToProps)函数:用来将store与组件关联起来。mapStateToProps:每次store中的状态更新后调用一次,用来更新组件中的值mapDispatchToProps:组件创建时调用一次,用来将store的1dispatch函数传入组件。
redux相关依赖安装:
npm i redux react-redux @reduxjs/toolkit
3)快速入门
index.js:
import React from 'react';
import ReactDOM from 'react-dom/client';
import './index.css';
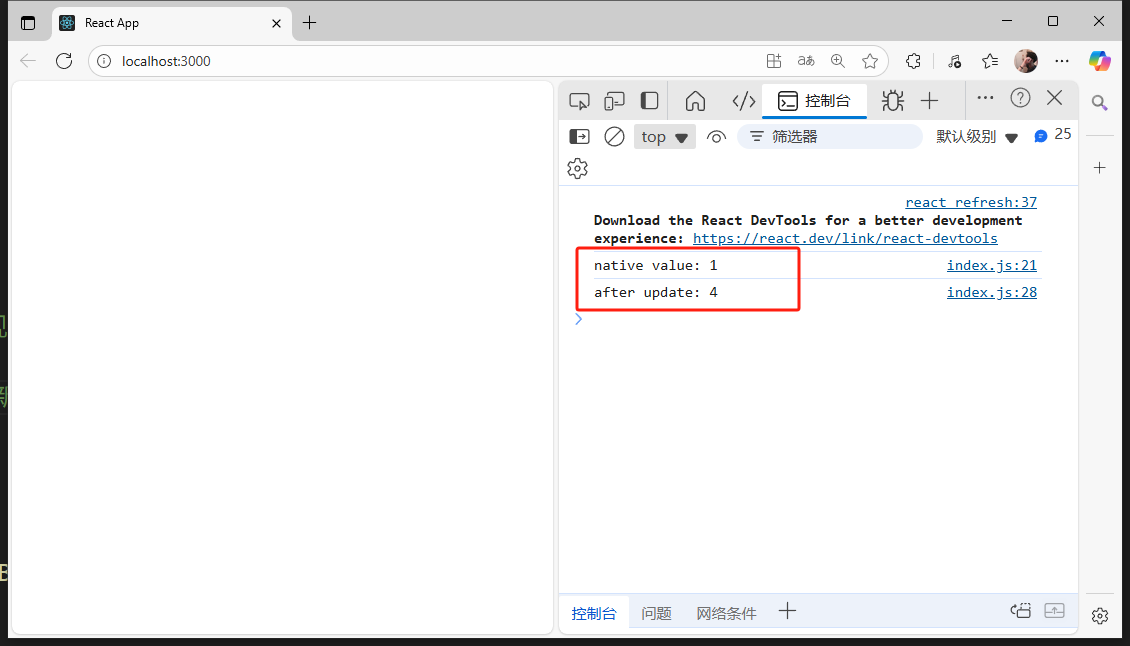
import { configureStore } from '@reduxjs/toolkit';const f1 = (state = 1, action) => {switch(action.type) {//规定对应类型执行怎么样的state更新操作case 'multiple':return state * 2;case 'cut':return state - 1;default:return state; }
};
const store = configureStore({reducer: f1
});console.log(`native value: ${store.getState()}`);//调用dispatch时传入action对象,对象中指定type,从而实现对应的更新
store.dispatch({type:'multiple'});
store.dispatch({type:'multiple'}); //多次调用则多次更新console.log(`after update: ${store.getState()}`);const root = ReactDOM.createRoot(document.getElementById('root'));
root.render(<React.StrictMode></React.StrictMode>
);state打印:
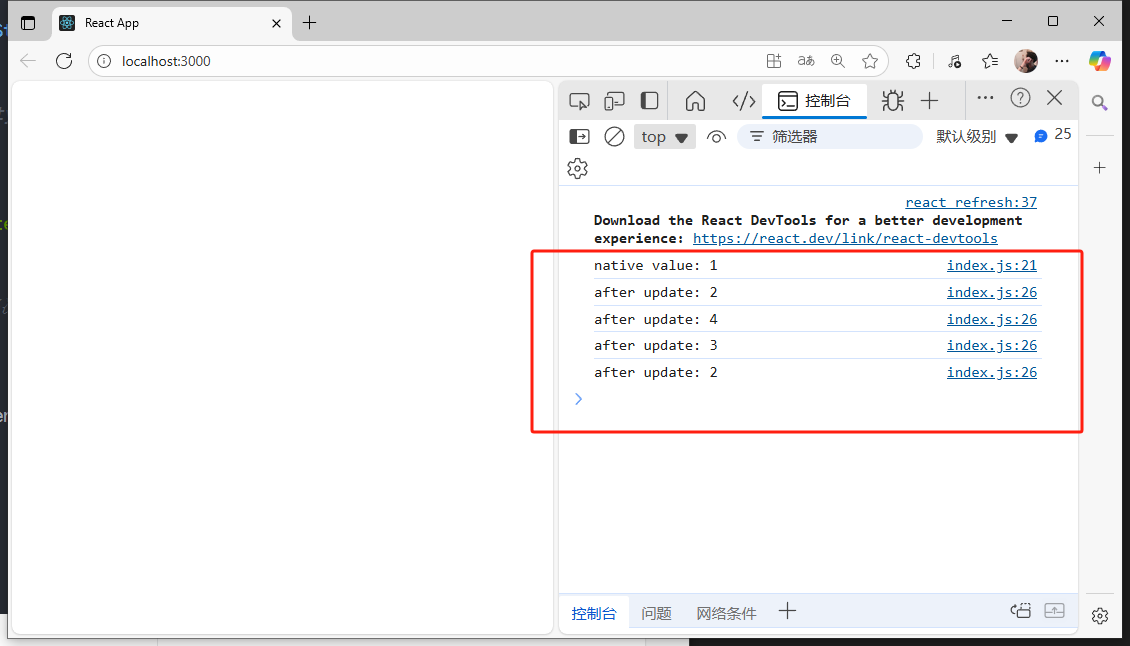
subscribe:
//每次dispatch更新之后会调用一次
store.subscribe(() => {console.log(`after update: ${store.getState()}`)})
import React from 'react';
import ReactDOM from 'react-dom/client';
import './index.css';
import { configureStore } from '@reduxjs/toolkit';const f1 = (state = 1, action) => {switch(action.type) {//规定对应类型执行怎么样的state更新操作case 'multiple':return state * 2;case 'cut':return state - 1;default:return state;    }
};
const store = configureStore({reducer: f1
});console.log(`native value: ${store.getState()}`);//调用dispatch时传入action对象,对象中指定type,从而实现对应的更新//每次dispatch更新之后会调用一次
store.subscribe(() => {console.log(`after update: ${store.getState()}`)})  store.dispatch({type:'multiple'});
store.dispatch({type:'multiple'}); //多次调用则多次更新
store.dispatch({type:'cut'});
store.dispatch({type:'cut'});const root = ReactDOM.createRoot(document.getElementById('root'));
root.render(<React.StrictMode></React.StrictMode>
);
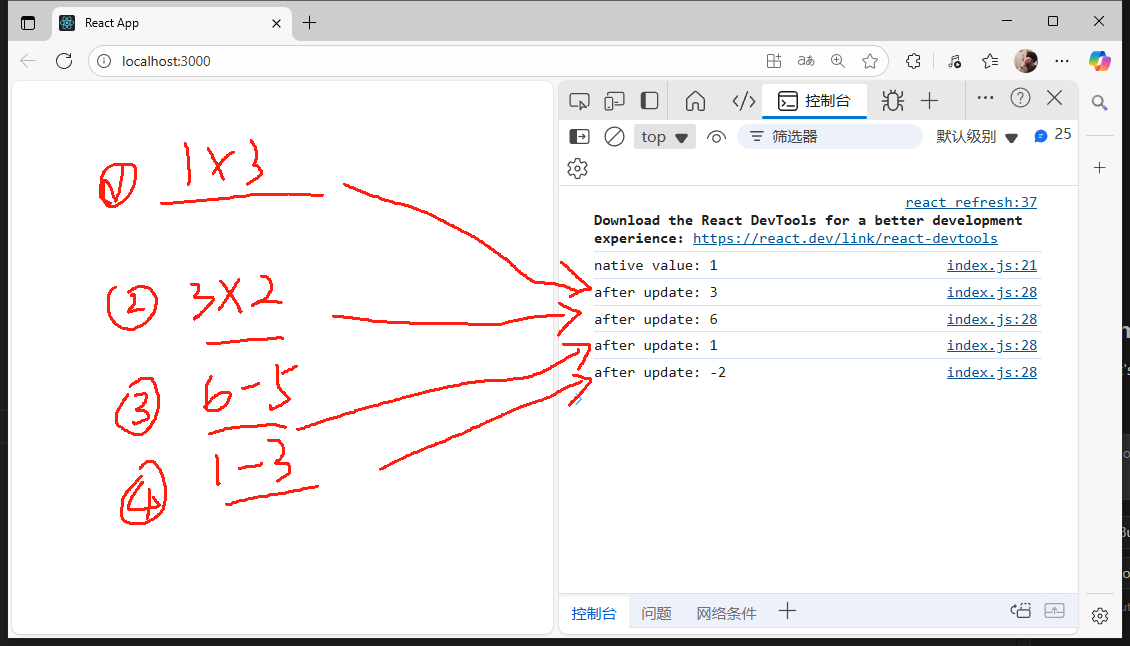
参数传入
import React from 'react';
import ReactDOM from 'react-dom/client';
import './index.css';
import { configureStore } from '@reduxjs/toolkit';const f1 = (state = 1, action) => {switch(action.type) {//规定对应类型执行怎么样的state更新操作case 'multiple':return state * action.value;case 'cut':return state - action.value;default:return state;    }
};
const store = configureStore({reducer: f1
});console.log(`native value: ${store.getState()}`);//调用dispatch时传入action对象,对象中指定type,从而实现对应的更新//每次dispatch更新之后会调用一次
store.subscribe(() => {console.log(`after update: ${store.getState()}`)})  store.dispatch({type:'multiple', value: 3});
store.dispatch({type:'multiple', value: 2}); //多次调用则多次更新
store.dispatch({type:'cut', value: 5});
store.dispatch({type:'cut', value: 3});const root = ReactDOM.createRoot(document.getElementById('root'));
root.render(<React.StrictMode></React.StrictMode>
);
子节点的状态更新
1.手动实现
具体看代码注释:
import React from 'react';
import ReactDOM from 'react-dom/client';
import './index.css';
import { configureStore } from '@reduxjs/toolkit';const f1 = (state = 1, action) => {switch(action.type) {//规定对应类型执行怎么样的state更新操作case 'multiple':return state * action.value;case 'cut':return state - action.value;default:return state;    }
};const f2 = (state = "", action) => {switch(action.type) {case 'concat':return state + action.character;default:return state;}
};//将两个state作为f3的子节点
const f3 = (state = {}, action) => {return {f1: f1(state.f1, action),f2: f2(state.f2, action),}
}//以f3作为树根
const store = configureStore({reducer: f3
});console.log(`native value: ${store.getState()}`);//调用dispatch时传入action对象,对象中指定type,从而实现对应的更新//每次dispatch更新之后会调用一次
store.subscribe(() => {console.log(store.getState())})  store.dispatch({type:'multiple', value: 3});
store.dispatch({type:'multiple', value: 2});
store.dispatch({type:'cut', value: 5});
store.dispatch({type:'cut', value: 3});//同样是调用树根的值,传入type实现不同子节点的状态更新
store.dispatch({type: 'concat', character: "this is concat result "})
store.dispatch({type: 'concat', character: "this is concat result "})const root = ReactDOM.createRoot(document.getElementById('root'));
root.render(<React.StrictMode></React.StrictMode>
);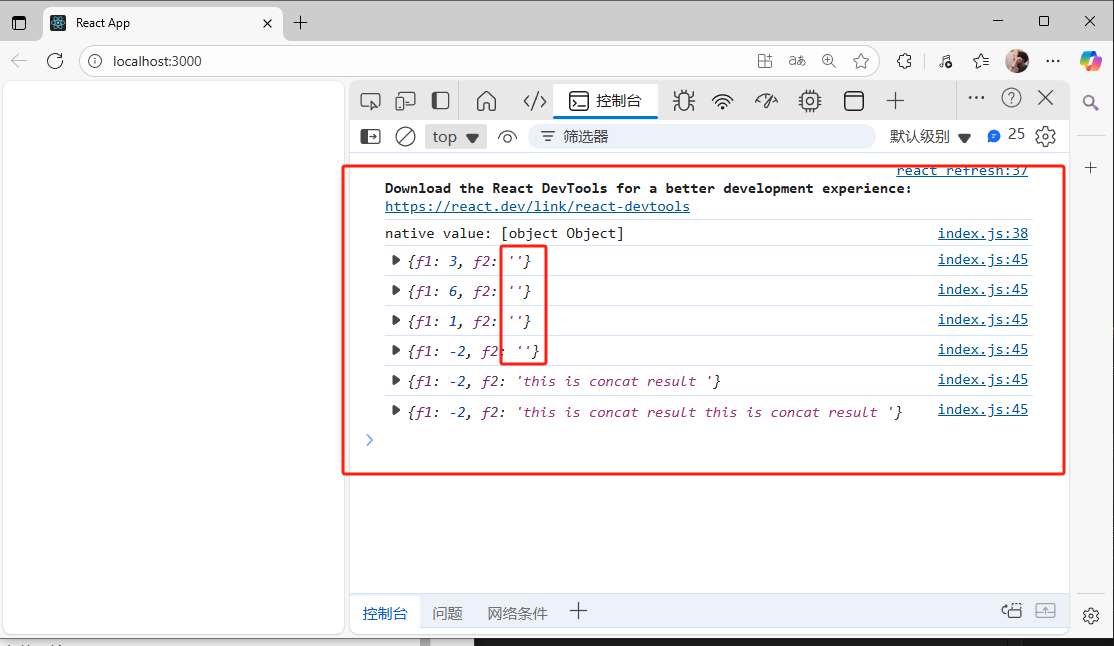
2.API实现
combineReducers:
直接使用该API效果和上面手动实现的效果一致。
import React from 'react';
import ReactDOM from 'react-dom/client';
import './index.css';
import { configureStore } from '@reduxjs/toolkit';
import { combineReducers } from '@reduxjs/toolkit';const f1 = (state = 1, action) => {switch(action.type) {//规定对应类型执行怎么样的state更新操作case 'multiple':return state * action.value;case 'cut':return state - action.value;default:return state;    }
};const f2 = (state = "", action) => {switch(action.type) {case 'concat':return state + action.character;default:return state;}
};// //将两个state作为f3的子节点
// const f3 = (state = {}, action) => {
//   return {
//     f1: f1(state.f1, action),
//     f2: f2(state.f2, action),
//   }
// }const f3 = combineReducers({f1: f1,f2: f2,
});//以f3作为树根
const store = configureStore({reducer: f3
});console.log(`native value: ${store.getState()}`);//调用dispatch时传入action对象,对象中指定type,从而实现对应的更新//每次dispatch更新之后会调用一次
store.subscribe(() => {console.log(store.getState())})  store.dispatch({type:'multiple', value: 3});
store.dispatch({type:'multiple', value: 2});
store.dispatch({type:'cut', value: 5});
store.dispatch({type:'cut', value: 3});//同样是调用树根的值,传入type实现不同子节点的状态更新
store.dispatch({type: 'concat', character: "this is concat result "})
store.dispatch({type: 'concat', character: "this is concat result "})const root = ReactDOM.createRoot(document.getElementById('root'));
root.render(<React.StrictMode></React.StrictMode>
);
4)实战演练
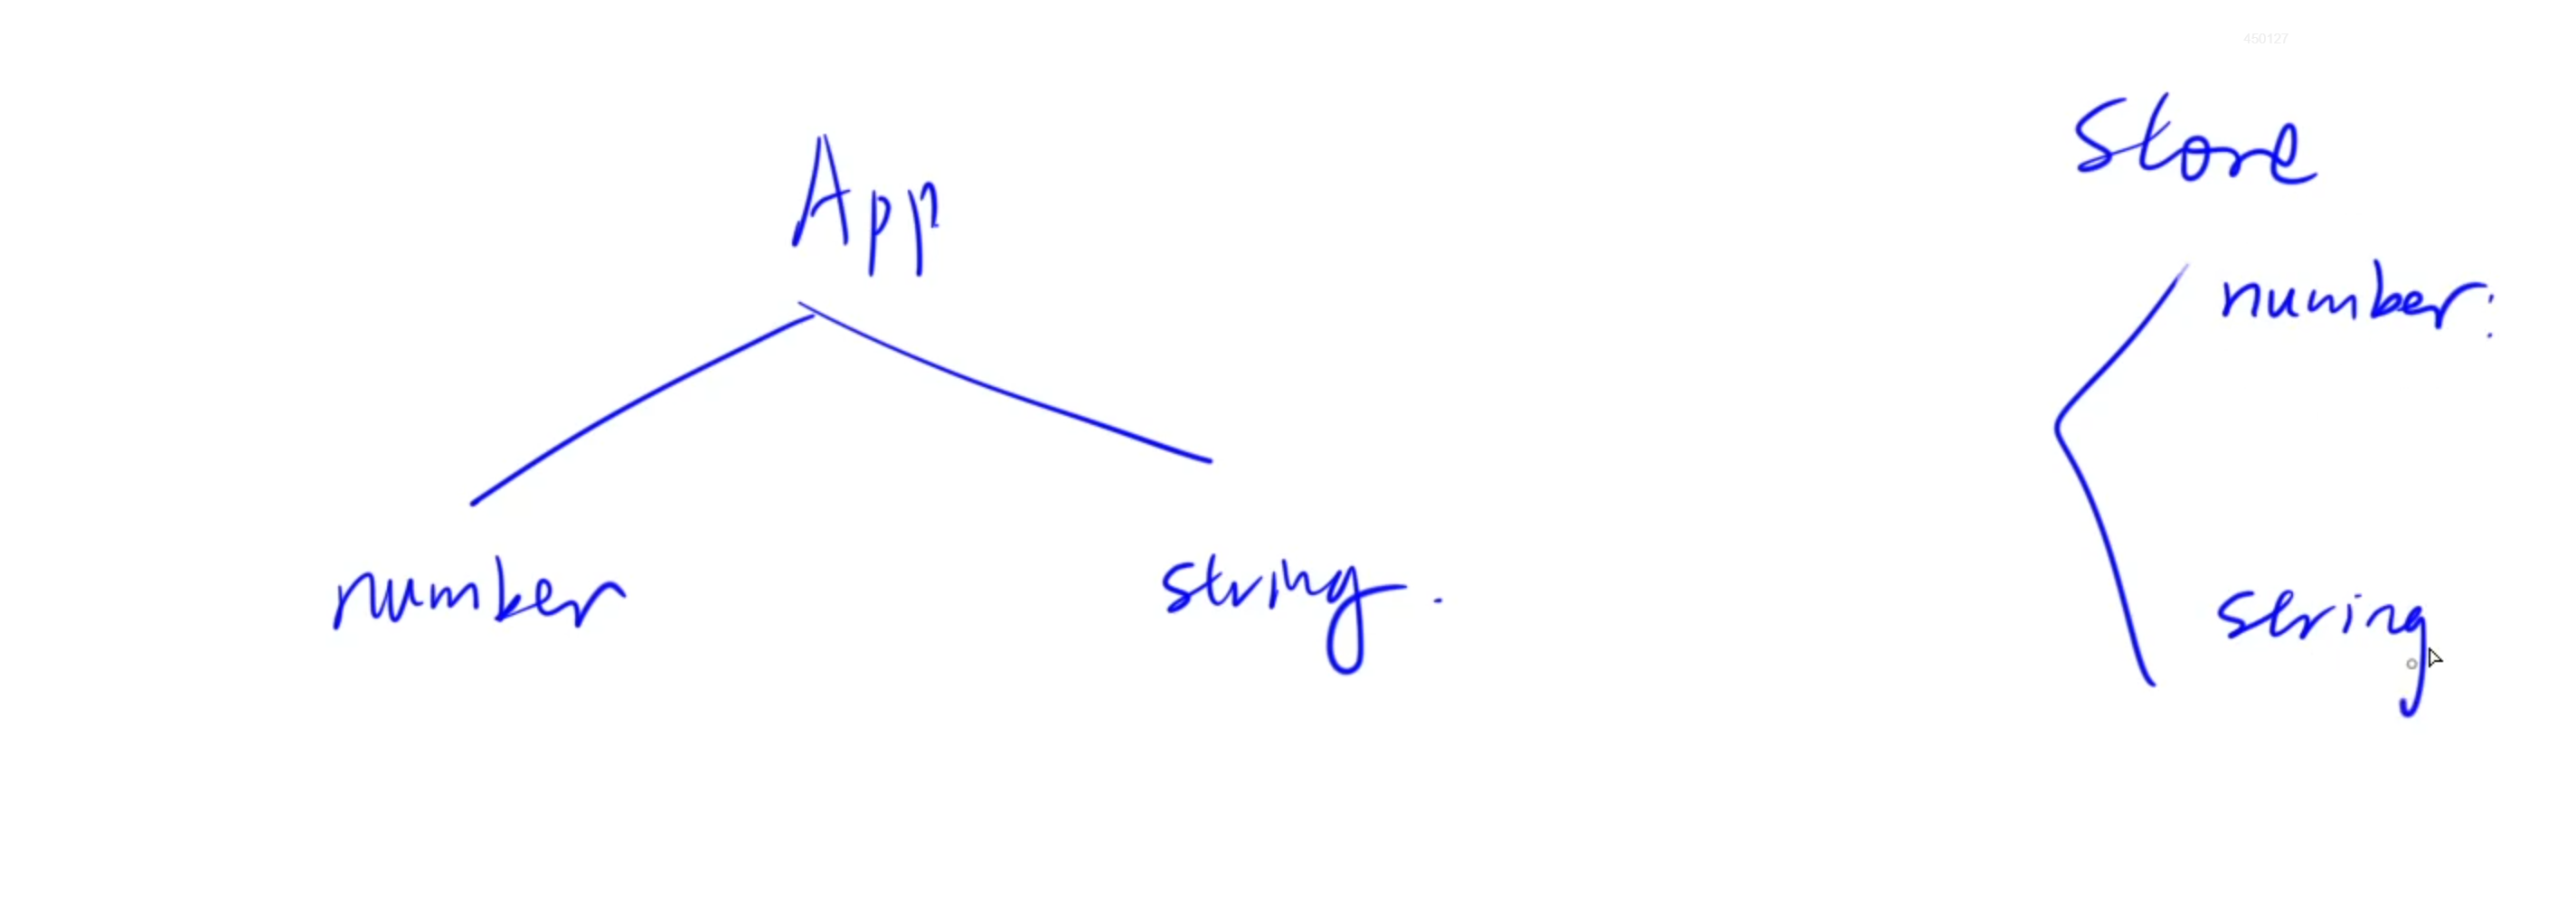
实现一个app:
- 包含两个组件:number和string
- 在
number组件中可以通过添加按钮,给string组件中的内容添加指定的内容 - 在
string组件中可以通过加或者减按钮,给number组件中的x增加或者减去指定内容
分析: - 首先使用redux去维护每个组件的state值,通过传入action对象指定操作类型,从而实现指定组件的state更新
- 需要将state值从redux中取出并显示在组件中(访问存储的全局变量):通过
connect(mapStateToProps)将store与组件关联起来。每次store中的状态更新后调用一次,用来更新组件中的值。 - 按下按钮后,修改对应组件中的state值,也就是如何更新全局变量:
说明:
mapStateToProps:将state映射到props中,用来更新组件中的值mapDispatchToProps:将dispatch函数映射到props中,用来操作改变组件中的值
1.index.js:
import React from 'react';
import ReactDOM from 'react-dom/client';
import './index.css';
import { configureStore } from '@reduxjs/toolkit';
import { combineReducers } from '@reduxjs/toolkit';
import App from './components/app';import { Provider } from 'react-redux';const f1 = (state = 0, action) => {switch(action.type) {//规定对应类型执行怎么样的state更新操作case 'add':return state + action.value;case 'cut':return state - action.value;default:return state;    }
};const f2 = (state = "the concat string is:", action) => {switch(action.type) {case 'concat':return state + action.character;default:return state;}
};}const f3 = combineReducers({number: f1,string: f2,
});//以f3作为树根
const store = configureStore({reducer: f3
});
const root = ReactDOM.createRoot(document.getElementById('root'));
root.render(<Provider store={store}><App /></Provider>
);2.app.jsx:
import React, { Component } from 'react';
import Number from './number';
import String from './string';class App extends Component {state = {  } render() { return (<React.Fragment><Number /><hr /><String /></React.Fragment>);}
}export default App;
3.number.jsx:
import React, { Component } from 'react';
import { connect } from 'react-redux';class Number extends Component {state = {  } handleClick = () => {this.props.concat('y ');console.log("click concat");}render() { console.log(this.props);return (<React.Fragment><h3>Nubmer:</h3><div>{this.props.number}</div><button onClick={this.handleClick}>添加</button></React.Fragment>);}
}//将state绑定到参数中
const mapStateToProps = (state, props) => {return {number: state.number,}
}//将dispatch函数绑定到props上
const mapDisPatchToProps =  {concat: (c) => {return {type: 'concat',character: c,}}
}export default connect(mapStateToProps, mapDisPatchToProps)(Number);
4.string.jsx:
import React, { Component } from 'react';
import { connect } from 'react-redux';class String extends Component {state = {  } handleClickAdd = () => {this.props.add(10);console.log("click add");}handleClickCut = () => {this.props.cut(1);console.log("click cut");}render() { return (<React.Fragment><h3>String:</h3><div>{this.props.string}</div><button onClick={this.handleClickAdd}>加</button><button onClick={this.handleClickCut}>减</button></React.Fragment>);}
}const mapStateToProps = (state, props) => {return {string: state.string,};
};const mapDisPatchToProps =  {add: (c) => {return {type: 'add',value: c,}},cut: (c) => {return {type: 'cut',value: c,}}
};export default connect(mapStateToProps, mapDisPatchToProps)(String);
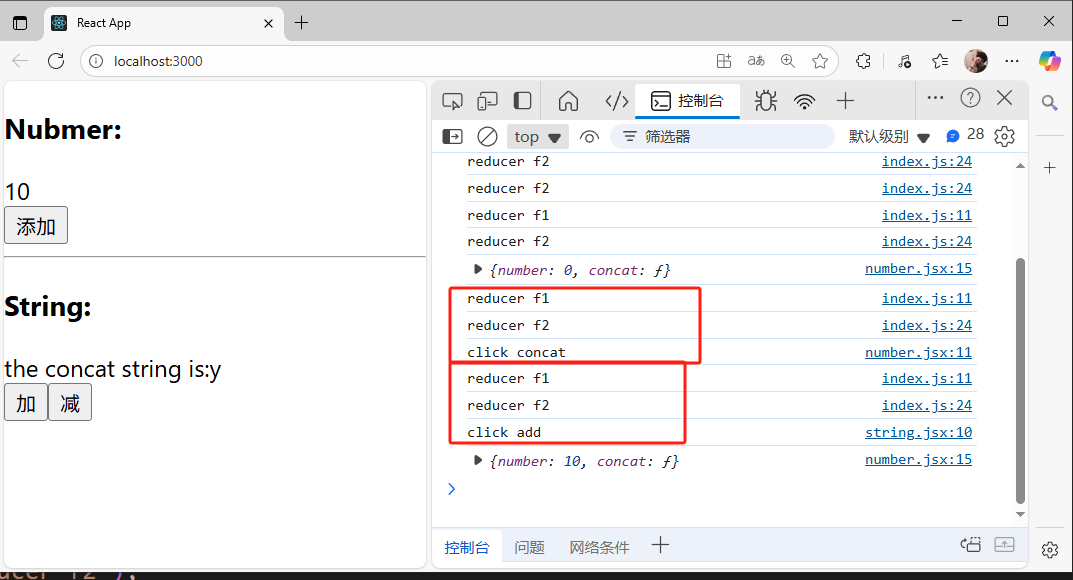
效果展示:

过程解释
整个流程分为两步(以string的操作为例):
-
1.数值的改变
点击添加按钮 ->调用handleClick函数->handleClick函数触发this.props.concat(通过mapDispatchToProps将concat绑定到props上)->concat函数会返回一个对象(包含type:concat和参数:c) ->通过connect(mapDispatchToProps)会传递到所有节点的reducer上,这里concat返回的对象就会作为action传入reducer中,对于f1来说,会对比type发现均不匹配,所以无操作,对于f2来说,type与concat匹配,于是会执行对应的state操作 ->完成f2的操作,在原本的state值上添加传入的参数字符 -
2.数值的更新同步
store是根节点,由于store传入到了<Provider>组件中,于是会重新渲染整个Provider组件-> 重新渲染App组件->String组件-> 通过mapStateToProps已经将f3中的string代表的state绑定到了String组件的props中-> 通过this.props.string获取到更新之后的state->完成同步
注意这里不管调用那个组件的参数更新,都会将所有的reducer执行一遍
11. React实战项目——计算器
总体效果预览:

1.创建项目以及配置环境
- 1.创建app:
create-react-app calculator-app - 2.配置环境:
- 配置redux,用于组件之间的交互:
npm i redux react-redux @reduxjs/toolkit - 配置路由router:
npm i react-router-dom - 配置bootstrap,前端常用样式库:
npm i bootstrap,文件中引入bootstrap:import 'bootstrap/dist/css/bootstrap.css';
- 配置redux,用于组件之间的交互:
- 3.启动项目:进入calculator-app文件夹,运行git bash,执行
npm start
2.创建各个组件以及建立路由
- 需要用到路由的组件必须:
- 引入:
import { BrowserRouter } from 'react-router-dom'; - 将该组件使用
<BrowserRouter>组件包裹起来,比如:
- 引入:
<BrowserRouter><App />
</BrowserRouter>
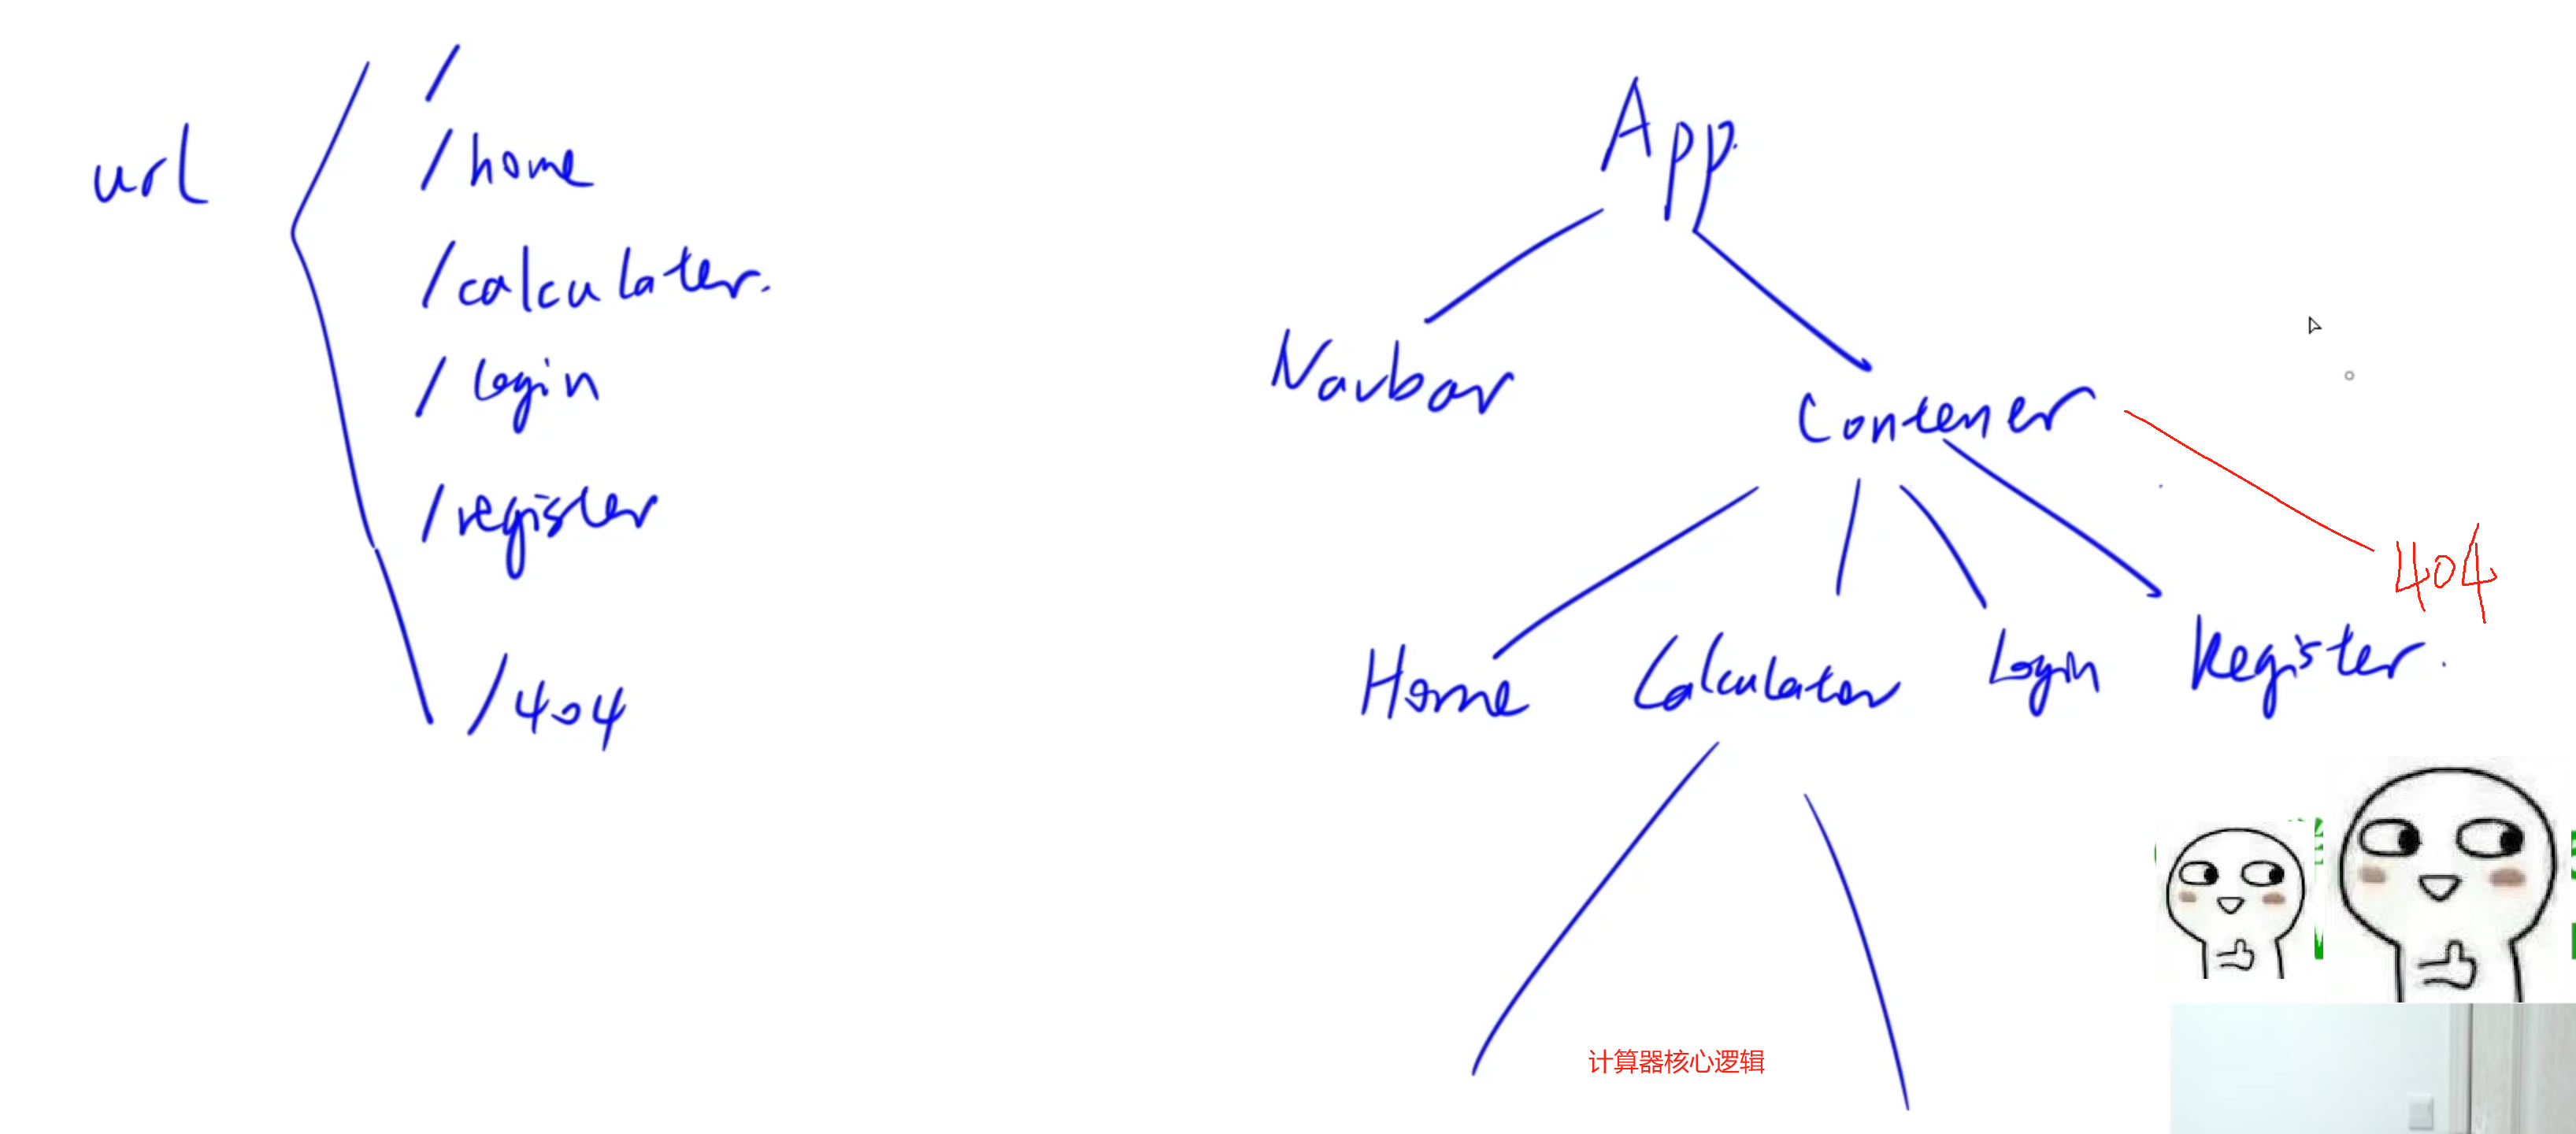
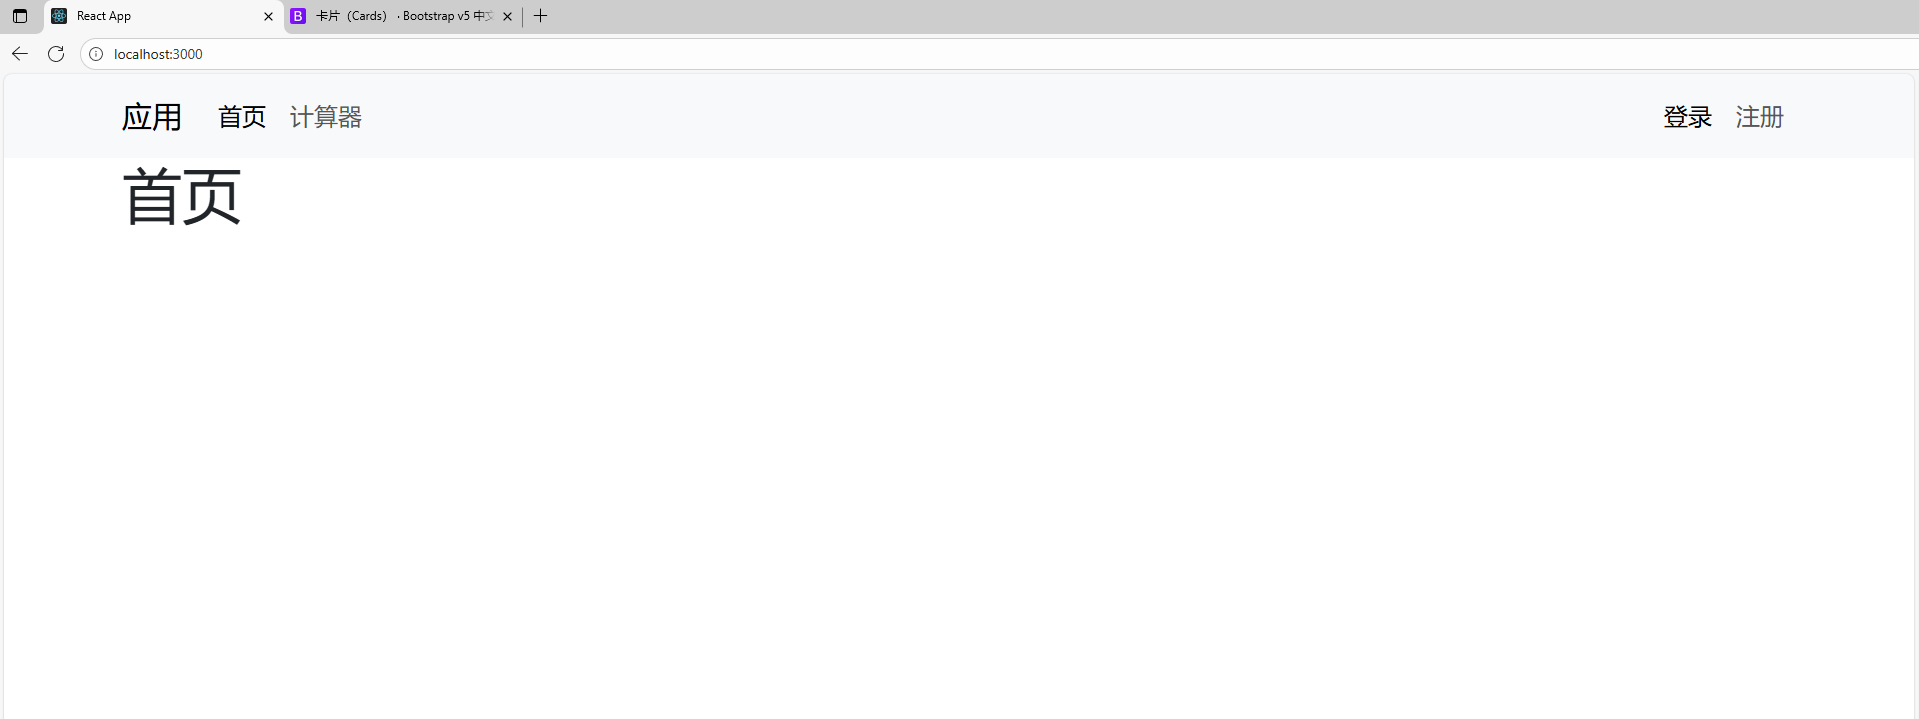
1.url的切换
创建navbar.jsx来实现各个组件之间的url的转换:
- 1.在bootstrap官网找到合适的样式,并复制过来,将class改为className
- 2.添加并修改对应的内容,使得符合预期样式:
- 3.写路由:引入Link:
import { Link } from 'react-router-dom'; - 4.将所有需要路由跳转的地方用
<Link>包围,to属性写上跳转的url地址:比如to='/login'表示会跳转到localhost:3000/login
navbar.jsx:
import React, { Component } from 'react';
import { Link } from 'react-router-dom';class NavBar extends Component {state = {  } render() { return (<nav className="navbar navbar-expand-lg bg-body-tertiary"><div className="container"><Link className="navbar-brand" to='/'>应用</Link><button className="navbar-toggler" type="button" data-bs-toggle="collapse" data-bs-target="#navbarText" aria-controls="navbarText" aria-expanded="false" aria-label="Toggle navigation"><span className="navbar-toggler-icon"></span></button><div className="collapse navbar-collapse" id="navbarText"><ul className="navbar-nav me-auto mb-2 mb-lg-0"><li className="nav-item"><Link className="nav-link active" aria-current="page" to='/'>首页</Link></li><li className="nav-item"><Link className="nav-link" to='/calculator'>计算器</Link></li></ul><ul className="navbar-nav"><li className="nav-item"><Link className="nav-link active" aria-current="page" to='/login'>登录</Link></li><li className="nav-item"><Link className="nav-link" to='register'>注册</Link></li></ul></div></div></nav>);}
}export default NavBar;
2.页面跳转
新建components文件夹,并在文件夹中依次创建:home.jsx, login.jsx, register.jsx, notFound.jsx, calculator.jsx
创建出Home, Login, Register, Calculator, NotFound五个组件,并导入到app.jsx中:
导入<Routes>和<Route>:
import { Route, Routes, Navigate } from 'react-router-dom';
其中:如果不属于定义的url则需要实现重定向到404url展示NotFound组件
<Route path="*" element={ <Navigate replace to="/404" /> } />
app.jsx:
import React, { Component } from 'react';
import NavBar from './navbar';
import { Route, Routes, Navigate } from 'react-router-dom';
import Home from './content/home';
import Login from './content/login';
import Register from './content/register';
import Calculator from './content/calculator';
import NotFound from './content/notFound';class App extends Component {state = {  } render() { return (<React.Fragment><NavBar /><div className='container'><Routes><Route path='/' element={ <Home /> } /><Route path='/login' element={ <Login /> } /><Route path='/register' element={ <Register /> } /><Route path='/calculator' element={ <Calculator /> } /><Route path='/404' element={ <NotFound /> } /><Route path="*" element={ <Navigate replace to="/404" /> } /></Routes></div></React.Fragment>);}
}export default App;
3.组合组件以及Redux应用
这的计算器实现主要由calculator.jsx来完成计算器前端显示以及数据的交互:
calculator.jsx:
import React, { Component } from 'react';
import Base from './base';
import { connect } from 'react-redux';
import NumberButton from './calculator/numberButton';
import OperationButton from './calculator/operationButton';
import ACTIONS from '../../redux/action';class Calculator extends Component {state = { formater: Intl.NumberFormat('en-us')};format = number => {if (number === "") return "";//将一个数分为整数部分和小数部分const [integer, decimal] = number.split('.');//如果小数部分不存在,就只返回整数部分的formatif (decimal === undefined) {return this.state.formater.format(integer);}//否则的话整数部分format,小数部分保持不变return `${this.state.formater.format(integer)}.${decimal}`;}render() { return (<Base><div className="calculator"><div className='screen'><div className='up-screen'>{this.format(this.props.lastResult)} {this.props.operation}</div><div className='down-screen'>{this.format(this.props.currentResult)}</div></div><button className='button-AC' onClick={this.props.clear}>AC</button><button onClick={this.props.delete_number}>Del</button><OperationButton operation={'÷'} /> <NumberButton  className='button-number' number={'7'} /><NumberButton  className='button-number' number={'8'} /><NumberButton  className='button-number' number={'9'} /><OperationButton operation={'×'} /> <NumberButton  className='button-number' number={'4'} /><NumberButton  className='button-number' number={'5'} /><NumberButton  className='button-number' number={'6'} /><OperationButton operation={'-'} /><NumberButton  className='button-number' number={'1'} /><NumberButton  className='button-number' number={'2'} /><NumberButton  className='button-number' number={'3'} /><OperationButton operation={'+'} /><NumberButton  className='button-number' number={'0'} /><NumberButton  className='button-number' number={'.'} /><button className='button-equal' onClick={this.props.evaculate}>=</button></div></Base>);}
}const mapStateToProps = (state, props) => {return {currentResult: state.currentResult,lastResult: state.lastResult,operation: state.operation,}
}const mapDispatchToProps = {delete_number: () => {return {type: ACTIONS.DELETE_NUMBER,}},clear: () => {return {type: ACTIONS.CLEAR,}},evaculate: () => {return {type: ACTIONS.EVACULATE,}}
}export default connect(mapStateToProps, mapDispatchToProps)(Calculator);
1.在index.css中定义按钮以及计算器页面样式:
body {margin: 0;font-family: -apple-system, BlinkMacSystemFont, 'Segoe UI', 'Roboto', 'Oxygen','Ubuntu', 'Cantarell', 'Fira Sans', 'Droid Sans', 'Helvetica Neue',sans-serif;-webkit-font-smoothing: antialiased;-moz-osx-font-smoothing: grayscale;
}code {font-family: source-code-pro, Menlo, Monaco, Consolas, 'Courier New',monospace;
}* {box-sizing: border-box;
}.calculator {display: grid;grid-template-columns: repeat(4, 6rem);grid-template-rows: minmax(6rem, auto) repeat(5, 4rem);gap: 1px;background-color: rgba(191, 191, 191, 0.75);width: calc(24rem + 5px);margin: 0 auto;border: 2px solid black;}.button-AC {grid-column: 1 / span 2;
}
.button-equal {grid-column: 3 / span 2;
}.button-number {background-color: white
}.screen {grid-column: 1 / span 4;display: flex;flex-direction: column;align-items: flex-end;justify-content: space-around;padding: 10px;word-wrap: break-word;word-break: break-all;
}.up-screen {font-size: 1rem;
}.down-screen {font-size: 3rem;
}.calculator > button:hover {background-color: #b5b5b5;
}
2.组合Components:
1)数字按键组件numberButton
对于数字键来说,按下数字键就会将数字键对应的数字添加到输入结果中,于是将他们的逻辑全部抽取成一个NumberButton组件:
numberButton.jsx:
import React, { Component } from 'react';
import ACTIONS from '../../../redux/action';
import { connect } from 'react-redux';//将点击按钮对应的内容添加到对应的状态上
class NumberButton extends Component {state = {  } render() { return (//当点击这个按钮时,会获取这个按钮的内容,作为参数传入add_number中<button onClick={() => this.props.add_number(this.props.number)}>{this.props.number}</button>);}
}const mapDispatchToProps = {//add_number已经绑定到Dispatch中,会将对应的type传到reducer中进行匹配add_number: number => {return {type: ACTIONS.ADD_NUMBER,number: number,}}
}export default connect(null, mapDispatchToProps)(NumberButton);
2)运算符按键组件operationButton
对于加减乘除四个按键来说,按下时,也就是执行对应的运算逻辑,所以也可以统一抽取为一个组件operationButton:
operationButton.jsx:
import React, { Component } from 'react';
import ACTIONS from '../../../redux/action';
import { connect } from 'react-redux';class OperationButton extends Component {state = {  } render() { return (<button onClick={() => {this.props.choose_operation(this.props.operation)}}>{this.props.operation}</button>);}
}const mapDispatchToProps = {choose_operation: operation => {return {type: ACTIONS.CHOOSE_OPERATION,operation: operation,}}
}export default connect(null, mapDispatchToProps)(OperationButton);
最后只需要将对应的按键用组件进行包围即可完成高效的复用。
3.Redux使用五个行为维护四个状态
1)创建store树根
store.js:
import { configureStore } from "@reduxjs/toolkit";
import reducer from "./reducer";const store = configureStore({reducer: reducer,
});export default store;
2)定义静态的行为集合
action.js:
const ACTIONS = {ADD_NUMBER: "add-number",DELETE_NUMBER: "delete-number",CHOOSE_OPERATION: "choose-operation",CLEAR: "clear",EVACULATE: "evaculate"
};export default ACTIONS;
3)reducer触发每个状态的更新
reducer.js:
import ACTIONS from "./action";const evaluate = state => {let {lastResult, operation, currentResult} = state;let last = parseFloat(lastResult);let cur = parseFloat(currentResult);let res = 0;switch(operation) {case '+':res = last + cur;break;case '-':res = last - cur;break;case '÷':res = last / cur;break;case '×':res = last * cur;break; }return res.toString();
}const reducer = (state={currentResult: "",lastResult: "",operator: "",overwrite: false,  //用于判断当前输入结果是否需要覆盖,默认为false,只有按下等号得到结果之后,再输入内容才需要覆盖
}, action) => {switch(action.type) {case ACTIONS.ADD_NUMBER://如果overwrite为true,则说明这是在计算结果之后输入数字//需要将计算结果清空,输入结果显示为当前输入的数字if (state.overwrite) {   return {...state,currentResult: action.number,overwrite: false,}}//如果当前的显示为0,并且当前位也为0,则说明是00,则不添加if (state.currentResult === '0' && action.number === '0') {return state;}//当前结果为0,如果下一位不是'.',构成'0.x'的话,说明是'0x',直接替换掉0,变成'x'if (state.currentResult === '0' && action.number !== '.') {return {...state,currentResult: action.number,}}//如果输入的结果是包含'.'的,则再次点击'.'则不添加if (action.number === '.' && state.currentResult.includes('.')) {return state;}//如果当前输入的结果直接是'.'则需要在前面补上'0'变成'0.'if (action.number === '.' && state.currentResult === "") {return {...state,currentResult: "0" + action.number,}}return {...state,currentResult: state.currentResult + action.number,}case ACTIONS.DELETE_NUMBER://当得到计算结果再按del键时,应该将计算结果作为一个整体删除,而不是一位一位删除if (state.overwrite) {return {...state,currentResult: "",overwrite: false,}}//当前输入结果为空时,就不需要再删除了if (state.currentResult === "") {return state;}return {...state,//slice(0, -1):删除从0开始的-1个元素,也就是把这个结果的最后一个元素删除currentResult: state.currentResult.slice(0, -1),}case ACTIONS.CHOOSE_OPERATION://如果上一个计算结果为0,并且当前的输入结果也是空的,则不添加if (state.lastResult === "" && state.currentResult === "") {return state;}//当上面没有结果,并且输入结果不为空,但是按了运算符时// 需要将当前结果发送到上面的结果中,并且运算符变为当前按下的运算符//当前输入结果清空if (state.lastResult === "" ) {return {//这里...state,会将state解构出来,然后后面列举的值会被替换成指定的内容...state,lastResult: state.currentResult,operation: action.operation,currentResult: "",}}//当当前输入结果为空,再次点击运算符时,表示需要将运算符替换掉if (state.currentResult === "") {return {...state,operation: action.operation}}//最后就是其他情况//当上一个计算结果不为空,并且当前输入结果不为空,// 再次点击运算符就需要将 上一个计算结果 (运算符) 当前输入结果  = 最终结果//放入到上一个计算结果中,并且将当前按下的运算符放到对应位置return {...state,lastResult: evaluate(state),operation: action.operation,currentResult: ""}case ACTIONS.CLEAR:return {...state,lastResult: "",operation: "",currentResult: ""}case ACTIONS.EVACULATE:if (state.currentResult === "" ||state.operation === "" || state.lastResult === "")return state;return {...state,currentResult: evaluate(state),lastResult: "",operation: "",overwrite: true,}default:return state;}
};export default reducer;
12.总结
上述只是支离破碎的片段,可能观感不佳,请谅解,完整项目放在acgit仓库
*注:以上内容来自acwing平台的web应用课学习整理,仅作为学习交流,不作为商业用途,如有侵权,联系删除。