【HarmonyOS】应用设置全屏和安全区域详解
【HarmonyOS】应用设置全屏和安全区域详解
一、前言
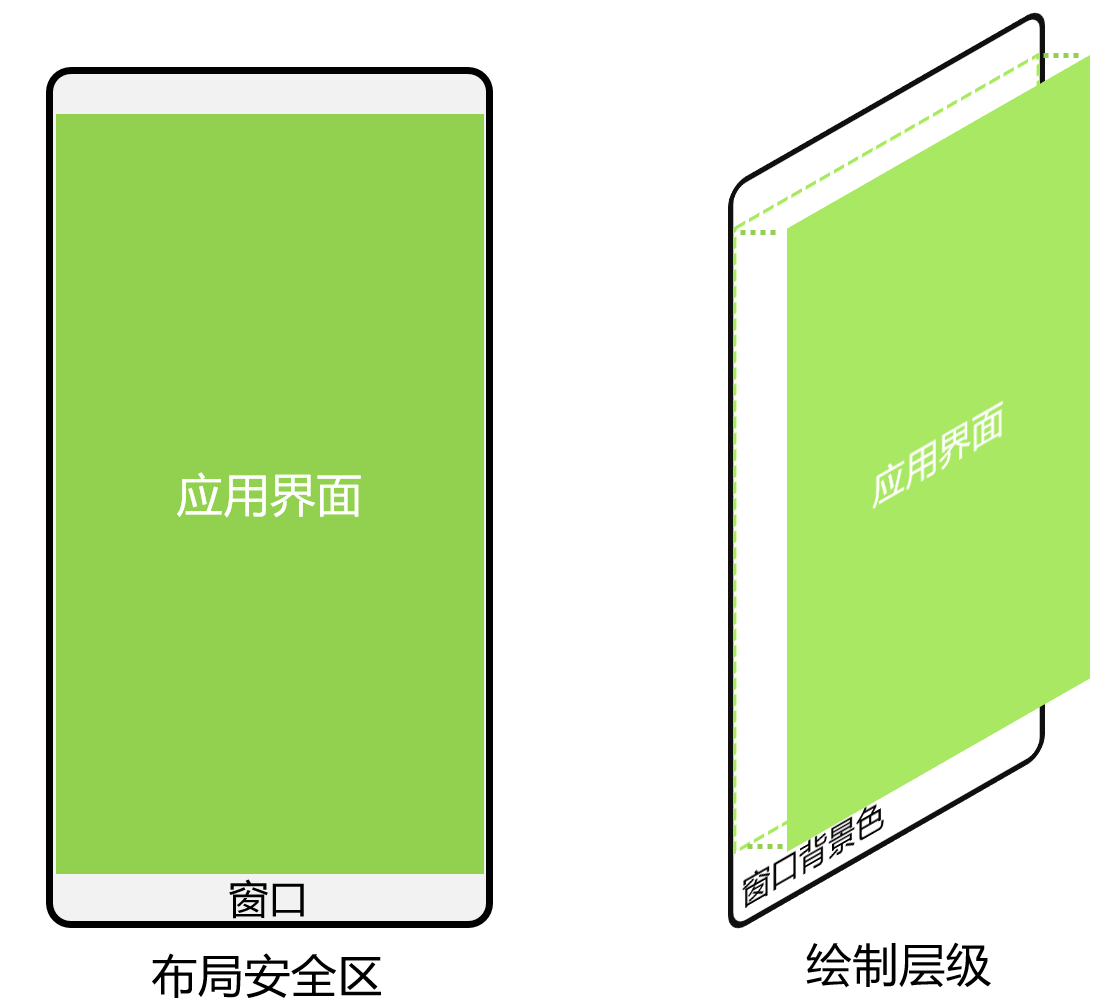
IDE创建的鸿蒙应用,默认采取组件安全区布局方案。顶部会预留状态栏区域,底部会预留导航条区域。这就是所谓的安全区域。
如果不处理,界面效果很割裂。所以业内UI交互设计,都会设置应用为全屏布局。将页面绘制区域沾满整个界面。
或者将安全区域的颜色与应用UI设置为一致。
以上两种方式都是沉浸式布局的处理。所以全屏非沉浸式,概念不可混为一谈。
在移动应用开发中,"沉浸式效果"早已不是新鲜词,但要真正实现自然、和谐的沉浸式体验,却需要对系统布局、交互逻辑有深入理解。
二、什么是应用沉浸式效果?
简单来说,应用沉浸式效果是通过优化状态栏、应用界面与底部导航区域(导航条或三键导航)的视觉融合与交互适配,减少系统界面的突兀感,让用户注意力更聚焦于应用内容本身。
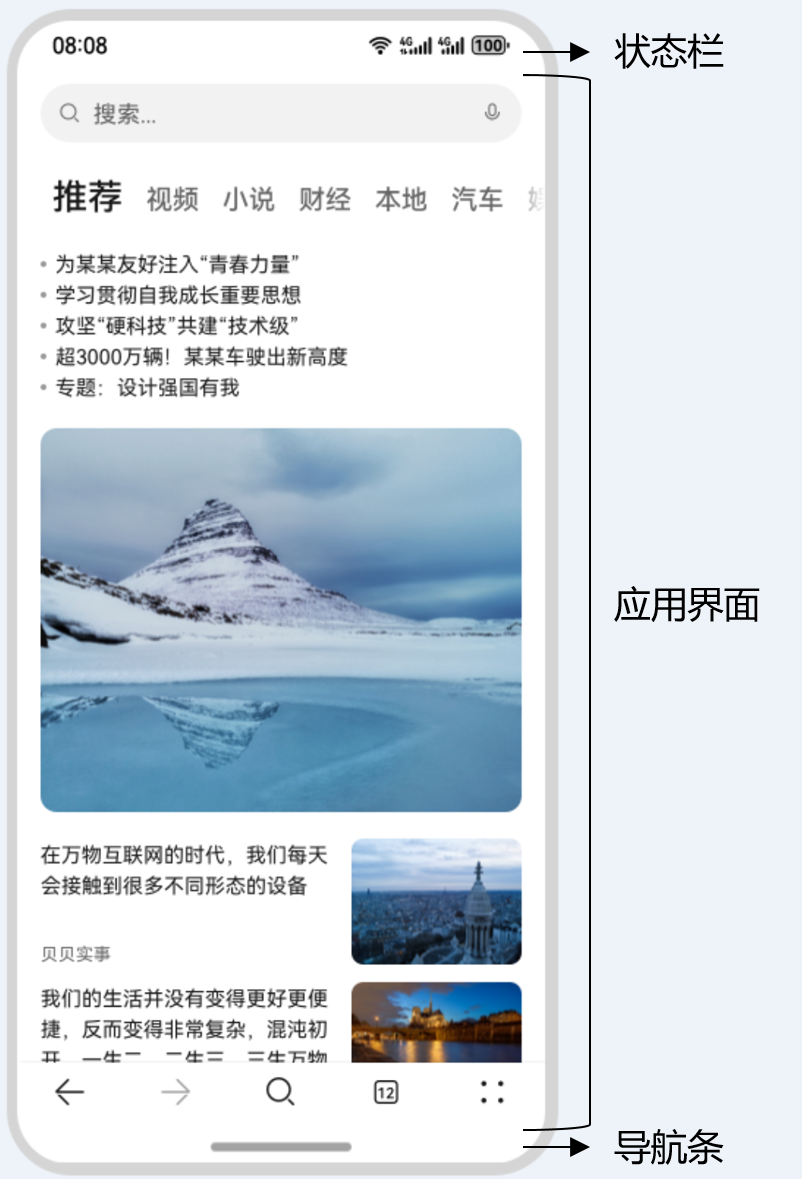
典型的界面元素包含三部分:
状态栏:显示时间、电量等系统信息的顶部区域
应用界面:承载应用核心内容的区域
底部导航区域:提供系统导航操作的底部区域
其中状态栏和底部导航区域被称为"避让区",其余区域为"安全区"。沉浸式开发的核心就是处理好这两个区域与应用内容的关系,主要涉及两类问题:
UI元素避让:避免可交互元素或关键信息被避让区遮挡
视觉融合:让避让区与应用界面的颜色、风格保持一致
三、如何设置沉浸式布局?
综上所述,我们可知,设置沉浸式布局有以下两种方式,如图所示:
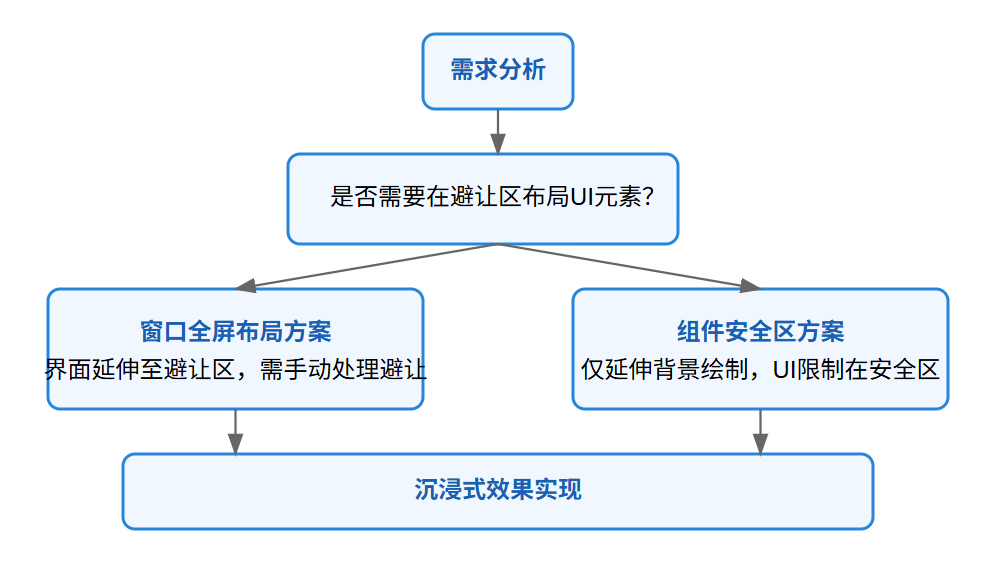
1、方案一:窗口全屏布局方案
该方案通过将应用界面强制扩展到全屏(包括状态栏和导航区域),实现深度沉浸式体验。适合需要在避让区放置UI元素的场景,如视频播放器控制栏、游戏界面等。
场景1:保留避让区,需处理UI避让
当需要显示状态栏和导航区域,但希望应用内容延伸至这些区域时,需通过以下步骤实现:
(1)开启全屏布局
在应用启动时调用setWindowLayoutFullScreen接口,让界面突破安全区限制:
// EntryAbility.ets
let windowClass = windowStage.getMainWindowSync();
windowClass.setWindowLayoutFullScreen(true).then(() => {console.info("窗口已设置为全屏布局");
});
(2)获取并监听避让区尺寸
通过getWindowAvoidArea获取状态栏和导航区域高度,并注册avoidAreaChange监听动态变化(如屏幕旋转、折叠屏展开等场景):
// 获取状态栏高度
let systemArea = windowClass.getWindowAvoidArea(window.AvoidAreaType.TYPE_SYSTEM);
AppStorage.setOrCreate('statusBarHeight', systemArea.topRect.height);// 获取导航区域高度
let navArea = windowClass.getWindowAvoidArea(window.AvoidAreaType.TYPE_NAVIGATION_INDICATOR);
AppStorage.setOrCreate('navBarHeight', navArea.bottomRect.height);// 动态监听变化
windowClass.on('avoidAreaChange', (data) => {if (data.type === window.AvoidAreaType.TYPE_SYSTEM) {AppStorage.setOrCreate('statusBarHeight', data.area.topRect.height);}
});
(3)布局中实现UI避让
在页面布局时,通过padding将内容区与避让区隔开,避免UI重叠:
// Index.ets
@Component
struct Index {@StorageProp('statusBarHeight') statusBarHeight: number = 0;@StorageProp('navBarHeight') navBarHeight: number = 0;build() {Column() {// 应用内容组件...}.padding({top: this.getUIContext().px2vp(this.statusBarHeight),bottom: this.getUIContext().px2vp(this.navBarHeight)})}
}
场景2:隐藏避让区,实现纯全屏
游戏、视频类应用常需要完全隐藏状态栏和导航区域,仅在用户操作时唤起:
(1)开启全屏布局(同场景1步骤1)
(2)隐藏系统栏
通过setSpecificSystemBarEnabled接口隐藏状态栏和导航区域:
// 隐藏状态栏
windowClass.setSpecificSystemBarEnabled('status', false);
// 隐藏导航区域
windowClass.setSpecificSystemBarEnabled('navigationIndicator', false);
(3)无需额外避让处理
此时界面已完全全屏,布局中无需设置避让padding,内容可直接铺满屏幕。
2、方案二:组件安全区方案
该方案为默认布局模式,UI元素自动限制在安全区内(无需手动处理避让),仅通过延伸背景绘制实现沉浸式效果。适合大多数普通应用,尤其是不需要在避让区布局UI的场景。
默认情况下,应用UI元素会自动避开避让区,但窗口背景可全屏绘制。通过以下方式优化视觉融合:
(1)状态栏与导航区域颜色相同时
直接设置窗口背景色与应用主背景一致,实现整体沉浸:
// EntryAbility.ets
windowStage.getMainWindowSync().setWindowBackgroundColor('#d5d5d5');
(2)颜色不同时:使用expandSafeArea扩展绘制
对顶部/底部组件单独设置expandSafeArea属性,使其背景延伸至避让区:
// Index.ets
@Component
struct Index {build() {Column() {// 顶部组件延伸至状态栏Row() {Text('顶部内容')}.backgroundColor('#2786d9').expandSafeArea([SafeAreaType.SYSTEM], [SafeAreaEdge.TOP])// 中间内容区...// 底部组件延伸至导航区Row() {Text('底部内容')}.backgroundColor('#96dffa').expandSafeArea([SafeAreaType.SYSTEM], [SafeAreaEdge.BOTTOM])}}
}
(3)典型场景适配技巧
背景图/视频场景:
让图片组件延伸至避让区
Image($r('app.media.bg')).width('100%').height('100%').expandSafeArea([SafeAreaType.SYSTEM], [SafeAreaEdge.TOP, SafeAreaEdge.BOTTOM])
滚动容器场景:
通过父容器扩展实现滚动背景沉浸
Scroll() {Column() {// 滚动内容...}.backgroundColor('rgb(213,213,213)')
}
.backgroundColor('rgb(213,213,213)')
.expandSafeArea([SafeAreaType.SYSTEM], [SafeAreaEdge.TOP, SafeAreaEdge.BOTTOM])
底部页签场景:
Navigation/Tabs组件默认支持背景延伸,自定义页签可手动设置:
// 自定义底部页签
Row() {// 页签按钮...
}
.backgroundColor('#f5f5f5')
.expandSafeArea([SafeAreaType.SYSTEM], [SafeAreaEdge.BOTTOM])
三、DEMO源码示例:
ImmersiveDemo/
├── src/main/ets/
│ ├── Ability/
│ │ └── EntryAbility.ets // 应用入口,处理窗口配置
│ ├── pages/
│ │ ├── FullScreenNormal.ets // 窗口全屏布局(不隐藏避让区)
│ │ ├── FullScreenHidden.ets // 窗口全屏布局(隐藏避让区)
│ │ └── SafeAreaMode.ets // 组件安全区方案
│ └── common/
│ └── Constants.ets // 常量定义
应用入口配置(EntryAbility.ets)
import { AbilityConstant, UIAbility, Want } from '@kit.AbilityKit';
import { window } from '@kit.ArkUI';
import { BusinessError } from '@kit.BasicServicesKit';
import { pageMap } from '../common/Constants';export default class EntryAbility extends UIAbility {private mainWindow: window.Window | null = null;async onWindowStageCreate(windowStage: window.WindowStage) {// 获取主窗口实例this.mainWindow = windowStage.getMainWindowSync();if (!this.mainWindow) {console.error('获取主窗口失败');return;}// 加载首页windowStage.loadContent(pageMap.FULL_SCREEN_NORMAL, (err) => {if (err.code) {console.error(`加载页面失败: ${JSON.stringify(err)}`);return;}});// 初始化避让区数据监听this.initAvoidAreaListener();}// 初始化避让区监听private initAvoidAreaListener() {if (!this.mainWindow) return;// 初始获取避让区数据this.updateAvoidAreaData();// 监听避让区变化this.mainWindow.on('avoidAreaChange', (data) => {console.info(`避让区变化: ${JSON.stringify(data)}`);if (data.type === window.AvoidAreaType.TYPE_SYSTEM) {AppStorage.setOrCreate('statusBarHeight', data.area.topRect.height);} else if (data.type === window.AvoidAreaType.TYPE_NAVIGATION_INDICATOR) {AppStorage.setOrCreate('navBarHeight', data.area.bottomRect.height);}});}// 更新避让区数据到全局存储private updateAvoidAreaData() {if (!this.mainWindow) return;try {// 获取状态栏区域const systemArea = this.mainWindow.getWindowAvoidArea(window.AvoidAreaType.TYPE_SYSTEM);AppStorage.setOrCreate('statusBarHeight', systemArea.topRect.height);// 获取导航栏区域const navArea = this.mainWindow.getWindowAvoidArea(window.AvoidAreaType.TYPE_NAVIGATION_INDICATOR);AppStorage.setOrCreate('navBarHeight', navArea.bottomRect.height);} catch (err) {console.error(`获取避让区数据失败: ${JSON.stringify(err)}`);}}// 切换到窗口全屏布局(不隐藏避让区)模式public switchToFullScreenNormal() {if (!this.mainWindow) return;// 开启全屏布局this.mainWindow.setWindowLayoutFullScreen(true).then(() => {// 显示状态栏和导航栏this.mainWindow?.setSpecificSystemBarEnabled('status', true);this.mainWindow?.setSpecificSystemBarEnabled('navigationIndicator', true);// 加载对应页面this.context?.getWindowStage().then((stage) => {stage.loadContent(pageMap.FULL_SCREEN_NORMAL);});});}// 切换到窗口全屏布局(隐藏避让区)模式public switchToFullScreenHidden() {if (!this.mainWindow) return;// 开启全屏布局this.mainWindow.setWindowLayoutFullScreen(true).then(() => {// 隐藏状态栏和导航栏this.mainWindow?.setSpecificSystemBarEnabled('status', false);this.mainWindow?.setSpecificSystemBarEnabled('navigationIndicator', false);// 加载对应页面this.context?.getWindowStage().then((stage) => {stage.loadContent(pageMap.FULL_SCREEN_HIDDEN);});});}// 切换到组件安全区模式public switchToSafeAreaMode() {if (!this.mainWindow) return;// 关闭全屏布局(使用默认安全区布局)this.mainWindow.setWindowLayoutFullScreen(false).then(() => {// 显示状态栏和导航栏this.mainWindow?.setSpecificSystemBarEnabled('status', true);this.mainWindow?.setSpecificSystemBarEnabled('navigationIndicator', true);// 设置窗口背景色(用于安全区方案)this.mainWindow?.setWindowBackgroundColor('#d5d5d5');// 加载对应页面this.context?.getWindowStage().then((stage) => {stage.loadContent(pageMap.SAFE_AREA_MODE);});});}
}
2. 常量定义(Constants.ets)
export const pageMap = {FULL_SCREEN_NORMAL: 'pages/FullScreenNormal',FULL_SCREEN_HIDDEN: 'pages/FullScreenHidden',SAFE_AREA_MODE: 'pages/SafeAreaMode'
};
3. 窗口全屏布局(不隐藏避让区)页面
import { EntryAbility } from '../Ability/EntryAbility';
import { pageMap } from '../common/Constants';
import { UIContext } from '@kit.ArkUI';@Entry
@Component
struct FullScreenNormal {@StorageProp('statusBarHeight') statusBarHeight: number = 0;@StorageProp('navBarHeight') navBarHeight: number = 0;private uiContext: UIContext | null = null;build() {Column() {// 顶部导航栏Row() {Text('窗口全屏模式(不隐藏避让区)').fontSize(18).fontWeight(FontWeight.Bold).color(Color.White)}.backgroundColor('#2786d9').width('100%').height(50).justifyContent(FlexAlign.Center)// 内容区Scroll() {Column() {// 方案说明Text('此模式下界面延伸至状态栏和导航栏,但通过padding实现内容避让').fontSize(14).padding(15).backgroundColor('#e6f7ff').margin(10).borderRadius(8).width('90%')// 功能按钮区Column() {Button('切换到全屏隐藏模式').width('80%').margin(5).onClick(() => {(getContext(this) as any).ability.switchToFullScreenHidden();})Button('切换到组件安全区模式').width('80%').margin(5).onClick(() => {(getContext(this) as any).ability.switchToSafeAreaMode();})}.margin(20)// 示例内容卡片ForEach([1, 2, 3, 4], (item) => {Row() {Text(`内容卡片 ${item}`).fontSize(16).color('#333')}.backgroundColor(Color.White).width('90%').height(100).borderRadius(10).margin(10).justifyContent(FlexAlign.Center)})}.width('100%')}// 底部信息栏Row() {Text('底部操作区').fontSize(16).color(Color.White)}.backgroundColor('#96dffa').width('100%').height(60).justifyContent(FlexAlign.Center)}.width('100%').height('100%').backgroundColor('#d5d5d5').padding({top: this.uiContext ? this.uiContext.px2vp(this.statusBarHeight) : 0,bottom: this.uiContext ? this.uiContext.px2vp(this.navBarHeight) : 0}).onAppear(() => {this.uiContext = this.getUIContext();})}
}
4. 窗口全屏布局(隐藏避让区)页面
import { pageMap } from '../common/Constants';@Entry
@Component
struct FullScreenHidden {build() {Column() {// 顶部区域Row() {Text('全屏隐藏模式').fontSize(18).fontWeight(FontWeight.Bold).color(Color.White)}.backgroundColor('#2786d9').width('100%').height(50).justifyContent(FlexAlign.Center)// 内容区Scroll() {Column() {// 提示信息Text('状态栏和导航栏已隐藏,上滑底部可唤起导航栏').fontSize(14).padding(15).backgroundColor('#fff3cd').margin(10).borderRadius(8).width('90%')// 功能按钮区Column() {Button('切换到全屏普通模式').width('80%').margin(5).onClick(() => {(getContext(this) as any).ability.switchToFullScreenNormal();})Button('切换到组件安全区模式').width('80%').margin(5).onClick(() => {(getContext(this) as any).ability.switchToSafeAreaMode();})}.margin(20)// 模拟视频播放区域Row() {Text('视频播放区域').fontSize(20).color(Color.White)}.backgroundColor('#333').width('90%').height(200).borderRadius(10).margin(10).justifyContent(FlexAlign.Center)// 示例内容卡片ForEach([1, 2, 3], (item) => {Row() {Text(`内容卡片 ${item}`).fontSize(16).color('#333')}.backgroundColor(Color.White).width('90%').height(100).borderRadius(10).margin(10).justifyContent(FlexAlign.Center)})}.width('100%')}// 底部操作区Row() {Text('播放控制区').fontSize(16).color(Color.White)}.backgroundColor('#96dffa').width('100%').height(60).justifyContent(FlexAlign.Center)}.width('100%').height('100%').backgroundColor('#d5d5d5')}
}
5. 组件安全区方案页面
import { SafeAreaEdge, SafeAreaType } from '@kit.ArkUI';
import { pageMap } from '../common/Constants';@Entry
@Component
struct SafeAreaMode {build() {Column() {// 顶部导航栏(延伸至状态栏)Row() {Text('组件安全区模式').fontSize(18).fontWeight(FontWeight.Bold).color(Color.White)}.backgroundColor('#2786d9').width('100%').height(50).justifyContent(FlexAlign.Center).expandSafeArea([SafeAreaType.SYSTEM], [SafeAreaEdge.TOP]) // 延伸至状态栏// 内容区Scroll() {Column() {// 方案说明Text('此模式下UI元素自动限制在安全区,通过expandSafeArea延伸背景至避让区').fontSize(14).padding(15).backgroundColor('#e6f7ff').margin(10).borderRadius(8).width('90%')// 功能按钮区Column() {Button('切换到全屏普通模式').width('80%').margin(5).onClick(() => {(getContext(this) as any).ability.switchToFullScreenNormal();})Button('切换到全屏隐藏模式').width('80%').margin(5).onClick(() => {(getContext(this) as any).ability.switchToFullScreenHidden();})}.margin(20)// 示例内容卡片ForEach([1, 2, 3, 4], (item) => {Row() {Text(`内容卡片 ${item}`).fontSize(16).color('#333')}.backgroundColor(Color.White).width('90%').height(100).borderRadius(10).margin(10).justifyContent(FlexAlign.Center)})}.width('100%')}// 底部信息栏(延伸至导航区)Row() {Text('底部导航区').fontSize(16).color(Color.White)}.backgroundColor('#96dffa').width('100%').height(60).justifyContent(FlexAlign.Center).expandSafeArea([SafeAreaType.SYSTEM], [SafeAreaEdge.BOTTOM]) // 延伸至导航区}.width('100%').height('100%').backgroundColor('#d5d5d5')}
}