aws(学习笔记第五十一课) ECS集中练习(3)
文章目录
- aws(学习笔记第五十一课) ECS集中练习(3)
- 学习内容:
- 1. 代码连接
- 1.1 代码链接
- 2. 练习设定`ecs`的`fargate service` + `network load balancer`(单一`task`)
- 2.1 整体架构
- 2.2 代码
- 2.3 执行代码
- 2.3.1 执行命令
- 2.3 网络问题的`workaround`,即`cloudshell`
- 2.3.1 在`cloudshell`进行`git clone`
- 2.3.2 同样进行部署
- 2.4 验证部署结果
- 2.5 `clean up`创建的`cloudformation`
- 3. 练习设定`ecs`的`fargate service` + `network load balancer`(复数`task`)
- 3.1 全体架构
- 3.2 和单一`task`的代码差分
- 3.3 执行代码
- 3.4 查看`fargate service`的运行`task`的数量
- 3.5 注意清理环境
- 4. 练习设定`ecs`复数`task`的`fargate service` + `efs`
- 4.1 全体架构
- 4.2 代码解析
- 4.2.1 创建常量,`vpc`以及`cluster`
- 4.2.2 创建`efs file system`和`access point`
- 4.2.3 创建`efs_volume_configuration`
- 4.2.4 创建`role`
- 4.2.5 创建`efs volume`以及`task definition`
- 4.2.6 创建`mount point`以及`port mapping`
- 4.2.7 创建`fargate service`
- 4.2.8 在`fargate service`和`efs`之间设定网络
- 4.2.9 对在`fargate service`设定`scalable`
- 4.3 整体执行并检测`task`是不是真正的共享使用`efs volume`
- 4.3.1 `AI`告诉如何在`deploy`两个以上的`task`后如何看`mount point`
aws(学习笔记第五十一课) ECS集中练习(3)
- 深入练习设定
ecs的fargate service的各种设定
学习内容:
- 练习设定
ecs单一task的fargate service+network load balancer - 练习设定
ecs复数task的fargate service+network load balancer - 练习设定
ecs复数task的fargate service+efs
1. 代码连接
1.1 代码链接
ECS集中练习
2. 练习设定ecs的fargate service + network load balancer(单一task)
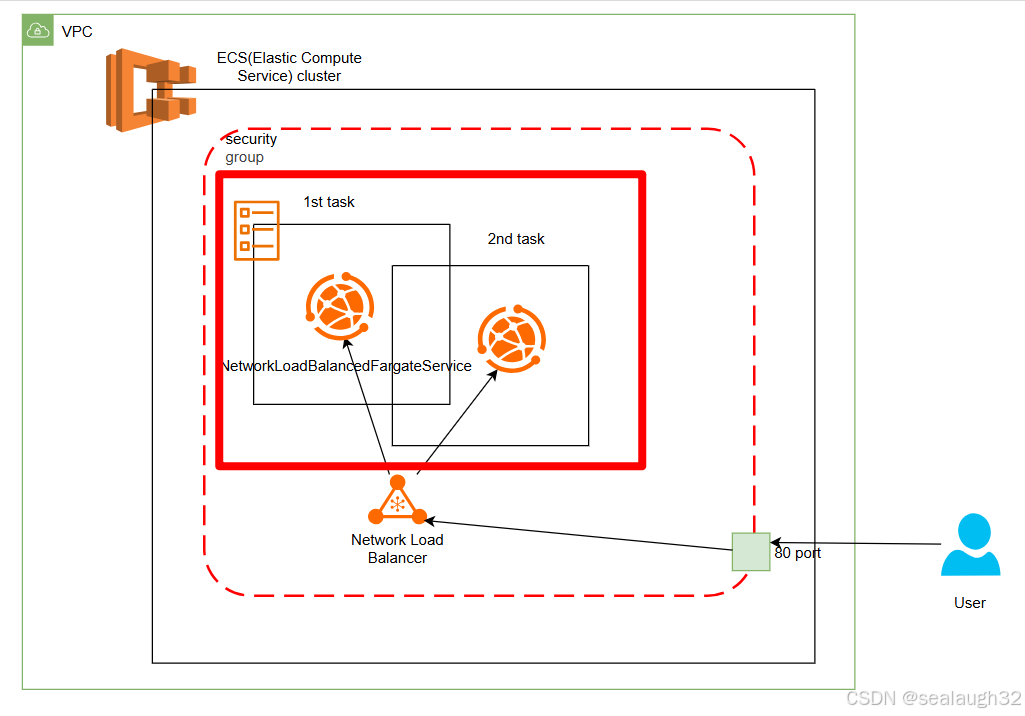
2.1 整体架构
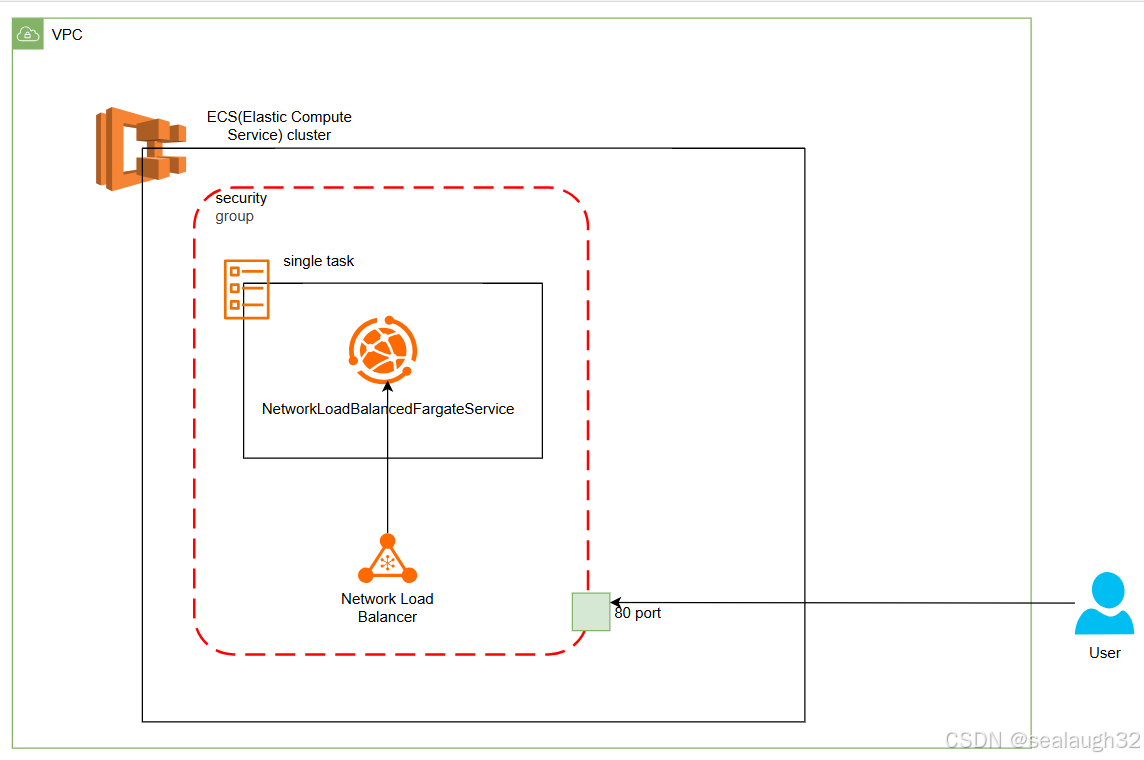
- 创建一个
ecs的cluster - 在
cluster中创建一个NetworkLoadBalancedFargateService aws会在创建fargate service同时,自动创建一个代理该fargate service的NetworkLoadBalancedFargateService- 没有指定
desired task count,这里aws会默认一个task运行service aws为这个fargate service创建一个security group以便进行安全设定- 这里,手动对
security group进行设定,开放0.0.0.0(internet)的80端口
2.2 代码
from aws_cdk import (aws_autoscaling as autoscaling,aws_ec2 as ec2,aws_ecs as ecs,aws_ecs_patterns as ecs_patterns,App, CfnOutput, Stack
)
from constructs import Constructclass BonjourFargate(Stack):def __init__(self, scope: Construct, id: str, **kwargs) -> None:super().__init__(scope, id, **kwargs)# Create VPC and Fargate Cluster# NOTE: Limit AZs to avoid reaching resource quotasvpc = ec2.Vpc(self, "MyVpc",max_azs=2)cluster = ecs.Cluster(self, 'Ec2Cluster',vpc=vpc)fargate_service = ecs_patterns.NetworkLoadBalancedFargateService(self, "FargateService",cluster=cluster,task_image_options=ecs_patterns.NetworkLoadBalancedTaskImageOptions(image=ecs.ContainerImage.from_registry("amazon/amazon-ecs-sample")))fargate_service.service.connections.security_groups[0].add_ingress_rule(peer = ec2.Peer.ipv4(vpc.vpc_cidr_block),connection = ec2.Port.tcp(80),description="Allow http inbound from VPC")CfnOutput(self, "LoadBalancerDNS",value=fargate_service.load_balancer.load_balancer_dns_name)app = App()
BonjourFargate(app, "Bonjour")
app.synth()
2.3 执行代码
2.3.1 执行命令
python -m venv ./venv
source ./.venv/Scripts/activate
pip -r requirements.txt
cdk --require-approval never deploy
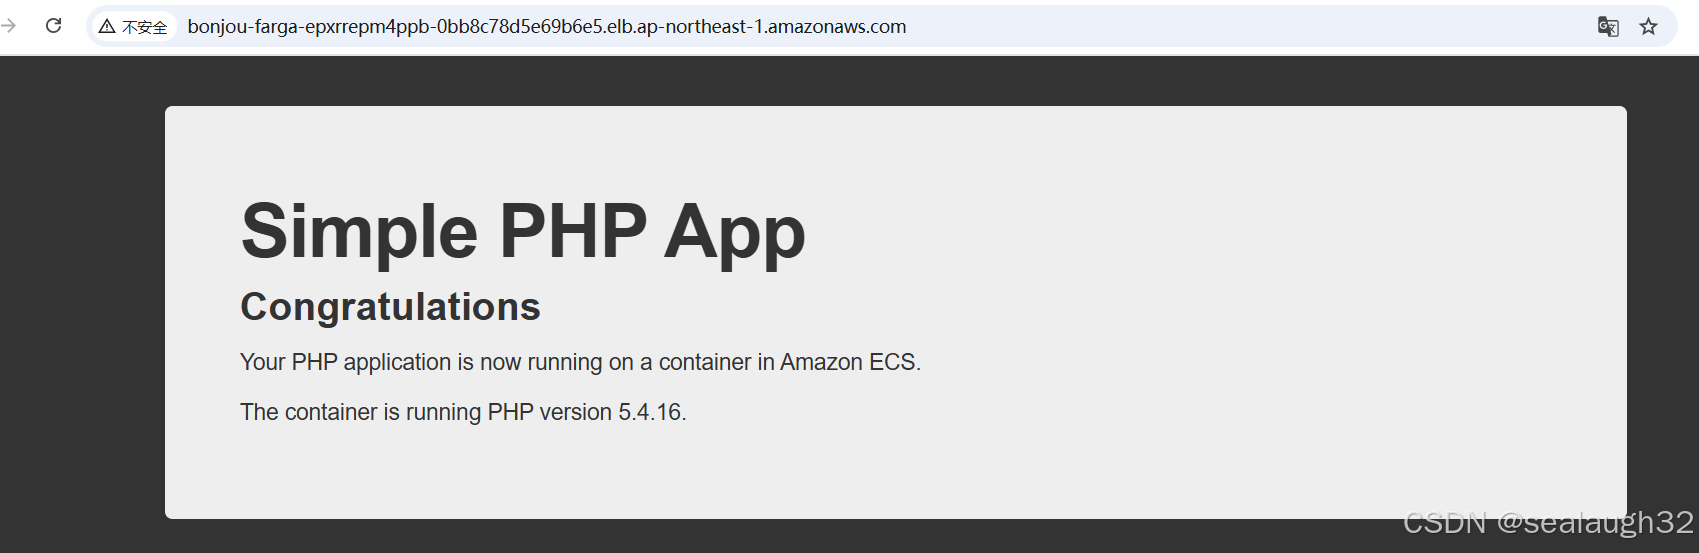
创建好了fargate service之后,进行验证。
2.3 网络问题的workaround,即cloudshell
最近的本地,已经网络好像出现了问题。
aws s3 ls
都出现了timeout的问题。没有办法,还是老办法,转头使用cloudshell
2.3.1 在cloudshell进行git clone
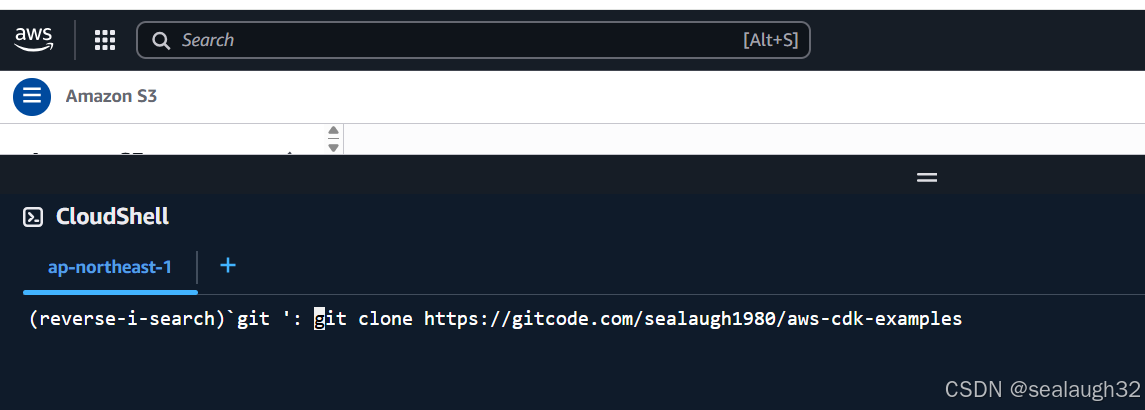
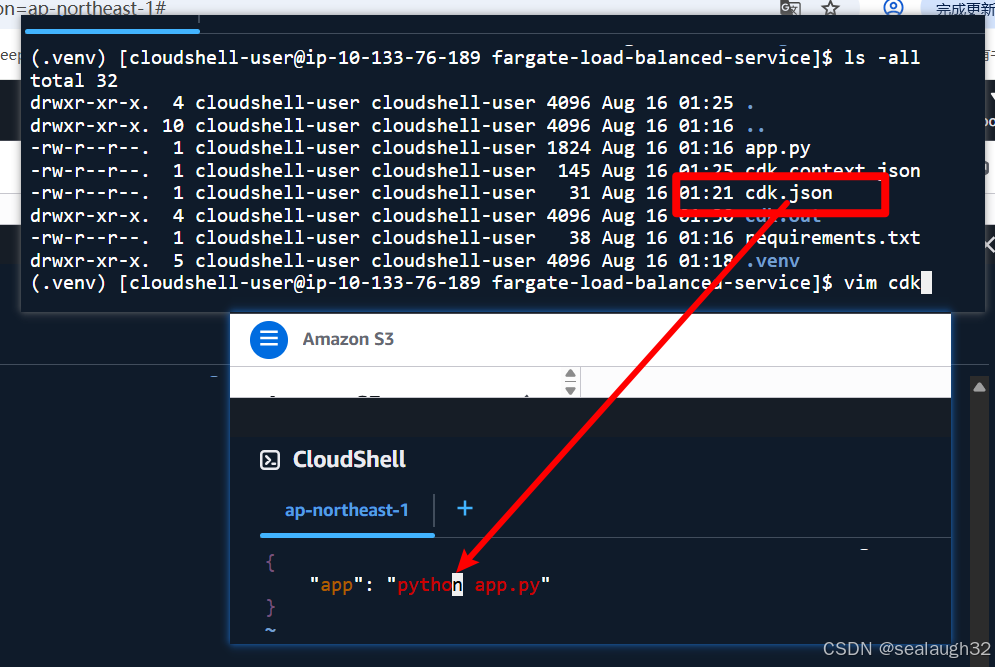
2.3.2 同样进行部署
python -m venv ./venv
source ./.venv/Scripts/activate
pip -r requirements.txt
cdk --require-approval never deploy
这里注意,既然使用python作为命令,修改下面的文件,将cdk.json里面的python3修改成python
2.4 验证部署结果

2.5 clean up创建的cloudformation
cdk destroy
3. 练习设定ecs的fargate service + network load balancer(复数task)
3.1 全体架构
这里看出,为了保持高可用性,运行service的task采用复数,并且使用NetworkLoadBalancer进行负载均衡。
3.2 和单一task的代码差分
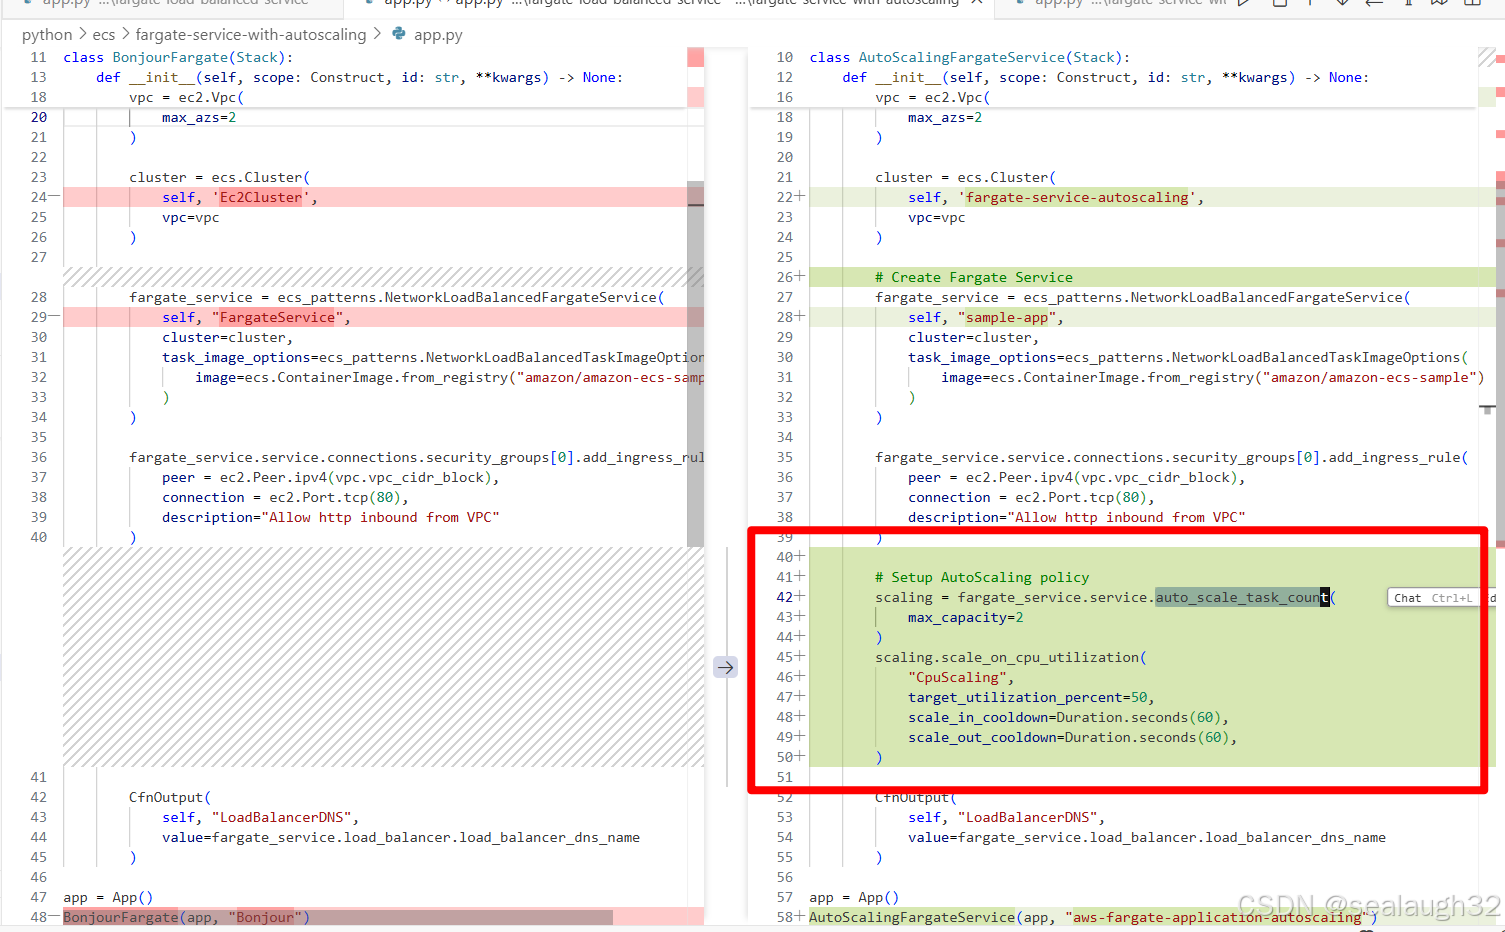
代码的差分,可以看得到就是在对service进行auto_scale_task_count,主要是设定复数运行service的task数量。
# Setup AutoScaling policyscaling = fargate_service.service.auto_scale_task_count(max_capacity=2)scaling.scale_on_cpu_utilization("CpuScaling",target_utilization_percent=50,scale_in_cooldown=Duration.seconds(60),scale_out_cooldown=Duration.seconds(60),)
3.3 执行代码
python -m venv ./venv
source ./.venv/Scripts/activate
pip -r requirements.txt
cdk --require-approval never deploy
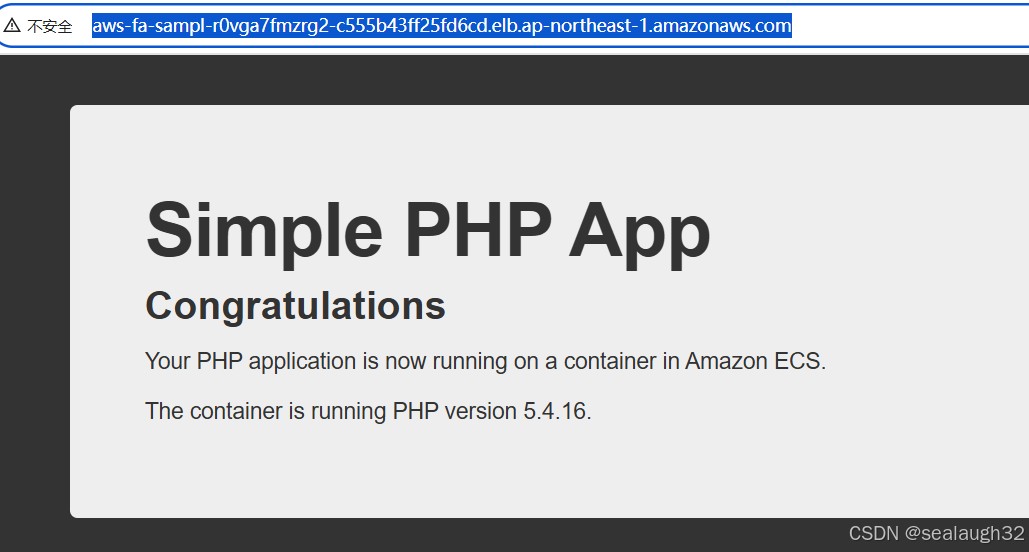
创建好了fargate service之后,进行验证。
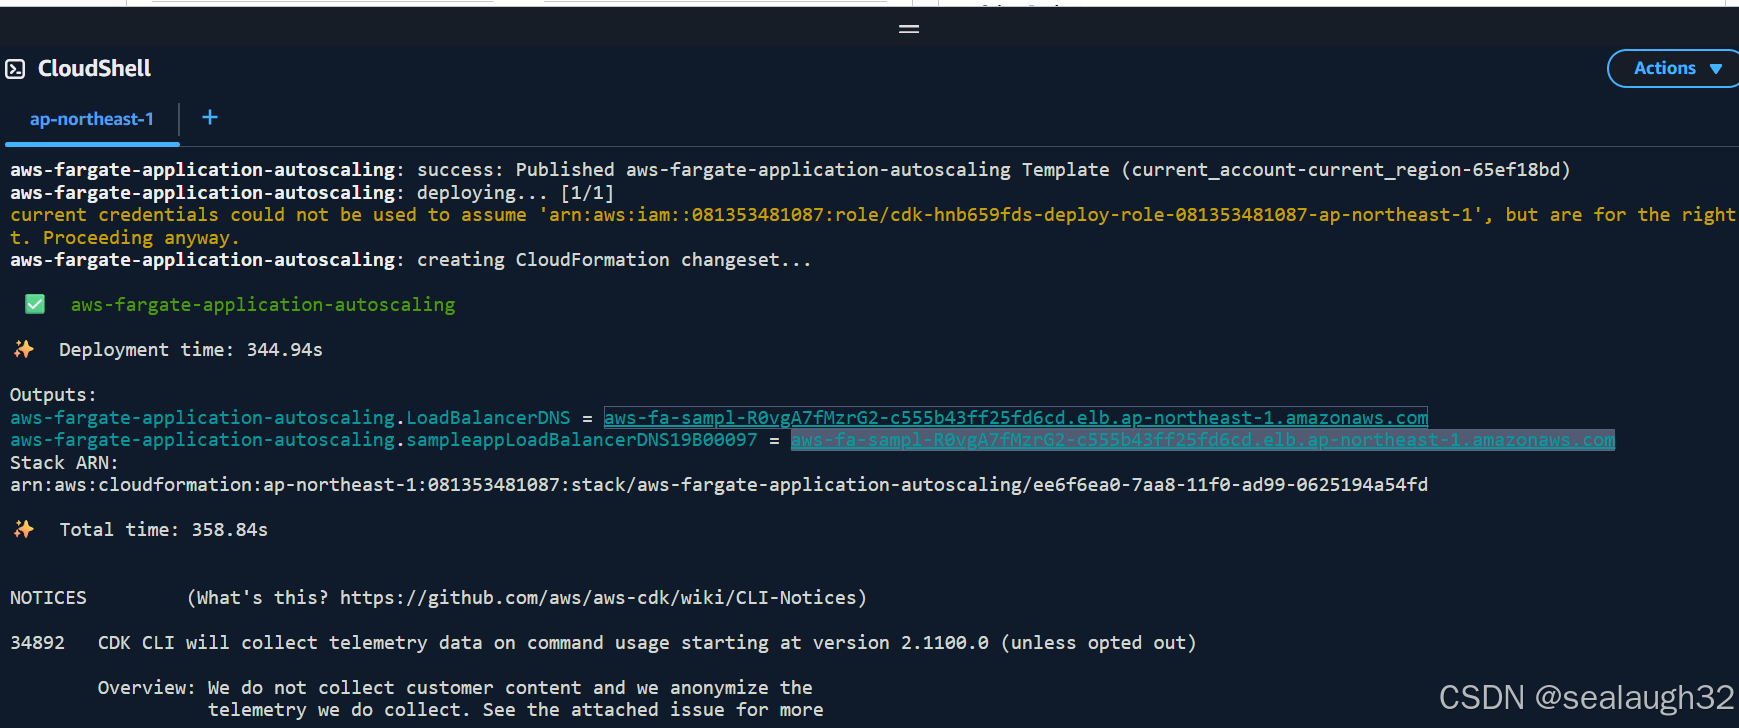
访问loader balancer
3.4 查看fargate service的运行task的数量
- 首先取得
fargate cluster的列表(问AI即可)
aws ecs list-clusters --query 'clusterArns[]' --output text | xargs -n 1 basename
aws-fargate-application-autoscaling-fargateserviceautoscalingD107CF93-qVM8jqB1V64n
- 取得
service的一览
得到# Get the ECS service name aws ecs list-services --cluster aws-fargate-application-autoscaling-fargateserviceautoscalingD107CF93-qVM8jqB1V64njson对象{"serviceArns": ["arn:aws:ecs:ap-northeast-1:081353481087:service/aws-fargate-application-autoscaling-fargateserviceautoscalingD107CF93-qVM8jqB1V64n/aws-fargate-application-autoscaling-sampleappServiceE7504FDB-rE2iT76J8A17"] } - 最后得到
task运行的数量# Get running task count (replace cluster/service names) aws ecs describe-services \--cluster aws-fargate-application-autoscaling-fargateserviceautoscalingD107CF93-qVM8jqB1V64n \--services aws-fargate-application-autoscaling-sampleappServiceE7504FDB-rE2iT76J8A17 \--query 'services[0].runningCount'
这里可以看出,虽然max_capacity=2,但是默认还是1。
3.5 注意清理环境
cdk destroy
4. 练习设定ecs复数task的fargate service + efs
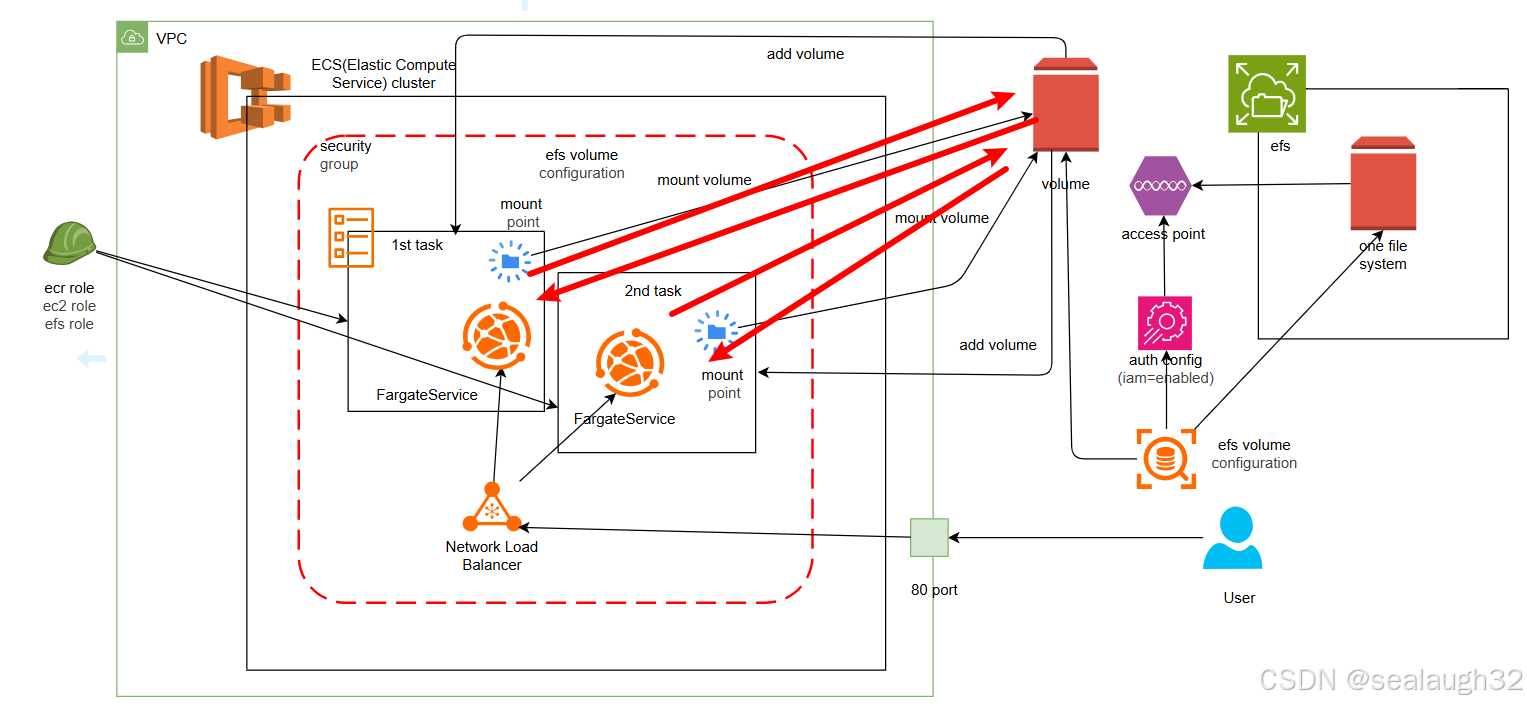
4.1 全体架构
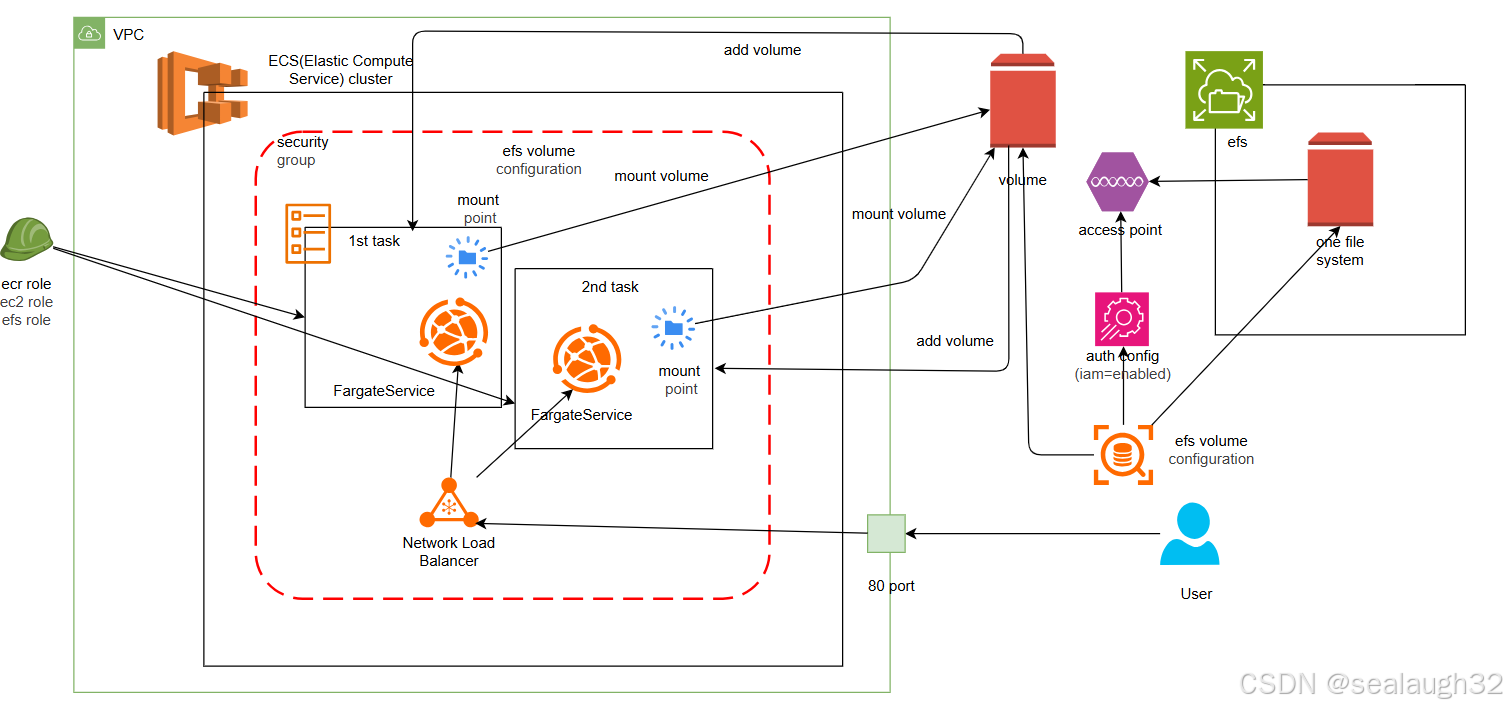
4.2 代码解析
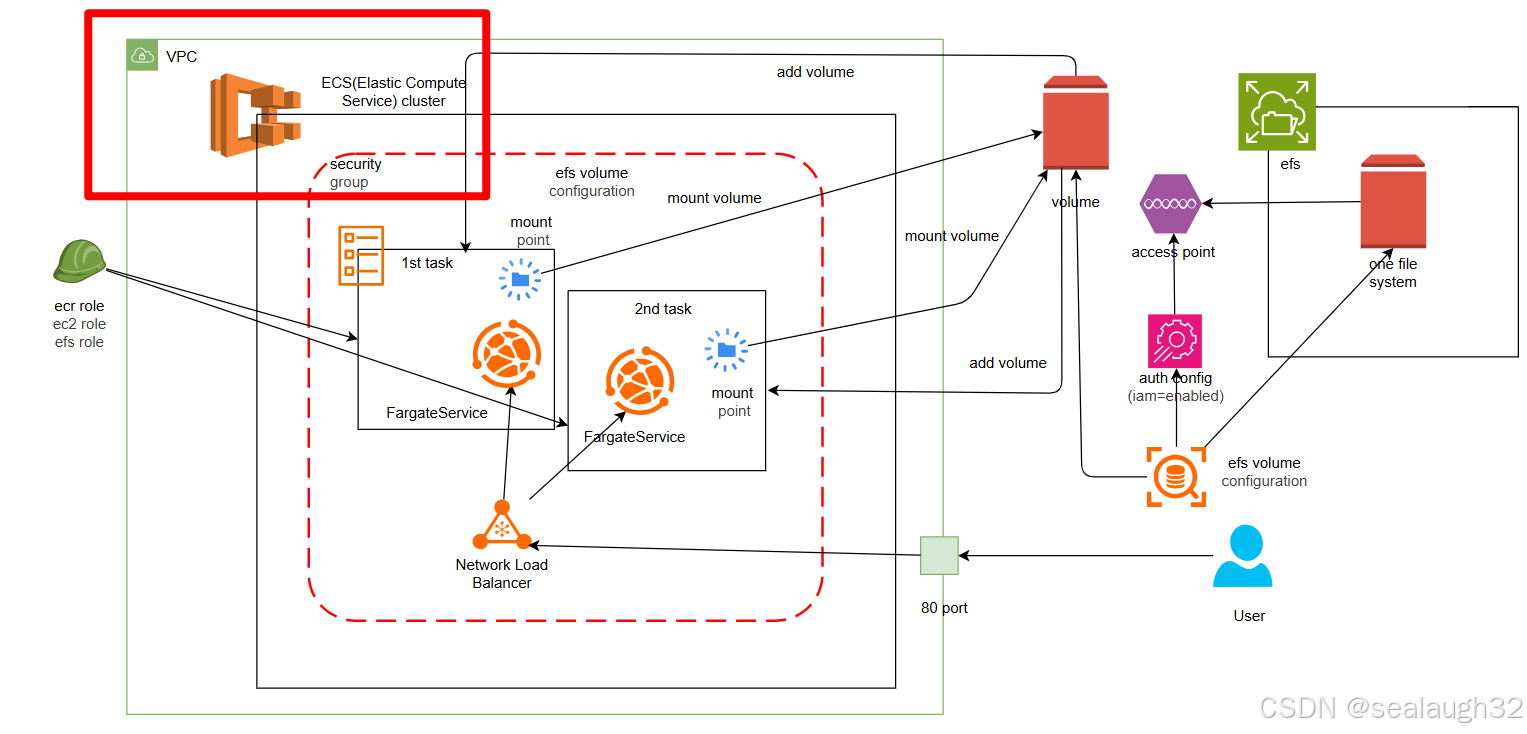
4.2.1 创建常量,vpc以及cluster
PREFIX = 'efs-sample-'APP_PATH = '/var/www/'VOLUME_NAME = 'cdk-ecs-sample-efs-volume'vpc = ec2.Vpc(self, PREFIX + 'Vpc',max_azs=2)ecs_cluster = ecs.Cluster(self, PREFIX + 'Cluster',vpc=vpc,)
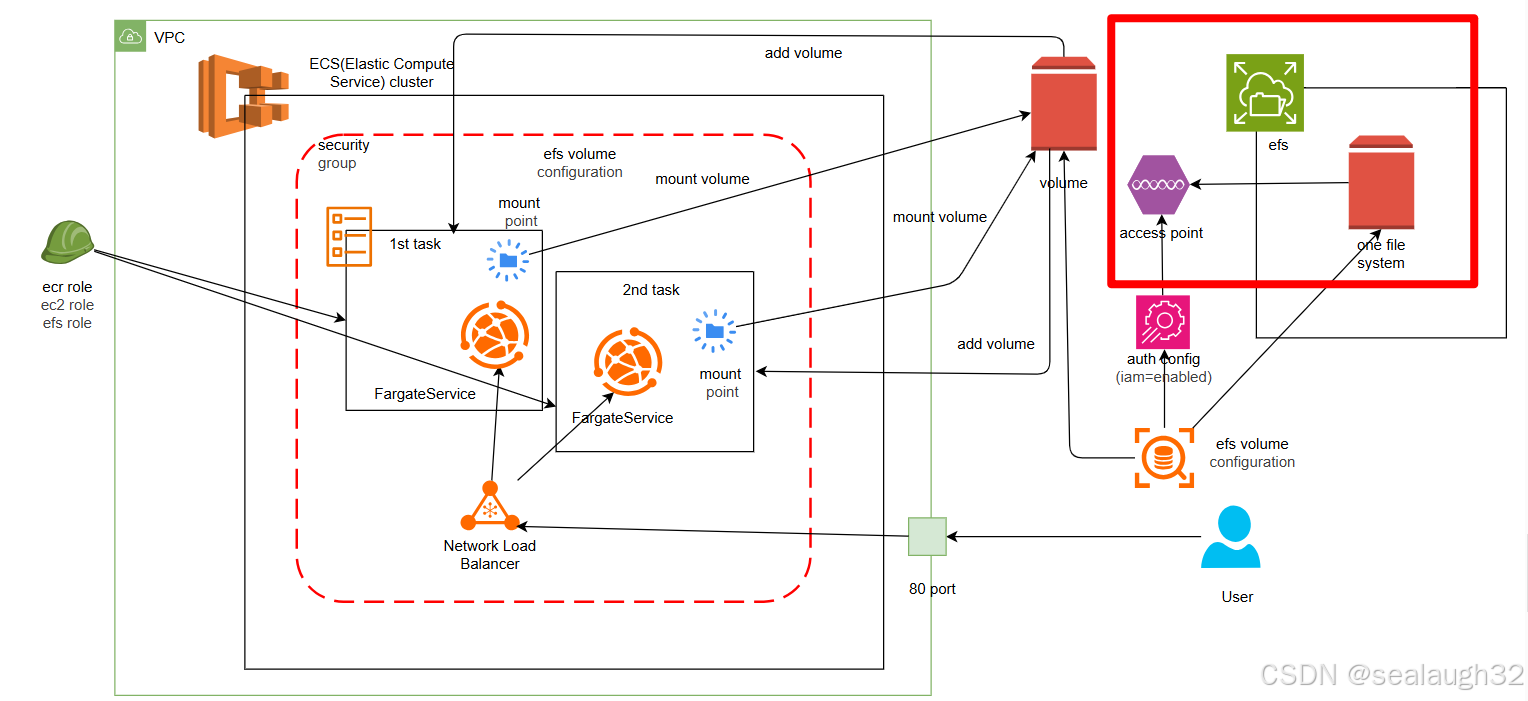
4.2.2 创建efs file system和access point
# Create an Amazon Elastic File System (EFS), with the logical ID CDK-efs-sample-EFSfile_system = efs.FileSystem(self, PREFIX + 'EFS',vpc=vpc,lifecycle_policy=efs.LifecyclePolicy.AFTER_14_DAYS,performance_mode=efs.PerformanceMode.GENERAL_PURPOSE,)# Create an Access Point for the EFS, with the logical ID CDK-efs-sample-AccessPointaccess_point = efs.AccessPoint(self, PREFIX + 'AccessPoint',file_system=file_system,)
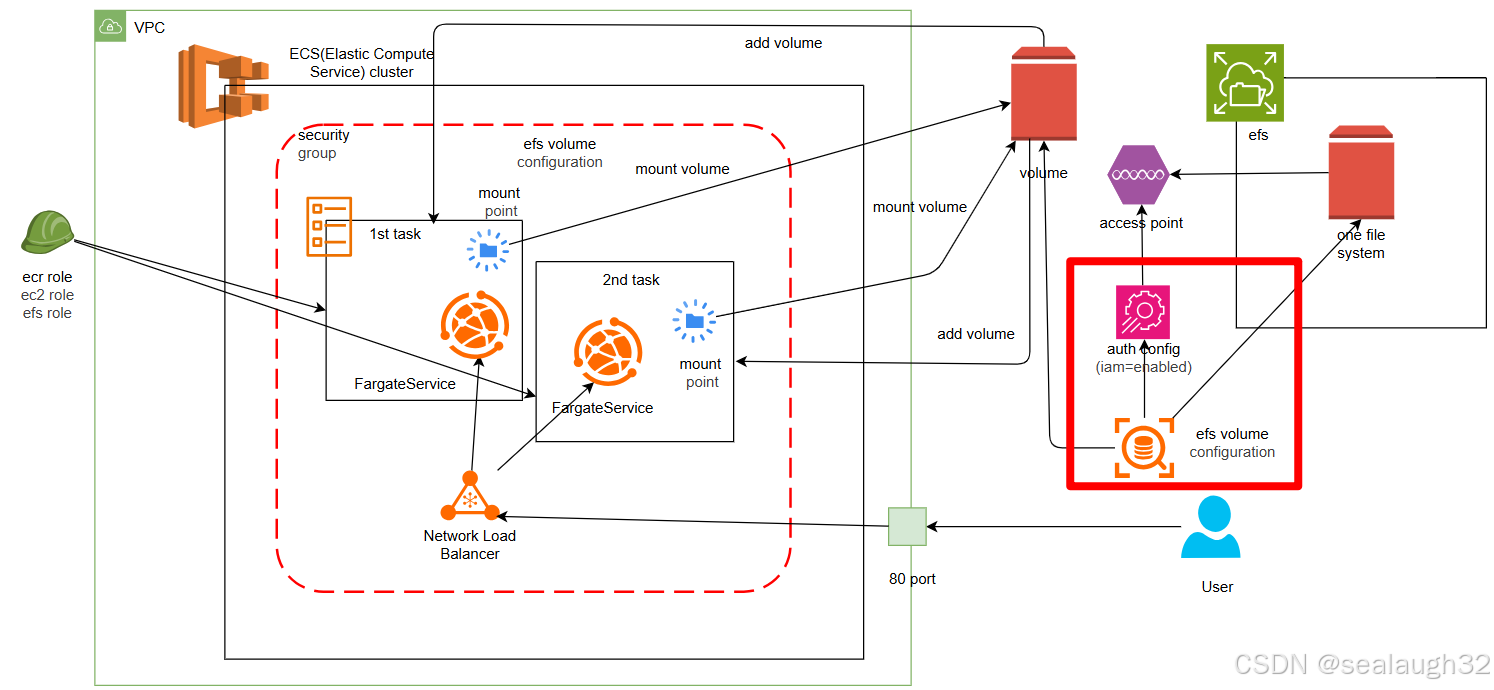
4.2.3 创建efs_volume_configuration
# Create a new EFS volume configuration for the ECS Taskefs_volume_configuration = ecs.EfsVolumeConfiguration(file_system_id=file_system.file_system_id,# The logical ID of the Access Point to use.# This is a string, not an ARN.authorization_config=ecs.AuthorizationConfig(access_point_id=access_point.access_point_id,iam='ENABLED',),transit_encryption='ENABLED',)
4.2.4 创建role
# Create a new IAM Role for the ECS Tasktask_role = iam.Role (self, PREFIX + 'EcsTaskRole',assumed_by=iam.ServicePrincipal('ecs-tasks.amazonaws.com').with_conditions({"StringEquals": {"aws:SourceAccount": Stack.of(self).account},"ArnLike":{"aws:SourceArn":"arn:aws:ecs:" + Stack.of(self).region + ":" + Stack.of(self).account + ":*"},}),)# Attach a managed policy to the IAM Roletask_role.attach_inline_policy(iam.Policy(self, PREFIX +'Policy',statements=[iam.PolicyStatement(effect=iam.Effect.ALLOW,resources=['*'],actions=["ecr:GetAuthorizationToken","ec2:DescribeAvailabilityZones"]),iam.PolicyStatement(sid='AllowEfsAccess',effect=iam.Effect.ALLOW,resources=['*'],actions=['elasticfilesystem:ClientRootAccess','elasticfilesystem:ClientWrite','elasticfilesystem:ClientMount','elasticfilesystem:DescribeMountTargets'])]))
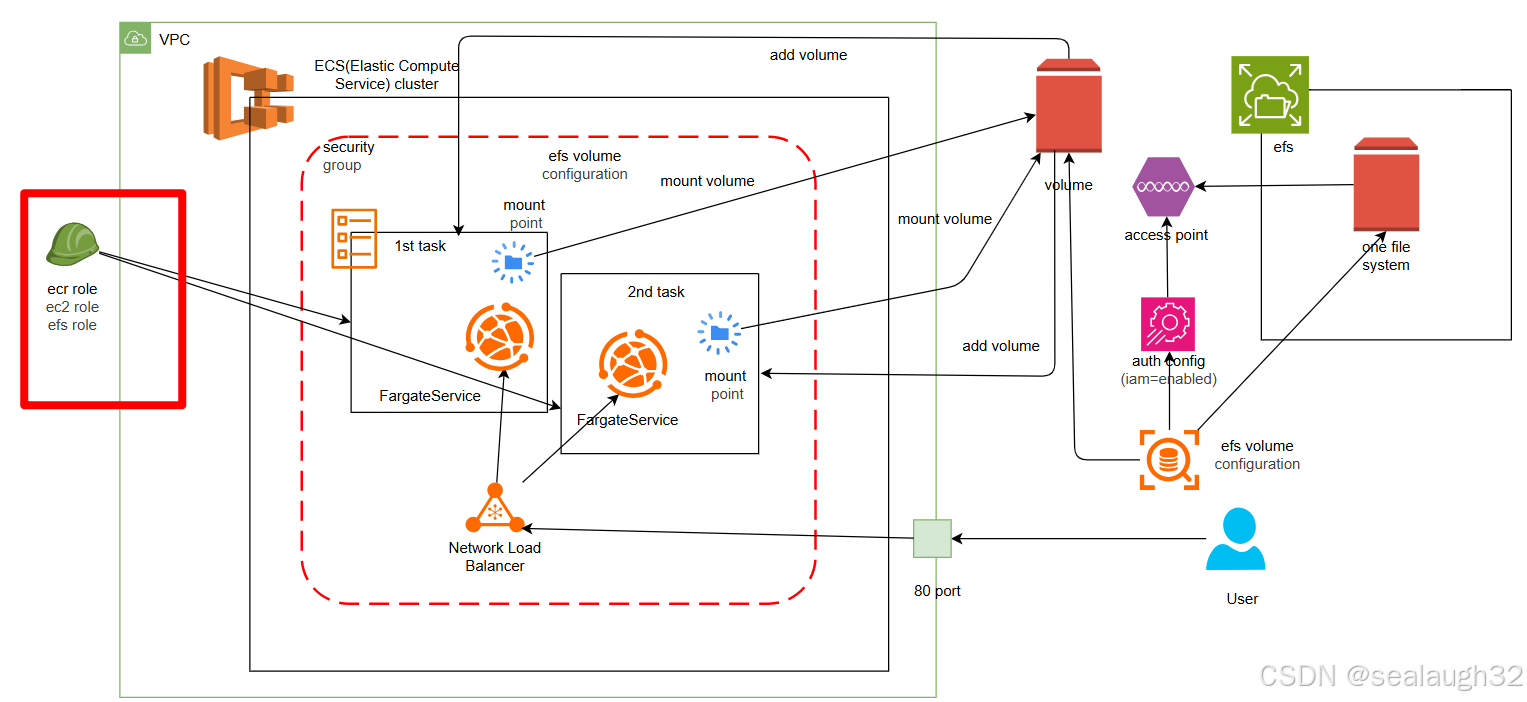
4.2.5 创建efs volume以及task definition
# Create a new Fargate Task Definitiontask_definition = ecs.FargateTaskDefinition(self, PREFIX + 'FargateTaskDef',task_role=task_role,)# Add a new volume to the Fargate Task Definitiontask_definition.add_volume(name=VOLUME_NAME,efs_volume_configuration=efs_volume_configuration,)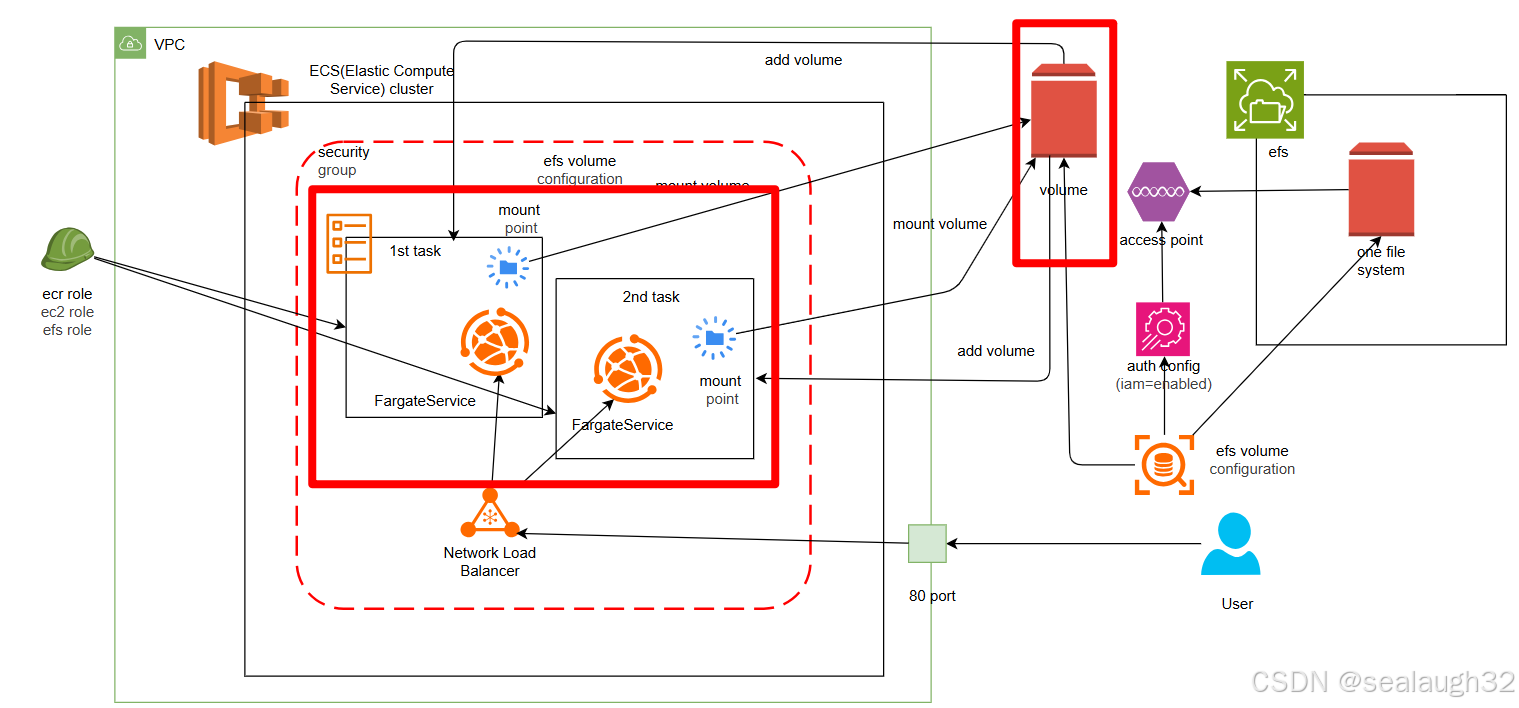
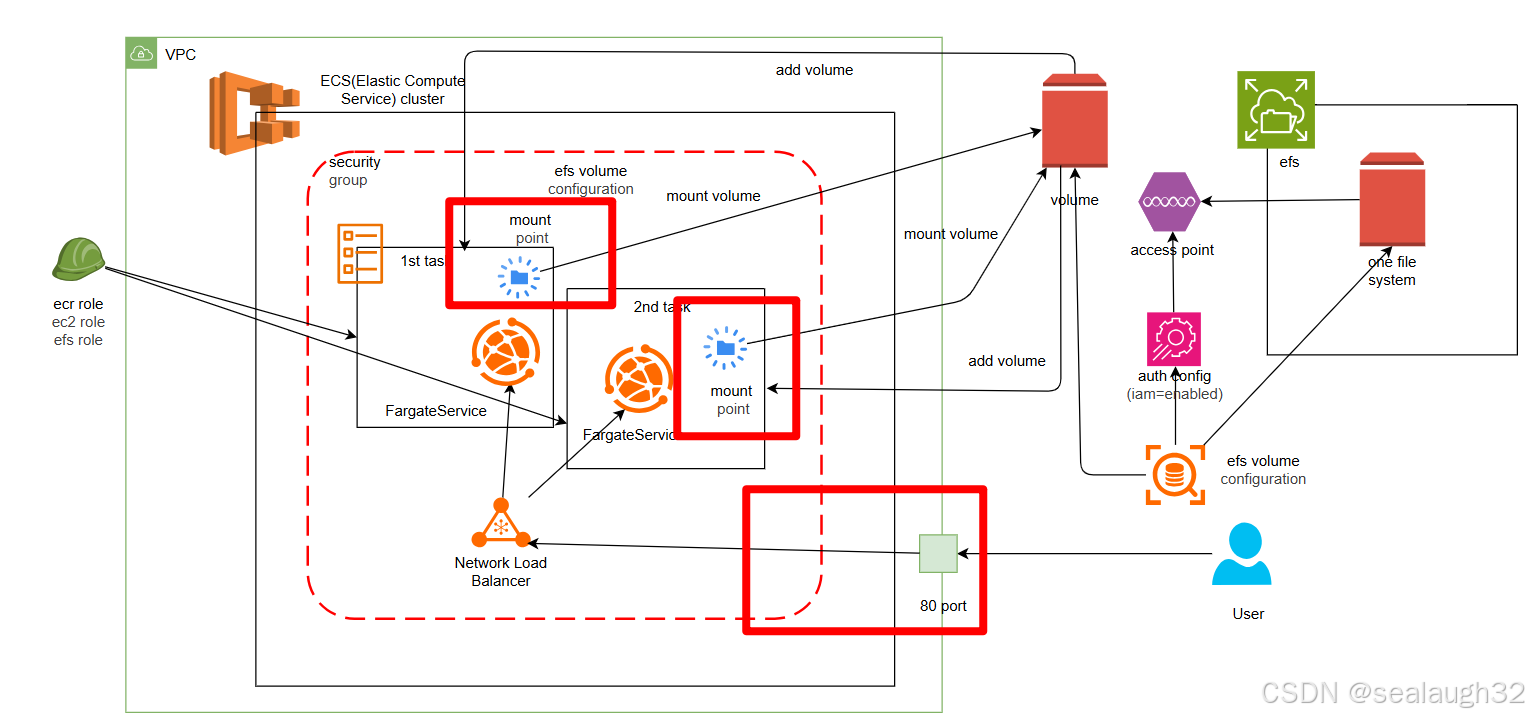
4.2.6 创建mount point以及port mapping
# Add a new container to the Fargate Task Definitionmount_point = ecs.MountPoint(container_path=APP_PATH+VOLUME_NAME,source_volume=VOLUME_NAME,read_only=False,)# Add a new port mapping to the Fargate Task Definitionport_mapping = ecs.PortMapping(container_port=80,host_port=80,protocol=ecs.Protocol.TCP,)
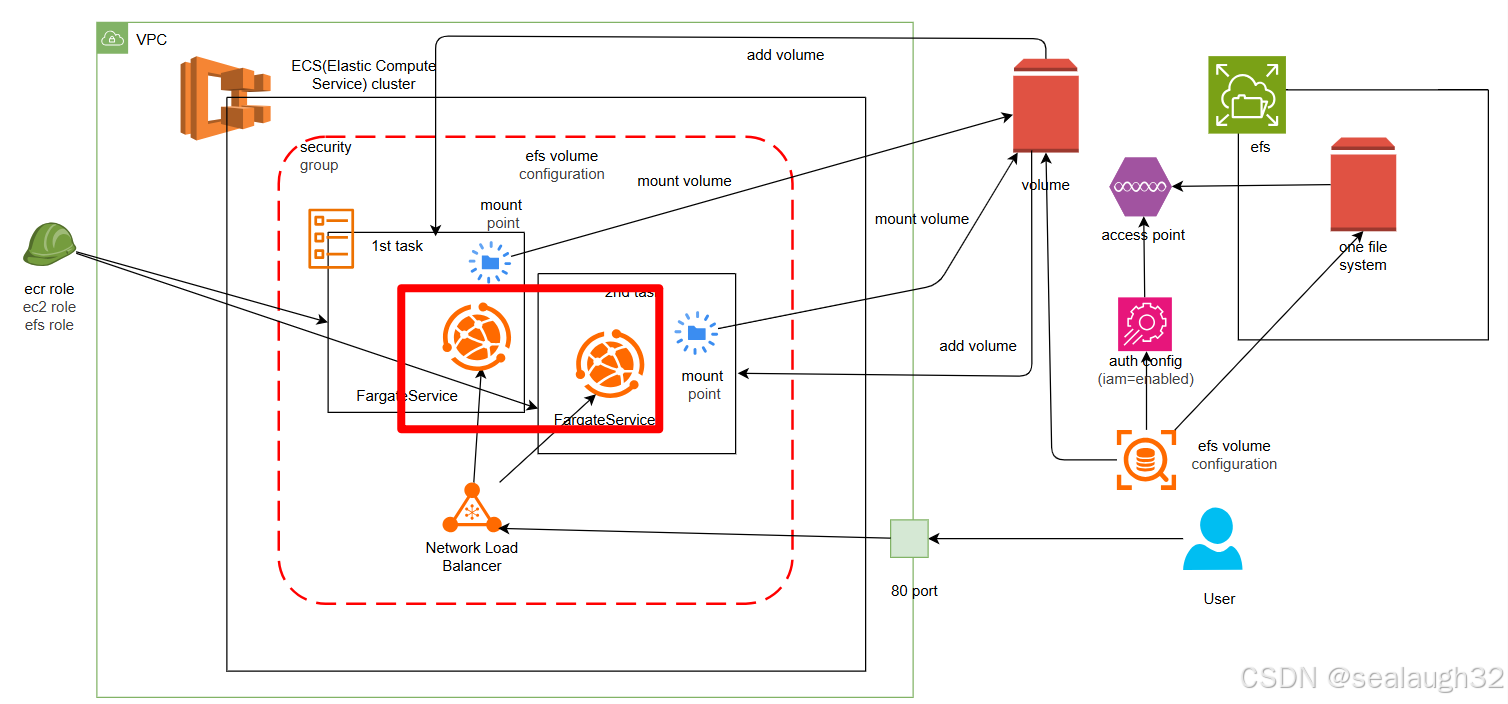
4.2.7 创建fargate service
# Create a new Fargate Service with ALBfargate_service = ecs_patterns.ApplicationLoadBalancedFargateService(self, PREFIX + 'Service',cluster=ecs_cluster,desired_count=1,task_definition=task_definition,task_subnets=ec2.SubnetSelection(subnet_type=ec2.SubnetType.PRIVATE_WITH_EGRESS,),platform_version=ecs.FargatePlatformVersion.LATEST,public_load_balancer=True,enable_execute_command=True,enable_ecs_managed_tags=True,)
4.2.8 在fargate service和efs之间设定网络
# Allow the ECS Service to connect to the EFSfargate_service.service.connections.allow_from(file_system, ec2.Port.tcp(2049)),# Allow the EFS to connect to the ECS Servicefargate_service.service.connections.allow_to(file_system, ec2.Port.tcp(2049)),
4.2.9 对在fargate service设定scalable
# Create a new Auto Scaling Policy for the ECS Servicescalable_target = fargate_service.service.auto_scale_task_count(min_capacity=2,max_capacity=20,)# Create a new Auto Scaling Policy for the ECS Servicescalable_target.scale_on_cpu_utilization("CpuScaling",target_utilization_percent=50,)# Create a new Auto Scaling Policy for the ECS Servicescalable_target.scale_on_memory_utilization("MemoryScaling",target_utilization_percent=50,)
这里为了检测,多个task执行的时候,会共享相同的efs volume,配置min_capacity=2
4.3 整体执行并检测task是不是真正的共享使用efs volume
4.3.1 AI告诉如何在deploy两个以上的task后如何看mount point
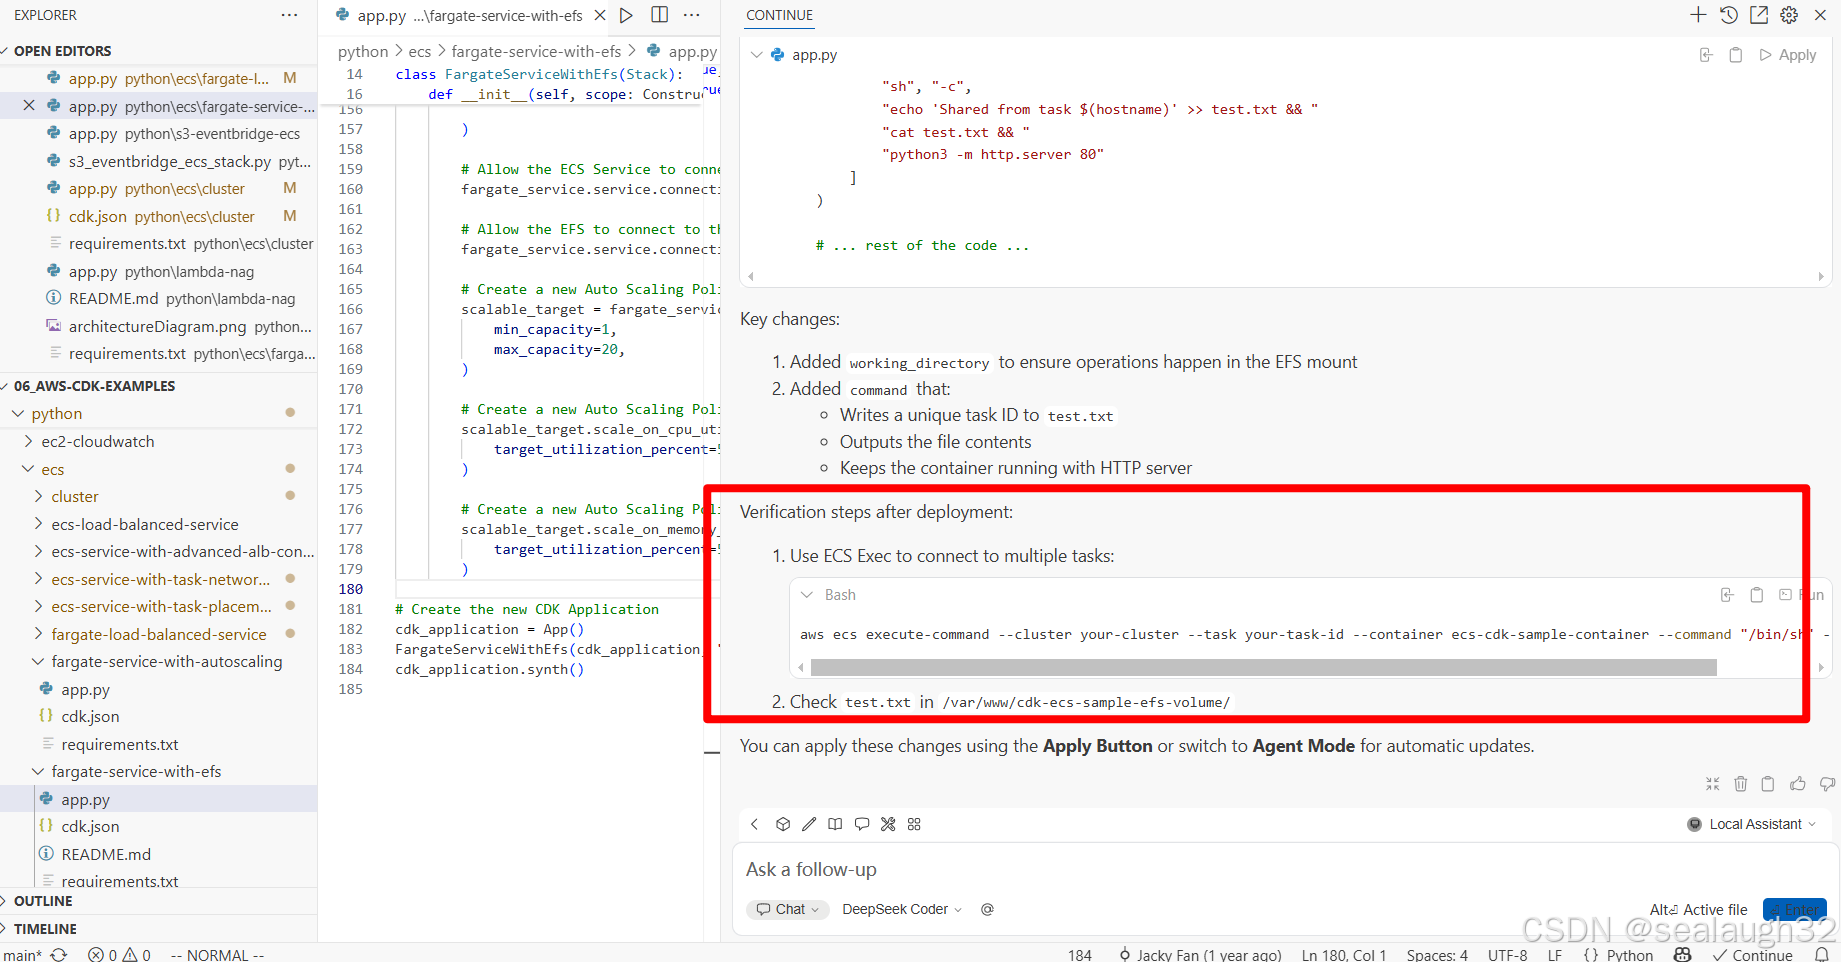 接下来进行验证(未完待续)。