【OpenGL】LearnOpenGL学习笔记10 - 平行光、点光源、聚光灯
上接:https://blog.csdn.net/weixin_44506615/article/details/150443248?spm=1001.2014.3001.5501
完整代码:https://gitee.com/Duo1J/learn-open-gl
之前我们使用的光源都是空间中的一个点,然后使用片段位置和光源位置来计算光照的方向。接下来我们要了解三种常见的投光物,来帮助我们更好的定义和使用光源
一、平行光 (Directional Light)
当一个光源处于非常远的位置时,光线到达我们的场景处就近似平行。这样的光源就是平行光,最典型的代表就是太阳光。在使用平行光的时候,我们只考虑光源的方向而不会考虑光源所处的位置,并且平行光是永不衰减的
首先来改造一下我们的场景,便于之后更清晰地观察,我们将会在场景中绘制十个位置和角度各不相同的立方体
首先定义十个立方体的坐标
Main.cpp
glm::vec3 cubePositions[] = {glm::vec3(0.0f,  0.0f,  0.0f),glm::vec3(2.0f,  5.0f, -15.0f),glm::vec3(-1.5f, -2.2f, -2.5f),glm::vec3(-3.8f, -2.0f, -12.3f),glm::vec3(2.4f, -0.4f, -3.5f),glm::vec3(-1.7f,  3.0f, -7.5f),glm::vec3(1.3f, -2.0f, -2.5f),glm::vec3(1.5f,  2.0f, -2.5f),glm::vec3(1.5f,  0.2f, -1.5f),glm::vec3(-1.3f,  1.0f, -1.5f)
};
接下来在我们的主循环中
Main.cpp
while (!glfwWindowShouldClose(window))
{float currentFrame = glfwGetTime();deltaTime = currentFrame - lastFrame;lastFrame = currentFrame;glClearColor(0.2f, 0.3f, 0.3f, 1.0f);glClear(GL_COLOR_BUFFER_BIT | GL_DEPTH_BUFFER_BIT);ProcessKeyboardInput(window);glm::mat4 view = camera.GetViewMatrix();glm::mat4 projection = glm::mat4(1);projection = glm::perspective(glm::radians(camera.fov), screenWidth / screenHeight, 0.1f, 100.0f);shader.Use();shader.SetMat4("view", view);shader.SetMat4("projection", projection);shader.SetVec3("lightColor", lightColor);shader.SetVec3("viewPos", camera.transform.position);shader.SetVec3("material.ambient", glm::vec3(1.0f, 0.5f, 0.31f));shader.SetInt("material.diffuse", 0);shader.SetInt("material.specular", 1);shader.SetFloat("material.shininess", 32.0f);shader.SetVec3("light.ambient", glm::vec3(0.2f, 0.2f, 0.2f));shader.SetVec3("light.diffuse", glm::vec3(0.5f, 0.5f, 0.5f));shader.SetVec3("light.specular", glm::vec3(1.0f, 1.0f, 1.0f));// 设置平行光的方向shader.SetVec3("light.direction", glm::vec3(-0.2f, -1.0f, -0.3f));glActiveTexture(GL_TEXTURE0);glBindTexture(GL_TEXTURE_2D, boxDiffuseTex.GetTextureID());glActiveTexture(GL_TEXTURE1);glBindTexture(GL_TEXTURE_2D, boxSpecularTex.GetTextureID());// 遍历十个坐标,计算model矩阵for (int i = 0; i < 10; ++i){glm::mat4 model = glm::mat4(1);model = glm::translate(model, cubePositions[i]);float angle = 20.0f * i;model = glm::rotate(model, glm::radians(angle), glm::vec3(1.0f, 0.3f, 0.5f));shader.SetMat4("model", model);glBindVertexArray(VAO);glDrawArrays(GL_TRIANGLES, 0, 36);}// 去掉光源的绘制//lightShader.Use();//glm::mat4 model = glm::mat4(1.0f);//model = glm::translate(model, lightPos);//model = glm::scale(model, glm::vec3(0.2f));//lightShader.SetMat4("model", model);//lightShader.SetMat4("view", view);//lightShader.SetMat4("projection", projection);//lightShader.SetVec3("objectColor", lightColor);//glBindVertexArray(lightVAO);//glDrawArrays(GL_TRIANGLES, 0, 36);glfwSwapBuffers(window);glfwPollEvents();
}
以上,我们还设置了平行光的方向 light.direction
接下来修改片段着色器
FragmentShader.fs
//...struct Light {// 平行光方向vec3 direction;vec3 ambient;vec3 diffuse;vec3 specular;
};// ...void main()
{// 环境光vec3 ambient = lightColor * vec3(texture(material.diffuse, TexCoords)) * light.ambient;// 漫反射vec3 normal = normalize(Normal);// 平行光方向vec3 directionalLightDir = normalize(light.direction);vec3 diffuse = max(dot(normal, directionalLightDir), 0.0) * lightColor * vec3(texture(material.diffuse, TexCoords)) * light.diffuse;// 镜面反射vec3 viewDir = normalize(viewPos - FragPos);vec3 reflectDir = reflect(-directionalLightDir, normal);vec3 specular = pow(max(dot(viewDir, reflectDir), 0), material.shininess) * lightColor * vec3(texture(material.specular, TexCoords)) * light.specular;FragColor = vec4(ambient + diffuse + specular, 1.0f);
}
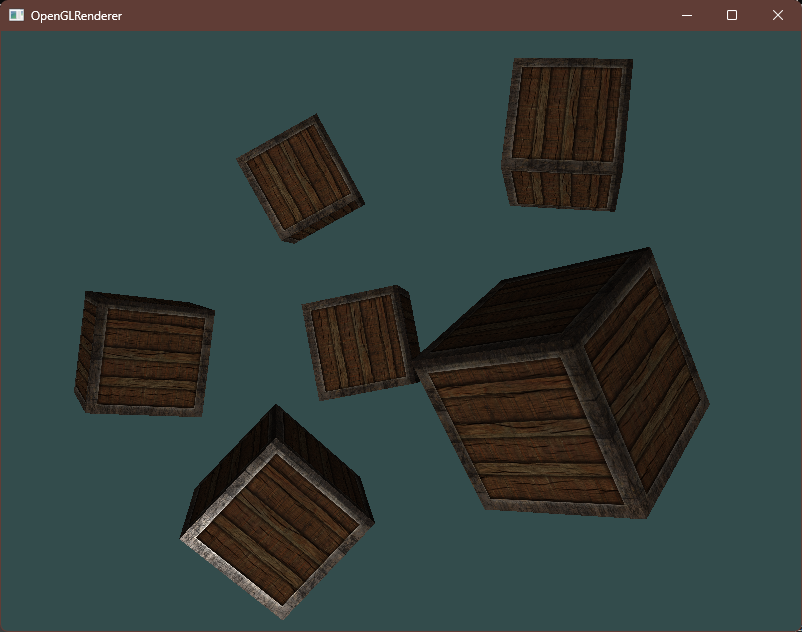
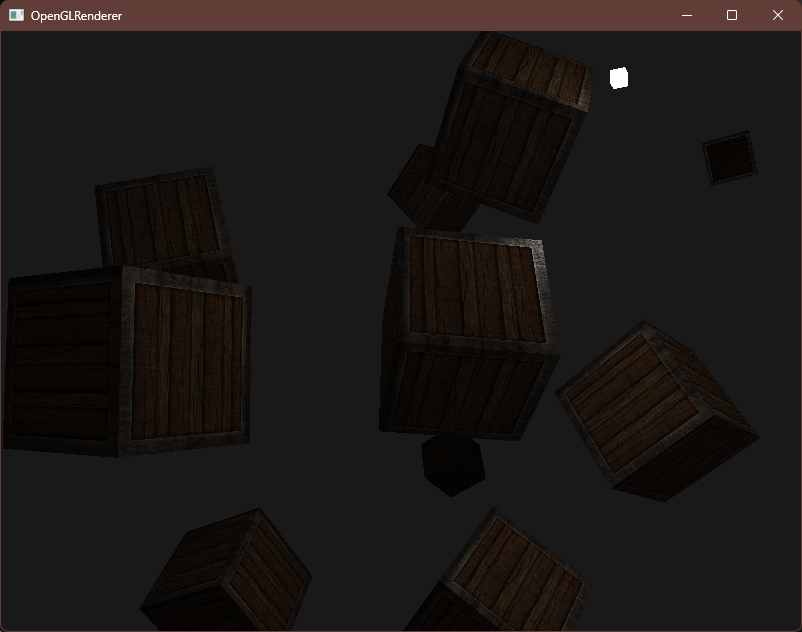
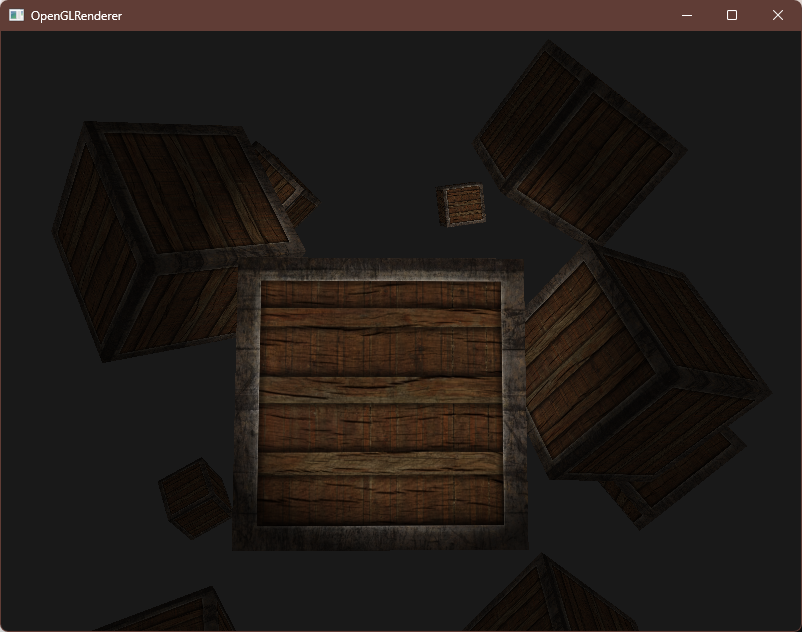
编译运行,顺利的话可以看见以下图像
二、点光源 (Point Light)
点光源就是处于场景某一处的光源,它会朝着四周发光,但是与我们一开始使用的光源不一样,点光源是会随着距离而衰减的,典型的例子就是生活中的灯泡或是火把
那么如何来计算衰减?
如果直接使用与光源的距离来进行线性衰减的话,虽然便于计算,但是效果会很假
所以这里我们会用到一个非线性的衰减计算公式
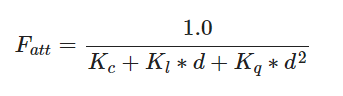
这里的Kc为常数项,通常为1,保证分母不会小于分子而出现强度增大的异常现象
Kl为一次项,来与距离d相乘以获得一个线性的衰减
Kq为二次项,来与距离d的平方相乘以获得一个快速下降的非线性衰减
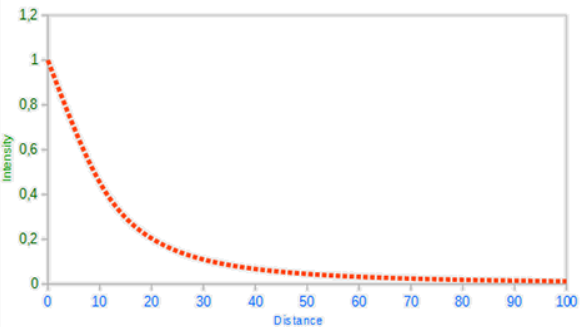
图片来自于LearnOpenGL
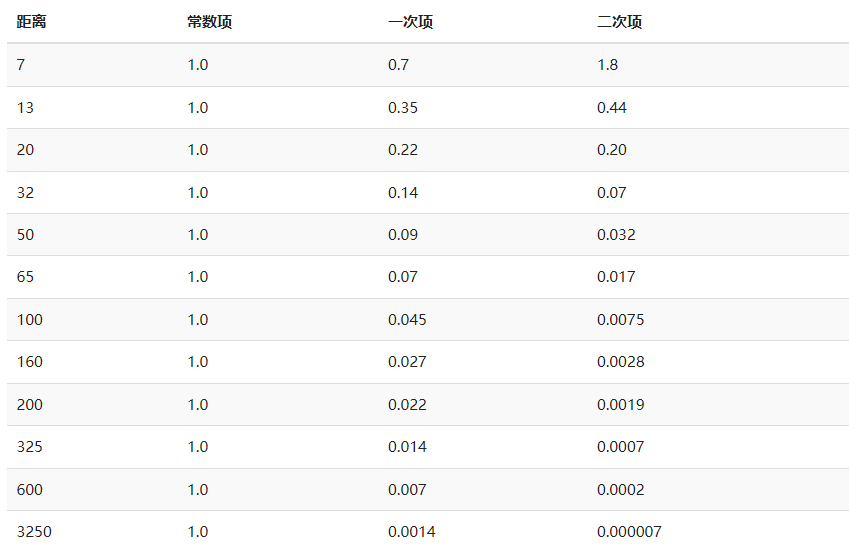
那么,我们在计算衰减的时候,Kl和Kq的选择就至关重要,以下表格显示了模拟一个(大概)真实的,覆盖特定半径(距离)的光源时,这些项可能取的一些值
数据来自于Ogre3D的Wiki
接下来实现点光源
首先修改片段着色器
FragmentShader.fs
// ...struct Light {// 点光源位置vec3 position;vec3 ambient;vec3 diffuse;vec3 specular;// 衰减参数float constant;float linear;float quadratic;
};// ...void main()
{// 与光源的距离float distance = length(light.position - FragPos);// 强度float attenuation = 1.0 / (light.constant + light.linear * distance + light.quadratic * distance * distance);// 环境光vec3 ambient = lightColor * vec3(texture(material.diffuse, TexCoords)) * light.ambient * attenuation;// 漫反射vec3 normal = normalize(Normal);vec3 lightDir = normalize(light.position - FragPos);vec3 diffuse = max(dot(normal, lightDir), 0.0) * lightColor * vec3(texture(material.diffuse, TexCoords)) * light.diffuse * attenuation;// 镜面反射vec3 viewDir = normalize(viewPos - FragPos);vec3 reflectDir = reflect(-lightDir, normal);vec3 specular = pow(max(dot(viewDir, reflectDir), 0), material.shininess) * lightColor * vec3(texture(material.specular, TexCoords)) * light.specular * attenuation;FragColor = vec4(ambient + diffuse + specular, 1.0f);
}
接下来将对应参数传递
Main.cpp
// 之前定义的点光源位置
glm::vec3 lightPos(2.5f, 2.0f, -2.0f);// 主循环
while (!glfwWindowShouldClose(window))
{float currentFrame = glfwGetTime();deltaTime = currentFrame - lastFrame;lastFrame = currentFrame;// 背景调暗,便于观察glClearColor(0.1f, 0.1f, 0.1f, 1.0f);glClear(GL_COLOR_BUFFER_BIT | GL_DEPTH_BUFFER_BIT);ProcessKeyboardInput(window);glm::mat4 view = camera.GetViewMatrix();glm::mat4 projection = glm::mat4(1);projection = glm::perspective(glm::radians(camera.fov), screenWidth / screenHeight, 0.1f, 100.0f);shader.Use();shader.SetMat4("view", view);shader.SetMat4("projection", projection);shader.SetVec3("lightColor", lightColor);shader.SetVec3("viewPos", camera.transform.position);shader.SetVec3("material.ambient", glm::vec3(1.0f, 0.5f, 0.31f));shader.SetInt("material.diffuse", 0);shader.SetInt("material.specular", 1);shader.SetFloat("material.shininess", 32.0f);shader.SetVec3("light.ambient", glm::vec3(0.2f, 0.2f, 0.2f));shader.SetVec3("light.diffuse", glm::vec3(0.5f, 0.5f, 0.5f));shader.SetVec3("light.specular", glm::vec3(1.0f, 1.0f, 1.0f));// 设置点光源的位置和衰减系数shader.SetVec3("light.position", lightPos);shader.SetFloat("light.constant", 1.0f);shader.SetFloat("light.linear", 0.09f);shader.SetFloat("light.quadratic", 0.032f);glActiveTexture(GL_TEXTURE0);glBindTexture(GL_TEXTURE_2D, boxDiffuseTex.GetTextureID());glActiveTexture(GL_TEXTURE1);glBindTexture(GL_TEXTURE_2D, boxSpecularTex.GetTextureID());for (int i = 0; i < 10; ++i){glm::mat4 model = glm::mat4(1);model = glm::translate(model, cubePositions[i]);float angle = 20.0f * i;model = glm::rotate(model, glm::radians(angle), glm::vec3(1.0f, 0.3f, 0.5f));shader.SetMat4("model", model);glBindVertexArray(VAO);glDrawArrays(GL_TRIANGLES, 0, 36);}// 绘制点光源的位置lightShader.Use();glm::mat4 model = glm::mat4(1.0f);model = glm::translate(model, lightPos);// 缩放再小点model = glm::scale(model, glm::vec3(0.1f));lightShader.SetMat4("model", model);lightShader.SetMat4("view", view);lightShader.SetMat4("projection", projection);lightShader.SetVec3("objectColor", lightColor);glBindVertexArray(lightVAO);glDrawArrays(GL_TRIANGLES, 0, 36);glfwSwapBuffers(window);glfwPollEvents();
}
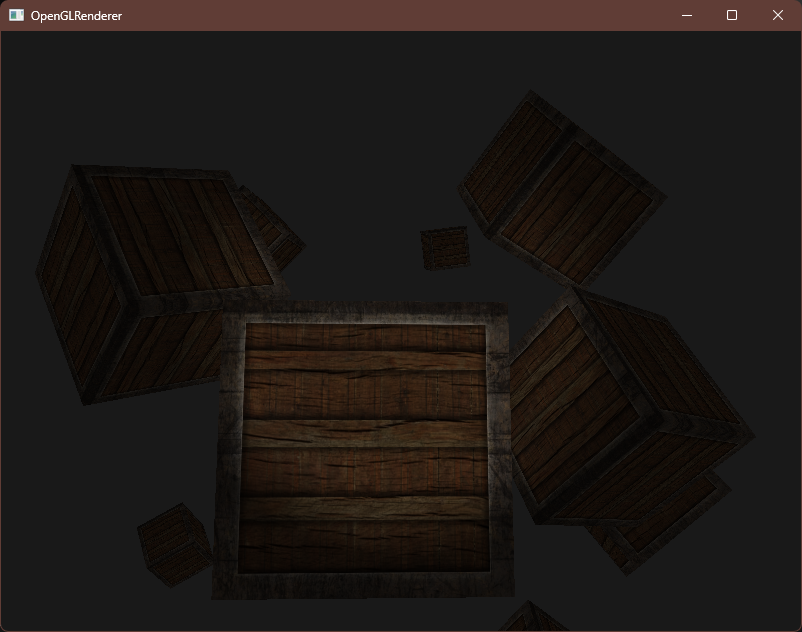
编译运行,顺利的话可以看见以下图像
距离光源越近的木箱就会越亮,远处则几乎漆黑一片
三、聚光灯 (Spot Light)
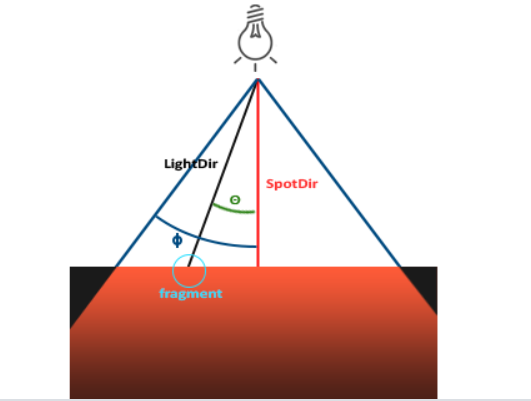
聚光灯也是位于环境中某个位置的光源,但它只朝向某一个特定的方向发射光线,我们用一个方向和一个**切光角(Cutoff Angle)**来表示
图片来自于LearnOpenGL
这里的 LightDir 表示从片段指向光源的向量
SpotDir 表示聚光灯所指向的方向
Φ 表示切光角
θ 表示LightDir和SpotDir向量之间的夹角
这里如果θ小于Φ的话,则表示将会被聚光灯所照亮
接下来我们把我们的相机作为一个手电筒,它会照亮我们所看向的方向
修改片段着色器
FragmentShader.fs
// ...struct Light {vec3 position;vec3 ambient;vec3 diffuse;vec3 specular;// 聚光灯的方向vec3 direction;// 切光角的cos值float cutOff;
};// ...void main()
{vec3 lightDir = normalize(light.position - FragPos);float theta_cos = dot(lightDir, normalize(-light.direction));// 切光角范围在0 ~ 90度,角度越大,cos值则越小if (theta_cos > light.cutOff){// 环境光vec3 ambient = lightColor * vec3(texture(material.diffuse, TexCoords)) * light.ambient;// 漫反射vec3 normal = normalize(Normal);vec3 diffuse = max(dot(normal, lightDir), 0.0) * lightColor * vec3(texture(material.diffuse, TexCoords)) * light.diffuse;// 镜面反射vec3 viewDir = normalize(viewPos - FragPos);vec3 reflectDir = reflect(-lightDir, normal);vec3 specular = pow(max(dot(viewDir, reflectDir), 0), material.shininess) * lightColor * vec3(texture(material.specular, TexCoords)) * light.specular;FragColor = vec4(ambient + diffuse + specular, 1.0f);}else{// 在切光角的范围外则只受到环境光影响vec3 ambient = lightColor * vec3(texture(material.diffuse, TexCoords)) * light.ambient;FragColor = vec4(ambient, 1.0f);}
}
这里为了不计算arccos,我们将在外面直接传入切光角的cos值,着色器计算时直接比较两角的cos值大小即可
接下来修改Main.cpp
// 设置聚光灯的位置和方向为相机的位置和方向
shader.SetVec3("light.position", camera.transform.position);
shader.SetVec3("light.direction", camera.transform.front);
// 设置切光角
shader.SetFloat("light.cutOff", glm::cos(glm::radians(12.5f)));// 隐藏绘制的光源
编译运行,顺利的话可以看见以下图像
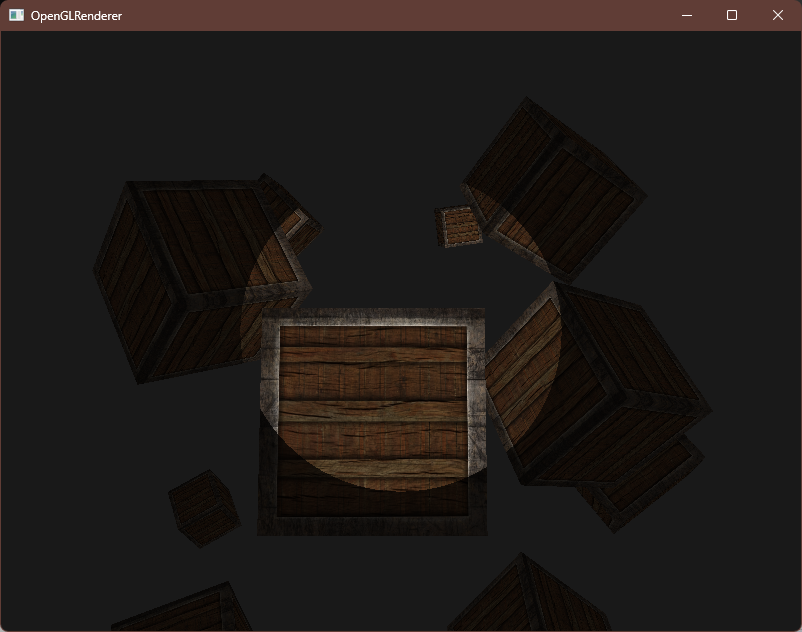
效果看起来有点假,这是因为边缘过硬,并且聚光灯也应该像点光源一样有一个距离衰减
优化聚光灯
为了软化边缘,我们需要再增加一个外切光角,那么之前的切光角就变成了内切光角
在内切光角到外切光角这一段范围,我们将对光照进行线性衰减
我们会用到以下公式来计算最终的光照强度
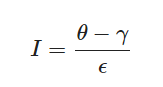
这里的ε是内外切光角的cos差,这个公式本质上就是再进行线性插值 (Lerp)
修改片段着色器
FragmentShader.fs
// ...struct Light {vec3 position;vec3 ambient;vec3 diffuse;vec3 specular;// 聚光灯的方向vec3 direction;// 内切光角的cos值float cutOff;// 外切光角的cos值float cutOffOuter;
};// ...void main()
{vec3 lightDir = normalize(light.position - FragPos);float theta_cos = dot(lightDir, normalize(-light.direction));float epsilon = light.cutOff - light.cutOffOuter;// 强度,直接作用于漫反射和镜面反射,由于会衰减到0,所以不需要再使用if-else来判断了float intensity = clamp((theta_cos - light.cutOffOuter) / epsilon, 0.0f, 1.0f);// 环境光vec3 ambient = lightColor * vec3(texture(material.diffuse, TexCoords)) * light.ambient;// 漫反射vec3 normal = normalize(Normal);vec3 diffuse = max(dot(normal, lightDir), 0.0) * lightColor * vec3(texture(material.diffuse, TexCoords)) * light.diffuse * intensity;// 镜面反射vec3 viewDir = normalize(viewPos - FragPos);vec3 reflectDir = reflect(-lightDir, normal);vec3 specular = pow(max(dot(viewDir, reflectDir), 0), material.shininess) * lightColor * vec3(texture(material.specular, TexCoords)) * light.specular * intensity;FragColor = vec4(ambient + diffuse + specular, 1.0f);
}
Main.cpp
// 设置切光角
shader.SetFloat("light.cutOff", glm::cos(glm::radians(12.5f)));
// 设置外切光角
shader.SetFloat("light.cutOffOuter", glm::cos(glm::radians(17.5f)));
编译运行,可以看见边缘软化了很多
接下来我们再添加一下距离衰减,和点光源类似
FragmentShader.fs
// ...struct Light {vec3 position;vec3 ambient;vec3 diffuse;vec3 specular;// 聚光灯的方向vec3 direction;// 内切光角的cos值float cutOff;// 外切光角的cos值float cutOffOuter;// 衰减参数float constant;float linear;float quadratic;
};// ...void main()
{vec3 lightDir = normalize(light.position - FragPos);float theta_cos = dot(lightDir, normalize(-light.direction));float epsilon = light.cutOff - light.cutOffOuter;// 强度,直接作用于漫反射和镜面反射,由于会衰减到0,所以不需要再使用if-else来判断了float intensity = clamp((theta_cos - light.cutOffOuter) / epsilon, 0.0f, 1.0f);// 衰减系数float distance = length(light.position - FragPos);float attenuation = 1.0f / (light.constant + light.linear * distance + light.quadratic * distance * distance);// 环境光vec3 ambient = lightColor * vec3(texture(material.diffuse, TexCoords)) * light.ambient;// 漫反射vec3 normal = normalize(Normal);vec3 diffuse = max(dot(normal, lightDir), 0.0) * lightColor * vec3(texture(material.diffuse, TexCoords)) * light.diffuse * intensity * attenuation;// 镜面反射vec3 viewDir = normalize(viewPos - FragPos);vec3 reflectDir = reflect(-lightDir, normal);vec3 specular = pow(max(dot(viewDir, reflectDir), 0), material.shininess) * lightColor * vec3(texture(material.specular, TexCoords)) * light.specular * intensity * attenuation;FragColor = vec4(ambient + diffuse + specular, 1.0f);
}
Main.cpp
// 设置衰减系数
shader.SetFloat("light.constant", 1.0f);
shader.SetFloat("light.linear", 0.09f);
shader.SetFloat("light.quadratic", 0.032f);
编译运行,可以发现距离远的物体暗了下来
慢慢移动摄像机靠近远距离物体,远距离物体会慢慢亮起来
完整代码请见顶部git仓库