kubernetes(序)
1.1 资源管理介绍(Kubernetes 世界观)
一切皆资源
在 Kubernetes 中,集群里所有要管理的“东西”都被抽象成一种“资源(Resource)”。
例如:Pod、Deployment、Service、ConfigMap、PV、PVC、Secret、Ingress、Namespace ……集群即平台
Kubernetes 本质是一个 分布式集群操作系统。
用户只需要“声明”自己想要什么资源、什么状态,K8s 控制平面会努力把实际状态逼近声明状态。服务 = 容器 × Pod × 控制器
你写的业务代码最终会以 容器镜像 的形式运行。
但 K8s 并不直接管理容器,而是把容器封装进 Pod。
人一般不会直接创建/删除 Pod,而是使用 Pod 控制器(Deployment、StatefulSet、DaemonSet、Job、CronJob 等)去保持副本数、滚动升级、故障自愈。
如何访问 Pod 里的服务?
通过 Service 资源实现稳定的虚拟 IP(ClusterIP)、节点端口(NodePort)或负载均衡(LoadBalancer)。如何让数据持久化?
通过 PersistentVolume(PV) 和 PersistentVolumeClaim(PVC) 将外部存储(NFS、Ceph、云盘等)挂进 Pod。
用一句话总结:
“在 Kubernetes 里,所有操作都是对资源的增删改查;
所有资源最终让 容器在 Pod 里运行,并通过 Service 对外提供持久、可靠的服务。”
1.2 资源管理方式(三种范式)
| 范式 | 对资源的操作风格 | 适用场景 | 优点 | 缺点 |
|---|---|---|---|---|
| 命令式对象管理(Imperative Object Management) | 一行命令直接“干” | 临时调试、CI/CD 临时脚本 | 简单直给,无需文件 | 不可审计、不可回滚、难复现 |
| 命令式对象配置(Imperative Object Configuration) | 先把期望状态写 YAML,再 kubectl create/patch/delete -f xxx.yaml | 开发环境、小项目 | 有文件、可版本控制 | 文件一多就痛苦,需要手动指定动作 |
| 声明式对象配置(Declarative Object Configuration) | 只写 YAML,不指定动作,kubectl apply -f 目录/ 让 K8s 自己 diff & reconcile | 生产、大型 GitOps | 支持目录级操作,天然支持 Git 版本 & 回滚,最符合 K8s 设计理念 | 初学时排错略麻烦 |
1.2.1 命令式对象管理详解
kubectl 是 Kubernetes 的“瑞士军刀”。
语法模板:
kubectl [command] [TYPE] [NAME] [flags]command:对资源做什么
create | get | describe | delete | exec | logs | rollout | scale | expose ...TYPE:资源类型
pod | deployment | service | ingress | configmap | secret | pvc ...NAME:对象名称,区分大小写
flags:额外参数
-n namespace-o yaml|json|wide--record--force...
常用示例(命令式对象管理)
# 1. 临时跑一个 Nginx Pod
kubectl run nginx-pod --image=nginx:1.25 --port=80# 2. 查看所有 Pod
kubectl get pod -A# 3. 查看单个 Pod 详情(默认格式)
kubectl get pod nginx-pod# 4. 查看单个 Pod 详情(YAML 格式)
kubectl get pod nginx-pod -o yaml# 5. 进入 Pod 容器
kubectl exec -it nginx-pod -- /bin/bash# 6. 删除 Pod
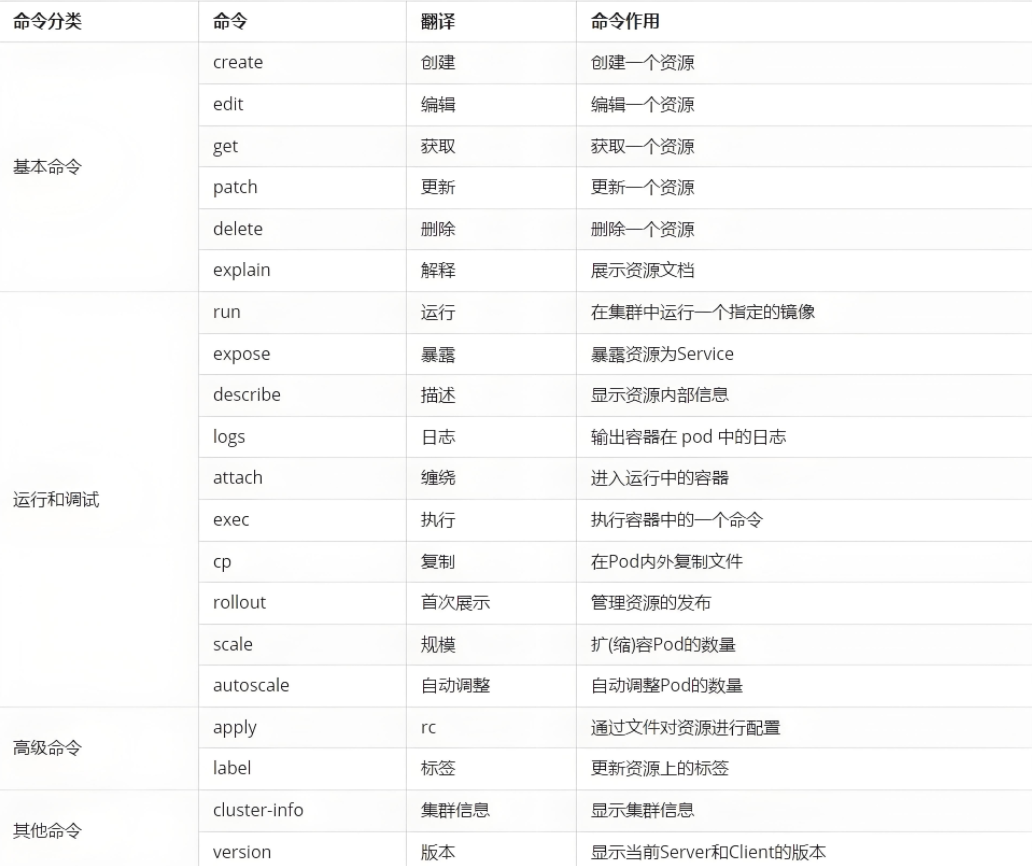
kubectl delete pod nginx-pod1.2.2 资源类型 & 速查表

查看集群支持的全部资源
kubectl api-resources输出列解释:
NAME:资源名称(复数,用于命令)
SHORTNAMES:简写(如
po代表pods)APIGROUP:API 组
NAMESPACED:是否受命名空间隔离
KIND:YAML 里的 kind 字段
高频资源速记
| 资源 | 简写 | KIND | 核心作用 |
|---|---|---|---|
| pods | po | Pod | 最小调度单元 |
| deployments | deploy | Deployment | 无状态副本控制 |
| services | svc | Service | 稳定虚拟 IP + 负载均衡 |
| ingresses | ing | Ingress | 7 层路由 |
| configmaps | cm | ConfigMap | 配置中心 |
| secrets | Secret | 敏感配置 | |
| persistentvolumes | pv | PersistentVolume | 集群级存储 |
| persistentvolumeclaims | pvc | PersistentVolumeClaim | 命名空间级存储申请 |
| namespaces | ns | Namespace | 逻辑隔离 |
| nodes | no | Node | 集群工作节点 |
| daemonsets | ds | DaemonSet | 每节点一个副本 |
| statefulsets | sts | StatefulSet | 有状态副本 |
| jobs | Job | 一次性任务 | |
| cronjobs | cj | CronJob | 定时任务 |
以下实验都建立在k8s和harbor仓库搭建好的情况下做(不会的可以看我前面的文章去做)
1.2.3 命令式对象配置 & 声明式对象配置实战
1) 命令式对象配置示例
# nginx-deploy.yaml
apiVersion: apps/v1
kind: Deployment
metadata:name: nginx-deploy
spec:replicas: 2selector:matchLabels:app: nginxtemplate:metadata:labels:app: nginxspec:containers:- name: nginximage: nginx:1.25ports:- containerPort: 80
# 创建
kubectl create -f nginx-deploy.yaml# 更新镜像
kubectl patch deploy nginx-deploy -p '{"spec":{"template":{"spec":{"containers":[{"name":"nginx","image":"nginx:1.26"}]}}}}'# 删除
kubectl delete -f nginx-deploy.yaml
2) 声明式对象配置示例
# 首次或后续更新都用 apply,K8s 会自动 diff
kubectl apply -f nginx-deploy.yaml# 回滚(利用 Git)
git checkout <旧版本>
kubectl apply -f nginx-deploy.yaml
3)查看集群版本与信息
# 显示客户端与服务端版本
[root@k8s-master ~]# kubectl version
Client Version: v1.30.0
Kustomize Version: v5.0.4-0.20230601165947-6ce0bf390ce3
Server Version: v1.30.0# 显示控制平面及核心DNS地址
[root@k8s-master ~]# kubectl cluster-info
Kubernetes control plane is running at https://172.25.254.100:6443
CoreDNS is running at https://172.25.254.100:6443/api/v1/namespaces/kube-system/services/kube-dns:dns/proxy
4)Deployment 快速创建与查询
# 创建名为 webcluster 的 Deployment,镜像 nginx,副本数 2
[root@k8s-master ~]# kubectl create deployment webcluster --image nginx --replicas 2# 查询 Deployment 状态
[root@k8s-master ~]# kubectl get deployments.apps
NAME        READY   UP-TO-DATE   AVAILABLE   AGE
webcluster  2/2     2            2           12s
5)资源字段自助查询
# 查看 Deployment 资源整体解释
[root@k8s-master ~]# kubectl explain deployment# 深入查看 Deployment.spec 字段说明
[root@k8s-master ~]# kubectl explain deployment.spec
...
replicas <integer>     # 目标副本数
...
4)在线编辑与补丁扩缩容
# 交互式编辑 Deployment(修改 replicas 为 2)
[root@k8s-master ~]# kubectl edit deployments.apps webcluster
# 将 spec.replicas 改为 2 后保存退出# 使用 patch 命令将副本数改为 4
[root@k8s-master ~]# kubectl patch deployments.apps webcluster -p '{"spec":{"replicas":4}}'
deployment.apps/webcluster patched# 验证
[root@k8s-master ~]# kubectl get deployments.apps
NAME        READY   UP-TO-DATE   AVAILABLE   AGE
webcluster  4/4     4            4           2m
5)删除资源
# 删除指定 Deployment
[root@k8s-master ~]# kubectl delete deployments.apps webcluster
deployment.apps "webcluster" deleted# 确认已清空
[root@k8s-master ~]# kubectl get deployments.apps
No resources found in default namespace.
1.2.4 运行与调试命令示例
1)运行单个 Pod
[root@k8s-master ~]# kubectl run testpod --image nginx
pod/testpod created[root@k8s-master ~]# kubectl get pods
NAME      READY   STATUS    RESTARTS   AGE
testpod   1/1     Running   0          7s
2)端口暴露与访问验证
# 查看当前 Service
[root@k8s-master ~]# kubectl get services
NAME         TYPE        CLUSTER-IP   EXTERNAL-IP   PORT(S)   AGE
kubernetes   ClusterIP   10.96.0.1    <none>        443/TCP   2d14h# 将 testpod 暴露为 ClusterIP 服务
[root@k8s-master ~]# kubectl expose pod testpod --port 80 --target-port 80
service/testpod exposed# 获取 ClusterIP 并访问
[root@k8s-master ~]# kubectl get services
NAME         TYPE        CLUSTER-IP     EXTERNAL-IP   PORT(S)   AGE
testpod      ClusterIP   10.106.78.42   <none>        80/TCP    18s[root@k8s-master ~]# curl 10.106.78.42
<!DOCTYPE html>
<html>
<head>
<title>Welcome to nginx!</title>
...
3)查看资源详情与日志
# 查看 Pod 详细信息
[root@k8s-master ~]# kubectl describe pods testpod# 查看容器日志
[root@k8s-master ~]# kubectl logs pods/testpod
/docker-entrypoint.sh: /docker-entrypoint.d/ is not empty, will attempt to perform configuration
...
10.244.0.0 - - [29/Aug/2024:05:41:11 +0000] "GET / HTTP/1.1" 200 615 "-" "curl/7.76.1" "-"
4)交互/非交互模式运行
# 交互式运行 busybox(Ctrl+P Q 退出不停止)
[root@k8s-master ~]# kubectl run -it debug --image busybox
/ ## 非交互式运行 nginx
[root@k8s-master ~]# kubectl run nginx --image nginx# 进入已运行的容器
[root@k8s-master ~]# kubectl exec -it pods/nginx -- /bin/bash
root@nginx:/#
5)文件双向复制
# 拷贝本地文件到 Pod
[root@k8s-master ~]# kubectl cp anaconda-ks.cfg nginx:/# 从 Pod 拷贝文件到本地
[root@k8s-master ~]# kubectl cp nginx:/anaconda-ks.cfg ./anaconda-ks.cfg
tar: Removing leading `/' from member names
1.2.5 高级命令示例(YAML 与标签管理)
1)一键生成 YAML 模板
# 生成 Deployment YAML 模板
[root@k8s-master ~]# kubectl create deployment webcluster \--image nginx --replicas 2 \--dry-run=client -o yaml > webcluster.yml# 查看模板
[root@k8s-master ~]# cat webcluster.yml
apiVersion: apps/v1
kind: Deployment
metadata:labels:app: webclustername: webcluster
spec:replicas: 2selector:matchLabels:app: webclustertemplate:metadata:labels:app: webclusterspec:containers:- image: nginxname: nginx# 应用模板
[root@k8s-master ~]# kubectl apply -f webcluster.yml
deployment.apps/webcluster created# 清理
[root@k8s-master ~]# kubectl delete -f webcluster.yml
2)标签管理实战
# 创建 Pod 并查看默认标签
[root@k8s-master ~]# kubectl run nginx --image nginx
[root@k8s-master ~]# kubectl get pods --show-labels
NAME    READY   STATUS    RESTARTS   AGE   LABELS
nginx   1/1     Running   0          12s   run=nginx# 追加标签
[root@k8s-master ~]# kubectl label pods nginx app=lee
[root@k8s-master ~]# kubectl get pods --show-labels
NAME    READY   STATUS    RESTARTS   AGE   LABELS
nginx   1/1     Running   0          57s   app=lee,run=nginx# 修改标签
[root@k8s-master ~]# kubectl label pods nginx app=webcluster --overwrite# 删除标签
[root@k8s-master ~]# kubectl label pods nginx app-
3)Deployment 控制器与标签关系演示
# 观察 Deployment 管理的 Pod 标签
[root@k8s-master ~]# kubectl get pods --show-labels
NAME                          READY   STATUS    RESTARTS   AGE
webcluster-7c584f774b-66zbd   1/1     Running   0          2m10s   app=webcluster,pod-template-hash=7c584f774b
webcluster-7c584f774b-9x2x2   1/1     Running   0          35m     app=webcluster,pod-template-hash=7c584f774b# 手动删除某 Pod 的 `app` 标签 → Deployment 立即重建
[root@k8s-master ~]# kubectl label pods webcluster-7c584f774b-66zbd app-
[root@k8s-master ~]# kubectl get pods --show-labels
NAME                          READY   STATUS    RESTARTS   AGE
webcluster-7c584f774b-9x2x2   1/1     Running   0          36m     app=webcluster,pod-template-hash=7c584f774b
webcluster-7c584f774b-hgprn   1/1     Running   0          2s      app=webcluster,pod-template-hash=7c584f774b
小结速记表
| 操作 | 一句话命令 |
|---|---|
| 创建 Deploy+2 副本 | kubectl create deployment d --image nginx --replicas 2 |
| 暴露 80 端口 | kubectl expose deployment d --port 80 |
| 扩副本到 4 | kubectl patch deploy d -p '{"spec":{"replicas":4}}' |
| 生成干净 YAML | kubectl create deploy d --image nginx --dry-run=client -o yaml > d.yml |
| 进入容器 | kubectl exec -it podName -- /bin/bash |
| 复制文件 | kubectl cp local/path pod:/path |
2. 什么是 Pod(Pod 101)
一句话:Pod 是 Kubernetes 里「最小可部署单元」,一个 Pod 就是集群里「一个进程」的具象化。
每个 Pod 拥有 独立 IP,内部可包含 一个或多个容器(最常见的是 Docker)。
类比豌豆荚:同一个荚里的豆子(容器)共享 IPC、Network、UTC namespace。
生命周期极短,不要直接生产使用——始终通过 控制器 来托管。
2.1 创建自主式 Pod(仅学习/调试用)
| 维度 | 说明 |
|---|---|
| 优点 | 灵活、教学友好、一次性验证快 |
| 缺点 | 无自愈、无滚动更新、无扩缩容、无版本管理 → 生产严禁 |
# 查看当前无 Pod
kubectl get pods
# No resources found in default namespace.# 手动创建自主式 Pod
kubectl run timinglee --image nginx
# pod/timinglee created# 验证运行
kubectl get pods -o wide
# NAME        READY   STATUS    IP           NODE
# timinglee   1/1     Running   10.244.1.17  k8s-node1
2.2 用控制器管理 Pod(生产唯一推荐)
| 能力 | 自主式 Pod | 控制器托管 |
|---|---|---|
| 故障自愈 | ❌ | ✅ 自动重建 |
| 水平扩缩 | ❌ | ✅ scale 一键完成 |
| 滚动更新 | ❌ | ✅ 零停机发布 |
| 声明式配置 | ❌ | ✅ YAML 即真理 |
2.2.1 创建 & 暴露
# 创建 Deployment(控制器)
kubectl create deployment timinglee --image nginx# 查看 Pod(由控制器自动生成)
kubectl get pods
# timinglee-859fbf84d6-mrjvx   1/1   Running
2.2.2 扩缩容实战
# 扩容到 6 副本
kubectl scale deployment timinglee --replicas 6
kubectl get pods
# 瞬间出现 6 个 Pod,调度到不同节点# 缩容回 2 副本
kubectl scale deployment timinglee --replicas 2
2.3 应用版本更新(滚动发布 & 回滚)
2.3.1 创建 v1 版本
# 1. 创建 Deployment(v1 镜像)
kubectl create deployment timinglee --image myapp:v1 --replicas 2# 2. 暴露为 Service
kubectl expose deployment timinglee --port 80 --target-port 80
kubectl get svc
# timinglee   ClusterIP   10.110.195.120   80/TCP# 3. 访问验证
curl 10.110.195.120
# Hello MyApp | Version: v1
2.3.2 滚动更新 → v2
# 1. 升级镜像(滚动更新执行中)
kubectl set image deployments/timinglee myapp=myapp:v2
# deployment.apps/timinglee image updated# 2. 观察历史
kubectl rollout history deployment timinglee
# REVISION 1  <none>
# REVISION 2  <none># 3. 验证 v2
curl 10.110.195.120
# Hello MyApp | Version: v2
2.3.3 一键回滚
# 回滚到 REVISION 1
kubectl rollout undo deployment timinglee --to-revision 1# 再次验证已回到 v1
curl 10.110.195.120
# Hello MyApp | Version: v1
速记卡片
| 任务 | 命令 |
|---|---|
| 创建控制器 | kubectl create deployment d --image=app:v1 |
| 暴露服务 | kubectl expose deployment d --port 80 |
| 扩容 | kubectl scale deployment d --replicas N |
| 升级镜像 | kubectl set image deployment/d app=app:v2 |
| 回滚版本 | kubectl rollout undo deployment d --to-revision 1 |
| 查看历史 | kubectl rollout history deployment d |
2.4.1 为什么 YAML 是生产刚需
| 维度 | 命令式 | 声明式 YAML |
|---|---|---|
| 可读 | 一行数十个参数 | 结构化一目了然 |
| 版本控制 | 无 | Git 直接 diff/回滚 |
| 自动化 | 人肉脚本 | CI/CD 直接 kubectl apply -f |
| 多人协作 | 口口相传 | Merge Request 评审 |
一句话:“写 YAML = 把集群当 Git 仓库用”。
2.4.2 资源清单字段速查表
| 字段 | 类型 | 说明 & 典型取值 |
|---|---|---|
apiVersion | string | 核心 API:v1;Deployment:apps/v1 |
kind | string | 资源类型:Pod / Deployment / Service … |
metadata.name | string | 必须唯一,同一命名空间下不可重名 |
metadata.namespace | string | 默认 default,建议显式指定 |
spec.containers[].name | string | 容器名称,同一 Pod 内唯一 |
spec.containers[].image | string | 镜像全名,如 nginx:1.25-alpine |
spec.containers[].imagePullPolicy | enum | Always / IfNotPresent / Never |
spec.containers[].ports[].containerPort | int | 容器内监听端口 |
spec.containers[].resources.limits.cpu | string | 上限,如 500m(0.5 核) |
spec.containers[].resources.requests.memory | string | 起步内存,如 128Mi |
spec.restartPolicy | enum | Always / OnFailure / Never |
spec.nodeSelector | object | 调度约束,如 disk: ssd |
spec.hostNetwork | bool | true 时共享宿主机网络 (慎用) |
spec.imagePullSecrets[].name | string | 拉取私有镜像用的 Secret 名称 |
2.4.3 在线文档 & 提示
# 任何字段都能自助查看
kubectl explain pod.spec.containers
kubectl explain deployment.spec.strategy
2.4.4 编写示例
2.4.4.1 单个容器 Pod(最简模板)
# 1. 导出干净模板
kubectl run timinglee --image myapp:v1 --dry-run=client -o yaml > pod.yml
# 2. 保留最核心字段即可
apiVersion: v1
kind: Pod
metadata:labels:run: timingleename: timinglee
spec:containers:- image: myapp:v1name: timinglee
# 3. 一键运行
kubectl apply -f pod.yml
kubectl get pods -l run=timinglee
2.4.4.2 多容器 Pod(端口冲突示例)
⚠️ 注意:
同一 Pod 内 容器端口不能重复,否则后启动容器会CrashLoopBackOff。
# 错误示例:两个 nginx 都监听 80
apiVersion: v1
kind: Pod
metadata:name: timinglee
spec:containers:- image: nginx:latestname: web1- image: nginx:latestname: web2
运行结果:
kubectl get pods
# timinglee   1/2   Error   ... bind():80 failed (98: Address already in use)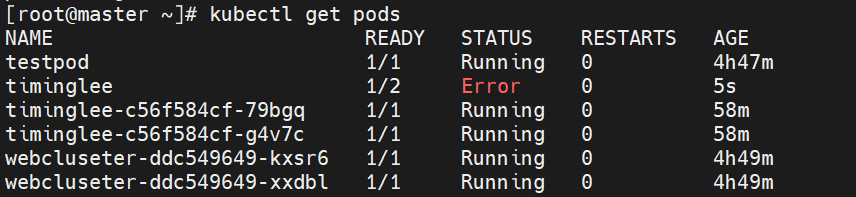
2.4.4.3 多容器 Pod(正确姿势)
apiVersion: v1
kind: Pod
metadata:labels:run: timingleename: timinglee
spec:containers:- image: nginx:latestname: web1ports:- containerPort: 80- image: busybox:latestname: busyboxcommand: ["/bin/sh","-c","sleep 1000000"]
kubectl apply -f pod.yml
kubectl get pods -w
# timinglee   2/2   Running   0          19s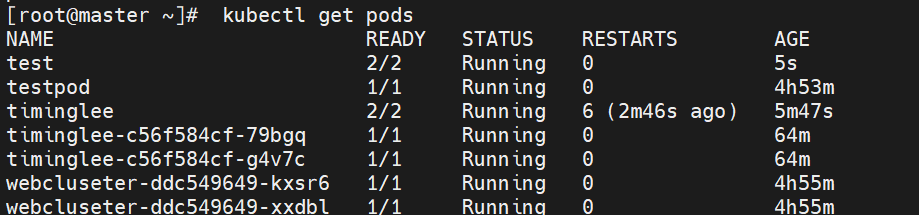
一键模板速记
| 场景 | 命令 |
|---|---|
| 导出单 Pod 模板 | kubectl run mypod --image nginx --dry-run=client -o yaml > pod.yml |
| 导出 Deployment 模板 | kubectl create deploy mydep --image nginx --replicas 3 --dry-run=client -o yaml > dep.yml |
| 验证语法 | kubectl apply --dry-run=client -f pod.yml |
| 应用并持续观察 | kubectl apply -f pod.yml && kubectl get pods -l run=mypod -w |
2.4.4.3 示例3:理解 Pod 内网络整合
结论先行:同一个 Pod 的所有容器共享 Network Namespace → IP 一样、端口空间一样、localhost 互通。
# pod.yml
apiVersion: v1
kind: Pod
metadata:labels:run: timingleename: test
spec:containers:- image: myapp:v1name: myapp1                    # 80 端口- image: busyboxplus:latestname: busyboxpluscommand: ["/bin/sh","-c","sleep 1000000"]
kubectl apply -f pod.yml
kubectl get pods
# NAME   READY   STATUS    RESTARTS   AGE
# test   2/2     Running   0          8s# 在 busyboxplus 容器里直接 curl localhost:80,成功证明网络共享
kubectl exec test -c busyboxplus -- curl -s localhost
# Hello MyApp | Version: v1 | <a href="hostname.html">Pod Name</a>
2.4.4.4 示例4:端口映射(hostPort)
hostPort 把容器端口直接映射到 宿主机端口,同一宿主机只能有一个实例。
apiVersion: v1
kind: Pod
metadata:labels:run: timingleename: test
spec:containers:- image: myapp:v1name: myapp1ports:- name: httpcontainerPort: 80hostPort: 80          # 宿主机 80 → 容器 80protocol: TCP
kubectl apply -f pod.yml
kubectl get pods -o wide
# NAME   READY   STATUS    IP           NODE
# test   1/1     Running   10.244.1.2   k8s-node1# 直接访问宿主机即可看到服务
curl k8s-node1.timinglee.org
# Hello MyApp | Version: v1
2.4.4.5 示例5:环境变量注入
apiVersion: v1
kind: Pod
metadata:labels:run: timingleename: test
spec:containers:- image: busybox:latestname: busyboxcommand: ["/bin/sh","-c","echo $NAME; sleep 3000000"]env:- name: NAMEvalue: timinglee
kubectl apply -f pod.yml
kubectl logs test busybox
# timinglee
2.4.4.6 示例6:资源限制 & QoS 优先级
QoS 三级优先级:Guaranteed > Burstable > BestEffort
| 配置方式 | QoS 类型 | 描述 |
|---|---|---|
| limits = requests | Guaranteed | 最高保障 |
| 只设 requests/limits 不一致 | Burstable | 中等弹性 |
| 两者皆无 | BestEffort | 最低优先级、最先被驱逐 |
apiVersion: v1
kind: Pod
metadata:name: test
spec:containers:- image: myapp:v1name: myappresources:limits:               # 上限cpu: "500m"memory: "100Mi"requests:             # 下限 = 上限 → Guaranteedcpu: "500m"memory: "100Mi"
kubectl apply -f pod.yml
kubectl describe pod test | grep -A2 "QoS Class"
# QoS Class:                   Guaranteed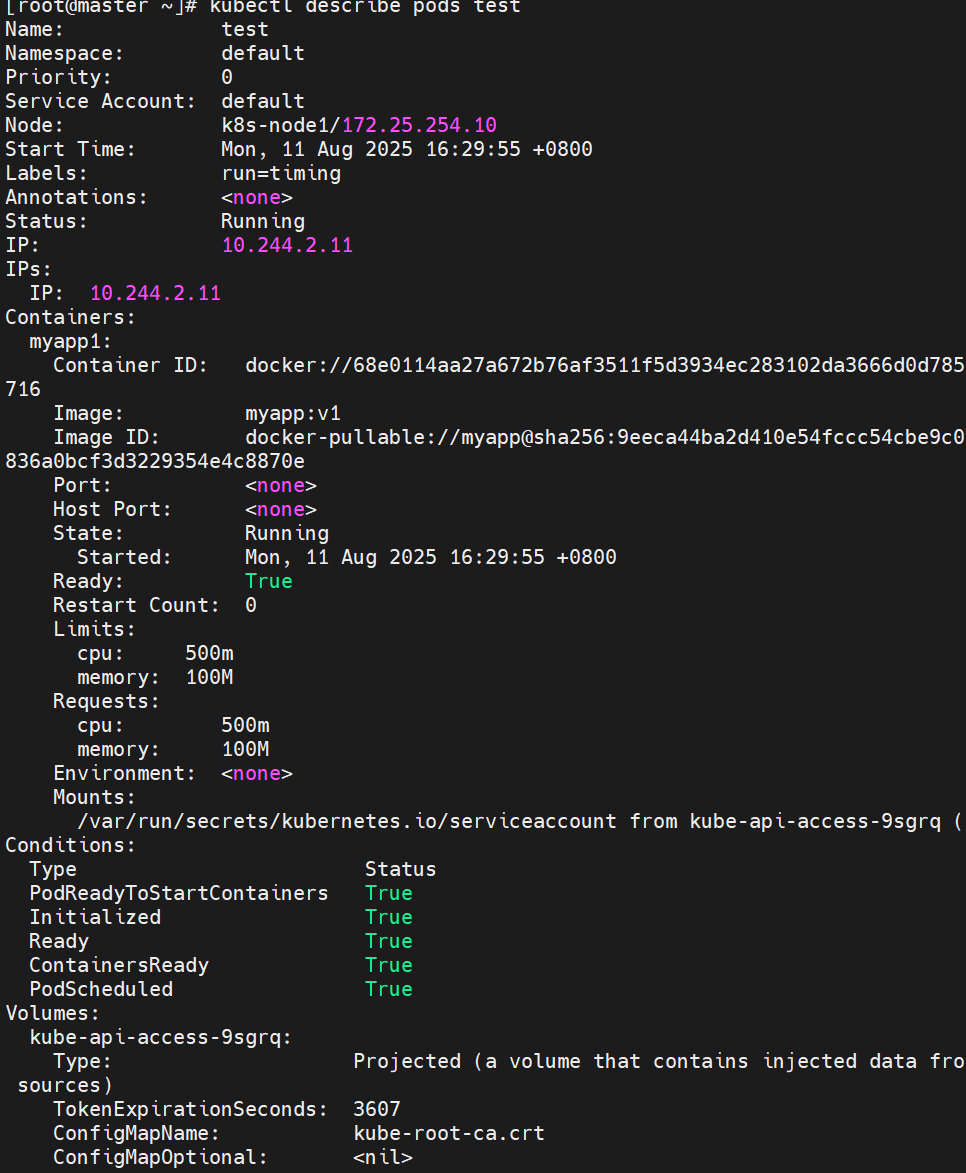
2.4.4.7 示例7:容器启动管理(restartPolicy)
| 策略 | 含义 |
|---|---|
Always(默认) | 任何退出都重启 |
OnFailure | 仅异常退出重启 |
Never | 不重启 |
apiVersion: v1
kind: Pod
metadata:labels:run: timingleename: test
spec:restartPolicy: Alwayscontainers:- image: myapp:v1name: myapp
kubectl apply -f pod.yml
kubectl get pods -o wide
# NAME   READY   STATUS    IP           NODE
# test   1/1     Running   10.244.2.3   k8s-node2# 在 node2 手动杀掉容器模拟故障
docker rm -f ccac1d64ea81# 观察 Pod 自动重启
kubectl get pods
# test   1/1   Running   1 (2s ago)   2m
2.4.5 本节速查表
| 场景 | YAML 片段 |
|---|---|
| 网络共享 | 同一 ports / localhost |
| 端口映射 | hostPort: 宿主机端口 |
| 环境变量 | env: [{name: KEY, value: VAL}] |
| 资源限制 | resources: {limits: {...}, requests: {...}} |
| 重启策略 | restartPolicy: Always/OnFailure/Never |
2.4.4.8 示例8:选择运行节点(nodeSelector)
原理:通过节点标签把 Pod 强制调度到指定机器,常用于 GPU、磁盘类型、地域隔离等场景。
apiVersion: v1
kind: Pod
metadata:labels:run: timingleename: test
spec:nodeSelector:                    # 调度约束kubernetes.io/hostname: k8s-node1restartPolicy: Alwayscontainers:- image: myapp:v1name: myapp
kubectl apply -f pod.yml
kubectl get pods -o wide
# NAME   READY   STATUS    IP           NODE        ...
# test   1/1     Running   10.244.1.5   k8s-node1   👈 固定在 node1
2.4.4.9 示例9:共享宿主机网络(hostNetwork)
原理:hostNetwork: true 让 Pod 直接使用宿主机网络栈,Pod IP = 宿主机 IP;适用于网络性能敏感或需要监听宿主机端口的服务。
apiVersion: v1
kind: Pod
metadata:labels:run: timingleename: test
spec:hostNetwork: true            # 关键开关restartPolicy: Alwayscontainers:- image: busybox:latestname: busyboxcommand: ["/bin/sh","-c","sleep 100000"]
kubectl apply -f pod.yml
kubectl exec -it pods/test -c busybox -- /bin/sh
/ # ifconfig | grep 172.25
eth0: ... inet addr:172.25.254.20 ...   👈 与宿主机完全一致
/ # exit
⚠️ 注意
同一宿主机只能运行 一个 实例(端口/网络冲突)。
DNS、Service 环境变量不会自动注入,需要手动配置。
生产慎用,建议用 NodePort / HostPort 替代。