Vue 服务端渲染(SSR)详解
Vue SSR是一种在服务端将 Vue 应用渲染成 HTML 字符串,然后直接发送到客户端的技术。相比传统的客户端渲染,Vue SSR 能带来更好的 SEO 性能和更快的首屏加载时间。下面我们从零到一,结合项目源码,详细讲解如何实现一个 Vue SSR 项目。
1. 项目结构
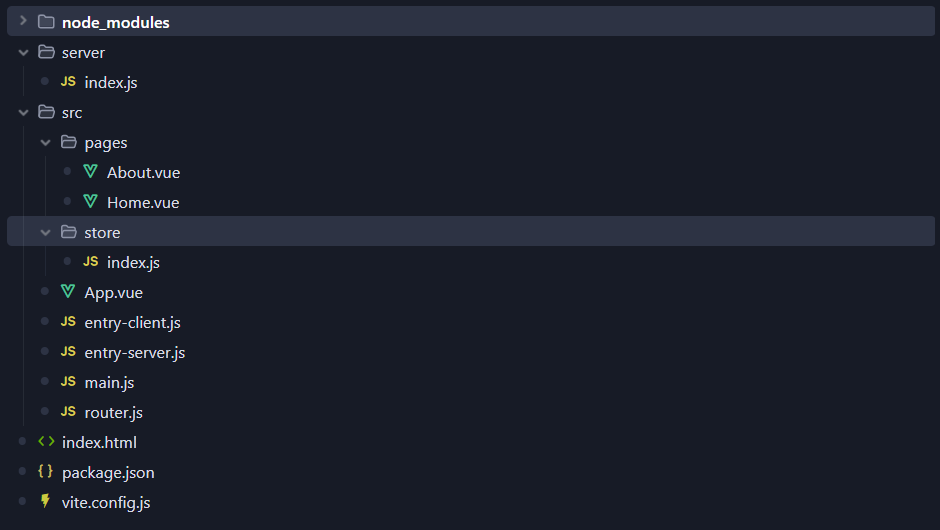
以下以一个基本的Demo来说明服务端渲染的实现,下图是项目的基本结构:
2. 安装项目依赖
以下是package.json中的配置:
{"name": "vue-ssr-example","version": "1.0.0","scripts": {"dev": "node server","dev:client": "vite","dev:server": "node server","dev:both": "concurrently \"npm run dev:client\" \"npm run dev:server\"","build": "npm run build:client && npm run build:server","build:client": "vite build --ssrManifest --outDir dist/client","build:server": "vite build --ssr src/entry-server.js --outDir dist/server","serve": "cross-env NODE_ENV=production node server"},"dependencies": {"vue": "^3.5.6","vue-router": "^4.0.0","pinia": "^2.0.0","express": "^4.17.1"},"devDependencies": {"@vitejs/plugin-vue": "^4.0.0","vite": "^4.0.0","cross-env": "^7.0.3","concurrently": "^6.2.0"}
}
3. 配置脚手架
// vite.config.js
import { defineConfig } from "vite";
import vue from "@vitejs/plugin-vue";export default defineConfig({plugins: [vue()],build: {minify: false,},
});
4. 服务端渲染流程
4.1. 请求阶段
Node服务器接收请求,以下是server代码:
// server/index.js// 引入必要的模块
const fs = require("fs");
const path = require("path");
const express = require("express");
const { createServer: createViteServer } = require("vite"); // 重命名Vite的createServer方法// 创建SSR服务器的主函数,接受生产环境标志参数
async function createServer(isProd = process.env.NODE_ENV === "production") {// 创建Express实例const app = express(); let vite;// 开发环境配置if (!isProd) {// 创建Vite开发服务器vite = await createViteServer({server: { middlewareMode: true }, // 中间件模式appType: "custom" // 自定义应用类型(避免Vite的默认SPA处理)});app.use(vite.middlewares); // 使用Vite中间件处理请求} else {// 生产环境直接使用构建好的静态文件app.use(express.static(path.resolve(__dirname, "../dist/client")));}// 处理所有路由的中间件app.use("*", async (req, res) => {const url = req.originalUrl; // 获取请求URLtry {let template, render;// 开发环境处理if (!isProd) {// 读取HTML模板文件template = fs.readFileSync(path.resolve(__dirname, "../index.html"),"utf-8");// 使用Vite转换HTML模板(包含HMR支持)template = await vite.transformIndexHtml(url, template);// 加载服务端入口模块render = (await vite.ssrLoadModule("/src/entry-server.js")).render;} else {// 生产环境处理template = fs.readFileSync(path.resolve(__dirname, "../dist/client/index.html"),"utf-8");// 直接加载构建后的服务端入口render = require("../dist/server/entry-server.js").render;}// 调用渲染函数获取SSR结果const [appHtml, preloadLinks, initialState] = await render(url);// 替换模板中的占位符const html = template.replace(`<!--app-html-->`, appHtml) // 插入应用HTML.replace(`"<!--pinia-state-->"`, JSON.stringify(initialState)); // 序列化Pinia状态// 返回最终HTMLres.status(200).set({ "Content-Type": "text/html" }).end(html);} catch (e) {// 开发环境下修正错误堆栈跟踪if (!isProd) {vite.ssrFixStacktrace(e);}res.status(500).end(e.message);}});// 启动服务器const port = process.env.PORT || 3000;app.listen(port, () => {console.log(`Server is running on http://localhost:${port}`);});
}// 启动服务器
createServer();
4.2. 应用初始化
创建Vue实例,以下是entry-server.js文件的代码:
// src/entry-server.js
// 从主模块导入应用创建函数
import { createApp } from "./main";
// 导入Vue服务端渲染工具
import { renderToString } from "vue/server-renderer";// 服务端渲染函数,接收请求URL作为参数
export async function render(url) {// 创建Vue应用实例(包含应用、路由和状态管理)const { app, router, pinia } = createApp();// 设置当前路由位置await router.push(url);// 等待路由导航完成await router.isReady();// 创建SSR上下文对象(用于收集渲染过程中的资源信息)const context = {};// 将Vue应用渲染为HTML字符串const appHtml = await renderToString(app, context);// 序列化Pinia状态(用于客户端hydration)const initialState = JSON.stringify(pinia.state.value);// 返回渲染结果数组:// [0] 应用HTML字符串// [1] 预加载模块信息(用于资源预加载)// [2] 初始状态数据return [appHtml, context.modules, initialState];}
以下是上面代码中引入的main.js文件代码:
// /src/main.js
// 导入SSR专用Vue应用创建方法和核心模块
import { createSSRApp } from "vue"; // 服务端渲染专用应用创建方法
import { createRouter } from "./router"; // 自定义路由配置
import { createPinia } from "pinia"; // 状态管理库
import App from "./App.vue"; // 根组件// 应用工厂函数(SSR核心要求)
export function createApp() {// 创建SSR应用实例(与客户端createApp的区别在于SSR优化)const app = createSSRApp(App);// 初始化路由系统const router = createRouter();// 创建Pinia状态管理实例const pinia = createPinia();// 注册路由插件(使this.$router可用)app.use(router);// 注册状态管理(使this.$pinia可用)app.use(pinia);// 返回应用核心三件套,供entry-server和entry-client使用:// app: Vue应用实例// router: 路由实例(处理服务端/客户端路由同步)// pinia: 状态管理实例(保证服务端/客户端状态一致)return { app, router, pinia };
}
以下是根组件App.vue代码:
<template><div><nav><router-link to="/">Home</router-link> |<router-link to="/about">About</router-link></nav><router-view></router-view></div>
</template><script>
export default {name: "App",
};
</script>
4.3. 路由解析
通过router.js匹配对应组件文件,以下是router.js文件代码:
// src/route.js
import {createRouter as _createRouter,createMemoryHistory,createWebHistory,
} from "vue-router";
import Home from "./pages/Home.vue";
import About from "./pages/About.vue";const routes = [{ path: "/", component: Home },{ path: "/about", component: About },
];export function createRouter() {return _createRouter({history: import.meta.env.SSR ? createMemoryHistory() : createWebHistory(),routes,});
}
4.4. 数据预取
数据预取通常是通过执行组件asyncData方法获取数据注入到组件文件里,本例中为了方便演示已省略。
以下是About.vue文件代码:
<!--src/pages/About.vue-->
<template><div><h1>About</h1><p>This is the about page.</p></div>
</template><script>
export default {name: "About",
};
</script>
以下是Home.vue文件代码:
<!--src/pages/Home.vue-->
<template><div><h1>Home</h1><p>Count: {{ count }}</p><button @click="increment">Increment</button></div>
</template><script setup>
import { useCounterStore } from "../store";
import { storeToRefs } from "pinia";const store = useCounterStore();
const { count } = storeToRefs(store);
const { increment } = store;</script>
4.5. 状态同步
准备初始状态,以下是store的代码:
// src/store/counter.jsimport { defineStore } from "pinia";
export const useCounterStore = defineStore("counter", {state: () => ({count: 10,}),actions: {increment() {this.count++;},},
});
4.6. HTML生成
Vue SSR 将组件树递归渲染为 HTML 字符串,包含初始状态和激活标记,用于服务端返回完整页面结构。
4.7. 响应返回
将响应的结果注入状态到模板中,以下是index.html文件代码:
<!DOCTYPE html>
<html lang="en"><head><meta charset="UTF-8" /><meta name="viewport" content="width=device-width, initial-scale=1.0" /><title>Vue 3 SSR Example</title>
</head><body><div id="app"><!--app-html--></div><script>window.__INITIAL_STATE__ = "<!--pinia-state-->";</script><script type="module" src="/src/entry-client.js"></script>
</body></html>
4.8. 客户端激活
客户端激活页面交互,以下是entry-client.js文件代码:
// /src/entry-client.js// 导入应用创建函数和状态管理库
import { createApp } from "./main";
import { createPinia } from "pinia";// 创建Vue应用实例(包含应用、路由和状态管理)
const { app, router, pinia } = createApp();// 服务端渲染注入的初始状态处理
// 从全局变量获取服务端序列化的状态数据
if (window.__INITIAL_STATE__) {try {// 将JSON字符串还原为Pinia状态对象pinia.state.value = JSON.parse(window.__INITIAL_STATE__);} catch (e) {// 解析失败时输出错误信息(开发环境调试用)console.error("Failed to parse initial state:", e);}
}// 等待路由导航准备就绪后挂载应用
// 确保异步路由组件解析完成后再执行挂载
router.isReady().then(() => {// 将Vue实例挂载到ID为app的DOM节点// 客户端hydration的入口点app.mount("#app");
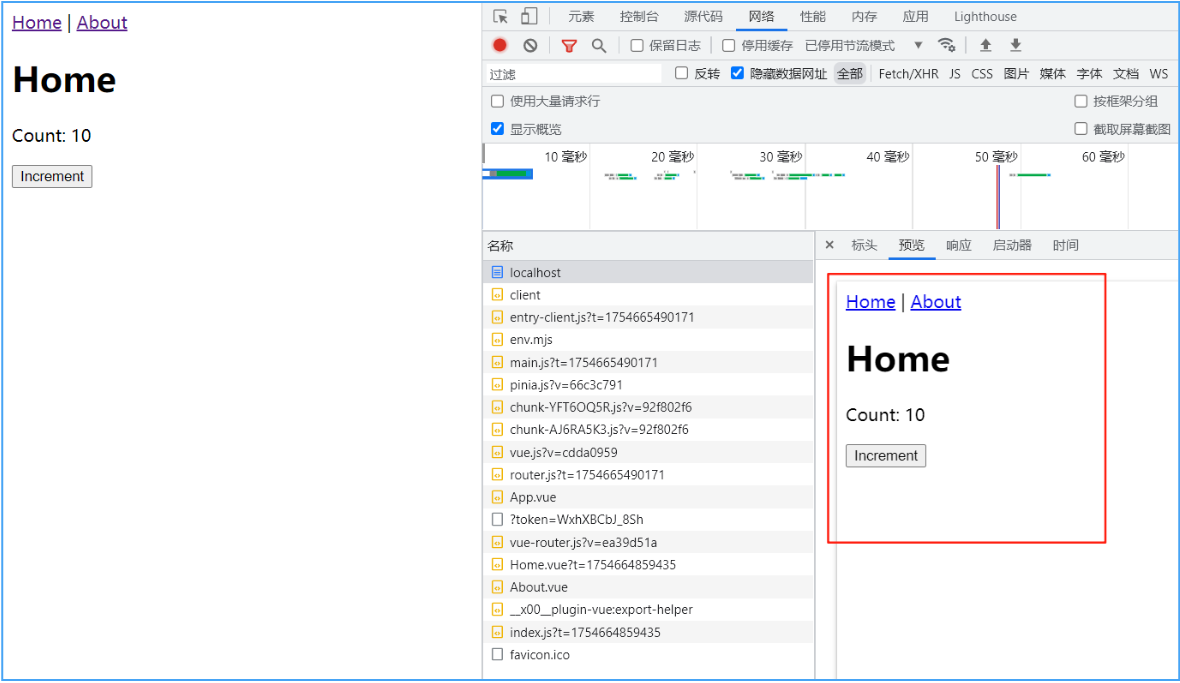
});5. 效果预览
观察控制台返回的结果,可以清楚的看到文件不再只是一个空壳文件,而是带有样式的页面,在浏览器上点击按钮数字均有变化,说明事件和状态已经被客户端激活了。