Vue Router 路由的创建和基本使用(超详细)
一、路由的基本概念
你是否好奇单页应用(SPA)是如何在不刷新页面的情况下实现页面切换的?这就离不开路由的功劳。
- 路由:本质是一组 key-value 的对应关系,在前端领域中,key 通常是路径,value 是对应的组件。
- 路由器:管理多个路由的工具,负责根据路径匹配对应的组件并进行渲染。
- SPA 应用特点:
- 整个应用只有一个完整的页面
- 点击导航链接不会刷新页面,只会做局部更新
- 数据通过 ajax 请求获取
举个例子,当我们访问 /home 路径时,路由器会帮我们渲染 Home 组件;访问 /about 路径时,渲染 About 组件,这就是前端路由的核心作用。
二、路由项目的初始化
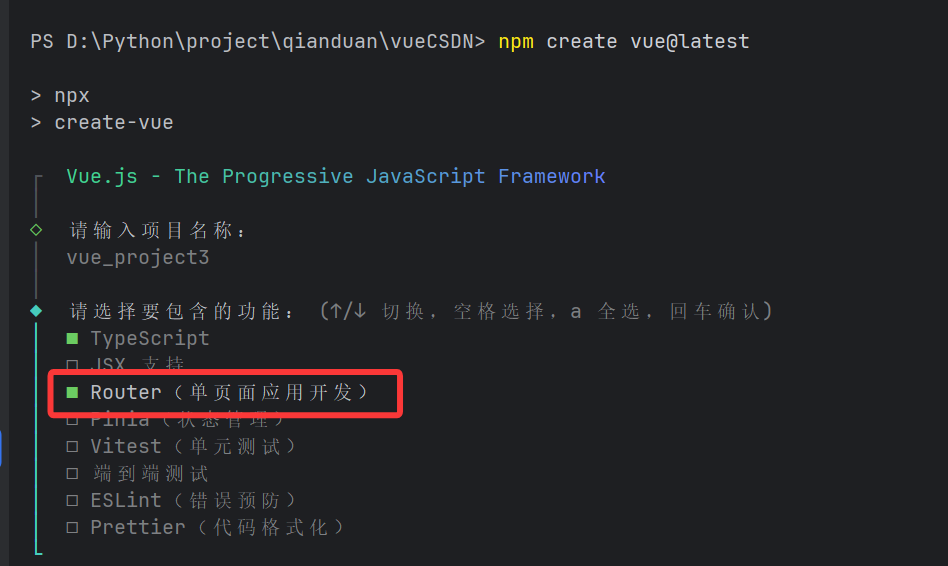
2.1 创建项目的时选择路由
在使用 Vue CLI 或 Vite 创建 Vue 项目时,通常会有一个选项让我们选择是否安装 Vue Router,直接勾选即可快速初始化带有路由配置的项目。
2.2 手搓路由(手动配置路由)
假如我们创建项目的时候没有添加路由配置,那我们怎么手动的添加路由配置呢?
①安装 Vue Router(Vue 3 对应版本为 4.x)
npm install vue-router@4
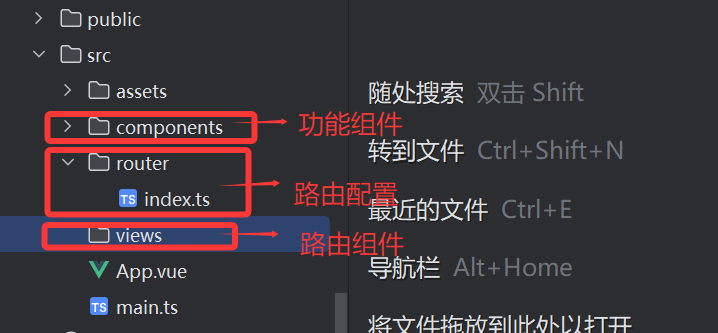
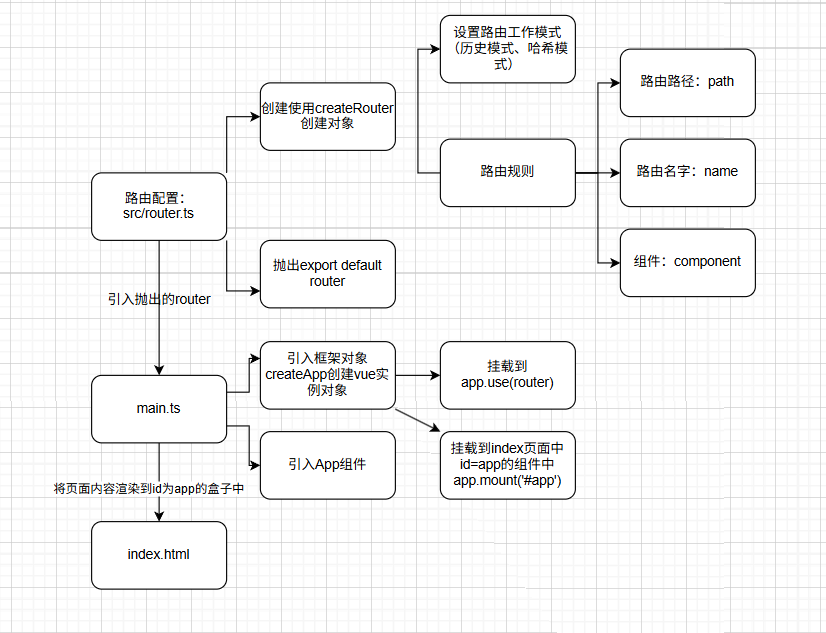
②创建路由配置文件(通常在 src/router/index.ts)
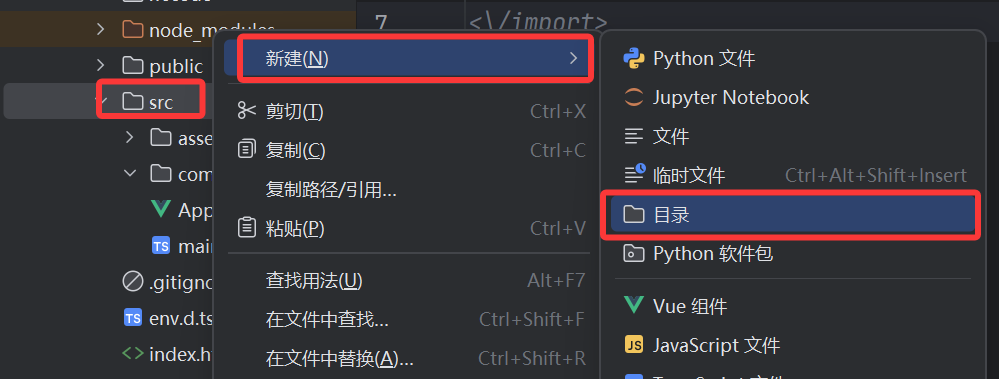
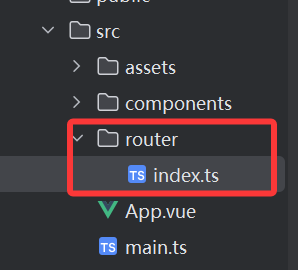
src/router/index.ts
// 1、导入创建路由对象(传入工作模式,路由规则):
// 导入createRouter对象, 创建路由对象// 2、导入创建工作模式:
// ①导入createWebHistory对象, 创建历史工作模式
// ②导入createWebHashHistory对象, 创建哈希工作模式
import {createRouter,createWebHistory} from "vue-router";
const roter =  createRouter({history:createWebHistory(),routes:[// 路由规则]
})
// 抛出路由对象,用于挂载到Vue实例中
export default roter
③在src/main.ts挂载到index的#app
src/main.ts
import './assets/main.css'
// 引入刚刚创建的src/router/index.ts router实例
import router from './router'import { createApp } from 'vue'
import App from './App.vue'const app = createApp(App)// 挂载router实例到app实例
app.use(router)app.mount('#app')
③原理的示意图
三、路由的基本使用
3.1 创建路由器
如何创建一个路由器来管理我们的路由规则呢?
// src/router/index.ts
import { createRouter, createWebHistory } from "vue-router";
import Home from "@/pages/Home.vue";
import About from "@/pages/About.vue";// 创建路由器实例
const router = createRouter({history: createWebHistory(), // 路由模式routes: [ // 路由规则数组{path: "/home", // 路径name: "home", // 路由名称component: Home // 对应的组件},{path: "/about",name: "about",component: About}]
});export default router;
3.2 路由的两种工作模式
路由有两种工作模式,它们各有什么特点,该如何选择呢?
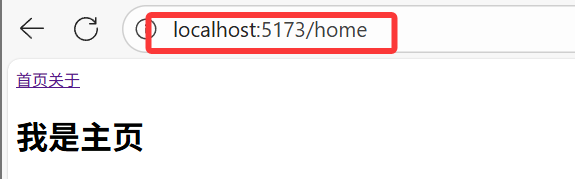
3.2.1 history 模式(createWebHistory)
const router = createRouter({history: createWebHistory(), // history模式// ...路由规则
});- 优点:URL 更加美观,不带有
#,更接近传统网站的 URL - 缺点:项目上线后,需要服务端配合处理路径问题,否则刷新页面可能会出现 404 错
3.2.2 hash 模式(createWebHashHistory)
const router = createRouter({history: createWebHashHistory(), // hash模式// ...路由规则
});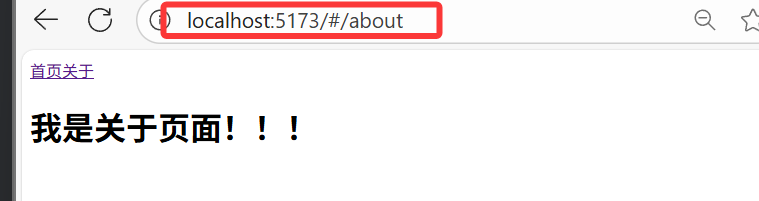
- 优点:兼容性更好,不需要服务器端处理路径
- 缺点:URL 带有
#不够美观,SEO 优化方面相对较差
总结:开发环境下两种模式均可使用;生产环境如果服务端支持,优先选择 history 模式,否则使用 hash 模式。
3.3 路由的使用(<router-link><router-view>)
路由的使用:
1.路由导航
<router-link to="src" active-class="选中之后的样式类名"></router-link>
2.路由展示
<router-view></router-view>
<template>
<!-- 1、路由导航 --><div class="nav"><!-- to 表示目标路径,active-class 是选中时的样式类名 --><router-link to="/home" active-class="active">首页</router-link><routerLink to="/about" active-class="active">关于</routerLink></div>
<!-- 2、路由展示 --><div class="content"><router-view></router-view></div>
</template><script setup></script><style>
/* 1、路由没有被选中 */
a{color: black;
}
/* 1、路由被选中样式 */
.active {color: #3a5fc6;border: #3a5fc6 1px solid;
}
</style>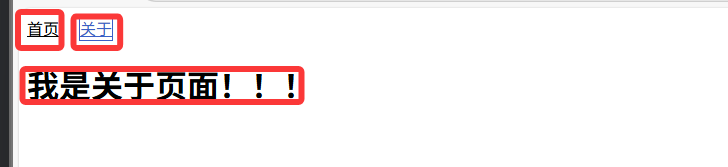
3.4 to的三种写法、
<router-link> 的 to 属性有多种写法,分别适用于什么场景呢?
3.4.1 写法一:对象型path写法 :to"{path:'src'}"
<router-link :to="{path:'/home'}" active-class="active">首页</router-link>适用于需要动态生成路径或携带参数的场景。
3.4.2 写法二:字符串写法(简写):to:"src"
<routerLink to="/about" active-class="active">关于</routerLink>适用于路径固定的简单场景,写法简洁。
3.4.3 写法三:对象型name写法 :to"{name:'name'}"
<routerLink :to="{name:'new'}" active-class="active">新页面</routerLink>需要先在路由规则中配置 name 属性,优点是当路径发生变化时,只需修改路由规则中的 path,不需要修改所有导航链接。
3.4.4 设置replace禁止返回上一个页面
使用replace清除浏览器的历史记录,不能返回上次浏览页面。
<router-link replace :to="{path:'/home'}" active-class="active">首页</router-link>
<routerLink replace to="/about" active-class="active">关于</routerLink>
<routerLink replace :to="{name:'new'}" active-class="active">新页面</routerLink>
四、路由嵌套
在实际开发中,我们经常会遇到页面中嵌套子页面的情况,比如新闻页面中嵌套新闻详情,这时就需要用到嵌套路由。
如何配置嵌套路由呢?
-
编写子组件(如
NewsDetail.vue) -
在路由规则中使用
children配置项
// src/router/index.ts
import {createRouter,createWebHistory,createWebHashHistory} from "vue-router";
import Home from "../views/homeView.vue";
import About from "../views/aboutView.vue";
import New from "../views/newView.vue";
import NewList from "../views/newlistView.vue";
const roter =  createRouter({history:createWebHashHistory(),routes:[// 路由规则{path: "/home", // 路径name: "home", // 路由名称component: Home // 对应的组件},{path: "/about",name: "about",component: About},{path: "/New",name: "new",component: New,children:[{path:"NewList",name:"NewList",component:NewList}]},]
})
// 抛出路由对象,用于挂载到Vue实例中
export default roter
注意:
子路由不需要加"/",否则不会被识别为子路由!!!

在新闻页面添加路由导航和路由渲染:
// src/views/newList.vue
<template><h1>我是新闻页面</h1><router-link to="/new/NewList">新闻详情</router-link><router-view></router-view>
</template>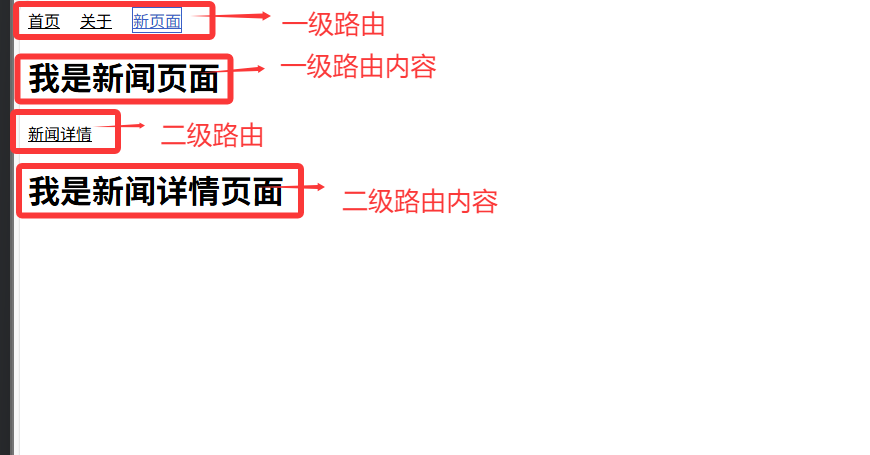
五、路由传参
在页面跳转时,我们经常需要传递参数(如新闻 ID、用户 ID 等),Vue Router 提供了两种主要的传参方式:query 传参和 params 传参。
5.1 to + query 传参
query 传参的参数会显示在 URL 中,形如 ?id=1&title=新闻标题。
query传参的路径样式:

5.1.1 模板字符串的 query 传参
①路由设置
{path: '/newList',name: 'newList',component: newListView,children:[{// 不要设置参数path: 'newDetail',name: 'newDetail',component: newDetailView,}]
},
②父路由传递参数
<script setup lang="ts">
import { RouterLink, RouterView } from 'vue-router'
import {reactive} from "vue";
const news = reactive([{id: 1001,title: '新闻标题1',content: '新闻内容1'},{id: 1002,title: '新闻标题2',content: '新闻内容2'},{id: 1003,title: '新闻标题3',content: '新闻内容3'},{id: 1004,title: '新闻标题4',content: '新闻内容4'},
])
</script><template><div class="nav" v-for="anew in news" >  // 注意<router-link  :to="`/newList/newDetail?id=${anew.id}&title=${anew.title}&content=${anew.content}`">{{anew.title}}</router-link></div><div class="content"><router-view></router-view></div>
</template><style scoped></style>
③子路由接受参数
<script setup lang="ts">
import { useRoute} from 'vue-router'
const route = useRoute()
</script><template><h2>news详情页面</h2><ul>// 注意怎么访问参数<li>{{route.query.id}}</li><li>{{route.query.title}}</li><li>{{route.query.content}}</li></ul>
</template>
5.1.2 query 传参 + 对象型参数
①路由设置
{path: '/newList',name: 'newList',component: newListView,children:[{// 不要设置参数path: 'newDetail',name: 'newDetail',component: newDetailView,}]
},
②父路由传递参数
<script setup lang="ts">
import { RouterLink, RouterView } from 'vue-router'
import {reactive} from "vue";
const news = reactive([{id: 1001,title: '新闻标题1',content: '新闻内容1'},{id: 1002,title: '新闻标题2',content: '新闻内容2'},{id: 1003,title: '新闻标题3',content: '新闻内容3'},{id: 1004,title: '新闻标题4',content: '新闻内容4'},
])
</script><template><div class="nav" v-for="anew in news" >  // 注意<router-link :to="{path:'/newList/newDetail',query:{id:anew.id,title:anew.title,content:anew.content}}">{{anew.title}}</router-link></div><div class="content"><router-view></router-view></div>
</template>
③子路由接受参数
<script setup lang="ts">
import { useRoute} from 'vue-router'
const route = useRoute()
</script><template><h2>news详情页面</h2><ul>// 注意怎么访问参数<li>{{route.query.id}}</li><li>{{route.query.title}}</li><li>{{route.query.content}}</li></ul>
</template>
5.1.3 name + query 传参 + 对象型参数
①路由设置
{path: '/newList',name: 'newList',component: newListView,children:[{// 不要设置参数path: 'newDetail',name: 'newDetail',component: newDetailView,}]
},
②父路由传递参数
<script setup lang="ts">
import { RouterLink, RouterView } from 'vue-router'
import {reactive} from "vue";
const news = reactive([{id: 1001,title: '新闻标题1',content: '新闻内容1'},{id: 1002,title: '新闻标题2',content: '新闻内容2'},{id: 1003,title: '新闻标题3',content: '新闻内容3'},{id: 1004,title: '新闻标题4',content: '新闻内容4'},
])
</script><template><div class="nav" v-for="anew in news" >  // 注意<router-link :to="{name:'newDetail',query:{id:anew.id,title:anew.title,content:anew.content}}">{{anew.title}}</router-link></div><div class="content"><router-view></router-view></div>
</template>
③子路由接受参数
<script setup lang="ts">
import { useRoute} from 'vue-router'
const route = useRoute()
</script><template><h2>news详情页面</h2><ul>// 注意怎么访问参数<li>{{route.query.id}}</li><li>{{route.query.title}}</li><li>{{route.query.content}}</li></ul>
</template>
5.2 to + params 写法传参
params 传参的参数需要在路由路径中占位,URL 形式如 /news/detail/1/新闻标题。
5.2.1 params 传参 + 模板字符串
①路由设置
{path: '/newList',name: 'newList',component: newListView,children:[{// 设置参数为路径的一部分path: 'newDetail/:id/:title/:content',name: 'newDetail',component: newDetailView,}]
},
②父路由传递参数
<script setup lang="ts">
import { RouterLink, RouterView } from 'vue-router'
import {reactive} from "vue";
const news = reactive([{id: 1001,title: '新闻标题1',content: '新闻内容1'},{id: 1002,title: '新闻标题2',content: '新闻内容2'},{id: 1003,title: '新闻标题3',content: '新闻内容3'},{id: 1004,title: '新闻标题4',content: '新闻内容4'},
])
</script><template><div class="nav" v-for="anew in news" >  // 注意<router-link :to="`/newList/newDetail/${anew.id}/${anew.title}/${anew.content}`">{{anew.title}}</router-link></div><div class="content"><router-view></router-view></div>
</template>
③子路由接受参数
<script setup lang="ts">
import { useRoute} from 'vue-router'
const route = useRoute()
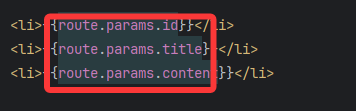
</script><template><h2>news详情页面</h2><ul>// 注意怎么访问参数<li>{{route.params.id}}</li><li>{{route.params.title}}</li><li>{{route.params.content}}</li></ul>
</template>5.2.2 name + params 传参 + 对象型参数
①路由设置
{path: '/newList',name: 'newList',component: newListView,children:[{// 设置参数为路径的一部分path: 'newDetail/:id/:title/:content',name: 'newDetail',component: newDetailView,}]
},
②父路由传递参数
<script setup lang="ts">
import { RouterLink, RouterView } from 'vue-router'
import {reactive} from "vue";
const news = reactive([{id: 1001,title: '新闻标题1',content: '新闻内容1'},{id: 1002,title: '新闻标题2',content: '新闻内容2'},{id: 1003,title: '新闻标题3',content: '新闻内容3'},{id: 1004,title: '新闻标题4',content: '新闻内容4'},
])
</script><template><div class="nav" v-for="anew in news" >  // 注意<router-link :to="{name:'newDetail',params:{id:anew.id, title:anew.title, content:anew.content}}">{{anew.title}}</router-link></div><div class="content"><router-view></router-view></div>
</template>
③子路由接受参数
<script setup lang="ts">
import { useRoute} from 'vue-router'
const route = useRoute()
</script><template><h2>news详情页面</h2><ul>// 注意怎么访问参数<li>{{route.params.id}}</li><li>{{route.params.title}}</li><li>{{route.params.content}}</li></ul>
</template>
5.3 defineProps接受参数小技巧
这样传递过来的参数获取起来大家会不会觉得写起来很复杂,其实使用defineProps就可以很好的解决父组件向子组件传参的问题得到解决:
①在路由中修改
{path: '/newList',name: 'newList',component: newListView,children:[{// 设置参数为路径的一部分path: 'newDetail/:id/:title/:content',name: 'newDetail',component: newDetailView,// 设置为defineProps为tureprops: true,}]
},
②在子组件中修改
<script setup lang="ts">
import { useRoute} from 'vue-router'
const route = useRoute()
// 接受路由参数
defineProps(['id', 'title', 'content'])
</script><template><h2>news详情页面</h2><ul>// 注意怎么访问参数<li>{{id}}</li><li>{{title}}</li><li>{{content}}</li></ul>
</template>
5.4 query 传参 vs params 传参 总结
| 特点 | query 传参 | params 传参 |
|---|---|---|
| URL 显示 | 带?和 & 符号 | 路径的一部分 |
| 路由配置 | 无需特殊配置 | 需要在 path 中占位 |
| 跳转方式 | 可使用 path 或 name | 只能使用 name |
| 刷新页面 | 参数不丢失 | 参数不丢失 |
| 适用场景 | 非必需参数(如筛选条件) | 必需参数(如资源 ID) |
六、路由的编程式导航
除了使用 <RouterLink> 组件进行声明式导航,我们还可以通过代码实现编程式导航(如点击按钮跳转,绑定点击事件)。
如何通过代码实现页面跳转呢?
主要导航方法:
6.1 router.push(location, onComplete?, onAbort?)
- 最常用的方法,向 history 栈添加一个新记录
- 等同于
<router-link :to="...">
// 字符串路径
router.push('/home')
// 对象
router.push({ path: '/home' })
// 命名的路由
router.push({ name: 'user', params: { userId: '123' } })
// 带查询参数
router.push({ path: '/register', query: { plan: 'private' } })
6.2 router.replace(location, onComplete?, onAbort?)
- 替换当前 history 栈中的记录,不会留下历史记录
- 等同于
<router-link :to="..." replace>
router.replace('/home')
router.replace({ path: '/home' })
6.3 router.go(n)
- 在 history 记录中前进或后退多少步
// 前进一步
router.go(1)
// 后退一步
router.go(-1)
// 前进三步
router.go(3)
6.4 router.back()
- 等同于
router.go(-1) - 后退一步
6.5 router.forward()
- 等同于
router.go(1) - 前进一步
6.6 编程式导航的实现
①在导航页面导入:import {useRoute,useRouter} from 'vue-router'
②创建路由对象:const router = useRouter():因为编程式子导航要使用router的相关方法
③绑定点击事件
④设置绑定事件
示例1:
<script setup lang="ts">
import {useRoute,useRouter} from 'vue-router'
const router = useRouter()   //可以用来实现编程式导航
const tocenter = () => {router.push("/center");
}
function toabout() {router.push({name:'about'})
}
function tohome() {router.push({name:'home'})
}
const tonewList = () => {router.push({path:'/newList'})
}
</script><template><div class="container"><h1>vu3-课堂练习</h1><div class="box"><div class="nav"><ul><li><button @click="tohome">首页</button></li><li><button @click="tonewList">新闻列表</button></li><li><button @click="toabout">关于</button></li><li><button @click="tocenter">用户中心</button></li></ul></div><div class="content"><router-view></router-view></div></div></div>
</template>
示例2:
<script setup lang="ts">
import {useRouter} from 'vue-router'
const userouter = useRouter()
function toback(){userouter.back()
}
function tonext(){userouter.forward()
}
</script>
<template><div class="center">用户中心</div><button v-on:click="toback">返回上一级</button><button @click="tonext">到下一级</button>
</template>
6.7 useRoute和useRouter的区别
①useRoute
作用:用于获取当前活跃的路由信息对象(
Route对象)返回值:一个响应式的路由信息对象,包含当前路由的各种属性
主要属性:
path:当前路由的路径params:路由参数(如/user/:id中的id)query:URL 查询参数(如?name=test)hash:URL 中的哈希值name:路由名称meta:路由元信息fullPath:完整的 URL 路径,包含查询参数和哈希
②useRouter
作用:用于获取路由实例(
Router对象)返回值:路由实例,包含各种路由操作方法
主要方法:
push():导航到新路由(类似router-link的to属性)replace():替换当前路由,不会留下历史记录go(n):在历史记录中前进或后退n步back():后退一步,相当于go(-1)forward():前进一步,相当于go(1)addRoute():动态添加路由removeRoute():移除路由使用场景:需要编程式导航或操作路由实例时使用
七、重定向和404
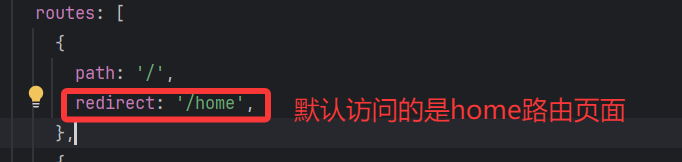
7.1 重定向
什么是重定向?
重定向的核心特点是:浏览器请求A地址,服务器/路由系统告诉浏览器"去B地址",然后浏览器自动跳转到B地址。
大家是否看到过浏览器控制台报出这样的警告:

其实本质上的原因就是没有设置重定向,当访问 网址:http://localhost:5173/,浏览器不知道要跳转到哪个路由去,可以设置重定向来解决这一问题:
7.2 404 概念和使用
在 Web 开发里,404 是客户端错误状态码 ,当服务器找不到对应请求的资源(比如页面、接口数据等)时,就会返回 404 响应 。在前端路由场景中,404 主要用来处理用户访问不存在的路由路径,让用户看到友好的 “页面未找到” 提示,而非空白或报错页面,提升体验。
比如访问不存在的路径的时候就会跳转到404页面:
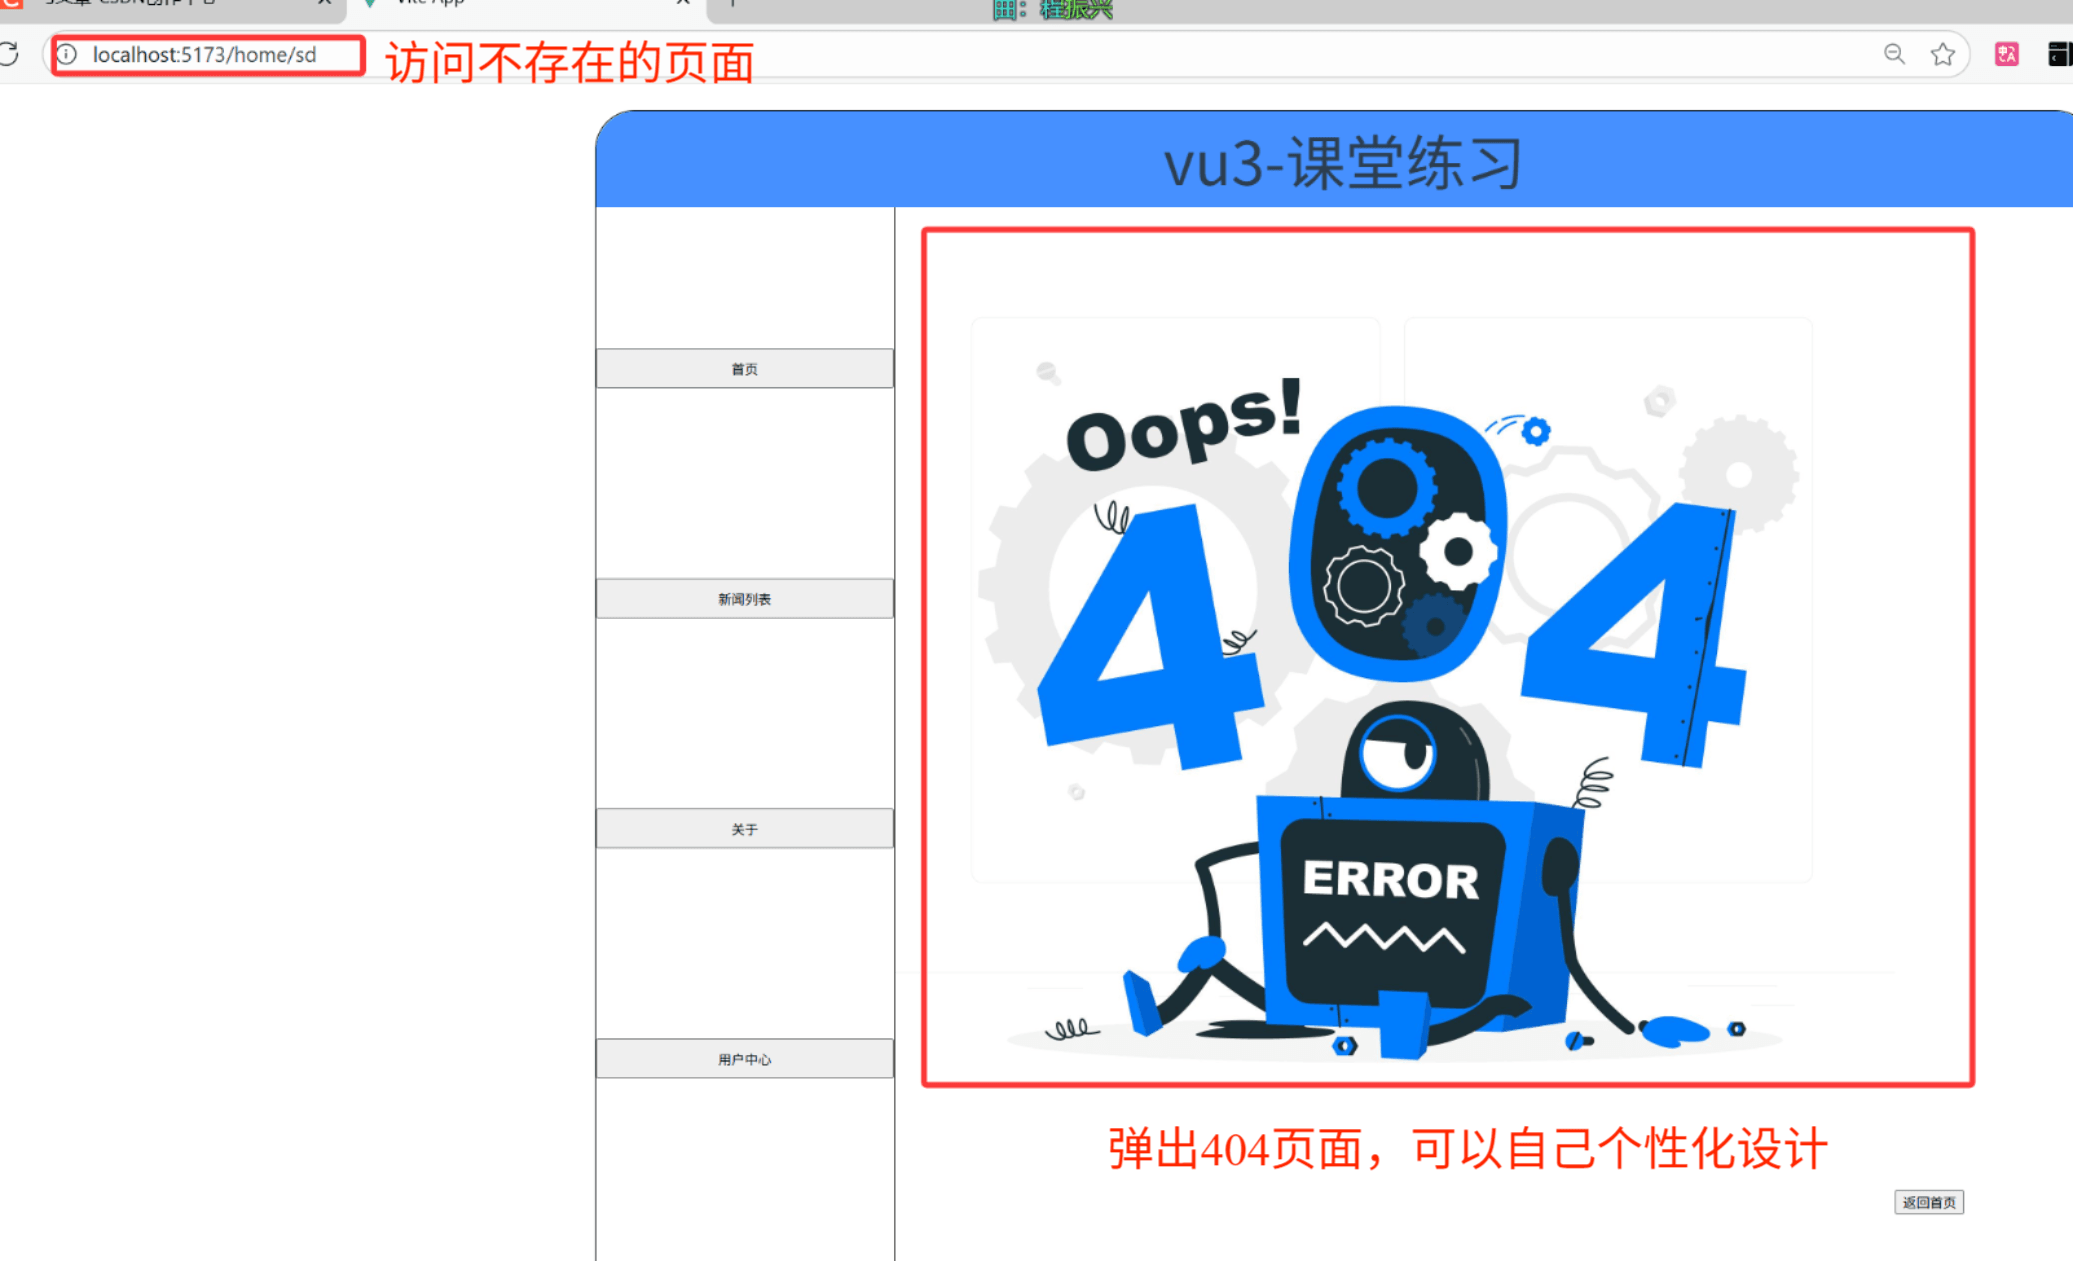
①在src/index.ts 路由配置中设置:
{path: "/:pathMatch(.*)*", // 匹配所有未定义的路径name: "notFind",component: NotFind,}②设置NotFind页面
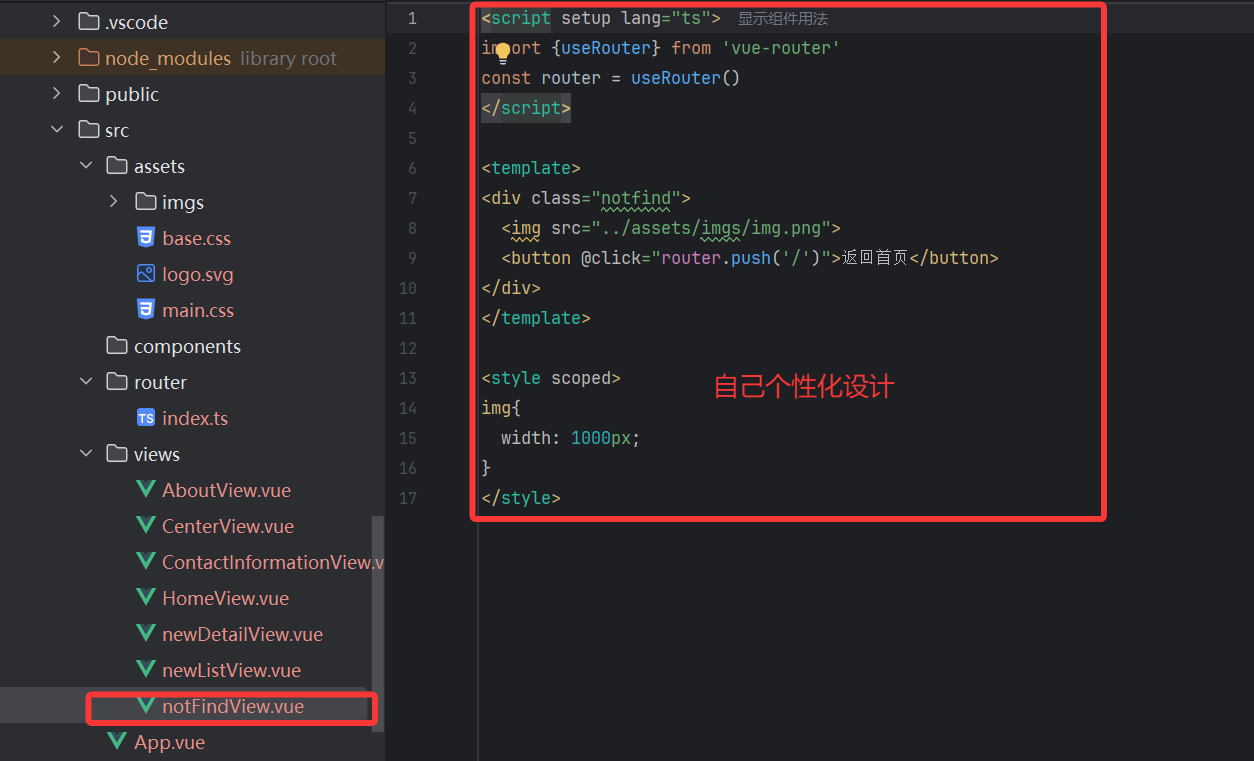
这样当我们访问不存在的页面的时候就会自动跳转到404页面啦!!!
八、路由守卫(补充内容)
路由守卫可以控制路由的访问权限,比如未登录用户不能访问个人中心页面。
8.1 全局前置守卫
// src/router/index.ts
router.beforeEach((to, from, next) => {// to:即将进入的路由// from:即将离开的路由// next():允许导航,next('/login'):跳转到登录页,next(false):阻止导航// 判断是否需要登录权限if (to.meta.requiresAuth) {// 检查是否登录(这里假设登录信息存储在 localStorage 中)const token = localStorage.getItem("token");if (token) {next(); // 已登录,允许访问} else {next("/login"); // 未登录,跳转到登录页}} else {next(); // 不需要登录,允许访问}
});使用时需要在路由规则中添加 meta 属性:
{path: "/profile",name: "profile",component: Profile,meta: { requiresAuth: true } // 表示需要登录权限
}
掌握这些知识点后,你可以轻松实现单页应用的路由管理,包括页面跳转、参数传递、权限控制等功能。在实际开发中,需要根据具体场景选择合适的路由配置和传参方式,让你的应用更加灵活和高效。