Spring 核心之 Bean 管理:配置、作用域与生命周期详解
Spring 核心之 Bean 管理:配置、作用域与生命周期详解
- 一 . Bean 的基础配置以及实例化
- 1.1 Bean 的别名设置
- 1.2 配置作用范围
- 1.3 Bean 的实例化
- 1.3.1 构造方法方式
- 1.3.2 静态工厂方式
- 1.3.3 实例工厂方式
- 麻烦方法
- 简便方法
- 二 . 依赖注入 (DI)
- 2.1 依赖注入的方式
- 2.1.1 setter 注入
- 引用类型
- 简单类型
- 2.1.2 构造方法注入
- 简单类型与引用类型
- 参数适配
- 2.2 依赖自动装配
- 2.3 集合注入
- 2.3.1 数组
- 2.3.2 List
- 2.3.3 Set
- 2.3.4 Map
- 2.3.5 Properties
- 2.3.6 进行测试
- 三 . Bean 的生命周期
- 3.1 原始方法
- 3.2 接口控制
- 3.3 bean 的销毁时机
- 3.4 Bean 的生命周期
- 四 . 第三方资源配置管理
- 4.1 管理 DataSource 连接池对象
- 4.1.1 Druid 连接池
- 4.1.2 c3p0 连接池
- 4.2 加载 properties 配置文件
- 4.2.1 开启 context 命名空间
- 4.2.2 使用 context 空间加载 properties 文件
- 4.2.3 使用表达式替换属性
- 4.2.4 测试效果
- 4.2.5 注意事项
- 配置不加载系统属性
- 加载多个 properties 配置文件
- 从类路径或 jar 包中搜索并加载 properties 文件
在 Spring 框架中,Bean 作为核心组件,其管理方式直接影响着应用的性能与灵活性。本文将从 Bean 的基础配置出发,深入探讨实例化、依赖注入及生命周期等关键知识点,帮你全面掌握 Spring 容器对对象的掌控逻辑
本部分的内容来源于黑马程序员的在线视频 , 感谢你们让编程的路不再难走

一 . Bean 的基础配置以及实例化
在 spring-config.xml 中 , 我们用到了 bean 标签 , 里面指定了 id 属性和 class 属性 , 那 bean 标签还支持别的操作 , 我们可以来看一下
1.1 Bean 的别名设置
我们可以指定 name 属性来对当前 bean 去起多个别名 , 多个别名之间可以用 ,、 、;来分隔
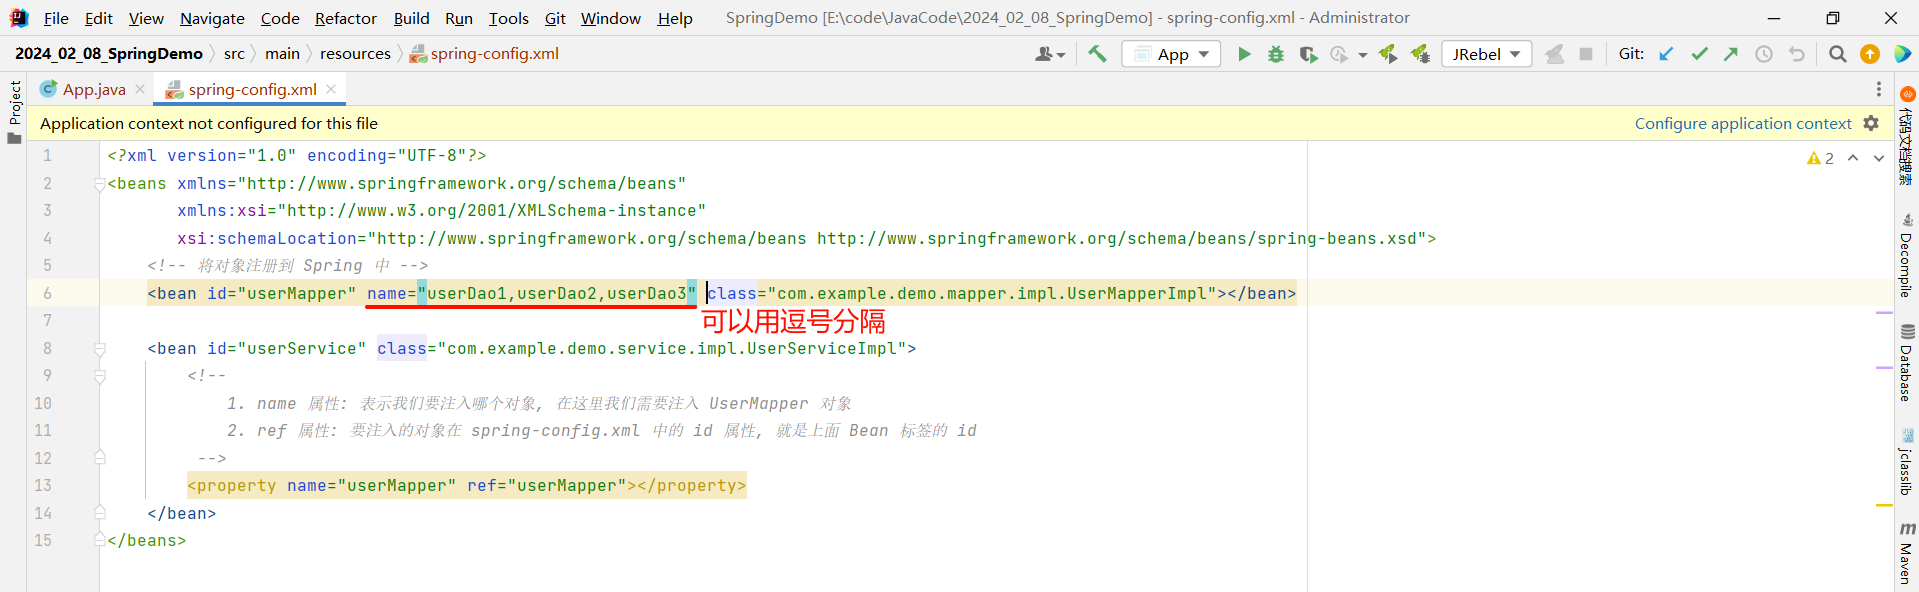
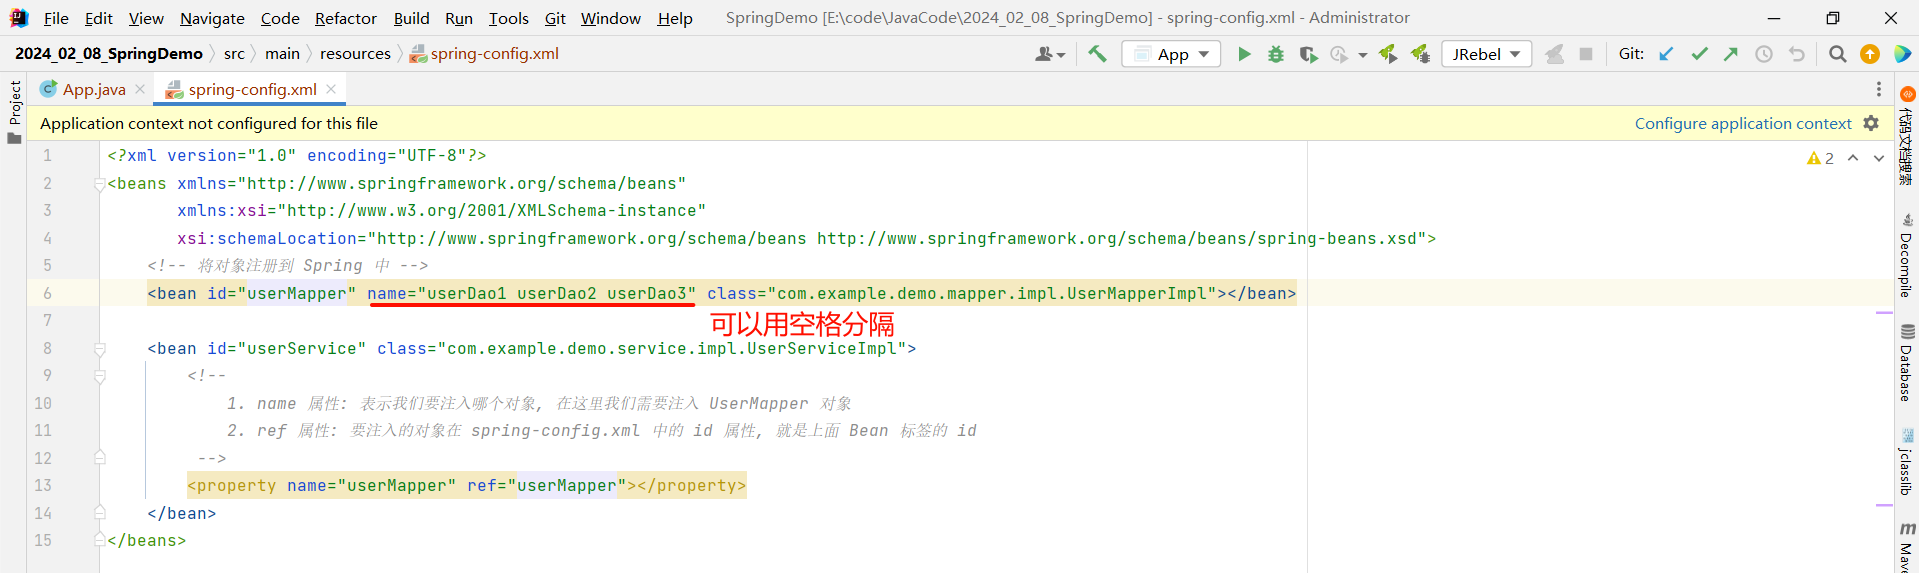
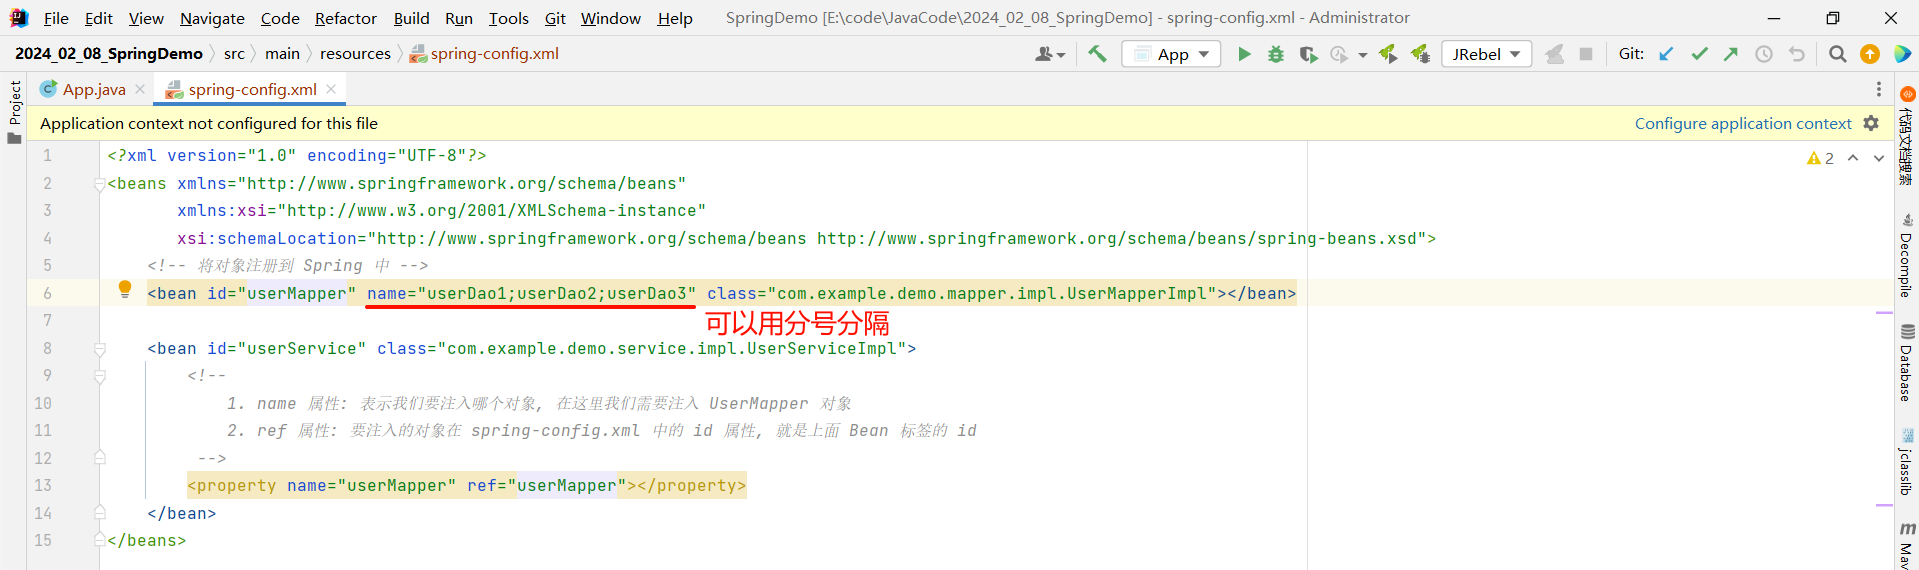
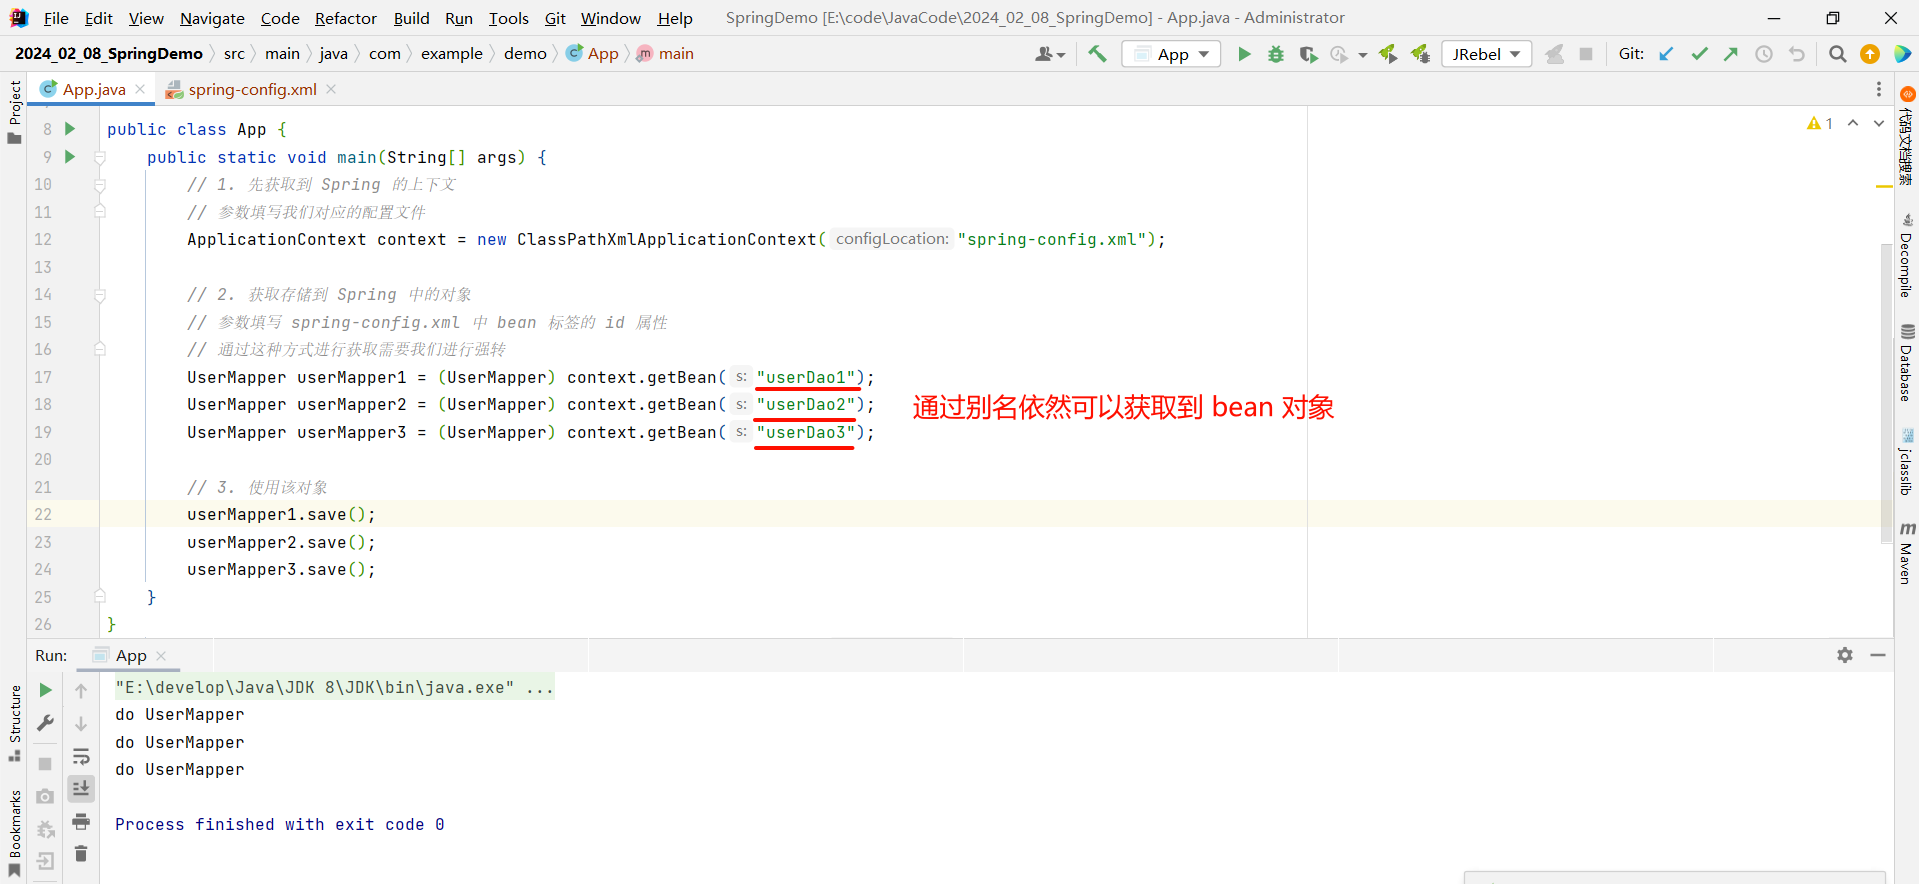
那我们就可以通过别名获取该 bean 对象
1.2 配置作用范围
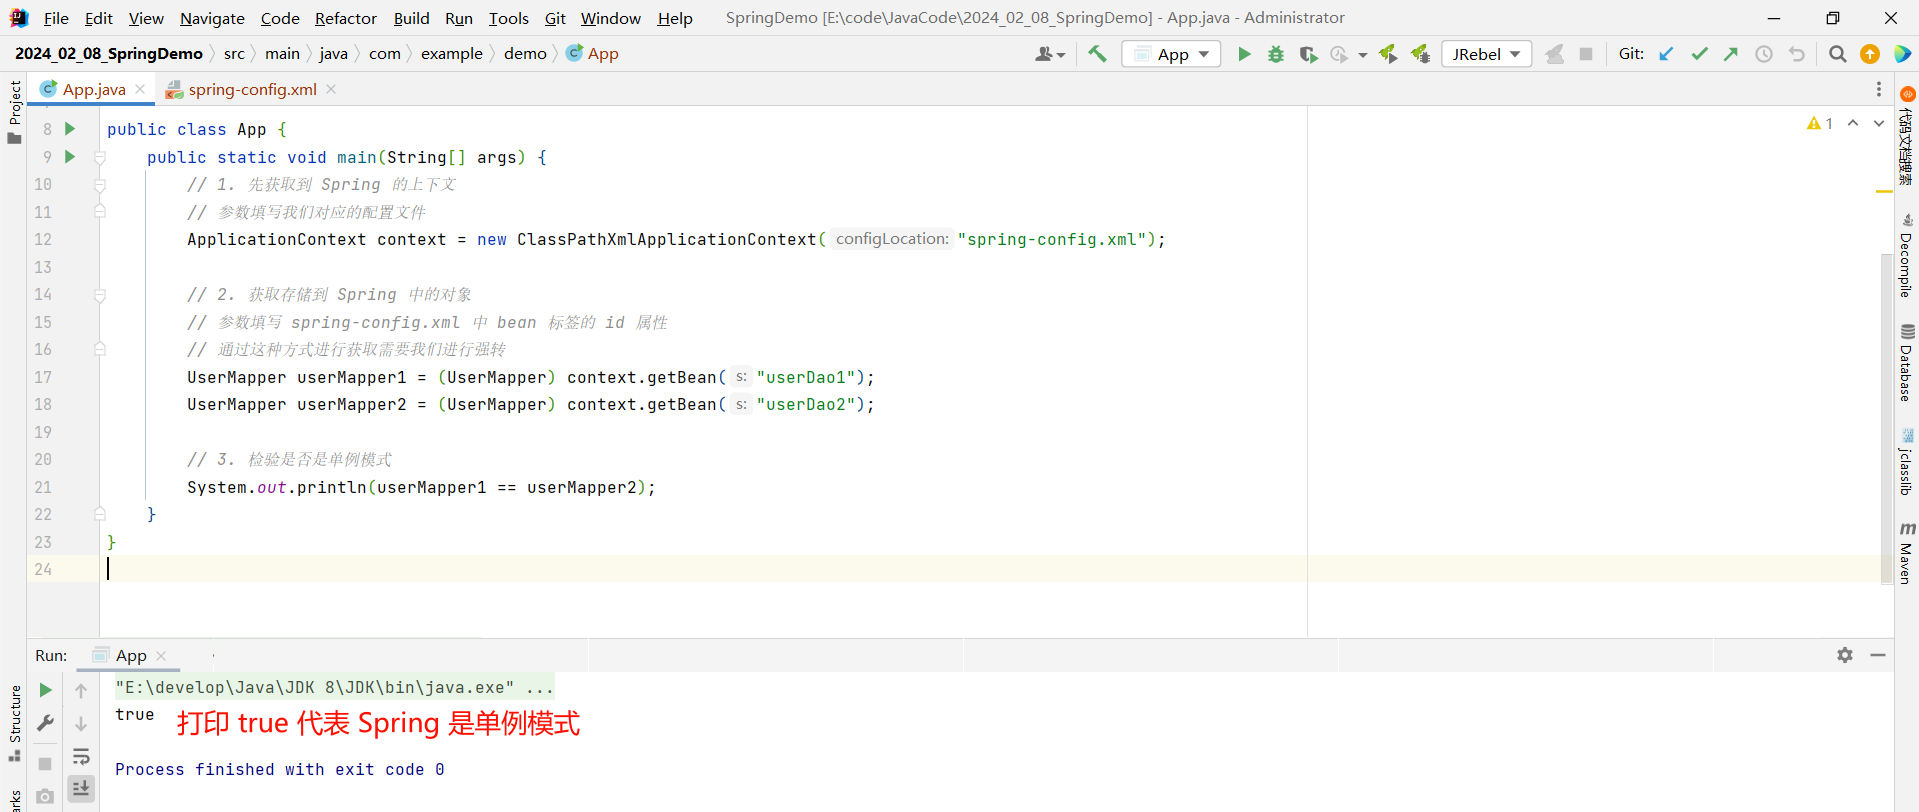
我们的 Spring 默认是单例模式的 , 我们可以检验一下
package com.example.demo;import com.example.demo.mapper.UserMapper;
import com.example.demo.service.UserService;
import org.springframework.context.ApplicationContext;
import org.springframework.context.support.ClassPathXmlApplicationContext;public class App {public static void main(String[] args) {// 1. 先获取到 Spring 的上下文// 参数填写我们对应的配置文件ApplicationContext context = new ClassPathXmlApplicationContext("spring-config.xml");// 2. 获取存储到 Spring 中的对象// 参数填写 spring-config.xml 中 bean 标签的 id 属性// 通过这种方式进行获取需要我们进行强转UserMapper userMapper1 = (UserMapper) context.getBean("userDao1");UserMapper userMapper2 = (UserMapper) context.getBean("userDao2");// 3. 检验是否是单例模式System.out.println(userMapper1 == userMapper2);}
}
那我们还可以设置当前 Bean 对象为非单例模式 , 在 bean 标签的最后面添加 scope 属性即可
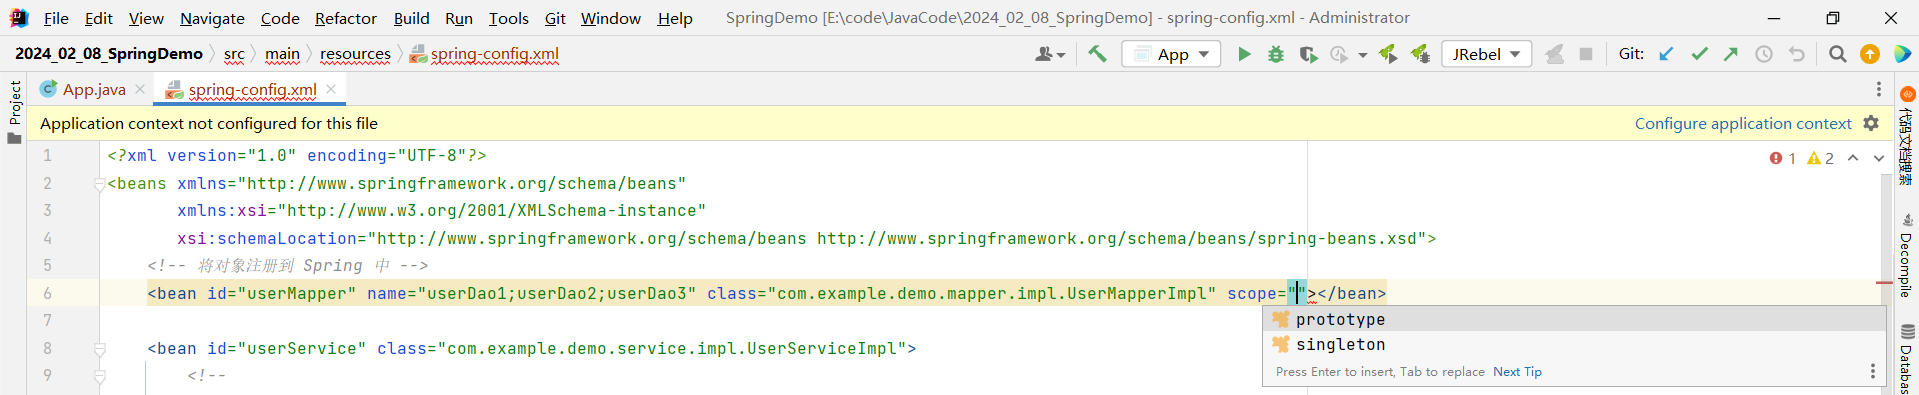
这里提供了两种选项
- prototype : 非单例模式
- singleton : 单例模式
要注意的是 , scope 的取值不光只有 prototype 和 singleton , 还有 request、session、application、 websocket 这几种 , 只不过我们现在接触不上 .
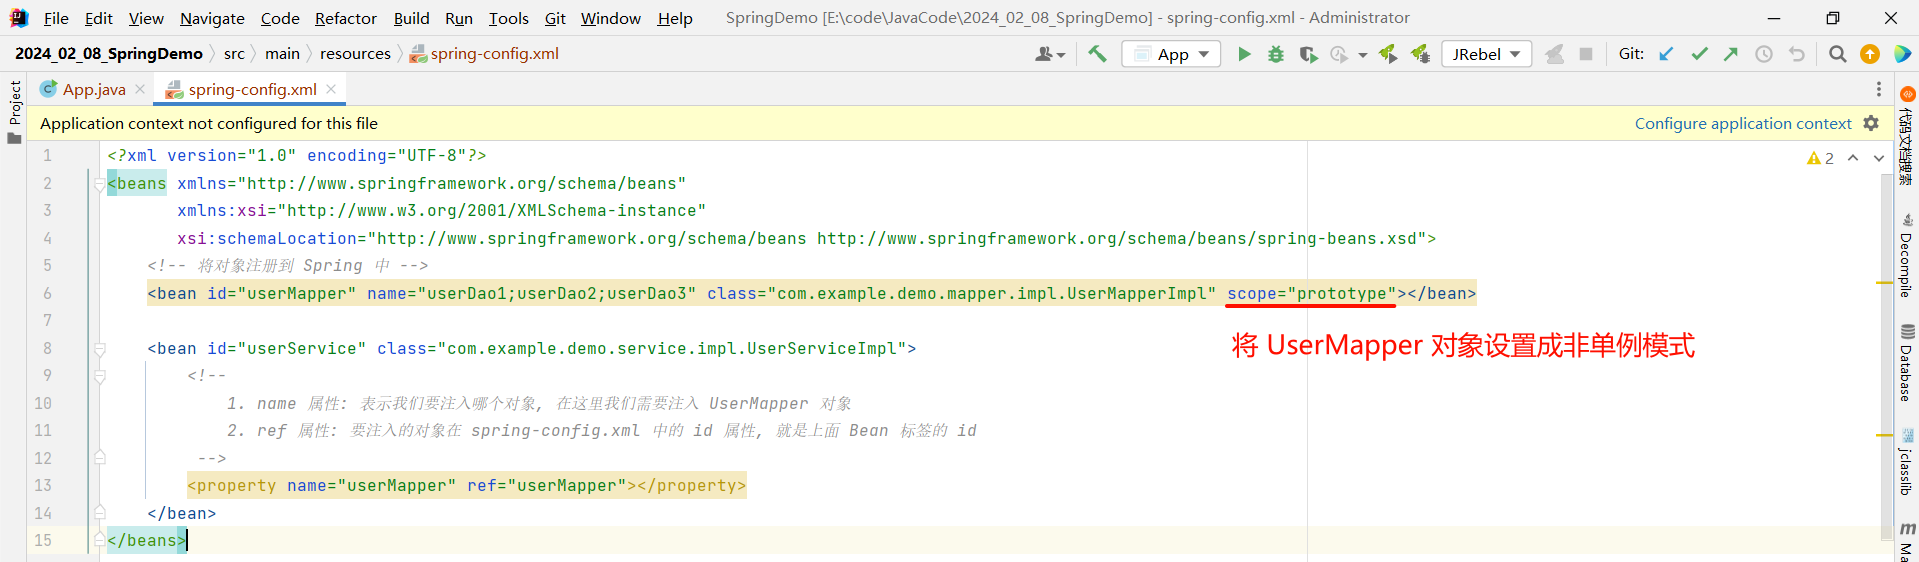
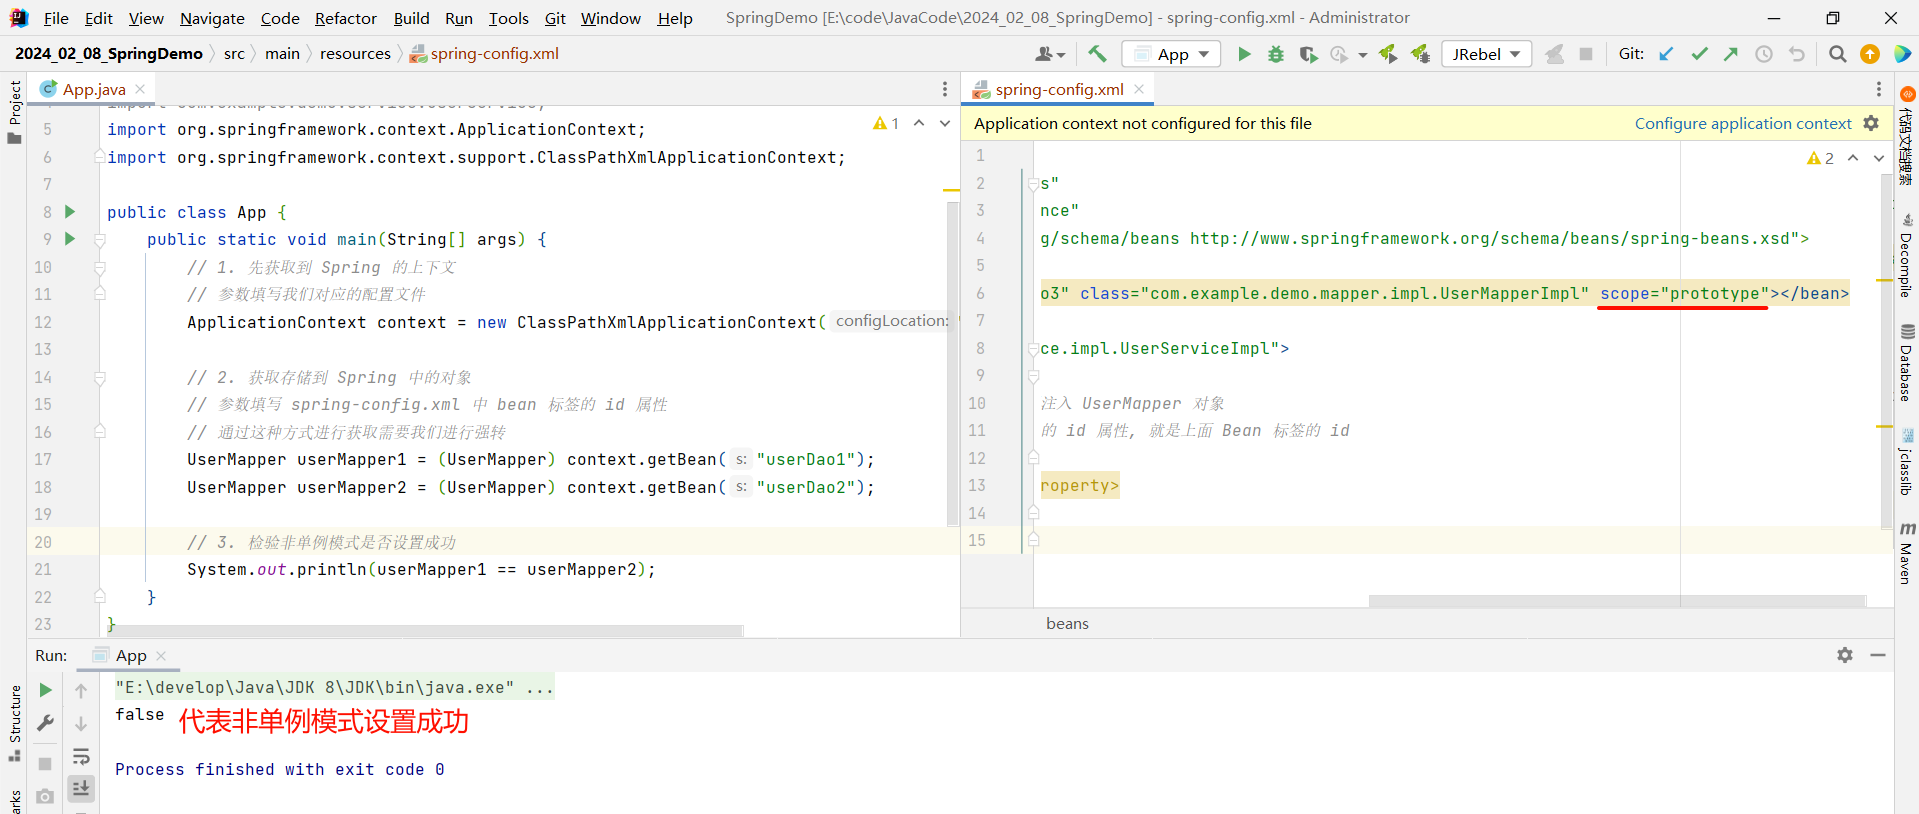
那我们设置 prototype , 这个对象就变成了非单例模式 , 但是只针对这个对象生效
<?xml version="1.0" encoding="UTF-8"?>
<beans xmlns="http://www.springframework.org/schema/beans"xmlns:xsi="http://www.w3.org/2001/XMLSchema-instance"xsi:schemaLocation="http://www.springframework.org/schema/beans http://www.springframework.org/schema/beans/spring-beans.xsd"><!-- 将对象注册到 Spring 中 --><bean id="userMapper" name="userDao1;userDao2;userDao3" class="com.example.demo.mapper.impl.UserMapperImpl" scope="prototype"></bean><bean id="userService" class="com.example.demo.service.impl.UserServiceImpl"><!--1. name 属性: 表示我们要注入哪个对象, 在这里我们需要注入 UserMapper 对象2. ref 属性: 要注入的对象在 spring-config.xml 中的 id 属性, 就是上面 Bean 标签的 id--><property name="userMapper" ref="userMapper"></property></bean>
</beans>
这样的话 , 再去执行启动类 , 就会打印 false 了
那为什么 Spring 默认要设置成单例模式呢 ?
1、单例模式相比于非单例模式更加节省资源
2、数据库连接池、线程池等重量级资源 , 单例模式可以确保它们全局唯一 , 避免重复创建导致的资源浪费
3、避免线程安全问题 , 防止多个线程同时访问和修改同一个变量时导致数据竞争
1.3 Bean 的实例化
我们目前已经通过 bean 标签将 Bean 对象存储到容器中了 , 在需要的位置获取 Bean 对象即可 , 即实例化 Bean 对象 .
但是 Spring 底层是怎样实例化一个对象的呢 ?
1.3.1 构造方法方式
我们最原始的方式是通过 new 的方式创建对象 , 那通过 new 的方式其实就是通过构造方法来去创建的 .
那大概率 Spring 底层也是通过构造方法来创建对象的 , 我们该怎么验证 Spring 创建对象的时候也调用了无参的构造方法呢 ?
我们可以在 UserMapperImpl 中手动实现一个无参的构造方法 , 然后在里面添加一条日志 .
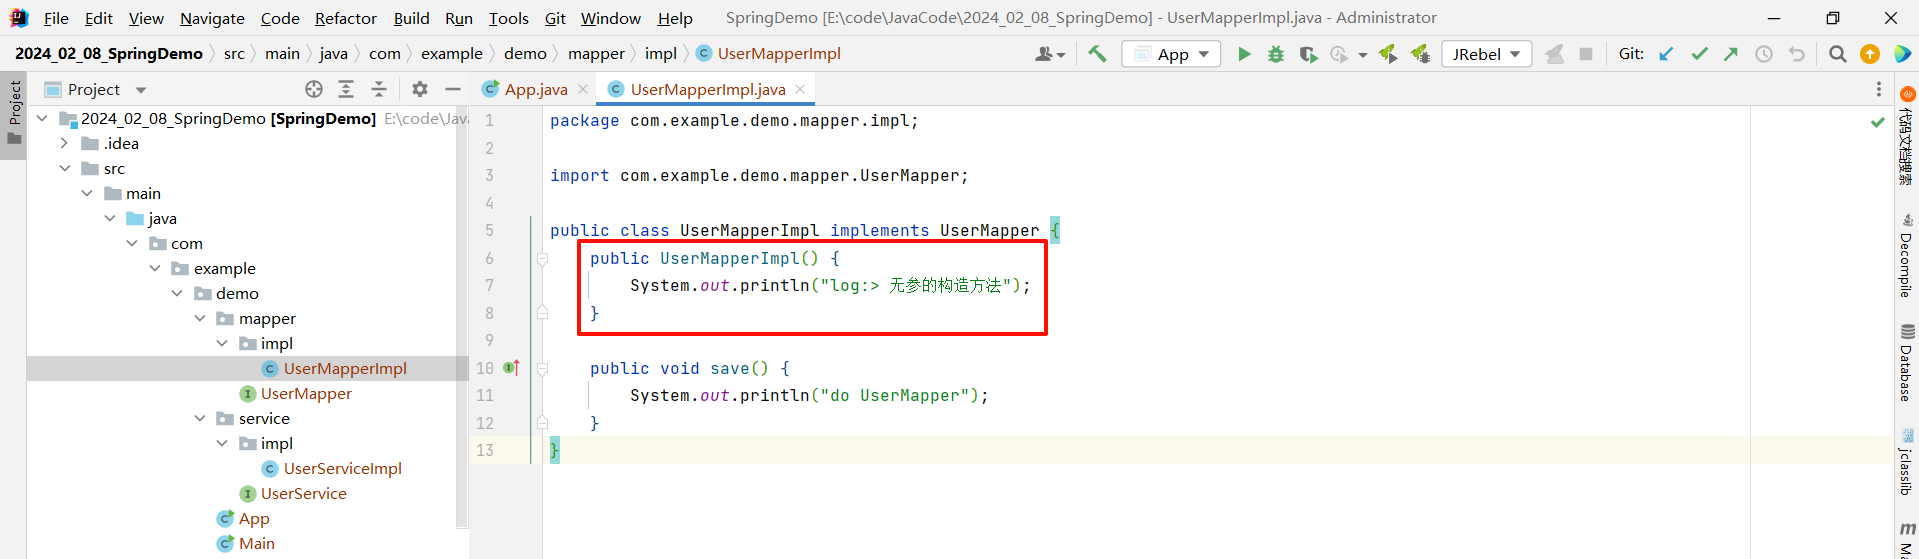
package com.example.demo.mapper.impl;import com.example.demo.mapper.UserMapper;public class UserMapperImpl implements UserMapper {public UserMapperImpl() {System.out.println("log:> 无参的构造方法");}public void save() {System.out.println("do UserMapper");}
}
那此时我们直接启动容器 , 查看一下运行结果
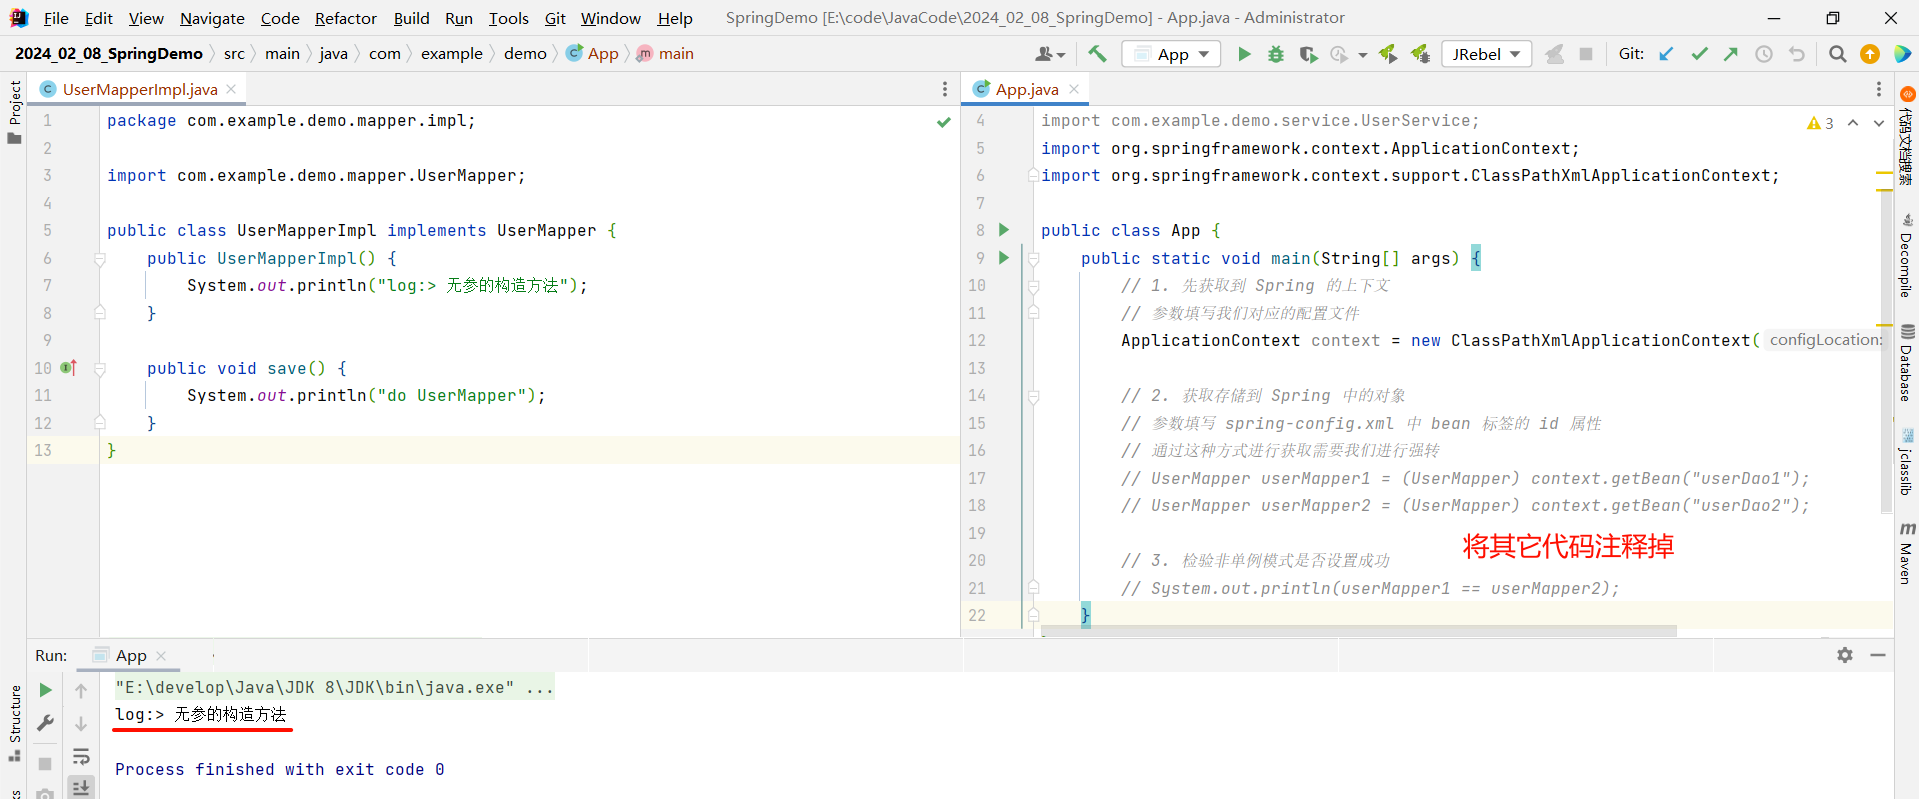
通过运行结果能够说明两个问题 :
- 实例化 Bean 的时候确实调用了无参的构造方法
- 在容器初始化的时候就完成了 Bean 对象的实例化
但是创建对象就只有实例化这样的一种方法吗 ?
1.3.2 静态工厂方式
我们之前学习过一种设计模式 , 叫做静态工厂模式 , 他只需要通过类名就能获取到我们需要的对象
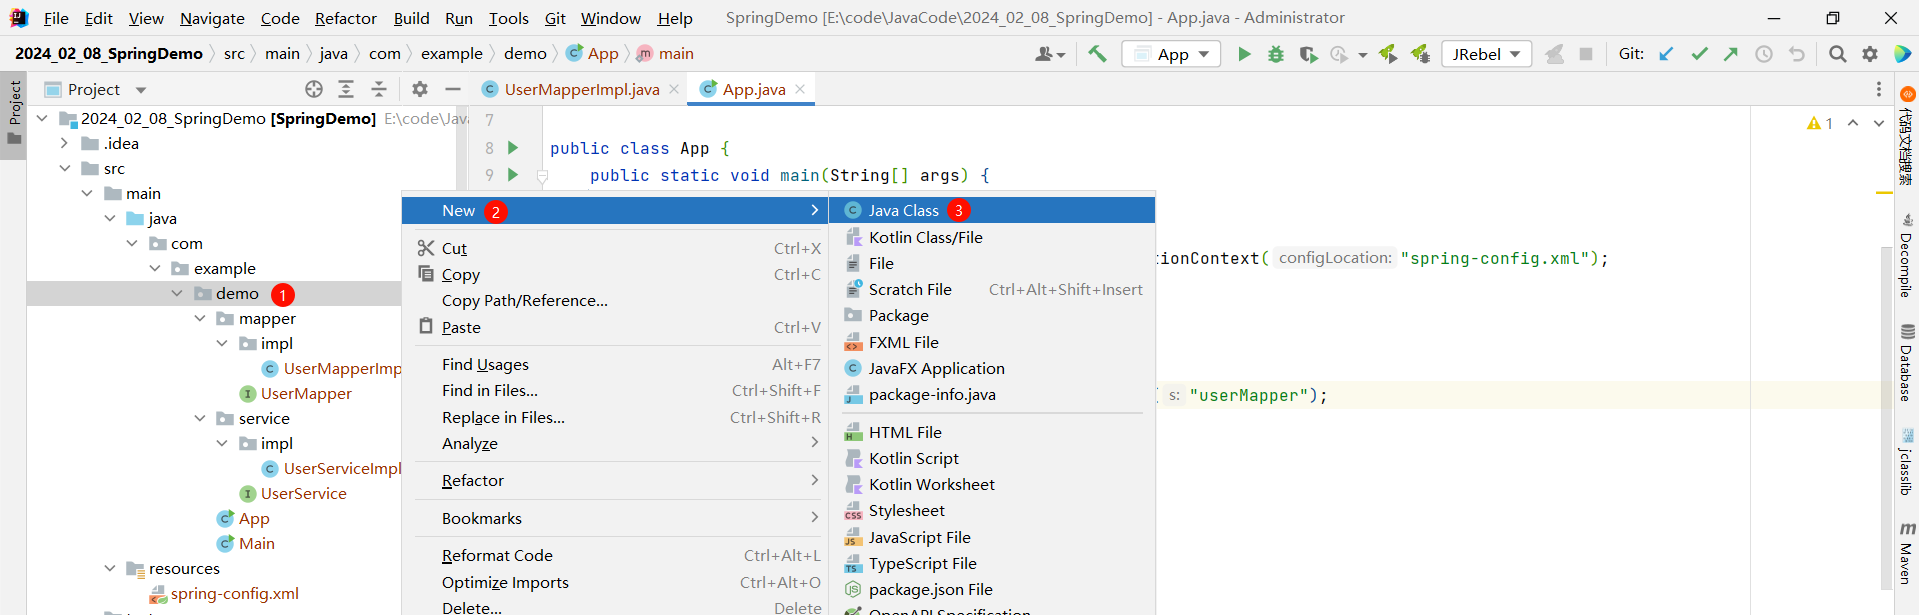
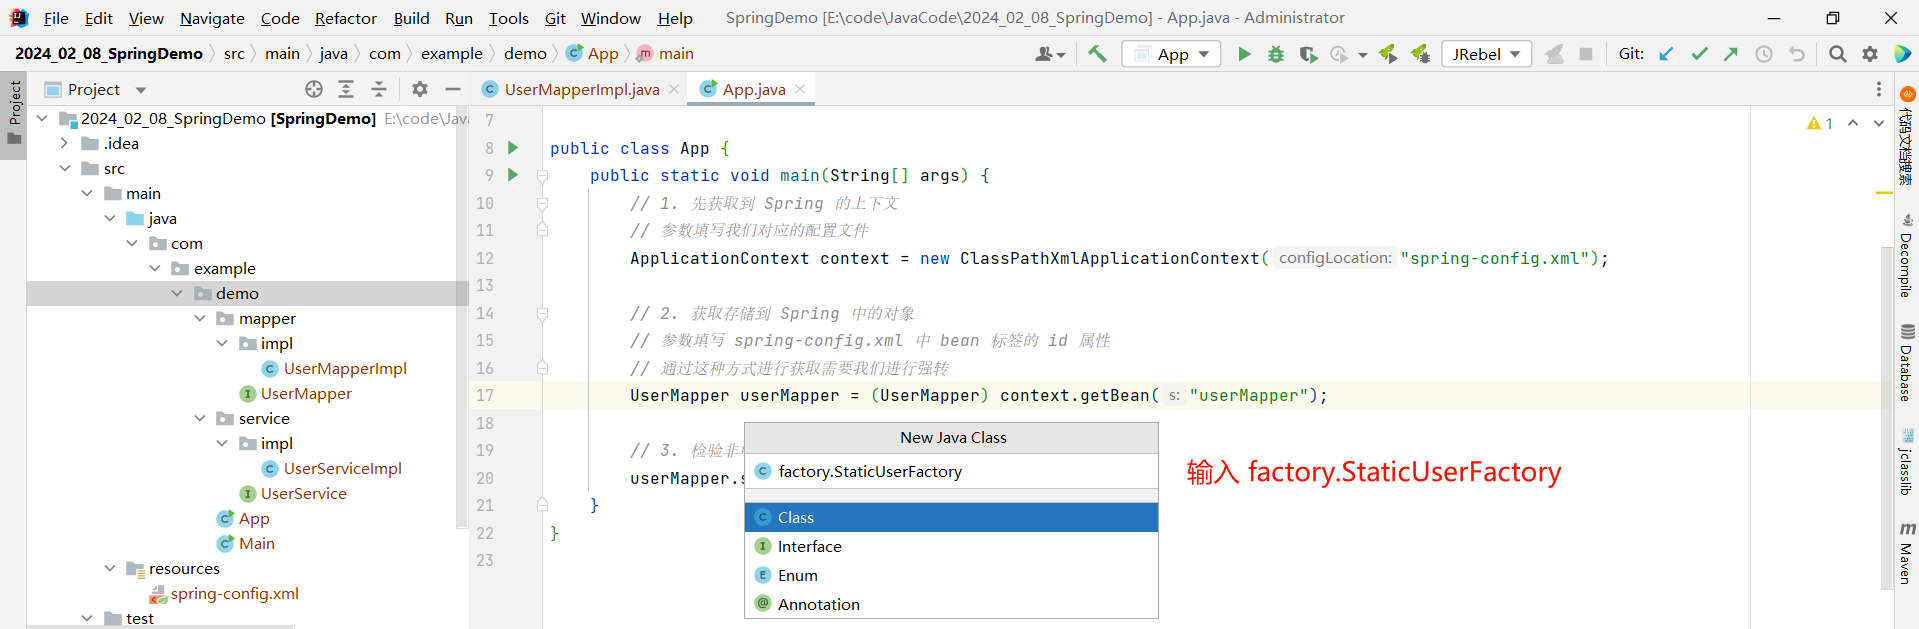
那静态工厂里面的方法都是静态的方法
package com.example.demo.factory;import com.example.demo.mapper.UserMapper;
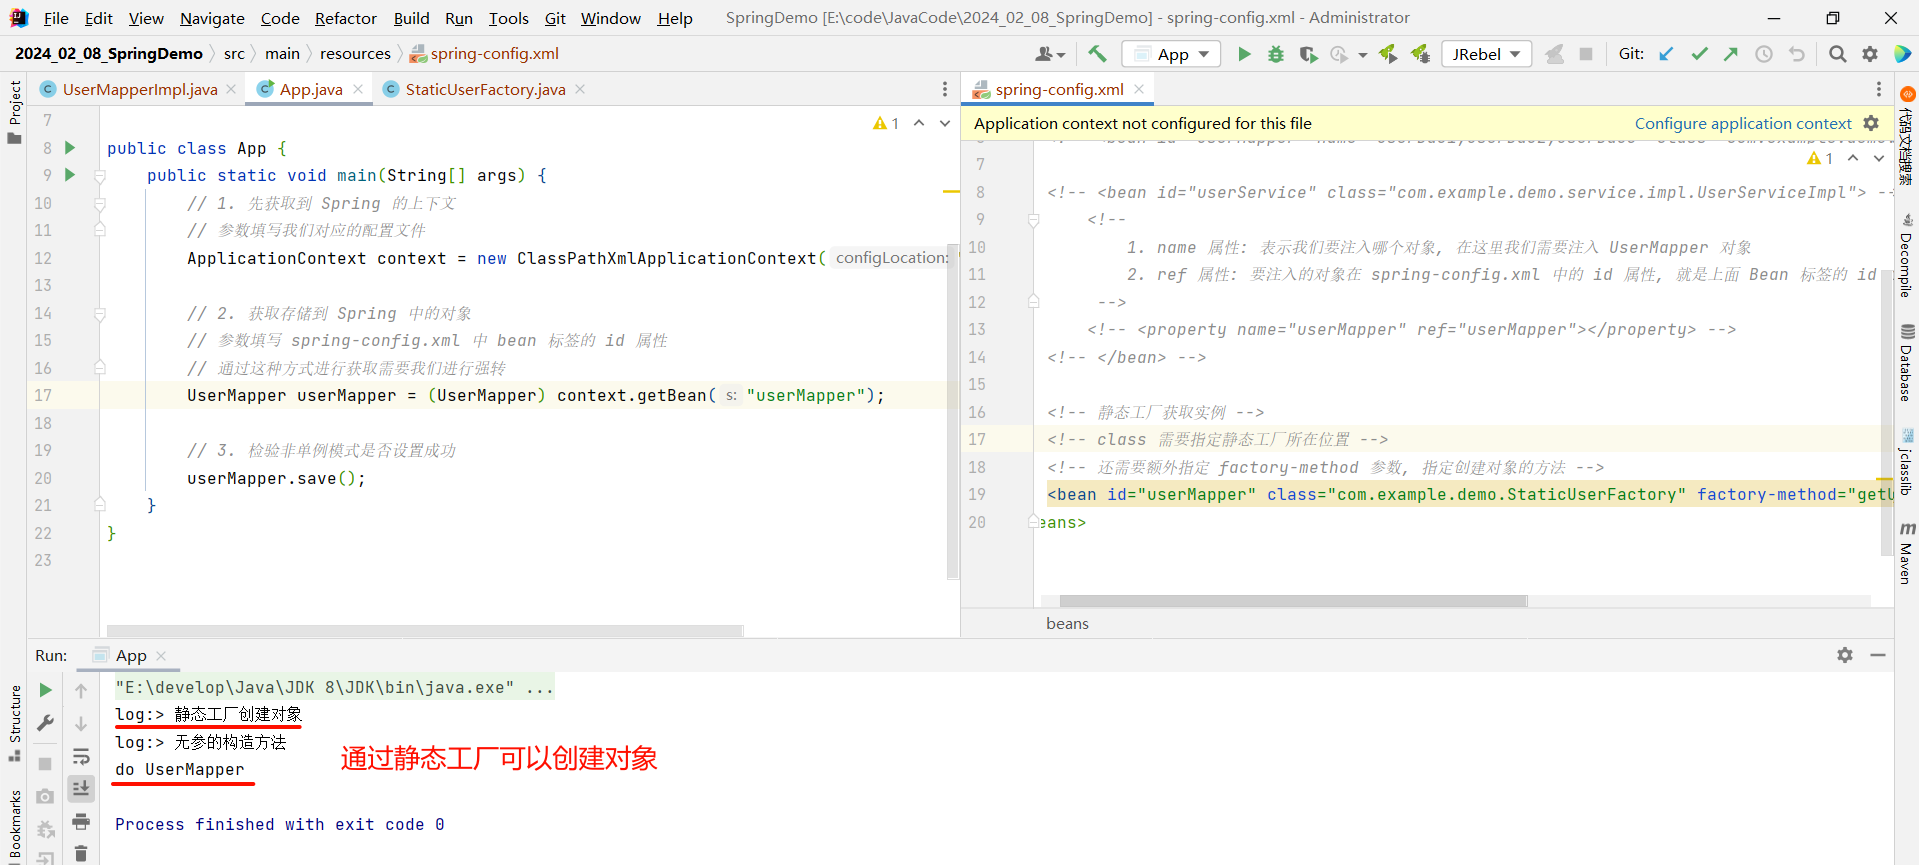
import com.example.demo.mapper.impl.UserMapperImpl;public class StaticUserFactory {public static UserMapper getUserMapper() {System.out.println("log:> 静态工厂创建对象");return new UserMapperImpl();}
}那之后我们要获取到 UserMapper 对象 , 就通过 类名. 的方式获取即可
那通过静态工厂的方式的话 , spring-config.xml 该怎么编写呢 ?
- id : 依然是获取 UserMapper 对象 , 填写 userMapper 即可
- class : 因为我们是通过静态工厂创建对象 , 所以 class 就应该要填写静态工厂所在位置
但是这样写还是不可以 , 因为这样编写的话 Spring 不知道我们要返回的是 UserMapper 对象还是 StaticUserFactory 对象 , 所以还需要添加一个参数 : factory-method , 指定我们静态工厂中创建对象所对应的方法 .
<?xml version="1.0" encoding="UTF-8"?>
<beans xmlns="http://www.springframework.org/schema/beans"xmlns:xsi="http://www.w3.org/2001/XMLSchema-instance"xsi:schemaLocation="http://www.springframework.org/schema/beans http://www.springframework.org/schema/beans/spring-beans.xsd"><!-- 静态工厂获取实例 --><!-- class 需要指定静态工厂所在位置 --><!-- 还需要额外指定 factory-method 参数, 指定创建对象的方法 --><bean id="userMapper" class="com.example.demo.factory.StaticUserFactory" factory-method="getUserMapper"></bean>
</beans>
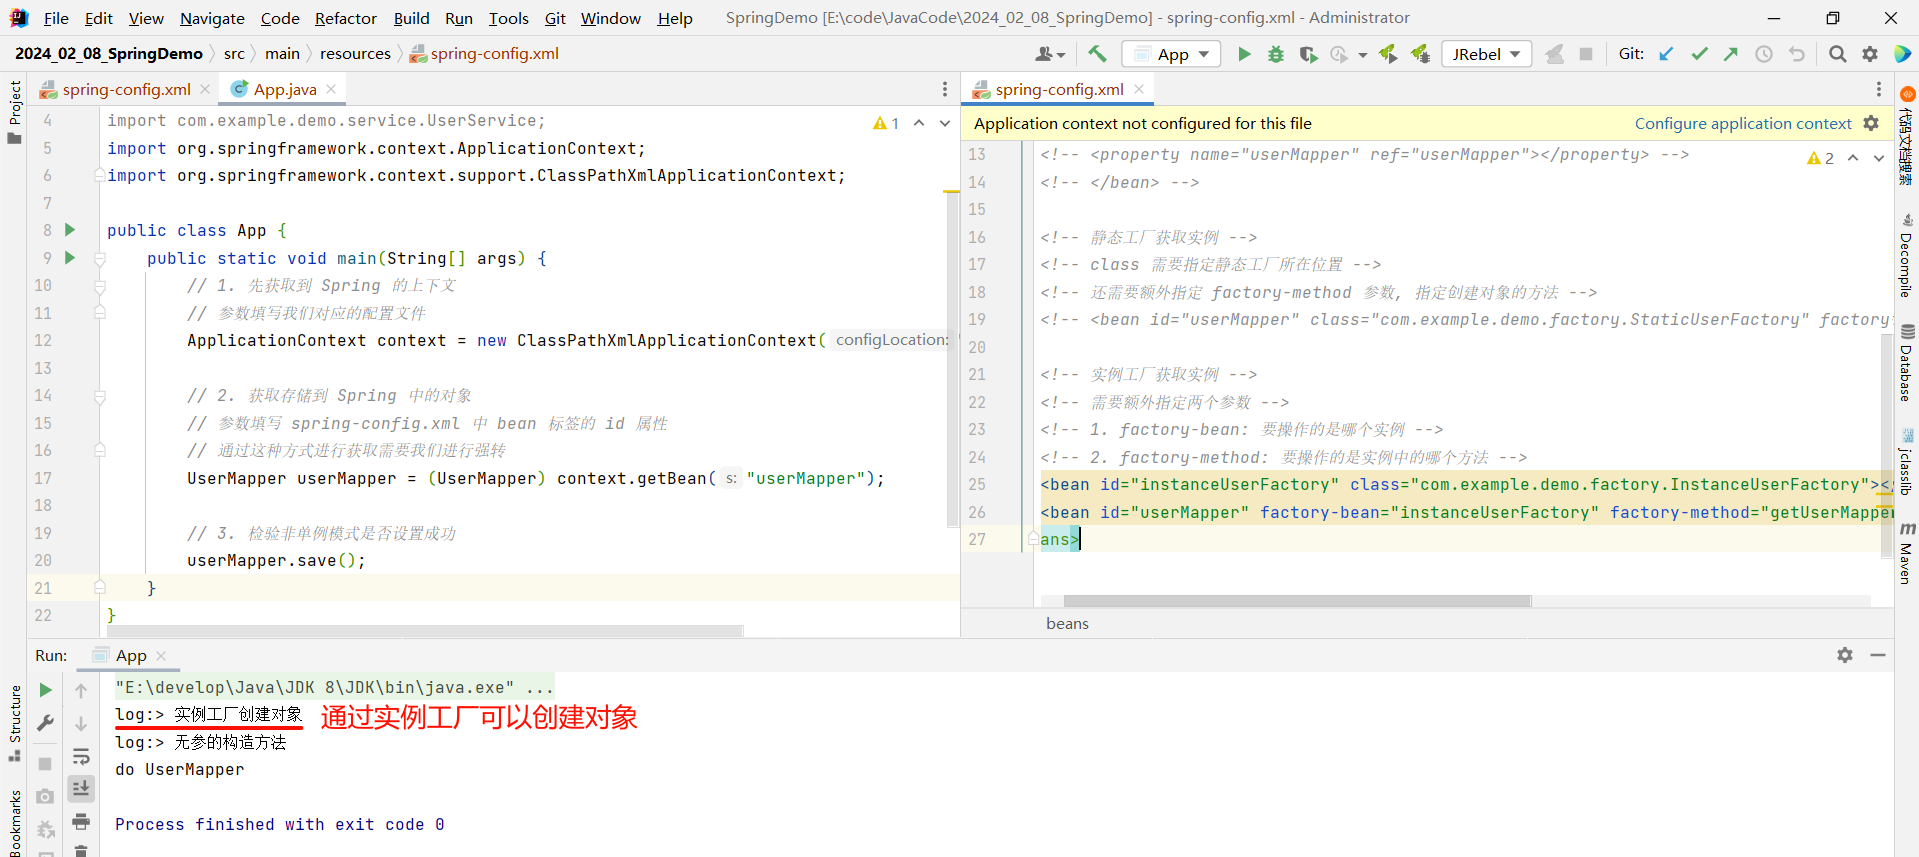
那接下来我们就可以验证一下
1.3.3 实例工厂方式
麻烦方法
实例工厂与静态工厂的区别只是把 static 去掉了
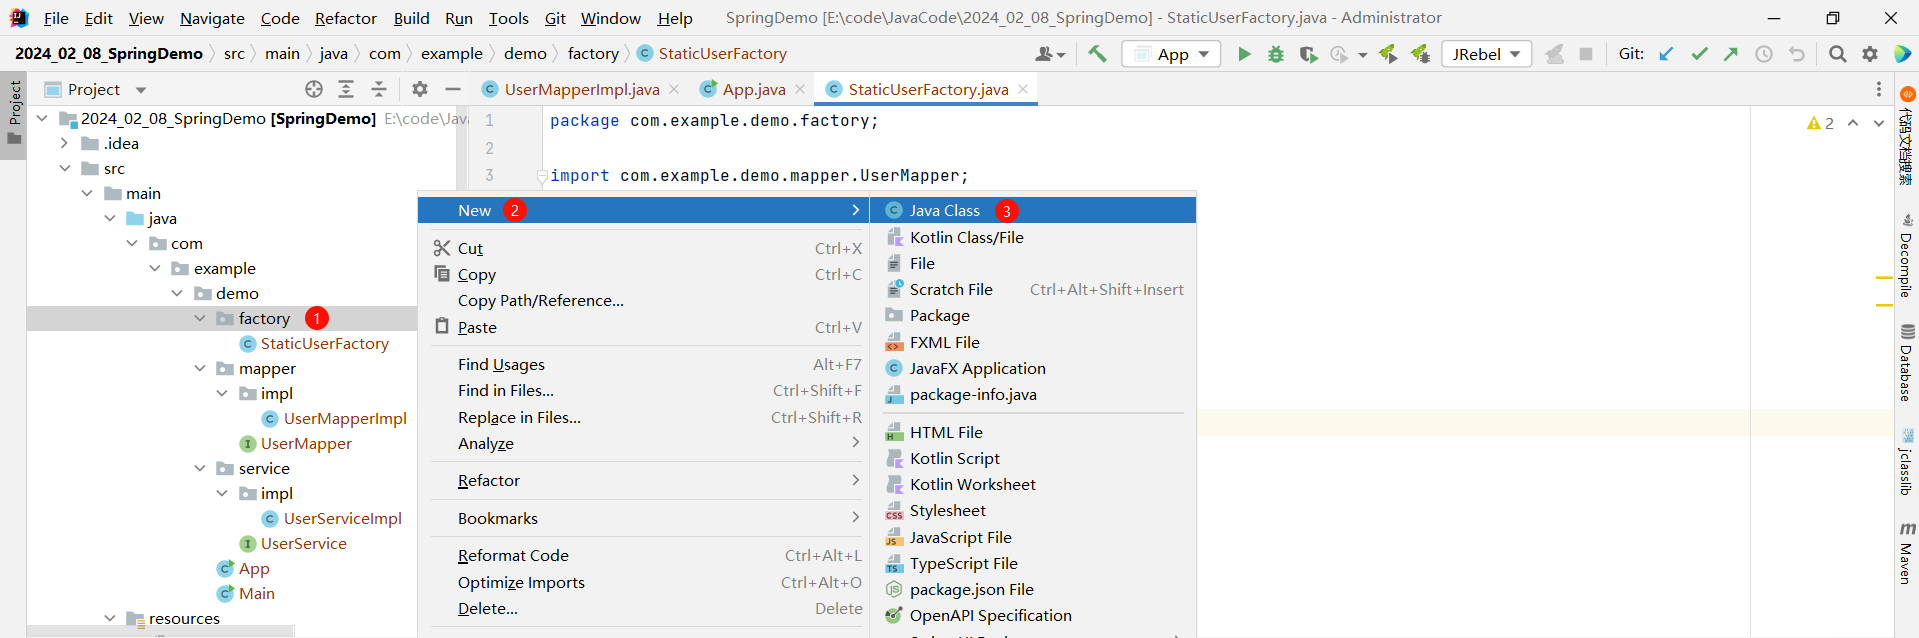
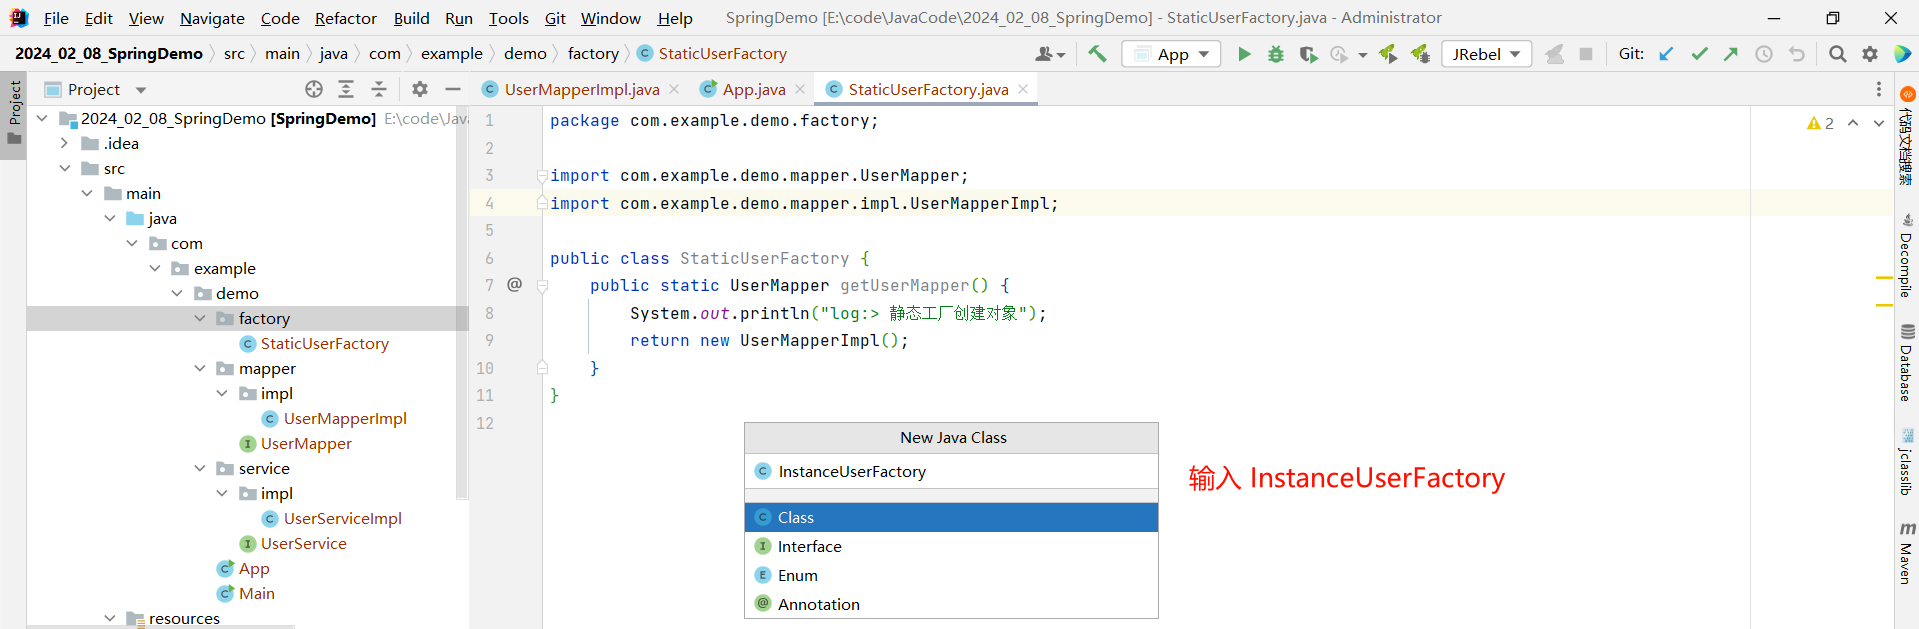
package com.example.demo.factory;import com.example.demo.mapper.UserMapper;
import com.example.demo.mapper.impl.UserMapperImpl;public class InstanceUserFactory {// 与静态工厂的区别就是没有 staticpublic UserMapper getUserMapper() {System.out.println("log:> 实例工厂创建对象");return new UserMapperImpl();}
}
那如果通过传统方式来获取 UserMapper 这个对象的话 , 就需要先 new InstanceUserFactory 这个对象
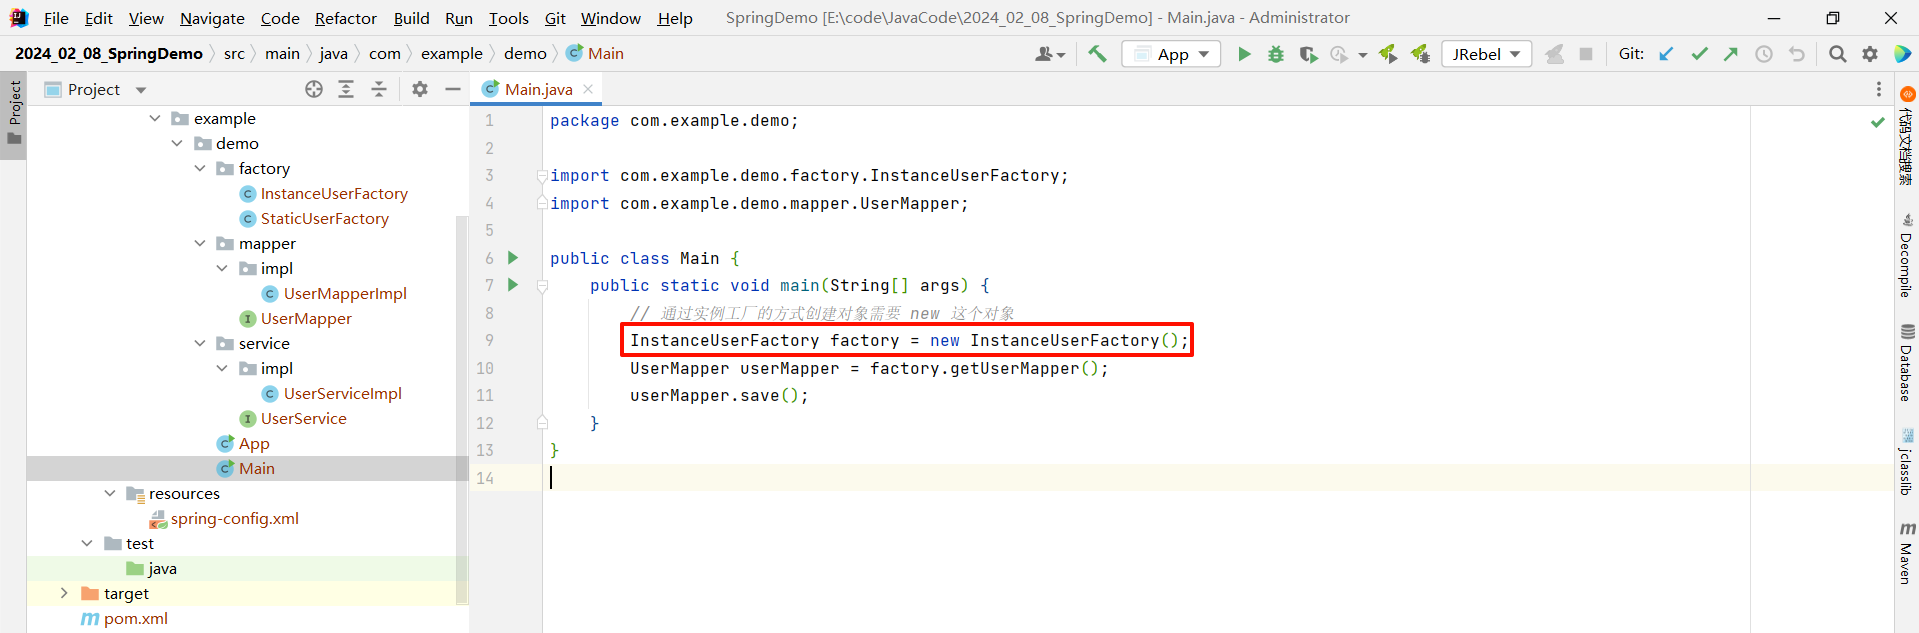
而 Spring 的存在 , 就是为了简化这些配置的 .
我们可以先通过 Spring 的方式创建出 InstanceUserFactory 对象
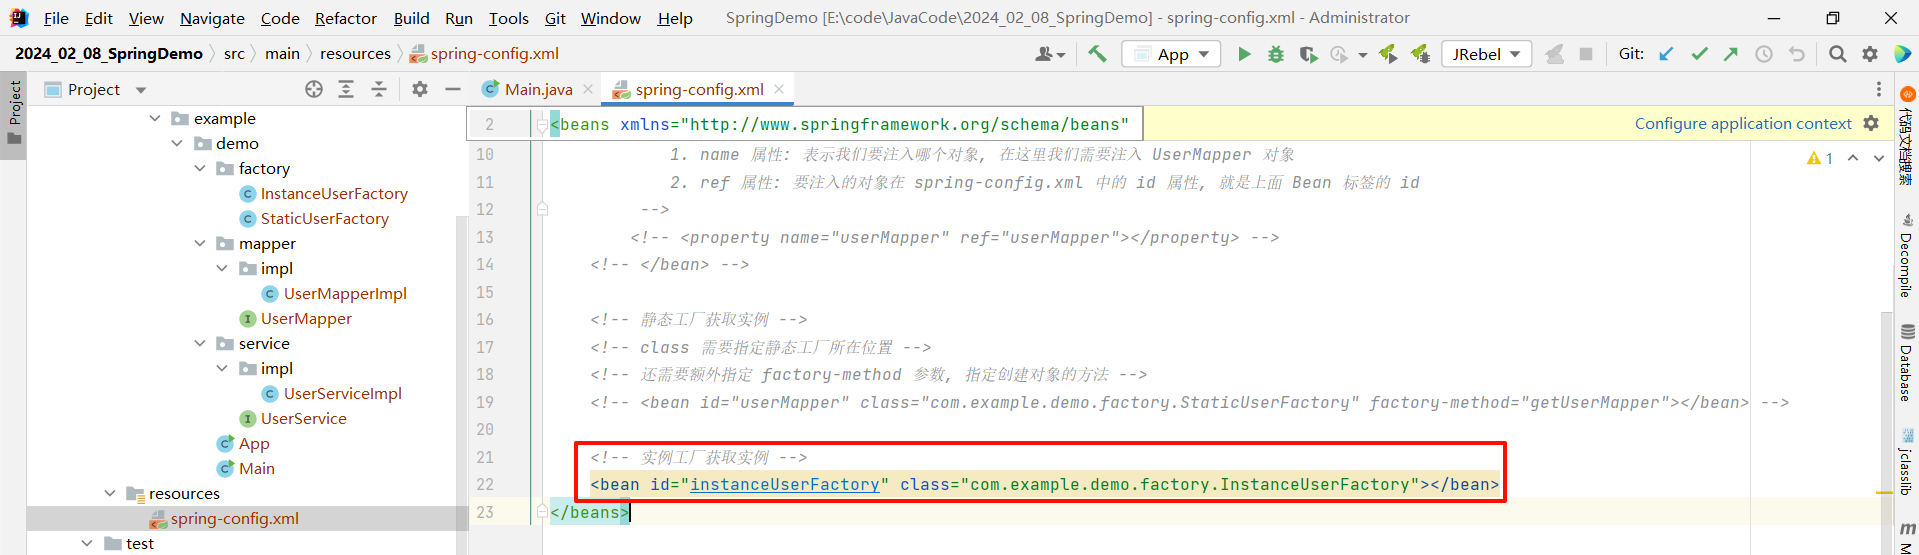
然后此时再去创建 UserMapper 对象 , 但是这次我们是通过实例工厂去创建的 , 所以不需要去指定 class , 额外指定两个参数即可
- factory-bean : 要操作的是哪个实例
- factory-method : 获取实例的方法
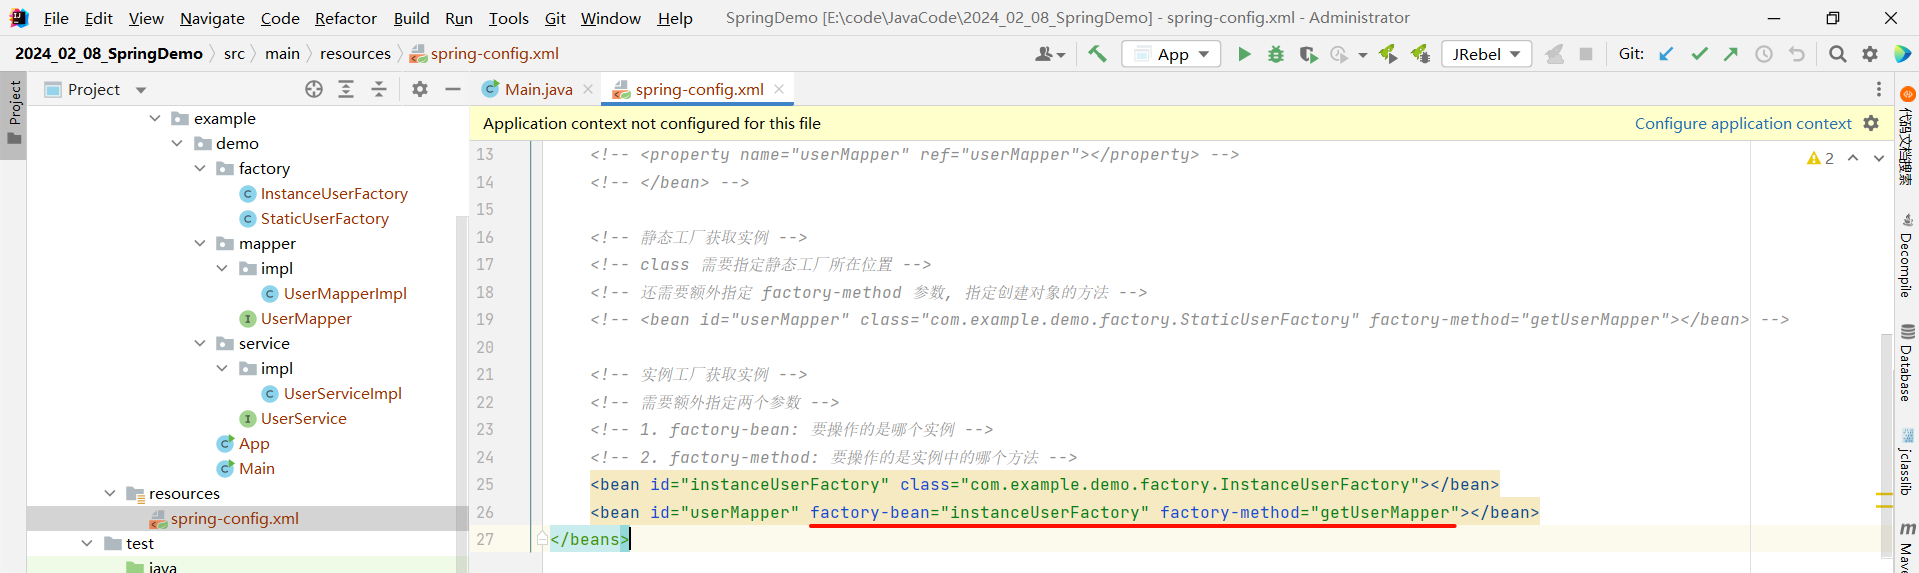
<?xml version="1.0" encoding="UTF-8"?>
<beans xmlns="http://www.springframework.org/schema/beans"xmlns:xsi="http://www.w3.org/2001/XMLSchema-instance"xsi:schemaLocation="http://www.springframework.org/schema/beans http://www.springframework.org/schema/beans/spring-beans.xsd"><!-- 实例工厂获取实例 --><!-- 配合使用, 无实际意义 --><bean id="instanceUserFactory" class="com.example.demo.factory.InstanceUserFactory"></bean><!-- 需要额外指定两个参数 --><!-- 1. factory-bean: 要操作的是哪个实例 --><!-- 2. factory-method: 要操作的是实例中的哪个方法 --><bean id="userMapper" factory-bean="instanceUserFactory" factory-method="getUserMapper"></bean>
</beans>
简便方法
上面的这种方法 , 太过于麻烦 , Spring 还给我们推出了一种更简便的写法
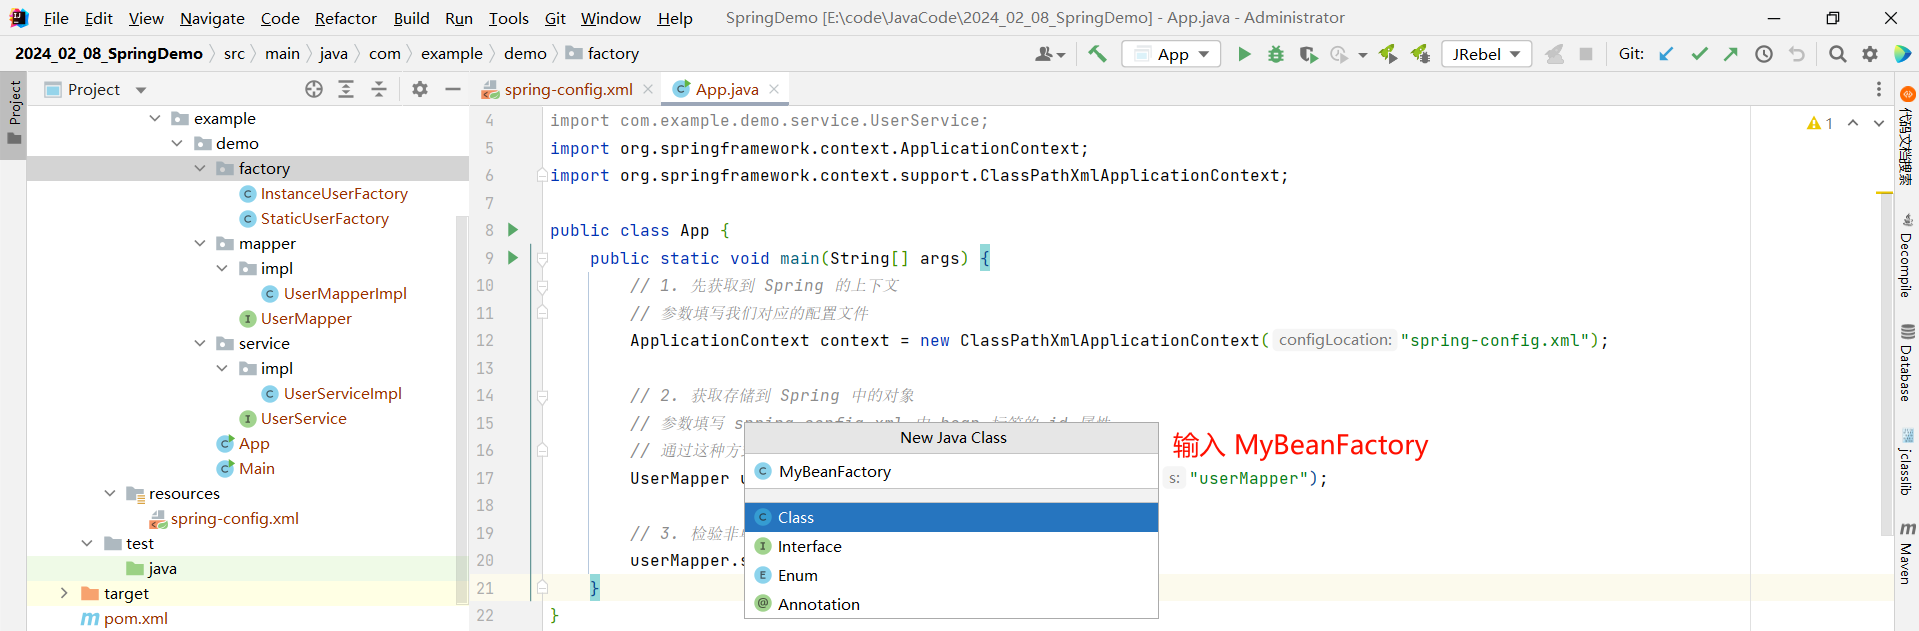
让他去实现 FactoryBean 接口 , 然后重写他的两个方法
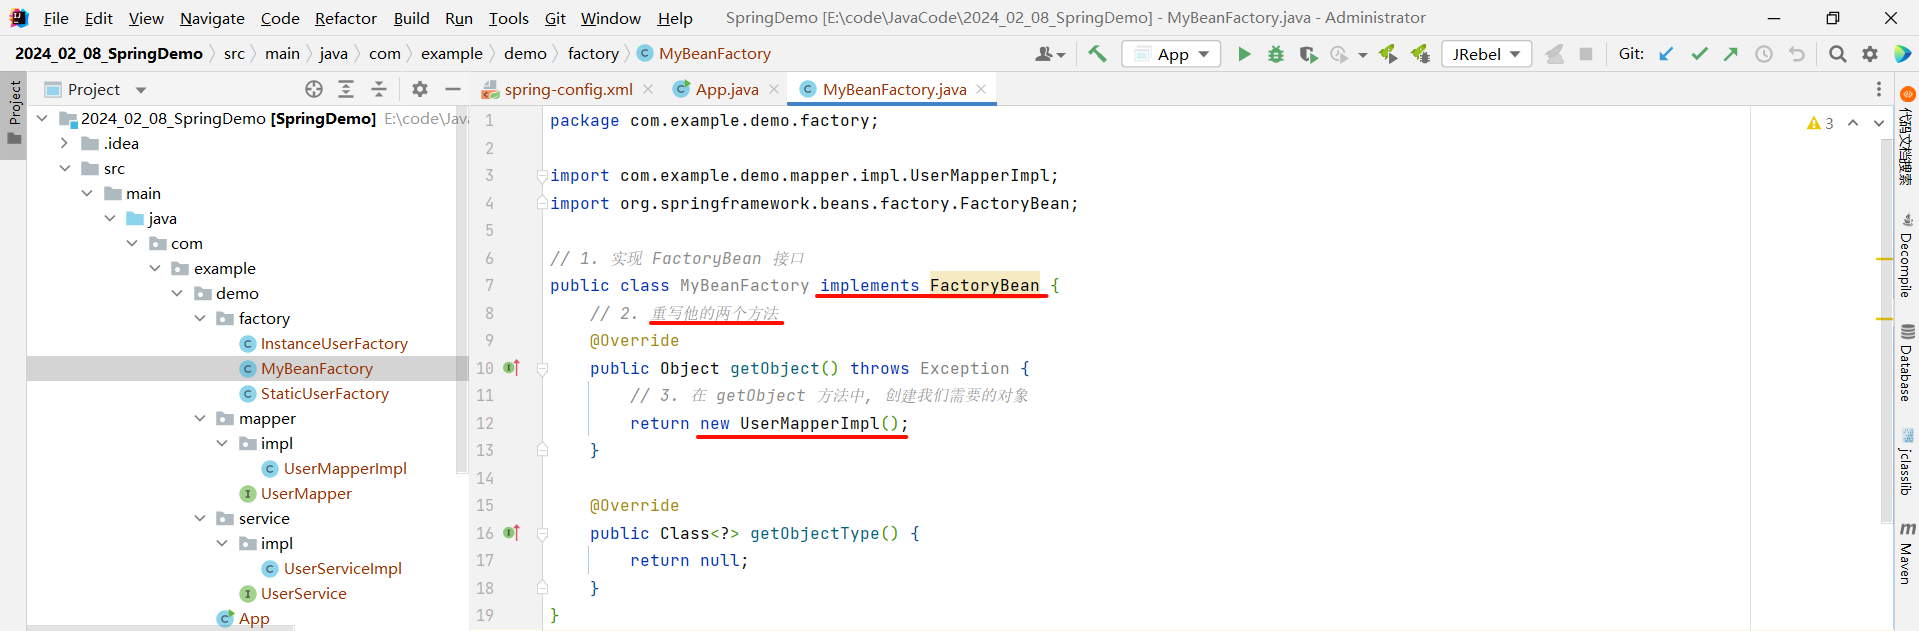
package com.example.demo.factory;import com.example.demo.mapper.impl.UserMapperImpl;
import org.springframework.beans.factory.FactoryBean;// 1. 实现 FactoryBean 接口
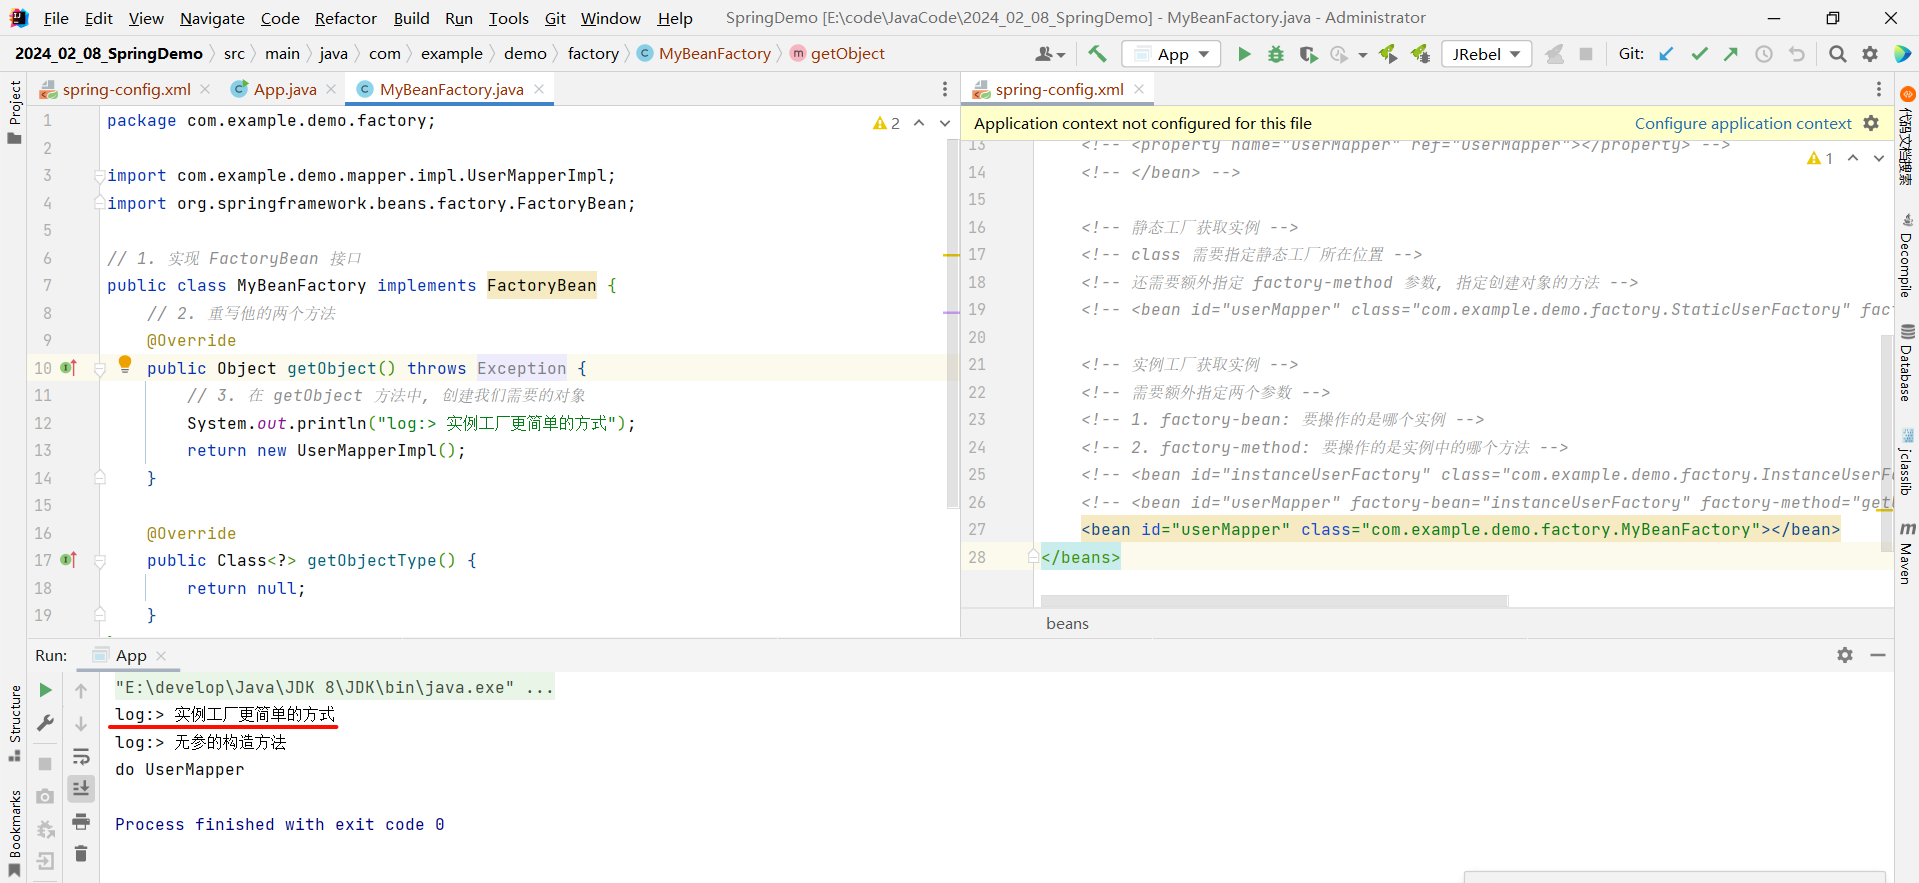
public class MyBeanFactory implements FactoryBean {// 2. 重写他的两个方法@Overridepublic Object getObject() throws Exception {// 3. 在 getObject 方法中, 创建我们需要的对象System.out.println("log:> 实例工厂更简单的方式");return new UserMapperImpl();}@Overridepublic Class<?> getObjectType() {return null;}
}然后我们直接去 spring-config.xml 中创建对应的 bean 标签即可
- id : 要返回的 Bean 对象 , 这里我们需要返回 UserMapper 对象
- class : 我们创建的实例工代码的位置
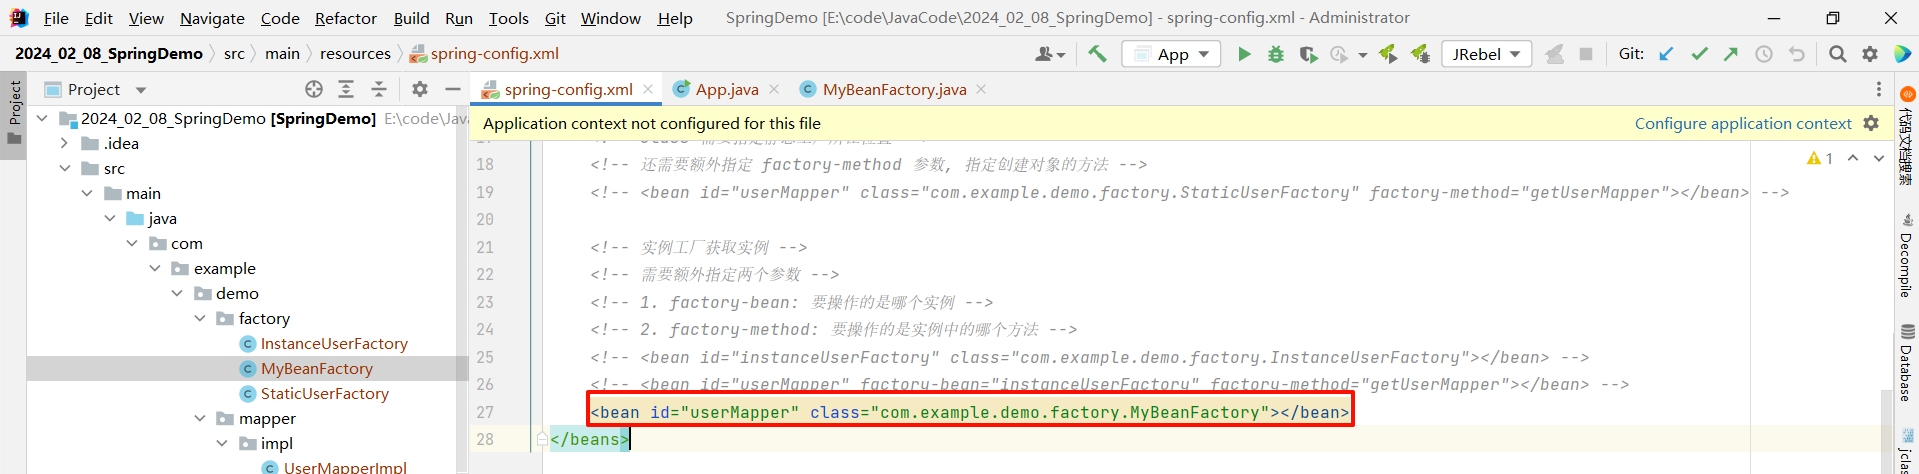
<?xml version="1.0" encoding="UTF-8"?>
<beans xmlns="http://www.springframework.org/schema/beans"xmlns:xsi="http://www.w3.org/2001/XMLSchema-instance"xsi:schemaLocation="http://www.springframework.org/schema/beans http://www.springframework.org/schema/beans/spring-beans.xsd"><bean id="userMapper" class="com.example.demo.factory.MyBeanFactory"></bean>
</beans>
此时我们再去启动类中测试一下
二 . 依赖注入 (DI)
2.1 依赖注入的方式
我们正常创建对象 , 向一个对象中传递数据 , 通常有这两种方式
- setter 方法
- 构造方法
那传递的数据一般也分为两种
- 简单数据类型 (基本数据类型 + String)
- 引用数据类型
那在依赖注入的过程中 , 有的情况下也需要注入相关的参数 , 我们在正常情况下的两两组合 , 通过类比也可以得出依赖注入的数据总共有四种
- setter 注入
- 简单类型
- 引用类型
- 构造器注入
- 简单类型
- 引用类型
接下来我们分别来看
2.1.1 setter 注入
我们先在 UserServiceImpl 中额外创建一个简单类型 , 并提供他的 setter 方法 , 方便接下来的测试
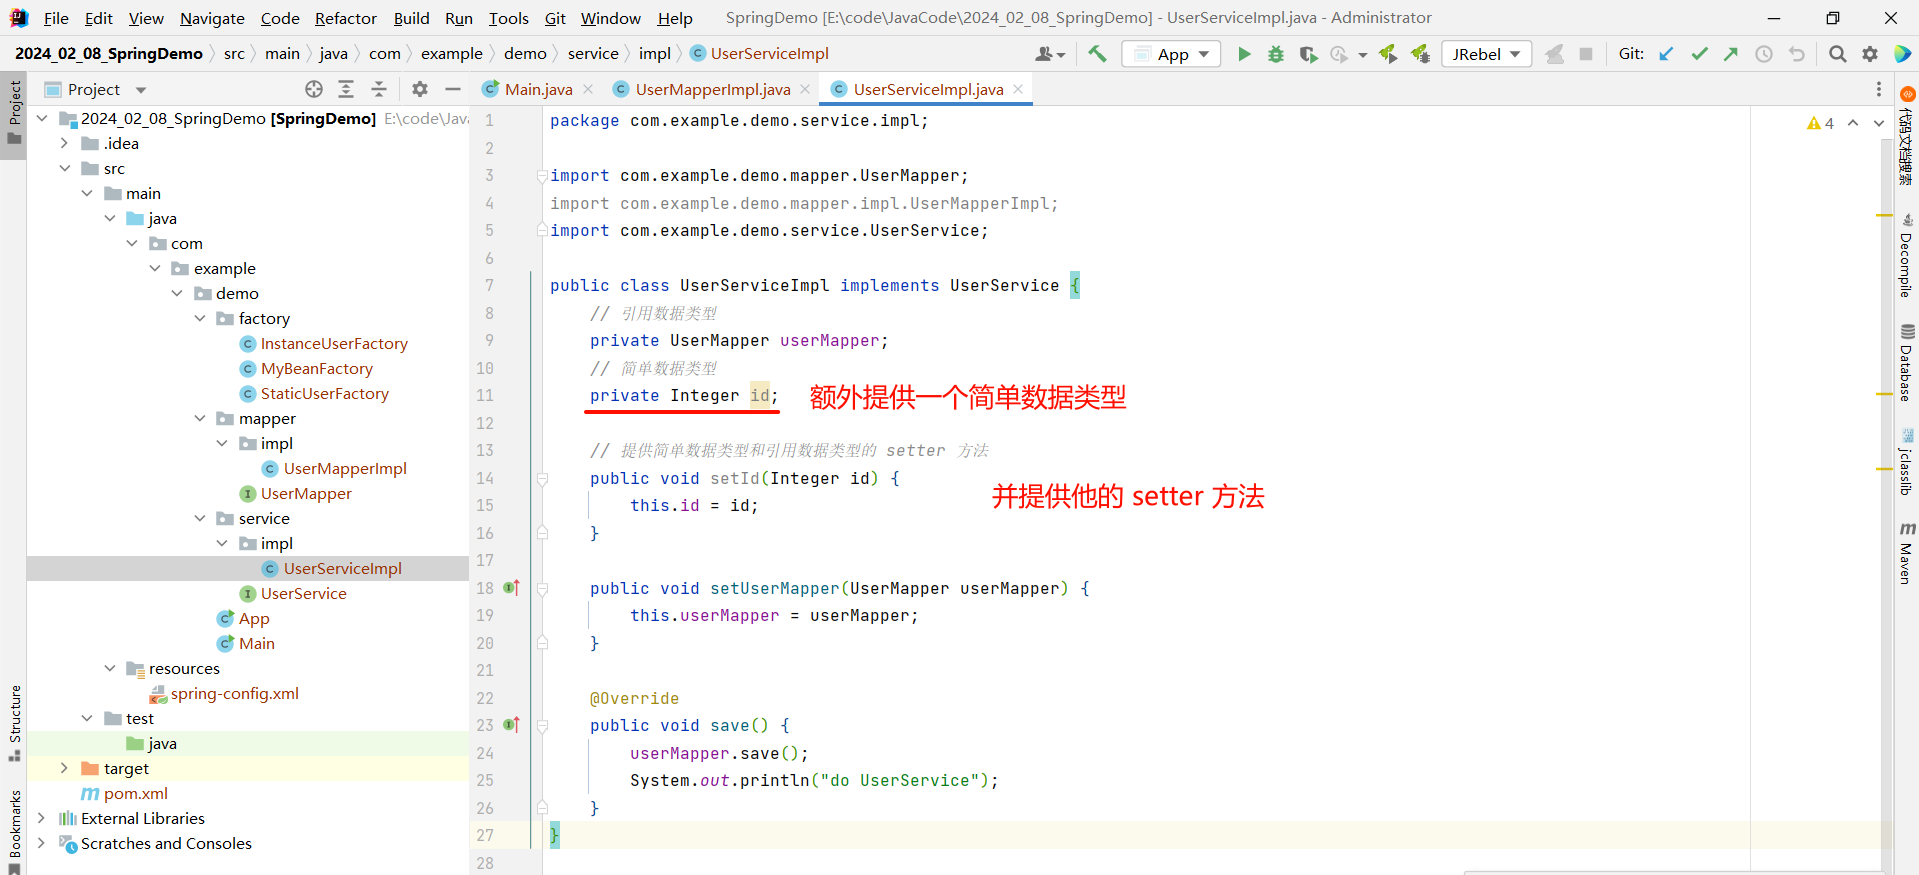
package com.example.demo.service.impl;import com.example.demo.mapper.UserMapper;
import com.example.demo.mapper.impl.UserMapperImpl;
import com.example.demo.service.UserService;public class UserServiceImpl implements UserService {// 引用数据类型private UserMapper userMapper;// 基本数据类型private Integer id;// 提供两个属性的 Setter 方法public void setId(Integer id) {System.out.println("Setter 方法注入基本数据类型");this.id = id;}public void setUserMapper(UserMapper userMapper) {System.out.println("Setter 方法注入引用数据类型");this.userMapper = userMapper;}@Overridepublic void save() {userMapper.save();System.out.println("do UserService");}
}
引用类型
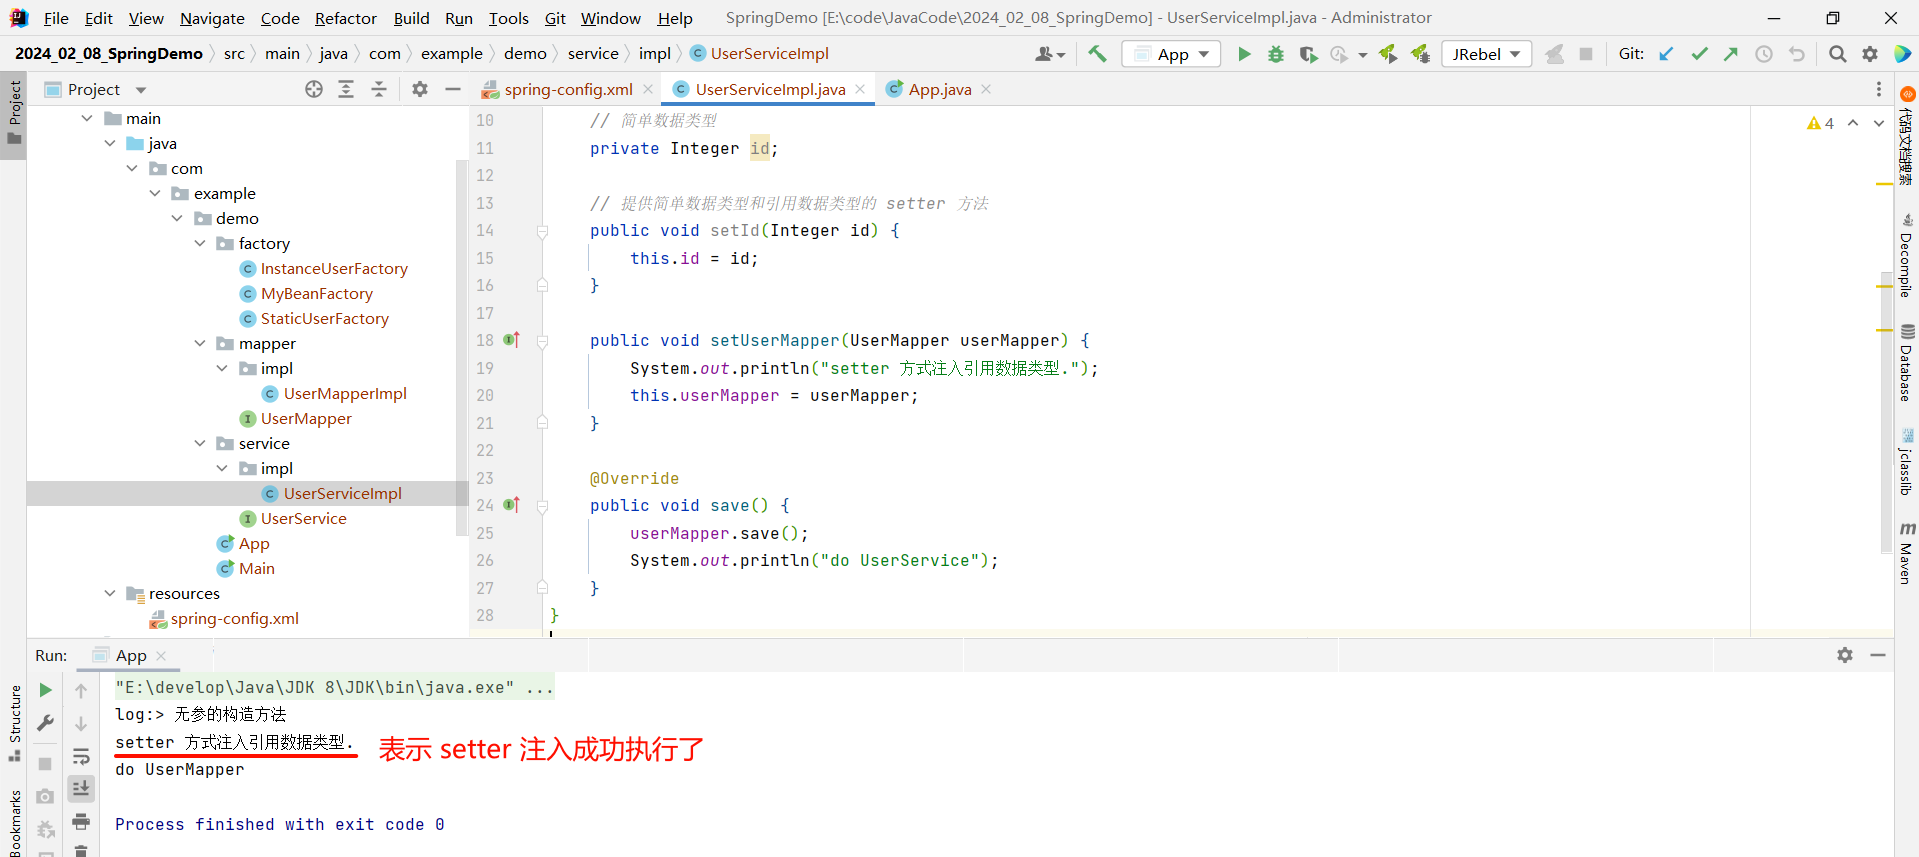
在 spring-config.xml 中 , 在对应的 bean 标签中使用 property 标签的 ref 属性来去注入对应的引用数据类型

<?xml version="1.0" encoding="UTF-8"?>
<beans xmlns="http://www.springframework.org/schema/beans"xmlns:xsi="http://www.w3.org/2001/XMLSchema-instance"xsi:schemaLocation="http://www.springframework.org/schema/beans http://www.springframework.org/schema/beans/spring-beans.xsd"><!-- UserMapper 对象 --><bean id="userMapper" class="com.example.demo.mapper.impl.UserMapperImpl"></bean><!-- UserService 对象 --><bean id="userService" class="com.example.demo.service.impl.UserServiceImpl"><!-- 注入引用数据类型 --><property name="userMapper" ref="userMapper"></property></bean></beans>
我们可以去启动类中测试一下
package com.example.demo;import com.example.demo.mapper.UserMapper;
import com.example.demo.service.UserService;
import org.springframework.context.ApplicationContext;
import org.springframework.context.support.ClassPathXmlApplicationContext;public class App {public static void main(String[] args) {// 1. 先获取到 Spring 的上下文// 参数填写我们对应的配置文件ApplicationContext context = new ClassPathXmlApplicationContext("spring-config.xml");// 2. 获取存储到 Spring 中的对象// 参数填写 spring-config.xml 中 bean 标签的 id 属性// 通过这种方式进行获取需要我们进行强转UserService userService = (UserService) context.getBean("userService");// 3. 使用方法userService.save();}
}
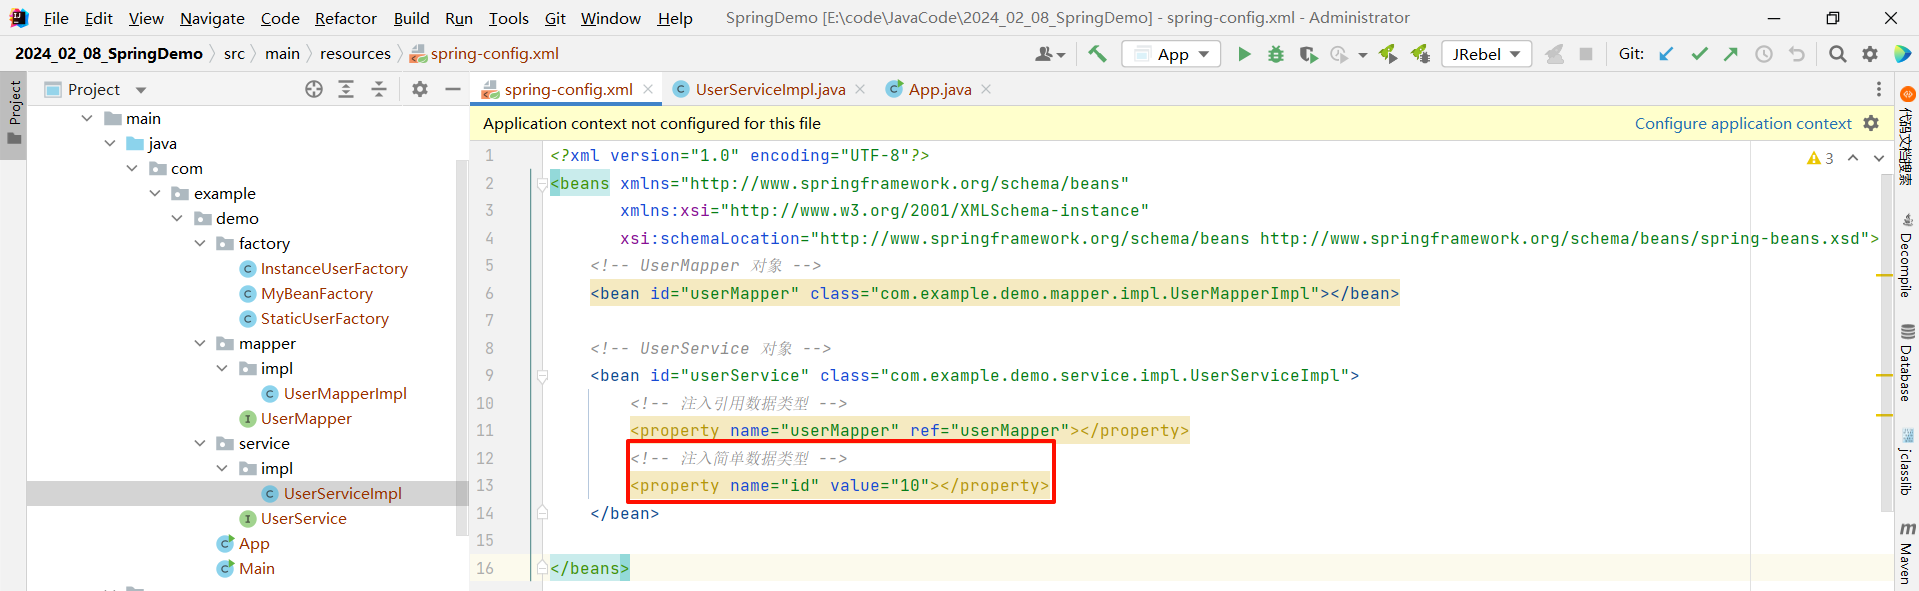
简单类型
在 spring-config.xml 中 , 在对应的 bean 标签中使用 property 标签的 value 属性来去注入简单数据类型
<?xml version="1.0" encoding="UTF-8"?>
<beans xmlns="http://www.springframework.org/schema/beans"xmlns:xsi="http://www.w3.org/2001/XMLSchema-instance"xsi:schemaLocation="http://www.springframework.org/schema/beans http://www.springframework.org/schema/beans/spring-beans.xsd"><!-- UserMapper 对象 --><bean id="userMapper" class="com.example.demo.mapper.impl.UserMapperImpl"></bean><!-- UserService 对象 --><bean id="userService" class="com.example.demo.service.impl.UserServiceImpl"><!-- 注入引用数据类型 --><property name="userMapper" ref="userMapper"></property><!-- 注入简单数据类型 --><property name="id" value="10"></property></bean></beans>
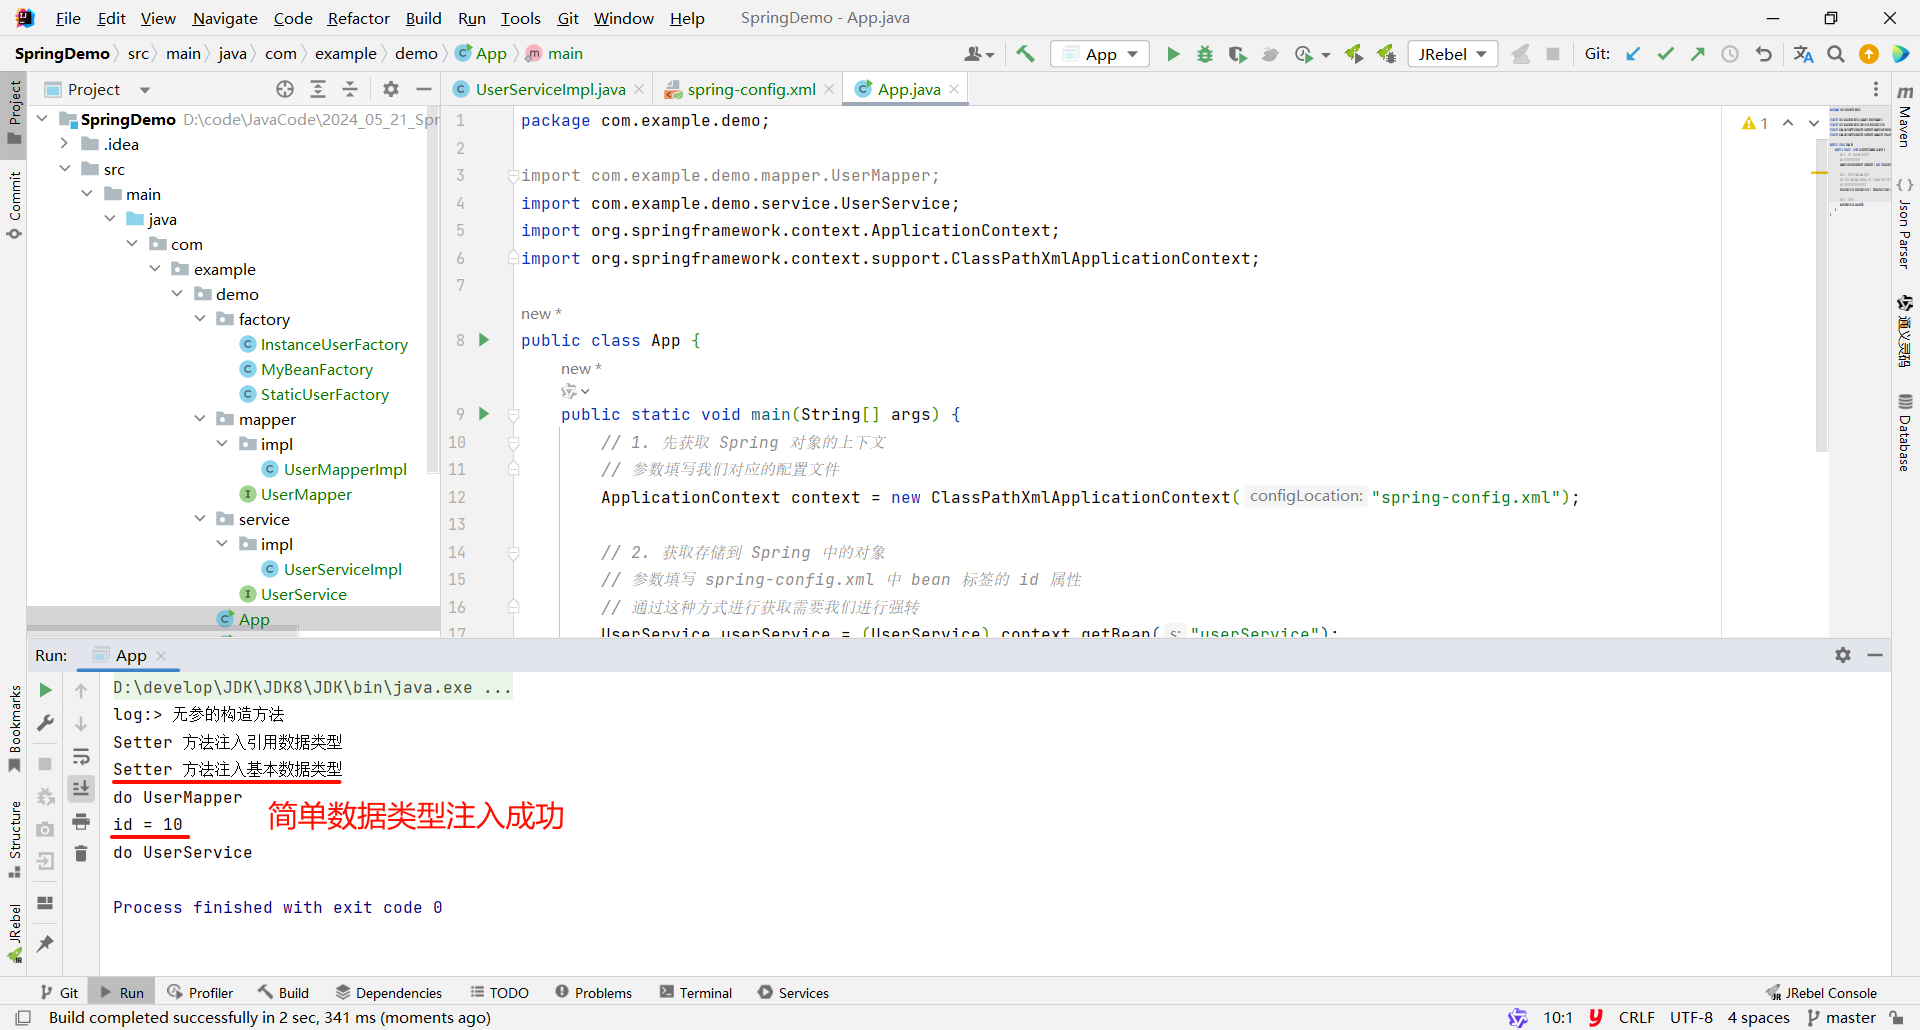
然后在 UserServiceImpl 中打印一下获取到的 id 的值
package com.example.demo.service.impl;import com.example.demo.mapper.UserMapper;
import com.example.demo.mapper.impl.UserMapperImpl;
import com.example.demo.service.UserService;public class UserServiceImpl implements UserService {// 引用数据类型private UserMapper userMapper;// 基本数据类型private Integer id;// 提供两个属性的 Setter 方法public void setId(Integer id) {System.out.println("Setter 方法注入基本数据类型");this.id = id;}public void setUserMapper(UserMapper userMapper) {System.out.println("Setter 方法注入引用数据类型");this.userMapper = userMapper;}@Overridepublic void save() {userMapper.save();System.out.println("id = " + id);System.out.println("do UserService");}
}
那我们接下来测试一下
package com.example.demo;import com.example.demo.mapper.UserMapper;
import com.example.demo.service.UserService;
import org.springframework.context.ApplicationContext;
import org.springframework.context.support.ClassPathXmlApplicationContext;public class App {public static void main(String[] args) {// 1. 先获取到 Spring 的上下文// 参数填写我们对应的配置文件ApplicationContext context = new ClassPathXmlApplicationContext("spring-config.xml");// 2. 获取存储到 Spring 中的对象// 参数填写 spring-config.xml 中 bean 标签的 id 属性// 通过这种方式进行获取需要我们进行强转UserService userService = (UserService) context.getBean("userService");// 3. 使用对象userService.save();}
}
2.1.2 构造方法注入
简单类型与引用类型
首先 , 我们先提供带两个参数的构造方法
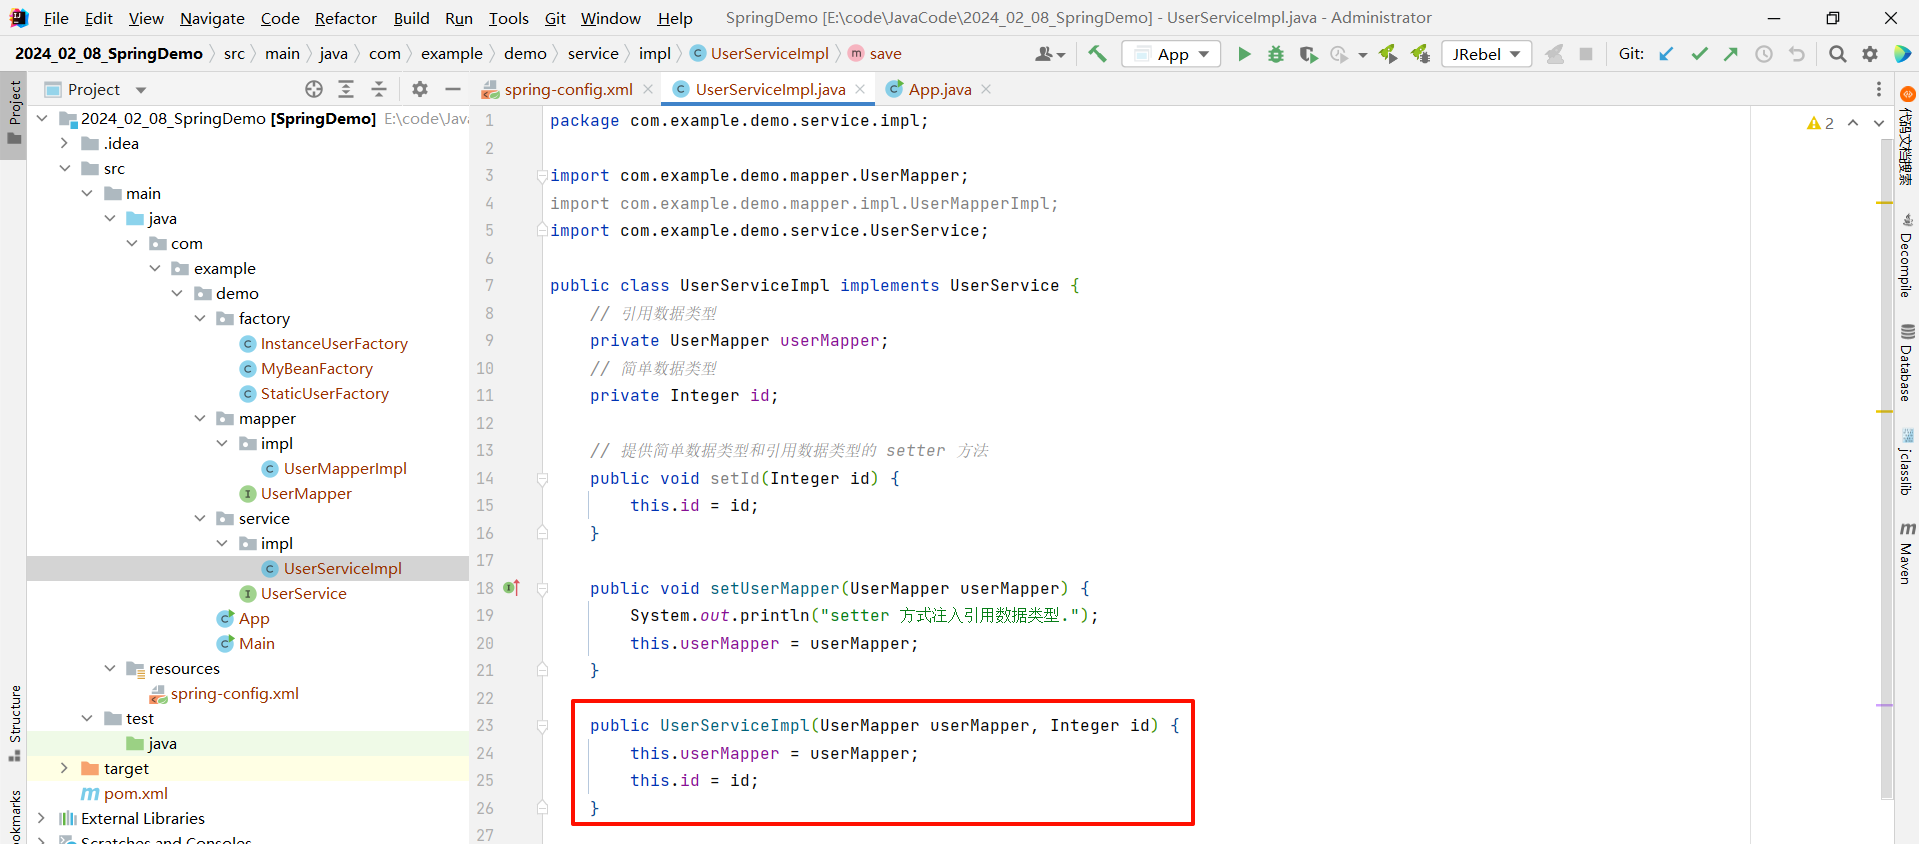
package com.example.demo.service.impl;import com.example.demo.mapper.UserMapper;
import com.example.demo.mapper.impl.UserMapperImpl;
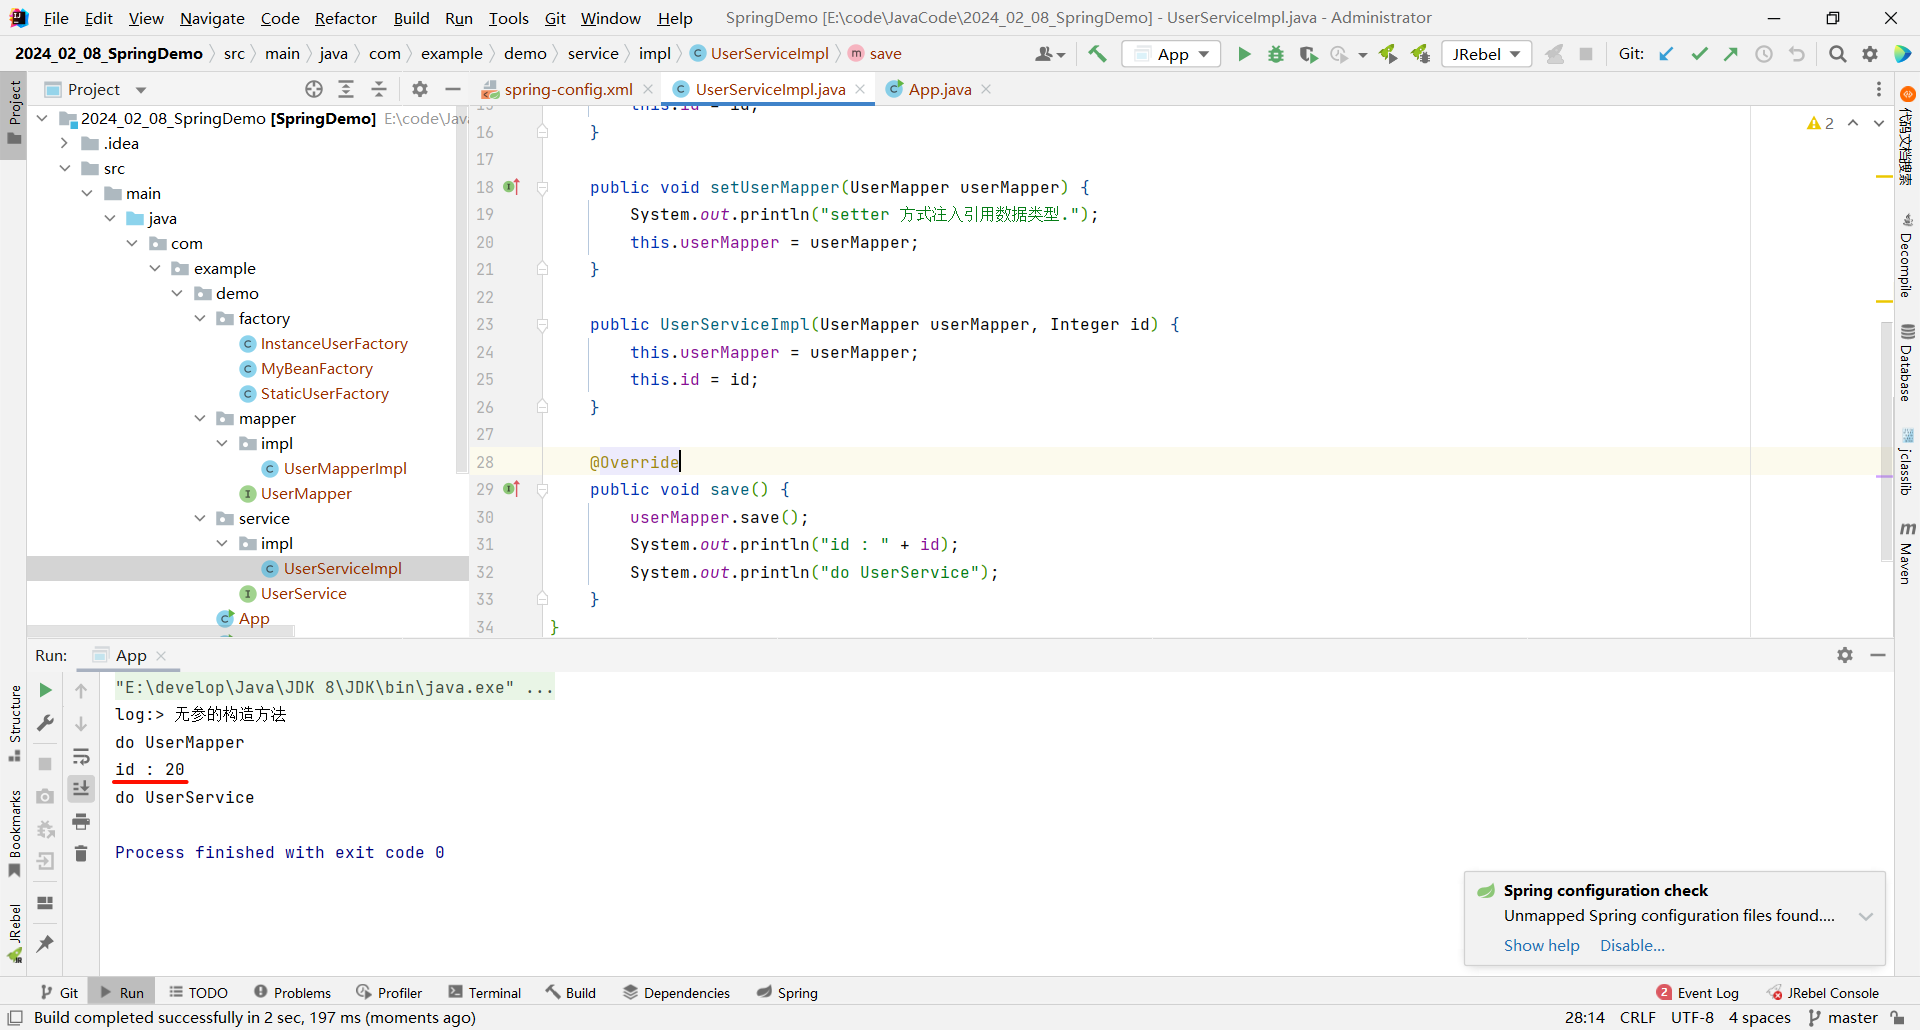
import com.example.demo.service.UserService;public class UserServiceImpl implements UserService {// 引用数据类型private UserMapper userMapper;// 简单数据类型private Integer id;// 提供简单数据类型和引用数据类型的 setter 方法public void setId(Integer id) {this.id = id;}public void setUserMapper(UserMapper userMapper) {System.out.println("setter 方式注入引用数据类型.");this.userMapper = userMapper;}// 提供引用数据类型和简单数据类型的构造方法public UserServiceImpl(UserMapper userMapper, Integer id) {this.userMapper = userMapper;this.id = id;}@Overridepublic void save() {userMapper.save();System.out.println("id : " + id);System.out.println("do UserService");}
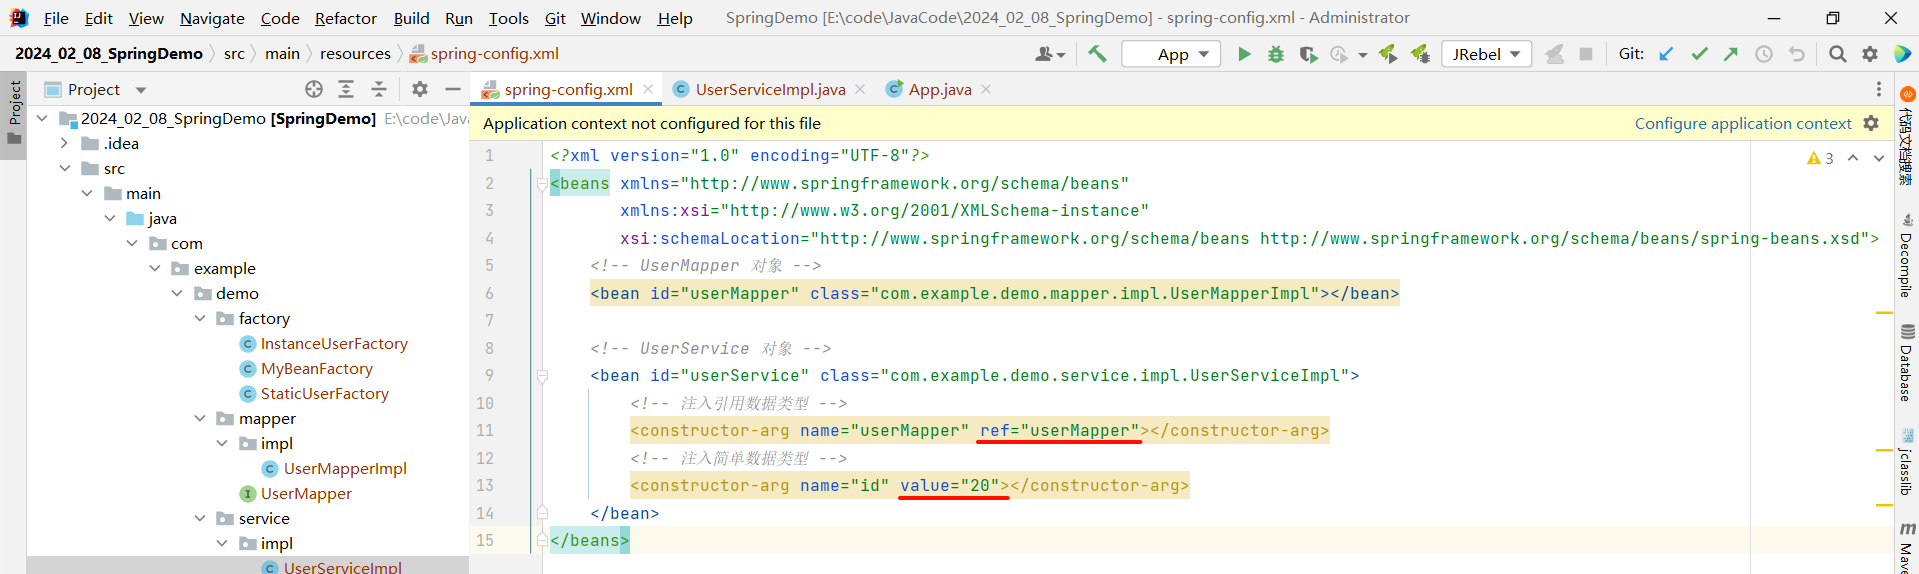
}然后在 spring-config.xml 中 , 在对应的 bean 标签中使用 constructor-arg 标签的 ref 属性来去注入引用数据类型 , 使用 value 属性注入简单数据类型
<?xml version="1.0" encoding="UTF-8"?>
<beans xmlns="http://www.springframework.org/schema/beans"xmlns:xsi="http://www.w3.org/2001/XMLSchema-instance"xsi:schemaLocation="http://www.springframework.org/schema/beans http://www.springframework.org/schema/beans/spring-beans.xsd"><!-- UserMapper 对象 --><bean id="userMapper" class="com.example.demo.mapper.impl.UserMapperImpl"></bean><!-- UserService 对象 --><bean id="userService" class="com.example.demo.service.impl.UserServiceImpl"><!-- 通过构造方法注入引用数据类型 --><constructor-arg name="userMapper" ref="userMapper"></constructor-arg><!-- 通过构造方法注入简单数据类型 --><constructor-arg name="id" value="20"></constructor-arg></bean>
</beans>
接下来我们可以测试一下
参数适配
constructor-arg 也提供了其他形式来去进行注入
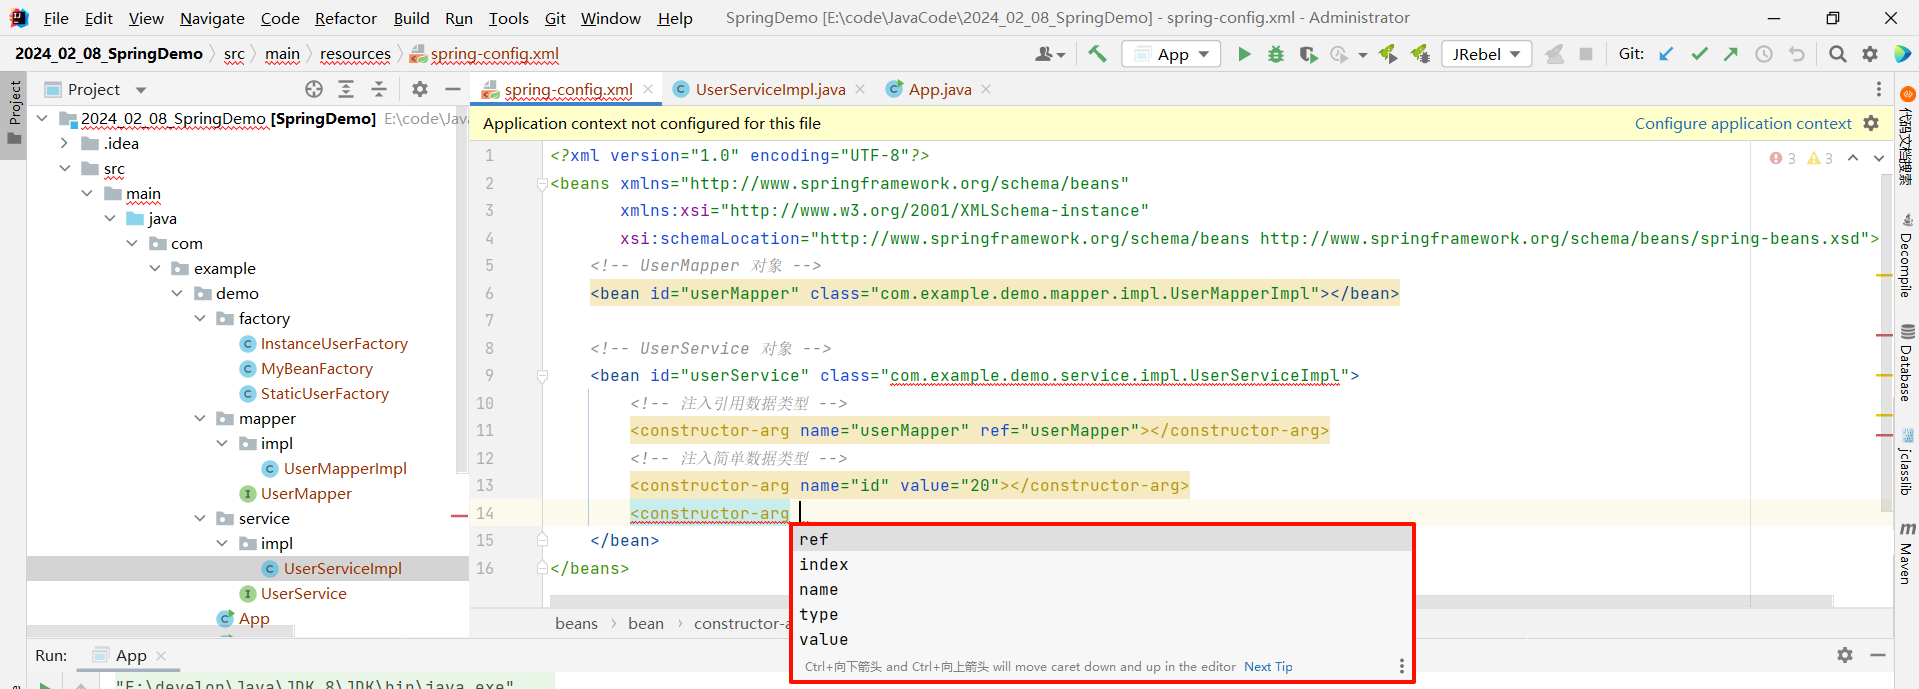
其他的我们都已经见到过了 , 我们接下来来去看一下 type 以及 index 是什么意思
type 属性指的是按照形参的类型来去注入
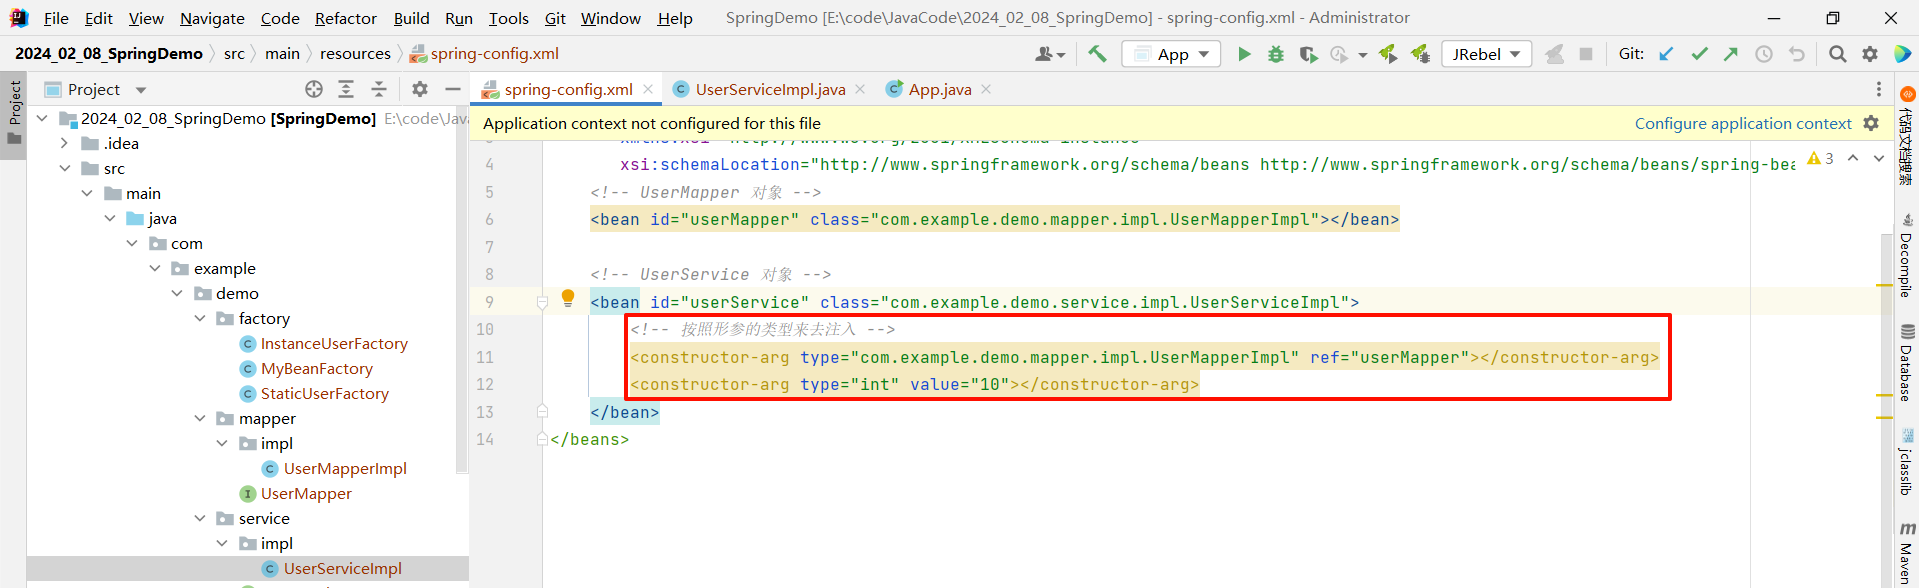
<?xml version="1.0" encoding="UTF-8"?>
<beans xmlns="http://www.springframework.org/schema/beans"xmlns:xsi="http://www.w3.org/2001/XMLSchema-instance"xsi:schemaLocation="http://www.springframework.org/schema/beans http://www.springframework.org/schema/beans/spring-beans.xsd"><!-- UserMapper 对象 --><bean id="userMapper" class="com.example.demo.mapper.impl.UserMapperImpl"></bean><!-- UserService 对象 --><bean id="userService" class="com.example.demo.service.impl.UserServiceImpl"><!-- 按照形参的类型来去注入 --><constructor-arg type="com.example.demo.mapper.impl.UserMapperImpl" ref="userMapper"></constructor-arg><constructor-arg type="int" value="10"></constructor-arg></bean>
</beans>
index 属性指的是按照形参的先后顺序来进行注入 (少见)
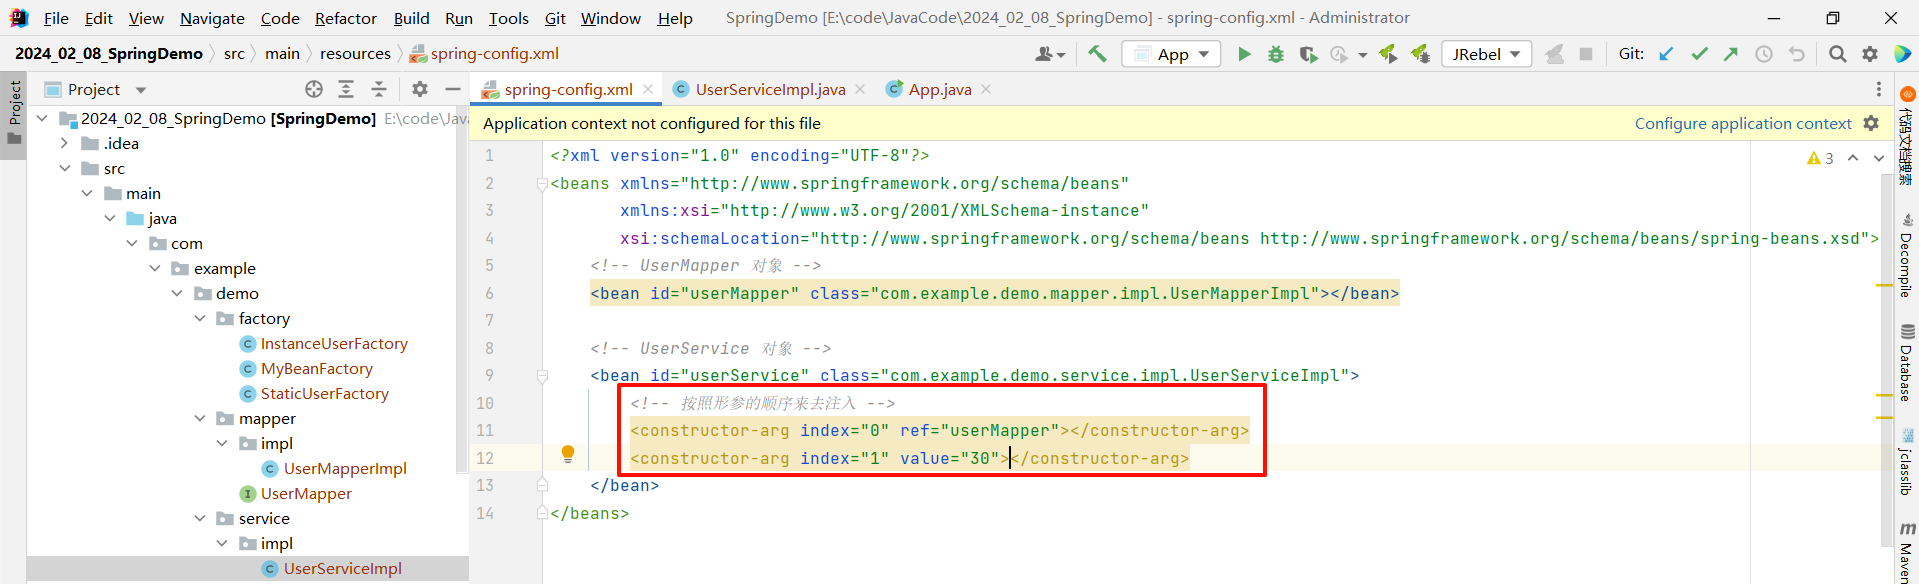
<?xml version="1.0" encoding="UTF-8"?>
<beans xmlns="http://www.springframework.org/schema/beans"xmlns:xsi="http://www.w3.org/2001/XMLSchema-instance"xsi:schemaLocation="http://www.springframework.org/schema/beans http://www.springframework.org/schema/beans/spring-beans.xsd"><!-- UserMapper 对象 --><bean id="userMapper" class="com.example.demo.mapper.impl.UserMapperImpl"></bean><!-- UserService 对象 --><bean id="userService" class="com.example.demo.service.impl.UserServiceImpl"><!-- 按照形参的顺序来去注入 --><constructor-arg index="0" ref="userMapper"></constructor-arg><constructor-arg index="1" value="30"></constructor-arg></bean>
</beans>
2.2 依赖自动装配
我们刚才介绍的 setter 注入和构造器注入 , 他们都是手动装配类型 , 需要我们自己在 bean 标签中添加需要依赖的属性或值 , 而 Spring 也为了简化配置 , 提供了自动装配 , 那么我们就来看一下
自动装配指的是 IoC 容器根据某个 bean 所依赖的资源去当前容器中进行查找 , 并注入到 bean 中的过程 .
一般来说 , 自动装配有四种方式
- 按类型 (常用)
- 按名称
- 按构造方法
- 不启用自动装配
那我们重点来看一下前两种方式 , 我们通过 UserServiceImpl 来进行测试
UserServiceImpl :
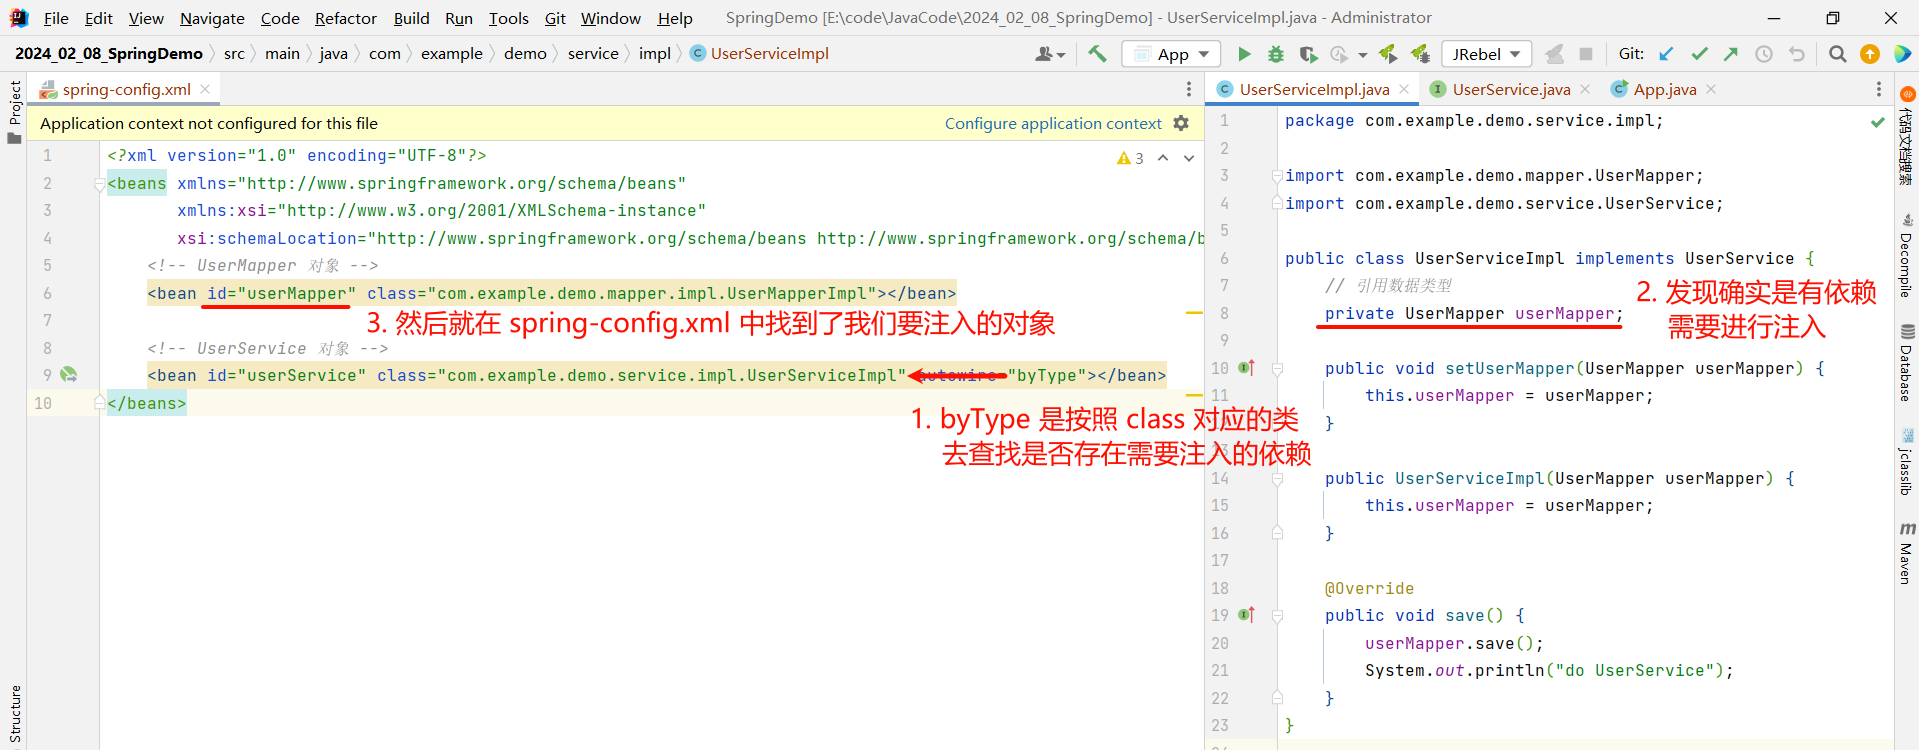
package com.example.demo.service.impl;import com.example.demo.mapper.UserMapper;
import com.example.demo.service.UserService;public class UserServiceImpl implements UserService {// 引用数据类型private UserMapper userMapper;// 提供引用数据类型的 setter 方法public void setUserMapper(UserMapper userMapper) {this.userMapper = userMapper;}@Overridepublic void save() {userMapper.save();System.out.println("do UserService");}
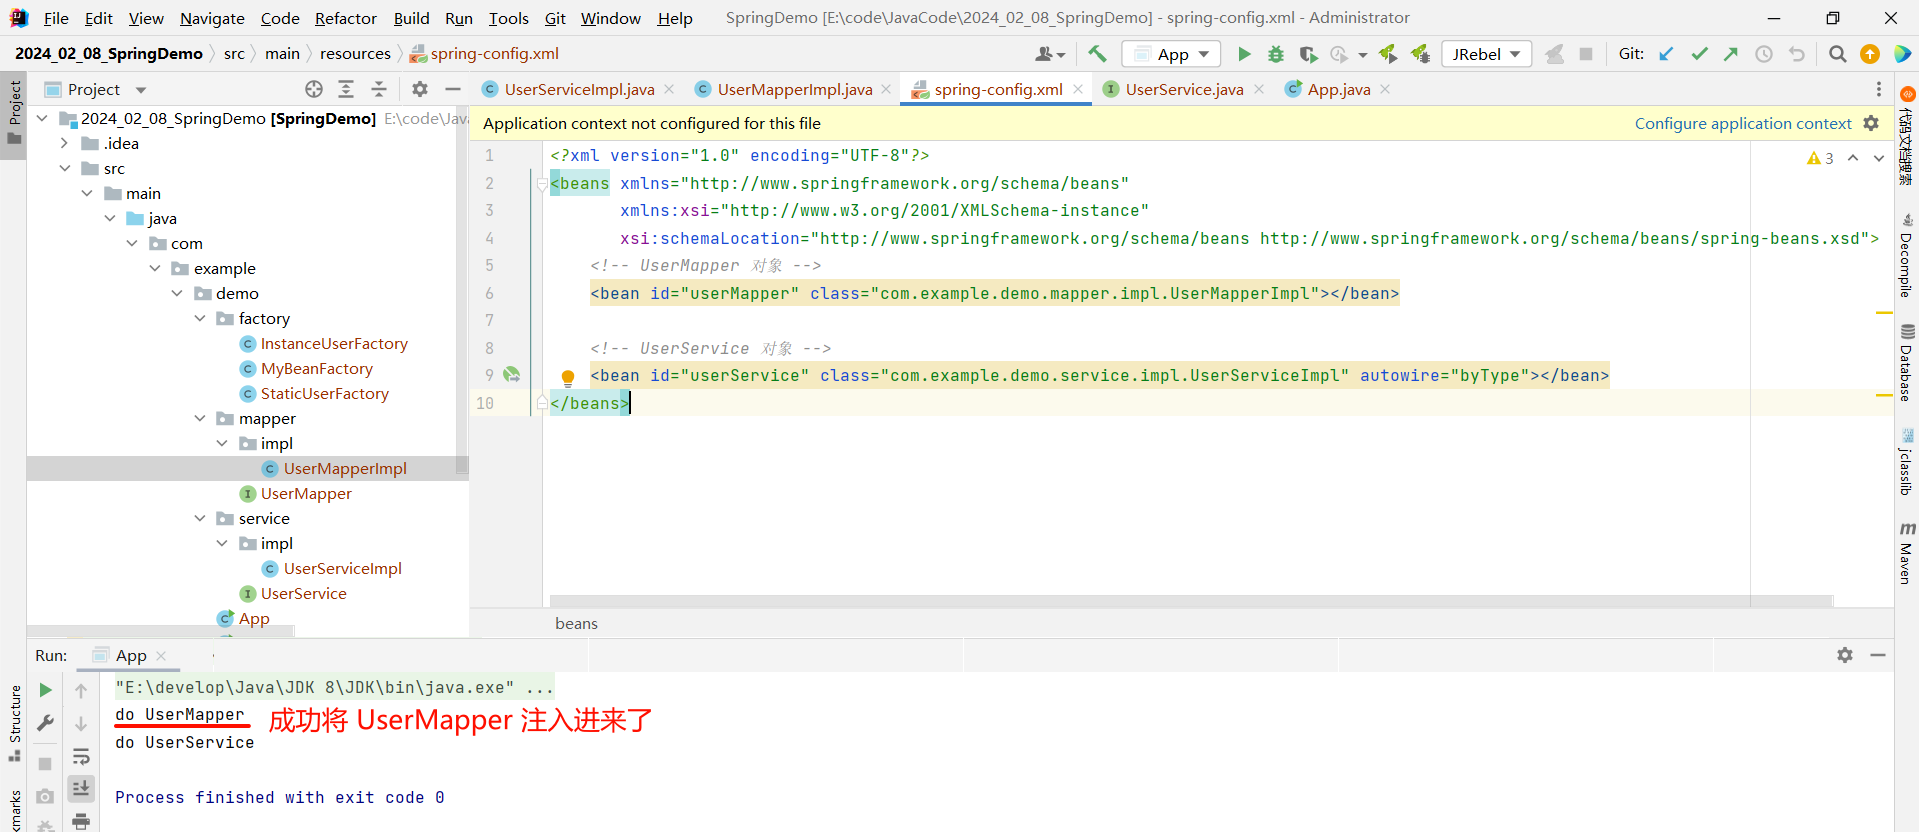
}我们只需要在 spring-config.xml 的 bean 标签中指定 autowire 属性
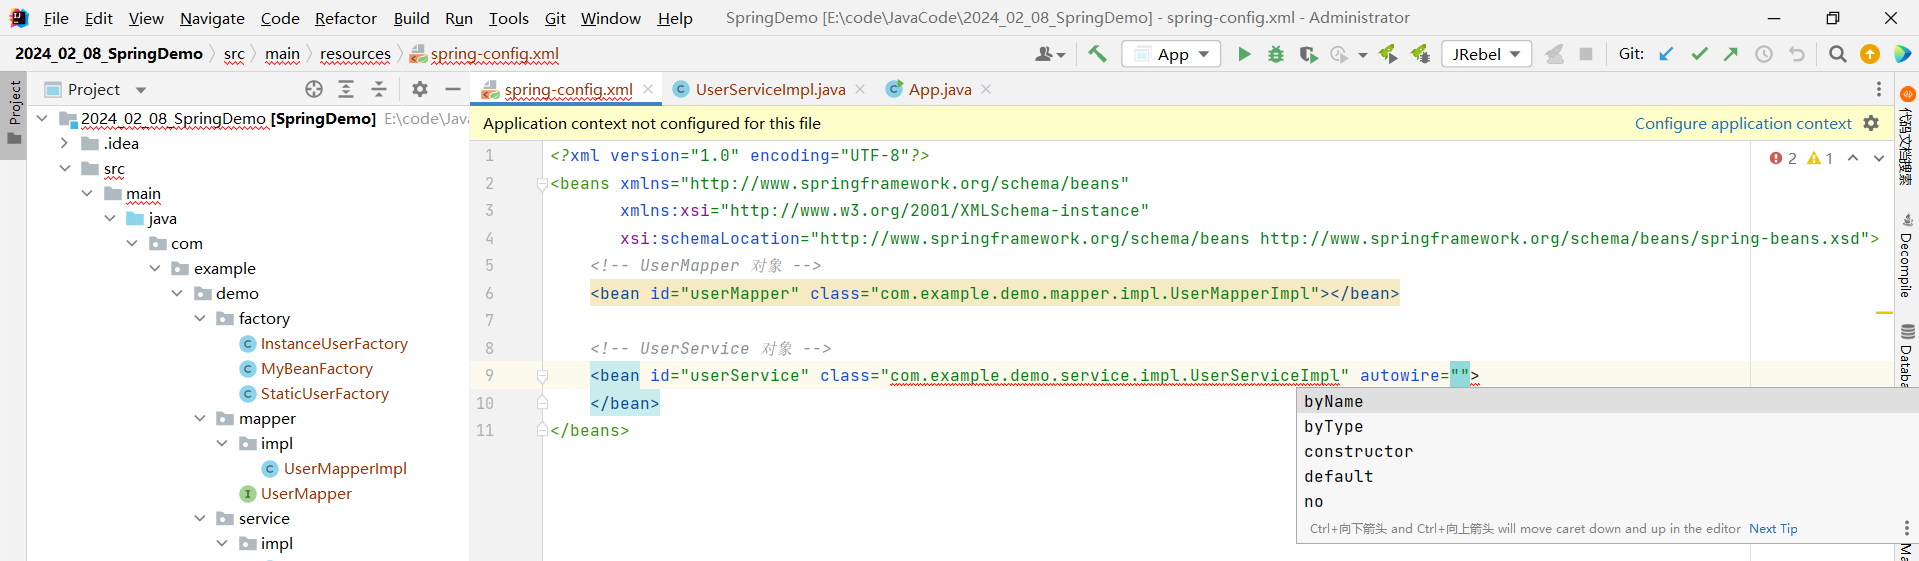
比如我们设置 byType , 他就会按照 class 对应的类所需要的依赖去进行查找 , 然后进行注入
<?xml version="1.0" encoding="UTF-8"?>
<beans xmlns="http://www.springframework.org/schema/beans"xmlns:xsi="http://www.w3.org/2001/XMLSchema-instance"xsi:schemaLocation="http://www.springframework.org/schema/beans http://www.springframework.org/schema/beans/spring-beans.xsd"><!-- UserMapper 对象 --><bean id="userMapper" class="com.example.demo.mapper.impl.UserMapperImpl"></bean><!-- UserService 对象 --><bean id="userService" class="com.example.demo.service.impl.UserServiceImpl" autowire="byType"></bean>
</beans>
此时我们可以运行一下 , 看一下效果
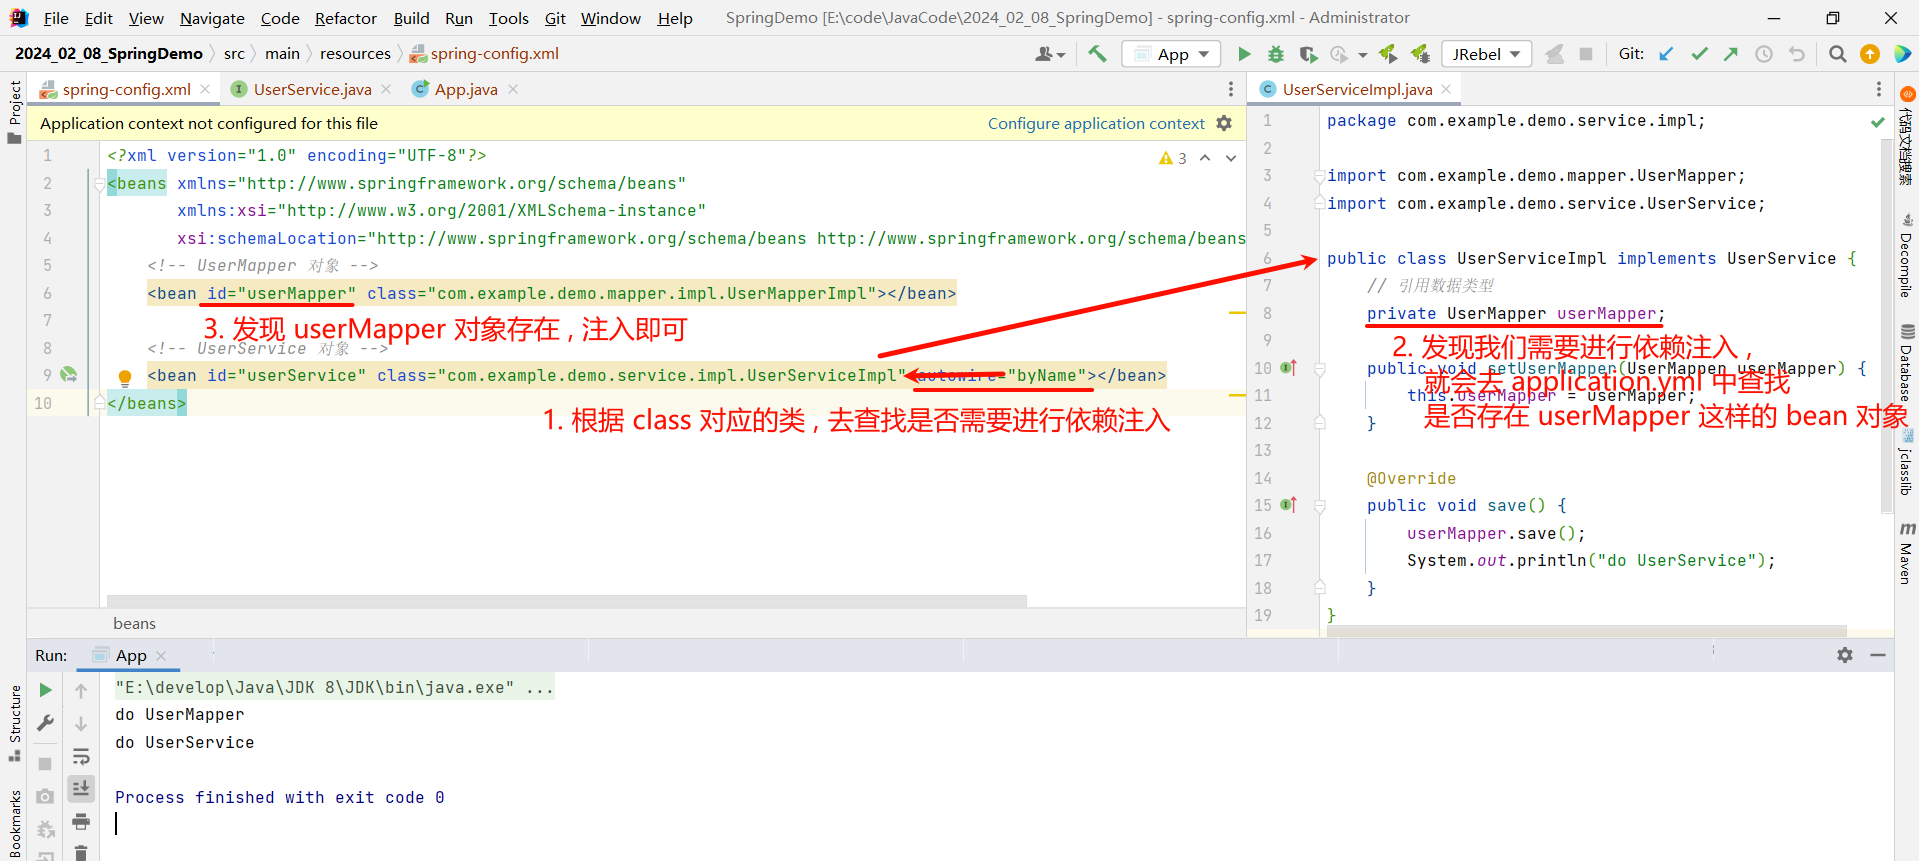
我们还可以设置 byName 类型 , 他会去查找 class 对应的类中是否也有叫做 userMapper 的属性 , 如果不一致就会找不到
<?xml version="1.0" encoding="UTF-8"?>
<beans xmlns="http://www.springframework.org/schema/beans"xmlns:xsi="http://www.w3.org/2001/XMLSchema-instance"xsi:schemaLocation="http://www.springframework.org/schema/beans http://www.springframework.org/schema/beans/spring-beans.xsd"><!-- UserMapper 对象 --><bean id="userMapper" class="com.example.demo.mapper.impl.UserMapperImpl"></bean><!-- UserService 对象 --><bean id="userService" class="com.example.demo.service.impl.UserServiceImpl" autowire="byName"></bean>
</beans>
但是有两个点需要注意一下 :
- 自动装配仅用于引用数据类型注入 , 不能对简单数据类型进行操作
- 自动装配的优先级低于手动装配 (setter 注入和构造方法注入) , 同时出现的话 , 自动装配就会失效
2.3 集合注入
依赖注入同样支持注入各种集合类对象 , 比如 : 数据、List、Set、Map、Properties 类型 .
Properites 是一种特殊的 Map , 他的 key 和 value 都是 String 类型的 , 并且他是线程安全的 .
那我们通过代码分别来看一下每种类型是如何进行注入的
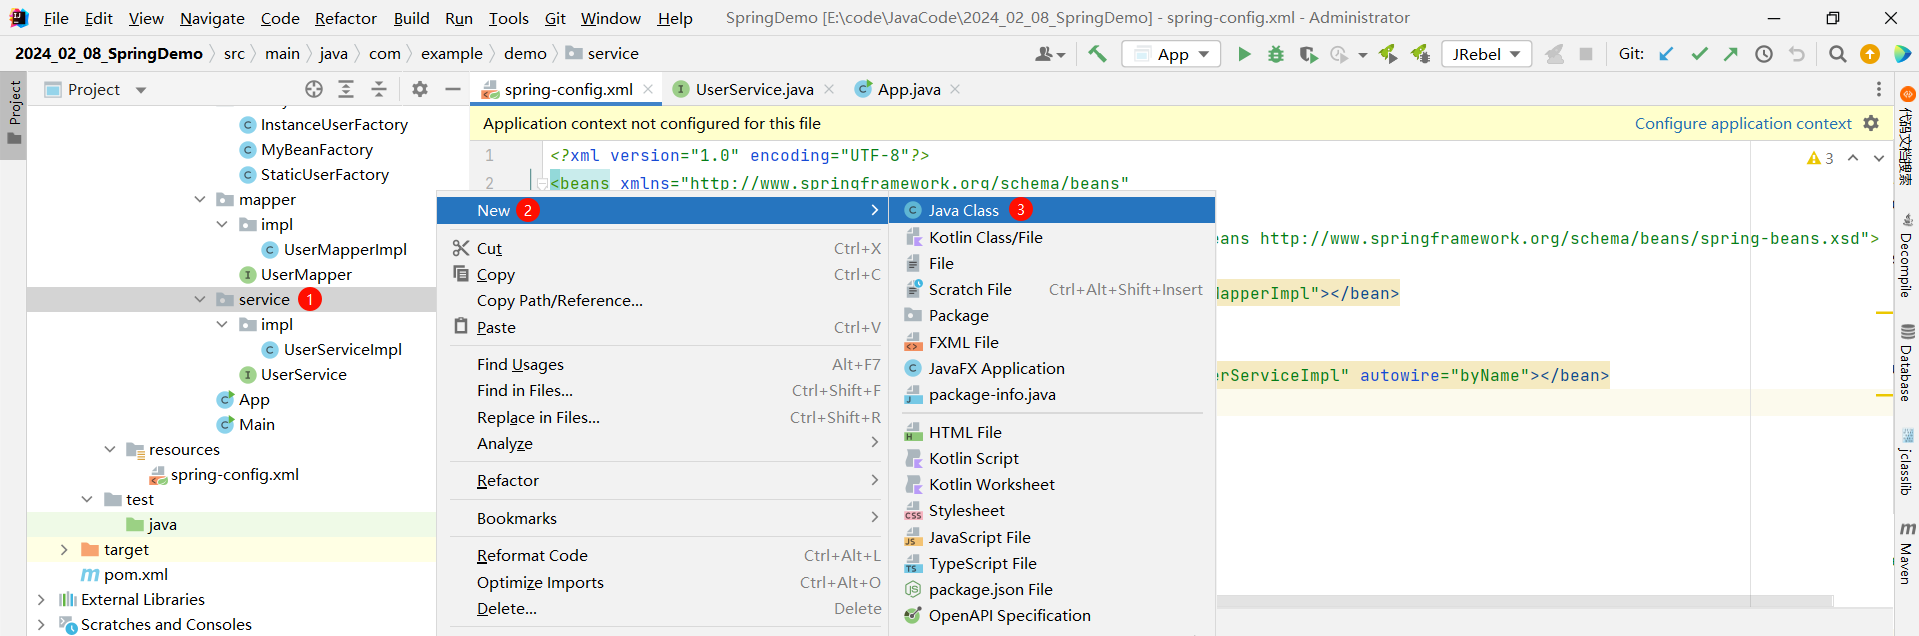
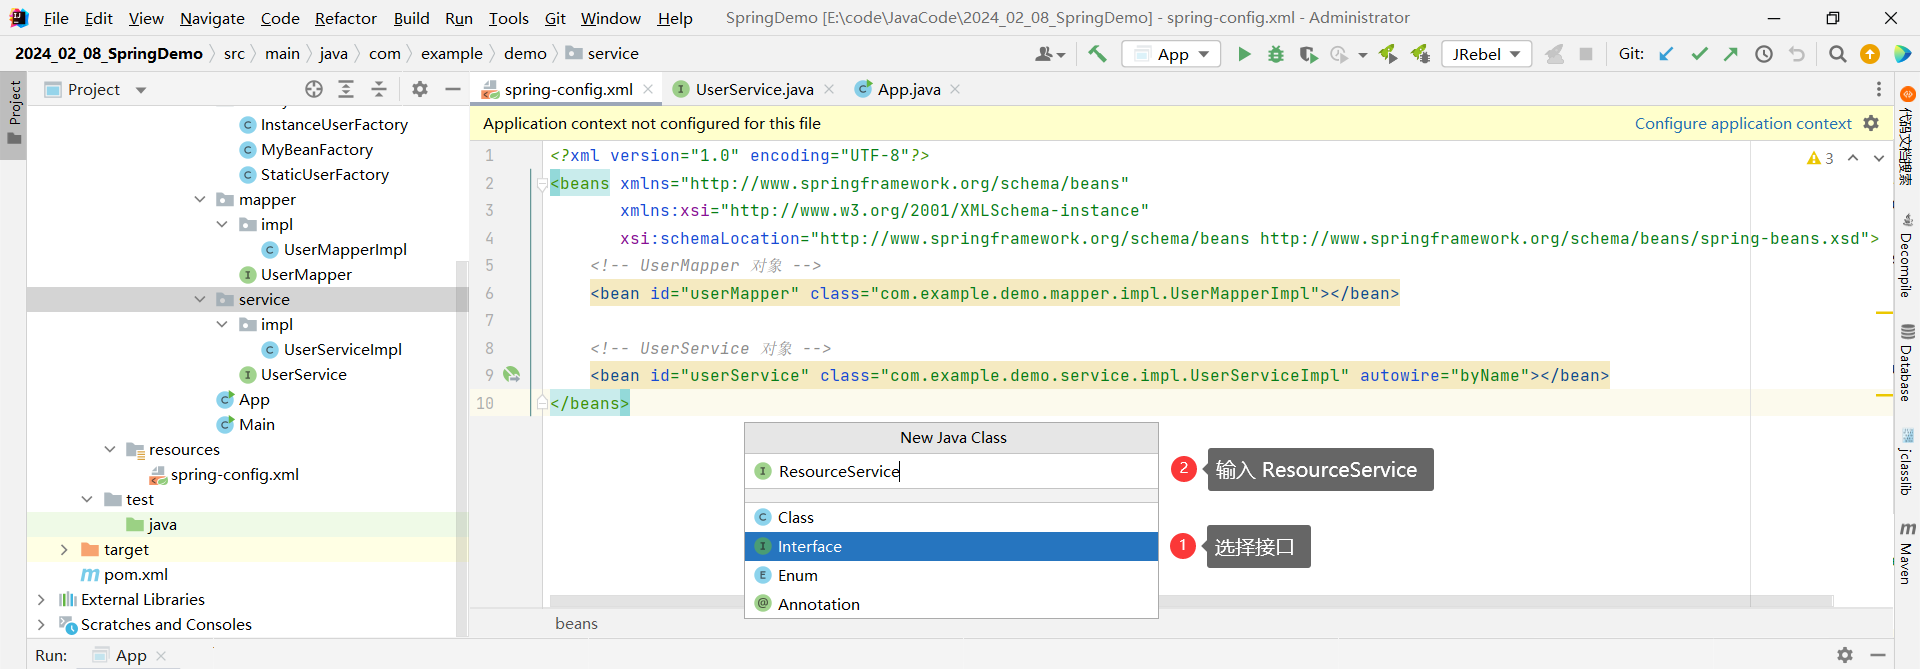
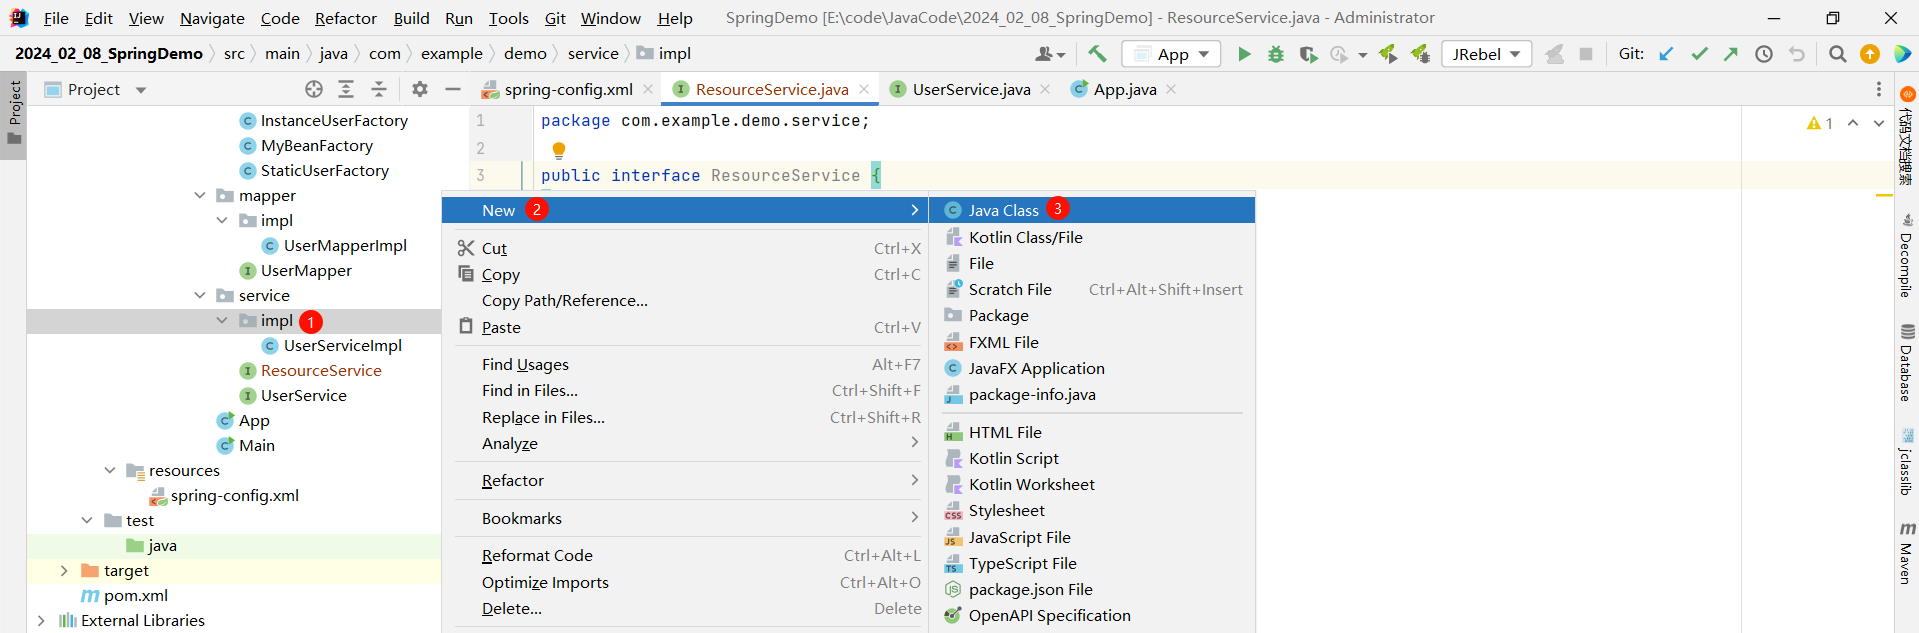

然后去实现刚才的接口
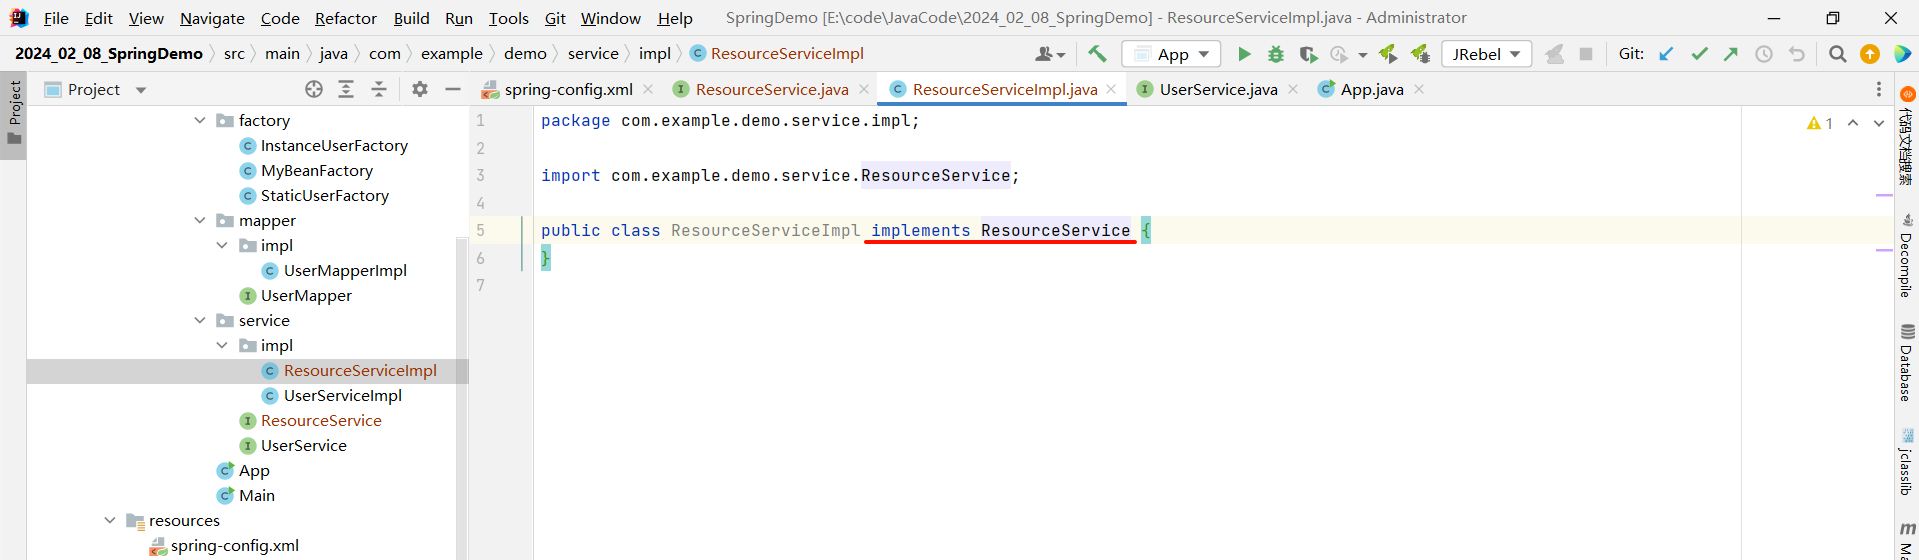
首先 , 我们要注入对象 , 就需要在当前类中指定这五种集合类 , 并且生成他的 setter 方法方便进行注入 , 生成他的 toString() 方法方便查看结果
package com.example.demo.service.impl;import com.example.demo.service.ResourceService;import java.util.*;public class ResourceServiceImpl implements ResourceService {// 1. 先准备要进行注入的集合类private String[] array;private List<String> list;private Set<String> set;private Map<String, String> map;private Properties properties;// 2. 提供这些集合类的 setter 方法public void setArray(String[] array) {this.array = array;}public void setList(List<String> list) {this.list = list;}public void setSet(Set<String> set) {this.set = set;}public void setMap(Map<String, String> map) {this.map = map;}public void setProperties(Properties properties) {this.properties = properties;}// 3. 提供 toString() 方法@Overridepublic String toString() {return "ResourceServiceImpl{" +"\n\tarray=" + Arrays.toString(array) +"\n\tlist=" + list +"\n\tset=" + set +"\n\tmap=" + map +"\n\tproperties=" + properties +'}';}
}
接下来我们就可以模拟一下各种集合类怎样进行注入了
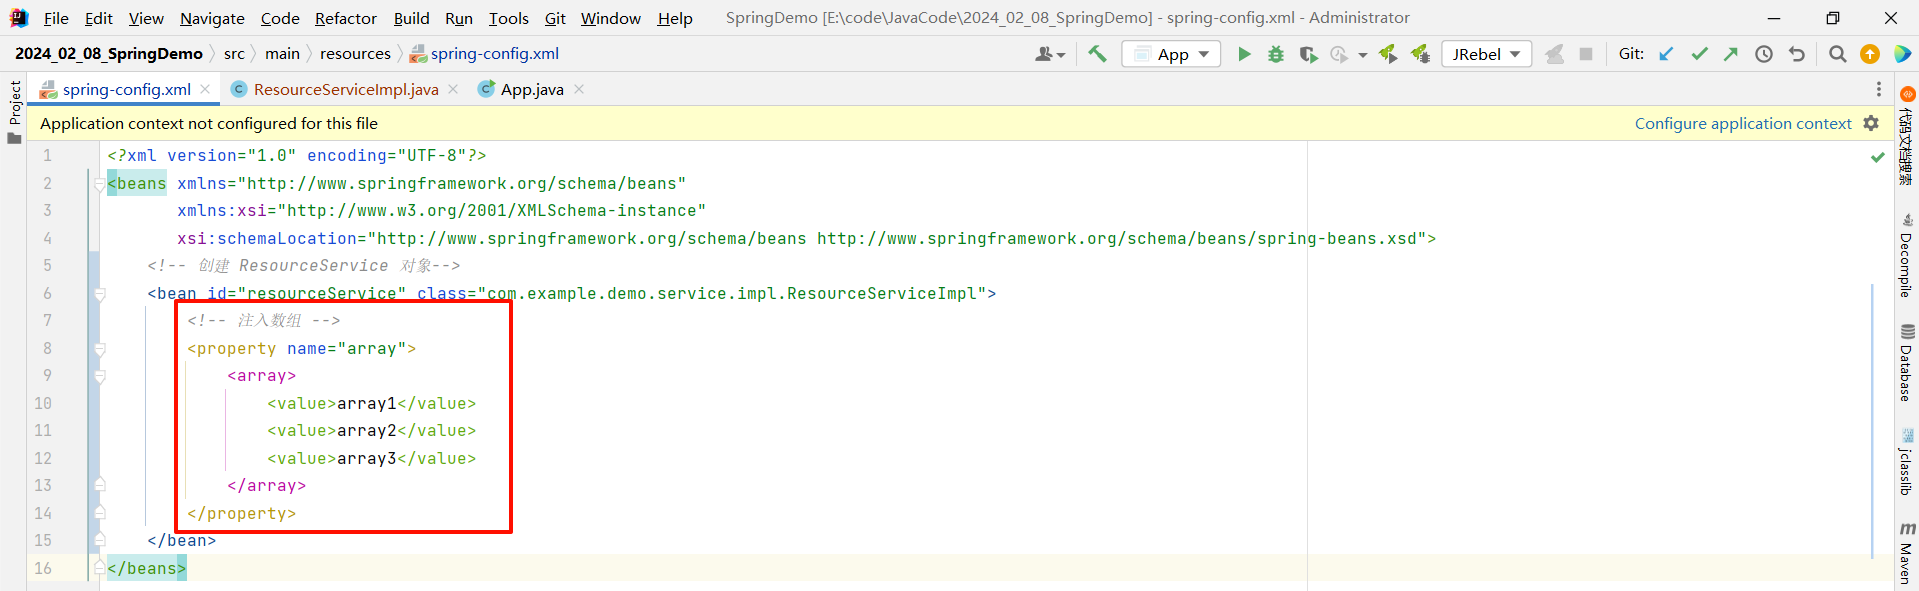
2.3.1 数组
我们只需要在对应的 bean 标签中添加 property 注解 , 然后在该注解中填写我们要注入的集合
<?xml version="1.0" encoding="UTF-8"?>
<beans xmlns="http://www.springframework.org/schema/beans"xmlns:xsi="http://www.w3.org/2001/XMLSchema-instance"xsi:schemaLocation="http://www.springframework.org/schema/beans http://www.springframework.org/schema/beans/spring-beans.xsd"><!-- 创建 ResourceService 对象--><bean id="resourceService" class="com.example.demo.service.impl.ResourceServiceImpl"><!-- 注入数组 --><property name="array"><array><value>array1</value><value>array2</value><value>array3</value></array></property></bean>
</beans>
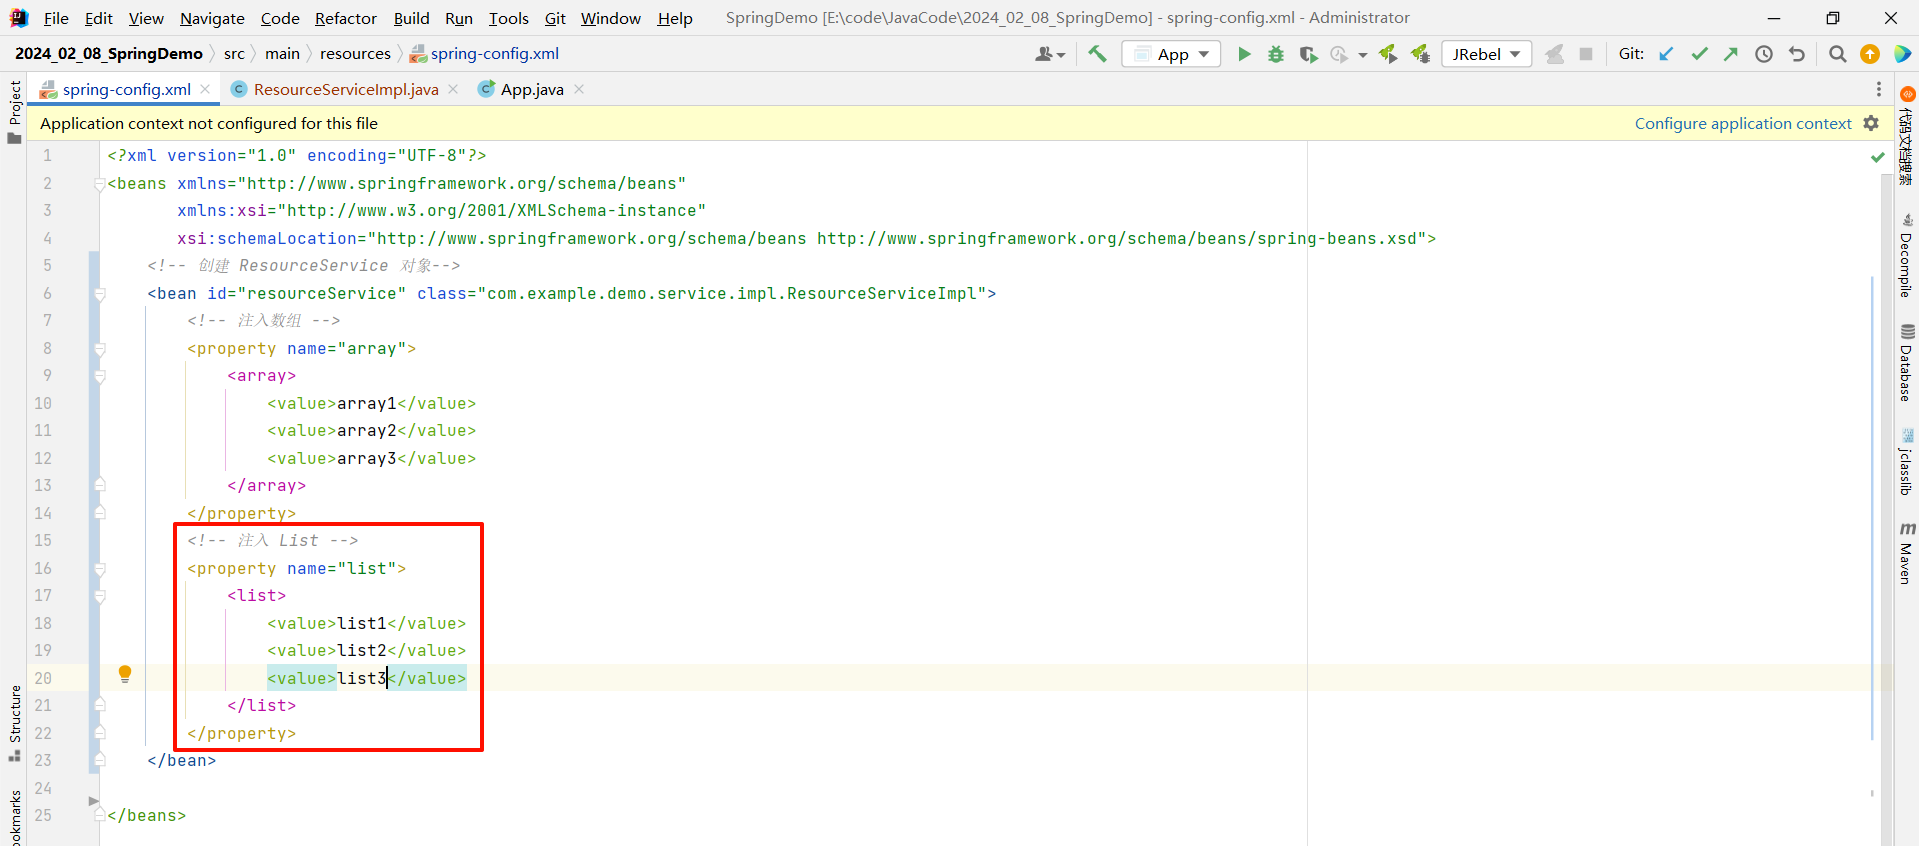
2.3.2 List
<?xml version="1.0" encoding="UTF-8"?>
<beans xmlns="http://www.springframework.org/schema/beans"xmlns:xsi="http://www.w3.org/2001/XMLSchema-instance"xsi:schemaLocation="http://www.springframework.org/schema/beans http://www.springframework.org/schema/beans/spring-beans.xsd"><!-- 创建 ResourceService 对象--><bean id="resourceService" class="com.example.demo.service.impl.ResourceServiceImpl"><!-- 注入 List --><property name="list"><list><value>list1</value><value>list2</value><value>list3</value></list></property></bean></beans>
2.3.3 Set

<?xml version="1.0" encoding="UTF-8"?>
<beans xmlns="http://www.springframework.org/schema/beans"xmlns:xsi="http://www.w3.org/2001/XMLSchema-instance"xsi:schemaLocation="http://www.springframework.org/schema/beans http://www.springframework.org/schema/beans/spring-beans.xsd"><!-- 创建 ResourceService 对象--><bean id="resourceService" class="com.example.demo.service.impl.ResourceServiceImpl"><!-- 注入 Set --><property name="set"><set><!-- 不要忘记 Set 是可以去重的 --><value>set1</value><value>set1</value><value>set2</value></set></property></bean></beans>
2.3.4 Map
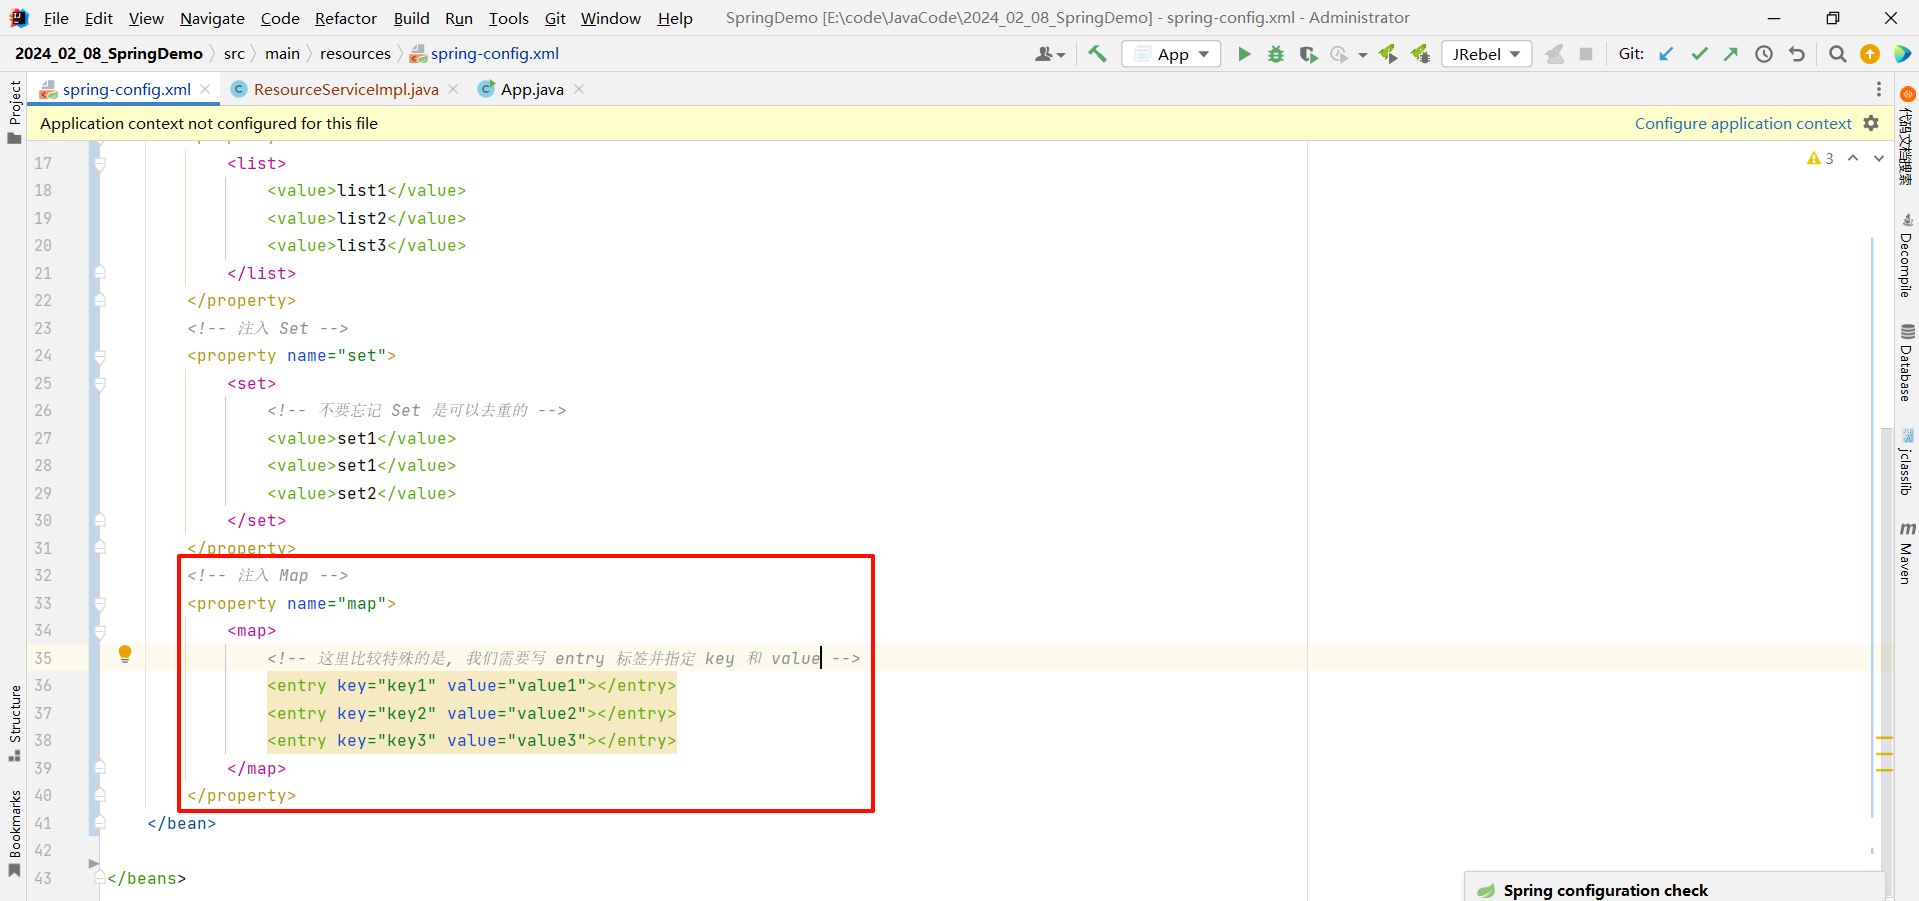
<?xml version="1.0" encoding="UTF-8"?>
<beans xmlns="http://www.springframework.org/schema/beans"xmlns:xsi="http://www.w3.org/2001/XMLSchema-instance"xsi:schemaLocation="http://www.springframework.org/schema/beans http://www.springframework.org/schema/beans/spring-beans.xsd"><!-- 创建 ResourceService 对象--><bean id="resourceService" class="com.example.demo.service.impl.ResourceServiceImpl"><!-- 注入 Map --><property name="map"><map><!-- 这里比较特殊的是, 我们需要写 entry 标签并指定 key 和 value --><entry key="key1" value="value1"></entry><entry key="key2" value="value2"></entry><entry key="key3" value="value3"></entry></map></property></bean></beans>
2.3.5 Properties
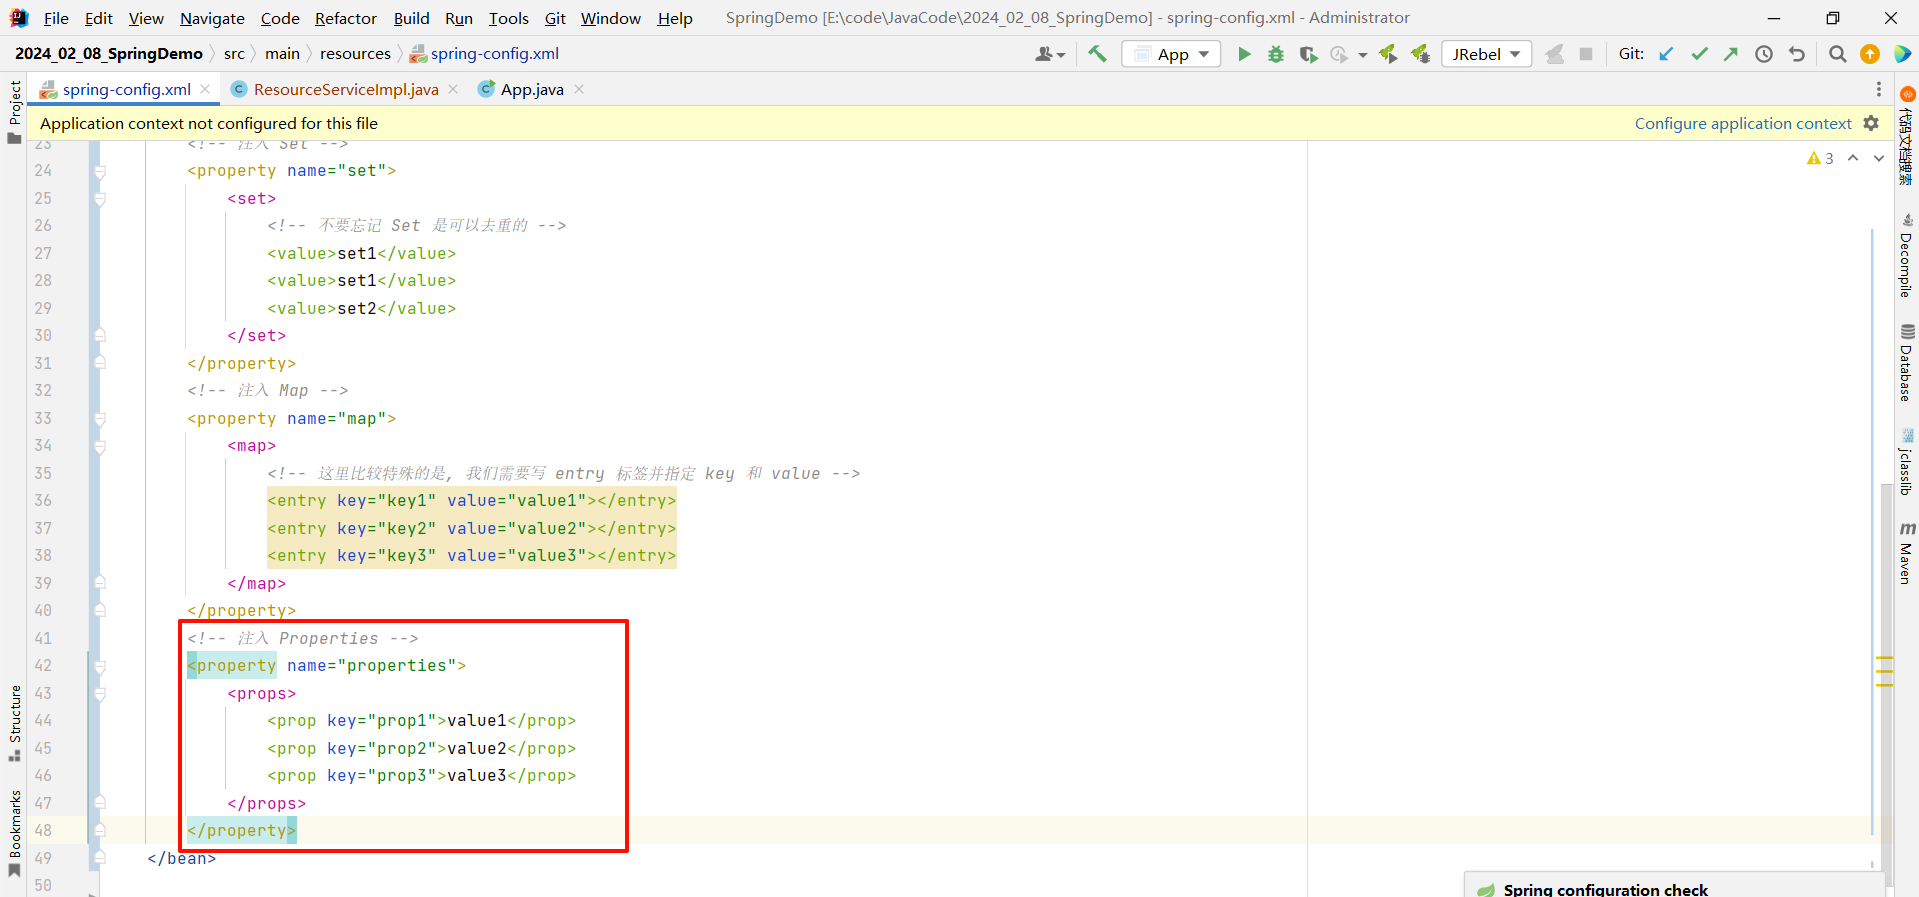
<?xml version="1.0" encoding="UTF-8"?>
<beans xmlns="http://www.springframework.org/schema/beans"xmlns:xsi="http://www.w3.org/2001/XMLSchema-instance"xsi:schemaLocation="http://www.springframework.org/schema/beans http://www.springframework.org/schema/beans/spring-beans.xsd"><!-- 创建 ResourceService 对象--><bean id="resourceService" class="com.example.demo.service.impl.ResourceServiceImpl"><!-- 注入 Properties --><property name="properties"><props><prop key="prop1">value1</prop><prop key="prop2">value2</prop><prop key="prop3">value3</prop></props></property></bean></beans>
2.3.6 进行测试
启动类 :
package com.example.demo;import com.example.demo.mapper.UserMapper;
import com.example.demo.service.ResourceService;
import com.example.demo.service.UserService;
import org.springframework.context.ApplicationContext;
import org.springframework.context.support.ClassPathXmlApplicationContext;public class App {public static void main(String[] args) {// 1. 先获取到 Spring 的上下文// 参数填写我们对应的配置文件ApplicationContext context = new ClassPathXmlApplicationContext("spring-config.xml");// 2. 获取存储到 Spring 中的对象// 参数填写 spring-config.xml 中 bean 标签的 id 属性// 通过这种方式进行获取需要我们进行强转ResourceService resourceService = (ResourceService) context.getBean("resourceService");// 3. 查看效果System.out.println(resourceService);}
}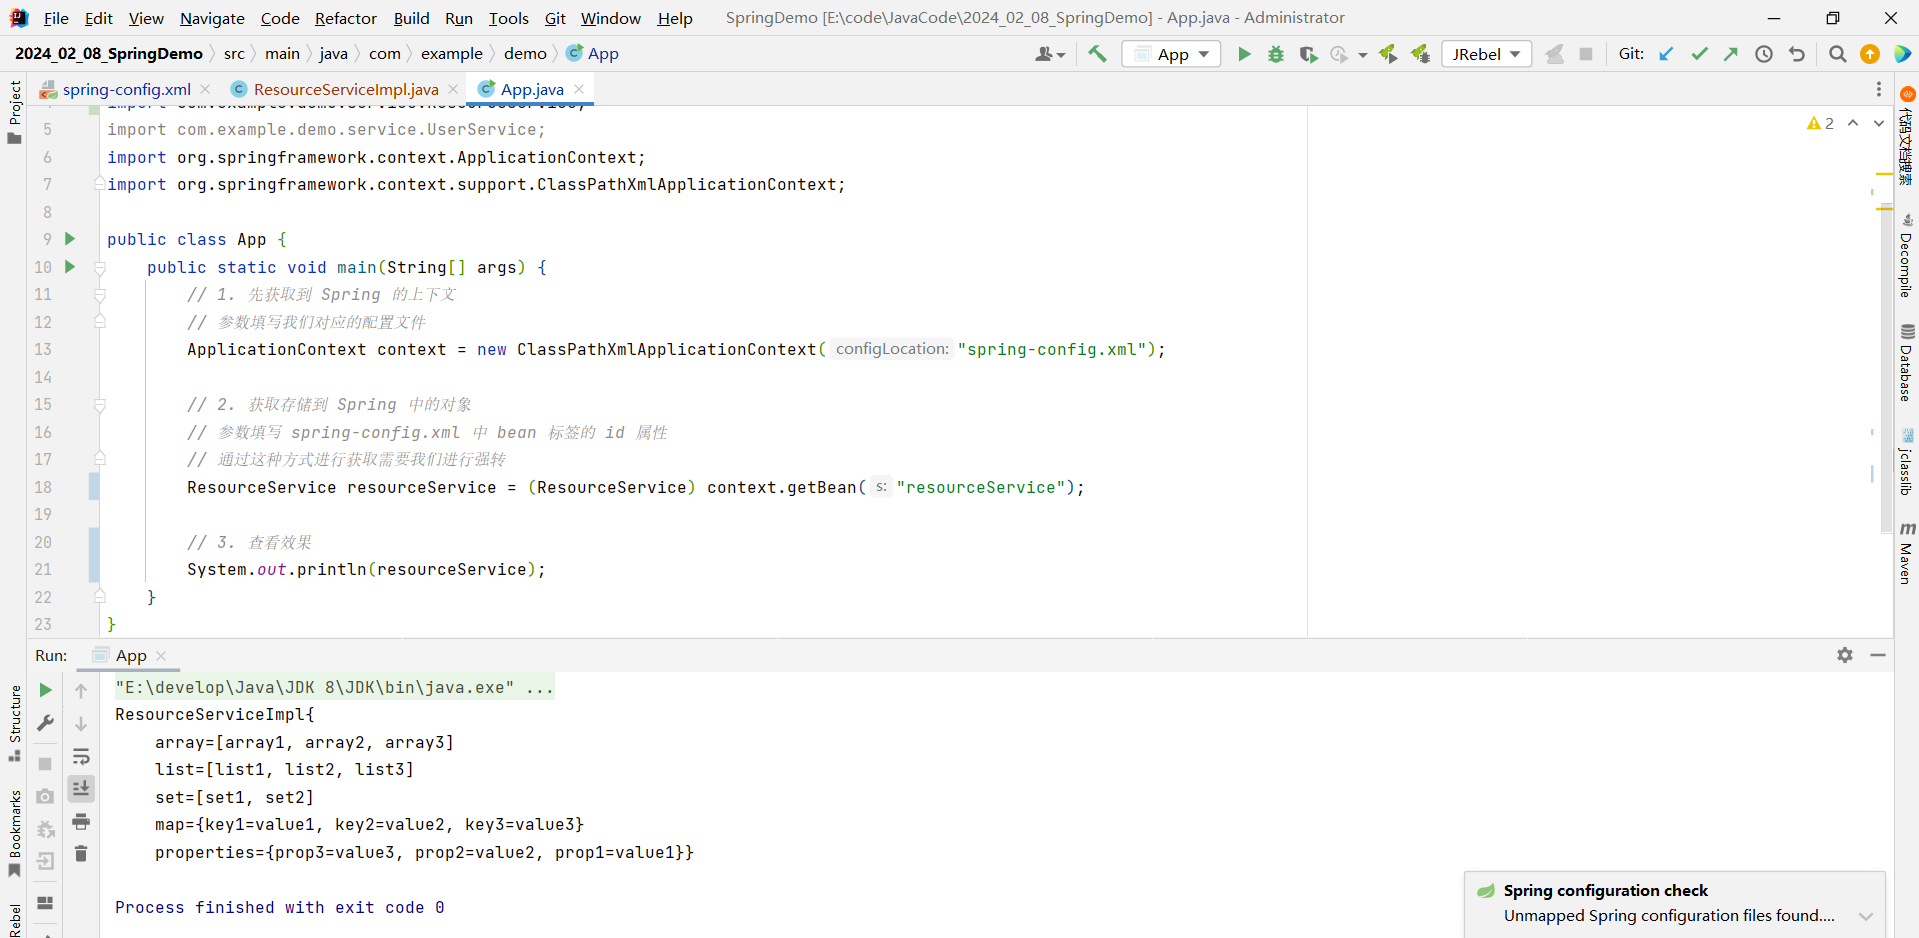
其中 , Set 也成功去重了
三 . Bean 的生命周期
首先 , 我们来理解几个概念
- Bean 是一个由 IoC 容器所管理的对象
- 生命周期 : 对象从创建到消亡的过程
- Bean 的生命周期 : Bean 对象从创建到消亡的整个过程
- Bean 的生命周期控制 : 在 Bean 对象创建后和销毁前做的事情
了解了这几个概念之后 , 那我们重点了解一下 Bean 对象的创建和销毁

然后我们在这个类中去进行 Bean 的生命周期演示
3.1 原始方法
我们首先 , 需要提供创建对象和销毁对象的方法
package com.example.demo.factory;public class BeanLifeCycle {// 创建对象public void init() {System.out.println("do init.");}// 销毁对象public void destory() {System.out.println("do destory.");}
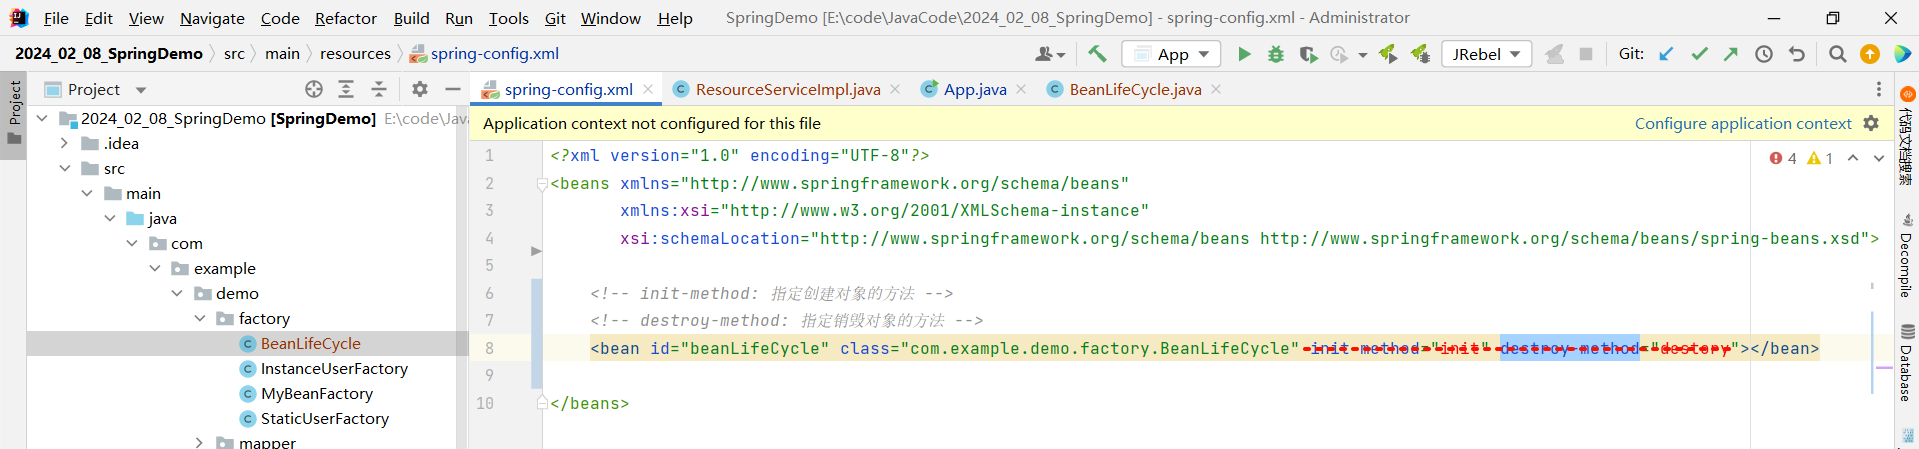
}那光写这两个方法肯定不行 , 我们需要让 Spring 知道这是一个创建对象和销毁对象的方法
所以我们需要在 spring-config.xml 中配置一下 , 我们需要指定两个属性
- init-method : 创建对象的方法
- destroy-method : 销毁对象的方法
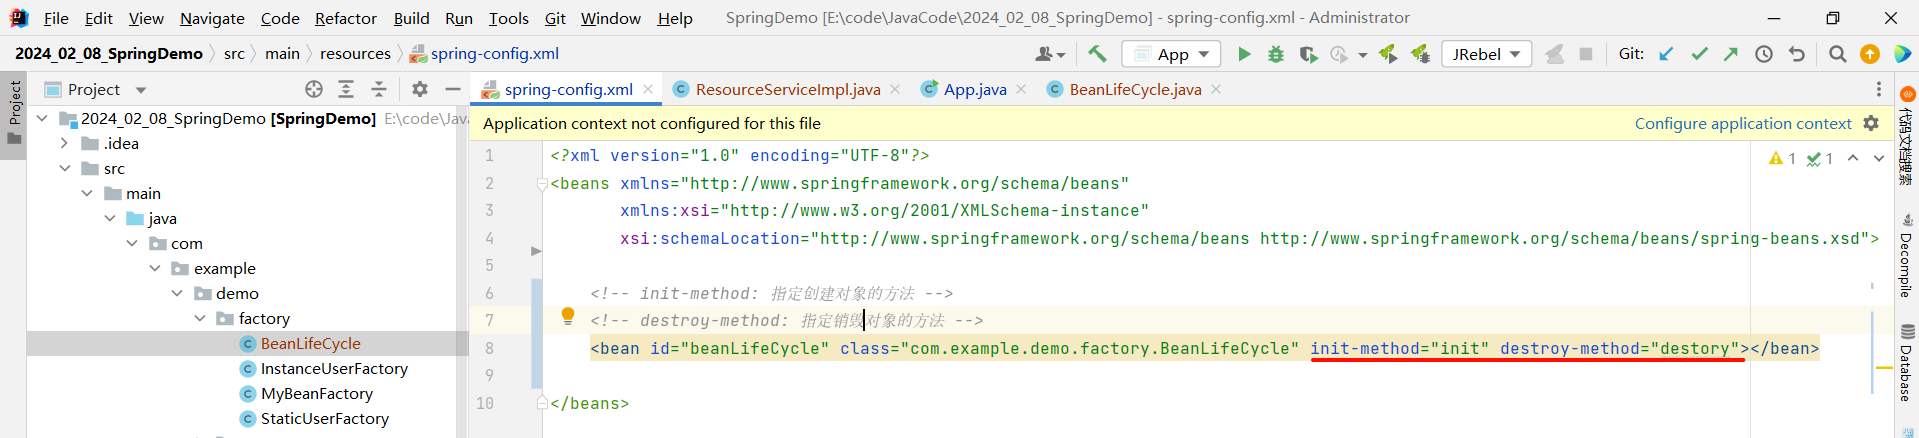
<?xml version="1.0" encoding="UTF-8"?>
<beans xmlns="http://www.springframework.org/schema/beans"xmlns:xsi="http://www.w3.org/2001/XMLSchema-instance"xsi:schemaLocation="http://www.springframework.org/schema/beans http://www.springframework.org/schema/beans/spring-beans.xsd"><!-- init-method: 指定创建对象的方法 --><!-- destroy-method: 指定销毁对象的方法 --><bean id="beanLifeCycle" class="com.example.demo.factory.BeanLifeCycle" init-method="init" destroy-method="destory"></bean></beans>
那这样的话 , 创建对象和销毁对象的方法已经关联完毕 , 我们去启动类测试一下
package com.example.demo;import com.example.demo.factory.BeanLifeCycle;
import com.example.demo.mapper.UserMapper;
import com.example.demo.service.ResourceService;
import com.example.demo.service.UserService;
import org.springframework.context.ApplicationContext;
import org.springframework.context.support.ClassPathXmlApplicationContext;public class App {public static void main(String[] args) {// 1. 先获取到 Spring 的上下文// 参数填写我们对应的配置文件ApplicationContext context = new ClassPathXmlApplicationContext("spring-config.xml");// 2. 获取存储到 Spring 中的对象// 参数填写 spring-config.xml 中 bean 标签的 id 属性// 通过这种方式进行获取需要我们进行强转BeanLifeCycle beanLifeCycle = (BeanLifeCycle) context.getBean("beanLifeCycle");}
}
我们来运行一下
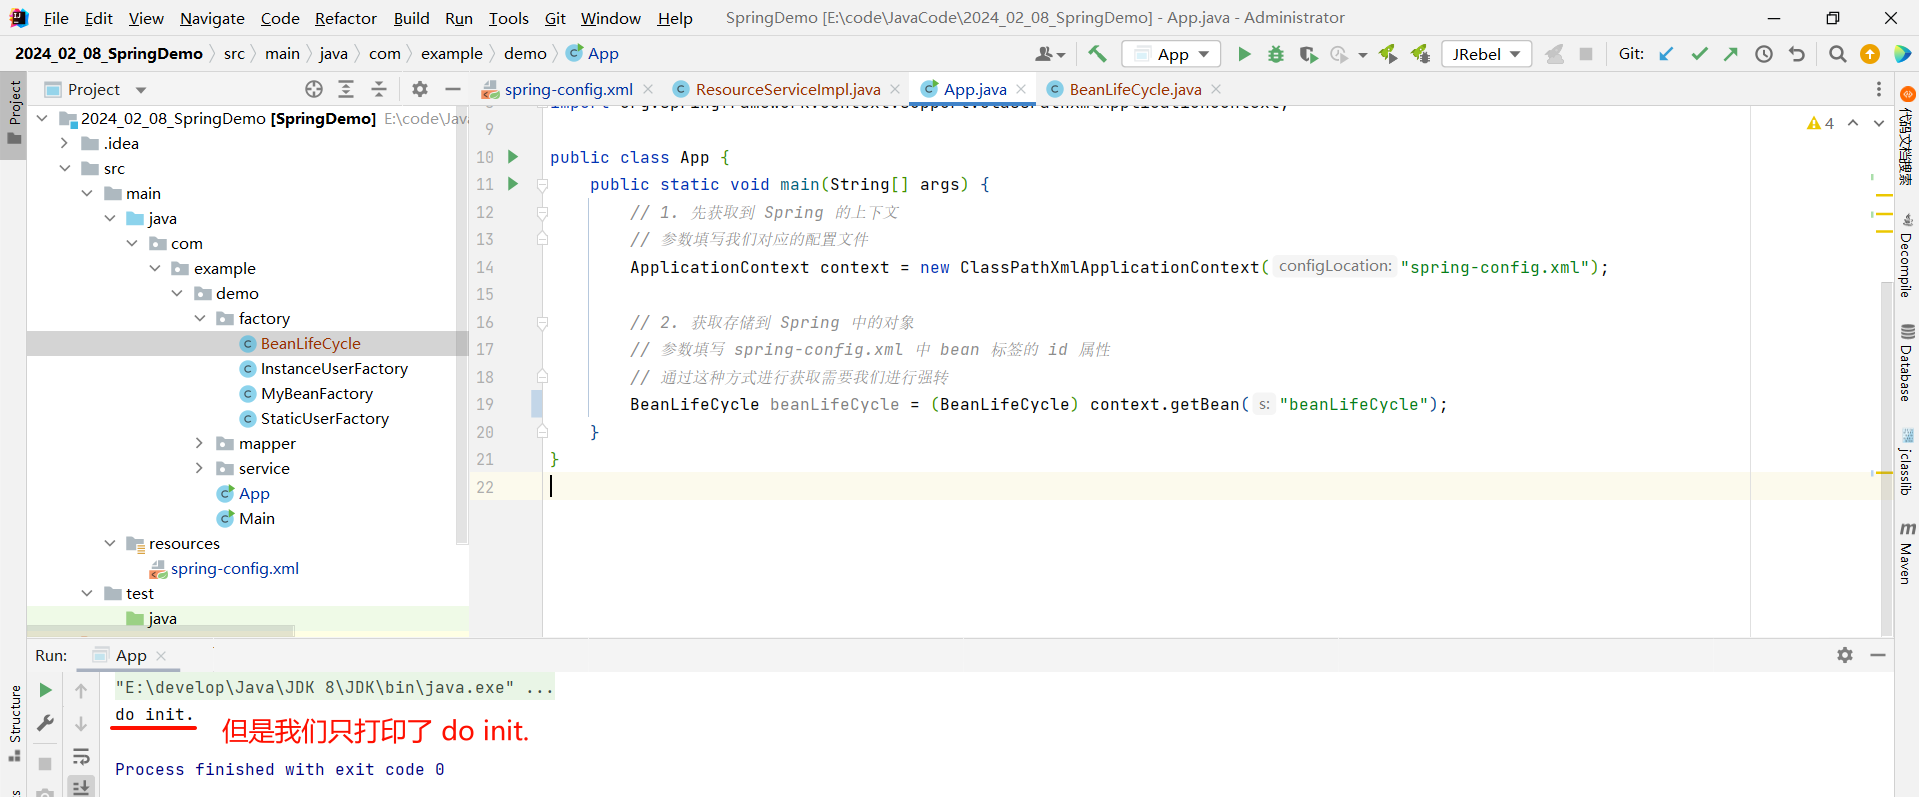
但是我们发现 , 只打印了 do init. 而并未打印 do destory.
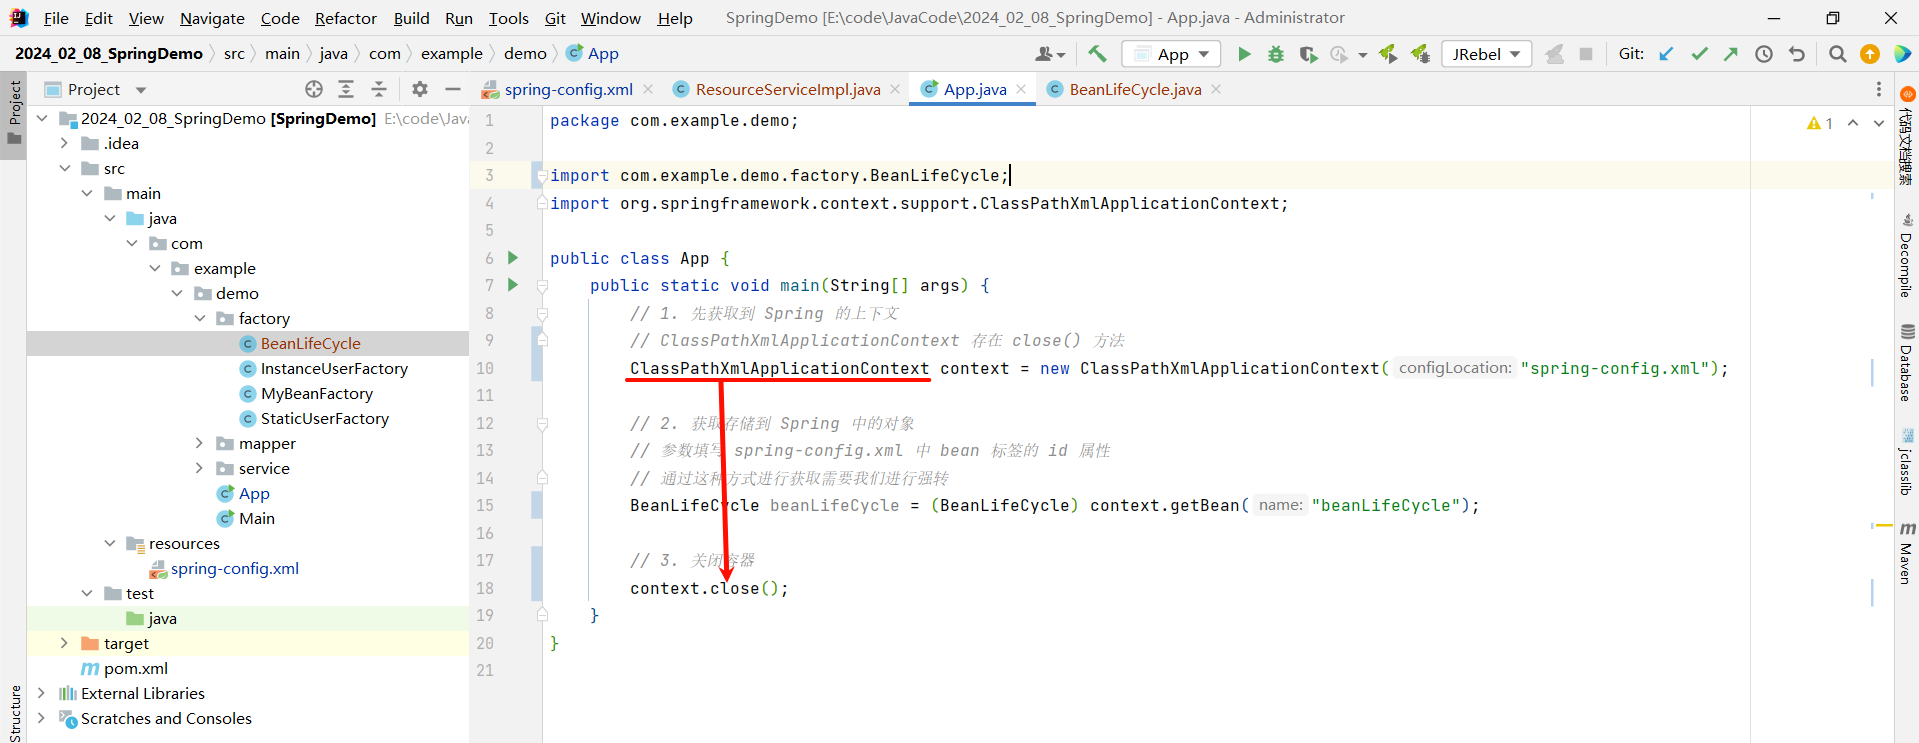
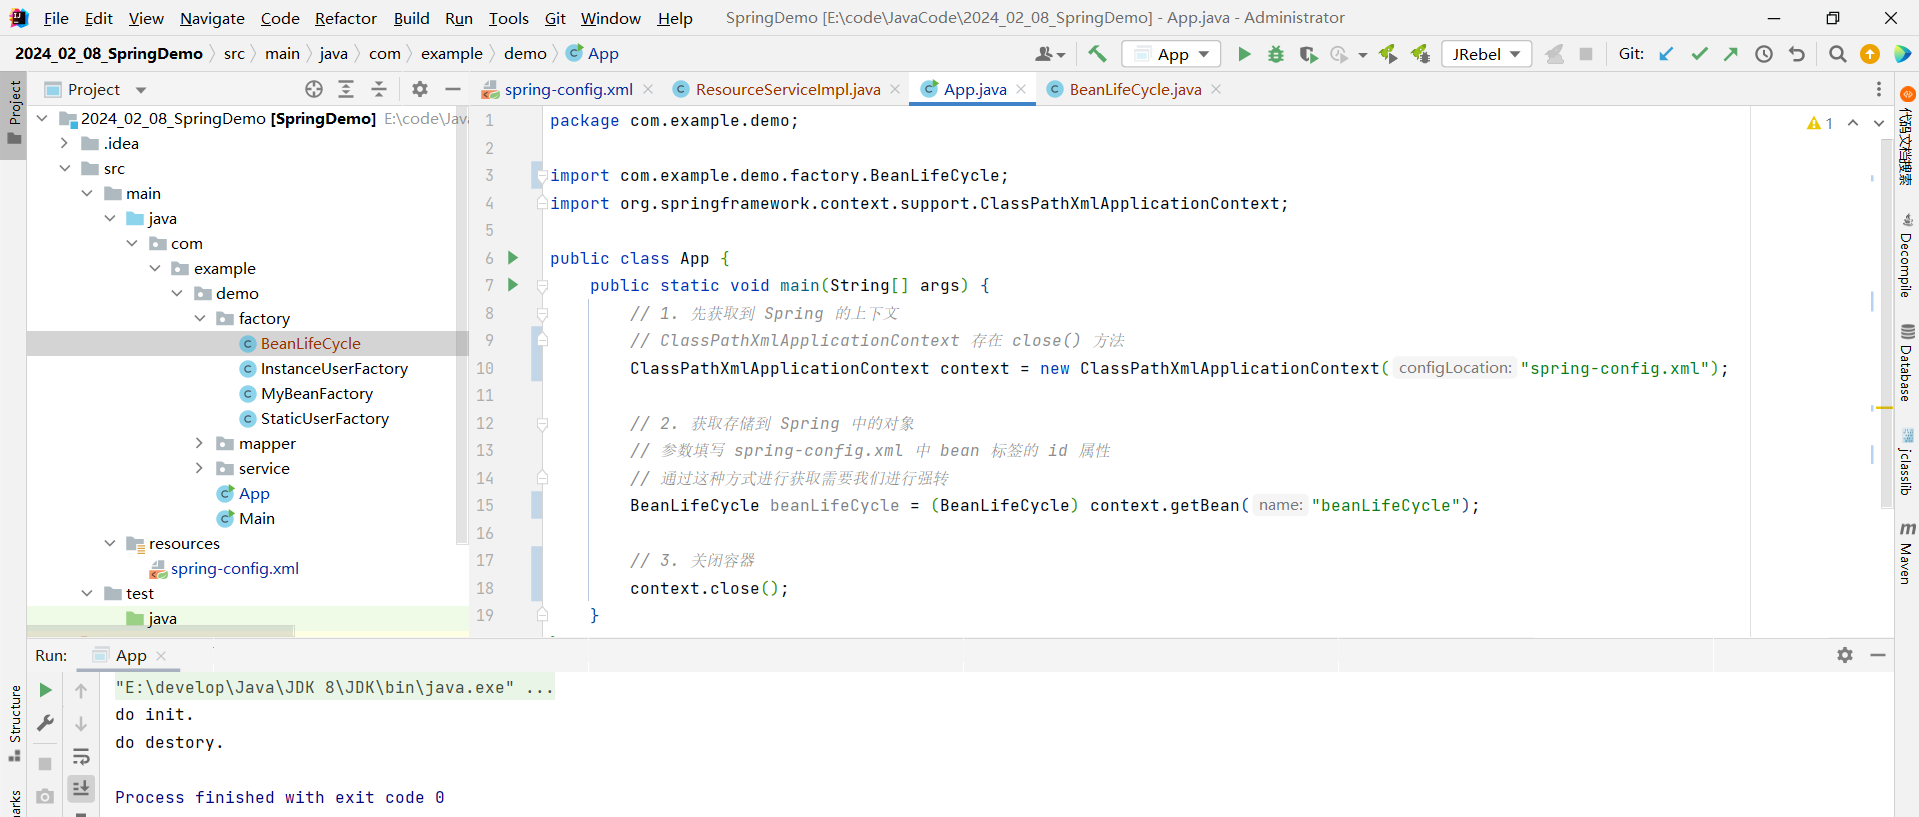
如果我们想打印 do destory. 的话 , 那就需要修改一下获取 Spring 上下文的方式 , 使用 ClassPathXmlApplicationContext 来去接收 , 这样的话就可以调用 ClassPathXmlApplicationContext 的 close() 方法了 .
因为 ApplicationContext 是 ClassPathXmlApplicationContext 的父接口 , ApplicationContext 接口并没有提供 close 方法 , 并且接口只能调用自己的方法而不能调用子类的方法 .
package com.example.demo;import com.example.demo.factory.BeanLifeCycle;
import org.springframework.context.support.ClassPathXmlApplicationContext;public class App {public static void main(String[] args) {// 1. 先获取到 Spring 的上下文// ClassPathXmlApplicationContext 存在 close() 方法ClassPathXmlApplicationContext context = new ClassPathXmlApplicationContext("spring-config.xml");// 2. 获取存储到 Spring 中的对象// 参数填写 spring-config.xml 中 bean 标签的 id 属性// 通过这种方式进行获取需要我们进行强转BeanLifeCycle beanLifeCycle = (BeanLifeCycle) context.getBean("beanLifeCycle");// 3. 关闭容器context.close();}
}
接下来我们重新运行

但是这样 , 依然需要我们进行配置 , 还是比较麻烦 , Spring 也给我们提供了一套比较方便的解决方案
3.2 接口控制
如果我们想要去实现容器初始化方法和销毁方法 , 不需要再去 spring-config.xml 中进行配置了 , 我们可以直接去实现 InitializingBean、DisposableBean 这两个接口 , 并且重写这两个接口的方法
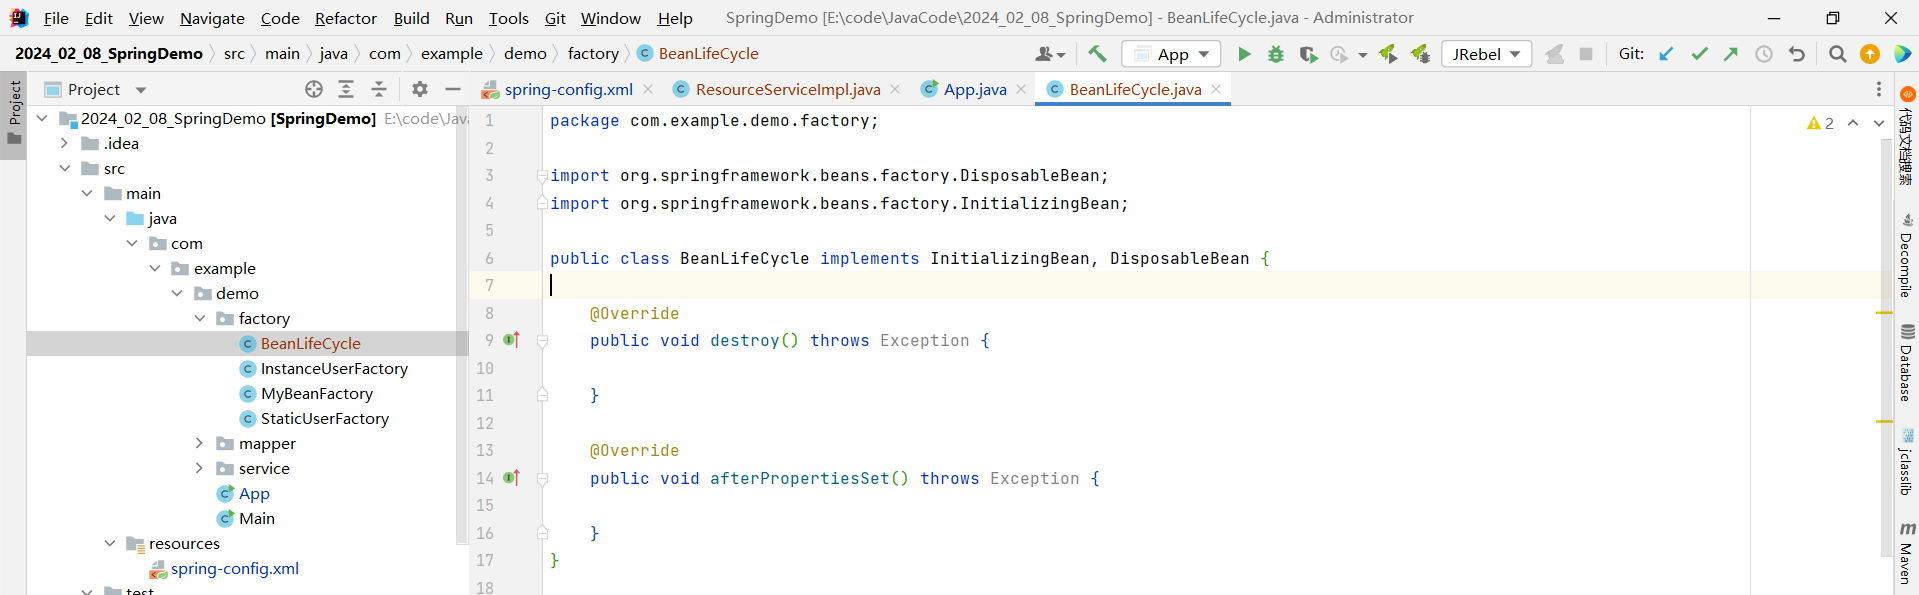
那目前有两个方法 , destory() 代表销毁 , 那 afterPropertiesSet() 方法就肯定代表容器初始化了 .
从这个命名上 , 我们也能推断出一些内容 , afterPropertiesSet - 在实例设置好之后再创建对象 , 这就说明在创建对象之前需要进行属性的注入 .
package com.example.demo.factory;import org.springframework.beans.factory.DisposableBean;
import org.springframework.beans.factory.InitializingBean;public class BeanLifeCycle implements InitializingBean, DisposableBean {@Overridepublic void destroy() throws Exception {System.out.println("do destory.");}@Overridepublic void afterPropertiesSet() throws Exception {System.out.println("do init.");}
}
不要忘记将配置文件中之前配置过的 init-method 和 destroy-method 删除掉
然后运行一下
3.3 bean 的销毁时机
但是我们通过 ClassPathXmlApplicationContext 的 close 方法去关闭容器 , 是非常粗暴的 , 比如这样
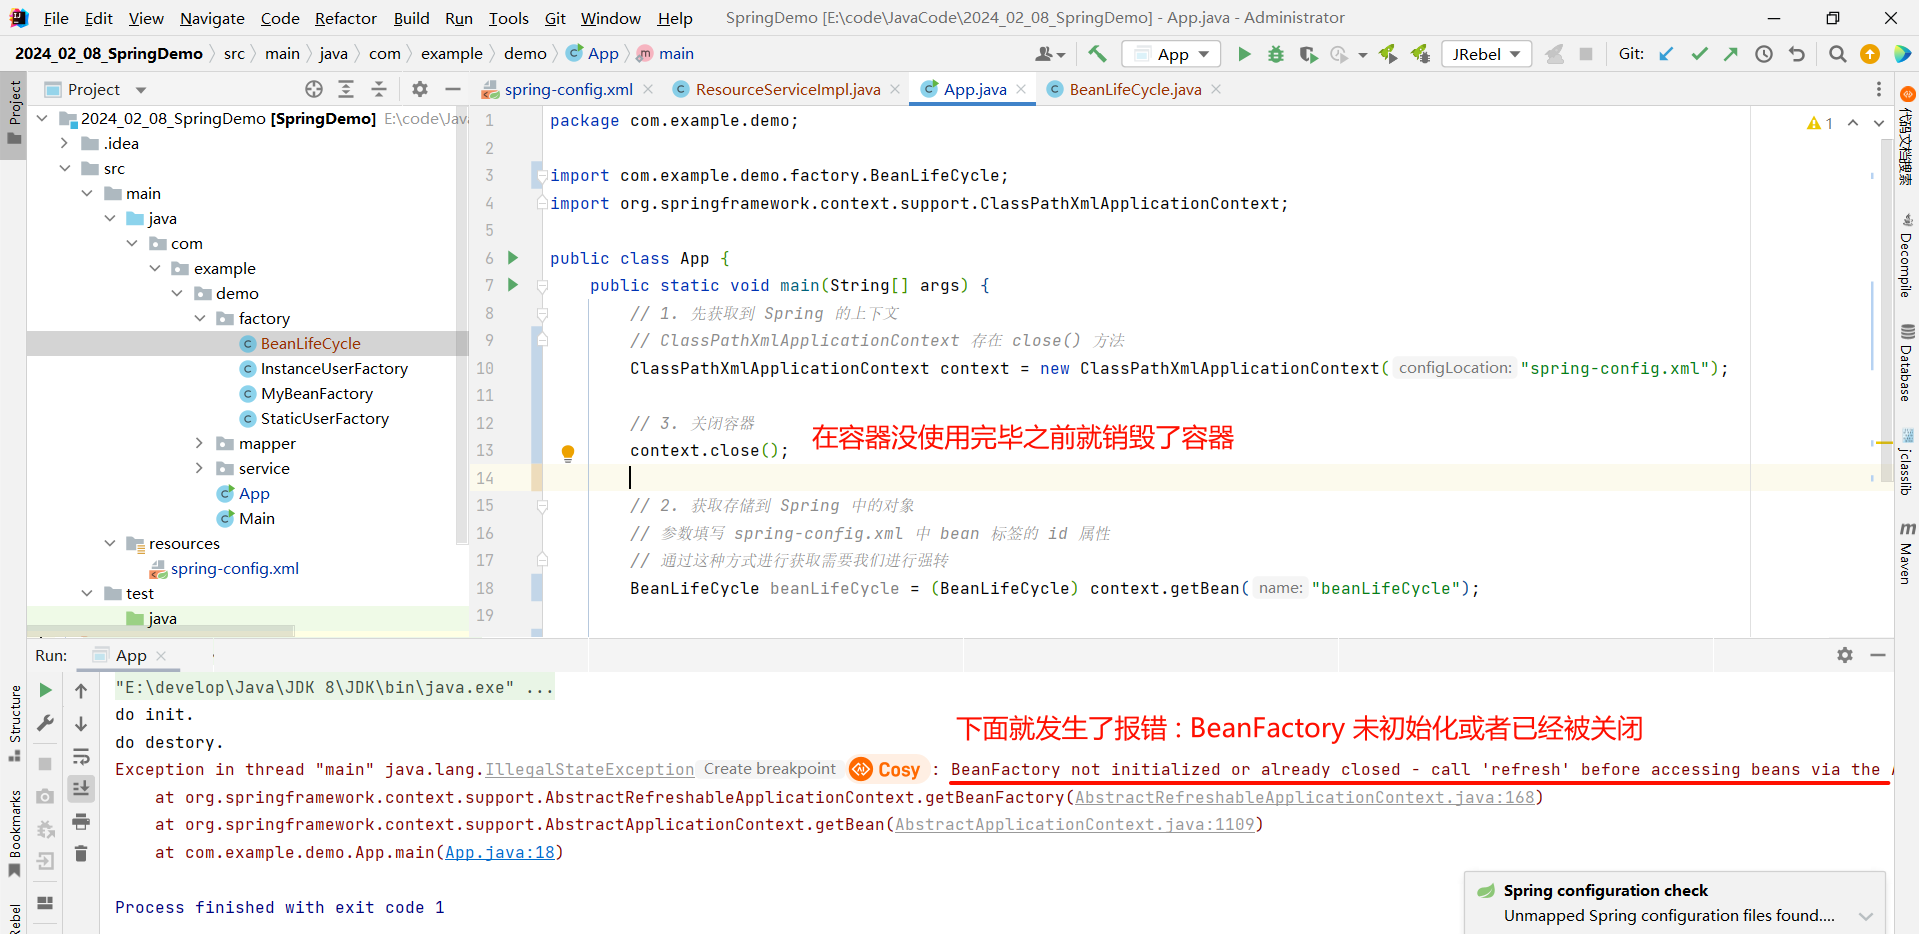
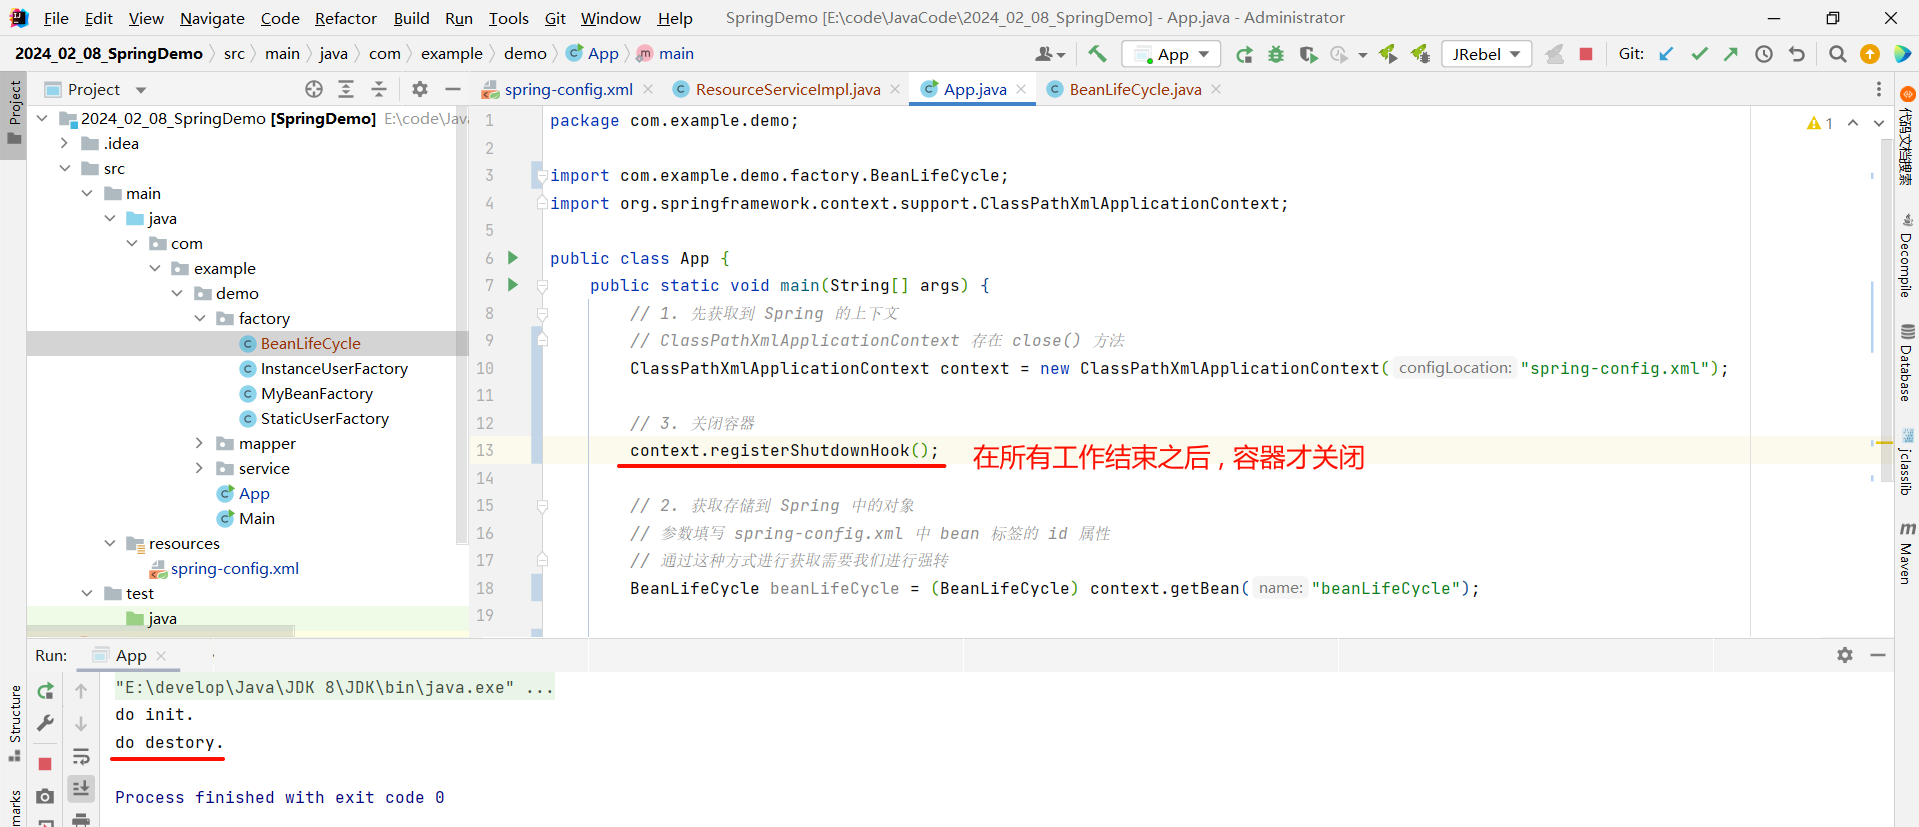
那我们可以通过 ClassPathXmlApplicationContext 提供的 registerShutdownHook 方法去关闭容器 , 它的好处就是会自动判断当前容器是否还要继续被使用 , 什么时候使用结束 , 什么时候再关闭容器
3.4 Bean 的生命周期
初始化容器
- 创建对象 (进行内存分配)
- 执行构造方法 (默认执行空参构造方法)
- 执行属性注入 (set 操作)
- 执行 Bean 的初始化方法
使用 Bean
- 执行业务操作
关闭 / 销毁容器
- 执行 Bean 的销毁方法
四 . 第三方资源配置管理
4.1 管理 DataSource 连接池对象
第三方资源配置管理的意思就是让 Spring 来管理第三方的 Bean .
那为什么要让 Spring 来管理第三方的 Bean 呢 ?
我们知道 , 如果引入第三方资源的话 , 就需要导入相关依赖 , 那依赖导入成功之后 , 它所对应的代码就保存到我们本地了 . 如果我们使用的话 , 是需要实例化这个对象的 , 那我们肯定不可能通过 new 的方式来去创建了 , 所以就需要将第三方的资源所对应的对象保存到 Spring 中 .
那我们以管理 DataSource 连接池对象为例来去模拟一下第三方资源配置管理
首先 , 执行这段 SQL 作为要测试的数据库
-- 创建数据库
create database if not exists spring_db character set utf8mb4;
-- 使用数据库
use spring_db;
-- 创建数据表
create table if not exists tbl_account(id int primary key auto_increment,name varchar(20),money double
);
4.1.1 Druid 连接池
首先 , 我们需要引入依赖 , 在 pom.xml 中粘贴以下代码
<dependency><groupId>com.alibaba</groupId><artifactId>druid</artifactId><version>1.1.16</version>
</dependency>
<dependency><groupId>mysql</groupId><artifactId>mysql-connector-java</artifactId><version>5.1.47</version>
</dependency>
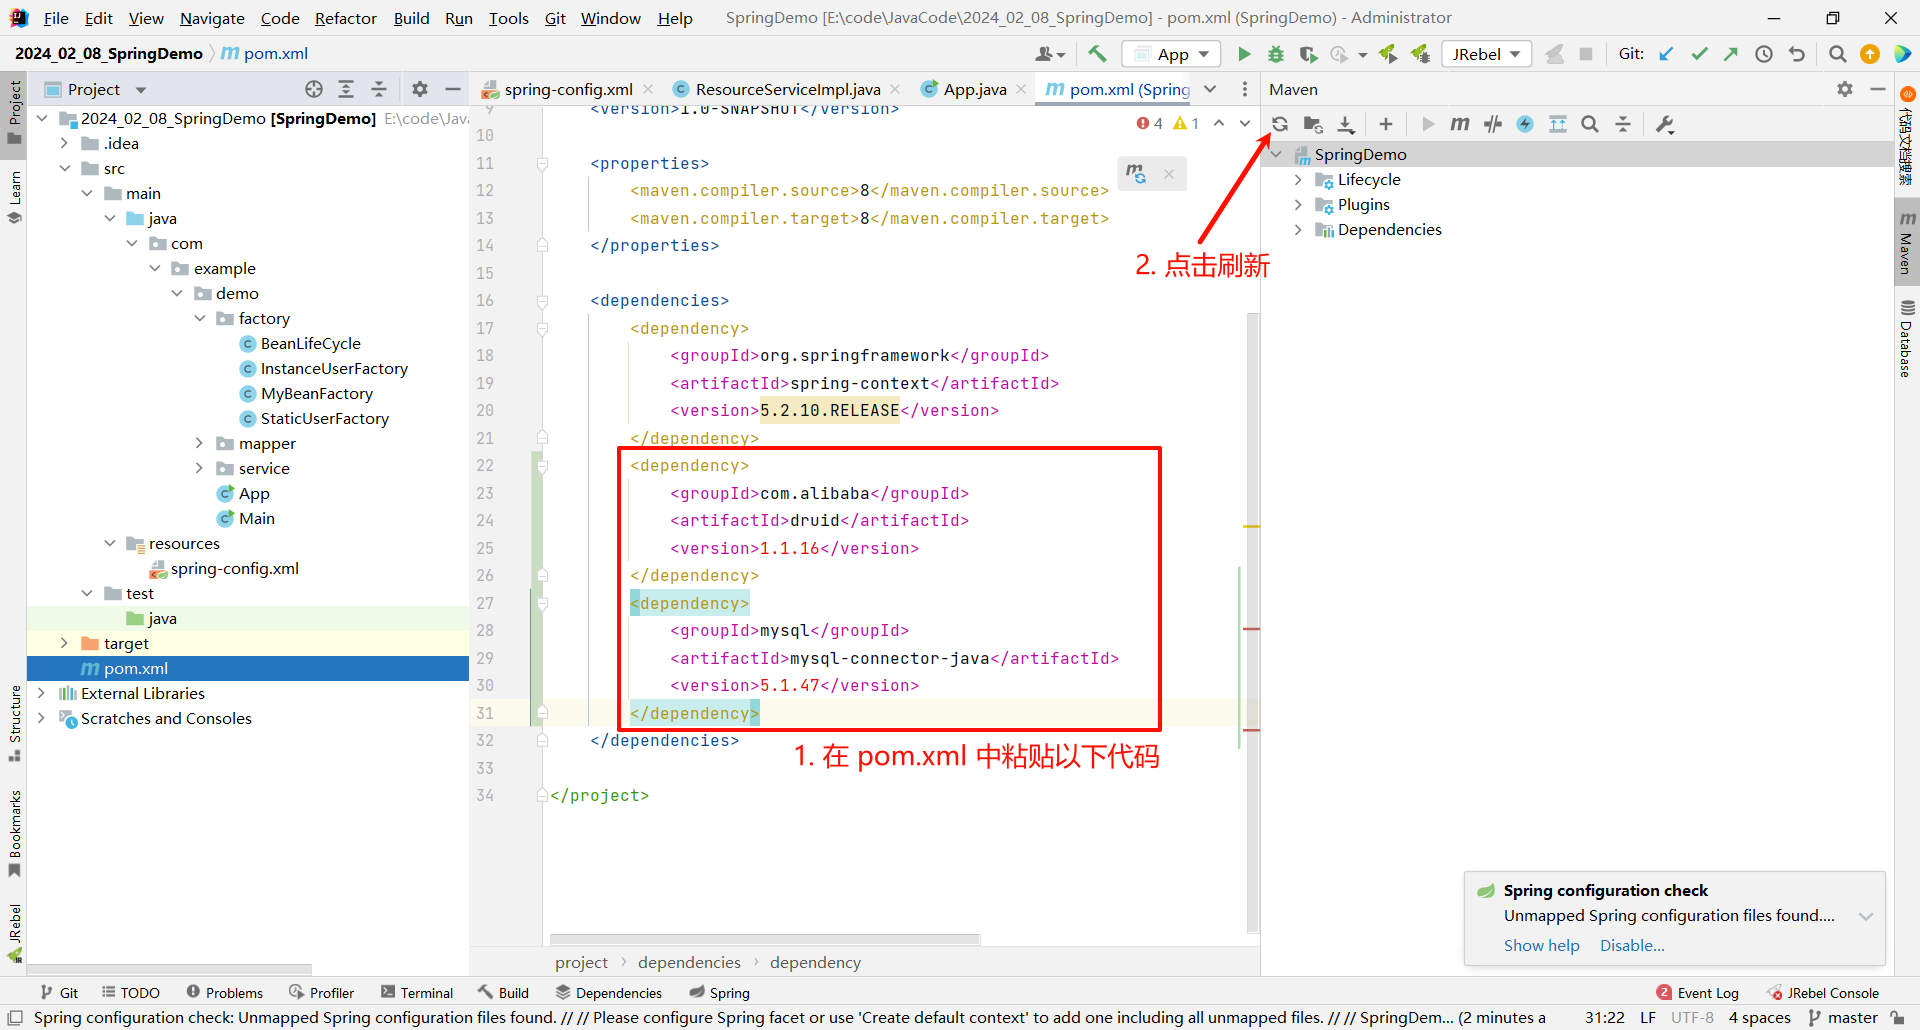
将依赖导入之后 , 我们就可以在 spring-config.xml 中去添加 druid 对象了
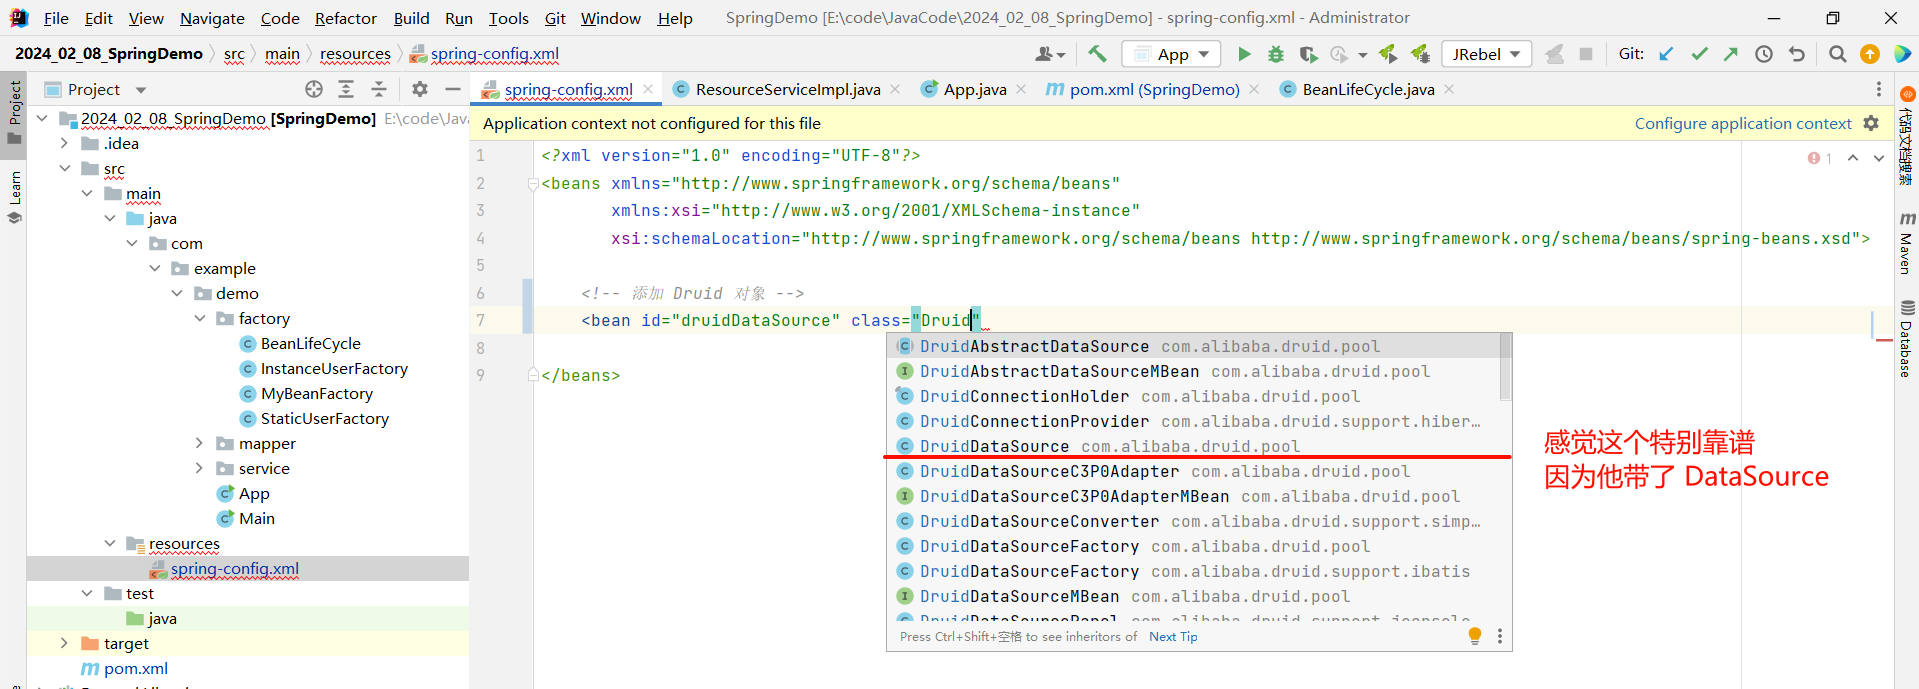
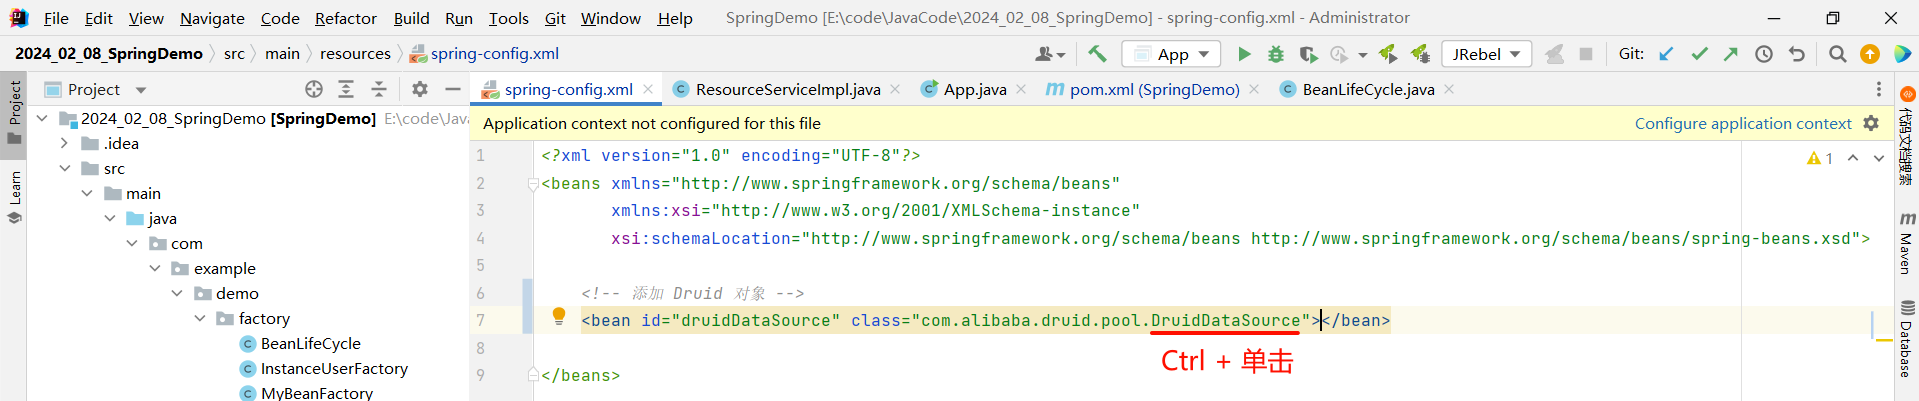
那 bean 标签的 id 无所谓 , class 怎么填写呢 ? 因为这并不是我们本地的代码了 .
我们可以直接尝试输入 Druid 看是否有提示
那 Druid 对应的 bean 对象创建成功之后 , 我们还需要指定一些配置 , 比如 : 用户名、密码等等 .
那我们选择使用构造方法注入还是 setter 注入呢 ? 我们需要看一下他的源码提供了哪种版本的注入 .
我们先来搜索一下构造方法 , 因为类名与构造方法同名 , 比较好搜索
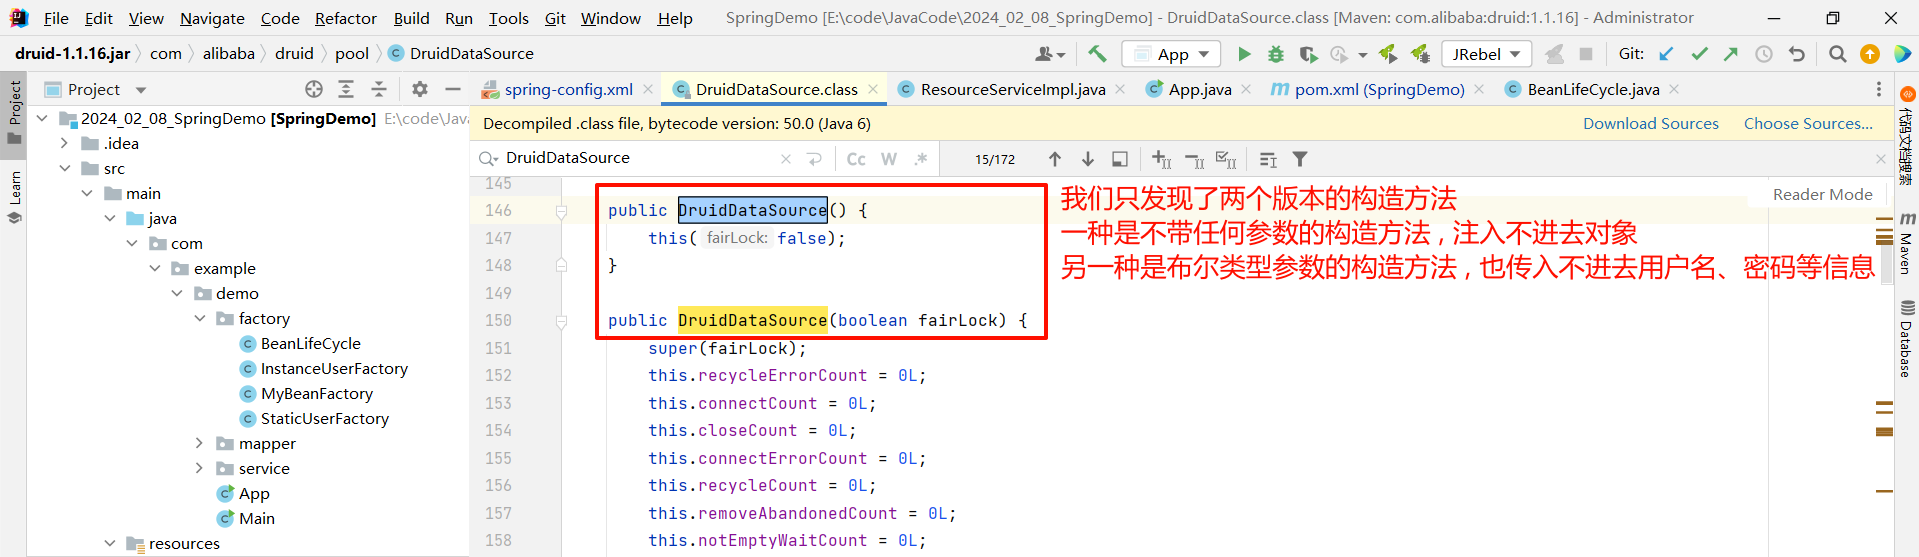
那就只能选择 setter 注入了
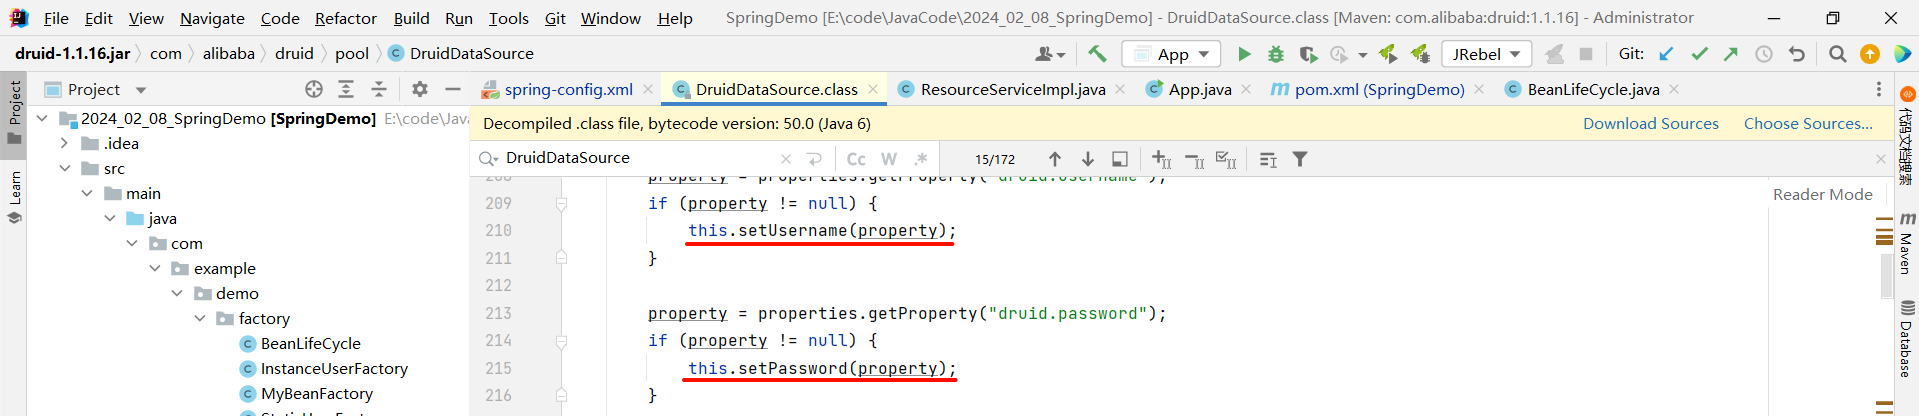
所以 bean 标签中我们使用 setter 注入的方式
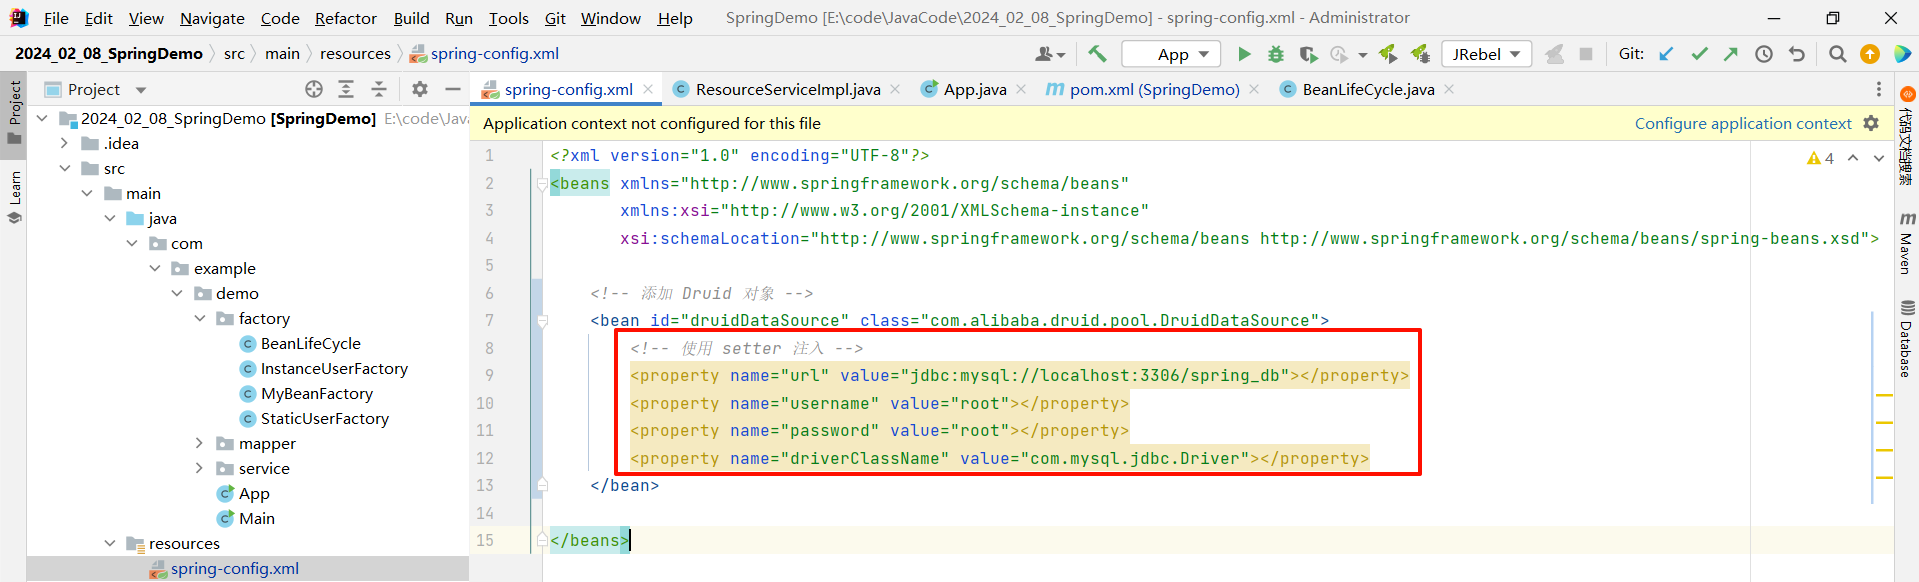
<?xml version="1.0" encoding="UTF-8"?>
<beans xmlns="http://www.springframework.org/schema/beans"xmlns:xsi="http://www.w3.org/2001/XMLSchema-instance"xsi:schemaLocation="http://www.springframework.org/schema/beans http://www.springframework.org/schema/beans/spring-beans.xsd"><!-- 添加 Druid 对象 --><bean id="druidDataSource" class="com.alibaba.druid.pool.DruidDataSource"><!-- 使用 setter 注入 --><property name="url" value="jdbc:mysql://localhost:3306/spring_db"></property><property name="username" value="root"></property><property name="password" value="root"></property><property name="driverClassName" value="com.mysql.jdbc.Driver"></property></bean></beans>
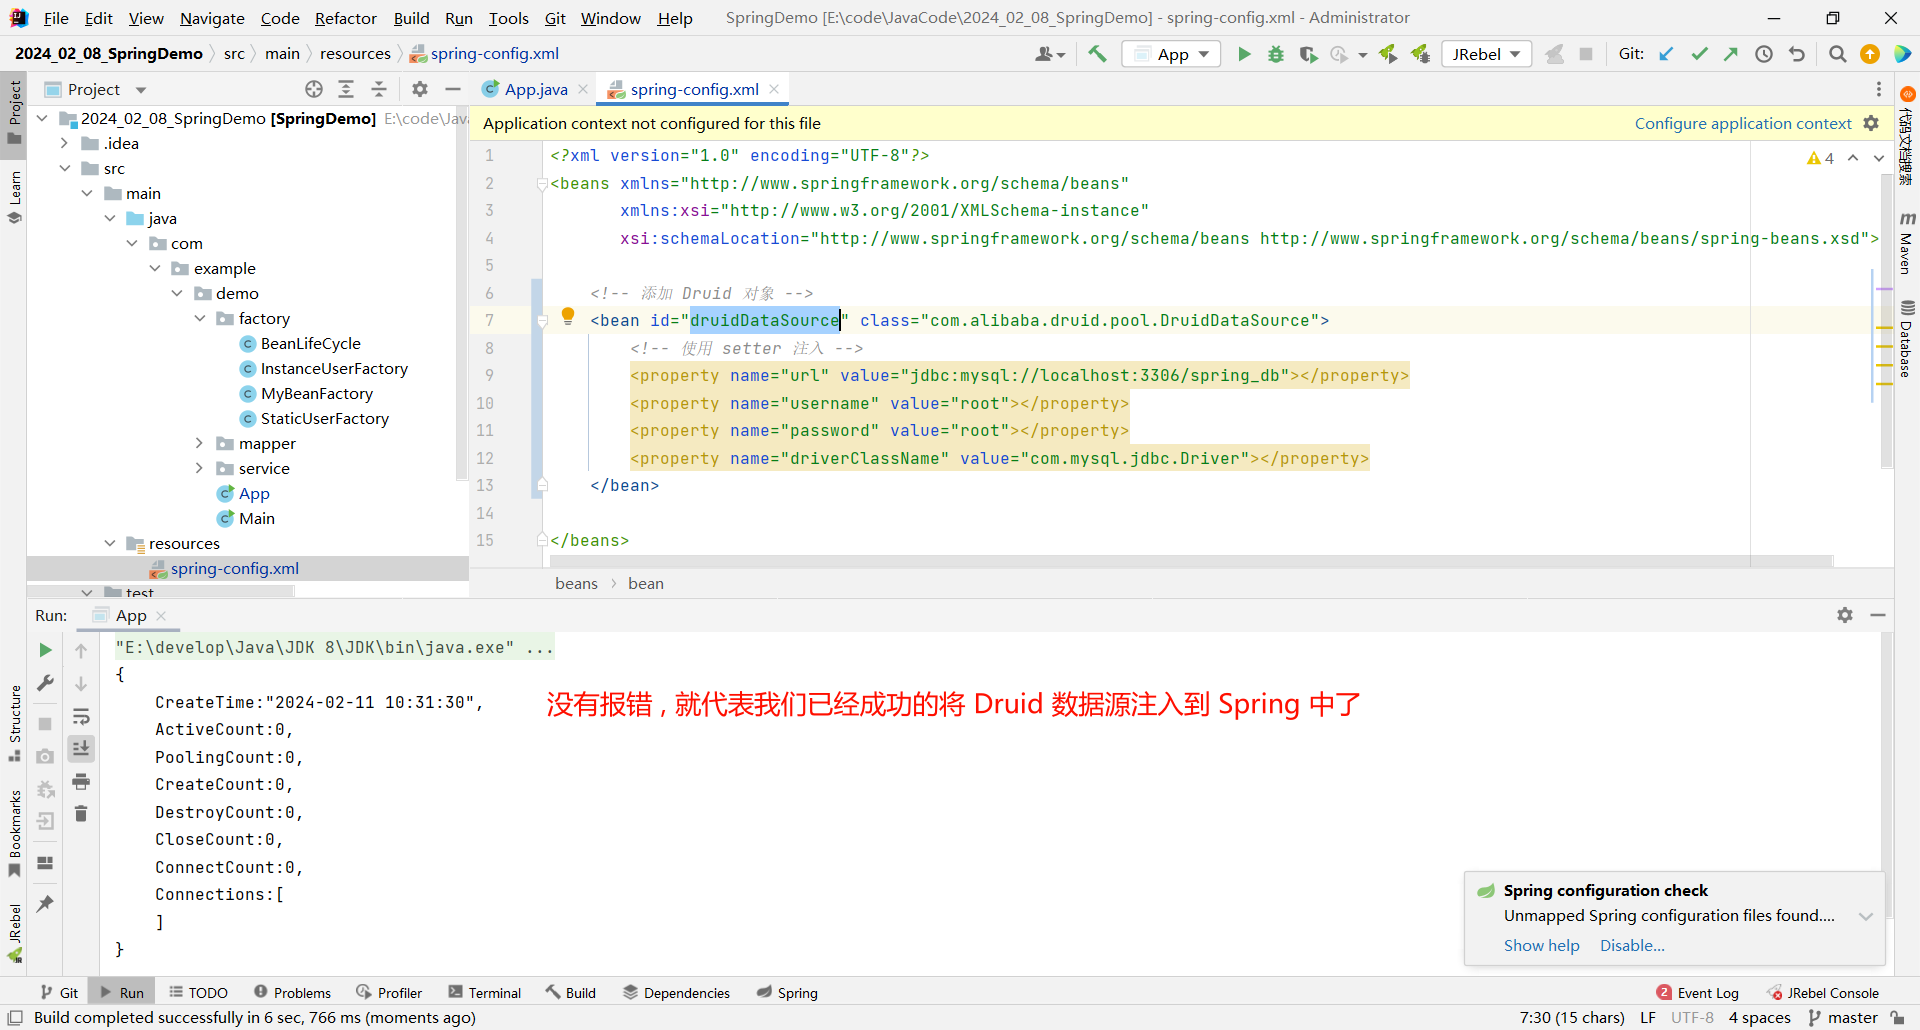
那接下来我们去启动类看一下效果
package com.example.demo;import com.example.demo.factory.BeanLifeCycle;
import org.springframework.context.ApplicationContext;
import org.springframework.context.support.ClassPathXmlApplicationContext;public class App {public static void main(String[] args) {// 1. 先获取到 Spring 的上下文// 参数填写我们对应的配置文件ApplicationContext context = new ClassPathXmlApplicationContext("spring-config.xml");// 2. 获取存储到 Spring 中的对象// 参数填写 spring-config.xml 中 bean 标签的 id 属性Object dataSource = context.getBean("druidDataSource");// 3. 使用该对象// 我们的目的只是检验能否正常运行, 所以打印一下即可System.out.println(dataSource);}
}
4.1.2 c3p0 连接池
刚才我们已经介绍了一种连接池 , 接下来再通过一种完全陌生的连接池 , 来帮助大家能够一定程度上更快速的去配置 spring-config.xml
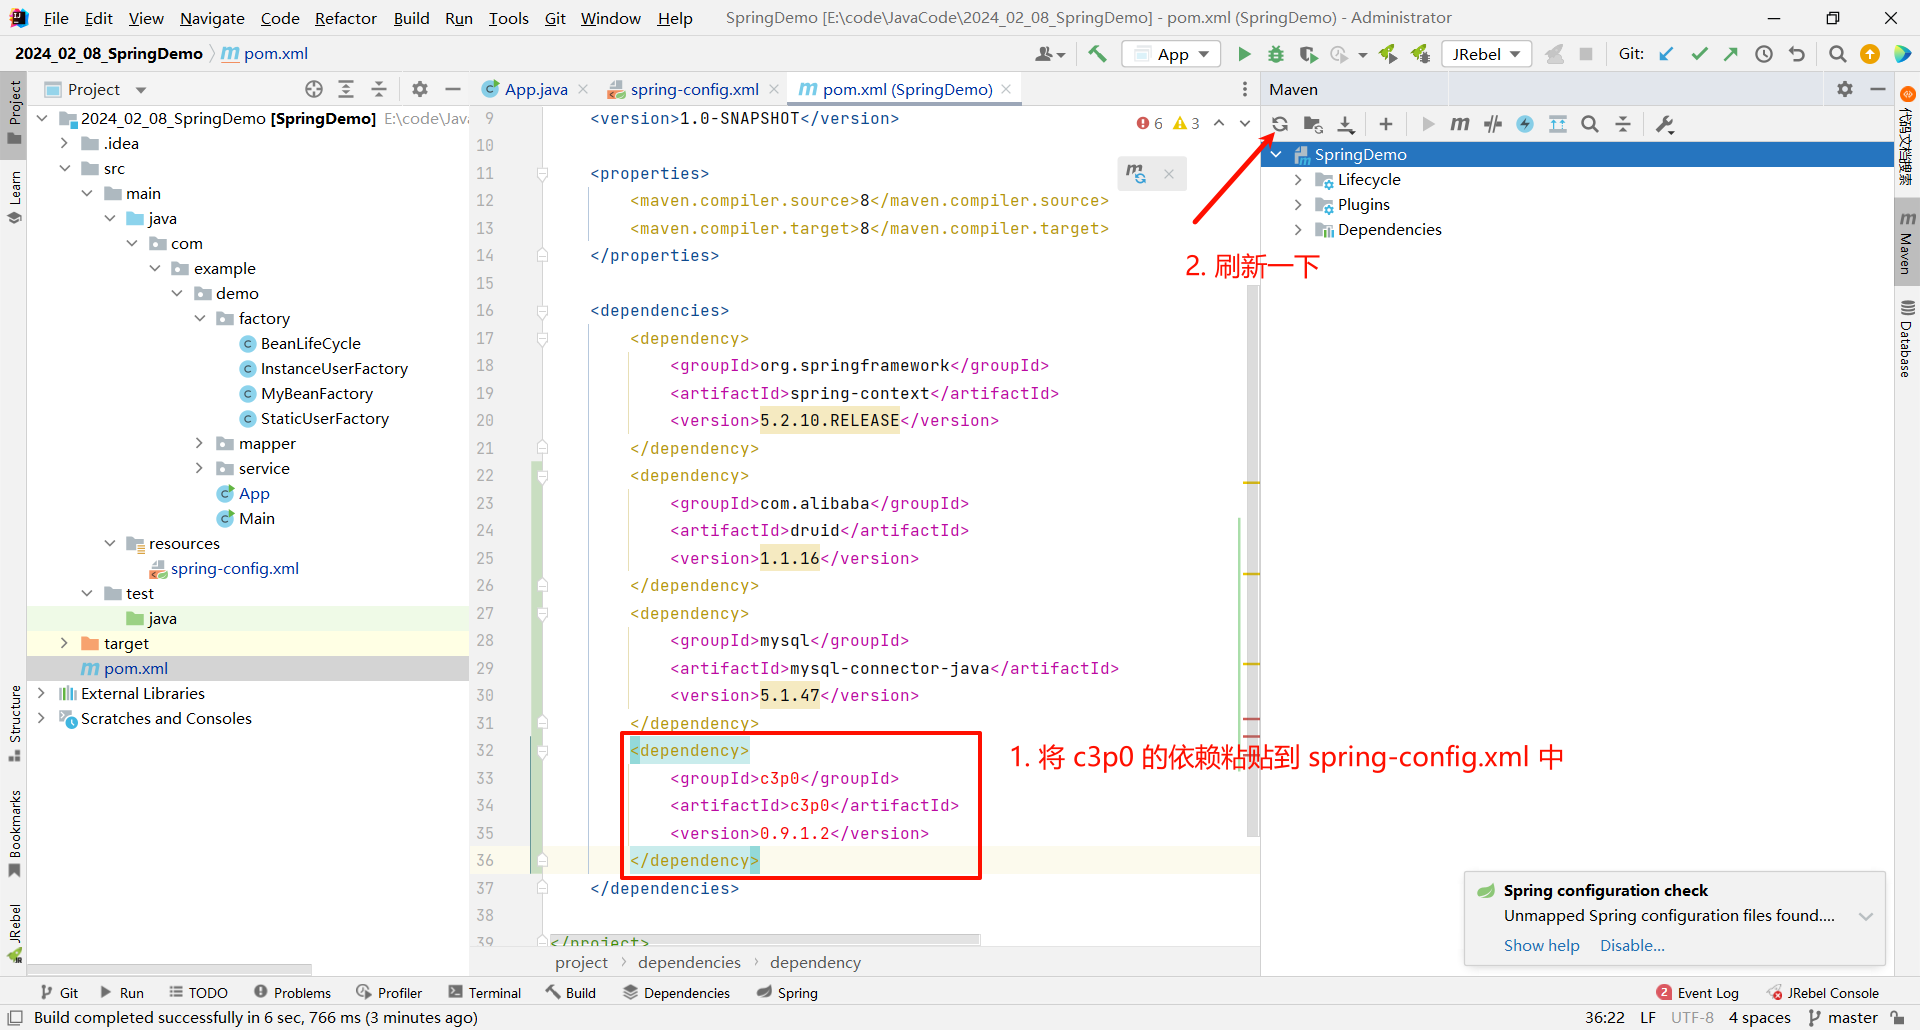
首先 , 我们还是需要导入 c3p0 的依赖
<dependency><groupId>c3p0</groupId><artifactId>c3p0</artifactId><version>0.9.1.2</version>
</dependency>
依赖导入成功之后 , 我们就可以编辑 spring-config.xml 文件了 , 我们依然还是需要先指定两个最基本的标签 : id 和 class , id 只是一个标识 , 无所谓的 . 但是 class 填写什么呢 ? 我们还是像上次一样 , 先输入一个 c3p0 的关键字 , 看是否提供了提示
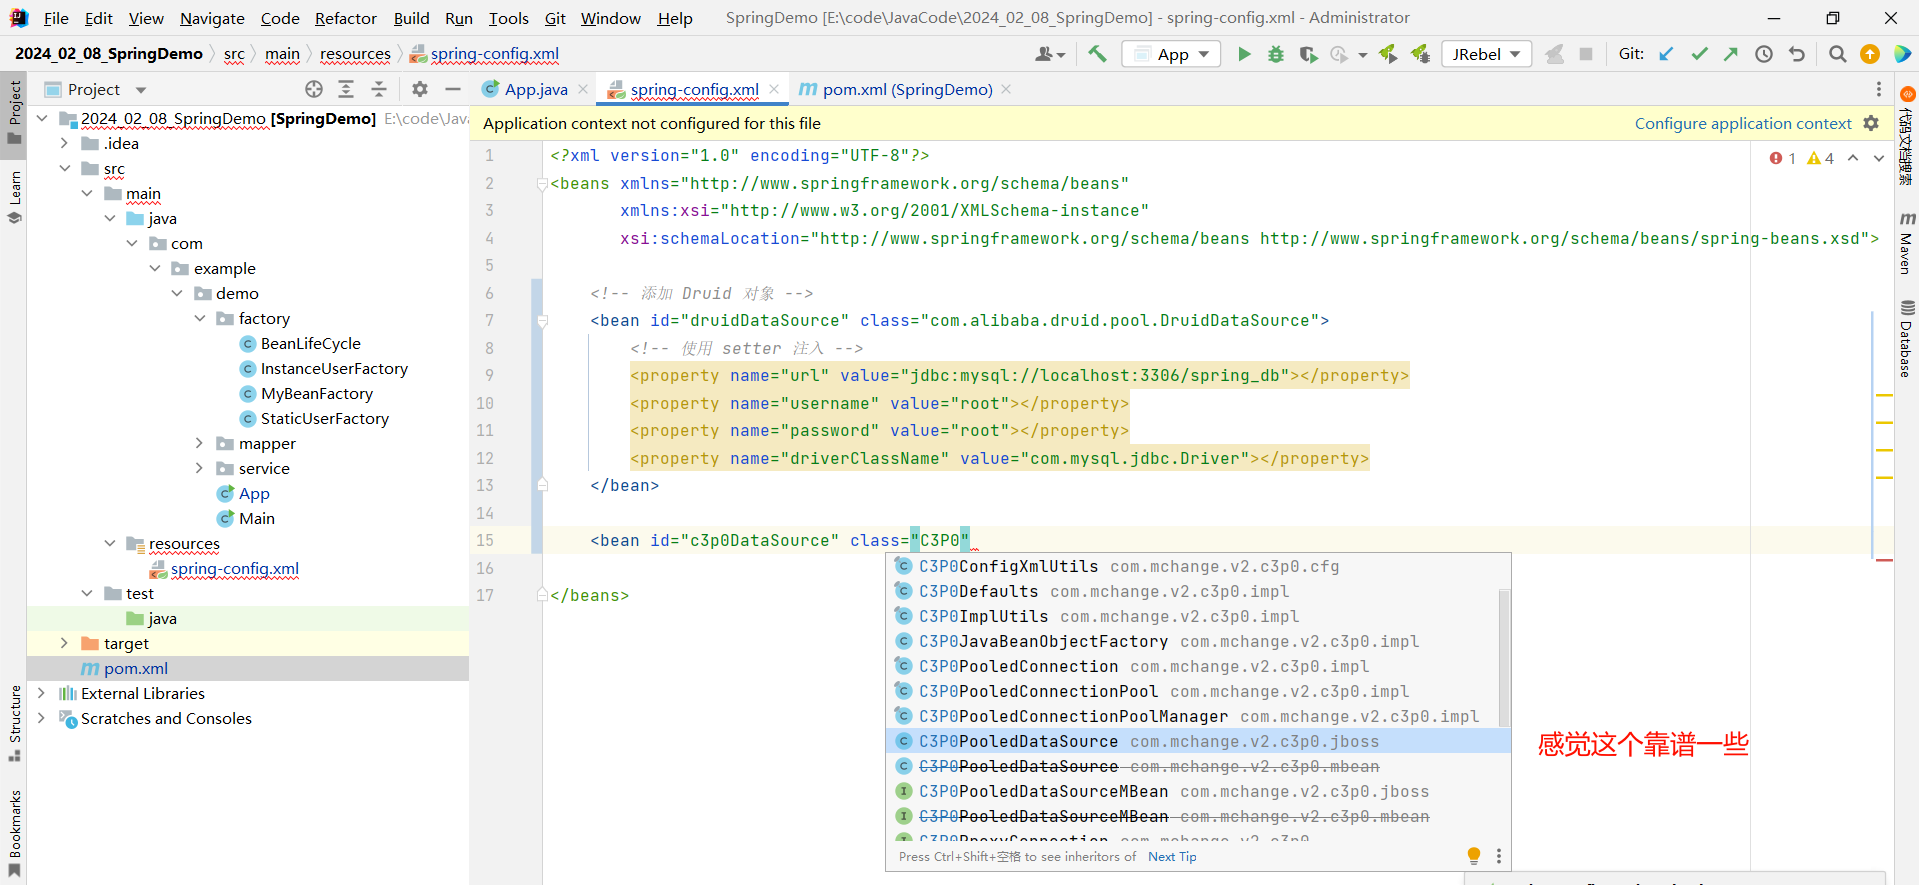
然后判断一下他是构造方法注入还是 setter 注入 ?
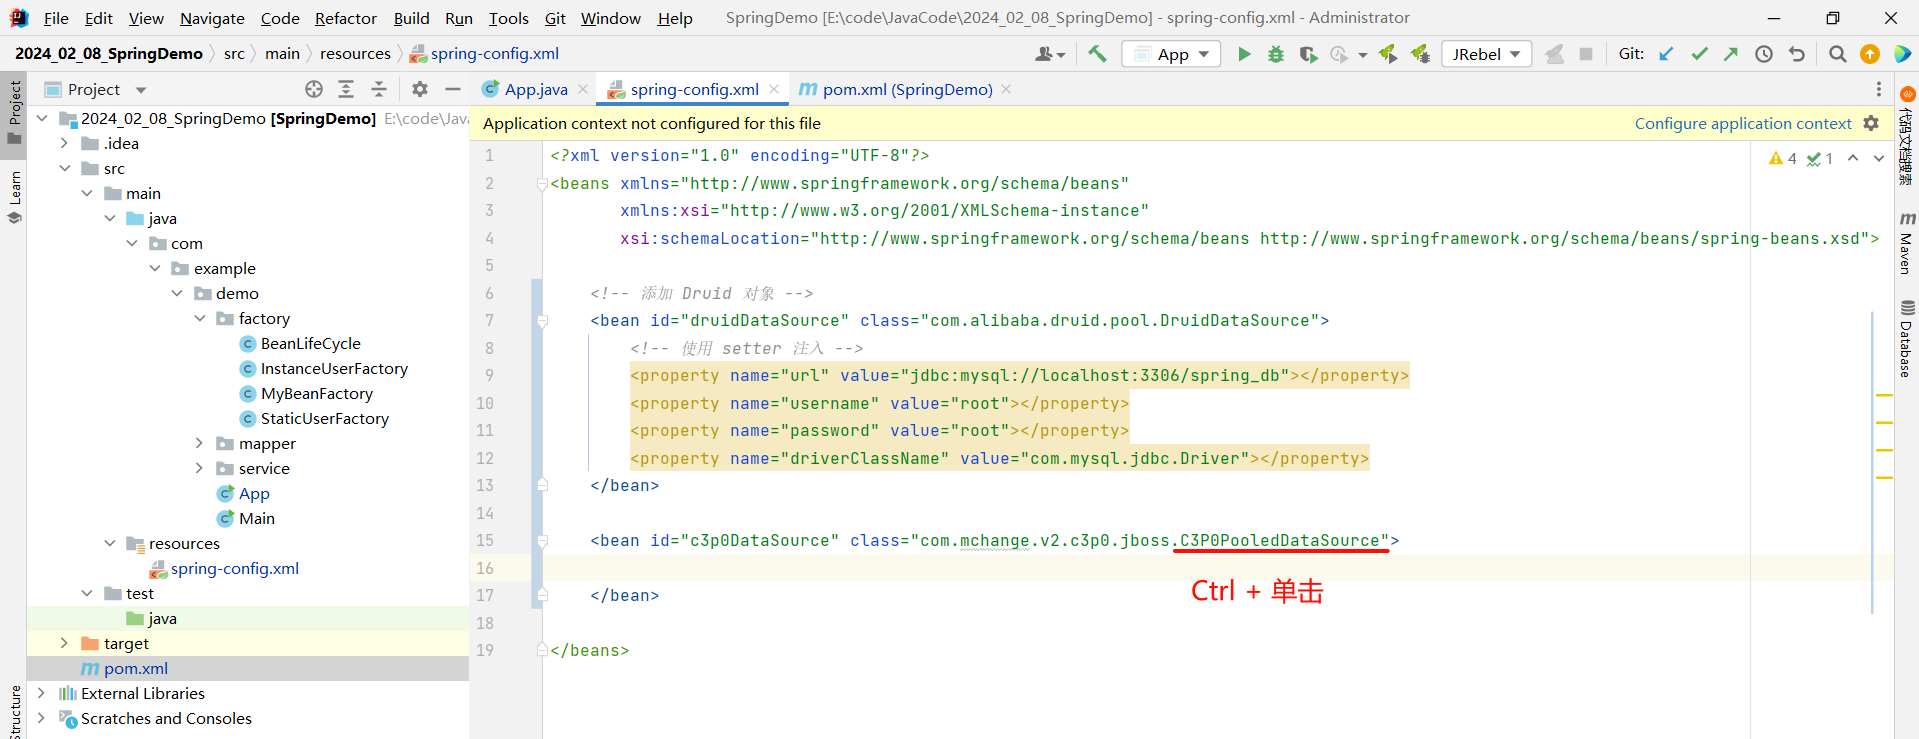
依然先判断是否是构造方法注入 , 因为类名与构造方法名相同 , 能够更方便的先找到构造方法
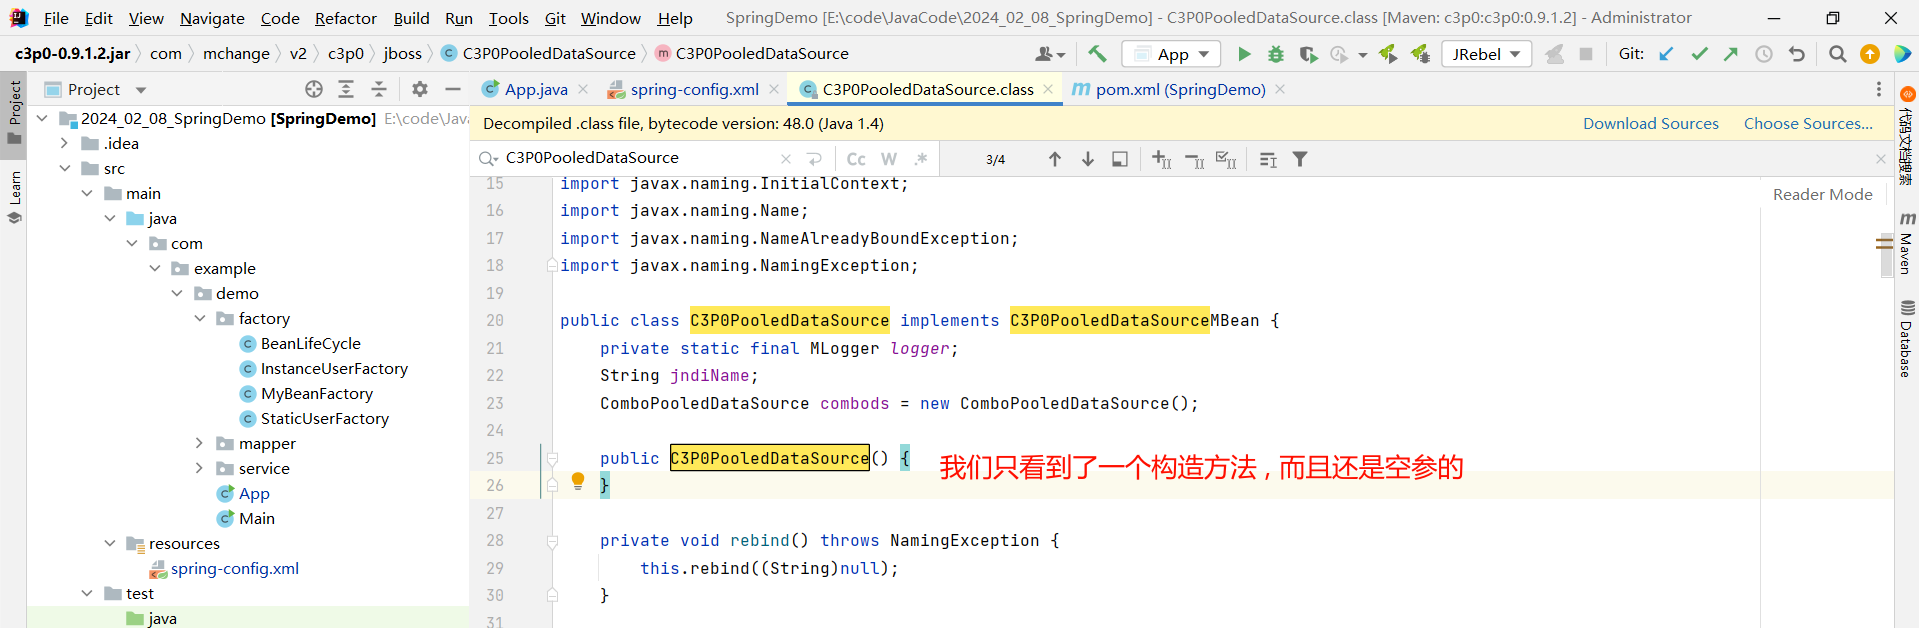
那就只能使用 setter 注入了
我们首先注入 url , 但是当我们输入了 url , 出来的其实是 jdbcurl
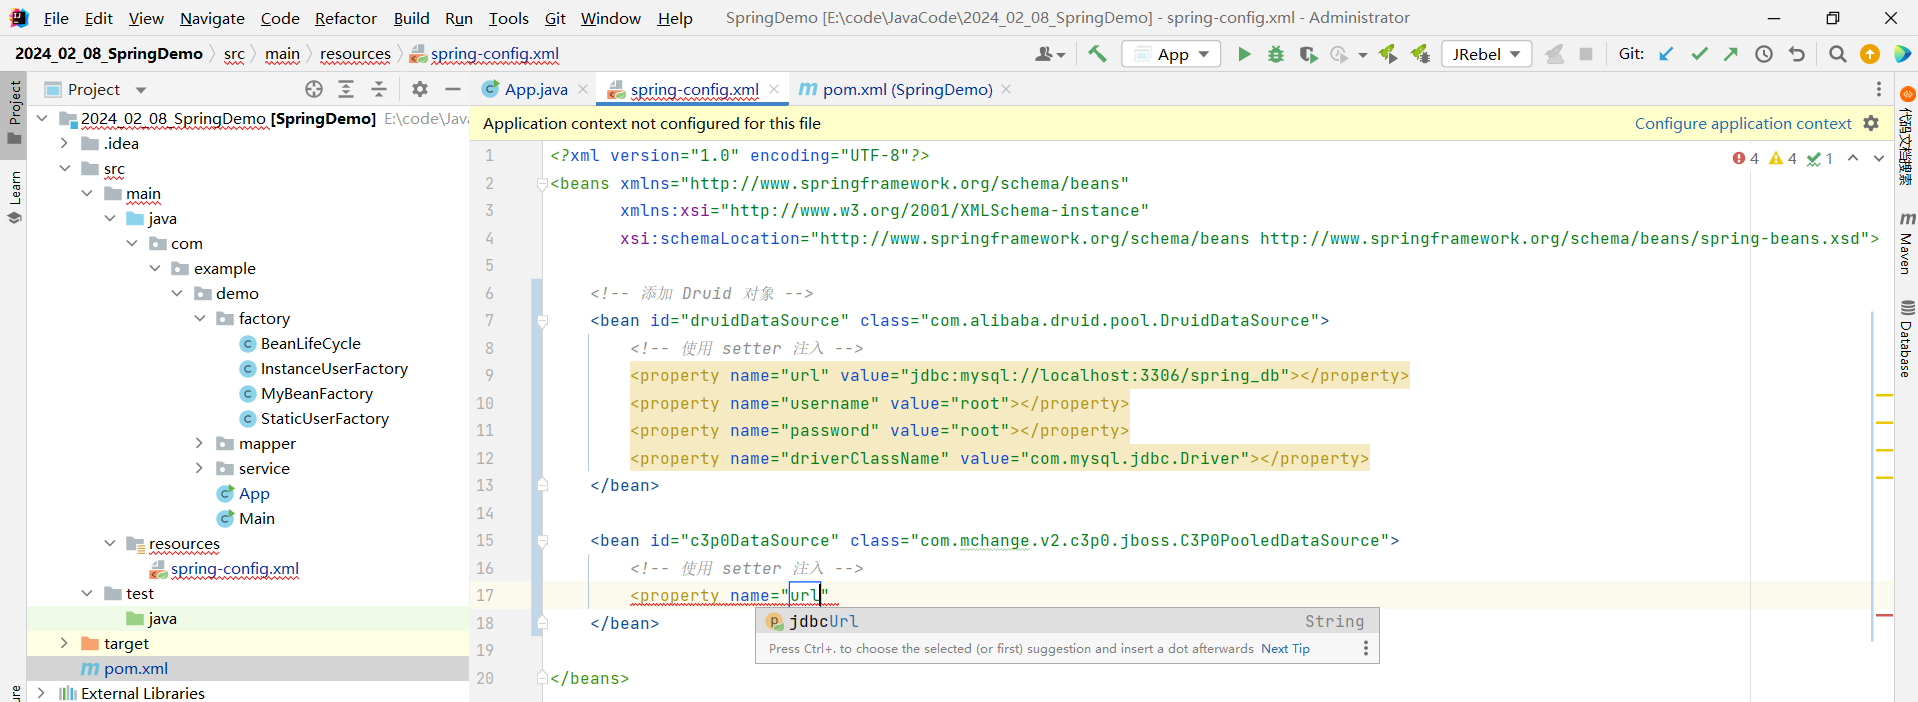
这其实是每个厂商不同的设计 , 我们只需要按照他提示的进行设置即可 , 其他的类似即可 .
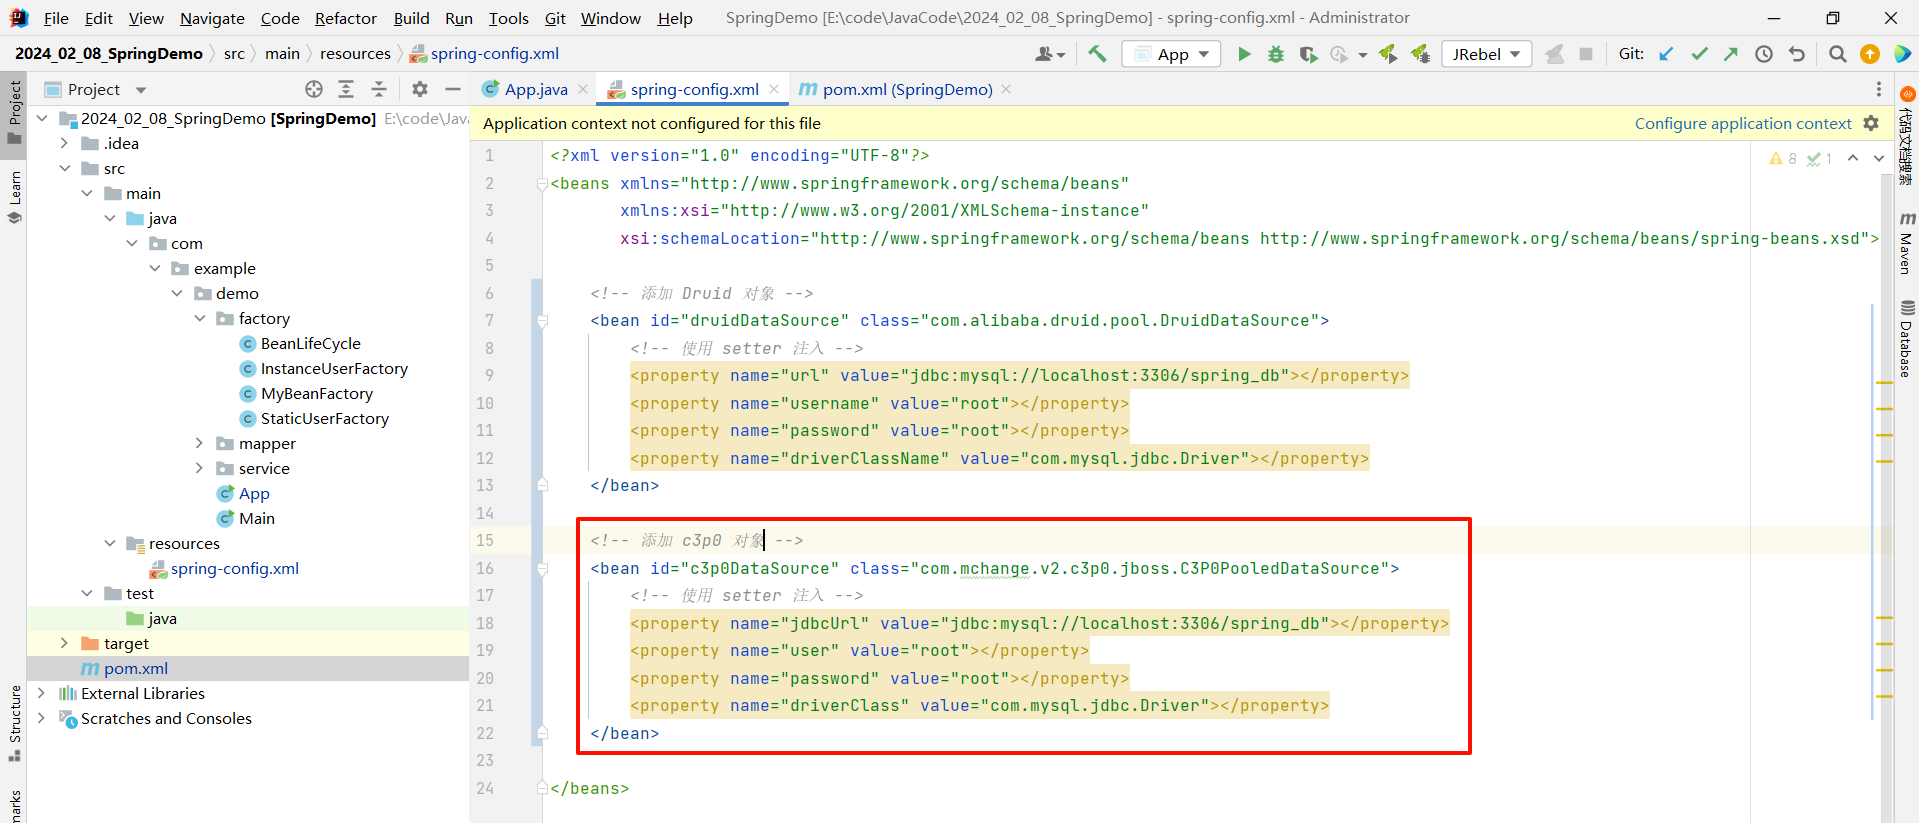
<?xml version="1.0" encoding="UTF-8"?>
<beans xmlns="http://www.springframework.org/schema/beans"xmlns:xsi="http://www.w3.org/2001/XMLSchema-instance"xsi:schemaLocation="http://www.springframework.org/schema/beans http://www.springframework.org/schema/beans/spring-beans.xsd"><!-- 添加 c3p0 对象 --><bean id="c3p0DataSource" class="com.mchange.v2.c3p0.jboss.C3P0PooledDataSource"><!-- 使用 setter 注入 --><property name="jdbcUrl" value="jdbc:mysql://localhost:3306/spring_db"></property><property name="user" value="root"></property><property name="password" value="root"></property><property name="driverClass" value="com.mysql.jdbc.Driver"></property></bean></beans>
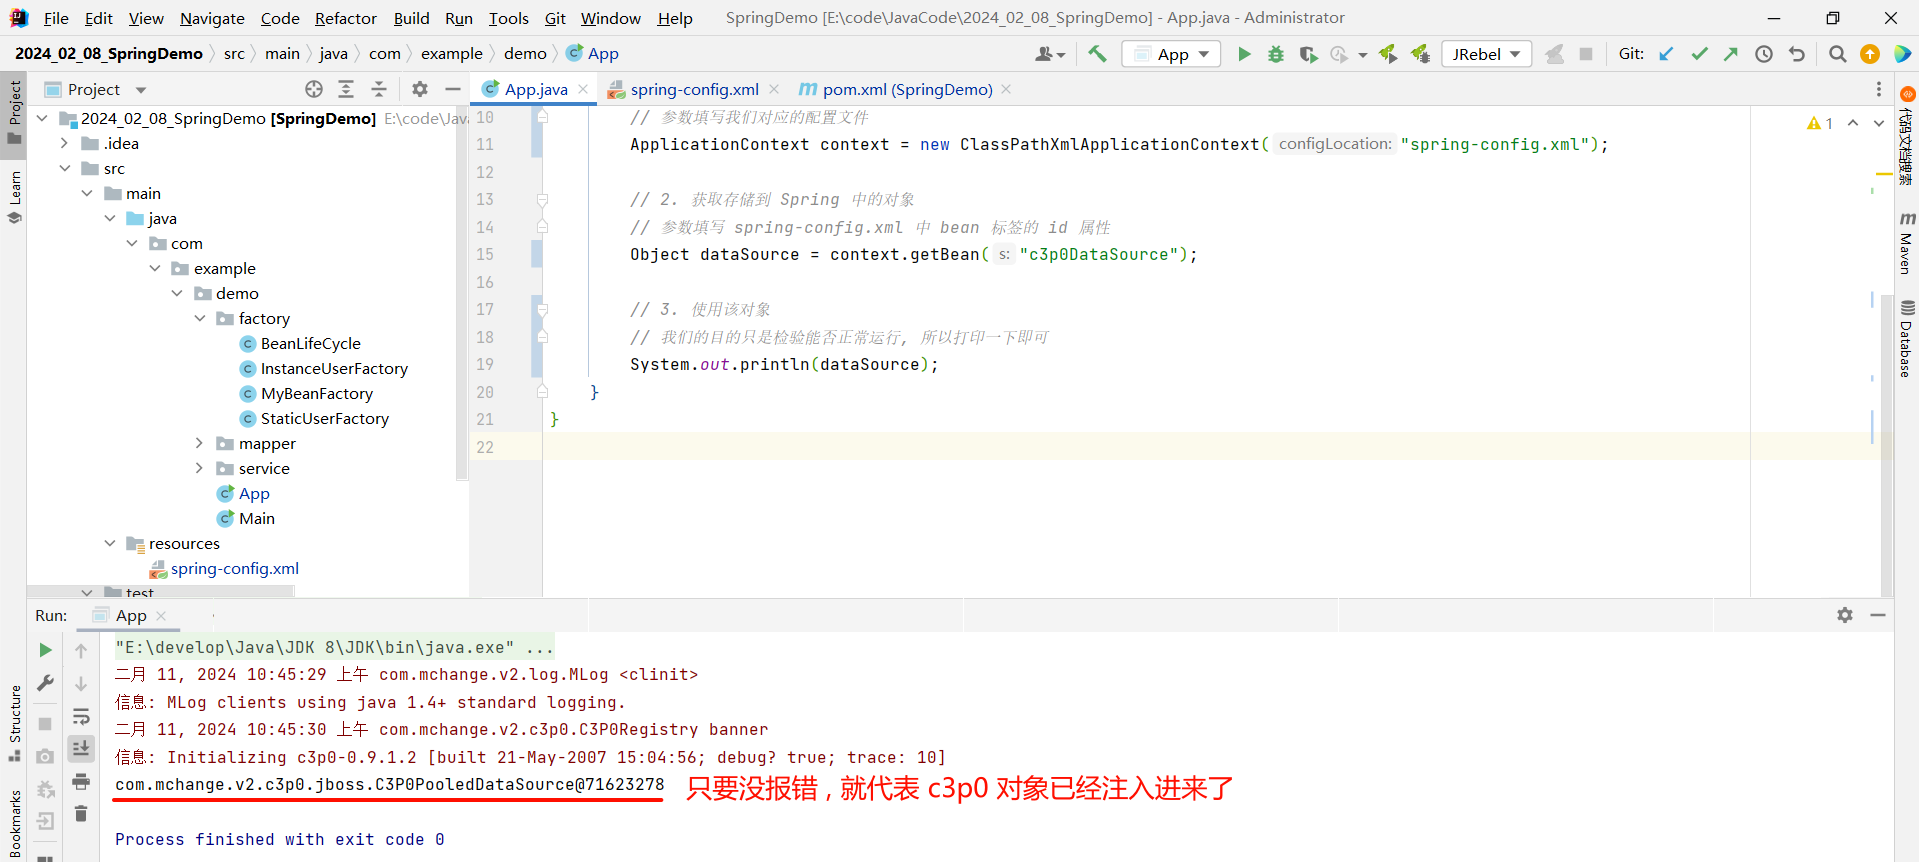
我们可以在启动类中测试一下
package com.example.demo;import com.example.demo.factory.BeanLifeCycle;
import org.springframework.context.ApplicationContext;
import org.springframework.context.support.ClassPathXmlApplicationContext;public class App {public static void main(String[] args) {// 1. 先获取到 Spring 的上下文// 参数填写我们对应的配置文件ApplicationContext context = new ClassPathXmlApplicationContext("spring-config.xml");// 2. 获取存储到 Spring 中的对象// 参数填写 spring-config.xml 中 bean 标签的 id 属性Object dataSource = context.getBean("c3p0DataSource");// 3. 使用该对象// 我们的目的只是检验能否正常运行, 所以打印一下即可System.out.println(dataSource);}
}
4.2 加载 properties 配置文件
我们刚才虽然已经完成了第三方资源的配置管理 , 但是将配置写在 spring-config.xml 中不是特别方便 , 并且配置信息都需要写到专门的配置文件中 , 所以接下来我们需要学习一下怎样读取 properties 配置文件中的信息
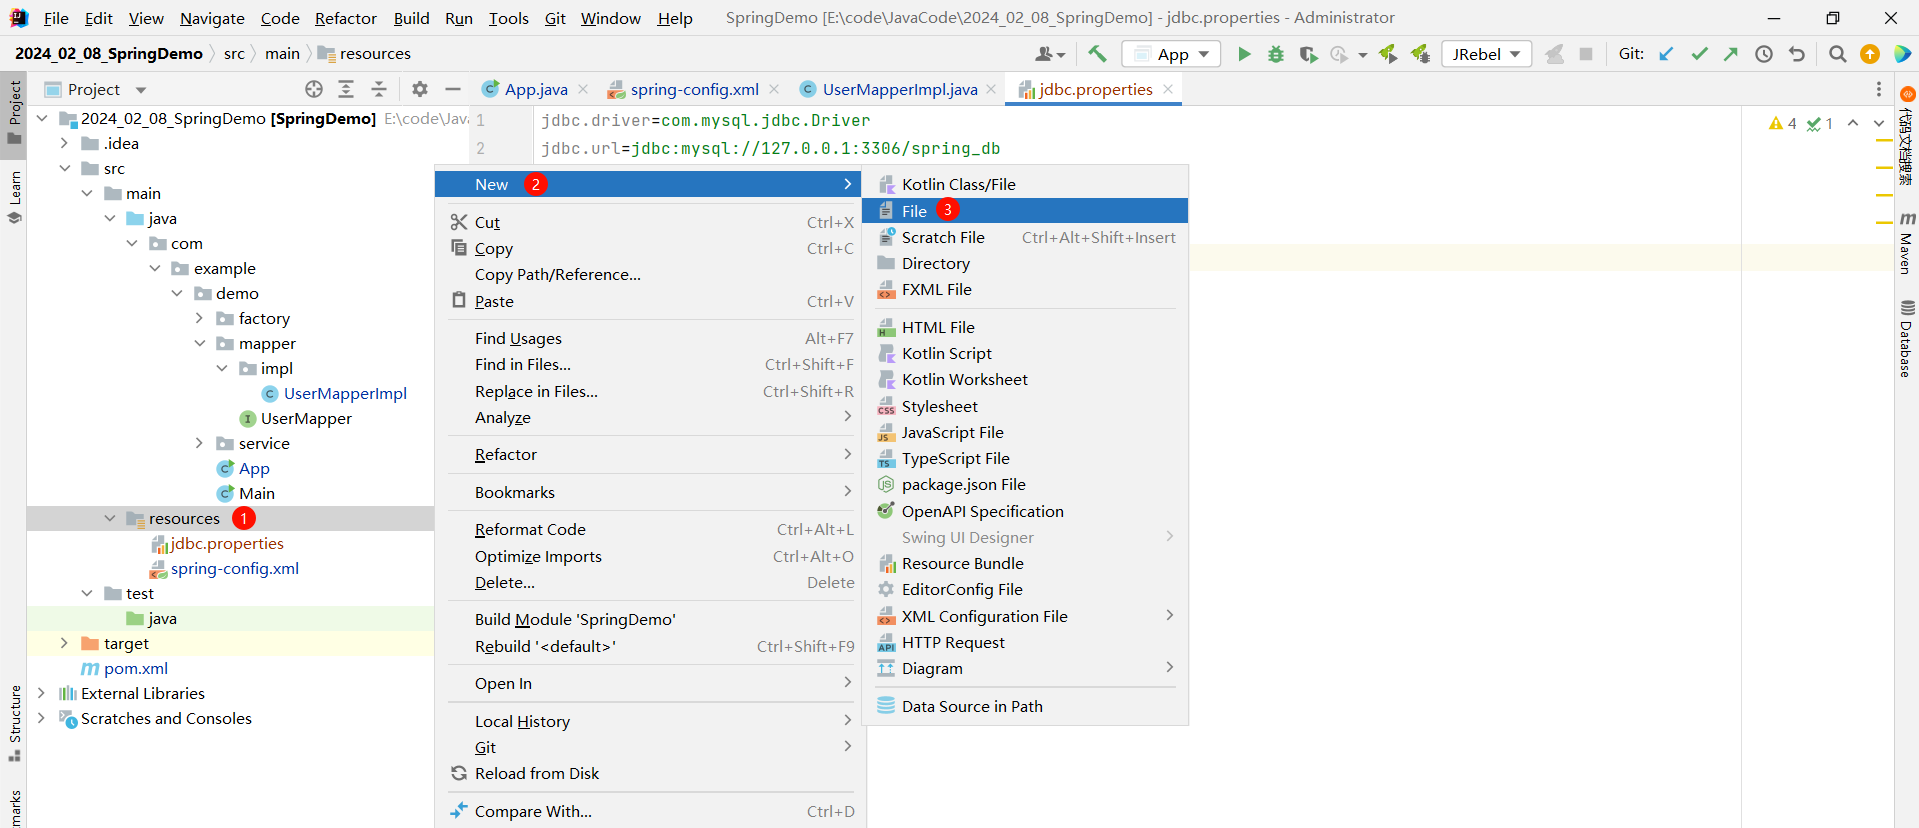
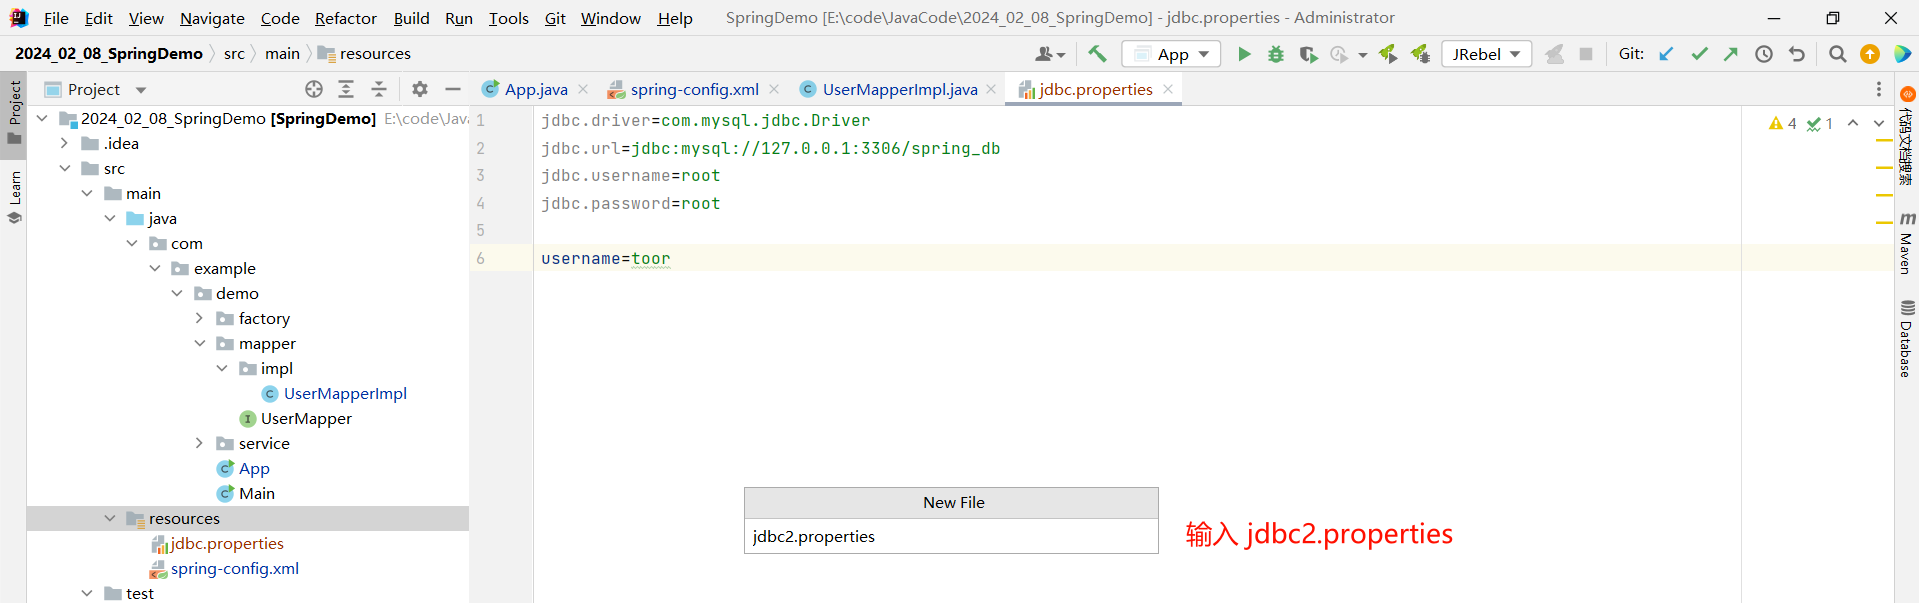
首先 , 我们需要创建一个 properties 文件 , 并且初始化一些配置
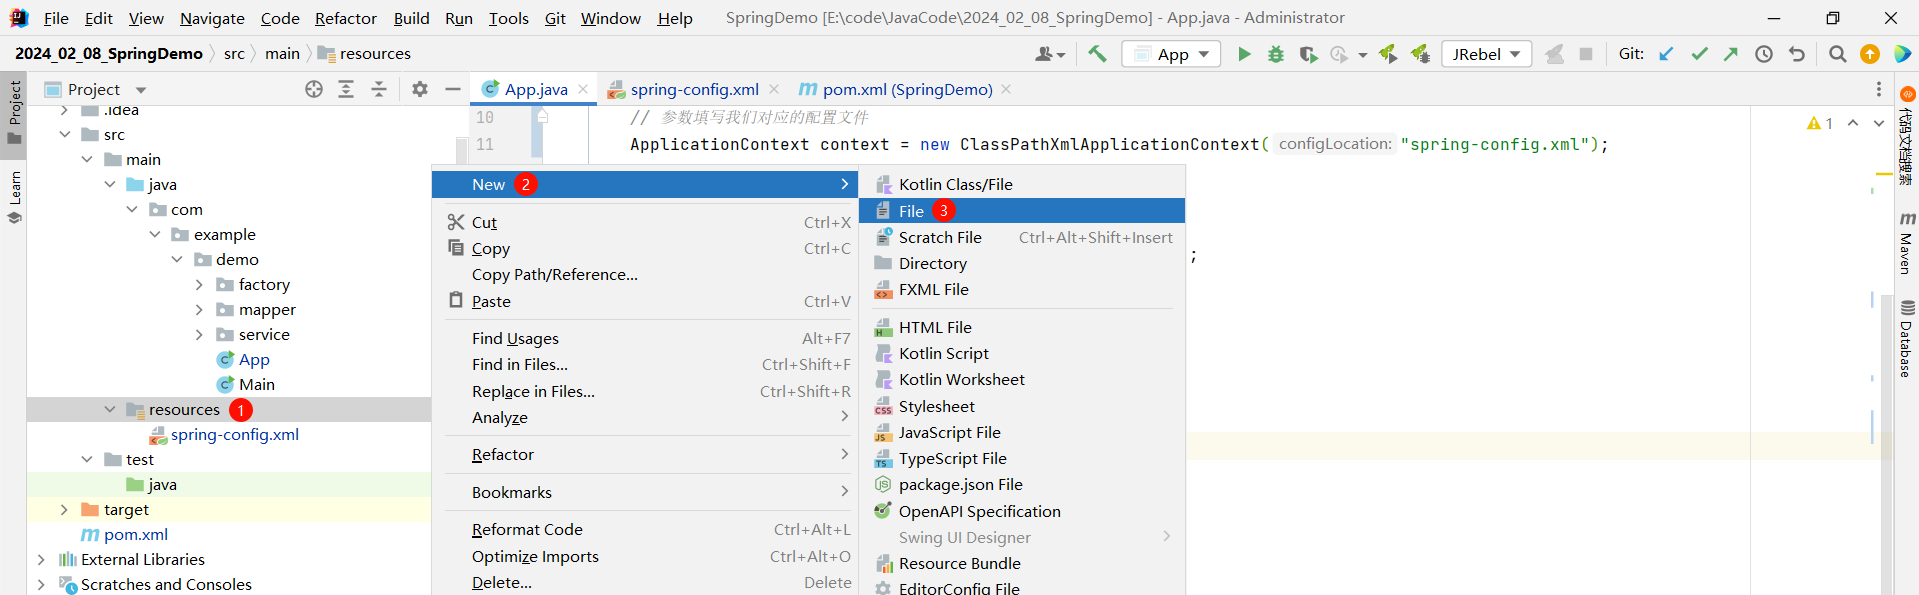
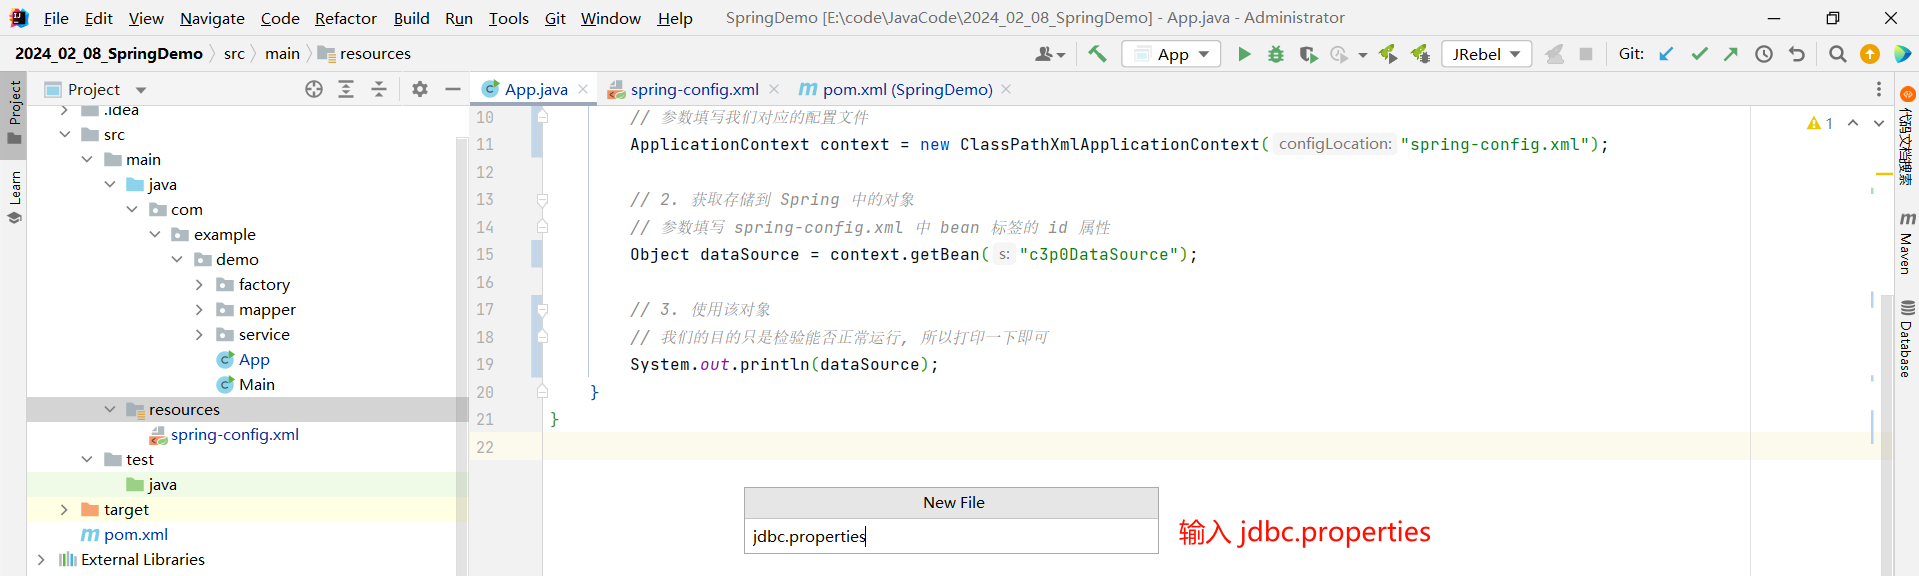
然后进行这些配置
jdbc.driver=com.mysql.jdbc.Driver
jdbc.url=jdbc:mysql://127.0.0.1:3306/spring_db
jdbc.username=root
jdbc.password=root
那如果 Spring 要想成功获取到这些配置 , 都需要哪些操作呢 ?
- Spring 首先要获取到 jdbc.properties 配置文件
- 将对应的参数进行替换
那我们就一步一步来看
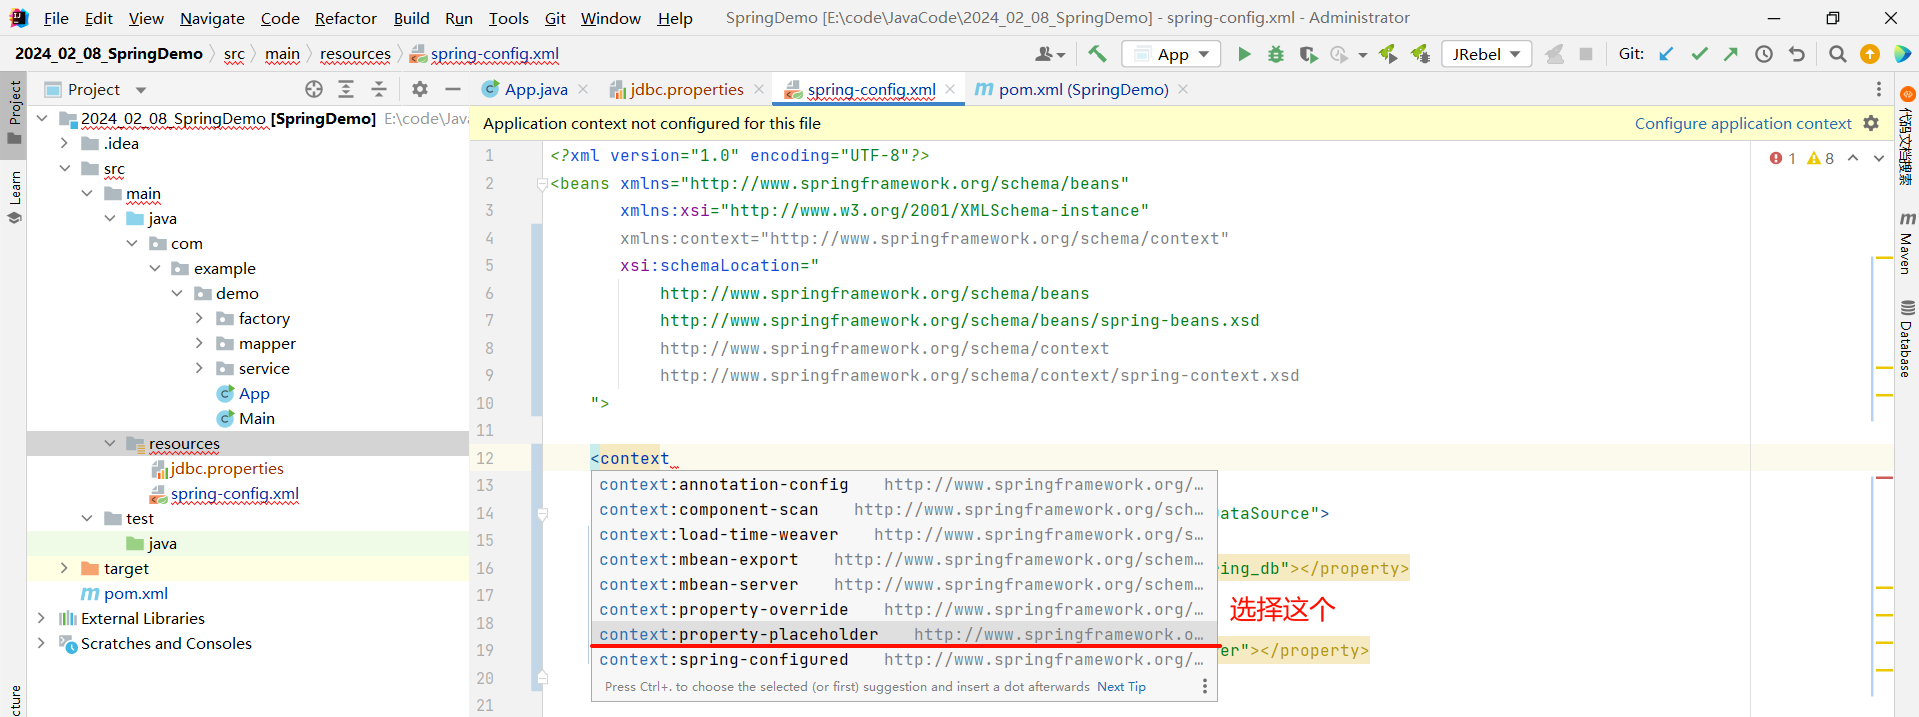
4.2.1 开启 context 命名空间
Spring 加载 properties 文件有些特殊 , 我们需要先开启一个新的命名空间 , 那开启新的命名空间的方式有些特殊 , 大家详细来看一下
PixPin_2024-02-11_13-30-57.gif
<?xml version="1.0" encoding="UTF-8"?>
<beans xmlns="http://www.springframework.org/schema/beans"xmlns:xsi="http://www.w3.org/2001/XMLSchema-instance"xmlns:context="http://www.springframework.org/schema/context"xsi:schemaLocation="http://www.springframework.org/schema/beanshttp://www.springframework.org/schema/beans/spring-beans.xsdhttp://www.springframework.org/schema/contexthttp://www.springframework.org/schema/context/spring-context.xsd"><!-- 添加 Druid 对象 --><bean id="druidDataSource" class="com.alibaba.druid.pool.DruidDataSource"><!-- 使用 setter 注入 --><property name="url" value="jdbc:mysql://localhost:3306/spring_db"></property><property name="username" value="root"></property><property name="password" value="root"></property><property name="driverClassName" value="com.mysql.jdbc.Driver"></property></bean></beans>
4.2.2 使用 context 空间加载 properties 文件
我们需要使用 context 标签来去加载 properties 配置文件
通过 location 参数指定我们要加载的文件
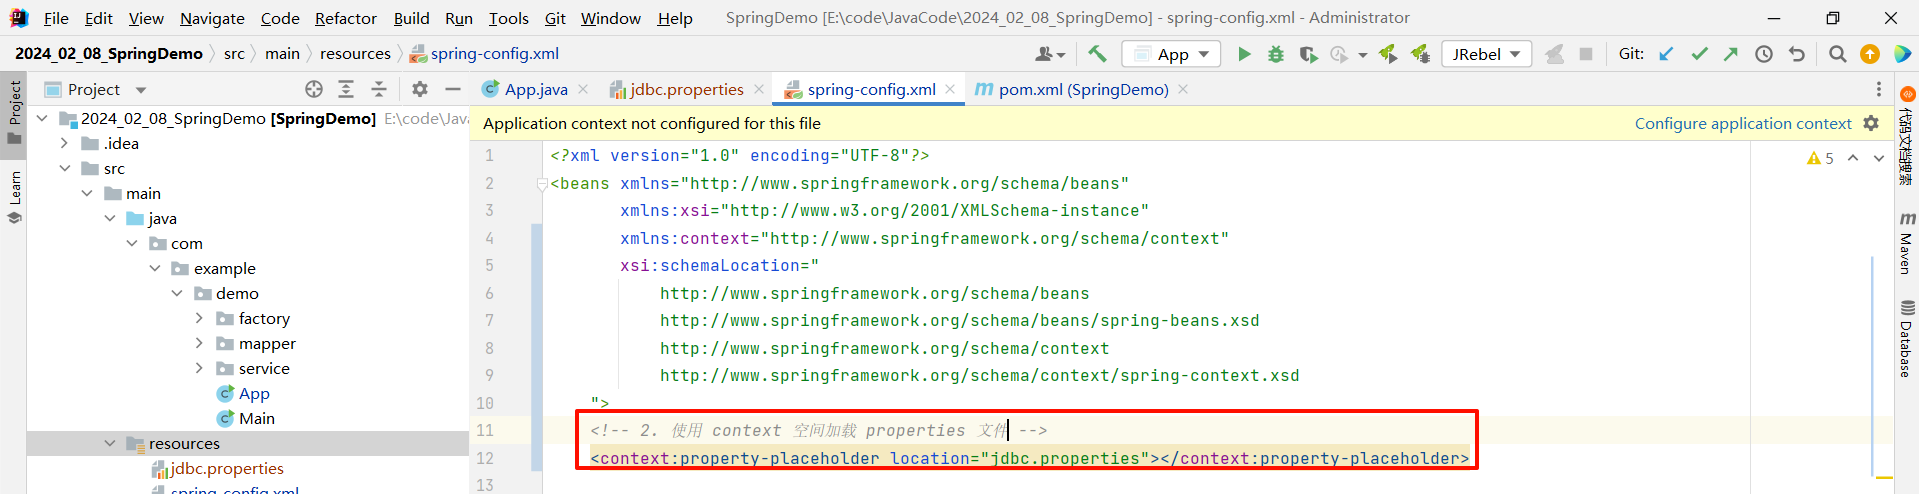
<?xml version="1.0" encoding="UTF-8"?>
<beans xmlns="http://www.springframework.org/schema/beans"xmlns:xsi="http://www.w3.org/2001/XMLSchema-instance"xmlns:context="http://www.springframework.org/schema/context"xsi:schemaLocation="http://www.springframework.org/schema/beanshttp://www.springframework.org/schema/beans/spring-beans.xsdhttp://www.springframework.org/schema/contexthttp://www.springframework.org/schema/context/spring-context.xsd"><!-- 2. 使用 context 空间加载 properties 文件 --><context:property-placeholder location="jdbc.properties"></context:property-placeholder><!-- 添加 Druid 对象 --><bean id="druidDataSource" class="com.alibaba.druid.pool.DruidDataSource"><!-- 使用 setter 注入 --><property name="url" value="jdbc:mysql://localhost:3306/spring_db"></property><property name="username" value="root"></property><property name="password" value="root"></property><property name="driverClassName" value="com.mysql.jdbc.Driver"></property></bean></beans>
4.2.3 使用表达式替换属性
接下来 , 我们需要使用表达式来去替换这些 value 的值

我们统一使用 ${} 来进行替换
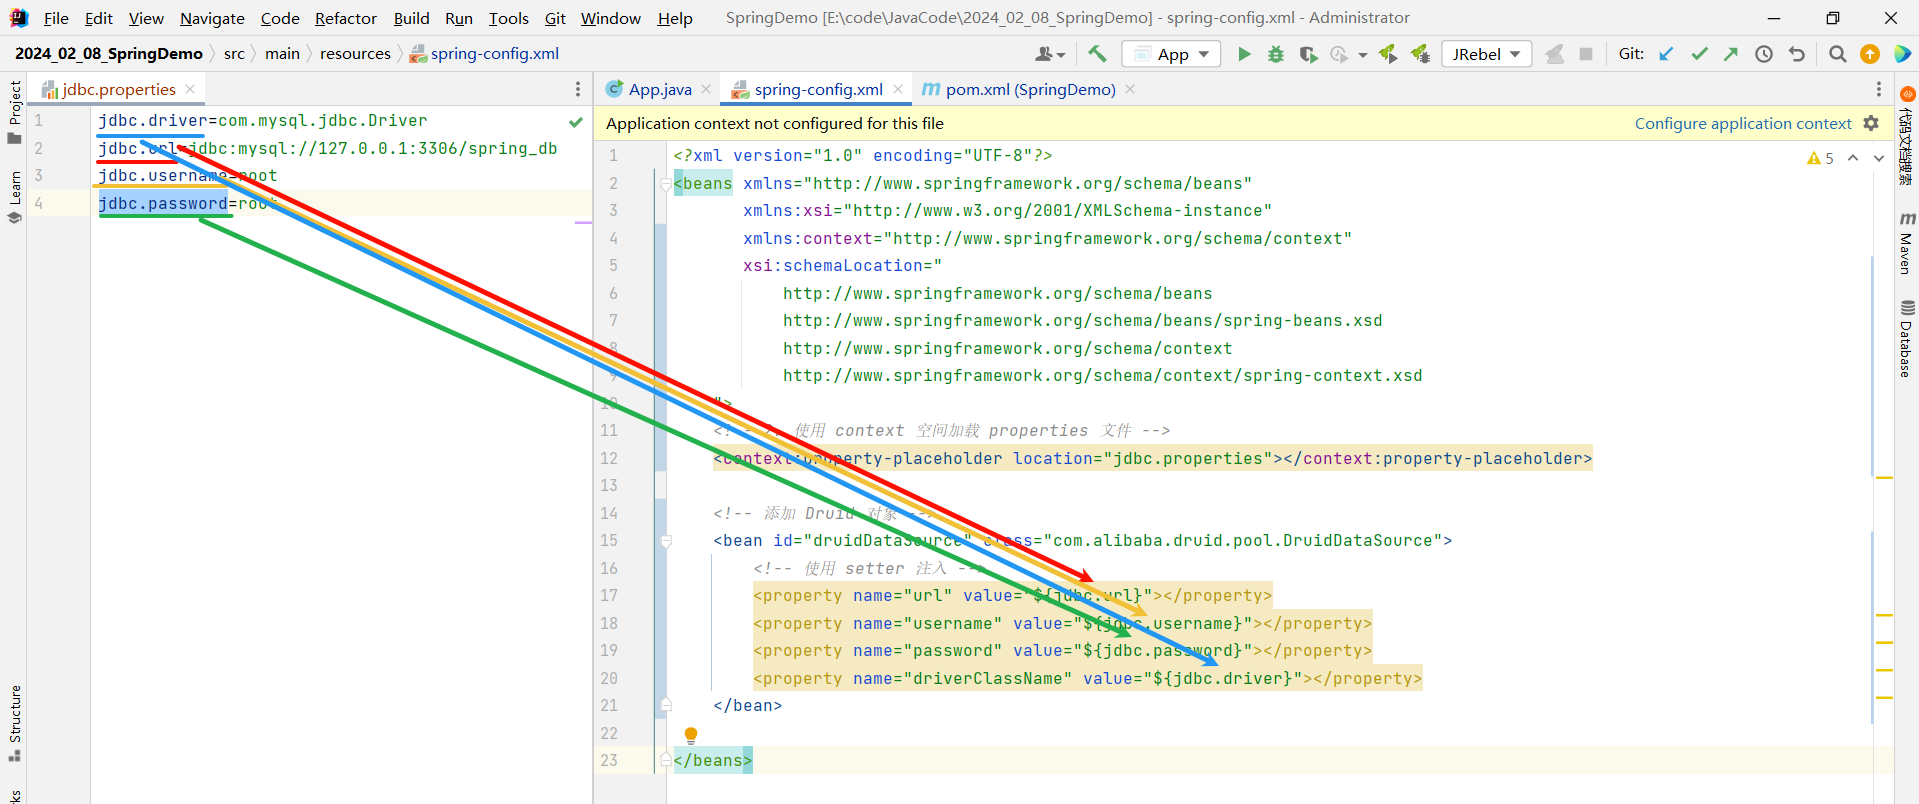
<?xml version="1.0" encoding="UTF-8"?>
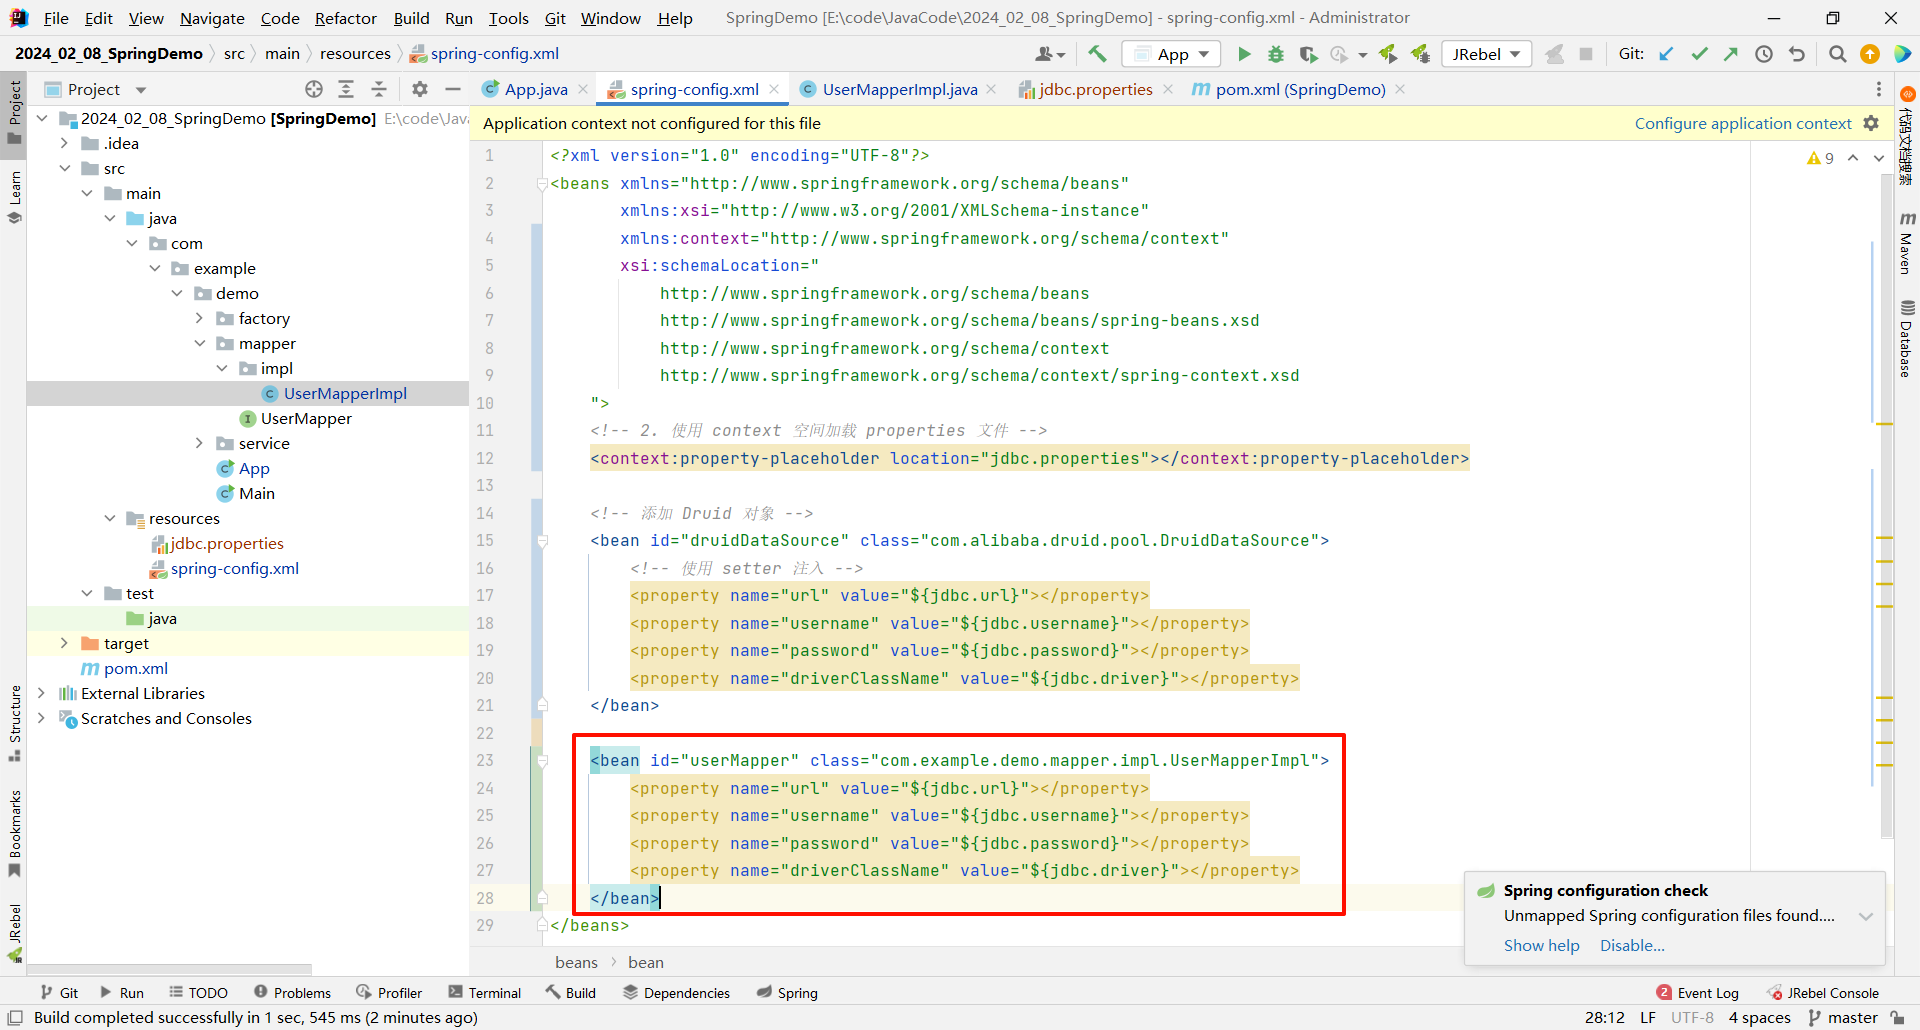
<beans xmlns="http://www.springframework.org/schema/beans"xmlns:xsi="http://www.w3.org/2001/XMLSchema-instance"xmlns:context="http://www.springframework.org/schema/context"xsi:schemaLocation="http://www.springframework.org/schema/beanshttp://www.springframework.org/schema/beans/spring-beans.xsdhttp://www.springframework.org/schema/contexthttp://www.springframework.org/schema/context/spring-context.xsd"><!-- 2. 使用 context 空间加载 properties 文件 --><context:property-placeholder location="jdbc.properties"></context:property-placeholder><!-- 添加 Druid 对象 --><bean id="druidDataSource" class="com.alibaba.druid.pool.DruidDataSource"><!-- 使用 setter 注入 --><property name="url" value="${jdbc.url}"></property><property name="username" value="${jdbc.username}"></property><property name="password" value="${jdbc.password}"></property><property name="driverClassName" value="${jdbc.driver}"></property></bean></beans>
这样的话 , 我们就完成了加载 properties 配置文件的步骤 , 我们可以测试一下
4.2.4 测试效果
由于使用 druidDataSource 不方便我们查看效果 , 我们就借助 userMapper 来查看一下效果
<?xml version="1.0" encoding="UTF-8"?>
<beans xmlns="http://www.springframework.org/schema/beans"xmlns:xsi="http://www.w3.org/2001/XMLSchema-instance"xmlns:context="http://www.springframework.org/schema/context"xsi:schemaLocation="http://www.springframework.org/schema/beanshttp://www.springframework.org/schema/beans/spring-beans.xsdhttp://www.springframework.org/schema/contexthttp://www.springframework.org/schema/context/spring-context.xsd"><!-- 2. 使用 context 空间加载 properties 文件 --><context:property-placeholder location="jdbc.properties"></context:property-placeholder><bean id="userMapper" class="com.example.demo.mapper.impl.UserMapperImpl"><property name="url" value="${jdbc.url}"></property><property name="username" value="${jdbc.username}"></property><property name="password" value="${jdbc.password}"></property><property name="driverClassName" value="${jdbc.driver}"></property></bean>
</beans>
然后 , 我们需要在 UserMapperImpl 中指定 url、username、password、driverClassName 这四个属性 , 然后生成他们的 setter 方法
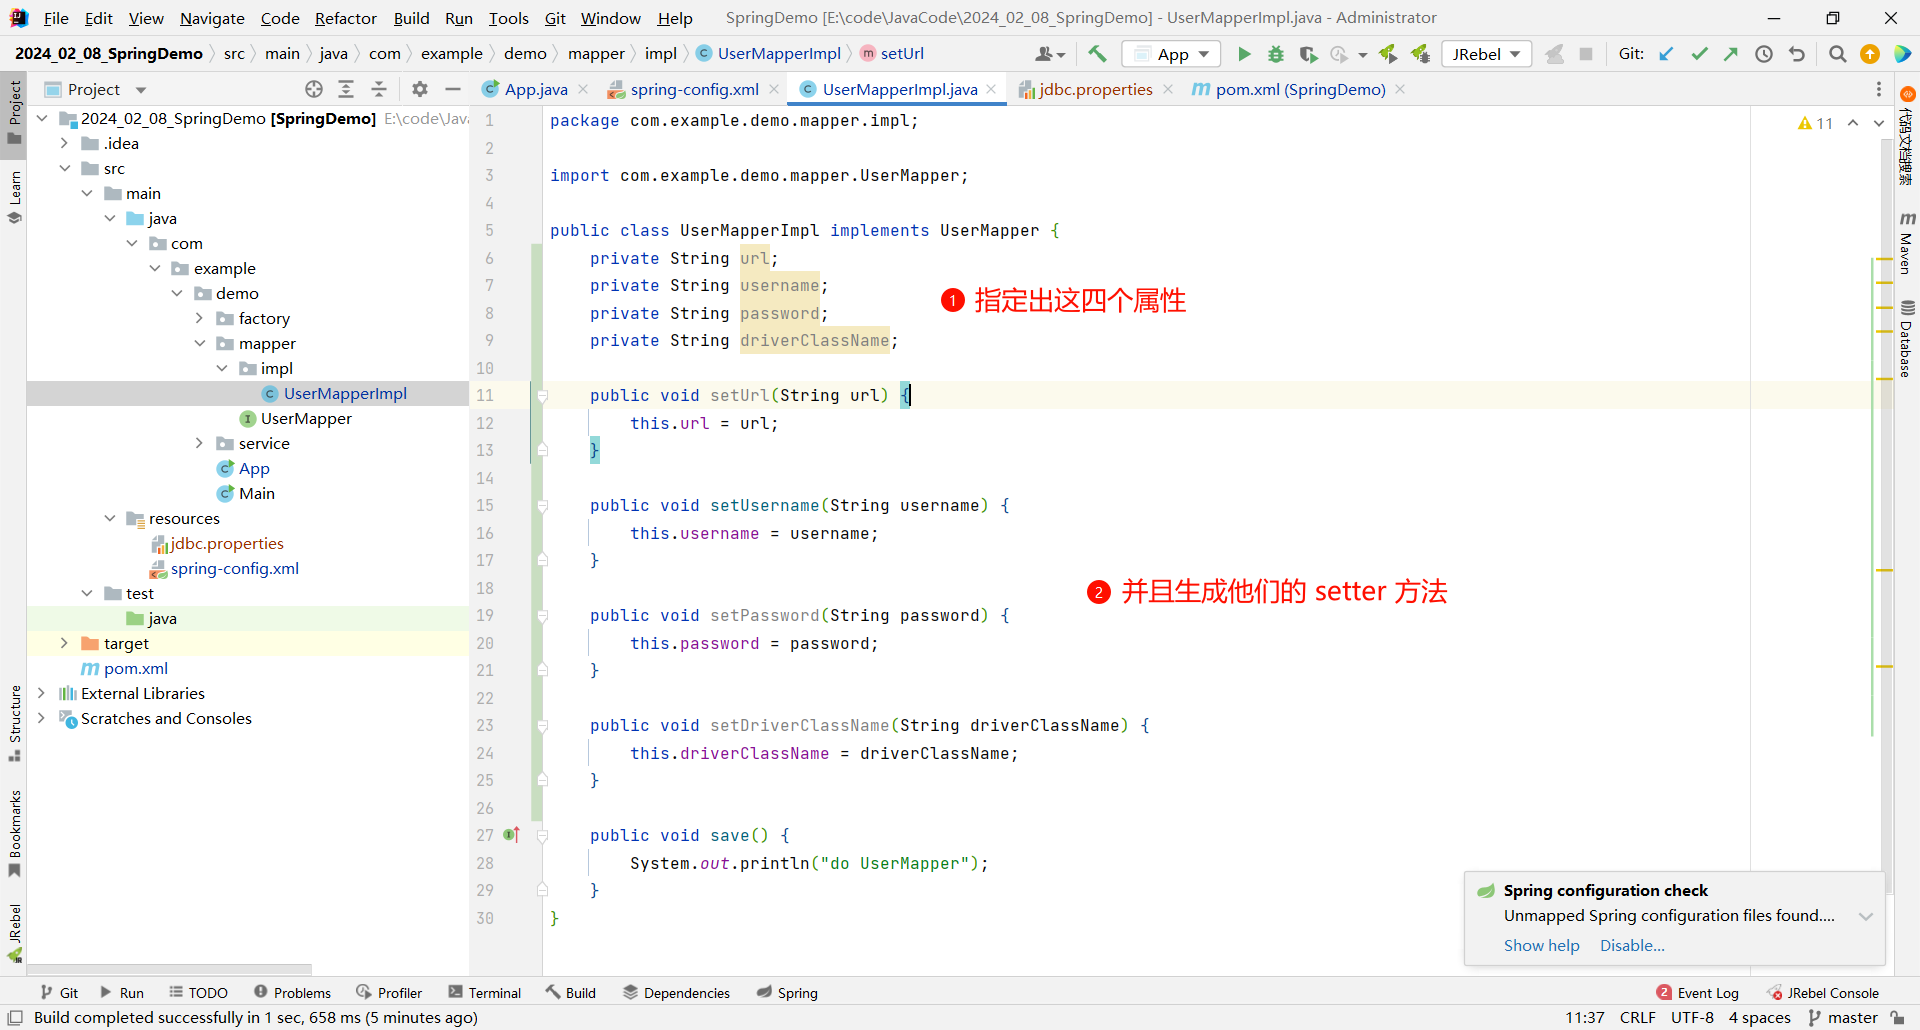
之后在 save 方法中 , 打印出这四个属性的信息
package com.example.demo.mapper.impl;import com.example.demo.mapper.UserMapper;public class UserMapperImpl implements UserMapper {private String url;private String username;private String password;private String driverClassName;public void setUrl(String url) {this.url = url;}public void setUsername(String username) {this.username = username;}public void setPassword(String password) {this.password = password;}public void setDriverClassName(String driverClassName) {this.driverClassName = driverClassName;}public void save() {System.out.println("url : " + url);System.out.println("username : " + username);System.out.println("password : " + password);System.out.println("driverClassName : " + driverClassName);}
}
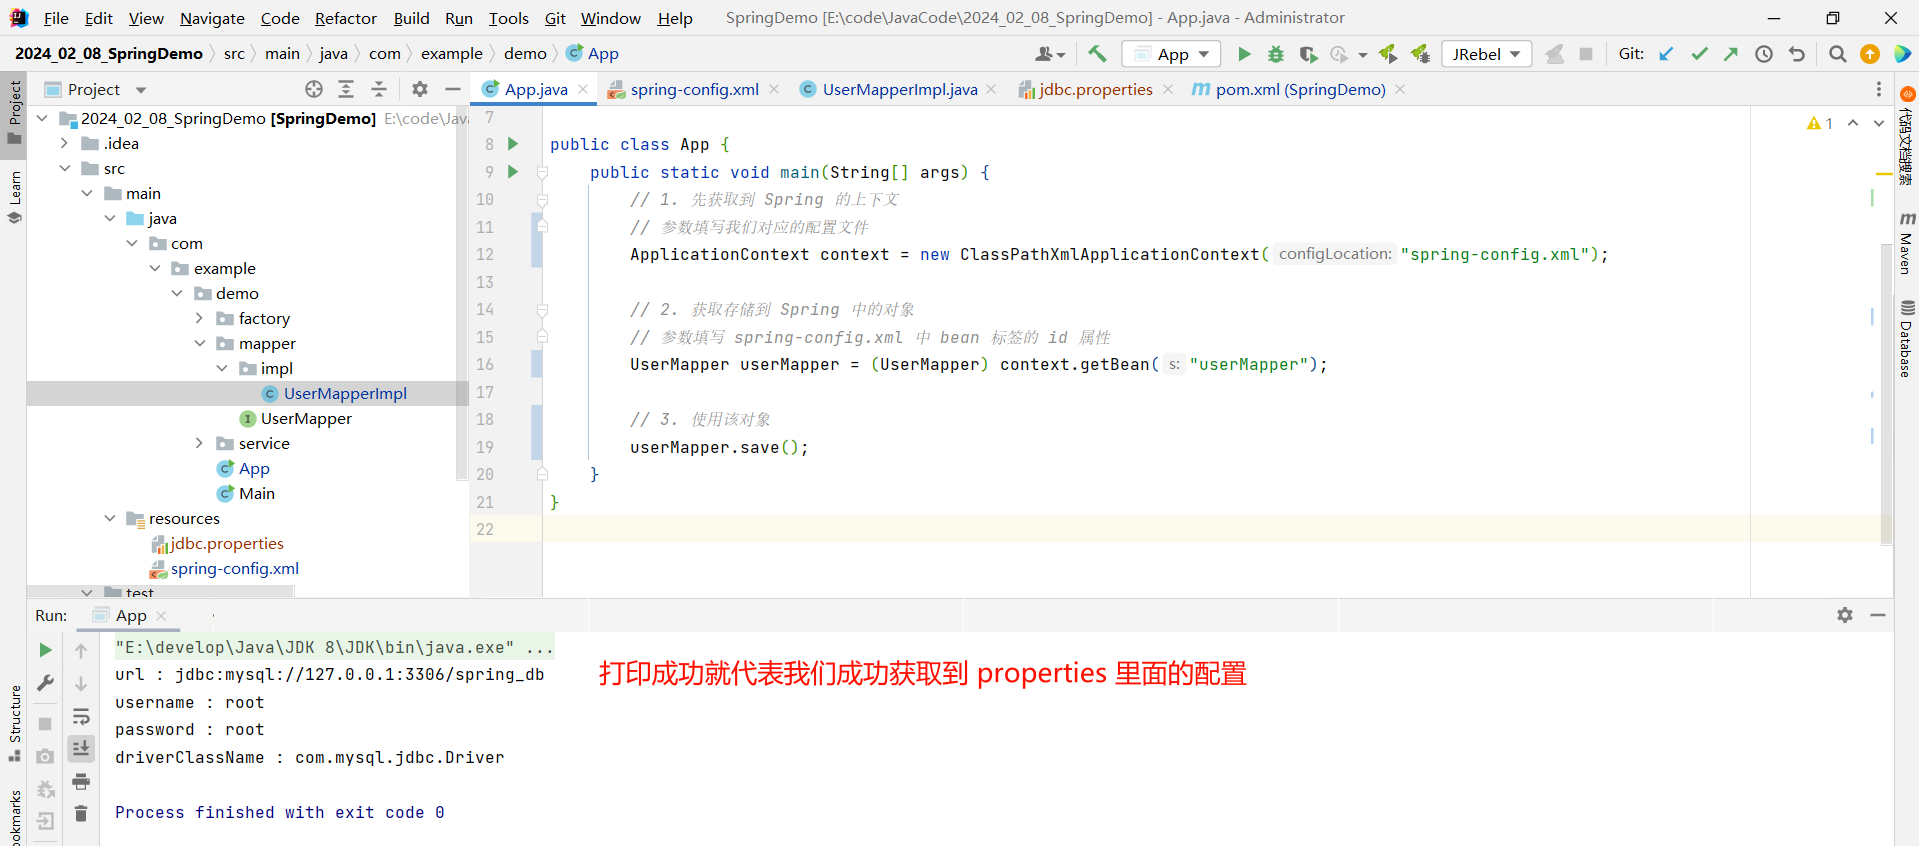
之后我们就可以通过启动类来查看一下效果了
package com.example.demo;import com.example.demo.factory.BeanLifeCycle;
import com.example.demo.mapper.UserMapper;
import org.springframework.context.ApplicationContext;
import org.springframework.context.support.ClassPathXmlApplicationContext;public class App {public static void main(String[] args) {// 1. 先获取到 Spring 的上下文// 参数填写我们对应的配置文件ApplicationContext context = new ClassPathXmlApplicationContext("spring-config.xml");// 2. 获取存储到 Spring 中的对象// 参数填写 spring-config.xml 中 bean 标签的 id 属性UserMapper userMapper = (UserMapper) context.getBean("userMapper");// 3. 使用该对象userMapper.save();}
}
4.2.5 注意事项
配置不加载系统属性
我们先在配置文件中添加一个其他的属性

jdbc.driver=com.mysql.jdbc.Driver
jdbc.url=jdbc:mysql://127.0.0.1:3306/spring_db
jdbc.username=root
jdbc.password=rootusername=toor
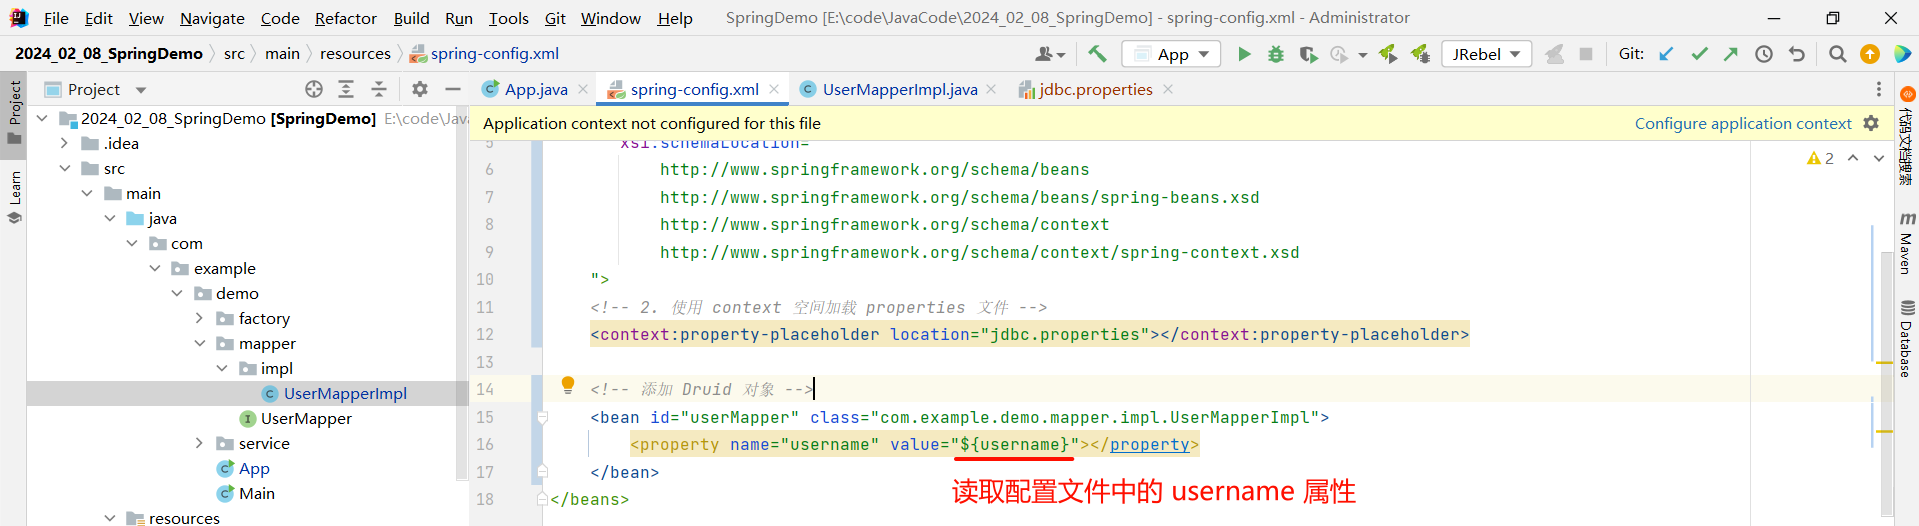
然后在配置文件中读取我们刚才添加的属性
<?xml version="1.0" encoding="UTF-8"?>
<beans xmlns="http://www.springframework.org/schema/beans"xmlns:xsi="http://www.w3.org/2001/XMLSchema-instance"xmlns:context="http://www.springframework.org/schema/context"xsi:schemaLocation="http://www.springframework.org/schema/beanshttp://www.springframework.org/schema/beans/spring-beans.xsdhttp://www.springframework.org/schema/contexthttp://www.springframework.org/schema/context/spring-context.xsd"><!-- 2. 使用 context 空间加载 properties 文件 --><context:property-placeholder location="jdbc.properties"></context:property-placeholder><!-- 添加 Druid 对象 --><bean id="userMapper" class="com.example.demo.mapper.impl.UserMapperImpl"><property name="username" value="${username}"></property></bean>
</beans>
那此时我们运行一下启动类 , 看一下最终获取到的配置是否是 toor
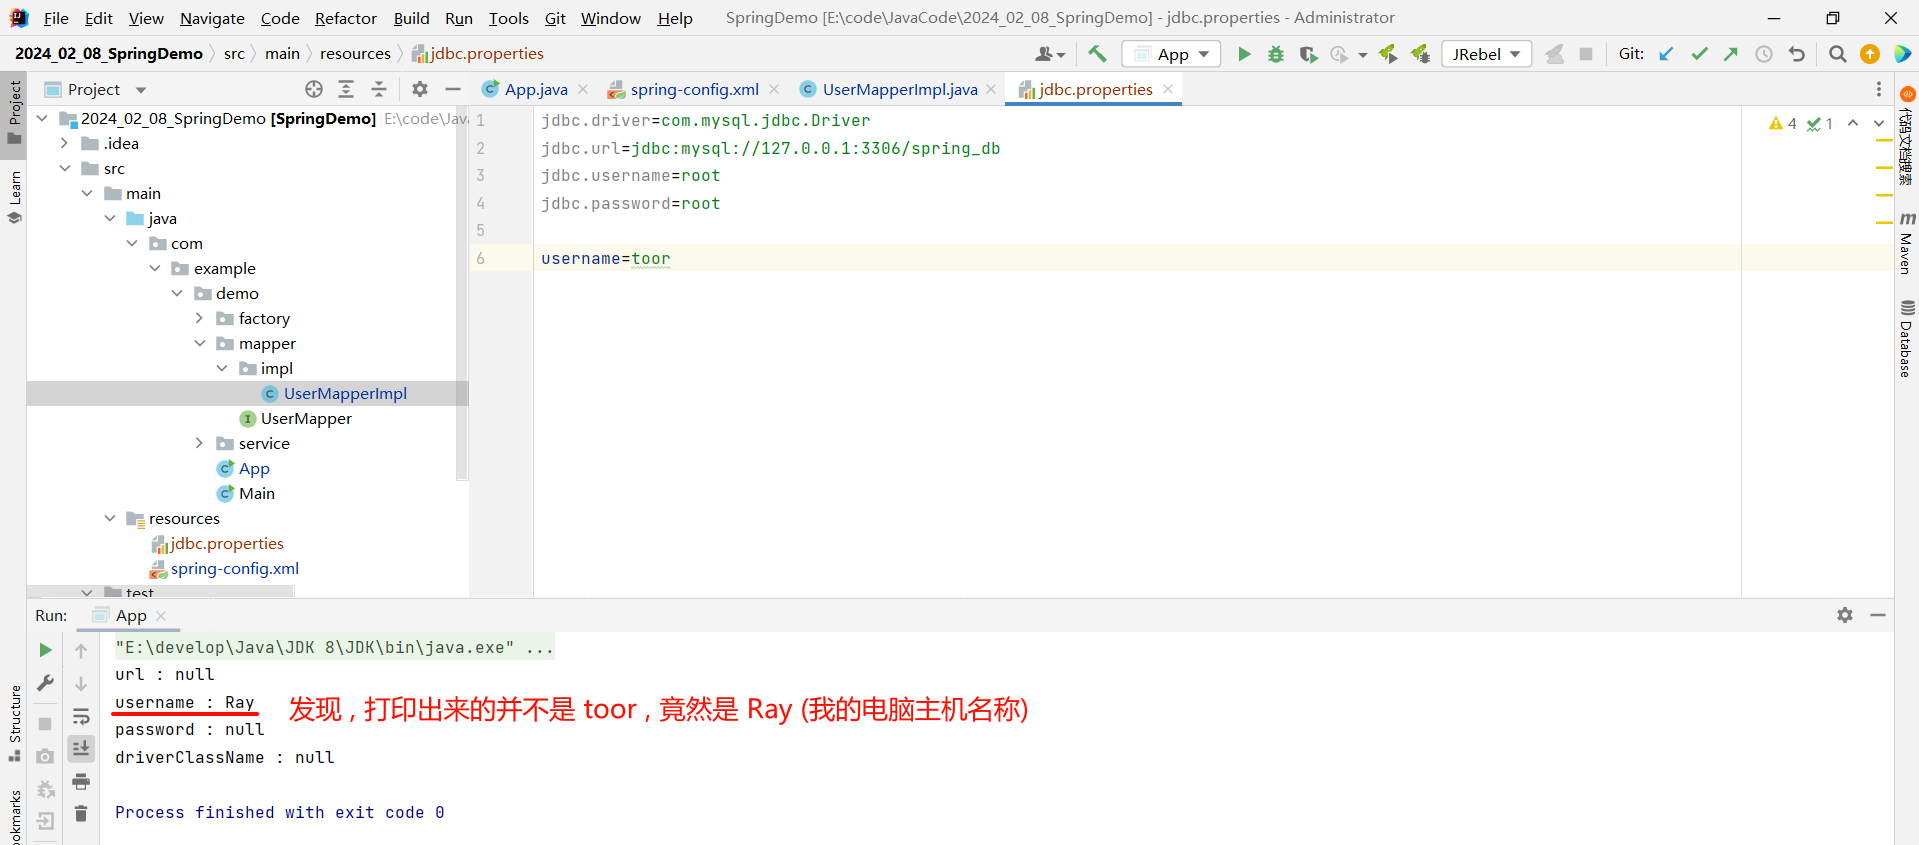
这是因为系统的属性要比我们配置文件中的属性优先级要高 , 从而替换掉了我们的 toor
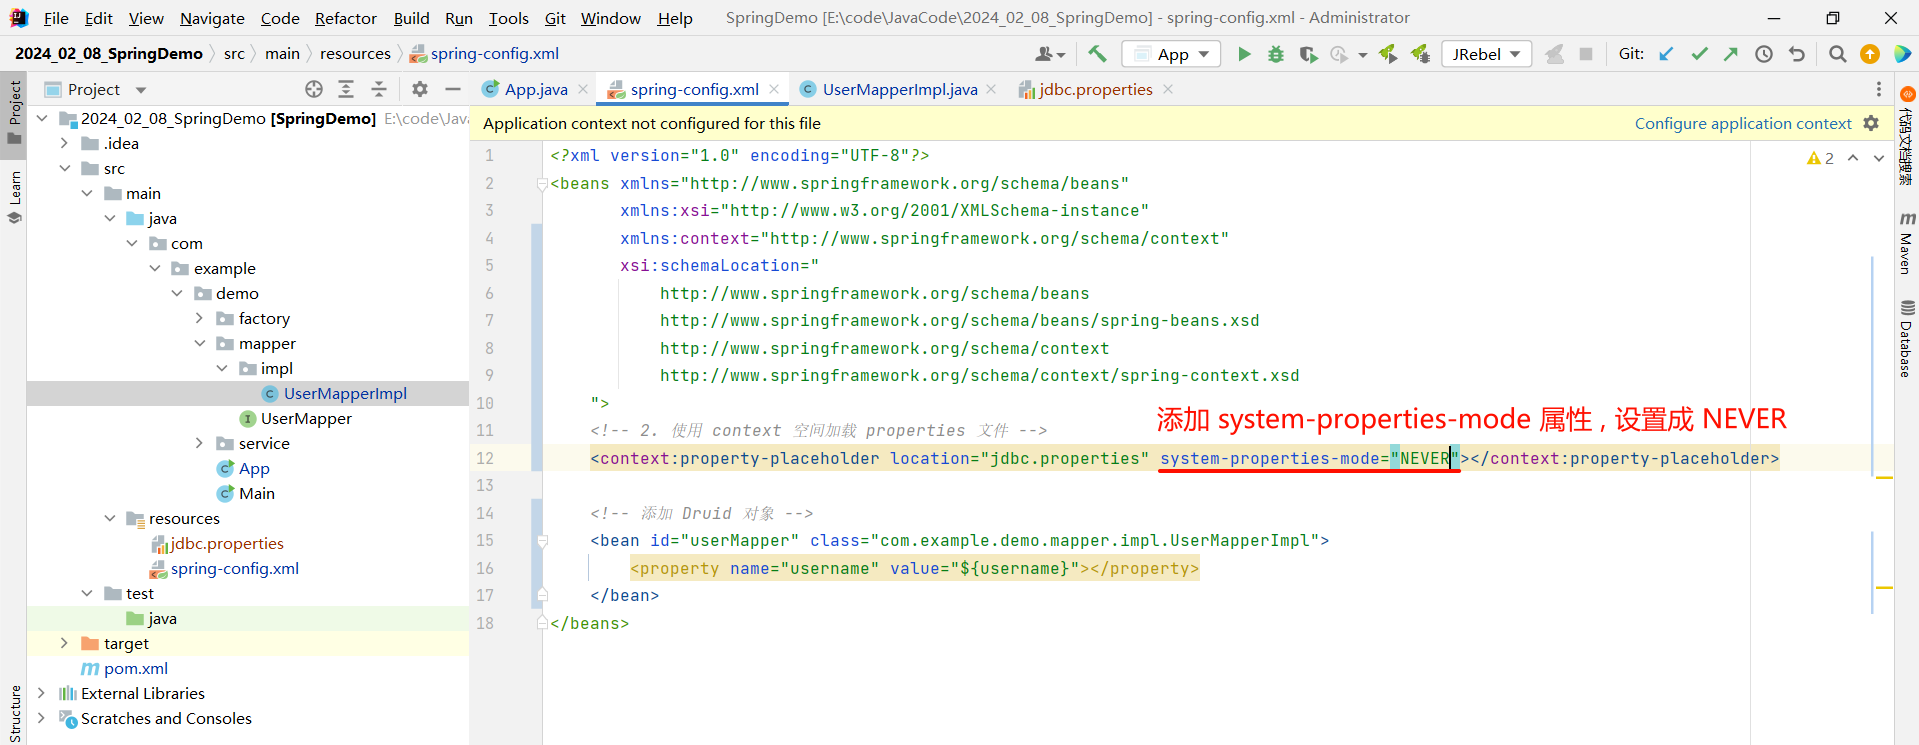
那我们可以通过配置来让系统读取我们的配置信息 , 使用 system-properties-mode 属性 , 设置成 NEVER
<?xml version="1.0" encoding="UTF-8"?>
<beans xmlns="http://www.springframework.org/schema/beans"xmlns:xsi="http://www.w3.org/2001/XMLSchema-instance"xmlns:context="http://www.springframework.org/schema/context"xsi:schemaLocation="http://www.springframework.org/schema/beanshttp://www.springframework.org/schema/beans/spring-beans.xsdhttp://www.springframework.org/schema/contexthttp://www.springframework.org/schema/context/spring-context.xsd"><!-- 2. 使用 context 空间加载 properties 文件 --><context:property-placeholder location="jdbc.properties" system-properties-mode="NEVER"></context:property-placeholder><!-- 添加 Druid 对象 --><bean id="userMapper" class="com.example.demo.mapper.impl.UserMapperImpl"><property name="username" value="${username}"></property></bean>
</beans>
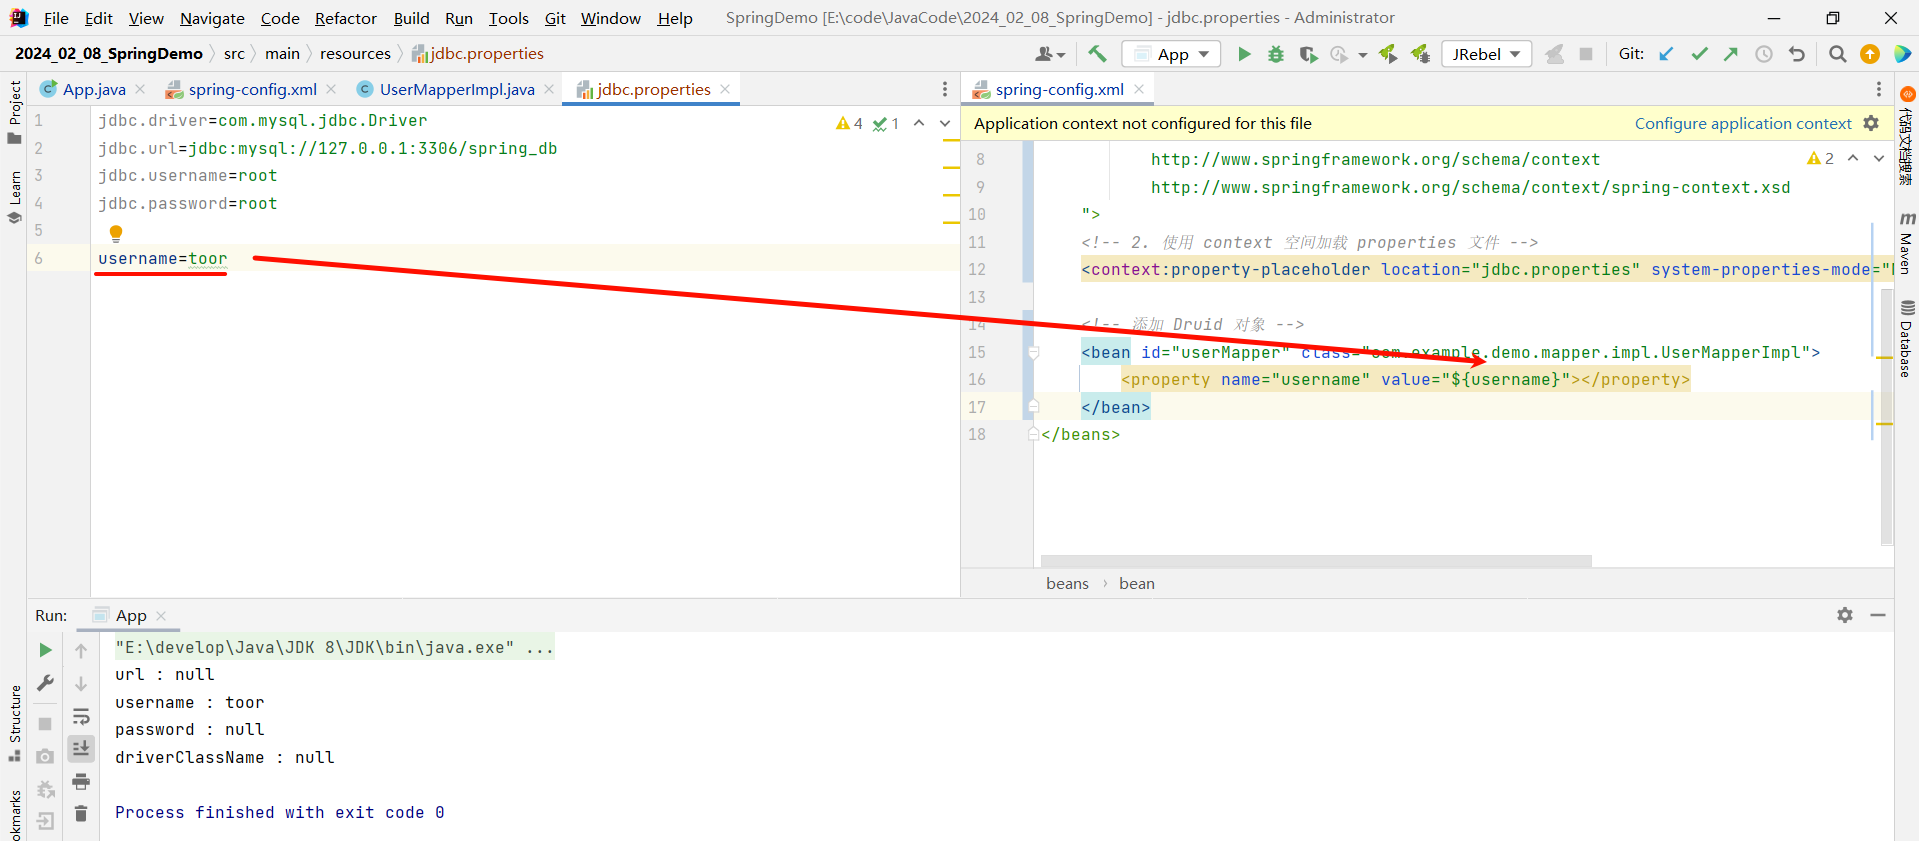
这样的话 , 我们重新运行
加载多个 properties 配置文件
我们再创建一个 properties 配置文件 , 然后将 username 的配置移动到新的配置文件中

那此时 , 我们要读取多个配置文件 , 该怎样读取
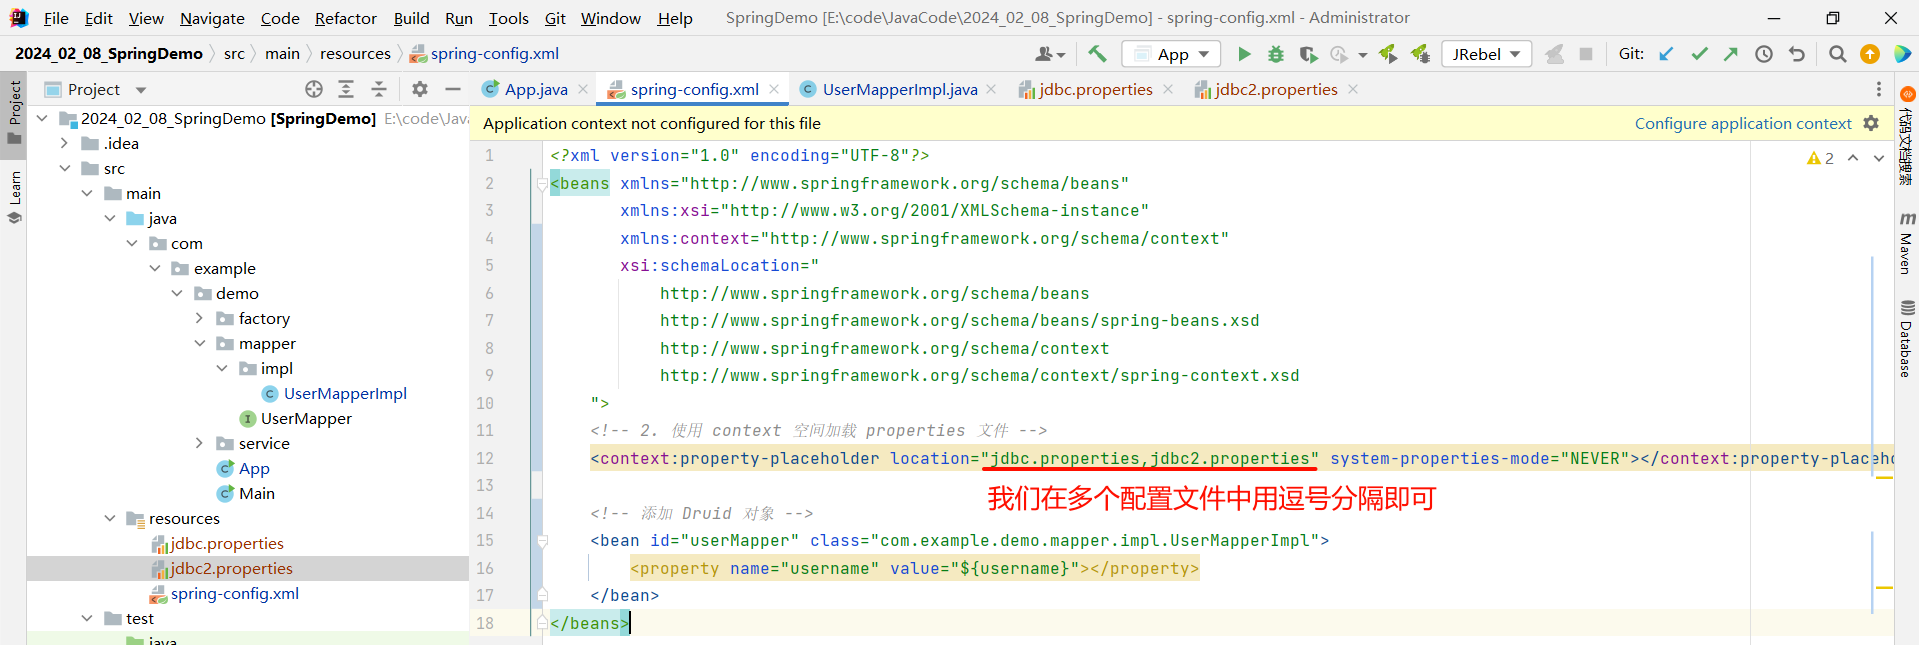
<?xml version="1.0" encoding="UTF-8"?>
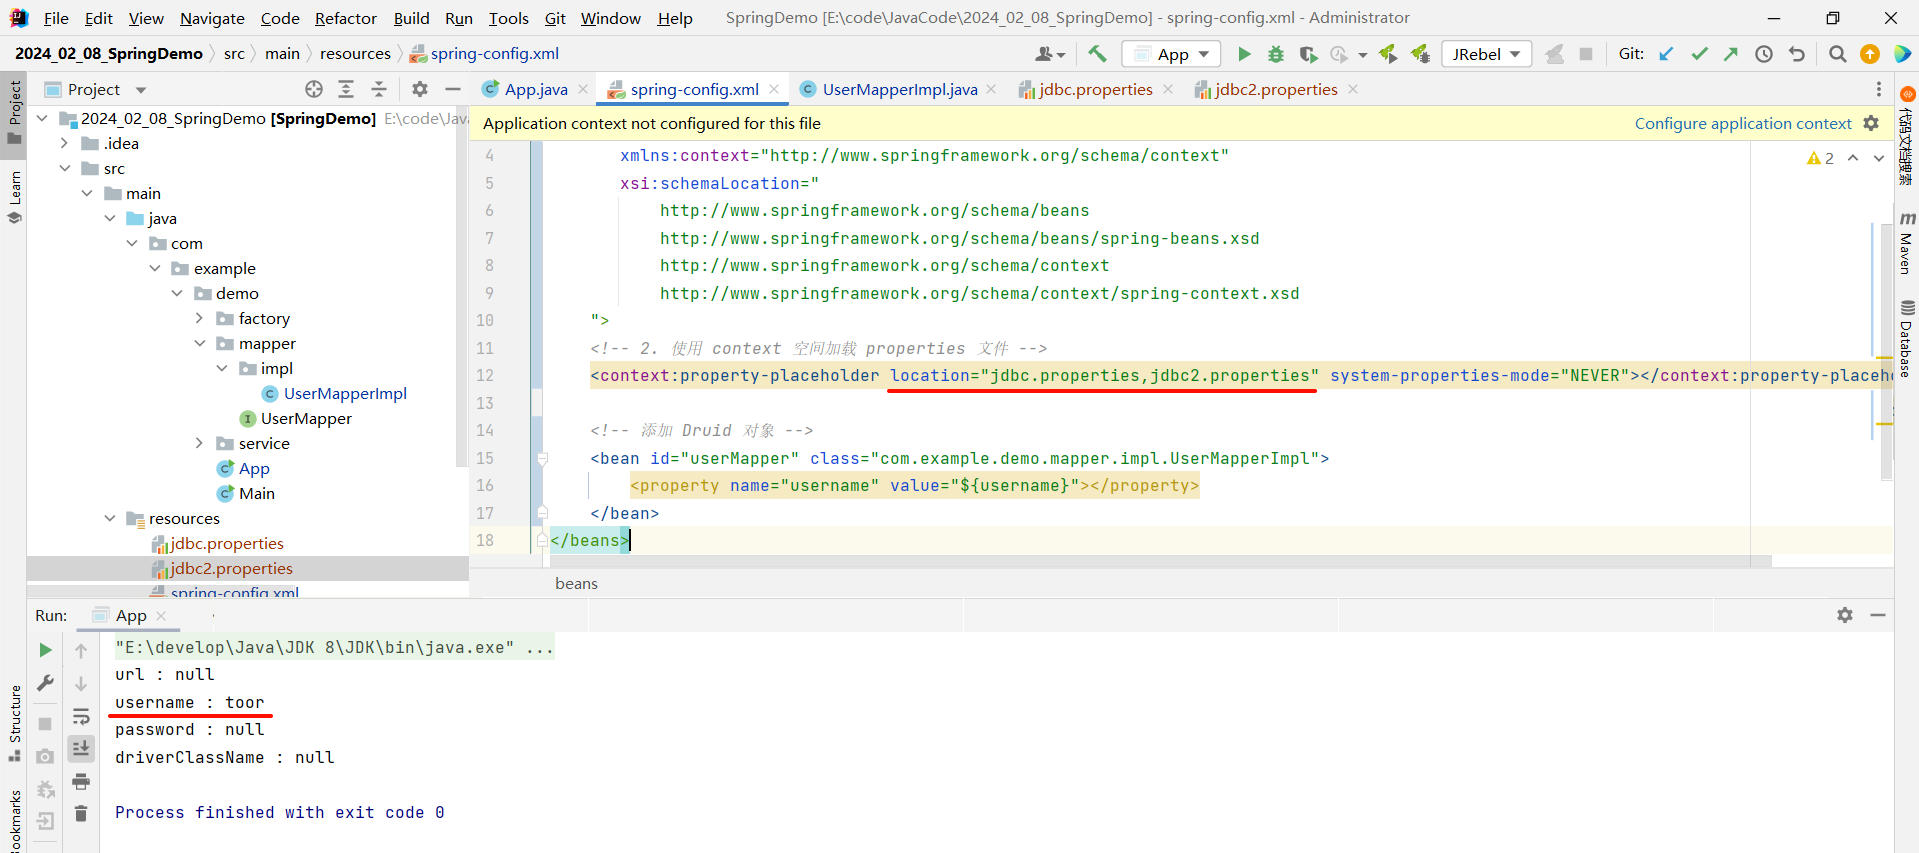
<beans xmlns="http://www.springframework.org/schema/beans"xmlns:xsi="http://www.w3.org/2001/XMLSchema-instance"xmlns:context="http://www.springframework.org/schema/context"xsi:schemaLocation="http://www.springframework.org/schema/beanshttp://www.springframework.org/schema/beans/spring-beans.xsdhttp://www.springframework.org/schema/contexthttp://www.springframework.org/schema/context/spring-context.xsd"><!-- 2. 使用 context 空间加载 properties 文件 --><context:property-placeholder location="jdbc.properties,jdbc2.properties" system-properties-mode="NEVER"></context:property-placeholder><!-- 添加 Druid 对象 --><bean id="userMapper" class="com.example.demo.mapper.impl.UserMapperImpl"><property name="username" value="${username}"></property></bean>
</beans>
此时我们运行一下 , 看一下能否读取到第二个配置文件的配置
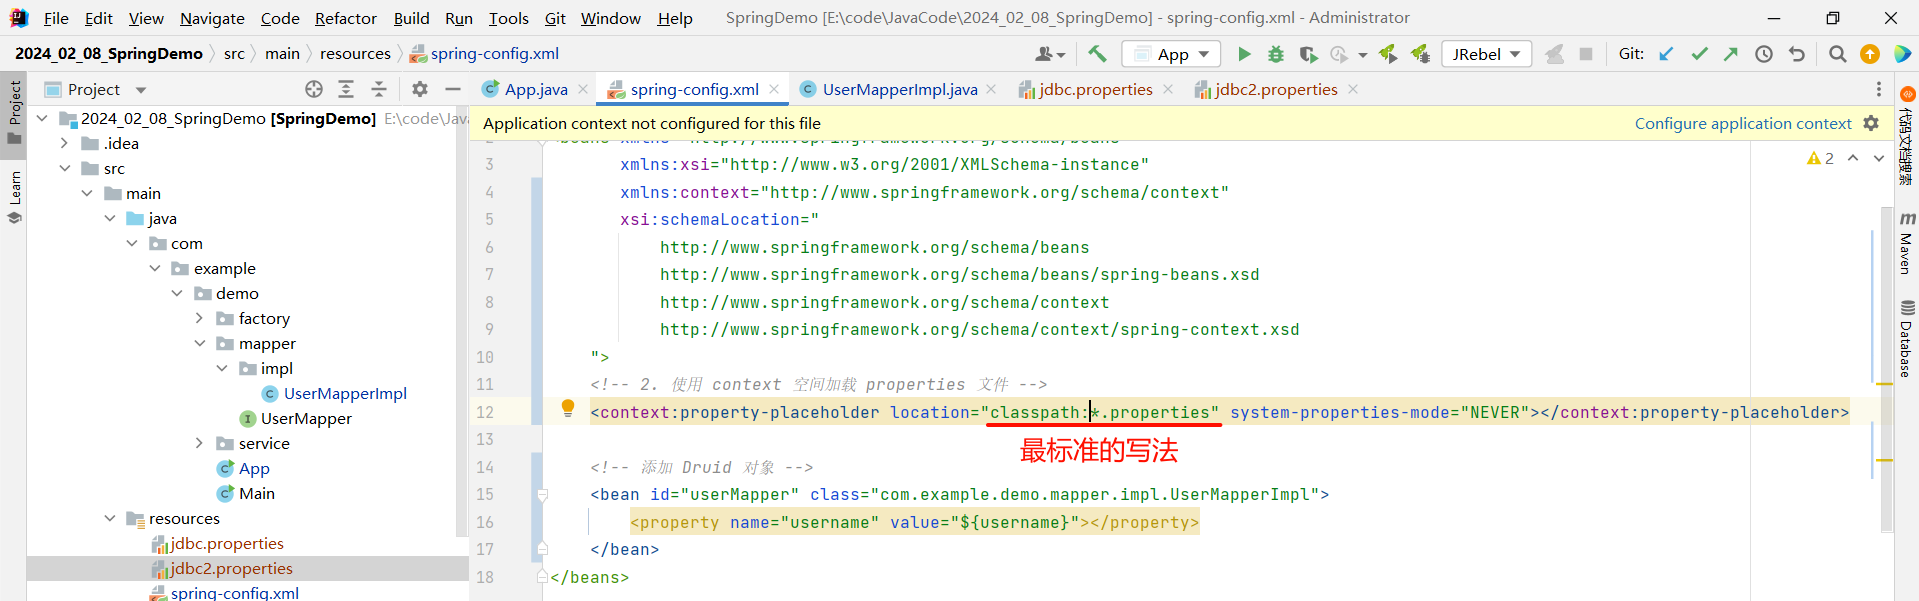
那我们还可以进一步的简写 , 使用通配符来指代所有的 properties 文件
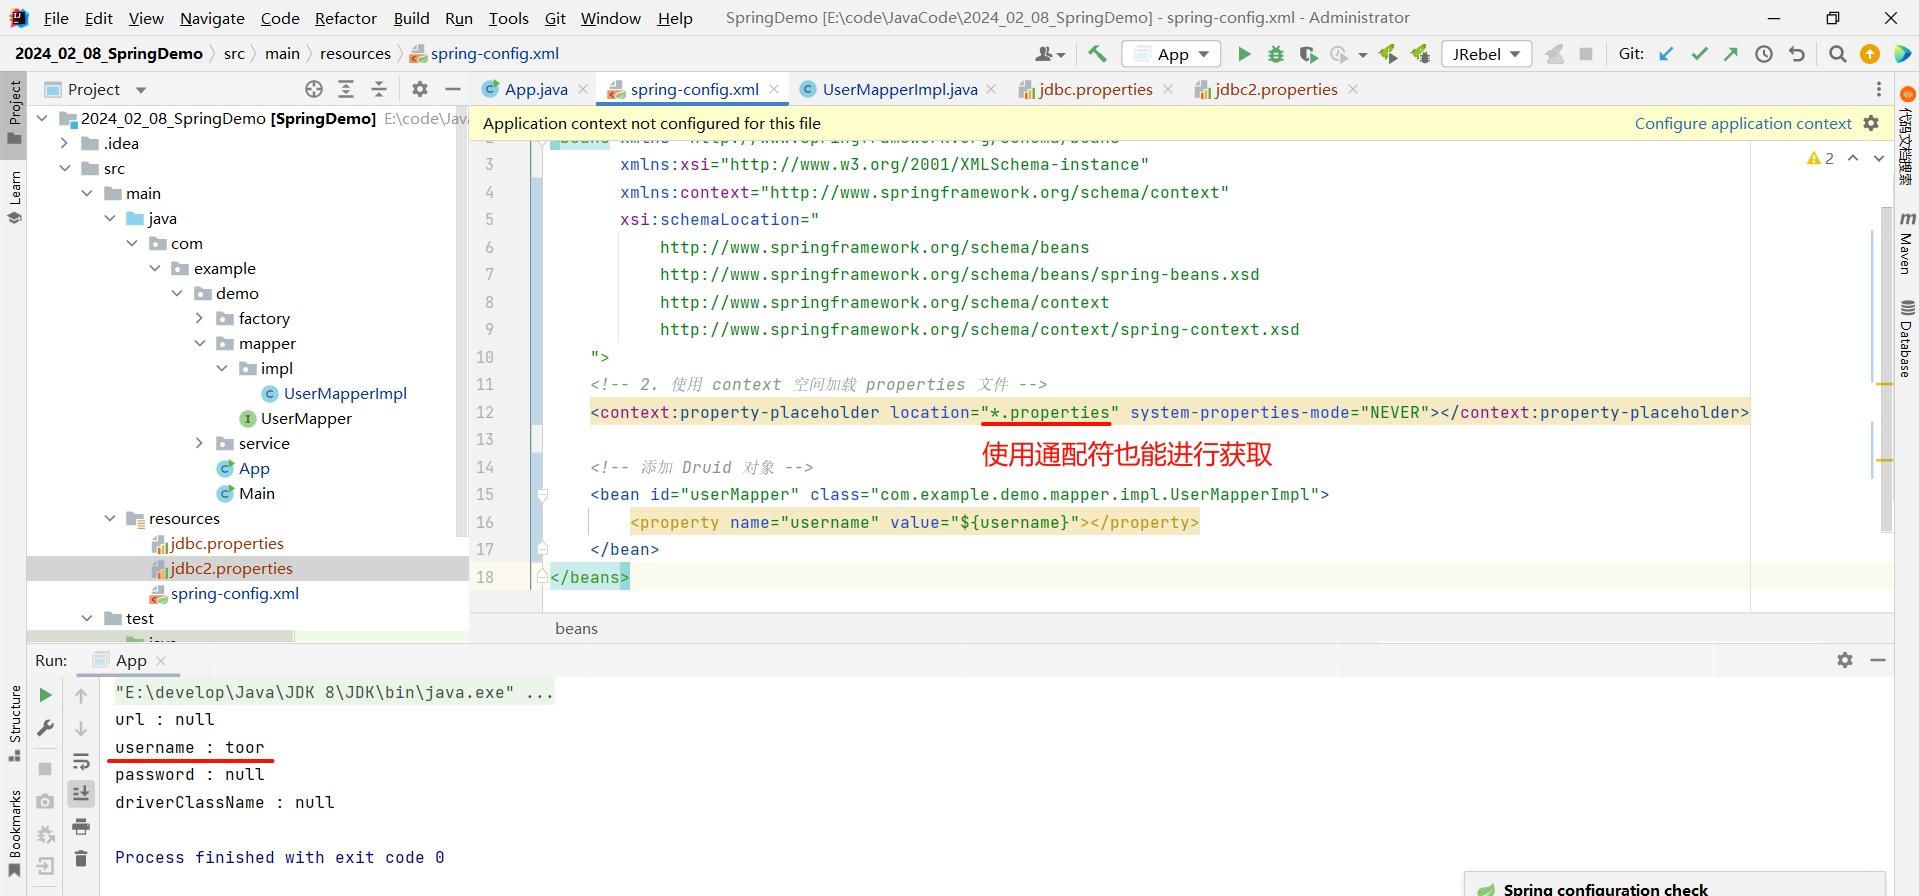
<?xml version="1.0" encoding="UTF-8"?>
<beans xmlns="http://www.springframework.org/schema/beans"xmlns:xsi="http://www.w3.org/2001/XMLSchema-instance"xmlns:context="http://www.springframework.org/schema/context"xsi:schemaLocation="http://www.springframework.org/schema/beanshttp://www.springframework.org/schema/beans/spring-beans.xsdhttp://www.springframework.org/schema/contexthttp://www.springframework.org/schema/context/spring-context.xsd"><!-- 2. 使用 context 空间加载 properties 文件 --><context:property-placeholder location="*.properties" system-properties-mode="NEVER"></context:property-placeholder><!-- 添加 Druid 对象 --><bean id="userMapper" class="com.example.demo.mapper.impl.UserMapperImpl"><property name="username" value="${username}"></property></bean>
</beans>
但是这种写法 , 不是最标准的写法 , 我们需要在通配符前面加上 classpath , 代表当前路径下的所有的 properties 配置文件
<?xml version="1.0" encoding="UTF-8"?>
<beans xmlns="http://www.springframework.org/schema/beans"xmlns:xsi="http://www.w3.org/2001/XMLSchema-instance"xmlns:context="http://www.springframework.org/schema/context"xsi:schemaLocation="http://www.springframework.org/schema/beanshttp://www.springframework.org/schema/beans/spring-beans.xsdhttp://www.springframework.org/schema/contexthttp://www.springframework.org/schema/context/spring-context.xsd"><!-- 2. 使用 context 空间加载 properties 文件 --><context:property-placeholder location="classpath:*.properties" system-properties-mode="NEVER"></context:property-placeholder><!-- 添加 Druid 对象 --><bean id="userMapper" class="com.example.demo.mapper.impl.UserMapperImpl"><property name="username" value="${username}"></property></bean>
</beans>
从类路径或 jar 包中搜索并加载 properties 文件
假如我们需要从其他的 jar 包中加载他的 properties 文件 , 我们需要在 classpath 与 : 的中间也添加一个 *
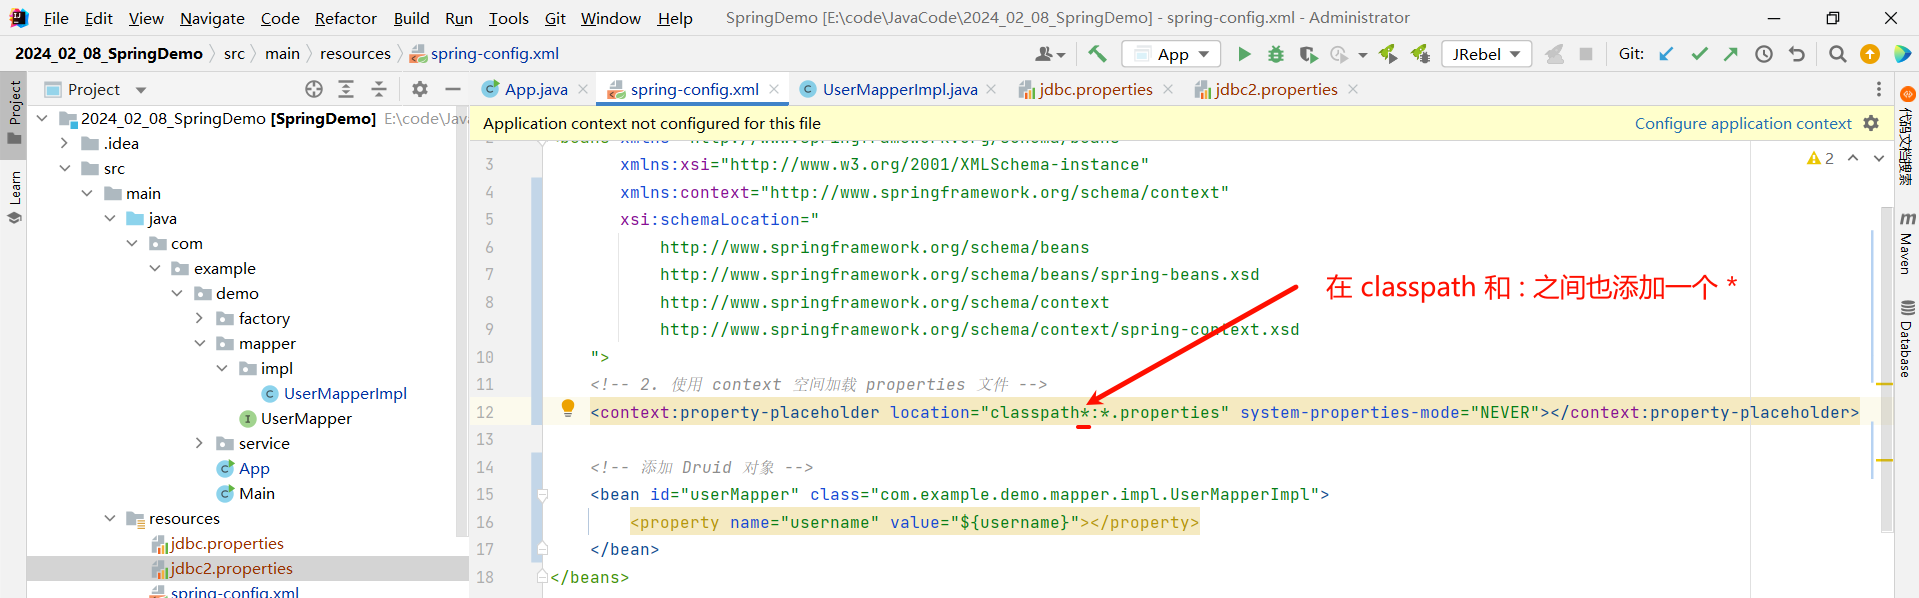
<?xml version="1.0" encoding="UTF-8"?>
<beans xmlns="http://www.springframework.org/schema/beans"xmlns:xsi="http://www.w3.org/2001/XMLSchema-instance"xmlns:context="http://www.springframework.org/schema/context"xsi:schemaLocation="http://www.springframework.org/schema/beanshttp://www.springframework.org/schema/beans/spring-beans.xsdhttp://www.springframework.org/schema/contexthttp://www.springframework.org/schema/context/spring-context.xsd"><!-- 2. 使用 context 空间加载 properties 文件 --><context:property-placeholder location="classpath*:*.properties" system-properties-mode="NEVER"></context:property-placeholder><!-- 添加 Druid 对象 --><bean id="userMapper" class="com.example.demo.mapper.impl.UserMapperImpl"><property name="username" value="${username}"></property></bean>
</beans>
这样的话 , 我们的 Spring 也能够读取其他位置 (比如 : 其他 Jar 包) 的配置文件中的内容了
小结 :
- Bean 的基础配置
- 别名设置:通过
name属性为 Bean 定义多个别名,可使用,、、;分隔,便于通过别名获取 Bean 对象。 - 作用域配置:默认采用单例模式(
singleton),可通过scope属性设置为非单例模式(prototype),另有request、session等其他作用域适用于特定场景。
- 别名设置:通过
- Bean 的实例化方式
- 构造方法方式:Spring 默认通过无参构造方法实例化 Bean,容器初始化时完成对象创建。
- 静态工厂方式:通过指定静态工厂类(
class)和创建方法(factory-method),由静态方法返回 Bean 对象。 - 实例工厂方式:需先实例化工厂对象,再通过
factory-bean指定工厂实例和factory-method指定创建方法;简便方式可实现FactoryBean接口,重写方法返回对象。
- 依赖注入(DI)
- 注入方式:包括 setter 注入(通过
property标签,ref注入引用类型,value注入简单类型)和构造器注入(通过constructor-arg标签,支持按名称、类型、索引注入)。 - 自动装配:通过
autowire属性实现,支持按类型(byType)和按名称(byName)装配,仅适用于引用类型,优先级低于手动装配。 - 集合注入:支持数组、List、Set、Map、Properties 类型,分别通过
<array>、<list>、<set>、<map>、<props>标签配置注入。
- 注入方式:包括 setter 注入(通过
- Bean 的生命周期
- 概念:指 Bean 从创建到消亡的过程,可通过
init-method指定初始化方法,destroy-method指定销毁方法,实现对 Bean 生命周期的控制。
- 概念:指 Bean 从创建到消亡的过程,可通过