YOLOv8/YOLOv11 C++ OpenCV DNN推理
首先需要将yolov8/yolov11的pt文件转为onnx文件
from ultralytics import YOLO
model = YOLO("best.pt")
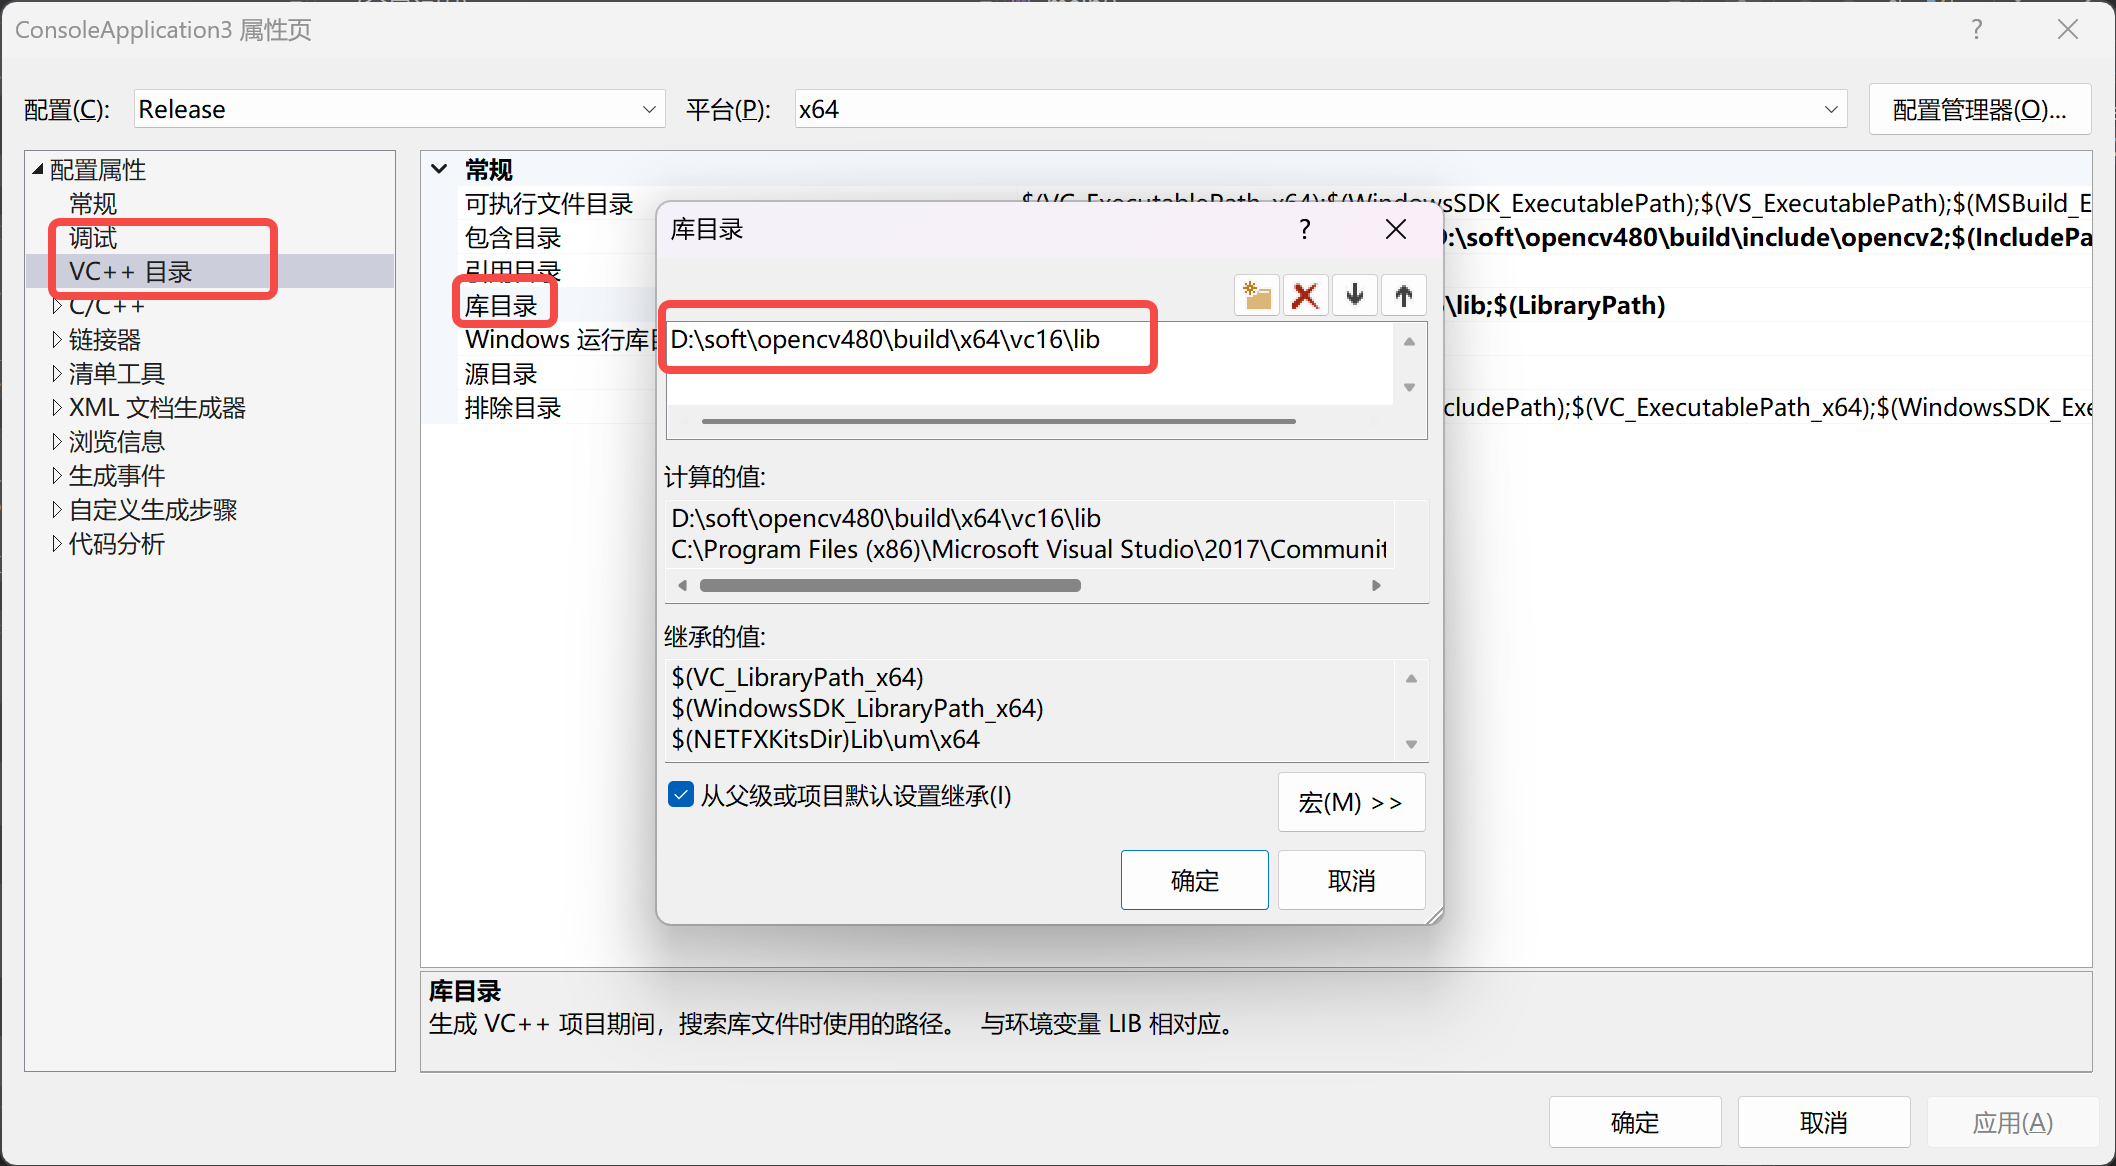
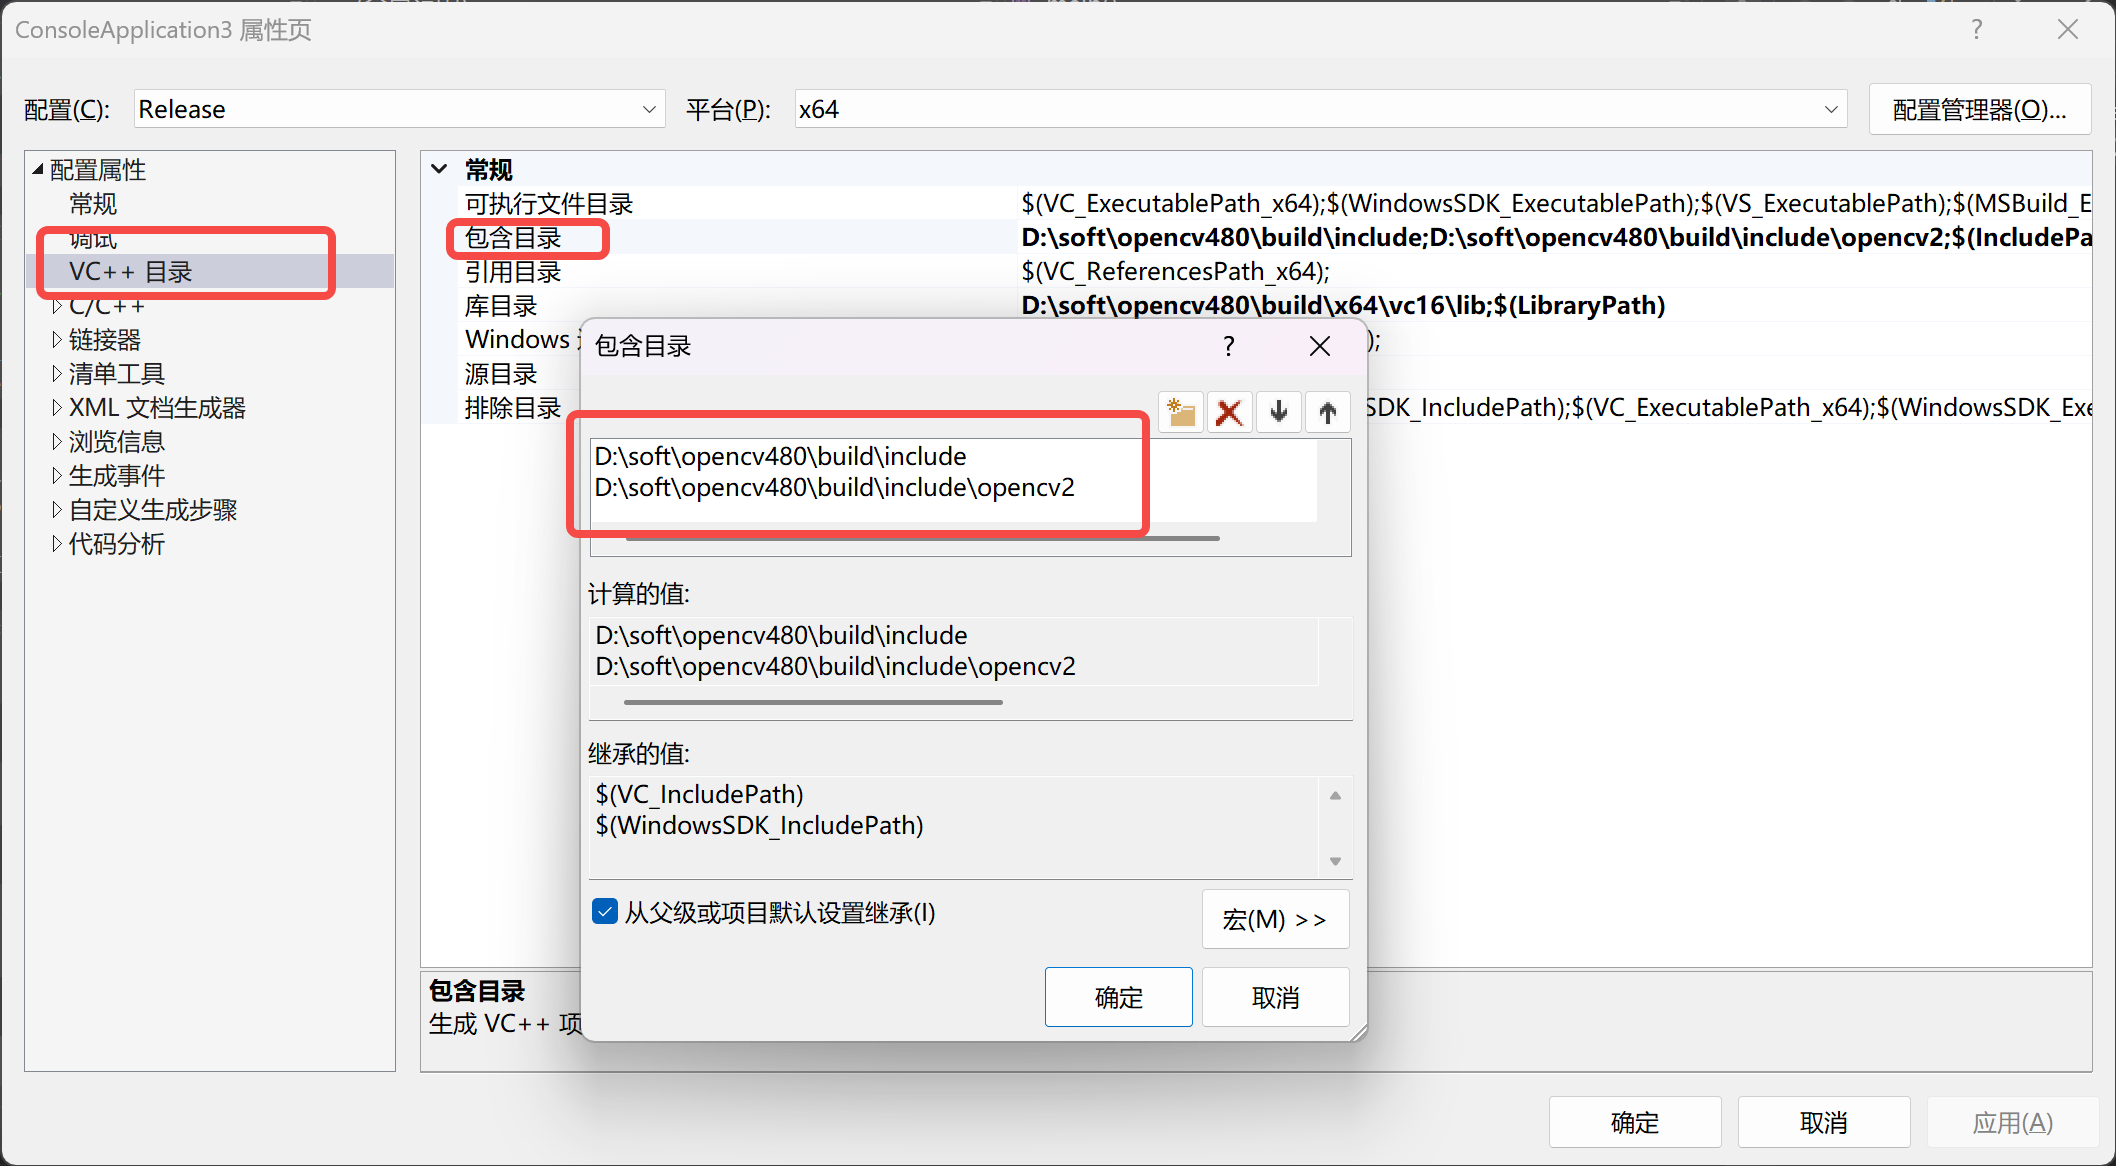
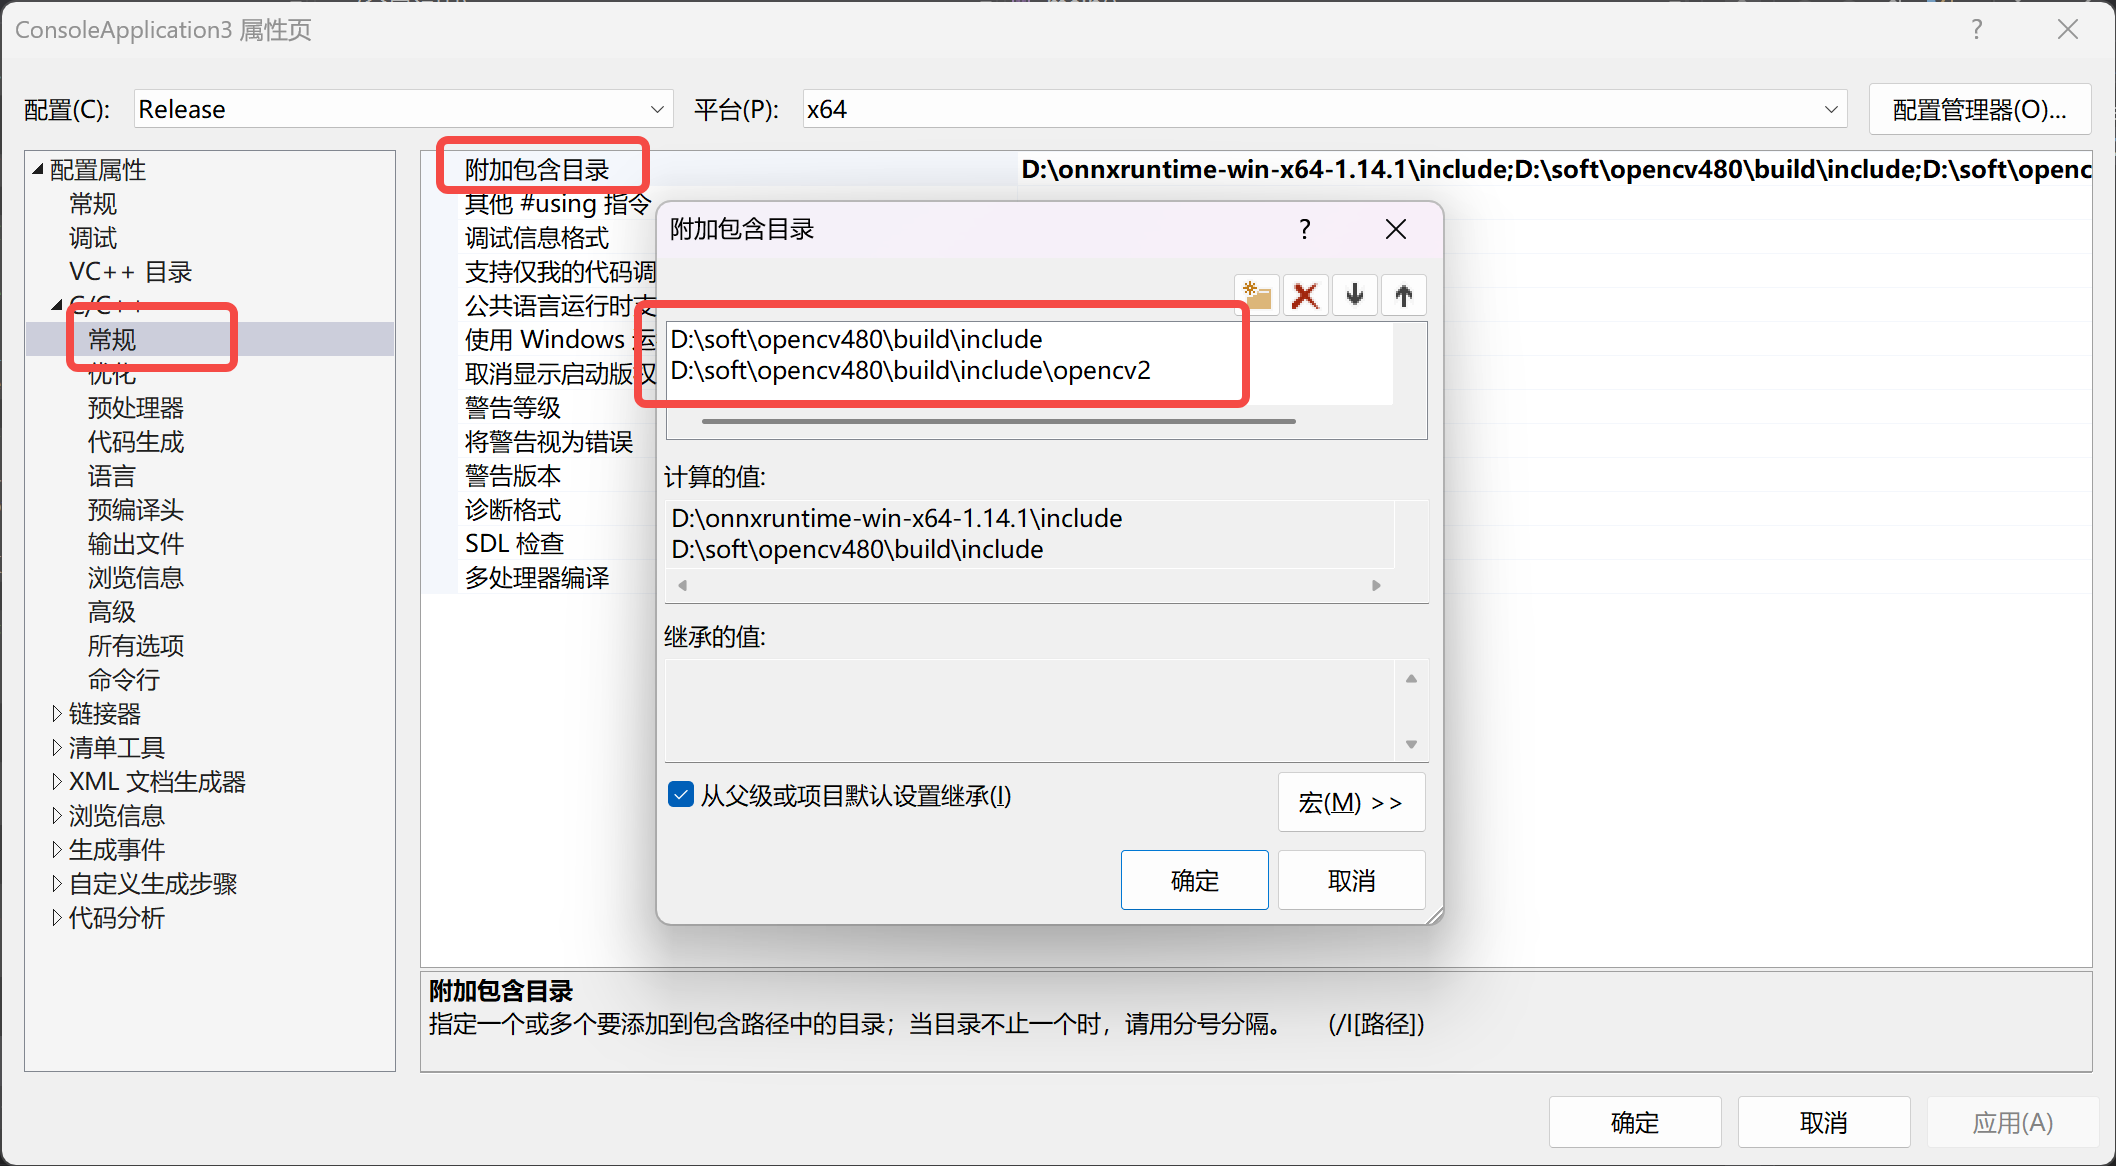
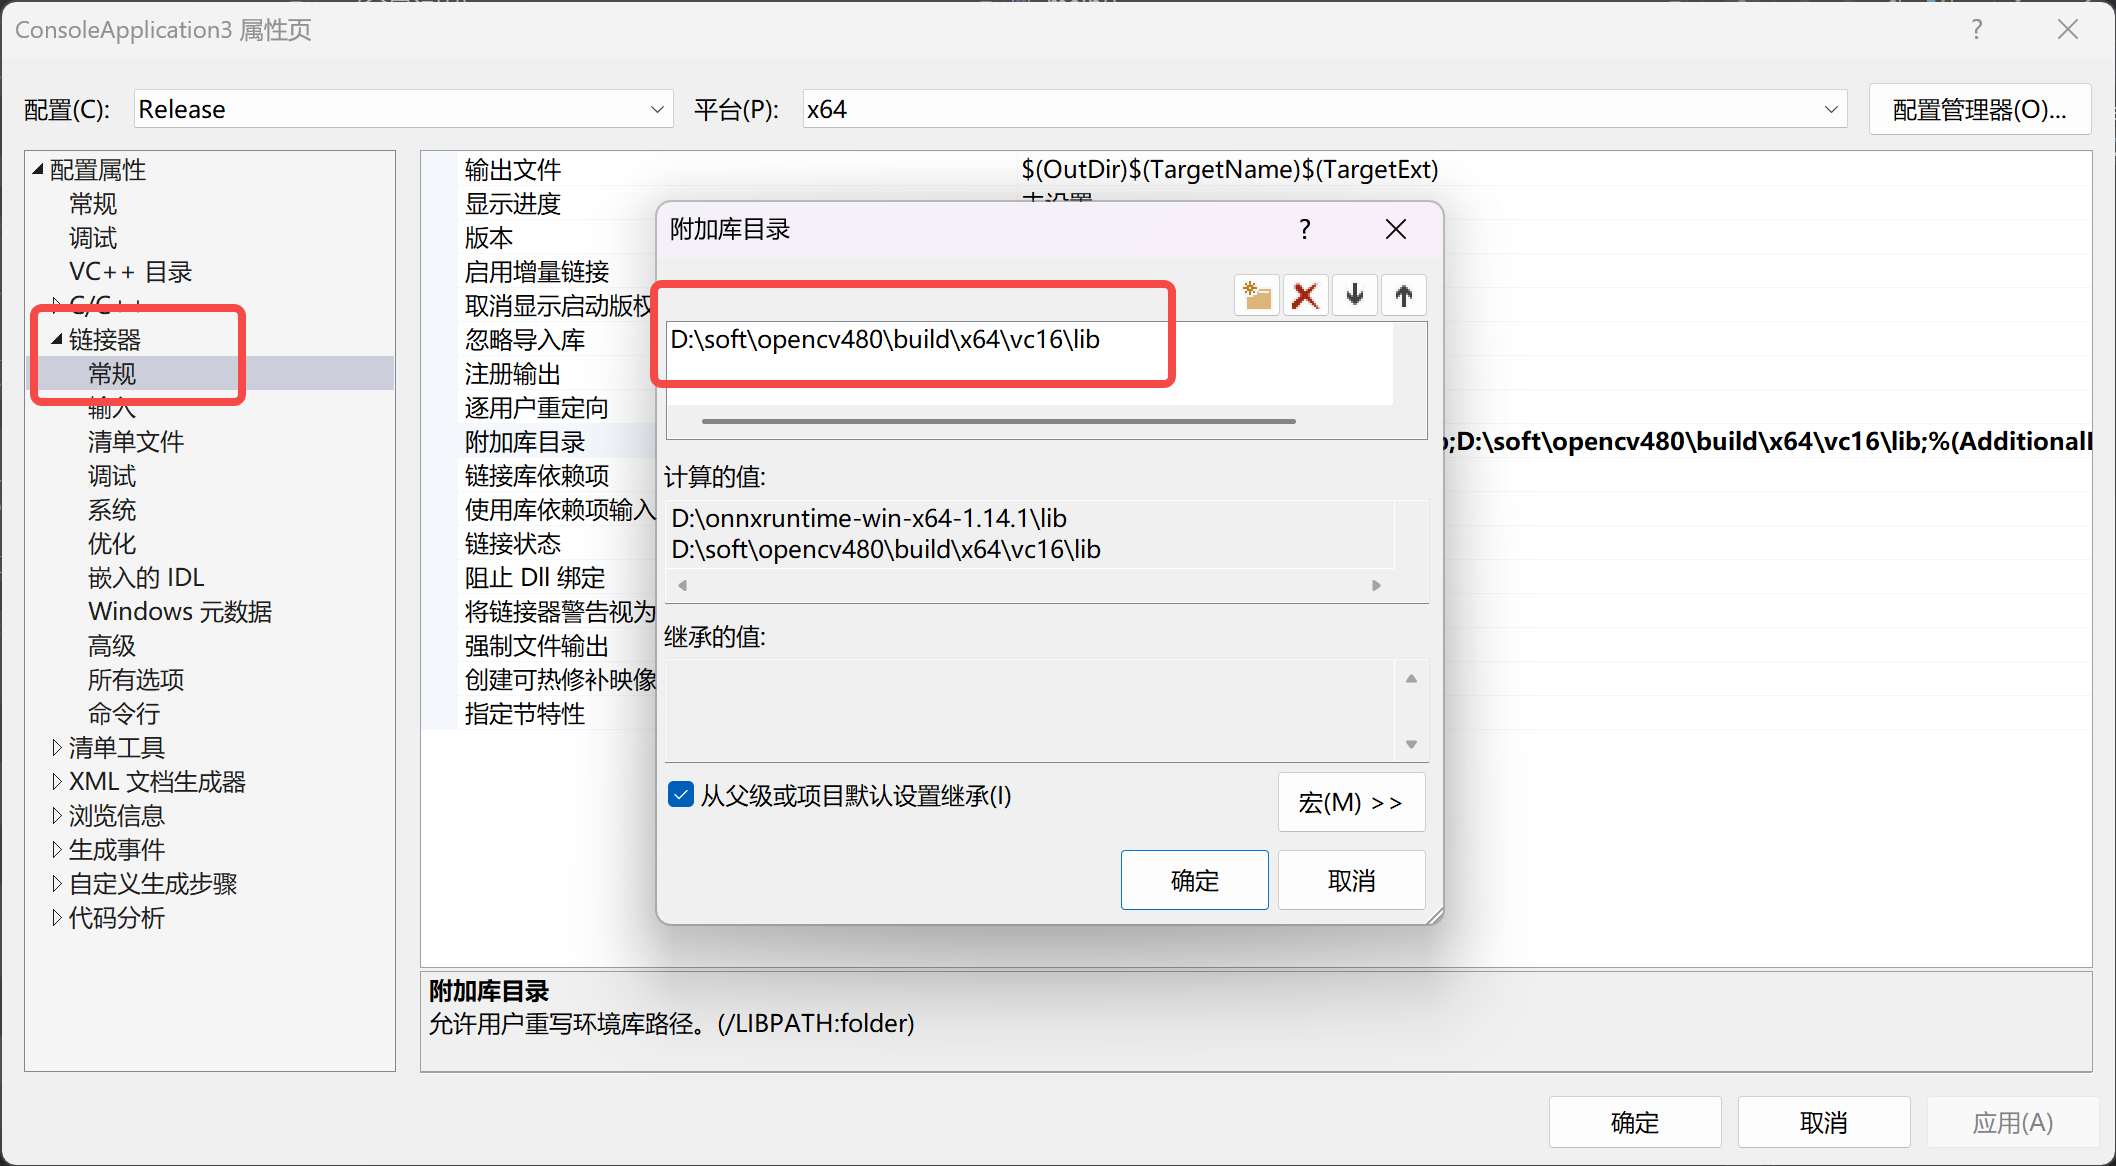
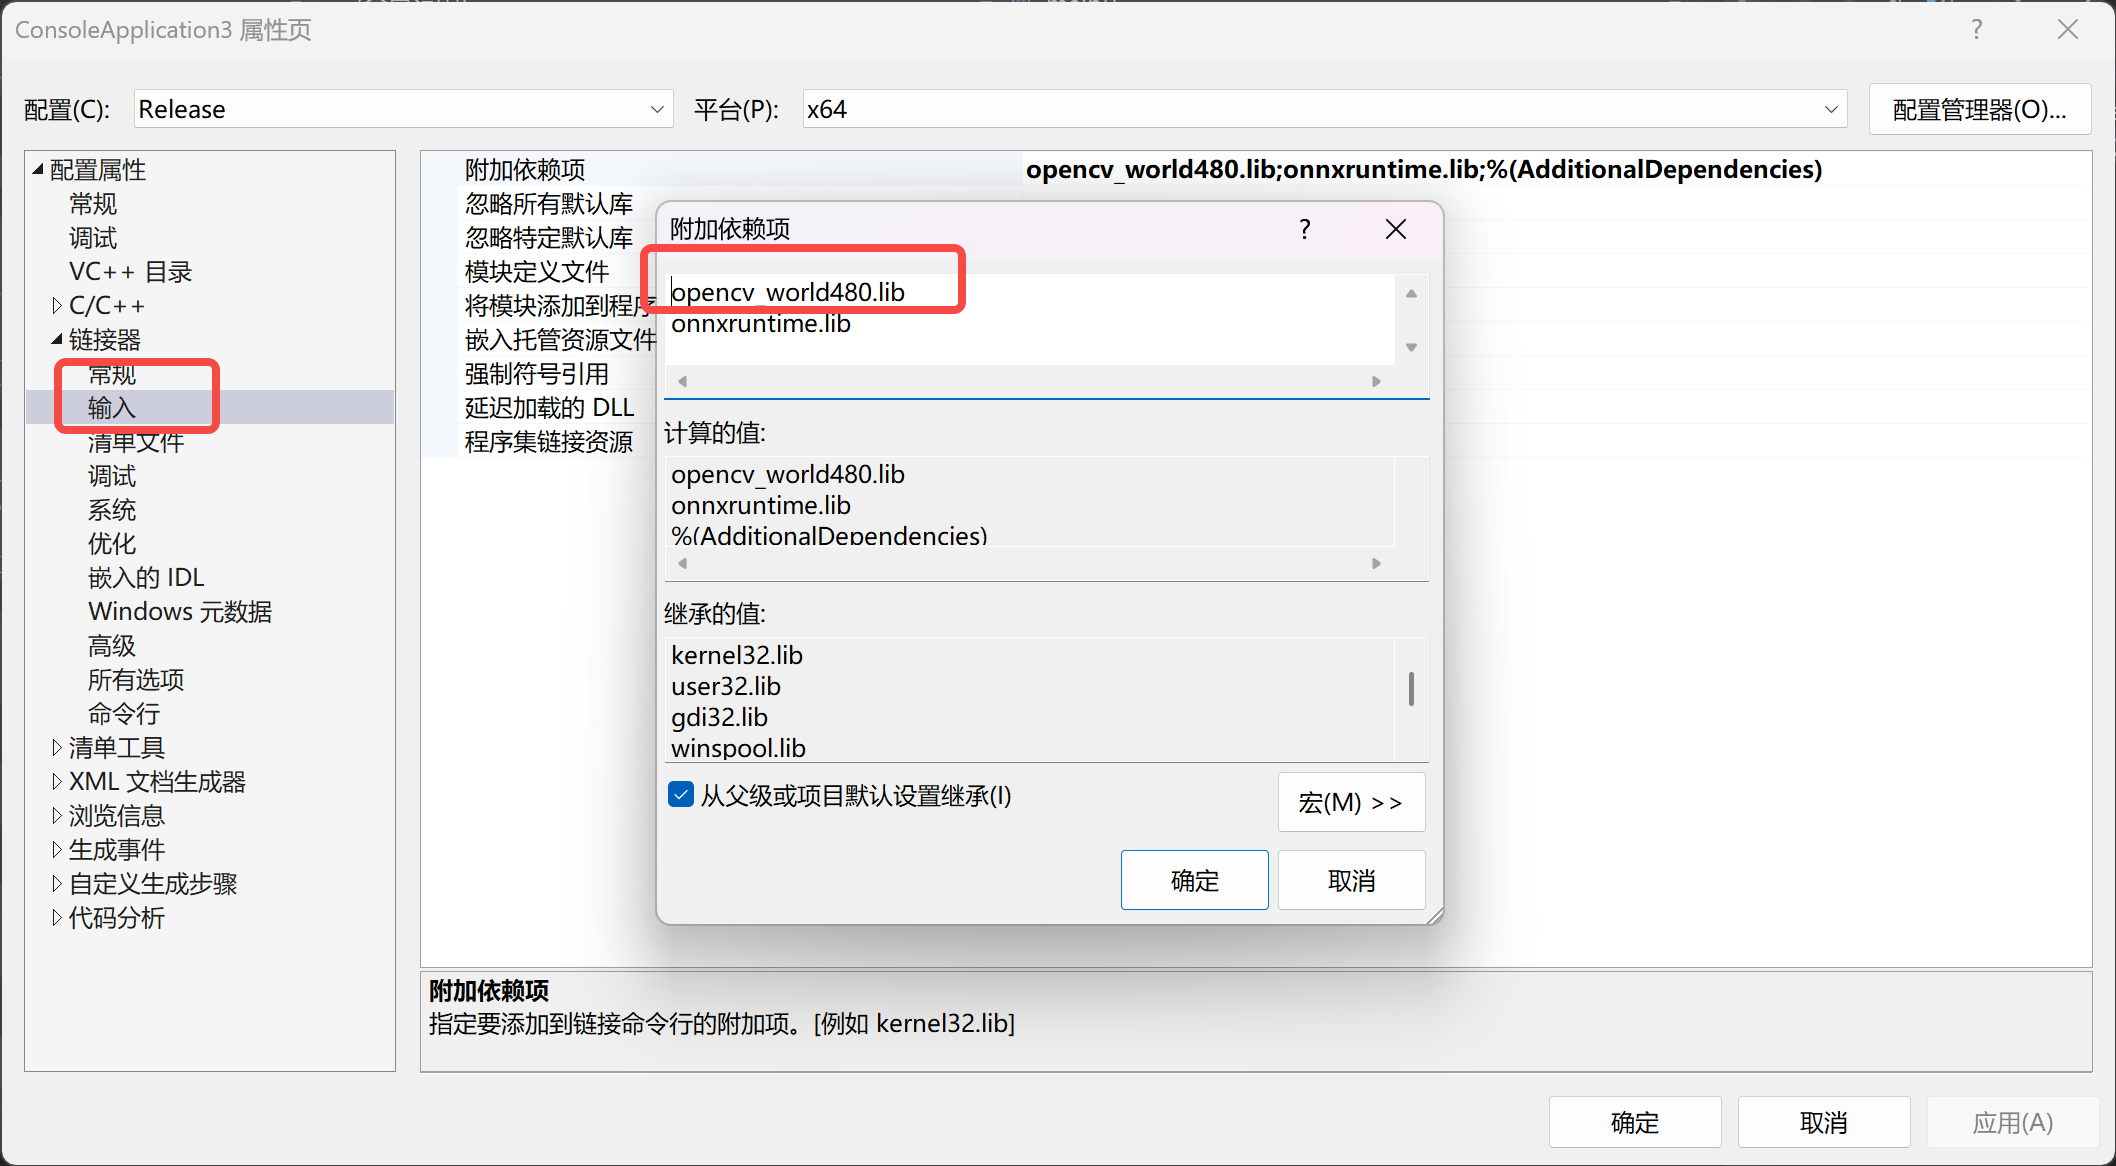
model.export(format="onnx",opset=11,dynamic=False)本次C++工具使用vs2017,需要下载OpenCV包:https://opencv.org/releases/,下在windows包即可,本次代码opencv4.7.0和opencv4.8.0均正常运行,下载好后跟着下面的步骤进行配置。
#include <opencv2/opencv.hpp>
#include <opencv2/dnn.hpp>
#include <iostream>
#include <vector>
#include <string>
#include <random>
#include <chrono>
#include <fstream>using namespace cv;
using namespace cv::dnn;
using namespace std;
using namespace chrono;class YOLO {
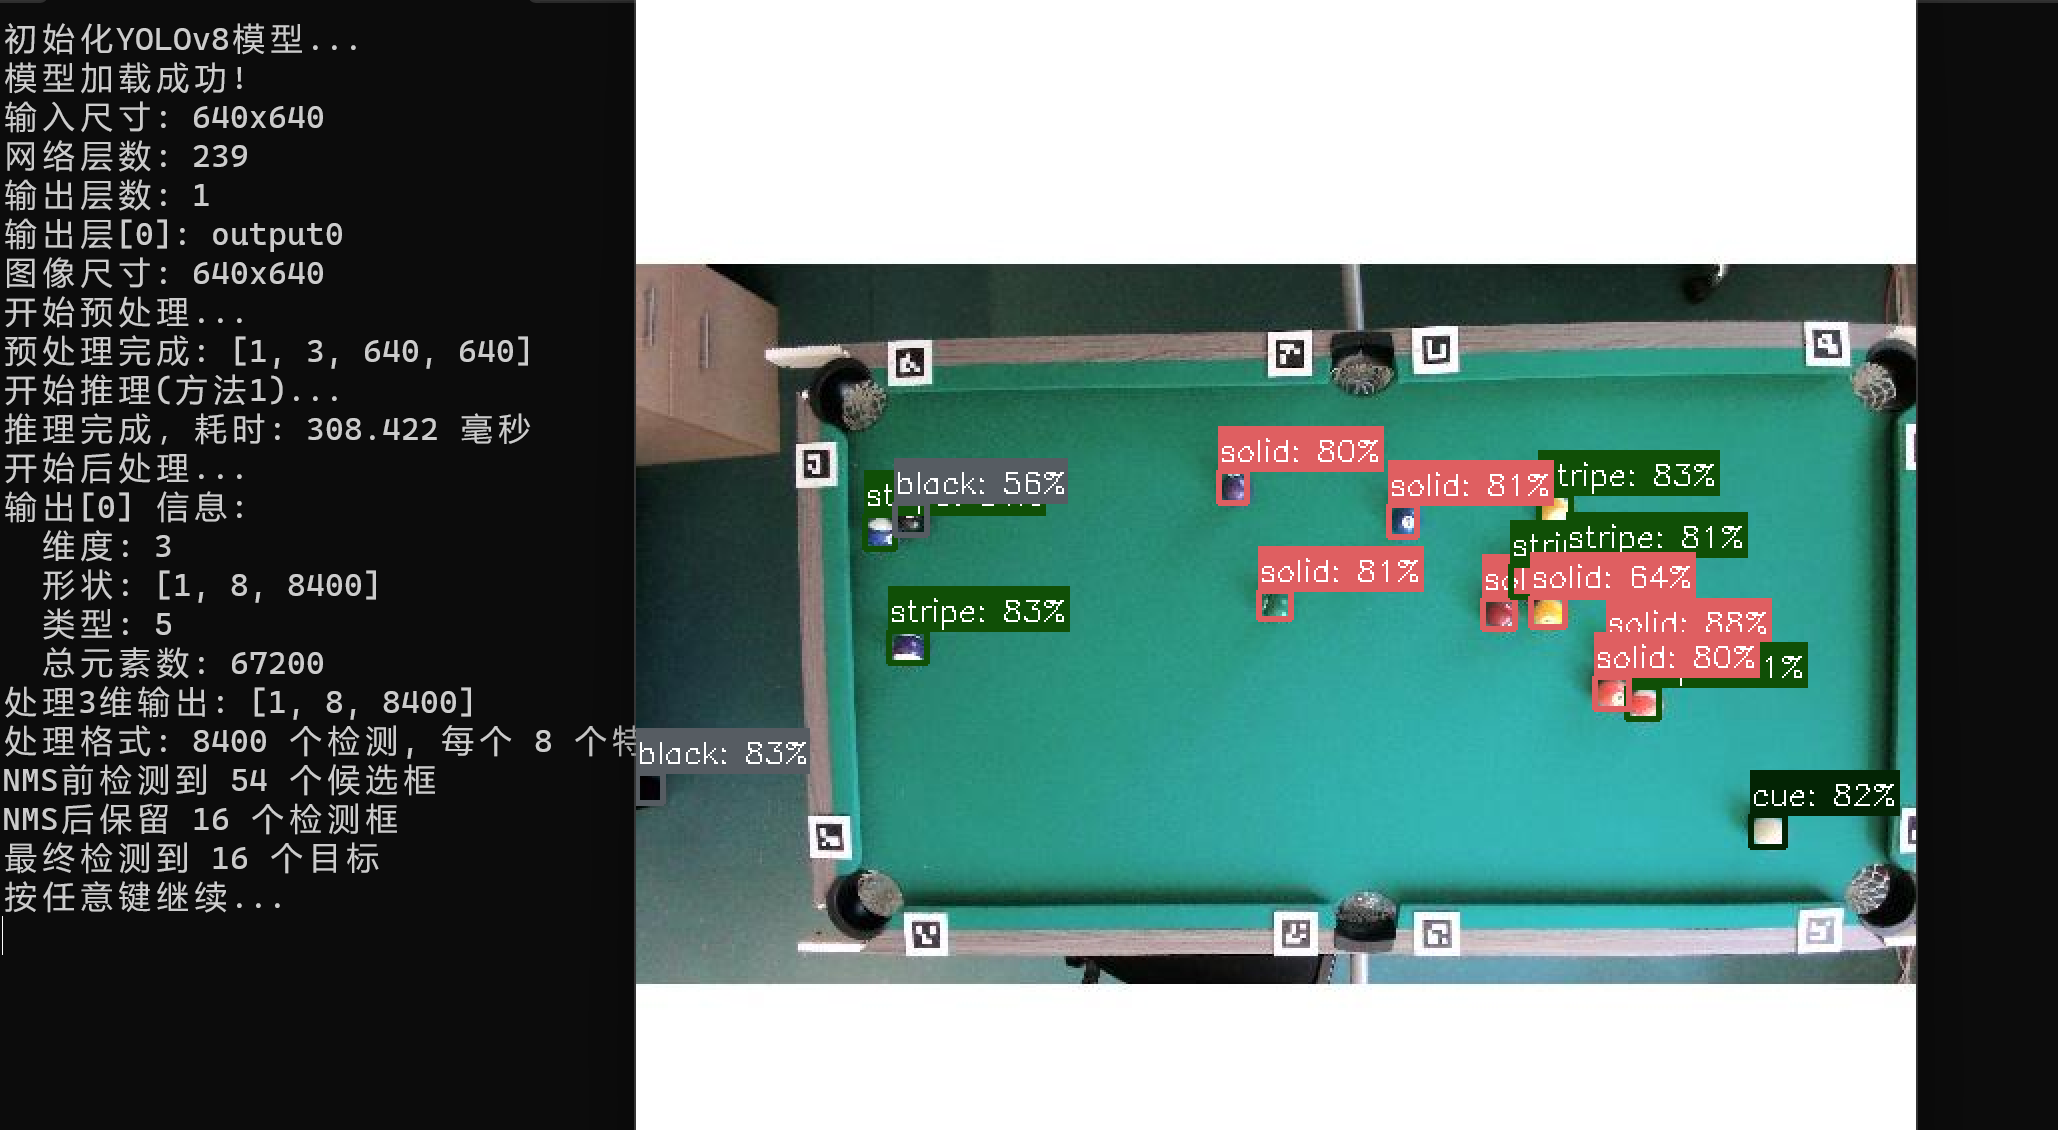
private:float confidenceThreshold;float iouThreshold;Net net;int inputHeight;int inputWidth;vector<string> classes;vector<Scalar> colors;// 初始化类别void initClasses() {classes = { "black", "cue", "solid", "stripe" };//填入你需要的类别}// 生成随机颜色void initColors() {random_device rd;mt19937 gen(rd());uniform_int_distribution<int> dist(0, 255);for (size_t i = 0; i < classes.size(); ++i) {colors.push_back(Scalar(dist(gen), dist(gen), dist(gen)));}}public:// 构造函数YOLO(const string& onnxModelPath, float confThreshold = 0.5f, float iouThreshold = 0.5f): confidenceThreshold(confThreshold), iouThreshold(iouThreshold),inputHeight(640), inputWidth(640) { //默认640,640try {// 加载模型net = readNetFromONNX(onnxModelPath);if (net.empty()) {throw runtime_error("无法加载ONNX模型: " + onnxModelPath);}// 设置计算后端和目标设备net.setPreferableBackend(DNN_BACKEND_OPENCV);net.setPreferableTarget(DNN_TARGET_CPU);// 初始化类别和颜色initClasses();initColors();// 打印网络信息vector<String> layerNames = net.getLayerNames();vector<String> outputNames = net.getUnconnectedOutLayersNames();cout << "模型加载成功!" << endl;cout << "输入尺寸: " << inputWidth << "x" << inputHeight << endl;cout << "网络层数: " << layerNames.size() << endl;cout << "输出层数: " << outputNames.size() << endl;for (size_t i = 0; i < outputNames.size(); i++) {cout << "输出层[" << i << "]: " << outputNames[i] << endl;}}catch (const Exception& e) {cerr << "初始化YOLOv8失败: " << e.what() << endl;throw;}}// 预处理图像Mat preprocess(const Mat& image) {Mat blob;// 创建blob,BGR->RGB,归一化到[0,1]blobFromImage(image, blob, 1.0 / 255.0, Size(inputWidth, inputHeight), Scalar(), true, false, CV_32F);return blob;}// 输出张量信息用于调试void printTensorInfo(const Mat& tensor, const string& name) {cout << name << " 信息:" << endl;cout << " 维度: " << tensor.dims << endl;cout << " 形状: [";for (int i = 0; i < tensor.dims; i++) {cout << tensor.size[i];if (i < tensor.dims - 1) cout << ", ";}cout << "]" << endl;cout << " 类型: " << tensor.type() << endl;cout << " 总元素数: " << tensor.total() << endl;}// 后处理void postprocess(const Mat& image, const vector<Mat>& outputs,vector<Rect>& boxes, vector<float>& confidences, vector<int>& classIds) {boxes.clear();confidences.clear();classIds.clear();if (outputs.empty()) {cerr << "错误: 模型输出为空" << endl;return;}int imageHeight = image.rows;int imageWidth = image.cols;// 打印所有输出的信息for (size_t i = 0; i < outputs.size(); i++) {printTensorInfo(outputs[i], "输出[" + to_string(i) + "]");}// 获取第一个输出Mat output = outputs[0];// 确保输出是浮点型if (output.type() != CV_32F) {output.convertTo(output, CV_32F);}int numClasses = classes.size();int numDetections = 0;int featuresPerDetection = 0;// 处理不同维度的输出Mat processedOutput;if (output.dims == 3) {// 3维输出: [batch, features, detections] 或 [batch, detections, features]int dim1 = output.size[1];int dim2 = output.size[2];cout << "处理3维输出: [" << output.size[0] << ", " << dim1 << ", " << dim2 << "]" << endl;// 判断格式if (dim1 == numClasses + 4) {// 格式: [1, 8, 8400] -> 转换为 [8400, 8]numDetections = dim2;featuresPerDetection = dim1;processedOutput = Mat::zeros(numDetections, featuresPerDetection, CV_32F);// 手动转置数据for (int i = 0; i < numDetections; i++) {for (int j = 0; j < featuresPerDetection; j++) {// 安全地访问3D张量数据const float* data = output.ptr<float>(0);int index = j * numDetections + i;processedOutput.at<float>(i, j) = data[index];}}}else if (dim2 == numClasses + 4) {// 格式: [1, 8400, 8] -> 直接重塑为 [8400, 8]numDetections = dim1;featuresPerDetection = dim2;// 创建2D视图processedOutput = Mat(numDetections, featuresPerDetection, CV_32F,(void*)output.ptr<float>(0));}else {cerr << "无法识别的3D输出格式" << endl;return;}}else if (output.dims == 2) {// 2维输出: [detections, features]cout << "处理2维输出: [" << output.size[0] << ", " << output.size[1] << "]" << endl;numDetections = output.size[0];featuresPerDetection = output.size[1];processedOutput = output;}else {cerr << "不支持的输出维度: " << output.dims << endl;return;}cout << "处理格式: " << numDetections << " 个检测, 每个 " << featuresPerDetection << " 个特征" << endl;// 检查特征数量是否正确if (featuresPerDetection != numClasses + 4) {cerr << "警告: 特征数量(" << featuresPerDetection << ")与期望值(" << numClasses + 4 << ")不匹配" << endl;}float x_factor = float(imageWidth) / float(inputWidth);float y_factor = float(imageHeight) / float(inputHeight);// 处理每个检测for (int i = 0; i < numDetections; ++i) {const float* detection = processedOutput.ptr<float>(i);// 前4个值是边界框坐标 [cx, cy, w, h]float cx = detection[0];float cy = detection[1];float w = detection[2];float h = detection[3];// 找到最高分的类别float maxScore = 0;int classId = -1;int availableClasses = min(numClasses, featuresPerDetection - 4);for (int j = 0; j < availableClasses; ++j) {float score = detection[4 + j];if (score > maxScore) {maxScore = score;classId = j;}}// 过滤低置信度if (maxScore > confidenceThreshold && classId >= 0 && classId < numClasses) {// 转换坐标:中心点坐标转换为左上角坐标float x1 = (cx - w / 2) * x_factor;float y1 = (cy - h / 2) * y_factor;float width = w * x_factor;float height = h * y_factor;// 确保边界框在图像范围内x1 = max(0.0f, x1);y1 = max(0.0f, y1);width = min(width, float(imageWidth) - x1);height = min(height, float(imageHeight) - y1);if (width > 0 && height > 0) {boxes.push_back(Rect(int(x1), int(y1), int(width), int(height)));confidences.push_back(maxScore);classIds.push_back(classId);}}}cout << "NMS前检测到 " << boxes.size() << " 个候选框" << endl;// 非极大值抑制vector<int> indices;if (!boxes.empty()) {NMSBoxes(boxes, confidences, confidenceThreshold, iouThreshold, indices);}// 应用NMS结果vector<Rect> tempBoxes;vector<float> tempConfidences;vector<int> tempClassIds;for (int i : indices) {tempBoxes.push_back(boxes[i]);tempConfidences.push_back(confidences[i]);tempClassIds.push_back(classIds[i]);}boxes = tempBoxes;confidences = tempConfidences;classIds = tempClassIds;cout << "NMS后保留 " << boxes.size() << " 个检测框" << endl;}// 绘制检测结果void drawDetections(Mat& image, const vector<Rect>& boxes,const vector<float>& confidences, const vector<int>& classIds) {for (size_t i = 0; i < boxes.size(); ++i) {Rect box = boxes[i];int classId = classIds[i];if (classId >= 0 && classId < colors.size()) {Scalar color = colors[classId];// 绘制边界框rectangle(image, box, color, 2);// 绘制类别和置信度string label = classes[classId] + ": " +to_string(int(confidences[i] * 100)) + "%";// 计算文本尺寸int baseline;Size textSize = getTextSize(label, FONT_HERSHEY_SIMPLEX, 0.5, 1, &baseline);// 绘制文本背景rectangle(image,Point(box.x, box.y - textSize.height - 10),Point(box.x + textSize.width, box.y),color, FILLED);// 绘制文本putText(image, label, Point(box.x, box.y - 5),FONT_HERSHEY_SIMPLEX, 0.5, Scalar(255, 255, 255), 1);}}}// 执行检测 void detect(Mat& image, Mat& resultImage,vector<Rect>& boxes, vector<float>& confidences, vector<int>& classIds) {try {// 预处理cout << "开始预处理..." << endl;Mat blob = preprocess(image);cout << "预处理完成: [" << blob.size[0] << ", " << blob.size[1]<< ", " << blob.size[2] << ", " << blob.size[3] << "]" << endl;// 设置输入net.setInput(blob);// 方法1: 使用简单的forward()方法cout << "开始推理(方法1)..." << endl;auto start = high_resolution_clock::now();try {Mat output = net.forward();auto end = high_resolution_clock::now();vector<Mat> outputs;outputs.push_back(output);// 计算推理时间duration<double> inferenceTime = end - start;cout << "推理完成,耗时: " << inferenceTime.count() * 1000 << " 毫秒" << endl;// 后处理cout << "开始后处理..." << endl;postprocess(image, outputs, boxes, confidences, classIds);}catch (const Exception& e1) {cout << "方法1失败: " << e1.what() << endl;// 方法2: 使用指定输出层名称的forward()方法cout << "尝试方法2..." << endl;try {vector<String> outputNames = net.getUnconnectedOutLayersNames();if (!outputNames.empty()) {cout << "使用输出层: " << outputNames[0] << endl;start = high_resolution_clock::now();vector<Mat> outputs;net.forward(outputs, outputNames);auto end = high_resolution_clock::now();duration<double> inferenceTime = end - start;cout << "推理完成,耗时: " << inferenceTime.count() * 1000 << " 毫秒" << endl;postprocess(image, outputs, boxes, confidences, classIds);}else {throw runtime_error("无法获取输出层名称");}}catch (const Exception& e2) {cout << "方法2也失败: " << e2.what() << endl;// 方法3: 使用所有输出层cout << "尝试方法3..." << endl;vector<int> outLayerIds = net.getUnconnectedOutLayers();vector<String> layerNames = net.getLayerNames();vector<String> outLayerNames;for (int id : outLayerIds) {outLayerNames.push_back(layerNames[id - 1]);}start = high_resolution_clock::now();vector<Mat> outputs;net.forward(outputs, outLayerNames);auto end = high_resolution_clock::now();duration<double> inferenceTime = end - start;cout << "推理完成,耗时: " << inferenceTime.count() * 1000 << " 毫秒" << endl;postprocess(image, outputs, boxes, confidences, classIds);}}// 绘制结果resultImage = image.clone();drawDetections(resultImage, boxes, confidences, classIds);cout << "最终检测到 " << boxes.size() << " 个目标" << endl;}catch (const Exception& e) {cerr << "检测过程中出错: " << e.what() << endl;resultImage = image.clone();}}
};int main() {try {// 模型和图像路径string onnxModelPath = "yolov8.onnx";//填入你需要的onnx权重文件string imagePath = "test.jpg";//测试图片// 检查文件是否存在ifstream modelFile(onnxModelPath);if (!modelFile.good()) {cerr << "错误: 找不到模型文件 " << onnxModelPath << endl;return -1;}// 初始化YOLOv8模型cout << "初始化YOLOv8模型..." << endl;YOLO yolo(onnxModelPath, 0.5f, 0.4f);// 读取图像Mat image = imread(imagePath);if (image.empty()) {cerr << "无法读取图像: " << imagePath << endl;return -1;}cout << "图像尺寸: " << image.cols << "x" << image.rows << endl;// 执行检测Mat resultImage;vector<Rect> boxes;vector<float> confidences;vector<int> classIds;yolo.detect(image, resultImage, boxes, confidences, classIds);// 显示结果if (!resultImage.empty()) {imshow("YOLOv8 Detection", resultImage);cout << "按任意键继续..." << endl;waitKey(0);// 保存结果imwrite("result.jpg", resultImage);cout << "检测结果已保存为 result.jpg" << endl;}destroyAllWindows();return 0;}catch (const exception& e) {cerr << "程序异常: " << e.what() << endl;return -1;}
}运行结果: