r0env2024:开箱即用的AI工具集成Kali发新版
什么是r0env2024?
那得先回顾下r0env系列的历史。
r0env2021、2022和2023
最早分享r0env是为了解决在APP逆向过程中,Windows的Powershell实在难以运行frida的问题,Windows实在不适合干安卓逆向,见文章:《r0env:打造年轻人的第一套安卓逆向环境!》。
从文中可以看出,分享第一版就集成了安卓逆向所需的环境和工具,例如多版本的frida、android-studio、jadx、jeb、HyperPwn、010 editor、Charles、Burp,大大小小二十几个工具打包进Kali Linux里作为VMWare虚拟机进行了分享。
后来2022版又增加了vscode、unidbg、ollvm开发环境、ida等工具、搜狗拼音输入法,原有的工具也升级到了最新版,具体见文章《r0env2022发布~!》;最后是到《r0env2023发布,更新内核至6.5全功能eBPF/bcc开发》,内核升级增加eBPF全套开发环境,增加beyond compare,同时修复改进r0env2022的bug与诸多工具的版本。
由此可见,r0env系列系统环境主要解决以下几个痛点: - Linux对比Win/mac有最为纯粹的开发环境平台的优势 - 节省逐一安装配置开发环境和调试各种工具的时间精力 - 作为打包环境拥有“时光机”功能,玩坏了再刷个回到过去
r0env2024:集成AI工具的Kali系统
到了AI时代,环境的痛点依旧存在,所以我做了类似的集成了AI工具的Kali系统环境,分享给大家共同使用,也就是r0env2024。
初心依旧是解决以上几个痛点,在Linux下开发AI工具和功能依旧有着无可比拟的优势,集成众多AI工具框架方便开箱即用,打包成镜像分享只需点击刷入即可回到最初的环境、免去各种装机之苦。
PS:之前的r0env是打包的VMWare镜像,电脑上安装有VMWare WorkStation Pro或者Fusion Pro即可使用。r0env2024版本由于主要依赖显卡跑大模型,虚拟机无法直通使用显卡,所以只能发布系统镜像,必须真实台式机+英伟达显卡运行。
集成的工具框架和模型包括: - 英伟达显卡驱动:NVIDIA-DRIVER 570.169 - 显卡开发套件工具:CUDA-toolkit-12.8 - 简易大模型本地推理工具:ollama-v0.9.6 - 问答大模型量化版:llama3.2:3b(GGUF) - 多模态视觉模型量化版:llama3.2-vision:11b(GGUF) - MCP环境打包工具暨Python虚拟环境管理:uv - 基本MCP工具:获取当前时间uv服务器 - AI对话客户端:CherryStudio调用本地LLM使用MCP - 在线大模型API:CherryStudio接入硅基流动 - AI代码IDE:VSCcode + CLINE + LLM API - 魔搭社区下载纯血大模型:modelscope+gemma-3-1b-it - 纯血大模型本地推理框架:vllm推理gemma-3-1b-it - 纯血大模型本地推理框架:SGLang推理gemma-3-1b-it - 纯本地智能体任务规划执行:OpenManus+llama3.2 - 文、图、生图、扩图:ComfyUI + SD-v1.5 - 文、图、视频生视频:ComfyUI + LTX-Video - 企业级Agentic工作流框架:docker + dify
初期只集成这些近二十款工具,后续还会不断更新和加入新的工具。
接下来介绍如何刷入和使用这些工具。
如何安装r0env2024?
这一节涵盖r0env镜像的下载、刷入与开机的流程介绍与注意事项。
下载地址与哈希校验
文件名:r0env2024.img.gz 文件格式:gunzip压缩包,解压后是Kali Linux的系统盘的磁盘镜像文件IMG 文件大小:62G(Windows资源管理器显示62,615,225KB)(Linux可能显示59.7G) MD5:76686d893791b213e8f10905e92c8b79 运行方式:系统盘刷入、真机运行 系统硬件要求:台式机 + 英伟达独立显卡
不同平台计算MD5的命令: Window下PowerShell:CertUtil -hashfile r0env2024.img.gz MD5 Linux下:md5sum r0env2024.img.gz macOS下:md5 -r r0env2024.img.gz
下载地址:(暂时使用我的极空间NAS分享,蹲一个好心人贡献百度网盘会员或BT做种)
极空间分享:【r0env2024.img.gz】https://t.znas.cn/ziL4Bk0NLcj
傻瓜式刷入与开机注意事项
下载后计算MD5确认哈希校验正确,即可使用BalenaEtcher刷入镜像,这款工具在WIn/macOS/Linux都有图形客户端,非常方便。
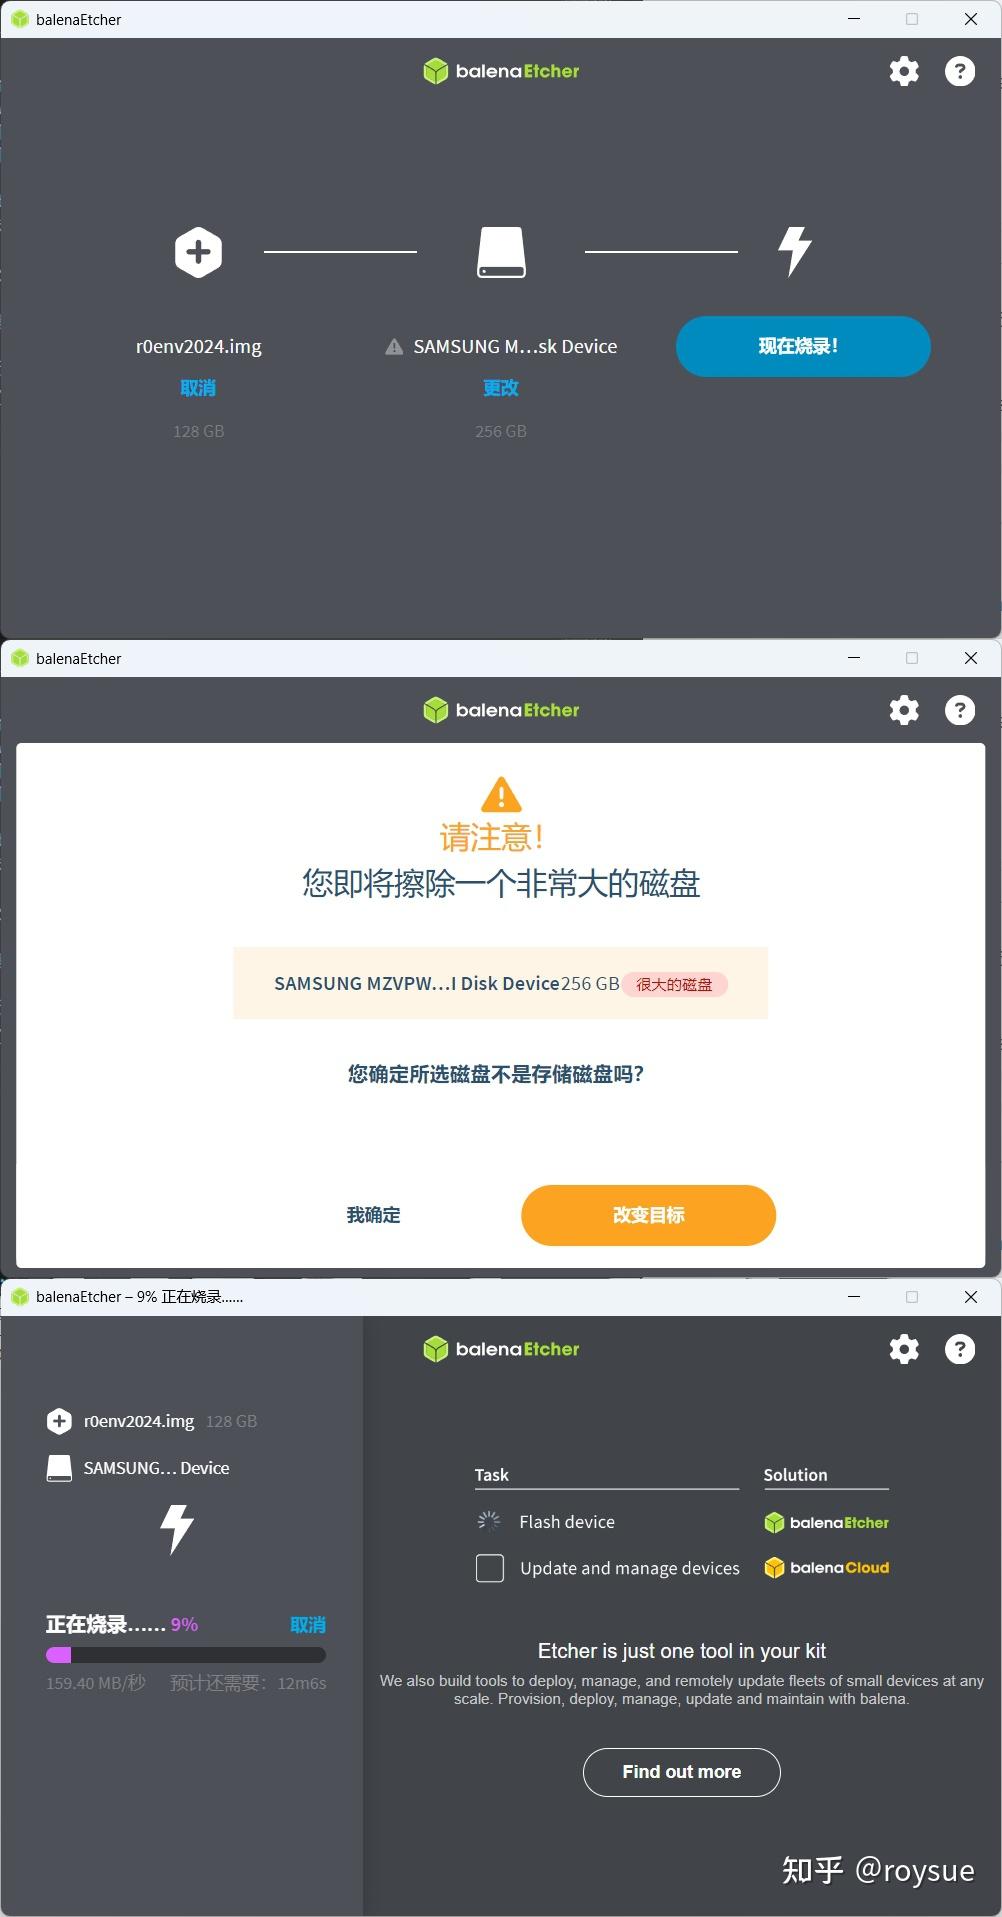
镜像文件有128G,建议使用的目标设备大于等于128G,256G为宜。
如果使用命令行,命令是:gunzip -c r0env2024.img.gz | dd of=/dev/sda,可以参考这个链接:https://www.cyberciti.biz/faq/unix-linux-dd-create-make-disk-image-commands/
我最为常用的是NVMe固态硬盘加硬盘盒的组合,刷好后直接替换主机的NVMe系统盘,直接用刷入的r0env2024固态硬盘来开机。
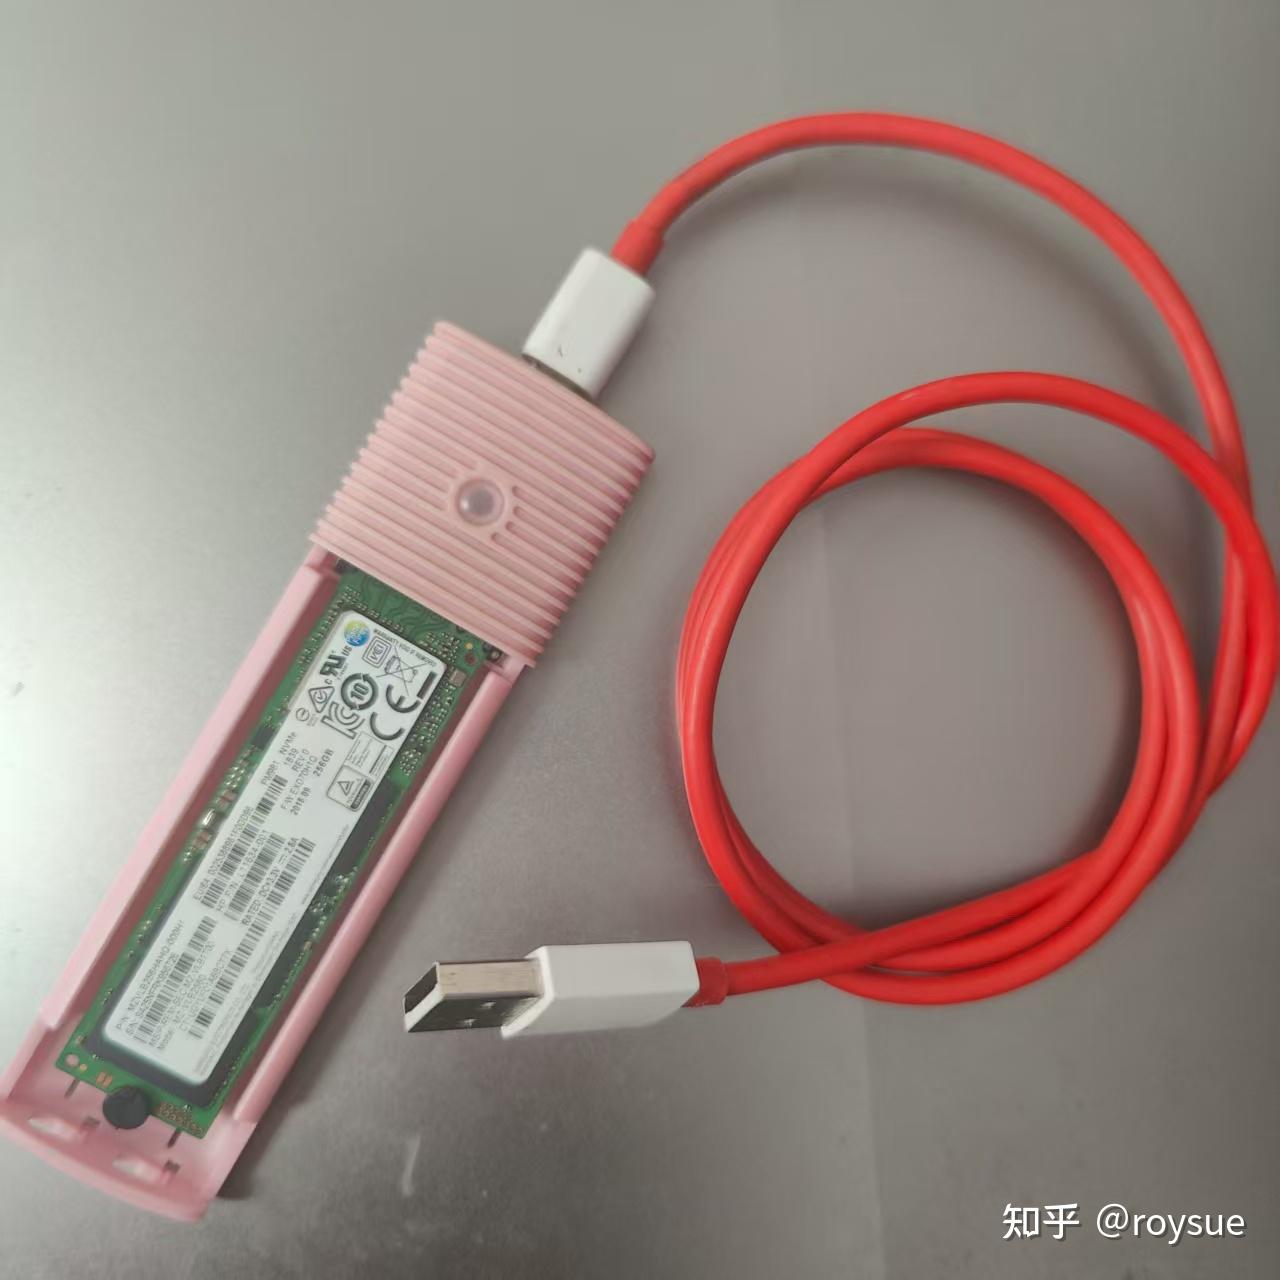
也可以带硬盘盒直接插到USB口,在主板BIOS设置启动项U盘启动,从U盘启动进入系统,调到启动项的第一个。
主板BIOS设置CSM模式,也就是UEFI+Legacy都支持,关闭Secure Boot,关闭Fast Boot。
只实测了台式机搭配英伟达独显的组合,笔记本加独显的组合还没有尝试,好像不大一样。期待热心网友的实测反馈。
即可正常开机进入系统。如果没有进入系统,反复检查上述要求。
输入用户r0ysue的密码r0ysue进入桌面。
如何使用r0env2024?
接下来是r0env2024的各项功能介绍。
基础环境
与系统相关的预设配置在这里。
ssh服务开机自启动
已经配置好openssh-server开机自启动,进入桌面看下IP即可远程接入。
> ssh r0ysue@192.168.1.19
r0ysue@192.168.1.19's password:
┌──(r0ysue㉿r0env)-[~]
└─$ whoami
r0ysue┌──(r0ysue㉿r0env)-[~]
└─$ fastfetch
..............                                      r0ysue@r0env..,;:ccc,.                              ------------......''';lxO.                            OS: Kali GNU/Linux Rolling x86_64
.....''''..........,:ld;                            Kernel: Linux 6.12.33+kali-amd64.';;;:::;,,.x,                           Uptime: 47 mins..'''.            0Xxoc:,.  ...               Packages: 1610 (dpkg)....                ,ONkc;,;cokOdc',.             Shell: zsh 5.9.                   OMo           ':ddo.           DE: GNOME 48.1dMc               :OO;          WM: Mutter (X11)0M.                 .:o.        WM Theme: Kali-Dark;Wd                             Theme: Fusion [Qt], adw-gtk3-blue-dark [GTK2/3/4];XO,                           Icons: Flat-Remix-Blue-Dark [Qt], Flat-Remix-Blue-Dark [GTK2/3/4],d0Odlc;,..                  Font: qt5ct [Qt], Cantarell (11pt) [GTK2/3/4]..',;:cdOOd::,.          Cursor: Adwaita (24px).:d;.':;.       Terminal: /dev/pts/0'd,  .'      CPU: 2 x Intel(R) Xeon(R) E5-2650 v4 (48) @ 2.90 GHz;l   ..    GPU: NVIDIA GeForce RTX 3060 Lite Hash Rate [Discrete].o        Memory: 3.75 GiB / 62.79 GiB (6%)c       Swap: 0 B / 6.16 GiB (0%).'      Disk (/): 91.09 GiB / 109.81 GiB (83%) - ext4.      Local IP (wlan0): 192.168.1.19/24Locale: en_US.UTF-8
Windows远程桌面已开启
Windows使用内置的远程桌面直接输入IP地址连接。
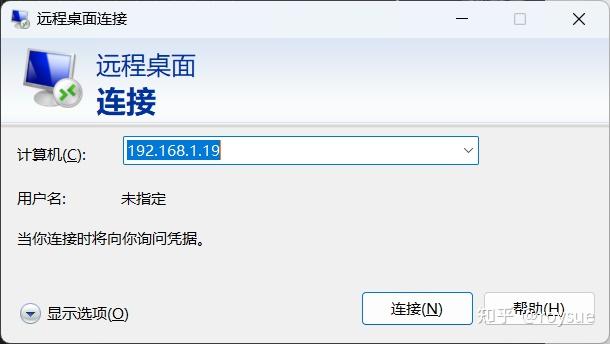
账号密码r0ysue输入后即可远程控制。
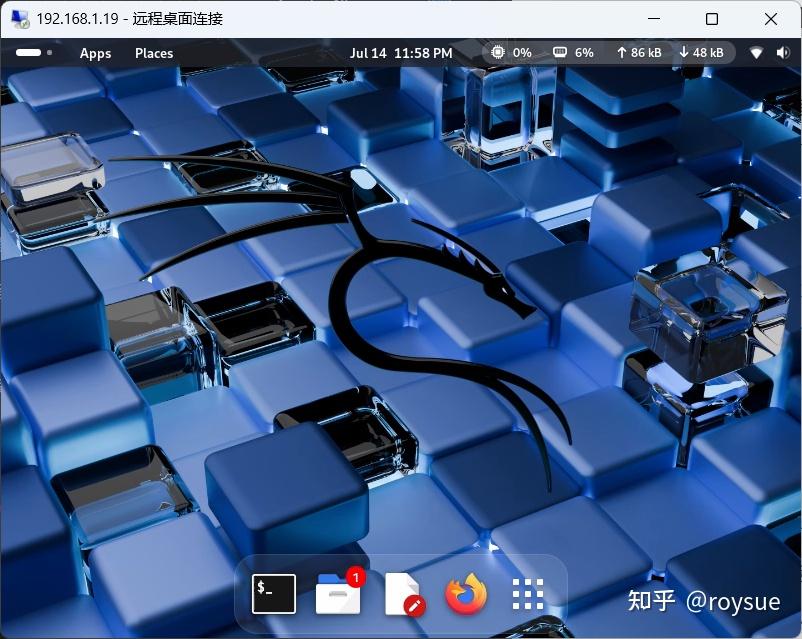
Linux使用reminna,macOS使用Windows App,即可远程连接r0env桌面。
另外已设置电源计划为性能模式,关闭自动息屏,关闭进入屏保,关闭自动休眠。确保远程登录不会中断。
安装常用系统软件
以下常用系统软件已安装。
$ sudo apt install net-tools fastfetch htop jnettop build-essential rep proxychains4 curl比如看IP地址的ifconfig就是net-tools里面的,默认没有安装很不方便。
显卡相关
官网显卡驱动
驱动文件位于:
┌──(r0ysue㉿r0env)-[~/Software/CUDA]
└─$ ls
cuda-repo-debian12-12-8-local_12.8.1-570.124.06-1_amd64.deb
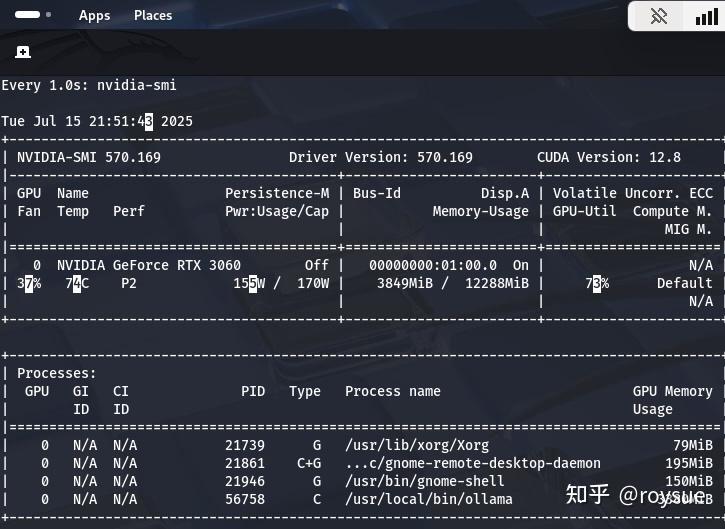
NVIDIA-Linux-x86_64-570.169.run安装的驱动版本是570.169,相对于今日是非常新的。
┌──(r0ysue㉿r0env)-[~/Software/CUDA]
└─$ nvidia-smi
Tue Jul 15 00:12:38 2025
+-----------------------------------------------------------------------------------------+
| NVIDIA-SMI 570.169                Driver Version: 570.169        CUDA Version: 12.8     |
|-----------------------------------------+------------------------+----------------------+
| GPU  Name                 Persistence-M | Bus-Id          Disp.A | Volatile Uncorr. ECC |
| Fan  Temp   Perf          Pwr:Usage/Cap |           Memory-Usage | GPU-Util  Compute M. |
|                                         |                        |               MIG M. |
|=========================================+========================+======================|
|   0  NVIDIA GeForce RTX 3060        Off |   00000000:01:00.0  On |                  N/A |
| 39%   48C    P2             39W /  170W |     352MiB /  12288MiB |      0%      Default |
|                                         |                        |                  N/A |
+-----------------------------------------+------------------------+----------------------++-----------------------------------------------------------------------------------------+
| Processes:                                                                              |
|  GPU   GI   CI              PID   Type   Process name                        GPU Memory |
|        ID   ID                                                               Usage      |
|=========================================================================================|
|    0   N/A  N/A           16565      G   /usr/lib/xorg/Xorg                       37MiB |
|    0   N/A  N/A           17214    C+G   ...c/gnome-remote-desktop-daemon        174MiB |
|    0   N/A  N/A           17347      G   /usr/bin/gnome-shell                     93MiB |
+-----------------------------------------------------------------------------------------+在英伟达驱动官网搜RTX5090的驱动,NVIDIA Recommended Driver就是: - Driver Version:570.169 - Release Date:Tue Jun 17, 2025 - File Size:375.82 MB
也就是我们安装的这一款驱动。从远古的RTX10系到最新的50系都支持的。
CUDA-toolkit 12.8
CUDA版本也是非常新的:
┌──(r0ysue㉿r0env)-[~]
└─$ nvcc --version
nvcc: NVIDIA (R) Cuda compiler driver
Copyright (c) 2005-2025 NVIDIA Corporation
Built on Fri_Feb_21_20:23:50_PST_2025
Cuda compilation tools, release 12.8, V12.8.93
Build cuda_12.8.r12.8/compiler.35583870_0┌──(r0ysue㉿r0env)-[~]
└─$ which nvcc
/usr/local/cuda/bin/nvcc┌──(r0ysue㉿r0env)-[~]
└─$ cd /usr/local/cuda/bin┌──(r0ysue㉿r0env)-[/usr/local/cuda/bin]
└─$ ls
bin2c              cuda-gdb                 cuda-gdb-python3.8-tui  fatbinary                    nsys                 nvdisasm  ptxas
computeprof        cuda-gdb-minimal         cuda-gdb-python3.9-tui  ncu                          nsys-ui              nvlink
compute-sanitizer  cuda-gdb-python3.10-tui  cuda-gdbserver          ncu-ui                       nvcc                 nvprof
crt                cuda-gdb-python3.11-tui  cu++filt                nsight_ee_plugins_manage.sh  __nvcc_device_query  nvprune
cudafe++           cuda-gdb-python3.12-tui  cuobjdump               nsight-sys                   nvcc.profile         nvvp
这一点也是非常关键,最新的PyTorch稳定版2.7.1依赖CUDA 12.8来进行安装。Kali Linux在源里自带的是一个12.3的版本,无法安装PyTorch2.7.1,也就无法驱动一些最新的本地推理框架如SGLang。这里安装的官网下载的deb包cuda-repo-debian12-12-8-local_12.8.1-570.124.06-1_amd64.deb。
模型相关
问答生成:llama3.2:3B
本地已经安装好的是Q4量化版,精度上与纯血LLM相比有损失。
┌──(r0ysue㉿r0env)-[~/.ollama]
└─$ ollama show llama3.2Modelarchitecture        llamaparameters          3.2Bcontext length      131072embedding length    3072quantization        Q4_K_MCapabilitiescompletiontoolsParametersstop    "<|start_header_id|>"stop    "<|end_header_id|>"stop    "<|eot_id|>"LicenseLLAMA 3.2 COMMUNITY LICENSE AGREEMENTLlama 3.2 Version Release Date: September 25, 2024...
可以直接用ollama框架与之问答:
┌──(r0ysue㉿r0env)-[~/.ollama]
└─$ ollama run llama3.2
>>> why sky looks blue ?
The sky appears blue because of a phenomenon called Rayleigh scattering, named after the British physicist Lord Rayleigh. Here's why it happens:1. **Sunlight composition**: When sunlight enters Earth's atmosphere, it consists of different wavelengths of light, or colors. The visible spectrum
of light is made up of approximately 450 nanometers (violet), 490 nanometers (blue), 570 nanometers (yellow), and other longer wavelengths.
2. **Atmospheric particles**: The air in the atmosphere contains tiny molecules like nitrogen (N2) and oxygen (O2). These molecules scatter sunlight,
but they are much more effective at scattering shorter (bluer) wavelengths than longer (redder) wavelengths.
3. **Rayleigh scattering**: When sunlight encounters these atmospheric particles, it scatters in all directions. The shorter wavelengths of light
(like blue and violet) are scattered more than the longer wavelengths (like red and orange). This is known as Rayleigh scattering.
4. **Scattered light reaches our eyes**: As a result of this scattering, the blue light is distributed throughout the atmosphere, reaching our eyes
from all directions. Since there's less blue light in the direct path of sunlight compared to other colors, we perceive the sky as blue.**Other factors th
...
...
多模态视觉:llama3.2-vision:11B
vision版本增加了图片理解能力,当然也是量化版本:
┌──(r0ysue㉿r0env)-[~/.ollama]
└─$ ollama show llama3.2-visionModelarchitecture        mllamaparameters          10.7Bcontext length      131072embedding length    4096quantization        Q4_K_MCapabilitiescompletionvisionParameterstemperature    0.6top_p          0.9License**Llama 3.2** **Acceptable Use Policy**Meta is committed to promoting safe and fair use of its tools and features,including Llama 3.2. If you access or use Llama 3.2, you agree to this AcceptableUse Policy (“**Policy**”). The most recent copy of this policy can be found at[https://www.llama.com/llama3_2/use-policy](https://www.llama.com/llama3_2/use-policy)....
可以对图片进行理解识别:
curl http://localhost:11434/api/chat -d '{"model": "llama3.2-vision","messages": [{"role": "user","content": "what is in this image?","images": ["<base64-encoded image data>"]}]
}'
纯血LLM:gemma-3-1b-it
从modelscope下载的、未经量化的纯血LLM,由于显存资源有限,只能跑个1B参数的版本:
┌──(r0ysue㉿r0env)-[~/.cache/modelscope/hub/models/LLM-Research]
└─$ tree
.
└── gemma-3-1b-it├── added_tokens.json├── config.json├── configuration.json├── generation_config.json├── model.safetensors├── README.md├── special_tokens_map.json├── tokenizer_config.json├── tokenizer.json└── tokenizer.model2 directories, 10 files
纯血LLM需要使用vLLM或者SGLang进行本地推理。
本地推理框架
简易LLM本地推理框架ollama
Ollama 是一个开源的本地化大模型(LLM)运行工具,旨在让用户能够简单、快速地在本地部署和运行大语言模型(如 Llama 3、Mistral、Gemma 等),无需复杂的配置或依赖云服务。它的核心优势是轻量级、跨平台(Windows/macOS/Linux)和一键运行。甚至只要系统内存足够大,运行在CPU+内存的组合里也可以,当然速度就非常缓慢了。使用显卡+大显存有更快的运行速度。
┌──(r0ysue㉿r0env)-[~]
└─$ ollama list
NAME                      ID              SIZE      MODIFIED
llama3.2-vision:latest    6f2f9757ae97    7.8 GB    6 days ago
llama3.2:latest a80c4f17acd5 2.0 GB 6 days ago运行ollama问答的时候可以使用watch -d -n nvidia-smi看到显卡的实时负载,与ollama对显存的占用。
ollama上运行的一般是量化后的,可以理解为有损压缩后的LLM,无损的纯血版一般使用vLLM或SGLang进行本地推理。
纯血大模型本地推理框架vLLM
vLLM(Vectorized Large Language Model)是由加州大学伯克利分校开发的高性能大语言模型(LLM)推理框架,旨在显著提升开源大模型(如LLaMA、ChatGLM、Phi-3等)的推理效率,适用于高并发、低延迟的实时服务场景。
# 进入VLLM工作目录
┌──(r0ysue㉿r0env)-[~]
└─$ cd Software/VLLM
# 激活uv的vllm专用虚拟环境
┌──(r0ysue㉿r0env)-[~/Software/VLLM]
└─$ source vllm/bin/activate
# 使用来自modelscope的大模型,而不是默认的huggingface
┌──(vllm)─(r0ysue㉿r0env)-[~/Software/VLLM]
└─$ export VLLM_USE_MODELSCOPE=True
# 开启本地推理
┌──(vllm)─(r0ysue㉿r0env)-[~/Software/VLLM]
└─$ vllm serve LLM-Research/gemma-3-1b-it
INFO 07-15 22:00:17 [__init__.py:244] Automatically detected platform cuda.
INFO 07-15 22:00:21 [api_server.py:1395] vLLM API server version 0.9.2
INFO 07-15 22:00:21 [cli_args.py:325] non-default args: {'model': 'LLM-Research/gemma-3-1b-it'}
Downloading Model from https://www.modelscope.cn to directory: /home/r0ysue/.cache/modelscope/hub/models/LLM-Research/gemma-3-1b-it
INFO 07-15 22:00:32 [config.py:841] This model supports multiple tasks: {'embed', 'generate', 'reward', 'classify'}. Defaulting to 'generate'.
INFO 07-15 22:00:32 [config.py:1472] Using max model len 32768
INFO 07-15 22:00:33 [config.py:2285] Chunked prefill is enabled with max_num_batched_tokens=2048.
INFO 07-15 22:00:42 [__init__.py:244] Automatically detected platform cuda.
INFO 07-15 22:00:45 [core.py:526] Waiting for init message from front-end.
INFO 07-15 22:00:45 [core.py:69] Initializing a V1 LLM engine (v0.9.2) with config: model='LLM-Research/gemma-3-1b-it', speculative_config=None, tokenizer='LLM-Research/gemma-3-1b-it', skip_tokenizer_init=False, tokenizer_mode=auto, revision=None, override_neuron_config={}, tokenizer_revision=None, trust_remote_code=False, dtype=torch.bfloat16, max_seq_len=32768, download_dir=None
...
INFO 07-15 22:00:46 [gpu_model_runner.py:1770] Starting to load model LLM-Research/gemma-3-1b-it...
INFO 07-15 22:00:46 [gpu_model_runner.py:1775] Loading model from scratch...
INFO 07-15 22:00:46 [cuda.py:284] Using Flash Attention backend on V1 engine.
Downloading Model from https://www.modelscope.cn to directory: /home/r0ysue/.cache/modelscope/hub/models/LLM-Research/gemma-3-1b-it
Loading safetensors checkpoint shards:   0% Completed | 0/1 [00:00<?, ?it/s]
Loading safetensors checkpoint shards: 100% Completed | 1/1 [00:01<00:00,  1.31s/it]
Loading safetensors checkpoint shards: 100% Completed | 1/1 [00:01<00:00,  1.31s/it]
INFO 07-15 22:00:49 [default_loader.py:272] Loading weights took 1.35 seconds
INFO 07-15 22:00:49 [gpu_model_runner.py:1801] Model loading took 1.9147 GiB and 2.704003 seconds
INFO 07-15 22:01:01 [backends.py:508] Using cache directory: /home/r0ysue/.cache/vllm/torch_compile_cache/eb3af0882d/rank_0_0/backbone for vLLM's torch.compile
INFO 07-15 22:01:01 [backends.py:519] Dynamo bytecode transform time: 11.57 s
[rank0]:W0715 22:01:03.339000 89201 torch/_inductor/utils.py:1250] [0/0] Not enough SMs to use max_autotune_gemm mode
INFO 07-15 22:01:08 [backends.py:181] Cache the graph of shape None for later use
INFO 07-15 22:01:49 [backends.py:193] Compiling a graph for general shape takes 47.63 s
INFO 07-15 22:02:03 [monitor.py:34] torch.compile takes 59.20 s in total
INFO 07-15 22:02:05 [gpu_worker.py:232] Available KV cache memory: 6.13 GiB
WARNING 07-15 22:02:05 [kv_cache_utils.py:831] Add 2 padding layers, may waste at most 9.09% KV cache memory
INFO 07-15 22:02:05 [kv_cache_utils.py:873] GPU KV cache size: 229,408 tokens
INFO 07-15 22:02:05 [kv_cache_utils.py:877] Maximum concurrency for 32,768 tokens per request: 33.30x
Capturing CUDA graph shapes: 100%|██████████████████████████████████████████████████████████████████████████████████████████| 67/67 [00:29<00:00,  2.26it/s]
INFO 07-15 22:02:35 [gpu_model_runner.py:2326] Graph capturing finished in 30 secs, took 0.44 GiB
INFO 07-15 22:02:35 [core.py:172] init engine (profile, create kv cache, warmup model) took 105.29 seconds
Downloading Model from https://www.modelscope.cn to directory: /home/r0ysue/.cache/modelscope/hub/models/LLM-Research/gemma-3-1b-it
INFO 07-15 22:02:38 [loggers.py:137] Engine 000: vllm cache_config_info with initialization after num_gpu_blocks is: 100369
Downloading Model from https://www.modelscope.cn to directory: /home/r0ysue/.cache/modelscope/hub/models/LLM-Research/gemma-3-1b-it
WARNING 07-15 22:02:39 [config.py:1392] Default sampling parameters have been overridden by the model's Hugging Face generation config recommended from the model creator. If this is not intended, please relaunch vLLM instance with `--generation-config vllm`.
INFO 07-15 22:02:39 [serving_chat.py:125] Using default chat sampling params from model: {'top_k': 64, 'top_p': 0.95}
Downloading Model from https://www.modelscope.cn to directory: /home/r0ysue/.cache/modelscope/hub/models/LLM-Research/gemma-3-1b-it
INFO 07-15 22:02:40 [serving_completion.py:72] Using default completion sampling params from model: {'top_k': 64, 'top_p': 0.95}
INFO 07-15 22:02:40 [api_server.py:1457] Starting vLLM API server 0 on http://0.0.0.0:8000
INFO 07-15 22:02:40 [launcher.py:29] Available routes are:
INFO 07-15 22:02:40 [launcher.py:37] Route: /openapi.json, Methods: GET, HEAD
INFO 07-15 22:02:40 [launcher.py:37] Route: /docs, Methods: GET, HEAD
INFO 07-15 22:02:40 [launcher.py:37] Route: /docs/oauth2-redirect, Methods: GET, HEAD
INFO 07-15 22:02:40 [launcher.py:37] Route: /redoc, Methods: GET, HEAD
INFO 07-15 22:02:40 [launcher.py:37] Route: /health, Methods: GET
INFO 07-15 22:02:40 [launcher.py:37] Route: /load, Methods: GET
INFO 07-15 22:02:40 [launcher.py:37] Route: /ping, Methods: POST
INFO 07-15 22:02:40 [launcher.py:37] Route: /ping, Methods: GET
INFO 07-15 22:02:40 [launcher.py:37] Route: /tokenize, Methods: POST
INFO 07-15 22:02:40 [launcher.py:37] Route: /detokenize, Methods: POST
INFO 07-15 22:02:40 [launcher.py:37] Route: /v1/models, Methods: GET
INFO 07-15 22:02:40 [launcher.py:37] Route: /version, Methods: GET
INFO 07-15 22:02:40 [launcher.py:37] Route: /v1/chat/completions, Methods: POST
INFO 07-15 22:02:40 [launcher.py:37] Route: /v1/completions, Methods: POST
INFO 07-15 22:02:40 [launcher.py:37] Route: /v1/embeddings, Methods: POST
INFO 07-15 22:02:40 [launcher.py:37] Route: /pooling, Methods: POST
INFO 07-15 22:02:40 [launcher.py:37] Route: /classify, Methods: POST
INFO 07-15 22:02:40 [launcher.py:37] Route: /score, Methods: POST
INFO 07-15 22:02:40 [launcher.py:37] Route: /v1/score, Methods: POST
INFO 07-15 22:02:40 [launcher.py:37] Route: /v1/audio/transcriptions, Methods: POST
INFO 07-15 22:02:40 [launcher.py:37] Route: /v1/audio/translations, Methods: POST
INFO 07-15 22:02:40 [launcher.py:37] Route: /rerank, Methods: POST
INFO 07-15 22:02:40 [launcher.py:37] Route: /v1/rerank, Methods: POST
INFO 07-15 22:02:40 [launcher.py:37] Route: /v2/rerank, Methods: POST
INFO 07-15 22:02:40 [launcher.py:37] Route: /invocations, Methods: POST
INFO 07-15 22:02:40 [launcher.py:37] Route: /metrics, Methods: GET
INFO:     Started server process [88217]
INFO:     Waiting for application startup.
INFO: Application startup complete.开启服务后会在http://0.0.0.0:8000端口进行监听,即可使用OpenAI兼容接口进行连接,后面使用CherryStudio作为前端进行连接和对话。
使用完毕后ctrl-c退出进程,使用deactivate命令退出uv虚拟环境。
纯血大模型本地推理框架SGLang
SGLang(Structured Generation Language)是一种针对大语言模型(LLM)推理的高性能接口和运行时环境,旨在提升复杂生成任务的执行效率和编程灵活性。它通过协同设计前端语言和后端运行时,显著优化了LLM应用的吞吐量、延迟和可控性,被广泛应用于聊天应用、RAG(检索增强生成)、Agent任务等领域。SGLang号称比vLLM快数倍,当然需要具体模型具体分析。
# 进入工作目录
┌──(r0ysue㉿r0env)-[~]
└─$ cd Software/SGLANG
# 激活sglang专属uv虚拟环境
┌──(r0ysue㉿r0env)-[~/Software/SGLANG]
└─$ source sglang/bin/activate
# 使用LLM的全路径进行推理
┌──(sglang)─(r0ysue㉿r0env)-[~/Software/SGLANG]
└─$ python -m sglang.launch_server --model-path /home/r0ysue/.cache/modelscope/hub/models/LLM-Research/gemma-3-1b-it --port 30000
[2025-07-15 22:11:25] server_args=ServerArgs(model_path='/home/r0ysue/.cache/modelscope/hub/models/LLM-Research/gemma-3-1b-it', tokenizer_path='/home/r0ysue/.cache/modelscope/hub/models/LLM-Research/gemma-3-1b-it', tokenizer_mode='auto', skip_tokenizer_init=False, skip_server_warmup=False, load_format='auto', model_loader_extra_config='{}', trust_remote_code=False, dtype='auto', kv_cache_dtype='auto', quantization=None, quantization_param_path=None, context_length=None, device='cuda', served_model_name='/home/r0ysue/.cache/modelscope/hub/models/LLM-Research/gemma-3-1b-it', chat_template=None, completion_template=None, is_embedding=False, enable_multimodal=None, revision=None, hybrid_kvcache_ratio=None, impl='auto', host='127.0.0.1', port=30000, nccl_port=None, mem_fraction_static=0.758, max_running_requests=None, max_total_tokens=None, chunked_prefill_size=2048, max_prefill_tokens=16384, schedule_policy='fcfs', schedule_conservativeness=1.0, cpu_offload_gb=0, page_size=1, tp_size=1, pp_size=1, max_micro_batch_size=None, stream_interval=1, stream_output=False, random_seed=746005111, constrained_json_whitespace_pattern=None, watchdog_timeout=300, dist_timeout=None, download_dir=None, base_gpu_id=0, gpu_id_step=1, sleep_on_idle=False, log_level='info', log_level_http=None, log_requests=False, log_requests_level=0, crash_dump_folder=None, show_time_cost=False, enable_metrics=False, bucket_time_to_first_token=None, bucket_e2e_request_latency=None, bucket_inter_token_latency=None, collect_tokens_histogram=False, decode_log_interval=40, enable_request_time_stats_logging=False, kv_events_config=None, api_key=None, file_storage_path='sglang_storage', enable_cache_report=False, reasoning_parser=None, tool_call_parser=None, dp_size=1, load_balance_method='round_robin', dist_init_addr=None, nnodes=1, node_rank=0, json_model_override_args='{}', preferred_sampling_params=None, lora_paths=None, max_loras_per_batch=8, lora_backend='triton', attention_backend=None, sampling_backend='flashinfer', grammar_backend='xgrammar', mm_attention_backend=None, speculative_algorithm=None, speculative_draft_model_path=None, speculative_num_steps=None, speculative_eagle_topk=None, speculative_num_draft_tokens=None, speculative_accept_threshold_single=1.0, speculative_accept_threshold_acc=1.0, speculative_token_map=None, ep_size=1, enable_ep_moe=False, enable_deepep_moe=False, enable_flashinfer_moe=False, enable_flashinfer_allreduce_fusion=False, deepep_mode='auto', ep_num_redundant_experts=0, ep_dispatch_algorithm='static', init_expert_location='trivial', enable_eplb=False, eplb_algorithm='auto', eplb_rebalance_num_iterations=1000, eplb_rebalance_layers_per_chunk=None, expert_distribution_recorder_mode=None, expert_distribution_recorder_buffer_size=1000, enable_expert_distribution_metrics=False, deepep_config=None, moe_dense_tp_size=None, enable_double_sparsity=False, ds_channel_config_path=None, ds_heavy_channel_num=32, ds_heavy_token_num=256, ds_heavy_channel_type='qk', ds_sparse_decode_threshold=4096, disable_radix_cache=False, cuda_graph_max_bs=8, cuda_graph_bs=None, disable_cuda_graph=False, disable_cuda_graph_padding=False, enable_profile_cuda_graph=False, enable_nccl_nvls=False, enable_tokenizer_batch_encode=False, disable_outlines_disk_cache=False, disable_custom_all_reduce=False, enable_mscclpp=False, disable_overlap_schedule=False, disable_overlap_cg_plan=False, enable_mixed_chunk=False, enable_dp_attention=False, enable_dp_lm_head=False, enable_two_batch_overlap=False, enable_torch_compile=False, torch_compile_max_bs=32, torchao_config='', enable_nan_detection=False, enable_p2p_check=False, triton_attention_reduce_in_fp32=False, triton_attention_num_kv_splits=8, num_continuous_decode_steps=1, delete_ckpt_after_loading=False, enable_memory_saver=False, allow_auto_truncate=False, enable_custom_logit_processor=False, enable_hierarchical_cache=False, hicache_ratio=2.0, hicache_size=0, hicache_write_policy='write_through_selective', hicache_io_backend='', flashinfer_mla_disable_ragged=False, disable_shared_experts_fusion=False, disable_chunked_prefix_cache=False, disable_fast_image_processor=False, enable_return_hidden_states=False, enable_triton_kernel_moe=False, warmups=None, debug_tensor_dump_output_folder=None, debug_tensor_dump_input_file=None, debug_tensor_dump_inject=False, debug_tensor_dump_prefill_only=False, disaggregation_mode='null', disaggregation_transfer_backend='mooncake', disaggregation_bootstrap_port=8998, disaggregation_decode_tp=None, disaggregation_decode_dp=None, disaggregation_prefill_pp=1, disaggregation_ib_device=None, num_reserved_decode_tokens=512, pdlb_url=None, custom_weight_loader=[], weight_loader_disable_mmap=False)
[2025-07-15 22:11:27] Inferred chat template from model path: gemma-it
[2025-07-15 22:11:35] Attention backend not set. Use flashinfer backend by default.
[2025-07-15 22:11:35] Init torch distributed begin.
[2025-07-15 22:11:35] Init torch distributed ends. mem usage=0.00 GB
[2025-07-15 22:11:36] Load weight begin. avail mem=11.06 GB
Loading safetensors checkpoint shards:   0% Completed | 0/1 [00:00<?, ?it/s]
Loading safetensors checkpoint shards: 100% Completed | 1/1 [00:00<00:00,  2.04it/s]
Loading safetensors checkpoint shards: 100% Completed | 1/1 [00:00<00:00,  2.04it/s]
[2025-07-15 22:11:37] Load weight end. type=Gemma3ForCausalLM, dtype=torch.bfloat16, avail mem=9.12 GB, mem usage=1.94 GB.
[2025-07-15 22:11:37] KV Cache is allocated. #tokens: 259752, K size: 3.22 GB, V size: 3.22 GB
[2025-07-15 22:11:37] Memory pool end. avail mem=2.11 GB
[2025-07-15 22:11:37] Capture cuda graph begin. This can take up to several minutes. avail mem=1.51 GB
[2025-07-15 22:11:37] Capture cuda graph bs [1, 2, 4, 8]
Capturing batches (bs=1 avail_mem=1.34 GB): 100%|█████████████████████████████████████████████████████████████████████████████| 4/4 [00:03<00:00,  1.10it/s]
[2025-07-15 22:11:41] Capture cuda graph end. Time elapsed: 3.66 s. mem usage=0.22 GB. avail mem=1.30 GB.
[2025-07-15 22:11:42] max_total_num_tokens=259752, chunked_prefill_size=2048, max_prefill_tokens=16384, max_running_requests=4058, context_len=32768, available_gpu_mem=1.30 GB
[2025-07-15 22:11:44] INFO:     Started server process [108190]
[2025-07-15 22:11:44] INFO:     Waiting for application startup.
[2025-07-15 22:11:44] INFO:     Application startup complete.
[2025-07-15 22:11:44] INFO:     Uvicorn running on http://127.0.0.1:30000 (Press CTRL+C to quit)
[2025-07-15 22:11:45] INFO:     127.0.0.1:50434 - "GET /get_model_info HTTP/1.1" 200 OK
[2025-07-15 22:11:45] Prefill batch. #new-seq: 1, #new-token: 7, #cached-token: 0, #token: 0, token usage: 0.00, #running-req: 0, #queue-req: 0, timestamp: 2025-07-15T22:11:45.739209
[2025-07-15 22:11:47] INFO:     127.0.0.1:50446 - "POST /generate HTTP/1.1" 200 OK
[2025-07-15 22:11:48] The server is fired up and ready to roll!开启服务后会在http://127.0.0.1:30000端口进行监听,即可使用OpenAI兼容接口进行连接,后面使用CherryStudio作为前端进行连接和对话。
使用完毕后ctrl-c退出进程,使用deactivate命令退出uv虚拟环境。
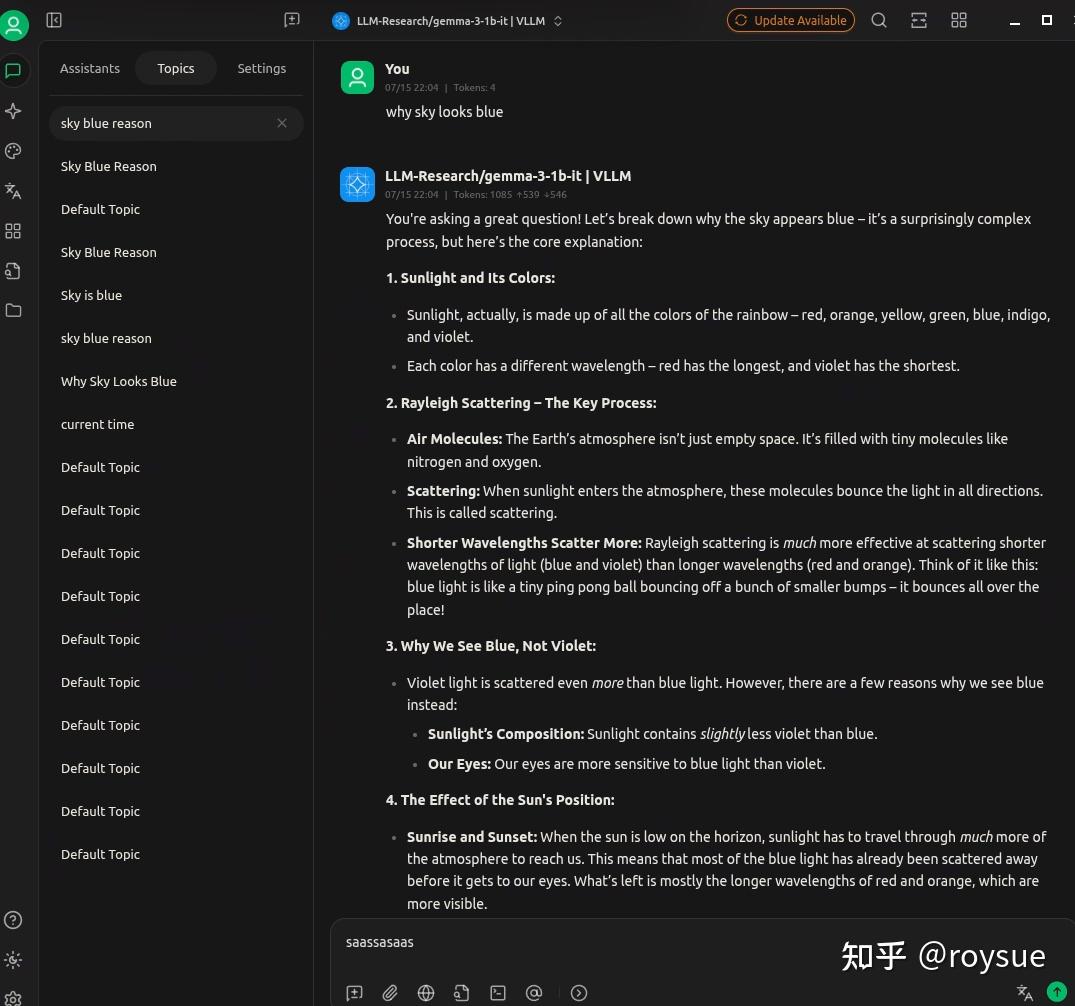
本地AI对话客户端:CherryStudio
Cherry Studio是支持多服务商集成的AI对话客户端,目前支持市面上绝大多数服务商的集成,并且支持多服务商的模型统一调度。
Cherry Studio的数据全部本地储存,无需担心隐私泄露,所有使用数据都储存在本地,不会上传到任何第三方服务器,并且支持本地部署的模型调用。
Cherry Studio目前已上线知识库功能,支持多种格式文件的导入和网页导入等来组件您的个性化知识库,AI知识库集成功能做您最贴心的助手。
应用里找到Cherry Studio打开,左下角设置里点开Model Provider,里面的硅基流动只要填个API Key即可在对话框选择qwen、deepseek等常用热门大模型的API进行对话。当然这是收费API,收费标准见硅基流动的网站。

vLLM、SGLang和ollama已经配置好了,只要服务端开启监听,即可使用本地推理的API。

聊天框界面如下:
智能体相关
MCP环境打包工具:uv
uv是由Astral团队用Rust写的“极速一体化Python包管理器”,官方口号是 “pip的即插即用替代品”,但现在已经扩展到能同时替代pip、pip-tools、pipx、Poetry、pyenv、virtualenv 等一整套工具。
核心亮点: • 10-100× 于 pip 的安装速度:并行下载、全局缓存、基于 PubGrub 的增量解析器 • 单一工具搞定「包管理 + 虚拟环境 + Python 版本 + CLI 工具 + 单文件脚本」 • 完全兼容 pip 命令:几乎所有 pip … 改成 uv pip … 就能立即提速 • 自带跨平台锁文件 uv.lock,保证 CI/同事之间环境一致 • 支持 Cargo 风格工作区,适合大仓项目
现在主流AI项目都用uv作为python包管理器,所以也内置好了uv。
┌──(r0ysue㉿r0env)-[~]
└─$ uv python list
cpython-3.14.0b3-linux-x86_64-gnu                 <download available>
cpython-3.14.0b3+freethreaded-linux-x86_64-gnu    <download available>
cpython-3.13.5-linux-x86_64-gnu                   <download available>
cpython-3.13.5+freethreaded-linux-x86_64-gnu      <download available>
cpython-3.13.3-linux-x86_64-gnu                   /usr/bin/python3.13
cpython-3.13.3-linux-x86_64-gnu                   /usr/bin/python3 -> python3.13
cpython-3.13.3-linux-x86_64-gnu                   /usr/bin/python -> python3
cpython-3.12.11-linux-x86_64-gnu                  .local/share/uv/python/cpython-3.12.11-linux-x86_64-gnu/bin/python3.12
cpython-3.11.13-linux-x86_64-gnu                  <download available>
cpython-3.10.18-linux-x86_64-gnu                  <download available>
cpython-3.9.23-linux-x86_64-gnu                   <download available>
cpython-3.8.20-linux-x86_64-gnu                   <download available>
pypy-3.11.11-linux-x86_64-gnu                     <download available>
pypy-3.10.16-linux-x86_64-gnu                     <download available>
pypy-3.9.19-linux-x86_64-gnu                      <download available>
pypy-3.8.16-linux-x86_64-gnu                      <download available>
graalpy-3.11.0-linux-x86_64-gnu                   <download available>
graalpy-3.10.0-linux-x86_64-gnu                   <download available>
graalpy-3.8.5-linux-x86_64-gnu                    <download available>
作为pip的替代打包管理器非常方便快捷:
┌──(sglang)─(r0ysue㉿r0env)-[~/Software/SGLANG]
└─$ uv pip list
Using Python 3.12.11 environment at: sglang
Package                   Version
------------------------- -------------
...
cuda-bindings             12.9.0
cuda-python               12.9.0
...
numpy                     2.3.1
nvidia-cublas-cu12        12.6.4.1
nvidia-cuda-cupti-cu12    12.6.80
nvidia-cuda-nvrtc-cu12    12.6.77
nvidia-cuda-runtime-cu12  12.6.77
nvidia-cudnn-cu12         9.5.1.17
nvidia-cufft-cu12         11.3.0.4
nvidia-cufile-cu12        1.11.1.6
nvidia-curand-cu12        10.3.7.77
nvidia-cusolver-cu12      11.7.1.2
nvidia-cusparse-cu12      12.5.4.2
nvidia-cusparselt-cu12    0.6.3
nvidia-ml-py              12.575.51
nvidia-nccl-cu12          2.26.2
nvidia-nvjitlink-cu12     12.6.85
nvidia-nvshmem-cu12       3.3.9
nvidia-nvtx-cu12          12.6.77
openai                    1.93.3
...
torch                     2.7.1
torch-memory-saver        0.0.8
torchao                   0.9.0
torchaudio                2.7.1
torchvision               0.22.1
...
基本MCP服务器:获取当前时间uv服务
大模型在没有联网的情况下,进行本地推理,肯定是不知道当前的实时时间的;可以通过工具调用tool calling能力,也就是MCP,调用第三方工具time,来获取当前的实时时间。
该工具提供了两个函数:
- get_current_time - 获取指定时区或系统时区的当前时间。必填参数:timezone (字符串): IANA时区名称(例如'America/New_York'、'Europe/London')
- convert_time - 在不同时区之间转换时间。必填参数:1.source_timezone (字符串): 源IANA时区名称 2.time (字符串): 24小时制时间格式(HH:MM)3.target_timezone (字符串): 目标IANA时区名称
大模型可以调用这两个函数来获取当前实时时间,并进行时区转换。
先开启MCP时间服务器:
┌──(r0ysue㉿r0env)-[~]
└─$ cd Software/MCP/servers/src/time
┌──(r0ysue㉿r0env)-[~/…/MCP/servers/src/time]
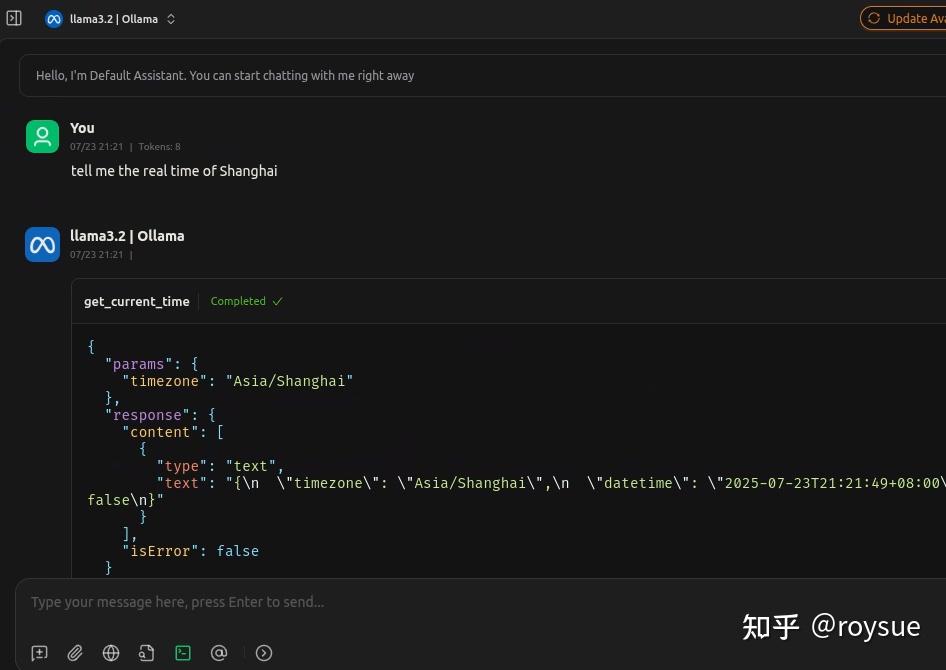
└─$ uvx mcp-server-timeCherryStudio配置MCP服务器的方法网上有很多,不再赘述。聊天里打开开关即可。
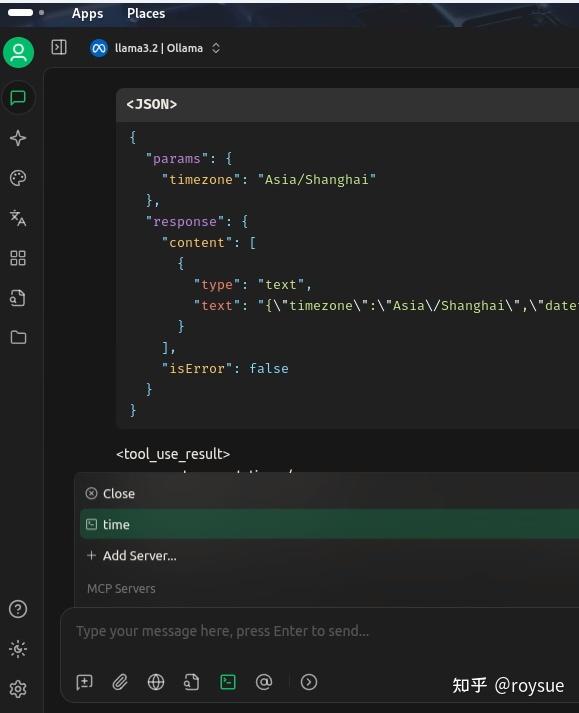
即可跟LLM要当前时间了,这里用的是纯本地的ollama的llama3.2,支持tool calling功能。在返回值里即是当前的上海时间。
这是个最为简易和入门的MCP服务器了,唯一的作用就是返回当前的时间。可以看看官方的MCP服务器示例:https://github.com/modelcontextprotocol/servers。
还有更多更有用的三方MCP工具,可以接入LLM供其调用。
纯本地智能体:OpenManus
OpenManus是一个开源的AI Agent框架,由MetaGPT社区团队在短短3小时内 开发完成,旨在复刻商业产品Manus(号称“全球首个通用 AI 智能体”)的核心功能。该项目因 Manus 的封闭内测机制(邀请码被炒至 10 万元天价)而诞生,提供完全开源、免费、本地化部署的替代方案,迅速在 GitHub 上获得广泛关注,24 小时内 Star 数突破 8.1k
# 进入工作目录
┌──(r0ysue㉿r0env)-[~]
└─$ cd Software/OpenManus
# 激活manus专用uv环境
┌──(r0ysue㉿r0env)-[~/Software/OpenManus]
└─$ source manus/bin/activate
请你帮我规划三日苏州旅行计划 不要问我,随便你
编辑配置文件:
┌──(manus)─(r0ysue㉿r0env)-[~/Software/OpenManus]
└─$ cat config/config.toml[llm] #OLLAMA:
api_type = 'ollama'
model = "llama3.2"
base_url = "http://localhost:11434/v1"
api_key = "ollama"
max_tokens = 4096
temperature = 0.0[llm.vision] #OLLAMA VISION:
api_type = 'ollama'
model = "llama3.2-vision"
base_url = "http://localhost:11434/v1"
api_key = "ollama"
max_tokens = 4096
temperature = 0.0[search]
engine = "Baidu"
fallback_engines = ["Baidu", "Bing"]
lang = "zh"
country = "cn"[mcp]
server_reference = "app.mcp.server" # default server module reference[runflow]
use_data_analysis_agent = false     # The Data Analysi Agent to solve various data analysis tasks
即可开始运行,输入“请你规划苏州三日游路线图”,智能体就会自动开始规划:
┌──(manus)─(r0ysue㉿r0env)-[~/Software/OpenManus]
└─$ python main.py
INFO     [browser_use] BrowserUse logging setup complete with level info
INFO     [root] Anonymized telemetry enabled. See https://docs.browser-use.com/development/telemetry for more information.
Enter your prompt: 请你规划苏州三日游路线图
2025-07-16 00:59:44.873 | WARNING  | __main__:main:25 - Processing your request...
2025-07-16 00:59:44.873 | INFO     | app.agent.base:run:140 - Executing step 1/20
2025-07-16 00:59:47.772 | INFO     | app.llm:update_token_count:243 - Token usage: Input=1579, Completion=184, Cumulative Input=1579, Cumulative Completion=184, Total=1763, Cumulative Total=1763
2025-07-16 00:59:47.772 | INFO     | app.agent.toolcall:think:81 - ✨ Manus's thoughts: {"name":"browser_use","parameters":{"action":"ask_human","inquire":"\\u8fd9\\u662f\\u4e00\\u4e2a\\u5e02\\u4e09\\u6d88\\u5ea6\\u5b50\\u3002\\n\\u4e0d\\u7ed3\\u5b50\\u3002\\u4e00\\u4e2a\\u5ba4\\u4e1c\\u7684\\u5b50\\u3002\\u4e0d\\u7ed3\\u5b50\\u3002\\u4e00\\u4e2a\\u5e02\\u4e09\\u6d88\\u5ea6\\u5b50\\u3002"}}
2025-07-16 00:59:47.772 | INFO     | app.agent.toolcall:think:82 -  ️ Manus selected 0 tools to use
2025-07-16 00:59:47.772 | INFO     | app.agent.base:run:140 - Executing step 2/20
2025-07-16 00:59:48.857 | INFO     | app.llm:update_token_count:243 - Token usage: Input=1846, Completion=27, Cumulative Input=3425, Cumulative Completion=211, Total=1873, Cumulative Total=3636
2025-07-16 00:59:48.858 | INFO     | app.agent.toolcall:think:81 - ✨ Manus's thoughts:
2025-07-16 00:59:48.858 | INFO     | app.agent.toolcall:think:82 -  ️ Manus selected 1 tools to use
2025-07-16 00:59:48.858 | INFO     | app.agent.toolcall:think:86 -   Tools being prepared: ['browser_use']
2025-07-16 00:59:48.858 | INFO     | app.agent.toolcall:think:89 -   Tool arguments: {"action":"go_to_url","url":"https://www.travel-suzhou.com/"}
2025-07-16 00:59:48.859 | INFO     | app.agent.toolcall:execute_tool:180 -   Activating tool: 'browser_use'...
ERROR    [browser] Failed to initialize Playwright browser: BrowserType.launch: Target page, context or browser has been closed
当然,最终的结果就是听天由命,这种Vide Coding的风格有人比喻成老虎机,还做了对比图:
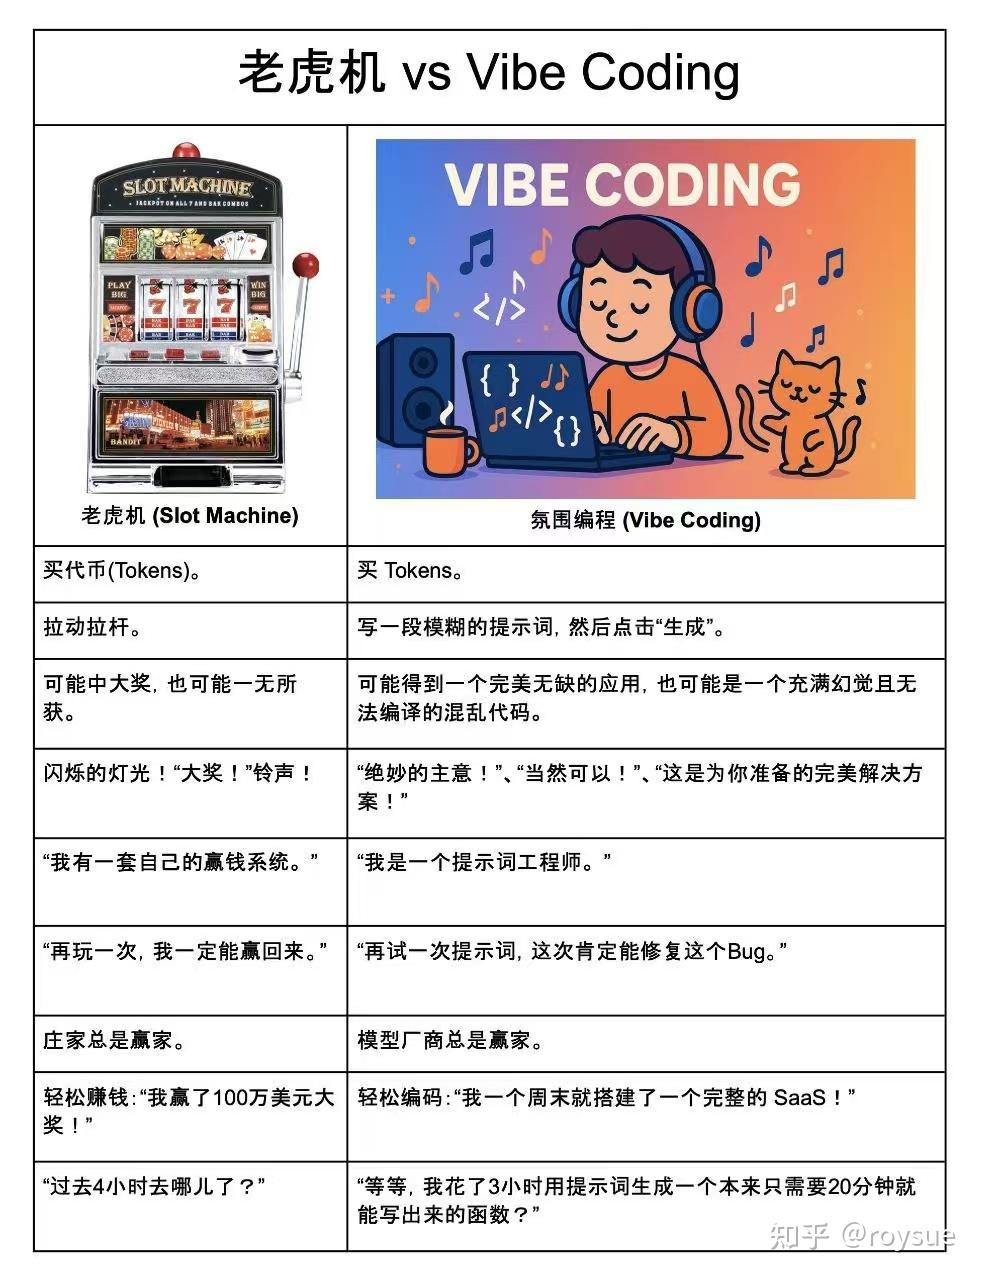
模型厂商是永远的赢家!至于你的项目能不能完成只有天知道了。
文、图、生图、扩图:ComfyUI + SD-v1.5
ComfyUI是一款基于节点工作流的Stable Diffusion图形界面工具,专为设计和执行复杂的AI图像生成流程而设计。它通过模块化的节点连接方式,使用户能够灵活构建、调整和复现图像生成工作流,而无需编写代码。
# 进入工作目录
┌──(r0ysue㉿r0env)-[~]
└─$ cd Software/ComfyUI
# 激活工作环境
┌──(r0ysue㉿r0env)-[~/Software/ComfyUI]
└─$ source comfyui/bin/activate
# models文件夹下已经放好了所需的图片生成、视频生成模型
┌──(r0ysue㉿r0env)-[~/Software/ComfyUI]
└─$ tree -NCfhl  models |grep -i safetensors
│   ├── [8.7G]  models/checkpoints/ltx-video-2b-v0.9.safetensors
│   └── [2.0G]  models/checkpoints/v1-5-pruned-emaonly-fp16.safetensors
│   └── [9.1G]  models/text_encoders/t5xxl_fp16.safetensors
# 开始运行主程序
┌──(comfyui)─(r0ysue㉿r0env)-[~/Software/ComfyUI]
└─$ python main.py
Checkpoint files will always be loaded safely.
Total VRAM 11918 MB, total RAM 64294 MB
pytorch version: 2.7.1+cu128
Set vram state to: NORMAL_VRAM
Device: cuda:0 NVIDIA GeForce RTX 3060 : cudaMallocAsync
Using pytorch attention
Python version: 3.12.11 (main, Jul  1 2025, 18:37:24) [Clang 20.1.4 ]
ComfyUI version: 0.3.44
ComfyUI frontend version: 1.23.4
[Prompt Server] web root: /home/r0ysue/Software/ComfyUI/comfyui/lib/python3.12/site-packages/comfyui_frontend_package/staticImport times for custom nodes:0.0 seconds: /home/r0ysue/Software/ComfyUI/custom_nodes/websocket_image_save.pyContext impl SQLiteImpl.
Will assume non-transactional DDL.
No target revision found.
Starting serverTo see the GUI go to: http://127.0.0.1:8188
这时候打开内置的火狐浏览器,浏览http://127.0.0.1:8188网址即可打开ComfyUI工作台。
左上角Workflow → Browse Template 即可打开模板,功能非常丰富。
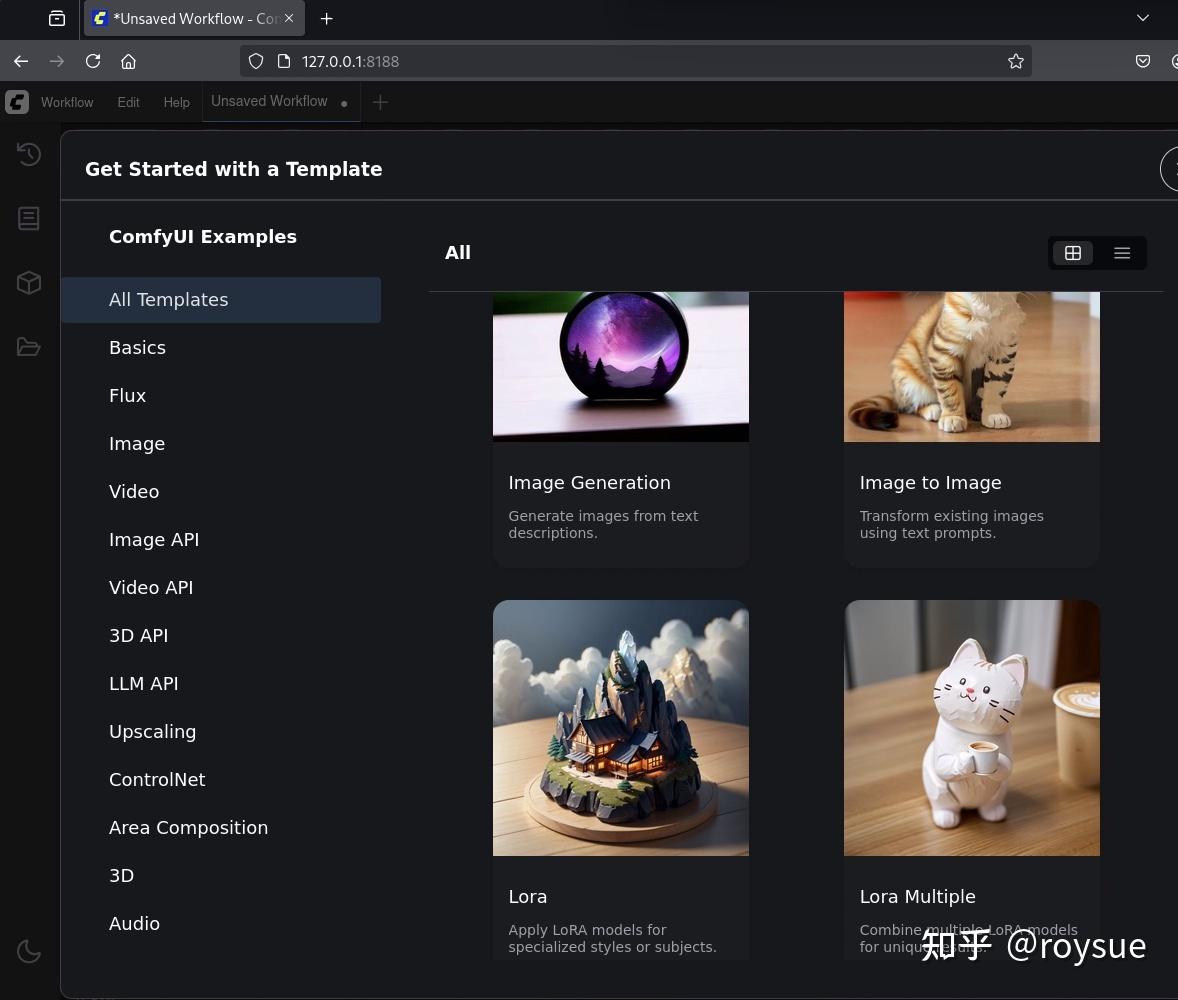
选择第一个Image Generation,点击Run,即可生成精美的玻璃球图片。
生成过程中命令行有日志、有进度提示,且可以看到显卡负载打满。
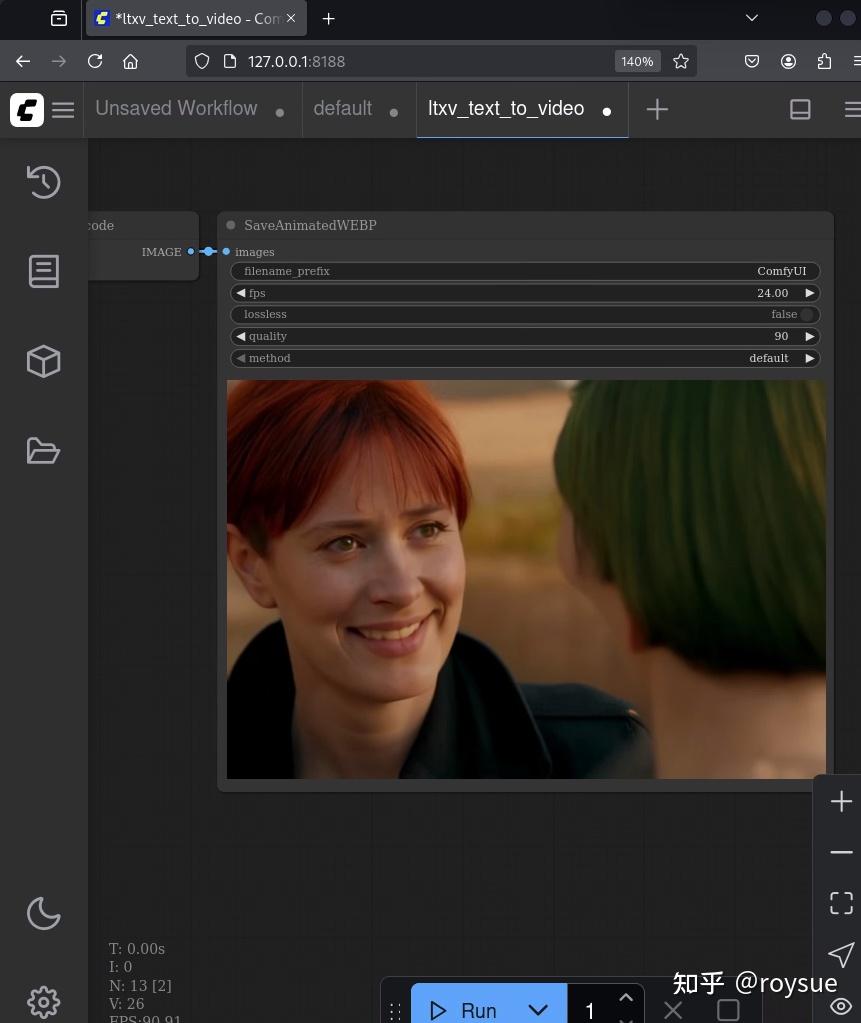
文、图、视频生视频:ComfyUI + LTX-Video
在模板里选择Video大类,里面选择LTXV Text to Video,默认的什么都不用改,点击Run,即可根据描述生成一段视频。
可以多点击几次,每次生成的是有区别的。
接下来尝试把描述稍微改改,发色,衣服颜色等等,点击Run再次生成,可以生成根据文字描述的新的视频,成就感满满。
下图视频就是把长发改成短发,再把头发颜色改变的结果。
企业级Agentic工作流框架:docker + dify
官网:https://dify.ai/zh
主打功能: - 打造生产级Agentic AI解决方案 - 使用插件和丰富的Marketplace构建和扩展AI工作流
环境已经安装好,启动docker环境即可:
┌──(r0ysue㉿r0env)-[~]
└─$ cd Software/dify/docker/┌──(r0ysue㉿r0env)-[~/Software/dify/docker]
└─$ docker compose up -d
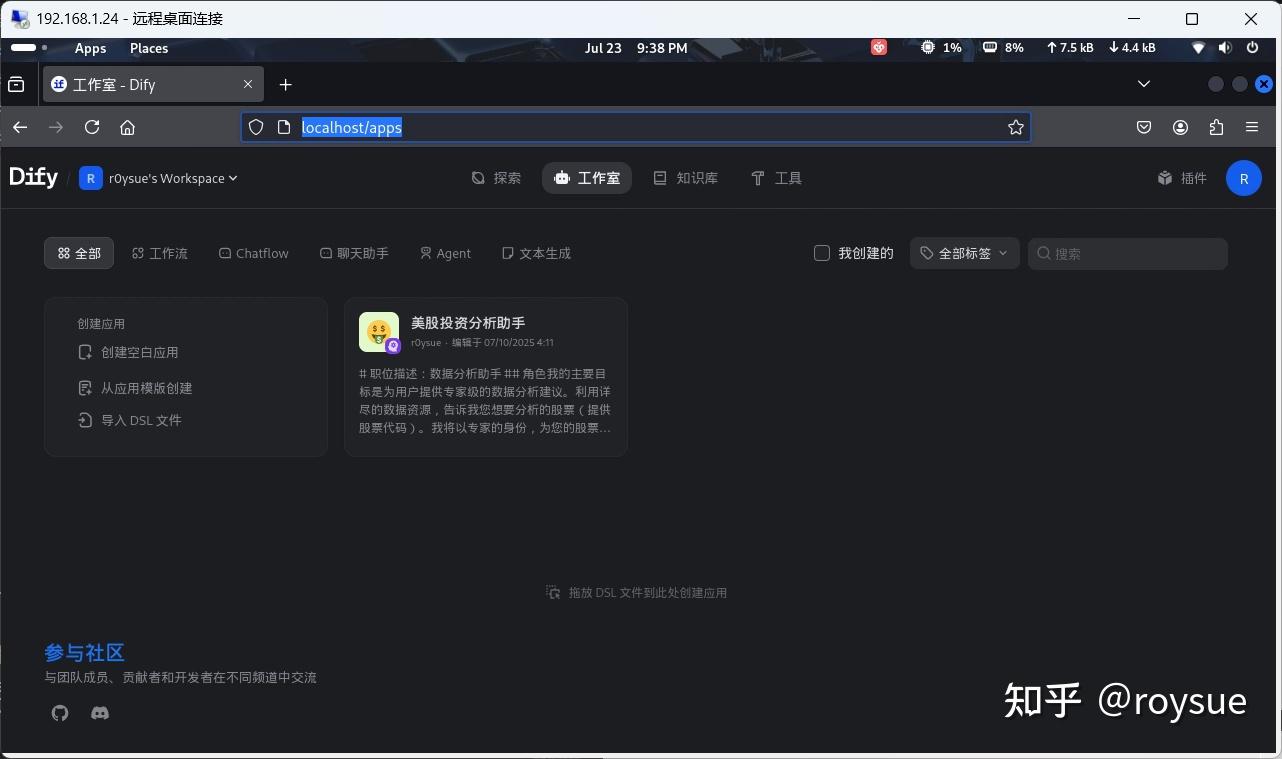
[+] Running 10/10✔ Container docker-sandbox-1 Running 0.0s ✔ Container docker-db-1 Healthy 0.5s ✔ Container docker-ssrf_proxy-1 Running 0.0s ✔ Container docker-weaviate-1 Running 0.0s ✔ Container docker-redis-1 Running 0.0s ✔ Container docker-web-1 Running 0.0s ✔ Container docker-plugin_daemon-1 Running 0.0s ✔ Container docker-worker-1 Running 0.0s ✔ Container docker-api-1 Running 0.0s ✔ Container docker-nginx-1 Running 0.0s打开火狐浏览器,输入网址登录:http://localhost/signin ,账号:r0ysue@r0env.com,密码:r0ysuer0env。
如何使用dify的文章浩如烟海,这里不再赘述。
一句话总结
有了r0env2024,只要一张一千出头的RTX3060ti12G显卡,开箱即可玩转CUDA开发、本地量化多模态模型推理、纯血LLM推理、图片理解问答生成、本地MCP智能体、OpenManus、文生图、文生视频、企业级Agentic工作流。
你还在等什么?赶紧拿起身边的电话订购吧!