Flink-1.19.0源码详解7-Flink集群端调度
Flink是Apache软件基金会下开源的分布式流批一体计算框架,具备实时流计算和高吞吐批处理计算的大数据计算能力。本专栏内容为Flink源码解析的记录与分享。
本文解析的Kafka源码版本为:flink-1.19.0
1.Flink集群端调度概述
在前文 《Flink-1.19.0源码详解5-JobGraph生成-前篇》和《Flink-1.19.0源码详解6-JobGraph生成-后篇》中,已介绍了Flink JobGraph生成的源码,解析了Flink遍历StreamGraph的每个StreamNode节点,逐步生成JobVertex节点、JobEdge边和IntermediateDataSet数据集,逐步构建JobGraph图的完整过程。在完成 JobGraph的生成后,Flink Client会向Yarn中的Flink集群提交调度请求与JobGraph,完成调度从客户端到集群端的转变。
本文从Flink集群接收Flink客户端请求开始,解析Flink集群端的调度(内容为下流程图的红色部分)。解析Flink集群Dispatcher接收了来自CliFrontend客户端发送的Request,从HDFS文件系统拉取JobGraph文件、Jar包和Artifacts依赖 ,创建并启动JobMaster开启Flink的集群端调度。
完整代码解析:
2.Dispatcher接收了CliFrontend客户端发送的Request
当Flink客户端完成JobGraph生成与客户端调度后,Flink CliFrontend客户端会向Yarn中的Flink集群发送调度请求,向Hdfs文件系统上传了JobGraph文件、Jar包和Artifacts依赖。Flink集群的Dispatcher接收到客户端请求后,开始进行Flink集群端调度。
源码图解:
DispatcherRestEndpoint接收到RestClient的JobSubmit请求,会调用JobSubmitHandler的handleRequest()方法处理请求。
JobSubmitHandler接收了客户端发送JobSubmitRequestBody请求体,获取JobGraph、jar、artifacts,并向Dispatcher(DispatcherGateway)提交了JobGraph。
JobSubmitHandler的handleRequest()方法源码:
protected CompletableFuture<JobSubmitResponseBody> handleRequest(@Nonnull HandlerRequest<JobSubmitRequestBody> request,@Nonnull DispatcherGateway gateway)throws RestHandlerException {//获取上传的文件信息final Collection<File> uploadedFiles = request.getUploadedFiles();final Map<String, Path> nameToFile =uploadedFiles.stream().collect(Collectors.toMap(File::getName, Path::fromLocalFile));//...//获取jobSubmit的请求体final JobSubmitRequestBody requestBody = request.getRequestBody();if (requestBody.jobGraphFileName == null) {throw new RestHandlerException(String.format("The %s field must not be omitted or be null.",JobSubmitRequestBody.FIELD_NAME_JOB_GRAPH),HttpResponseStatus.BAD_REQUEST);}//获取JobGraph、jar、artifactsCompletableFuture<JobGraph> jobGraphFuture = loadJobGraph(requestBody, nameToFile);Collection<Path> jarFiles = getJarFilesToUpload(requestBody.jarFileNames, nameToFile);Collection<Tuple2<String, Path>> artifacts =getArtifactFilesToUpload(requestBody.artifactFileNames, nameToFile);CompletableFuture<JobGraph> finalizedJobGraphFuture =uploadJobGraphFiles(gateway, jobGraphFuture, jarFiles, artifacts, configuration);//向Dispatcher(DispatcherGateway)提交JobGraphCompletableFuture<Acknowledge> jobSubmissionFuture =finalizedJobGraphFuture.thenCompose(jobGraph -> gateway.submitJob(jobGraph, timeout));return jobSubmissionFuture.thenCombine(jobGraphFuture,(ack, jobGraph) -> new JobSubmitResponseBody("/jobs/" + jobGraph.getJobID()));
}
执行gateway.submitJob()时,由实现DispatcherGateway接口的Dispatcher执行submitJob()方法 。Dispatcher又经过下面多次调用,进入JobMaster启动。
Dispatcher.submitJob()方法源码:
//继续调用
internalSubmitJob(jobGraph);
Dispatcher.internalSubmitJob()方法源码:
//继续调用
waitForTerminatingJob(jobGraph.getJobID(), jobGraph, this::persistAndRunJob)
Dispatcher.internalSubmitJob()方法调用了Dispatcher.persistAndRunJob()方法进行JobMaster创建。
3.Dispatcher创建JobMasterServiceLeadership
在Dispatcher.persistAndRunJob()方法中,Dispatcher先执行createJobMasterRunner()方法创建了JobMasterServiceLeadership (RunnerJobManagerRunner接口的实现),再执行Dispatcher.runJob()方法启动JobMasterServiceLeadership。
Dispatcher.persistAndRunJob()方法源码:
private void persistAndRunJob(JobGraph jobGraph) throws Exception {jobGraphWriter.putJobGraph(jobGraph);initJobClientExpiredTime(jobGraph);//先调用createJobMasterRunner(),再执行runJob()runJob(createJobMasterRunner(jobGraph), ExecutionType.SUBMISSION);
}
在Dispatcher.createJobMasterRunner()方法中,Dispatcher通过JobManagerRunnerFactory创建了JobMasterServiceLeadership实例(RunnerJobManagerRunner接口的实现)。
Dispatcher.createJobMasterRunner()方法源码:
private JobManagerRunner createJobMasterRunner(JobGraph jobGraph) throws Exception {Preconditions.checkState(!jobManagerRunnerRegistry.isRegistered(jobGraph.getJobID()));//创建JobMasterServiceLeadershipreturn jobManagerRunnerFactory.createJobManagerRunner(jobGraph,configuration,getRpcService(),highAvailabilityServices,heartbeatServices,jobManagerSharedServices,new DefaultJobManagerJobMetricGroupFactory(jobManagerMetricGroup),fatalErrorHandler,failureEnrichers,System.currentTimeMillis());
}
在Dispatcher.runJob()方法则启动了JobMasterServiceLeadership。
Dispatcher.runJob()方法源码:
private void runJob(JobManagerRunner jobManagerRunner, ExecutionType executionType)throws Exception {//启动JobMasterServiceLeadershipjobManagerRunner.start();//...
}
4.JobMasterServiceLeadership启动并启动JobMaster
JobMasterServiceLeadership需要走一遍Flink的选举流程,然后启动JobMaster,由于选举流程经历了大量封装和调用,具体解析见下图的源码图解。
源码图解:
最终由DefaultJobMasterServiceFactory的internalCreateJobMasterService()方法创建并启动JobMaster实例。
DefaultJobMasterServiceFactory.internalCreateJobMasterService()方法源码:
private JobMasterService internalCreateJobMasterService(UUID leaderSessionId, OnCompletionActions onCompletionActions) throws Exception {//创建JobMaster实例final JobMaster jobMaster =new JobMaster(rpcService,JobMasterId.fromUuidOrNull(leaderSessionId),jobMasterConfiguration,ResourceID.generate(),jobGraph,haServices,slotPoolServiceSchedulerFactory,jobManagerSharedServices,heartbeatServices,jobManagerJobMetricGroupFactory,onCompletionActions,fatalErrorHandler,userCodeClassloader,shuffleMaster,lookup ->new JobMasterPartitionTrackerImpl(jobGraph.getJobID(), shuffleMaster, lookup),new DefaultExecutionDeploymentTracker(),DefaultExecutionDeploymentReconciler::new,BlocklistUtils.loadBlocklistHandlerFactory(jobMasterConfiguration.getConfiguration()),failureEnrichers,initializationTimestamp);//启动JobMasterjobMaster.start();return jobMaster;
}
5.JobMaster创建
DefaultJobMasterServiceFactory的internalCreateJobMasterService()方法创建了JobMaster实例。
//创建JobMaster实例
final JobMaster jobMaster =new JobMaster(rpcService,JobMasterId.fromUuidOrNull(leaderSessionId),jobMasterConfiguration,ResourceID.generate(),jobGraph,haServices,slotPoolServiceSchedulerFactory,jobManagerSharedServices,heartbeatServices,jobManagerJobMetricGroupFactory,onCompletionActions,fatalErrorHandler,userCodeClassloader,shuffleMaster,lookup ->new JobMasterPartitionTrackerImpl(jobGraph.getJobID(), shuffleMaster, lookup),new DefaultExecutionDeploymentTracker(),DefaultExecutionDeploymentReconciler::new,BlocklistUtils.loadBlocklistHandlerFactory(jobMasterConfiguration.getConfiguration()),failureEnrichers,initializationTimestamp);
源码图解:
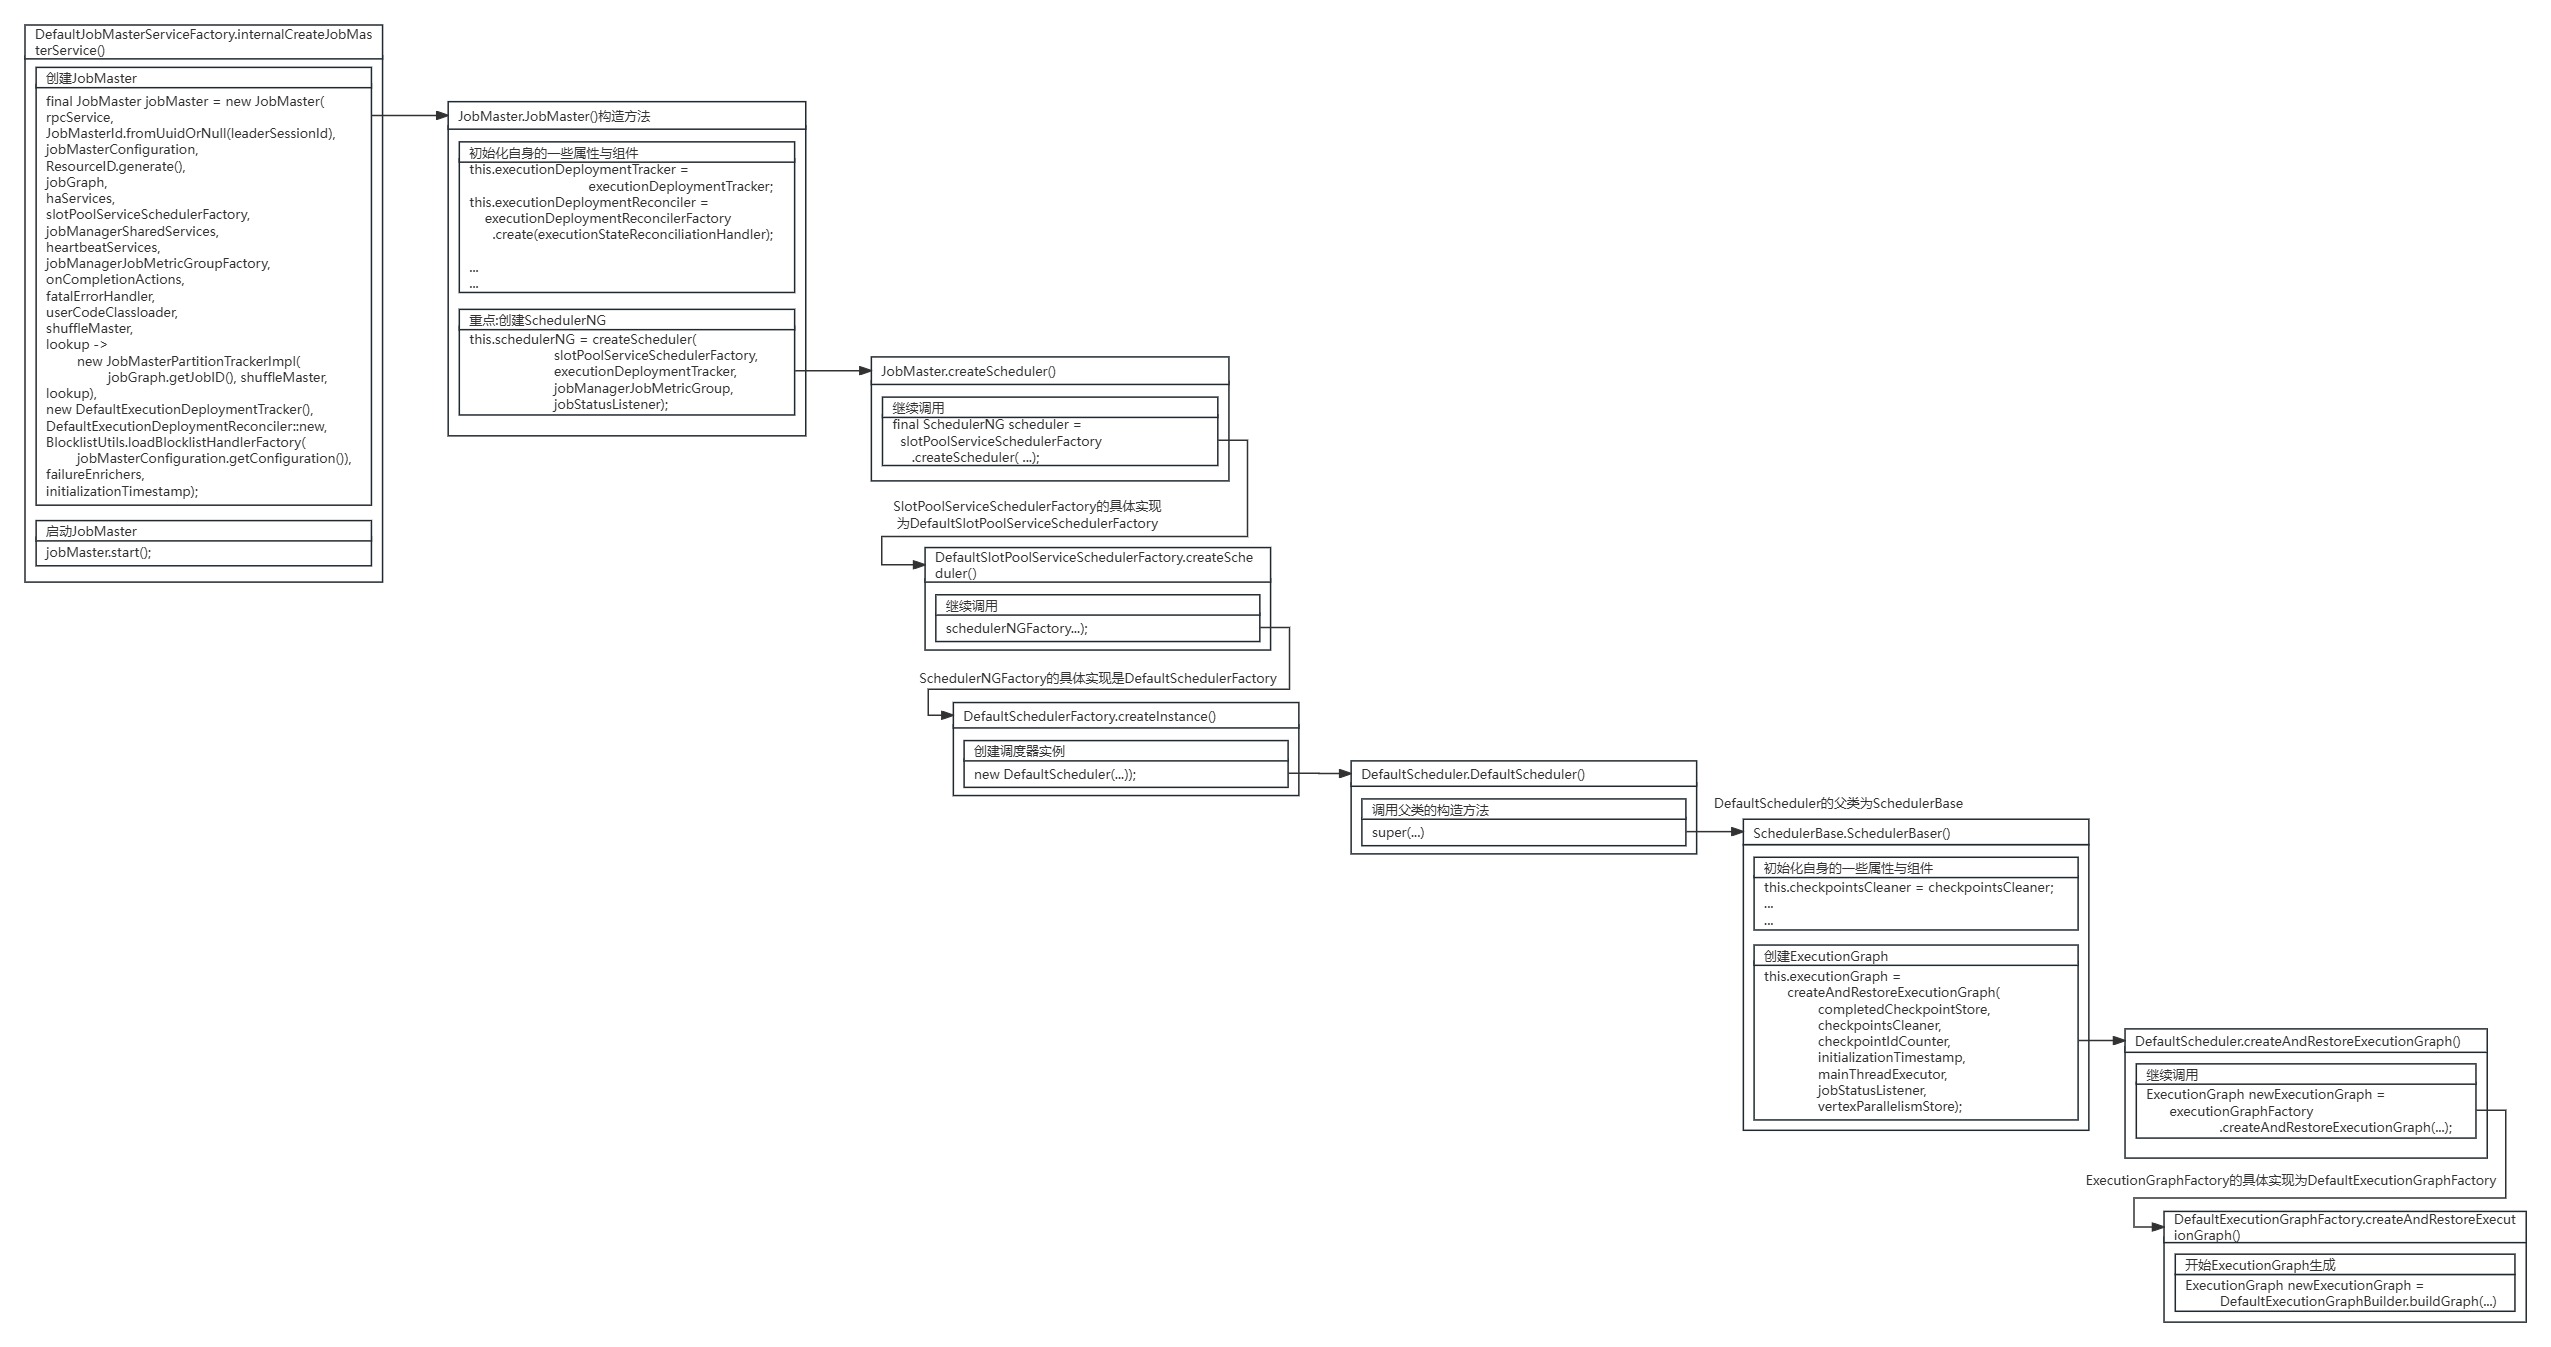
首先进入JobMaster的构造方法,JobMaster的构造方法初始化了自身的一些属性与组件,重点关注SchedulerNG的创建。
JobMaster.JobMaster()构造方法源码:
public JobMaster(RpcService rpcService,JobMasterId jobMasterId,JobMasterConfiguration jobMasterConfiguration,ResourceID resourceId,JobGraph jobGraph,HighAvailabilityServices highAvailabilityService,SlotPoolServiceSchedulerFactory slotPoolServiceSchedulerFactory,JobManagerSharedServices jobManagerSharedServices,HeartbeatServices heartbeatServices,JobManagerJobMetricGroupFactory jobMetricGroupFactory,OnCompletionActions jobCompletionActions,FatalErrorHandler fatalErrorHandler,ClassLoader userCodeLoader,ShuffleMaster<?> shuffleMaster,PartitionTrackerFactory partitionTrackerFactory,ExecutionDeploymentTracker executionDeploymentTracker,ExecutionDeploymentReconciler.Factory executionDeploymentReconcilerFactory,BlocklistHandler.Factory blocklistHandlerFactory,Collection<FailureEnricher> failureEnrichers,long initializationTimestamp)throws Exception {super(rpcService, RpcServiceUtils.createRandomName(JOB_MANAGER_NAME), jobMasterId);final ExecutionDeploymentReconciliationHandler executionStateReconciliationHandler =new ExecutionDeploymentReconciliationHandler() {@Overridepublic void onMissingDeploymentsOf(Collection<ExecutionAttemptID> executionAttemptIds, ResourceID host) {log.debug("Failing deployments {} due to no longer being deployed.",executionAttemptIds);for (ExecutionAttemptID executionAttemptId : executionAttemptIds) {schedulerNG.updateTaskExecutionState(new TaskExecutionState(executionAttemptId,ExecutionState.FAILED,new FlinkException(String.format("Execution %s is unexpectedly no longer running on task executor %s.",executionAttemptId, host))));}}@Overridepublic void onUnknownDeploymentsOf(Collection<ExecutionAttemptID> executionAttemptIds, ResourceID host) {log.debug("Canceling left-over deployments {} on task executor {}.",executionAttemptIds,host);for (ExecutionAttemptID executionAttemptId : executionAttemptIds) {TaskManagerRegistration taskManagerRegistration =registeredTaskManagers.get(host);if (taskManagerRegistration != null) {taskManagerRegistration.getTaskExecutorGateway().cancelTask(executionAttemptId, rpcTimeout);}}}};//初始化自身的一些属性与组件this.executionDeploymentTracker = executionDeploymentTracker;this.executionDeploymentReconciler =executionDeploymentReconcilerFactory.create(executionStateReconciliationHandler);this.jobMasterConfiguration = checkNotNull(jobMasterConfiguration);this.resourceId = checkNotNull(resourceId);this.jobGraph = checkNotNull(jobGraph);this.rpcTimeout = jobMasterConfiguration.getRpcTimeout();this.highAvailabilityServices = checkNotNull(highAvailabilityService);this.blobWriter = jobManagerSharedServices.getBlobWriter();this.futureExecutor = jobManagerSharedServices.getFutureExecutor();this.ioExecutor = jobManagerSharedServices.getIoExecutor();this.jobCompletionActions = checkNotNull(jobCompletionActions);this.fatalErrorHandler = checkNotNull(fatalErrorHandler);this.userCodeLoader = checkNotNull(userCodeLoader);this.initializationTimestamp = initializationTimestamp;this.retrieveTaskManagerHostName =jobMasterConfiguration.getConfiguration().get(JobManagerOptions.RETRIEVE_TASK_MANAGER_HOSTNAME);final String jobName = jobGraph.getName();final JobID jid = jobGraph.getJobID();log.info("Initializing job '{}' ({}).", jobName, jid);resourceManagerLeaderRetriever =highAvailabilityServices.getResourceManagerLeaderRetriever();this.registeredTaskManagers = new HashMap<>();this.blocklistHandler =blocklistHandlerFactory.create(new JobMasterBlocklistContext(),this::getNodeIdOfTaskManager,getMainThreadExecutor(),log);this.slotPoolService =checkNotNull(slotPoolServiceSchedulerFactory).createSlotPoolService(jid,createDeclarativeSlotPoolFactory(jobMasterConfiguration.getConfiguration()));this.partitionTracker =checkNotNull(partitionTrackerFactory).create(resourceID -> {return Optional.ofNullable(registeredTaskManagers.get(resourceID)).map(TaskManagerRegistration::getTaskExecutorGateway);});this.shuffleMaster = checkNotNull(shuffleMaster);this.jobManagerJobMetricGroup = jobMetricGroupFactory.create(jobGraph);this.jobStatusListener = new JobManagerJobStatusListener();this.failureEnrichers = checkNotNull(failureEnrichers);//重点:创建SchedulerNGthis.schedulerNG =createScheduler(slotPoolServiceSchedulerFactory,executionDeploymentTracker,jobManagerJobMetricGroup,jobStatusListener);this.heartbeatServices = checkNotNull(heartbeatServices);this.taskManagerHeartbeatManager = NoOpHeartbeatManager.getInstance();this.resourceManagerHeartbeatManager = NoOpHeartbeatManager.getInstance();this.resourceManagerConnection = null;this.establishedResourceManagerConnection = null;this.accumulators = new HashMap<>();
}
执行JobMaster.createScheduler()方法创建SchedulerNG后,又经过下图一系列调用,最终执行到SchedulerBase.SchedulerBase()构造方法。
源码图解:
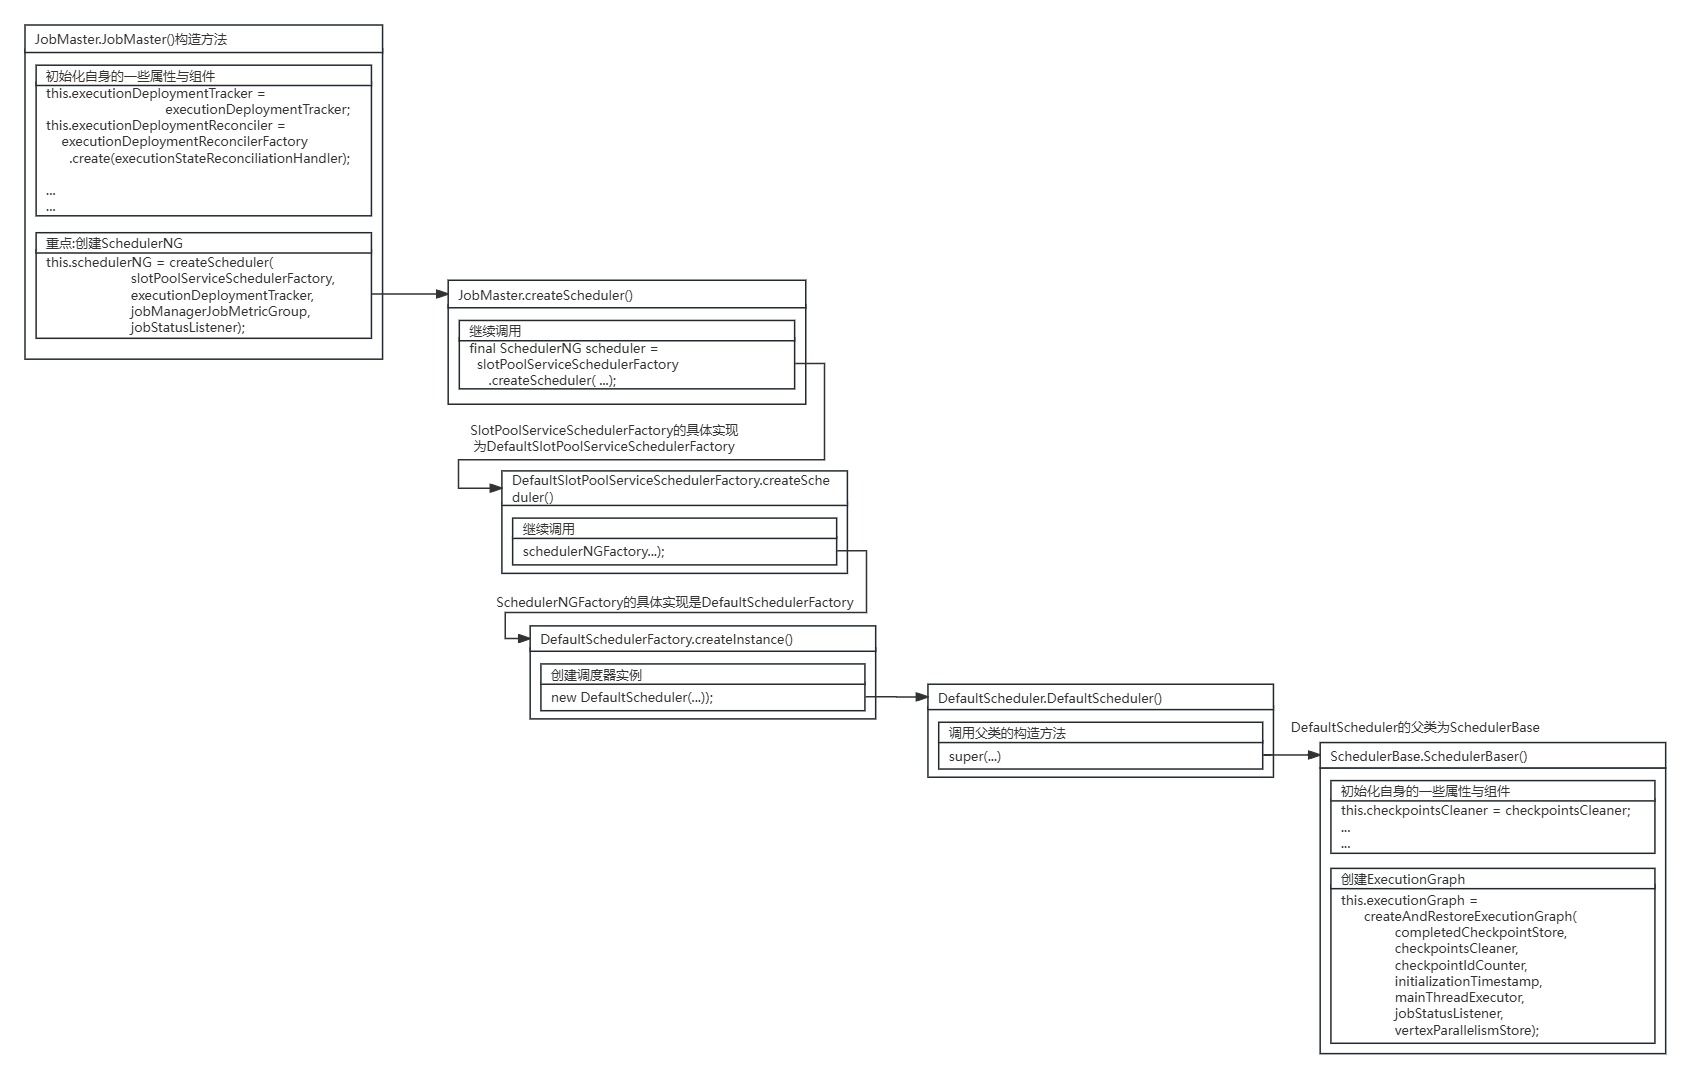
SchedulerBase的构造方法通过createAndRestoreExecutionGraph()方法进行ExecutionGraph的创建。
SchedulerBase.SchedulerBase()构造方法源码:
public SchedulerBase(final Logger log,final JobGraph jobGraph,final Executor ioExecutor,final Configuration jobMasterConfiguration,final CheckpointsCleaner checkpointsCleaner,final CheckpointRecoveryFactory checkpointRecoveryFactory,final JobManagerJobMetricGroup jobManagerJobMetricGroup,final ExecutionVertexVersioner executionVertexVersioner,long initializationTimestamp,final ComponentMainThreadExecutor mainThreadExecutor,final JobStatusListener jobStatusListener,final ExecutionGraphFactory executionGraphFactory,final VertexParallelismStore vertexParallelismStore)throws Exception {this.log = checkNotNull(log);this.jobGraph = checkNotNull(jobGraph);this.jobInfo = new JobInfoImpl(jobGraph.getJobID(), jobGraph.getName());this.executionGraphFactory = executionGraphFactory;this.jobManagerJobMetricGroup = checkNotNull(jobManagerJobMetricGroup);this.executionVertexVersioner = checkNotNull(executionVertexVersioner);this.mainThreadExecutor = mainThreadExecutor;this.checkpointsCleaner = checkpointsCleaner;this.completedCheckpointStore =SchedulerUtils.createCompletedCheckpointStoreIfCheckpointingIsEnabled(jobGraph,jobMasterConfiguration,checkNotNull(checkpointRecoveryFactory),ioExecutor,log);this.checkpointIdCounter =SchedulerUtils.createCheckpointIDCounterIfCheckpointingIsEnabled(jobGraph, checkNotNull(checkpointRecoveryFactory));this.jobStatusMetricsSettings =MetricOptions.JobStatusMetricsSettings.fromConfiguration(jobMasterConfiguration);this.deploymentStateTimeMetrics =new DeploymentStateTimeMetrics(jobGraph.getJobType(), jobStatusMetricsSettings);//创建ExecutionGraphthis.executionGraph =createAndRestoreExecutionGraph(completedCheckpointStore,checkpointsCleaner,checkpointIdCounter,initializationTimestamp,mainThreadExecutor,jobStatusListener,vertexParallelismStore);this.schedulingTopology = executionGraph.getSchedulingTopology();stateLocationRetriever =executionVertexId ->getExecutionVertex(executionVertexId).getPreferredLocationBasedOnState();inputsLocationsRetriever =new ExecutionGraphToInputsLocationsRetrieverAdapter(executionGraph);this.kvStateHandler = new KvStateHandler(executionGraph);this.executionGraphHandler =new ExecutionGraphHandler(executionGraph, log, ioExecutor, this.mainThreadExecutor);this.operatorCoordinatorHandler =new DefaultOperatorCoordinatorHandler(executionGraph, this::handleGlobalFailure);operatorCoordinatorHandler.initializeOperatorCoordinators(this.mainThreadExecutor);this.exceptionHistory =new BoundedFIFOQueue<>(jobMasterConfiguration.get(WebOptions.MAX_EXCEPTION_HISTORY_SIZE));this.vertexEndOfDataListener = new VertexEndOfDataListener(executionGraph);
}
SchedulerBase.createAndRestoreExecutionGraph()方法为ExecutionGraph创建的入口。
源码图解:
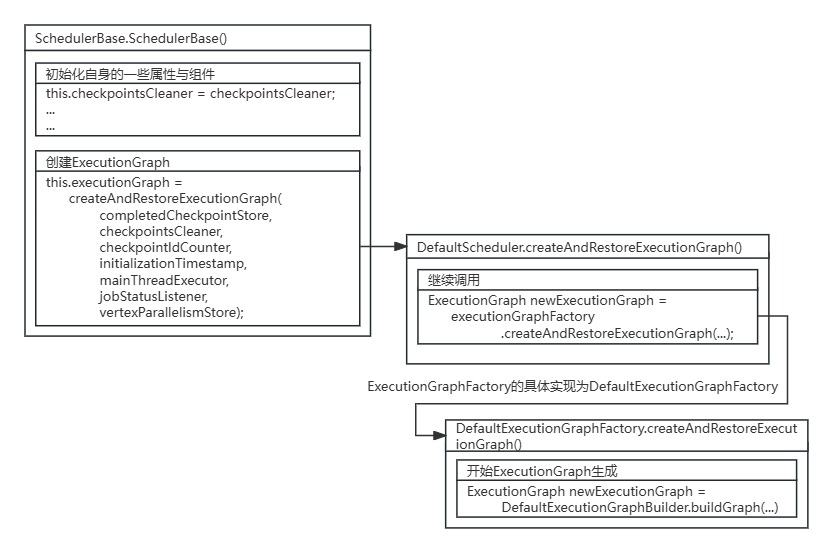
SchedulerBase又通过ExecutionGraphFactory进行ExecutionGraph创建。
SchedulerBase.createAndRestoreExecutionGraph()方法源码:
private ExecutionGraph createAndRestoreExecutionGraph(CompletedCheckpointStore completedCheckpointStore,CheckpointsCleaner checkpointsCleaner,CheckpointIDCounter checkpointIdCounter,long initializationTimestamp,ComponentMainThreadExecutor mainThreadExecutor,JobStatusListener jobStatusListener,VertexParallelismStore vertexParallelismStore)throws Exception {//通过executionGraphFactory创建ExecutionGraphfinal ExecutionGraph newExecutionGraph =executionGraphFactory.createAndRestoreExecutionGraph(jobGraph,completedCheckpointStore,checkpointsCleaner,checkpointIdCounter,TaskDeploymentDescriptorFactory.PartitionLocationConstraint.fromJobType(jobGraph.getJobType()),initializationTimestamp,new DefaultVertexAttemptNumberStore(),vertexParallelismStore,deploymentStateTimeMetrics,getMarkPartitionFinishedStrategy(),log);newExecutionGraph.setInternalTaskFailuresListener(new UpdateSchedulerNgOnInternalFailuresListener(this));newExecutionGraph.registerJobStatusListener(jobStatusListener);newExecutionGraph.start(mainThreadExecutor);return newExecutionGraph;
}
ExecutionGraphFactory的实现为DefaultExecutionGraphFactory,进入DefaultExecutionGraphFactory的createAndRestoreExecutionGraph()方法。
DefaultExecutionGraphFactory.createAndRestoreExecutionGraph()方法源码:
public ExecutionGraph createAndRestoreExecutionGraph(JobGraph jobGraph,CompletedCheckpointStore completedCheckpointStore,CheckpointsCleaner checkpointsCleaner,CheckpointIDCounter checkpointIdCounter,TaskDeploymentDescriptorFactory.PartitionLocationConstraint partitionLocationConstraint,long initializationTimestamp,VertexAttemptNumberStore vertexAttemptNumberStore,VertexParallelismStore vertexParallelismStore,ExecutionStateUpdateListener executionStateUpdateListener,MarkPartitionFinishedStrategy markPartitionFinishedStrategy,Logger log)throws Exception {ExecutionDeploymentListener executionDeploymentListener =new ExecutionDeploymentTrackerDeploymentListenerAdapter(executionDeploymentTracker);ExecutionStateUpdateListener combinedExecutionStateUpdateListener =(execution, previousState, newState) -> {executionStateUpdateListener.onStateUpdate(execution, previousState, newState);if (newState.isTerminal()) {executionDeploymentTracker.stopTrackingDeploymentOf(execution);}};int totalNumberOfSubTasks =StreamSupport.stream(jobGraph.getVertices().spliterator(), false).mapToInt(jobVertex ->vertexParallelismStore.getParallelismInfo(jobVertex.getID()).getParallelism()).sum();final ExecutionGraph newExecutionGraph =DefaultExecutionGraphBuilder.buildGraph(jobGraph,configuration,futureExecutor,ioExecutor,userCodeClassLoader,completedCheckpointStore,checkpointsCleaner,checkpointIdCounter,rpcTimeout,blobWriter,log,shuffleMaster,jobMasterPartitionTracker,partitionLocationConstraint,executionDeploymentListener,combinedExecutionStateUpdateListener,initializationTimestamp,vertexAttemptNumberStore,vertexParallelismStore,// We are caching CheckpointStatsTracker, but we also need to update it with// new parallelism info() ->checkpointStatsTrackerFactory.get().updateTotalNumberOfSubtasks(totalNumberOfSubTasks),isDynamicGraph,executionJobVertexFactory,markPartitionFinishedStrategy,nonFinishedHybridPartitionShouldBeUnknown,jobManagerJobMetricGroup);final CheckpointCoordinator checkpointCoordinator =newExecutionGraph.getCheckpointCoordinator();if (checkpointCoordinator != null) {// check whether we find a valid checkpointif (!checkpointCoordinator.restoreInitialCheckpointIfPresent(new HashSet<>(newExecutionGraph.getAllVertices().values()))) {// check whether we can restore from a savepointtryRestoreExecutionGraphFromSavepoint(newExecutionGraph, jobGraph.getSavepointRestoreSettings());}}return newExecutionGraph;
}
最终DefaultExecutionGraphFactory通过调用DefaultExecutionGraphBuilder.buildGraph()方法进行ExecutionGraph创建。
ExecutionGraph的创建为Flink调度的重点部分,具体内容在下篇博文《Flink-1.19.0源码详解8-ExecutionGraph生成》详细展开。
6.JobMaster启动
在完成JobMaster的创建后,DefaultJobMasterServiceFactory将进行JobMaster的启动。
DefaultJobMasterServiceFactory.internalCreateJobMasterService()方法源码:
private JobMasterService internalCreateJobMasterService(UUID leaderSessionId, OnCompletionActions onCompletionActions) throws Exception {//创建JobMaster实例final JobMaster jobMaster =new JobMaster(rpcService,JobMasterId.fromUuidOrNull(leaderSessionId),jobMasterConfiguration,ResourceID.generate(),jobGraph,haServices,slotPoolServiceSchedulerFactory,jobManagerSharedServices,heartbeatServices,jobManagerJobMetricGroupFactory,onCompletionActions,fatalErrorHandler,userCodeClassloader,shuffleMaster,lookup ->new JobMasterPartitionTrackerImpl(jobGraph.getJobID(), shuffleMaster, lookup),new DefaultExecutionDeploymentTracker(),DefaultExecutionDeploymentReconciler::new,BlocklistUtils.loadBlocklistHandlerFactory(jobMasterConfiguration.getConfiguration()),failureEnrichers,initializationTimestamp);//启动JobMasterjobMaster.start();return jobMaster;
}
源码图解:
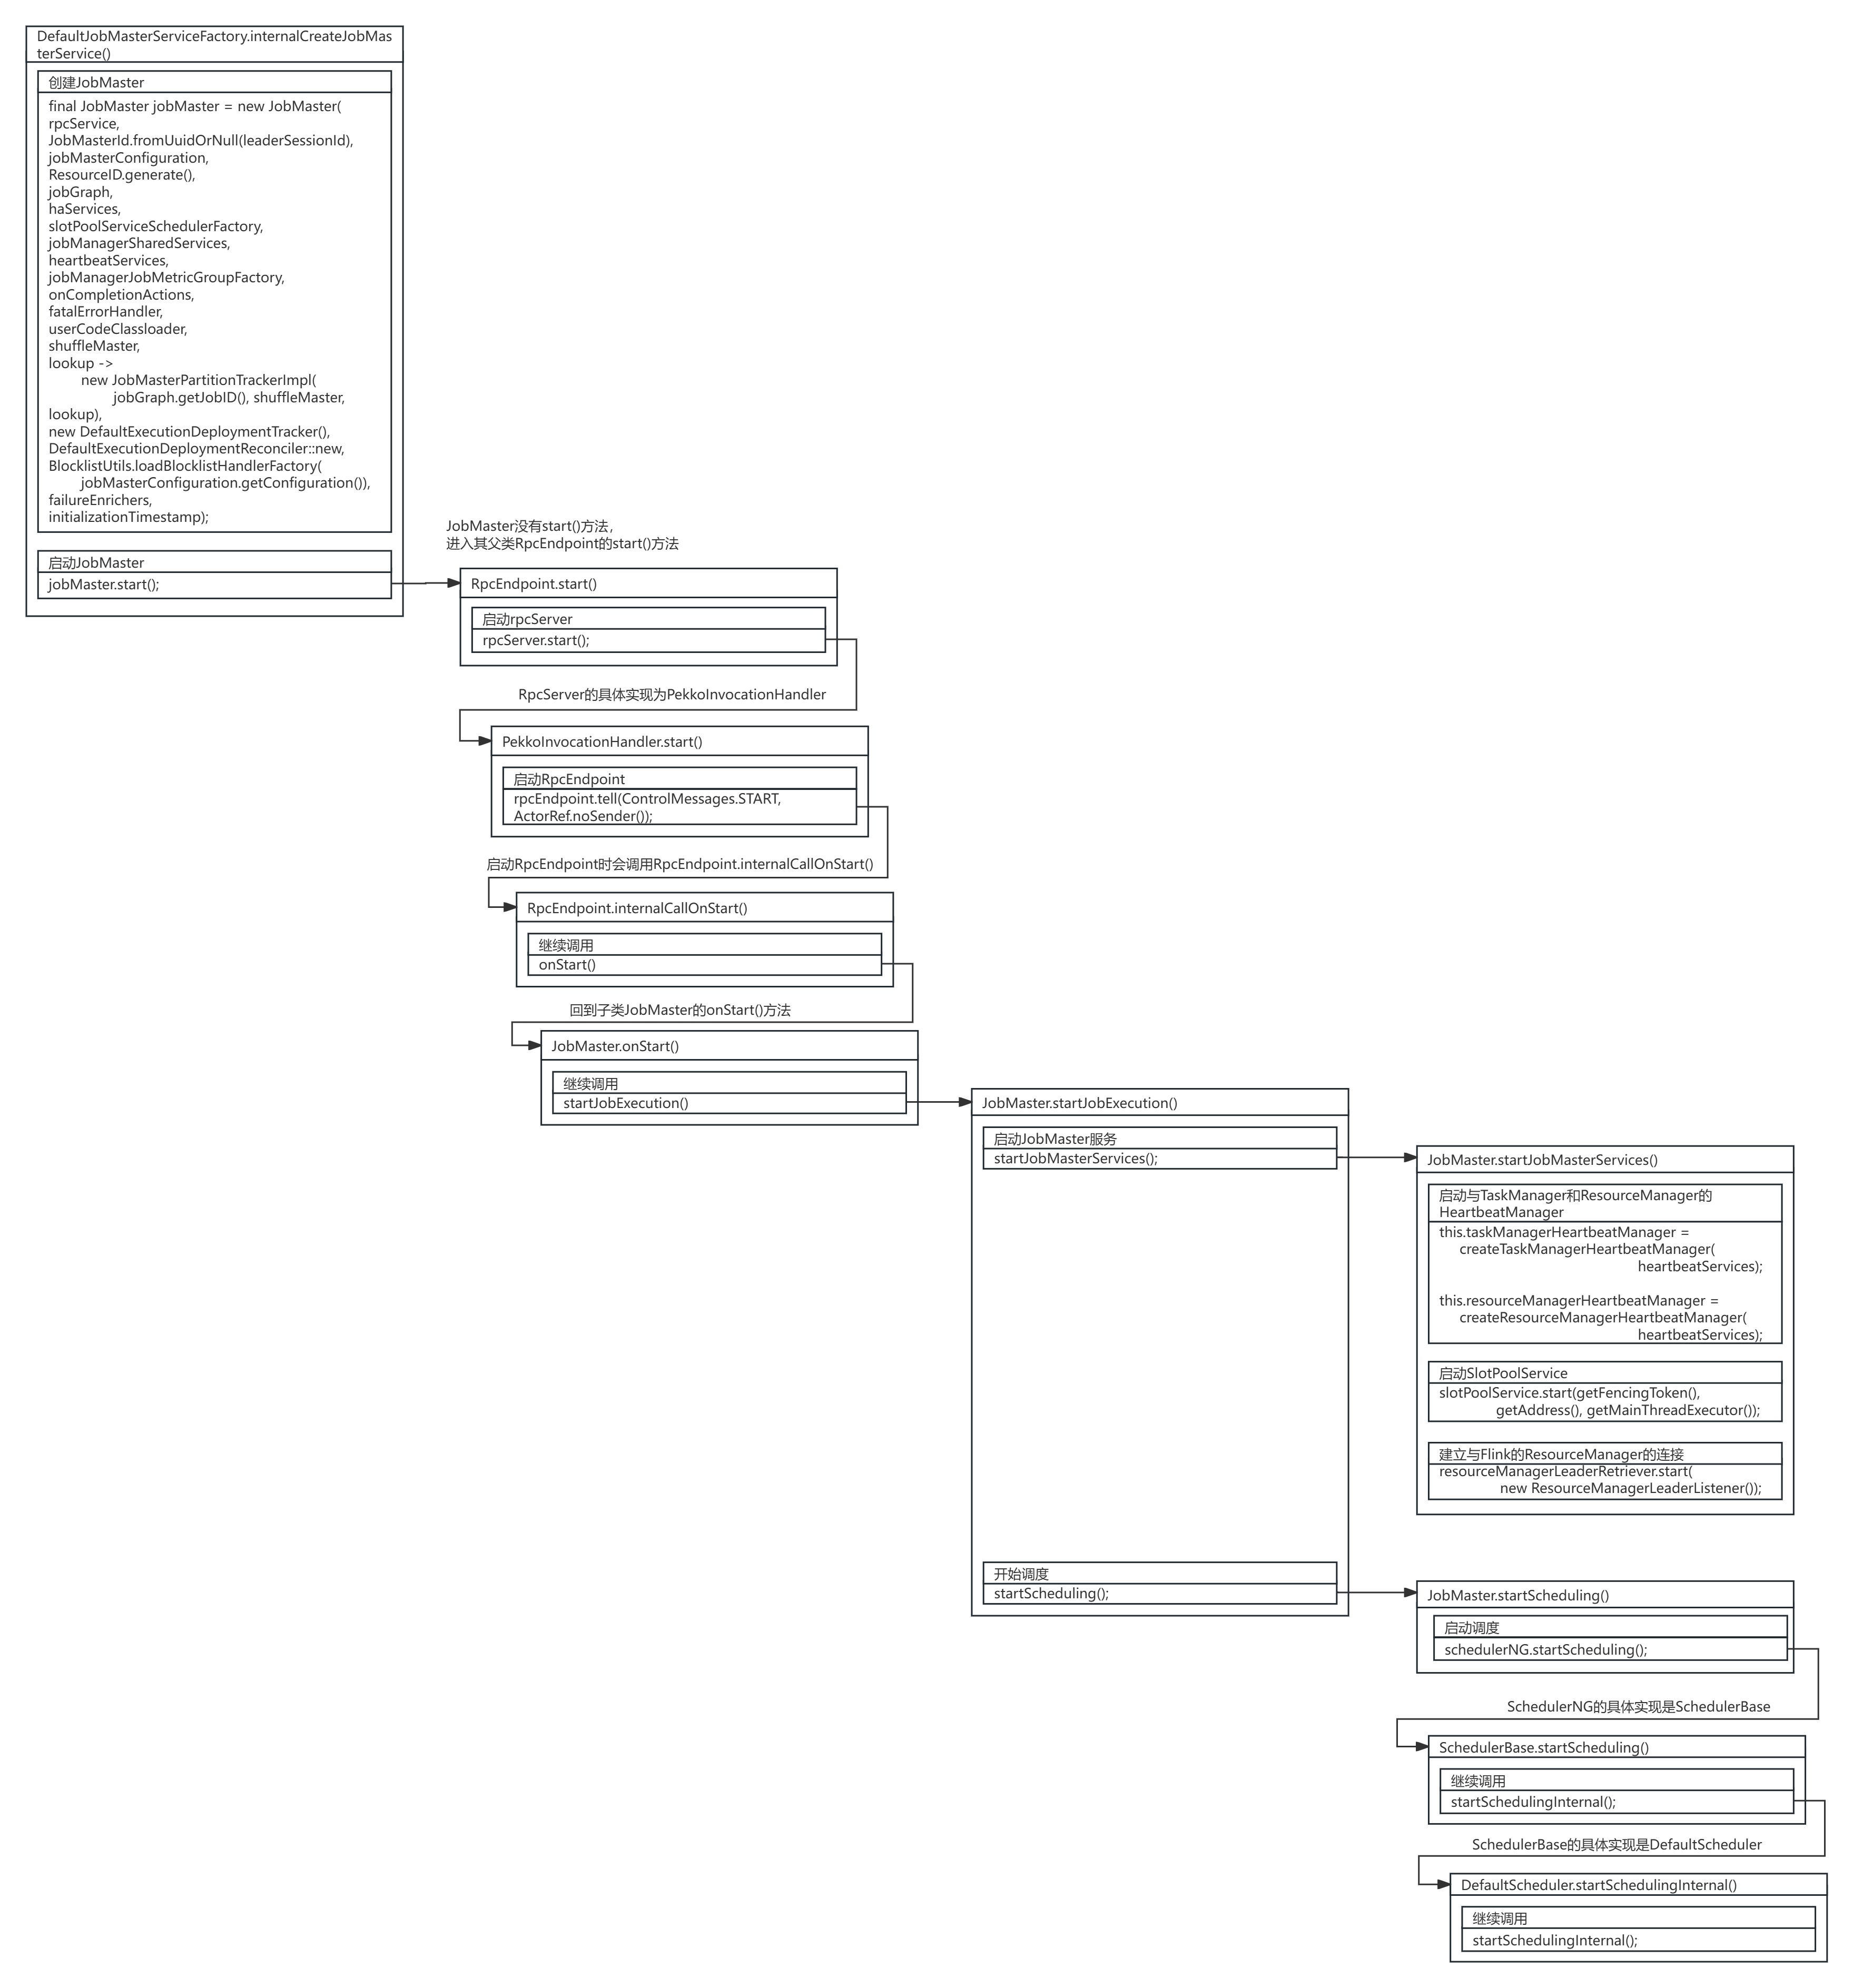
JobMaster启动经过下列一系列调用,进入JobMaster的startJobExecution()方法,开始具体JobMaster启动。
源码图解:
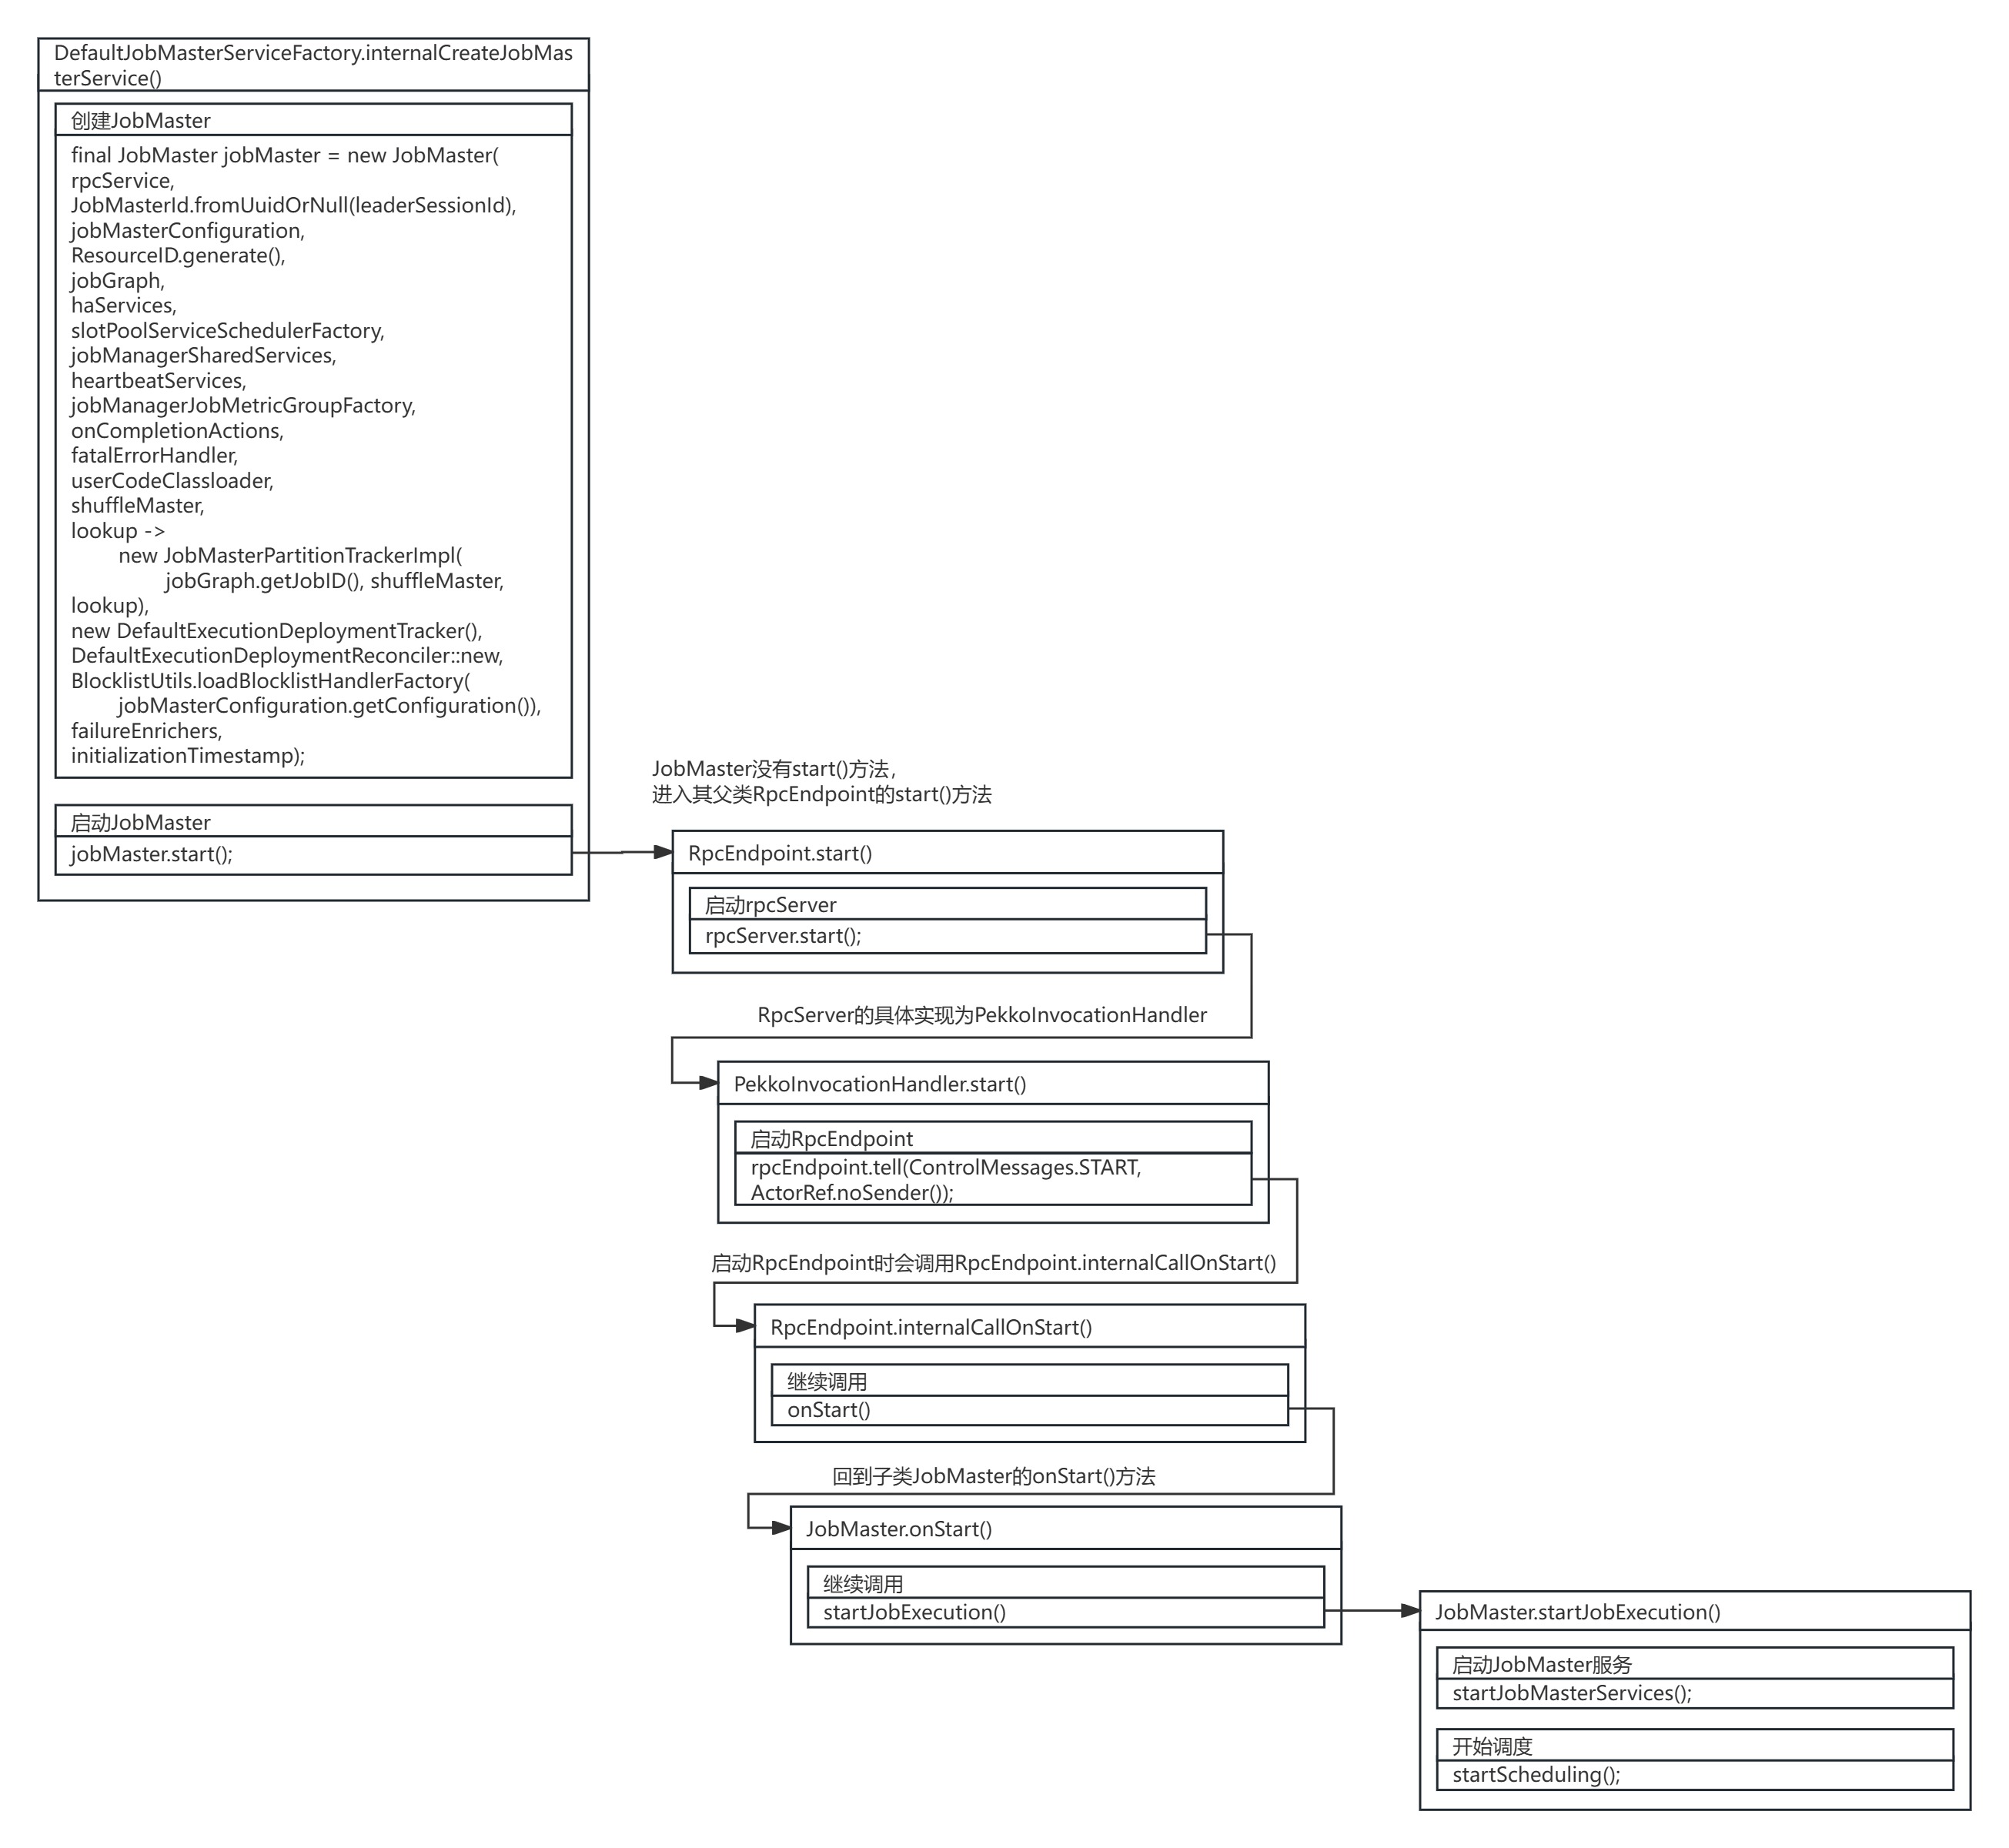
JobMaster的startJobExecution()方法启动了JobMaster服务,并开启了JobMaster调度。
JobMaster.startJobExecution()方法源码:
private void startJobExecution() throws Exception {validateRunsInMainThread();JobShuffleContext context = new JobShuffleContextImpl(jobGraph.getJobID(), this);shuffleMaster.registerJob(context);//启动JobMaster服务startJobMasterServices();log.info("Starting execution of job '{}' ({}) under job master id {}.",jobGraph.getName(),jobGraph.getJobID(),getFencingToken());//开始JobMaster调度startScheduling();
}
源码图解:
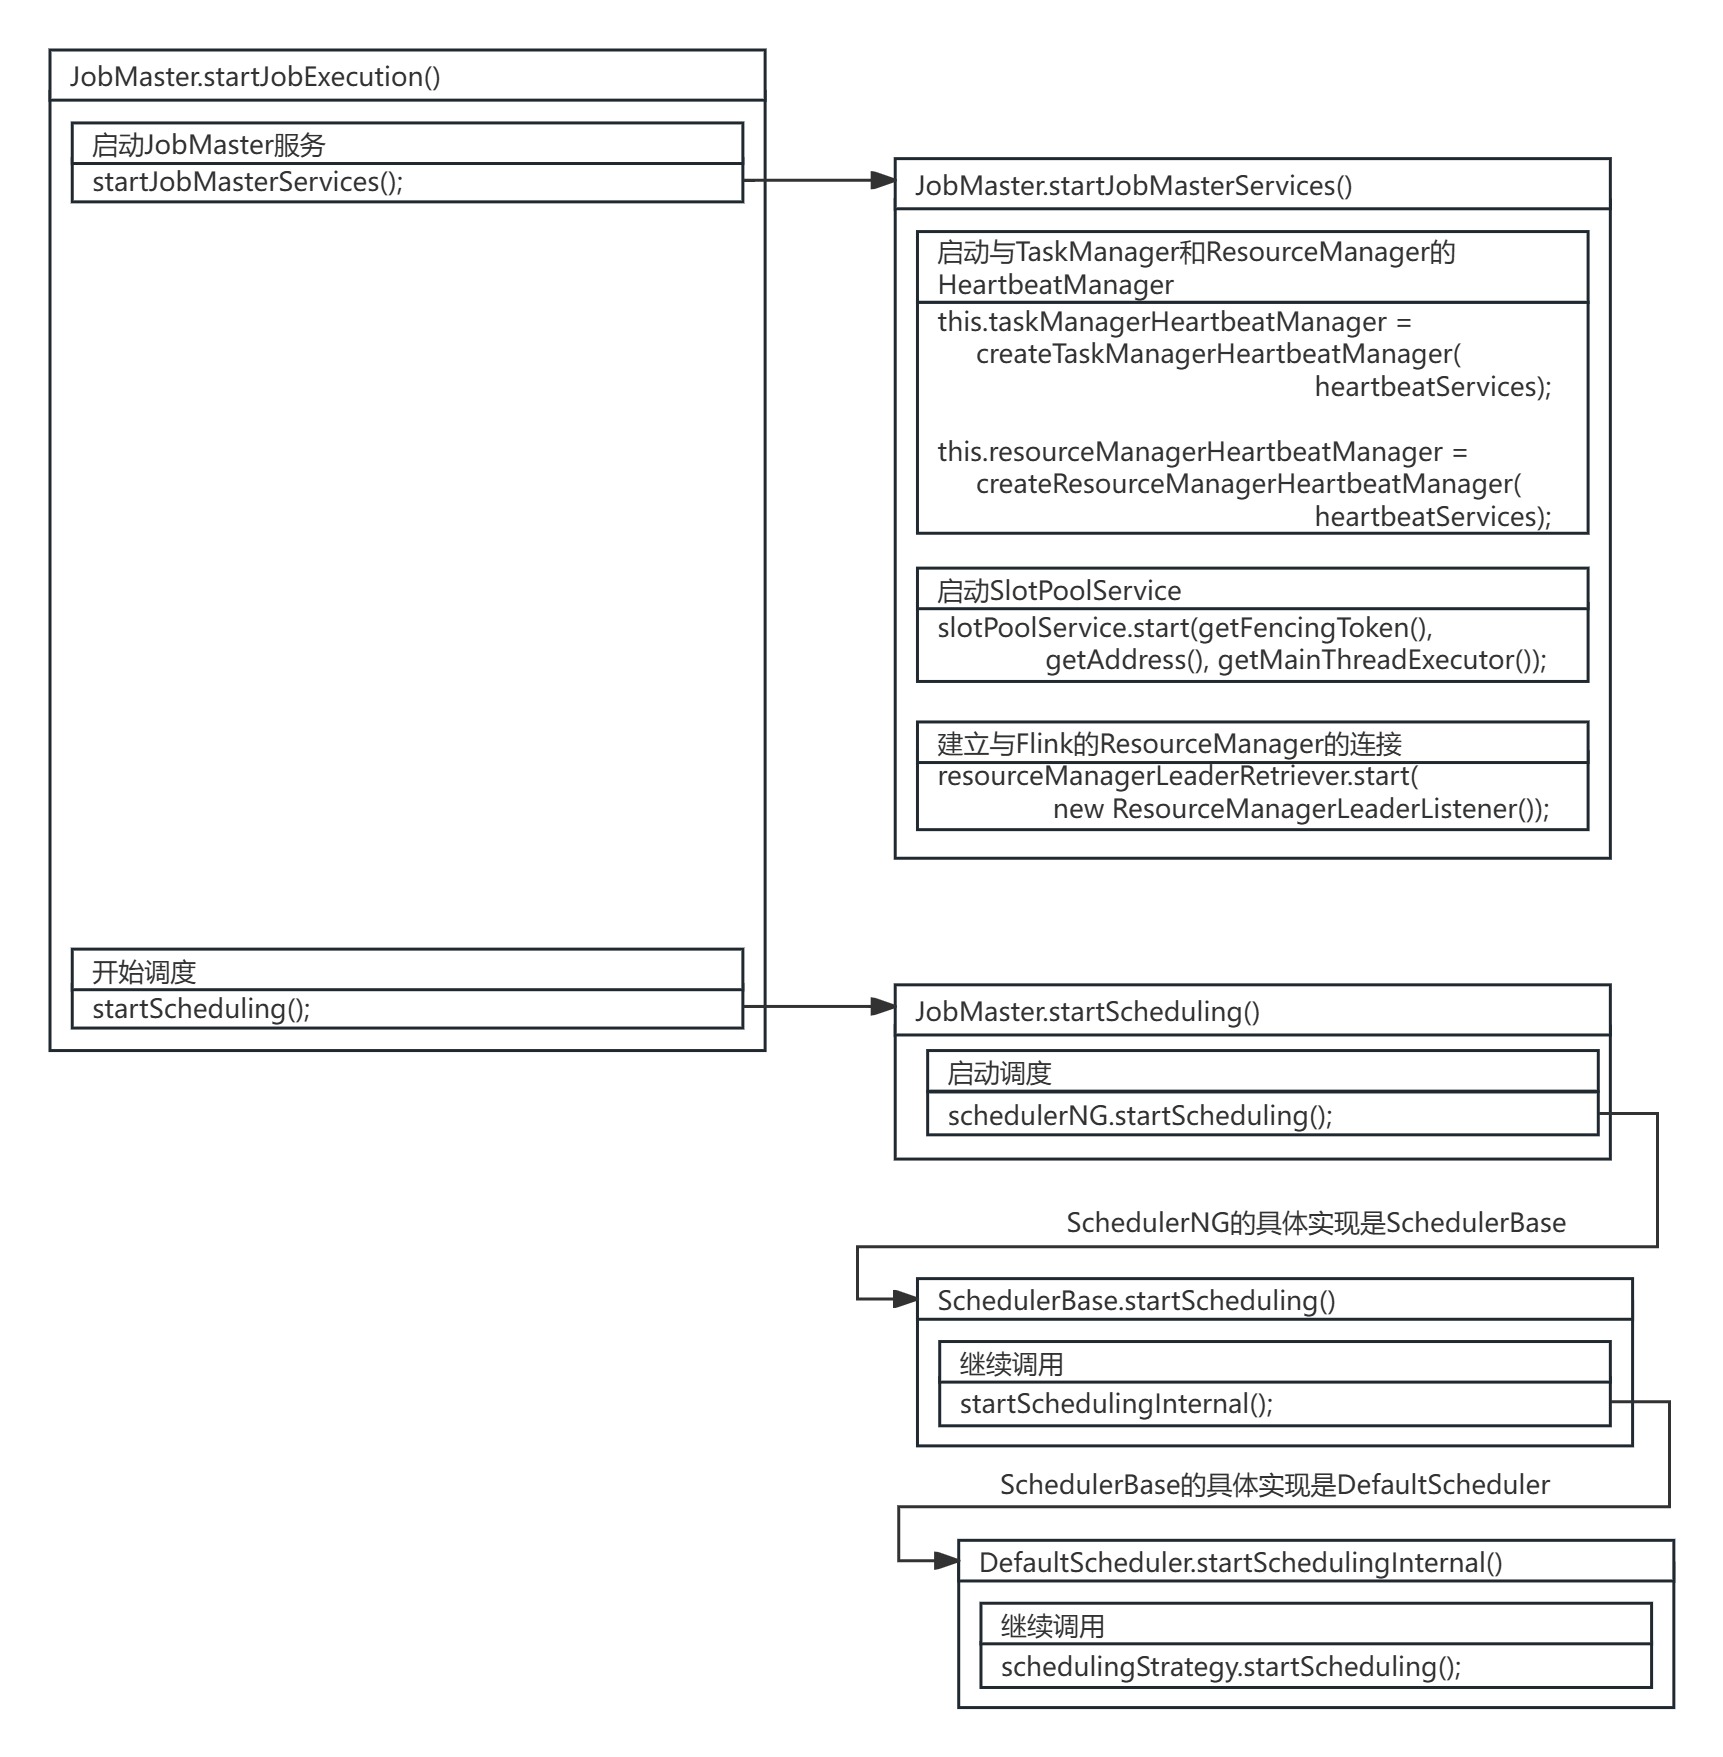
在启动JobMaster服务的JobMaster.startJobMasterServices()方法中,启动了与TaskManager和ResourceManager通信的HeartbeatManager,启动了SlotPoolService,为后续与ResourceManager交互进而申请计算资源做准备。
JobMaster.startJobMasterServices()方法源码:
private void startJobMasterServices() throws Exception {try {//启动与TaskManager和ResourceManager通信的HeartbeatManagerthis.taskManagerHeartbeatManager = createTaskManagerHeartbeatManager(heartbeatServices);this.resourceManagerHeartbeatManager =createResourceManagerHeartbeatManager(heartbeatServices);//启动SlotPoolService// start the slot pool make sure the slot pool now accepts messages for this leaderslotPoolService.start(getFencingToken(), getAddress(), getMainThreadExecutor());// job is ready to go, try to establish connection with resource manager//   - activate leader retrieval for the resource manager//   - on notification of the leader, the connection will be established and//     the slot pool will start requesting slots//建立与Flink的ResourceManager的连接resourceManagerLeaderRetriever.start(new ResourceManagerLeaderListener());} catch (Exception e) {handleStartJobMasterServicesError(e);}
}
在开启JobMaster调度的JobMaster.startScheduling()方法中,又经历了几次调用,最终JobMaster开启了SchedulerNG的调度。
JobMaster.startScheduling()方法源码:
private void startScheduling() {//继续调用schedulerNG.startScheduling();
}
继续调用,其中SchedulerNG的具体实现为SchedulerBase。
SchedulerBase.startScheduling()方法源码:
public final void startScheduling() {mainThreadExecutor.assertRunningInMainThread();registerJobMetrics(jobManagerJobMetricGroup,executionGraph,this::getNumberOfRestarts,deploymentStateTimeMetrics,executionGraph::registerJobStatusListener,executionGraph.getStatusTimestamp(JobStatus.INITIALIZING),jobStatusMetricsSettings);operatorCoordinatorHandler.startAllOperatorCoordinators();//继续调用startSchedulingInternal();
}
继续调用,其中SchedulerBase的具体实现为DefaultScheduler。
DefaultScheduler.startSchedulingInternal()方法源码:
protected void startSchedulingInternal() {log.info("Starting scheduling with scheduling strategy [{}]",schedulingStrategy.getClass().getName());transitionToRunning();//开始调度schedulingStrategy.startScheduling();
}
最终执行到schedulingStrategy.startScheduling(),开始进行JobMaster与Flink ResourceManager通信,为Task进行cpu与内存申请的资源调度,资源调度的源码解析将在本专栏后续博文中具体展开。
至此,Flink集群端完成了Dispatcher对客户端调度请求的接收,创建并启动了JobMaster,JobMaster开始进行ExecutionGraph生成,并开始向Flink ResourceManager申请资源。
7.结语
本文解析了Flink集群Dispatcher接收了CliFrontend客户端发送的Request,从hdfs拉取JobGraph文件、Jar包和Artifacts依赖 ,创建并启动JobMaster开始Flink集群端的调度的过程,本专栏后续博文将继续展开JobMaster的ExecutionGraph生成与Flink ResourceManager进行Cpu内存计算资源调度的源码。