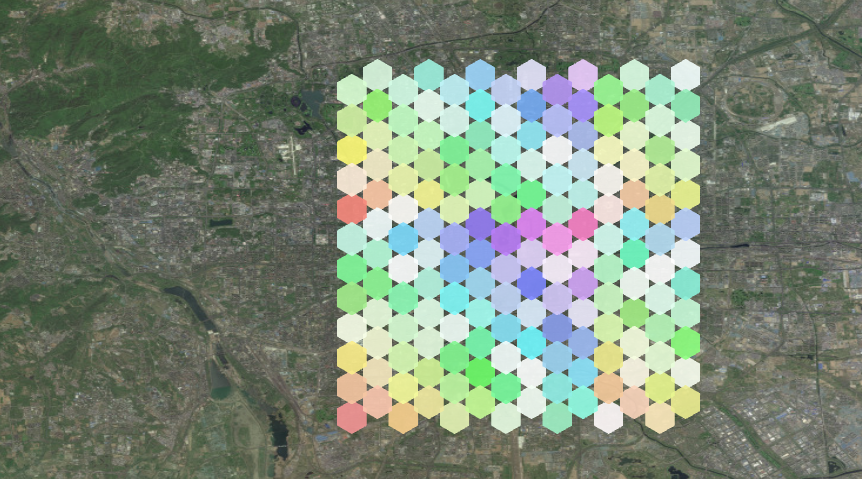
基于vue + Cesium 的蜂巢地图可视化实现
在地理信息系统 (GIS) 应用中,蜂巢图(六边形网格)是一种常见的数据可视化方式。它能够将地理空间划分为规则的六边形区域,常用于热力图、密度分析、区域划分等场景。本文将详细介绍如何使用 Cesium JS 库实现一个交互式的蜂巢地图可视化应用。
功能概述
我们要实现的应用具有以下功能:
- 基于高德地图底图的三维地理信息展示
- 点击按钮生成规则的六边形蜂巢网格
- 每个六边形具有独特的颜色,基于其位置计算
- 支持点击六边形进行高亮交互
- 提供视图重置功能,方便用户回到初始视角
下面是完整的实现代码,已经添加了详细的注释:
<template><div><!-- Cesium地图容器,占据整个屏幕 --><div id="cesiumContainer" style="width: 100%; height: 100vh"></div><!-- 左上角控制面板 --><div class="controls flex flex-col gap-3 w-64"><!-- 生成蜂巢图按钮 --><button@click="generateHoneycomb"class="px-4 py-2 bg-blue-500 text-white rounded-lg hover:bg-blue-600 transition-all transform hover:scale-105 active:scale-95 flex items-center justify-center gap-2"><i class="fa fa-honeycomb"></i><span>生成蜂巢图</span></button><!-- 视图控制区域 --><div class="space-y-2"><label class="block text-sm font-medium text-gray-700">视图控制</label><div class="grid grid-cols-2 gap-2"><button@click="resetView"class="px-3 py-1.5 bg-gray-100 text-gray-700 rounded hover:bg-gray-200 transition-colors text-sm"><i class="fa fa-refresh mr-1"></i>重置视图</button></div></div></div></div>
</template><script>
// 引入地图初始化函数和配置
import initMap from '@/config/initMap.js';
import { mapConfig } from '@/config/mapConfig';export default {data() {return {viewer: null, // Cesium Viewer实例hexagonSize: 0.01, // 六边形大小hexagonEntities: [], // 存储所有六边形实体centerPosition: { lng: 116.3972, lat: 39.9075 }, // 中心点位置(北京)interactionEnabled: true, // 交互是否启用controlsVisible: true, // 控制面板是否可见};},mounted() {// 初始化地图,使用高德地图作为底图this.viewer = initMap(mapConfig.gaode.url2, false);// 设置初始视图,定位到中心点位置this.viewer.camera.setView({destination: Cesium.Cartesian3.fromDegrees(this.centerPosition.lng,this.centerPosition.lat,50000 // 高度(米)),orientation: {heading: Cesium.Math.toRadians(0.0), // 水平旋转角度pitch: Cesium.Math.toRadians(-15.0), // 俯仰角度},});// 禁用默认的双击事件(默认会触发视角放大)this.viewer.cesiumWidget.screenSpaceEventHandler.removeInputAction(Cesium.ScreenSpaceEventType.LEFT_DOUBLE_CLICK);},methods: {// 生成蜂巢图generateHoneycomb() {// 清除现有六边形this.clearHexagons();// 定义网格大小和六边形尺寸const gridWidth = 0.2; // 网格宽度(经纬度范围)const gridHeight = 0.2; // 网格高度const size = this.hexagonSize; // 六边形大小// 计算六边形的几何参数const sideLength = size; // 六边形边长const hexWidth = sideLength * 2; // 六边形宽度const hexHeight = Math.sqrt(3) * sideLength; // 六边形高度// 计算网格的列数和行数const numCols = Math.ceil(gridWidth / (hexWidth * 0.75));const numRows = Math.ceil(gridHeight / hexHeight);// 计算网格起始位置const startX = this.centerPosition.lng - gridWidth / 2;const startY = this.centerPosition.lat - gridHeight / 2;// 生成六边形网格for (let col = 0; col < numCols; col++) {for (let row = 0; row < numRows; row++) {// 计算当前六边形的中心位置const x = startX + col * hexWidth * 0.75;// 相邻行的六边形错开排列,形成蜂巢结构const yOffset = col % 2 === 0 ? 0 : hexHeight / 2;const y = startY + row * hexHeight + yOffset;// 计算六边形的六个顶点const points = [];for (let i = 0; i < 6; i++) {const angle = ((2 * Math.PI) / 6) * (i + 0.5);const pointX = x + sideLength * Math.cos(angle);const pointY = y + sideLength * Math.sin(angle);points.push(Cesium.Cartesian3.fromDegrees(pointX, pointY, 0));}// 创建六边形实体并添加到地图const hexagon = this.viewer.entities.add({polygon: {hierarchy: new Cesium.PolygonHierarchy(points),material: this.getHexagonMaterial(col, row), // 设置六边形材质(颜色)outline: true, // 显示轮廓outlineColor: Cesium.Color.BLACK, // 轮廓颜色outlineWidth: 1.5, // 轮廓宽度},description: `六边形 (${col}, ${row})`, // 六边形描述信息});// 保存六边形实体引用并添加点击事件处理this.hexagonEntities.push(hexagon);this.addHexagonClickHandler(hexagon);}}},// 根据位置生成六边形颜色getHexagonMaterial(col, row) {// 基于列和行计算色相,确保相邻六边形颜色差异明显const hue = (((col * 37) % 360) + ((row * 53) % 360)) / 2;// 添加随机饱和度和亮度变化,使颜色更加丰富const saturation = 0.7 + Math.random() * 0.3;const brightness = 0.7 + Math.random() * 0.3;// 返回HSLA颜色return Cesium.Color.fromHsl(hue / 360, saturation, brightness, 0.9);},// 清除所有六边形clearHexagons() {this.hexagonEntities.forEach((entity) => {this.viewer.entities.remove(entity);});this.hexagonEntities = [];},// 为六边形添加点击事件处理addHexagonClickHandler(hexagon) {// 保存原始材质以便恢复const originalMaterial = hexagon.polygon.material.getValue();// 创建高亮材质const highlightMaterial = Cesium.Color.fromHsl(Math.random(), // 随机色相0.8, // 固定饱和度0.8, // 固定亮度0.9 // 透明度);// 创建屏幕空间事件处理器const handler = new Cesium.ScreenSpaceEventHandler(this.viewer.scene.canvas);// 设置左键点击事件处理handler.setInputAction((click) => {// 检查点击的对象const pickedObject = this.viewer.scene.pick(click.position);// 如果点击的是当前六边形,则切换其颜色if (Cesium.defined(pickedObject) && pickedObject.id === hexagon) {hexagon.polygon.material =hexagon.polygon.material.getValue() === originalMaterial? highlightMaterial: originalMaterial;}}, Cesium.ScreenSpaceEventType.LEFT_CLICK);},// 重置视图到初始位置resetView() {this.viewer.camera.setView({destination: Cesium.Cartesian3.fromDegrees(this.centerPosition.lng,this.centerPosition.lat,50000),orientation: {heading: Cesium.Math.toRadians(0.0),pitch: Cesium.Math.toRadians(-15.0),},});},},beforeDestroy() {// 组件销毁前清理资源this.clearHexagons();if (this.viewer) {this.viewer.destroy();this.viewer = null;}},
};
</script><style lang="scss" scoped>
#cesiumContainer {width: 100%;height: 100vh;touch-action: none; // 禁用触摸缩放,防止与地图交互冲突
}.controls {position: absolute;top: 100px;left: 10px;display: flex;flex-direction: column;gap: 10px;
}/* 添加平滑过渡效果 */
.fade-enter-active,
.fade-leave-active {transition: opacity 0.3s ease;
}
.fade-enter-from,
.fade-leave-to {opacity: 0;
}
</style>
代码解析
这个 Vue 组件实现了一个基于 Cesium 的蜂巢地图可视化应用,主要包含以下几个部分:
1. 模板结构
模板部分定义了界面布局:
- 一个占据整个屏幕的 Cesium 地图容器
- 左上角的控制面板,包含生成蜂巢图和视图重置两个功能按钮
2. 数据属性
组件维护了几个重要的数据属性:
viewer: Cesium Viewer 实例,是操作地图的核心对象hexagonSize: 控制六边形的大小hexagonEntities: 存储所有生成的六边形实体,便于后续操作centerPosition: 地图中心点位置,默认设为北京
3. 生命周期钩子
在mounted钩子中:
- 初始化地图并设置底图
- 设置初始视角,定位到中心点
- 禁用默认的双击事件,避免干扰用户交互
4. 核心方法
generateHoneycomb(): 生成蜂巢图的核心方法,通过嵌套循环计算每个六边形的位置和顶点,然后创建多边形实体getHexagonMaterial(): 根据六边形的行列位置计算其颜色,确保相邻六边形颜色差异明显addHexagonClickHandler(): 为每个六边形添加点击事件处理,实现点击高亮效果resetView(): 将视图重置到初始位置
5. 资源清理
在beforeDestroy钩子中,清理创建的六边形实体并销毁 Cesium Viewer 实例,防止内存泄漏。
实现原理
蜂巢图的实现基于数学原理:规则六边形是能够完全填充平面的三种正多边形之一(另外两种是正方形和等边三角形)。在代码中,我们通过计算每个六边形的顶点位置,然后使用 Cesium 的 PolygonHierarchy 创建多边形实体。
为了形成蜂巢结构,相邻行的六边形需要错开排列。这通过以下代码实现:
const yOffset = col % 2 === 0 ? 0 : hexHeight / 2;
const y = startY + row * hexHeight + yOffset;
这种排列方式使得六边形能够紧密排列,形成美观的蜂巢效果。
应用扩展
这个基础应用可以进一步扩展:
- 添加数据绑定:将六边形与实际数据关联,实现数据可视化
- 增强交互功能:添加悬停提示、右键菜单等交互方式
- 优化性能:对于大规模数据,考虑使用 Cesium 的 Primitive API 提高性能
- 支持不同底图:切换不同的地图服务提供商
- 添加动画效果:为六边形的生成和交互添加平滑动画
通过这种方式,你可以构建出功能强大、视觉吸引力强的地理信息可视化应用。Cesium 提供了丰富的 API 和工具,使得我们能够轻松实现复杂的 3D 地理信息展示和交互功能。

