项目:从零开始制作一个微信小程序(第六天)
目录
1. 渲染分类页面的基本结构
2. 获取分类数据
3. 动态渲染左侧的一级分类列表
4. 动态渲染右侧的二级分类列表
5. 动态渲染右侧的三级分类列表
6. 切换一级分类后重置滚动条的位置
7. 点击三级分类跳转到商品列表页面
8. 搜索
8.1 自定义搜索组件(my-search 组件)
8.2 通过自定义属性增强组件的通用性
8.3 为自定义组件封装 click 事件
8.4 实现首页搜索组件的吸顶效果
9. 搜索建议
9.1 实现搜索框自动获取焦点
9.2 实现搜索框的防抖处理
9.3 根据关键词查询搜索建议列表和渲染搜索建议列表
10. 搜索历史
10.1 渲染搜索历史记录的基本结构
10.2 实现搜索建议和搜索历史的按需展示
10.3 将搜索关键词存入 historyList
10.4 将搜索历史记录持久化存储到本地
10.5 清空搜索历史记录
10.6 点击搜索历史跳转到商品列表页面
11. 最终实现代码(在上次项目基础之上实现)
12. 最终产品效果
13. 下面是之前和本次项目的源码需要的请自取哦
大家好!接下来我们将在上次项目的基础之上继续开发分类页面和搜索栏,话不多说,让我们开始吧!
1. 渲染分类页面的基本结构
1. 定义页面结构如下:
<template>
<view>
<view class="scroll-view-container">
<!-- 左侧的滚动视图区域 -->
<scroll-view class="left-scroll-view" scroll-y :style="{height: wh
+ 'px'}">
<view class="left-scroll-view-item active">xxx</view>
<view class="left-scroll-view-item">xxx</view>
<view class="left-scroll-view-item">xxx</view>
<view class="left-scroll-view-item">xxx</view>
<view class="left-scroll-view-item">xxx</view>
<view class="left-scroll-view-item">多复制一些节点,演示纵向滚动效
果...</view>
</scroll-view>
<!-- 右侧的滚动视图区域 -->
<scroll-view class="right-scroll-view" scroll-y :style="{height: wh
+ 'px'}">
<view class="left-scroll-view-item">zzz</view>
<view class="left-scroll-view-item">zzz</view>
<view class="left-scroll-view-item">zzz</view>
<view class="left-scroll-view-item">zzz</view>
<view class="left-scroll-view-item">多复制一些节点,演示纵向滚动效果
</view>
</scroll-view>
</view>
</view>
</template>
2. 动态计算窗口的剩余高度:
<script>
export default {
data() {
return {
// 窗口的可用高度 = 屏幕高度 - navigationBar高度 - tabBar 高度
wh: 0
};
},
onLoad() {
// 获取当前系统的信息
const sysInfo = uni.getSystemInfoSync()
// 为 wh 窗口可用高度动态赋值
this.wh = sysInfo.windowHeight
}
}
</script>
3. 美化页面结构:
.scroll-view-container {
display: flex;
.left-scroll-view {
width: 120px;
.left-scroll-view-item {
line-height: 60px;
background-color: #f7f7f7;
text-align: center;
font-size: 12px;
// 激活项的样式
&.active {
background-color: #ffffff;
position: relative;
// 渲染激活项左侧的红色指示边线
&::before {
content: ' ';
display: block;
width: 3px;
height: 30px;
background-color: #c00000;
position: absolute;
left: 0;
top: 50%;
transform: translateY(-50%);
}
}
}
}
}
2. 获取分类数据
1. 在 data 中定义分类数据节点:
data() {
return {
// 分类数据列表
cateList: []
}
}
2. 调用获取分类列表数据的方法:
onLoad() {
// 调用获取分类列表数据的方法
this.getCateList()
}
3. 定义获取分类列表数据的方法:
methods: {
async getCateList() {
// 发起请求
const { data: res } = await
uni.$http.get('/api/public/v1/categories')
// 判断是否获取失败
if (res.meta.status !== 200) return uni.$showMsg()
// 转存数据
this.cateList = res.message
}
}
3. 动态渲染左侧的一级分类列表
<!-- 左侧的滚动视图区域 -->
<scroll-view class="left-scroll-view" scroll-y :style="{height: wh +
'px'}">
<block v-for="(item, i) in cateList" :key="i">
<view class="left-scroll-view-item">{{item.cat_name}}</view>
</block>
</scroll-view>data() {
return {
// 当前选中项的索引,默认让第一项被选中
active: 0
}
}<block v-for="(item, i) in cateList" :key="i">
<view :class="['left-scroll-view-item', i === active ? 'active' : '']">
{{item.cat_name}}</view>
</block><block v-for="(item, i) in cateList" :key="i">
<view :class="['left-scroll-view-item', i === active ? 'active' : '']"
@click="activeChanged(i)">{{item.cat_name}}</view>
</block>methods: {
// 选中项改变的事件处理函数
activeChanged(i) {
this.active = i
}
}4. 动态渲染右侧的二级分类列表
data() {
return {
// 二级分类列表
cateLevel2: []
}
}async getCateList() {
const { data: res } = await uni.$http.get('/api/public/v1/categories')
if (res.meta.status !== 200) return uni.$showMsg()
this.cateList = res.message
// 为二级分类赋值
this.cateLevel2 = res.message[0].children
}activeChanged(i) {
this.active = i
// 为二级分类列表重新赋值
this.cateLevel2 = this.cateList[i].children
}<!-- 右侧的滚动视图区域 -->
<scroll-view class="right-scroll-view" scroll-y :style="{height: wh +
'px'}">
<view class="cate-lv2" v-for="(item2, i2) in cateLevel2" :key="i2">
<view class="cate-lv2-title">/ {{item2.cat_name}} /</view>
</view>
</scroll-view>.cate-lv2-title {
font-size: 12px;
font-weight: bold;
text-align: center;
padding: 15px 0;
}5. 动态渲染右侧的三级分类列表
<!-- 右侧的滚动视图区域 -->
<scroll-view class="right-scroll-view" scroll-y :style="{height: wh +
'px'}">
<view class="cate-lv2" v-for="(item2, i2) in cateLevel2" :key="i2">
<view class="cate-lv2-title">/ {{item2.cat_name}} /</view>
<!-- 动态渲染三级分类的列表数据 -->
<view class="cate-lv3-list">
<!-- 三级分类 Item 项 -->
<view class="cate-lv3-item" v-for="(item3, i3) in item2.children"
:key="i3">
<!-- 图片 -->
<image :src="item3.cat_icon"></image>
<!-- 文本 -->
<text>{{item3.cat_name}}</text>
</view>
</view>
</view>
</scroll-view>.cate-lv3-list {
display: flex;
flex-wrap: wrap;
.cate-lv3-item {
width: 33.33%;
margin-bottom: 10px;
display: flex;
flex-direction: column;
align-items: center;
image {
width: 60px;
height: 60px;
}
text {
font-size: 12px;
}
}
}6. 切换一级分类后重置滚动条的位置
data() {
return {
// 滚动条距离顶部的距离
scrollTop: 0
}
}<!-- 右侧的滚动视图区域 -->
<scroll-view class="right-scroll-view" scroll-y :style="{height: wh +
'px'}" :scroll-top="scrollTop"></scroll-view>// 选中项改变的事件处理函数
activeChanged(i) {
this.active = i
this.cateLevel2 = this.cateList[i].children
// 让 scrollTop 的值在 0 与 1 之间切换
this.scrollTop = this.scrollTop === 0 ? 1 : 0
// 可以简化为如下的代码:
// this.scrollTop = this.scrollTop ? 0 : 1
}7. 点击三级分类跳转到商品列表页面
<view class="cate-lv3-item" v-for="(item3, i3) in item2.children"
:key="i3" @click="gotoGoodsList(item3)">
<image :src="item3.cat_icon"></image>
<text>{{item3.cat_name}}</text>
</view>// 点击三级分类项跳转到商品列表页面
gotoGoodsList(item3) {
uni.navigateTo({
url: '/subpkg/goods_list/goods_list?cid=' + item3.cat_id
})
}8. 搜索
8.1 自定义搜索组件(my-search 组件)
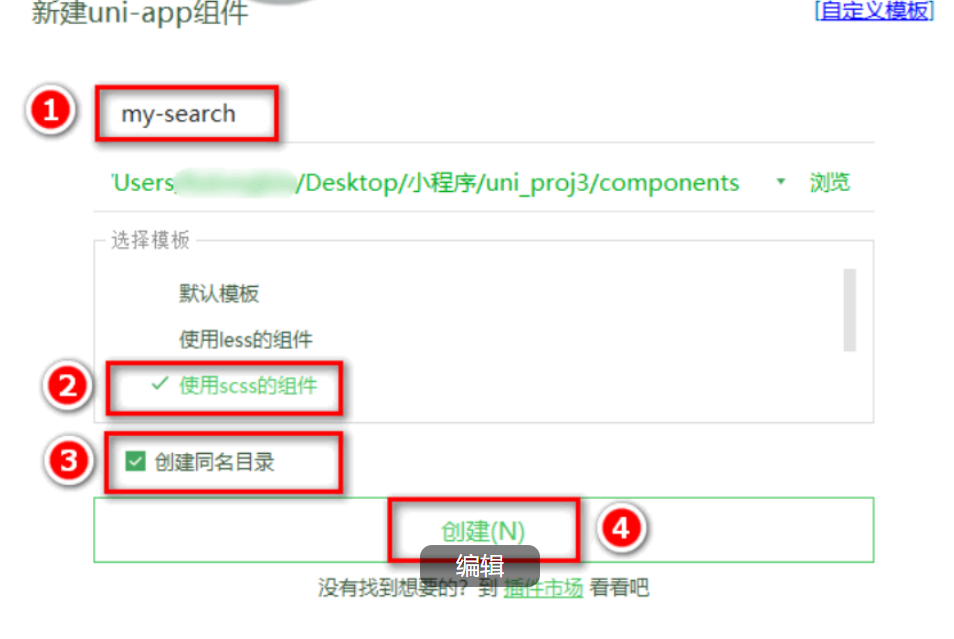
2. 定义 my-search 组件的 UI 结构如下:
<template>
<view class="my-search-container">
<!-- 使用 view 组件模拟 input 输入框的样式 -->
<view class="my-search-box">
<uni-icons type="search" size="17"></uni-icons>
<text class="placeholder">搜索</text>
</view>
</view>
</template>
注意:在当前组件中,我们使用 view 组件模拟 input 输入框的效果;并不会在页面上渲染真正的 input 输入框
3. 美化自定义 search 组件的样式:
.my-search-container {
background-color: #c00000;
height: 50px;
padding: 0 10px;
display: flex;
align-items: center;
}
.my-search-box {
height: 36px;
background-color: #ffffff;
border-radius: 15px;
width: 100%;
display: flex;
align-items: center;
justify-content: center;
.placeholder {
font-size: 15px;
margin-left: 5px;
}
}onLoad() {
const sysInfo = uni.getSystemInfoSync()
// 可用高度 = 屏幕高度 - navigationBar高度 - tabBar高度 - 自定义的search组件高
度
this.wh = sysInfo.windowHeight - 50
}8.2 通过自定义属性增强组件的通用性
props: {
// 背景颜色
bgcolor: {
type: String,
default: '#C00000'
},
// 圆角尺寸
radius: {
type: Number,
// 单位是 px
default: 18
}
}<view class="my-search-container" :style="{'background-color': bgcolor}">
<view class="my-search-box" :style="{'border-radius': radius + 'px'}">
<uni-icons type="search" size="17"></uni-icons>
<text class="placeholder">搜索</text>
</view>
</view>.my-search-container {
// 移除背景颜色,改由 props 属性控制
// background-color: #C00000;
height: 50px;
padding: 0 10px;
display: flex;
align-items: center;
}
.my-search-box {
height: 36px;
background-color: #ffffff;
// 移除圆角尺寸,改由 props 属性控制
// border-radius: 15px;
width: 100%;
display: flex;
align-items: center;
justify-content: center;
.placeholder {
font-size: 15px;
margin-left: 5px;
}
}8.3 为自定义组件封装 click 事件
<view class="my-search-box" :style="{'border-radius': radius + 'px'}"
@click="searchBoxHandler">
<uni-icons type="search" size="17"></uni-icons>
<text class="placeholder">搜索</text>
</view>methods: {
// 点击了模拟的 input 输入框
searchBoxHandler() {
// 触发外界通过 @click 绑定的 click 事件处理函数
this.$emit('click')
}
}<!-- 使用自定义的搜索组件 -->
<my-search @click="gotoSearch"></my-search>
1
2
methods: {
// 跳转到分包中的搜索页面
gotoSearch() {
uni.navigateTo({
url: '/subpkg/search/search'
})
}
}8.4 实现首页搜索组件的吸顶效果
<!-- 使用自定义的搜索组件 -->
<view class="search-box">
<my-search @click="gotoSearch"></my-search>
</view>
1
2
3
4
gotoSearch() {
uni.navigateTo({
url: '/subpkg/search/search'
})
}
.search-box {
// 设置定位效果为“吸顶”
position: sticky;
// 吸顶的“位置”
top: 0;
// 提高层级,防止被轮播图覆盖
z-index: 999;
}
9. 搜索建议
<view class="search-box">
<!-- 使用 uni-ui 提供的搜索组件 -->
<uni-search-bar @input="input" :radius="100" cancelButton="none"></unisearch-bar>
</view>
.uni-searchbar {
/* #ifndef APP-NVUE */
display: flex;
/* #endif */
flex-direction: row;
position: relative;
padding: 16rpx;
/* 将默认的 #FFFFFF 改为 #C00000 */
background-color: #c00000;
}
.search-box {
position: sticky;
top: 0;
z-index: 999;
}
methods: {
input(e) {
// e.value 是最新的搜索内容
console.log(e.value)
}
}
9.1 实现搜索框自动获取焦点
data() {
return {
show: true,
showSync: true,
searchVal: ""
}
}
9.2 实现搜索框的防抖处理
实现:
data() {
return {
// 延时器的 timerId
timer: null,
// 搜索关键词
kw: ''
}
}
input(e) {
// 清除 timer 对应的延时器
clearTimeout(this.timer)
// 重新启动一个延时器,并把 timerId 赋值给 this.timer
this.timer = setTimeout(() => {
// 如果 500 毫秒内,没有触发新的输入事件,则为搜索关键词赋值
this.kw = e.value
console.log(this.kw)
}, 500)
}
9.3 根据关键词查询搜索建议列表和渲染搜索建议列表
实现:
data() {
return {
// 搜索结果列表
searchResults: []
}
}
this.timer = setTimeout(() => {
this.kw = e.value
// 根据关键词,查询搜索建议列表
this.getSearchList()
}, 500)
// 根据搜索关键词,搜索商品建议列表
async getSearchList() {
// 判断关键词是否为空
if (this.kw === '') {
this.searchResults = []
return
}
// 发起请求,获取搜索建议列表
const { data: res } = await
uni.$http.get('/api/public/v1/goods/qsearch', { query: this.kw })
if (res.meta.status !== 200) return uni.$showMsg()
this.searchResults = res.message
}
<!-- 搜索建议列表 -->
<view class="sugg-list">
<view class="sugg-item" v-for="(item, i) in searchResults" :key="i"
@click="gotoDetail(item.goods_id)">
<view class="goods-name">{{item.goods_name}}</view>
<uni-icons type="arrowright" size="16"></uni-icons>
</view>
</view>
.sugg-list {
padding: 0 5px;
.sugg-item {
font-size: 12px;
padding: 13px 0;
border-bottom: 1px solid #efefef;
display: flex;
align-items: center;
justify-content: space-between;
.goods-name {
// 文字不允许换行(单行文本)
white-space: nowrap;
// 溢出部分隐藏
overflow: hidden;
// 文本溢出后,使用 ... 代替
text-overflow: ellipsis;
margin-right: 3px;
}
}
}
gotoDetail(goods_id) {
uni.navigateTo({
// 指定详情页面的 URL 地址,并传递 goods_id 参数
url: '/subpkg/goods_detail/goods_detail?goods_id=' + goods_id
})
}10. 搜索历史
10.1 渲染搜索历史记录的基本结构
1. 实现:
data() {
return {
// 搜索关键词的历史记录
historyList: ['a', 'app', 'apple']
}
}
<!-- 搜索历史 -->
<view class="history-box">
<!-- 标题区域 -->
<view class="history-title">
<text>搜索历史</text>
<uni-icons type="trash" size="17"></uni-icons>
</view>
<!-- 列表区域 -->
<view class="history-list">
<uni-tag :text="item" v-for="(item, i) in historyList" :key="i">
</uni-tag>
</view>
</view>
.history-box {
padding: 0 5px;
.history-title {
display: flex;
justify-content: space-between;
align-items: center;
height: 40px;
font-size: 13px;
border-bottom: 1px solid #efefef;
}
.history-list {
display: flex;
flex-wrap: wrap;
.uni-tag {
margin-top: 5px;
margin-right: 5px;
}
}
}
10.2 实现搜索建议和搜索历史的按需展示
<!-- 搜索建议列表 -->
<view class="sugg-list" v-if="searchResults.length !== 0">
<!-- 省略其它代码... -->
</view>
<!-- 搜索历史 -->
<view class="history-box" v-else>
<!-- 省略其它代码... -->
</view>
10.3 将搜索关键词存入 historyList
methods: {
// 根据搜索关键词,搜索商品建议列表
async getSearchList() {
// 省略其它不必要的代码...
// 1. 查询到搜索建议之后,调用 saveSearchHistory() 方法保存搜索关键词
this.saveSearchHistory()
},
// 2. 保存搜索关键词的方法
saveSearchHistory() {
// 2.1 直接把搜索关键词 push 到 historyList 数组中
this.historyList.push(this.kw)
}
}computed: {
historys() {
// 注意:由于数组是引用类型,所以不要直接基于原数组调用 reverse 方法,以免修改原数
组中元素的顺序
// 而是应该新建一个内存无关的数组,再进行 reverse 反转
return [...this.historyList].reverse()
}
}<view class="history-list">
<uni-tag :text="item" v-for="(item, i) in historys" :key="i"></uni-tag>
</view>// 保存搜索关键词为历史记录
saveSearchHistory() {
// this.historyList.push(this.kw)
// 1. 将 Array 数组转化为 Set 对象
const set = new Set(this.historyList)
// 2. 调用 Set 对象的 delete 方法,移除对应的元素
set.delete(this.kw)
// 3. 调用 Set 对象的 add 方法,向 Set 中添加元素
set.add(this.kw)
// 4. 将 Set 对象转化为 Array 数组
this.historyList = Array.from(set)
}
10.4 将搜索历史记录持久化存储到本地
// 保存搜索关键词为历史记录
saveSearchHistory() {
const set = new Set(this.historyList)
set.delete(this.kw)
set.add(this.kw)
this.historyList = Array.from(set)
// 调用 uni.setStorageSync(key, value) 将搜索历史记录持久化存储到本地
uni.setStorageSync('kw', JSON.stringify(this.historyList))
}
onLoad() {
this.historyList = JSON.parse(uni.getStorageSync('kw') || '[]')
}
10.5 清空搜索历史记录
<uni-icons type="trash" size="17" @click="cleanHistory"></uni-icons>
// 清空搜索历史记录
cleanHistory() {
// 清空 data 中保存的搜索历史
this.historyList = []
// 清空本地存储中记录的搜索历史
uni.setStorageSync('kw', '[]')
}
10.6 点击搜索历史跳转到商品列表页面
<uni-tag :text="item" v-for="(item, i) in historys" :key="i"
@click="gotoGoodsList(item)"></uni-tag>
// 点击跳转到商品列表页面
gotoGoodsList(kw) {
uni.navigateTo({
url: '/subpkg/goods_list/goods_list?query=' + kw
})
}
11. 最终实现代码(在上次项目基础之上实现)
1. pages文件中建立cate.vue文件:
<template><view><!-- 使用自定义的搜索组件 --><!-- <my-search :bgcolor="'pink'" :radius="3"></my-search> --><my-search @click="gotoSearch"></my-search><view class="scroll-view-container"><!-- 左侧的滑动区域 --><scroll-view class="left-scroll-view" scroll-y="true" :style="{height: wh + 'px'}"><block v-for="(item, i) in cateList" :key="i"><view :class="['left-scroll-view-item', i === active ? 'active' : '']" @click="activeChanged(i)">{{item.cat_name}}</view></block></scroll-view><!-- 右侧的滑动区域 --><scroll-view scroll-y="true" :style="{height: wh + 'px'}" :scroll-top="scrollTop"><view class="cate-lv2" v-for="(item2, i2) in cateLevel2" :key="i2"><!-- 二级分类的标题 --><view class="cate-lv2-title">/ {{item2.cat_name}} /</view><!-- 当前二级分类下的三级分类列表 --><view class="cate-lv3-list"><!-- 三级分类的Item项 --><view class="cate-lv3-item" v-for="(item3, i3) in item2.children" :key="i3" @click="gotoGoodsList(item3)"><!-- 三级分类的图片 --><image :src="item3.cat_icon"></image><!-- 三级分类的文本 --><text>{{item3.cat_name}}</text></view></view></view></scroll-view></view></view>
</template><script>export default {data() {return {// 当前设备可用的高度wh: 0,cateList: [],active: 0,// 二级分类的列表cateLevel2: [],scrollTop: 0};},onLoad() {const sysInfo = uni.getSystemInfoSync()this.wh = sysInfo.windowHeight - 50this.getCateList()},methods: {// 获取分类列表的数据async getCateList() {const { data: res } = await uni.$http.get('/api/public/v1/categories')if (res.meta.status !== 200) return uni.$showMsg()this.cateList = res.message// 为二级分类赋值this.cateLevel2 = res.message[0].children},activeChanged(i) {this.active = i// 重新为二级分类赋值this.cateLevel2 = this.cateList[i].childrenthis.scrollTop = this.scrollTop === 0 ? 1 : 0},// 跳转到商品列表页面gotoGoodsList(item) {uni.navigateTo({url: '/subpkg/goods_list/goods_list?cid=' + item.cat_id})},gotoSearch() {uni.navigateTo({url: '/subpkg/search/search'})}}}
</script><style lang="scss">.scroll-view-container {display: flex;.left-scroll-view {width: 120px;.left-scroll-view-item {background-color: #F7F7F7;line-height: 60px;text-align: center;font-size: 12px;&.active {background-color: #FFFFFF;position: relative;&::before {content: ' ';display: block;width: 3px;height: 30px;background-color: #C00000;position: absolute;top: 50%;left: 0;transform: translateY(-50%);}}}}}.cate-lv2-title {font-size: 12px;font-weight: bold;text-align: center;padding: 15px 0;}.cate-lv3-list {display: flex;flex-wrap: wrap;.cate-lv3-item {width: 33.33%;display: flex;flex-direction: column;justify-content: center;align-items: center;margin-bottom: 10px;image {width: 60px;height: 60px;}text {font-size: 12px;}}}
</style>
2. pages文件中建立my.vue文件:
<template><view>My</view>
</template><script>export default {data() {return {};}}
</script><style lang="scss"></style>
3. search.vue文件:
<template><view><view class="search-box"><uni-search-bar @input="input" :radius="100" cancelButton="none"></uni-search-bar></view><!-- 搜索建议列表 --><view class="sugg-list" v-if="searchResults.length !== 0"><view class="sugg-item" v-for="(item, i) in searchResults" :key="i" @click="gotoDetail(item)"><view class="goods-name">{{item.goods_name}}</view><uni-icons type="arrowright" size="16"></uni-icons></view></view><!-- 搜索历史 --><view class="history-box" v-else><!-- 标题区域 --><view class="history-title"><text>搜索历史</text><uni-icons type="trash" size="17" @click="clean"></uni-icons></view><!-- 列表区域 --><view class="history-list"><uni-tag :text="item" v-for="(item, i) in histories" :key="i" @click="gotoGoodsList(item)"></uni-tag></view></view></view>
</template><script>export default {data() {return {timer: null,kw: '',// 搜索的结果列表searchResults: [],// 搜索历史的数组historyList: []};},onLoad() {this.historyList = JSON.parse(uni.getStorageSync('kw') || '[]')},methods: {// input 输入事件的处理函数input(e) {clearTimeout(this.timer)this.timer = setTimeout(() => {this.kw = e.valuethis.getSearchList()}, 500)},async getSearchList() {// 判断搜索关键词是否为空if (this.kw.length === 0) {this.searchResults = []return}const { data: res } = await uni.$http.get('/api/public/v1/goods/qsearch', { query: this.kw })if (res.meta.status !== 200) return uni.$showMsg()this.searchResults = res.messagethis.saveSearchHistory()},gotoDetail(item) {uni.navigateTo({url: '/subpkg/goods_detail/goods_detail?goods_id=' + item.goods_id})},saveSearchHistory() {// this.historyList.push(this.kw)const set = new Set(this.historyList)set.delete(this.kw)set.add(this.kw)this.historyList = Array.from(set)// 对搜索历史数据,进行持久化的存储uni.setStorageSync('kw', JSON.stringify(this.historyList))},clean() {this.historyList = []uni.setStorageSync('kw', '[]')},gotoGoodsList(kw) {uni.navigateTo({url: '/subpkg/goods_list/goods_list?query=' + kw})}},computed: {histories() {return [...this.historyList].reverse()}}}
</script><style lang="scss">.search-box {position: sticky;top: 0;z-index: 999;}.sugg-list {padding: 0 5px;.sugg-item {display: flex;align-items: center;justify-content: space-between;font-size: 12px;padding: 13px 0;border-bottom: 1px solid #efefef;.goods-name {white-space: nowrap;overflow: hidden;text-overflow: ellipsis;margin-right: 3px;}}}.history-box {padding: 0 5px;.history-title {display: flex;justify-content: space-between;height: 40px;align-items: center;font-size: 13px;border-bottom: 1px solid #efefef;}.history-list {display: flex;flex-wrap: wrap;.uni-tag {margin-top: 5px;margin-right: 5px;}}}
</style>
4. search-taber文件:
<template><view class="uni-searchbar"><view :style="{borderRadius:radius+'px',backgroundColor: bgColor}" class="uni-searchbar__box" @click="searchClick"><!-- #ifdef MP-ALIPAY --><view class="uni-searchbar__box-icon-search"><uni-icons color="#999999" size="18" type="search" /></view><!-- #endif --><!-- #ifndef MP-ALIPAY --><uni-icons color="#999999" class="uni-searchbar__box-icon-search" size="18" type="search" /><!-- #endif --><input v-if="show" :focus="showSync" :placeholder="placeholder" :maxlength="maxlength" @confirm="confirm" class="uni-searchbar__box-search-input" confirm-type="search" type="text" v-model="searchVal" /><text v-else class="uni-searchbar__text-placeholder">{{ placeholder }}</text><view v-if="show && (clearButton==='always'||clearButton==='auto'&&searchVal!=='')" class="uni-searchbar__box-icon-clear" @click="clear"><uni-icons color="#999999" class="" size="24" type="clear" /></view></view><text @click="cancel" class="uni-searchbar__cancel" v-if="cancelButton ==='always' || show && cancelButton ==='auto'">{{cancelText}}</text></view>
</template><script>import uniIcons from "../uni-icons/uni-icons.vue";/*** SearchBar 搜索栏* @description 评分组件* @tutorial https://ext.dcloud.net.cn/plugin?id=866* @property {Number} radius 搜索栏圆角* @property {Number} maxlength 输入最大长度* @property {String} placeholder 搜索栏Placeholder* @property {String} clearButton = [always|auto|none] 是否显示清除按钮* 	@value always 一直显示* 	@value auto 输入框不为空时显示* 	@value none 一直不显示* @property {String} cancelButton = [always|auto|none] 是否显示取消按钮* 	@value always 一直显示* 	@value auto 输入框不为空时显示* 	@value none 一直不显示* @property {String} cancelText 取消按钮的文字* @property {String} bgColor 输入框背景颜色* @event {Function} confirm uniSearchBar 的输入框 confirm 事件,返回参数为uniSearchBar的value,e={value:Number}* @event {Function} input uniSearchBar 的 value 改变时触发事件,返回参数为uniSearchBar的value,e={value:Number}* @event {Function} cancel 点击取消按钮时触发事件,返回参数为uniSearchBar的value,e={value:Number}*/export default {name: "UniSearchBar",components: {uniIcons},props: {placeholder: {type: String,default: "请输入搜索内容"},radius: {type: [Number, String],default: 5},clearButton: {type: String,default: "auto"},cancelButton: {type: String,default: "auto"},cancelText: {type: String,default: '取消'},bgColor: {type: String,default: "#F8F8F8"},maxlength: {type: [Number, String],default: 100}},data() {return {show: true,showSync: true,searchVal: ""}},watch: {searchVal() {this.$emit("input", {value: this.searchVal})}},methods: {searchClick() {if (this.show) {return}this.searchVal = ""this.show = true;this.$nextTick(() => {this.showSync = true;})},clear() {this.searchVal = ""},cancel() {this.$emit("cancel", {value: this.searchVal});this.searchVal = ""this.show = falsethis.showSync = false// #ifndef APP-PLUSuni.hideKeyboard()// #endif// #ifdef APP-PLUSplus.key.hideSoftKeybord()// #endif},confirm() {// #ifndef APP-PLUSuni.hideKeyboard();// #endif// #ifdef APP-PLUSplus.key.hideSoftKeybord()// #endifthis.$emit("confirm", {value: this.searchVal})}}};
</script><style scoped>.uni-searchbar {/* #ifndef APP-NVUE */display: flex;/* #endif */flex-direction: row;position: relative;padding: 16rpx;background-color: #C00000;}.uni-searchbar__box {/* #ifndef APP-NVUE */display: flex;box-sizing: border-box;/* #endif */overflow: hidden;position: relative;flex: 1;justify-content: center;flex-direction: row;align-items: center;height: 36px;padding: 5px 8px 5px 0px;border-width: 0.5px;border-style: solid;border-color: #e5e5e5;}.uni-searchbar__box-icon-search {/* #ifndef APP-NVUE */display: flex;/* #endif */flex-direction: row;width: 32px;justify-content: center;align-items: center;color: #808080;}.uni-searchbar__box-search-input {flex: 1;font-size: 28rpx;color: #333;}.uni-searchbar__box-icon-clear {align-items: center;line-height: 24px;padding-left: 5px;}.uni-searchbar__text-placeholder {font-size: 28rpx;color: #808080;margin-left: 5px;}.uni-searchbar__cancel {padding-left: 10px;line-height: 36px;font-size: 14px;color: #333;}
</style>
5. my-search文件:
<template><view class="my-search-container" :style="{ 'background-color': bgcolor }" @click="searchBoxHandler"><view class="my-search-box" :style="{ 'border-radius': radius + 'px' }"><!-- 使用 uni-ui 提供的图标组件 --><uni-icons type="search" size="17"></uni-icons><text class="placeholder">搜索</text></view></view>
</template><script>export default {props: {// 背景颜色bgcolor: {type: String,default: '#C00000'},// 圆角尺寸radius: {type: Number,default: 18 // px}},data() {return {}},methods: {searchBoxHandler() {this.$emit('click')}}}
</script><style lang="scss">.my-search-container {height: 50px;// background-color: #C00000;display: flex;align-items: center;padding: 0 10px;.my-search-box {height: 36px;background-color: #FFFFFF;// border-radius: 18px;width: 100%;display: flex;justify-content: center;align-items: center;.placeholder {font-size: 15px;margin-left: 5px;}}}
</style>
12. 最终产品效果

13. 下面是之前和本次项目的源码需要的请自取哦
爱吃橘子的猫 - Gitee.com![]() https://gitee.com/dragon-rain-tree/
https://gitee.com/dragon-rain-tree/