基于LAMP环境的校园论坛项目
1.配置本地仓库
a.修改主机名为自己姓名全拼
[root@server ~]# hostnamectl set-hostname jun
[root@server ~]# bash
[root@jun ~]#
运行结果图如下图所示:

b.光盘挂载到/mnt目录下
[root@jun yum.repos.d]# mount /dev/sr0 /mnt
mount: /mnt: WARNING: source write-protected, mounted read-only.
运行结果图如下图所示:

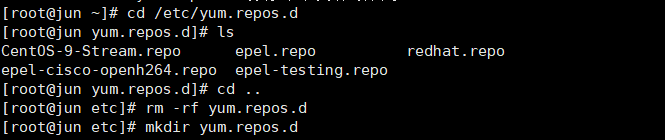
c.在/etc/yum.repos.d/目录下新建一个仓库文件yum.repo并编写文件内容
第一步:先删除/etc/yum.repos.d/目录下的所有文件并且新建一个yum.repos.d,并且进行yum clean all (清理之前的缓存)
[root@jun ~]# cd /etc/yum.repos.d
[root@jun yum.repos.d]# ls
CentOS-9-Stream.repo      epel.repo          redhat.repo
epel-cisco-openh264.repo  epel-testing.repo
[root@jun yum.repos.d]# cd ..
[root@jun etc]# rm -rf yum.repos.d
[root@jun etc]# mkdir yum.repos.d
[root@jun yum.repos.d]# yum clean all
正在更新 Subscription Management 软件仓库。
无法读取客户身份本系统尚未在权利服务器中注册。可使用 subscription-manager 进行注册。29 文件已删除
运行结果图如下:
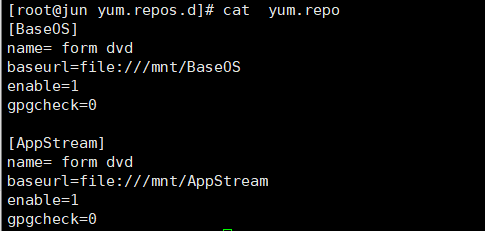
第二步:进入/etc/yum.repos.d/目录下创建一个文件yum.repo,并在里面写入内容
[root@jun yum.repos.d]# cat  yum.repo
[BaseOS]
name= form dvd
baseurl=file:///mnt/BaseOS
enable=1
gpgcheck=0[AppStream]
name= form dvd
baseurl=file:///mnt/AppStream
enable=1
gpgcheck=0
运行结果图如下:
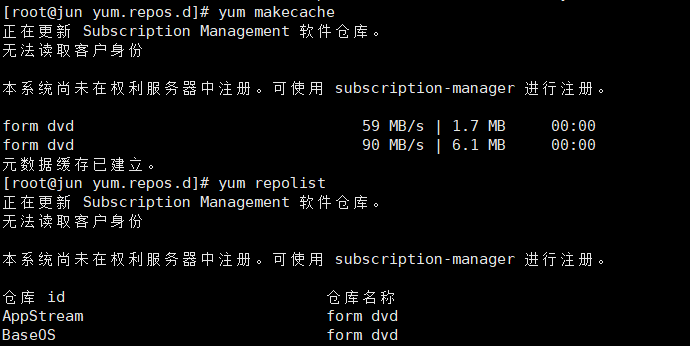
第三步:进行重新建立yum缓存,查看yum源
[root@jun yum.repos.d]# yum makecache
正在更新 Subscription Management 软件仓库。
无法读取客户身份本系统尚未在权利服务器中注册。可使用 subscription-manager 进行注册。form dvd                                59 MB/s | 1.7 MB     00:00
form dvd                                90 MB/s | 6.1 MB     00:00
元数据缓存已建立。
[root@jun yum.repos.d]# yum repolist
正在更新 Subscription Management 软件仓库。
无法读取客户身份本系统尚未在权利服务器中注册。可使用 subscription-manager 进行注册。仓库 id                             仓库名称
AppStream                           form dvd
BaseOS                              form dvd
运行结果图如下图所示:
d.验证是否挂载成功
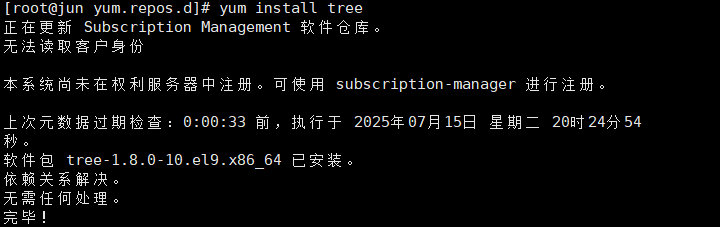
[root@jun yum.repos.d]# yum install tree
正在更新 Subscription Management 软件仓库。
无法读取客户身份本系统尚未在权利服务器中注册。可使用 subscription-manager 进行注册。上次元数据过期检查:0:00:33 前,执行于 2025年07月15日 星期二 20时24分54秒。
软件包 tree-1.8.0-10.el9.x86_64 已安装。
依赖关系解决。
无需任何处理。
完毕!
运行结果图如下:
2.关闭防火墙和SELinux服务
防火墙
[root@jun ~]# systemctl stop firewalld
[root@jun ~]# systemctl disable firewalld
[root@jun ~]# systemctl status firewalld
○ firewalld.service - firewalld - dynamic firewall daemonLoaded: loaded (/usr/lib/systemd/system/firewalld.service; disabled; vendor preset: enabled)Active: inactive (dead)Docs: man:firewalld(1)
运行结果图如下:

SELinux服务
[root@jun ~]# vim /etc/selinux/config
SELINUX=disabled
# SELINUXTYPE= can take one of these three values:
#     targeted - Targeted processes are protected,
#     minimum - Modification of targeted policy. Only selected processes are protected.
#     mls - Multi Level Security protection.
SELINUXTYPE=targeted
[root@jun ~]# getenforce
Disabled
运行结果图如下所示:

3.安装PHP环境
a.分别安装php,php-fpm,php-mysqlnd软件
安装php
[root@jun ~]# yum install php -y
安装php-fpm
[root@jun ~]# yum install php-fpm -y
安装php-mysqlnd
[root@jun ~]# yum install php-mysqlnd -y
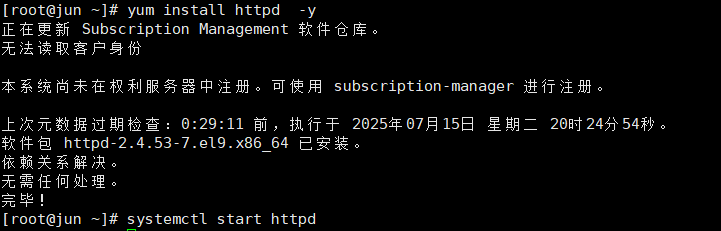
4.安装httpd服务
[root@jun ~]# yum install httpd  -y
正在更新 Subscription Management 软件仓库。
无法读取客户身份本系统尚未在权利服务器中注册。可使用 subscription-manager 进行注册。上次元数据过期检查:0:29:11 前,执行于 2025年07月15日 星期二 20时24分54秒。
软件包 httpd-2.4.53-7.el9.x86_64 已安装。
依赖关系解决。
无需任何处理。
完毕!
[root@jun ~]# systemctl start httpd
运行结果图如下:
5.安装mariadb-server数据库
安装mariadb
[root@jun ~]# yum install mariadb -y
安装mairadb-server
[root@jun ~]# yum install mariadb-server -y
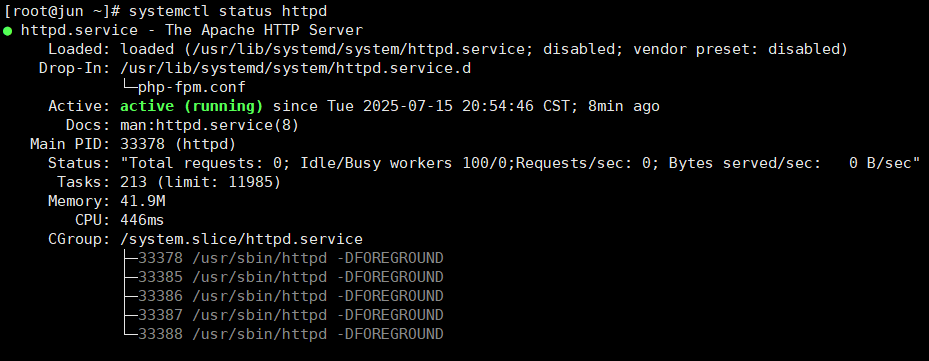
6.启动httpd服务,并查看进程
[root@jun ~]# systemctl start httpd
[root@jun ~]# ps -ef | grep   httpd
root       33378       1  0 20:54 ?        00:00:00 /usr/sbin/httpd -DFOREGROUND
apache     33385   33378  0 20:54 ?        00:00:00 /usr/sbin/httpd -DFOREGROUND
apache     33386   33378  0 20:54 ?        00:00:00 /usr/sbin/httpd -DFOREGROUND
apache     33387   33378  0 20:54 ?        00:00:00 /usr/sbin/httpd -DFOREGROUND
apache     33388   33378  0 20:54 ?        00:00:00 /usr/sbin/httpd -DFOREGROUND
root       34383   32805  0 21:00 pts/2    00:00:00 grep --color=auto httpd
[root@jun ~]# systemctl status httpd
● httpd.service - The Apache HTTP ServerLoaded: loaded (/usr/lib/systemd/system/httpd.service; disabled; vendor preset: disabled)Drop-In: /usr/lib/systemd/system/httpd.service.d└─php-fpm.confActive: active (running) since Tue 2025-07-15 20:54:46 CST; 8min agoDocs: man:httpd.service(8)Main PID: 33378 (httpd)Status: "Total requests: 0; Idle/Busy workers 100/0;Requests/sec: 0; Bytes served/sec:   0 B/sec"Tasks: 213 (limit: 11985)Memory: 41.9MCPU: 446msCGroup: /system.slice/httpd.service├─33378 /usr/sbin/httpd -DFOREGROUND├─33385 /usr/sbin/httpd -DFOREGROUND├─33386 /usr/sbin/httpd -DFOREGROUND├─33387 /usr/sbin/httpd -DFOREGROUND└─33388 /usr/sbin/httpd -DFOREGROUND
运行结果图:

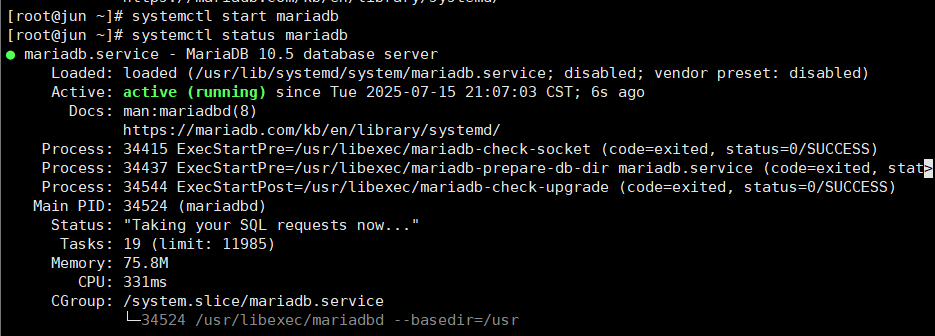
7.启动mariadb-server数据块
[root@jun ~]# systemctl start mariadb
[root@jun ~]# systemctl status mariadb
● mariadb.service - MariaDB 10.5 database serverLoaded: loaded (/usr/lib/systemd/system/mariadb.service; disabled; vendor preset: disabled)Active: active (running) since Tue 2025-07-15 21:07:03 CST; 6s agoDocs: man:mariadbd(8)https://mariadb.com/kb/en/library/systemd/Process: 34415 ExecStartPre=/usr/libexec/mariadb-check-socket (code=exited, status=0/SUCCESS)Process: 34437 ExecStartPre=/usr/libexec/mariadb-prepare-db-dir mariadb.service (code=exited, stat>Process: 34544 ExecStartPost=/usr/libexec/mariadb-check-upgrade (code=exited, status=0/SUCCESS)Main PID: 34524 (mariadbd)Status: "Taking your SQL requests now..."Tasks: 19 (limit: 11985)Memory: 75.8MCPU: 331msCGroup: /system.slice/mariadb.service└─34524 /usr/libexec/mariadbd --basedir=/usr
运行结果图如下:
8.配置数据库
进入数据库:
[root@jun ~]# mysql -uroot -p
Enter password:
Welcome to the MariaDB monitor.  Commands end with ; or \g.
Your MariaDB connection id is 4
Server version: 10.5.16-MariaDB MariaDB ServerCopyright (c) 2000, 2018, Oracle, MariaDB Corporation Ab and others.Type 'help;' or '\h' for help. Type '\c' to clear the current input statement.MariaDB [(none)]>
a.设置数据库的root用户的密码为redhat123
MariaDB [(none)]> alter user 'root'@'localhost'  identified by 'redhat123';
Query OK, 0 rows affected (0.001 sec)
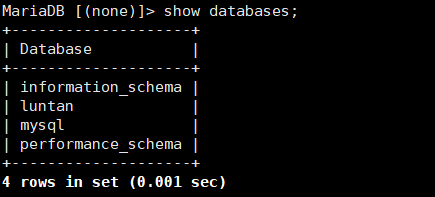
b.创建luntan数据库
MariaDB [(none)]> create database luntan;
Query OK, 1 row affected (0.000 sec)
MariaDB [(none)]> show databases;
+--------------------+
| Database           |
+--------------------+
| information_schema |
| luntan             |
| mysql              |
| performance_schema |
+--------------------+
4 rows in set (0.001 sec)
运行结果图如下图所示:
9.将Discuz!论坛的安装包放到/var/www/html目录下
切换到/var/www/html目录下,通过xftp8把windows里的Discuz压缩包的upload传输到/var/www/html
[root@jun ~]# cd /var/www/html
[root@jun html]#
运行结果图如下:

注意:一定要给/upload设置777权限
[root@jun html]# chmod -R 777 /var/www/html/upload/
[root@jun html]# ls
upload
10.输入网址,并配置论坛
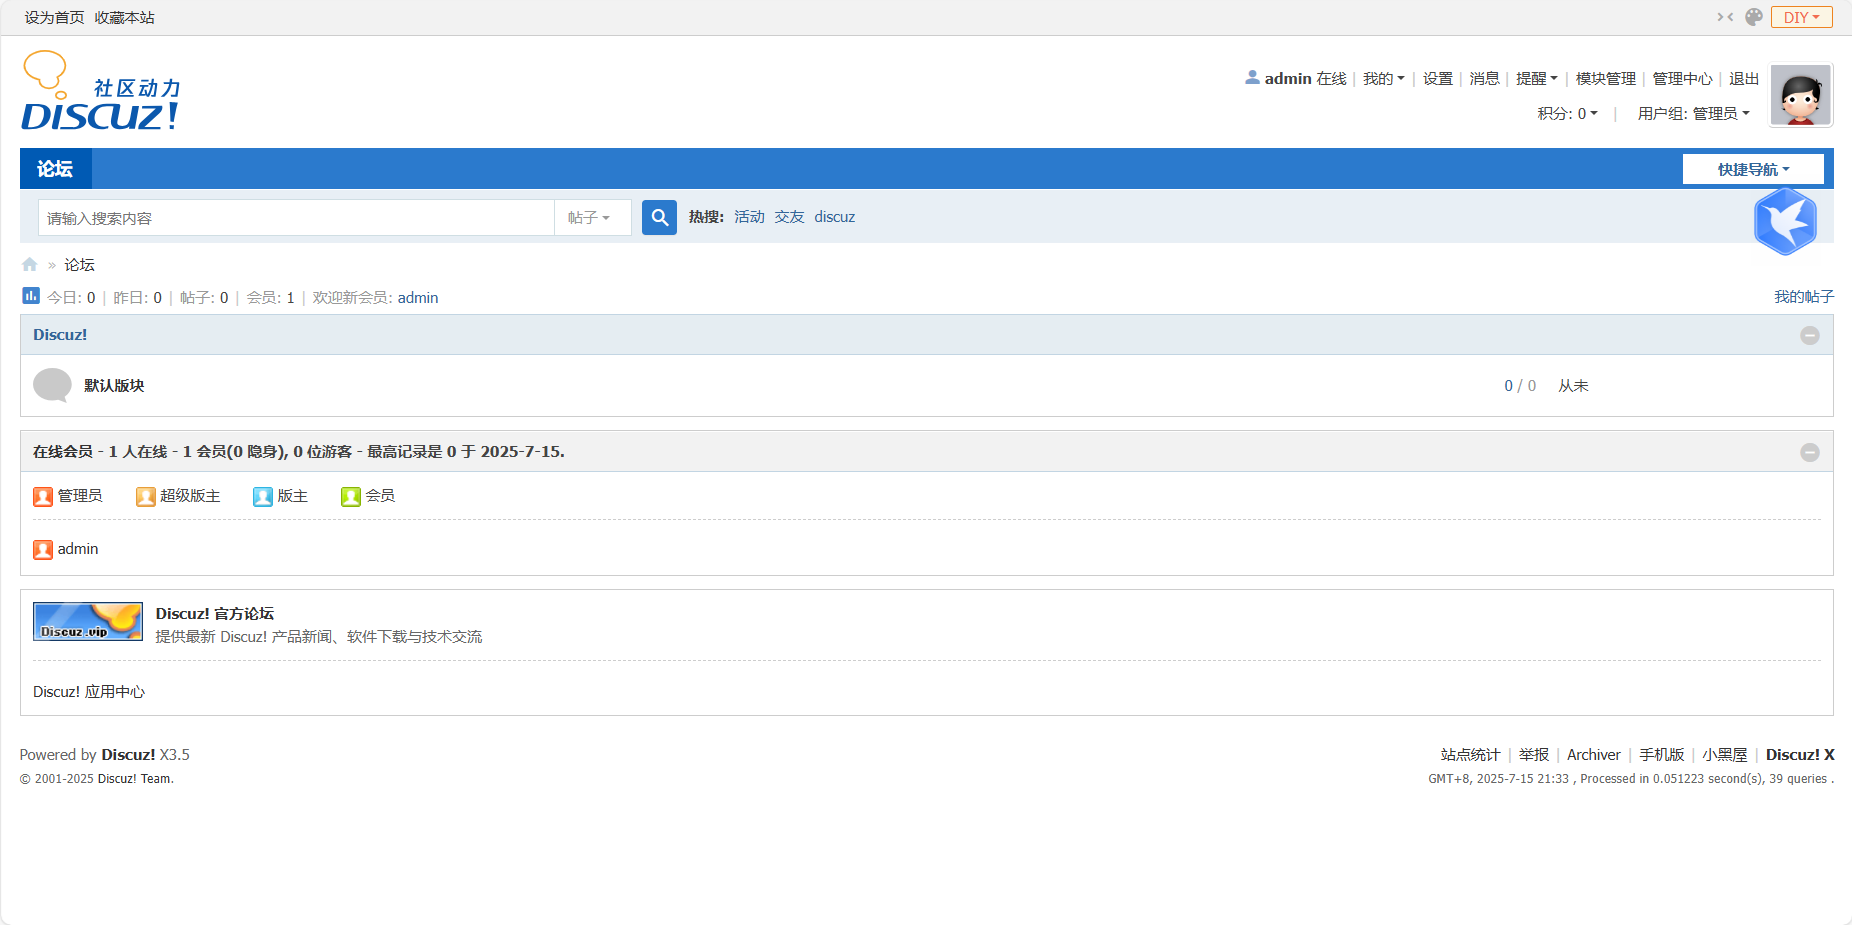
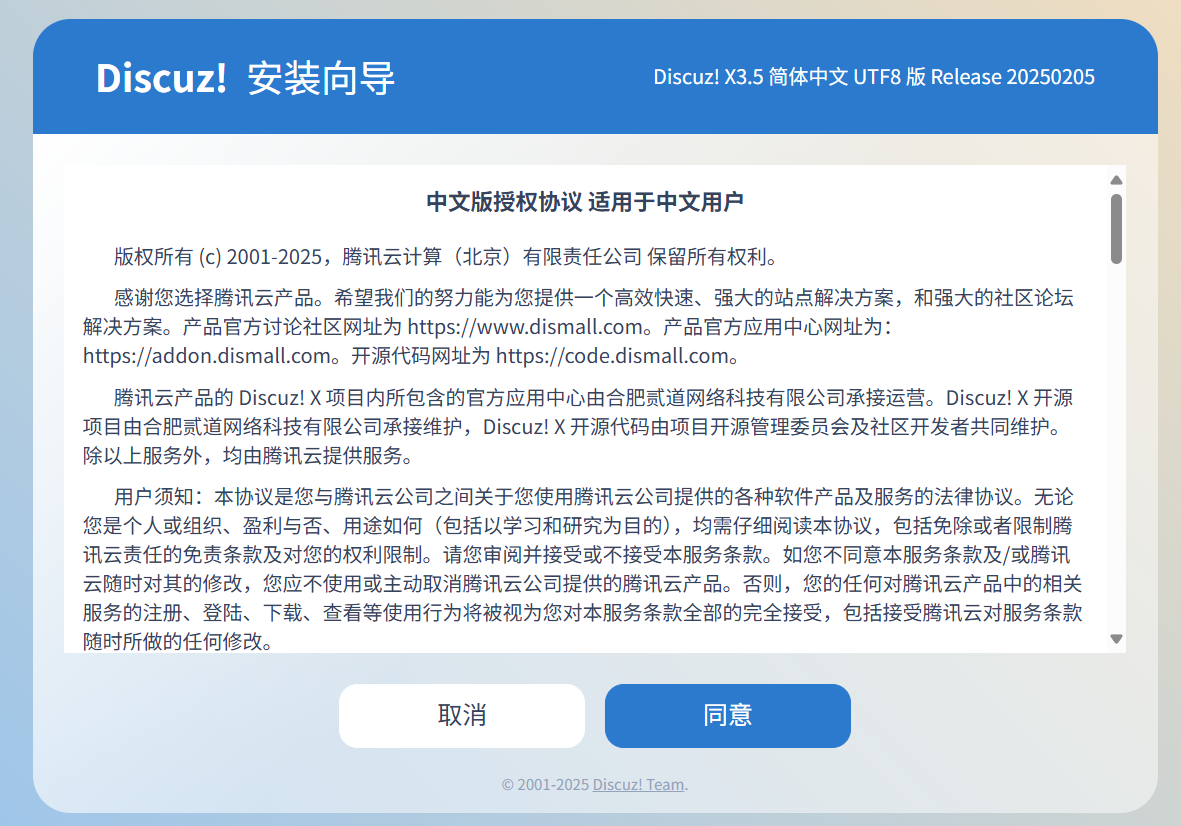
a.打开浏览器并在地址栏中输入:http://192.168.75.151/upload,就会看到如下界面
注意:请输入你自己服务器的IP地址(ip a)
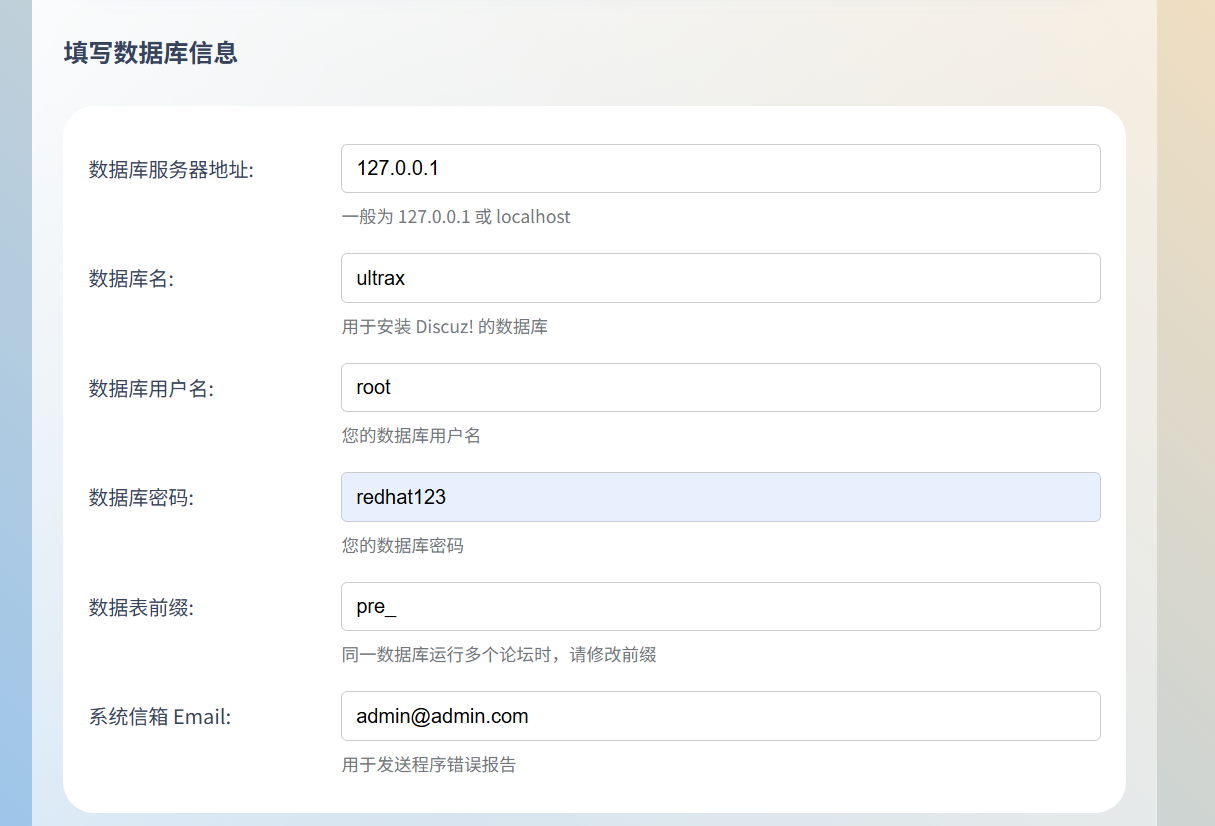
b.配置论坛

c.成功搭建LAMP校园项目