Vue脚手架相关记录
脚手架
安装与配置
安装node
node -> 16.20.2
切换淘宝镜像
npm install -g cnpm -registry=http://registry.npm.taobao.orgnpm config set registry http://registry.npm.taobao.org/
使用了第二个,下一步才有用
安装vue
npm install -g @vue/cli

vscode中不给运行vue解决办法
set-ExecutionPolicy RemoteSigne
问题就是脚本的执行策略不行,应该是安全问题
创建vue项目
vue create jplan
vue还不给输入大写
项目结构
main.js是整个项目的入口
import Vue from 'vue'
import App from './App.vue'
//关闭生产提示
Vue.config.productionTip = falsenew Vue({render: h => h(App),
}).$mount('#app')
$mount(‘#app’) 挂载根组件,和el没区别
public 下的index.html
<!DOCTYPE html>
<html lang=""><head><meta charset="utf-8"><!-- 针对IE浏览器的配置 --><meta http-equiv="X-UA-Compatible" content="IE=edge"><!-- 开启移动端的理想视口 --><meta name="viewport" content="width=device-width,initial-scale=1.0"><!-- 配置页签的图标 --><link rel="icon" href="<%= BASE_URL %>favicon.ico"><!-- 配置网页标题 --><title><%= htmlWebpackPlugin.options.title %></title></head><body><!-- 浏览器不支持js的时候,这个就会出现 --><noscript><strong>We're sorry but <%= htmlWebpackPlugin.options.title %> doesn't work properly without JavaScript enabled. Please enable it to continue.</strong></noscript><!-- 跟组件 --><div id="app"></div><!-- built files will be auto injected --></body></html>
render函数
正常来说,我们
import Vue from 'vue',导入的是阉割版的vue.js
esm的意思是 es module,es6模块化引入
import Vue from 'vue'
// import App from './App.vue'Vue.config.productionTip = falsenew Vue({// render: h => h(App),render(createElement) {return createElement('h1','哈哈哈')}
}).$mount('#app')
render函数实际上就是以上这个函数,默认的写法是简化的写法
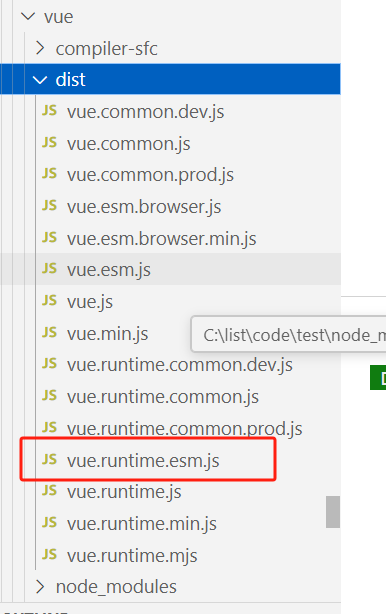
vue.js 是完整版Vue 包含 核心功能 + 模板解析器
vue.runtime.esm.js 是运行版的Vue,只有核心功能
因为vue.runtime.esm.js没有模板解析器,所以不能使用template配置项,只能使用render函数,接收到createment函数去指定具体内容
组件里边的template有解析器解析
修改默认配置
查看脚手架的默认配置
vue inspect > output.js
命令的意思是,生成要给output.js的文件
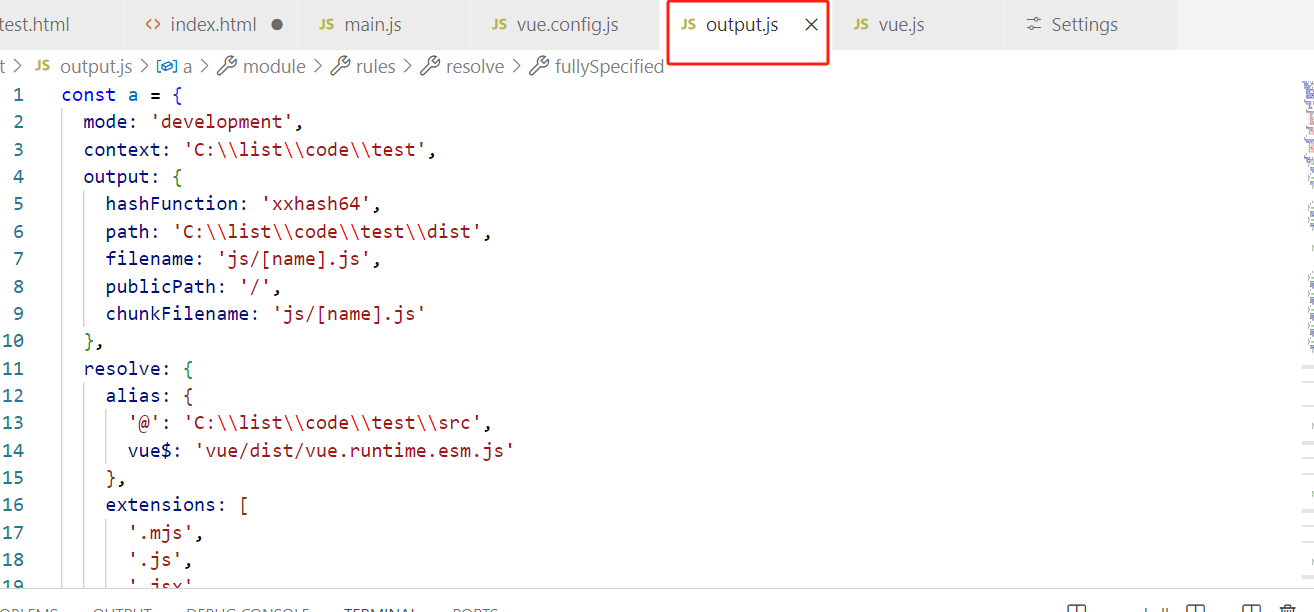
默认的配置,webpack不会让我们看,我们要修改的话
就得修改vue.config.js
module.exports = {pages: {index: {//入口entry: 'src/peiqi.js'}},//关闭eslintlintOnSave:false
}
例如上面,我们修改入口,把main.js改成peiqi.js
最后这个配置会合并到webpack上的,所以这里是common.js的语法
这些配置可以在vue-cli的官网上进行配置
vue-cli官网
ref
如果我们想要得到原生的dom
如果不用ref的话,如下使用
<template><div><h2 v-text="msg" id="title"></h2><button @click="showInfo">点我查看dom</button></div></template><script>
export default {name: 'School',data() {return {msg:'wofe fuck'}},methods: {showInfo() {console.log(document.getElementById('title'));}}
}
</script><style></style>
这样写不好看,我们在dom上写ref
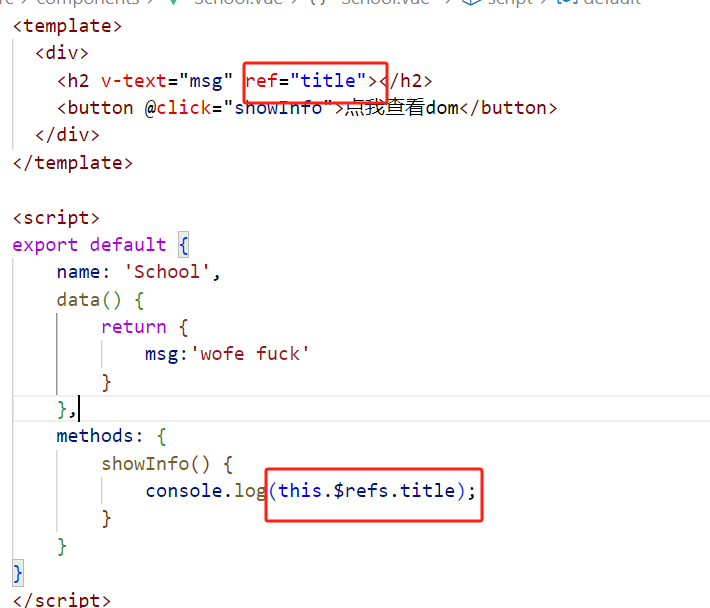 this指向的是组件实例对象,找到$refs下的title
注意,如果这里的标签是组件的话,获得就不是dom了,而是组件实例对象
<template><div id="app"><School ref="sch"></School><button @click="showInfo">点我</button></div></template><script>
import School from './components/School.vue'export default {name: 'App',components: {School},methods: {showInfo() {console.log(this.$refs.sch);}}
}
</script><style></style>
但是需要注意的是,如果我们用id来获取组,得到依然是真实dom
props(父 -> 子组件传值)
3、props配置项
(1) 功能:让组件接收外部传来的数据
① 传递数据:<Demo name="xxx"/>
② 接收数据:
- 第一种方式(只接收):
props:[‘name’] - 第二种方式(限制类型):
props:{name:String} - 第三种方式(限制类型、限制必要性、指定默认值):
props: {
name:{
type:String, //类型
required:true, //必要性
default:‘老王’ //默认值
}
}
备注:props是只读的,Vue底层会监测你对props的修改,如果进行了修改,就会发出警告,若业务需求确实需要修改,那么请复制props的内容到data中一份,然后去修改data中的数据。
src/components/Student.vue
<template><div><h1>{{msg}}</h1><h2>学生姓名:{{studentName}}</h2><h2>性别:{{sex}}</h2><h2>年龄:{{myAge+1}}</h2><button @click="updateAge">尝试修改收到的年龄</button></div></template><script>
export default {name:'Student',data(){return {msg:'晚安',myAge:this.age}},methods:{updateAge(){this.myAge++}},//简单声明接收//props接收到的数据不可以改// props:['studentName','sex','age']  //接收的同时对数据进行类型限制/*  props:{studentName:String,sex:String,age:Number} *///接收的同时对数据进行类型限制+指定默认值+必要性的限制props:{studentName:{type:String,     //studentName的类型是字符串required:true    //studentName是必要的},age:{type:Number,default:99  //默认值   required 和deafault不会同时出现},sex:{type:String,required:true}}
}
</script>
src/App.vue
<template>
<div><!-- v-bind:里面装表达式  --><Student studentName="玛卡巴卡" sex="男" :age="18"/>
</div></template><script>
//汇总所有的组件(引入School组件)
import Student from './components/Student.vue'
export default {name:'App',components:{ Student }
}
</script>
需要注意的是,传值的时候默认传过来的是字符串,如果要想再子组件中使用为变量,就是在传值的时候,前面加个:,类似如下的age
<Student studentName="玛卡巴卡" sex="男" :age="18"/>
mixin
混合,将多个组件公用的配置提取成一个混入对象
有点像封装
export const mixin = {methods: {showName() {alert(this.name)}},mounted() {console.log('halllo');}
}
mixin.js
局部混入
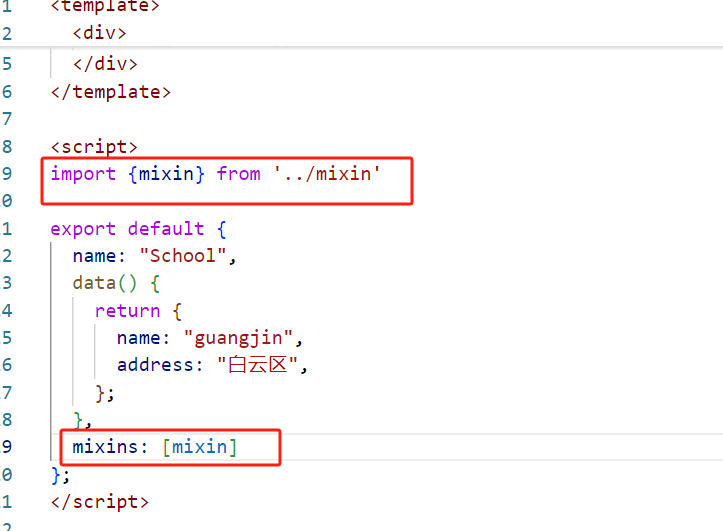
使用配置项mixins 里边是数组形式
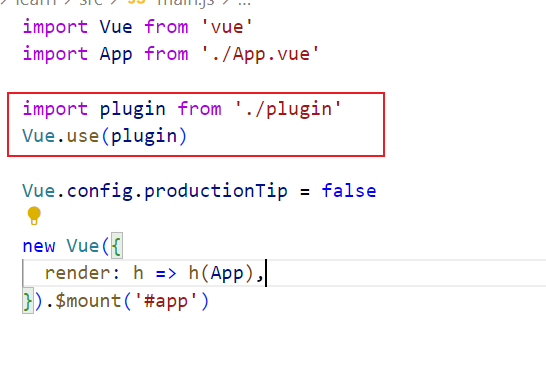
全局混入
import Vue from 'vue'
import App from './App.vue'//全局混入
import {mixin} from './mixin'
Vue.mixin(mixin);Vue.config.productionTip = falsenew Vue({render: h => h(App),
}).$mount('#app')
插件
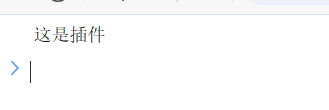
简单使用
plugin.js
export default {install() {console.log('这是插件');}
}
main.js
效果
注意
install,可以接收参数
install(Vue,options) {
}
我们在插件里边可以获取Vue的对象
plugin.js
export default {install(Vue) {console.log(Vue);}
}

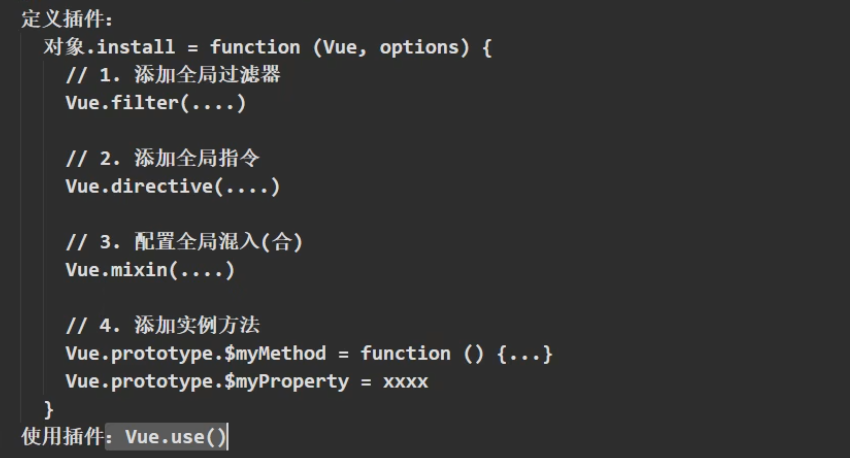
我们可以干很多事情
scoped
让样式在局部生效,防止冲突
<style scoped></scoped>
动画效果

缓缓的从左边进来
隐藏的时候,缓缓的从右往左走
<template><div class="app"><div><button @click="isShow = !isShow">点击隐藏</button></div><transition appear><h1 v-show="isShow">{{ msg }}</h1></transition></div>
</template><script>export default {name: 'App',data() {return {msg: '你好啊!',isShow: true}}
}
</script><style scoped>
h1 {  background-color: aqua;
}.v-enter-active {animation: jjking 1s;
}.v-leave-active {animation: jjking 1s reverse;
}@keyframes jjking {from {transform: translateX(-100%);}to {transform: translateX(0px);}
}
</style>
最原始的写法
在样式里边写.v-enter-active
.v-leave-active
必须这么写
<transition appear><h1 v-show="isShow">{{ msg }}</h1>
</transition><transition :appear="true"><h1 v-show="isShow">{{ msg }}</h1>
</transition>
两种写法都是一样的
动画起名字
<transition :appear="true" name="hello"><h1 v-show="isShow">{{ msg }}</h1>
</transition>.hello-enter-active {animation: jjking 1s;
}.hello-leave-active {animation: jjking 1s reverse;
}@keyframes jjking {from {transform: translateX(-100%);}to {transform: translateX(0px);}
}
把v改成对应的名字即可
集成第三方库
npm install animate.css
<template><div class="app"><div><button @click="isShow = !isShow">点击隐藏</button></div><transition-groupappearname="animate__animated animate__bounce"enter-active-class="animate__swing"leave-active-class="animate__backOutUp"><h1 v-show="isShow" key="1">{{ msg }}</h1></transition-group></div>
</template><script>
import 'animate.css';
export default {name: 'App',data() {return {msg: '你好啊!',isShow: true}}
}
</script><style scoped>
h1 {  background-color: aqua;
}
</style>
必须写
name
enter-active-class=“animate__swing”
leave-active-class=“animate__backOutUp”
注意要给过度的元素添加key,不然会报错
配置代理
安装axios
npm i axios
方法一
在vue.config.js中添加如下配置:
devServer:{proxy:"http://localhost:5000"
}
这样是简单的配置,缺点是灵活性差,并且不能设置多台服务器
发请求代码
getStudentData() {axios.get('http://localhost:8080/students').then((res) => {console.log(res.data);})
}
vue-cli 帮我们开启了一个虚拟服务器 localhost:8080 和我们vue服务器一致
虚拟的代理服务器和服务器去交互,proxy写的是请求转发的地址
且优先匹配的是前端的8080下的资源,如果前端8080下没有,就去找代理服务器
方法二
module.exports = {devServer: {proxy: {'/api1': {// 匹配所有以 '/api1'开头的请求路径target: 'http://localhost:5000',// 代理目标的基础路径changeOrigin: true,pathRewrite: {'^/api1': ''}},'/api2': {// 匹配所有以 '/api2'开头的请求路径target: 'http://localhost:5001',// 代理目标的基础路径changeOrigin: true,pathRewrite: {'^/api2': ''}}}}
}
/*changeOrigin设置为true时,服务器收到的请求头中的host为:localhost:5000changeOrigin设置为false时,服务器收到的请求头中的host为:localhost:8080changeOrigin默认值为true
*/
发请求代码
getStudentData() {axios.get('http://localhost:8080/api1/students').then((res) => {console.log(res.data);})}
我们在localhost后边写前缀
需要注意的是这里的pathRewrite()必须写
因为我们发请求给虚拟服务器,他拿到的前缀是 /api1/students,整体的请求路径应该是
target里边的路径 + /api1/students ->localhost:5000/api1/students
服务器端不认识,所以这里得把api1用正则给替换成空字符串