Arduino - 继电器
Arduino - 继电器
In a previous tutorial, we have learned how to turn on/off an LED. In this tutorial, we are going to learn how to turn on/off some kind of devices that use the high voltage power supply(such as a light bulb, fan, electromagnetic lock, linear actuator…).
在之前的教程中,我们学习了如何打开/关闭 LED。在本教程中,我们将学习如何打开/关闭某种使用高压电源的设备(例如灯泡、风扇、电磁锁、线性执行器等)。
How To Scan Keypad
如何扫描键盘
What are the common and difference between controlling LED and controlling a light bulb?
控制LED和控制灯泡有什么共同之处和区别?
The common: Just like controlling LED, we use the Arduino’s output pin to turn on/off them.
共同点:就像控制LED一样,我们使用Arduino的输出引脚来打开/关闭它们。
The difference: 区别:
- For LED, we can use power from the Arduino board (≤ 5v). Therefore, we can connect LED directly to Arduino’s pin.
对于LED,我们可以使用Arduino板(≤ 5v)的电源。因此,我们可以将 LED 直接连接到 Arduino 的引脚。 - For the light bulb, we MUST use another power source (high voltage and/or high current), which can burn Arduino. Therefore, we CANNOT connect the light bulb directly to Arduino’s pin. We need to use a relay between Arduino’s pin and light bulb to protect Arduino from high voltage/current.
对于灯泡,我们必须使用另一种电源(高电压和/或大电流),这可能会烧毁Arduino。因此,我们无法将灯泡直接连接到Arduino的引脚。我们需要在Arduino的引脚和灯泡之间使用继电器来保护Arduino免受高电压/电流的影响。
About Relay 关于Relay
A relay is a programmable electrical switch, which can be controlled by Arduino or any micro-controller. It is used to programmatically control on/off the devices, which use the high voltage and/or high current.
继电器是一种可编程的电气开关,可以由Arduino或任何微控制器控制。它用于以编程方式控制使用高电压和/或高电流的设备的开/关。
It is a bridge between Arduino and high voltage devices.
它是Arduino和高压设备之间的桥梁。
WARNING
When you are making projects that are connected to mains voltage, you need to know what you are doing, otherwise, you may shock yourself. This is a serious topic, and we want you to be safe. If you’re NOT 100% sure what you are doing, do yourself a favor and don’t touch anything. Ask someone who knows!
当您制作连接到电源电压的项目时,您需要知道自己在做什么,否则您可能会震惊自己。这是一个严肃的话题,我们希望您安全。如果您不是 100% 确定自己在做什么,请帮自己一个忙,不要碰任何东西。问问知道的人!
Although some kinds of relays support both DC and AC devices, We highly recommend you to use a DC device (≤24V) for testing.
尽管某些类型的继电器同时支持直流和交流设备,但我们强烈建议您使用直流设备 (≤24V) 进行测试。
Relay Pinout 继电器引脚排列

Relay has two groups of pins: input (low voltage) group and output (high voltage) group.
继电器有两组引脚:输入(低压)组和输出(高压)组。
-
Pins in the input group are connected to Arduino, including three pins:
输入组中的引脚连接到Arduino,包括三个引脚:-
DC- pin: needs to be connected to GND (0V)
DC- 引脚:需要连接到 GND (0V) -
DC+ pin: needs to be connected to VCC (5V)
DC+ 引脚:需要连接到 VCC (5V)
IN pin: receives the control signal from Arduino
IN引脚:接收来自Arduino的控制信号 -
-
Pins in the output group are connected to the high voltage device, including three pins (usually in screw terminal):
输出组中的引脚连接到高压器件,包括三个引脚(通常在螺丝端子中):- COM pin: is the common pin. It is used in both normally open mode and normally closed mode
COM引脚:是常用引脚。它用于常开模式和常闭模式 - NO pin: is normally open pin. It is used in the normally open mode
NO 引脚:是常开引脚。它在常开模式下使用 - NC pin: is normally closed pin. It is used in the normally closed mode
NC引脚:常闭引脚。它在常闭模式下使用
- COM pin: is the common pin. It is used in both normally open mode and normally closed mode
-
In practice, we usually do NOT use all of the pins in the high voltage group. We use only two of them:
在实践中,我们通常不会使用高压组中的所有引脚。我们只使用其中两种: -
We use only COM pin and NO pin if we use normally open mode.
如果我们使用常开模式,我们只使用 COM 引脚和 NO 引脚。 -
We use only COM pin and NC pin if we use normally closed mode.
如果我们使用常闭模式,我们只使用 COM 引脚和 NC 引脚。 -
Additionally, if the relay supports both LOW and HIGH level triggers, there is usually a jumper to select one of two: LOW level trigger or HIGH level trigger.
此外,如果继电器同时支持低电平和高电平触发,则通常有一个跳线可以选择以下两种触发之一:低电平触发或高电平触发。 -
※ NOTE THAT: ※ 注意事项:
The order of the relay module’s pins can vary between manufacturers. ALWAYS use the labels printed on the relay. Look closely!
继电器模块引脚的顺序可能因制造商而异。始终使用印在继电器上的标签。仔细看! -
How to Connect the High Voltage Device to Relay
如何将高压设备连接到继电器

-
How It Works 它是如何工作的
-
Depending on manufacturers and user’s installation, a relay can work differently.
根据制造商和用户的安装,继电器的工作方式可能有所不同。 -
The input mode mode (for IN pin): There are two input modes that make relay works oppositely:
输入模式模式(用于 IN 引脚):有两种输入模式使继电器相反地工作: -
LOW level trigger mode 低电平触发模式
-
HIGH level trigger mode HIGH电平触发模式
-
The output mode mode (for output pins): There are two output modes that make relay works oppositely:
输出模式模式(用于输出引脚):有两种输出模式使继电器相反地工作: -
normally open mode 常开模式
-
normally closed mode. These modes are the opposite.
常闭模式。这些模式正好相反。 -
The “normally” means “if IN pin is connected to *LOW* (0V)”.
“通常”表示“如果 IN 引脚连接到 LOW (0V)”。 -
Before going into detail, let’s see some quick information:
在详细介绍之前,让我们先看一些快速信息: -
The normally open and normally closed mode work oppositely
常开和常闭模式相反 -
The most of relay modules supports both normally open and normally closed mode
大多数继电器模块支持常开和常闭模式 -
The LOW level trigger and HIGH level trigger mode work oppositely
低电平触发和高电平触发模式相反 -
NOT all of relay modules supports both LOW level trigger and HIGH level trigger mode
并非所有继电器模块都支持低电平触发和高电平触发模式 -
At a time, The relay module can work at only one of two LOW level trigger and HIGH level trigger mode
一次,继电器模块只能在两个低电平触发和高电平触发模式之一下工作 -
The combination of the input modes mode and output modes modes creates many use cases. If you are a beginner, we recommend using HIGH level trigger mode and normally open mode
输入模式模式和输出模式模式的组合创造了许多用例。如果您是初学者,我们建议您使用 HIGH 级别触发模式和常开模式 -
Because the LOW level trigger and HIGH level trigger mode work oppositely, The next will explain the HIGH level trigger mode in detail. The LOW level trigger works oppositely.
由于 LOW 电平触发和 HIGH 电平触发模式的工作方式相反,因此接下来将详细解释 HIGH 电平触发模式。LOW 电平触发器的工作方式相反。 -
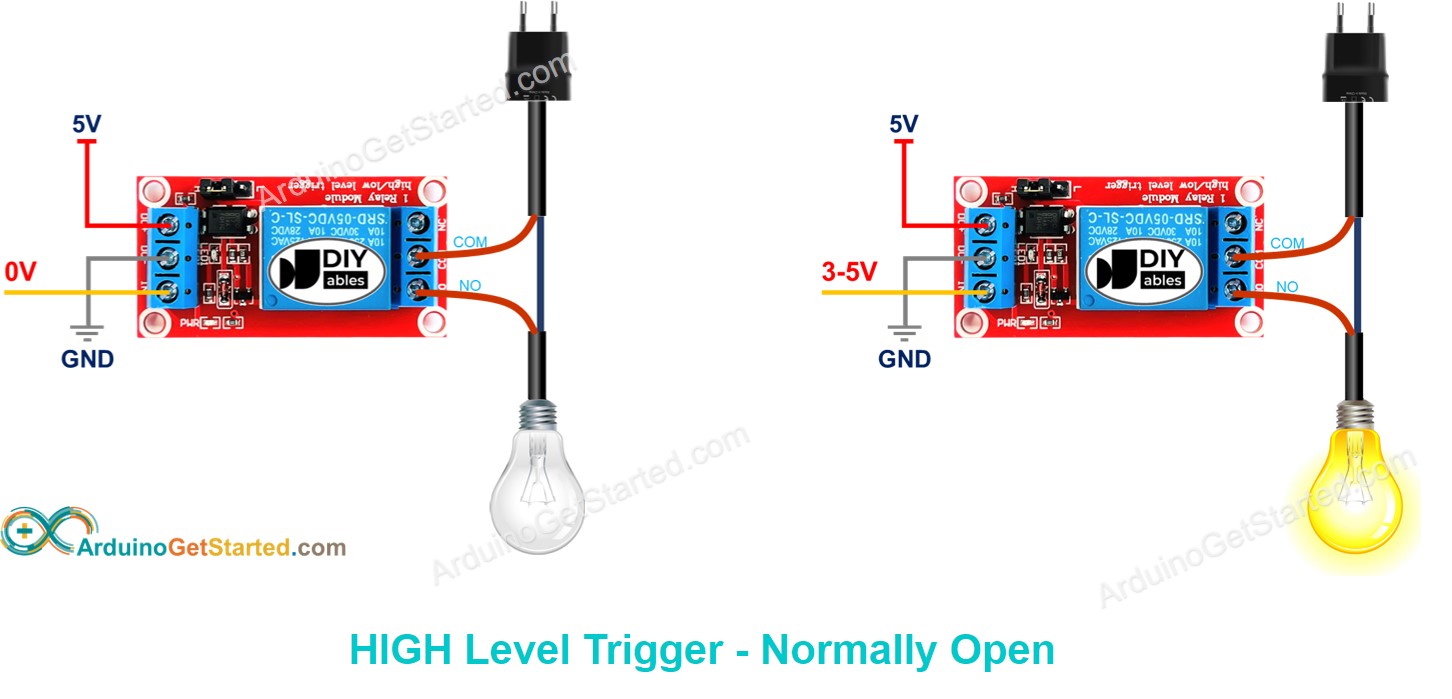
HIGH Level Trigger - Normally Open Mode
HIGH 电平触发 - 常开模式 -
To use this mode, we need to connect the high voltage device to the COM pin and NO pin.
要使用此模式,我们需要将高压设备连接到 COM 引脚和 NO 引脚。 -
If the IN pin is connected to LOW (0V), the switch is open. The device is OFF (or inactive).
如果 IN 引脚连接到 LOW (0V),则开关断开。设备处于关闭(或非活动状态)。 -
If the IN pin is connected to HIGH (5V), the switch is closed. The device is ON (or active).
如果 IN 引脚连接到高电平 (5V),则开关闭合。设备处于打开(或活动)状态。 -
-
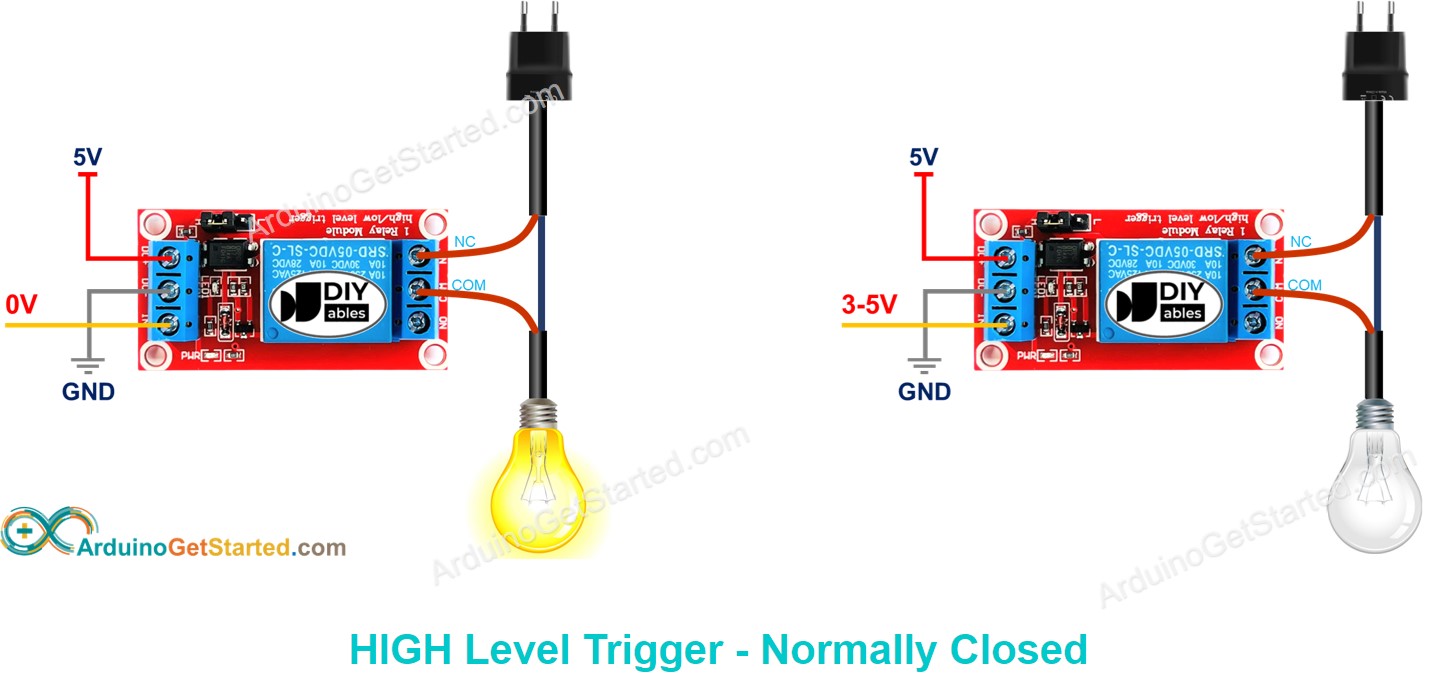
HIGH Level Trigger - Normally Closed Mode
HIGH 电平触发 - 常闭模式 -
To use this mode, we need to connect the high voltage device to the COM pin and NC pin.
要使用此模式,我们需要将高压器件连接到COM引脚和NC引脚。 -
If the IN pin is connected to LOW (0V), the switch is closed. The device is ON (or active).
如果 IN 引脚连接到低电平 (0V),则开关闭合。设备处于打开(或活动)状态。 -
If the IN pin is connected to HIGH (5V), the switch is open. The device is OFF (or inactive).
如果 IN 引脚连接到高电平 (5V),则开关断开。设备处于关闭(或非活动状态)。 -
-
There are up to 8 use cases. It may overload you. However, If you are a newbie, you just need to care about the two first cases, where HIGH level trigger and normally open are used. The rest of this tutorial will use those two use cases
最多有 8 个用例。它可能会使您超负荷。但是,如果您是新手,则只需要关心前两种情况,即使用高电平触发和常开。本教程的其余部分将使用这两个用例 -
Arduino - Relay Arduino - 继电器
-
Arduino controls a high voltage device by controlling a relay.
Arduino通过控制继电器来控制高压设备。 -
Controlling a relay is simple. We just need:
控制继电器很简单。我们只需要: -
Connect an Arduino’s pin to the IN pin of the relay
将Arduino的引脚连接到继电器的IN引脚 -
Control the relay by programming the pin to LOW or HIGH
通过将引脚编程为低电平或高电平来控制继电器
Wiring Diagram 接线图

How To Program For Relay 如何为继电器编程
- Configure an Arduino’s pin to the digital output mode by using pinMode() function. For example, pin 3:
使用 pinMode() 函数将 Arduino 的引脚配置为数字输出模式。例如,引脚 3:
pinMode(3, OUTPUT);
- Program the pin to LOW (0V) by using digitalWrite() function:
使用 digitalWrite() 函数将引脚编程为低电平 (0V):
digitalWrite(3, LOW);
- Program the pin to HIGH (5V) by using digitalWrite() function:
使用 digitalWrite() 函数将引脚编程为高电平 (5V):
digitalWrite(3, HIGH);
Arduino Code Arduino代码
/** Created by ArduinoGetStarted.com** This example code is in the public domain** Tutorial page: https://arduinogetstarted.com/tutorials/arduino-relay*/// constants won't change
const int RELAY_PIN = 3;  // the Arduino pin, which connects to the IN pin of relay// the setup function runs once when you press reset or power the board
void setup() {// initialize digital pin as an output.pinMode(RELAY_PIN, OUTPUT);
}// the loop function runs over and over again forever
void loop() {digitalWrite(RELAY_PIN, HIGH);delay(500);digitalWrite(RELAY_PIN, LOW);delay(500);
}
Quick Steps 快速步骤
- Copy the above code and open with Arduino IDE
复制上面的代码并使用Arduino IDE打开 - Click Upload button on Arduino IDE to upload code to Arduino
单击Arduino IDE上的“上传”按钮,将代码上传到Arduino - See LED strip state: blinking
查看 LED 灯条状态:闪烁