Java整合APNS推送消息-IOS-APP(基于.p12推送证书)
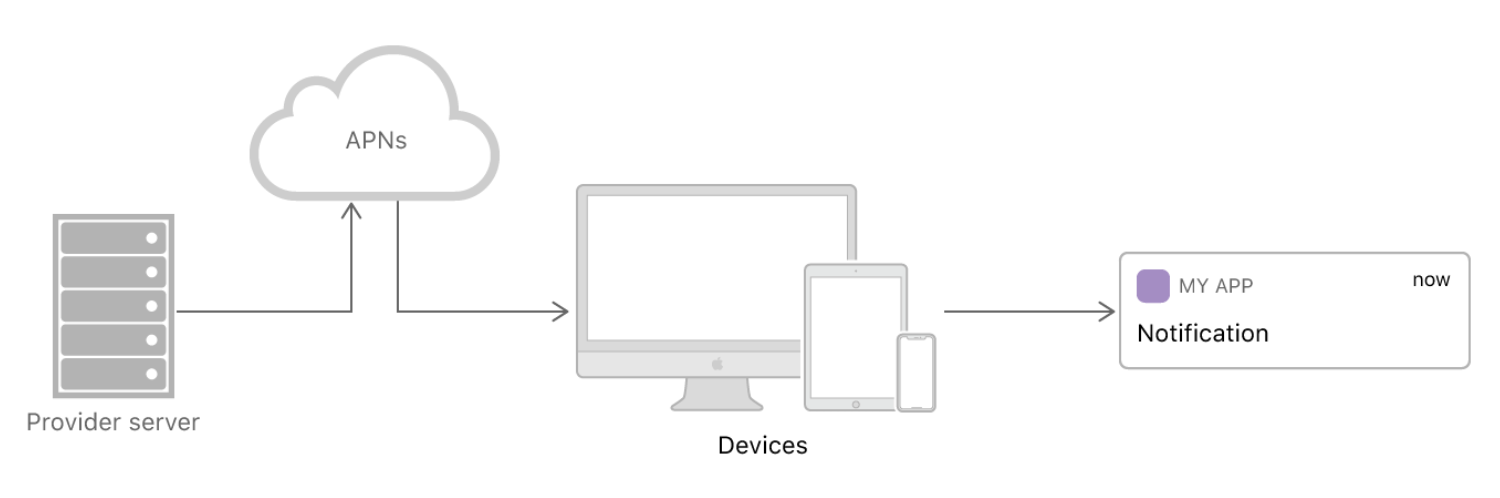
推送整体流程
1.在开发者中心申请对应的证书(我用的是.p12文件)
2.苹果手机用户注册到APNS,APNS将注册的token返回给APP(服务端接收使用)。
3.后台服务连接APNS,获取连接对象
4.后台服务构建消息载体
5.后台通过连接对象,根据指定的token将信息发送给指定的手机用户
证书是iOS同事生成给我的,具体生成步骤此处不做描述,网上能够搜到生成步骤。
引入maven文件
<dependency><groupId>com.turo</groupId><artifactId>pushy</artifactId><version>0.13.10</version>
</dependency>
下面是一个推送小demo,具体代码可以根据你们业务优化
package top.hnym.hnymsfapp.util;import com.turo.pushy.apns.*;
import com.turo.pushy.apns.util.SimpleApnsPushNotification;
import com.turo.pushy.apns.util.concurrent.PushNotificationFuture;
import io.netty.channel.EventLoopGroup;
import io.netty.channel.nio.NioEventLoopGroup;
import lombok.extern.slf4j.Slf4j;
import org.springframework.stereotype.Component;import java.io.File;
import java.util.Date;
import java.util.UUID;/*** @Author Lebron* @Date 2023/7/20 17:10* @Description apns消息推送 TODO*/
@Component
@Slf4j
public class APNsUtils {private static ApnsClient apnsClient1 = null;private static String topic1 = "com.hnym.sf.micro";private static String p12Password1 = "apns_push1.p12";public static void main(String[] args) throws Exception {// IOS等终端设备注册后返回的DeviceTokenString deviceToken = "853fa4caaf01d36df40bc54b339dba0fd6689585b1cd478552bee4f589380cb2";// 这是你的主题,大多数情况是bundleId,voip需要在bundleId加上.voip。对应文档中的apns-topic// 代表app签名的topicString payload = "{\n" +"    \"aps\":{\n" +"        \"alert\":{\n" +"            \"title\":\"基尼太美\",\n" +"            \"body\":\"基尼实在是太美\"\n" +"        },\n" +"        \"badge\":\"1\",\n" +"        \"sound\":\"default\",\n" +"        \"userinfo\":{\n" +"            \"username\":\"tome\"\n" +"        }\n" +"    }\n" +"}";sendNotification1(deviceToken, payload);}public static ApnsClient sendNotification1(String deviceToken, String payload) {log.info("IOS开始推送............");try {apnsClient1 = null;// 有效时间Date invalidationTime = new Date(System.currentTimeMillis() + 60 * 60 * 1000L);// 发送策略 apns-priority 10为立即 5为省电DeliveryPriority priority = DeliveryPriority.IMMEDIATE;// 推送方式,主要有alert,background,voip,complication,fileprovider,mdmPushType pushType = PushType.ALERT;// 推送的合并ID,相同的 apns-collapse-id会在App中合并String collapseId = UUID.randomUUID().toString();// apnsId 唯一标示,如果不传,APNs会给我们生成一个UUID apnsId = UUID.randomUUID();// 构造一个APNs的推送消息实体SimpleApnsPushNotification msg = new SimpleApnsPushNotification(deviceToken, topic1, payload, invalidationTime,priority, pushType, collapseId, apnsId);// 四个线程EventLoopGroup eventLoopGroup = new NioEventLoopGroup(4);apnsClient1 = new ApnsClientBuilder()//setApnsServer用于设置推送服务环境(正式还是开发)ApnsClientBuilder.DEVELOPMENT_APNS_HOST.setApnsServer(ApnsClientBuilder.PRODUCTION_APNS_HOST).setClientCredentials(new File("/apns_push1.p12"), p12Password1)//setConcurrentConnections用于设置服务器与苹果服务器建立几个链接通道,这里是建立了四个,链接通道并不是越多越好的,具体速度自己百度.setConcurrentConnections(4)//setEventLoopGroup的作用是建立几个线程来处理,说白了就是多线程,我这里设置的都是4,相当于16个线程同时处理。.setEventLoopGroup(eventLoopGroup).build();PushNotificationFuture<SimpleApnsPushNotification, PushNotificationResponse<SimpleApnsPushNotification>> future = apnsClient1.sendNotification(msg);PushNotificationResponse<SimpleApnsPushNotification> response = future.get();apnsClient1.close();log.info("IOS推送结束............");// 如果返回的消息中success为true那么成功,否则失败!// 如果失败不必惊慌,rejectionReason字段中会有失败的原因。对应官网找到原因即可// https://developer.apple.com/documentation/usernotifications/setting_up_a_remote_notification_server/handling_notification_responses_from_apns?language=objclog.info("IOS推送结果--------------->{}", response);} catch (Exception e) {log.error("ios get pushy apns client failed!");e.printStackTrace();}return apnsClient1;}
}
执行后即收到推送过来的消息,速度还是蛮快的【真爱粉】

总结:
1、本人真爱粉;
2、.setClientCredentials(new File("/apns_push1.p12"), p12Password1),大家需要更改为自己的.p12文件路径;
3、如果你们不是安装的正式app,推送方式需要更改为ApnsClientBuilder.DEVELOPMENT_APNS_HOST,否则会推送不过去;
4、支持自定义声音、角标,ios版本不同,格式也不同
//        i0S10之前
//        "aps":{
//            "alert":"内容",
//                    "badge":"1",
//                    "sound":"default",
//                    "userinfo":{
//                "username":"tome"
//            }
//        }
//        IOS10及之后(ios7、ios8、ios9可通用此模板)
//        "aps":{
//            "alert":{
//                "title":"标题",// i0S7、8 资置无,i0S9 一严资为appName
//                        "subtitle":"子标题", // 一般用title就能满足篇求
//                        "body":"内容"
//            },
//            "badge":"1",// 角标数
//                    "sound":"default",// 声音
//                    "userinfo":{// 通知消息内容
//                "username":"tome"
//            }
//        }