[Tools: Camera Conventions] NeRF中的相机矩阵估计
参考:NeRF代码解读-相机参数与坐标系变换 - 知乎
- 在NeRF中,一个重要的步骤是确定射线(rays)的初始点和方向。
- 根据射线的初始点和方向,和设定射线深度和采样点数量,可以估计该射线成像的像素值。
- 估计得到的像素值,在训练中用于计算损失更新参数,在测试中用于渲染图像。
相机矩阵包含内参和外参矩阵:
- 计算相机坐标系在图片坐标系中的坐标:相机内参矩阵;
- 计算世界坐标系在相机坐标系中的坐标:相机外参矩阵。
确定射线的初始点和方向,通常是上述过程的逆过程,通常包含两个步骤:
- 计算图片坐标系在相机坐标系中的坐标;
- 计算相机坐标系在世界坐标系中的坐标:c2w矩阵。
目录
1. 计算c2w矩阵
2. 根据相机内参,计算射线在相机坐标系下的方向
3. 根据c2w矩阵和相机坐标系下的方向,计算射线在世界坐标系下的方向和初始位置
1. 计算c2w矩阵
在NeRF中,通常使用相机外参矩阵的逆矩阵,也即:camera-to-world (c2w)矩阵。c2w矩阵左乘相机坐标系下的坐标,即可得到世界坐标系下的坐标。给定世界坐标系和相机坐标系,可以计算c2w矩阵:
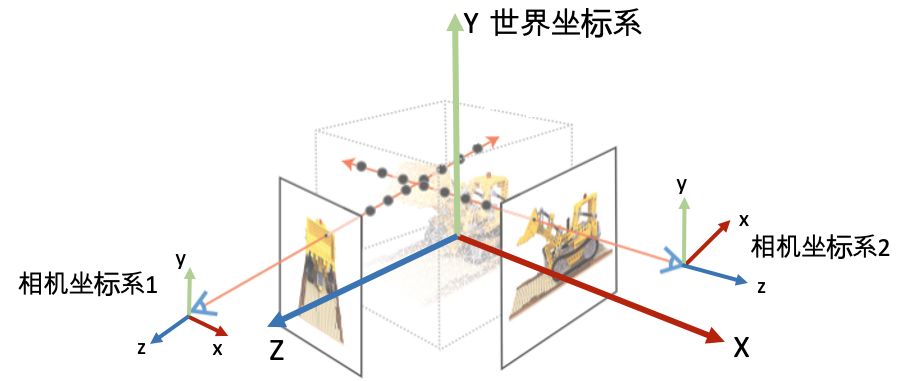
以上图的世界坐标系和NeRF中使用的相机坐标系为例:
- 根据给定的相机的elevation, azimuth和camera_distance,计算相机在世界坐标系下的坐标;
- 根据相机在世界坐标系下的坐标,计算相机的朝向;
- 根据相机在世界坐标系下的坐标和朝向(X_C, Y_C, Z_C),组成c2w矩阵。
# elevation: X_W -> Y_W
# azimuth: X_w -> Z_W
# camera_distance: 相机距离原点的距离
# camera_position的顺序是(x, y, z)camera_positions = torch.stack([camera_distance * torch.cos(elevation) * torch.cos(azimuth),camera_distance * torch.sin(elevation),camera_distance * torch.cos(elevation) * torch.sin(azimuth),],dim=-1,
)
# default scene center at origin
center = torch.zeros_like(camera_positions)
# default camera up direction as +z
up = torch.as_tensor([0, 1, 0], dtype=torch.float32)
# fovy = torch.tensor(fovy_deg * math.pi / 180, dtype=torch.float32)lookat = F.normalize(center - camera_positions, dim=-1)
right = F.normalize(torch.cross(lookat, up), dim=-1)
up = F.normalize(torch.cross(right, lookat), dim=-1)
# default setting
c2w3x4 = torch.cat([torch.stack([right, up, -lookat], dim=-1), camera_positions[:, None]],dim=-1,
)c2w = torch.cat([c2w3x4, torch.zeros_like(c2w3x4[:1])], dim=0
)
c2w[3, 3] = 1.0
2. 根据相机内参,计算射线在相机坐标系下的方向
之后根据fovy/focal length,以及图片height和width确定相机内参矩阵(没有标准化):
def get_ray_directions(H: int,W: int,focal: Union[float, Tuple[float, float]],principal: Optional[Tuple[float, float]] = None,use_pixel_centers: bool = True,
) -> Float[Tensor, "H W 3"]:"""Get ray directions for all pixels in camera coordinate.Reference: https://www.scratchapixel.com/lessons/3d-basic-rendering/ray-tracing-generating-camera-rays/standard-coordinate-systemsInputs:H, W, focal, principal, use_pixel_centers: image height, width, focal length, principal point and whether use pixel centersOutputs:directions: (H, W, 3), the direction of the rays in camera coordinate"""pixel_center = 0.5 if use_pixel_centers else 0if isinstance(focal, float):fx, fy = focal, focalcx, cy = W / 2, H / 2else:fx, fy = focalassert principal is not Nonecx, cy = principali, j = torch.meshgrid(torch.arange(W, dtype=torch.float32) + pixel_center,torch.arange(H, dtype=torch.float32) + pixel_center,indexing="xy",)directions: Float[Tensor, "H W 3"] = torch.stack([(i - cx) / fx, -(j - cy) / fy, -torch.ones_like(i)], -1)return directions# 相机内参矩阵
intrinsic = torch.tensor([[focal_length * width, 0, 0.5 * width], [0, focal_length * height, 0.5 * height], [0, 0, 1]]
)# 计算射线方向
directions = get_ray_directions(height, width,(intrinsic[0, 0], intrinsic[1, 1]),(intrinsic[0, 2], intrinsic[1, 2]),use_pixel_centers=False)
3. 根据c2w矩阵和相机坐标系下的方向,计算射线在世界坐标系下的方向和初始位置
def get_rays(directions: Float[Tensor, "... 3"],c2w: Float[Tensor, "... 4 4"],keepdim=False,noise_scale=0.0,
) -> Tuple[Float[Tensor, "... 3"], Float[Tensor, "... 3"]]:# Rotate ray directions from camera coordinate to the world coordinateassert directions.shape[-1] == 3if directions.ndim == 2:  # (N_rays, 3)if c2w.ndim == 2:  # (4, 4)c2w = c2w[None, :, :]assert c2w.ndim == 3  # (N_rays, 4, 4) or (1, 4, 4)rays_d = (directions[:, None, :] * c2w[:, :3, :3]).sum(-1)  # (N_rays, 3)rays_o = c2w[:, :3, 3].expand(rays_d.shape)elif directions.ndim == 3:  # (H, W, 3)assert c2w.ndim in [2, 3]if c2w.ndim == 2:  # (4, 4)rays_d = (directions[:, :, None, :] * c2w[None, None, :3, :3]).sum(-1)  # (H, W, 3)rays_o = c2w[None, None, :3, 3].expand(rays_d.shape)elif c2w.ndim == 3:  # (B, 4, 4)rays_d = (directions[None, :, :, None, :] * c2w[:, None, None, :3, :3]).sum(-1)  # (B, H, W, 3)rays_o = c2w[:, None, None, :3, 3].expand(rays_d.shape)elif directions.ndim == 4:  # (B, H, W, 3)assert c2w.ndim == 3  # (B, 4, 4)rays_d = (directions[:, :, :, None, :] * c2w[:, None, None, :3, :3]).sum(-1)  # (B, H, W, 3)rays_o = c2w[:, None, None, :3, 3].expand(rays_d.shape)# add camera noise to avoid grid-like artifect# https://github.com/ashawkey/stable-dreamfusion/blob/49c3d4fa01d68a4f027755acf94e1ff6020458cc/nerf/utils.py#L373if noise_scale > 0:rays_o = rays_o + torch.randn(3, device=rays_o.device) * noise_scalerays_d = rays_d + torch.randn(3, device=rays_d.device) * noise_scalerays_d = F.normalize(rays_d, dim=-1)if not keepdim:rays_o, rays_d = rays_o.reshape(-1, 3), rays_d.reshape(-1, 3)return rays_o, rays_d
rays_o, rays_d = get_rays(directions, c2w.unsqueeze(0), keepdim=True)