Pytest学习笔记
Pytest学习笔记
1、介绍
1.1、单元测试
单元测试是指在软件开发当中,针对软件的最小单位(函数,方法)进行正确性的检查测试
1.2、单元测试框架
- 测试发现:从多个py文件里面去找到我们测试用例
- 测试执行:按照一定的顺序和规则去执行。并生成结果
- 测试判断:通过断言判断预期结果和实际结果的差异
- 测试报告:统计测试进度,耗时,通过率,生成测试报告
1.3、自动化测试框架
针对一个项目开发的一个代码框架,这个框架封装了很多的基础模块,报告模块等等
1.4、Pytest
pytest可以和selenium,requests,appium结合实现web自动化,接口自动化,app自动化
pytest可以实现测试用例的跳过以及reruns失败用例重试
pytest可以和allure生成非常美观的测试报告
pytest可以和Jenkins持续集成
pytest有很多非常强大的插件,并且这些插件能够实现很多的实用的操作
- pytest pytest-xdist 测试用例分布式执行,多CPU分发
- pytest-ordering 用于改变测试用例的执行顺序(从上到下)
- pytest-rerunfailures 用例失败后重跑 pytest-html (生成html格式的自动化测试报告)
- allure-pytest 用于生成美观的测试报告
2、快速入门
2.1、Pytest约定
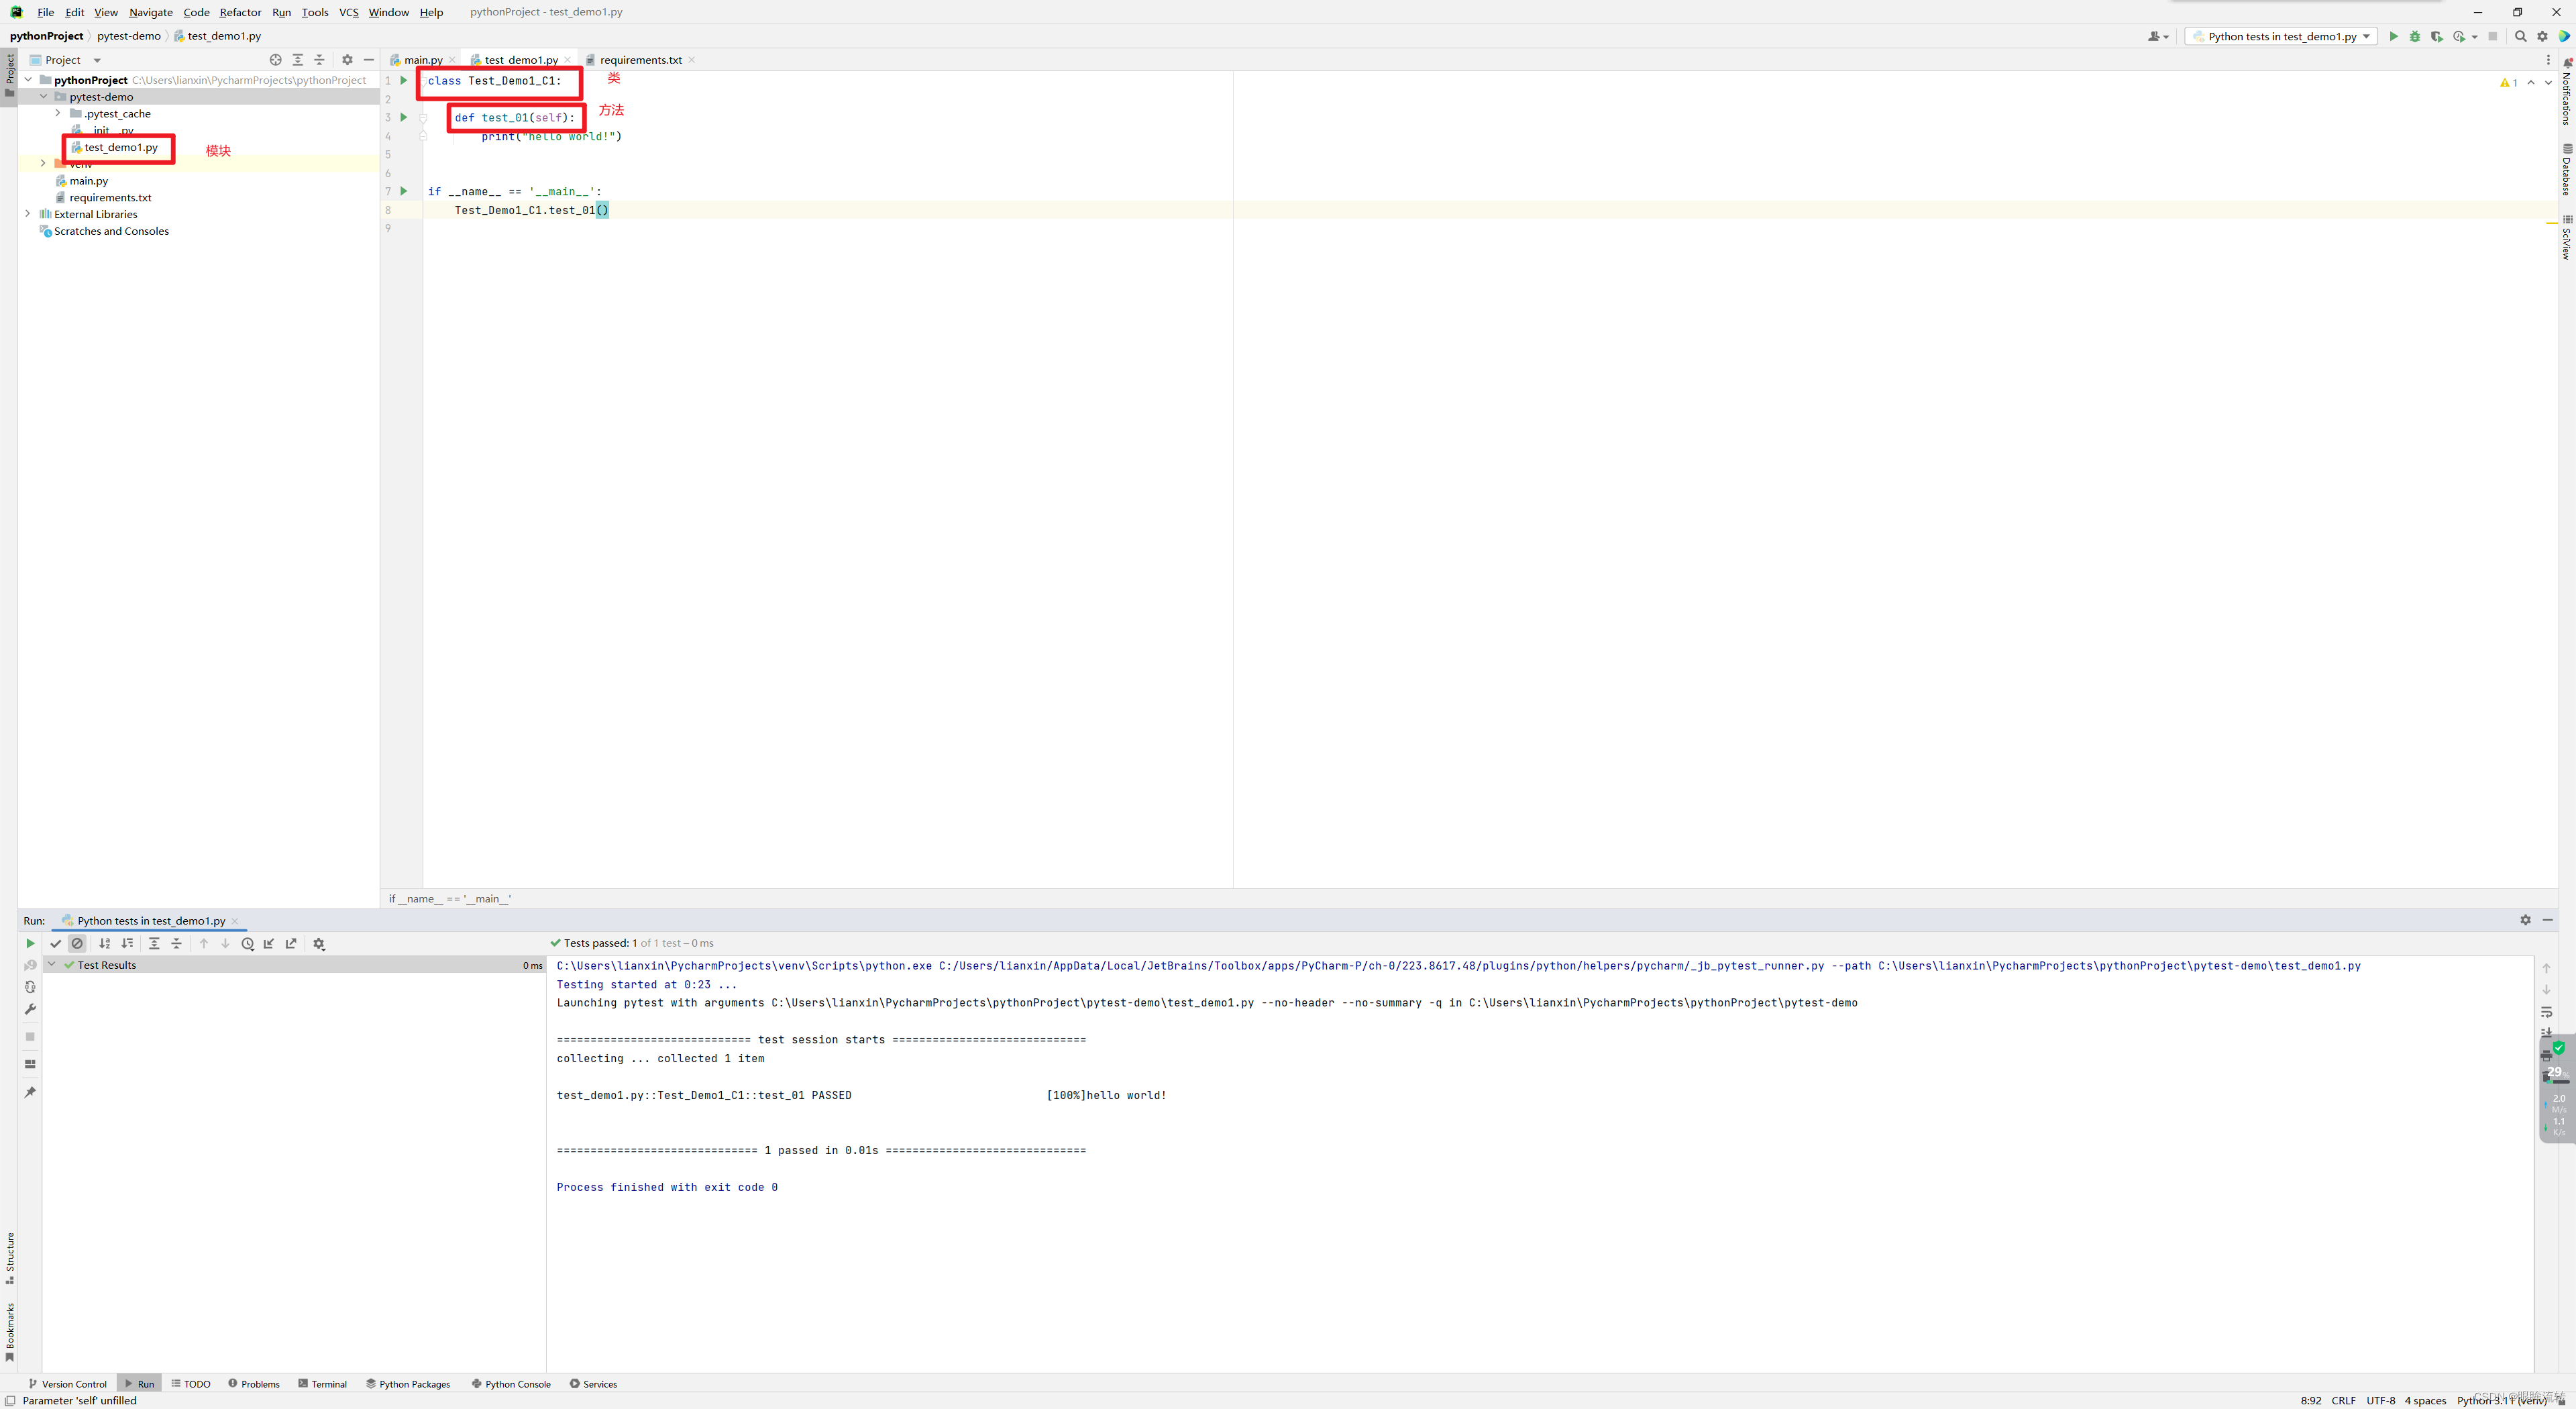
模块名必须以test_开头或者_test结尾
测试类必须以Test开头,并且不能有init方法
测试方法必须以test开头
pytest
pytest-xdist
pytest-ordering
pytest-rerunfailures
pytest-html
allure-pytest
requests
2.2、安装依赖
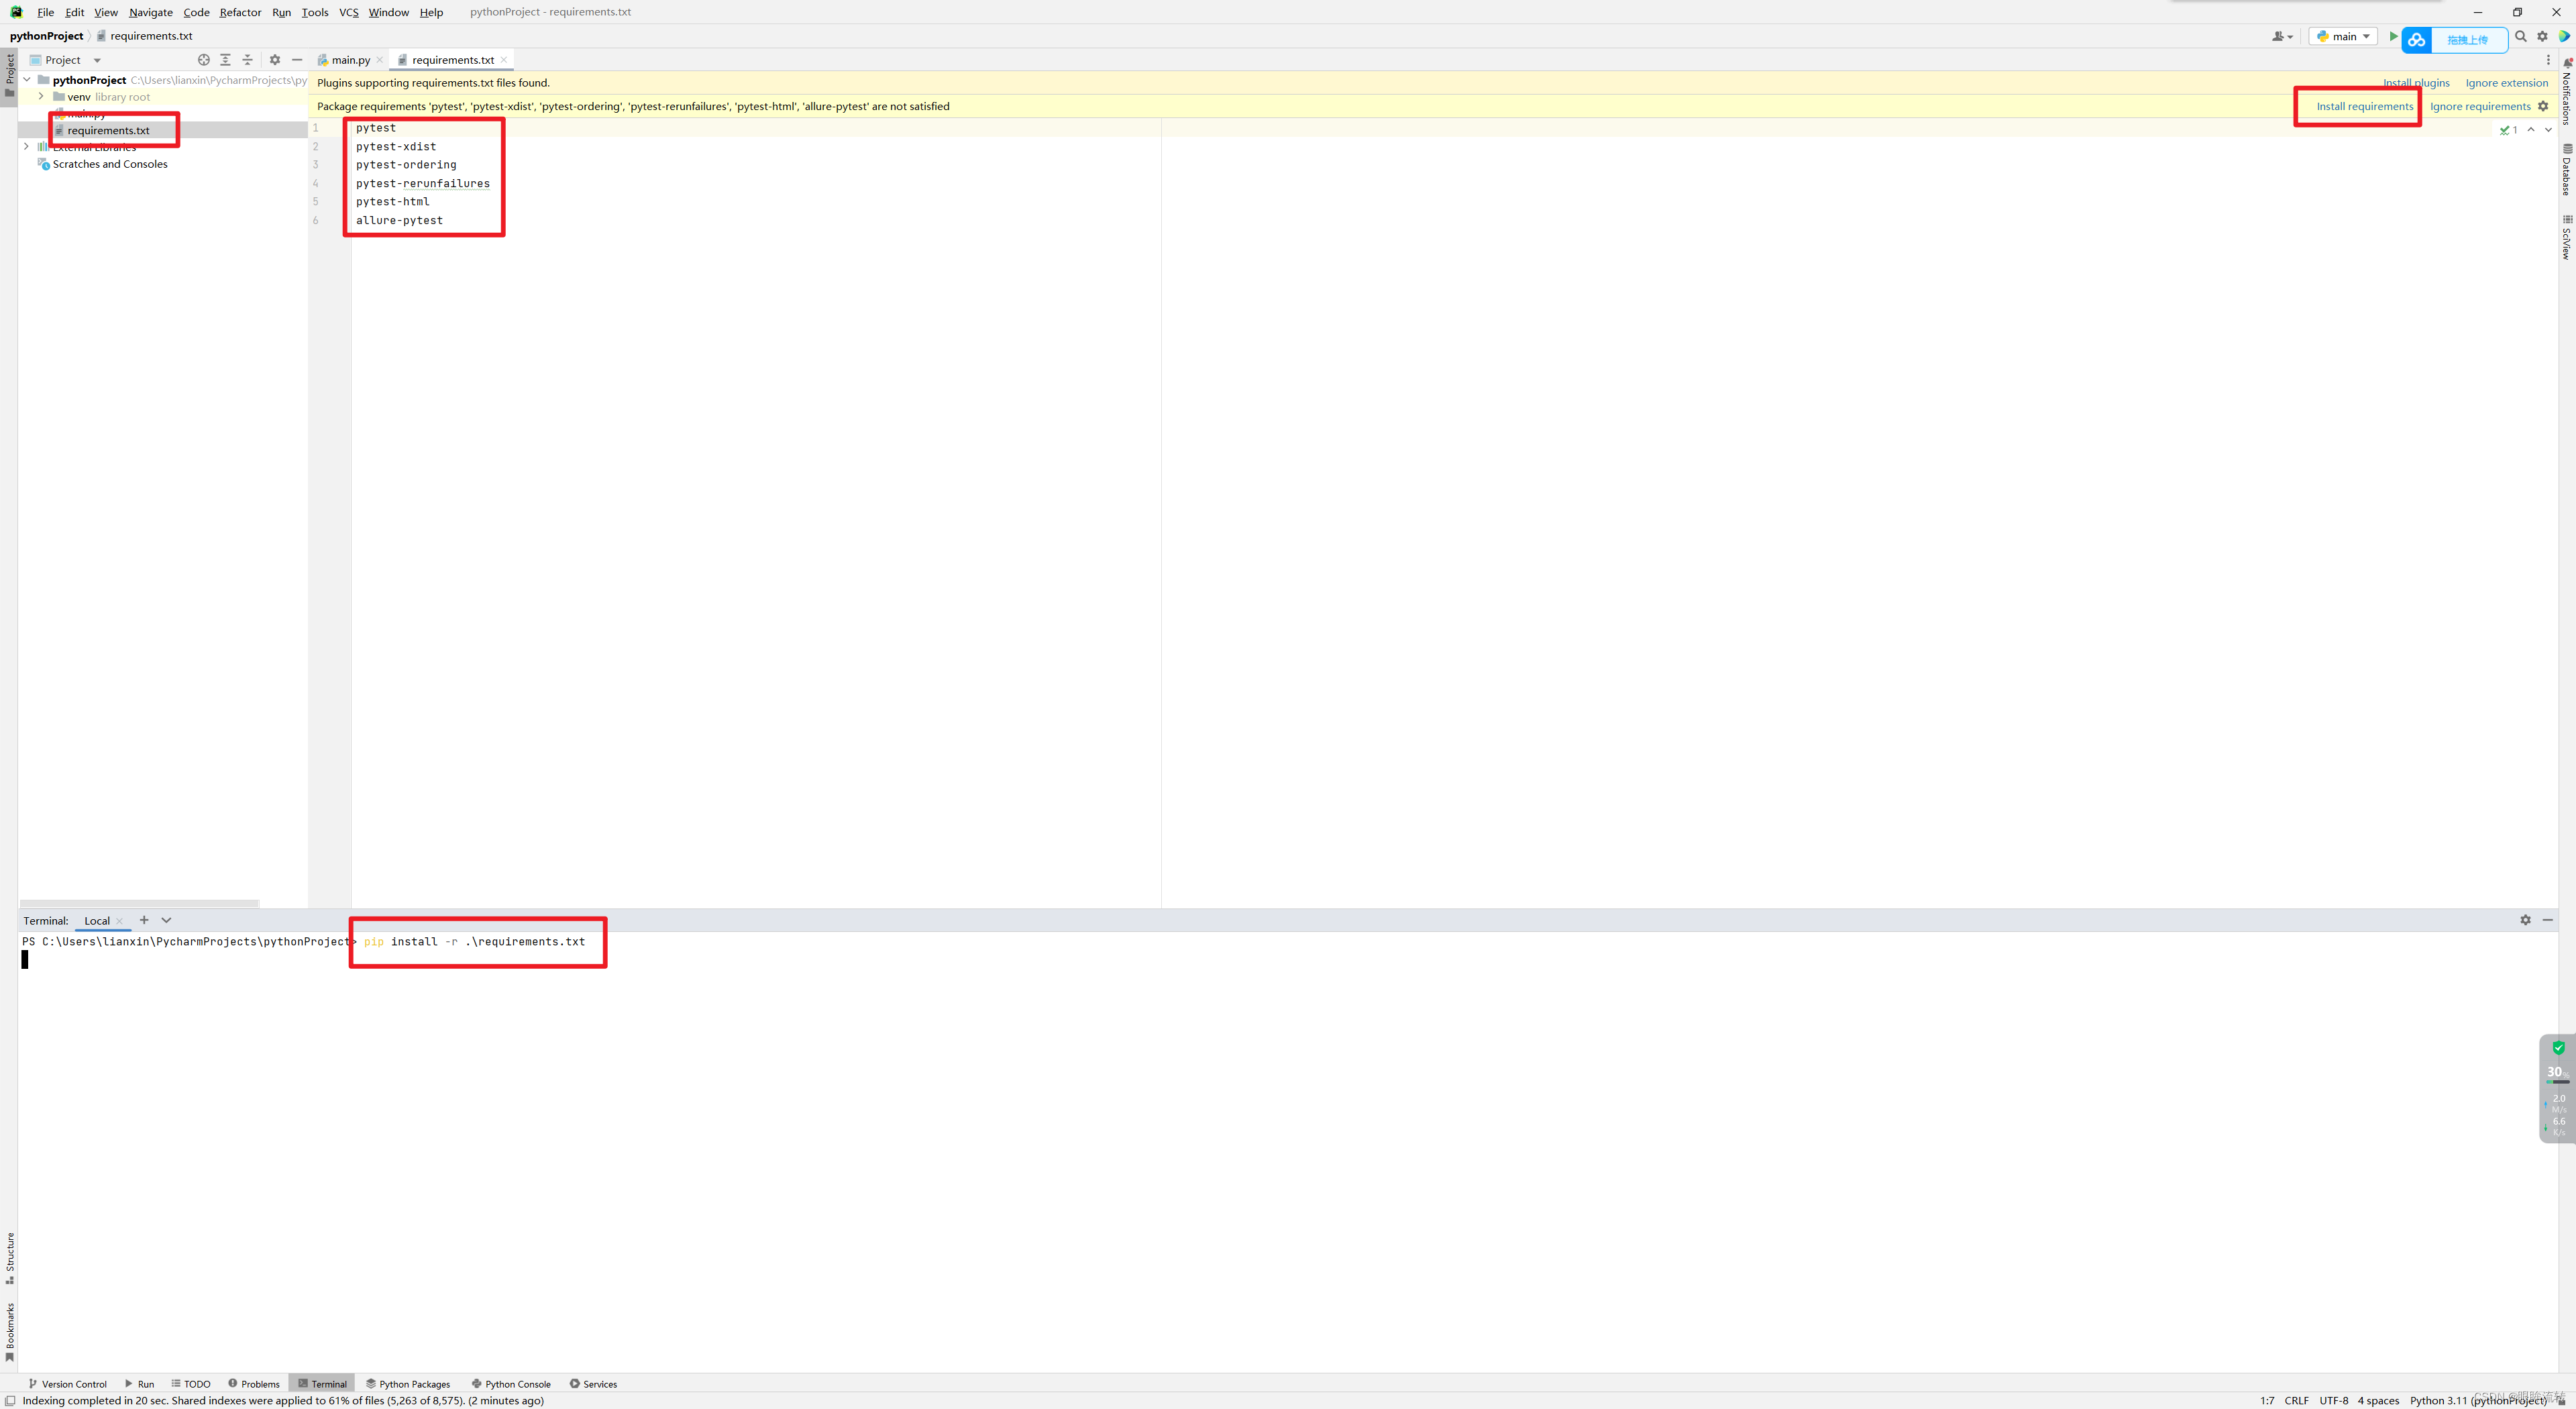
安装插件时可以通过将要安装的插件卸载requirements.txt中进行快速进行安装
2.3、运行方式
main.py
import pytestif __name__ == '__main__':# pytest.main()
test_demo1.py
class Test_Demo1_C1:def test_01(self):print("hello world!")
test_demo2.py
class Test_Demo1_C2:def test_02(self):print("hello world!2")
test_demo3.py
class Test_Demo1_C3:def test_03(self):print("hello world!3")
test_demo4.py
class Test_Demo1_C4:def test_04(self):print("hello world!4")
test_demo5.py
class Test_Demo1_C4:def test_05(self):print("hello world!5")
test_demo7.py
import timeclass Test_Demo1_C6:def test_06(self):time.sleep(5)print("hello world!6")class Test_Demo1_C7:def test_07(self):time.sleep(5)print("hello world!7")
test_demo8.py
import timeclass Test_Demo1_C8:def test_08(self):time.sleep(5)print("hello world!8")
test_demo9.py
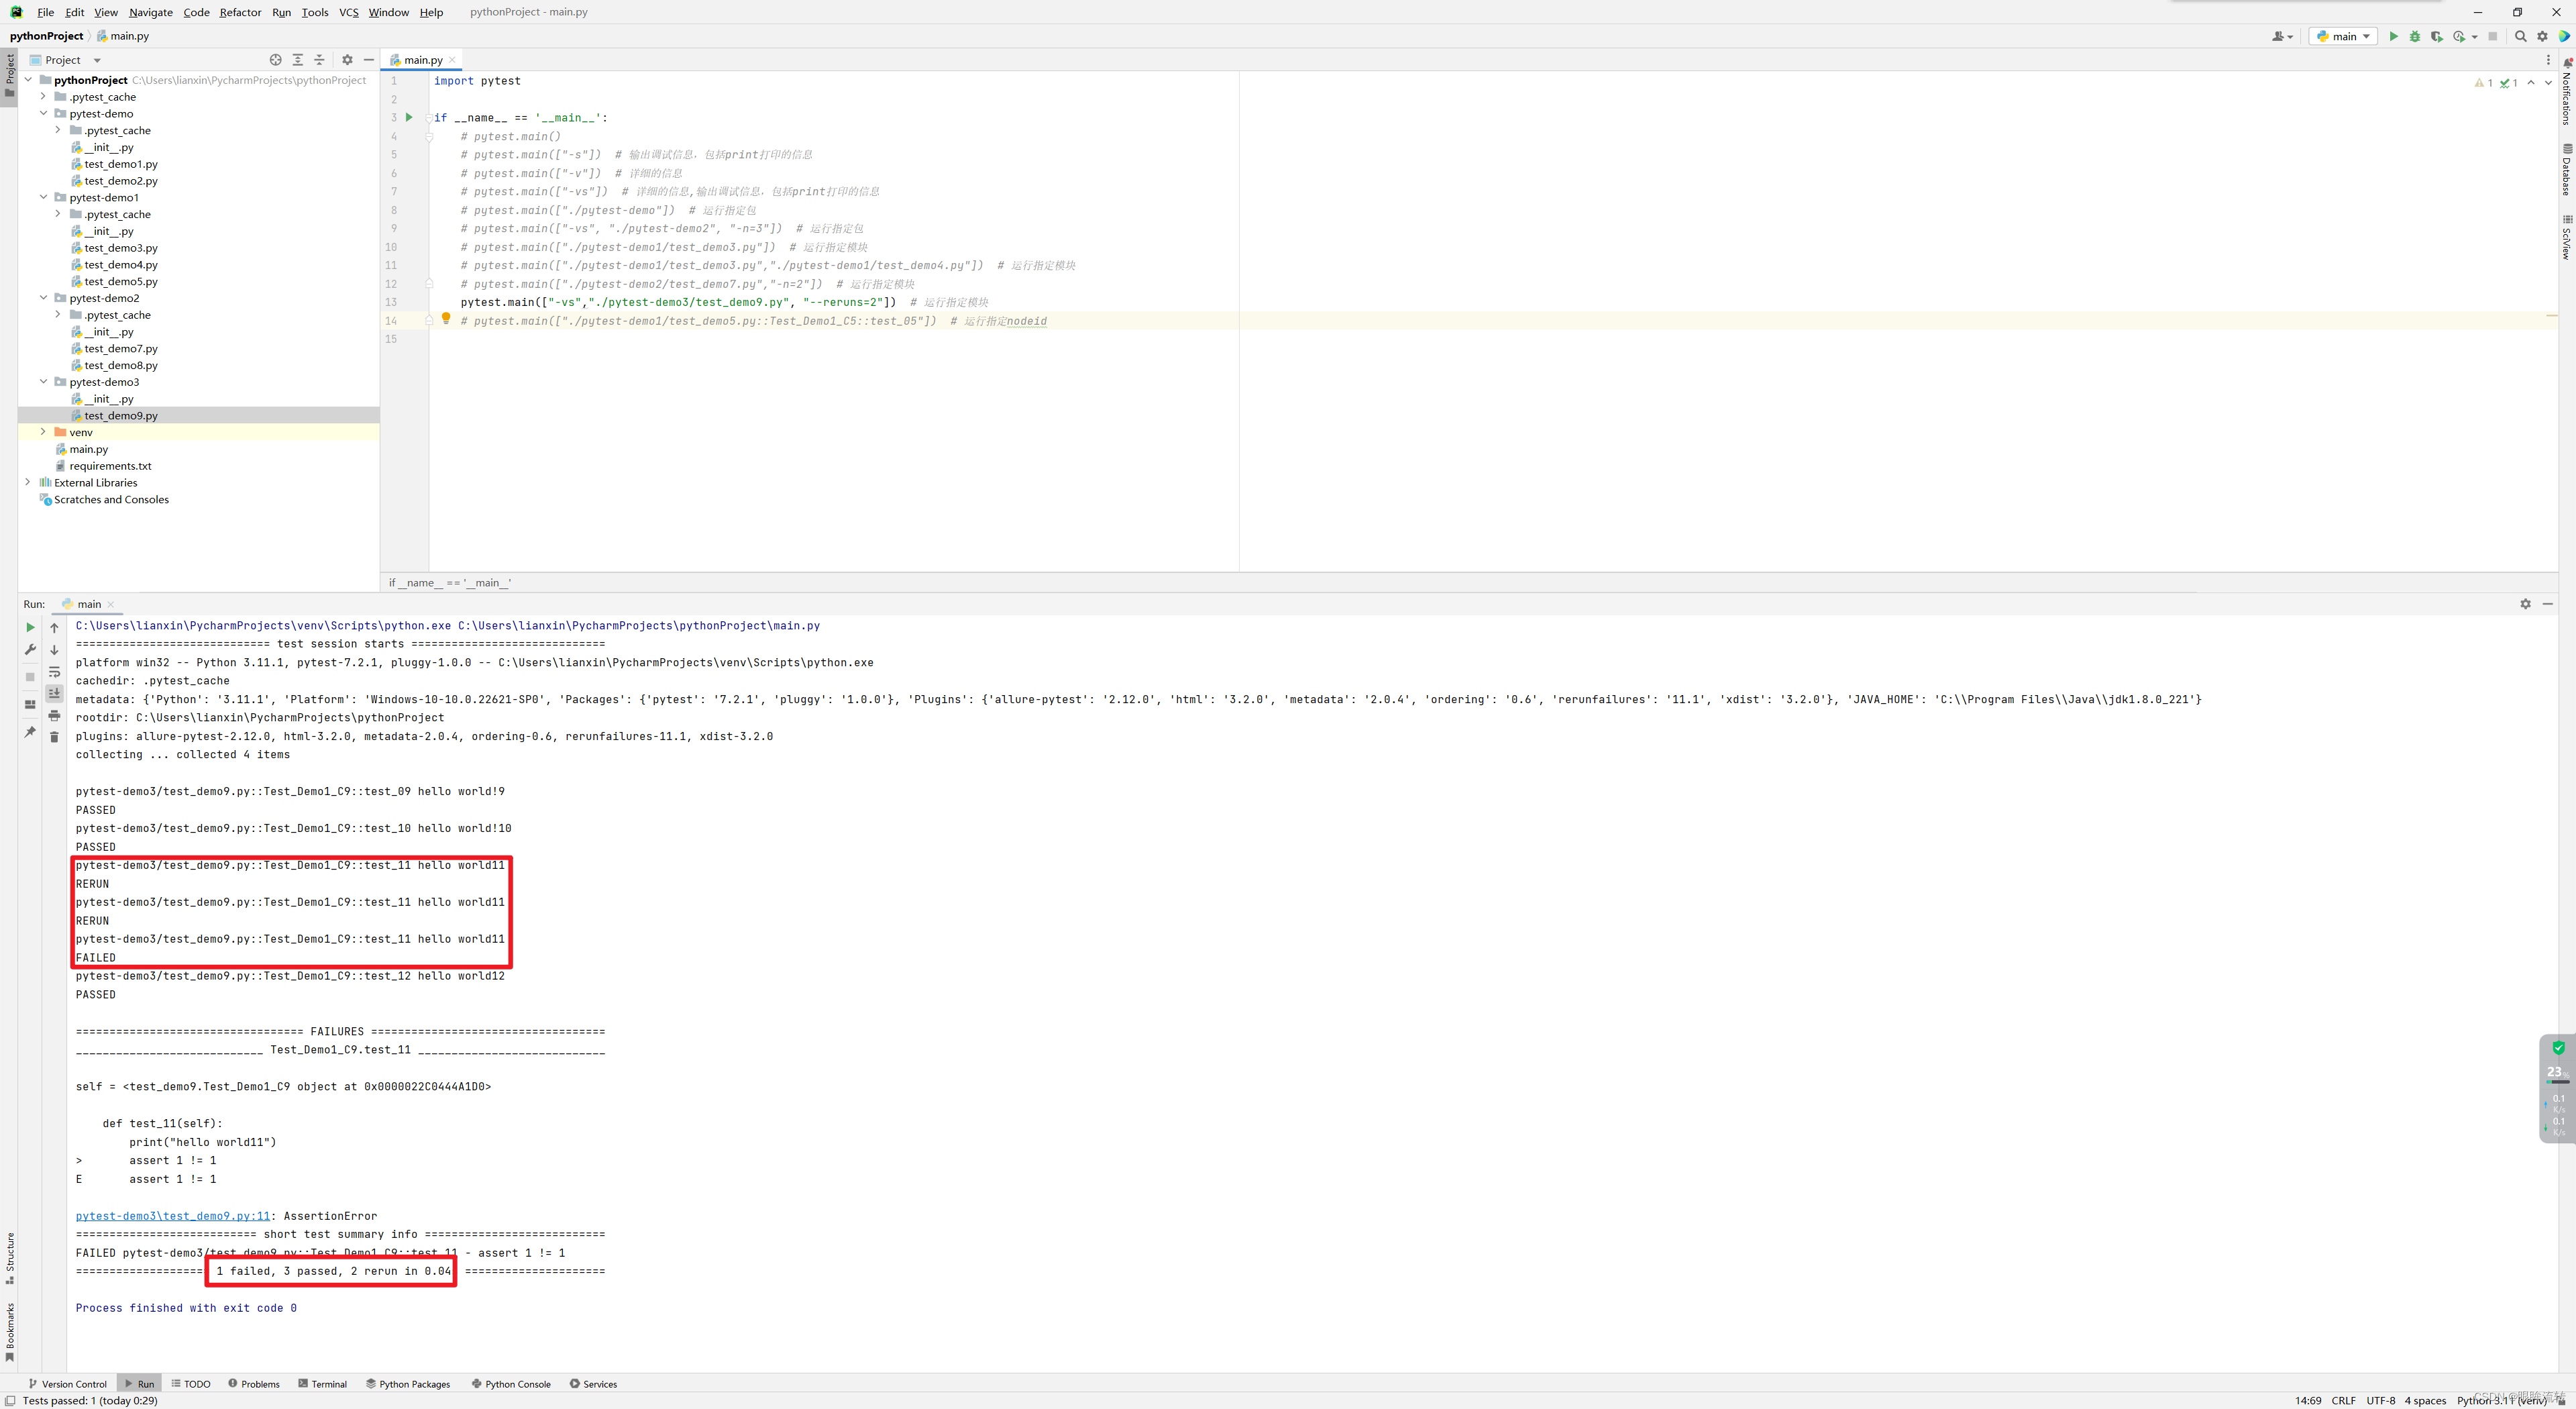
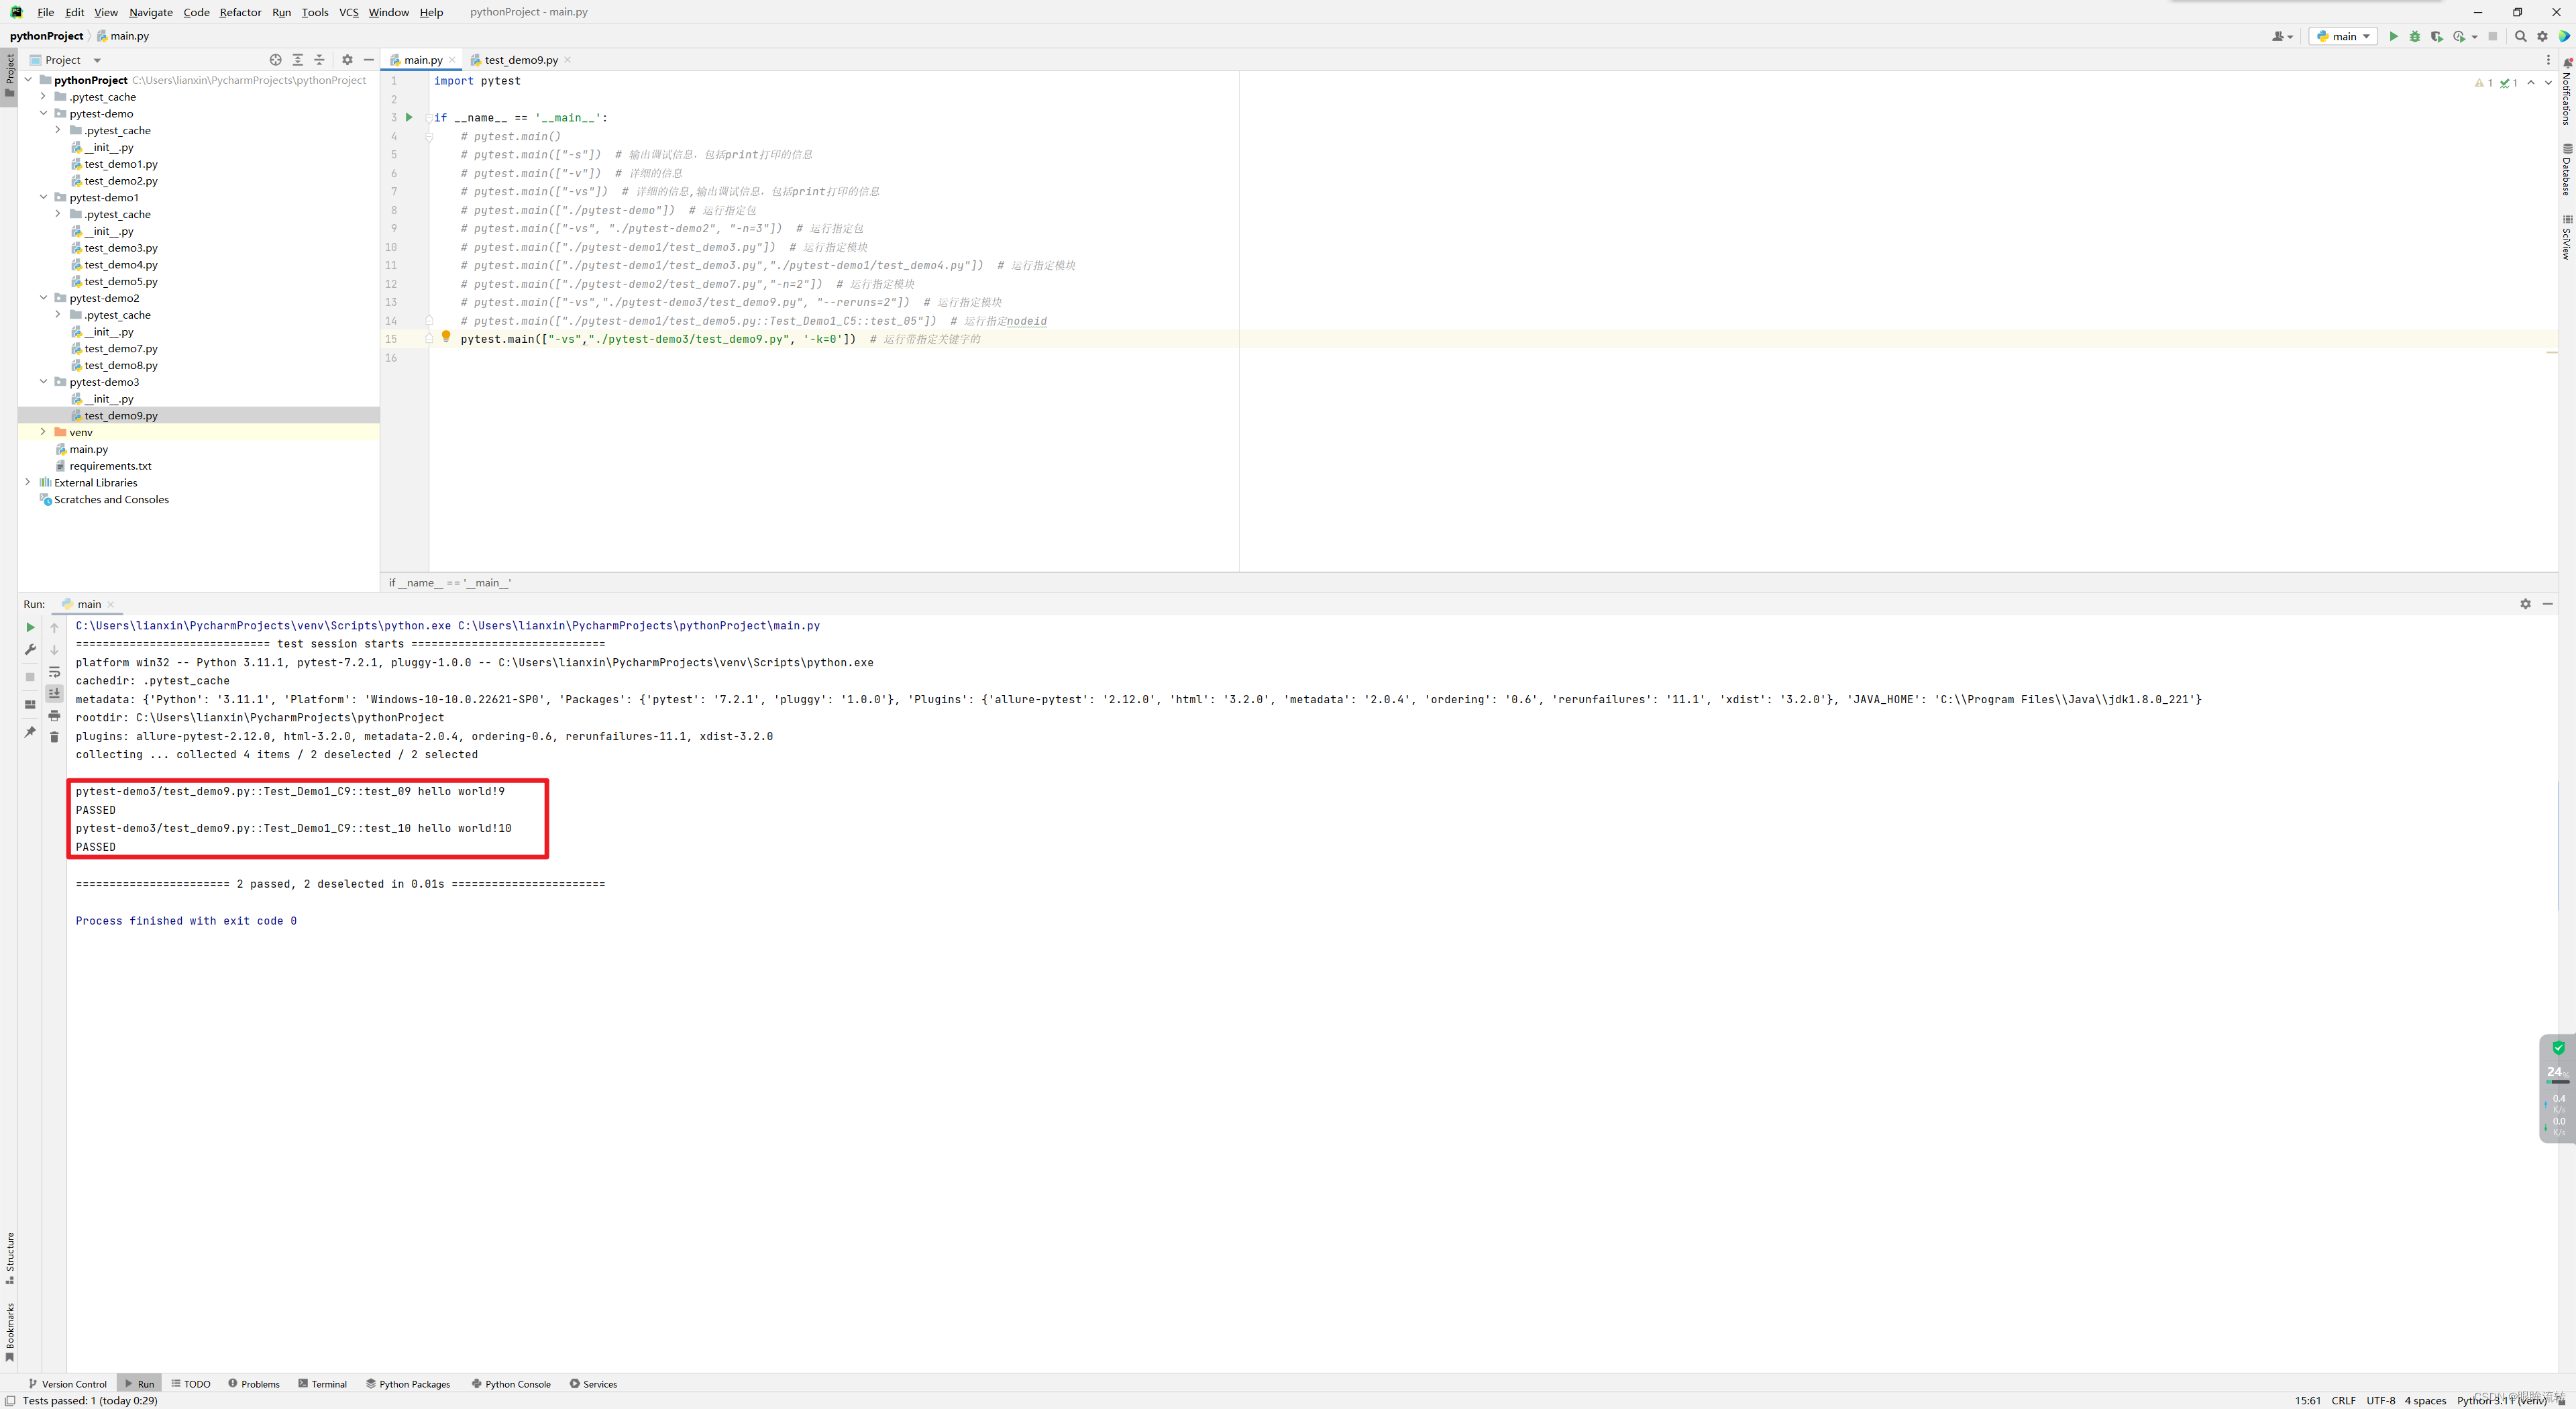
class Test_Demo1_C9:def test_09(self):print("hello world!9")def test_10(self):print("hello world!10")def test_11(self):print("hello world11")assert 1 != 1def test_12(self):print("hello world12")
1、主函数模式
运行所有
import pytestif __name__ == '__main__':pytest.main()
指定包运行
import pytestif __name__ == '__main__':pytest.main(["./pytest-demo"]) # 运行指定包
指定模块运行
import pytestif __name__ == '__main__':pytest.main(["./pytest-demo1/test_demo3.py"]) # 运行指定模块pytest.main(["./pytest-demo1/test_demo3.py","./pytest-demo1/test_demo4.py"])
指定nodeid运行
import pytestif __name__ == '__main__':pytest.main(["./pytest-demo1/test_demo5.py::Test_Demo1_C5::test_05"]) # 运行指定nodeid
2、命令行模式
运行所有
pytest
指定包运行
pytest ./pytest-demo
指定模块运行
pytest ./pytest-demo/test_demo3.py
pytest ./pytest-demo/test_demo3.py ./pytest-demo1/test_demo4.py
指定nodeid运行
pytest ./pytest-demo1/test_demo5.py::Test_Demo1_C5::test_05
3、配置文件模式
读取pytest.ini全局配置文件运行
pytest.ini(需要时ANSI编码或者GBK)
[pytest]
# 命令行参数,用空格进行分隔
addopts = -vs# 测试用例的路径 ./为pytest.ini当前目录下的同级文件夹
testpaths =./pytest_demo# 模块名的规则,配置测试搜索的模块文件名称
python_files = test_*.py
# 类名的规则,配置测试搜索的测试类名
python_classes = Test*
# 方法名的规则,配置测试搜索的测试函数名
python_functions = test
4、参数详解
-s:输出调试信息,包括print打印的信息
-v:详细的信息
-vs:详细的信息,输出调试信息,包括print打印的信息
-n:多线程(在命令行中-n参数分割符为空格,主函数中-n参数分隔符为=)
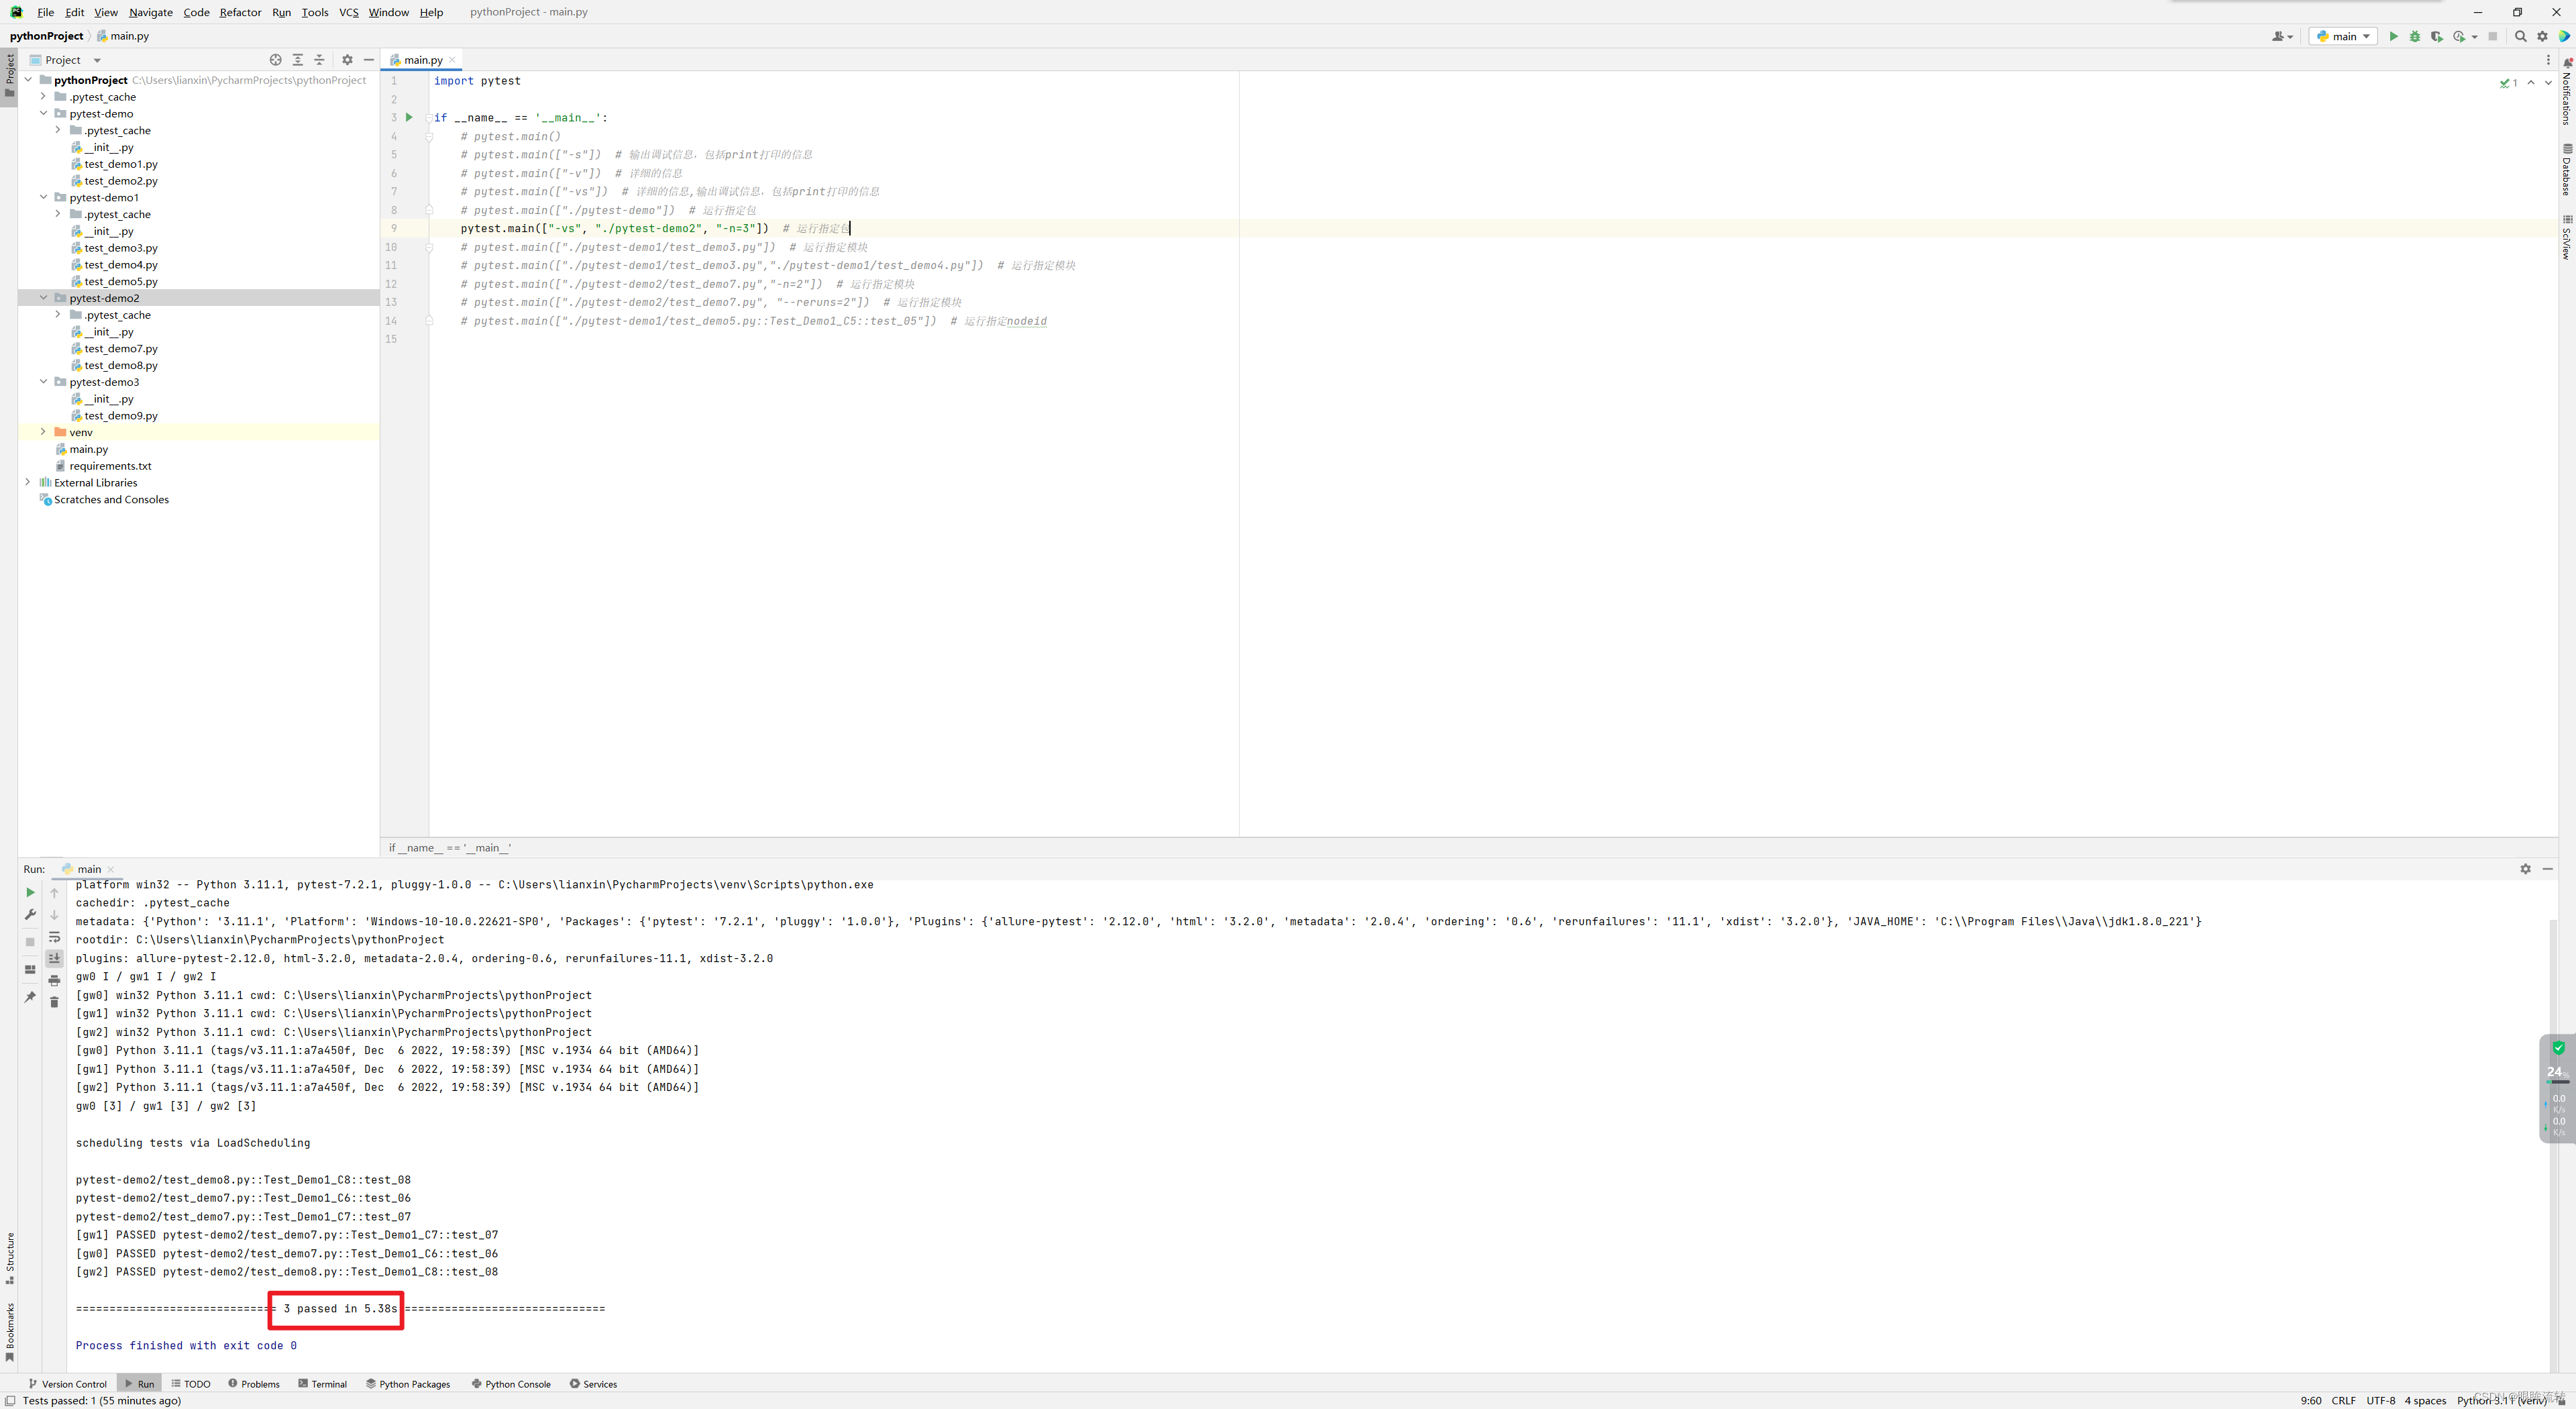
–reruns:失败重试(在命令行中–reruns参数分割符为空格,主函数中–reruns参数分隔符为=)
-k:运行带指定关键字的
2.4、执行顺序
默认执行顺序:从上到下,依次执行
可以使用@pytest.mark.run(order=x)改变执行顺序,数字越小越先执行
test_demo13.py
import pytestclass Test_Demo1_C13:@pytest.mark.run(order=1)def test_013(self):print("hello world!13")@pytest.mark.run(order=4)def test_14(self):print("hello world!14")@pytest.mark.run(order=2)def test_15(self):print("hello world15")@pytest.mark.run(order=3)def test_16(self):print("hello world16")
2.5、冒烟测试
1、单组
test_demo14.py
import pytestclass Test_Demo1_C14:@pytest.mark.smokedef test_017(self):print("hello world!17")@pytest.mark.xumengdef test_18(self):print("hello world!18")def test_19(self):print("hello world19")def test_20(self):print("hello world20")test_demo15.py
import pytestclass Test_Demo1_C15:@pytest.mark.smokedef test_017(self):print("hello world!17")@pytest.mark.xumengdef test_18(self):print("hello world!18")def test_19(self):print("hello world19")def test_20(self):print("hello world20")pytest.ini
[pytest]
# 命令行参数,用空格进行分隔
addopts = -vs -m="smoke"# 测试用例的路径 ./为pytest.ini当前目录下的同级文件夹
testpaths =./pytest-demo5# 模块名的规则,配置测试搜索的模块文件名称
python_files = test_*.py
# 类名的规则,配置测试搜索的测试类名
python_classes = Test*
# 方法名的规则,配置测试搜索的测试函数名
python_functions = test# 冒烟测试
markers =smoke:冒烟测试
2、多组
[pytest]
# 命令行参数,用空格进行分隔
addopts = -vs -m="smoke or xumeng"# 测试用例的路径 ./为pytest.ini当前目录下的同级文件夹
testpaths =./pytest-demo5# 模块名的规则,配置测试搜索的模块文件名称
python_files = test_*.py
# 类名的规则,配置测试搜索的测试类名
python_classes = Test*
# 方法名的规则,配置测试搜索的测试函数名
python_functions = test# 冒烟测试
markers =smoke:冒烟测试xumeng:测试
2.6、跳过用例
1、无条件跳过
test_demo16.py
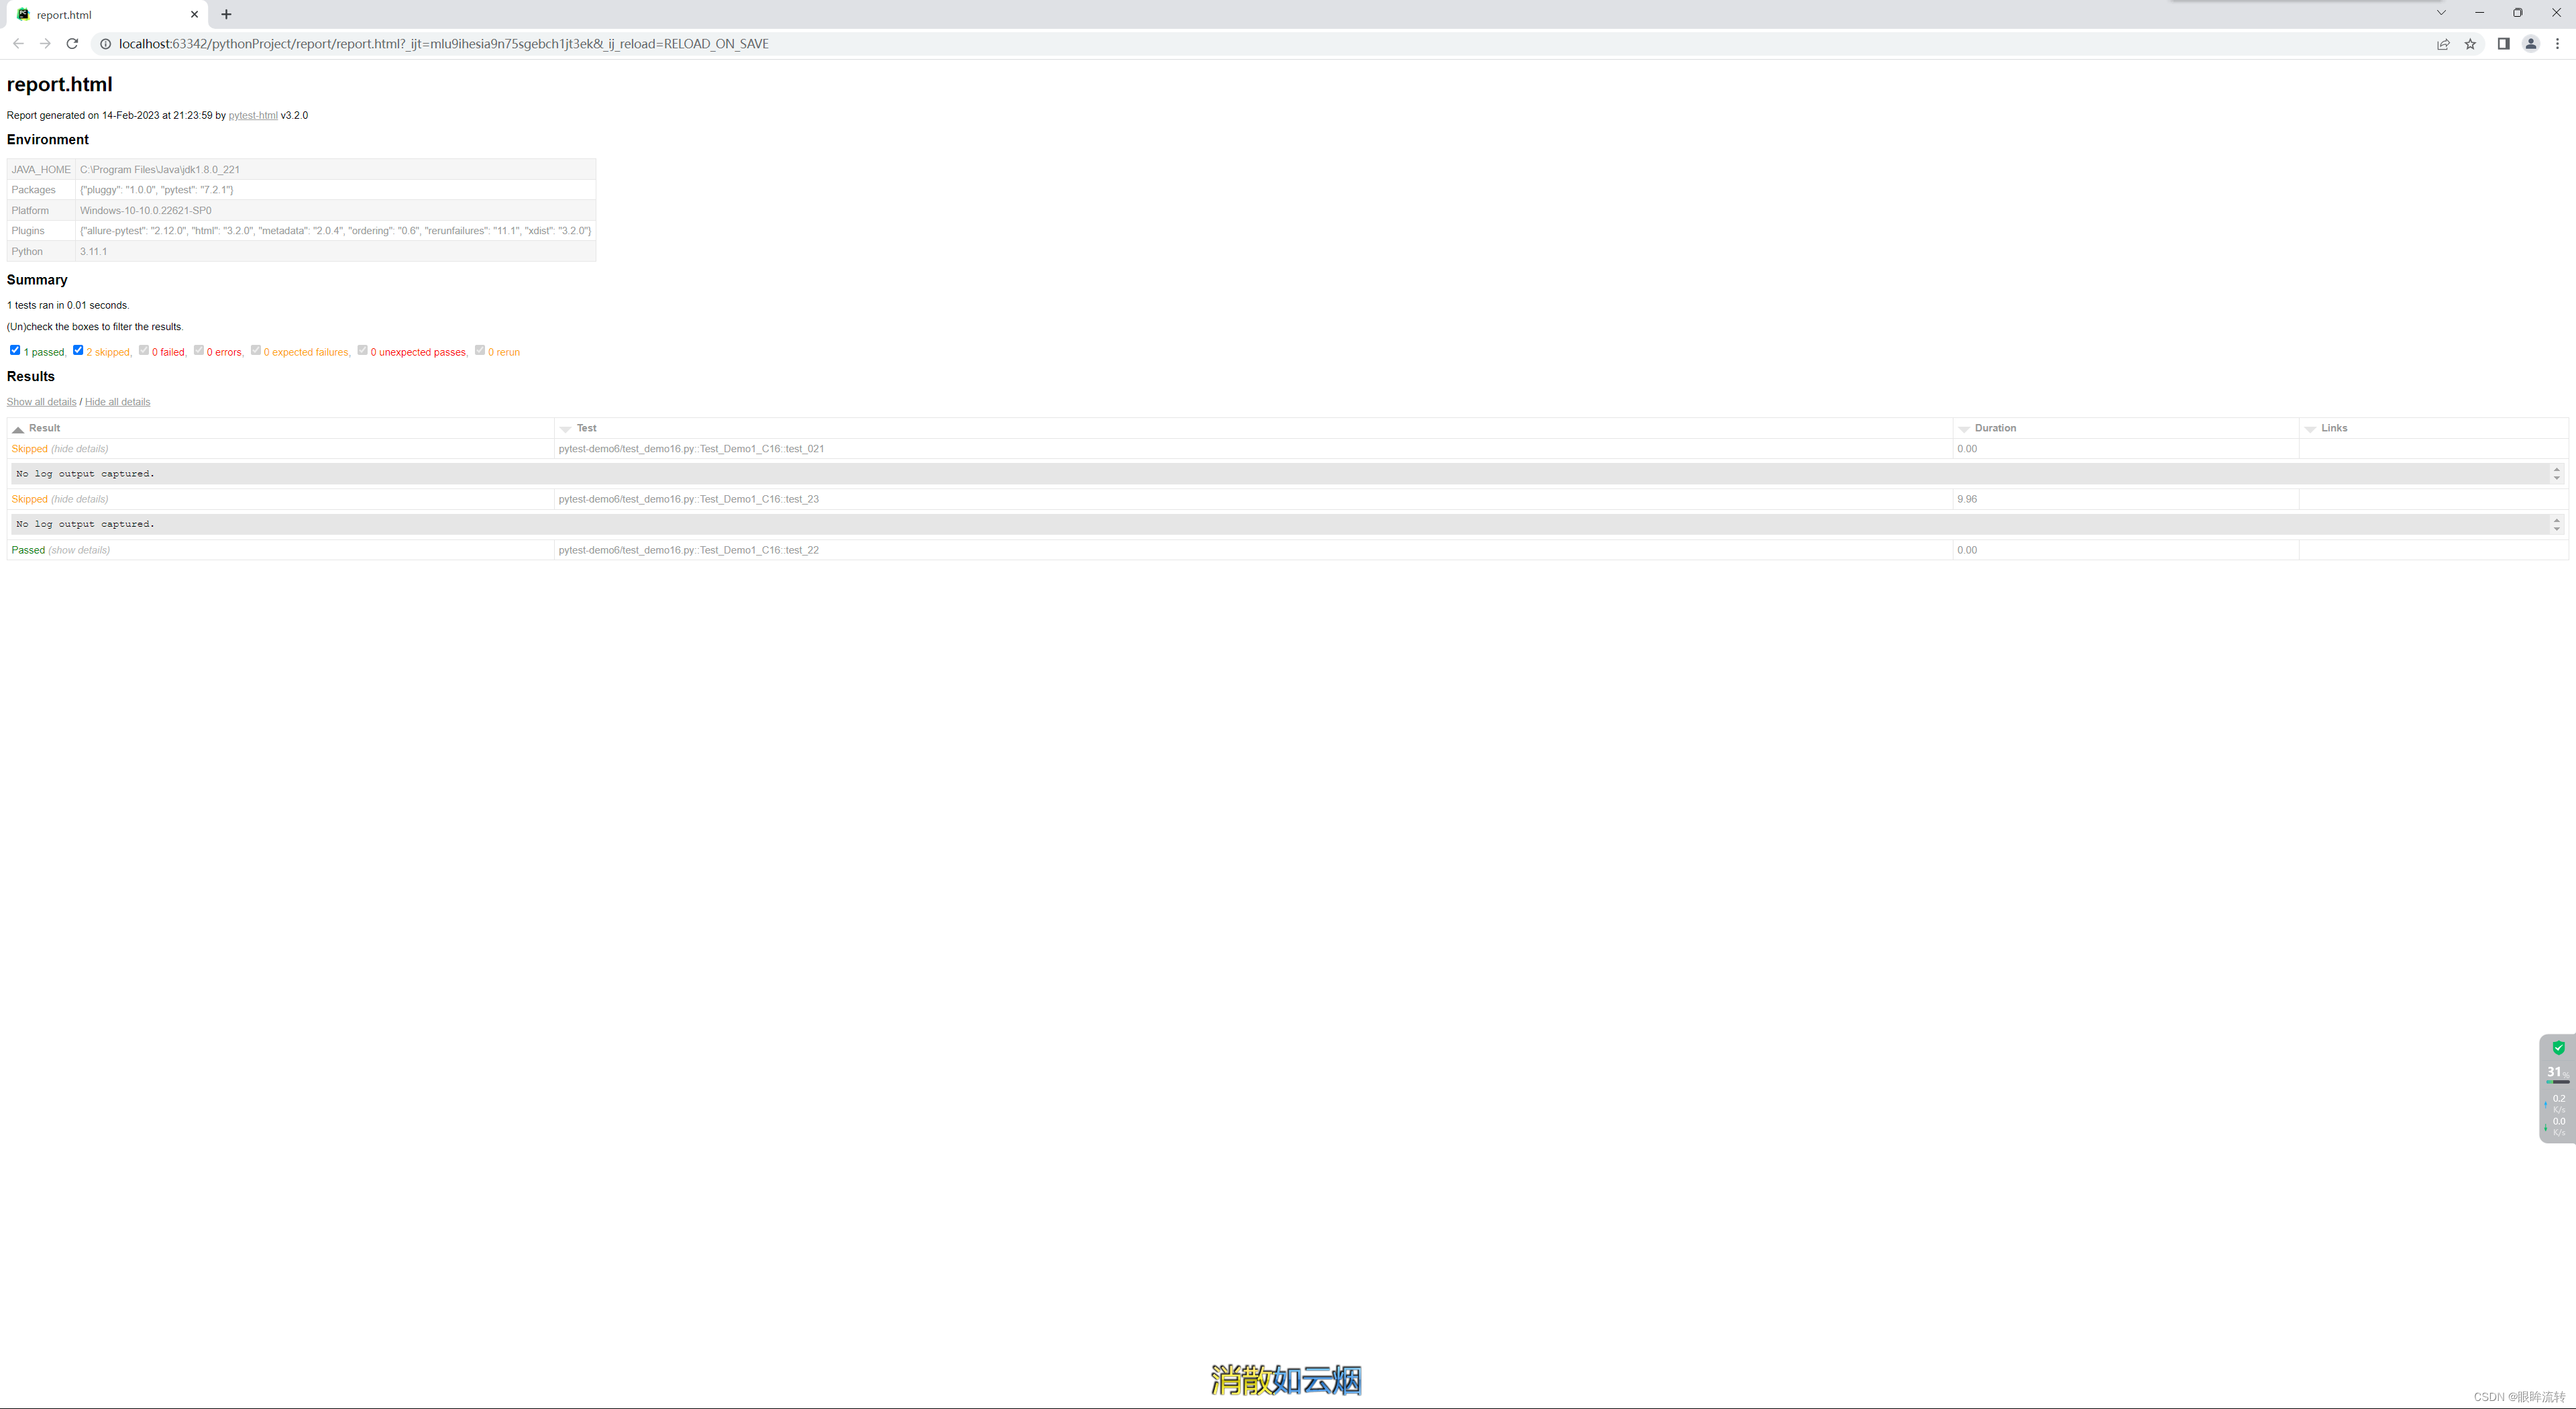
import pytestclass Test_Demo1_C16:age = 18@pytest.mark.skip(reason="任性")def test_021(self):print("hello world!21")def test_22(self):print("hello world!22")def test_23(self):print("hello world23")
pytest.ini
[pytest]
# 命令行参数,用空格进行分隔
addopts = -vs# 测试用例的路径 ./为pytest.ini当前目录下的同级文件夹
testpaths =./pytest-demo6# 模块名的规则,配置测试搜索的模块文件名称
python_files = test_*.py
# 类名的规则,配置测试搜索的测试类名
python_classes = Test*
# 方法名的规则,配置测试搜索的测试函数名
python_functions = test
2、有条件跳过
test_demo16.py
import pytestclass Test_Demo1_C16:age = 18@pytest.mark.skip(reason="任性")def test_021(self):print("hello world!21")@pytest.mark.skipif(age != 18, reason="任性")def test_22(self):print("hello world!22")@pytest.mark.skipif(age == 18, reason="任性")def test_23(self):print("hello world23")
pytest.ini
[pytest]
# 命令行参数,用空格进行分隔
addopts = -vs# 测试用例的路径 ./为pytest.ini当前目录下的同级文件夹
testpaths =./pytest-demo6# 模块名的规则,配置测试搜索的模块文件名称
python_files = test_*.py
# 类名的规则,配置测试搜索的测试类名
python_classes = Test*
# 方法名的规则,配置测试搜索的测试函数名
python_functions = test
2.7、生成报告
[pytest]
# 命令行参数,用空格进行分隔
addopts = -vs --html ./report/report.html# 测试用例的路径 ./为pytest.ini当前目录下的同级文件夹
testpaths =./pytest-demo6# 模块名的规则,配置测试搜索的模块文件名称
python_files = test_*.py
# 类名的规则,配置测试搜索的测试类名
python_classes = Test*
# 方法名的规则,配置测试搜索的测试函数名
python_functions = test
3、前后置处理(固件,夹具)
3.1、基本用法
def setup_module(self):print("测试模块运行前执行一次")def teardown_module(self):print("测试模块运行后执行一次")class Test_Demo:def setup_class(self):print("测试类运行前执行一次")def setup_method(self):print("测试函数运行前执行一次")def test_demo1(self):print("hello ")def test_demo2(self):print("world ")def teardown_method(self):print("测试函数运行后执行一次")def teardown_class(self):print("测试类运行后执行一次")class Test_Demo1:def setup_class(self):print("测试类运行前执行一次1")def setup_method(self):print("测试函数运行前执行一次1")def test_demo1(self):print("hello ")def test_demo2(self):print("world ")def teardown_method(self):print("测试函数运行后执行一次1")def teardown_class(self):print("测试类运行后执行一次1")

3.2、装饰器
@pytest.fixture(scope=“”,params=“”,autouse=Boolean,ids=“”,name=“”)
1、基础使用(scope、autouse)
scope也支持session
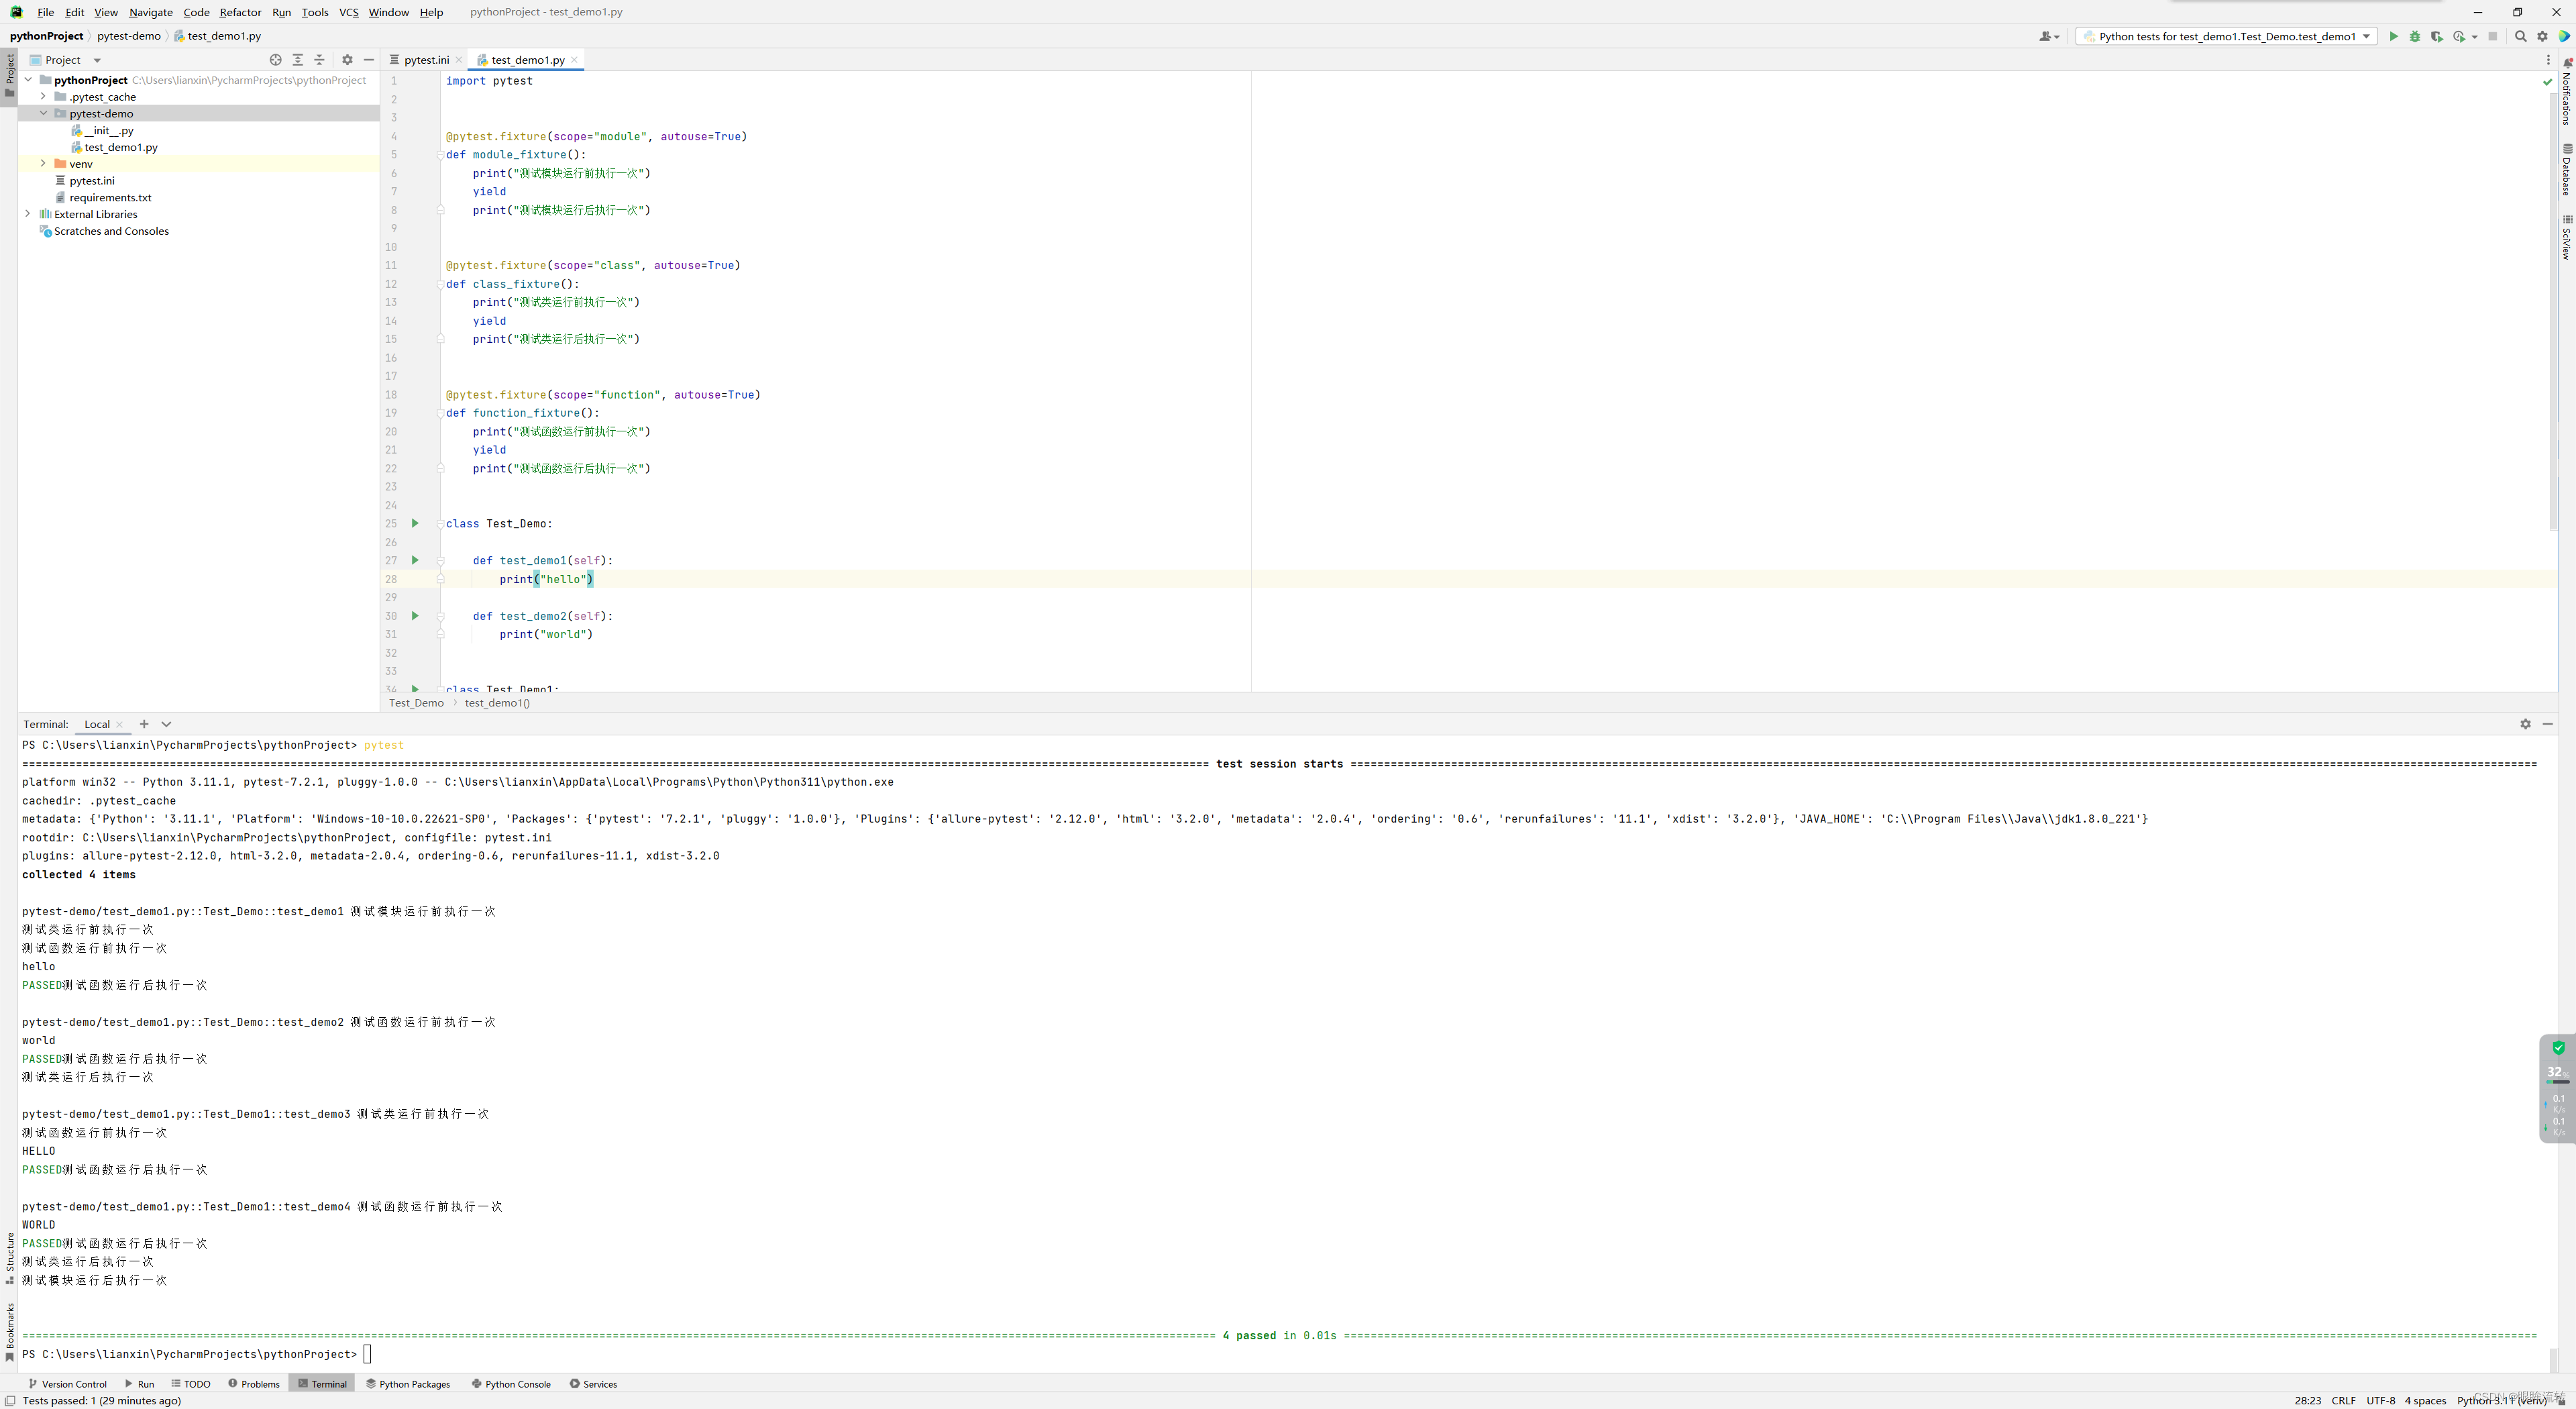
import pytest@pytest.fixture(scope="module", autouse=True)
def module_fixture():print("测试模块运行前执行一次")yieldprint("测试模块运行后执行一次")@pytest.fixture(scope="class", autouse=True)
def class_fixture():print("测试类运行前执行一次")yieldprint("测试类运行后执行一次")@pytest.fixture(scope="function", autouse=True)
def function_fixture():print("测试函数运行前执行一次")yieldprint("测试函数运行后执行一次")class Test_Demo:def test_demo1(self):print("hello")def test_demo2(self):print("world")class Test_Demo1:def test_demo3(self):print("HELLO")def test_demo4(self):print("WORLD")
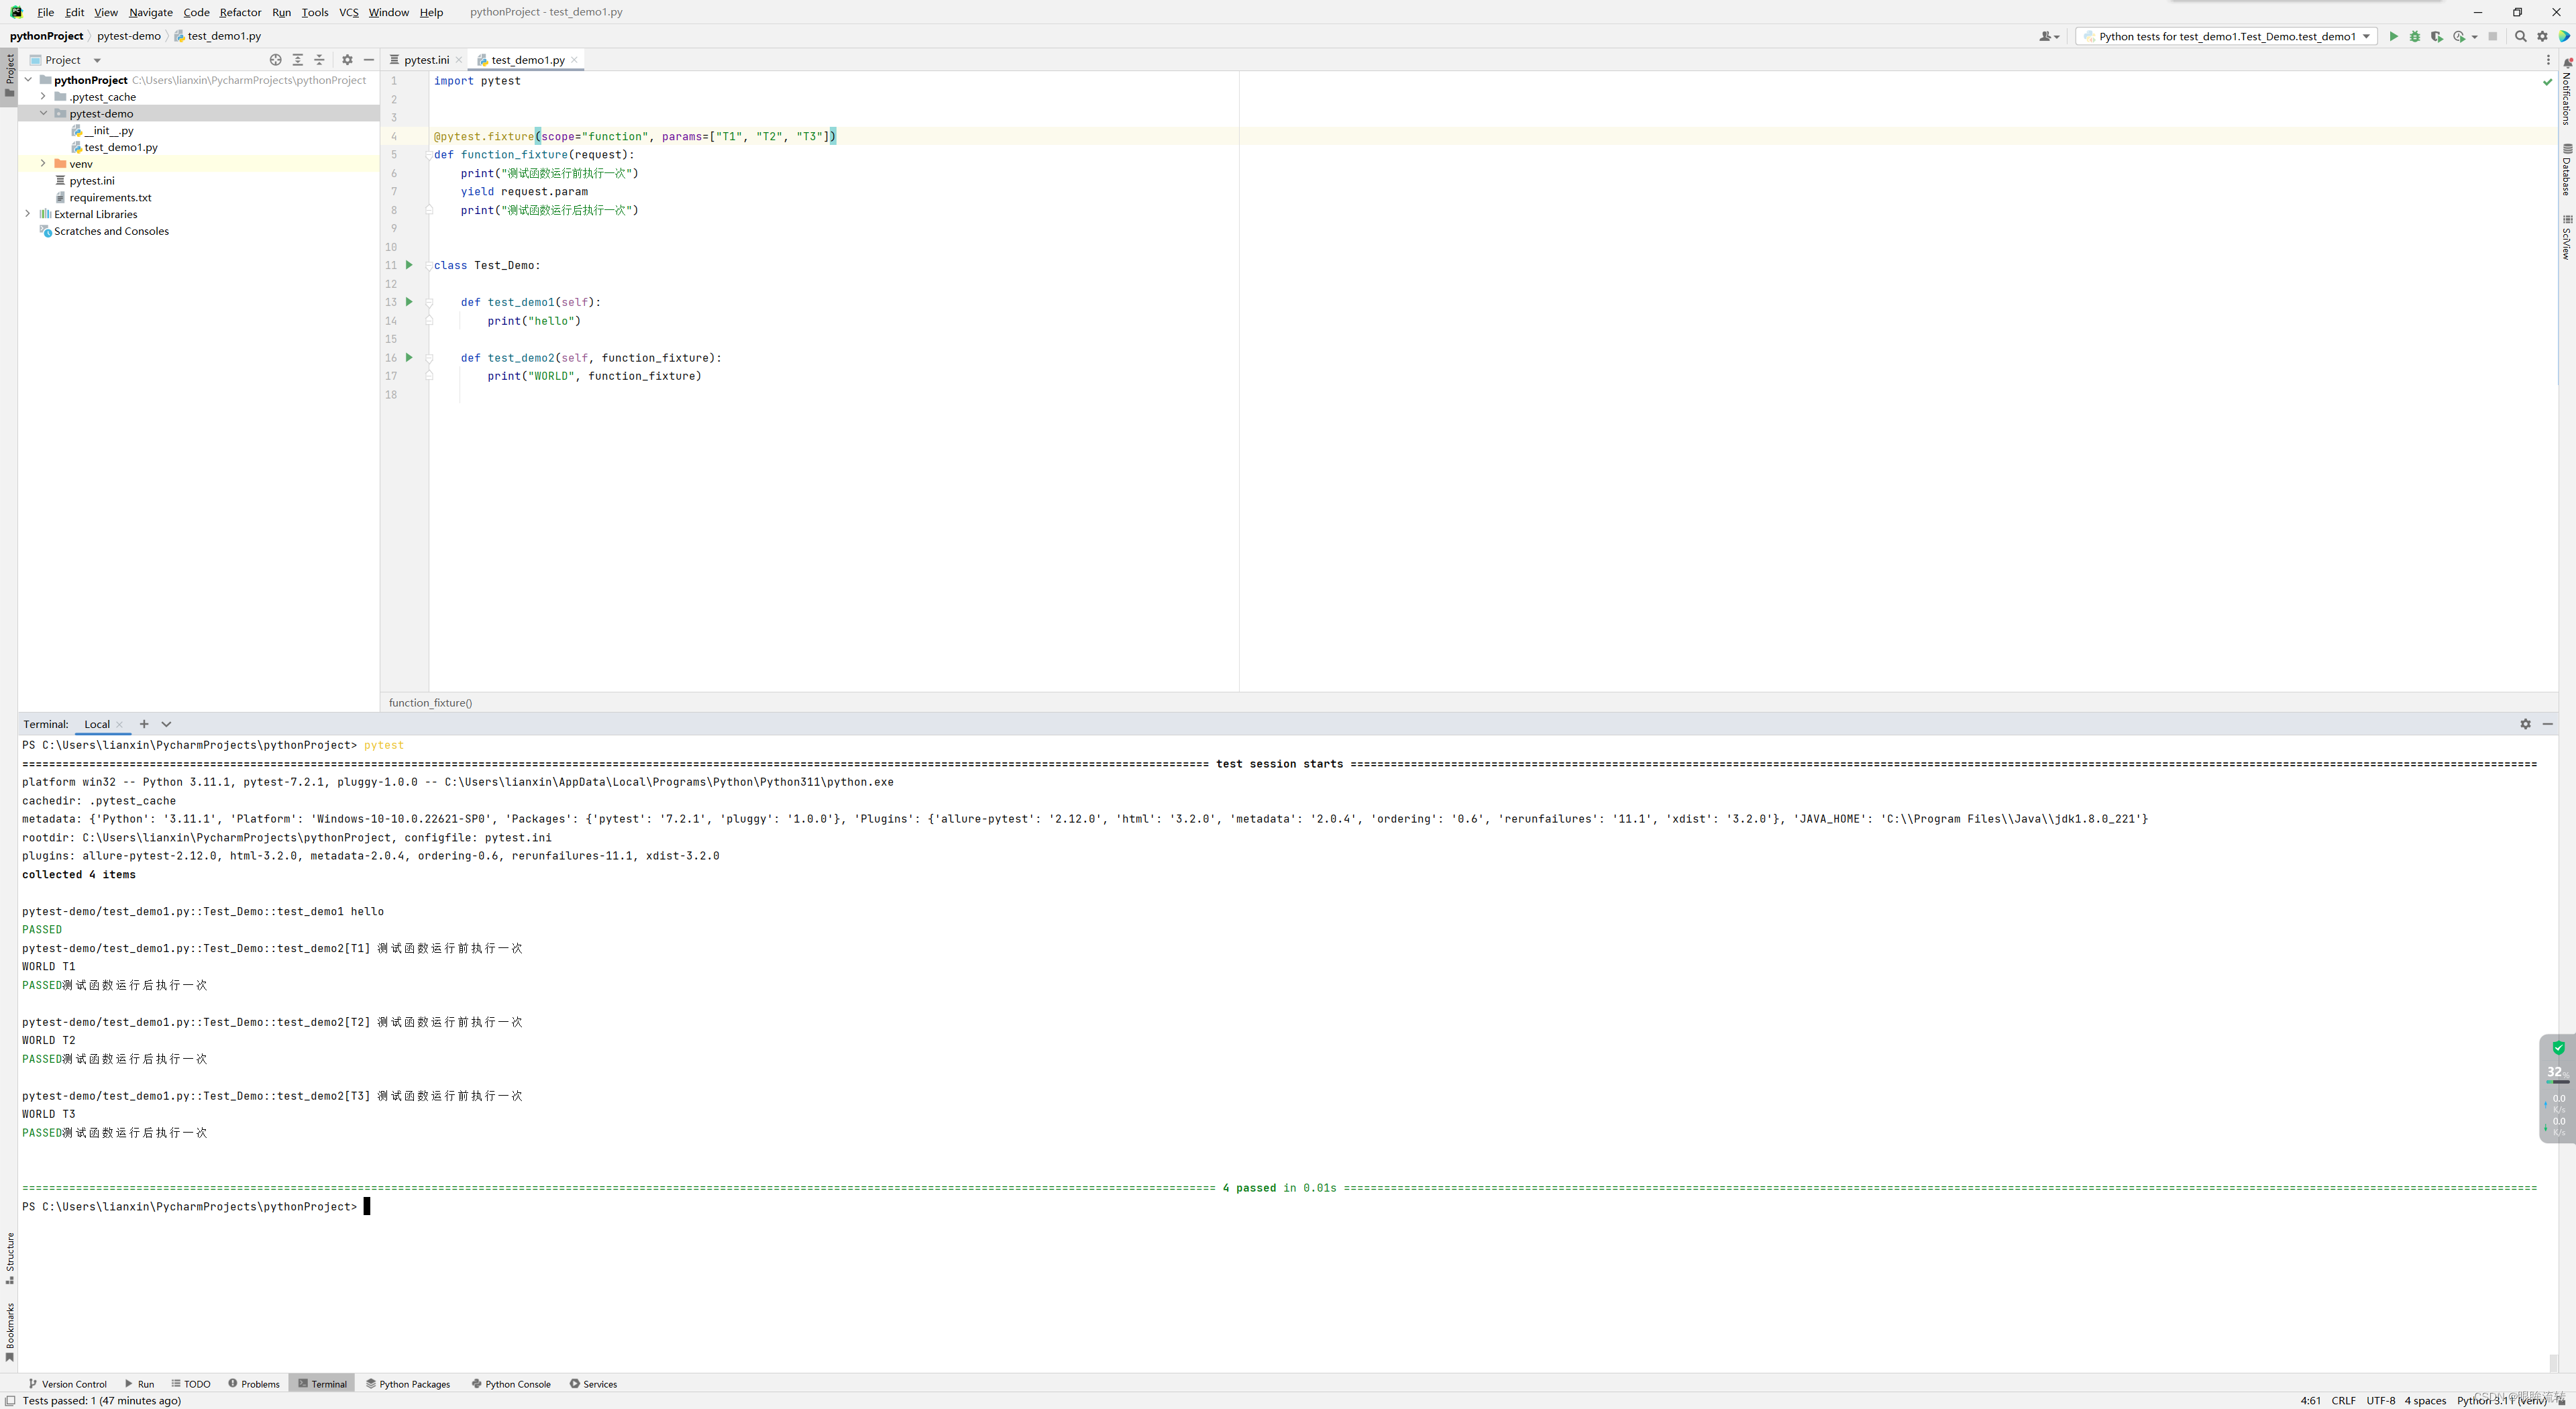
2、参数化(params、ids)
import pytest@pytest.fixture(scope="function", params=["T1", "T2", "T3"])
def function_fixture(request):print("测试函数运行前执行一次")yield request.paramprint("测试函数运行后执行一次")class Test_Demo:def test_demo1(self):print("hello")def test_demo2(self, function_fixture):print("WORLD", function_fixture)
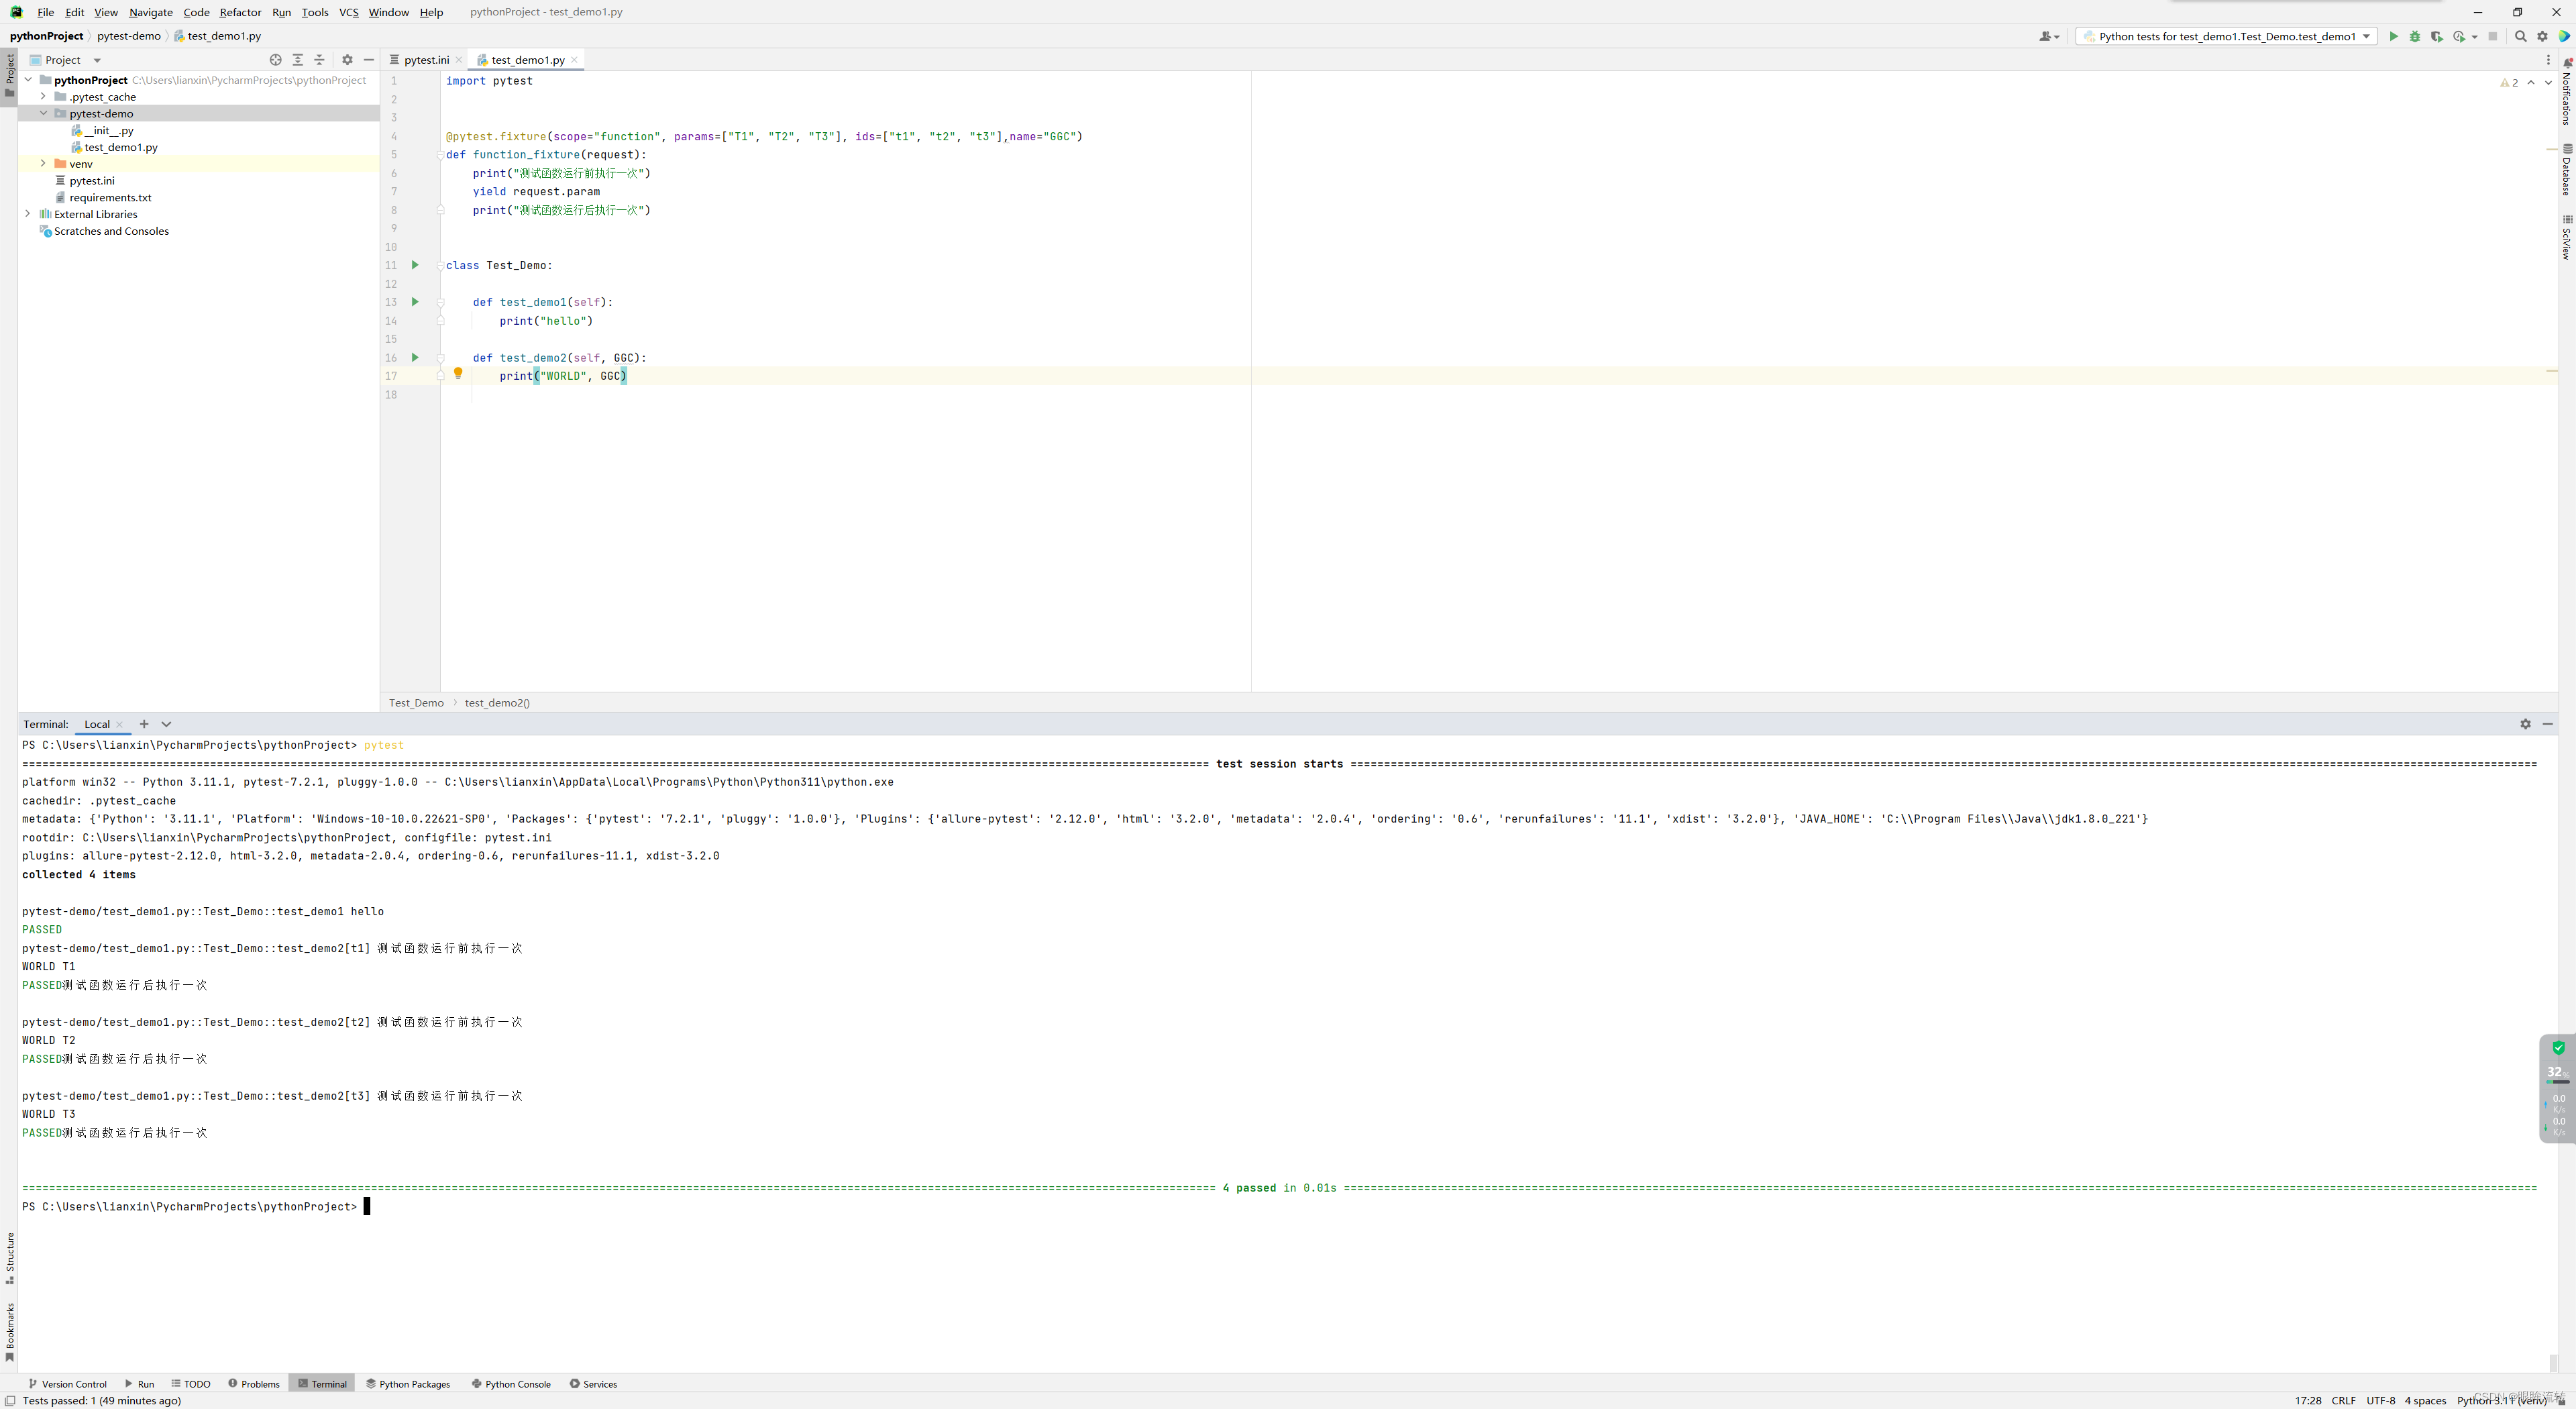
import pytest@pytest.fixture(scope="function", params=["T1", "T2", "T3"], ids=["t1", "t2", "t3"])
def function_fixture(request):print("测试函数运行前执行一次")yield request.paramprint("测试函数运行后执行一次")class Test_Demo:def test_demo1(self):print("hello")def test_demo2(self, function_fixture):print("WORLD", function_fixture)

3、别名
import pytest@pytest.fixture(scope="function", params=["T1", "T2", "T3"], ids=["t1", "t2", "t3"],name="GGC")
def function_fixture(request):print("测试函数运行前执行一次")yield request.paramprint("测试函数运行后执行一次")class Test_Demo:def test_demo1(self):print("hello")def test_demo2(self, GGC):print("WORLD", GGC)
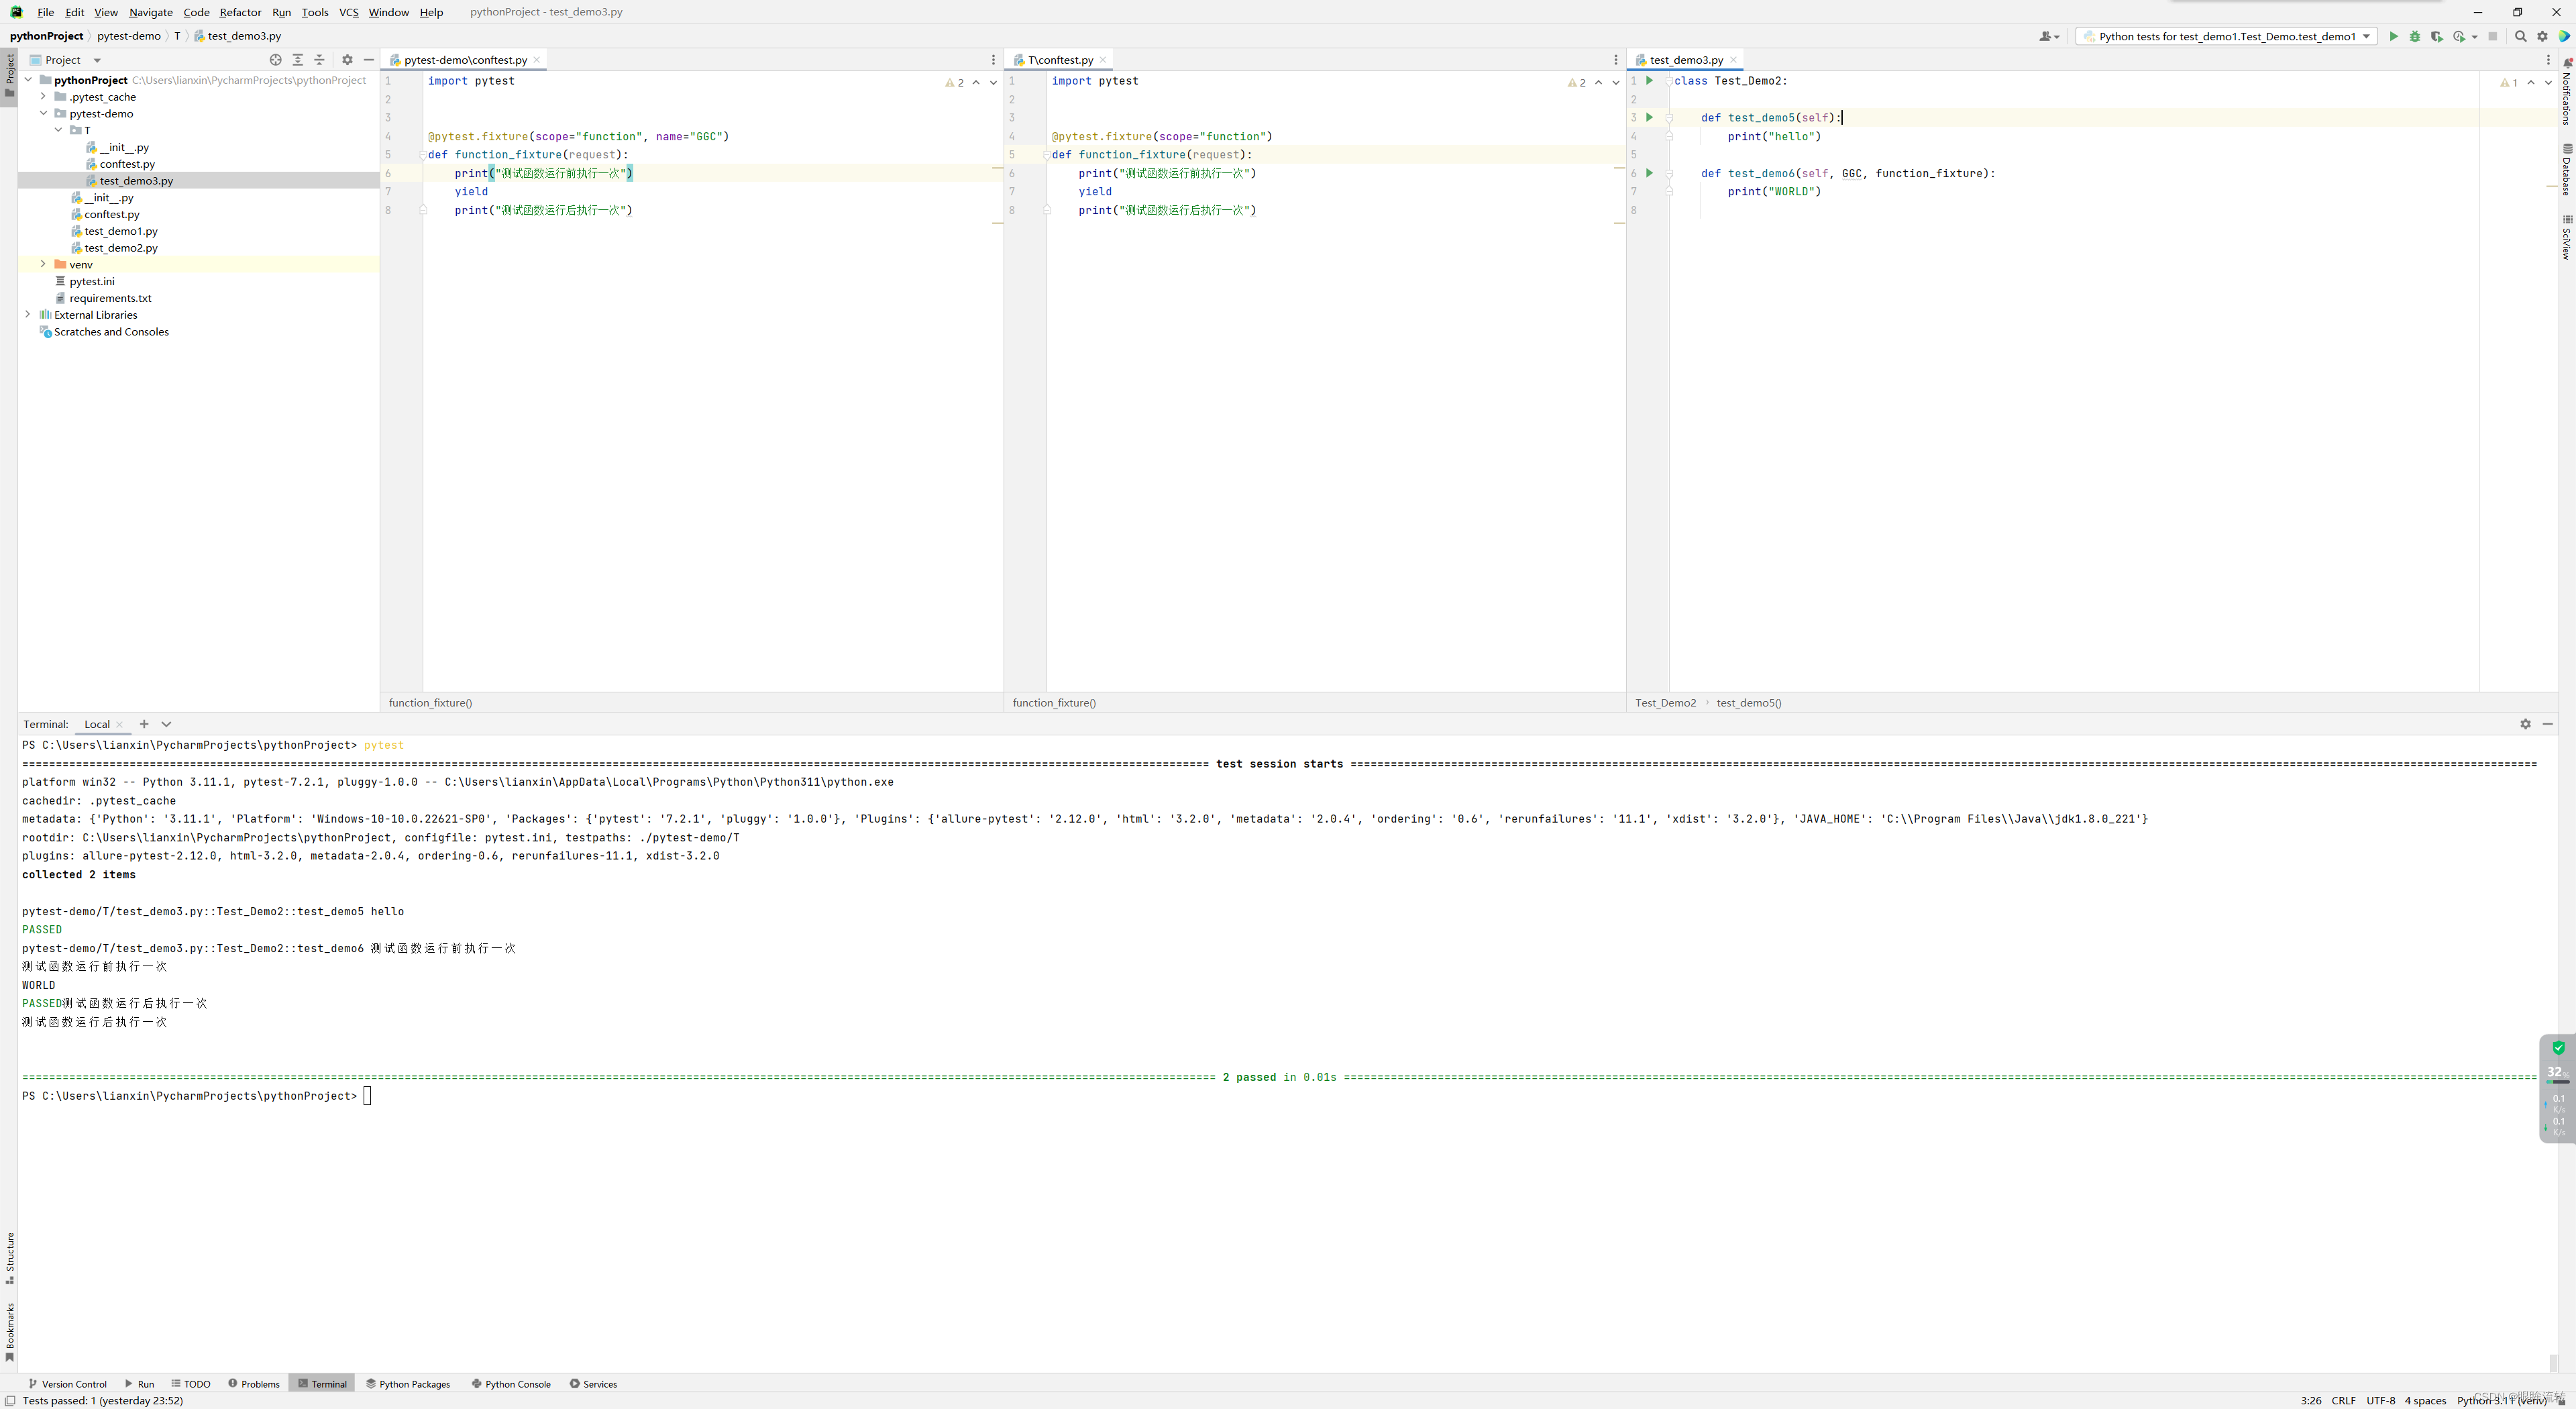
4、conftest.py
conftest.py文件是单独存放的一个夹具配置文件,名称是不能更改
可以在不同的py文件中使用同一个fixture函数
原则上conftest.py需要和运行的用例放到同一层,但是其实可以访问上层的conftest.py
conftest.py的fixture函数使用时也是有先后顺序的
4、接口测试
支持HTTP连接保持和连接池
支持使用cookie保持会话
支持文件上传
支持自动确定响应内容的编码
支持国际化的 URL 和 POST 数据自动编码
4.1、request
1、get
requests.get(url, params=None, **kwargs)
url:接口地址
params:传参(通过url之后以?传参,多个参数之间用&分隔)
**kwargs:可变长度的字典
import pytest
import requestsclass TestDemo1:access_token = ""# 获取tokendef test_1(self):data = {"grant_type": "client_credential","appid": "wx4a3a215280b8f14a","secret": "2609941fb2b5d8aaea637a1d430cab222"}response = requests.get("https://api.weixin.qq.com/cgi-bin/token", data)print(response.json())TestDemo1.access_token = response.json()["access_token"]print(TestDemo1.access_token)
2、post
requests.post(url, data=None, json=None, **kwargs)
url:接口地址
data:表单
json:json数据
files:文件上传
import osimport pytest
import requestsclass TestDemo1:access_token = ""# 获取tokendef test_1(self):data = {"grant_type": "client_credential","appid": "wx4a3a215280b8f14a","secret": "2609941fbb5d8aaea637a1d430cab222"}response = requests.get("https://api.weixin.qq.com/cgi-bin/token", data)print(response.json())TestDemo1.access_token = response.json()["access_token"]print(TestDemo1.access_token)# 创建标签@pytest.mark.skipdef test_2(self):json = {"tag": {"name": "xumeng"}}response = requests.post("https://api.weixin.qq.com/cgi-bin/tags/create?access_token=" + TestDemo1.access_token,json=json)print(response.json())# 获取所有标签def test_3(self):json = {"tag": {"name": "xumeng"}}response = requests.post("https://api.weixin.qq.com/cgi-bin/tags/get?access_token=" + TestDemo1.access_token,json=json)print(response.json())# 上传文件def test_4(self):# print(os.getcwd())files = {"media": open("./Luoyang.jpg", "rb")  # 路径起点为项目根目录}response = requests.post("https://api.weixin.qq.com/cgi-bin/media/uploadimg?access_token=" + TestDemo1.access_token,files=files)print(response.json())
3、put
requests.put(url, data=None, **kwargs)
url:接口地址
data:表单
4、delete
requests.delete(url, **kwargs)
url:接口地址
5、request
requests.request(method, url, **kwargs)
method:请求方式
url:请求路径
**kwargs:
- params:get请求传参
- data:post请求传参
- headers:请求头
- cookies:cookie
- files:文件
- auth:授权
- timeout=None
- allow_redirects=True
- proxies:代理
- hooks=None
- stream=None
- verify:SSL证书检验
- cert=None
- json:post请求传参
4.2、response
res.text:返回字符串的响应数据
res.content:返回字节响应数据bytes
res.json():返回字典格式的响应数据
res.status_code:返回状态码
res.reason:返回状态信息
res.cookies:返回cookie信息
res.encoding:返回编码格式
res.headers:返回响应头
res.request.url:返回请求路径
res.request.headers:返回请求头
res.request.body:返回请求数据
res.request.method:返回请求方式
4.3、cookie
4.4、session
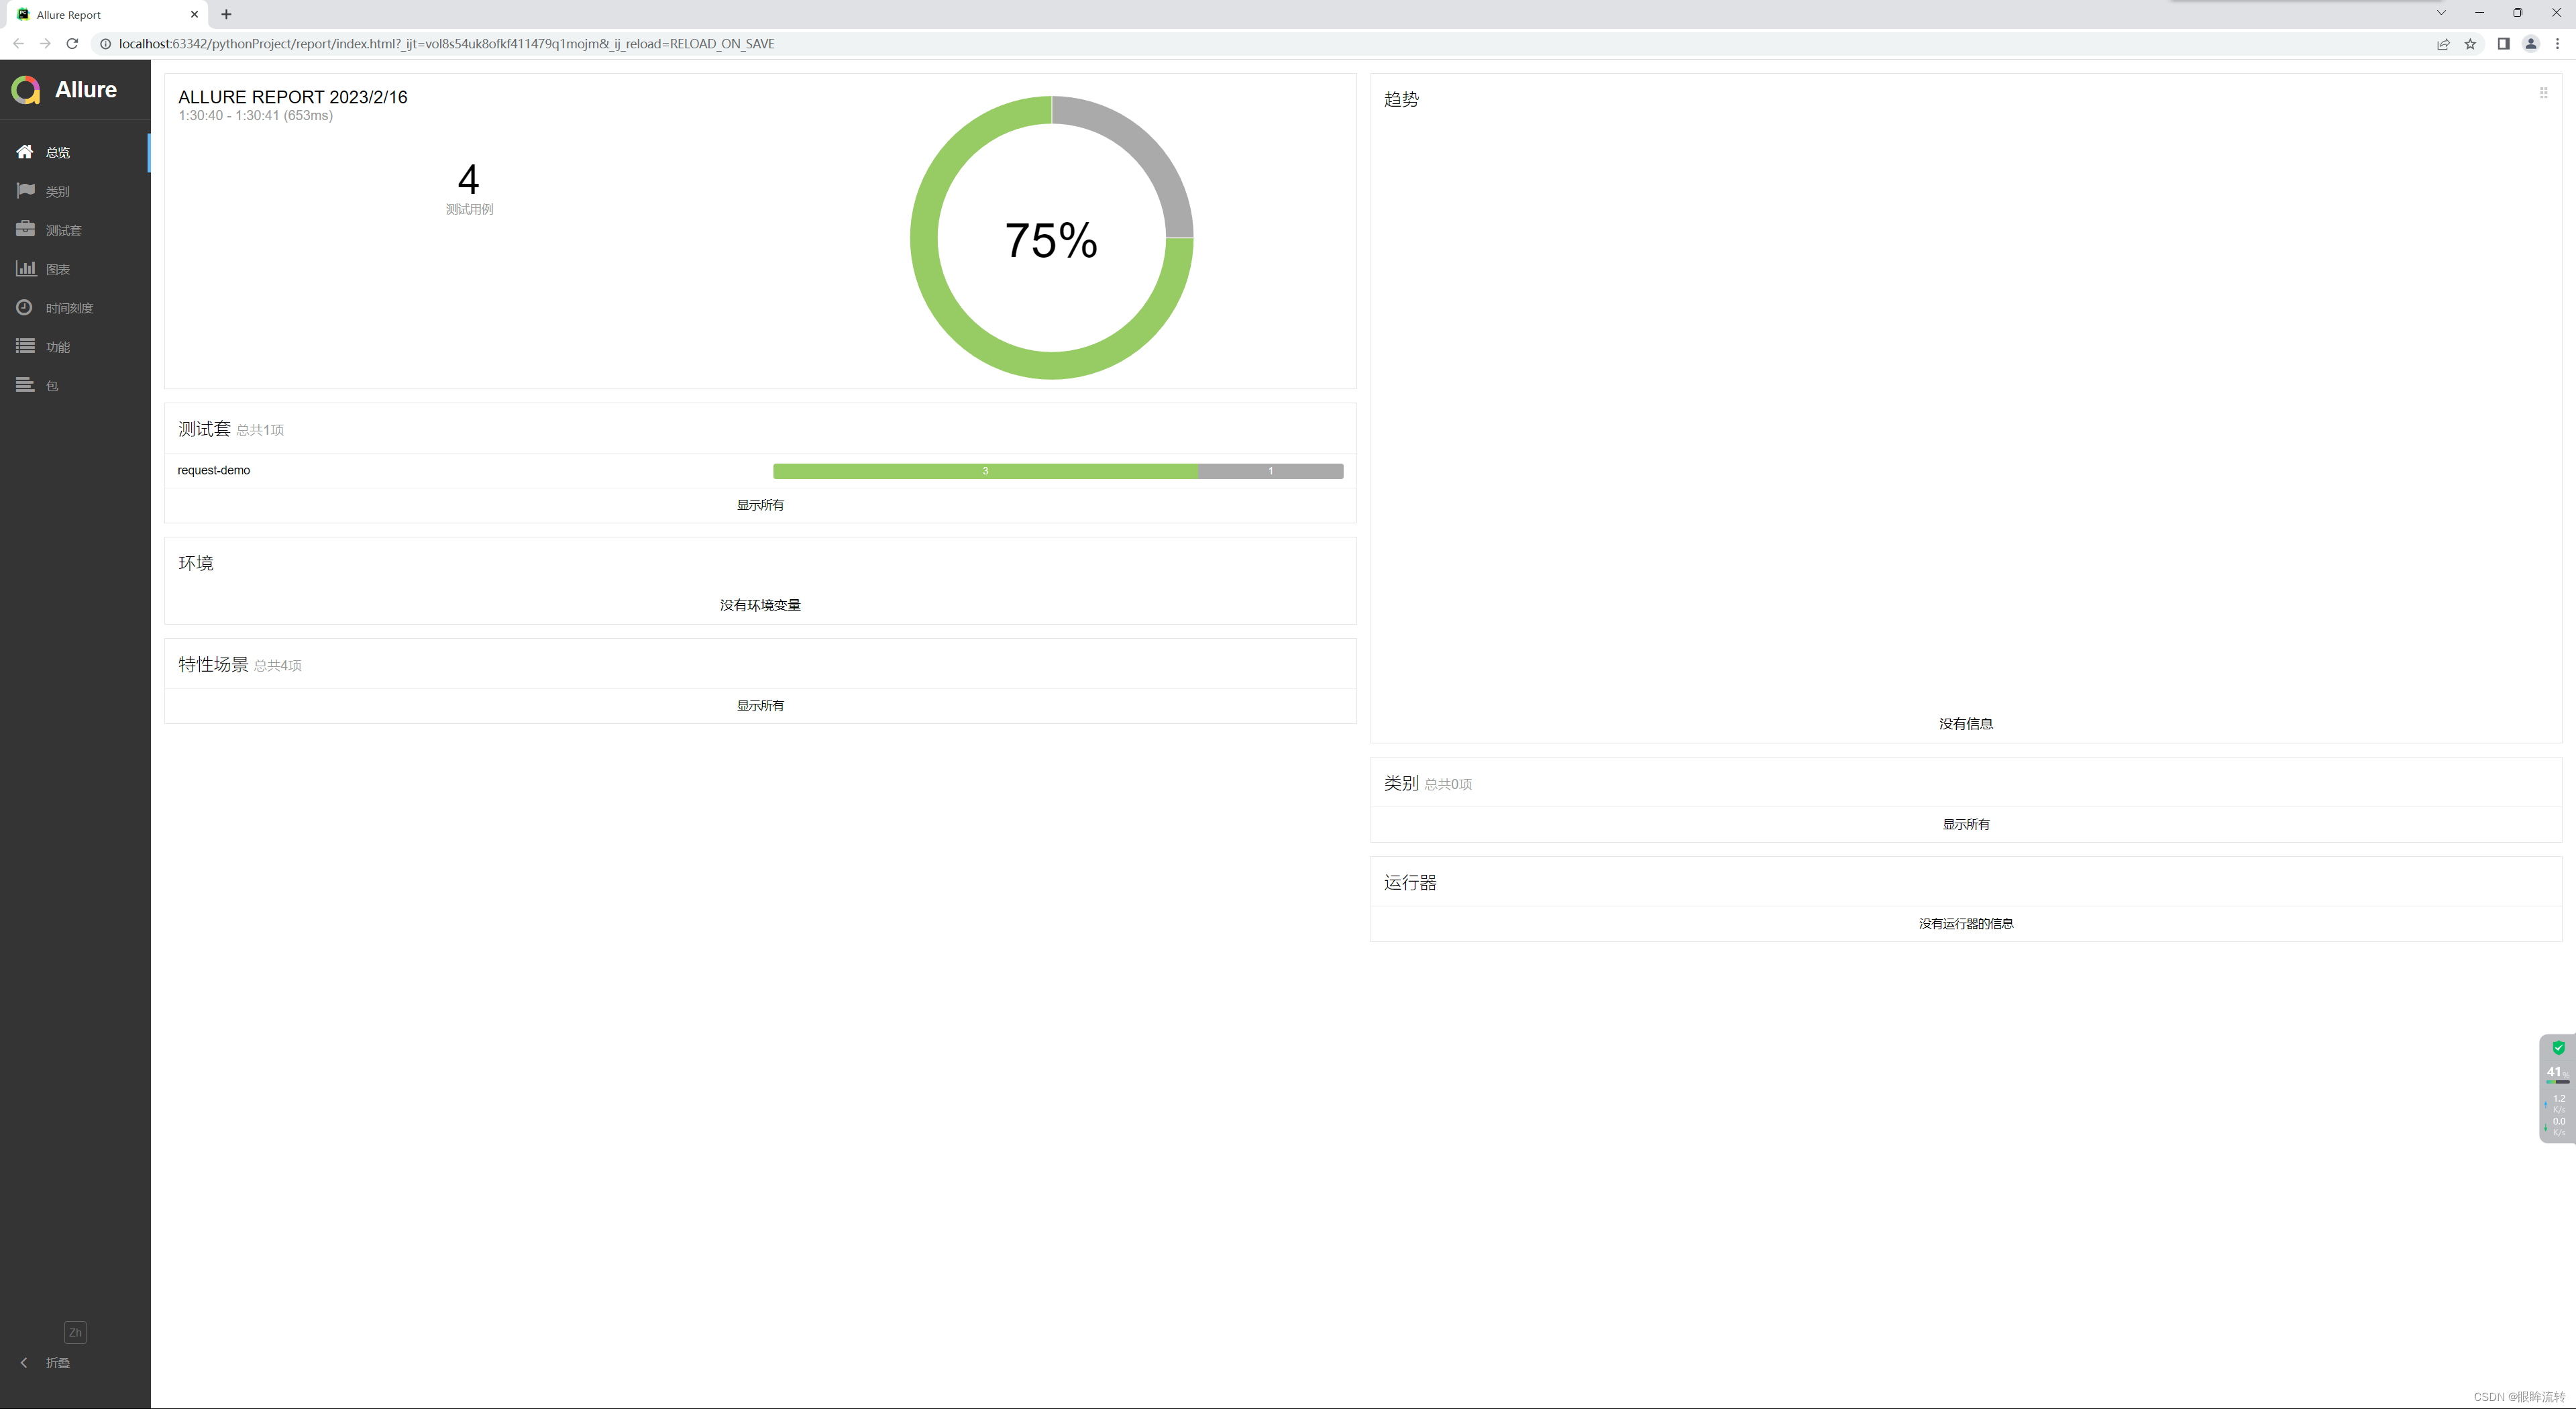
5、allure
生成pytest测试报告
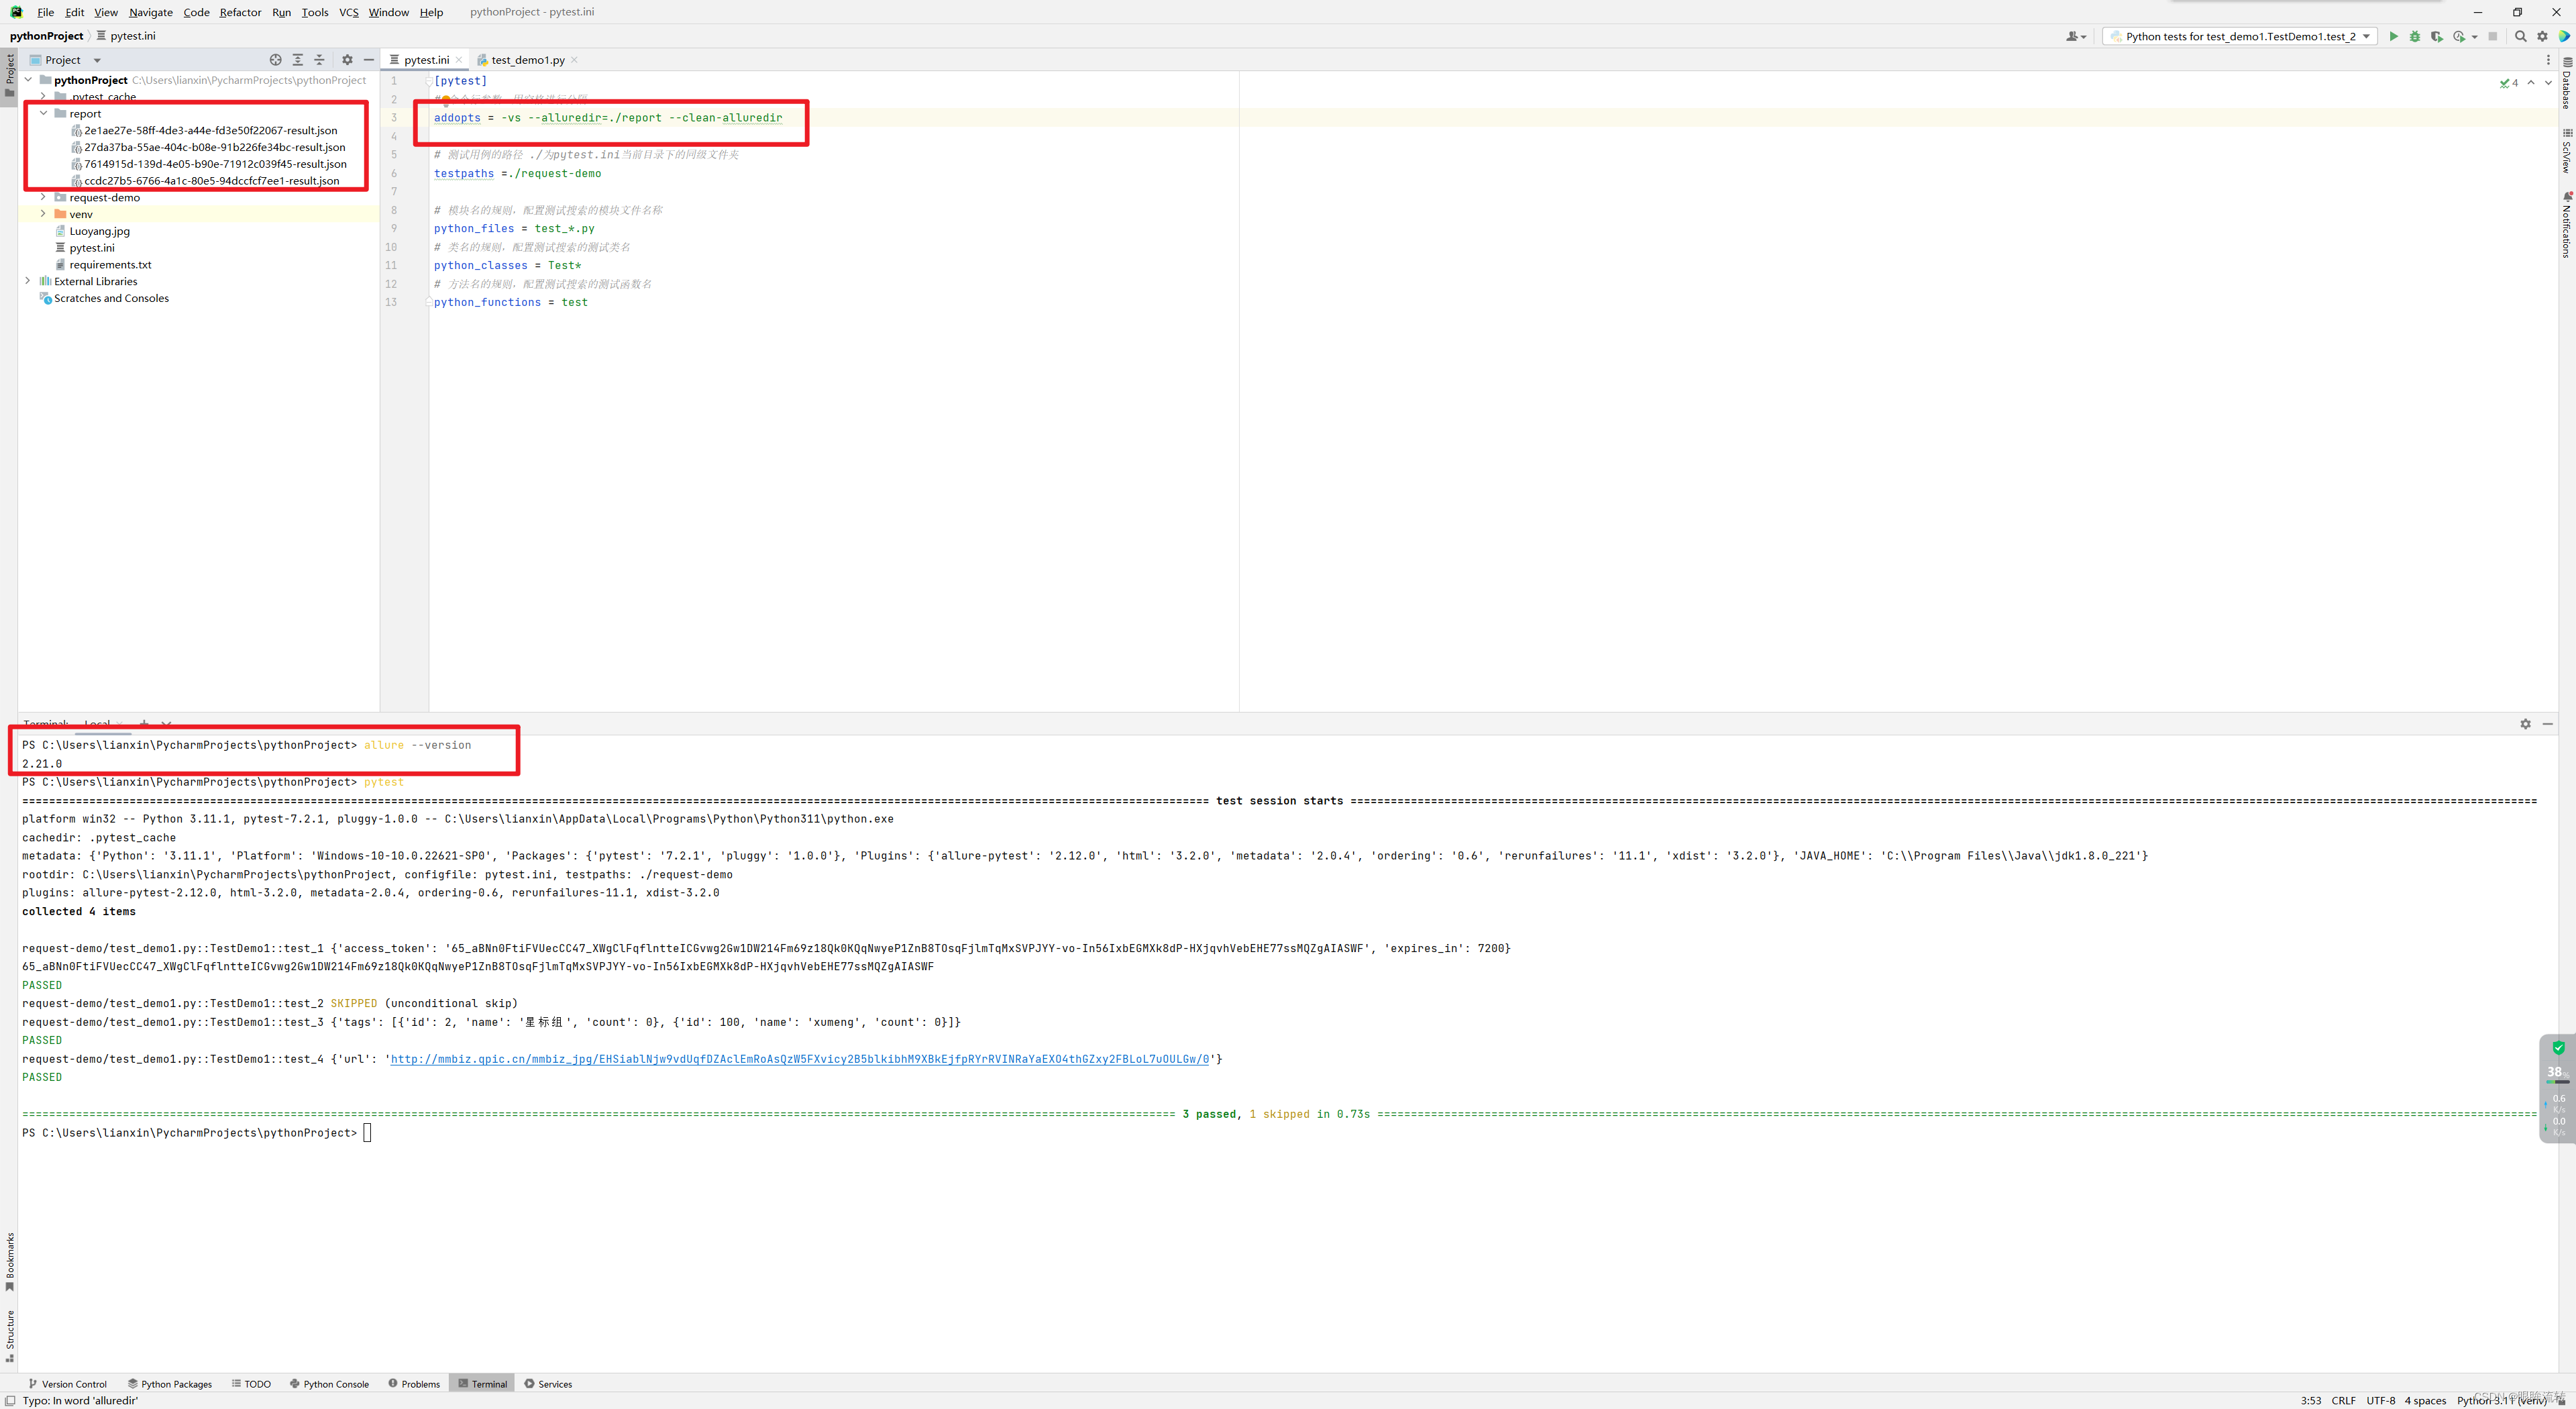
下载地址:https://github.com/allure-framework/allure2/releases
验证是否成功allure --version
5.1、临时报告
[pytest]
# 命令行参数,用空格进行分隔
addopts = -vs --alluredir=./report --clean-alluredir# 测试用例的路径 ./为pytest.ini当前目录下的同级文件夹
testpaths =./request-demo# 模块名的规则,配置测试搜索的模块文件名称
python_files = test_*.py
# 类名的规则,配置测试搜索的测试类名
python_classes = Test*
# 方法名的规则,配置测试搜索的测试函数名
python_functions = test
5.2、正式报告
import os
import timeimport pytestif __name__ == '__main__':pytest.main()time.sleep(3)os.system("allure generate ./temp -o ./report --clean")
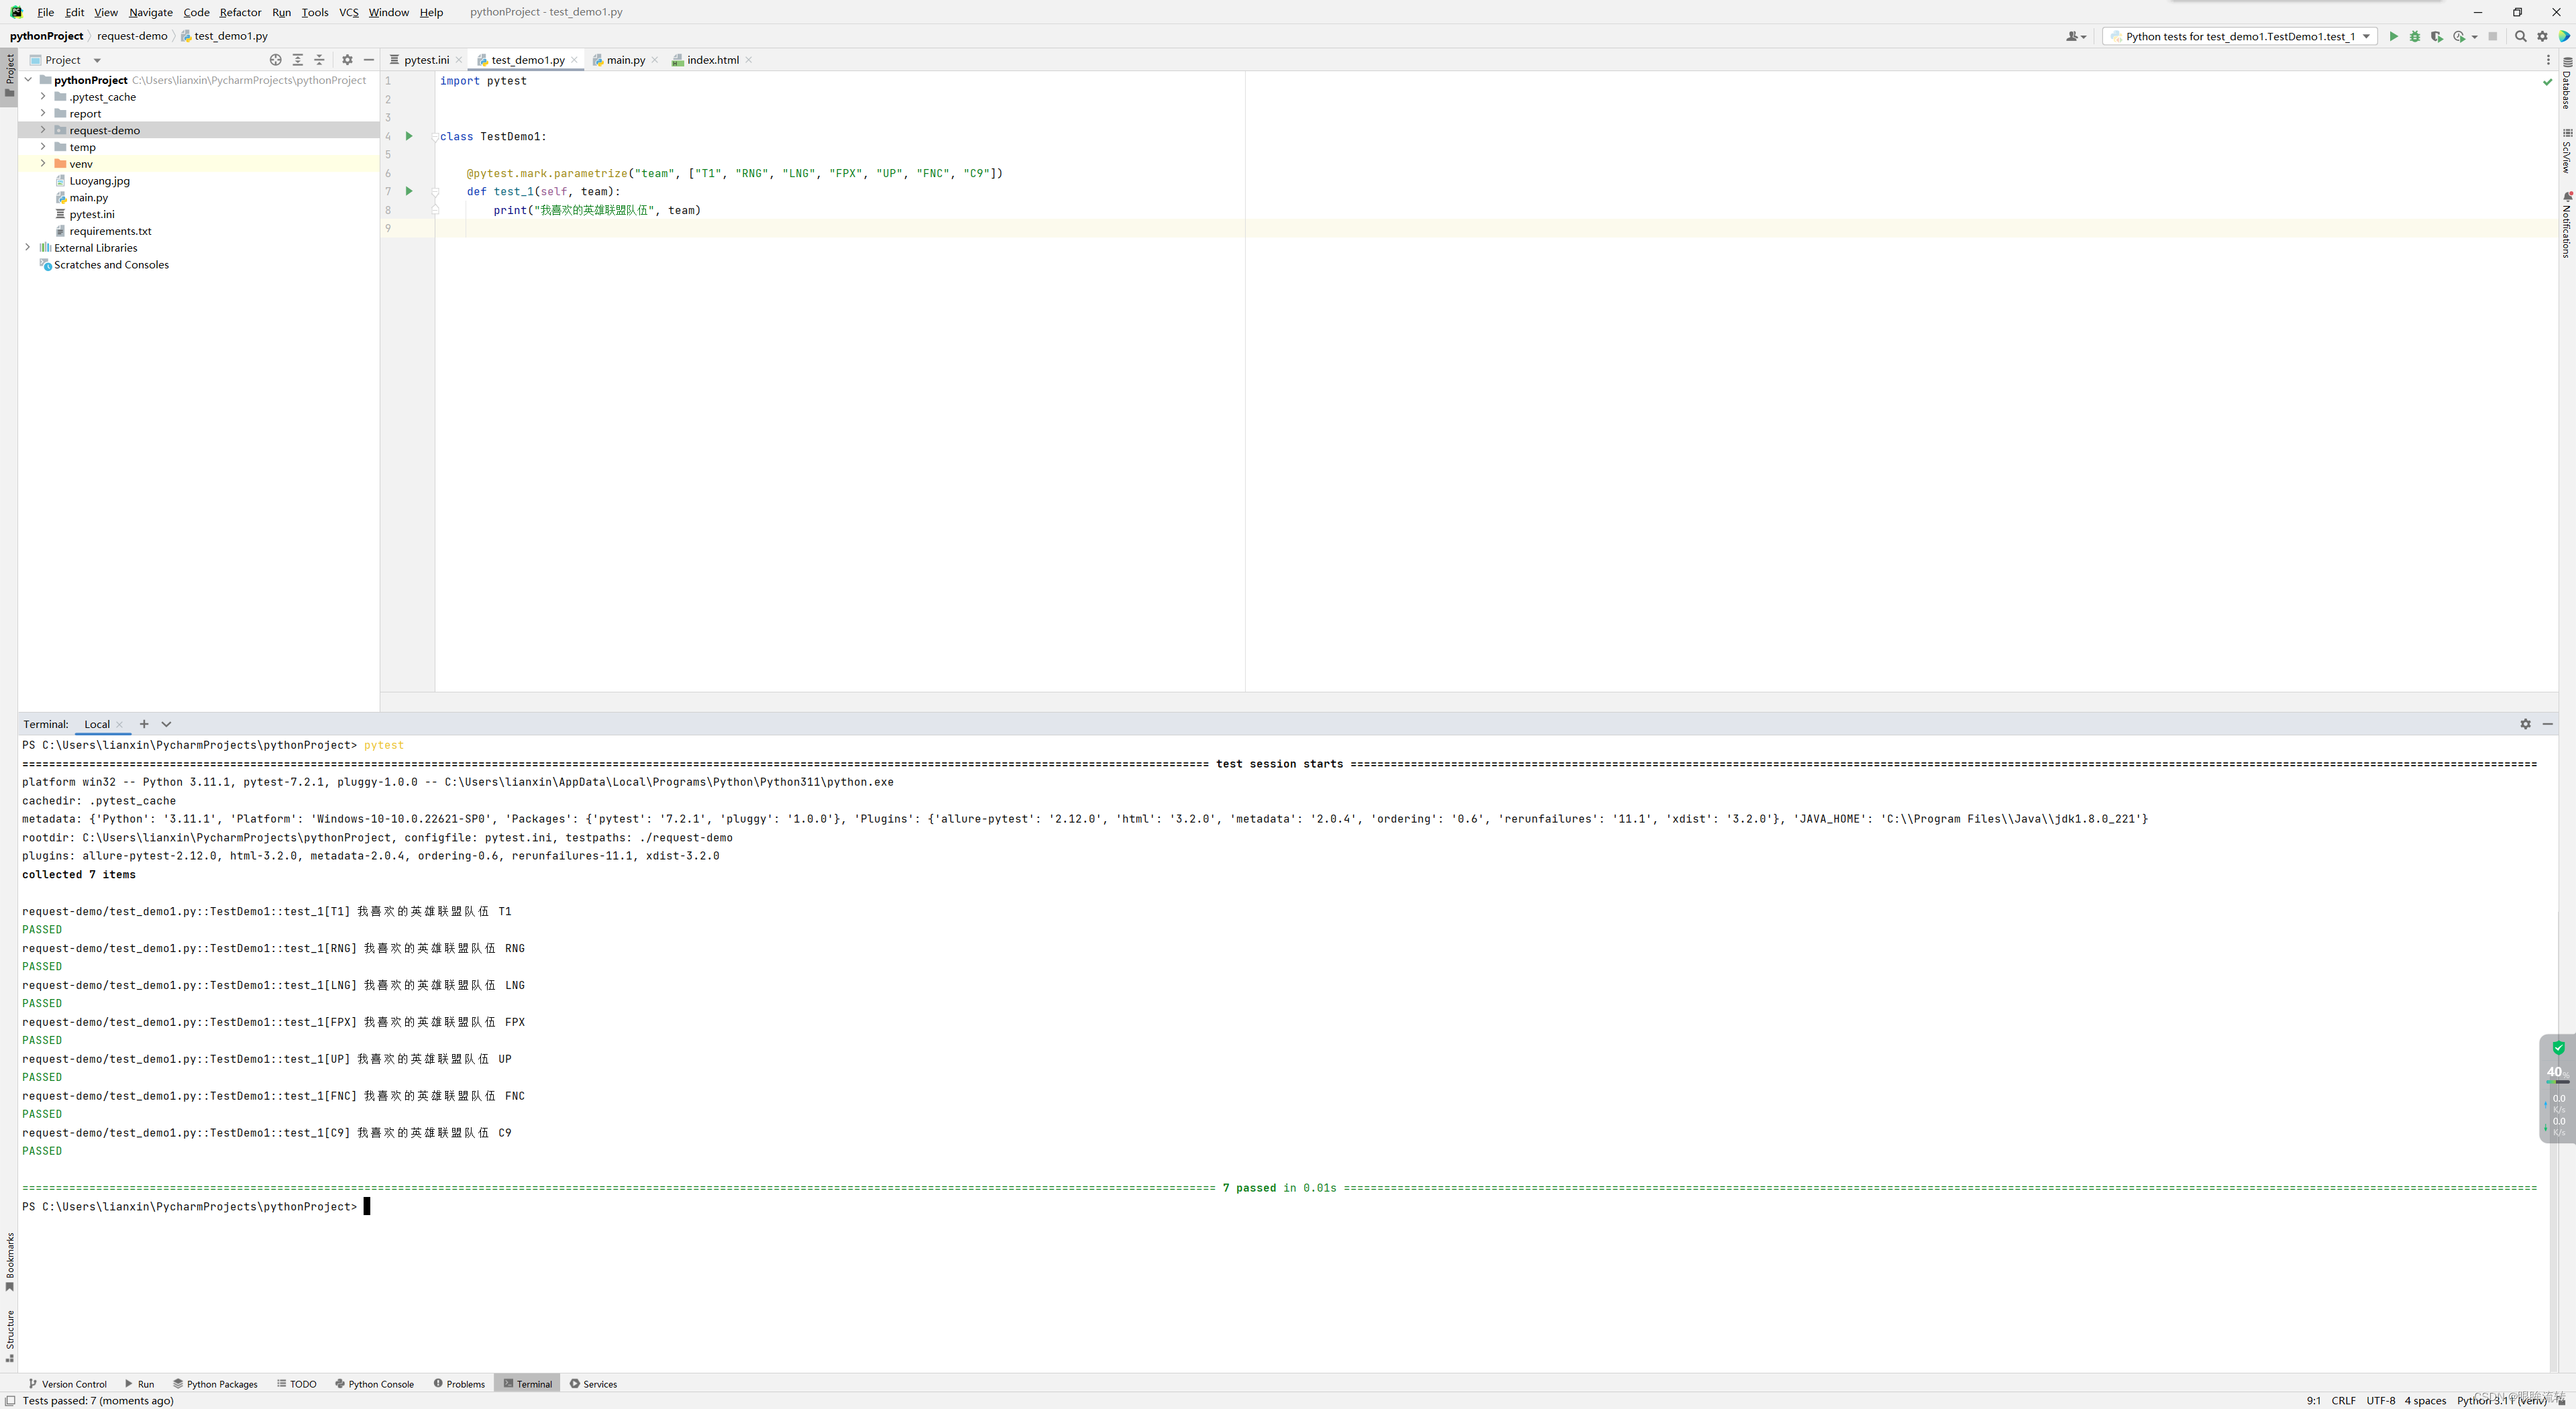
6、数据驱动
6.1、基础使用
import pytestclass TestDemo1:@pytest.mark.parametrize("team", ["T1", "RNG", "LNG", "FPX", "UP", "FNC", "C9"])def test_1(self, team):print("我喜欢的英雄联盟队伍", team)
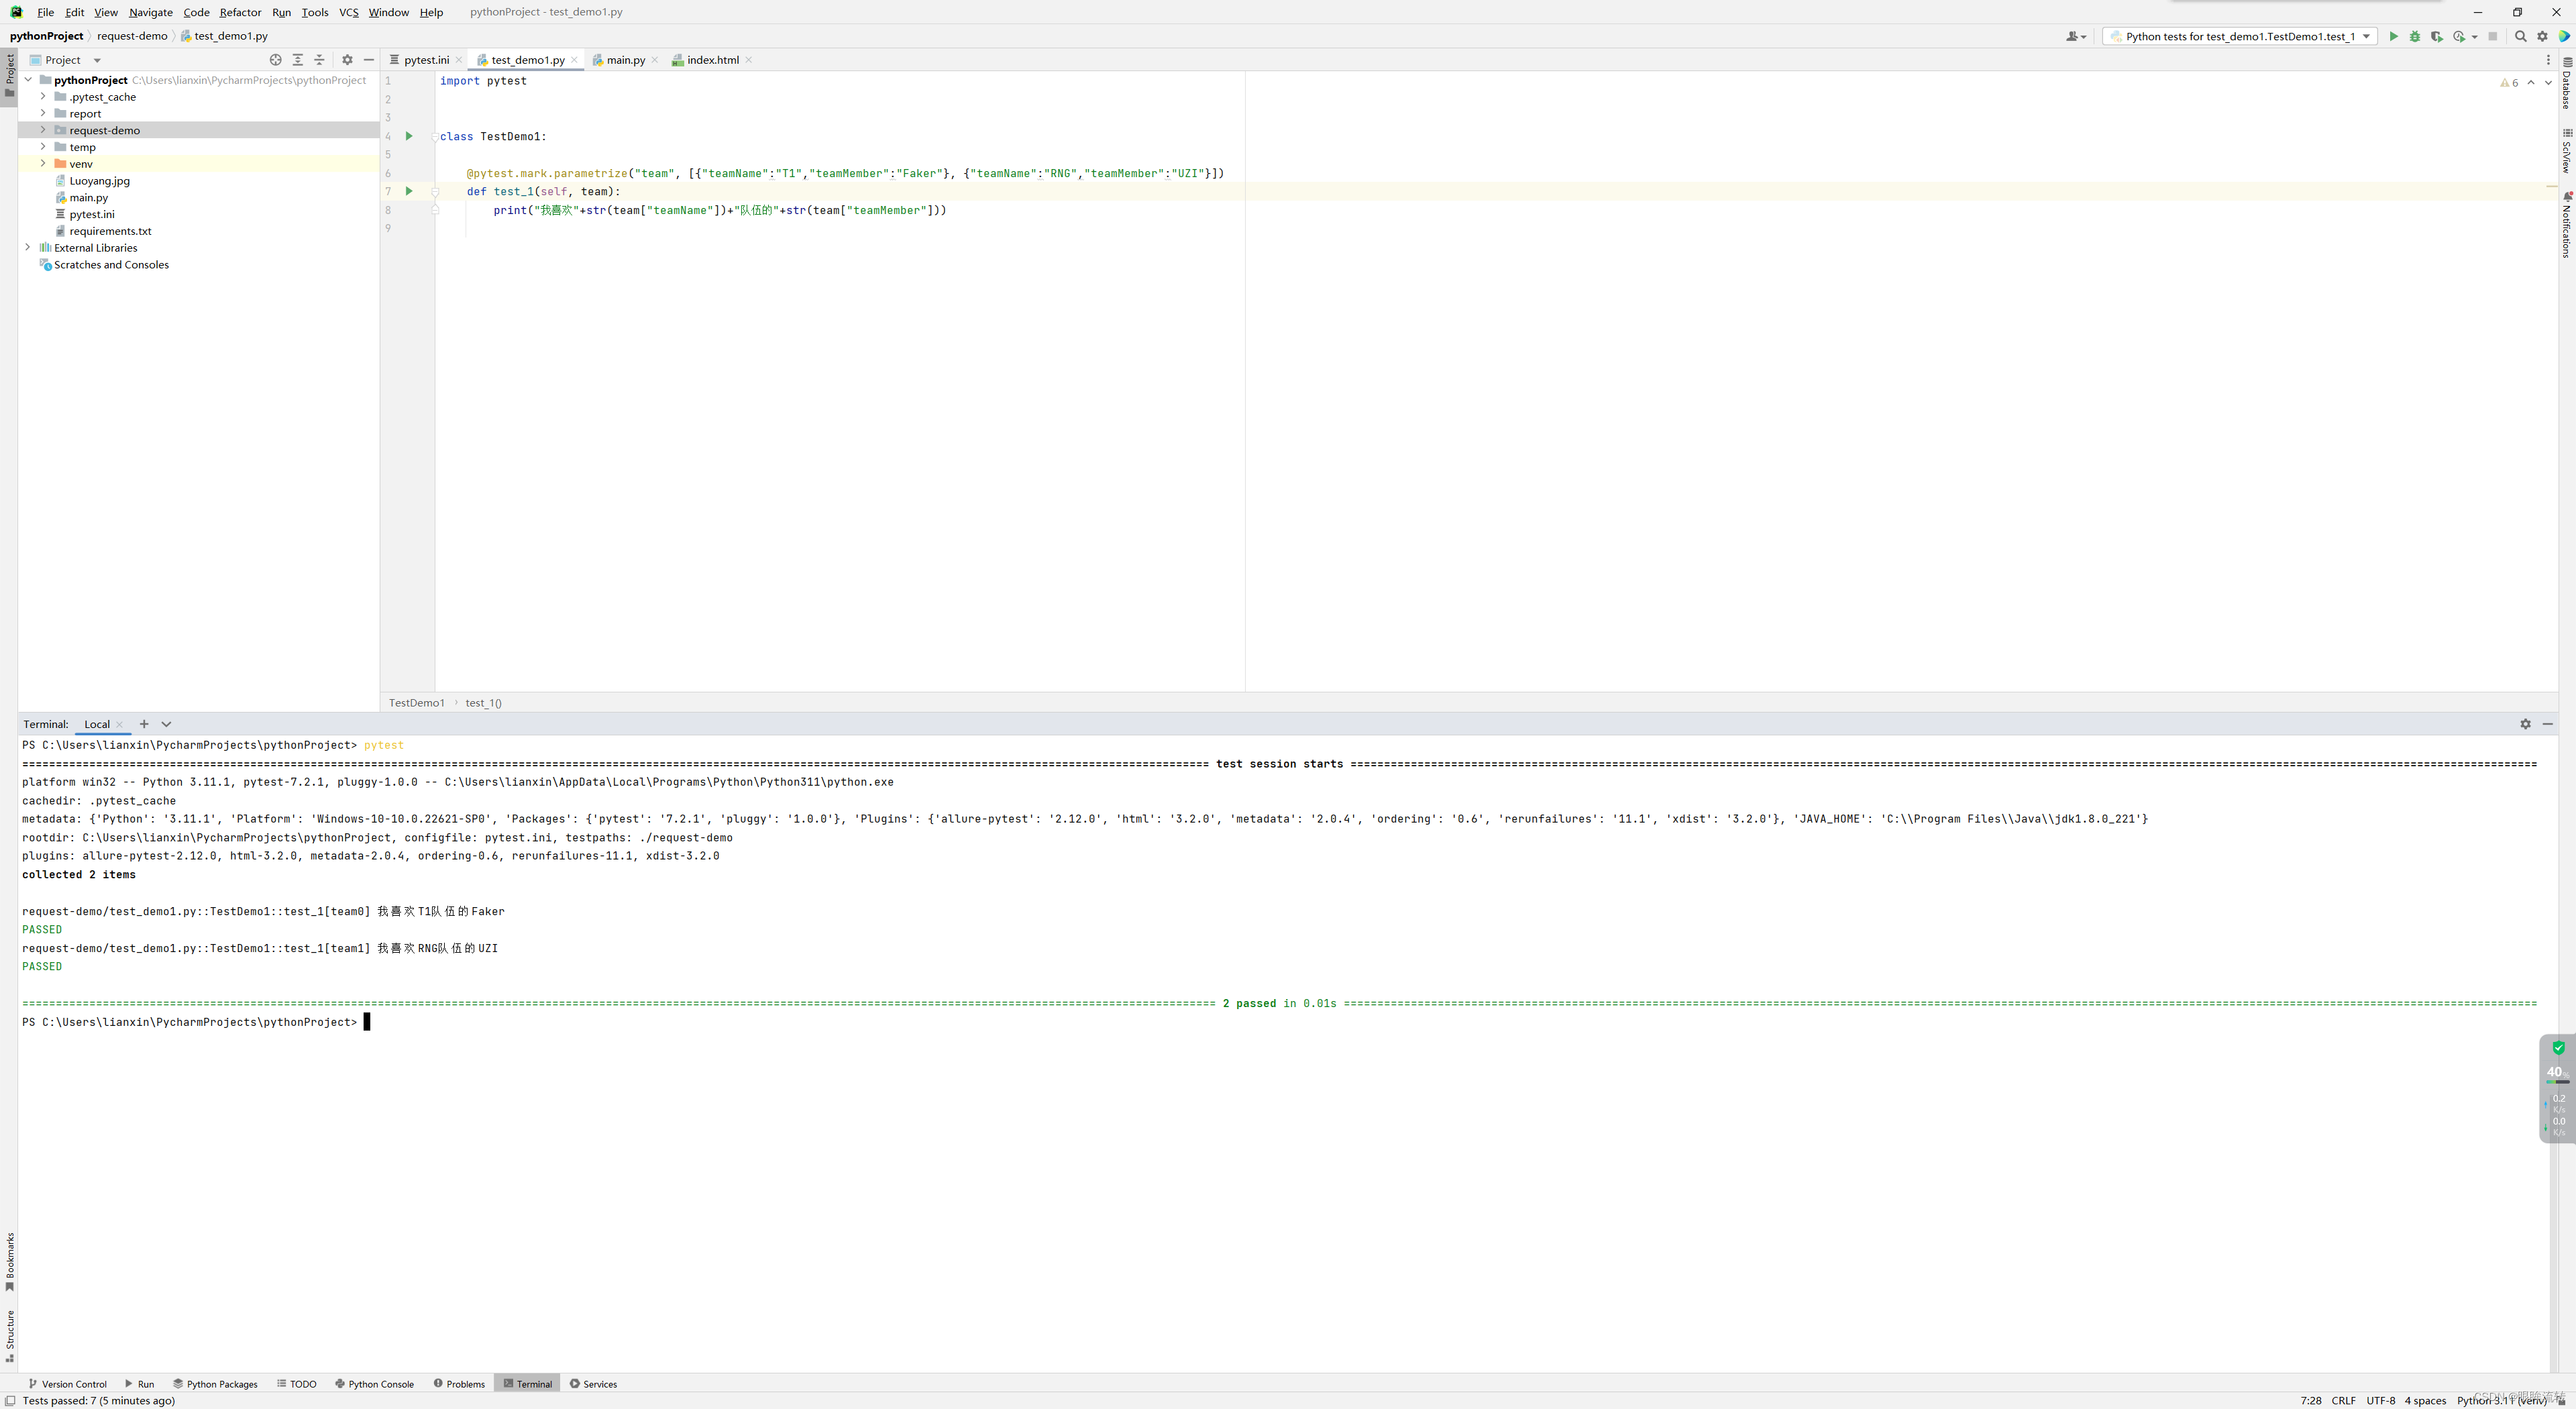
import pytestclass TestDemo1:@pytest.mark.parametrize("team", [{"teamName":"T1","teamMember":"Faker"}, {"teamName":"RNG","teamMember":"UZI"}])def test_1(self, team):print("我喜欢"+str(team["teamName"])+"队伍的"+str(team["teamMember"]))
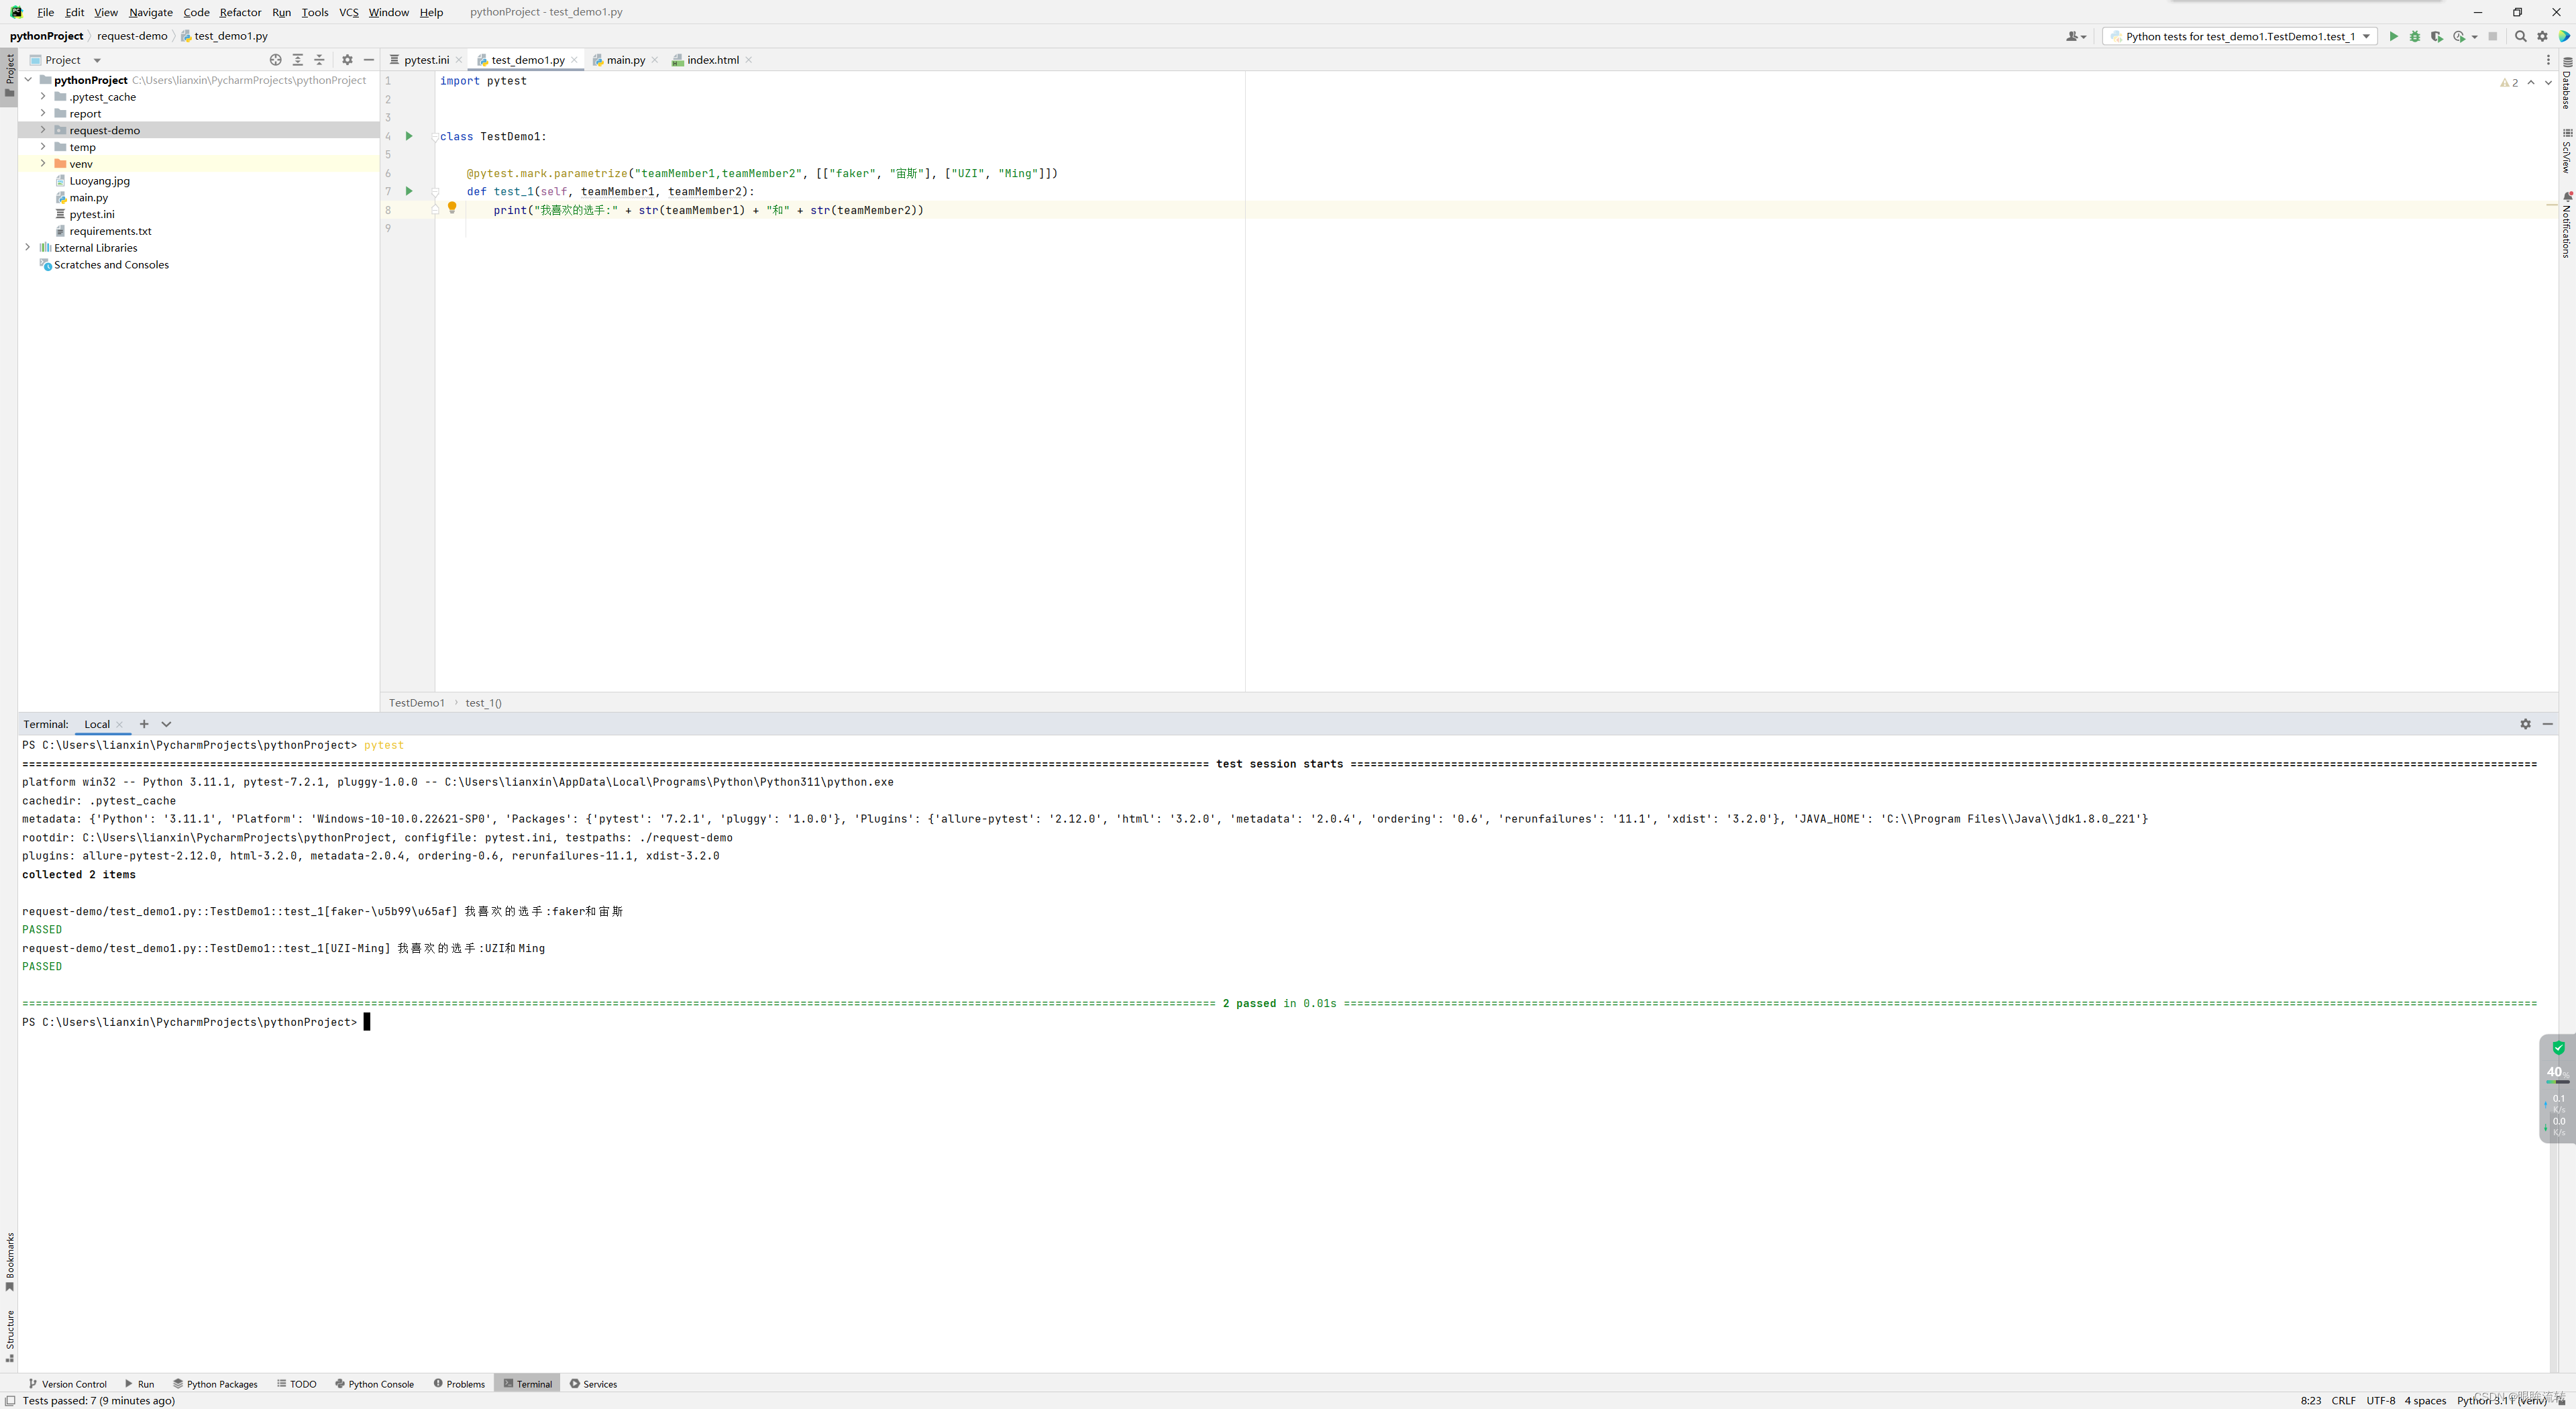
import pytestclass TestDemo1:@pytest.mark.parametrize("teamMember1,teamMember2", [["faker", "宙斯"], ["UZI", "Ming"]])def test_1(self, teamMember1, teamMember2):print("我喜欢的选手:" + str(teamMember1) + "和" + str(teamMember2))
6.2、yaml
yaml详解:https://blog.csdn.net/gyfghh/article/details/119465409
1、yaml读取
yaml
-name: zhangsanage: 20money: 123.5hobbies: baskball,football,volleyballbooks:- book1- book2- book3lotteries: [lottery1,lottery2,lottery3]bankcards: {ICBC: 123456789,ABC: 987654321}pet:name: huahuaage: 2
-name: lisiage: 20money: 123.5hobbies: baskball,football,volleyballbooks:- book1- book2- book3lotteries: [lottery1,lottery2,lottery3]bankcards: {ICBC: 123456789,ABC: 987654321}pet:name: huahuaage: 2
安装依赖
pip install pyyaml
load_yaml.py
import yamldef load_yaml(path):with open(path, mode="r", encoding="utf-8") as file:return yaml.load(stream=file, Loader=yaml.FullLoader)
test_demo1.py
import load_yamlclass TestDemo1:def test_1(self):print(load_yaml.load_yaml("./request-demo/data.yaml"))
6.3、yaml配合parametrize
-name: zhangsanage: 20money: 123.5hobbies: baskball,football,volleyballbooks:- book1- book2- book3lotteries: [lottery1,lottery2,lottery3]bankcards: {ICBC: 123456789,ABC: 987654321}pet:name: huahuaage: 2
-name: lisiage: 20money: 123.5hobbies: baskball,football,volleyballbooks:- book1- book2- book3lotteries: [lottery1,lottery2,lottery3]bankcards: {ICBC: 123456789,ABC: 987654321}pet:name: huahuaage: 2
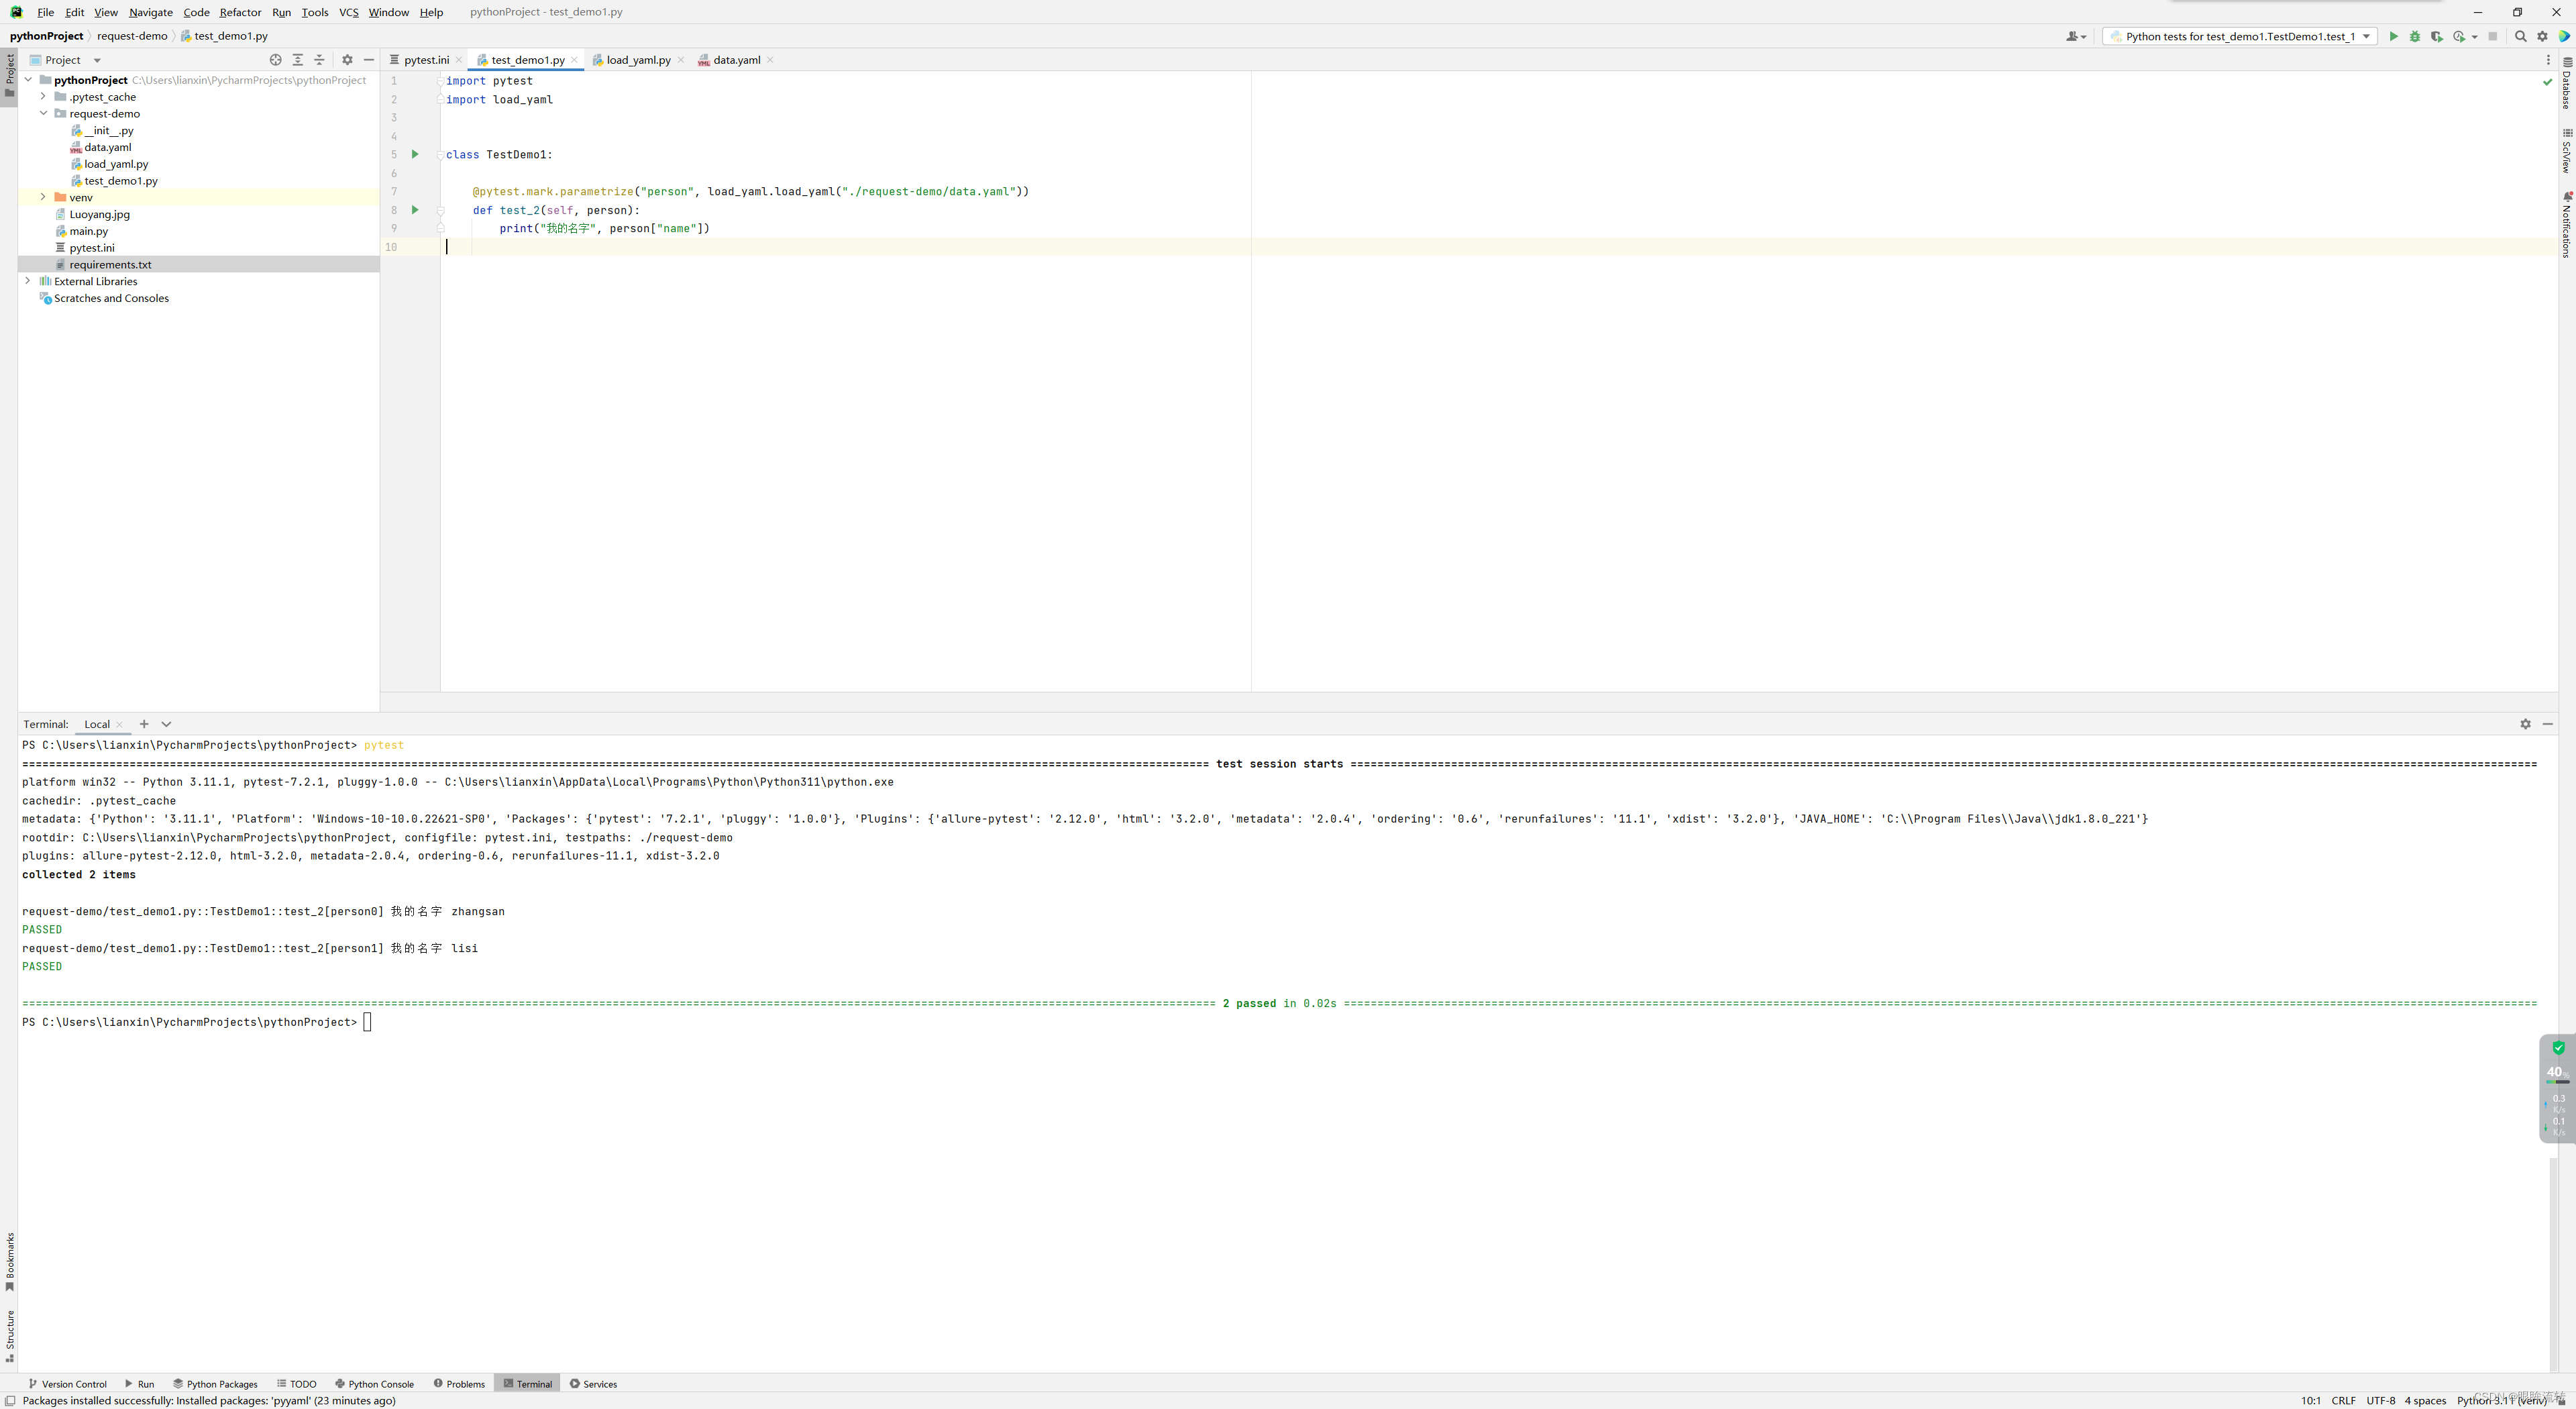
import pytest
import load_yamlclass TestDemo1:@pytest.mark.parametrize("person", load_yaml.load_yaml("./request-demo/data.yaml"))def test_2(self, person):print("我的名字", person["name"])