十分钟教你搭建类似ChatGPT的安卓应用程序
大家好,我是易安!
Chat GPT 是当今著名的人工智能工具,就像聊天机器人一样。Chat GPT会回答发送给它的所有查询。今天,我将通过集成 OpenAI API (ChatGPT)构建一个简单的类似 ChatGPT 的 android 应用程序,我们可以在其中提出任何问题并获得答案。
详细步骤
第 1 步:在 Android Studio 中创建一个新项目
要在 Android Studio 中创建新项目,以 Kotlin 作为编程语言为例。
第 2 步:在 build.gradle 文件中添加以下依赖项
下面是 Volley 的依赖项,我们将使用它从 API 获取数据。要添加此依赖项,请导航至 app > Gradle Scripts > build.gradle(app) 并在 dependencies 部分添加以下依赖项。我们使用 Picasso 依赖项从 URL 加载图像。
// 下一行用于 volley 库
实现 'com.android.volley:volley:1.2.0'
添加此依赖项后,同步您的项目,然后转到 AndroidManifest.xml 部分。
第三步:在AndroidManifest.xml文件中添加上网权限
导航到应用 > AndroidManifest.xml 并向其中添加以下代码。
-
XML
<!--permissions for INTERNET-->
<uses-permission android:name="android.permission.INTERNET"/>
第 4 步:使用 activity_main.xml 文件
导航到 app > res > layout > activity_main.xml 并将以下代码添加到该文件。下面是 activity_main.xml 文件的代码。
-
XML
<?xml version="1.0" encoding="utf-8"?>
<RelativeLayout xmlns:android="http://schemas.android.com/apk/res/android"
 xmlns:app="http://schemas.android.com/apk/res-auto"
 xmlns:tools="http://schemas.android.com/tools"
 android:layout_width="match_parent"
 android:layout_height="match_parent"
 android:background="@color/back_color"
 tools:context=".MainActivity">

 <ScrollView
  android:layout_width="match_parent"
  android:layout_height="match_parent"
  android:layout_above="@id/idTILQuery"
  android:layout_alignParentTop="true"
  android:layout_margin="5dp"
  android:padding="5dp">

  <LinearLayout
   android:layout_width="match_parent"
   android:layout_height="match_parent"
   android:orientation="vertical">

   <!-- text view for displaying question-->
   <TextView
    android:id="@+id/idTVQuestion"
    android:layout_width="match_parent"
    android:layout_height="match_parent"
    android:layout_marginTop="30dp"
    android:padding="4dp"
    android:text="Question"
    android:textColor="@color/white"
    android:textSize="17sp" />

   <!-- text view for displaying response-->
   <TextView
    android:id="@+id/idTVResponse"
    android:layout_width="match_parent"
    android:layout_height="match_parent"
    android:layout_marginTop="5dp"
    android:padding="4dp"
    android:text="Response"
    android:textColor="@color/white"
    android:textSize="15sp" />
  </LinearLayout>

 </ScrollView>
 <!-- text field for asking question-->
 <com.google.android.material.textfield.TextInputLayout
  android:id="@+id/idTILQuery"
  style="@style/TextInputLayoutStyle"
  android:layout_width="match_parent"
  android:layout_height="wrap_content"
  android:layout_alignParentBottom="true"
  android:layout_margin="5dp"
  android:hint="Enter your query"
  android:padding="5dp"
  android:textColorHint="@color/white"
  app:hintTextColor="@color/white">

  <com.google.android.material.textfield.TextInputEditText
   android:id="@+id/idEdtQuery"
   android:layout_width="match_parent"
   android:layout_height="match_parent"
   android:background="@color/edt_back_color"
   android:drawableEnd="@drawable/ic_send"
   android:drawableTint="@color/white"
   android:ems="10"
   android:imeOptions="actionSend"
   android:importantForAutofill="no"
   android:inputType="textEmailAddress"
   android:textColor="@color/white"
   android:textColorHint="@color/white"
   android:textSize="14sp" />
 </com.google.android.material.textfield.TextInputLayout>
</RelativeLayout>
第 5 步:生成使用 API 的不记名令牌。
导航到以下URL (openai获取你的api key),只需使用您的电子邮件和密码注册即可。在此屏幕上单击创建新密钥以生成新密钥。生成您的密钥后,我们必须将其用作制作 API 密钥的令牌。
第 6 步:使用 MainActivity.kt 文件。
导航到 app > java > 你的应用程序包名称 > MainActivity.kt 文件并向其中添加以下代码。
这里选择的模型text-davinci-003,当然你可以选择其他3.5的模型
-
Kotlin
import android.content.Context
import android.os.Bundle
import android.util.Log
import android.view.inputmethod.EditorInfo
import android.widget.TextView
import android.widget.TextView.OnEditorActionListener
import android.widget.Toast
import androidx.appcompat.app.AppCompatActivity
import com.android.volley.RequestQueue
import com.android.volley.Response
import com.android.volley.RetryPolicy
import com.android.volley.VolleyError
import com.android.volley.toolbox.JsonObjectRequest
import com.android.volley.toolbox.Volley
import com.google.android.material.textfield.TextInputEditText
import org.json.JSONObject

class MainActivity : AppCompatActivity() {

 // creating variables on below line.
 lateinit var responseTV: TextView
 lateinit var questionTV: TextView
 lateinit var queryEdt: TextInputEditText

 var url = "https://api.openai.com/v1/completions"

 override fun onCreate(savedInstanceState: Bundle?) {
  super.onCreate(savedInstanceState)
  setContentView(R.layout.activity_main)

  responseTV = findViewById(R.id.idTVResponse)
  questionTV = findViewById(R.id.idTVQuestion)
  queryEdt = findViewById(R.id.idEdtQuery)


  queryEdt.setOnEditorActionListener(OnEditorActionListener { v, actionId, event ->
   if (actionId == EditorInfo.IME_ACTION_SEND) {

    responseTV.text = "Please wait.."

    if (queryEdt.text.toString().length > 0) {

     getResponse(queryEdt.text.toString())
    } else {
     Toast.makeText(this, "Please enter your query..", Toast.LENGTH_SHORT).show()
    }
    return@OnEditorActionListener true
   }
   false
  })
 }

 private fun getResponse(query: String) {

  questionTV.text = query
  queryEdt.setText("")

  val queue: RequestQueue = Volley.newRequestQueue(applicationContext)

  val jsonObject: JSONObject? = JSONObject()

  jsonObject?.put("model", "text-davinci-003")
  jsonObject?.put("prompt", query)
  jsonObject?.put("temperature", 0)
  jsonObject?.put("max_tokens", 100)
  jsonObject?.put("top_p", 1)
  jsonObject?.put("frequency_penalty", 0.0)
  jsonObject?.put("presence_penalty", 0.0)


  val postRequest: JsonObjectRequest =

   object : JsonObjectRequest(Method.POST, url, jsonObject,
    Response.Listener { response ->

     val responseMsg: String =
      response.getJSONArray("choices").getJSONObject(0).getString("text")
     responseTV.text = responseMsg
    },

    Response.ErrorListener { error ->
     Log.e("TAGAPI", "Error is : " + error.message + "\n" + error)
    }) {
    override fun getHeaders(): kotlin.collections.MutableMap<kotlin.String, kotlin.String> {
     val params: MutableMap<String, String> = HashMap()

     params["Content-Type"] = "application/json"
     params["Authorization"] =
      "Bearer Enter your token here"
     return params;
    }
   }


  postRequest.setRetryPolicy(object : RetryPolicy {
   override fun getCurrentTimeout(): Int {
    return 50000
   }

   override fun getCurrentRetryCount(): Int {
    return 50000
   }

   @Throws(VolleyError::class)
   override fun retry(error: VolleyError) {
   }
  })

  queue.add(postRequest)
 }
}
最终运行结果:
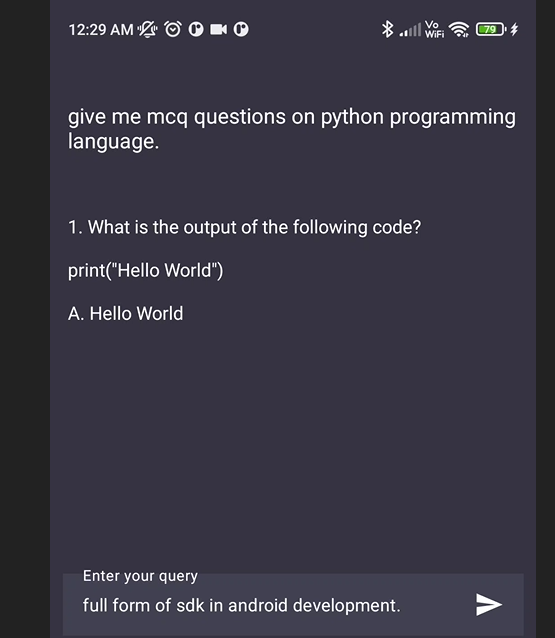
多年没开发安卓的我,也能在很短的时间不费吹飞之力搭建出来,你也赶紧去试试吧!之后我还会出一些更加详细的搭建教程,感谢阅读!
本文由 mdnice 多平台发布