vue3+ts+vite自适应项目——路由、layout布局
系列文章目录
第一章:搭建项目
目录
系列文章目录
前言
一、vue-router
1.安装vue-router
2.引入
2.1 新建页面
2.2 公共样式引入
2.3 layout 布局
2.4路由配置
总结
前言
上一章我们搭建了项目,这一张主要讲路由和layout布局,和vue2 有所不同,但是也有相似的地方,如果看过我之前的博客,那这里就很好理解啦~
一、vue-router
1.安装vue-router
首先,我们需要安装vue-router,执行以下命令:
yarn add vue-router2.引入
2.1 新建页面
首先,我们新建views文件夹,在新建三个页面,如下:
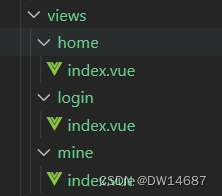
每个页面先只写一个div占位,如下:
<template><div class="comm_bg">首页</div>
</template>
<script lang="ts" setup></script>
<style scoped lang="scss"></style>
2.2 公共样式引入
上一章我们知道啦如何 引入公共样式 和 修改element-plus 样式,这里我们需要定义另一个index.scss 存放两个文件,结构如下:
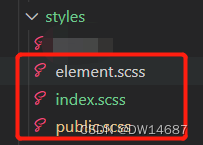
在index.scss里面引入两个文件,如下:
@import './element.scss';
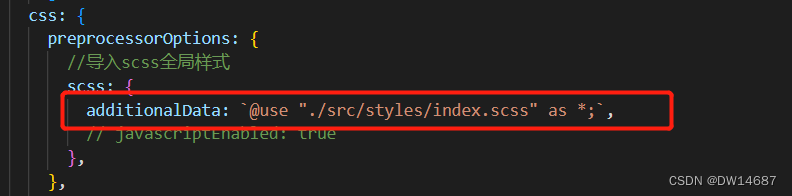
@import './public.scss';修改vite.config.ts 中得公共样式路径,如下:
此时,我们在 public.scss 中定义comm_bg 作为每个页面得公共背景类,如下:
.comm_bg {width: auto;height: 100%;padding: 29px;background: #ffffff;border-radius: 14px;
}
2.3 layout 布局
新建layout/index.vue 和 header.vue,结构如下:

header.vue如下:
<template><div class="barBg"><div class="left">XXX综合平台</div><div class="right"><div class="btn" :class="nowIndex === index ? 'actived' : ''" v-for="(item, index) in tabList" :key="item.id"@click="clickTab(item.router, index)"><span>{{ item.name }}</span></div></div></div>
</template><script lang="ts" setup>
// 引入路由
import { useRouter } from 'vue-router'
import { ref } from 'vue';
//全局中引入这个方法
const router = useRouter()
const nowIndex = ref(0)
console.log(nowIndex.value)
//声明一个函数
const clickTab = (e, index) => {console.log(e)nowIndex.value = indexrouter.push(e)
}
const tabList = [{ id: "1", name: '首页', router: '/home', },{ id: "3", name: '综合商城', router: '/mine', },{ id: "2", name: '我的主页', router: '/mine', },]</script><style lang="scss" scoped>
.barBg {padding: 50px 3px;display: flex;justify-content: space-between;.left {font-size: 28px;line-height: 19px;color: #ffffff;}.actived {padding-bottom: 23px;border-bottom: 4px solid #ffff;border-radius: 2px;font-weight: bold}.right {display: flex;justify-content: space-between;.btn {display: flex;vertical-align: middle}div {margin-right: 29px;}div:nth-child(3) {margin-right: 0;}}}
</style>
index.vue主要是配置layout布局,如下:
<template><el-container><el-header><Bar /></el-header><el-main><!-- 子路由出口 --><router-view /></el-main></el-container>
</template><script setup lang="ts">
import Bar from './header.vue'</script><style scoped lang="scss">
.el-container {height: 100vh;
}.el-header {width: calc(100vw);height: 128px;background-color: $main_bg;color: #ffffff
}.el-main {width: calc(100vw);background-color: #E9EEF3;padding: 30px;
}
</style>
2.4路由配置
我们新建 router/routes.ts 引入layout布局,主要存放路由信息,代码如下:
// 引入创建路由模式 history模式
import Layout from '../layout/index.vue'
// 引入路由各页面配置
const routes = [{path: '/login',name: 'login',component: () => import('../views/login/index.vue'),},{path: '/',redirect: '/home'},{path: '/',component: Layout,name: 'layout',children: [{path: '/home',component: () => import('../views/home/index.vue'),name: 'home'},{path: '/mine',component: () => import('../views/mine/index.vue'),name: 'mine'}]},]export default routes;
再新建router/index.ts,注册路由,这里使用history模式,如下:
import { createRouter, createWebHistory } from "vue-router"
import routes from "./routes"
var router = createRouter({history: createWebHistory(),routes
})
export default router
最后在main.ts里面引入 和注册,如下:
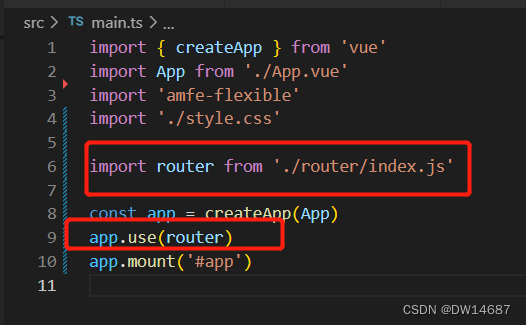
此时路由就引入完成了~
最后再配置app.vue入口,如下:
<script setup lang="ts"></script><template><router-view />
</template><style lang="scss" scoped></style>
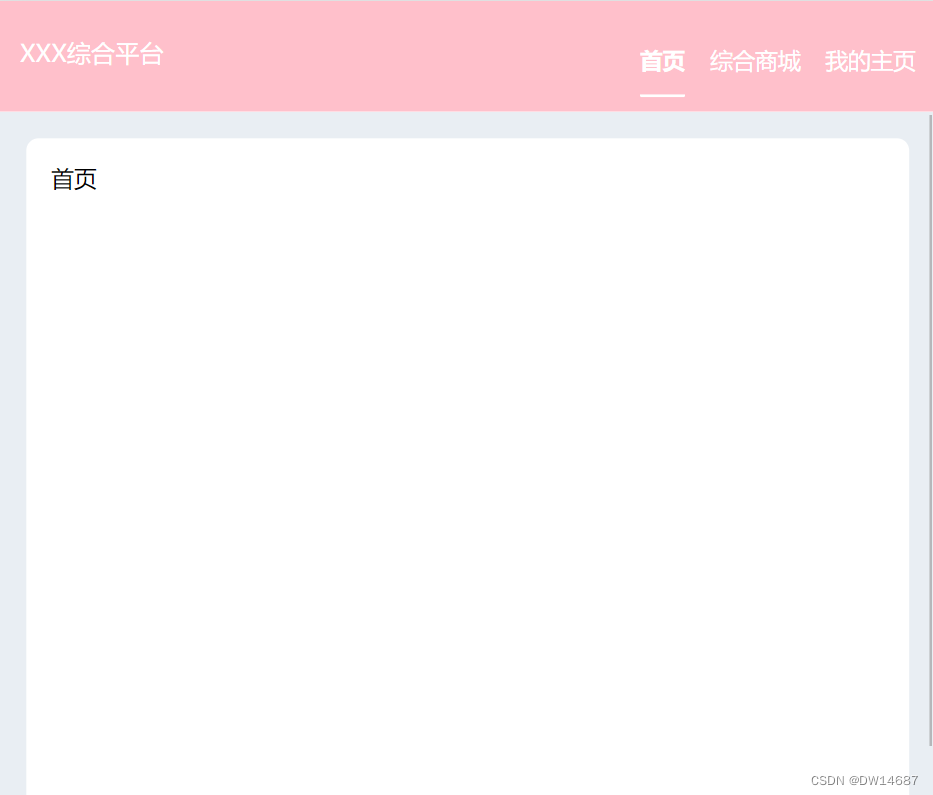
此时再运行,截图如下:
总结
以上就是今天得内容,路由配置,下一章准备将请求控制~