进程替换:从 “改头换面” 到程序加载的底层逻辑
前言
当一个进程创建后,是否只能执行自身的代码?答案是否定的。操作系统提供了一种巧妙的机制 ——进程替换,让一个已存在的进程 “抛弃” 原有代码和数据,转而加载并执行另一个程序的指令。这一机制看似简单,却支撑起了命令行解释器(如 bash)、程序启动器等核心功能的实现。
本文将从 “为什么需要进程替换” 这一前提切入,逐步揭开其神秘面纱:从替换的底层原理(如何覆盖进程的地址空间),到
execl、execv、execvp等一系列exec函数的用法与区别;从具体实例中理解 “替换后进程 PID 不变” 的特性,到延伸探讨进程替换与fork结合的经典场景(如 shell 如何执行用户输入的命令)。无论你是想搞懂 “为什么execl之后的代码不会执行”,还是想理解 “进程替换为何不创建新进程”,这些内容都将带你从表象到本质,吃透进程替换的设计智慧。
目录
前提引入
替换原理
替换函数
函数理解实例
扩展延伸
前提引入
替换原理
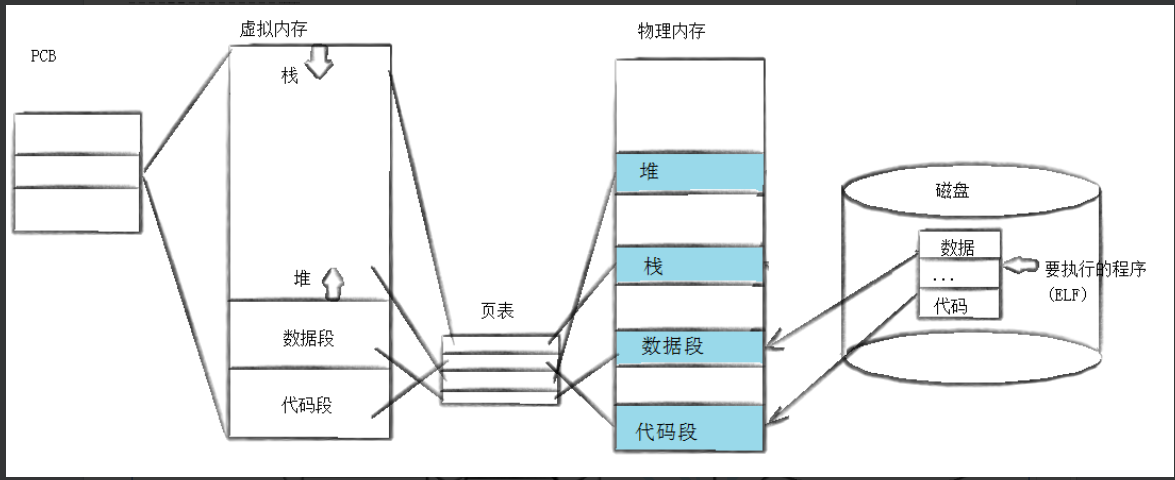
在程序替换的过程中,并没有创建新的进程,只是把当前进程的代码和数据用新的程序的代码和数据覆盖式的进行替换。
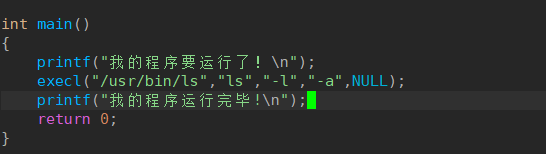
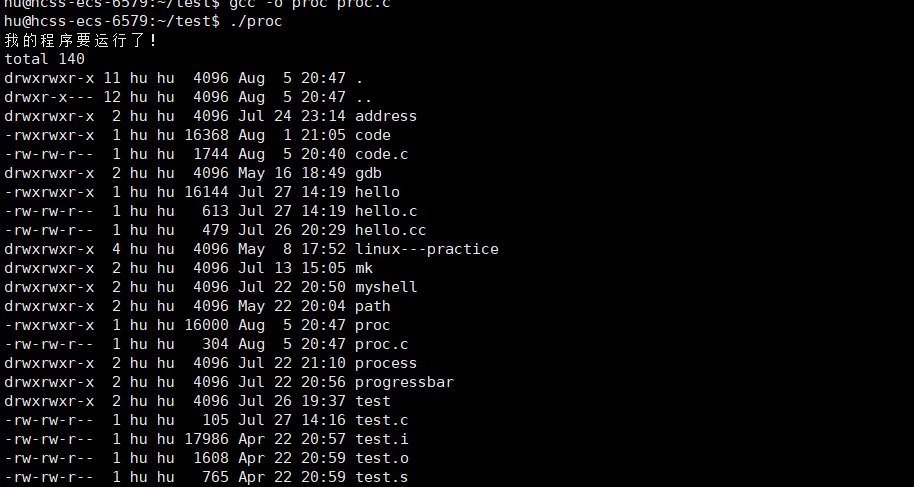
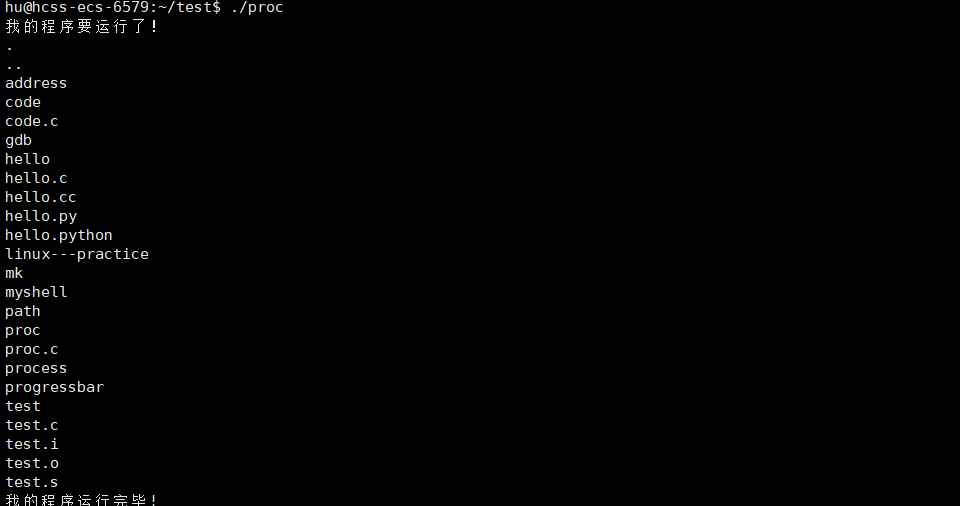
发现结果后面没有print没有输出。
一旦程序替换成功,就去执行新代码了,原始代码的后半部分,已经不存在了!
exec*函数,只有失败返回值,没有成功返回值。

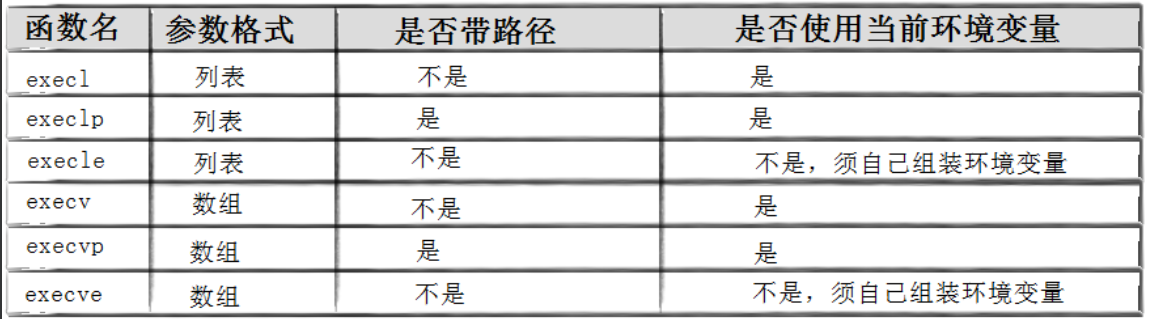
替换函数
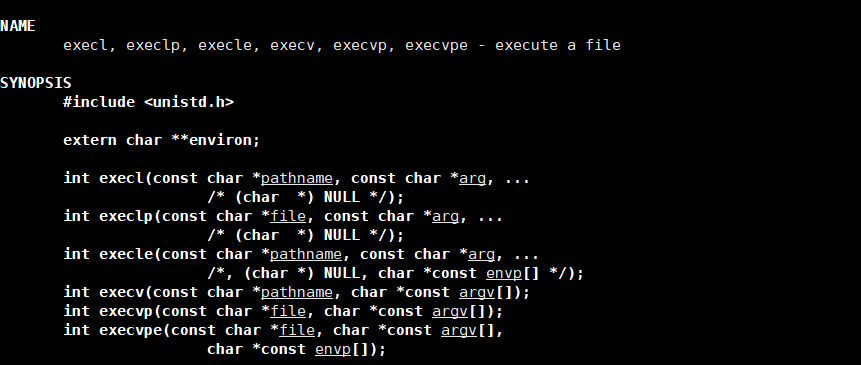
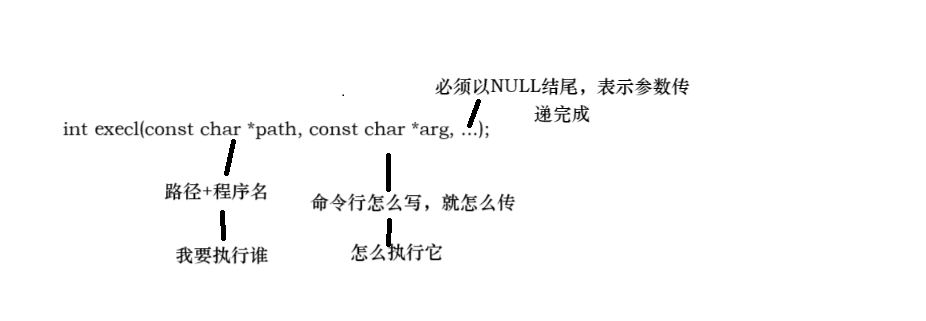
#include <unistd.h>
int execl(const char *path, const char *arg, ...);
int execlp(const char *file, const char *arg, ...);
int execle(const char *path, const char *arg, ...,char *const envp[]);
int execv(const char *path, char *const argv[]);
int execvp(const char *file, char *const argv[]);
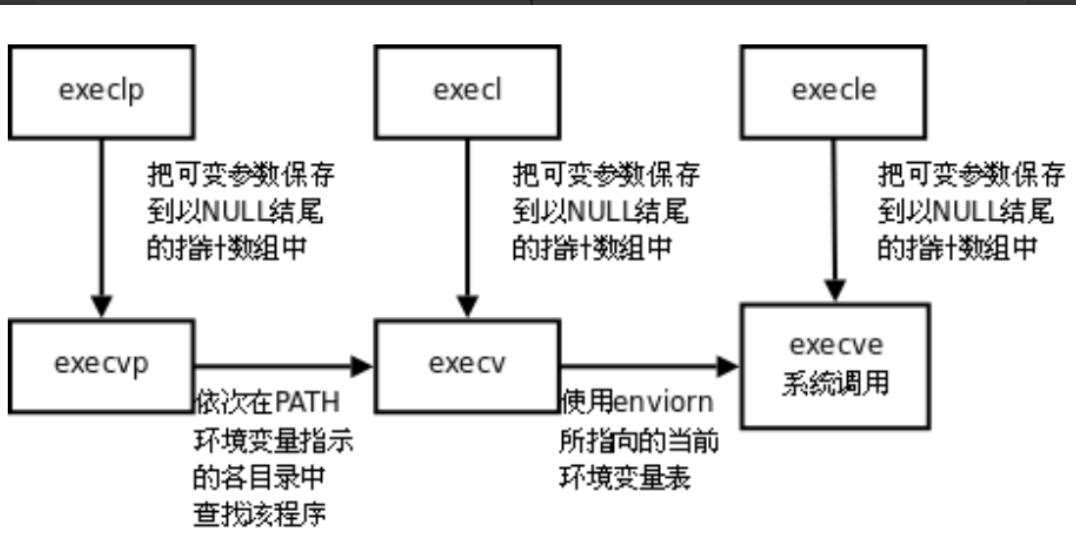
int execve(const char *path, char *const argv[], char *const envp[]);命名理解
l(list) : 表示参数采用列表v(vector) : 参数用数组p(path) : 有p用动搜索环境变量PATHe(env) : 表示自己维护环境变量
函数理解实例
#include <stdio.h>
#include <stdlib.h>
#include <string.h>
#include <unistd.h>
#include <sys/types.h>
#include <sys/wait.h>
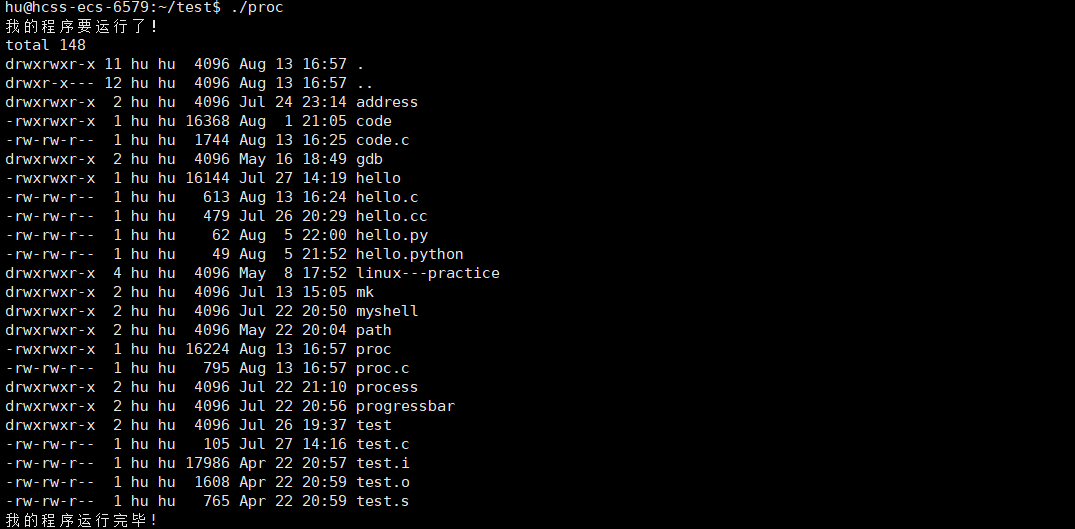
int main(){printf("我的程序要运行了!\n");if(fork()==0){ sleep(1);execl("/usr/bin/ls","ls","-l","-a",NULL);exit(1);}waitpid(-1,NULL,0);printf("我的程序运行完毕!\n");return 0;}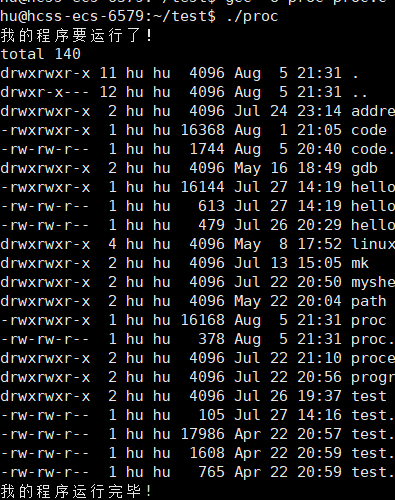
为什么不影响父进程吗?
1.进程具有独立性 2.代码数据写时拷贝
能替换自己的程序吗?能
1.替换C程序exe
int main()
{printf("我的程序要运行了!\n");if(fork()==0){sleep(1);// execl("/usr/bin/ls","ls","-l","-a",NULL);execl("./code","code",NULL);                                                                                                                                                                          exit(1);}waitpid(-1,NULL,0);printf("我的程序运行完毕!\n");return 0;}

2.替换.py文件
#include <stdio.h>2 #include <stdlib.h>3 #include <string.h>4 #include <unistd.h>5 #include <sys/types.h>6 #include <sys/wait.h>7 8 9 int main()10 {11 printf("我的程序要运行了!\n");12 if(fork()==0){13 sleep(1);14 // execl("/usr/bin/ls","ls","-l","-a",NULL);15 //execl("./code","code",NULL);16 execl("/usr/bin/python3", "python3", "hello.py", NULL);17 18 // 如果execl执行失败,才会执行以下代码19 perror("execl执行失败"); 20 exit(1);21 }22 waitpid(-1,NULL,0);23 printf("我的程序运行完毕!\n");24 return 0;25 }
第二个参数,命令行示例

print("hello python!!!)
其他java等都行。

#include <stdio.h>
#include <stdlib.h>
#include <string.h>
#include <unistd.h>
#include <sys/types.h>
#include <sys/wait.h>
int main(){printf("我的程序要运行了!\n");if(fork()==0){sleep(1);// execl("/usr/bin/ls","ls","-l","-a",NULL);execlp("ls","ls","-1","-a",NULL);                                                                                                                                                                     exit(1);}waitpid(-1,NULL,0);printf("我的程序运行完毕!\n");return 0;}
命令行参数表
char* const argv[]={
(char*const)"ls",
(char*const)"-l",
(char*const)"-a",                                                                                                                                                                                NULL};
execv("/usr/bin/ls",argv);
要求被替换的子进程,使用全新的env列表!

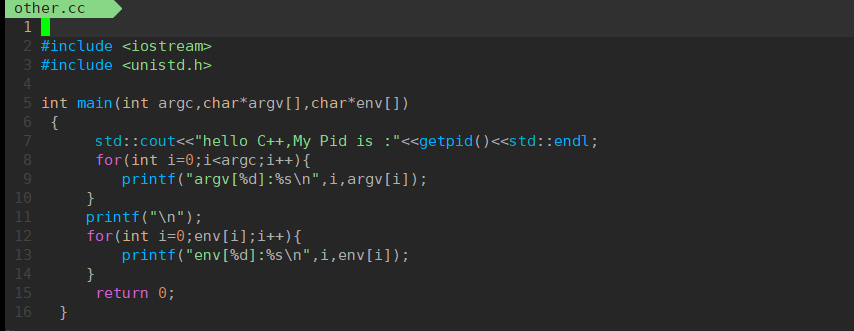
8 int main()9 {10 printf("我的程序要运行了!\n");11 if(fork()==0){12 sleep(1);13 // execl("/usr/bin/ls","ls","-l","-a",NULL);14 //execlp("ls","ls","-1","-a",NULL);15 // char* const argv[]={16 // (char*const)"ls",17 // (char*const)"-l",18 // (char*const)"-a",19 // NULL20 // };21 printf("I am Child,my pid is:%d\n",getpid());22 char *const argv[]={23 (char *const)"other",24 (char*const)"-a",25 (char*const)"-b",26 (char*const)"-c",27 (char*const)"-d",28 NULL29 };30 char*const env[]={31 (char*const)"MYVAL=123456789",32 NULL33 }; 34 execvpe("./other",argv,env);35 // execv("/usr/bin/ls",argv);36 exit(1);37 }38 waitpid(-1,NULL,0);39 printf("我的程序运行完毕!\n");40 return 0;41 }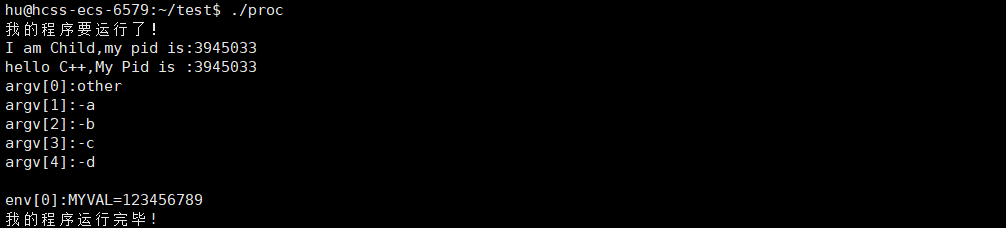
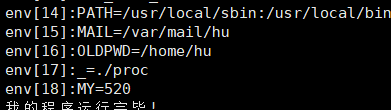
如果要新增方式给子进程,可以直接putenv, exec*e,putenv(),environ
char *new=(char*)"MY=520";int main(){ printf("我的程序要运行了!\n");if(fork()==0){sleep(1);// execl("/usr/bin/ls","ls","-l","-a",NULL);//execlp("ls","ls","-1","-a",NULL);// char* const argv[]={// (char*const)"ls",// (char*const)"-l",// (char*const)"-a",// NULL// };printf("I am Child,my pid is:%d\n",getpid());char *const argv[]={(char *const)"other",(char*const)"-a",(char*const)"-b",(char*const)"-c",(char*const)"-d",NULL};char*const env[]={(char*const)"MYVAL=123456789",NULL};putenv(new);// execvpe("./other",argv,env);execvp("./other",argv);// execv("/usr/bin/ls",argv);exit(1);}
char *const addenv[]={(char*const)"MYVAL1=520",(char*const)"MYVAL2=1234",NULL};int main(){printf("我的程序要运行了!\n");if(fork()==0){sleep(1);printf("I am Child,my pid is:%d\n",getpid());char *const argv[]={(char *const)"other",(char*const)"-a",(char*const)"-b",(char*const)"-c",(char*const)"-d",NULL};for(int i=0;addenv[i];i++){putenv(addenv[i]);                                                                                                                                                                                }extern char**environ;execvpe("./other",argv,environ);...
}
扩展延伸
结束语
进程替换的核心,是 “在不改变进程标识符(PID)的前提下,彻底更新进程的运行内容”。它通过覆盖虚拟地址空间中的代码段、数据段等区域,让进程 “改头换面” 却保持身份不变,这种设计既避免了创建新进程的开销,又实现了程序动态加载的灵活性 —— 这也是 shell 等工具能高效执行各种命令的底层原因。
从
exec系列函数的参数差异,到替换后进程资源的变化(如文件描述符的继承规则),我们看到的不仅是一组 API 的用法,更是操作系统对 “进程” 这一概念的深刻抽象:进程的本质是 “资源分配的单位”,而执行的程序只是 “暂时占据资源的代码”。理解这一点,便不难明白为何进程替换后 PID 不变,却能完全切换执行逻辑。进程替换虽看似独立,却与进程创建(
fork)、等待(wait)等机制紧密配合,共同构成了多程序协作的基础。希望本文能让你对 “进程如何执行不同程序” 有更清晰的认知,下次在命令行输入指令时,或许能多一份对底层机制的了然 —— 每一个命令的执行,都是进程替换机制在默默运转的见证。