前端最新Vue2+Vue3基础入门到实战项目全套教程,自学前端vue就选黑马程序员,一套全通关!笔记
Vue快速上手
Vue是什么
概念:Vue是一个 构建用户界面(基于数据渲染出用户看到的页面) 的 渐进式(循序渐进) 框架(一套完整的项目解决方法)
创建实例
核心步骤 4步:
1.准备容器

2.引包(官网)-开发版本/生产版本
Vue2官方文档
起步 —> 安装(开发版本) —> 懒得下载就用#CDN(开发版本)—> 通过script标签引入开发版本

3.创建 Vue 实例 new Vue()
一旦引入 VueJS核心包,在全局环境,就有了 Vue 构造函数
const app = new Vue()4.指定配置项→ 渲染数据
①el指定挂载点
②data提供数据
const app = new Vue({// 通过 el 配置选择器,指定 Vue 管理的是哪个盒子el: '#app',// 通过 data 提供数据data: {msg: 'Hello World',count: 666}})完整代码如下:
<!DOCTYPE html>
<html lang="en"><head><meta charset="UTF-8"><meta http-equiv="X-UA-Compatible" content="IE=edge"><meta name="viewport" content="width=device-width, initial-scale=1.0"><title>Document</title></head><body><!-- 创建Vue实例,初始化渲染1. 准备容器 (Vue所管理的范围)2. 引包 (开发版本包 / 生产版本包) 官网3. 创建实例4. 添加配置项 => 完成渲染--><!-- 不是Vue管理的范围 --><div class="box2">box2 -- {{ count }}
</div><div class="box">box -- {{ msg }}
</div>-----------------------------------------------------<!-- Vue所管理的范围 --><div id="app"><!-- 这里将来会编写一些用于渲染的代码逻辑 ,用{{}}来读取vue实例里面的data--><h1>{{ msg }}</h1><a href="#">{{ count }}</a></div><!-- 引入的是开发版本包 - 包含完整的注释和警告 --><script src="https://cdn.jsdelivr.net/npm/vue@2.7.14/dist/vue.js"></script><script>// 一旦引入 VueJS核心包,在全局环境,就有了 Vue 构造函数const app = new Vue({// 通过 el 配置选择器,指定 Vue 管理的是哪个盒子el: '#app',// 通过 data 提供数据data: {msg: 'Hello World',count: 666}})</script></body></html>
效果:(可见,没有被Vue管理的盒子,没有渲染对应的数据)

插值表达式
插值表达式 { { }}
插值表达式是一种 Vue 的模板语法
<!-- 不是Vue管理的范围 -->
<div class="box2">box2 -- {{ count }}</div><div class="box">box -- {{ msg }}
</div>-----------------------------------------------------<!-- Vue所管理的范围 --><div id="app"><!-- 这里将来会编写一些用于渲染的代码逻辑 --><h1>{{ msg }}</h1><a href="#">{{ count }}</a></div>
1. 作用: 利用表达式进行插值,渲染到页面中
表达式:是可以被求值的代码,JS引擎会将其计算出一个结果

上述表达式都成立,可以对data里面数据使用函数或者进行判断,拼接等等
2. 语法:{ { 表达式 }}
3. 注意点:
(1)使用的数据必须存在 (data)
(2)支持的是表达式,而非语句,比如:if for ...
(3)不能在标签属性中使用 { { }} 插值
响应式特性
Vue 核心特性:响应式
我们已经掌握了基础的模板渲染,其实除了基本的模板渲染,Vue背后还做了大量工作。
比如:数据的响应式处理 → 响应式:数据变化,视图自动更新
如何访问 or 修改?data中的数据, 最终会被添加到实例上
① 访问数据: "实例.属性名"
② 修改数据: "实例.属性名" = "值"
<!DOCTYPE html>
<html lang="en"><head><meta charset="UTF-8"><meta http-equiv="X-UA-Compatible" content="IE=edge"><meta name="viewport" content="width=device-width, initial-scale=1.0"><title>Document</title></head><body><div id="app">{{ msg }}{{ count }}
</div><script src="https://cdn.jsdelivr.net/npm/vue@2.7.14/dist/vue.js"></script><script>const app = new Vue({el: '#app',data: {// 响应式数据 → 数据变化了,视图自动更新msg: '你好,世界',count: 100}})// data中的数据,是会被添加到实例上// 1. 访问数据  实例.属性名// 2. 修改数据  实例.属性名 = 新值</script></body></html>
代码效果:

在浏览器控制台直接修改数据

页面自动更新

在浏览器控制台直接修改数据(count++)

页面自动更新

总结:

数据改变,视图会自动更新
聚焦于数据 → 数据驱动视图
使用 Vue 开发,关注业务的核心逻辑,根据业务修改数据即可
开发者工具
PS:因为写这篇笔记的时候已经是2025年了,这个教学视频还是23年的,我其实没找到这个插件,估计已经被淘汰了,但是这个找插件的网站还可以用
安装 Vue 开发者工具:装插件调试 Vue 应用
(1)通过谷歌应用商店安装 (国外网站)
(2)极简插件: 下载 → 开发者模式 → 拖拽安装 → 插件详情允许访问文件
极简插件


重新打开浏览器,打开写的Vue应用:

可修改数据(不经过浏览器控制台console):

Vue指令
Vue 会根据不同的【指令】,针对标签实现不同的【功能】
指令:带有 v- 前缀 的 特殊 标签属性
v-html:
作用:设置元素的 innerHTML
语法:v-html = "表达式 "

注意:插值表达式并不能解析标签(仍把它当做字符串),所以在data里面要把标签也写进去,相当于在data里面写Html结构

还有哪些指令?
见于官网Vue.js

常用的:

总结:
不同指令的目的:解决不同业务场景需求
如果需要动态解析标签,可以用哪个指令?语法?
——v-html = "表达式 " → 动态设置元素 innerHTML
指令-v-show和v-if
v-show
1. 作用: 控制元素显示隐藏
2. 语法: v-show = "表达式" 表达式值 true 显示, false 隐藏
3. 原理: 切换 display:none 控制显示隐藏
4. 场景: 频繁切换显示隐藏的场景
v-if
1. 作用: 控制元素显示隐藏(条件渲染)
2. 语法: v-if = "表达式" 表达式值 true 显示, false 隐藏
3. 原理: 基于条件判断,是否 创建 或 移除 元素节点(条件渲染)
4. 场景: 要么显示,要么隐藏,不频繁切换的场景
指令 v-else 和 v-else-if
1. 作用: 辅助 v-if 进行判断渲染
2. 语法: v-else v-else-if = "表达式"
3. 注意: 需要紧挨着 v-if 一起使用
指令-v-on
Vue 指令 v-on
1. 作用: 注册事件 = 添加监听 + 提供处理逻辑
2. 语法:
① v-on:事件名 = "内联语句"

② v-on:事件名 = "methods中的函数名"

3. 简写:@事件名
v-on:click可以简写为@click4. 注意:methods函数内的 this 指向 Vue 实例
data的数据已经挂到Vue实例上,methods中的函数,this都指向当前实例,
所以在methods内的函数中,我们可以通过this.的方式访问数据。
还可以通过app.的方式访问数据,但app作为变量,名字可能会被修改,如此访问代码可维护性不高,推荐使用this访问。
实操代码:
因为el挂载的是#app,所以要想使用app内的内容,按钮也必须放置在id=‘app’的div里面
<!DOCTYPE html>
<html lang="en"><head><meta charset="UTF-8"><meta http-equiv="X-UA-Compatible" content="IE=edge"><meta name="viewport" content="width=device-width, initial-scale=1.0"><title>Document</title>
</head><body><div id="app">{{ msg }}{{ count }}<button @click="change">点击更改显示</button></div><script src="https://cdn.jsdelivr.net/npm/vue@2.7.14/dist/vue.js"></script><script>const app = new Vue({el: '#app',data: {// 响应式数据 → 数据变化了,视图自动更新msg: '你好,世界',count: 100},methods: {change() {this.msg = 'hello world'this.count = 200}}})// data中的数据,是会被添加到实例上// 1. 访问数据  实例.属性名// 2. 修改数据  实例.属性名 = 新值</script>
</body></html>
指令-v-on-调用传参
1.不传参

2.传参

实操代码:
<!DOCTYPE html>
<html lang="en"><head><meta charset="UTF-8"><meta http-equiv="X-UA-Compatible" content="IE=edge"><meta name="viewport" content="width=device-width, initial-scale=1.0"><title>Document</title>
</head><body><div id="app">{{ msg }}{{ count }}<button @click="change">点击更改显示</button><button @click="add(3,5)">点击加参数内部的3减去5</button></div><script src="https://cdn.jsdelivr.net/npm/vue@2.7.14/dist/vue.js"></script><script>const app = new Vue({el: '#app',data: {// 响应式数据 → 数据变化了,视图自动更新msg: '你好,世界',count: 100},methods: {change() {this.msg = 'hello world'this.count = 200},add(a, b) {this.count = this.count + a - b}}})// data中的数据,是会被添加到实例上// 1. 访问数据  实例.属性名// 2. 修改数据  实例.属性名 = 新值</script>
</body></html>
指令-v-bind
1. 作用: 动态地设置html的标签属性 → src url title class ...
2. 语法: v-bind:属性名="表达式"
3. 注意: 简写形式 :属性名="表达式"
个人理解::属性名=“表达式”其实就是把这个属性名给响应式了,这属性名的值变成动态的了,传什么进来它的值就是什么,因为很多地方都不能写死数值,数据都是从后端接口传过来的,这样的话后端传什么,这里的值就是什么

操作style

案例-波仔的学习之旅

实操代码:
<!DOCTYPE html>
<html lang="en">
<head><meta charset="UTF-8"><meta http-equiv="X-UA-Compatible" content="IE=edge"><meta name="viewport" content="width=device-width, initial-scale=1.0"><title>Document</title>
</head>
<body><div id="app"><button v-show="index > 0" @click="index--">上一页</button><div><img :src="list[index]" alt=""></div><button v-show="index < list.length - 1" @click="index++">下一页</button></div><script src="https://cdn.jsdelivr.net/npm/vue@2/dist/vue.js"></script><script>const app = new Vue({el: '#app',data: {index: 0,list: ['./imgs/11-00.gif','./imgs/11-01.gif','./imgs/11-02.gif','./imgs/11-03.gif','./imgs/11-04.png','./imgs/11-05.png',]}})</script>
</body>
</html>
效果:

指令-v-for
1. 作用: 基于数据循环, 多次渲染整个元素 → 数组、对象、数字...
2. 遍历数组语法:
v-for = "(item, index) in 数组"
- item 每一项, index 下标
- 省略 index: v-for = "item in 数组"
实操代码:
<!DOCTYPE html>
<html lang="en"><head><meta charset="UTF-8"><meta http-equiv="X-UA-Compatible" content="IE=edge"><meta name="viewport" content="width=device-width, initial-scale=1.0"><title>Document</title>
</head><body><div id="app"><h3>文具店</h3><ul><li v-for="(item, index) in list">{{ item }} - {{ index }}</li></ul><ul><li v-for="item in list">{{ item }}</li></ul></div><script src="https://cdn.jsdelivr.net/npm/vue@2/dist/vue.js"></script><script>const app = new Vue({el: '#app',data: {list: ['铅笔', '橡皮', '格尺', '修正带']}})</script>
</body></html>
效果:

案例-小黑的书架

实操代码:
<!DOCTYPE html>
<html lang="en">
<head><meta charset="UTF-8"><meta http-equiv="X-UA-Compatible" content="IE=edge"><meta name="viewport" content="width=device-width, initial-scale=1.0"><title>Document</title>
</head>
<body><div id="app"><h3>小卡的书架</h3><ul><li v-for="(item, index) in booksList" :key="item.id"><span>{{ item.name }}</span><span>{{ item.author }}</span><!-- 注册点击事件 →  通过 id 进行删除数组中的 对应项 --><button @click="del(item.id)">删除</button></li></ul></div><script src="https://cdn.jsdelivr.net/npm/vue@2/dist/vue.js"></script><script>const app = new Vue({el: '#app',data: {booksList: [{ id: 1, name: '《红楼梦》', author: '曹雪芹' },{ id: 2, name: '《西游记》', author: '吴承恩' },{ id: 3, name: '《水浒传》', author: '施耐庵' },{ id: 4, name: '《三国演义》', author: '罗贯中' }]},methods: {del (id) {// console.log('删除', id)// 通过 id 进行删除数组中的 对应项 → filter(不会改变原数组)// filter: 根据条件,保留满足条件的对应项,得到一个新数组。// console.log(this.booksList.filter(item => item.id !== id))this.booksList = this.booksList.filter(item => item.id !== id)}}})</script>
</body>
</html>
效果:

点击删除红楼梦:

关于filter函数,filter 是 JavaScript 数组的一个方法,它会创建一个新数组,包含通过测试的所有元素
指令-v-for的key
一般只要用了v-for指令,就要加上:key
语法:key属性 = "唯一标识"
作用:给列表项添加的唯一标识。便于Vue进行列表项的正确排序复用。
key作用:给元素添加的唯一标识。
(第一项红楼梦所在li元素,有自己的样式)

删除第一项后(加key):

如果v-for 中的 key - 不加 key
v-for 的默认行为会尝试 原地修改元素 (就地复用)

注意点:
1. key 的值只能是 字符串 或 数字类型
2. key 的值必须具有 唯一性
3. 推荐使用 id 作为 key(唯一),不推荐使用 index 作为 key(会变化,不对应)
指令-v-model
1. 作用: 给 表单元素 使用, 双向数据绑定 → 可以快速 获取 或 设置 表单元素内容
① 数据变化 → 视图自动更新
② 视图变化 → 数据自动更新
2. 语法: v-model = '变量'
- v-bind
功能:用于单向数据绑定,将 Vue 实例中的数据绑定到 HTML 元素的属性上。
特点:
-
- 数据从 Vue 实例流向 DOM,但 DOM 的变化不会影响数据。
- 可以绑定任何类型的属性,如
class、style、id等。
- v-model
功能:用于双向数据绑定,允许表单输入和应用状态之间建立动态绑定关系。
特点:数据可以在 Vue 实例和 DOM 之间双向流动。
实操代码:
<!DOCTYPE html>
<html lang="en">
<head><meta charset="UTF-8"><meta http-equiv="X-UA-Compatible" content="IE=edge"><meta name="viewport" content="width=device-width, initial-scale=1.0"><title>Document</title>
</head>
<body><div id="app"><!-- v-model 可以让数据和视图,形成双向数据绑定(1) 数据变化,视图自动更新(2) 视图变化,数据自动更新可以快速[获取]或[设置]表单元素的内容-->账户:<input type="text" v-model="username"> <br><br>密码:<input type="password" v-model="password"> <br><br><button @click="login">登录</button><button @click="reset">重置</button></div><script src="https://cdn.jsdelivr.net/npm/vue@2/dist/vue.js"></script><script>const app = new Vue({el: '#app',data: {username: '',password: ''},methods: {login () {console.log(this.username, this.password)},reset () {this.username = ''this.password = ''}}})</script>
</body>
</html>
效果:

在开发工具中修改数据:

页面自动更新:

在页面修改数据(删除卡字):

数据跟着变化:

指令补充
指令修饰符
通过 "." 指明一些指令 后缀,不同 后缀 封装了不同的处理操作 → 简化代码

① 按键修饰符
@keyup.enter → 键盘回车监听
添加功能(按回车完成添加):

② v-model修饰符
v-model.trim → 去除首尾空格
@事件名.stop ->阻止冒泡
实操代码:
因为儿子在父亲里面,所以点击儿子,父亲的点击函数也会被触发,这就是冒泡
<!DOCTYPE html>
<html lang="en">
<head><meta charset="UTF-8"><meta http-equiv="X-UA-Compatible" content="IE=edge"><meta name="viewport" content="width=device-width, initial-scale=1.0"><title>Document</title><style>.father {width: 200px;height: 200px;background-color: pink;margin-top: 20px;}.son {width: 100px;height: 100px;background-color: skyblue;}</style>
</head>
<body><div id="app"><h3>v-model修饰符 .trim .number</h3>姓名:<input v-model.trim="username" type="text"><br>年纪:<input v-model.number="age" type="text"><br><h3>@事件名.stop     →  阻止冒泡</h3><div @click="fatherFn" class="father"><div @click.stop="sonFn" class="son">儿子</div></div><h3>@事件名.prevent  →  阻止默认行为</h3><a @click.prevent href="http://www.baidu.com">阻止默认行为</a></div><script src="https://cdn.jsdelivr.net/npm/vue@2/dist/vue.js"></script><script>const app = new Vue({el: '#app',data: {username: '',age: '',},methods: {fatherFn () {alert('老父亲被点击了')},sonFn (e) {// e.stopPropagation()alert('儿子被点击了')}}})</script>
</body>
</html>
效果:如果没有阻止冒泡,当点击儿子元素(会因事件冒泡触发两次提示)
添加.stop修饰符,阻止子元素点击事件冒泡,则在点击儿子元素后仅提示一次。
@事件名.prevent → 阻止默认行为

该元素的默认点击事件,点击后跳转百度,添加.prevent修饰符,将拦截其默认跳转行为。

v-model 应用于其他表单元素
常见的表单元素都可以用 v-model 绑定关联 → 快速 获取 或 设置 表单元素的值
它会根据 控件类型 自动选取 正确的方法 来更新元素
输入框 input:text → value
文本域 textarea → value
复选框 input:checkbox → checked
单选框 input:radio → checked
下拉菜单 select → value
...
单选框

computed 计算属性
概念:基于现有的数据,计算出来的新属性。 依赖的数据变化,自动重新计算。
语法:
① 声明在 computed 配置项中,一个计算属性对应一个函数
② 使用起来和普通属性一样使用 { { 计算属性名 }}
计算属性 → 可以将一段 求值的代码 进行封装


用计算属性算一下这个礼物总数
computed: {sum:{return this.list.reduce((total, item) => total + item.num, 0)}}礼物总数 :{{sum}}reduce 是 JavaScript 中一个非常强大的数组方法,它不仅可以用于求和,还可以用于各种复杂的数组操作。reduce 的核心功能是将数组中的所有元素归并为一个单一的值。
reduce 的基本用法
reduce 方法接收两个参数:
- 回调函数:用于处理数组中的每个元素。
- 初始值(可选):归并过程的初始值。
回调函数本身接收两个参数:
- 累加器(accumulator):累加器是上一次回调函数返回的值,或者是初始值(如果提供了初始值)。
- 当前值(currentValue):当前正在处理的数组元素。
示例:计算数组中对象的总和
假设你有一个对象数组,每个对象都有一个 value 属性,你可以使用 reduce 来计算所有对象的 value 总和。
const items = [{ name: 'item1', value: 10 },{ name: 'item2', value: 20 },{ name: 'item3', value: 30 }
];
const totalValue = items.reduce((accumulator, item) => {return accumulator + item.value;
}, 0); // 初始值为 0
console.log(totalValue); // 输出:60
reduce 可以用于更复杂的操作,例如将数组中的对象按某个属性分组。
const users = [{ name: 'Alice', age: 25 },{ name: 'Bob', age: 30 },{ name: 'Charlie', age: 25 },{ name: 'David', age: 30 }
];
const groupedByAge = users.reduce((accumulator, user) => {if (!accumulator[user.age]) {accumulator[user.age] = [];}accumulator[user.age].push(user);return accumulator;
}, {});
console.log(groupedByAge);
// 输出:
// {
//   25: [{ name: 'Alice', age: 25 }, { name: 'Charlie', age: 25 }],
//   30: [{ name: 'Bob', age: 30 }, { name: 'David', age: 30 }]
// }
这里传递的初始值是{},所以accumulator最开始是一个空对象
accumulator[user.age]:
- 这是
accumulator对象中以user.age为键的值。 - 例如,如果
user.age是25,那么accumulator[25]就是accumulator对象中键为25的值。
if (!accumulator[user.age]):
-
- 这个条件检查
accumulator对象中是否存在键为user.age的属性。 - 如果
accumulator[user.age]不存在(即undefined),条件为真,执行代码块中的内容。
- 这个条件检查
accumulator[user.age] = [];:
-
- 如果
accumulator[user.age]不存在,就初始化一个空数组。 - 这样,后续可以将具有相同
age的用户对象推入这个数组。
- 如果
computed计算属性vs方法methods
computed 计算属性:
作用:封装了一段对于数据的处理,求得一个结果。
语法:
① 写在 computed 配置项中
② 作为属性,直接使用 → this.计算属性 { { 计算属性 }}
methods 方法:
作用:给实例提供一个方法,调用以处理业务逻辑。
语法:
① 写在 methods 配置项中
② 作为方法,需要调用 → this.方法名( ) { { 方法名() }} @事件名="方法名"
缓存特性(提升性能):computed比方法的优势
计算属性会对计算出来的结果缓存,再次使用直接读取缓存,
依赖项变化了,会自动重新计算 → 并再次缓存
methods方法没有缓冲,会重复执行。
计算属性完整写法
计算属性默认的简写,只能读取访问,不能 "修改"。
如果要 "修改" → 需要写计算属性的完整写法

实操代码:
<!DOCTYPE html>
<html lang="en">
<head><meta charset="UTF-8"><meta http-equiv="X-UA-Compatible" content="IE=edge"><meta name="viewport" content="width=device-width, initial-scale=1.0"><title>Document</title><style>input {width: 30px;}</style>
</head>
<body><div id="app">姓:<input type="text" v-model="firstName"> +名:<input type="text" v-model="lastName"> =<span>{{ fullName }}</span><br><br><button @click="changeName">改名卡</button></div><script src="https://cdn.jsdelivr.net/npm/vue@2/dist/vue.js"></script><script>const app = new Vue({el: '#app',data: {firstName: '刘',lastName: '备',},methods: {changeName () {this.fullName = '黄忠'}},computed: {// 简写 → 获取,没有配置设置的逻辑// fullName () {//   return this.firstName + this.lastName// }// 完整写法 → 获取 + 设置fullName: {// (1) 当fullName计算属性,被获取求值时,执行get(有缓存,优先读缓存)//     会将返回值作为,求值的结果get () {return this.firstName + this.lastName},// (2) 当fullName计算属性,被修改赋值时,执行set,直接修改这个计算属性的函数名,才会触发set函数//     修改的值,传递给set方法的形参set (value) {// console.log(value.slice(0, 1))          // console.log(value.slice(1))         this.firstName = value.slice(0, 1)this.lastName = value.slice(1)}}}})</script>
</body>
</html>
效果:

点击改名卡:

成绩案例

实操代码:
<!DOCTYPE html>
<html lang="en"><head><meta charset="UTF-8" /><meta http-equiv="X-UA-Compatible" content="IE=edge" /><meta name="viewport" content="width=device-width, initial-scale=1.0" /><link rel="stylesheet" href="./styles/index.css" /><title>Document</title>
</head><body><div id="app" class="score-case"><div class="table"><table><thead><tr><th>编号</th><th>科目</th><th>成绩</th><th>操作</th></tr></thead><tbody v-if="list.length > 0"><tr v-for="(item, index) in list" :key="item.id"><td>{{ index + 1 }}</td><td>{{ item.subject }}</td><!-- 需求:不及格的标红, < 60 分, 加上 red 类 --><td :class="{ red: item.score < 60 }">{{ item.score }}</td><td><a @click.prevent="del(item.id)" href="http://www.baidu.com">删除</a></td></tr></tbody><tbody v-else><tr><td colspan="5"><span class="none">暂无数据</span></td></tr></tbody><tfoot><tr><td colspan="5"><span>总分:{{ totalScore }}</span><span style="margin-left: 50px">平均分:{{ averageScore }}</span></td></tr></tfoot></table></div><div class="form"><div class="form-item"><div class="label">科目:</div><div class="input"><input type="text" placeholder="请输入科目" v-model.trim="subject" /></div></div><div class="form-item"><div class="label">分数:</div><div class="input"><input type="text" placeholder="请输入分数" v-model.number="score" /></div></div><div class="form-item"><div class="label"></div><div class="input"><button @click="add" class="submit">添加</button></div></div></div></div><script src="https://cdn.jsdelivr.net/npm/vue@2/dist/vue.js"></script><script>const app = new Vue({el: '#app',data: {list: [{ id: 1, subject: '语文', score: 62 },{ id: 7, subject: '数学', score: 89 },{ id: 12, subject: '英语', score: 70 },],subject: '',score: ''},computed: {totalScore() {return this.list.reduce((sum, item) => sum + item.score, 0)},averageScore() {if (this.list.length === 0) {return 0}return (this.totalScore / this.list.length).toFixed(2)}},methods: {del(id) {// console.log(id)this.list = this.list.filter(item => item.id !== id)},add() {if (!this.subject) {alert('请输入科目')return}if (typeof this.score !== 'number') {alert('请输入正确的成绩')return}this.list.unshift({id: +new Date(),subject: this.subject,score: this.score})this.subject = ''this.score = ''}}})</script>
</body></html>
技术总结:

效果:

watch 侦听器
watch 侦听器(监视器)
作用:监视数据变化,执行一些 业务逻辑 或 异步操作。

语法:
① 简单写法 → 简单类型数据,直接监视
② 完整写法 → 添加额外配置项

watch-简写-语法
实践代码:
如果监听的是某个对象中的属性:'obj.words' (newValue) { }
  const app = new Vue({el: '#app',data: {// words: ''obj: {words: ''}},// 具体讲解:(1) watch语法 (2) 具体业务实现watch: {// 该方法会在数据变化时调用执行// newValue新值, oldValue老值(一般不用)// words (newValue) {//   console.log('变化了', newValue)// }'obj.words' (newValue,oldValue) {console.log('变化了', newValue,oldValue)}}})</script></body>
</html>
watch-简写-业务实现
进行防抖处理:一段时间内都没有触发,才会执行,如果又被触发,等待时间重新开始
 <script src="https://cdn.jsdelivr.net/npm/vue@2/dist/vue.js"></script><script src="https://cdn.jsdelivr.net/npm/axios/dist/axios.min.js"></script><script>// 接口地址:https://applet-base-api-t.itheima.net/api/translate// 请求方式:get// 请求参数:// (1)words:需要被翻译的文本(必传)// (2)lang: 需要被翻译成的语言(可选)默认值-意大利// -----------------------------------------------const app = new Vue({el: '#app',data: {// words: ''obj: {words: ''},result: '', // 翻译结果// timer: null // 延时器id},// 具体讲解:(1) watch语法 (2) 具体业务实现watch: {// 该方法会在数据变化时调用执行// newValue新值, oldValue老值(一般不用)// words (newValue) {//   console.log('变化了', newValue)// }'obj.words' (newValue) {// console.log('变化了', newValue)// 防抖: 延迟执行 → 干啥事先等一等,延迟一会,一段时间内没有再次触发,才执行clearTimeout(this.timer) //清除之前的计时器this.timer = setTimeout(async () => {const res = await axios({url: 'https://applet-base-api-t.itheima.net/api/translate',params: {words: newValue}})this.result = res.data.dataconsole.log(res.data.data)}, 300)}}})</script></body>
</html>
此处提到,像timer这样不需要响应式的数据,并不需要写到data里面去,把Vue实例当做普通对象直接this.timer进行绑定。
watch-完整写法
② 完整写法 → 添加额外配置项
(1) deep: true 对复杂类型深度监视
(2) immediate: true 初始化立刻执行一次handler方法

深度监视:可以监视到对象内部的属性,不用把每个属性单拿出来监视,只要对象中任何一个属性变化都会被触发
实践代码:
监听obj :{words:apple,lang:Italy}内容属性,语言属性任一变化都会触发

进入页面就执行一次watch

watch: {obj: {deep: true, // 深度监视immediate: true, // 立刻执行,一进入页面handler就立刻执行一次handler (newValue) {clearTimeout(this.timer)this.timer = setTimeout(async () => {const res = await axios({url: 'https://applet-base-api-t.itheima.net/api/translate',params: newValue})this.result = res.data.dataconsole.log(res.data.data)}, 300)}}

对于上图如何实现全选,用计算属性
<!-- 全选 -->
<label class="check-all"><input type="checkbox" v-model="isAll" />全选
</label>
isAll: {get() {return this.fruitList.every(item => item.isChecked); //get 方法用于计算 isAll 的值。它会根据 fruitList 中的所有水果的 isChecked 属性来确定全选复选框的选中状态。只要有一个item没选,那么返回false,就不算全选},set(value) {this.fruitList.forEach(item => item.isChecked = value);//set 方法用于设置 isAll 的值。当用户点击全选复选框时,set 方法会被触发,并将所有水果的 isChecked 属性设置为相同的值。}
},find 方法用于在数组中查找满足指定条件的第一个元素,并返回该元素。如果没有找到满足条件的元素,则返回 undefined。
查找特定 ID 的元素
const fruitList = [{ id: 1, name: 'Apple', isChecked: true },{ id: 2, name: 'Banana', isChecked: false },{ id: 3, name: 'Cherry', isChecked: true }
];const fruit = fruitList.find(item => item.id === 2);
console.log(fruit); // 输出: { id: 2, name: 'Banana', isChecked: false }
查找第一个未选中的元素
const firstUnchecked = fruitList.find(item => !item.isChecked);
console.log(firstUnchecked); // 输出: { id: 2, name: 'Banana', isChecked: false }
every 方法用于检查数组中的所有元素是否都满足指定条件。如果所有元素都满足条件,则返回 true;否则返回 false。
const scores = [70, 85, 90, 65];
const allAboveFifty = scores.every(score => score > 50);
console.log(allAboveFifty); // 输出: true
forEach 方法用于对数组中的每个元素执行一次指定的函数。它不会返回任何值(即返回 undefined)。
fruitList.forEach(item => {console.log(item.name, item.isChecked);
});
// 输出:
// Apple true
// Banana false
// Cherry true
生命周期
生命周期 & 生命周期四个阶段
思考:什么时候可以发送初始化渲染请求?(越早越好) 什么时候可以开始操作dom?(至少dom得渲染出来)
Vue生命周期:一个Vue实例从 创建 到 销毁 的整个过程。
生命周期四个阶段:① 创建 ② 挂载 ③ 更新 ④ 销毁

Vue 生命周期函数(钩子函数)
Vue生命周期过程中,会自动运行一些函数,被称为【生命周期钩子】→ 让开发者可以在【特定阶段】运行自己的代码。

有八个钩子:

不同时期可执行特定的代码:

实操代码:
<!DOCTYPE html>
<html lang="en">
<head><meta charset="UTF-8"><meta http-equiv="X-UA-Compatible" content="IE=edge"><meta name="viewport" content="width=device-width, initial-scale=1.0"><title>Document</title>
</head>
<body><div id="app"><h3>{{ title }}</h3><div><button @click="count--">-</button><span>{{ count }}</span><button @click="count++">+</button></div></div><script src="https://cdn.jsdelivr.net/npm/vue@2/dist/vue.js"></script><script>const app = new Vue({el: '#app',data: {count: 100,title: '计数器'},// 1. 创建阶段(准备数据)beforeCreate () {console.log('beforeCreate 响应式数据准备好之前', this.count)},created () {console.log('created 响应式数据准备好之后', this.count)// this.数据名 = 请求回来的数据// 可以开始发送初始化渲染的请求了},// 2. 挂载阶段(渲染模板)beforeMount () {console.log('beforeMount 模板渲染之前', document.querySelector('h3').innerHTML)},mounted () {console.log('mounted 模板渲染之后', document.querySelector('h3').innerHTML)// 可以开始操作dom了},// 3. 更新阶段(修改数据 → 更新视图)beforeUpdate () {console.log('beforeUpdate 数据修改了,视图还没更新', document.querySelector('span').innerHTML)},updated () {console.log('updated 数据修改了,视图已经更新', document.querySelector('span').innerHTML)},// 4. 卸载阶段beforeDestroy () {console.log('beforeDestroy, 卸载前')console.log('清除掉一些Vue以外的资源占用,定时器,延时器...')},destroyed () {console.log('destroyed,卸载后')}})</script>
</body>
</html>
效果:

没有任何点击操作时:

点击计数器(点击+号):

卸载Vue实例,Vue官方提供了方法 app.$destroy() :

页面中计数器还在,但点击加减号已经没有反应:

重点记住created和mounted。
生命周期两个例子-初始化渲染和获取焦点
新闻列表案例
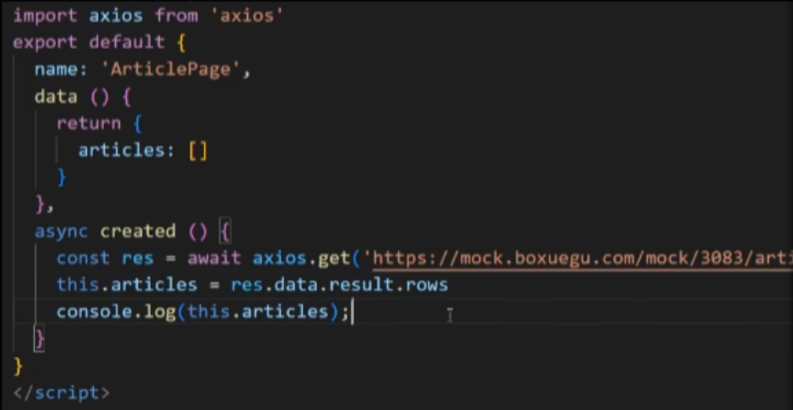
在created钩子函数中发送请求:来获取数据list,也就是准备数据部分
实操代码:
 // 接口地址:http://hmajax.itheima.net/api/news// 请求方式:getconst app = new Vue({el: '#app',data: {list: []},async created () {// 1. 发送请求获取数据const res = await axios.get('http://hmajax.itheima.net/api/news')// 2. 更新到 list 中,用于页面渲染 v-forthis.list = res.data.data}})</script>
</body>
</html>
输入框自动聚焦
要求一进界面,输入框获取焦点-》也就是开始操作dom
mounted () {document.querySelector('#inp').focus()}综合案例:小黑记账清单
接口文档地址:查询我的账单列表 - 传智教育-vue基础案例接口
实现基本渲染
关键代码(发送请求得到数据,并进行渲染):
/*** 接口文档地址:* https://www.apifox.cn/apidoc/shared-24459455-ebb1-4fdc-8df8-0aff8dc317a8/api-53371058* * 功能需求:* 1. 基本渲染* (1) 立刻发送请求获取数据 created* (2) 拿到数据,存到data的响应式数据中* (3) 结合数据,进行渲染 v-for* (4) 消费统计 => 计算属性* 2. 添加功能* 3. 删除功能* 4. 饼图渲染*/const app = new Vue({el: '#app',data: {list: []},computed: {totalPrice () {return this.list.reduce((sum, item) => sum + item.price, 0)}},async created () {const res = await axios.get('https://applet-base-api-t.itheima.net/bill', {params: {creator: '小黑'}})this.list = res.data.data}})效果:

实现添加功能
关键代码:add方法
请求接口参数

(只有get、delete请求传参时需要写上params属性名)
methods: {async getList () {const res = await axios.get('https://applet-base-api-t.itheima.net/bill', {params: {creator: '小黑'}})this.list = res.data.data},async add () {if (!this.name) {alert('请输入消费名称')return}if (typeof this.price !== 'number') {alert('请输入正确的消费价格')return}// 发送添加请求const res = await axios.post('https://applet-base-api-t.itheima.net/bill', {creator: '小黑',name: this.name,price: this.price})// 重新渲染一次this.getList()this.name = ''this.price = ''}}添加或删除后(后台数据发送变化),需要重新发送获取数据请求,将后台数据同步,故将其封装。
async getList () {const res = await axios.get('https://applet-base-api-t.itheima.net/bill', {params: {creator: '小黑'}})this.list = res.data.data
}
效果(输入消费信息):

页面刷新:

实现删除功能
async del (id) {// 根据 id 发送删除请求const res = await axios.delete(`https://applet-base-api- t.itheima.net/bill/${id}`)// 重新渲染this.getList()}饼图渲染
Apache ECharts
直接看快速入门

核心代码:
需要的是饼图,到“示例”中找就行

上面的意思就是想要加异步数据,直接再次setoption就行
(因为需要跨mounted和methods配置项使用myChart对象,所以挂载到Vue实例中。)

完整mounted钩子函数:
4. 饼图渲染* (1) 初始化一个饼图 echarts.init(dom) mounted钩子实现* (2) 根据数据实时更新饼图 echarts.setOption({ ... })*/mounted () {this.myChart = echarts.init(document.querySelector('#main'))this.myChart.setOption({// 大标题title: {text: '消费账单列表',left: 'center'},// 提示框tooltip: {trigger: 'item'},// 图例legend: {orient: 'vertical',left: 'left'},// 数据项series: [{name: '消费账单',type: 'pie',radius: '50%', // 半径data: [// { value: 1048, name: '球鞋' },// { value: 735, name: '防晒霜' }],emphasis: {itemStyle: {shadowBlur: 10,shadowOffsetX: 0,shadowColor: 'rgba(0, 0, 0, 0.5)'}}}]})},在methods配置项中的getlist方法中需要再次setOption来把请求到的数据放入图表
async getList () {const res = await axios.get('https://applet-base-api-t.itheima.net/bill', {params: {creator: '小黑'}})this.list = res.data.data// 更新图表this.myChart.setOption({// 数据项series: [{// data: [// { value: 1048, name: '球鞋' },// { value: 735, name: '防晒霜' }// ]data: this.list.map(item => ({ value: item.price, name: item.name}))}]})},在箭头函数中:
- 如果函数体只包含一个表达式(如
item.name或item.value + 1),可以省略花括号{}和return。 - 如果函数体包含一个对象字面量,必须用括号
()包裹对象,否则 JavaScript 会将其解析为代码块。
{ value: item.price, name: item.name}是一整个对象,所以要用括号包裹起来
总结:

工程化开发入门
工程化开发和脚手架
开发 Vue 的两种方式:
1. 核心包传统开发模式:基于 html / css / js 文件,直接引入核心包,开发 Vue。
2. 工程化开发模式:基于构建工具(例如:webpack ) 的环境中开发 Vue。

问题:
① webpack 配置不简单
② 雷同的基础配置
③ 缺乏统一标准
需要一个工具,生成标准化的配置

使用步骤:
1. 全局安装 (一次) :yarn global add @vue/cli 或 npm i @vue/cli -g
2. 查看 Vue 版本:vue --version
3. 创建项目架子:vue create project-name(项目名-不能用中文)
4. 启动项目: yarn serve 或 npm run serve(找package.json)
ps:我用yarn安装后查看版本报错vue不被识别,好像要配置环境变量(我猜的),我用npm安装就不报错了
项目目录介绍和运行流程

public文件夹下的index.html
<!DOCTYPE html>
<html lang=""><head><meta charset="utf-8"><meta http-equiv="X-UA-Compatible" content="IE=edge"><meta name="viewport" content="width=device-width,initial-scale=1.0"><link rel="icon" href="<%= BASE_URL %>favicon.ico"><title><%= htmlWebpackPlugin.options.title %></title></head><body><!-- 兼容:给不支持js的浏览器一个提示 --><noscript><strong>We're sorry but <%= htmlWebpackPlugin.options.title %> doesn't work properly without JavaScript enabled. Please enable it to continue.</strong></noscript><!-- Vue所管理的容器:将来创建结构动态渲染这个容器 --><div id="app"><!-- 工程化开发模式中:这里不再直接编写模板语法,通过 App.vue这个文件 提供结构渲染 --></div><!-- built files will be auto injected --></body>
</html>
main.js
// 文件核心作用:导入App.vue,基于App.vue创建结构渲染index.html
// 1. 导入 Vue 核心包
import Vue from 'vue'// 2. 导入 App.vue 根组件
import App from './App.vue'// 提示:当前处于什么环境 (生产环境 / 开发环境)
Vue.config.productionTip = false// 3. Vue实例化,提供render方法 → 基于App.vue创建结构渲染index.html
new Vue({// el: '#app', 作用:和$mount('选择器')作用一致,用于指定Vue所管理容器// render: h => h(App),render: (createElement) => {// 基于App创建元素结构return createElement(App)}
}).$mount('#app')
组件化开发 & 根组件


App.vue 文件(单文件组件)的三个组成部分
1. 语法高亮插件:

2. 三部分组成:
◆ template:结构 ( 有且只能一个根元素(vue2) )
◆ script: js逻辑
◆ style: 样式 (可支持less,需要装包)

3. 让组件支持 less
(1) style标签,lang="less" 开启less功能
(2) 装包: yarn add less less-loader / npm i less less-loader
实操代码:
<template><div class="App">{{ msg }}<div class="box" @click="fn"></div></div>
</template>
<script>
// 导出的是当前组件的配置项
// 里面可以提供 data(特殊) methods computed watch 生命周期八大钩子
export default {created() {console.log("我是created");},data() {return {msg: "hello world",};},methods: {fn() {alert("你好");},},
};
</script>
<style lang="less">
/* 让style支持less1. 给style加上 lang="less"2. 安装依赖包 less less-loaderyarn add less less-loader -D (开发依赖)
*/
.App {width: 400px;height: 400px;background-color: pink;.box {width: 100px;height: 100px;background-color: skyblue;}
}
</style>
总结:

普通组件的注册使用
组件注册的两种方式:
局部注册(组件)
1. 局部注册:只能在注册的组件内使用
① 创建 .vue 文件 (三个组成部分)
② 在使用的组件内导入并注册
(在components文件夹里新建.vue组件)


实操代码:
快速生成vue模板

(在components文件夹里新建这三个.vue组件)
HmFooter.vue
<template><div class="hm-footer">我是hm-footer</div>
</template>
<script>
export default {}
</script>
<style>
.hm-footer {height: 100px;line-height: 100px;text-align: center;font-size: 30px;background-color: #4f81bd;color: white;
}
</style>
HmHeader.vue
<template><div class="hm-header">我是hm-header</div>
</template>
<script>
export default {}
</script>
<style>
.hm-header {height: 100px;line-height: 100px;text-align: center;font-size: 30px;background-color: #8064a2;color: white;
}
</style>
HmMain.vue
<template><div class="hm-main">我是hm-main</div>
</template>
<script>
export default {}
</script>
<style>
.hm-main {height: 400px;line-height: 400px;text-align: center;font-size: 30px;background-color: #f79646;color: white;margin: 20px 0;
}
</style>
<template><div class="App"><!-- 头部组件 --><HmHeader></HmHeader><!-- 主体组件 --><HmMain></HmMain><!-- 底部组件 --><HmFooter></HmFooter><!-- 如果 HmFooter + tab 出不来 → 需要配置 vscode设置中搜索 trigger on tab → 勾上--></div>
</template>
<script>
import HmHeader from './components/HmHeader.vue'
import HmMain from './components/HmMain.vue'
import HmFooter from './components/HmFooter.vue'
export default {components: {// '组件名': 组件对象HmHeader: HmHeader,HmMain,HmFooter}
}
</script>
<style>
.App {width: 600px;height: 700px;background-color: #87ceeb;margin: 0 auto;padding: 20px;
}
</style>
全部注册(组件)
2. 全局注册:所有组件内都能使用
① 创建 .vue 文件 (三个组成部分)
② main.js 中进行全局注册


使用:
◆ 当成 html 标签使用 `<组件名></组件名>`

直接用,不用在使用的文件里面重新引了
综合案例:小兔鲜首页
小兔鲜首页 - 组件拆分
封装组件时,加一些前缀Xtx(整体框架),Base(基础组件)等,这样不容易出现重复命名的情况。

页面开发思路:
1. 分析页面,按模块拆分组件,搭架子 (局部或全局注册)

2. 根据设计图,编写组件 html 结构 css 样式 (已准备好),
3. 拆分封装通用小组件 (局部或全局注册)

将来 → 通过 js 动态渲染,实现功能

如何一次选中多条-》ctrl+按住鼠标中间滚轮往下拖,然后把复制好的组件名全都粘贴

现在全都是静态的,所以可以把热门品牌的展示拆成一张图,然后循环五次就是这样的效果,当然现在只是最基础的,后期肯定不会这样用,后期用v-for

组件的三大组成部分 (结构/样式/逻辑)

scoped样式冲突
1.style中的样式 默认是作用到全局的
2.加上scoped可以让样式变成局部样式,只作用于当前文件内的元素
组件都应该有独立的样式,推荐加scoped(原理)
-----------------------------------------------------
scoped原理:
1.给当前组件模板的所有元素,都会添加上一个自定义属性
data-v-hash值
data-v-5f6a9d56 用于区分开不同的组件

2.css选择器后面,被自动处理,添加上了属性选择器
div[data-v-5f6a9d56]

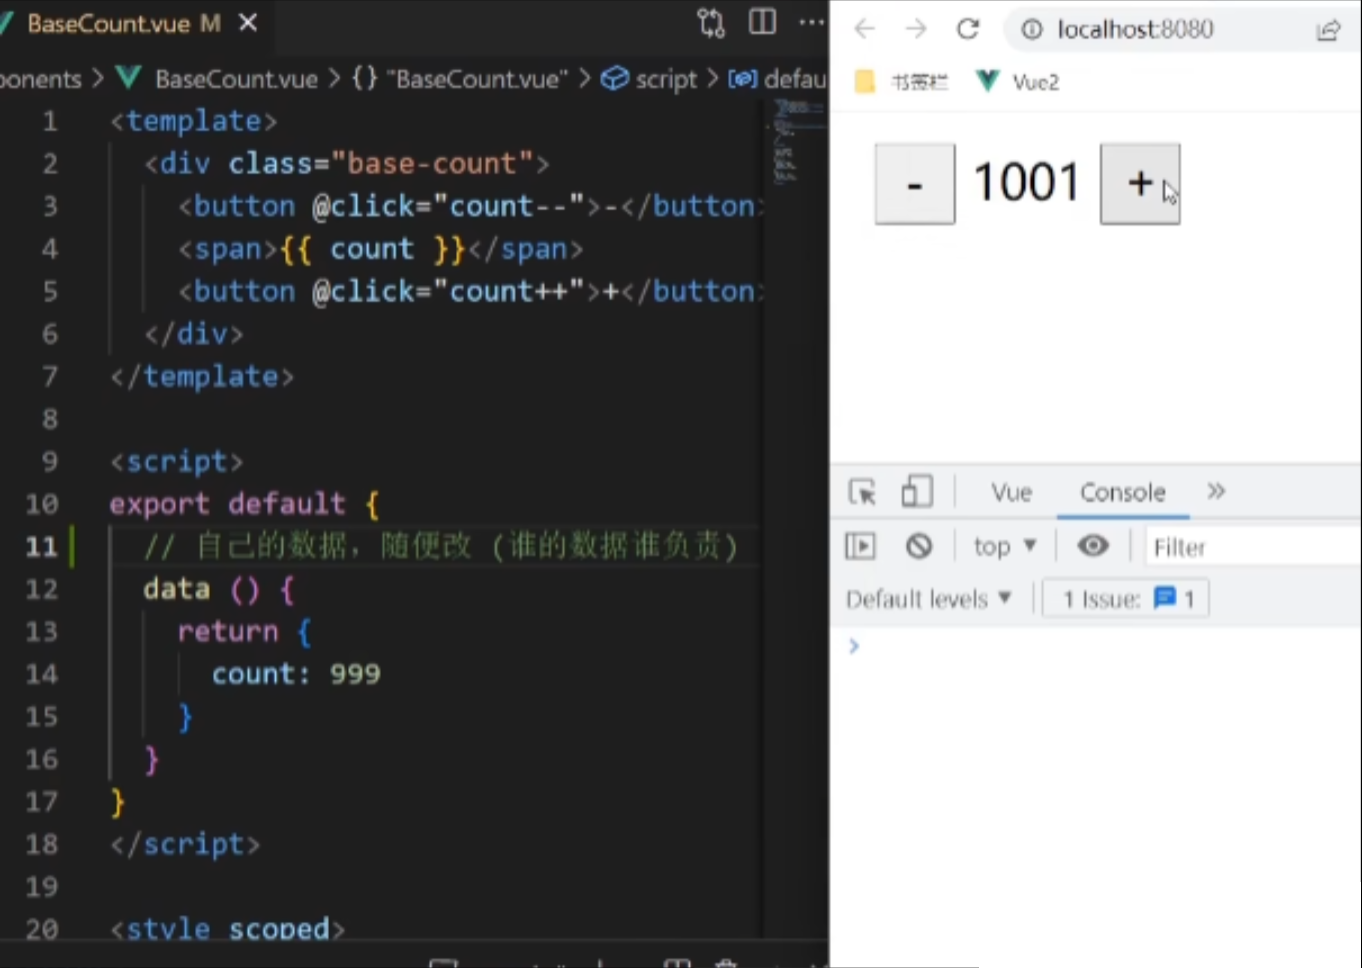
data是一个函数
一个组件的 data 选项必须是一个函数。→ 保证每个组件实例,维护独立的一份数据对象。
每次创建新的组件实例,都会新执行一次 data 函数,得到一个新对象。

在App.vue中注册使用三个BaseCount:

效果:

控制台:

对每一个999进行操作都只影响它一个,用了三个组件,所以data执行三次,3个999互不干扰
组件通信
什么是组件通信?


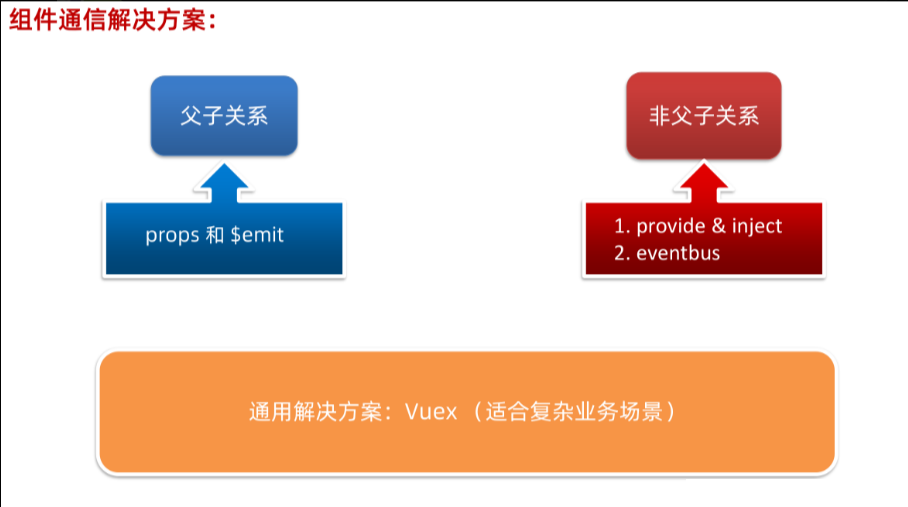
父子组件通信

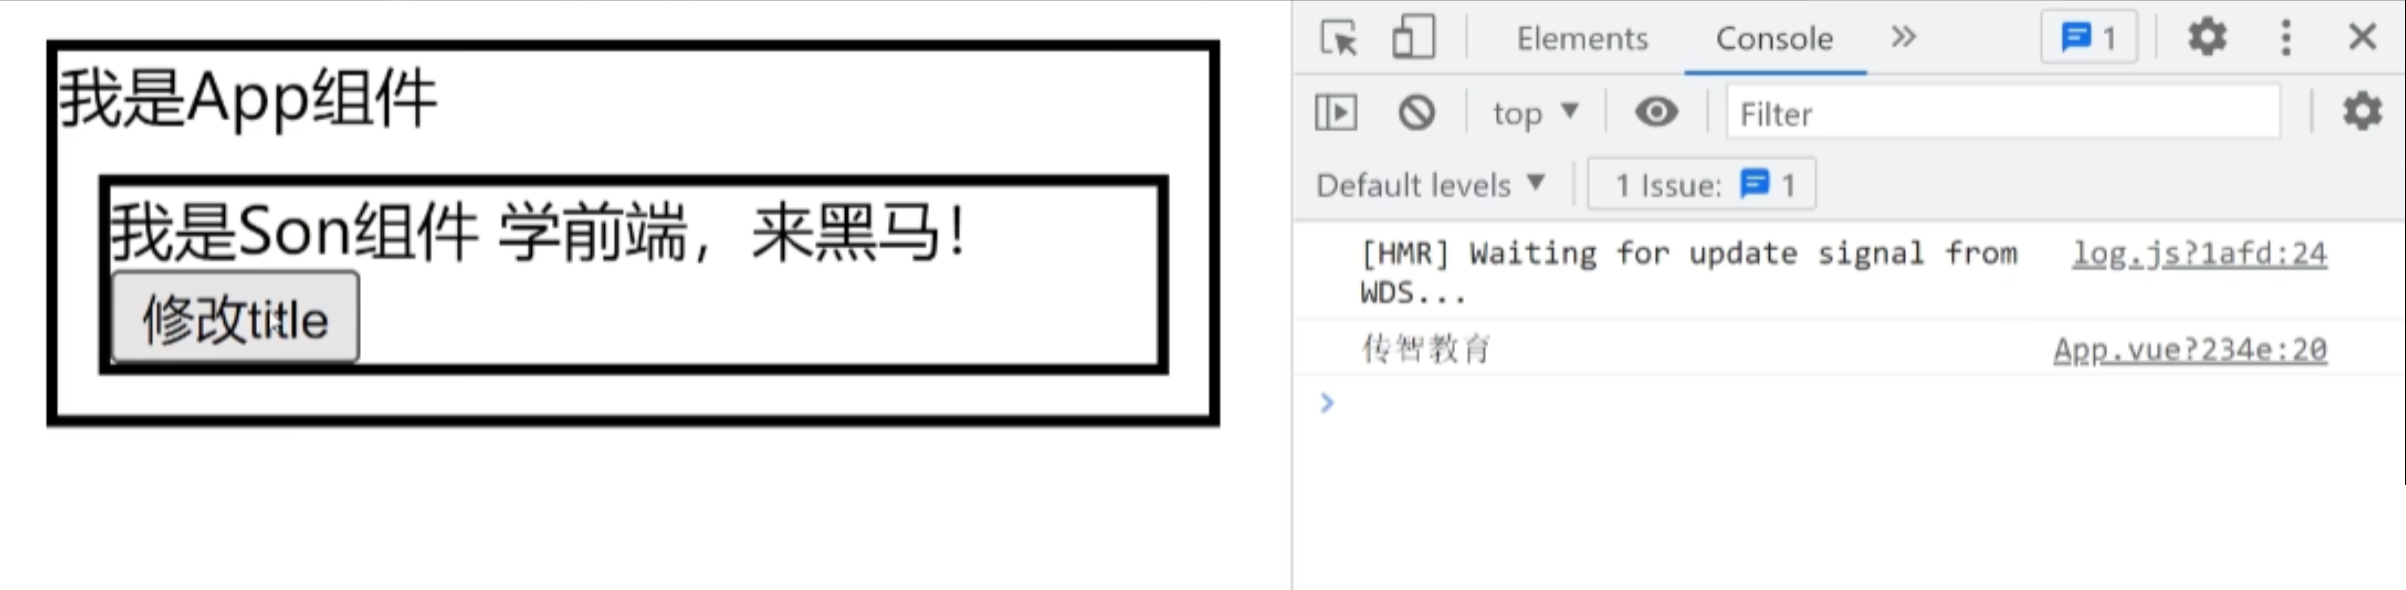
父传子

效果:
如果代码报错:error Component name "Son" should always be multi-word vue/multi-word-component-names-》这是 ESLint 的 vue/multi-word-component-names 规则在提示:组件名应该由多个单词组成,可以直接把组件名称改成SonComponent
或者在组件里面给他定义一个新名字,比如下图,就ok了,引入还有在页面使用还用Son也不会报错了
子传父
实操代码:
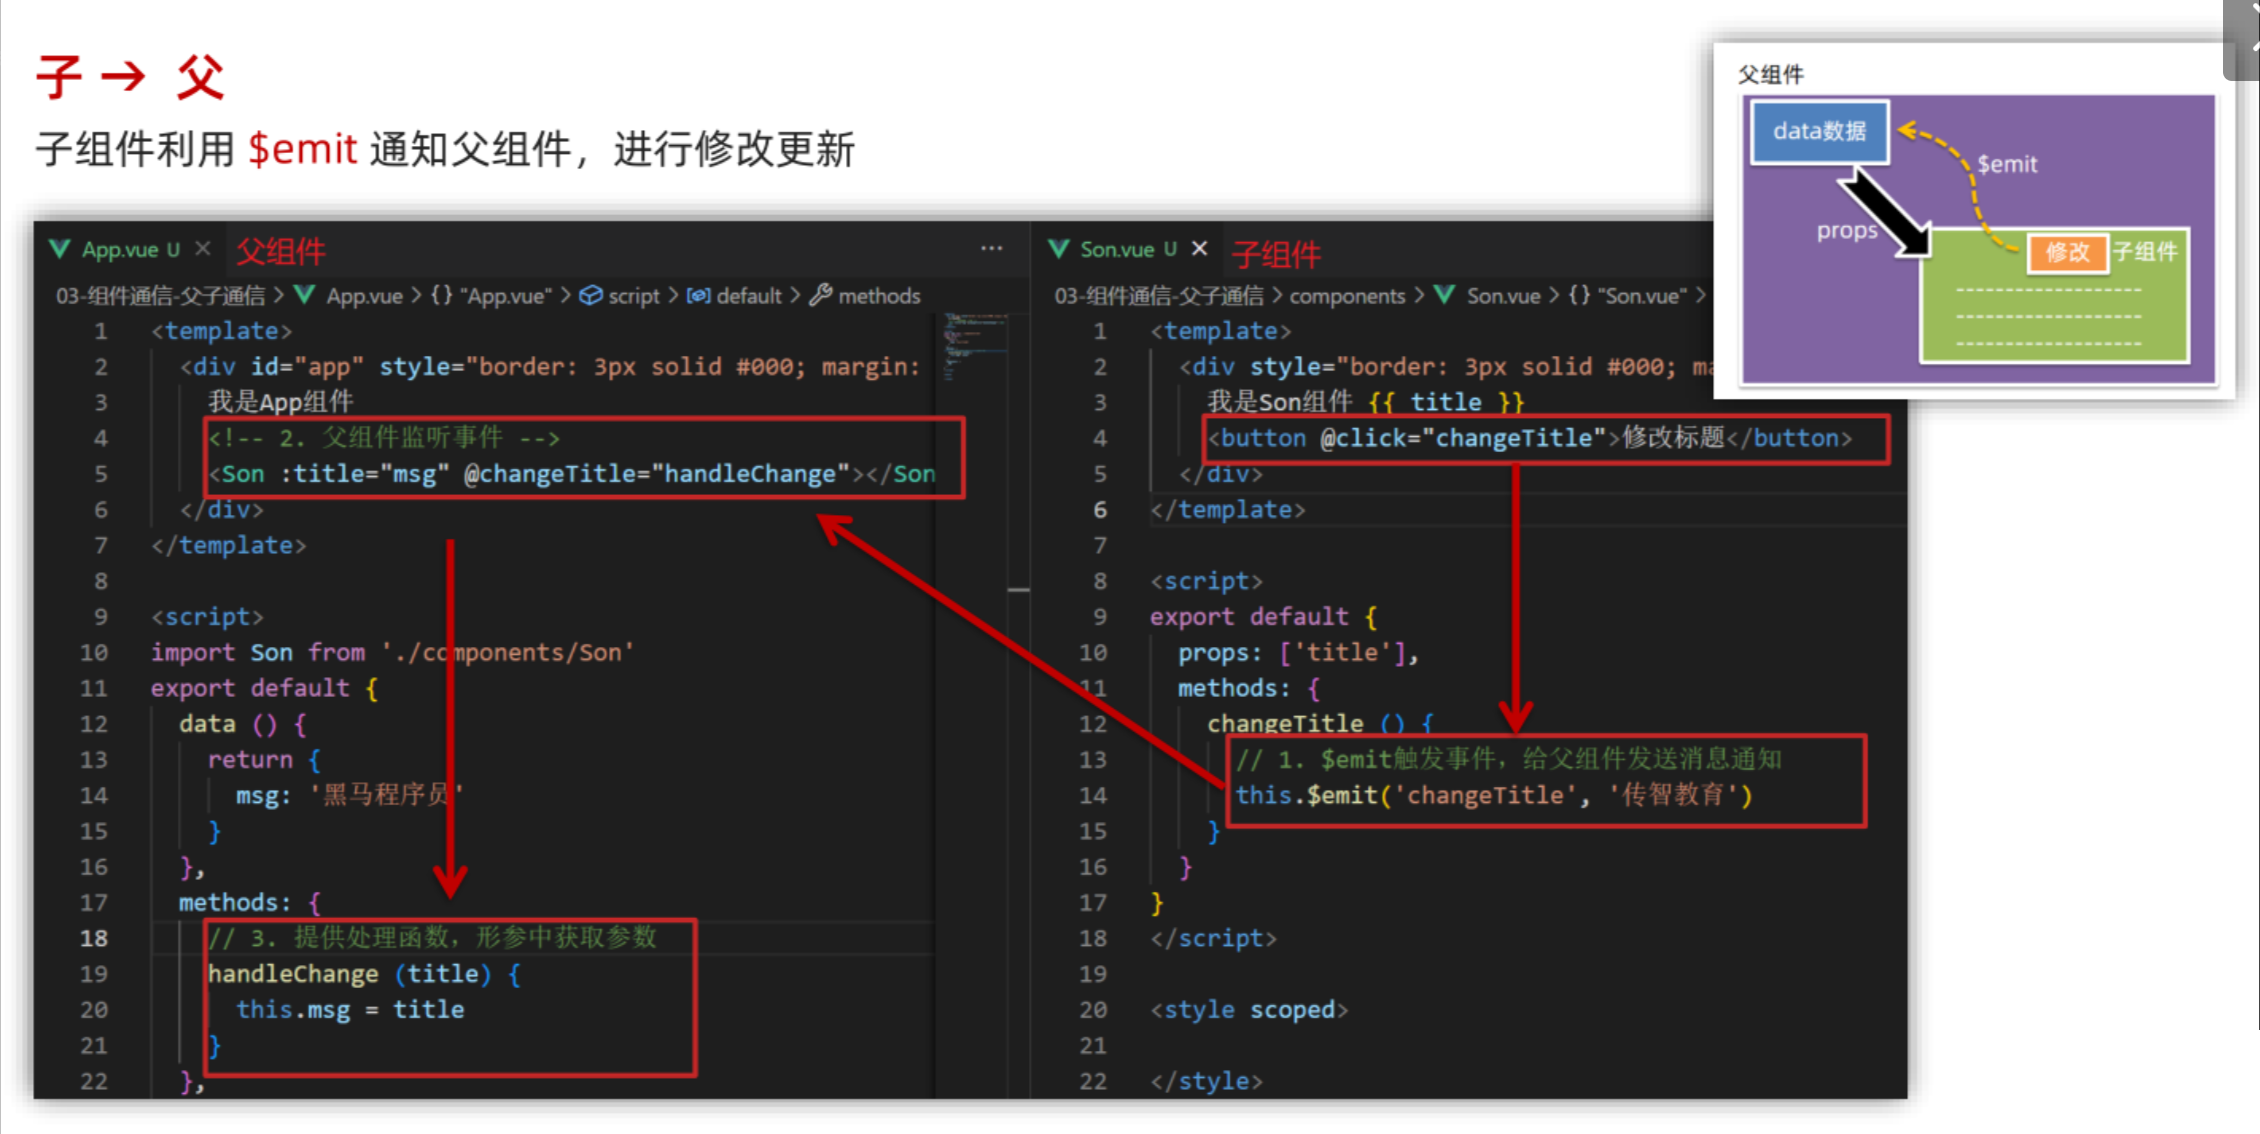
效果:
props详解
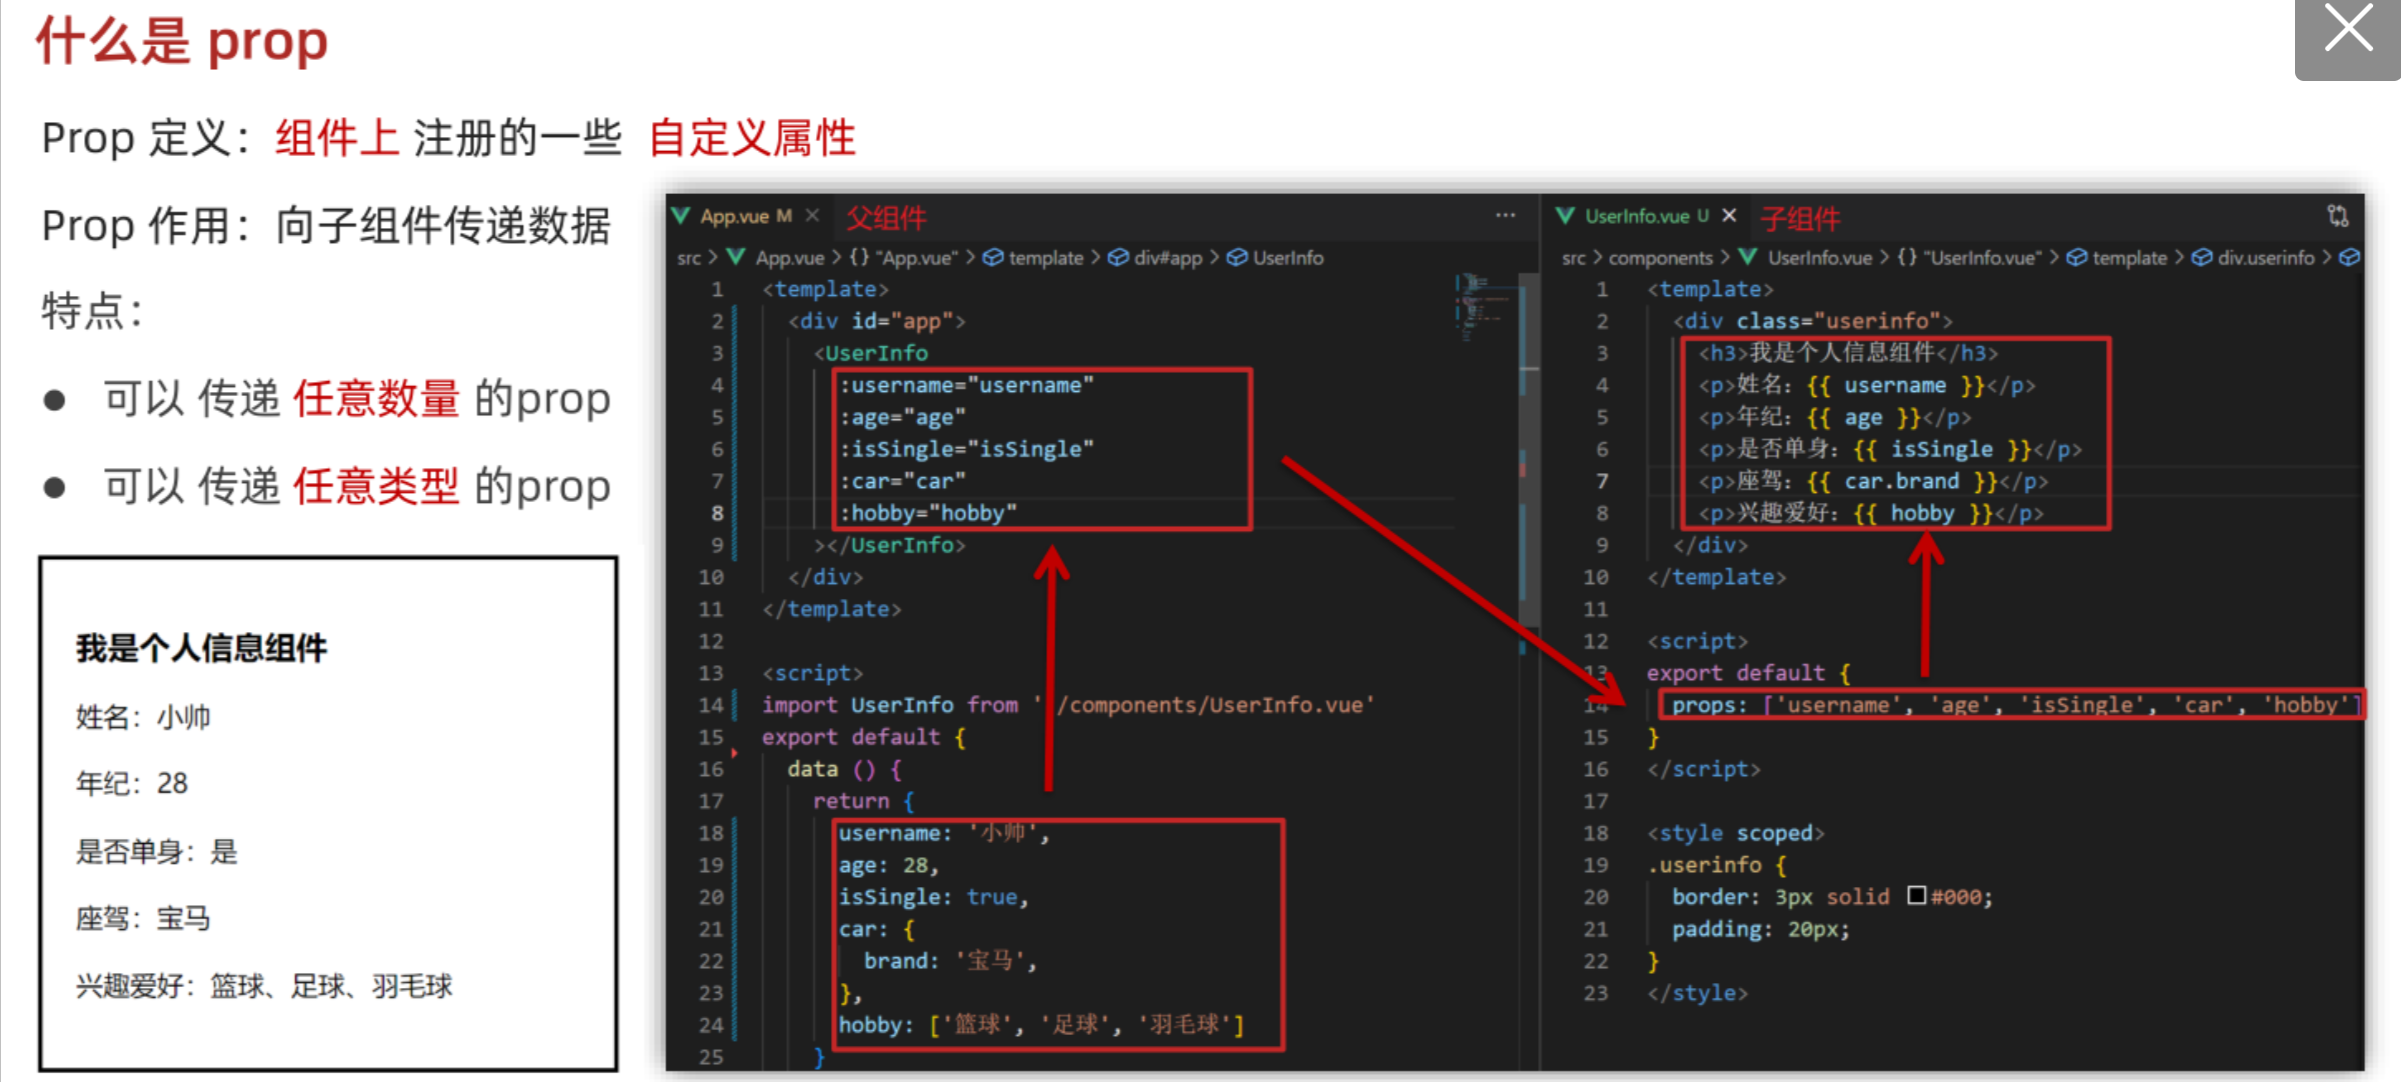
什么是 prop
props 校验
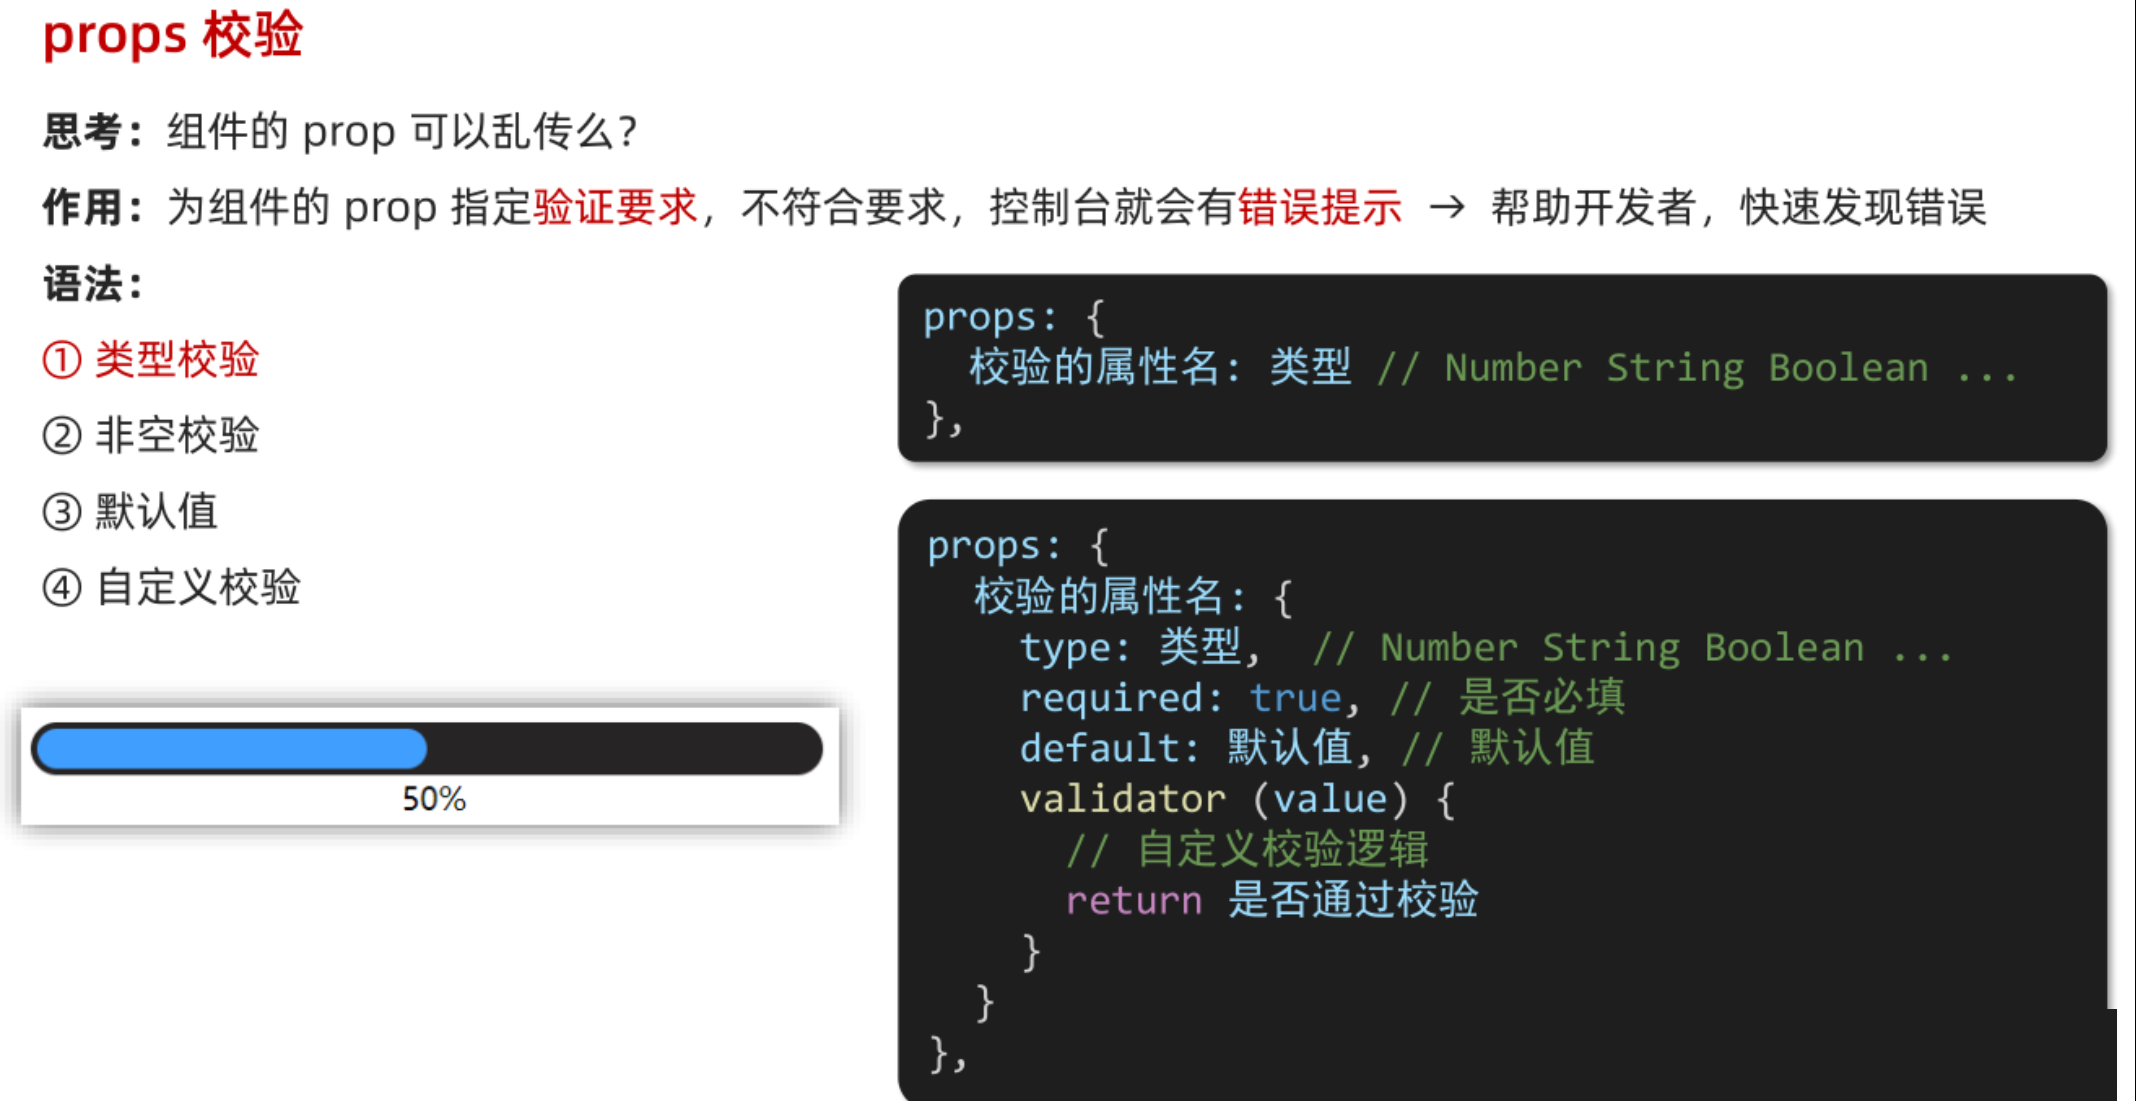
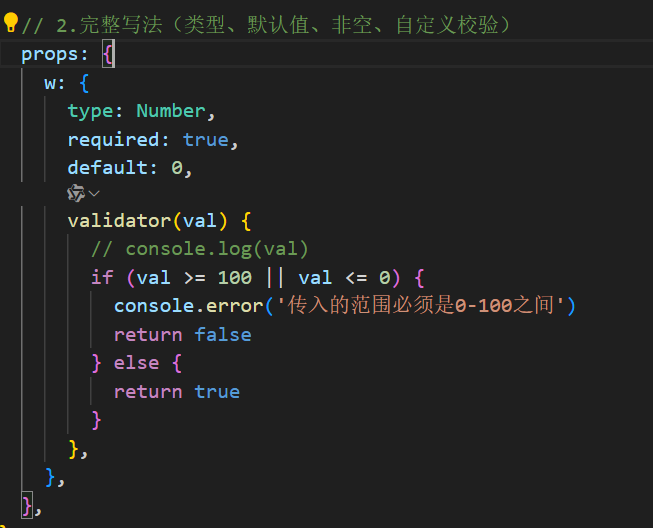
类型校验
添加校验(类型校验):
![]()
单向数据流
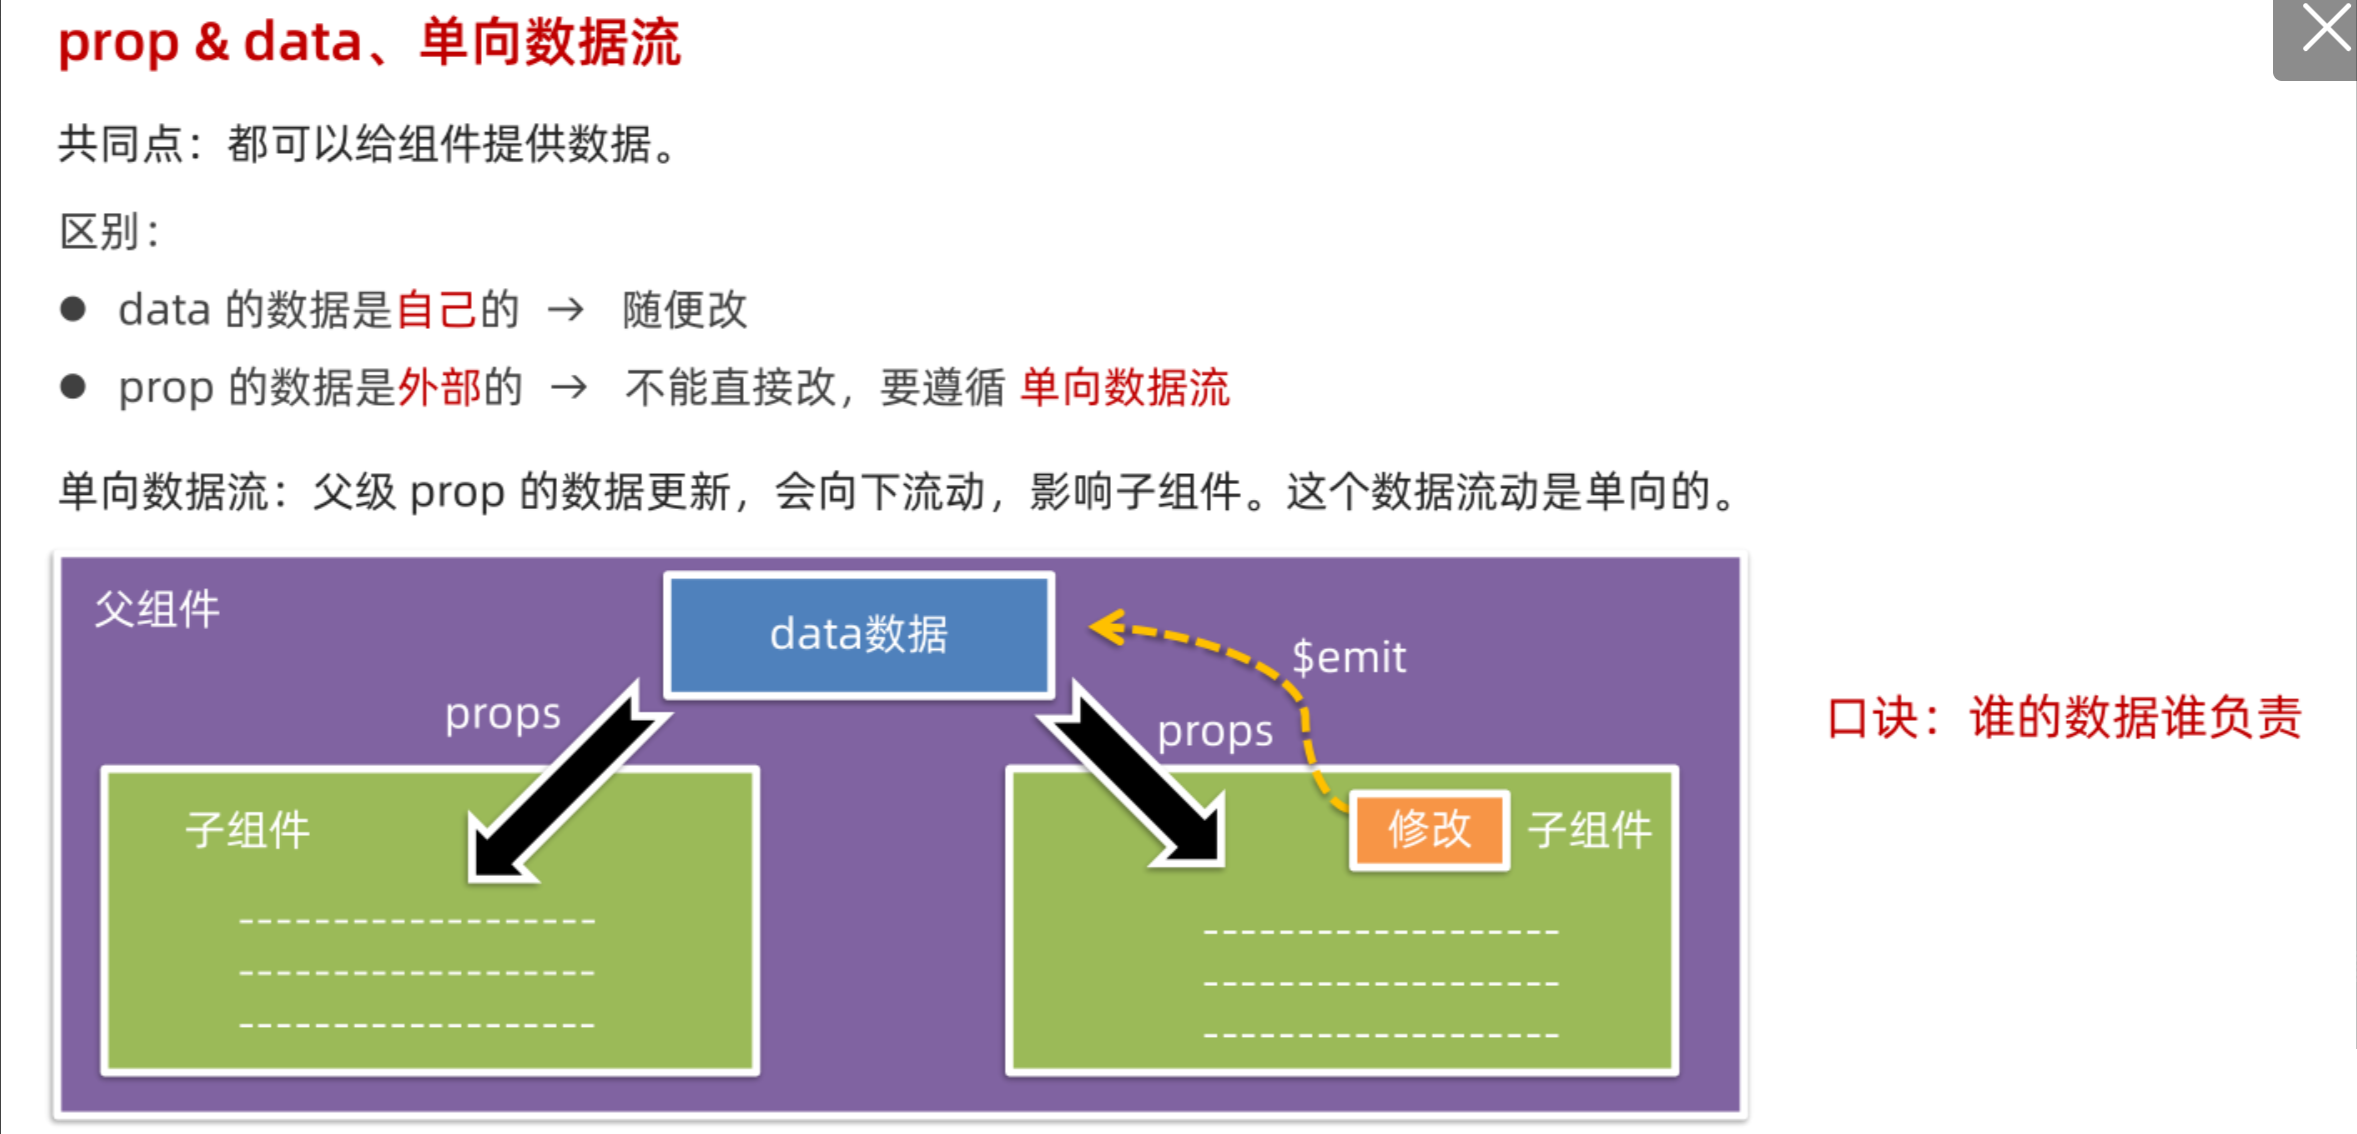
子组件随意修改自己内部的数据count:
在子组件中尝试修改父组件传过来的count:
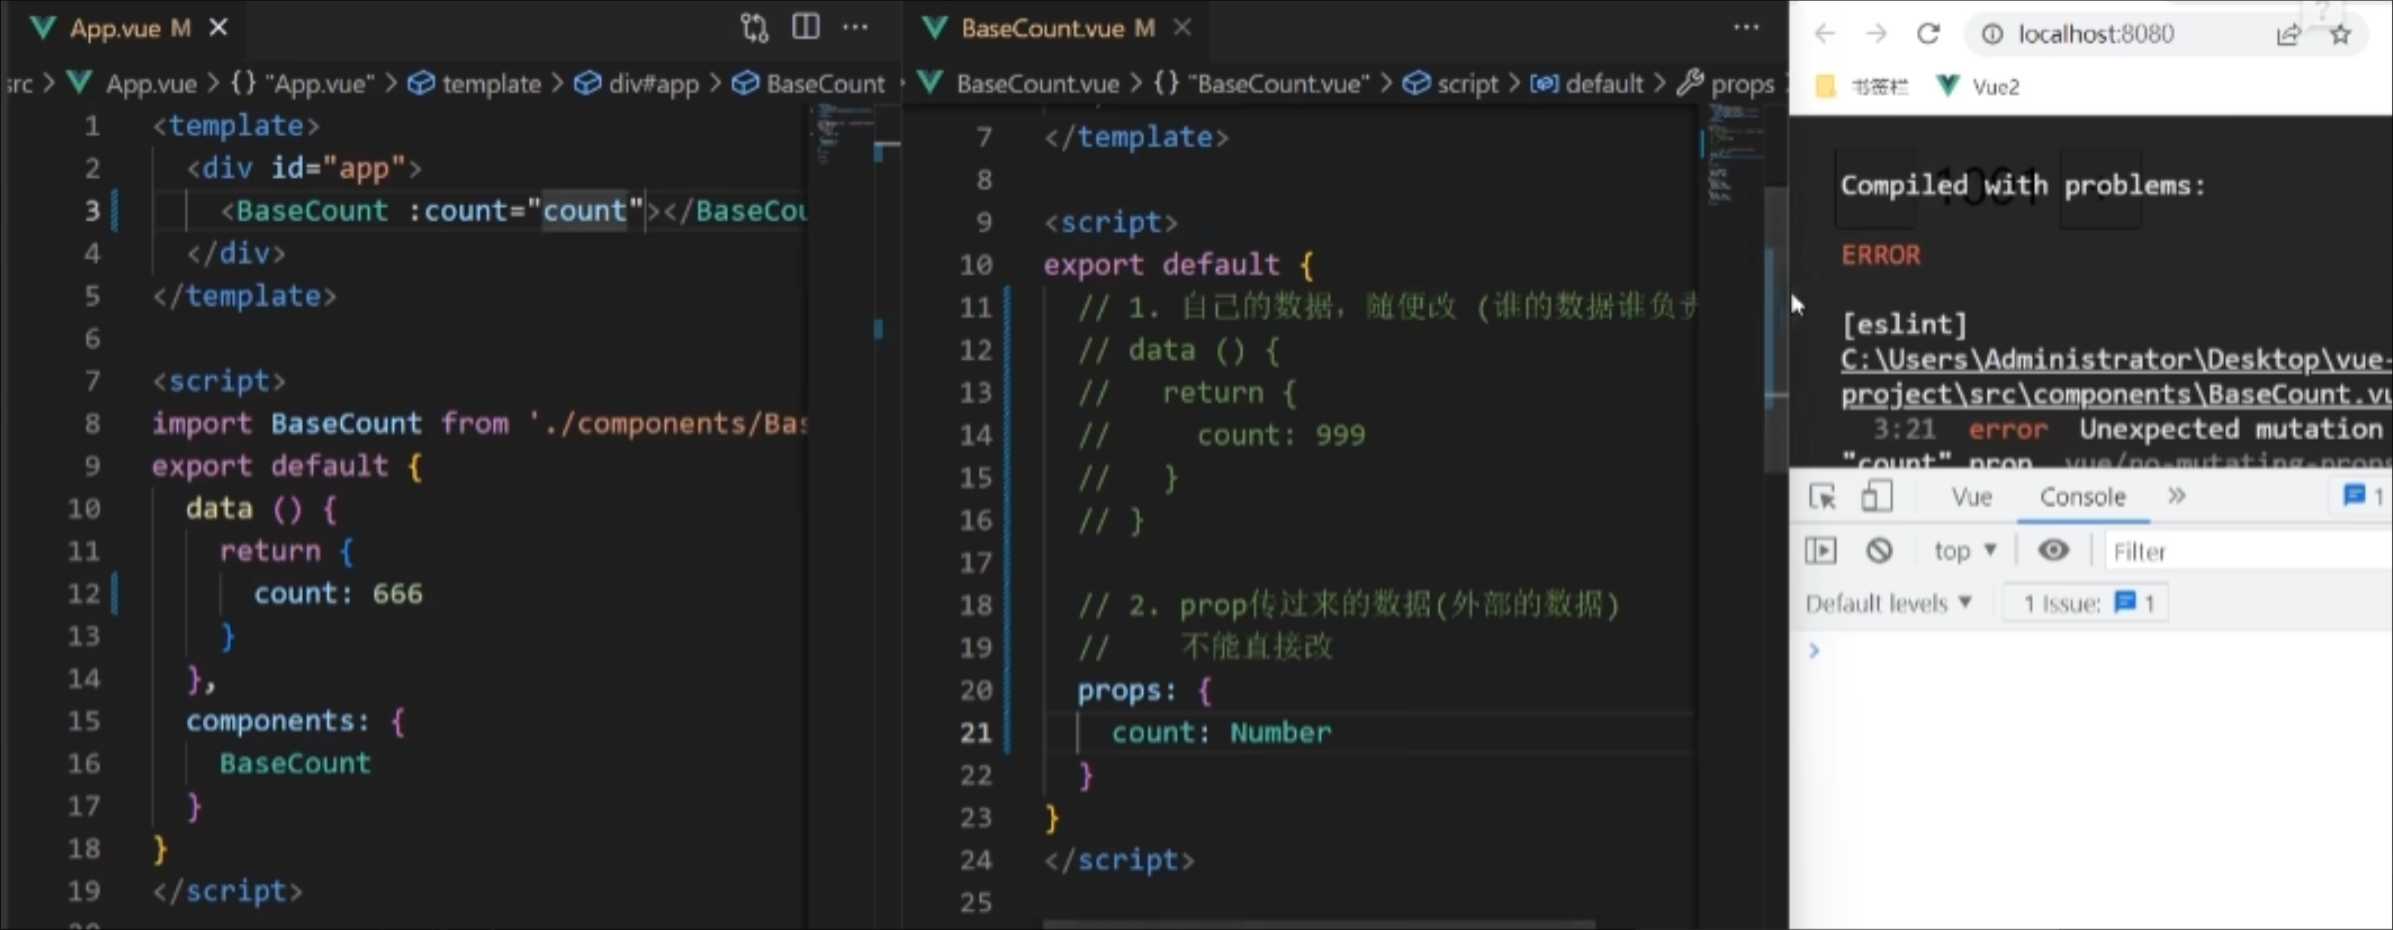
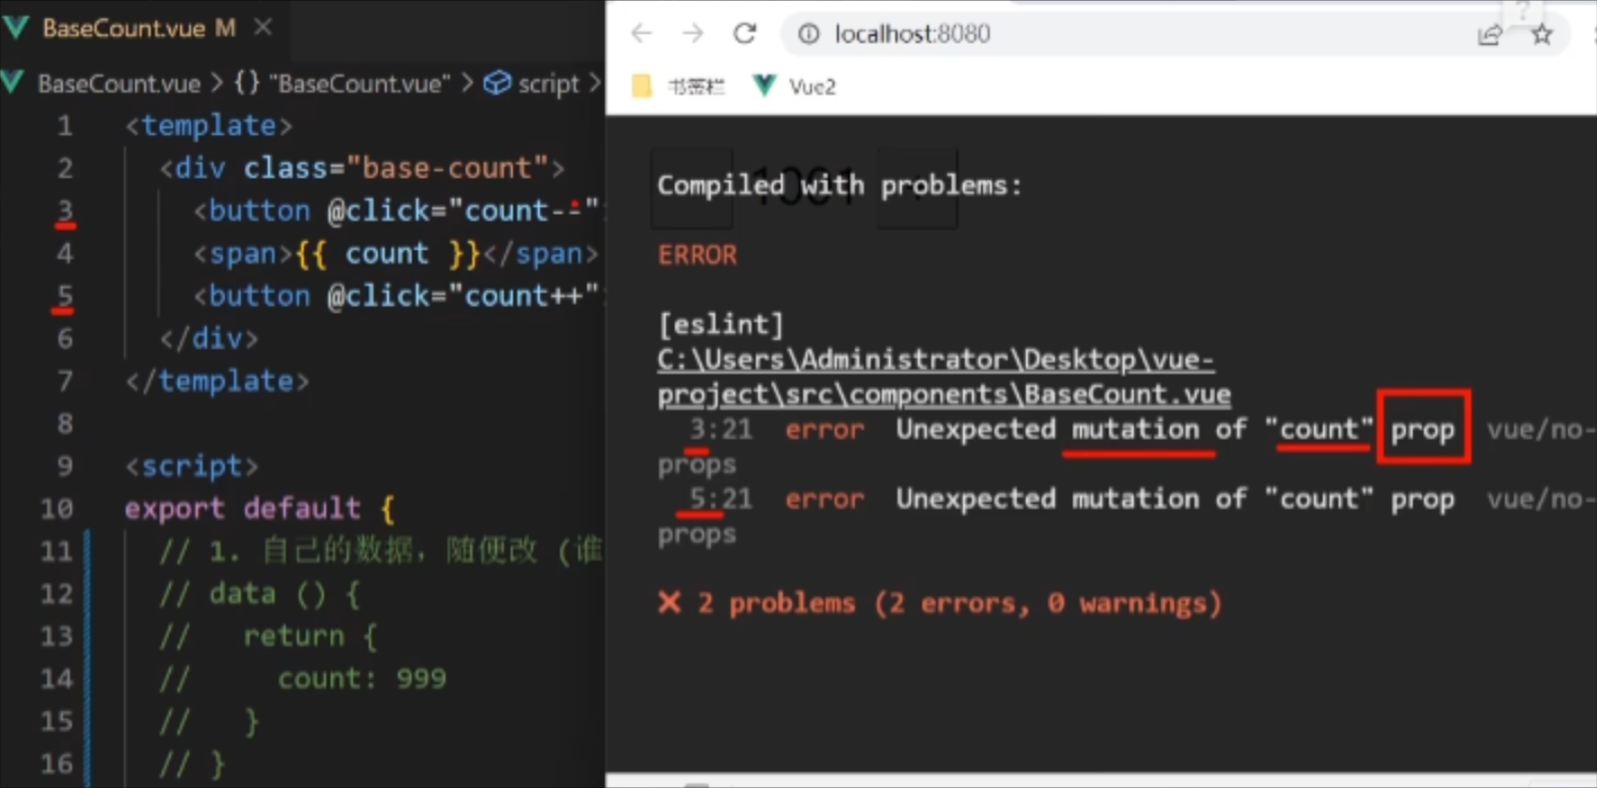
正确做法(儿子通知老爹,让其修改—— 子传父通信 )->$emit
单向数据流:父组件的prop更新,会单向地向下流动,影响到子组件(数据更新)。
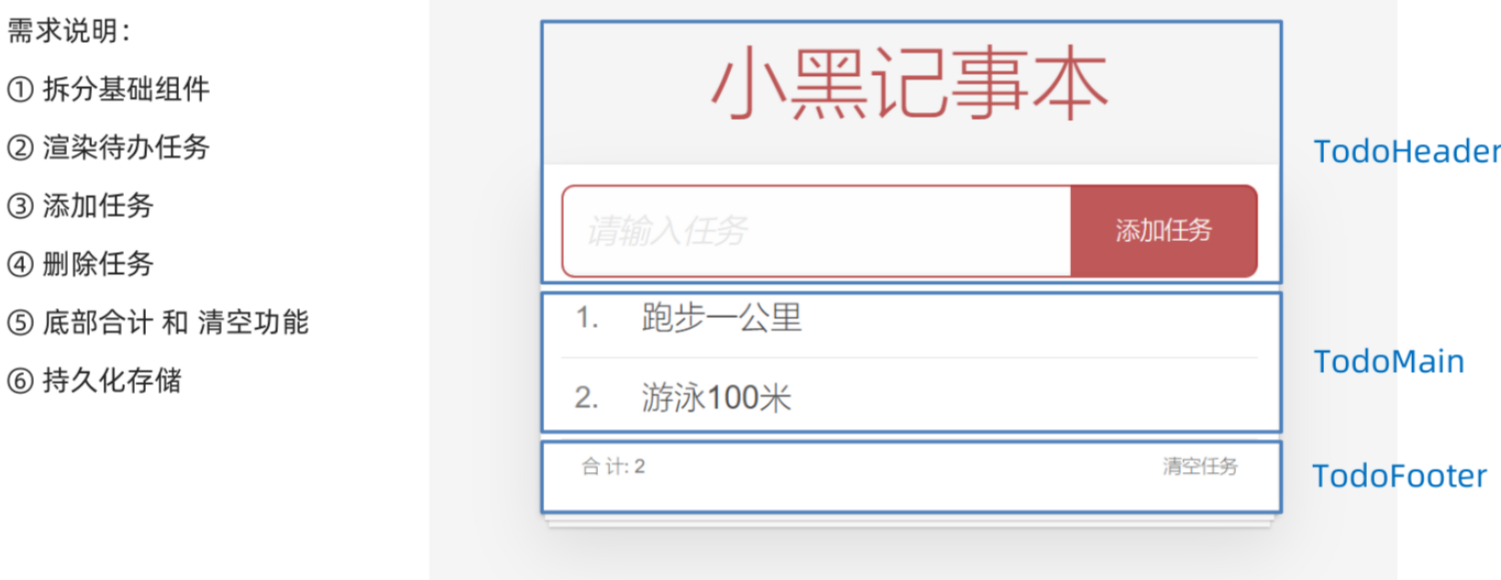
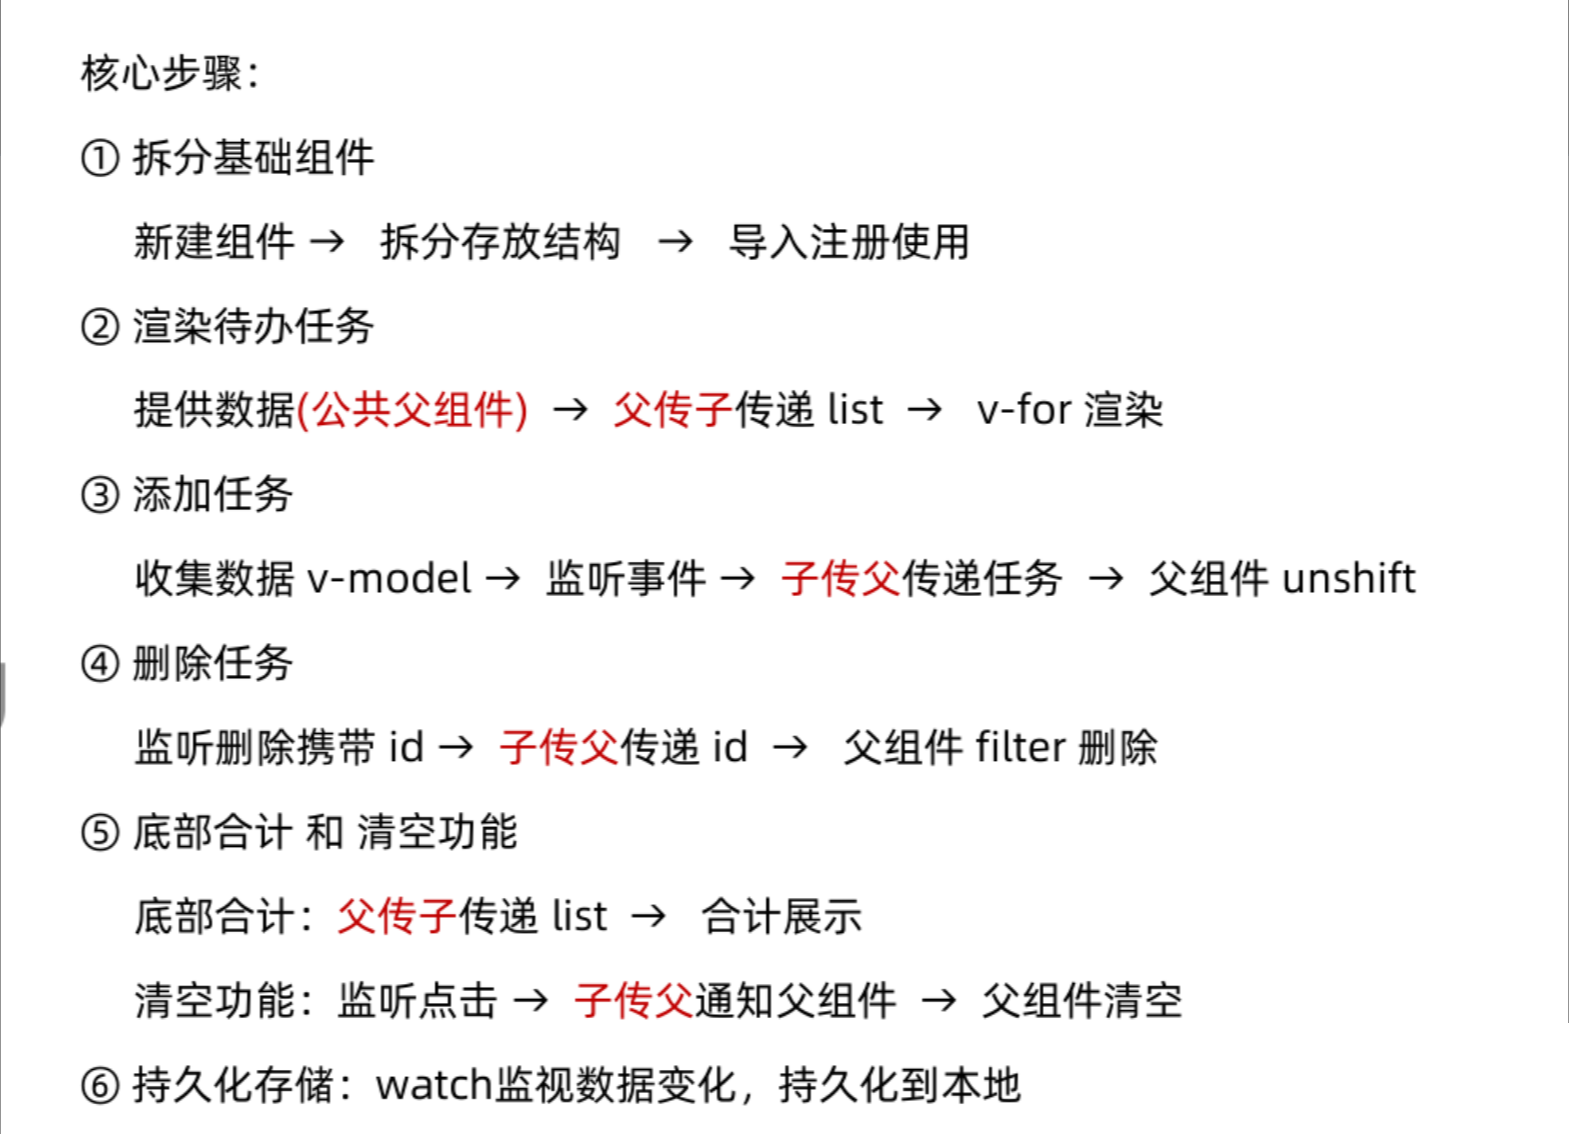
综合案例:小黑记事本 (组件版)
小黑记事本组件版-拆分组件
只展示了部分代码
app.vue代码
<template><!-- 主体区域 --><section id="app"><TodoHeader @add="handleAdd"></TodoHeader><TodoMain :list="list" @del="handelDel"></TodoMain><TodoFooter :list="list" @clear="clear"></TodoFooter></section>
</template>
<script>
import TodoHeader from './components/TodoHeader.vue'
import TodoMain from './components/TodoMain.vue'
import TodoFooter from './components/TodoFooter.vue'// 渲染功能:
// 1.提供数据: 提供在公共的父组件 App.vue
// 2.通过父传子,将数据传递给TodoMain
// 3.利用 v-for渲染// 添加功能:
// 1.手机表单数据  v-model
// 2.监听事件(回车+点击都要添加)
// 3.子传父,讲任务名称传递给父组件 App.vue
// 4.进行添加 unshift(自己的数据自己负责)
// 5.清空文本框输入的内容
// 6.对输入的空数据 进行判断// 删除功能
// 1.监听事件(监听删除的点击) 携带id
// 2.子传父,讲删除的id传递给父组件的App.vue
// 3.进行删除filter(自己的数据 自己负责)// 底部合计:父传子  传list 渲染
// 清空功能:子传父  通知父组件 → 父组件进行更新
// 持久化存储:watch深度监视list的变化 -> 往本地存储 ->进入页面优先读取本地数据
export default {data() {return {list: JSON.parse(localStorage.getItem('list')) || [{ id: 1, name: '打篮球' },{ id: 2, name: '看电影' },{ id: 3, name: '逛街' },],}},components: {TodoHeader,TodoMain,TodoFooter,},watch: { //完整写法,对list深度监听,进行本地存储list: {deep: true,handler(newVal) {localStorage.setItem('list', JSON.stringify(newVal))},},},methods: {handleAdd(todoName) {// console.log(todoName)this.list.unshift({id: +new Date(),name: todoName,})},handelDel(id) {// console.log(id);this.list = this.list.filter((item) => item.id !== id)},clear() {this.list = []},},
}
</script>
<style>
</style>
总结
非父子通信 (拓展) - event bus 事件总线

建立两个非父子组件的通信:
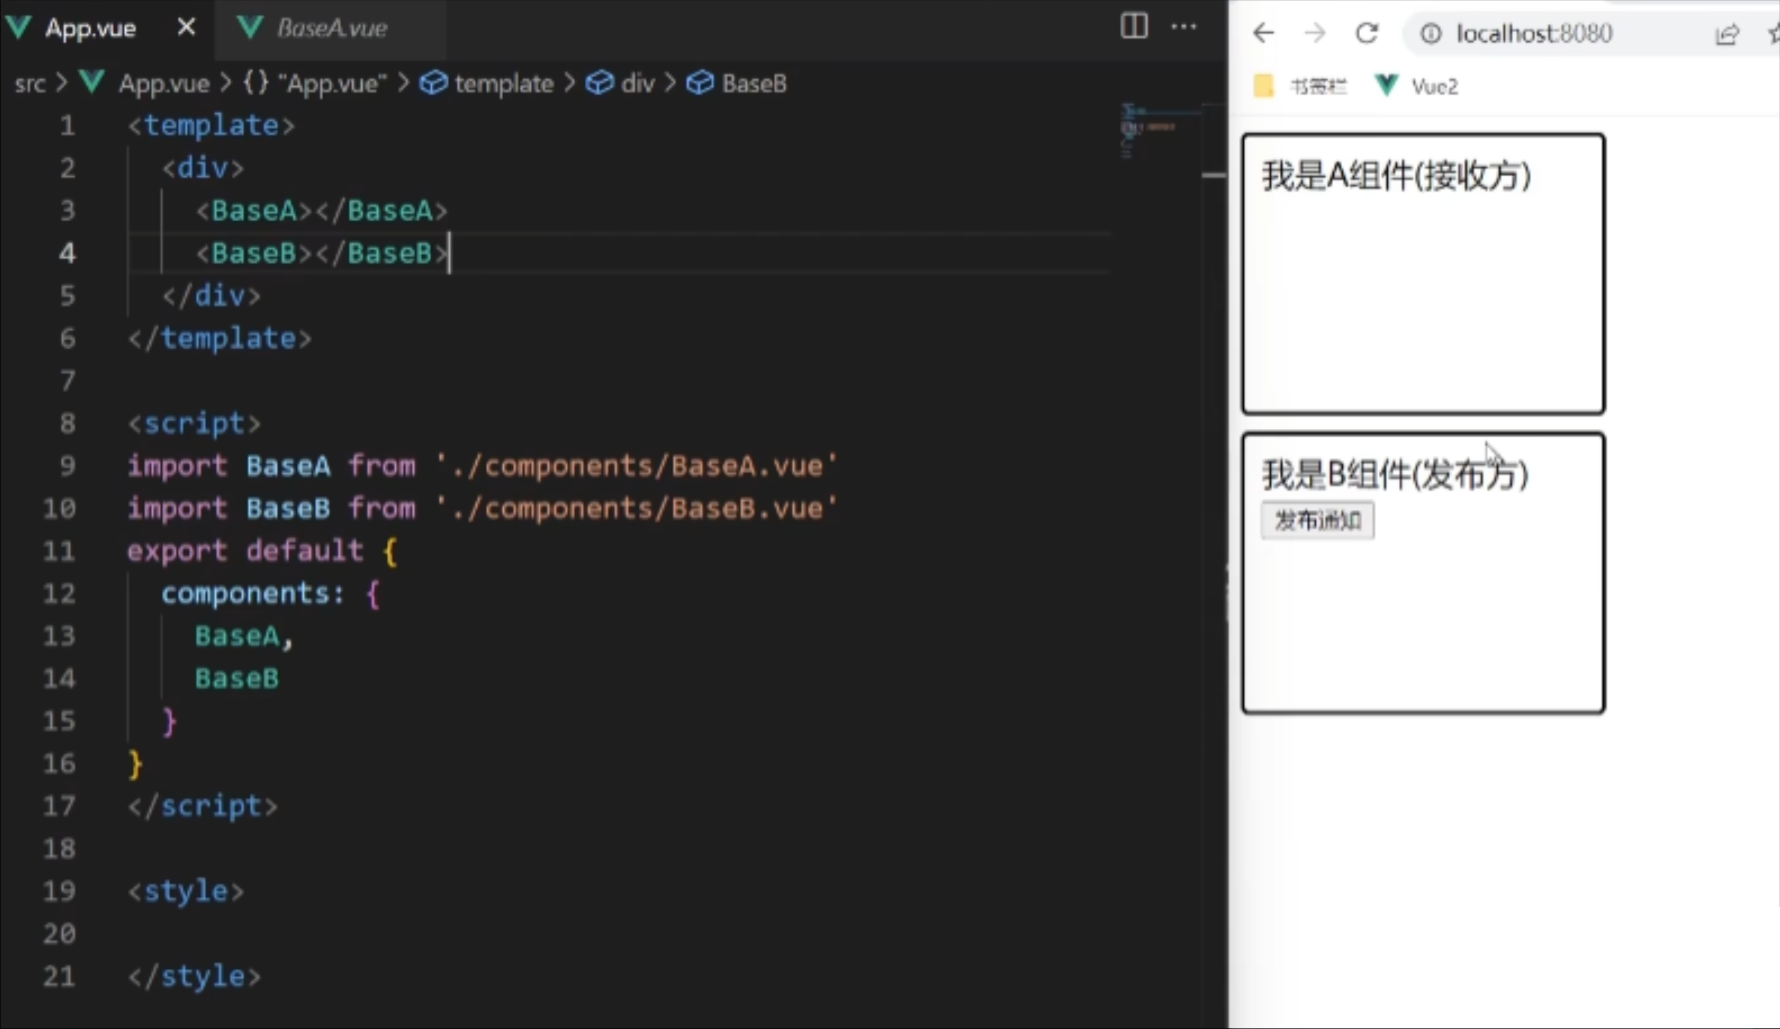
创建 src/utils/EventBus.js
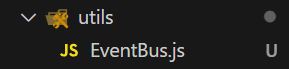
EventBus.js
import Vue from 'vue'const Bus = new Vue()export default Bus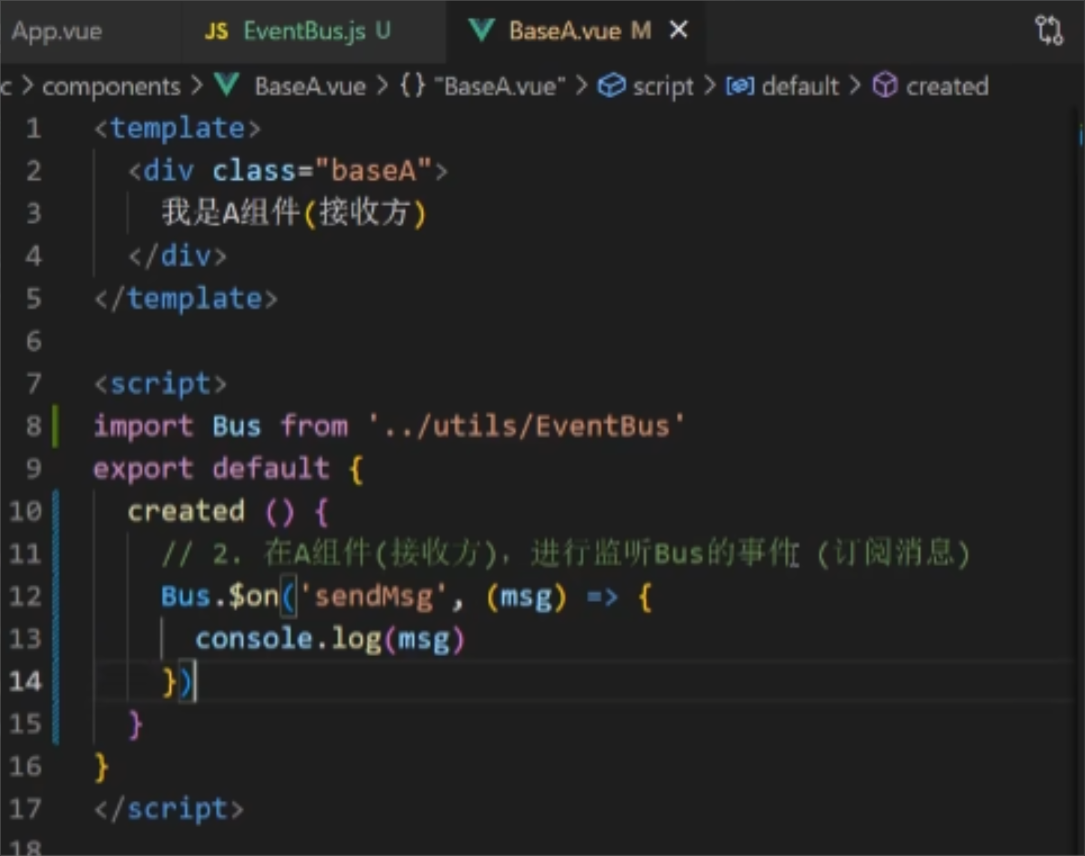
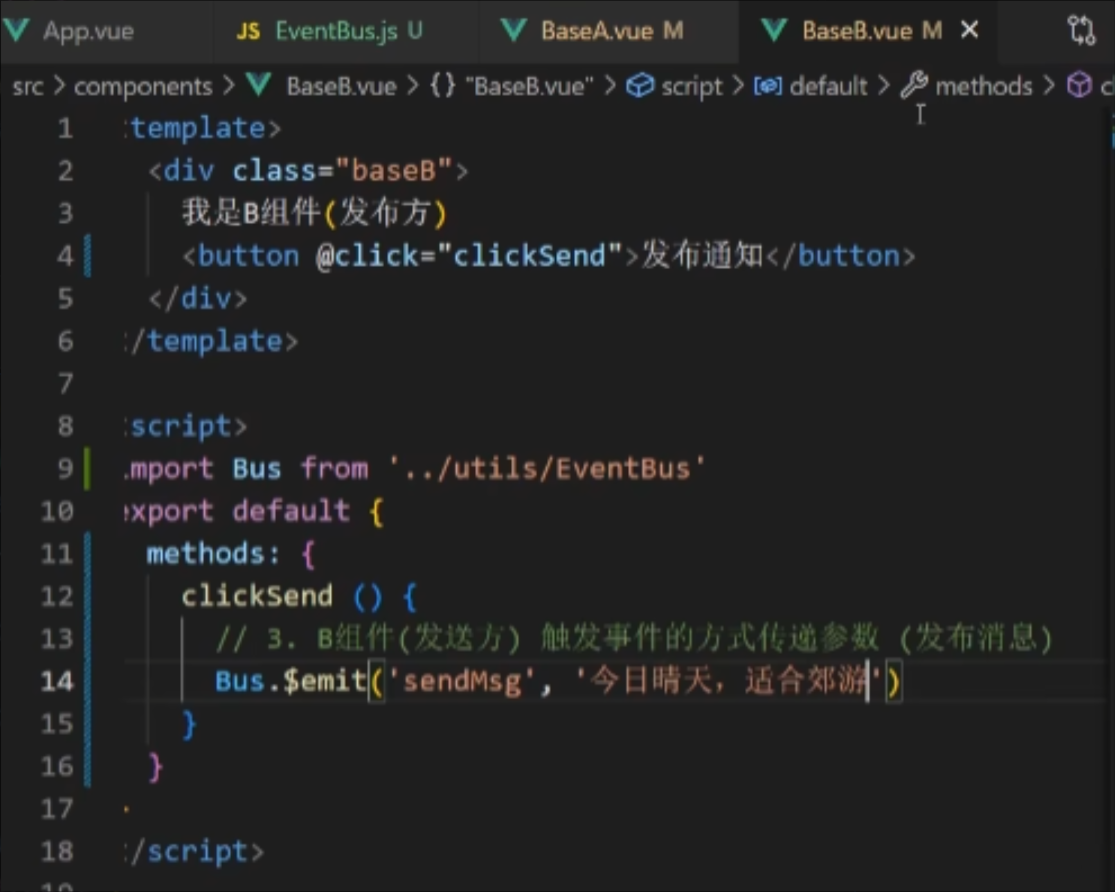
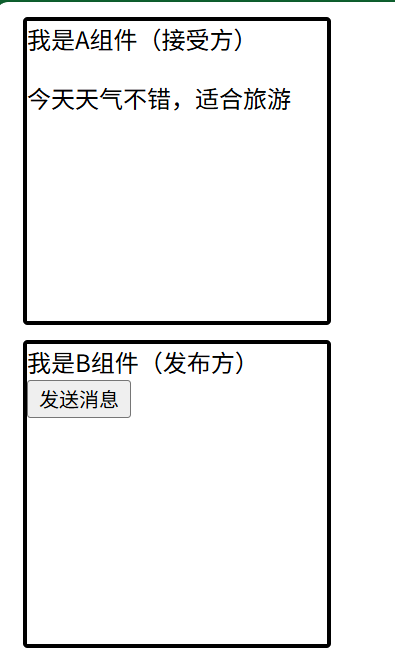
点击B组件中的按钮后,A组件接收到信息并显示:
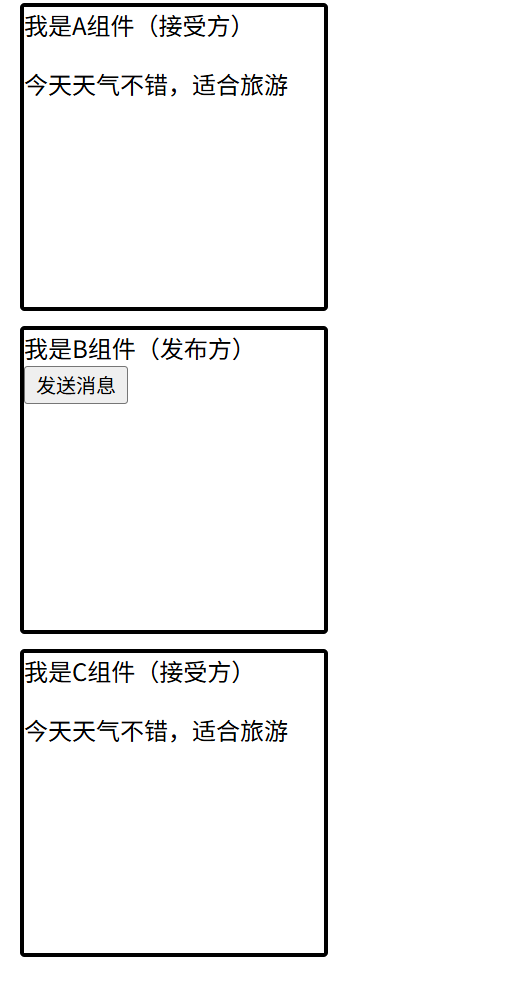
可以实现一对多通信:
非父子通信 (拓展) - provide & inject
跨层级共享数据:
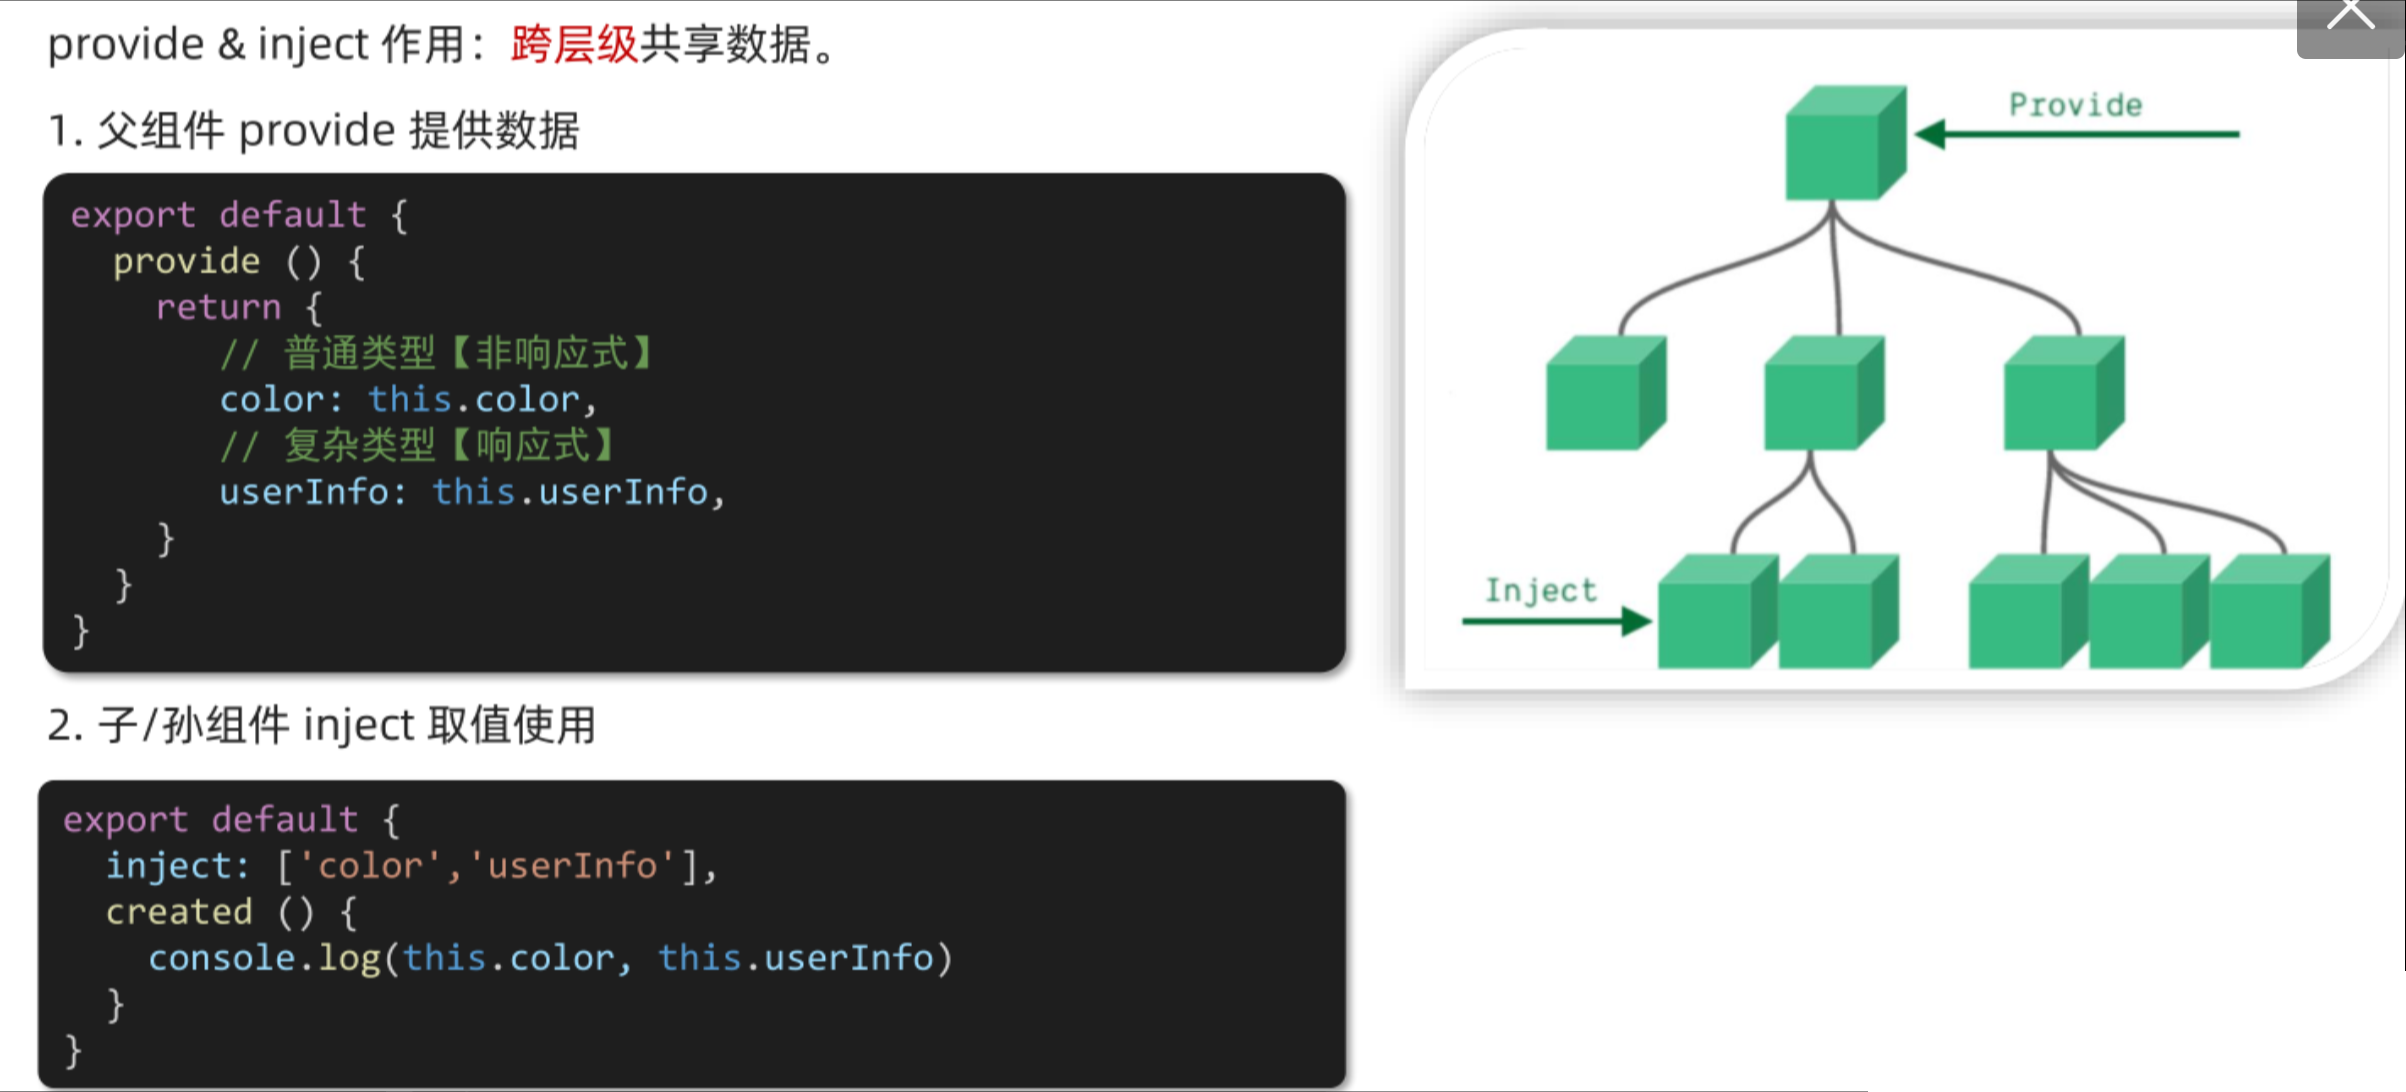
组件结构:
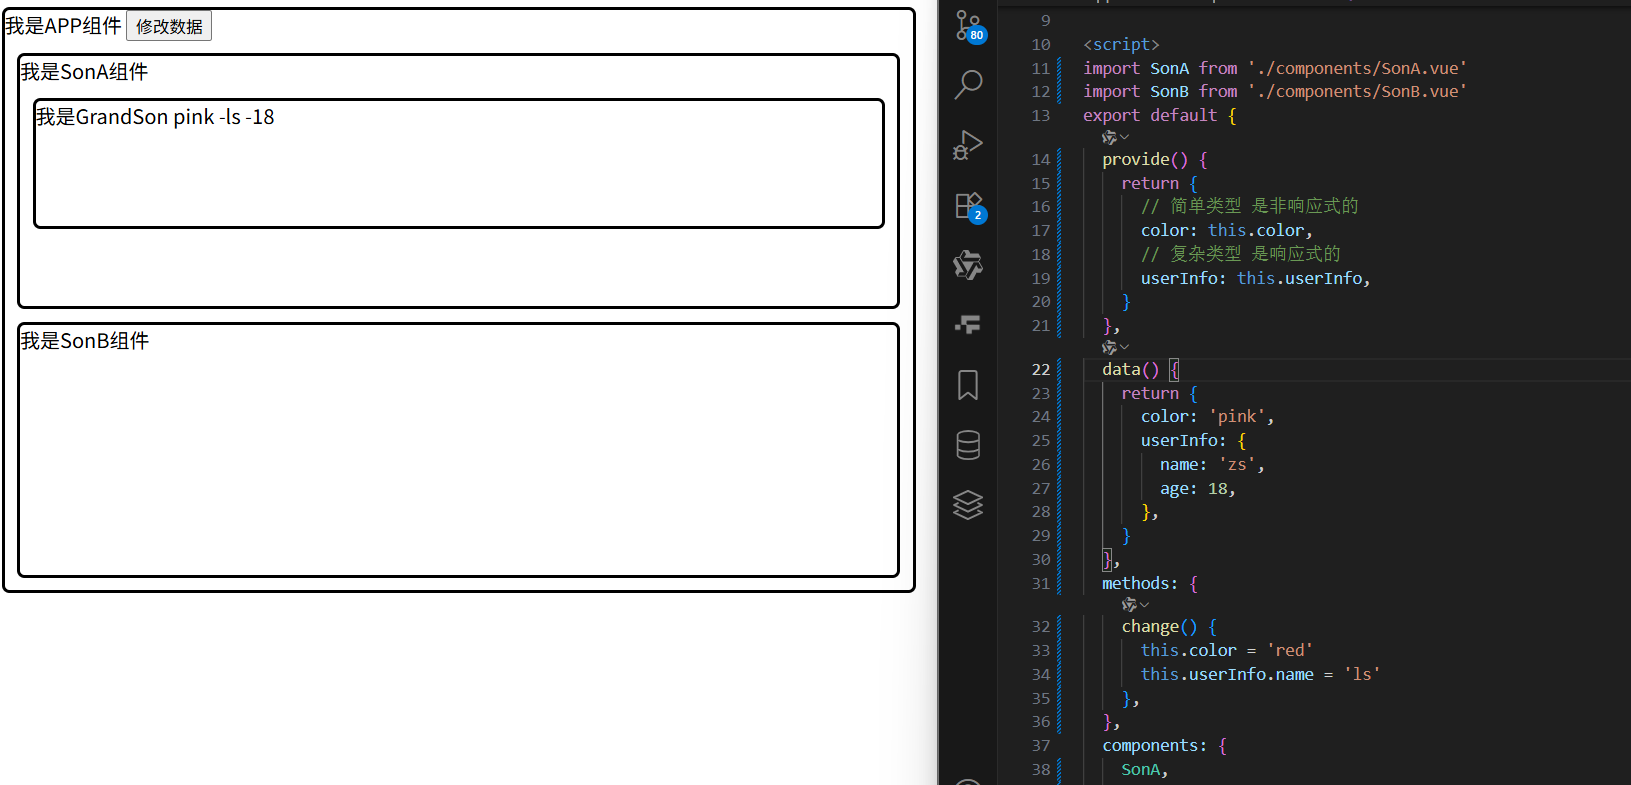
App.vue中既有简单类型数据,也有复杂类型数据:
在 Vue 中,provide 和 inject 主要用于组件之间的依赖注入,但它们的行为与常规的响应式系统有所不同。
关键点
provide中的值是否响应式取决于其来源:
-
- 如果
provide中的值是一个简单类型(如字符串、数字、布尔值),那么它在provide中是非响应式的。即使它来自data中的响应式数据,一旦传递到provide中,它就失去了响应式特性。 - 如果
provide中的值是一个复杂类型(如对象、数组),那么它在provide中是响应式的。
- 如果
简单数据类型(非响应式)
复杂类型(响应式,推荐)

<template><div class="app">我是APP组件<button @click="change">修改数据</button><SonA></SonA><SonB></SonB></div>
</template><script>
import SonA from './components/SonA.vue'
import SonB from './components/SonB.vue'
export default {provide() {return {// 简单类型 是非响应式的color: this.color,// 复杂类型 是响应式的userInfo: this.userInfo,}},data() {return {color: 'pink',userInfo: {name: 'zs',age: 18,},}},methods: {change() {this.color = 'red'this.userInfo.name = 'ls'},},components: {SonA,SonB,},
}
</script><style>
.app {border: 3px solid #000;border-radius: 6px;margin: 10px;
}
</style>
<template><div class="SonA">我是SonA组件<GrandSon></GrandSon></div>
</template><script>
import GrandSon from '../components/GrandSon.vue'
export default {components:{GrandSon}
}
</script><style>
.SonA {border: 3px solid #000;border-radius: 6px;margin: 10px;height: 200px;
}
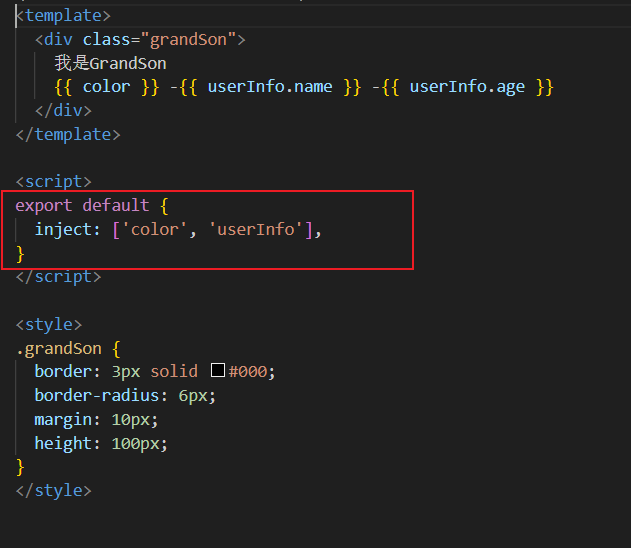
</style><template><div class="grandSon">我是GrandSon{{ color }} -{{ userInfo.name }} -{{ userInfo.age }}</div>
</template><script>
export default {inject: ['color', 'userInfo'],
}
</script><style>
.grandSon {border: 3px solid #000;border-radius: 6px;margin: 10px;height: 100px;
}
</style>进阶语法
v-model 原理
不同的input组件,比如checkbox就是checked属性和checked事件的合写。
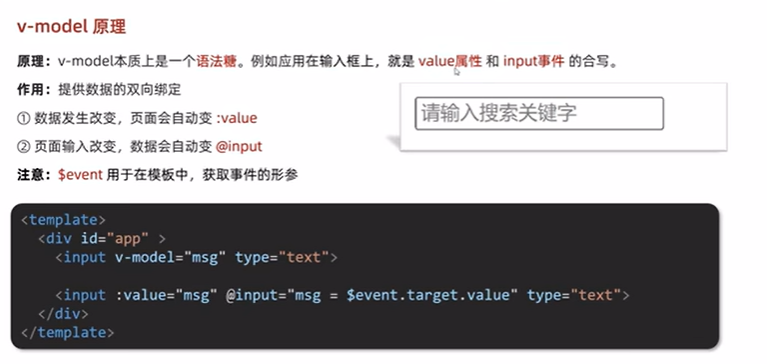
在模板中不能写e,而应写$event(获取事件对象)
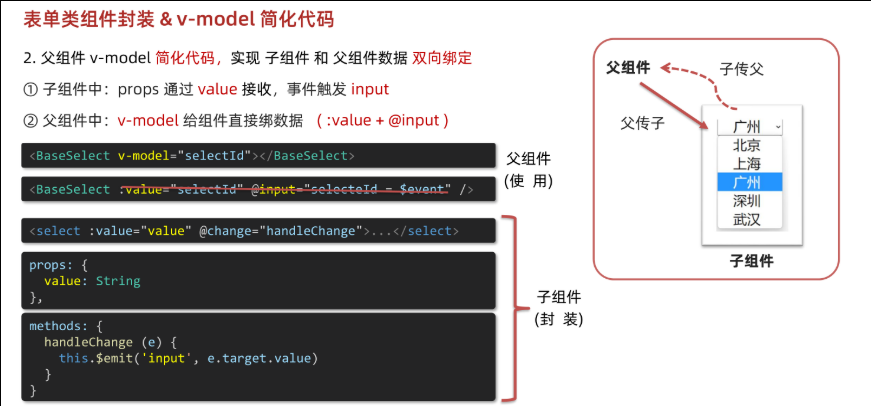
表单类组件封装 & v-model 简化代码
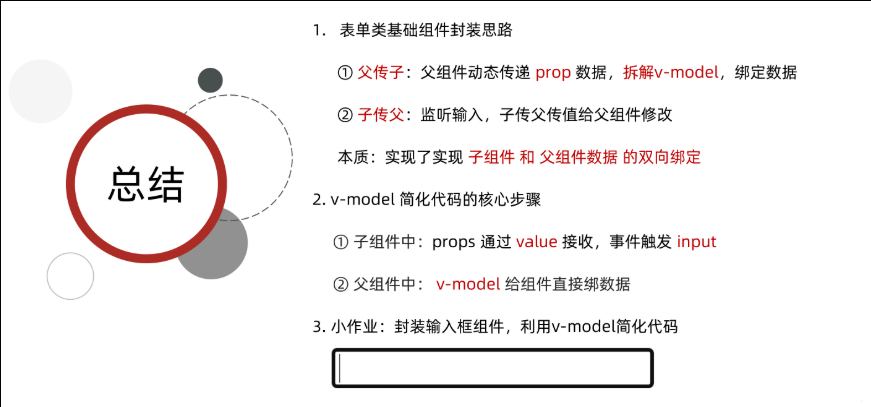
表单类组件封装
封装自己的表单类组件(BaseSelect)时,
因为单向数据流的存在,而v-model是双向数据绑定,所以需要拆解(不再使用语法糖v-model)
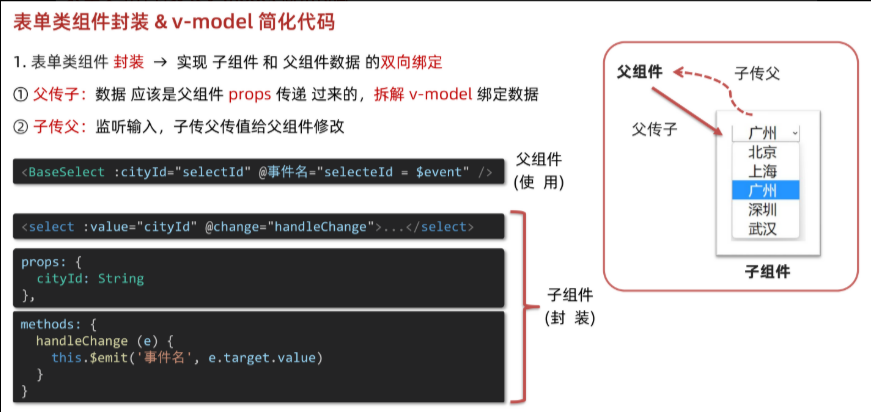
如果在封装表单类组件时(作为子组件使用)使用v-model,会报错
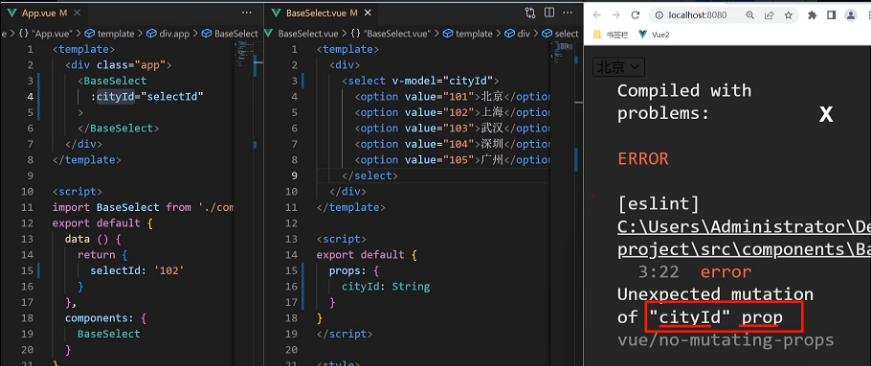
因为v-model双向绑定,会修改子组件中的cityId,不符合单向数据流(cityId是props传入进来的),所以要用单项(v-bind)简写为(:)
完整代码
BaseSelect.vue
<template><div><select :value="selectId" @change="selectCity"><option value="101">北京</option><option value="102">上海</option><option value="103">武汉</option><option value="104">广州</option><option value="105">深圳</option></select></div>
</template>
<script>
export default {props: {selectId: String,},methods: {selectCity(e) {this.$emit('changeCity', e.target.value)},},
}
</script>
<style>
</style>
App.vue
(在父组件中,使用 $event 获取形参)
<template><div class="app"><BaseSelect:selectId="selectId"@changeCity="selectId = $event"></BaseSelect></div>
</template>
<script>
import BaseSelect from './components/BaseSelect.vue'
export default {data() {return {selectId: '102',}},components: {BaseSelect,},
}
</script>
<style>
</style>
$event:用于模板(template)中直接传递事件对象,是一个特殊变量,不能写在javascript里面,是一个特殊的 Vue 提供的变量,明确表示这是一个事件对象。e:用于事件处理器的参数中,是一个普通的变量名,表示事件对象。
v-model 简化代码
使用场景:
父组件向子组件传递数据,子组件要修改这个数据再返回给父组件,此时就可以用v-model简化代码
可以以后直接记住这种场景,对父组件直接进行v-model简写
父组件:
![]()
子组件通过props接受到父组件传递的数据,由于子组件不能直接修改props传递的数据,所以在子组件中不能使用v-model来直接绑定props传来的数据,此时用v-bind(:)
所以此时,父组件可以简写为
![]()
关键:
父子通信时,子组件触发事件名为‘input’的事件(触发事件为input,固定的);
在父组件使用v-mdel语法糖::value=" " @input=" " (所传属性为value,固定的)
v-model=:value+@input
总结
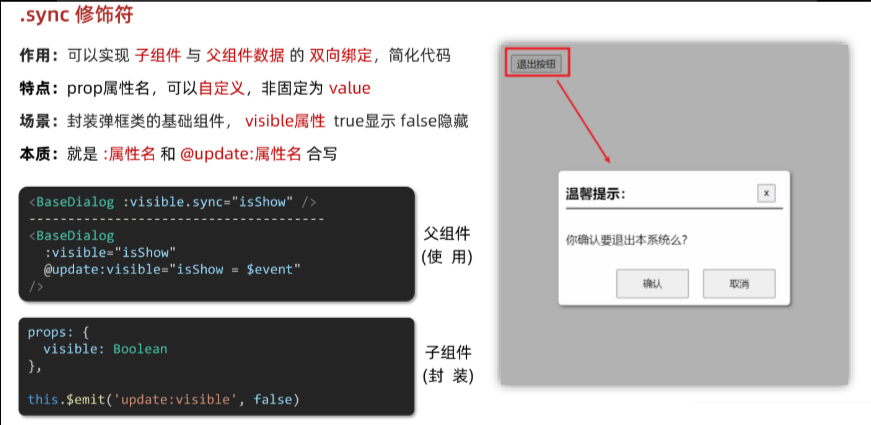
.sync 修饰符
代码:
BaseDialog.vue
<template><div class="base-dialog-wrap" v-show="isShow"><div class="base-dialog"><div class="title"><h3>温馨提示:</h3><button class="close" @click="closeDialog">x</button></div><div class="content"><p>你确认要退出本系统么?</p></div><div class="footer"><button>确认</button><button>取消</button></div></div></div>
</template>
<script>
export default {props: {isShow: Boolean,},methods:{closeDialog(){this.$emit('update:isShow',false)}}
}
</script>
<style scoped>
.base-dialog-wrap {width: 300px;height: 200px;box-shadow: 2px 2px 2px 2px #ccc;position: fixed;left: 50%;top: 50%;transform: translate(-50%, -50%);padding: 0 10px;
}
.base-dialog .title {display: flex;justify-content: space-between;align-items: center;border-bottom: 2px solid #000;
}
.base-dialog .content {margin-top: 38px;
}
.base-dialog .title .close {width: 20px;height: 20px;cursor: pointer;line-height: 10px;
}
.footer {display: flex;justify-content: flex-end;margin-top: 26px;
}
.footer button {width: 80px;height: 40px;
}
.footer button:nth-child(1) {margin-right: 10px;cursor: pointer;
}
</style>
App.vue
<template><div class="app"><button @click="openDialog">退出按钮</button><!-- isShow.sync  => :isShow="isShow" @update:isShow="isShow=$event" --><BaseDialog :isShow.sync="isShow"></BaseDialog></div>
</template>
<script>
import BaseDialog from './components/BaseDialog.vue'
export default {data() {return {isShow: false,}},methods: {openDialog() {this.isShow = true// console.log(document.querySelectorAll('.box')); },},components: {BaseDialog,},
}
</script>
<style>
</style>
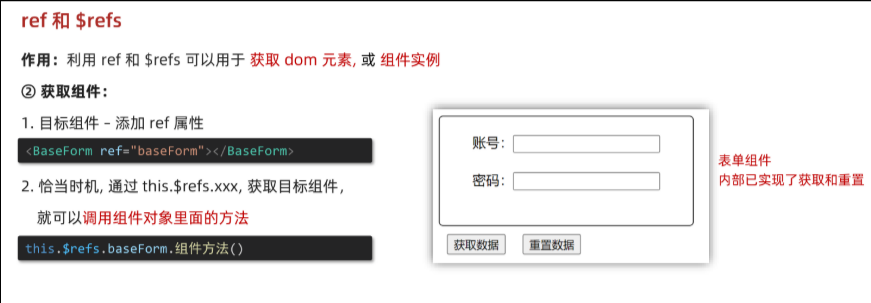
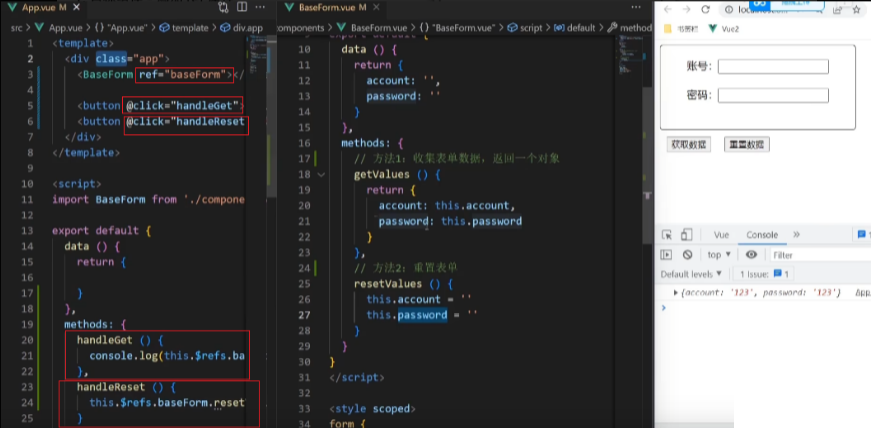
ref 和 $refs
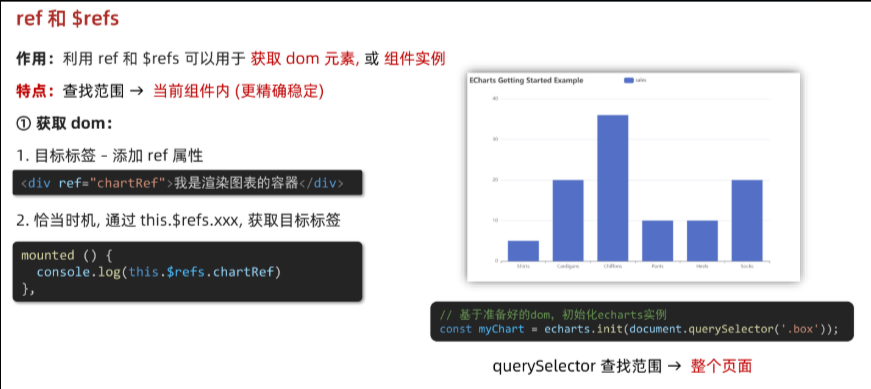
document.querySelector查找范围是整个页面,当有相同的类名的时候,就会选到查找的第一个,所以要使用this.$refs.xxx来精准获取
获取组件实例
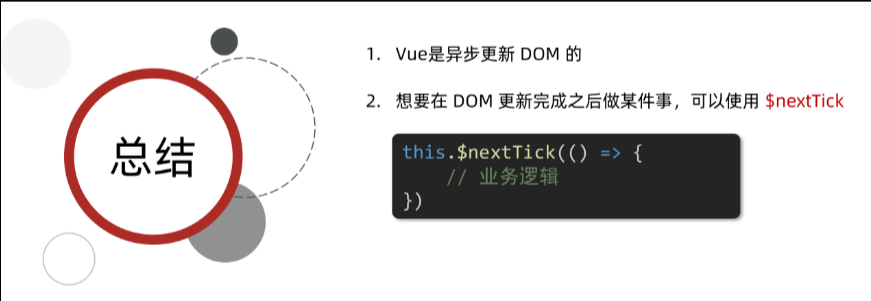
Vue异步更新和$nextTick
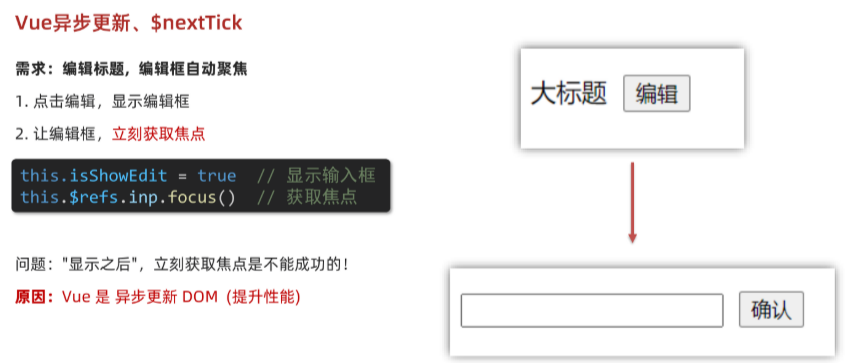
this.$refs.inp为undefined ,需要$nextTick
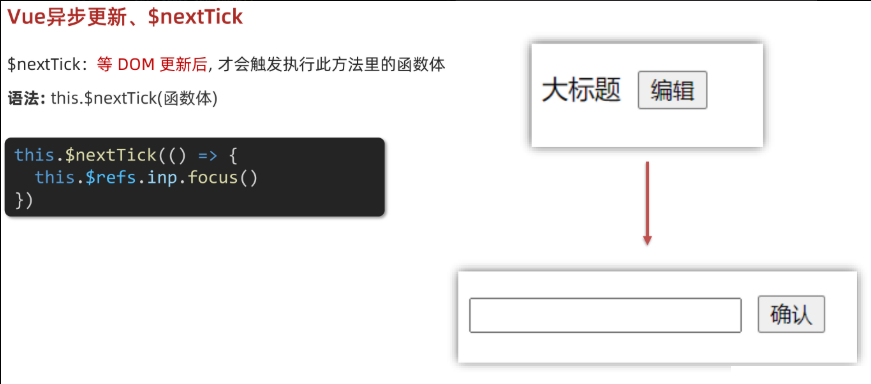
使用$nextTick改进代码:
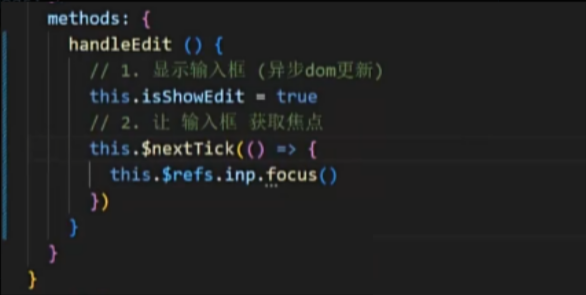
$nextTick:等 DOM 更新后, 才会触发执行此方法里的函数体
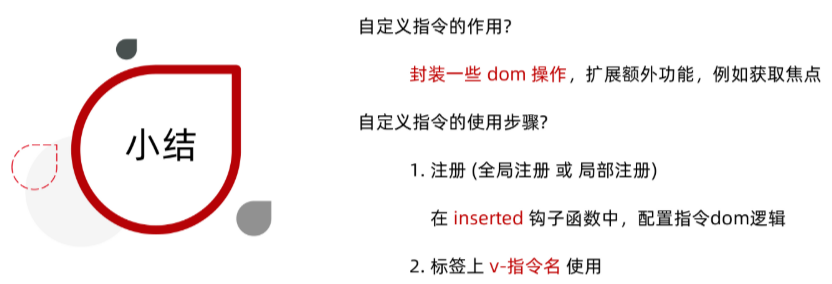
自定义指令
指令注册
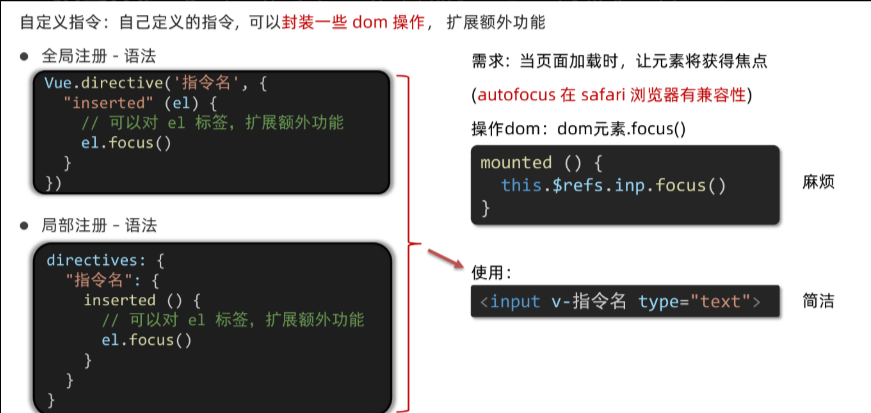
directive-> 指令的意思
main.js(全局注册)
// inserted 会在 指令所在的元素,被插入到页面中时触发
import Vue from 'vue'
import App from './App.vue'Vue.config.productionTip = false// // 1. 全局注册指令Vue.directive('focus', {// inserted 会在 指令所在的元素,被插入到页面中时触发inserted (el) {// el 就是指令所绑定的元素console.log(el);el.focus()}})new Vue({render: h => h(App),
}).$mount('#app')
App.vue(局部注册)
directives
<template><div><h1>自定义指令</h1><input v-focus ref="inp" type="text"></div>
</template>
<script>
export default {// mounted () {//   this.$refs.inp.focus()// }// 2. 局部注册指令directives: {// 指令名:指令的配置项focus: {inserted (el) {el.focus()}}}
}
</script>
<style></style>
指令的值
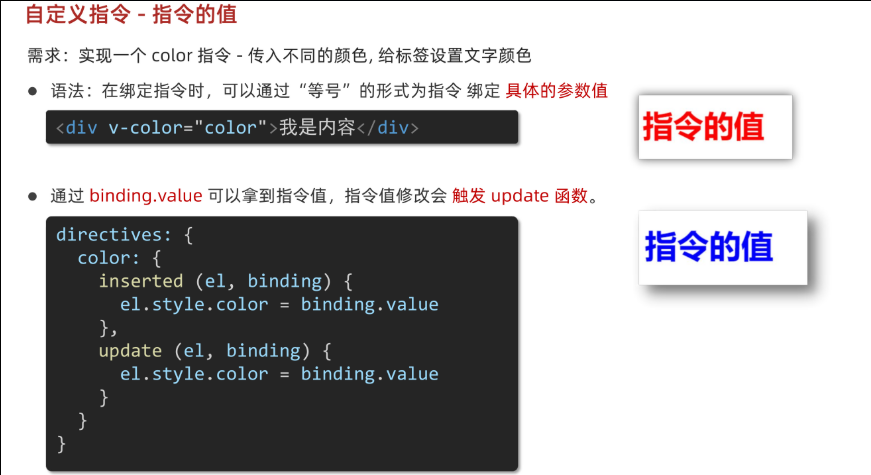
// 2. update 指令的值修改的时候触发,提供值变化后,dom更新的逻辑
<template><div><h1 v-color="color" ref="inp">自定义指令</h1><input type="text" /><button @click="color = 'blue'">变蓝色</button></div>
</template><script>
export default {// mounted () {//   this.$refs.inp.focus()// }data() {return {color: "red",};},
};
</script><style></style>
注意:点击函数里面直接写的就是color,而不是this.color,在模版(template)直接用,在js里面要加上this
import Vue from 'vue'
import App from './App.vue'Vue.config.productionTip = false// // 1. 全局注册指令
// Vue.directive('focus', {
//   // inserted 会在 指令所在的元素,被插入到页面中时触发
//   inserted (el) {
//     // el 就是指令所绑定的元素
//     // console.log(el);
//     el.focus()
//   }
// })
Vue.directive('color', {inserted(el, binding) {el.style.color = binding.value},update(el, binding) {el.style.color = binding.value},})new Vue({render: h => h(App),
}).$mount('#app')
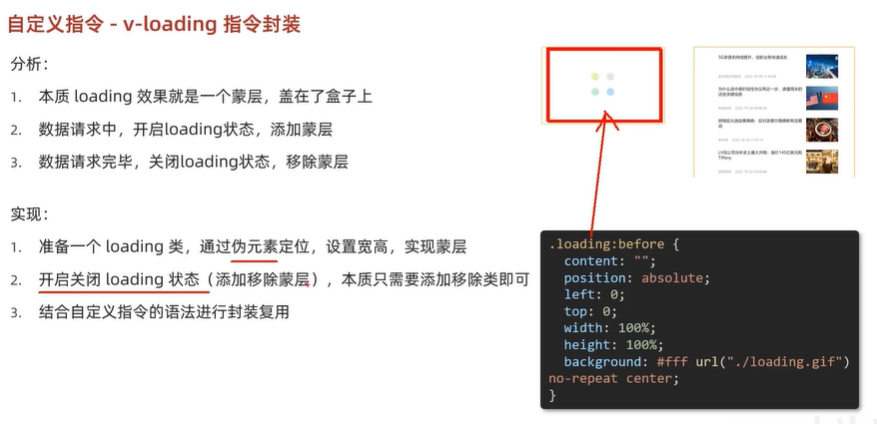
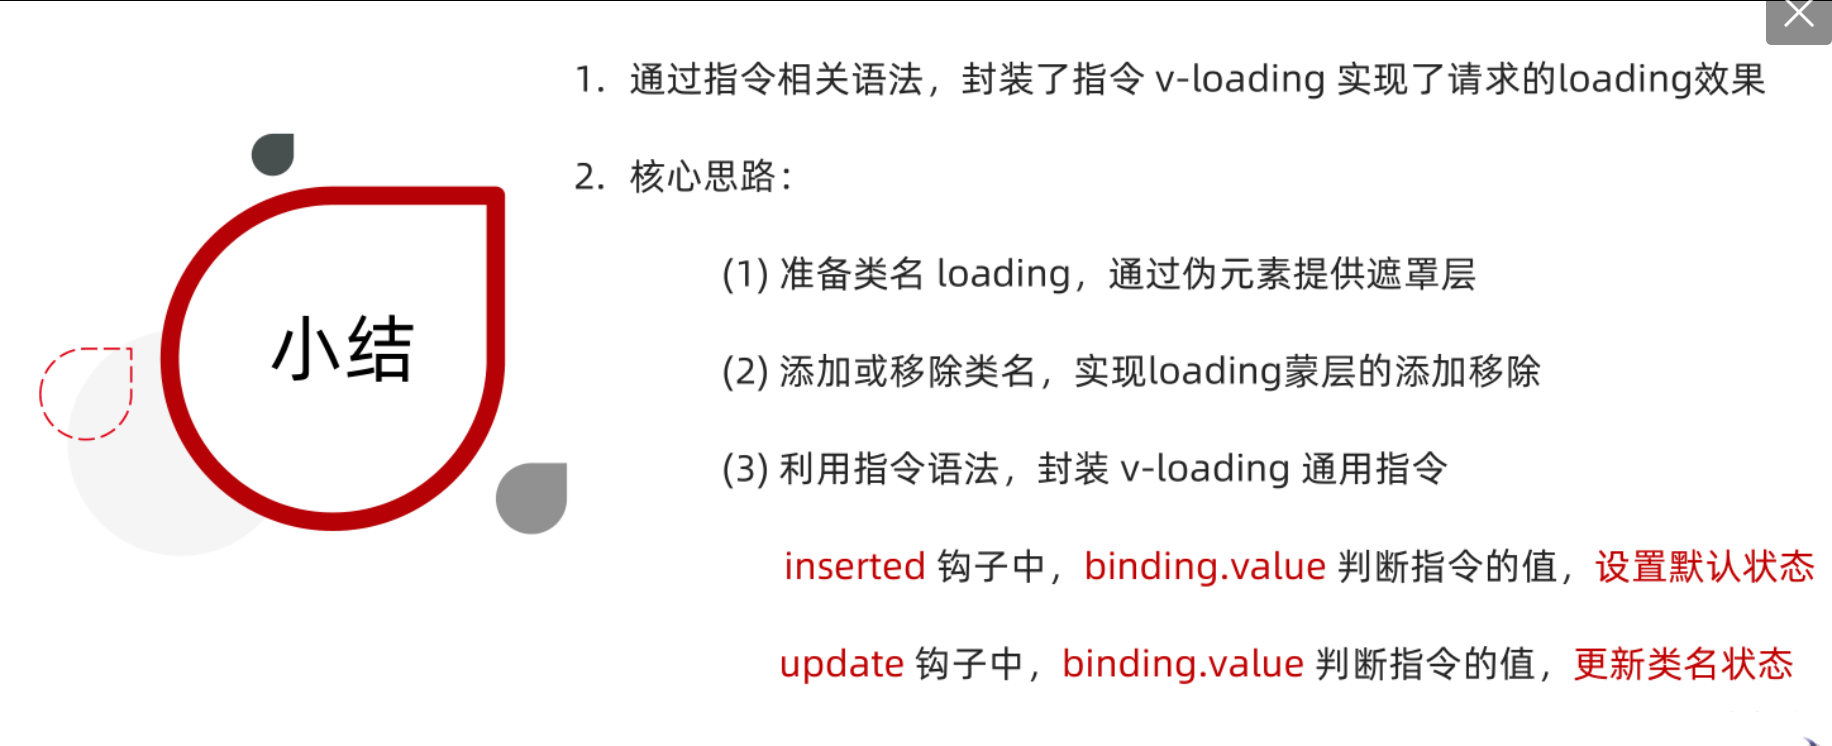
自定义指令 - v-loading 指令封装
![]()

代码:
<template><div class="main"><div class="box" v-loading="isLoading"><ul><li v-for="item in list" :key="item.id" class="news"><div class="left"><div class="title">{{ item.title }}</div><div class="info"><span>{{ item.source }}</span><span>{{ item.time }}</span></div></div><div class="right"><img :src="item.img" alt=""></div></li></ul></div><div class="box2" v-loading="isLoading2"></div></div>
</template>
<script>
// 安装axios =>  yarn add axios
import axios from 'axios'// 接口地址:http://hmajax.itheima.net/api/news
// 请求方式:get
export default {data () {return {list: [],isLoading: true,isLoading2: true}},async created () {// 1. 发送请求获取数据const res = await axios.get('http://hmajax.itheima.net/api/news')setTimeout(() => {// 2. 更新到 list 中,用于页面渲染 v-forthis.list = res.data.datathis.isLoading = false}, 2000)},directives: {loading: {inserted (el, binding) {binding.value ? el.classList.add('loading') : el.classList.remove('loading')},update (el, binding) {binding.value ? el.classList.add('loading') : el.classList.remove('loading')}}}
}
</script>
<style>
.loading:before {content: '';position: absolute;left: 0;top: 0;width: 100%;height: 100%;background: #fff url('./loading.gif') no-repeat center;
}.box2 {width: 400px;height: 400px;border: 2px solid #000;position: relative;
}.box {width: 800px;min-height: 500px;border: 3px solid orange;border-radius: 5px;position: relative;
}
.news {display: flex;height: 120px;width: 600px;margin: 0 auto;padding: 20px 0;cursor: pointer;
}
.news .left {flex: 1;display: flex;flex-direction: column;justify-content: space-between;padding-right: 10px;
}
.news .left .title {font-size: 20px;
}
.news .left .info {color: #999999;
}
.news .left .info span {margin-right: 20px;
}
.news .right {width: 160px;height: 120px;
}
.news .right img {width: 100%;height: 100%;object-fit: cover;
}
</style>
总结:
插槽
默认插槽
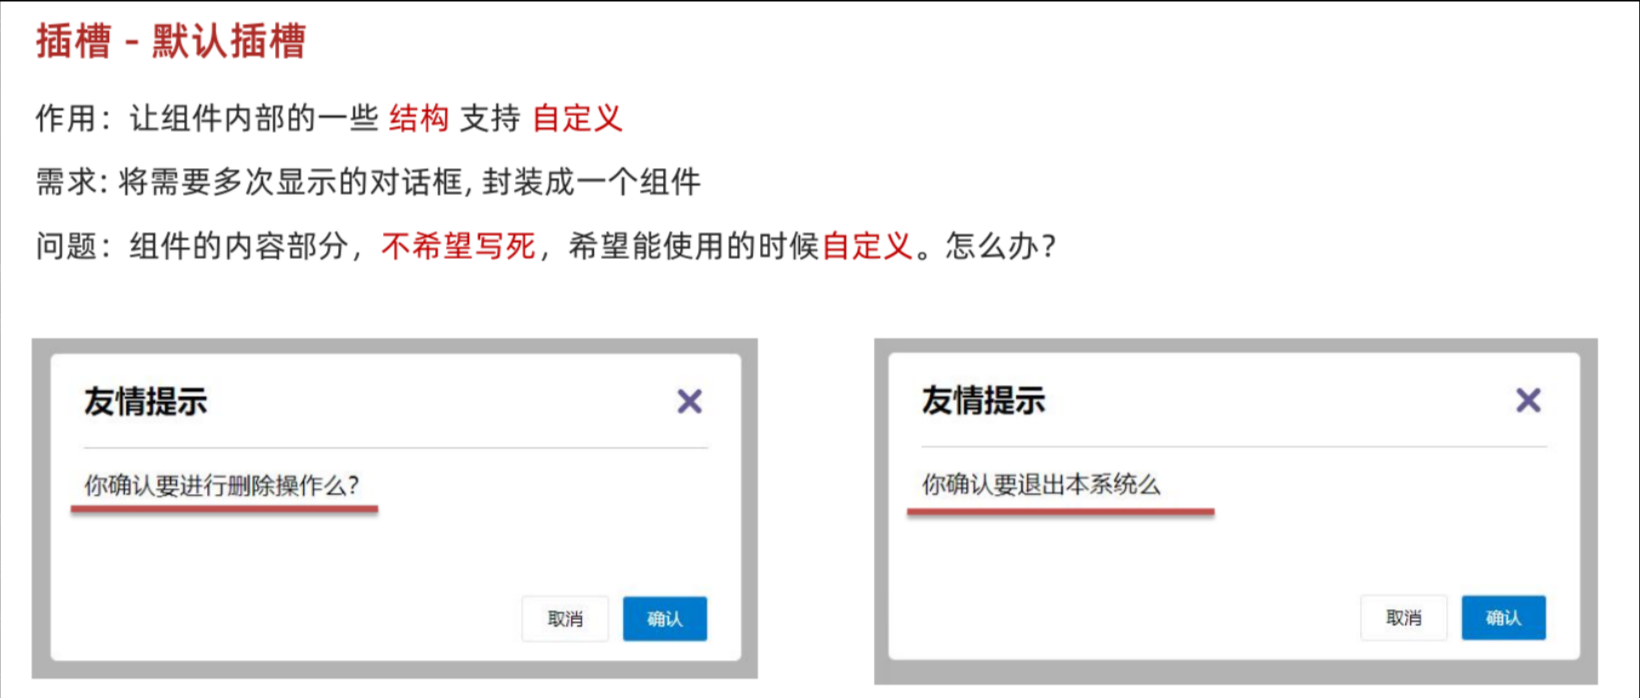
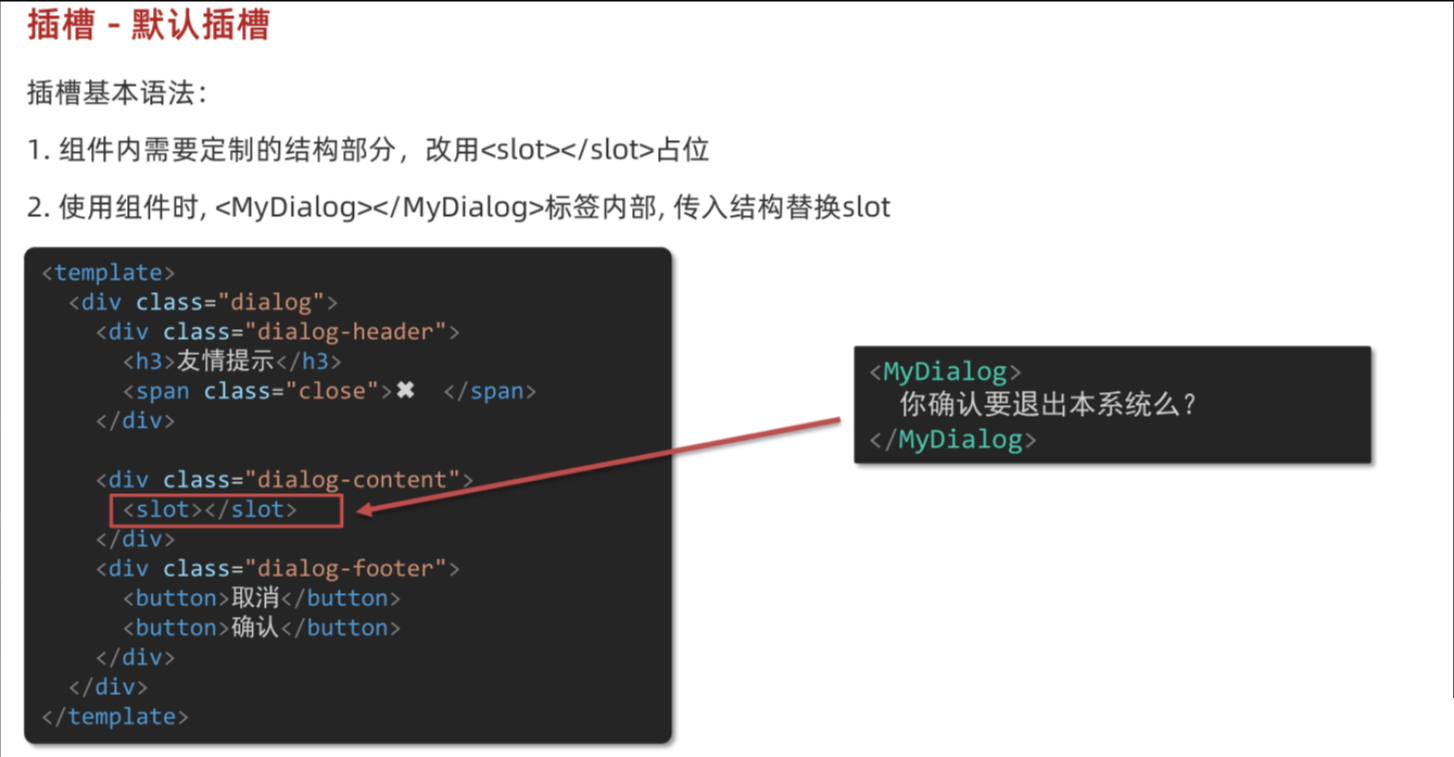
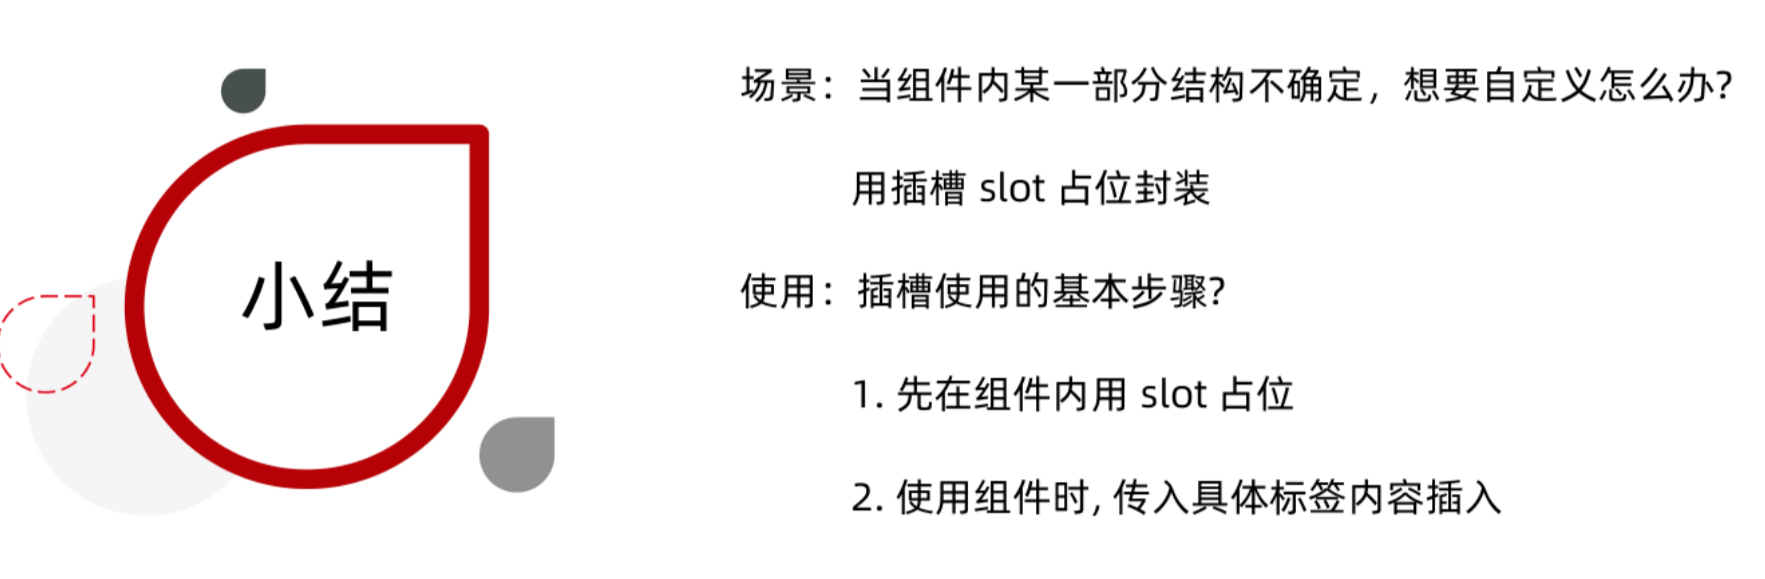
基本语法
代码演示:
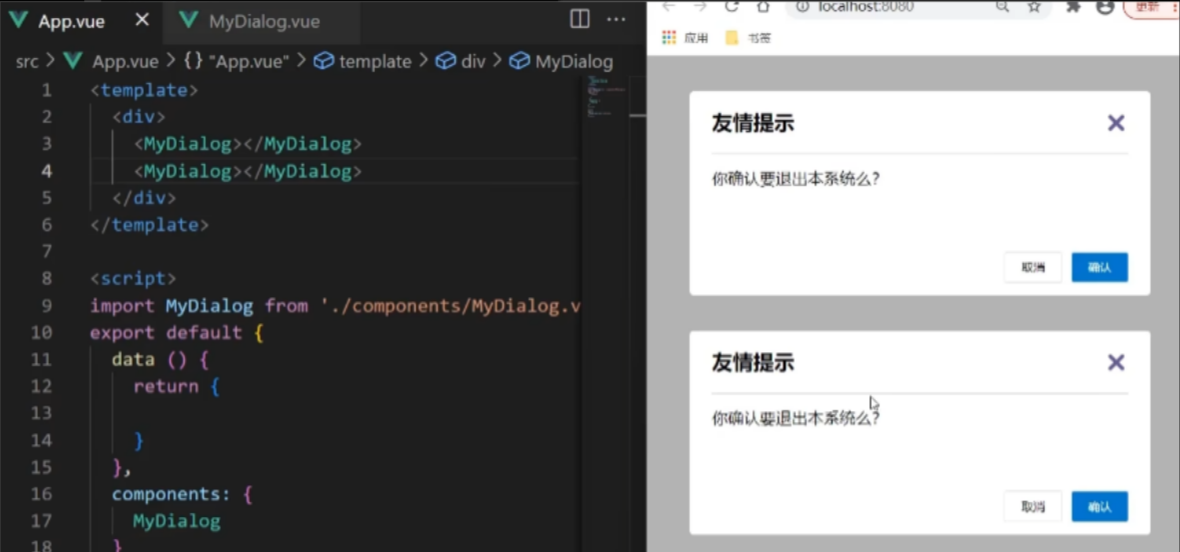
不使用插槽时(组件内容一样、不可变、固定):
使用插槽:
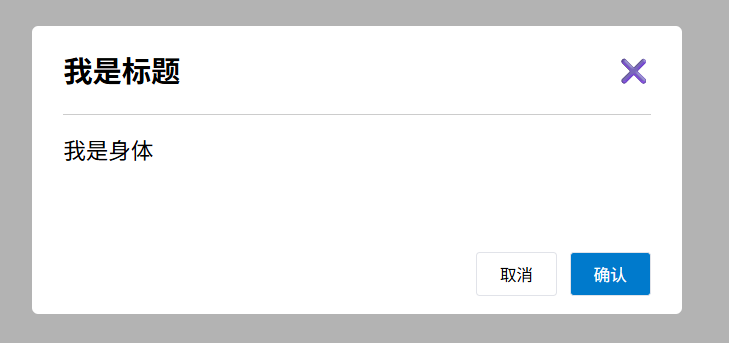
MyDialog.vue
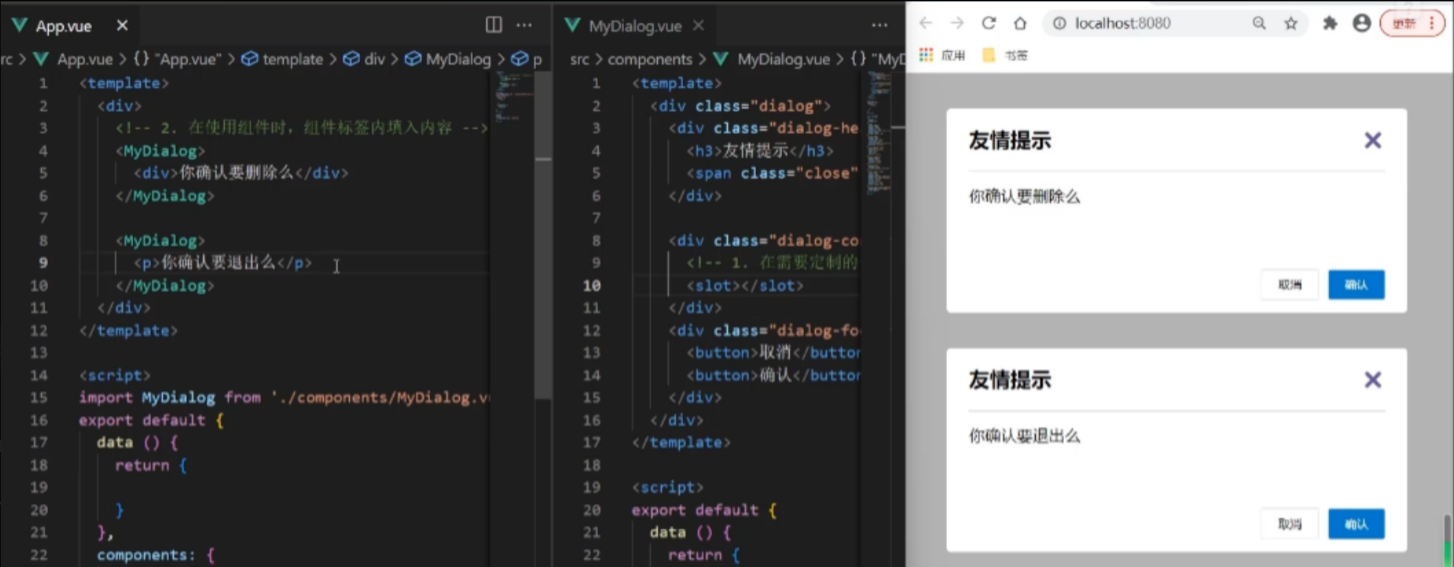
<template><div class="dialog"><div class="dialog-header"><h3>友情提示</h3><span class="close">✖️</span></div><div class="dialog-content"><!-- 1. 在需要定制的位置,使用slot占位 --><slot></slot></div><div class="dialog-footer"><button>取消</button><button>确认</button></div></div>
</template>
<script>
export default {data () {return {}}
}
</script>
<style scoped>
* {margin: 0;padding: 0;
}
.dialog {width: 470px;height: 230px;padding: 0 25px;background-color: #ffffff;margin: 40px auto;border-radius: 5px;
}
.dialog-header {height: 70px;line-height: 70px;font-size: 20px;border-bottom: 1px solid #ccc;position: relative;
}
.dialog-header .close {position: absolute;right: 0px;top: 0px;cursor: pointer;
}
.dialog-content {height: 80px;font-size: 18px;padding: 15px 0;
}
.dialog-footer {display: flex;justify-content: flex-end;
}
.dialog-footer button {width: 65px;height: 35px;background-color: #ffffff;border: 1px solid #e1e3e9;cursor: pointer;outline: none;margin-left: 10px;border-radius: 3px;
}
.dialog-footer button:last-child {background-color: #007acc;color: #fff;
}
</style>
App.vue
<template><div><!-- 2. 在使用组件时,组件标签内填入内容 --><MyDialog><div>你确认要删除么</div></MyDialog><MyDialog><p>你确认要退出么</p></MyDialog></div>
</template>
<script>
import MyDialog from './components/MyDialog.vue'
export default {data () {return {}},components: {MyDialog}
}
</script>
<style>
body {background-color: #b3b3b3;
}
</style>
效果:
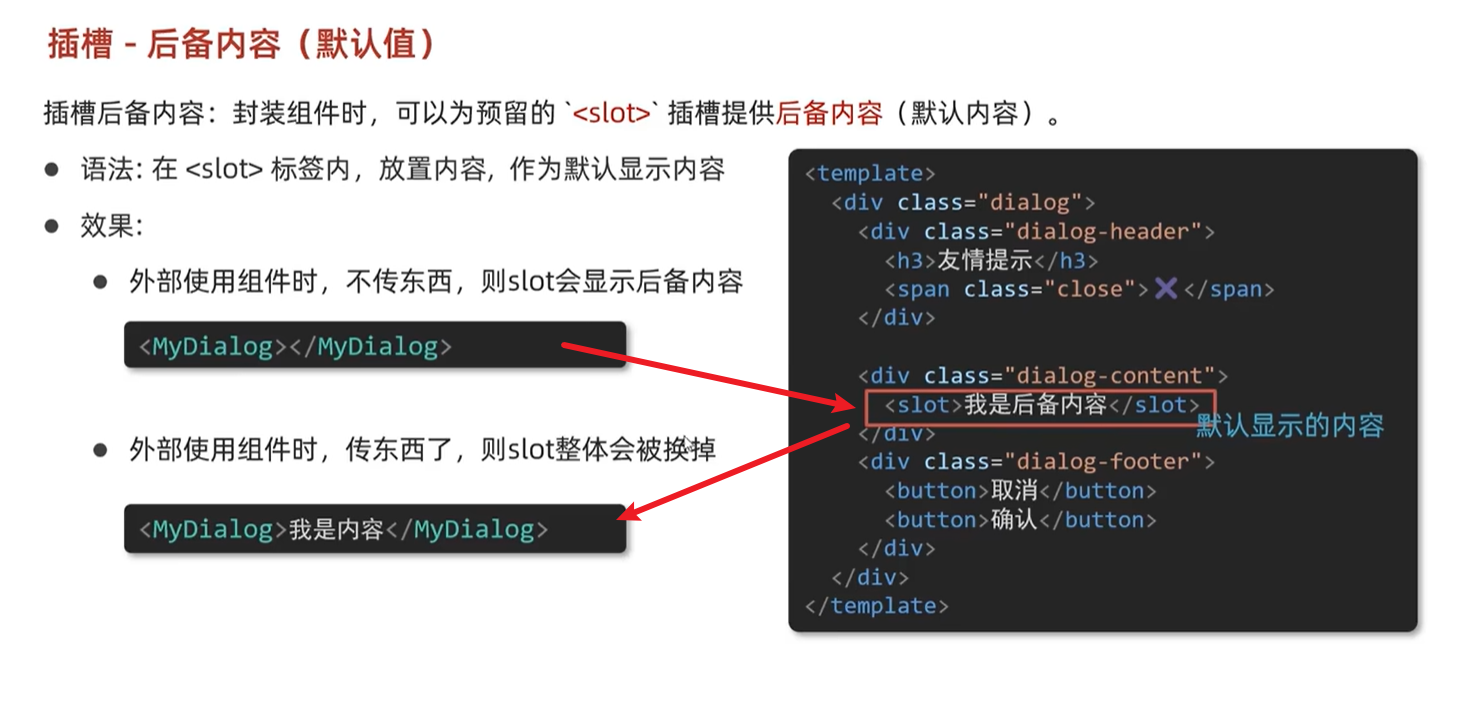
后备内容

slot标签里面的内容会作为默认显示内容:
没有默认内容时(不显示任何内容):

往slot标签内部,编写内容,可以作为后备内容也就是(默认值)
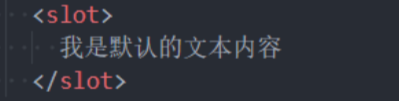
![]()
此时使用的组件内部必须什么也没有,如果有空的div标签之类的也不算空,这时也不会显示设置的默认值,必须标签内什么也没有。
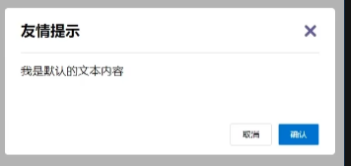
效果:
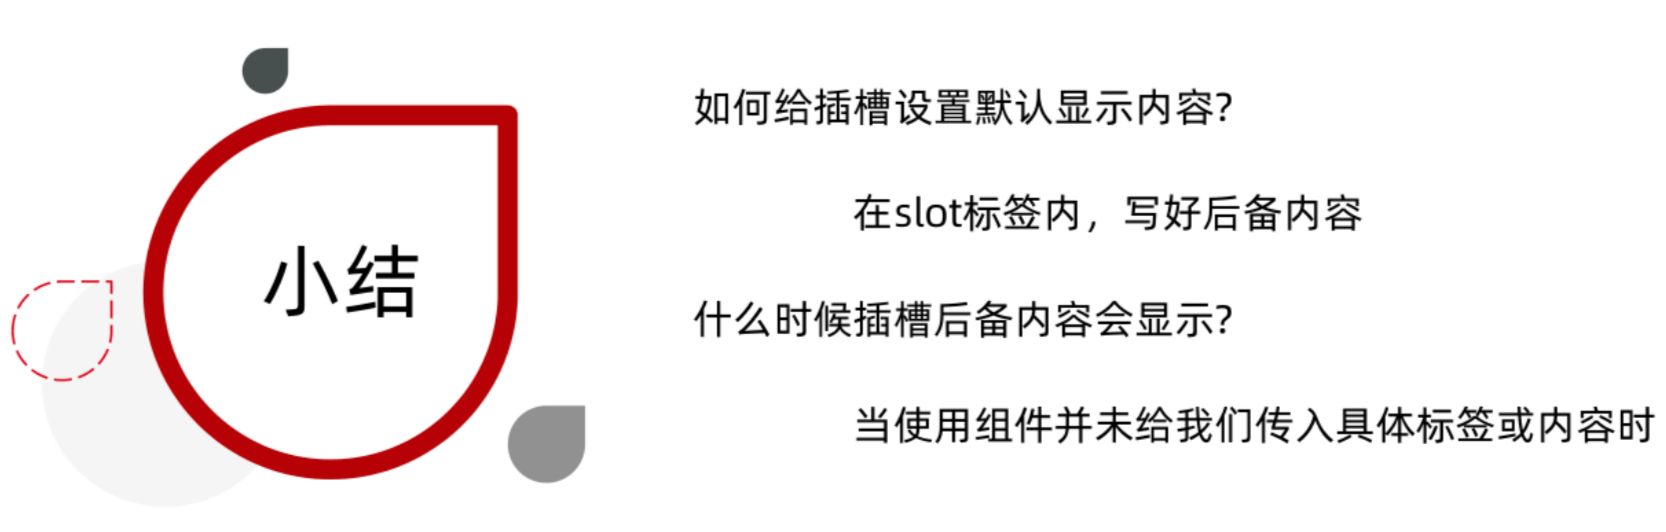
总结:
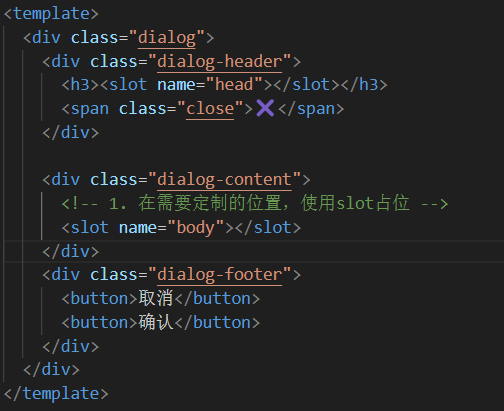
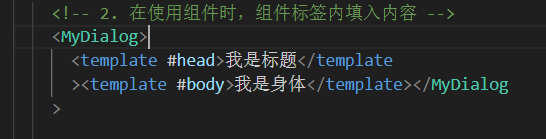
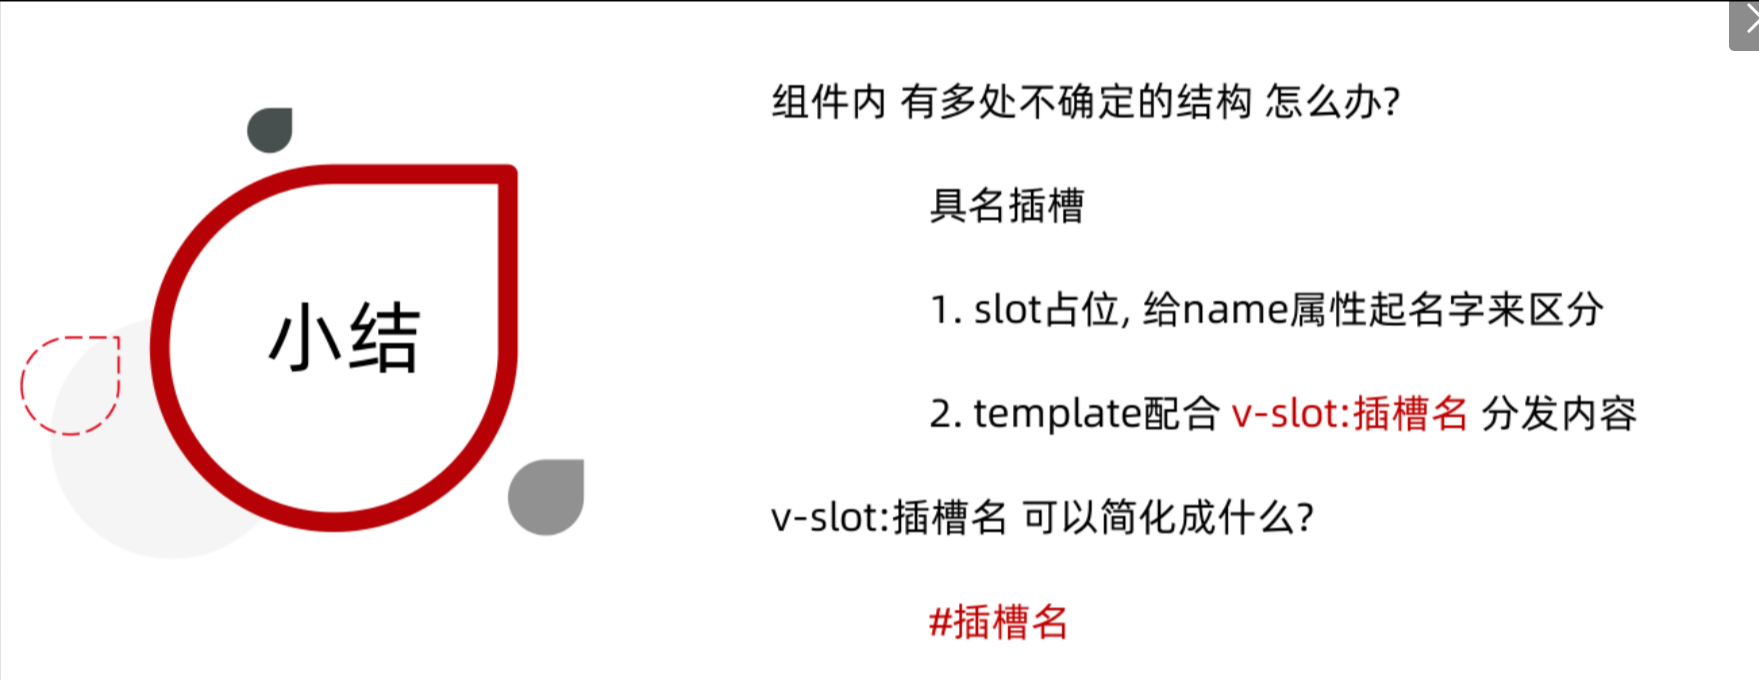
具名插槽
既想定制标题,也要定制内容:
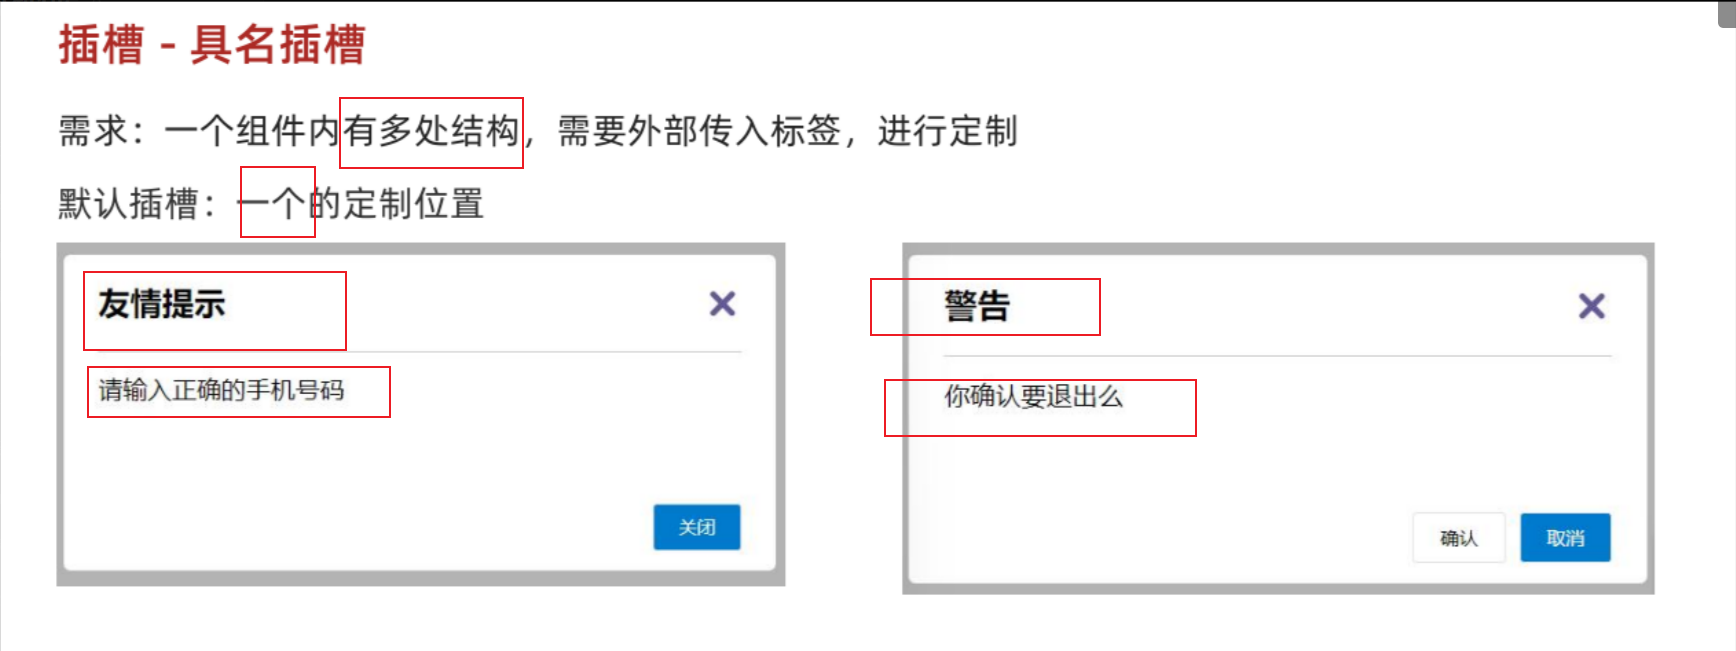
用法:
template标签包裹内容,配合v-slot:名字来分发对应标签
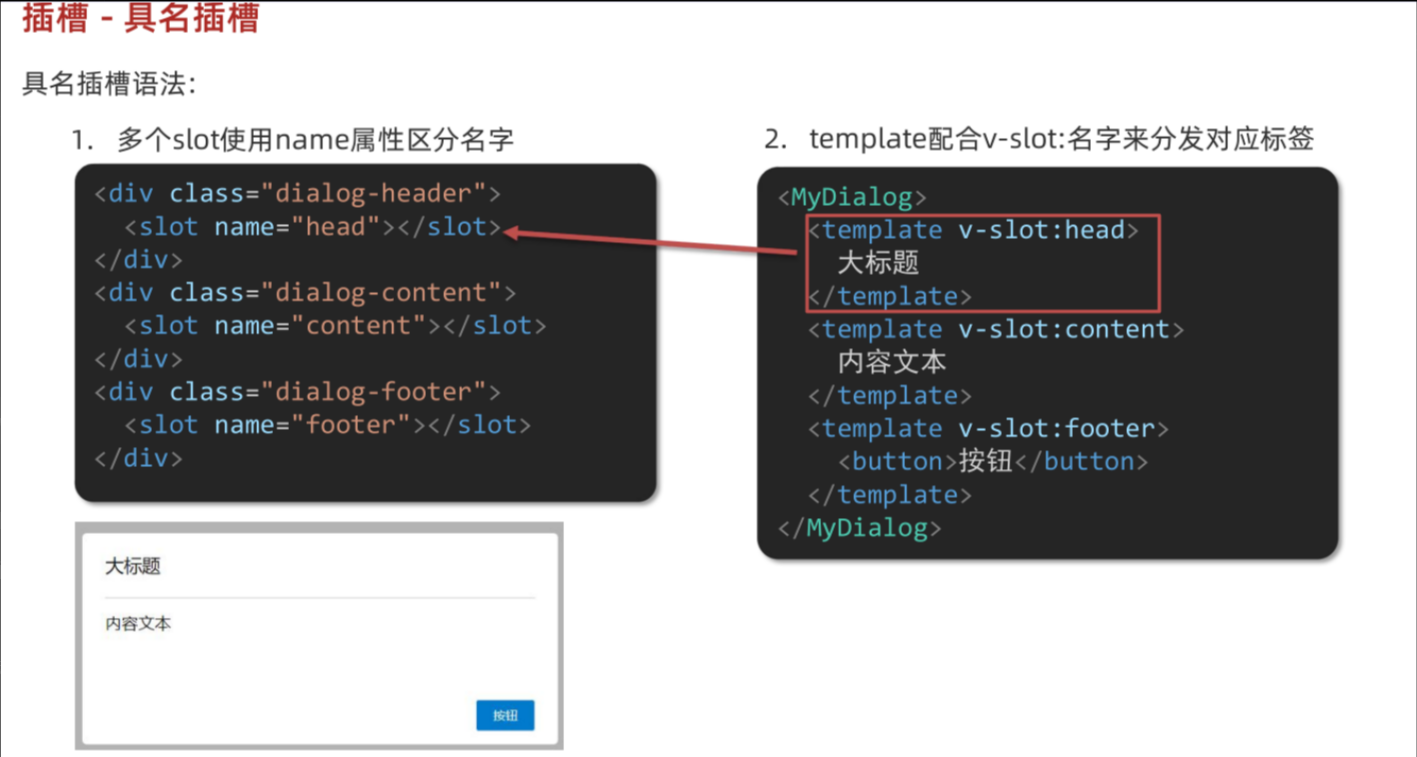
v-slot可以简写成#
使用具名插槽:
总结:
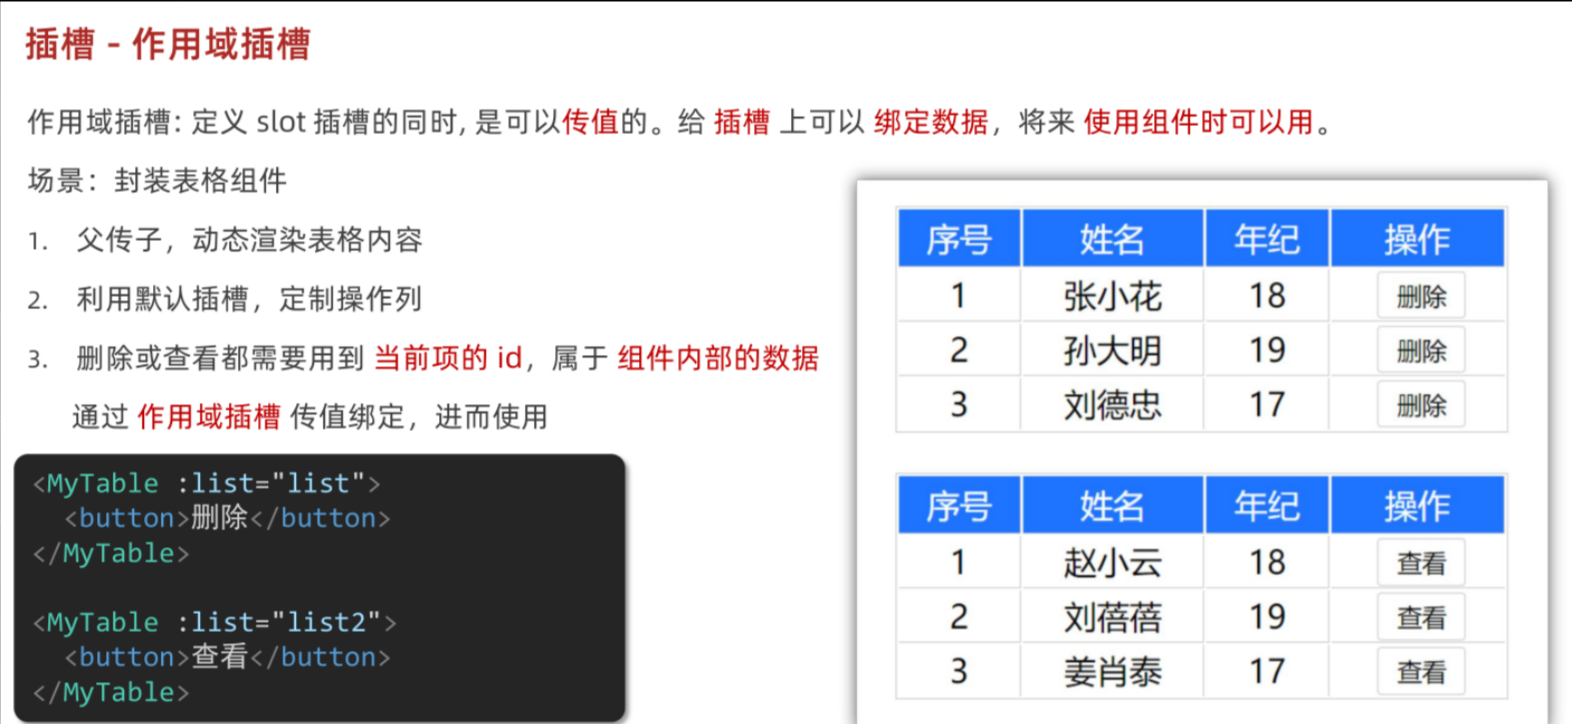
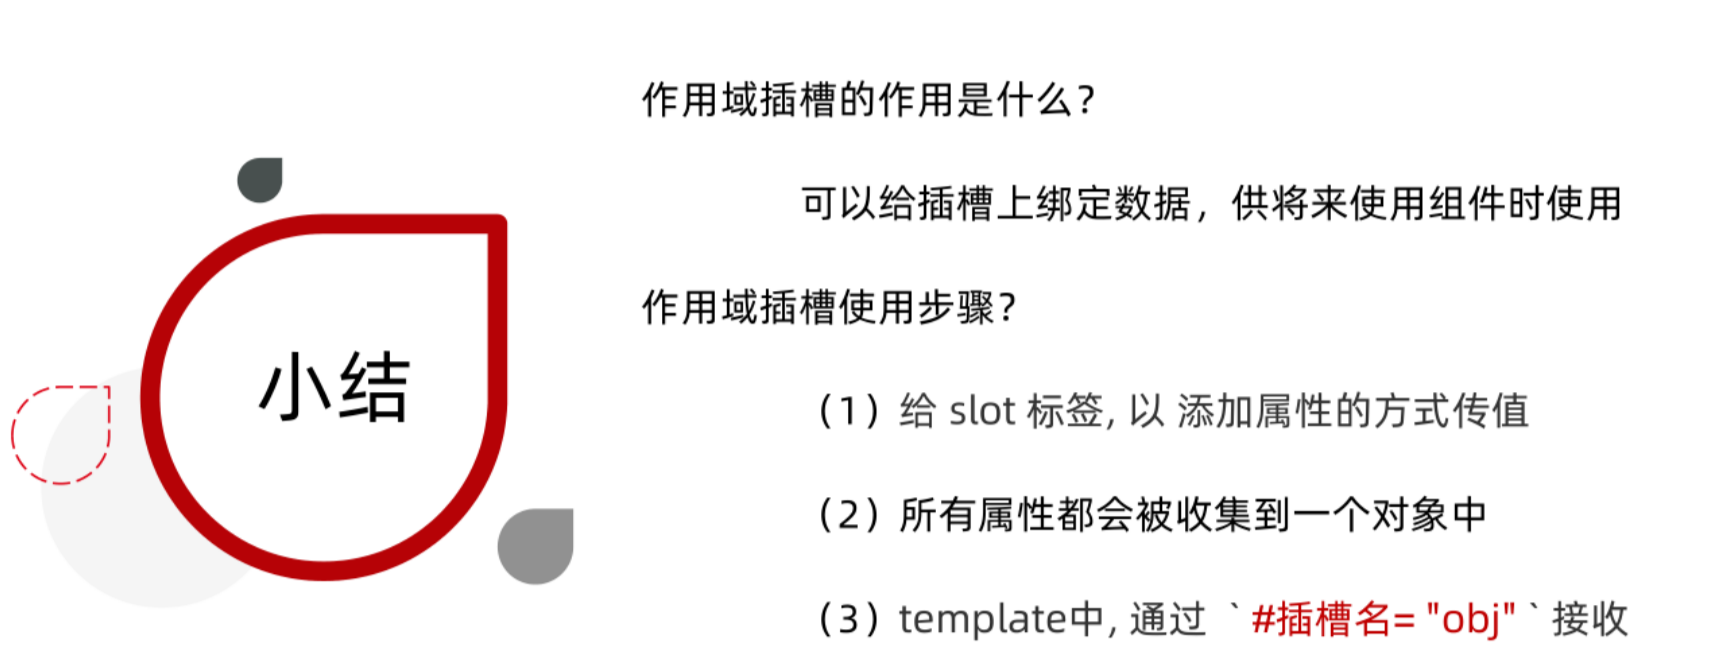
作用域插槽
作用域插槽:是插槽的一个传参语法

使用步骤:

也可以直接解构,#default(这里写的是插槽名,默认插槽名叫做default)={row}

使用作用域插槽:
MyTable.vue
<template><table class="my-table"><thead><tr><th>序号</th><th>姓名</th><th>年纪</th><th>操作</th></tr></thead><tbody><tr v-for="(item, index) in data" :key="item.id"><td>{{ index + 1 }}</td><td>{{ item.name }}</td><td>{{ item.age }}</td><td><!-- 1. 给slot标签,添加属性的方式传值 --><slot :row="item" msg="测试文本"></slot><!-- 2. 将所有的属性,添加到一个对象中 --><!-- {row: { id: 2, name: '孙大明', age: 19 },msg: '测试文本'}--></td></tr></tbody></table>
</template>
<script>
export default {props: {data: Array}
}
</script>
<style scoped>
.my-table {width: 450px;text-align: center;border: 1px solid #ccc;font-size: 24px;margin: 30px auto;
}
.my-table thead {background-color: #1f74ff;color: #fff;
}
.my-table thead th {font-weight: normal;
}
.my-table thead tr {line-height: 40px;
}
.my-table th,
.my-table td {border-bottom: 1px solid #ccc;border-right: 1px solid #ccc;
}
.my-table td:last-child {border-right: none;
}
.my-table tr:last-child td {border-bottom: none;
}
.my-table button {width: 65px;height: 35px;font-size: 18px;border: 1px solid #ccc;outline: none;border-radius: 3px;cursor: pointer;background-color: #ffffff;margin-left: 5px;
}
</style>
App.vue
<template><div><MyTable :data="list"><!-- 3. 通过template #插槽名="变量名" 接收 --><template #default="obj"><button @click="del(obj.row.id)">删除</button></template></MyTable><MyTable :data="list2"><template #default="{ row }"> //可以直接解构<button @click="show(row)">查看</button></template></MyTable></div>
</template>
<script>
import MyTable from './components/MyTable.vue'
export default {data () {return {list: [{ id: 1, name: '张小花', age: 18 },{ id: 2, name: '孙大明', age: 19 },{ id: 3, name: '刘德忠', age: 17 },],list2: [{ id: 1, name: '赵小云', age: 18 },{ id: 2, name: '刘蓓蓓', age: 19 },{ id: 3, name: '姜肖泰', age: 17 },]}},methods: {del (id) {this.list = this.list.filter(item => item.id !== id)},show (row) {// console.log(row);alert(`姓名:${row.name}; 年纪:${row.age}`)}},components: {MyTable}
}
</script>
总结:
个人认为作用域插槽传值,比组件通信-子传父-$emit 会更加简洁方便。
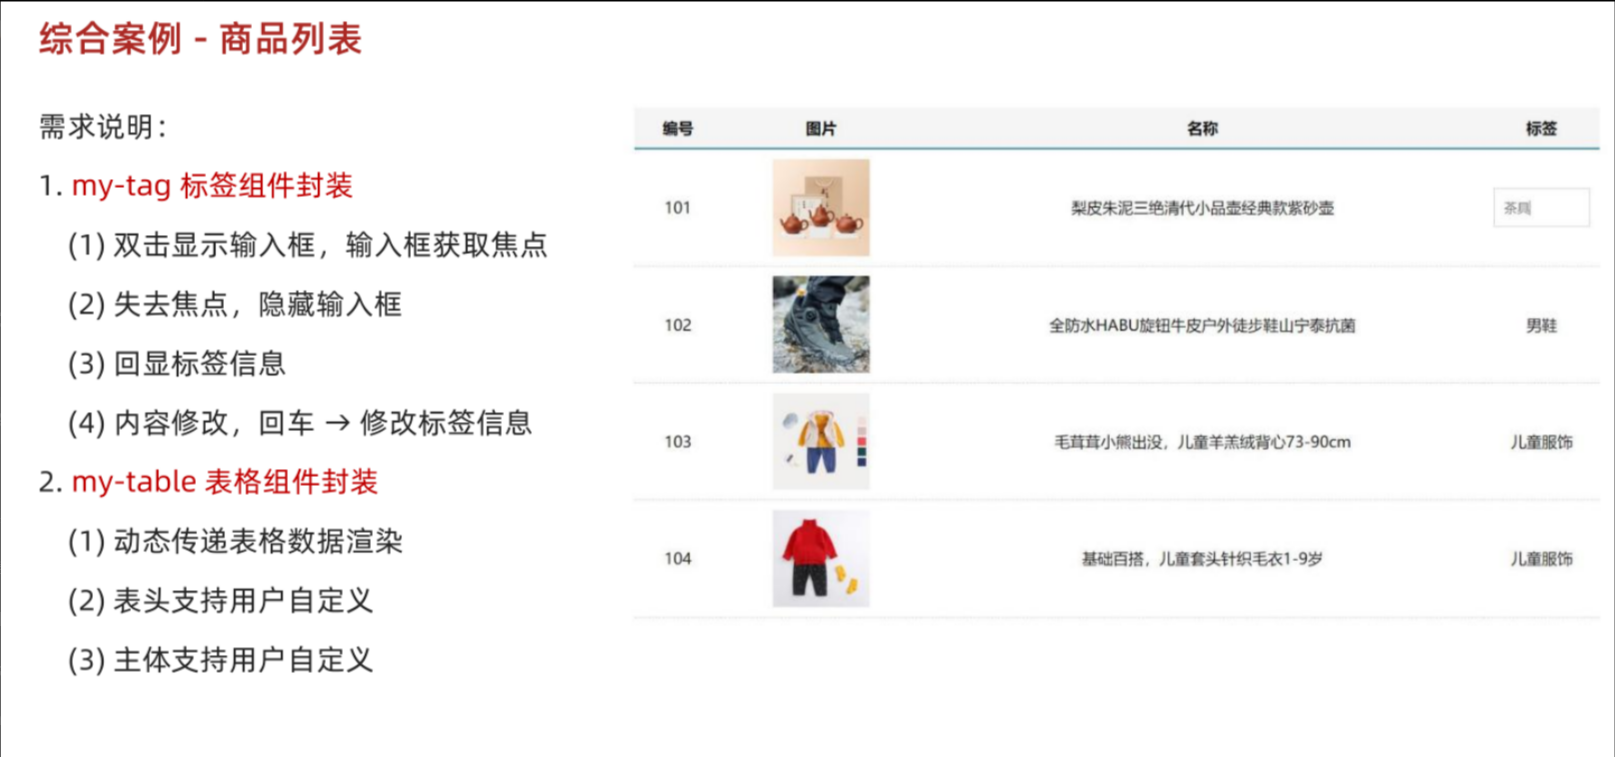
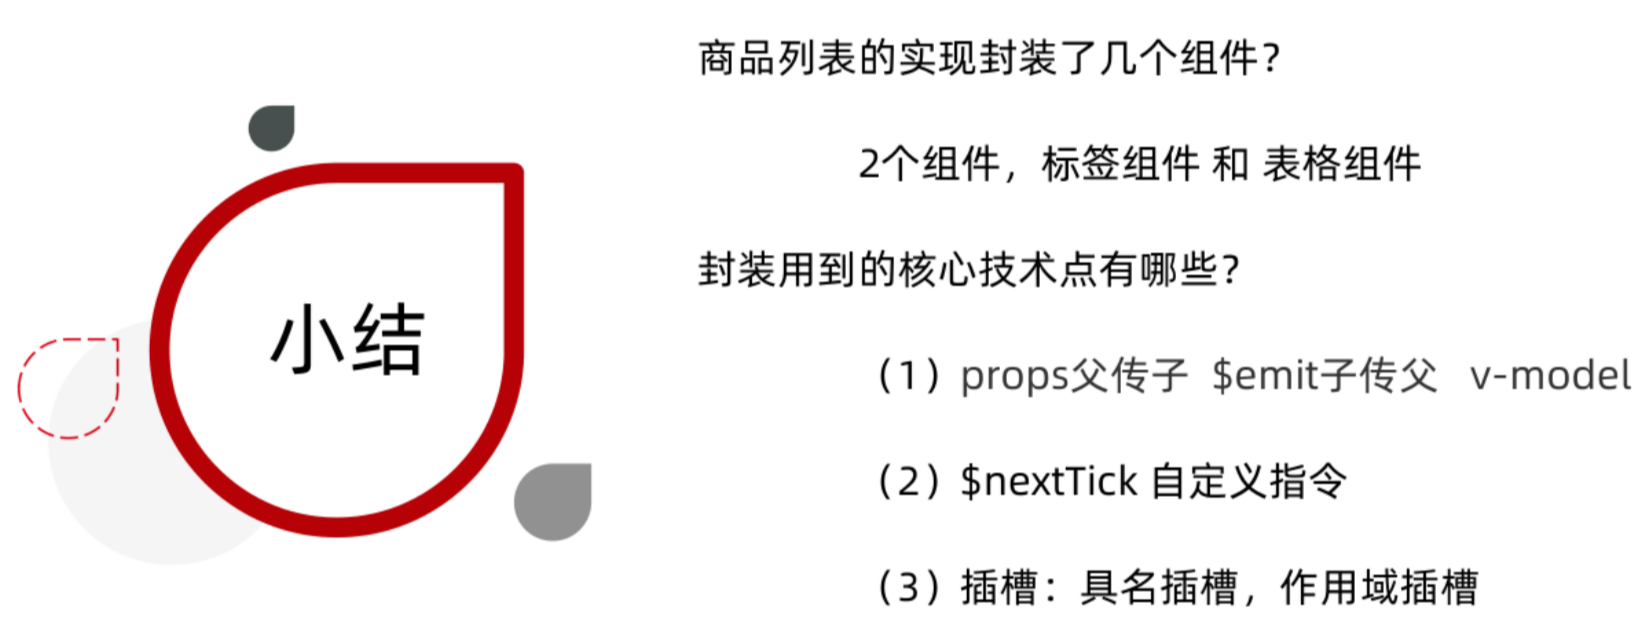
综合案例:商品列表
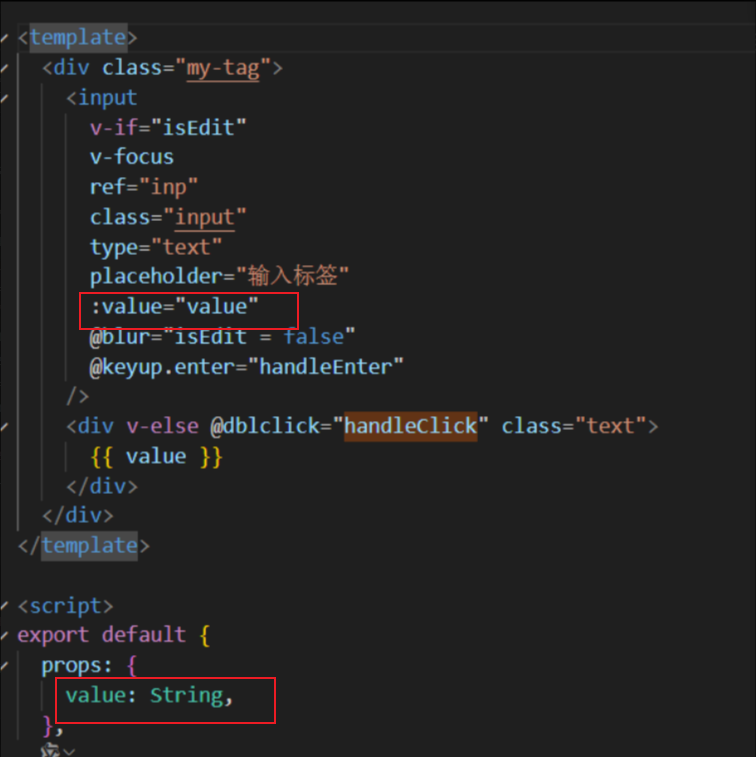
MyTag.vue
<template><div class="my-tag"><inputv-if="isEdit"v-focusref="inp"class="input"type="text"placeholder="输入标签":value="value"@blur="isEdit = false"@keyup.enter="handleEnter"/><div v-else@dblclick="handleClick"class="text">{{ value }}</div></div>
</template>
<script>
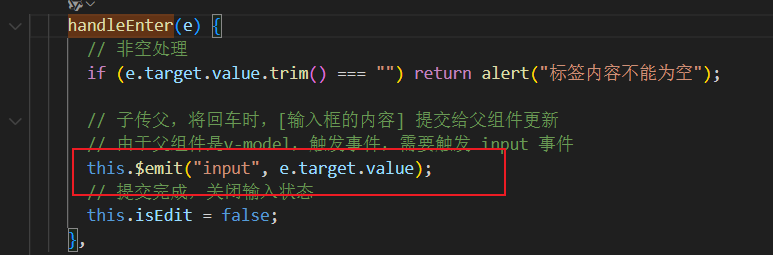
export default {props: {value: String},data () {return {isEdit: false}},methods: {handleClick () {// 双击后,切换到显示状态 (Vue是异步dom更新)this.isEdit = true// // 等dom更新完了,再获取焦点// this.$nextTick(() => {// // 立刻获取焦点// this.$refs.inp.focus()// })},handleEnter (e) {// 非空处理if (e.target.value.trim() === '') return alert('标签内容不能为空')// 子传父,将回车时,[输入框的内容] 提交给父组件更新// 由于父组件是v-model,触发事件,需要触发 input 事件this.$emit('input', e.target.value)// 提交完成,关闭输入状态this.isEdit = false}}
}
</script>
<style lang="less" scoped>
.my-tag {cursor: pointer;.input {appearance: none;outline: none;border: 1px solid #ccc;width: 100px;height: 40px;box-sizing: border-box;padding: 10px;color: #666;&::placeholder {color: #666;}}
}
</style>
MyTable.vue
<template><table class="my-table"><thead><tr><slot name="head"></slot></tr></thead><tbody><tr v-for="(item, index) in data" :key="item.id"><slot name="body" :item="item" :index="index" ></slot></tr></tbody></table>
</template>
<script>
export default {props: {data: {type: Array,required: true}}
};
</script>
<style lang="less" scoped>.my-table {width: 100%;border-spacing: 0;img {width: 100px;height: 100px;object-fit: contain;vertical-align: middle;}th {background: #f5f5f5;border-bottom: 2px solid #069;}td {border-bottom: 1px dashed #ccc;}td,th {text-align: center;padding: 10px;transition: all .5s;&.red {color: red;}}.none {height: 100px;line-height: 100px;color: #999;}
}</style>
App.vue
<template><div class="table-case"><MyTable :data="goods"><template #head><th>编号</th><th>名称</th><th>图片</th><th width="100px">标签</th></template><template #body="{ item, index }"><td>{{ index + 1 }}</td><td>{{ item.name }}</td><td><img:src="item.picture"/></td><td><MyTag v-model="item.tag"></MyTag></td></template></MyTable></div>
</template><script>
// my-tag 标签组件的封装
// 1. 创建组件 - 初始化
// 2. 实现功能
//    (1) 双击显示,并且自动聚焦
//        v-if v-else @dbclick 操作 isEdit
//        自动聚焦:
//        1. $nextTick => $refs 获取到dom,进行focus获取焦点
//        2. 封装v-focus指令//    (2) 失去焦点,隐藏输入框
//        @blur 操作 isEdit 即可//    (3) 回显标签信息
//        回显的标签信息是父组件传递过来的
//        v-model实现功能 (简化代码)  v-model => :value 和 @input
//        组件内部通过props接收, :value设置给输入框//    (4) 内容修改了,回车 => 修改标签信息
//        @keyup.enter, 触发事件 $emit('input', e.target.value)// ---------------------------------------------------------------------// my-table 表格组件的封装
// 1. 数据不能写死,动态传递表格渲染的数据  props
// 2. 结构不能写死 - 多处结构自定义 【具名插槽】
//    (1) 表头支持自定义
//    (2) 主体支持自定义import MyTag from './components/MyTag.vue'
import MyTable from './components/MyTable.vue'
export default {name: 'TableCase',components: {MyTag,MyTable},data () {return {// 测试组件功能的临时数据tempText: '水杯',tempText2: '钢笔',goods: [{ id: 101, picture: 'https://yanxuan-item.nosdn.127.net/f8c37ffa41ab1eb84bff499e1f6acfc7.jpg', name: '梨皮朱泥三绝清代小品壶经典款紫砂壶', tag: '茶具' },{ id: 102, picture: 'https://yanxuan-item.nosdn.127.net/221317c85274a188174352474b859d7b.jpg', name: '全防水HABU旋钮牛皮户外徒步鞋山宁泰抗菌', tag: '男鞋' },{ id: 103, picture: 'https://yanxuan-item.nosdn.127.net/cd4b840751ef4f7505c85004f0bebcb5.png', name: '毛茸茸小熊出没,儿童羊羔绒背心73-90cm', tag: '儿童服饰' },{ id: 104, picture: 'https://yanxuan-item.nosdn.127.net/56eb25a38d7a630e76a608a9360eec6b.jpg', name: '基础百搭,儿童套头针织毛衣1-9岁', tag: '儿童服饰' },]}}
}
</script><style lang="less" scoped>
.table-case {width: 1000px;margin: 50px auto;img {width: 100px;height: 100px;object-fit: contain;vertical-align: middle;}
}</style>
效果:
总结
路由入门
单页应用程序
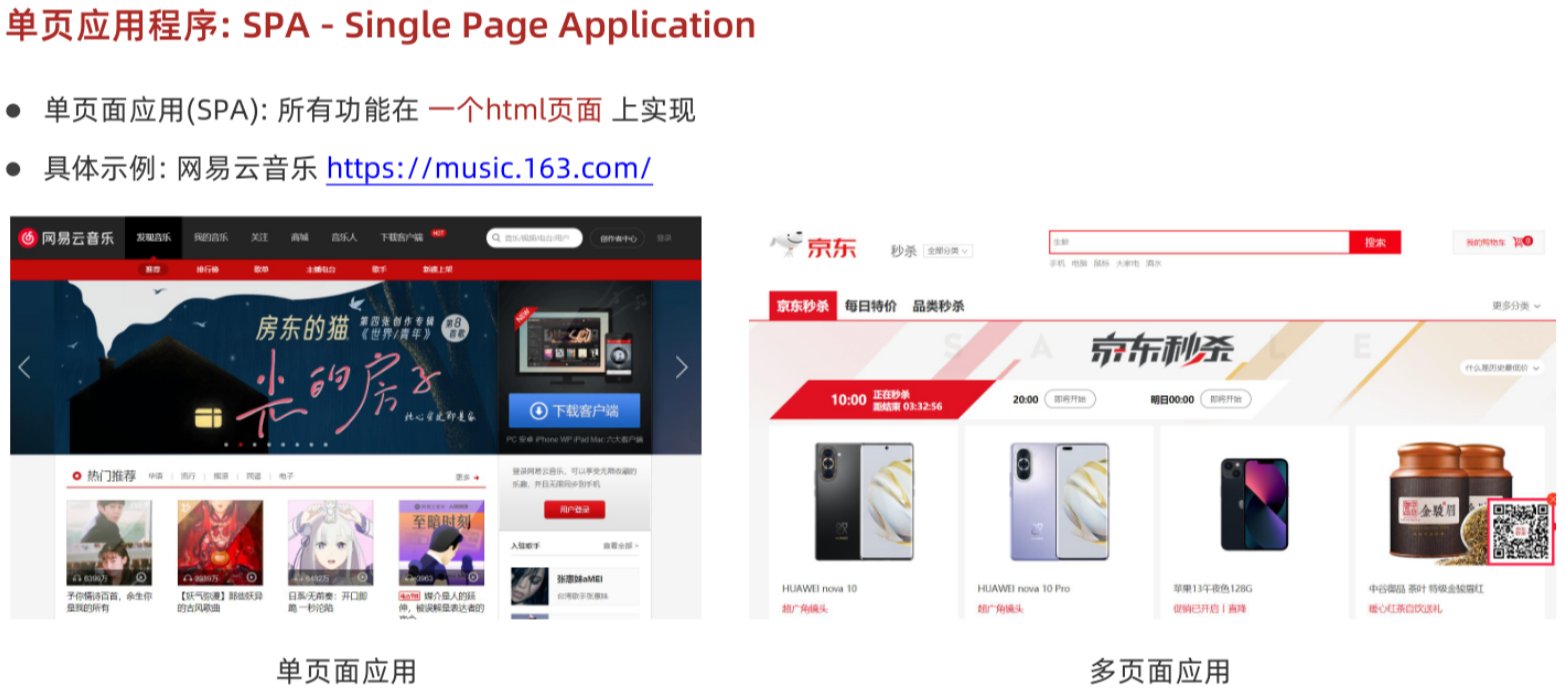
对比:
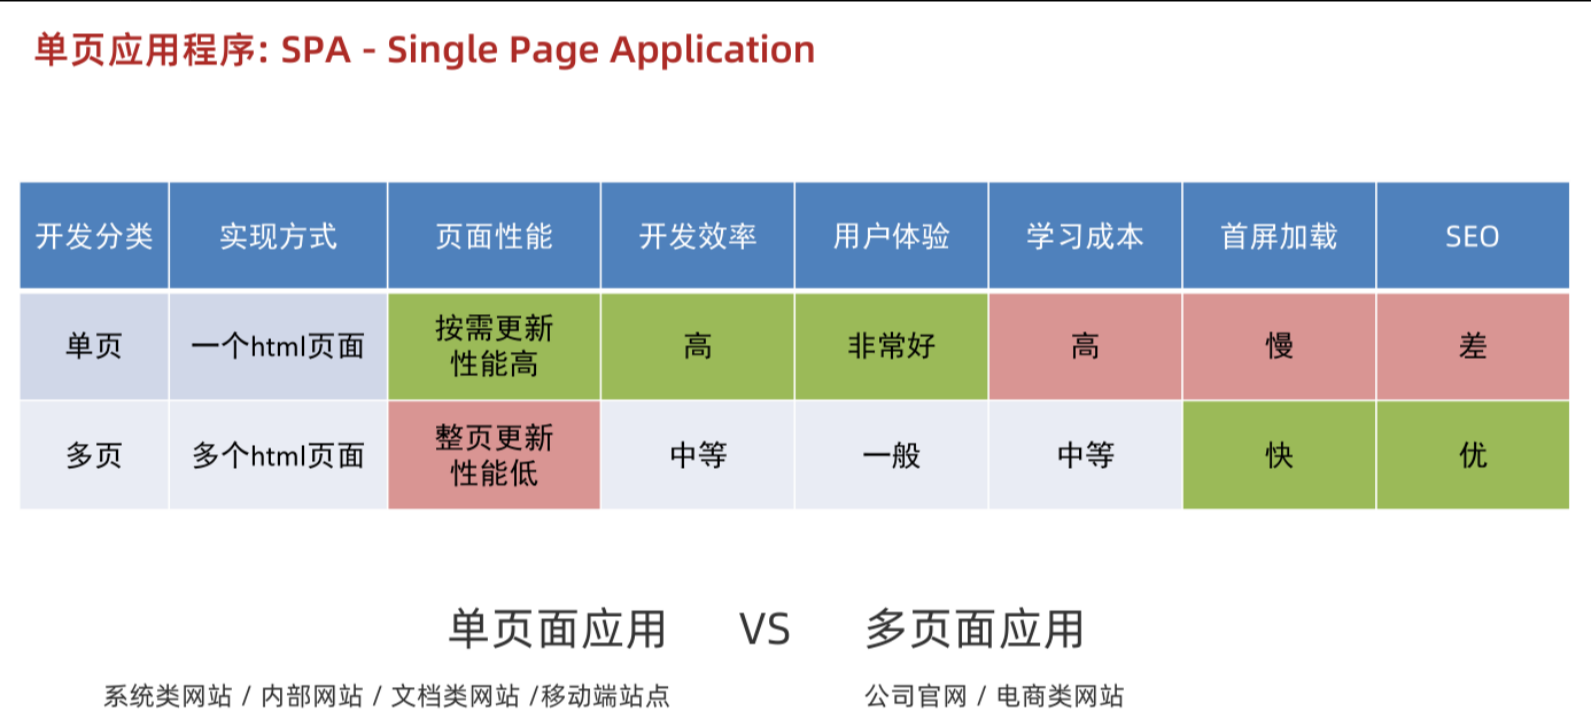
总结:
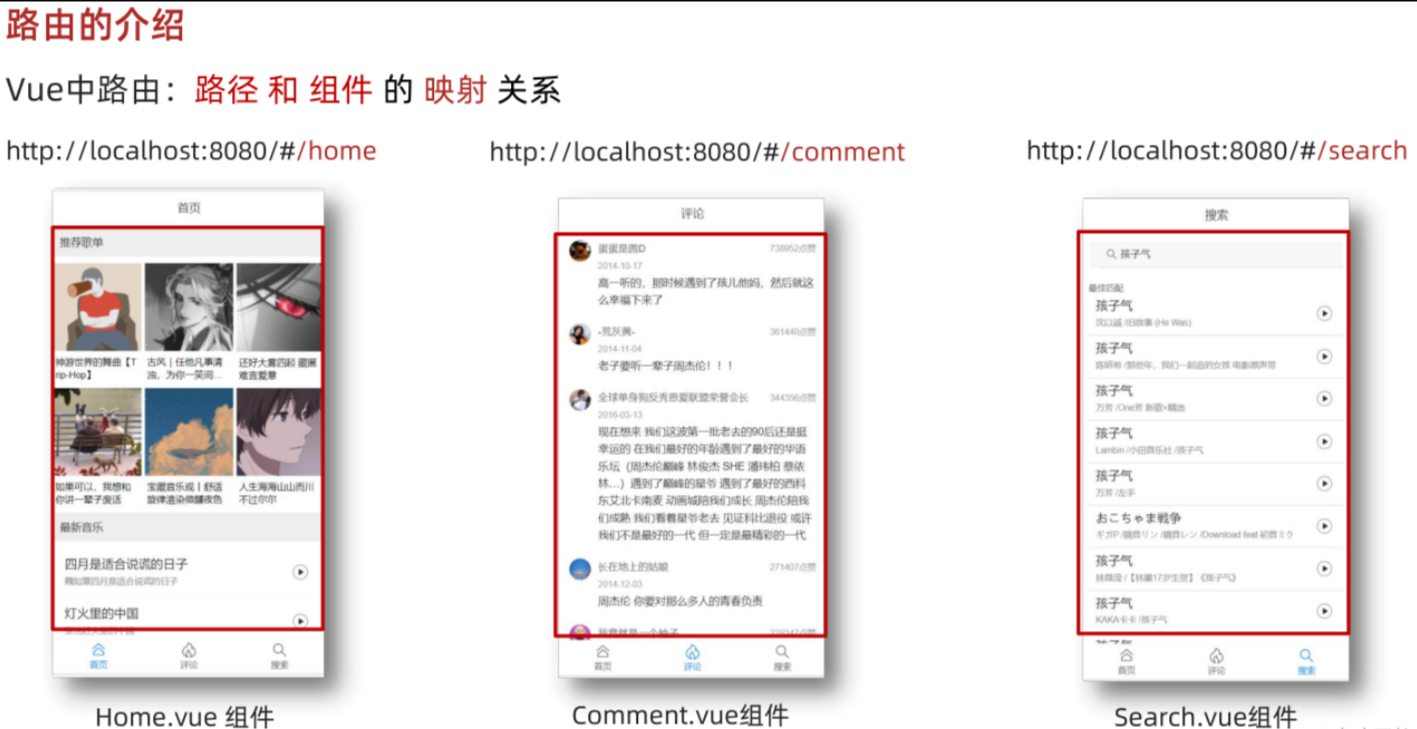
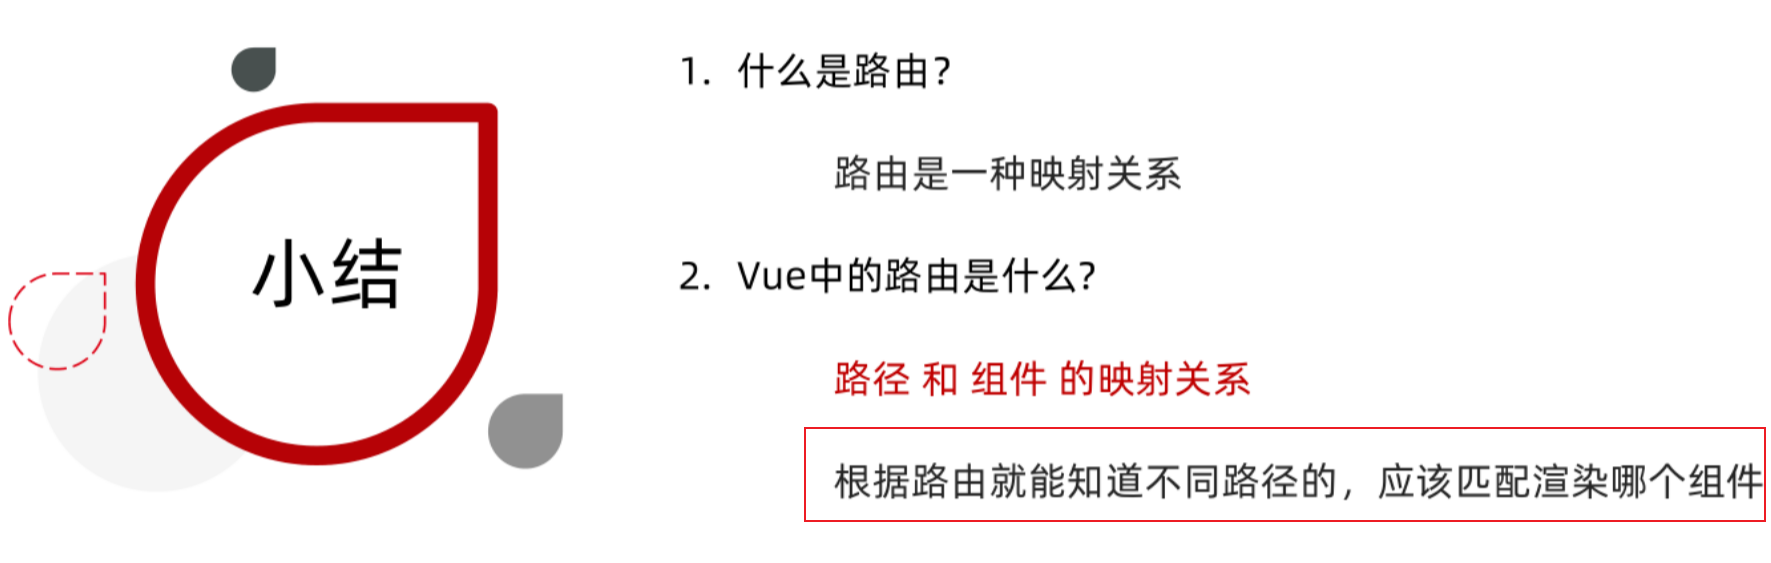
路由概念
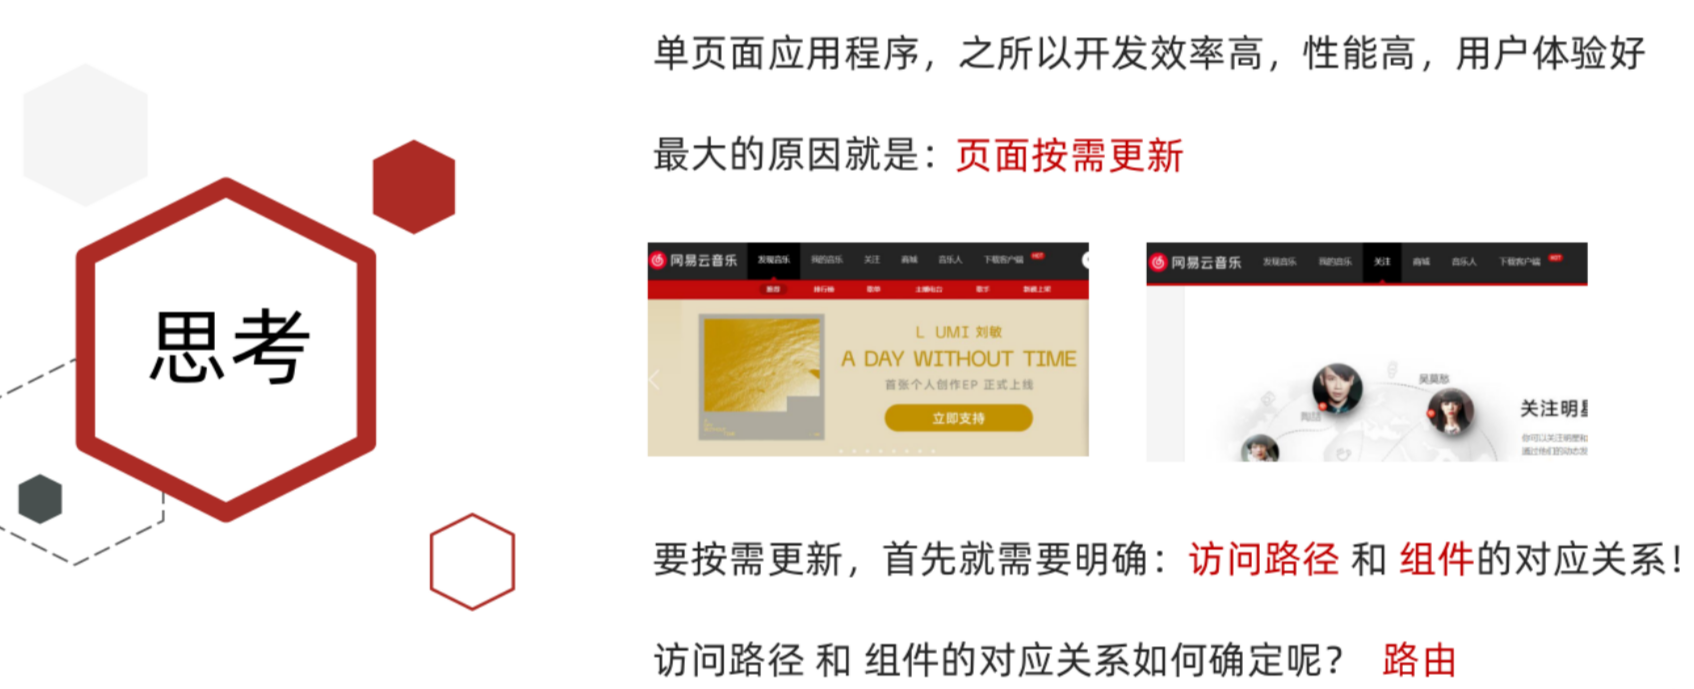
Vue中的路由:
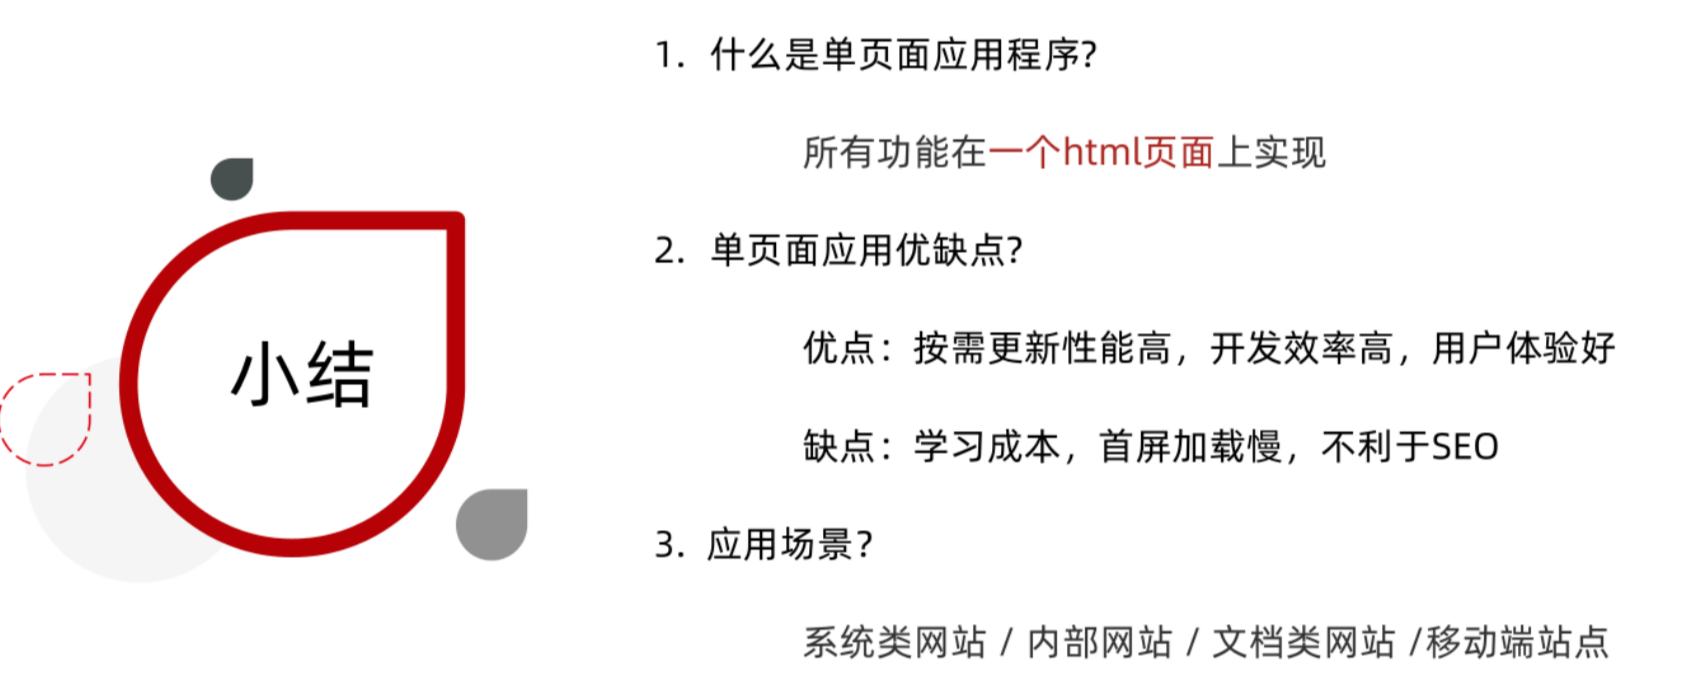
小结:
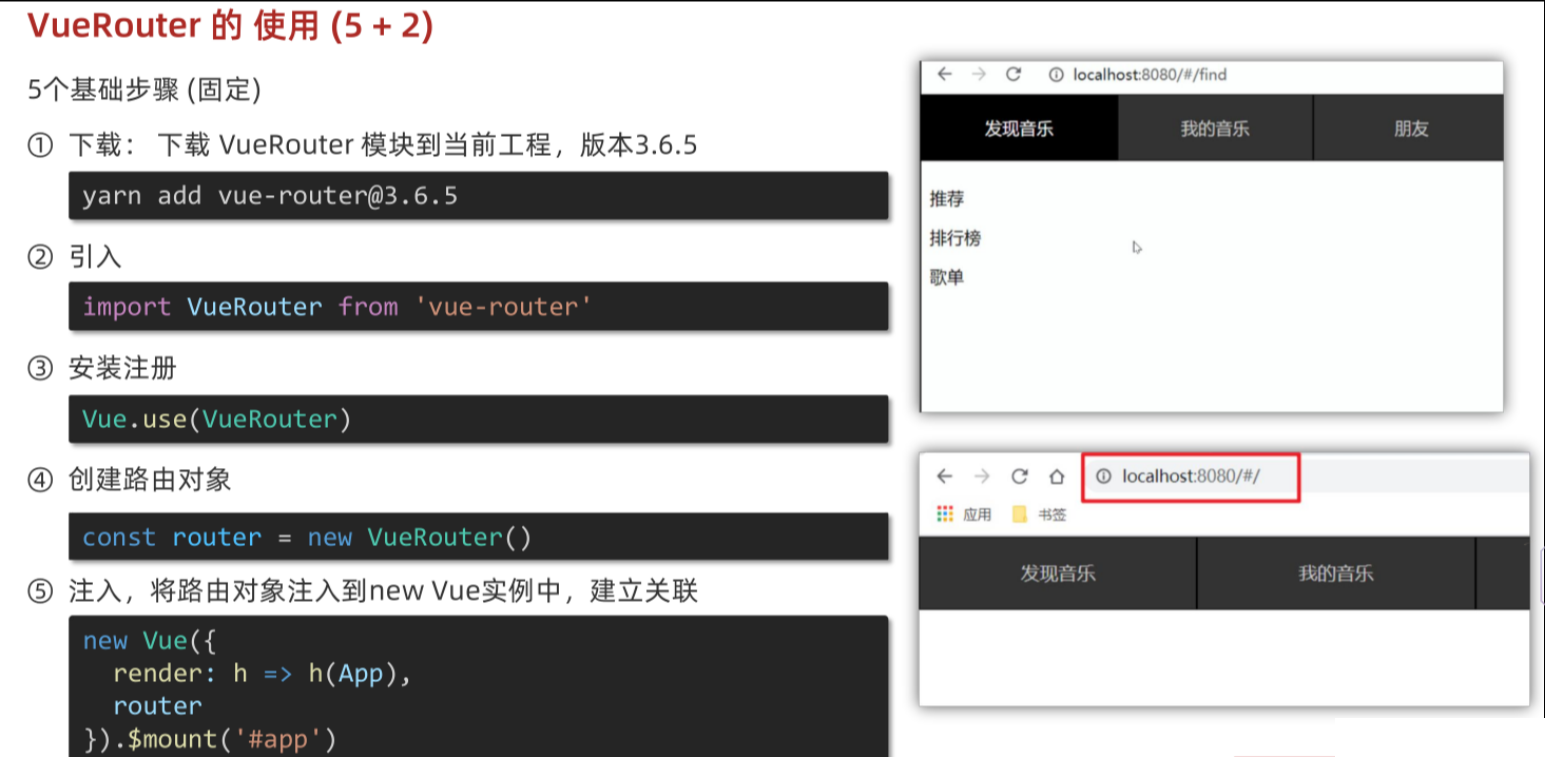
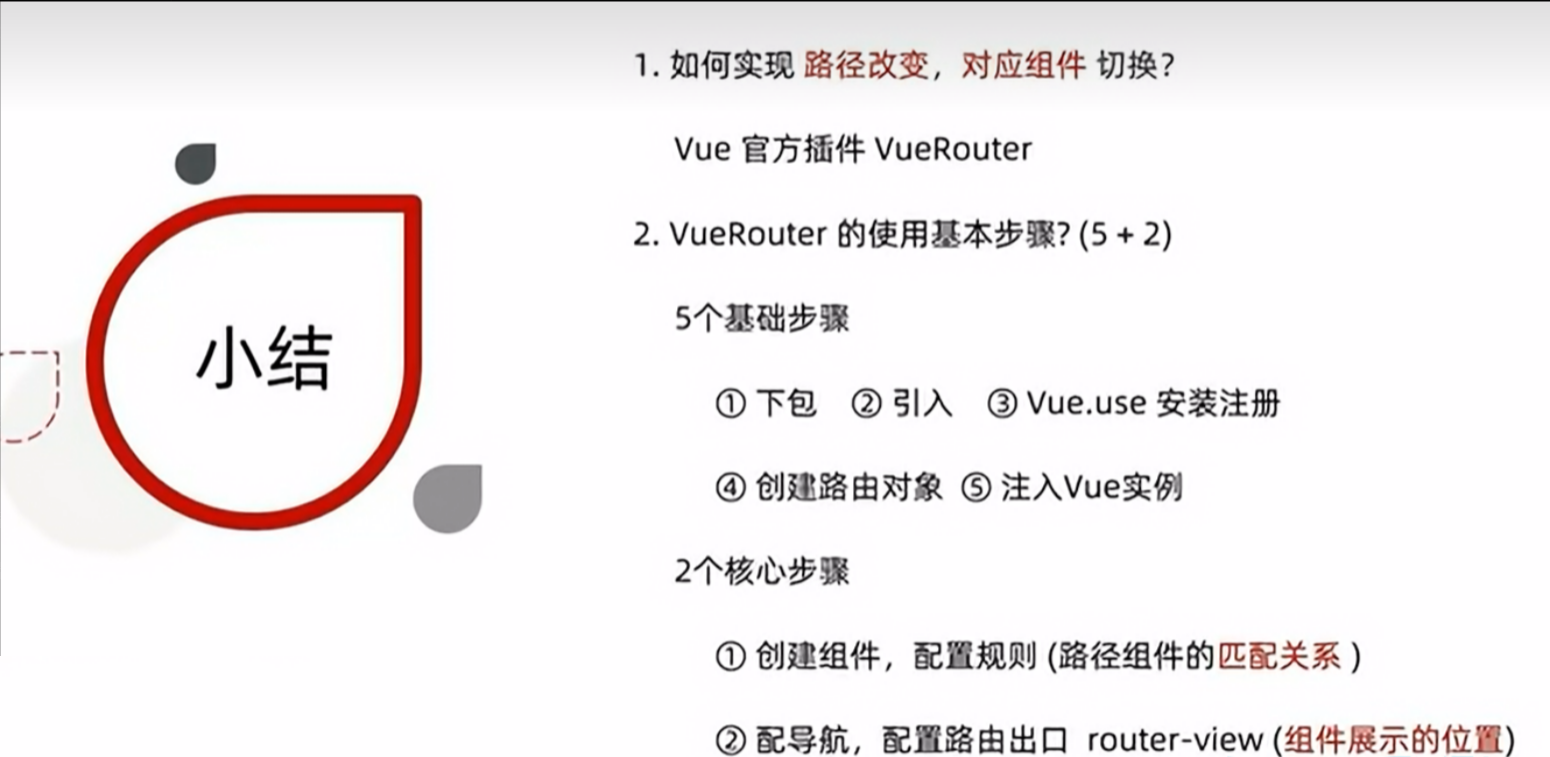
VueRouter 的基本使用
使用步骤5+2
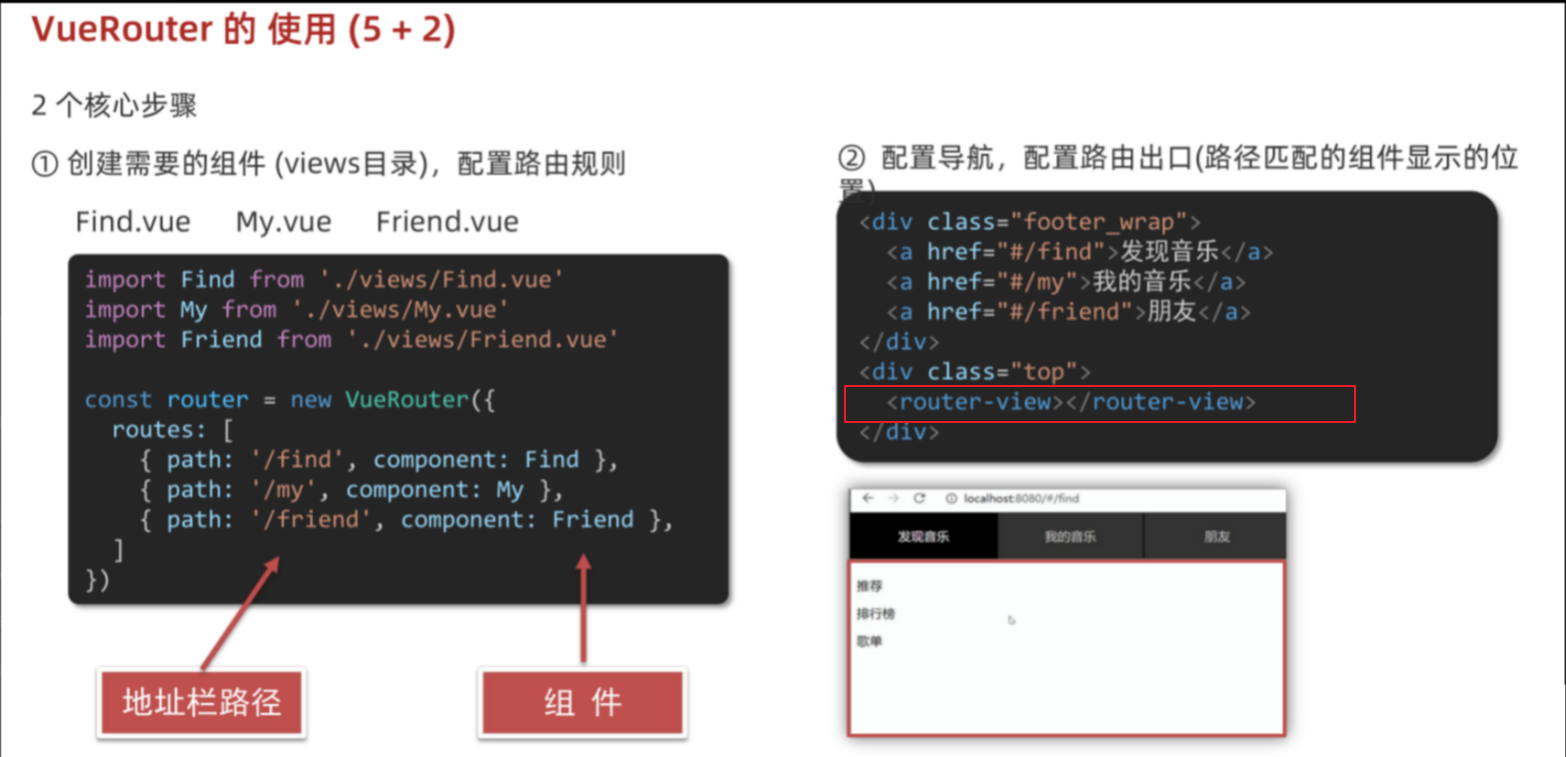
2个核心步骤
小结:
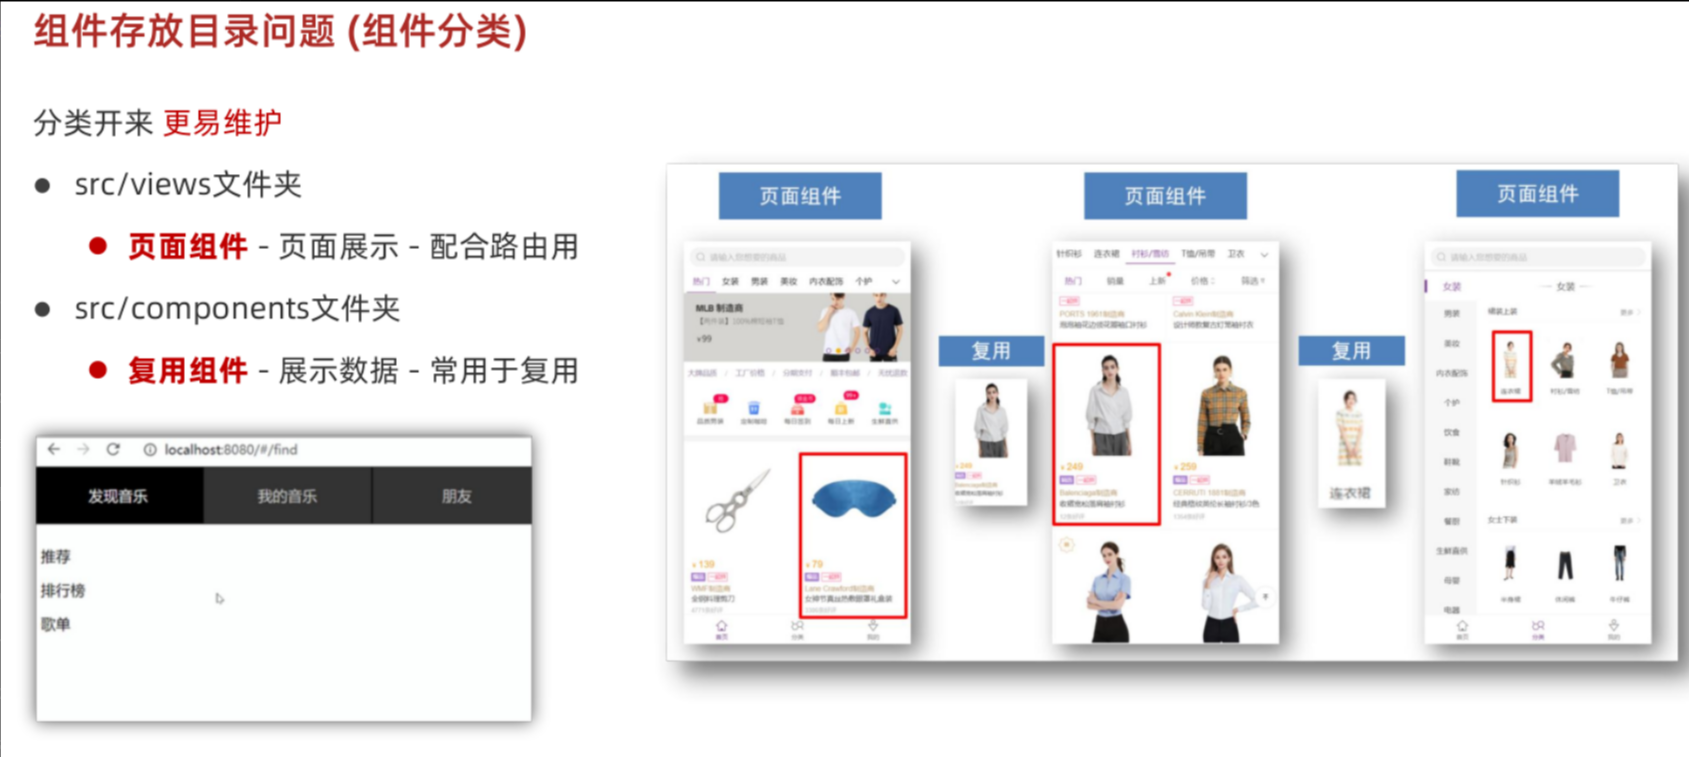
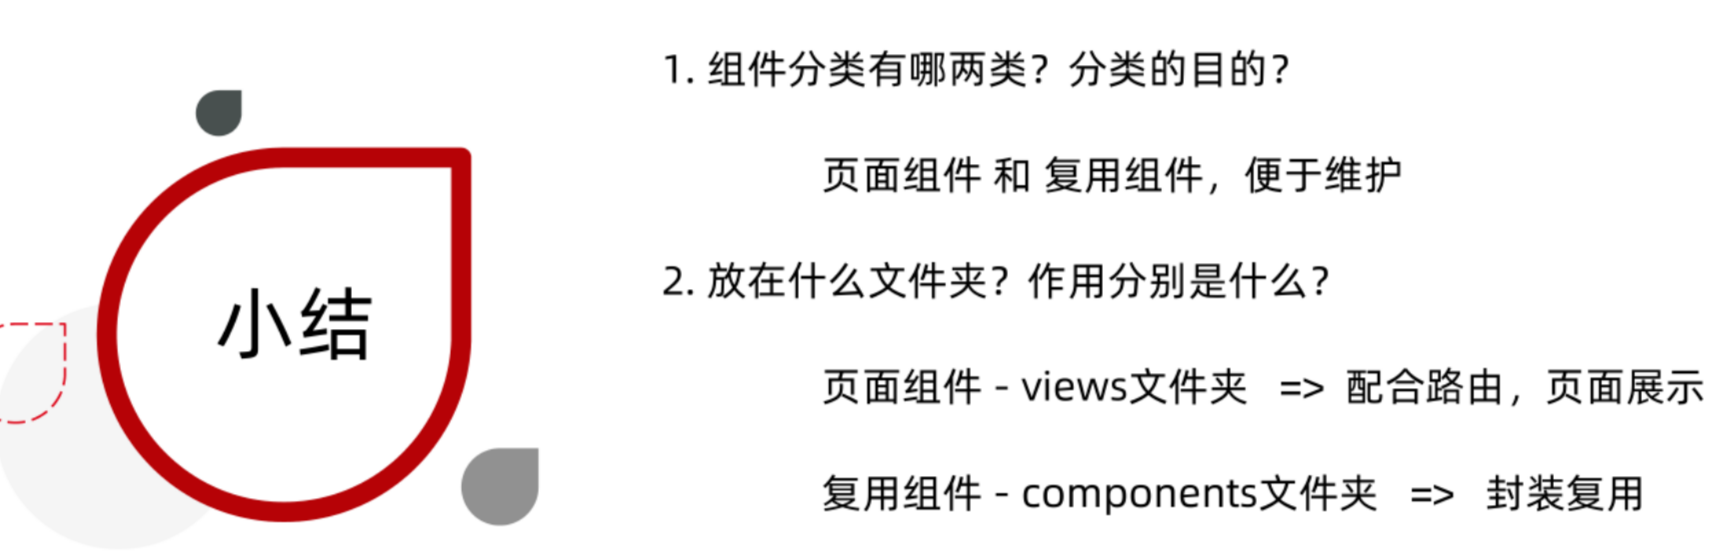
组件目录存放问题
页面组件和复用组件:
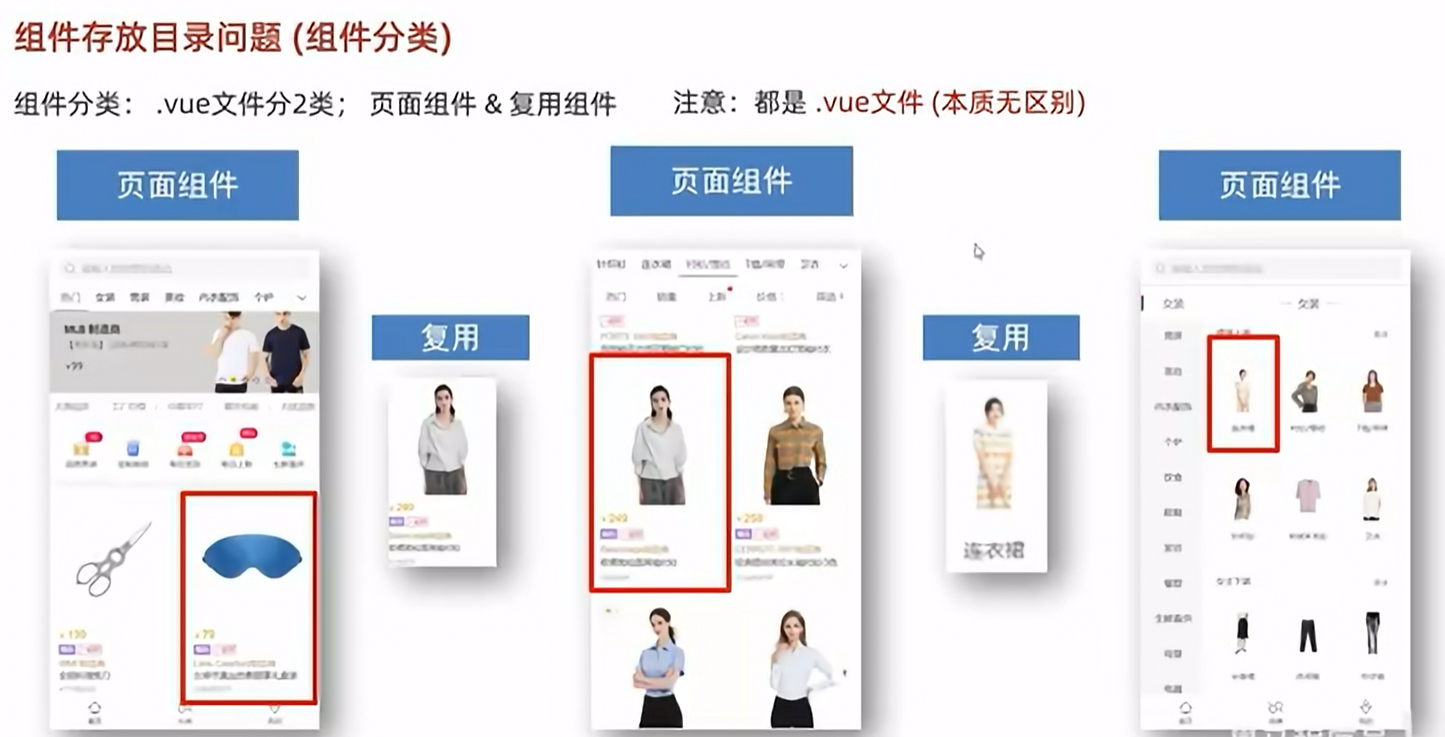
分类分开存放,更容易维护
小结:
路由进阶
路由模块封装
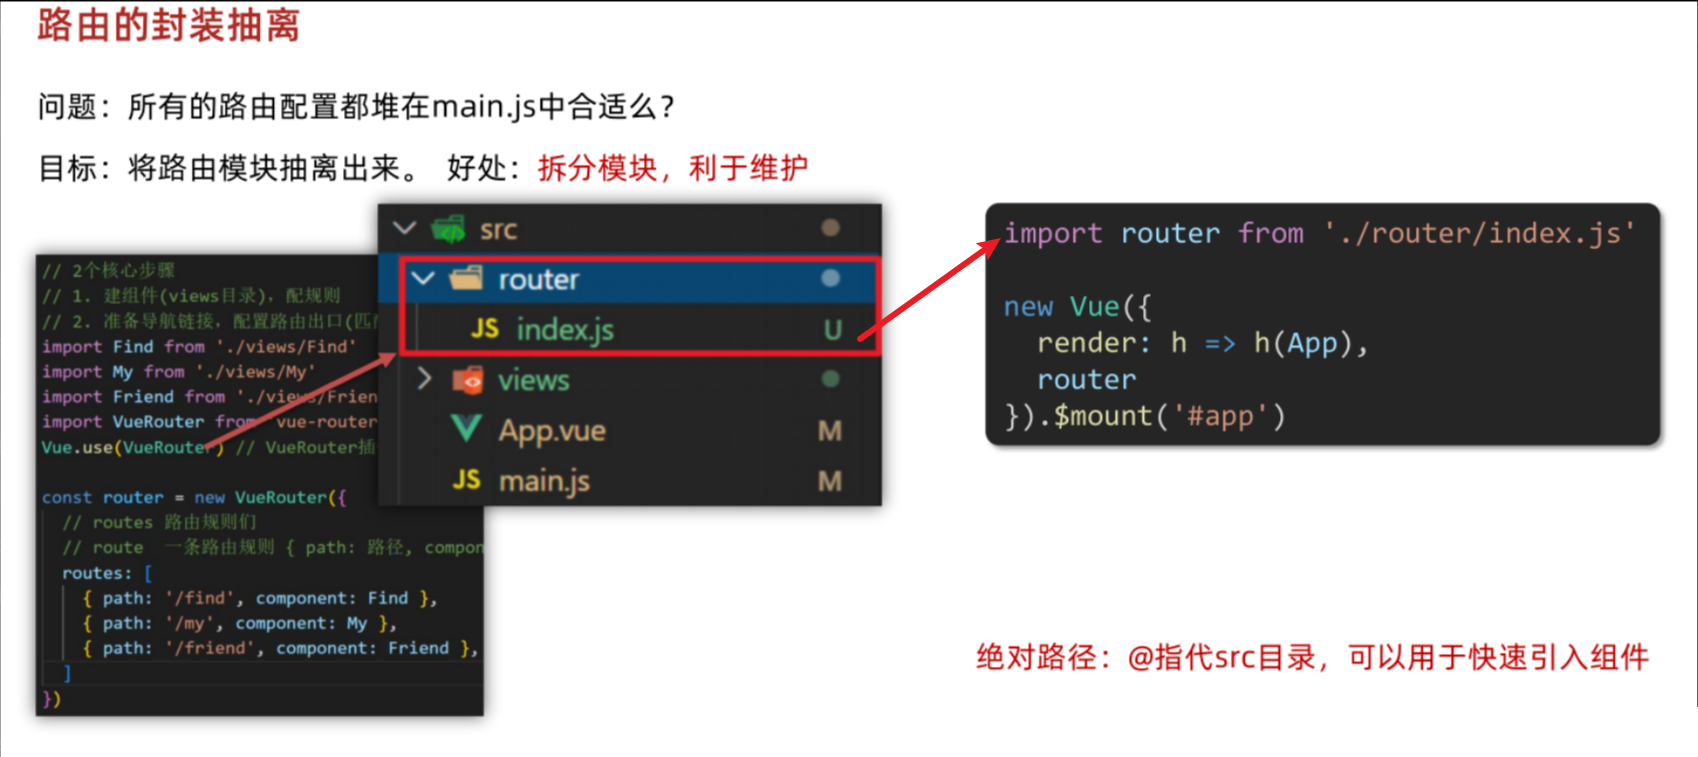
router/index.js
所抽离内容包括:导入组件、(额外需要)导入Vue、导入VueRouter插件、创建路由对象、导出路由对象
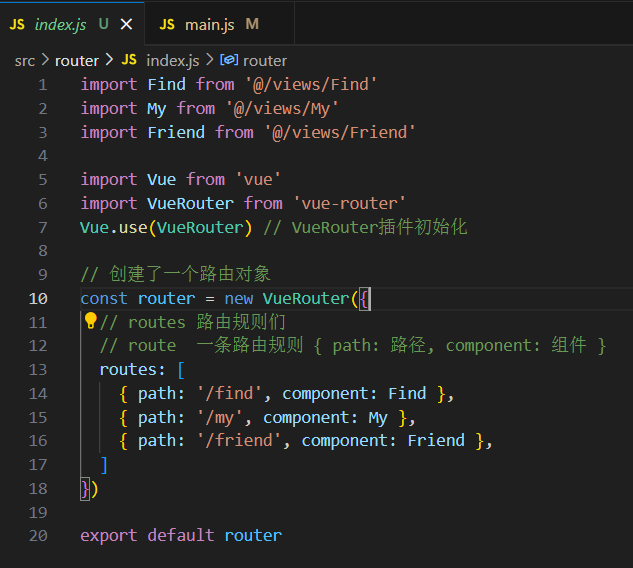
需要注意路径写法(推荐使用绝对路径 @代表当前src目录)

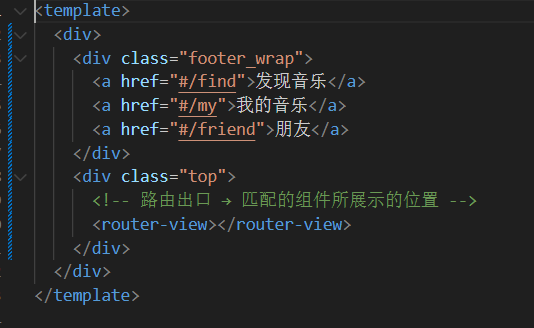
使用router-link替代a标签实现高亮
本质渲染还是a标签,to无需#,且能高亮
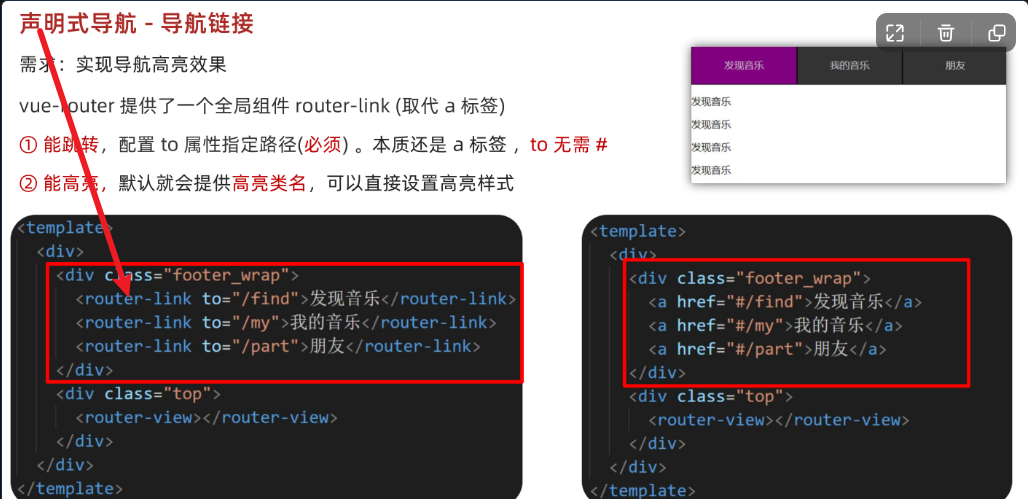
代码:
<template><div><div class="footer_wrap"><router-link to="/find">发现音乐</router-link><router-link to="/my">我的音乐</router-link><router-link to="/friend">朋友</router-link></div><div class="top"><!-- 路由出口 → 匹配的组件所展示的位置 --><router-view></router-view></div></div>
</template>
……
小结:

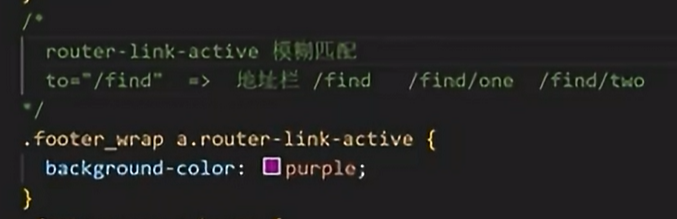
精确匹配&模糊匹配
关于两个类名
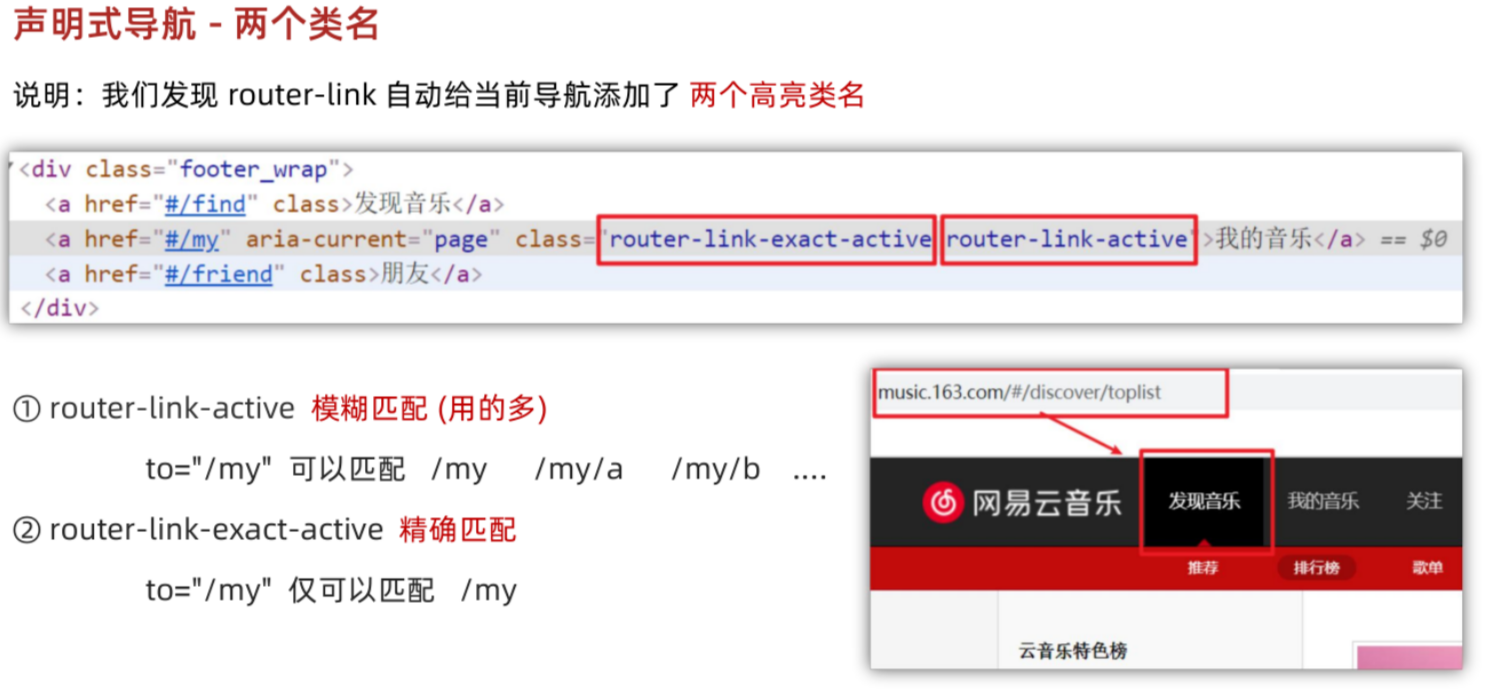

自定义匹配的类名
长有长的好处,不容易重名。
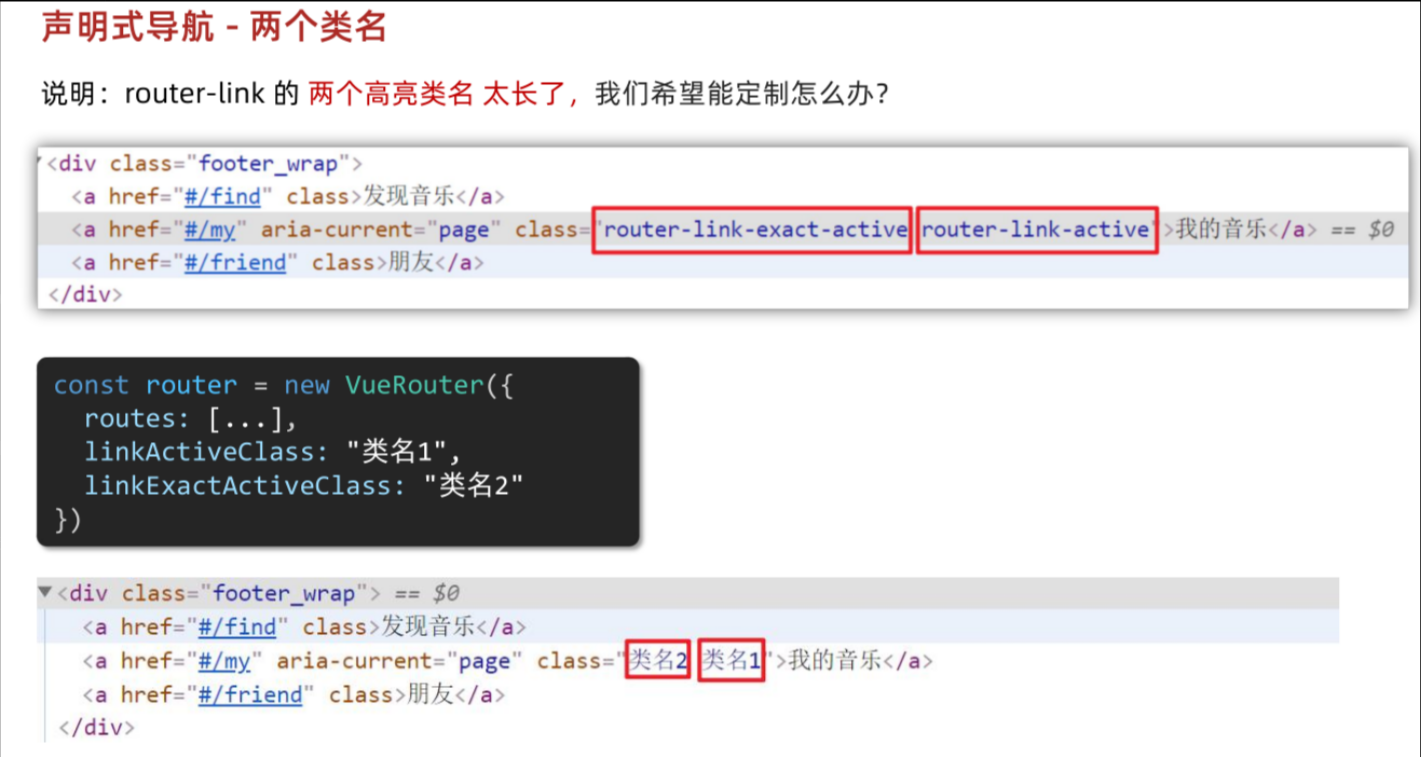
配置代码(router/index.js):
import Find from '@/views/Find'
import My from '@/views/My'
import Friend from '@/views/Friend'import Vue from 'vue'
import VueRouter from 'vue-router'
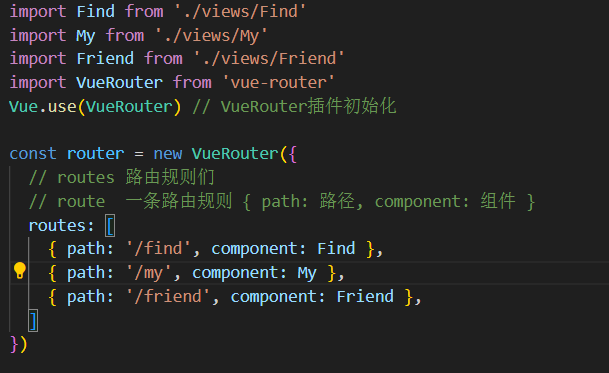
Vue.use(VueRouter) // VueRouter插件初始化// 创建了一个路由对象
const router = new VueRouter({// routes 路由规则们// route 一条路由规则 { path: 路径, component: 组件 }routes: [{ path: '/find', component: Find },{ path: '/my', component: My },{ path: '/friend', component: Friend },],// link自定义高亮类名linkActiveClass: 'active', // 配置模糊匹配的类名linkExactActiveClass: 'exact-active' // 配置精确匹配的类名
})export default router声明式导航-跳转传参
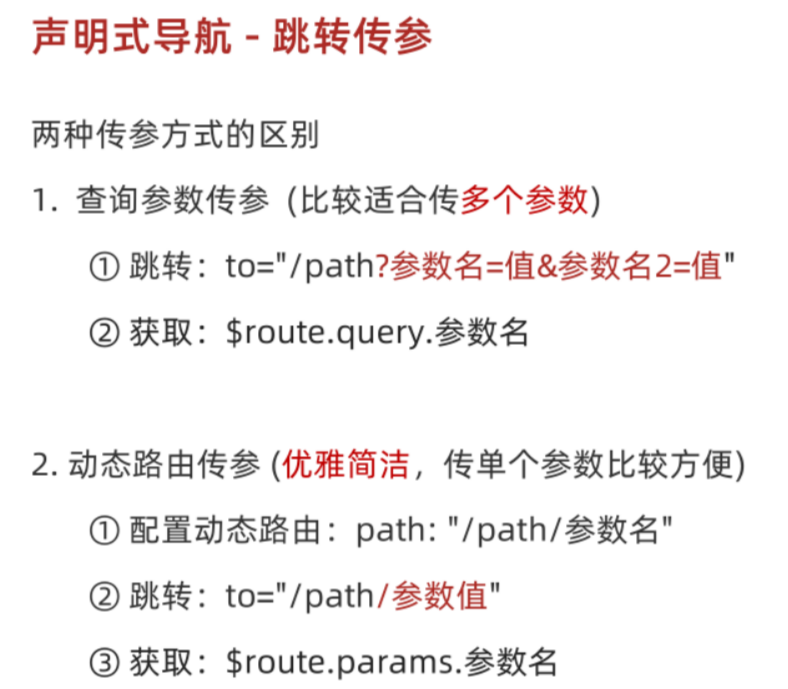
传参方式有两种:
1.查询参数传参
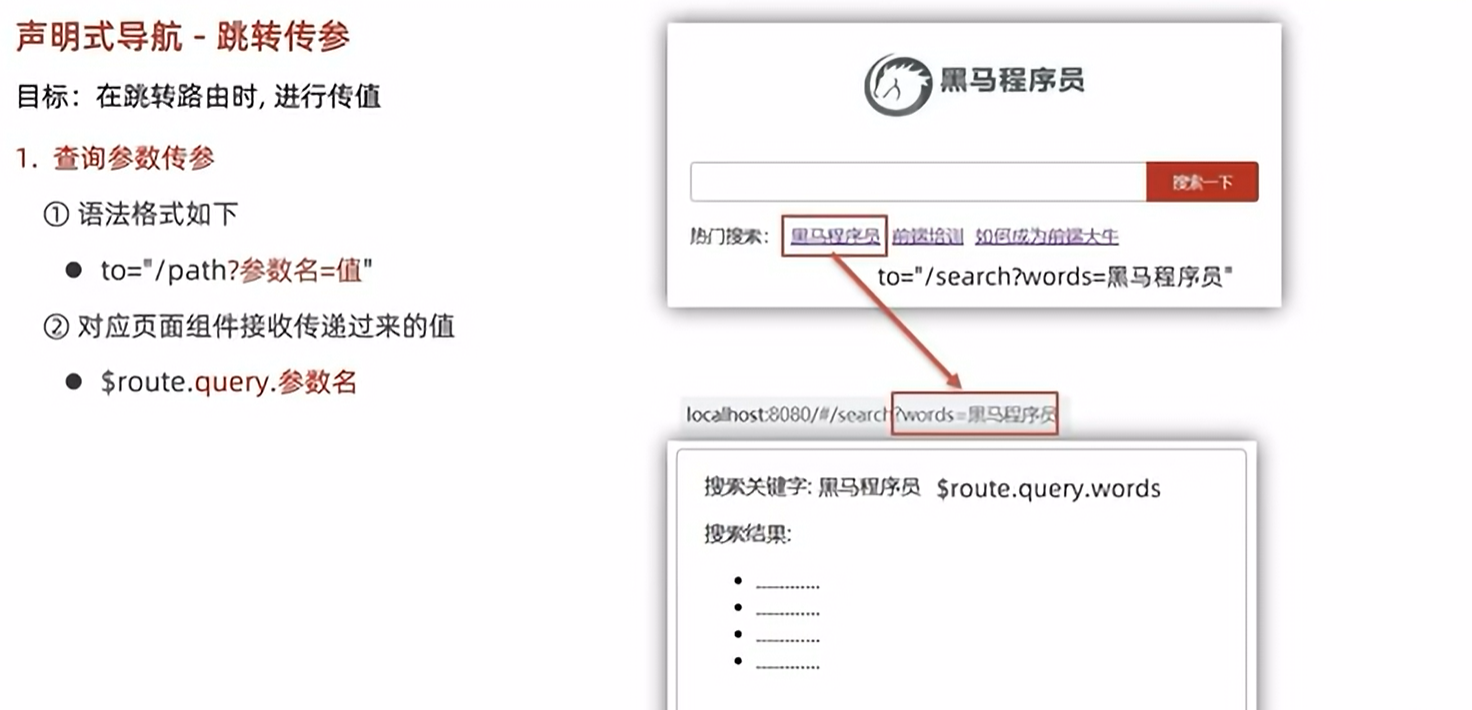
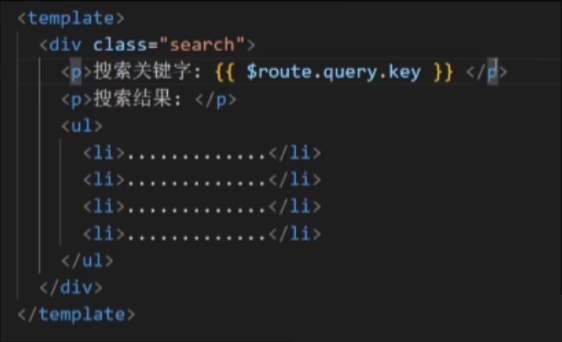
携带查询参数:

在页面获取参数:
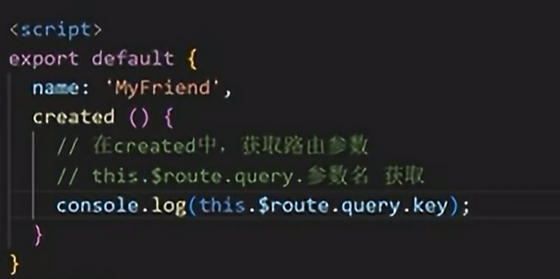
如果想要基于参数去发送请求?
在哪发?—— created
获取参数?this.$route.query.key
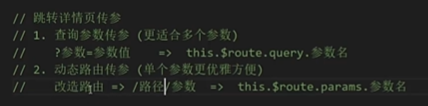
2.动态路由传参
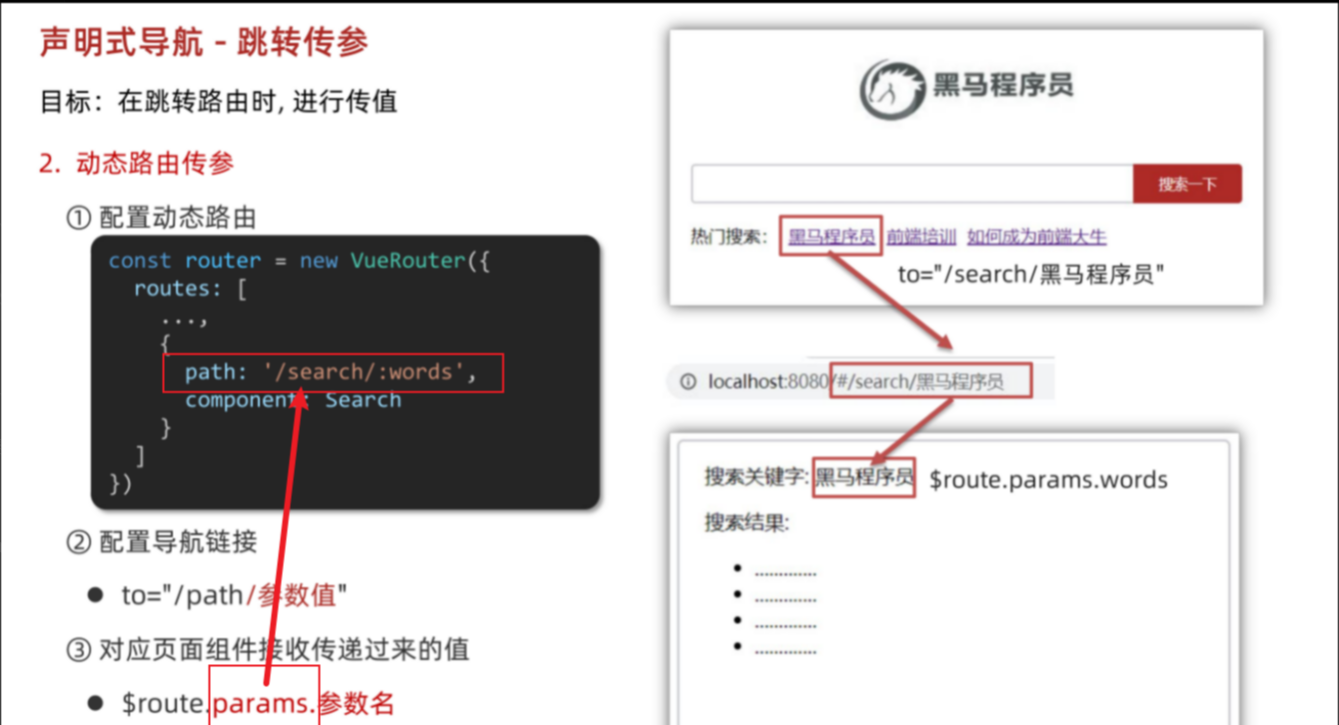
<template><div class="home"><div class="logo-box"></div><div class="search-box"><input type="text"><button>搜索一下</button></div><div class="hot-link">热门搜索:<router-link to="/search/黑马程序员">黑马程序员</router-link><router-link to="/search/前端培训">前端培训</router-link><router-link to="/search/如何成为前端大牛">如何成为前端大牛</router-link></div></div>
</template>
<script>
export default {name: 'FindMusic'
}
</script>
<style>
.logo-box {height: 150px;background: url('../assets/logo.jpeg') no-repeat center;
}
.search-box {display: flex;justify-content: center;
}
.search-box input {width: 400px;height: 30px;line-height: 30px;border: 2px solid #c4c7ce;border-radius: 4px 0 0 4px;outline: none;
}
.search-box input:focus {border: 2px solid #ad2a26;
}
.search-box button {width: 100px;height: 36px;border: none;background-color: #ad2a26;color: #fff;position: relative;left: -2px;border-radius: 0 4px 4px 0;
}
.hot-link {width: 508px;height: 60px;line-height: 60px;margin: 0 auto;
}
.hot-link a {margin: 0 5px;
}
</style>
两种传参方式的区别
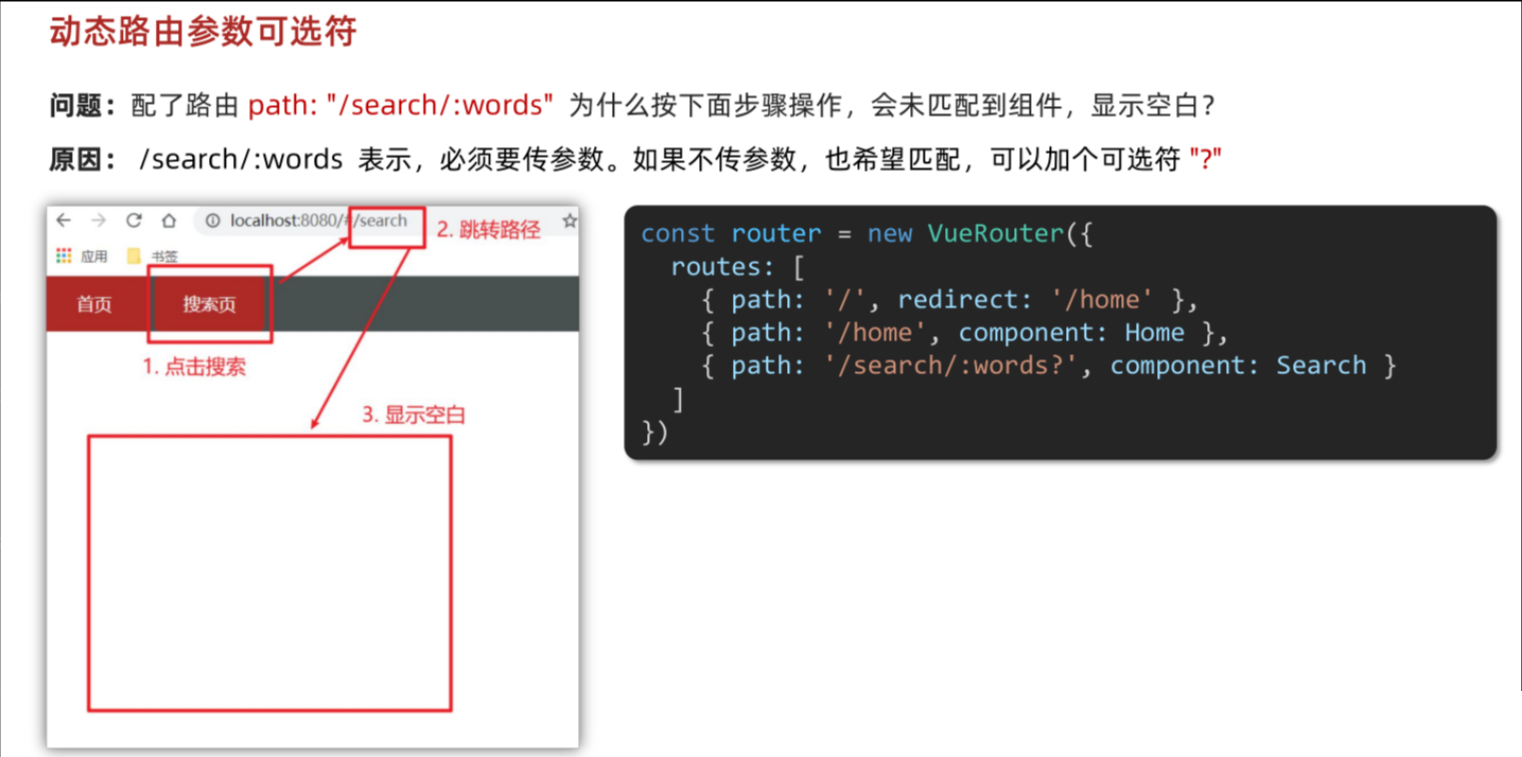
动态路由参数可选符
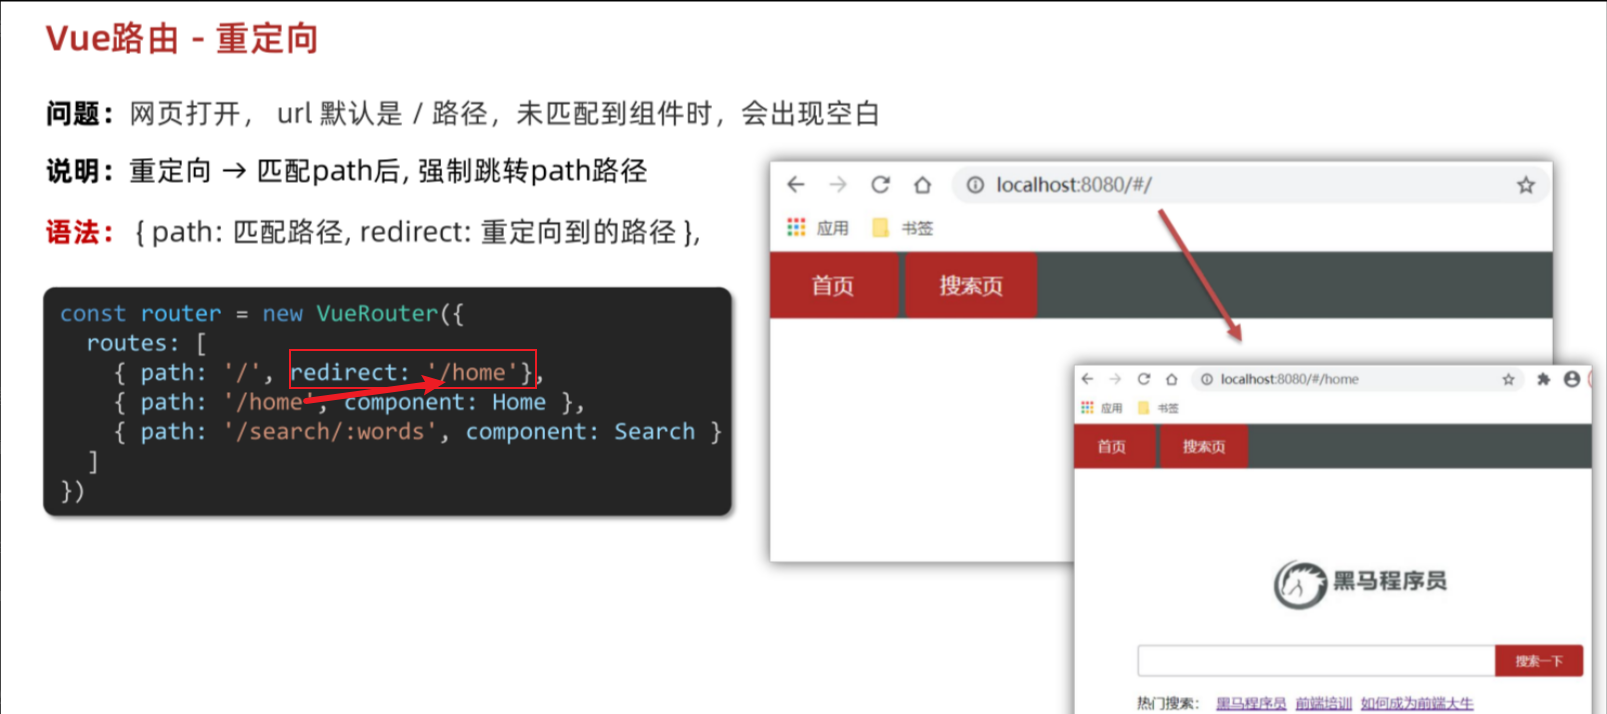
路由重定向
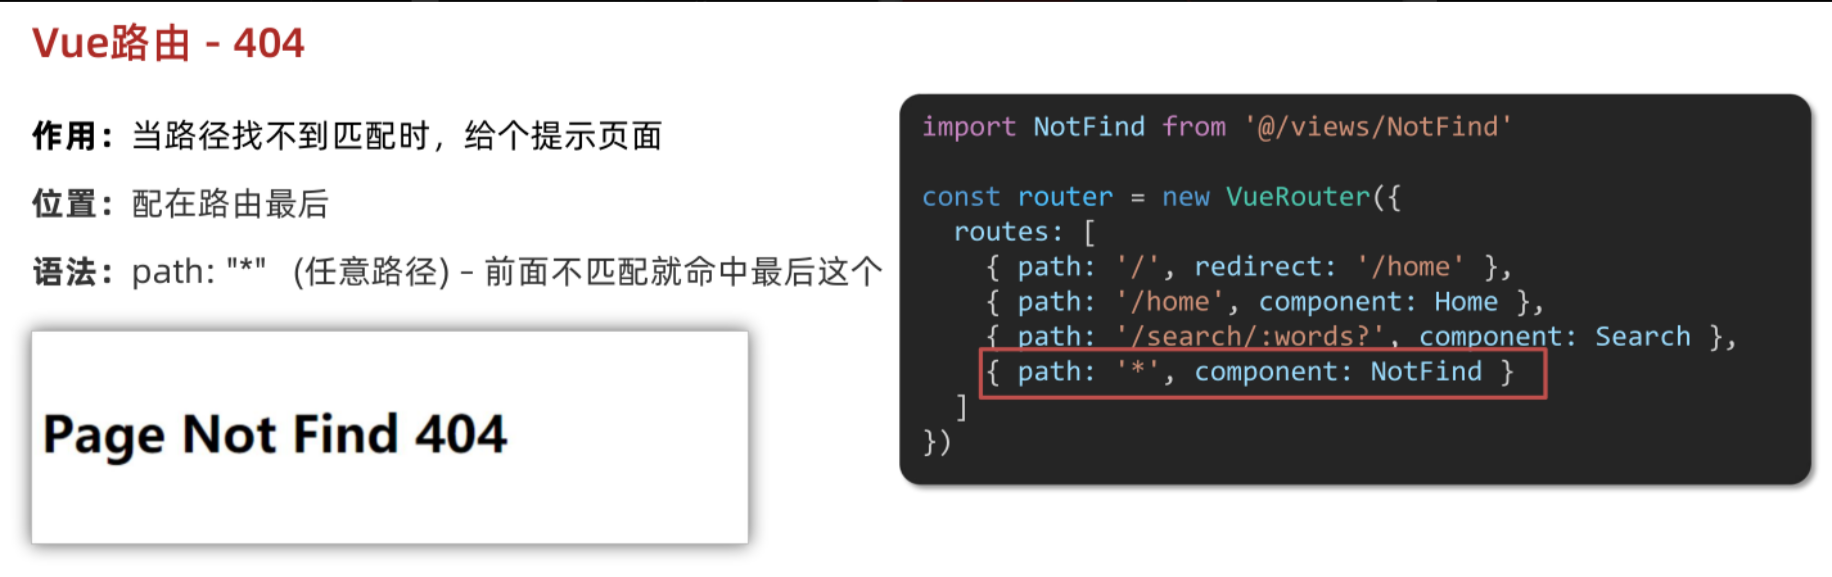
路由404
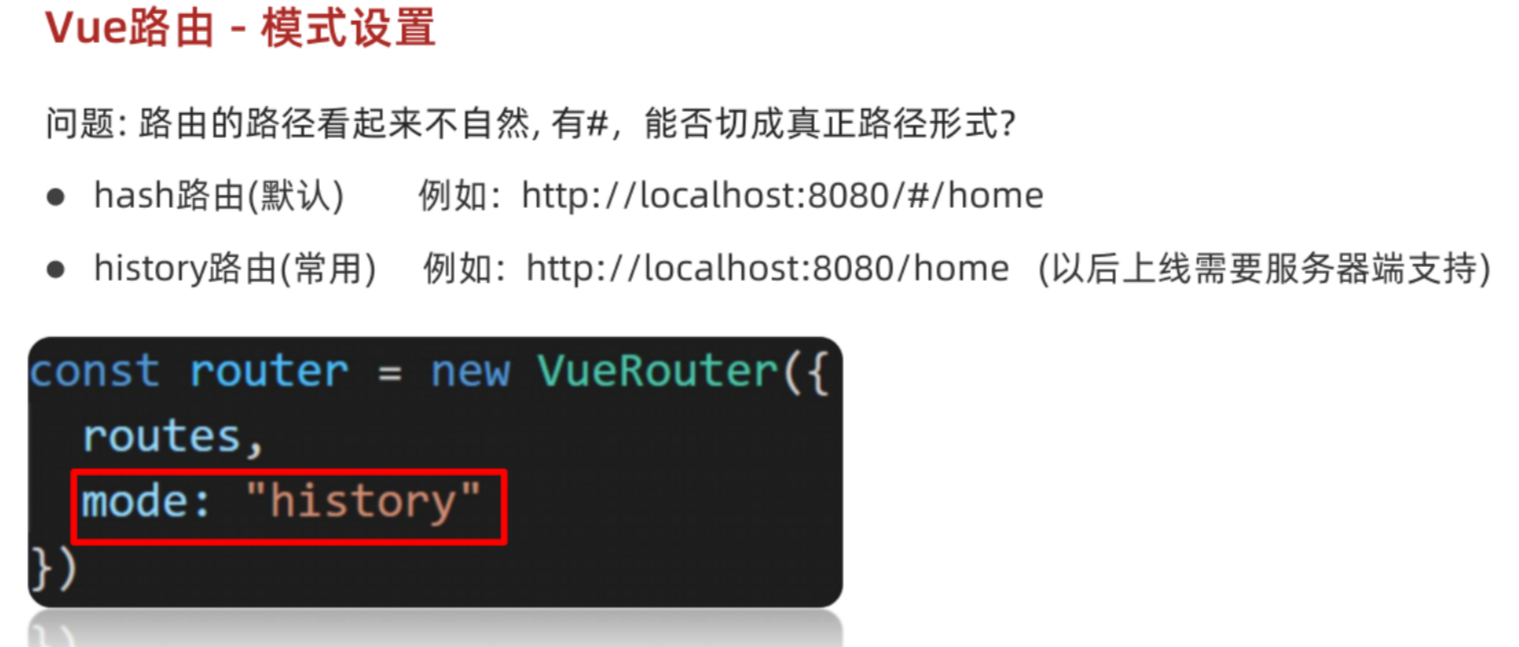
路由模式
router/index.js
import Home from '@/views/Home'
import Search from '@/views/Search'
import NotFound from '@/views/NotFound'
import Vue from 'vue'
import VueRouter from 'vue-router'
Vue.use(VueRouter) // VueRouter插件初始化// 创建了一个路由对象
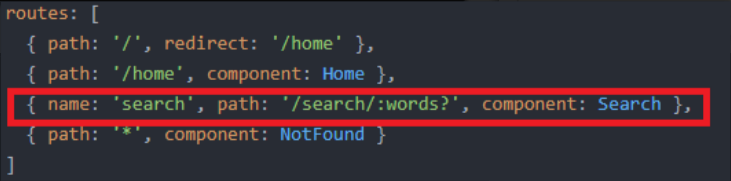
const router = new VueRouter({// 注意:一旦采用了 history 模式,地址栏就没有 #,需要后台配置访问规则mode: 'history',routes: [{ path: '/', redirect: '/home' },{ path: '/home', component: Home },{ name: 'search', path: '/search/:words?', component: Search },{ path: '*', component: NotFound }]
})export default router编程式导航
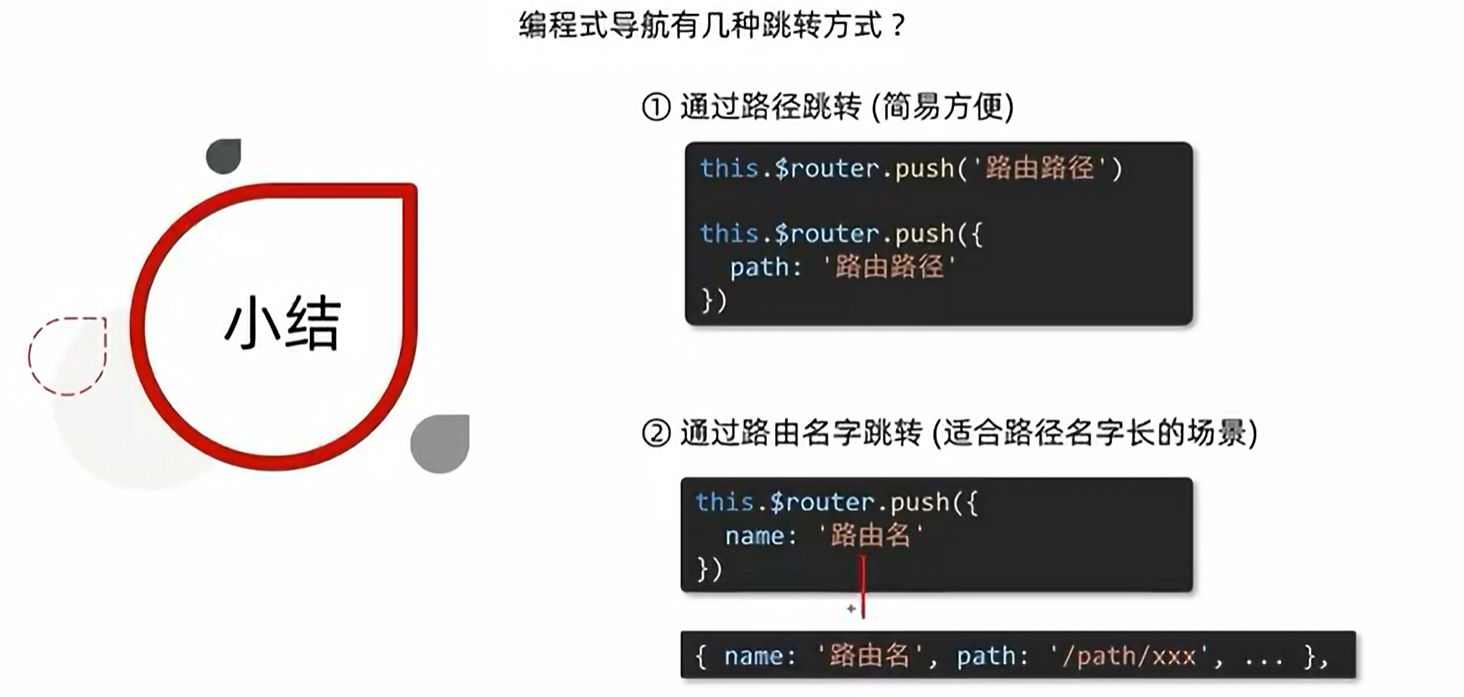
用JS代码来进行跳转
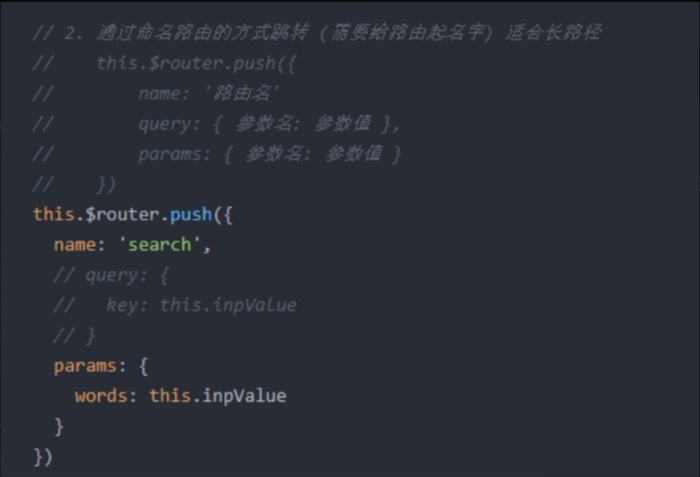
1. 通过路径的方式跳转

2. 通过命名路由的方式跳转
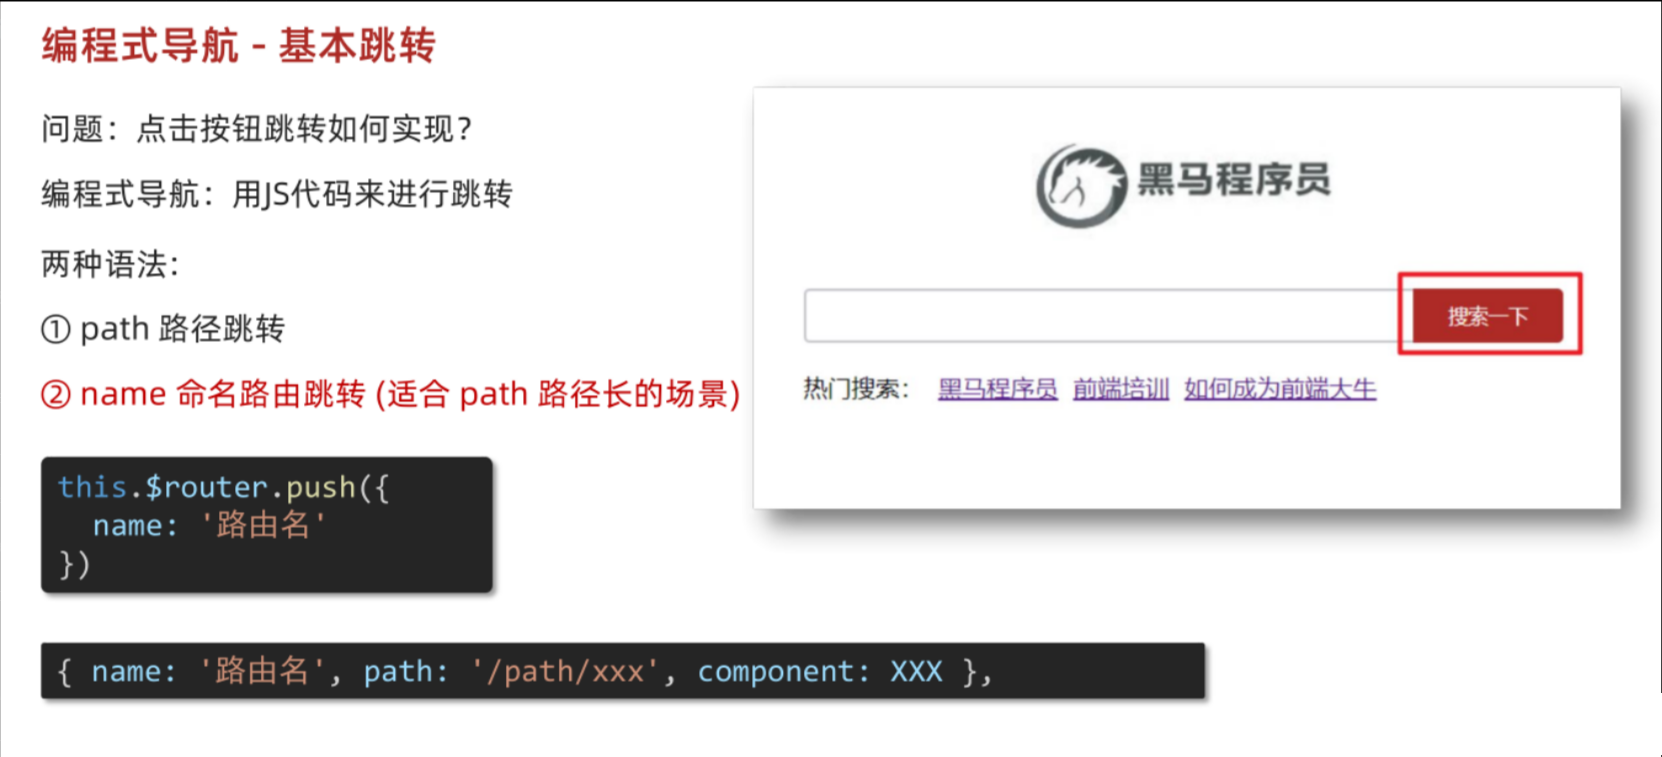
(需要给路由起名字) 适合长路径
router/index.js
import Home from '@/views/Home'
import Search from '@/views/Search'
import NotFound from '@/views/NotFound'
import Vue from 'vue'
import VueRouter from 'vue-router'
Vue.use(VueRouter) // VueRouter插件初始化// 创建了一个路由对象
const router = new VueRouter({// 注意:一旦采用了 history 模式,地址栏就没有 #,需要后台配置访问规则mode: 'history',routes: [{ path: '/', redirect: '/home' },{ path: '/home', component: Home },{ name: 'search', path: '/search/:words?', component: Search },{ path: '*', component: NotFound }]
})export default router
Home.vue
<template><div class="home"><div class="logo-box"></div><div class="search-box"><input type="text"><button @click="goSearch">搜索一下</button></div><div class="hot-link">热门搜索:<router-link to="/search/黑马程序员">黑马程序员</router-link><router-link to="/search/前端培训">前端培训</router-link><router-link to="/search/如何成为前端大牛">如何成为前端大牛</router-link></div></div>
</template>
<script>
export default {name: 'FindMusic',methods: {goSearch () {// 1. 通过路径的方式跳转// (1) this.$router.push('路由路径') [简写]// this.$router.push('/search')// (2) this.$router.push({     [完整写法]//         path: '路由路径' //     })// this.$router.push({//   path: '/search'// })// 2. 通过命名路由的方式跳转 (需要给路由起名字) 适合长路径//    this.$router.push({//        name: '路由名'//    })this.$router.push({name: 'search'})}}
}
</script>
<style>
.logo-box {height: 150px;background: url('@/assets/logo.jpeg') no-repeat center;
}
.search-box {display: flex;justify-content: center;
}
.search-box input {width: 400px;height: 30px;line-height: 30px;border: 2px solid #c4c7ce;border-radius: 4px 0 0 4px;outline: none;
}
.search-box input:focus {border: 2px solid #ad2a26;
}
.search-box button {width: 100px;height: 36px;border: none;background-color: #ad2a26;color: #fff;position: relative;left: -2px;border-radius: 0 4px 4px 0;
}
.hot-link {width: 508px;height: 60px;line-height: 60px;margin: 0 auto;
}
.hot-link a {margin: 0 5px;
}
</style>
小结:
编程式导航传参 ( 查询参数传参 & 动态路由传参 )
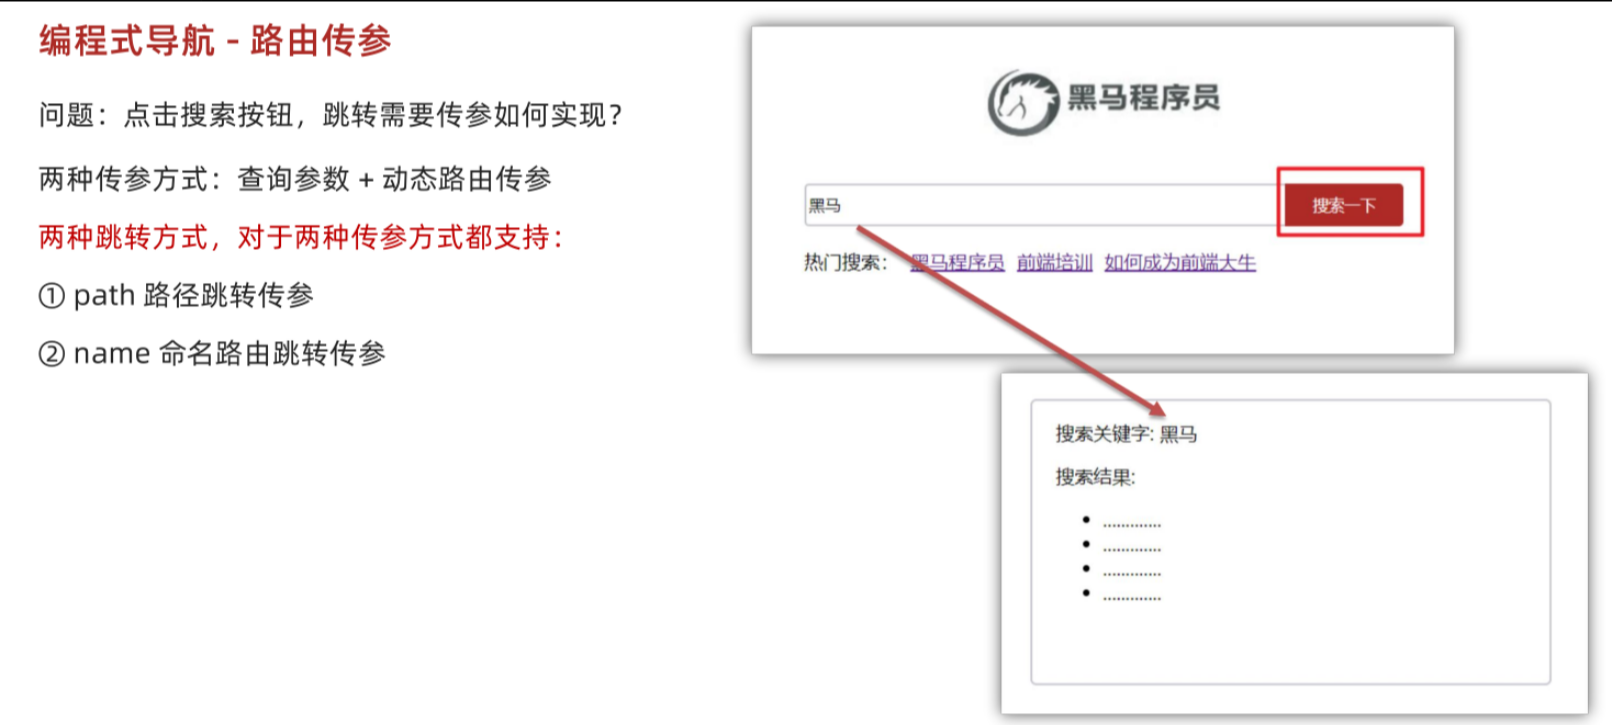
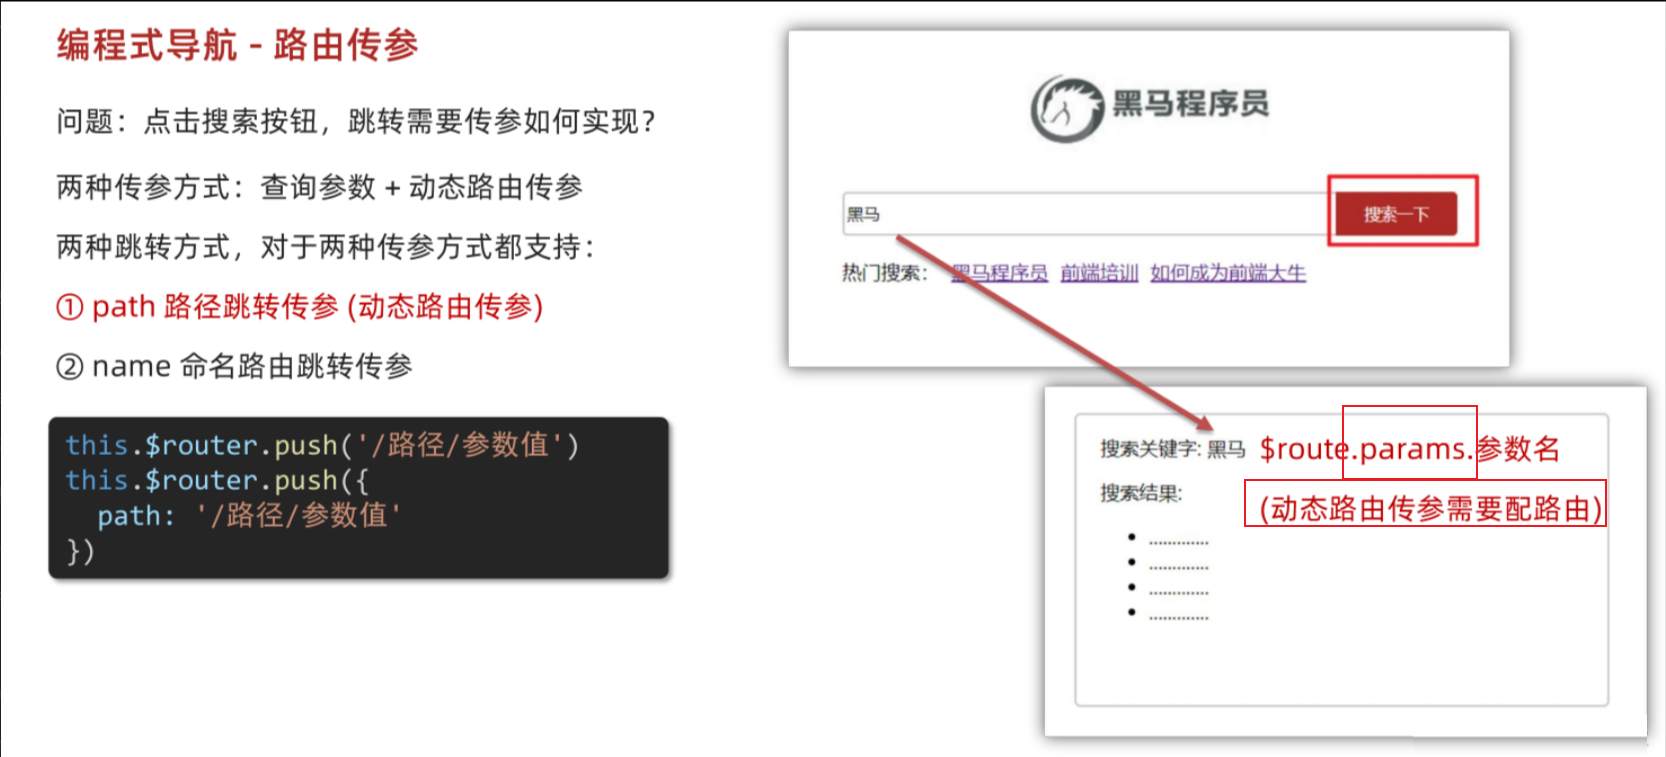
path路径跳转传参
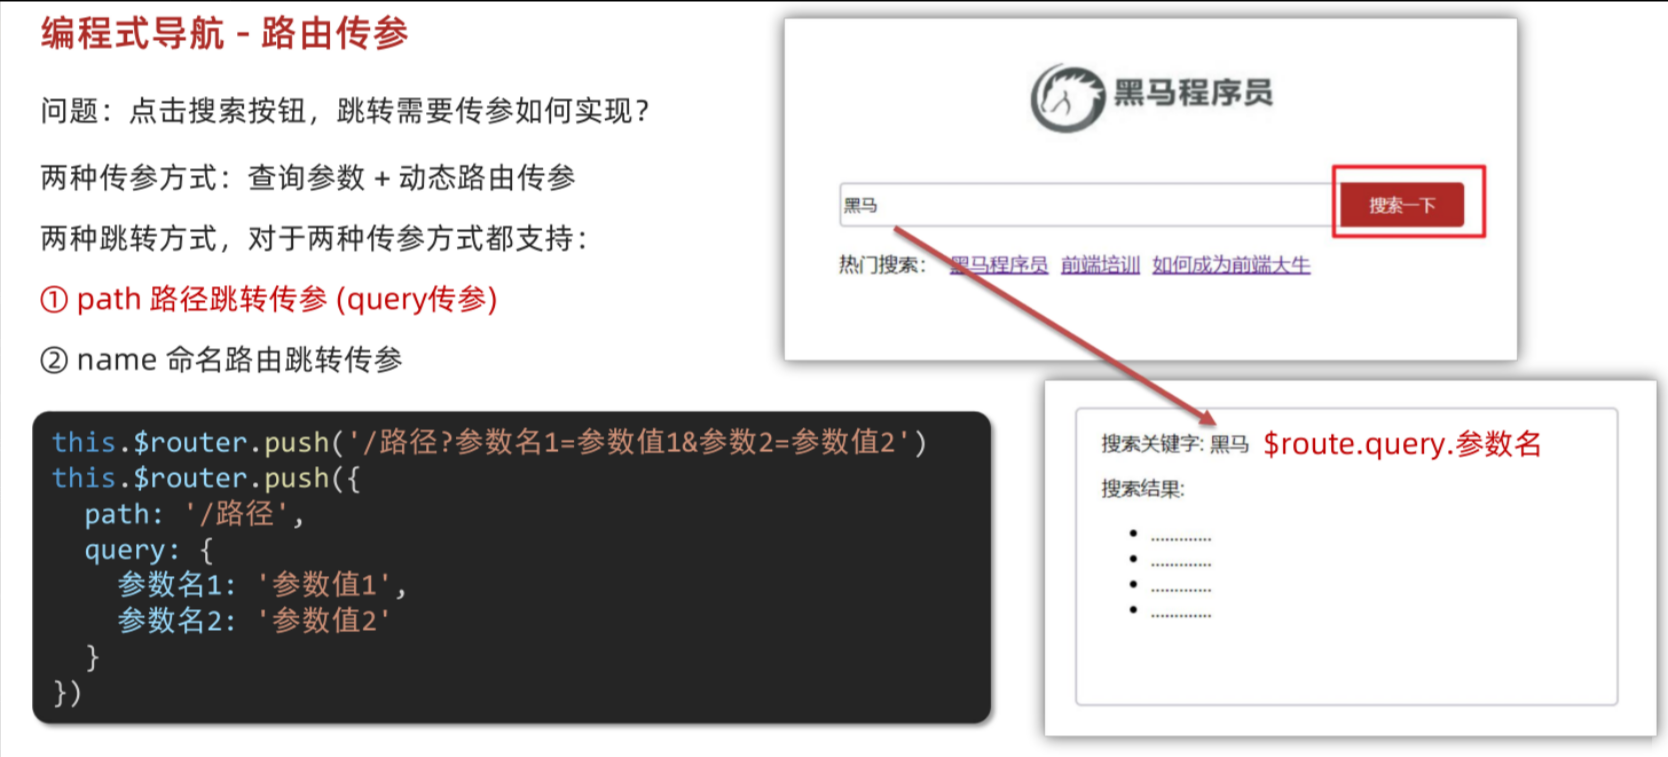
两种传参方式:查询参数传参和动态路由传参 都支持
name命名路由跳转传参
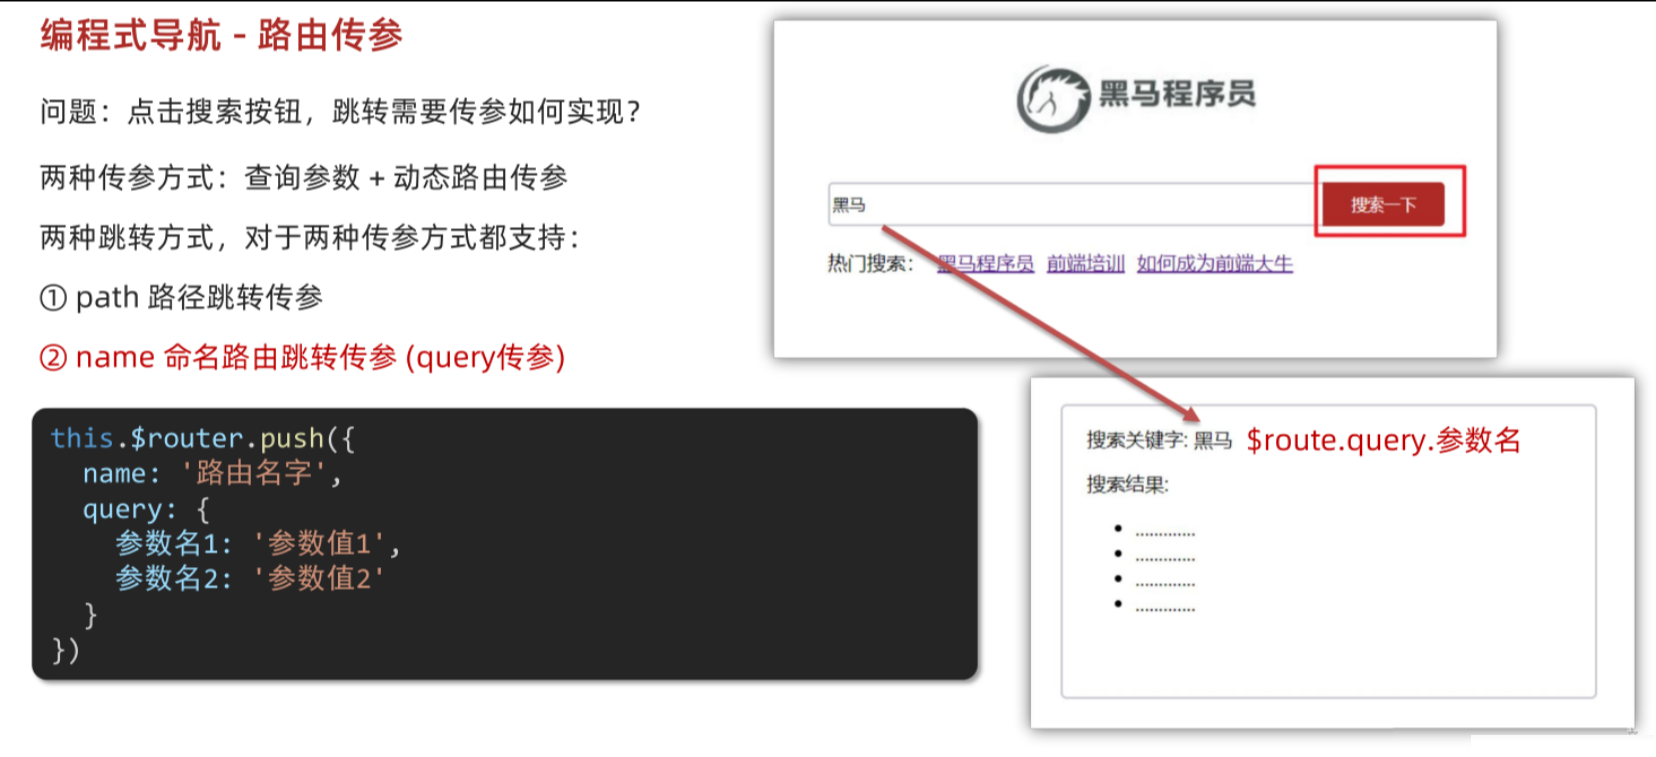
在路由中配置动态路由
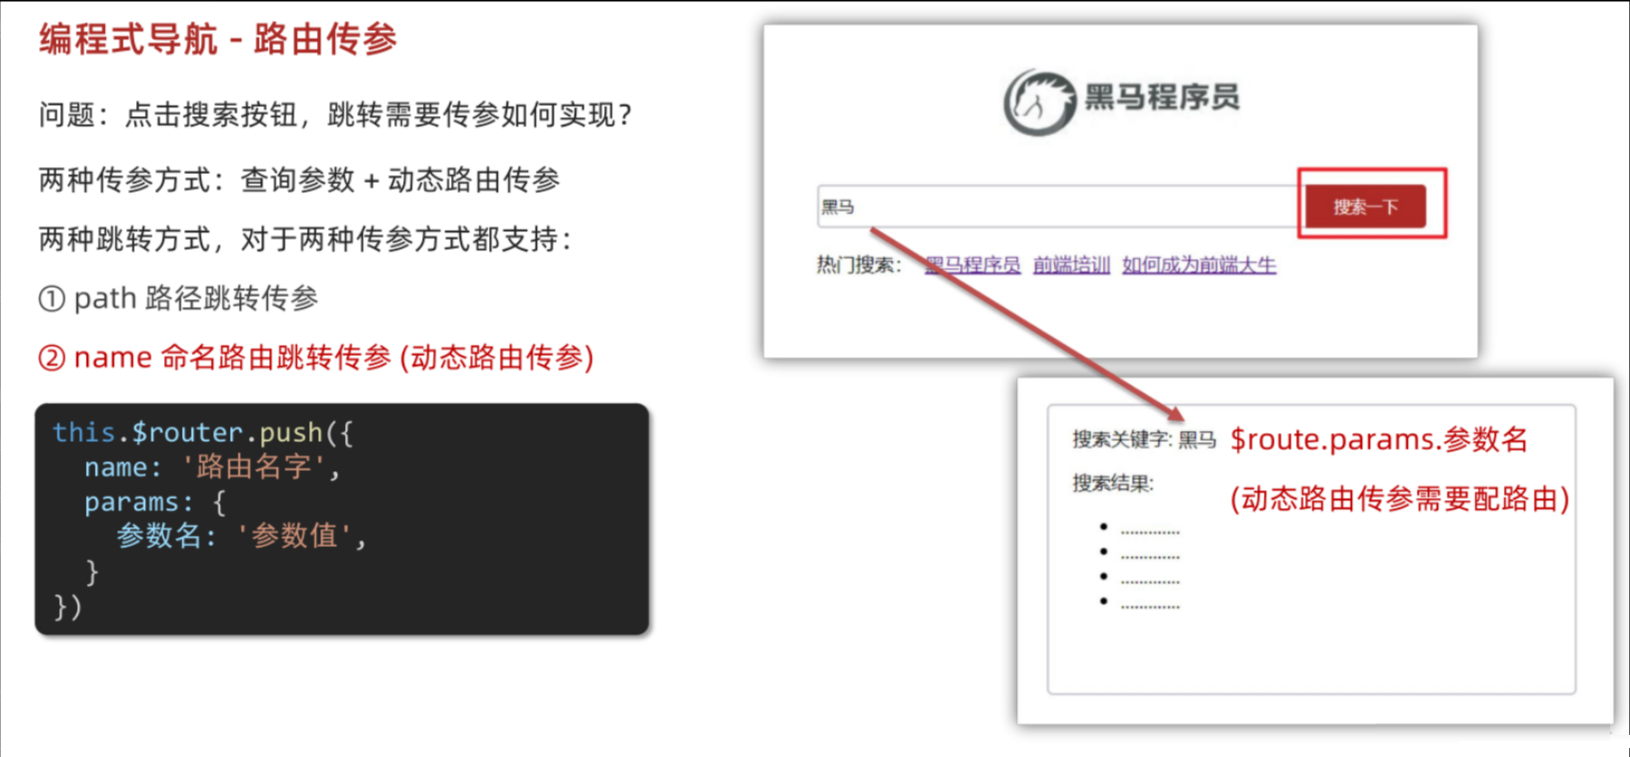
与path不同的是,如果使用动态路由,name跳转要使用params传参,path动态路由传参不需要单独写出来params
在 path 动态传参(即路由路径中定义了多个参数)时,你必须用模板字符串手动拼接路径,因为 path 跳转方式不支持 params 字段(写了也会被忽略)。
JavaScript
{path: '/user/:userId/post/:postId',name: 'UserPost',component: UserPost
}
✅ 正确写法(用 path):
JavaScript
this.$router.push(`/user/${userId}/post/${postId}`)这就是“手动拼接”,因为 path 不支持 params,你只能自己把参数塞进路径字符串里。
在所跳转的组件中,通过 $route.params.参数名 获取传入参数值
小结:
个人总结
路由导航 传参 跳转 三问:
1.哪种路由导航?
2.传参方式是什么?
3.如果是编程式导航,跳转方式是什么?
路由导航的种类有两种:
1.声明式导航——使用router-link组件,点击后跳转 路由跳转的方法:
2.编程式导航——触发事件,用JS代码来进行跳转 路由跳转的方法: this.$router.push()
路由传参方式也有两种:
1.查询参数传参——在路由中拼接查询参数 形式:?key=value
传过去的参数,通过 this.$route.query.key 获取
2.动态路由传参——在路由中直接拼接参数 形式:/value (前提:在router中配置动态路由 '…/:key' )
传过去的参数,通过 this.$route.params.key 获取
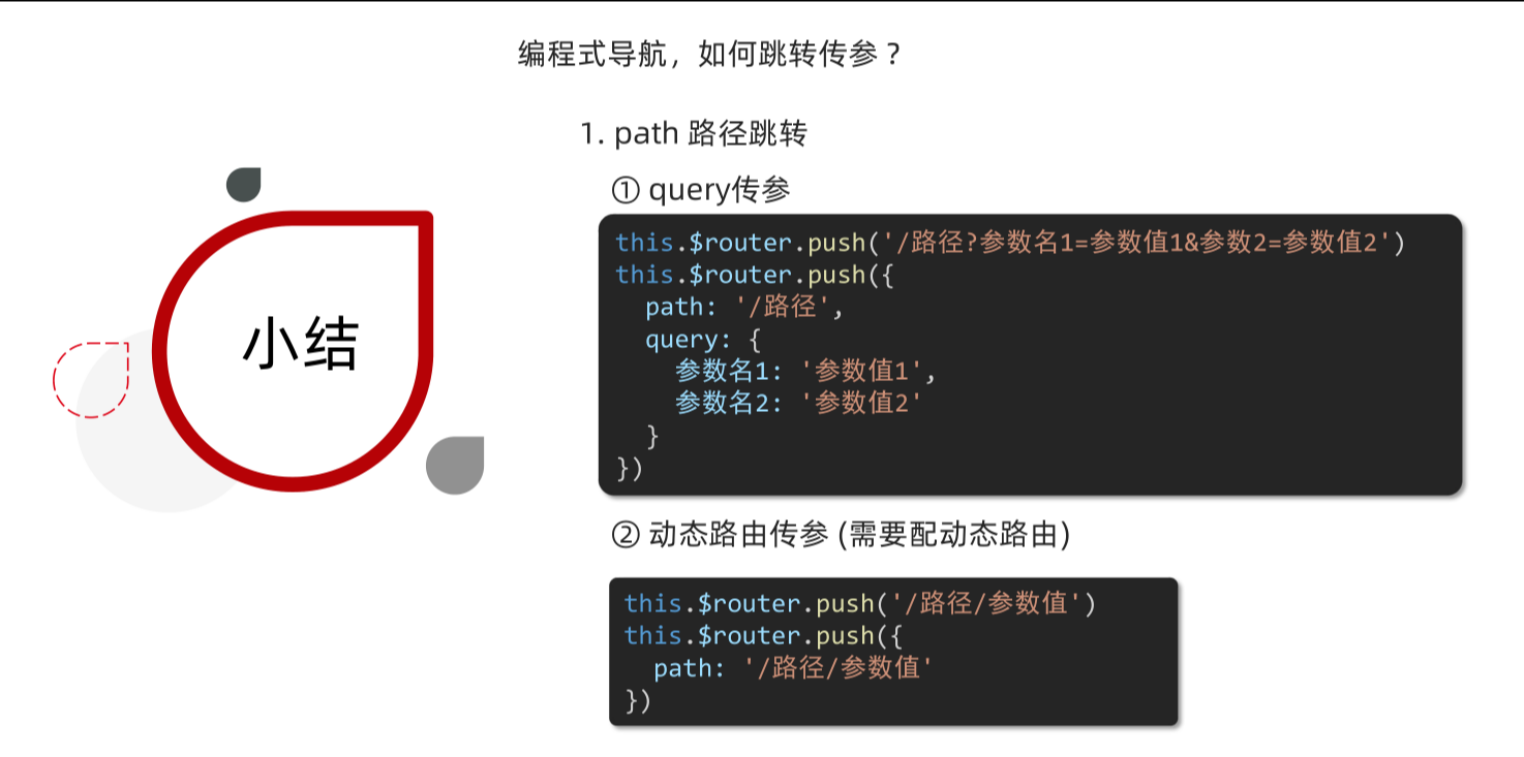
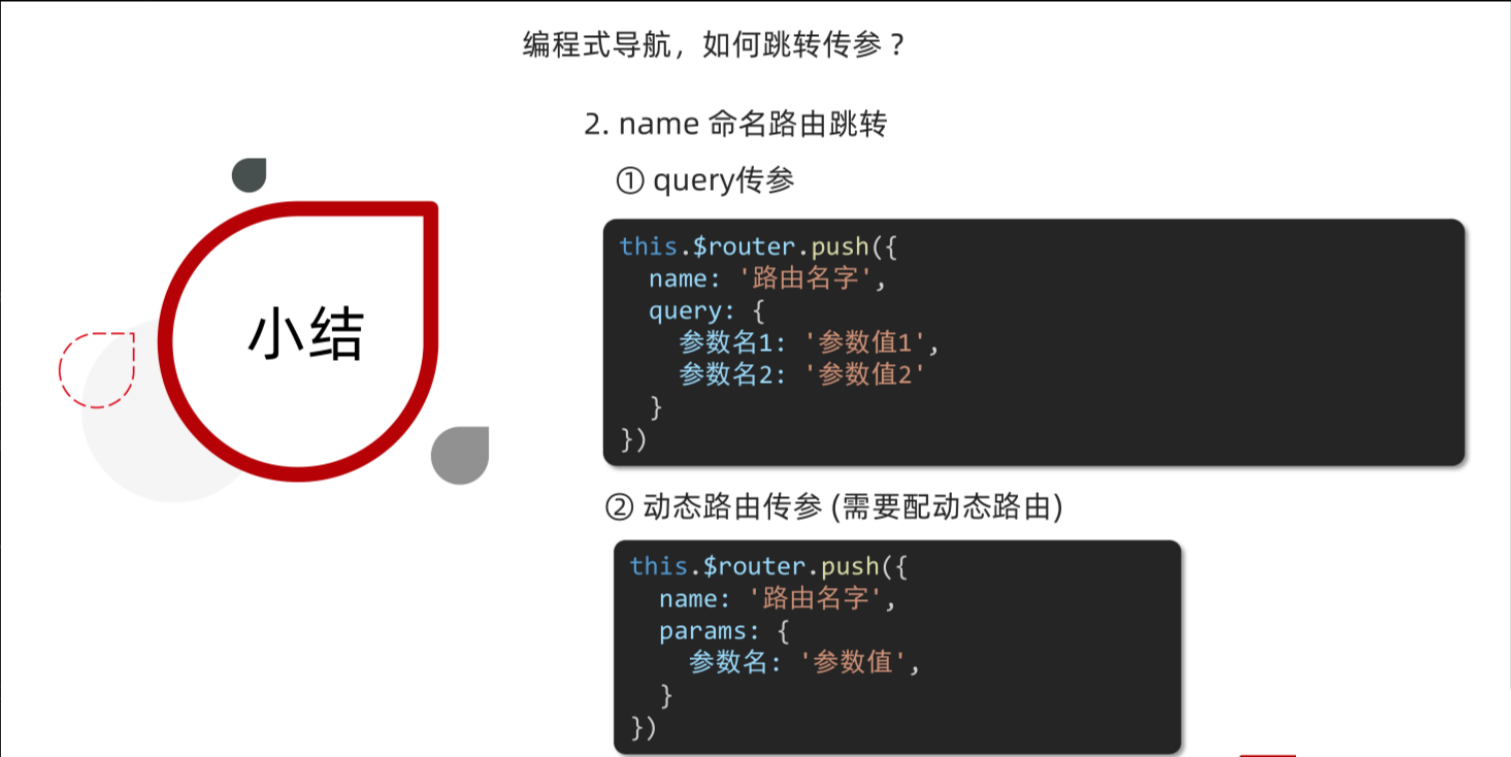
编程式导航的跳转方式有两种:
① path 路径跳转
② name 命名路由跳转
传参方式 和 跳转方式 可以两两组合,实现 携带参数的路由跳转
声明式导航 也可以使用 命名路由跳转 方式
个人认为:
在元素(router-link)的属性写一个对象(JS代码)阅读性较差,故少用
综合案例:面经基础版
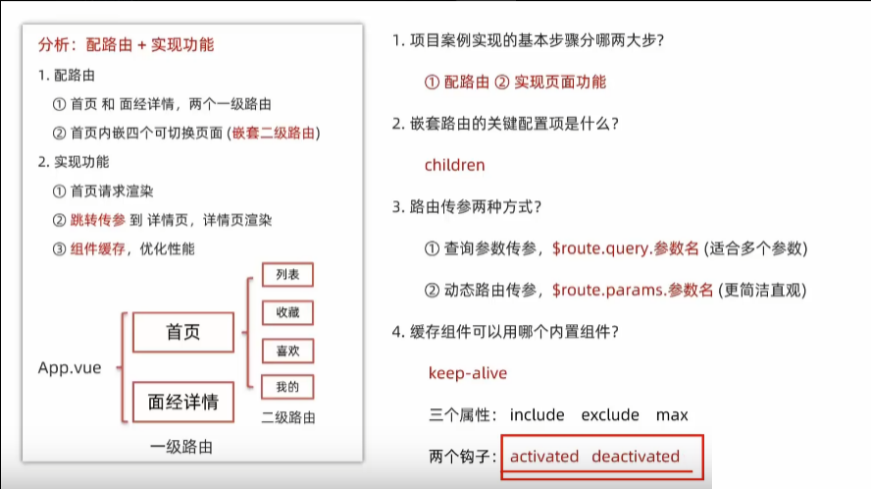
案例分析:

面经基础版-路由配置
一级路由
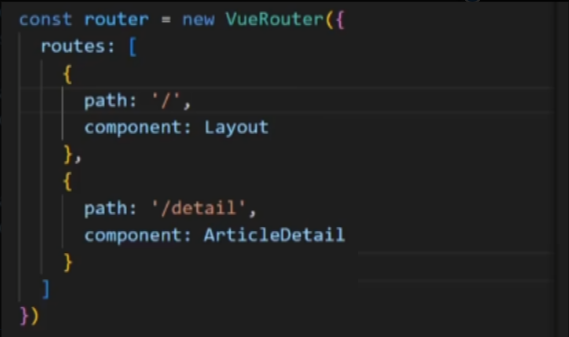
二级路由(还要准备第二级路由出口)
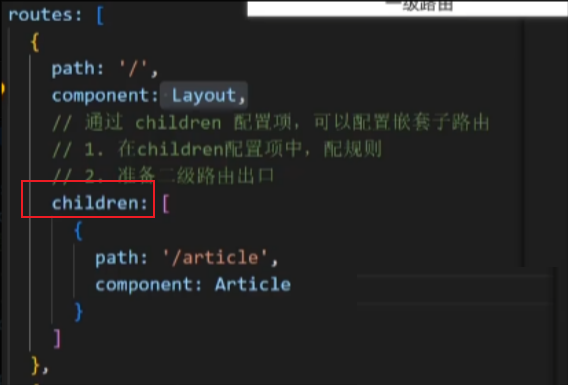
二级路由出口

面经基础版-首页请求渲染
步骤:
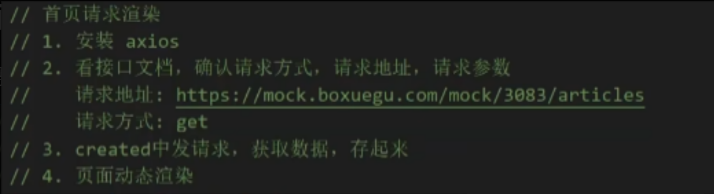
请求数据:
然后在模板中渲染即可。
面经基础版-传参(查询参数&动态路由)
传参方式:
查询参数传参:
![]()
地址栏处会带上id
动态路由传参(单个参数更优雅方便):
配置动态路由
不用写上 id=
![]()
给头部导航的返回小箭头添加返回功能( $router.back() ):
![]()

面经基础版-详情页渲染
有时候出现空白:
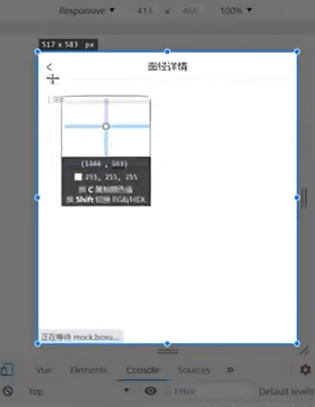
有的内容没渲染出来,为什么?发请求需要时间,有一小段时间,article为空。
解决方法:加上v-if,有内容才去渲染
![]()
面经基础版-缓存组件
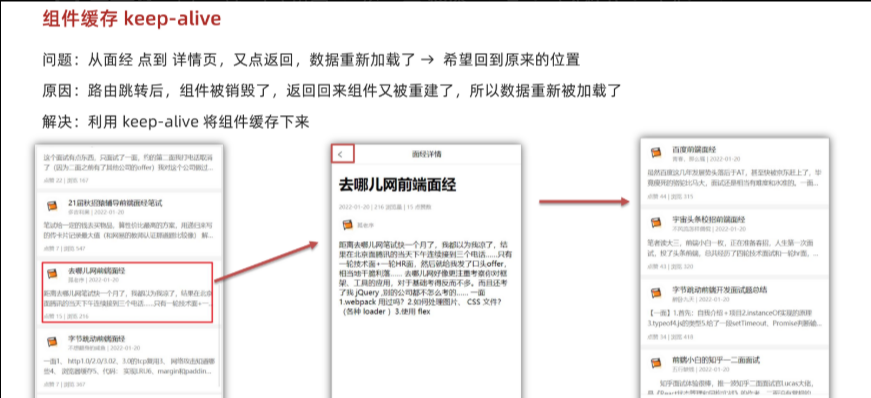
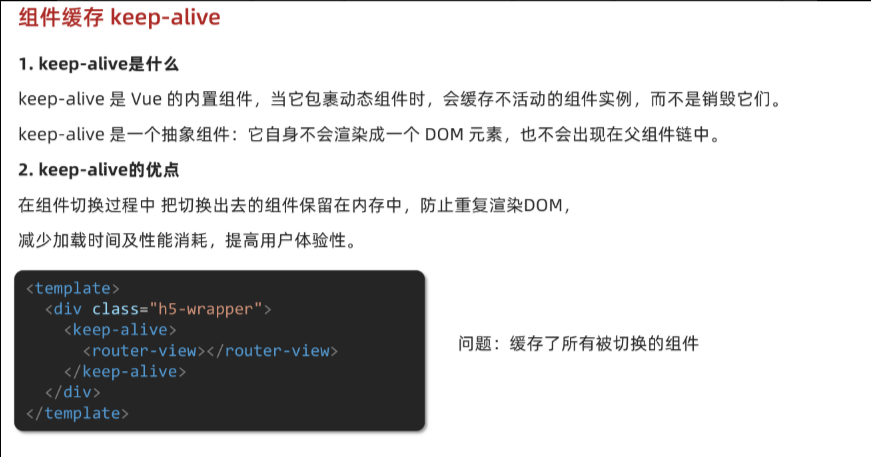
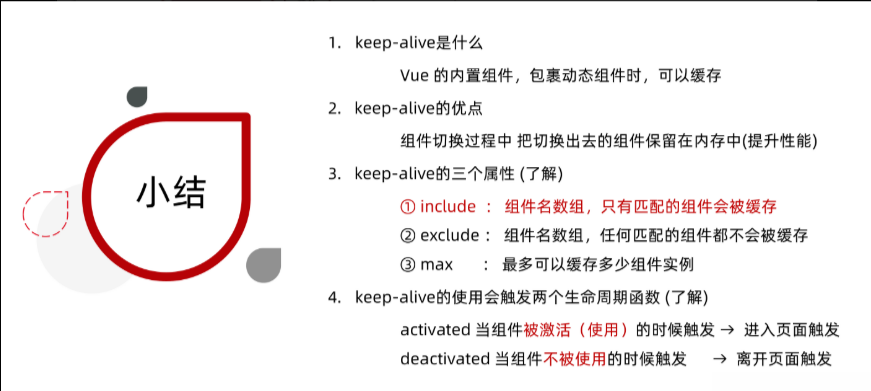
keep-alive
注意:name优先级更高,如果没有配置name,才会找文件名作为组件名
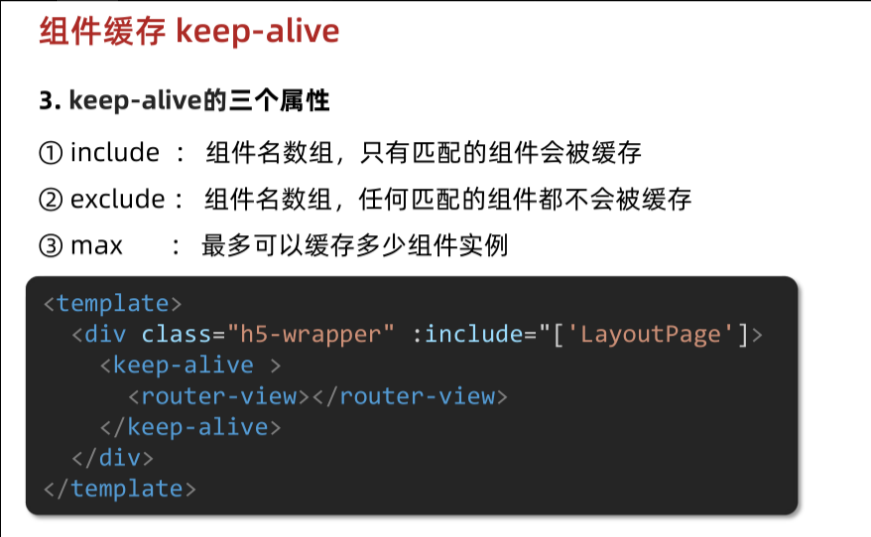
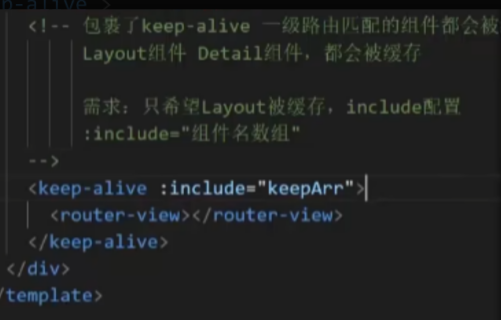
使用keep-alive的include属性
被缓存组件多两个生命周期钩子
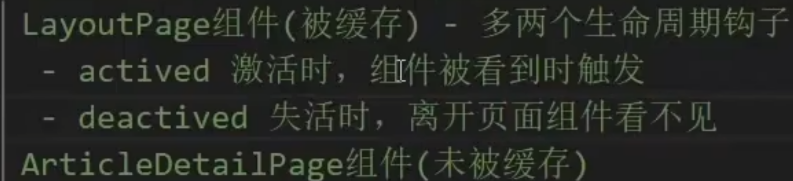
实操:

点击面经进入详情页面后,再返回,created mounted destroyed不会再被触发。
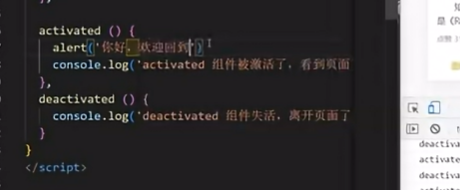
如果希望回到首页有提示等,在哪实现?
提供了actived deactived
小结:
自定义创建项目
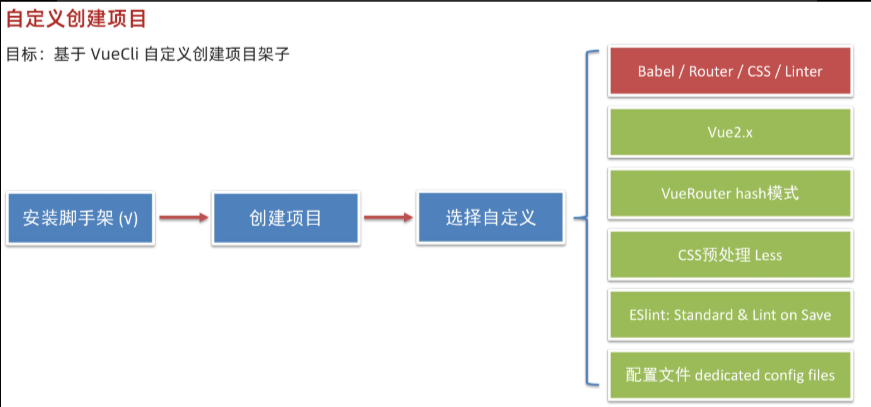
1.安装脚手架 (已安装)
npm i @vue/cli -g2.创建项目
vue create hm-exp-mobile- 选项
Vue CLI v5.0.8
? Please pick a preset:Default ([Vue 3] babel, eslint)Default ([Vue 2] babel, eslint)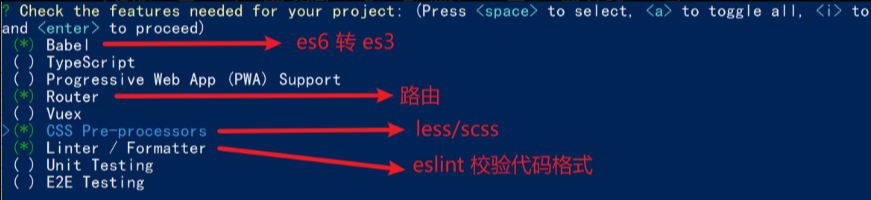
> Manually select features 选自定义- 手动选择功能,空格就是选中

- 选择vue的版本
  3.x
> 2.x- 是否使用history模式,默认是hash模式

- 选择css预处理

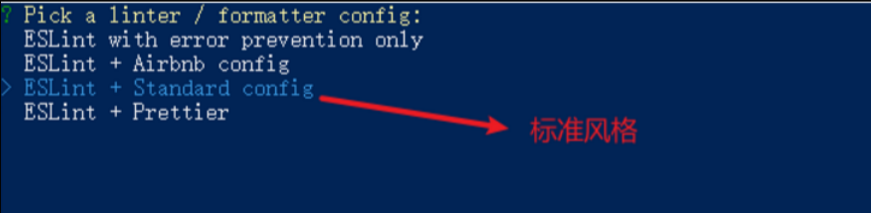
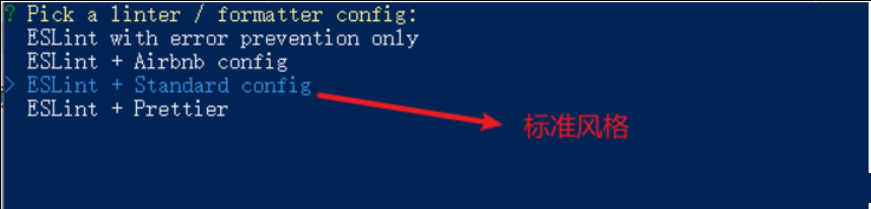
- 选择eslint的风格 (eslint 代码规范的检验工具,检验代码是否符合规范)
- 比如:const age = 18; => 报错!多加了分号!后面有工具,一保存,全部格式化成最规范的样子
- 选择校验的时机 (直接回车)

- 选择配置文件的生成方式 (直接回车)

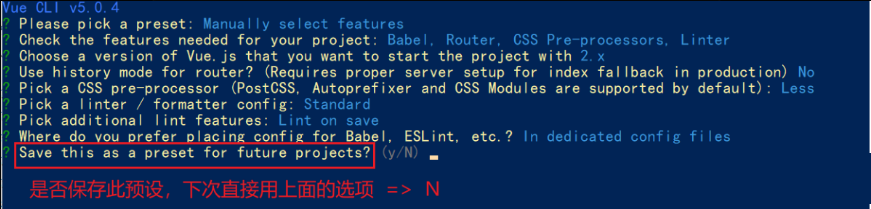
- 是否保存预设,下次直接使用? => 不保存,输入 N
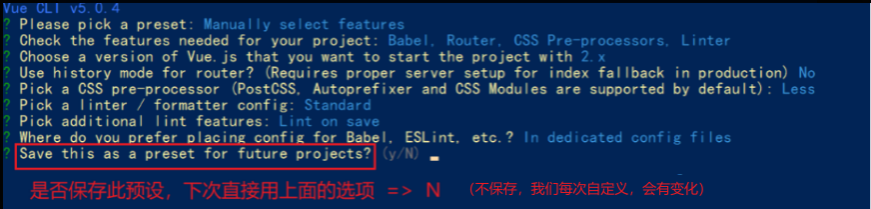
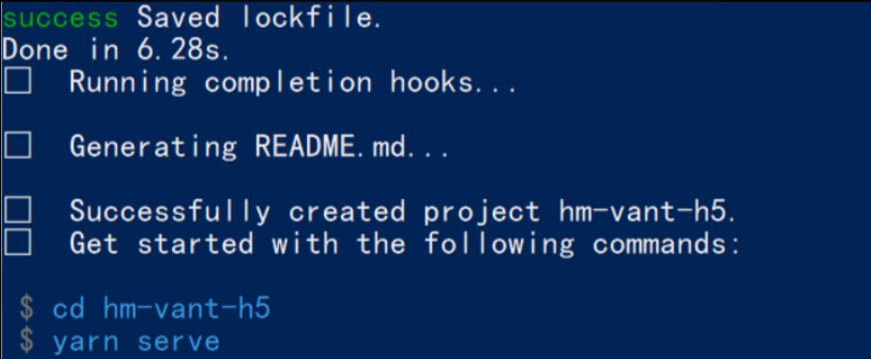
- 等待安装,项目初始化完成
- 启动项目
cd
npm run serve
ESLint手动修正代码规范错误
举例:

使用注意:
以 vue create 的文件夹(目录)作为根目录
运行报错:
根据规范说明找错:
ESLint 入门 - ESLint - 插件化的 JavaScript 代码检查工具
理解错误:
ESLint自动修正代码规范错误
设置——>打开设置
vuex的基本认知
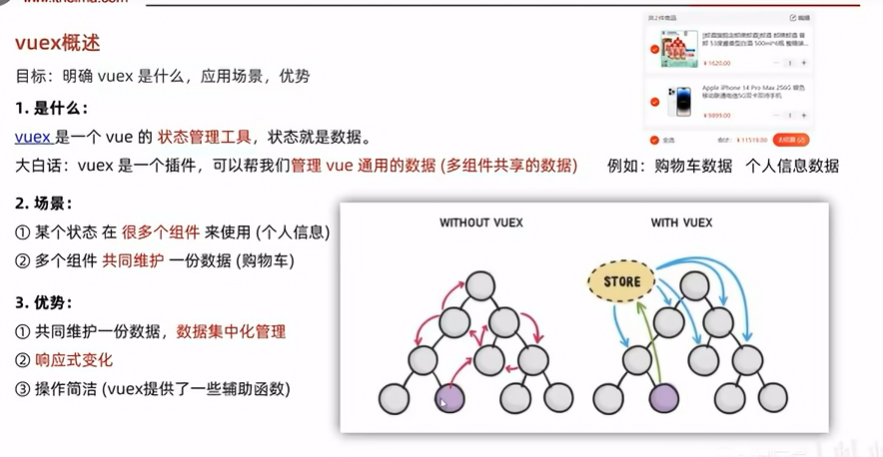
使用场景
- 某个状态 在 很多个组件 来使用 (个人信息)
- 多个组件 共同维护 一份数据 (购物车)
构建多组件共享的数据环境
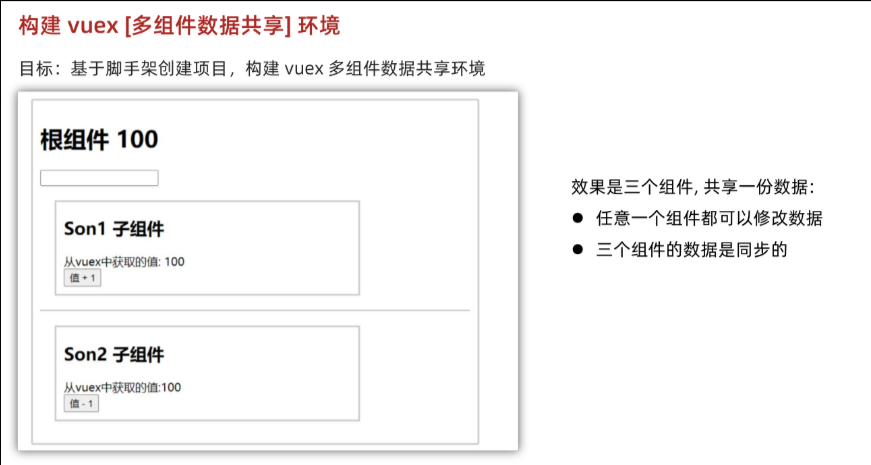
1.创建项目
如果创建的时候就选了store,那么store文件夹还有main.js就都自动配置好了
vue create vuex-demo2.创建三个组件, 目录如下
|-components
|--Son1.vue
|--Son2.vue
|-App.vue
3.源代码如下
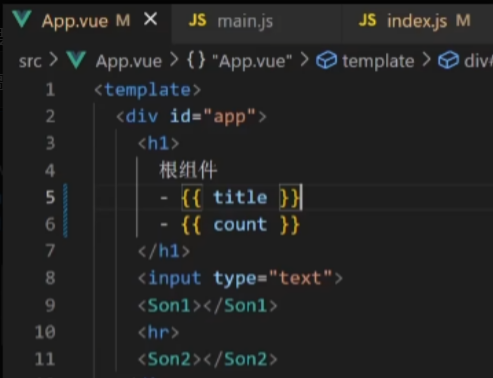
App.vue在入口组件中引入 Son1 和 Son2 这两个子组件
<template><div id="app"><h1>根组件</h1><input type="text"><Son1></Son1><hr><Son2></Son2></div>
</template>
<script>
import Son1 from './components/Son1.vue'
import Son2 from './components/Son2.vue'export default {name: 'app',data: function () {return {}},components: {Son1,Son2}
}
</script>
<style>
#app {width: 600px;margin: 20px auto;border: 3px solid #ccc;border-radius: 3px;padding: 10px;
}
</style>
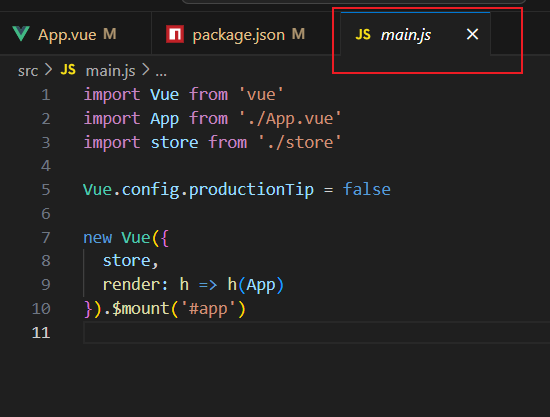
main.js
import Vue from 'vue'
import App from './App.vue'Vue.config.productionTip = falsenew Vue({render: h => h(App)
}).$mount('#app')
Son1.vue
<template><div class="box"><h2>Son1 子组件</h2>从vuex中获取的值: <label></label><br><button>值 + 1</button></div>
</template>
<script>
export default {name: 'Son1Com'
}
</script>
<style lang="css" scoped>
.box{border: 3px solid #ccc;width: 400px;padding: 10px;margin: 20px;
}
h2 {margin-top: 10px;
}
</style>
Son2.vue
<template><div class="box"><h2>Son2 子组件</h2>从vuex中获取的值:<label></label><br /><button>值 - 1</button></div>
</template>
<script>
export default {name: 'Son2Com'
}
</script>
<style lang="css" scoped>
.box {border: 3px solid #ccc;width: 400px;padding: 10px;margin: 20px;
}
h2 {margin-top: 10px;
}
</style>
创建一个空仓库
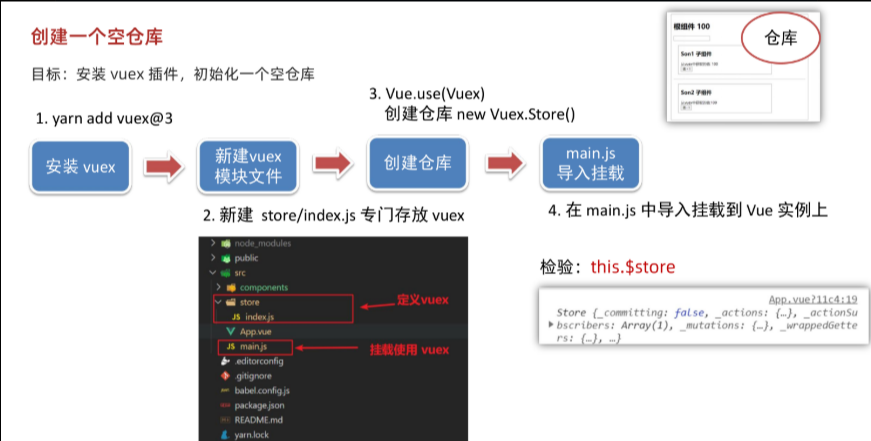
注意:在安装vuex@3报错的话,注意报错信息,多半是当前项目的某个插件的版本已经不兼容了
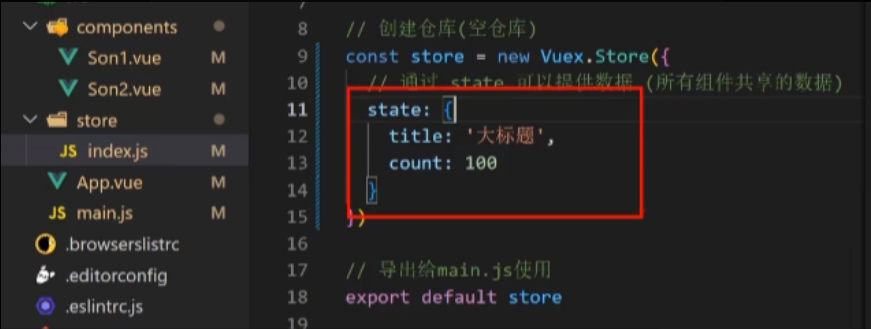
创建仓库
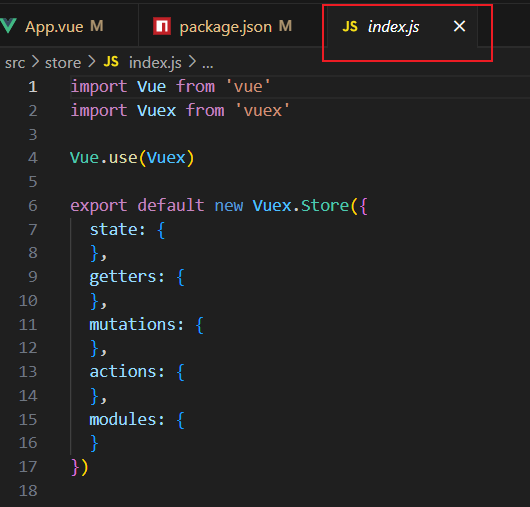
main.js导入挂载
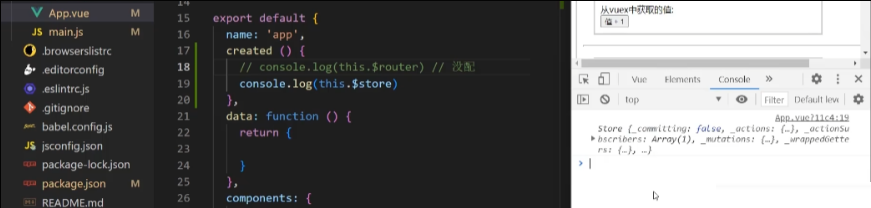
查看仓库
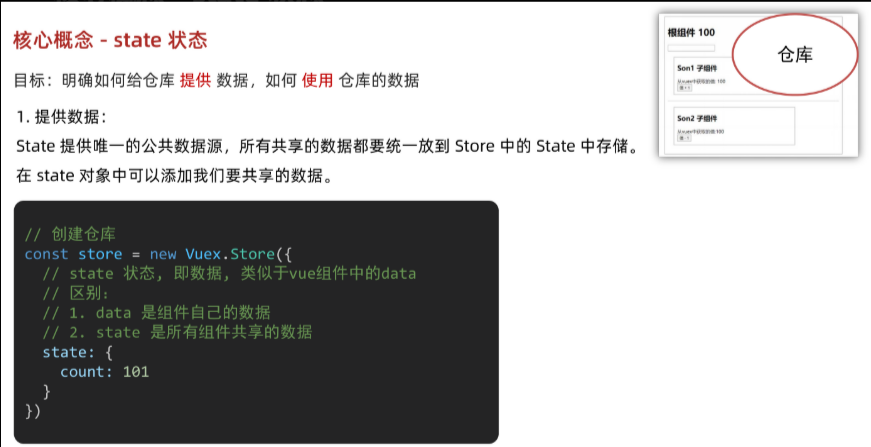
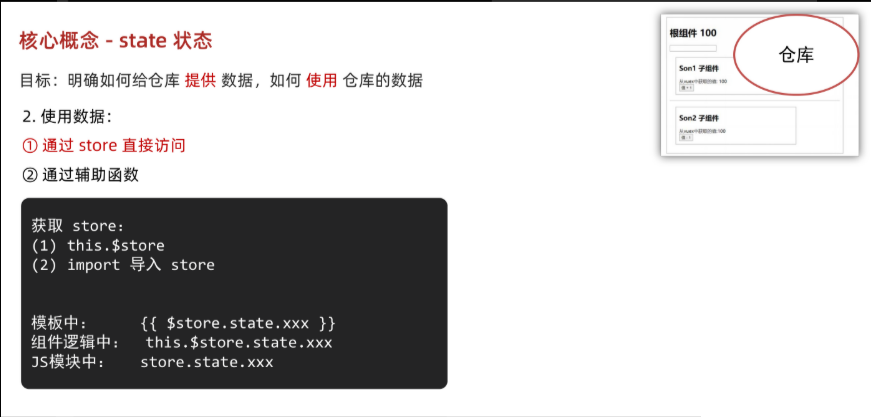
核心概念 - state 状态
如何提供&访问vuex的数据
提供数据
访问数据
实操:
提供数据
访问数据
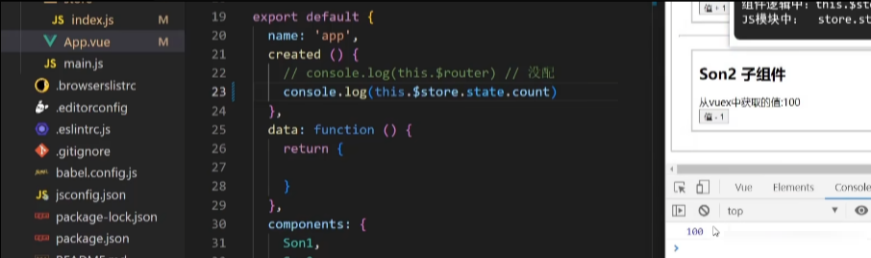
在App.vue中访问
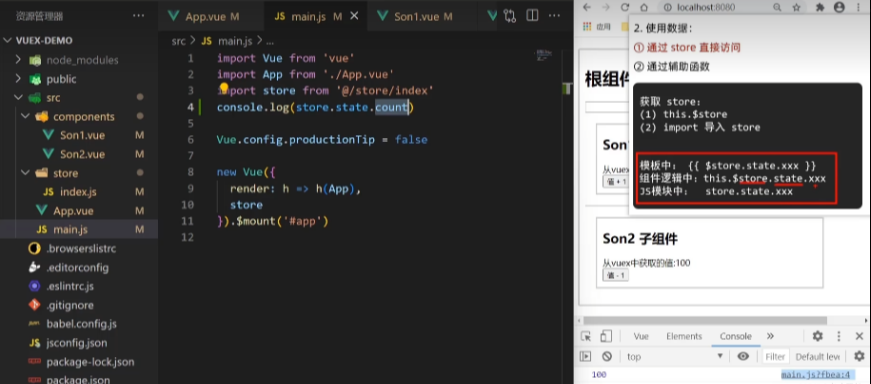
在main.js中访问
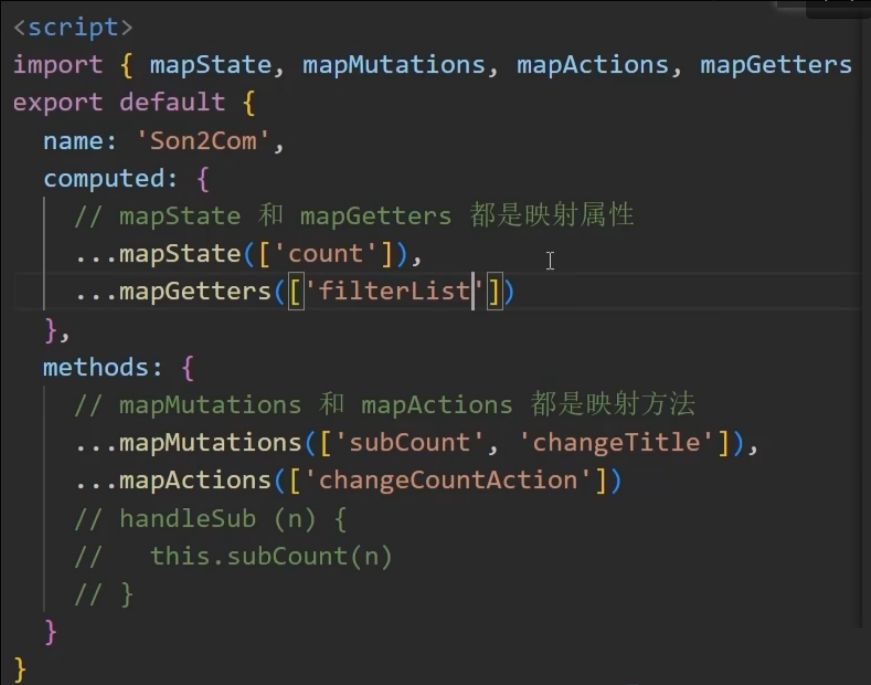
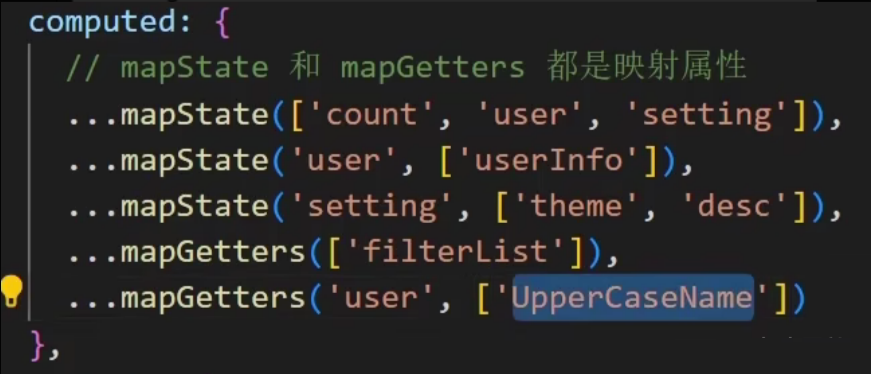
辅助函数简化访问mapState
自动映射
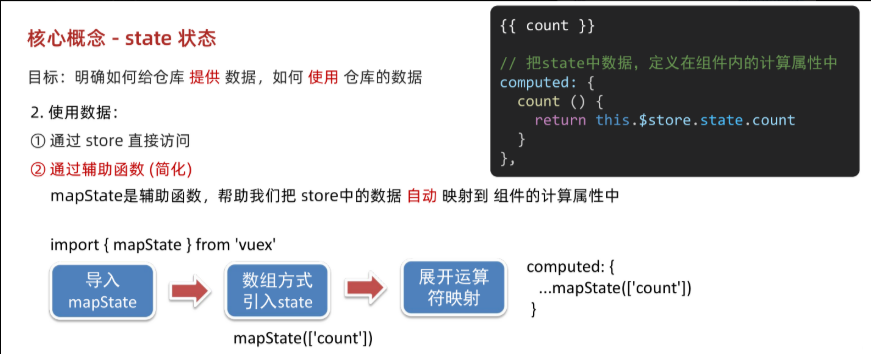
1.导入mapState
import {mapState} from 'vuex'2.数组方式引入state
import { mapState } from 'vuex'export default {computed: {...mapState(['count', 'name']) // 等价于 this.$store.state.count / name}
}
因为 mapState() 返回的是一个对象,所以要用 ... 展开后才能和别的 computed 属性一起用。
模板中就不需要写成 { { $store.state.属性名}}
直接写成 { {属性名}}
然后组件中也可以直接写this.属性名就可以了,不需要再写成this.$store.state.属性名
核心概念 - mutations(改变)
vuex遵循单向数据流
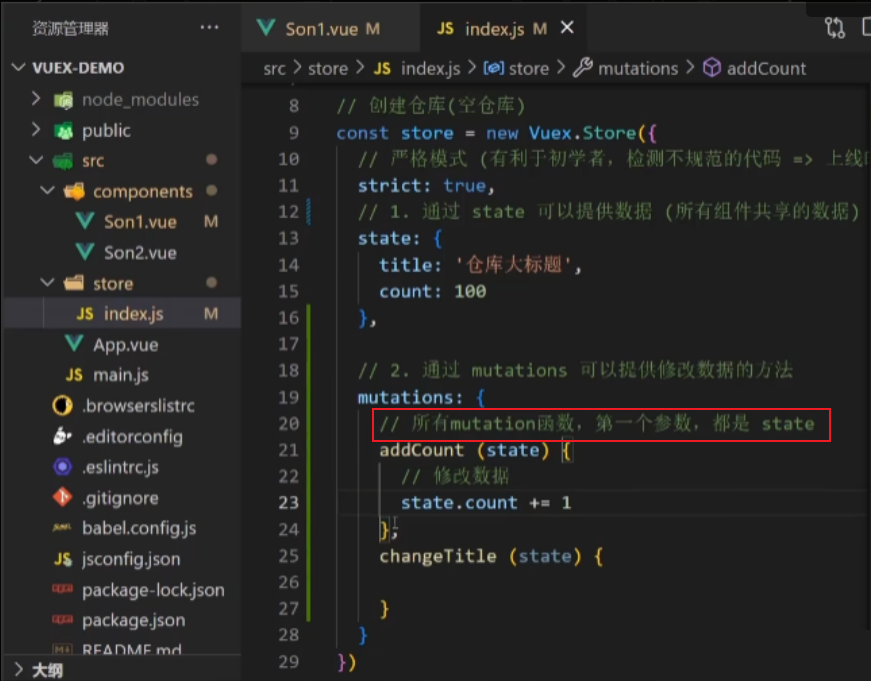
错误写法检测会消耗性能,Vue默认不会对错误写法报错,如果希望报错,可通过开启严格模式
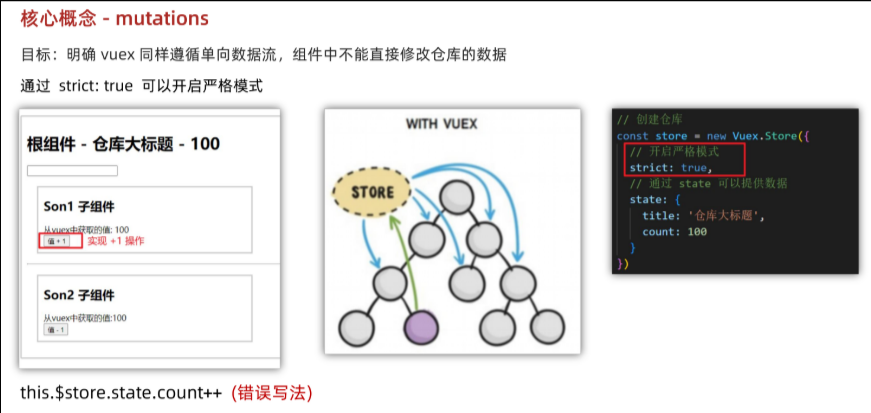
开启严格模式(上线时需要关闭,需要消耗性能)
mutations的基本使用
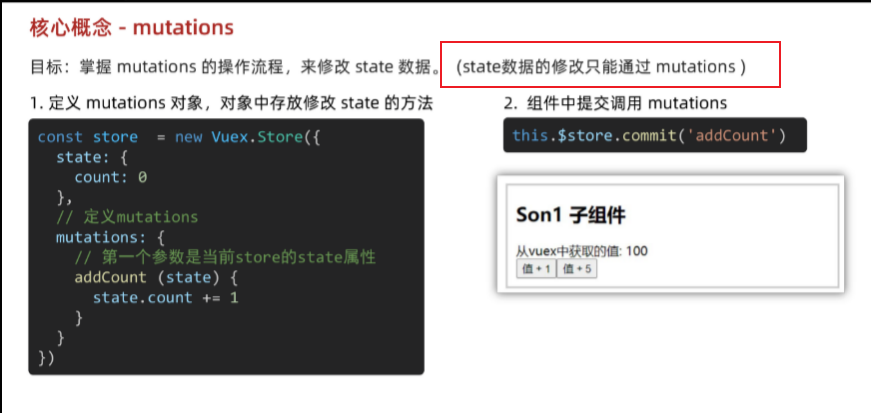
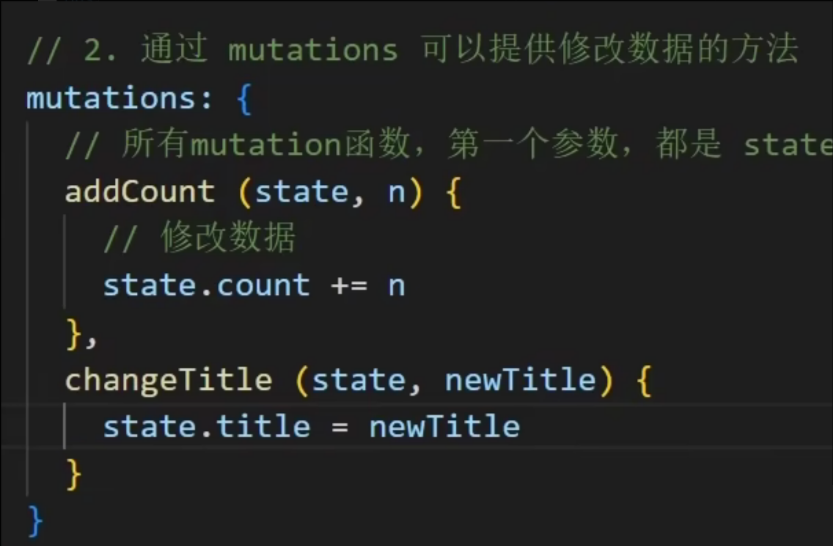
在Store中通过mutations提供修改数据的方法
mutations传参
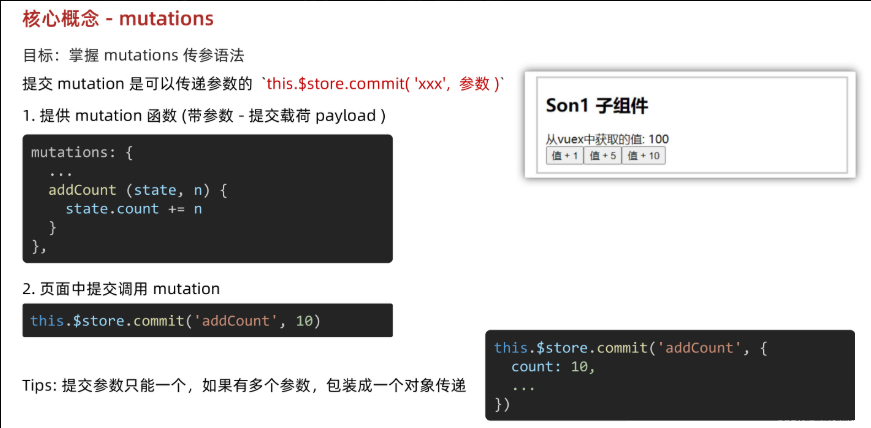
mutation函数带参数
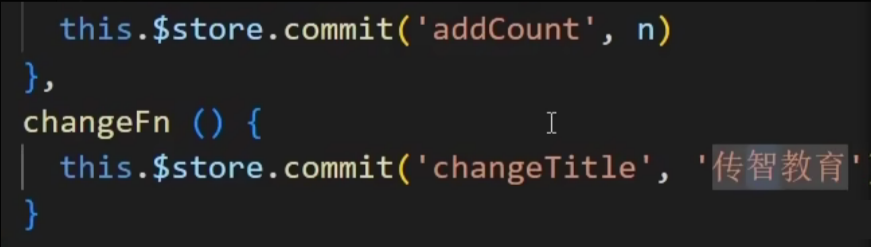
页面中提交并携带参数
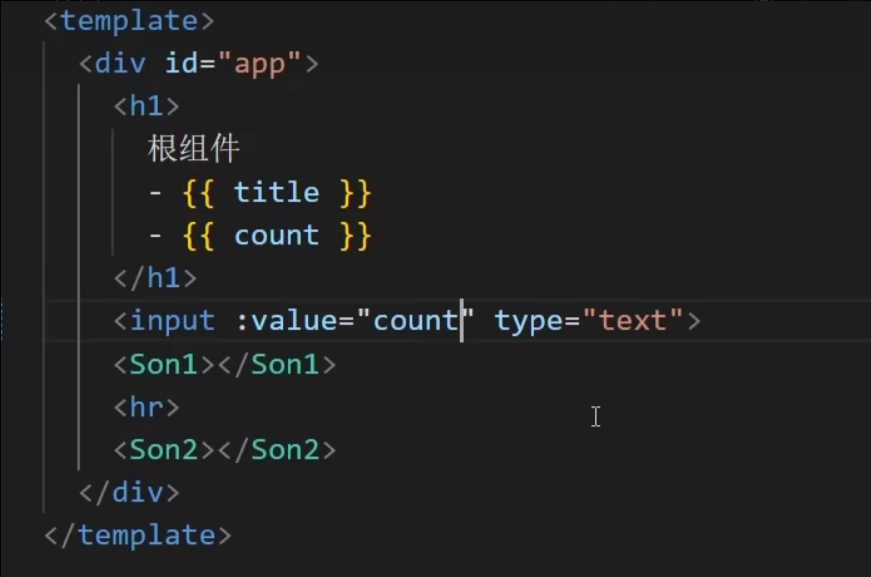
实时输入,实时更新
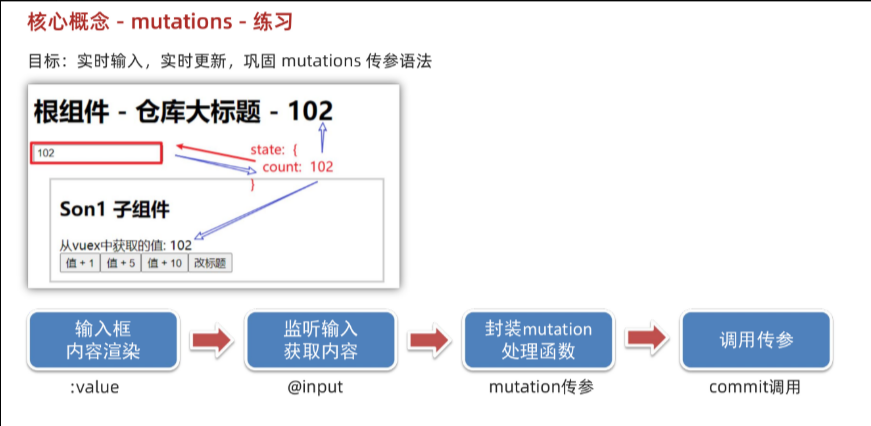
注意此处不能使用v-model,因为要遵循单向数据流。
输入框内容渲染:(:value传入count,count已经经过辅助函数mapState简化访问)
![]()
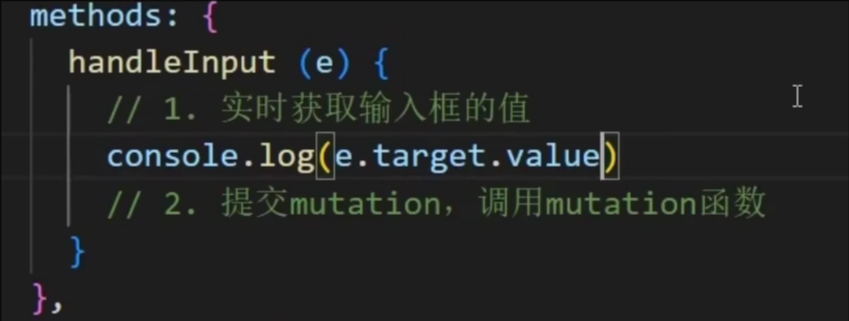
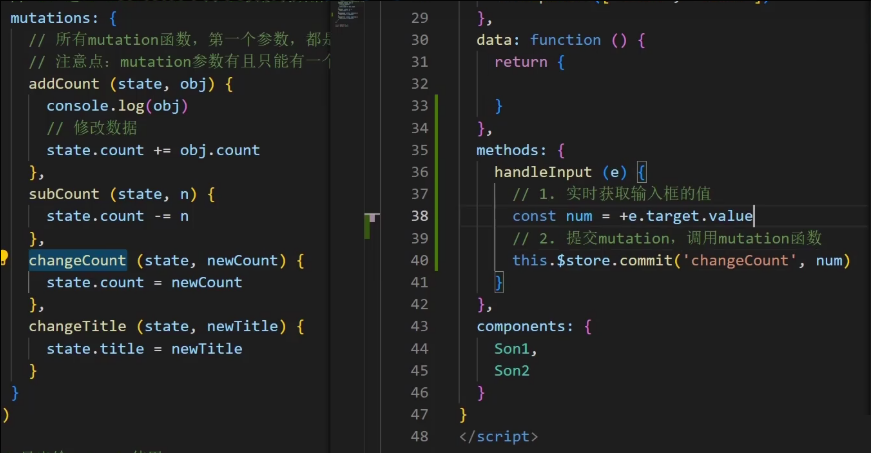
+e.target.value是把字符串转换成数字的作用
PS,如果如图eslint报一堆错
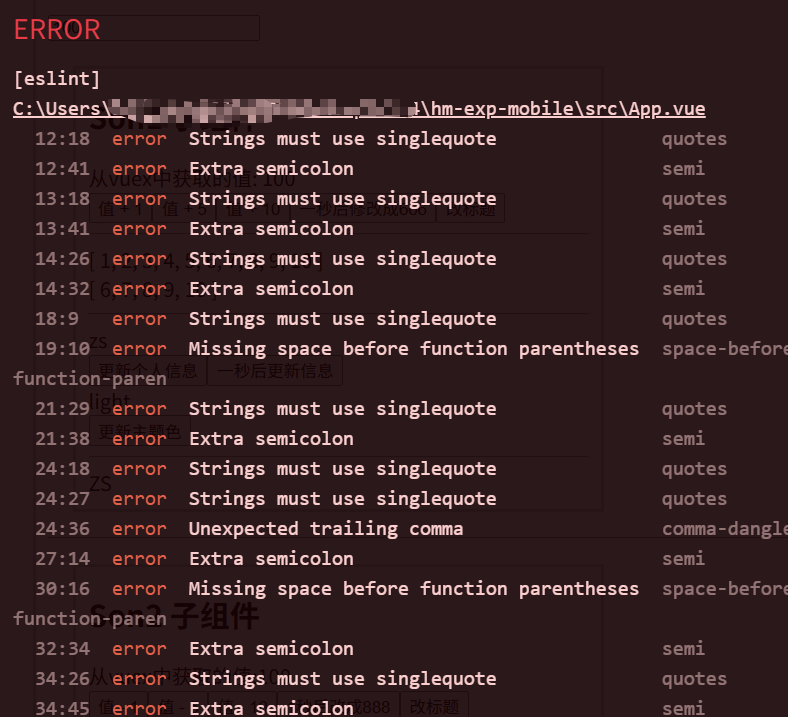
npm run lint -- --fix //解决90% 这会自动帮你修好缩进、引号、分号等格式问题。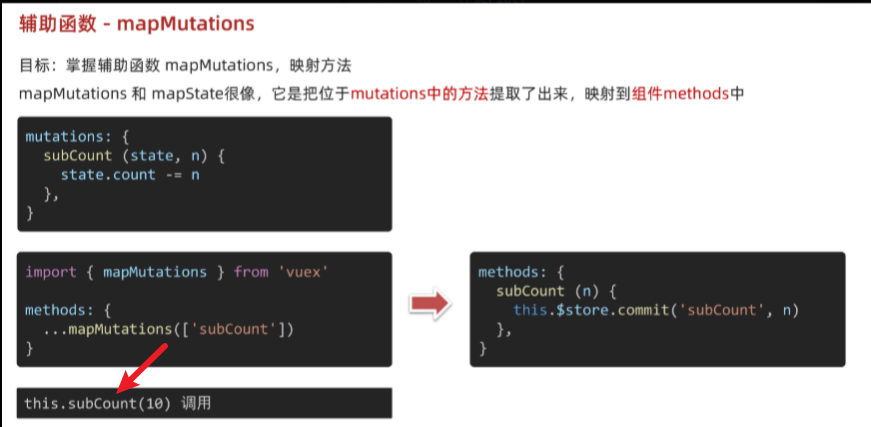
甚至可以直接在页面中直接用
![]()
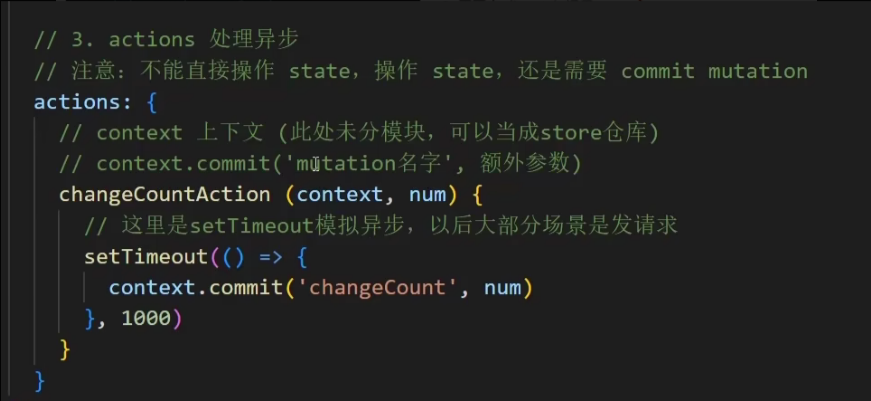
核心概念-actions
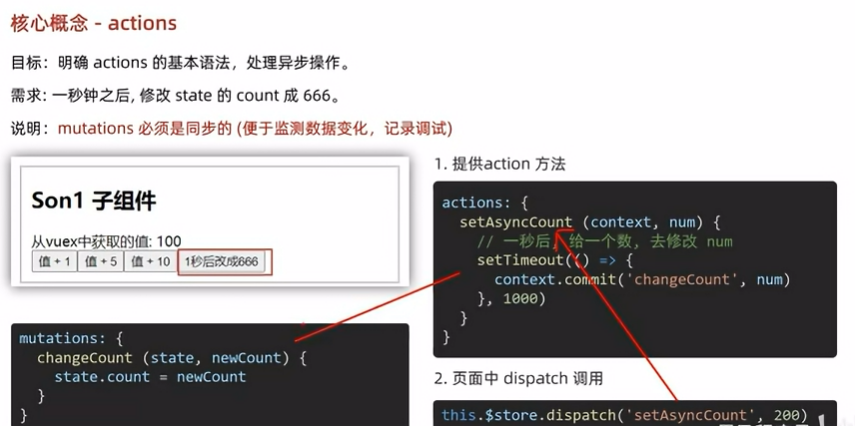
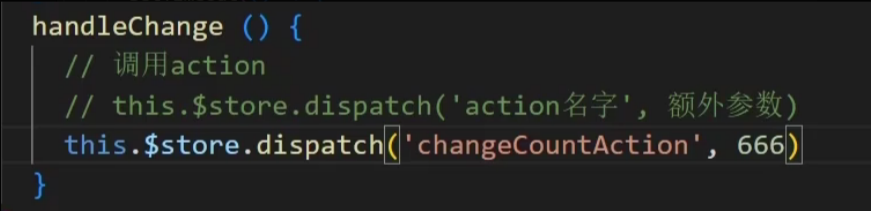
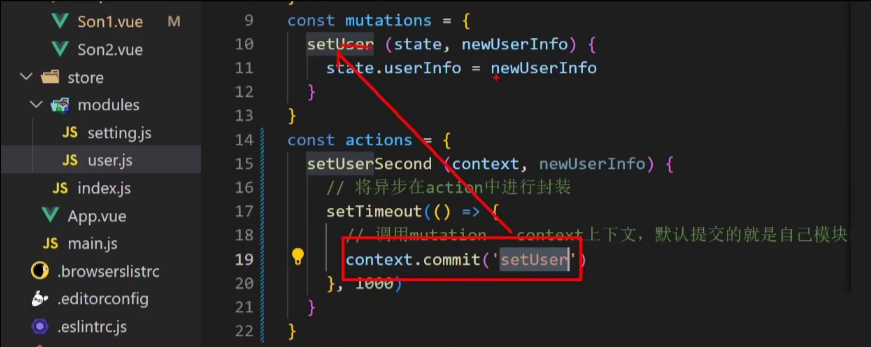
提供action方法
context是上下文,默认提交的就是自己模块的action和mutation
页面中dispatch调用
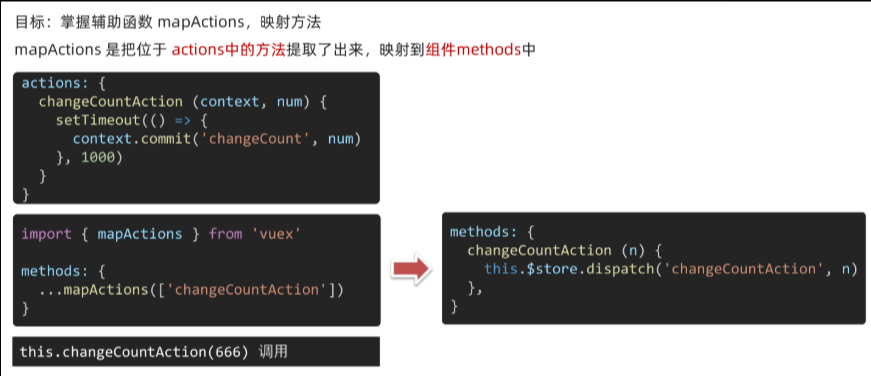
辅助函数 - mapActions
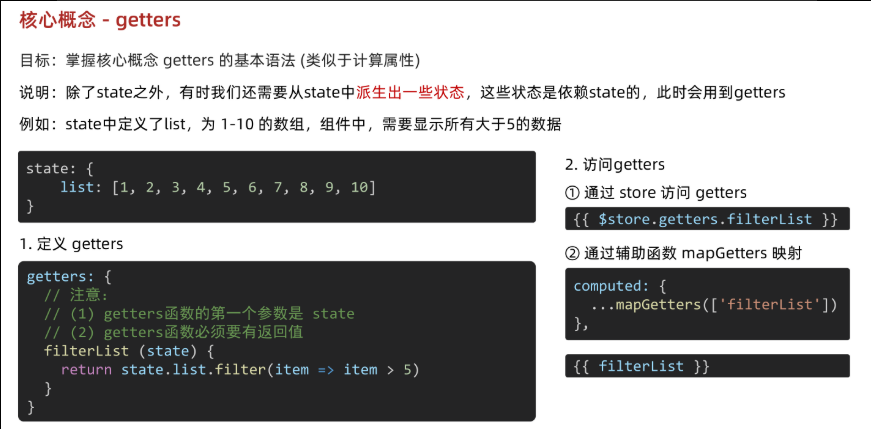
核心概念 - getters
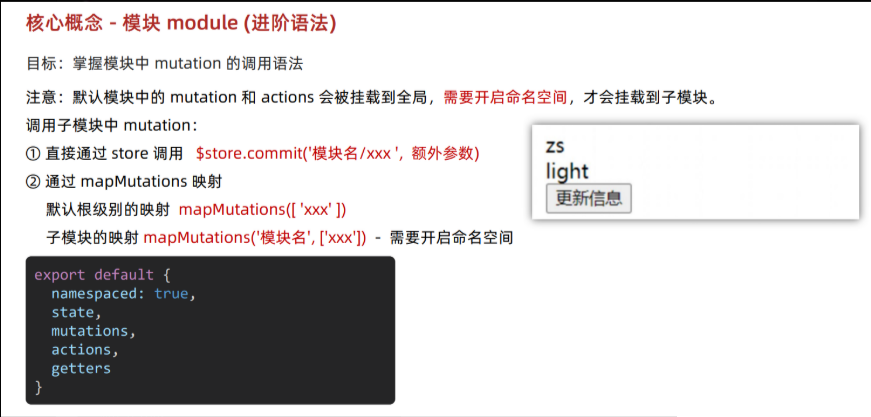
核心概念 - 模块 module (进阶语法)
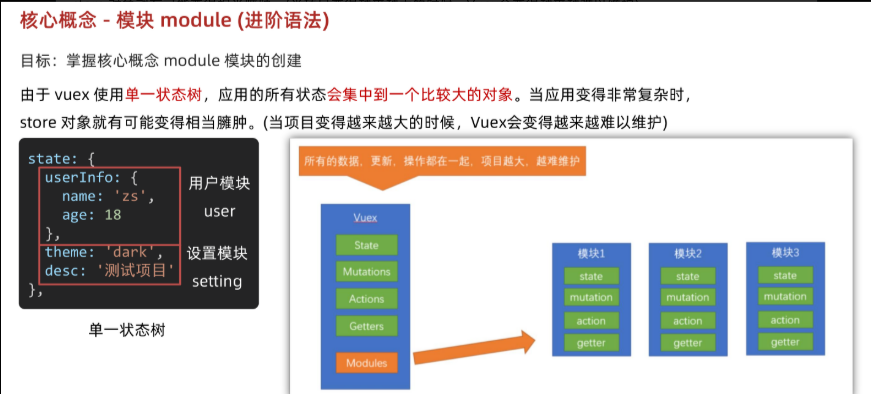
模块创建
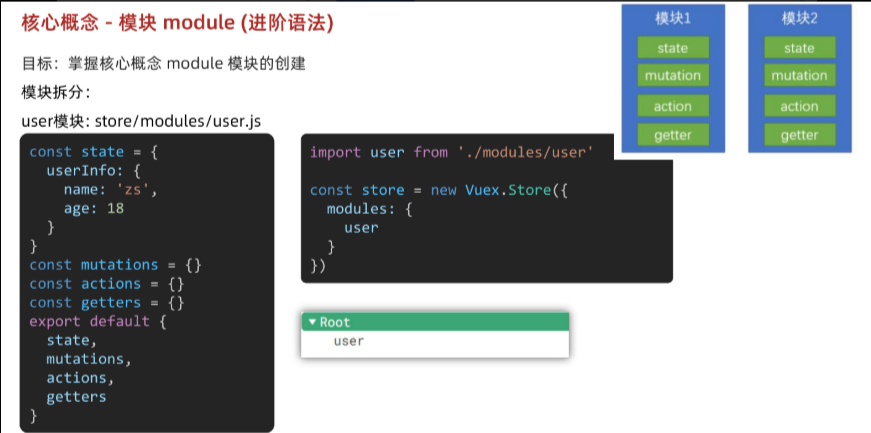
user.js
// user模块
const state = {userInfo: {name: 'zs',age: 18},score: 80
}
const mutations = {setUser (state, newUserInfo) {state.userInfo = newUserInfo}
}
const actions = {setUserSecond (context, newUserInfo) {// 将异步在action中进行封装setTimeout(() => {// 调用mutation context上下文,默认提交的就是自己模块的action和mutationcontext.commit('setUser', newUserInfo)}, 1000)}
}
const getters = {// 分模块后,state指代子模块的stateUpperCaseName (state) {return state.userInfo.name.toUpperCase()}
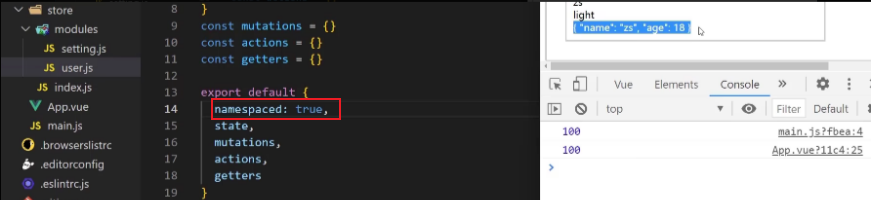
}export default {namespaced: true,state,mutations,actions,getters
}
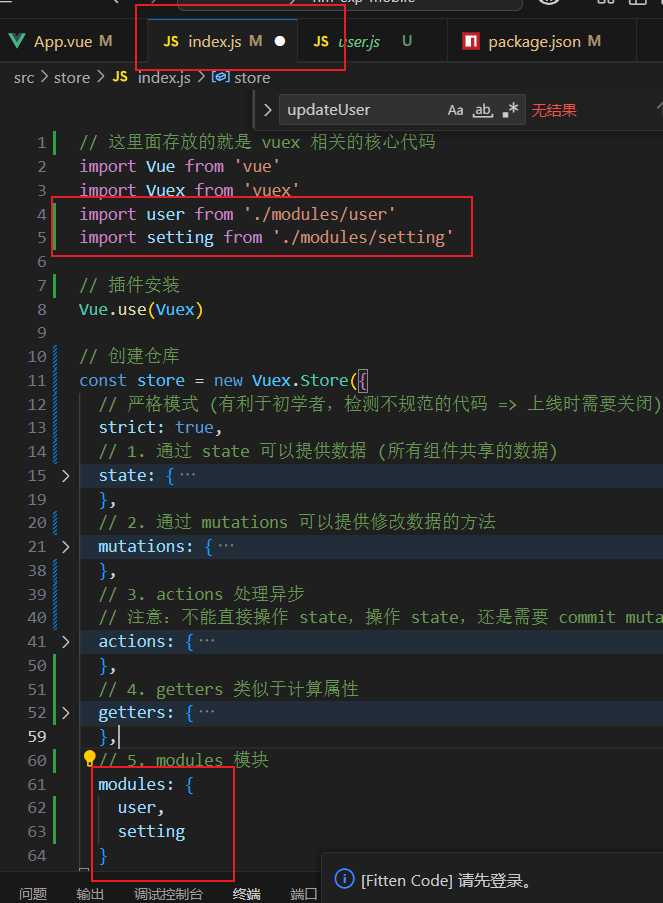
导入到index.js
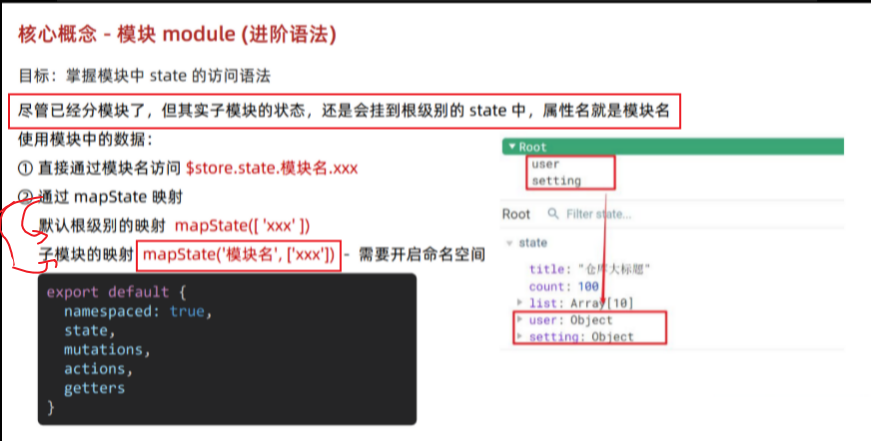
模块中state的访问语法
原生方式访问:
user模块

通过mapState映射
默认根级别

子模块,开启命名空间
再使用
mapstate可以写多个,只要不重名就行
![]()
表示访问的是user模块下的userinfo数据
模块中getters的访问语法
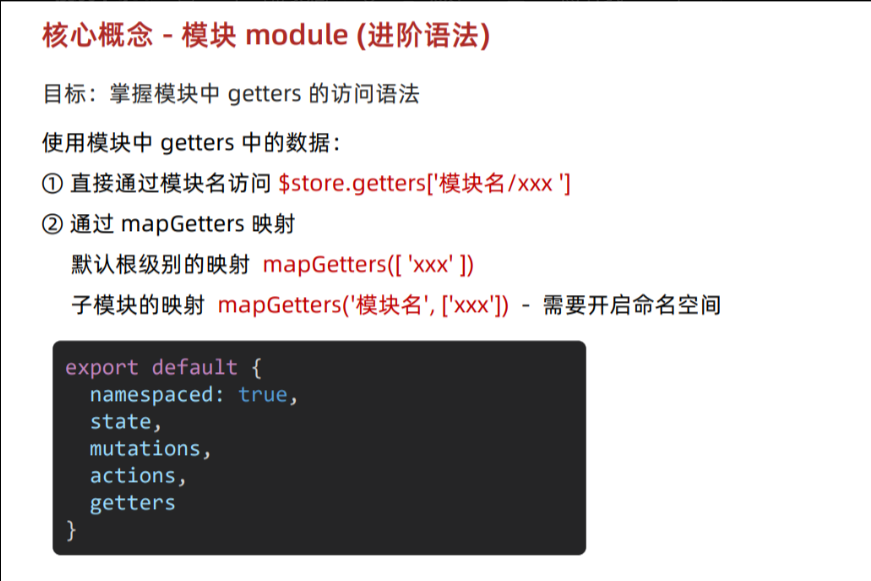
原生方式访问getters
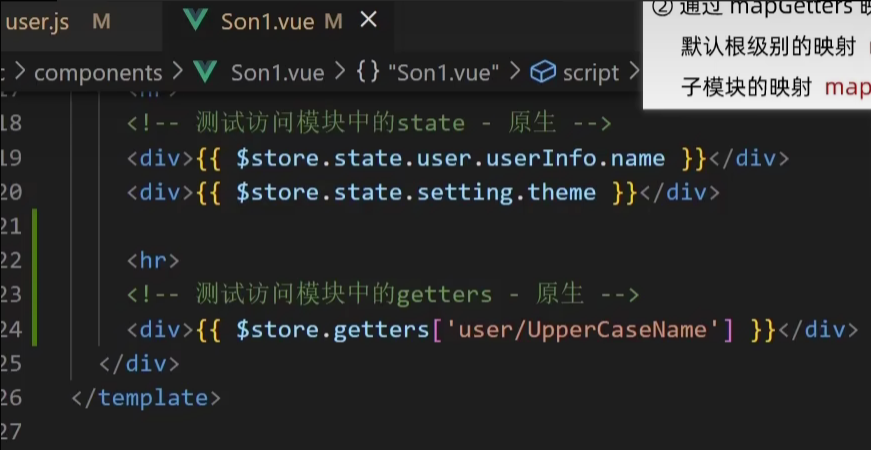
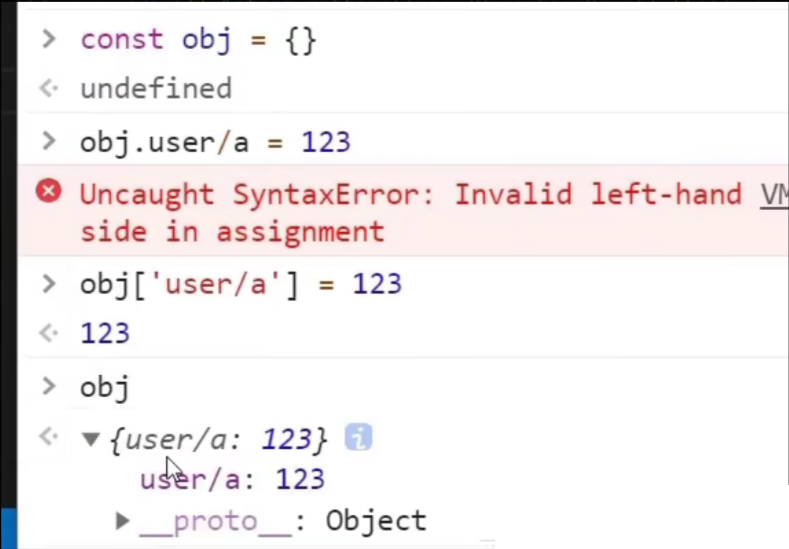
关于特殊的属性名:比如说属性名就叫user/a,因为有特殊字符/ ,所以不能用.来直接访问,此时可以用[]来访问
通过mapGetters辅助函数映射:
模块中mutation的调用语法
模块中action的调用语法
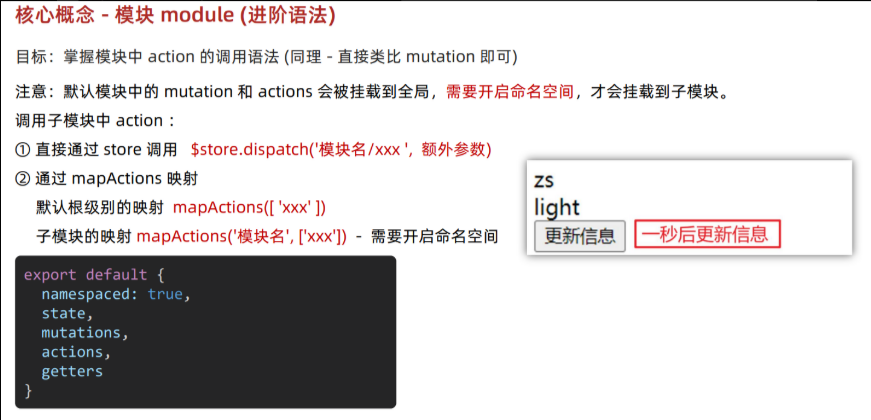
context默认就是当前模块下,所以这里不需要加上模块名
dispatch需要写明模块
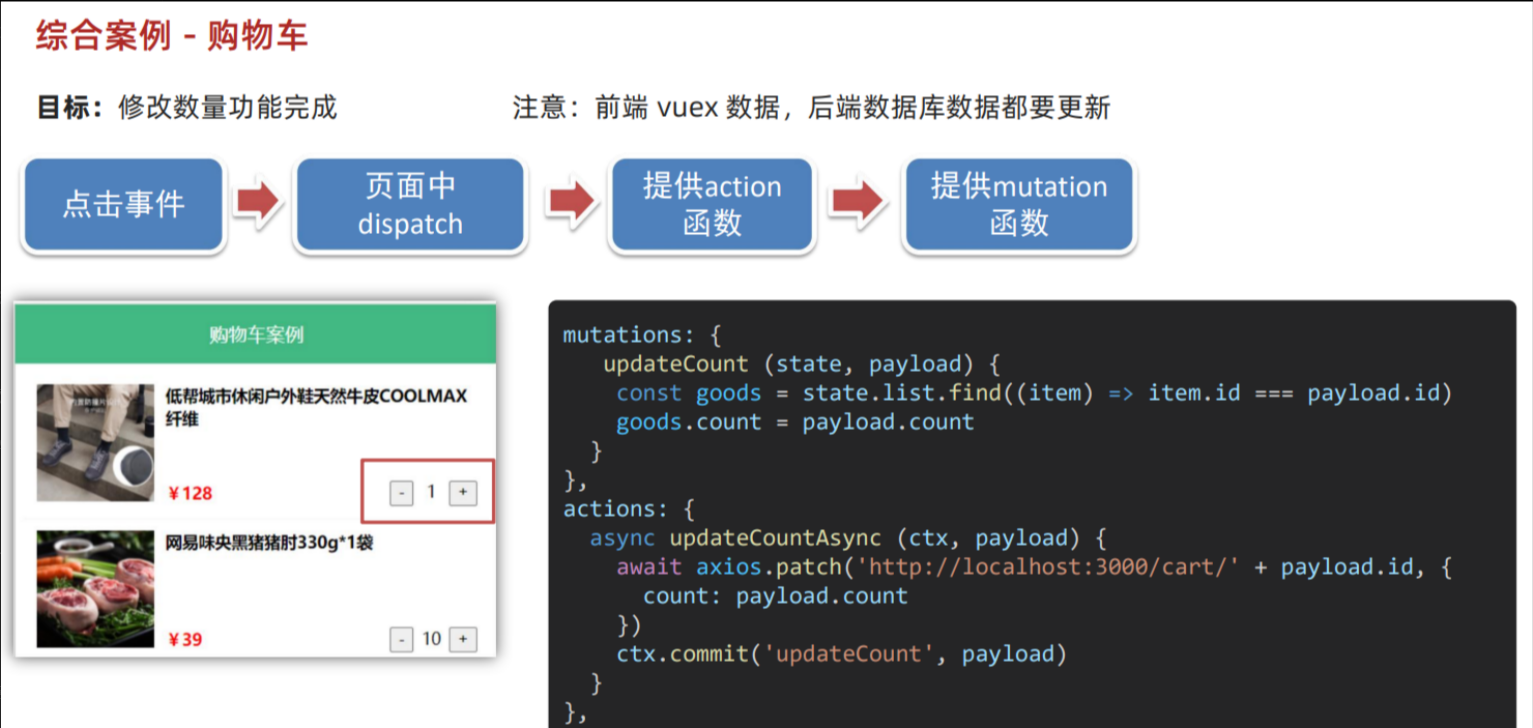
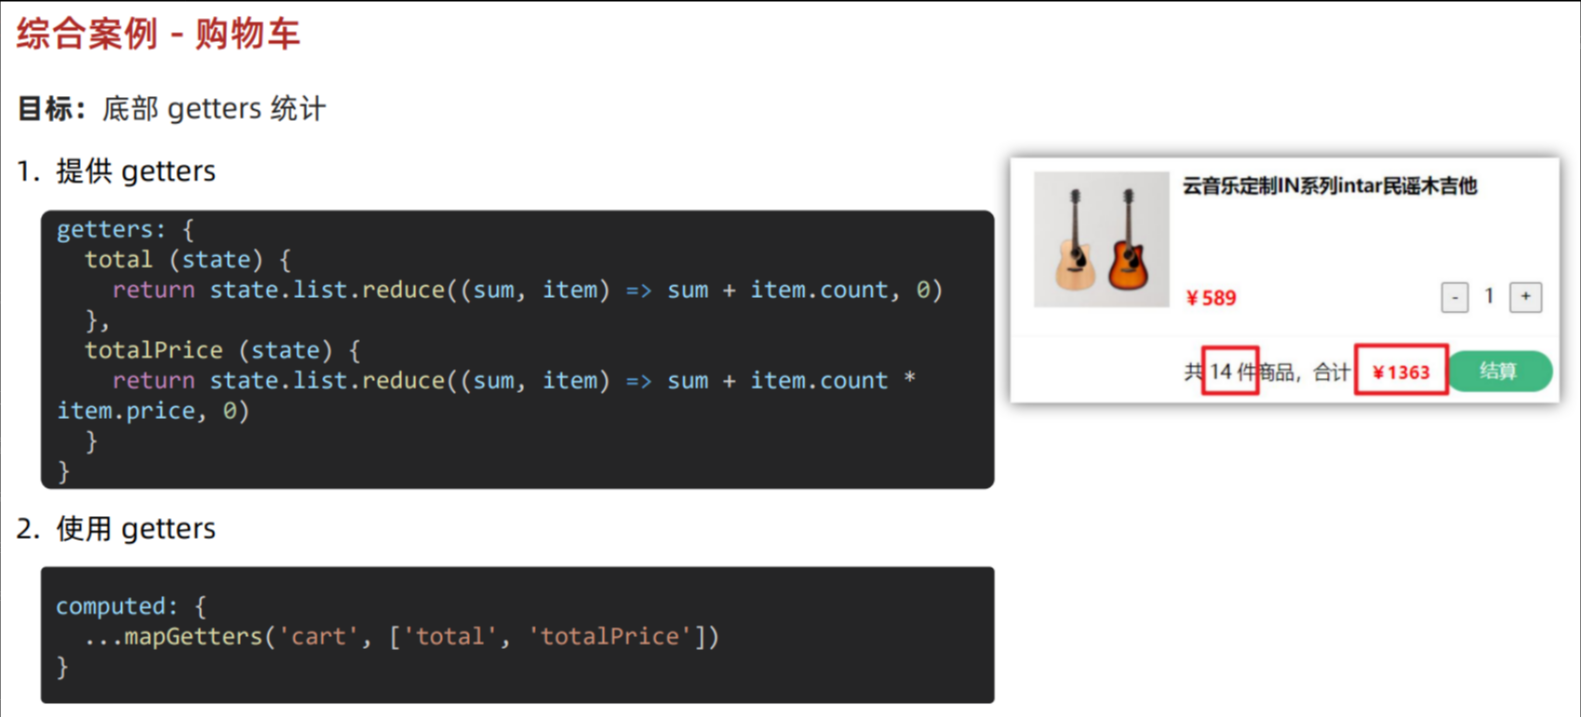
综合案例 - 购物车
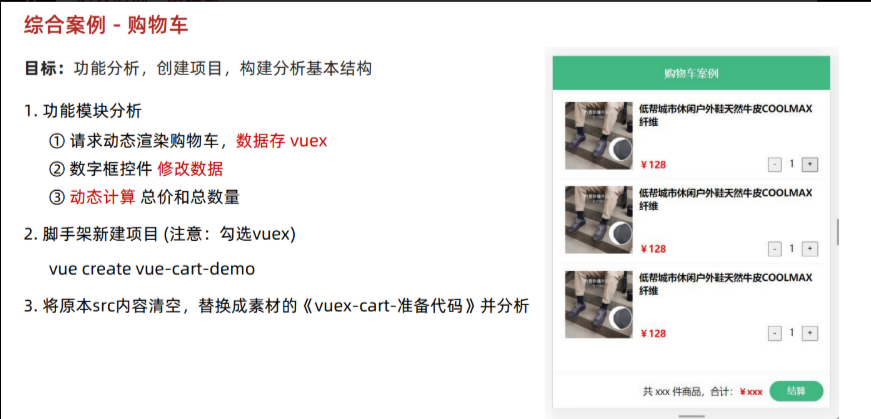
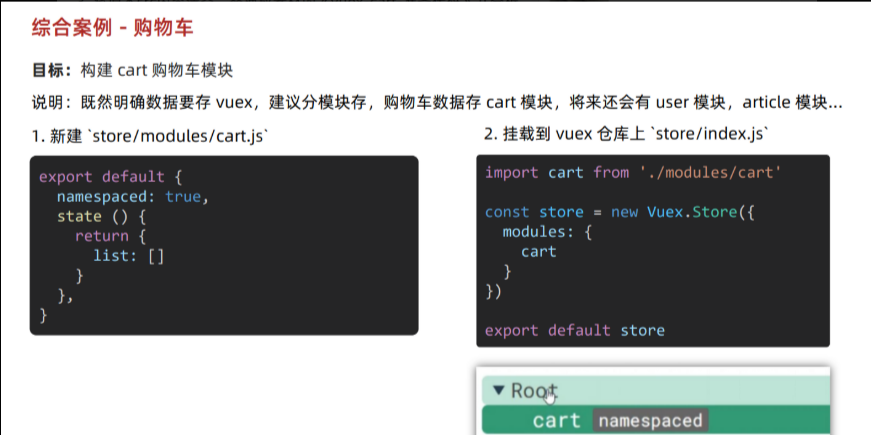
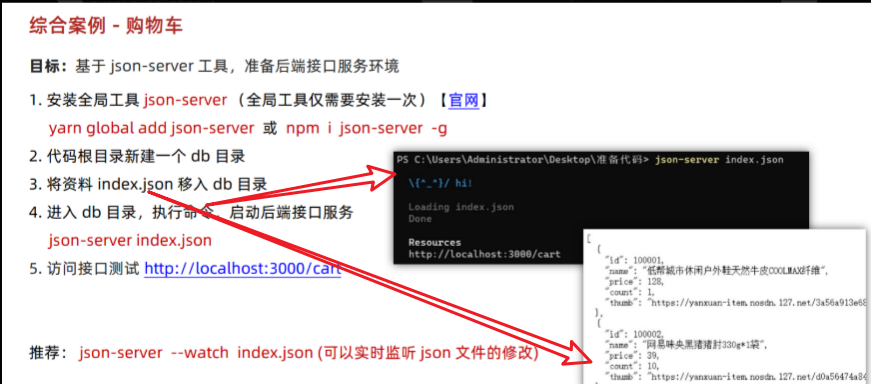
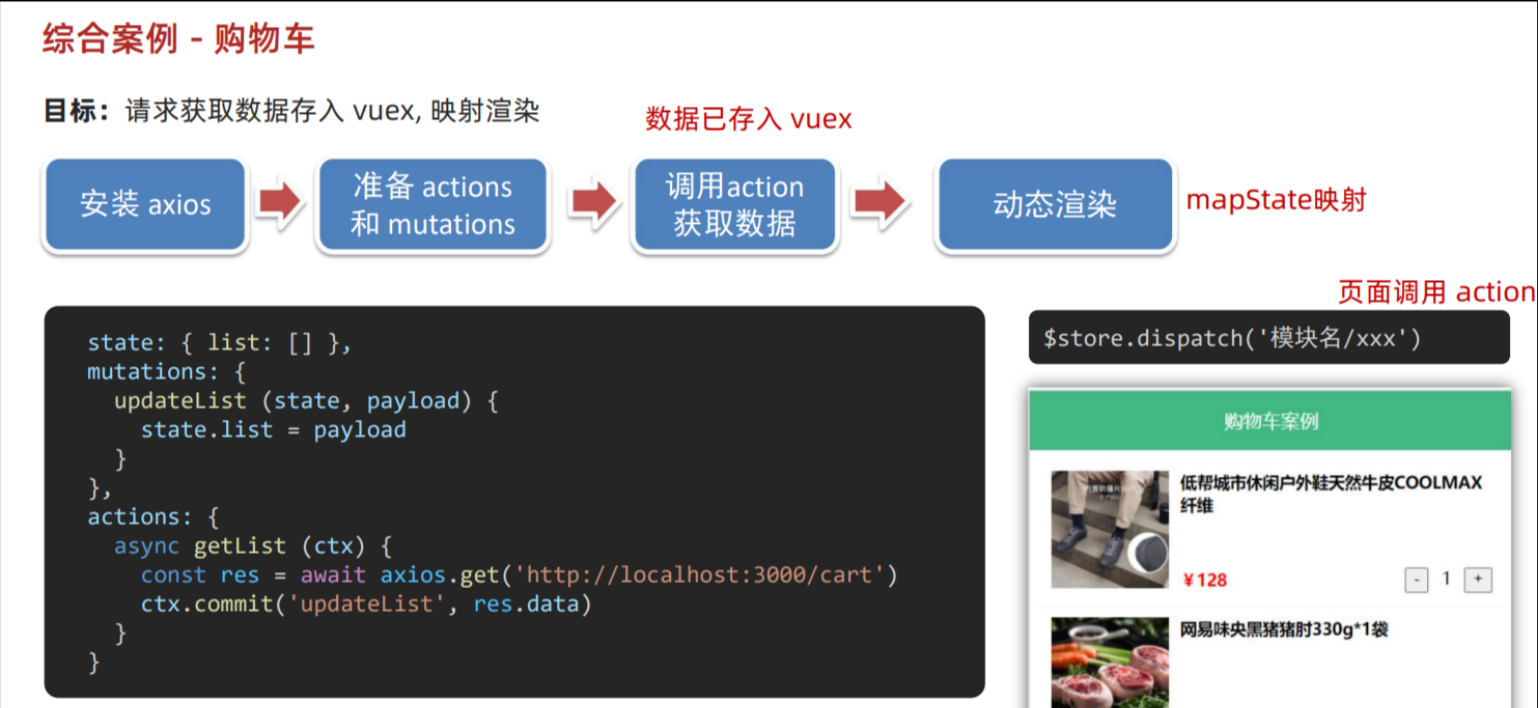
在后端没有接口时候,可以利用json-server来根据json文件快速生成增删改查接口
异步用actions
智慧商城
接口文档地址:登录 - 传智教育-面经项目--h5移动端接口文档
一、项目功能演示
1.目标
启动准备好的代码,演示移动端面经内容,明确功能模块
2.项目收获
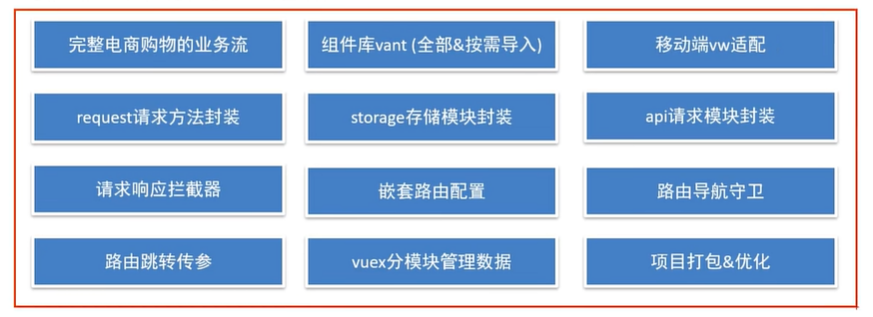
二、项目创建目录初始化
vue-cli 建项目
1.安装脚手架 (已安装)
npm i @vue/cli -g2.创建项目
vue create hm-vant-h5- 选项
Vue CLI v5.0.8
? Please pick a preset:Default ([Vue 3] babel, eslint)Default ([Vue 2] babel, eslint)
> Manually select features 选自定义- 手动选择功能
- 选择vue的版本
  3.x
> 2.x- 是否使用history模式

- 选择css预处理

- 选择eslint的风格 (eslint 代码规范的检验工具,检验代码是否符合规范)
- 比如:const age = 18; => 报错!多加了分号!后面有工具,一保存,全部格式化成最规范的样子
- 选择校验的时机 (直接回车)

- 选择配置文件的生成方式 (直接回车)

- 是否保存预设,下次直接使用? => 不保存,输入 N
- 等待安装,项目初始化完成
- 启动项目
npm run serve三、ESlint代码规范及手动修复
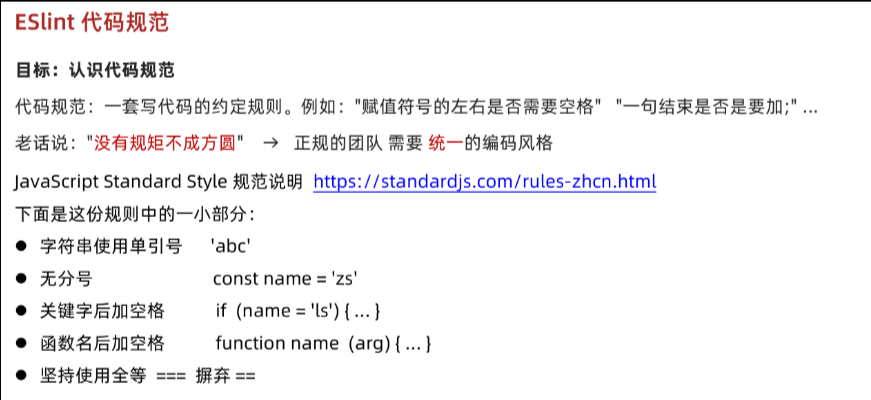
代码规范:一套写代码的约定规则。例如:赋值符号的左右是否需要空格?一句结束是否是要加;?…
没有规矩不成方圆
ESLint:是一个代码检查工具,用来检查你的代码是否符合指定的规则(你和你的团队可以自行约定一套规则)。在创建项目时,我们使用的是 JavaScript Standard Style 代码风格的规则。
1.JavaScript Standard Style 规范说明
建议把:JavaScript Standard Style 看一遍,然后在写的时候, 遇到错误就查询解决。
下面是这份规则中的一小部分:
- 字符串使用单引号 – 需要转义的地方除外
- 无分号 – 这没什么不好。不骗你!
- 关键字后加空格
if (condition) { ... } - 函数名后加空格
function name (arg) { ... } - 坚持使用全等
===摒弃==一但在需要检查null || undefined时可以使用obj == null - …
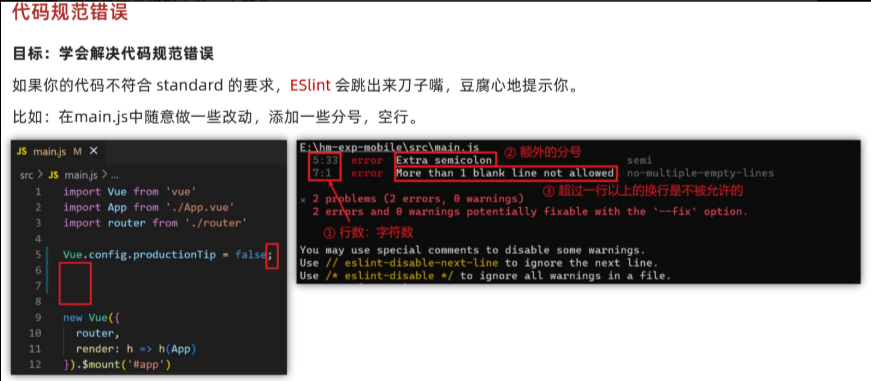
2.代码规范错误
如果你的代码不符合standard的要求,eslint会跳出来刀子嘴,豆腐心地提示你。
eslint 是来帮助你的。心态要好,有错,就改。
3.手动修正
根据错误提示来一项一项手动修正。
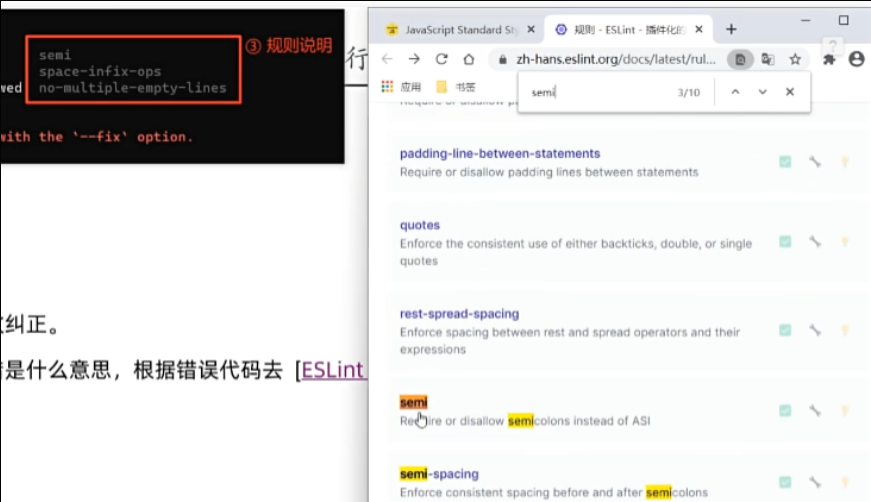
如果你不认识命令行中的语法报错是什么意思,你可以根据错误代码(func-call-spacing, space-in-parens,…)去 ESLint 规则列表中查找其具体含义。
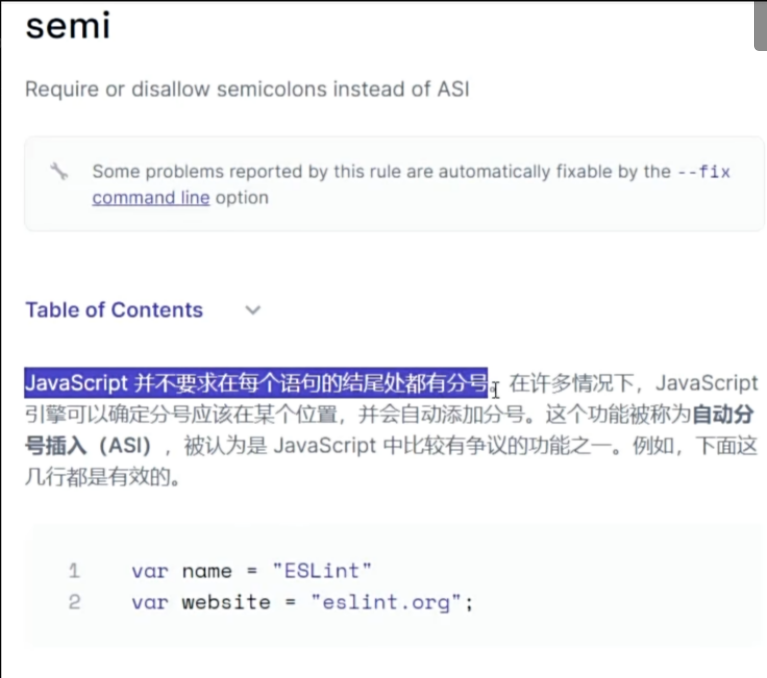
打开 ESLint 规则表,使用页面搜索(Ctrl + F)这个代码,查找对该规则的一个释义。
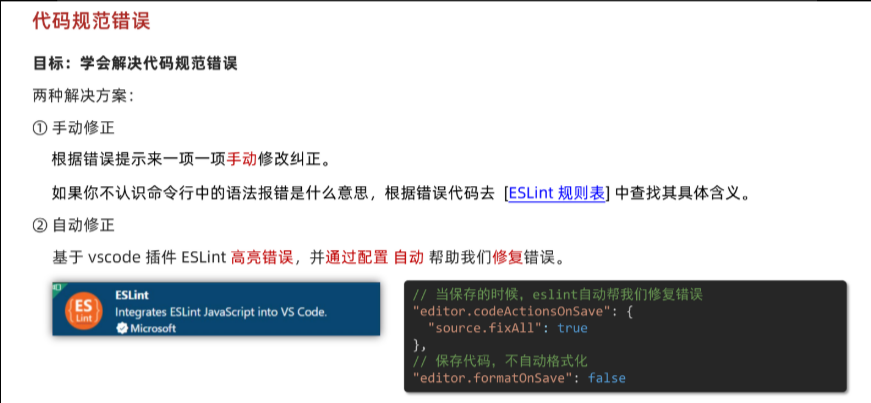
四、通过eslint插件来实现自动修正
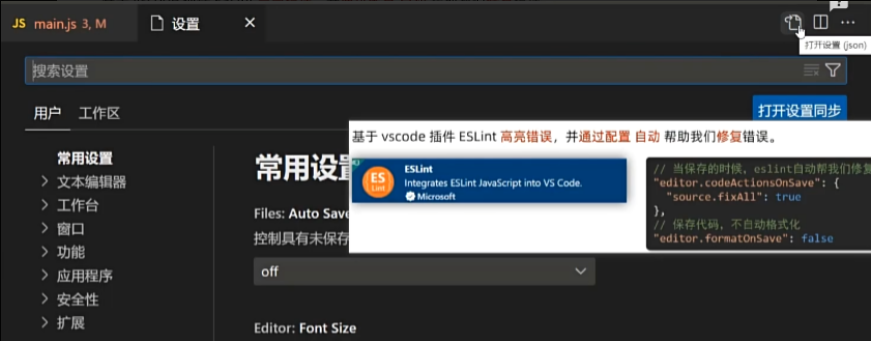
- eslint会自动高亮错误显示
- 通过配置,eslint会自动帮助我们修复错误
- 如何配置
// 当保存的时候,eslint自动帮我们修复错误
"editor.codeActionsOnSave": {"source.fixAll": true
},
// 保存代码,不自动格式化
"editor.formatOnSave": false- 注意:eslint的配置文件必须在根目录下,这个插件才能才能生效。打开项目必须以根目录打开,一次打开一个项目
- 注意:使用了eslint校验之后,把vscode带的那些格式化工具全禁用了 Beatify
settings.json 参考
{"window.zoomLevel": 2,"workbench.iconTheme": "vscode-icons","editor.tabSize": 2,"emmet.triggerExpansionOnTab": true,// 当保存的时候,eslint自动帮我们修复错误"editor.codeActionsOnSave": {"source.fixAll": true},// 保存代码,不自动格式化"editor.formatOnSave": false
}
五、调整初始化目录结构
强烈建议大家严格按照老师的步骤进行调整,为了符合企业规范
为了更好的实现后面的操作,我们把整体的目录结构做一些调整。
目标:
- 删除初始化的一些默认文件
- 修改没删除的文件
- 新增我们需要的目录结构
1.删除文件
- src/assets/logo.png
- src/components/HelloWorld.vue
- src/views/AboutView.vue
- src/views/HomeView.vue
2.修改文件
main.js 不需要修改
router/index.js
删除默认的路由配置
import Vue from 'vue'
import VueRouter from 'vue-router'Vue.use(VueRouter)const routes = [
]const router = new VueRouter({routes
})export default router
App.vue
<template><div id="app"><router-view/></div>
</template>
3.新增目录
- src/api 目录
-
- 存储接口模块 (发送ajax请求接口的模块)
- src/utils 目录
-
- 存储一些工具模块 (自己封装的方法)
目录效果如下:

六、vant组件库及Vue周边的其他组件库
组件库:第三方封装好了很多很多的组件,整合到一起就是一个组件库。
Vant Doc | 组件 中文文档 documentation | v2.13.2 v2.0 v2.x | Vant UI (for vue 2.0) | Vue UI Component for mobile phone | Vant js
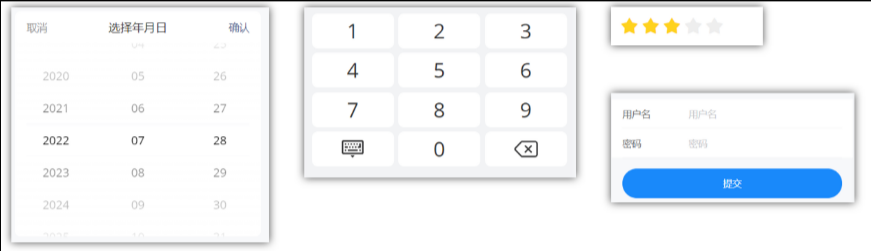
比如日历组件、键盘组件、打分组件、登录组件等
组件库并不是唯一的,常用的组件库还有以下几种:
pc: element-ui element-plus iview ant-design
移动:vant-ui Mint UI (饿了么) Cube UI (滴滴)
七、全部导入和按需导入的区别
目标:明确 全部导入 和 按需导入 的区别
区别:
1.全部导入会引起项目打包后的体积变大,进而影响用户访问网站的性能
2.按需导入只会导入你使用的组件,进而节约了资源
八、全部导入
- 安装vant-ui
yarn add vant@latest-v2
// 或者 npm i vant@latest-v2- 在main.js中
import Vant from 'vant';
import 'vant/lib/index.css'; //这个不管是全局还是局部导入都要引
// 把vant中所有的组件都导入了
Vue.use(Vant)- 即可使用
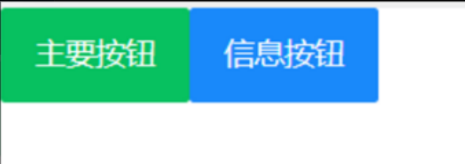
<van-button type="primary">主要按钮</van-button>
<van-button type="info">信息按钮</van-button>
vant-ui提供了很多的组件,全部导入,会导致项目打包变得很大。
九、按需导入
- 安装vant-ui
npm i vant@latest-v2 或 yarn add vant@latest-v2- 安装一个插件
npm i babel-plugin-import -D- 在
babel.config.js中配置
module.exports = {presets: ['@vue/cli-plugin-babel/preset'],plugins: [['import', {      libraryName: 'vant',libraryDirectory: 'es',style: true}, 'vant']]
}- 按需加载,在
main.js
import { Button, Icon } from "vant";
Vue.use(Button)
Vue.use(Icon)app.vue中进行测试
<van-button type="primary">主要按钮</van-button>
<van-button type="info">信息按钮</van-button>
<van-button type="default">默认按钮</van-button>
<van-button type="warning">警告按钮</van-button>
<van-button type="danger">危险按钮</van-button>
- 把引入组件的步骤抽离到单独的js文件中比如
utils/vant-ui.js
import { Button, Icon } from "vant";
Vue.use(Button)
Vue.use(Icon)
main.js中进行导入
// 导入按需导入的配置文件
import '@/utils/vant-ui'
ps :window+shift+p 启动设置,输入reload window就可以重启窗口
十、项目中的vw适配
官方说明:进阶用法 Doc | 组件 中文文档 documentation | v2.13.2 v2.0 v2.x | Vant UI (for vue 2.0) | Vue UI Component for mobile phone | Vant js
yarn add postcss-px-to-viewport@1.1.1 -D- 项目根目录, 新建postcss的配置文件
postcss.config.js
// postcss.config.js
module.exports = {plugins: {'postcss-px-to-viewport': {viewportWidth: 375,},},
};
viewportWidth:设计稿的视口宽度
- vant-ui中的组件就是按照375的视口宽度设计的
- 恰好面经项目中的设计稿也是按照375的视口宽度设计的,所以此时 我们只需要配置375就可以了
- 如果设计稿不是按照375而是按照750的宽度设计,也还是375,如果是640的话这里就写320
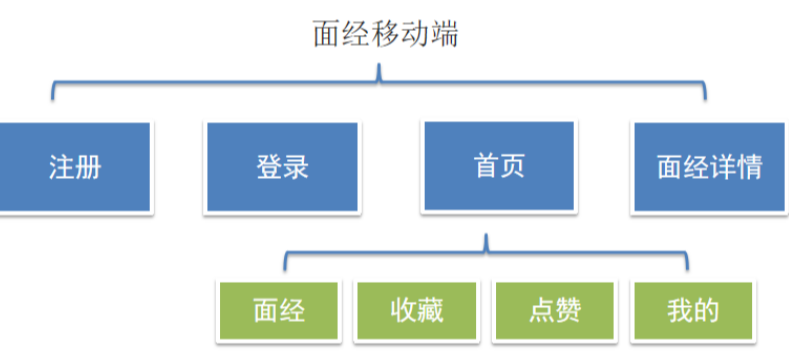
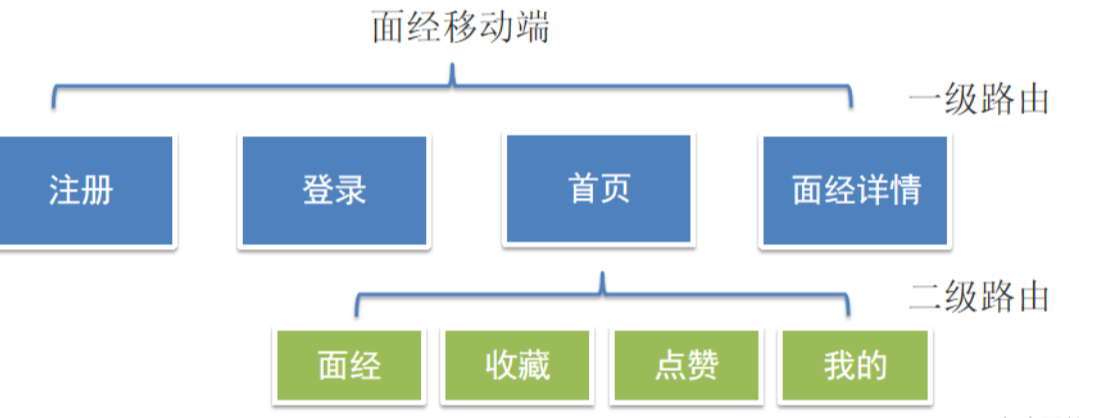
十一、路由配置-一级路由
但凡是单个页面,独立展示的,都是一级路由
路由设计:
- 登录页 (一级) Login
- 注册页(一级) Register
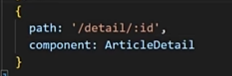
- 文章详情页(一级) Detail
- 首页(一级) Layout
-
- 面经(二级)Article
- 收藏(二级)Collect
- 喜欢(二级)Like
- 我的(二级)My
一级路由
router/index.js配置一级路由, 一级views组件于准备好的中直接 CV 即可
import Vue from 'vue'
import VueRouter from 'vue-router'
import Login from '@/views/Login'
import Register from '@/views/Register'
import Detail from '@/views/Detail'
import Layout from '@/views/Layout'
Vue.use(VueRouter)const router = new VueRouter({routes: [{ path: '/login', component: Login },{ path: '/register', component: Register },{ path: '/article/:id', component: Detail },{path: '/',component: Layout}]
})
export default router
清理 App.vue
<template><div id="app"><router-view/></div>
</template>
<script>
export default {created () {}
}
</script>
十二、路由配置-vant->tabbar标签页

Tabbar 标签栏 vant-tabbar Doc | 组件 中文文档 documentation | v2.13.2 v2.0 v2.x | Vant UI (for vue 2.0) | Vue UI Component for mobile phone | Vant js
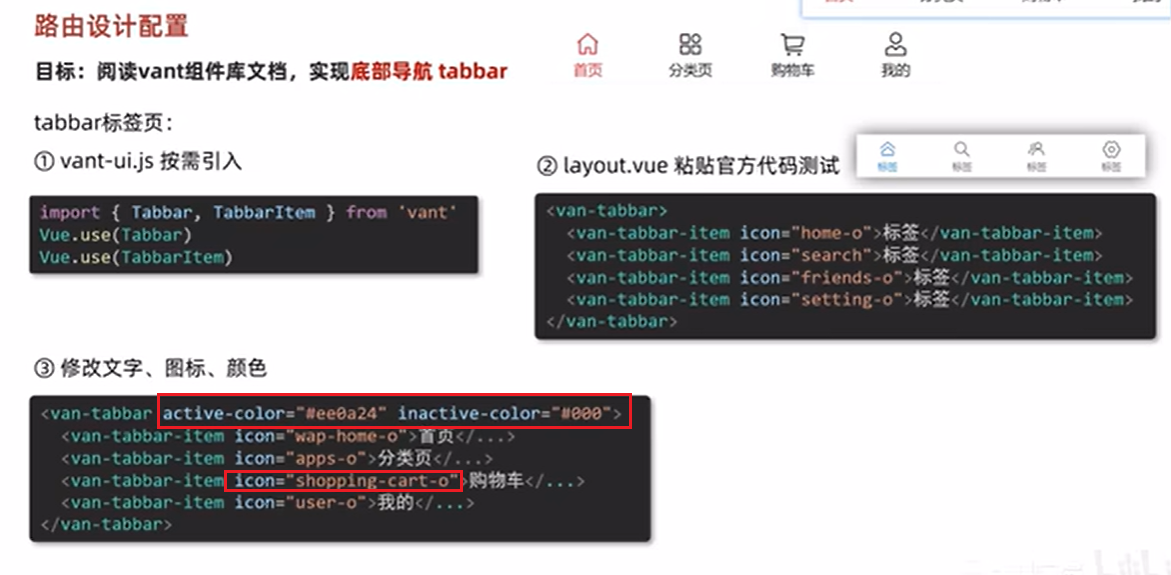
直接去官网看,讲的很清楚
vant-ui.js 引入组件
import { Button, Icon, Tabbar, TabbarItem } from 'vant'
Vue.use(Tabbar)
Vue.use(TabbarItem)
layout.vue
- 复制官方代码
- 修改显示文本及显示的图标
<template><div class="layout-page">首页架子 - 内容区域 <van-tabbar><van-tabbar-item icon="notes-o">面经</van-tabbar-item><van-tabbar-item icon="star-o">收藏</van-tabbar-item><van-tabbar-item icon="like-o">喜欢</van-tabbar-item><van-tabbar-item icon="user-o">我的</van-tabbar-item></van-tabbar></div>
</template>
十三、路由配置-配置主题色
整体网站风格,其实都是橙色的,可以通过变量覆盖的方式,制定主题色
定制主题 Doc | 组件 中文文档 documentation | v2.13.2 v2.0 v2.x | Vant UI (for vue 2.0) | Vue UI Component for mobile phone | Vant js
babel.config.js 制定样式路径
module.exports = {presets: ['@vue/cli-plugin-babel/preset'],plugins: [['import', {libraryName: 'vant',libraryDirectory: 'es',// 指定样式路径style: (name) => `${name}/style/less`}, 'vant']]
}
vue.config.js 覆盖变量
const { defineConfig } = require('@vue/cli-service')
module.exports = defineConfig({transpileDependencies: true,css: {loaderOptions: {less: {lessOptions: {modifyVars: {// 直接覆盖变量'blue': '#FA6D1D',},},},},},
})
重启服务器生效!
十四、路由配置-二级路由
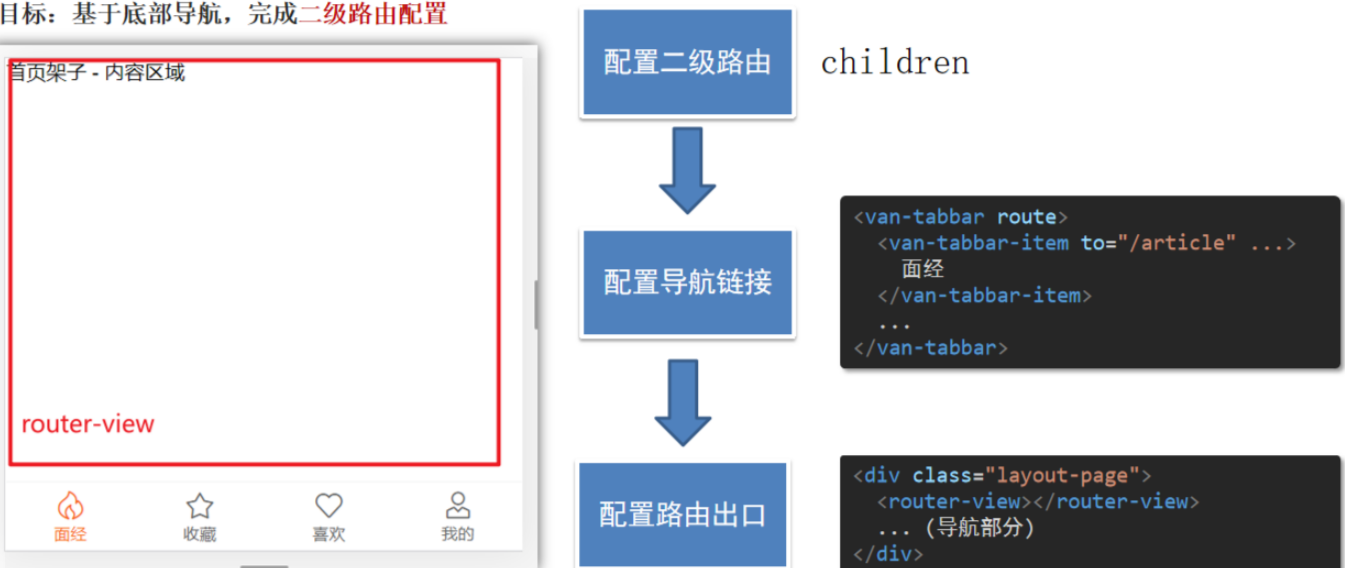
1.router/index.js配置二级路由
在准备好的代码中去复制对应的组件即可
import Vue from 'vue'
import VueRouter from 'vue-router'
import Login from '@/views/Login'
import Register from '@/views/Register'
import Detail from '@/views/Detail'
import Layout from '@/views/Layout'import Like from '@/views/Like'
import Article from '@/views/Article'
import Collect from '@/views/Collect'
import User from '@/views/User'
Vue.use(VueRouter)const router = new VueRouter({routes: [{ path: '/login', component: Login },{ path: '/register', component: Register },{ path: '/article/:id', component: Detail },{ path: '/',component: Layout,redirect: '/article',children: [{ path: 'article', component: Article },{ path: 'like', component: Like },{ path: 'collect', component: Collect },{ path: 'user', component: User }]}]
})export default router2.layout.vue 配置路由出口, 配置 tabbar
<template><div class="layout-page">//路由出口<router-view></router-view> <van-tabbar route><van-tabbar-item to="/article" icon="notes-o">面经</van-tabbar-item><van-tabbar-item to="/collect" icon="star-o">收藏</van-tabbar-item><van-tabbar-item to="/like" icon="like-o">喜欢</van-tabbar-item><van-tabbar-item to="/user" icon="user-o">我的</van-tabbar-item></van-tabbar></div>
</template>
十五、登录静态布局
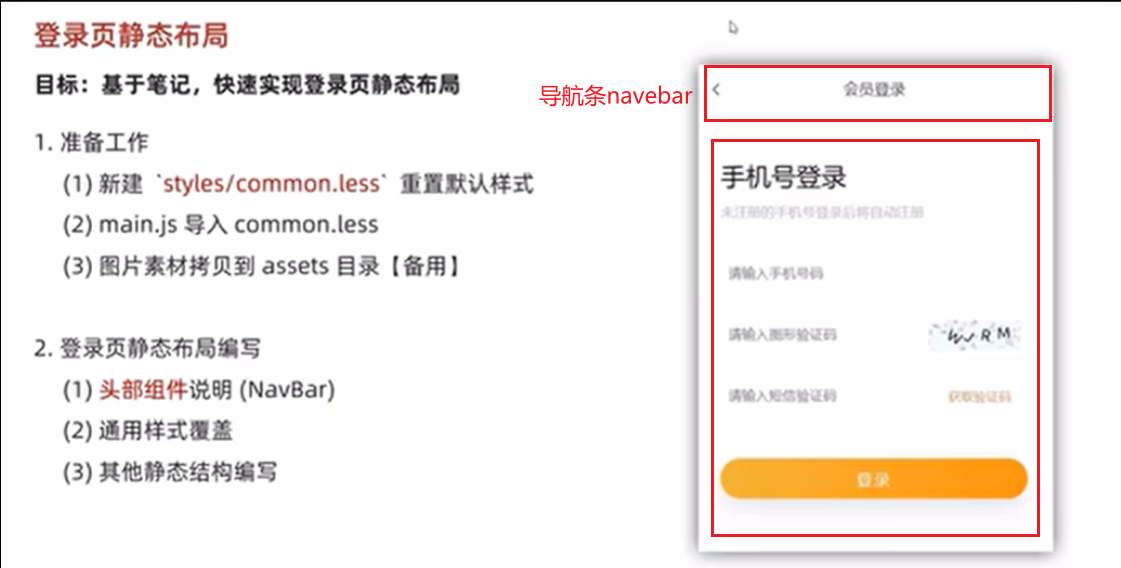
// 重置默认样式
* {margin: 0;padding: 0;box-sizing: border-box;
}// 文字溢出省略号
.text-ellipsis-2 {overflow: hidden;-webkit-line-clamp: 2;text-overflow: ellipsis;display: -webkit-box;-webkit-box-orient: vertical;
}// 添加导航的通用样式
.van-nav-bar {.van-nav-bar__arrow {color: #333;}
}
使用组件
- van-nav-bar
-
- 对于修改导航栏的箭头颜色,可以去通用样式common.less里面去改,直接通过类名就行,增加权重就是类名嵌套一下
- van-form
- van-field
- van-button
vant-ui.js 注册
import Vue from 'vue'
import {NavBar,Form,Field
} from 'vant'
Vue.use(NavBar)
Vue.use(Form)
Vue.use(Field)
Login.vue 使用
<template><div class="login-page"><!-- 导航栏部分 --><van-nav-bar title="面经登录" /><!-- 一旦form表单提交了,就会触发submit,可以在submit事件中根据拿到的表单提交信息,发送axios请求--><van-form @submit="onSubmit"><!-- 输入框组件 --><!-- \w 字母数字_   \d 数字0-9 --><van-fieldv-model="username"name="username"label="用户名"placeholder="用户名":rules="[{ required: true, message: '请填写用户名' },{ pattern: /^\w{5,}$/, message: '用户名至少包含5个字符' }]"/><van-fieldv-model="password"type="password"name="password"label="密码"placeholder="密码":rules="[{ required: true, message: '请填写密码' },{ pattern: /^\w{6,}$/, message: '密码至少包含6个字符' }]"/><div style="margin: 16px"><van-button block type="info" native-type="submit">提交</van-button></div></van-form></div>
</template>
<script>
export default {name: 'LoginPage',data () {return {username: 'zhousg',password: '123456'}},methods: {onSubmit (values) {console.log('submit', values)}}
}
</script>
login.vue添加 router-link 标签(跳转到注册)
<template><div class="login-page"><van-nav-bar title="面经登录" /><van-form @submit="onSubmit">...</van-form><router-link class="link" to="/register">注册账号</router-link></div>
</template>
login.vue调整样式
<style lang="less" scoped>
.link {color: #069;font-size: 12px;padding-right: 20px;float: right;
}
</style>
十六、登录表单中的细节分析
- @submit事件:当点击提交按钮时会自动触发submit事件
- v-model双向绑定:会自动把v-model后面的值和文本框中的值进行双向绑定
- name属性:收集的key的值,要和接口文档对应起来
- label:输入的文本框的title
- :rules: 表单的校验规则
- placeholder: 文本框的提示语
十七、注册静态布局
Register.vue
<template><div class="login-page"><van-nav-bar title="面经注册" /><van-form @submit="onSubmit"><van-fieldv-model="username"name="username"label="用户名"placeholder="用户名":rules="[{ required: true, message: '请填写用户名' },{ pattern: /^\w{5,}$/, message: '用户名至少包含5个字符' }]"/><van-fieldv-model="password"type="password"name="password"label="密码"placeholder="密码":rules="[{ required: true, message: '请填写密码' },{ pattern: /^\w{6,}$/, message: '密码至少包含6个字符' }]"/><div style="margin: 16px"><van-button block type="primary" native-type="submit">注册</van-button></div></van-form><router-link class="link" to="/login">有账号,去登录</router-link></div>
</template>
<script>
export default {name: 'Register-Page',data () {return {username: '',password: ''}},methods: {onSubmit (values) {console.log('submit', values)}}
}
</script>
<style lang="less" scoped>
.link {color: #069;font-size: 12px;padding-right: 20px;float: right;
}
</style>
十八、request模块 - axios封装
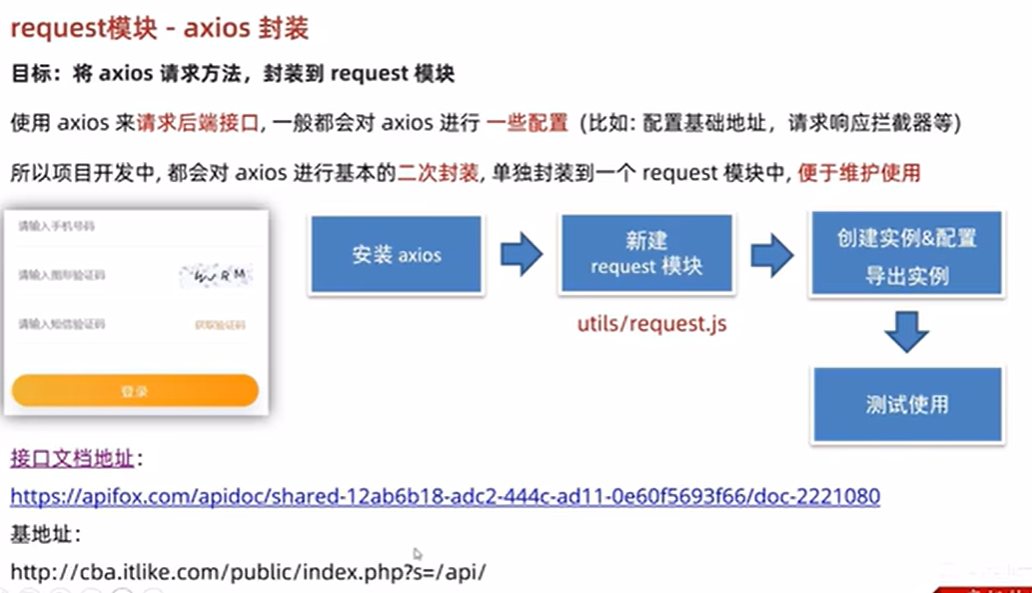
接口文档地址:登录 - 传智教育-面经项目--h5移动端接口文档
基地址:http://smart-shop.itheima.net/index.php?s=/api/
目标:将 axios 请求方法,封装到 request 模块
我们会使用 axios 来请求后端接口, 一般都会对 axios 进行一些配置 (比如: 配置基础地址,请求响应拦截器等等)
一般项目开发中, 都会对 axios 进行基本的二次封装, 单独封装到一个模块中, 便于使用
- 安装 axios
npm i axios- 新建
utils/request.js封装 axios 模块利用 axios.create 创建一个自定义的 axios 来使用
/* 封装axios用于发送请求 */
import axios from 'axios'// 创建一个新的axios实例
const request = axios.create({baseURL: 'http://smart-shop.itheima.net/index.php?s=/api/',timeout: 5000
})// 添加请求拦截器
request.interceptors.request.use(function (config) {// 在发送请求之前做些什么return config
}, function (error) {// 对请求错误做些什么return Promise.reject(error)
})// 添加响应拦截器
request.interceptors.response.use(function (response) {// 对响应数据做点什么return response.data //这里直接拆掉一层data,因为axios默认会多包装一层data,所以需要响应拦截器中处理一下,这样以后发请求的时候自动拿到的就是res.data这一层
}, function (error) {// 对响应错误做点什么return Promise.reject(error)
})export default request- 注册测试
// 监听表单的提交,形参中:可以获取到输入框的值
async onSubmit (values) {console.log('submit', values)const res = await request.post('/user/register', values)console.log(res)
}
十九、封装api接口 - 注册功能
1.目标:将请求封装成方法,统一存放到 api 模块,与页面分离
2.原因:
以前的模式:
- 页面中充斥着请求代码,
- 可阅读性不高
- 相同的请求没有复用请求没有统一管理
3.期望:

- 请求与页面逻辑分离
- 相同的请求可以直接复用请求
- 进行了统一管理
4.具体实现
新建 api/user.js 提供注册 Api 函数
import request from '@/utils/request'// 注册接口
export const register = (data) => {return request.post('/user/register', data)
}register.vue页面中调用测试
methods: {async onSubmit (values) {// 往后台发送注册请求了await register(values)alert('注册成功')this.$router.push('/login')}
}
二十、toast 轻提示
Toast 轻提示 vant-toast Doc | 组件 中文文档 documentation | v2.13.2 v2.0 v2.x | Vant UI (for vue 2.0) | Vue UI Component for mobile phone | Vant js
上面说的组件内可以理解为vue文件,组件外为js文件
可以有success,error,loading等状态
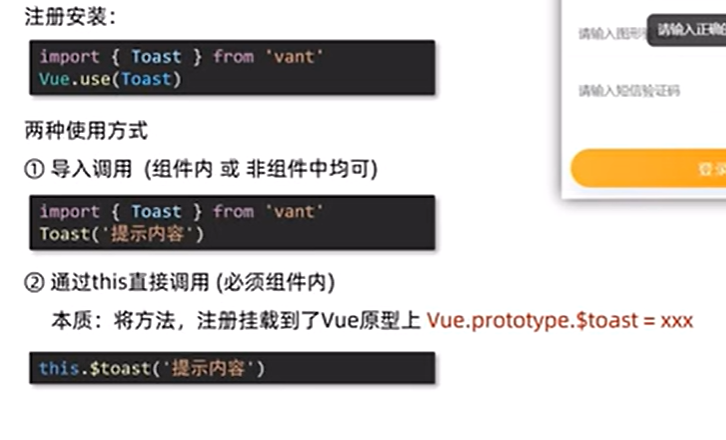
两种使用方式
- 组件内或js文件内 导入,调用
import { Toast } from 'vant';
Toast('提示内容');- **组件内 **通过this直接调用
main.js
import {Toast } from 'vant';
Vue.use(Toast)this.$toast('提示内容')代码演示
this.$toast.loading({message:'拼命加载中...',forbidClick:true
})
try{      await register(values)this.$toast.success('注册成功')this.$router.push('/login')
}catch(e){this.$toast.fail('注册失败')
}
二十一、响应拦截器统一处理错误提示
响应拦截器是咱们拿到数据的第一个“数据流转站”

import { Toast } from 'vant'...// 添加响应拦截器
request.interceptors.response.use(function (response) {// 对响应数据做点什么return response.data
}, function (error) {if (error.response) {// 有错误响应, 提示错误提示Toast(error.response.data.message)}// 对响应错误做点什么return Promise.reject(error)
})
二十二、封装api接口 - 登录功能
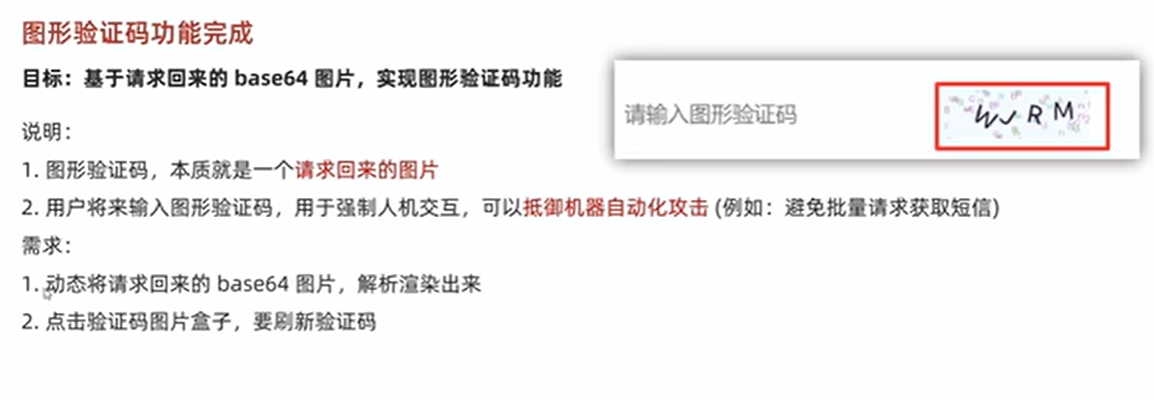
![]()
由于图形验证码的src我们最开始设置是空的,所以采用:src时候来回点击切换验证码会有一瞬间没图片,也就是空,这个时候加个v-if就可以解决,也就是只有有图片的时候,才会加载,v-if很适用于这种场景,很常见
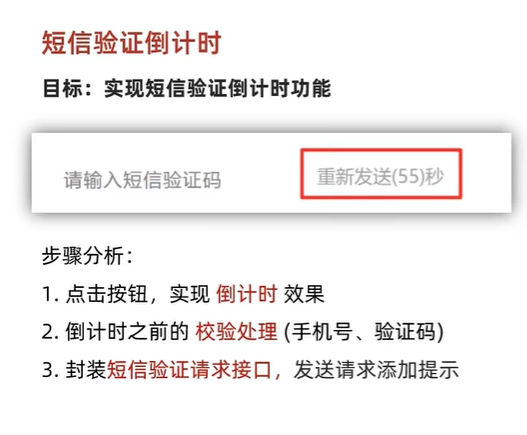
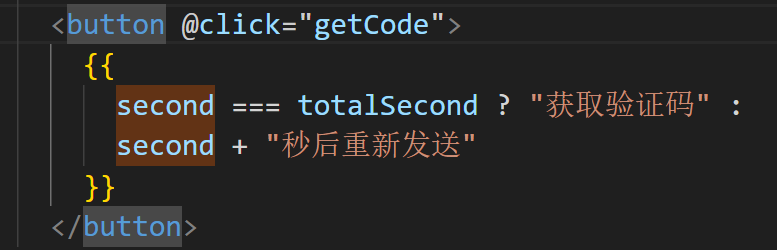
// 获取短信验证码async getCode() {if (!this.validFn()) {// 如果没通过校验,没必要往下走了return;}// 当前目前没有定时器开着,且 totalSecond 和 second 一致 (秒数归位) 才可以倒计时if (!this.timer && this.second === this.totalSecond) {// 发送请求// 预期:希望如果响应的status非200,最好抛出一个promise错误,await只会等待成功的promiseawait getMsgCode(this.picCode, this.picKey, this.mobile);this.$toast("短信发送成功,注意查收");// 开启倒计时this.timer = setInterval(() => {this.second--;if (this.second <= 0) {clearInterval(this.timer);this.timer = null; // 重置定时器 idthis.second = this.totalSecond; // 归位}}, 1000);}},
api/user.js 提供登录 Api 函数
// 登录接口
export const login = (data) => {return request.post('/user/login', data)
}
login.vue 登录功能
import { login } from '@/api/user'methods: {async onSubmit (values) {const { data } = await login(values)this.$toast.success('登录成功')localStorage.setItem('vant-mobile-exp-token', data.token)this.$router.push('/')}
}
二十三、local模块 - 本地存储
新建 utils/storage.js
const KEY = 'vant-mobile-exp-token'// 直接用按需导出,可以导出多个
// 获取
export const getToken = () => {return localStorage.getItem(KEY)
}// 设置
export const setToken = (newToken) => {localStorage.setItem(KEY, newToken)
}// 删除
export const delToken = () => {localStorage.removeItem(KEY)
}
登录完成存储token到本地
import { login } from '@/api/user'
import { setToken } from '@/utils/storage'methods: {async onSubmit (values) {const { data } = await login(values)setToken(data.token)this.$toast.success('登录成功')this.$router.push('/')}
}
面经项目
一、全局前置守卫-语法认识
这个 面经移动端 项目,只对 登录用户 开放,如果未登录,一律拦截到登录
- 如果访问的是 首页, 无token, 拦走
- 如果访问的是 列表页,无token, 拦走
- 如果访问的是 详情页,无token, 拦走…
分析:哪些页面,是不需要登录,就可以访问的! => 注册 和 登录 (白名单 - 游客可以随意访问的)
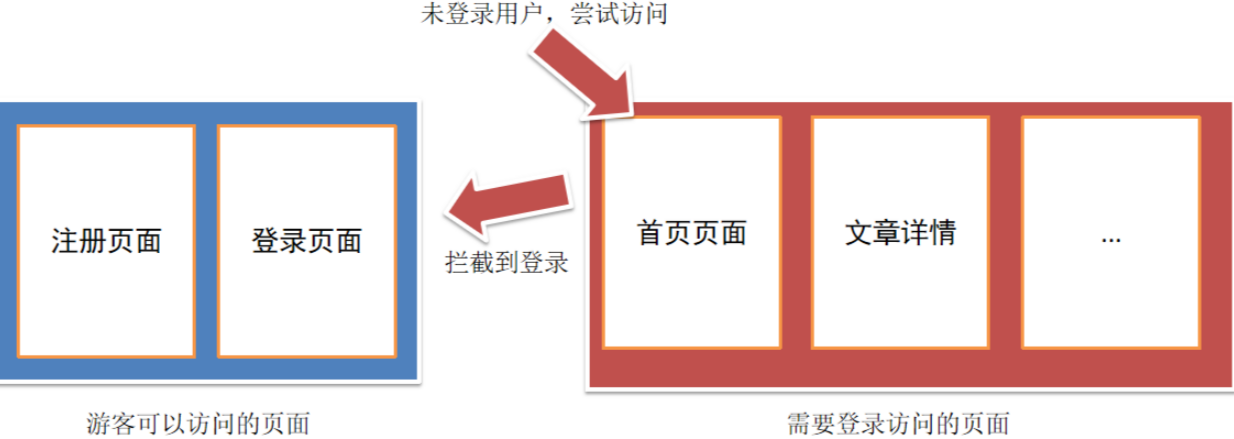
路由导航守卫 - 全局前置守卫
- 访问的路径一旦被路由规则匹配到,都会先经过全局前置守卫
- 只有全局前置守卫放行,才会真正解析渲染组件,才能看到页面内容
router/index.js
router.beforeEach((to, from, next) => {// 1. to   往哪里去, 到哪去的路由信息对象  // 2. from 从哪里来, 从哪来的路由信息对象// 3. next() 是否放行//    如果next()调用,就是放行//    next(路径) 拦截到某个路径页面
})
二、全局前置守卫-访问拦截处理
拦截或放行的关键点? → 用户是否有登录权证 token
核心逻辑:
- 判断用户有没有token, 有token, 直接放行 (有身份的人,想去哪就去哪~)
- 没有token(游客),如果是白名单中的页面,直接放行
- 否则,无token(游客),且在访问需要权限访问的页面,直接拦截到登录
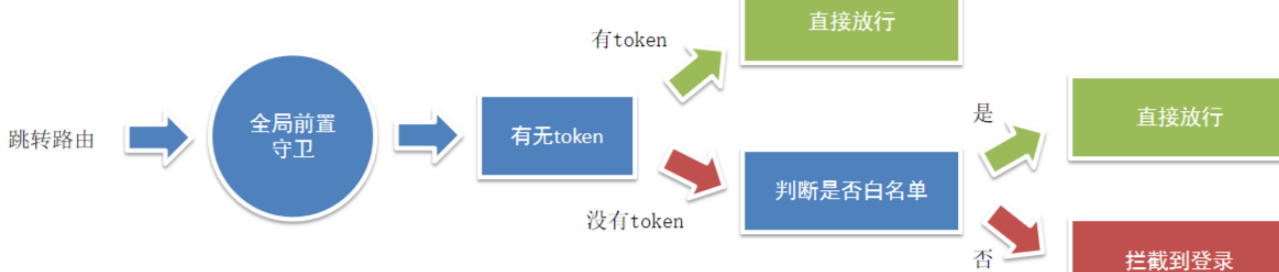
// 全局前置守卫:
// 1. 所有的路由一旦被匹配到,在真正渲染解析之前,都会先经过全局前置守卫
// 2. 只有全局前置守卫放行,才能看到真正的页面// 任何路由,被解析访问前,都会先执行这个回调
// 1. from 你从哪里来, 从哪来的路由信息对象
// 2. to   你往哪里去, 到哪去的路由信息对象
// 3. next() 是否放行,如果next()调用,就是放行 => 放你去想去的页面
//    next(路径) 拦截到某个路径页面
import { getToken } from '@/utils/storage'const whiteList = ['/login', '/register'] // 白名单列表,记录无需权限访问的所有页面router.beforeEach((to, from, next) => {const token = getToken()// 如果有token,直接放行if (token) {next()} else {// 没有token的人, 看看你要去哪// (1) 访问的是无需授权的页面(白名单),也是放行//     就是判断,访问的地址,是否在白名单数组中存在 includesif (whiteList.includes(to.path)) {next()} else {// (2) 否则拦截到登录next('/login')}}
})
三、面经列表-认识Cell组件-准备基础布局
1.认识静态结构
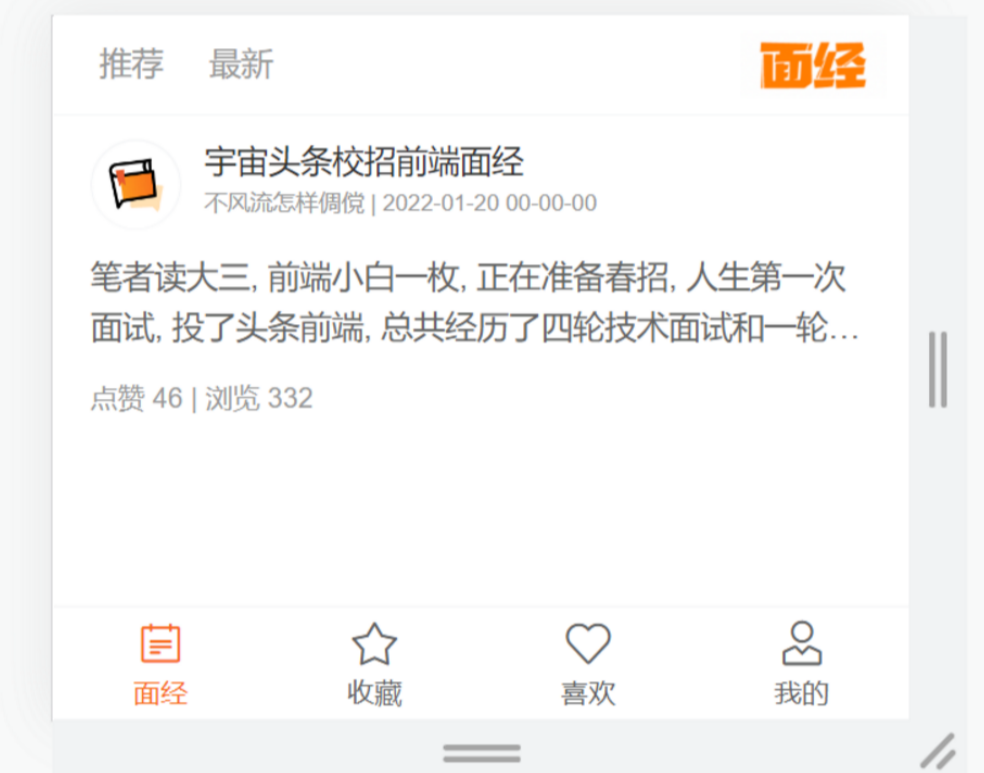
2.注册组件:
- van-cell
import Vue from 'vue'
import { Cell } from 'vant'
Vue.use(Cell)
3.静态结构 Article.vue
<template><div class="article-page"><nav class="my-nav van-hairline--bottom"><ahref="javascript:;">推荐</a><ahref="javascript:;">最新</a><div class="logo"><img src="@/assets/logo.png" alt=""></div></nav><van-cell class="article-item" ><template #title><div class="head"><img src="http://teachoss.itheima.net/heimaQuestionMiniapp/%E5%AE%98%E6%96%B9%E9%BB%98%E8%AE%A4%E5%A4%B4%E5%83%8F%402x.png" alt="" /><div class="con"><p class="title van-ellipsis">宇宙头条校招前端面经</p><p class="other">不风流怎样倜傥 | 2022-01-20 00-00-00</p></div></div></template><template #label><div class="body van-multi-ellipsis--l2">笔者读大三, 前端小白一枚, 正在准备春招, 人生第一次面试, 投了头条前端, 总共经历了四轮技术面试和一轮hr面, 不多说, 直接上题 一面</div><div class="foot">点赞 46 | 浏览 332</div></template></van-cell></div>
</template>
<script>
export default {name: 'article-page',data () {return {}},methods: {}
}
</script>
<style lang="less" scoped>
.article-page {margin-bottom: 50px;margin-top: 44px;.my-nav {height: 44px;position: fixed;left: 0;top: 0;width: 100%;z-index: 999;background: #fff;display: flex;align-items: center;> a {color: #999;font-size: 14px;line-height: 44px;margin-left: 20px;position: relative;transition: all 0.3s;&::after {content: '';position: absolute;left: 50%;transform: translateX(-50%);bottom: 0;width: 0;height: 2px;background: #222;transition: all 0.3s;}&.active {color: #222;&::after {width: 14px;}}}.logo {flex: 1;display: flex;justify-content: flex-end;> img {width: 64px;height: 28px;display: block;margin-right: 10px;}}}
}
.article-item {.head {display: flex;img {width: 40px;height: 40px;border-radius: 50%;overflow: hidden;}.con {flex: 1;overflow: hidden;padding-left: 10px;p {margin: 0;line-height: 1.5;&.title {width: 280px;}&.other {font-size: 10px;color: #999;}}}}.body {font-size: 14px;color: #666;line-height: 1.6;margin-top: 10px;}.foot {font-size: 12px;color: #999;margin-top: 10px;}
}
</style>
四、封装 ArticleItem 组件
说明:每个文章列表项,其实就是一个整体,封装成一个组件 → 可阅读性 & 复用性
步骤:
- 新建 components/ArticleItem.vue 组件,贴入内容
- 注册成全局组件
- Article.vue 页面中应用
新建 components/ArticleItem.vue 组件
<template><van-cell class="article-item"><template #title><div class="head"><img src="http://teachoss.itheima.net/heimaQuestionMiniapp/%E5%AE%98%E6%96%B9%E9%BB%98%E8%AE%A4%E5%A4%B4%E5%83%8F%402x.png"alt=""/><div class="con"><p class="title van-ellipsis">宇宙头条校招前端面经</p><p class="other">不风流怎样倜傥 | 2022-01-20 00-00-00</p></div></div></template><template #label><div class="body van-multi-ellipsis--l2">笔者读大三, 前端小白一枚, 正在准备春招, 人生第一次面试, 投了头条前端,总共经历了四轮技术面试和一轮hr面, 不多说, 直接上题 一面</div><div class="foot">点赞 46 | 浏览 332</div></template></van-cell>
</template>
<script>
export default {name: 'ArticleItem'
}
</script>
<style lang="less" scoped>
.article-item {.head {display: flex;img {width: 40px;height: 40px;border-radius: 50%;overflow: hidden;}.con {flex: 1;overflow: hidden;padding-left: 10px;p {margin: 0;line-height: 1.5;&.title {width: 280px;}&.other {font-size: 10px;color: #999;}}}}.body {font-size: 14px;color: #666;line-height: 1.6;margin-top: 10px;}.foot {font-size: 12px;color: #999;margin-top: 10px;}
}
</style>
注册成全局组件使用
import ArticleItem from '@/components/ArticleItem.vue'
Vue.component('ArticleItem', ArticleItem)Article.vue页面中
<template><div class="article-page">... <ArticleItem></ArticleItem></div>
</template>
五、封装 api 接口-获取文章列表数据
接口:获取面经列表 - 传智教育-面经项目--h5移动端接口文档
1.新建 api/article.js 提供接口函数
import request from '@/utils/request'export const getArticles = (obj) => {return request.get('/interview/query', {params: {current: obj.current,sorter: obj.sorter,pageSize: 10}})
}
2.页面中调用测试
import { getArticles } from '@/api/article'
export default {name: 'article-page',data () {return {}},async created () {const res = await getArticles({current: 1,sorter: 'weight_desc'})console.log(res)},methods: {}
}
3.发现 401 错误, 通过 headers 携带 token
注意:这个token,需要拼上前缀 Bearer token标识前缀
// 封装接口,获取文章列表
export const getArticles = (obj) => {const token = getToken()return request.get('/interview/query', {params: {current: obj.current, // 当前页pageSize: 10, // 每页条数sorter: obj.sorter // 排序字段 =>  传"weight_desc" 获取 推荐, "不传" 获取 最新},headers: {// 注意 Bearer 和 后面的空格不能删除,为后台的token辨识Authorization: `Bearer ${token}`}})
}
六、请求拦截器-携带 token
utils/request.js
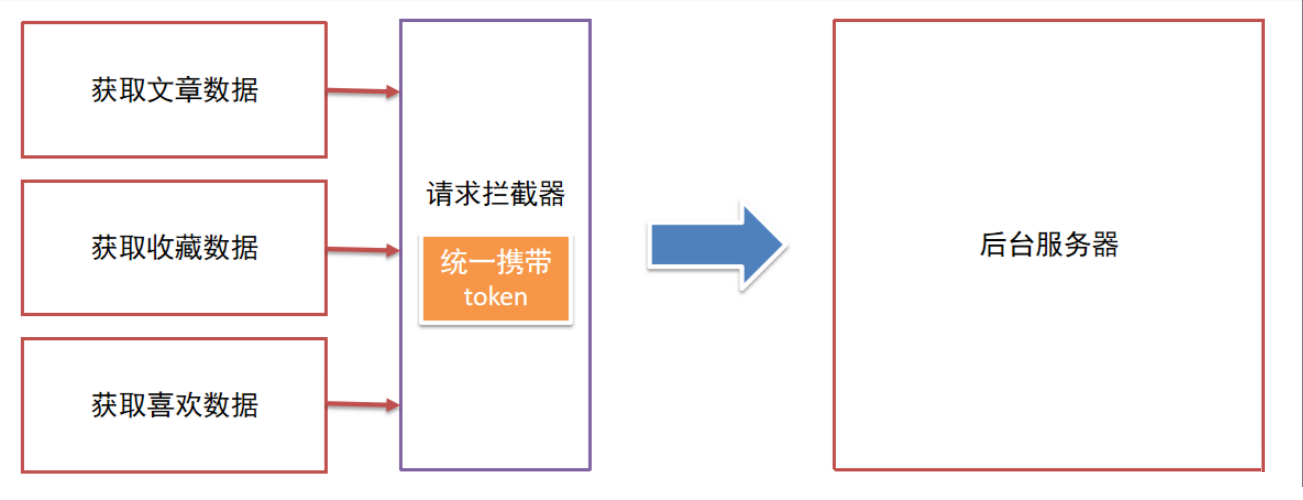
每次自己携带token太麻烦,通过请求拦截器统一携带token更方便
import { getToken } from './storage'// 添加请求拦截器
request.interceptors.request.use(function (config) {// 在发送请求之前做些什么const token = getToken()if (token) {config.headers.Authorization = `Bearer ${token}`}return config
}, function (error) {// 对请求错误做些什么return Promise.reject(error)
})
七、响应拦截器-处理token过期
说明:token 是有过期时间的 (6h),一旦 过期 或 失效 就无法正确获取到数据!

utils/request.js
// 添加响应拦截器
request.interceptors.response.use(function (response) {// 对响应数据做点什么return response.data
}, function (error) {if (error.response) {// 有错误响应, 提示错误提示if (error.response.status === 401) {delToken()router.push('/login')} else {Toast(error.response.data.message)}}// 对响应错误做点什么return Promise.reject(error)
})
八、面经列表-动态渲染列表

article.vue
存储数据
import {getArticles} from '@/api/article'
data () {return {list: [],current: 1,sorter: 'weight_desc'}
},
async created () {const { data } = await getArticles({current: this.current,sorter: this.sorter})this.list = data.data.rows
},
v-for循环展示
<template><div class="article-page">...<ArticleItem v-for="(item,i) in list" :key="item.id" :item="item"></ArticleItem></div>
</template>
子组件接收渲染
<template><van-cell class="article-item" @click="$router.push(`/detail/${item.id}`)"><template #title><div class="head"><img :src="item.avatar" alt="" /><div class="con"><p class="title van-ellipsis">{{ item.stem }}</p><p class="other">{{ item.creator }} | {{ item.createdAt }}</p></div></div></template><template #label><div class="body van-multi-ellipsis--l2" v-html="item.content"></div><div class="foot">点赞 {{ item.likeCount }} | 浏览 {{ item.views }}</div></template></van-cell>
</template>
<script>
export default {name: 'ArticleItem',props: {item: {type: Object,default: () => ({})}}
}
</script>
<style lang="less" scoped>
.article-item {.head {display: flex;img {width: 40px;height: 40px;border-radius: 50%;overflow: hidden;}.con {flex: 1;overflow: hidden;padding-left: 10px;p {margin: 0;line-height: 1.5;&.title {width: 280px;}&.other {font-size: 10px;color: #999;}}}}.body {font-size: 14px;color: #666;line-height: 1.6;margin-top: 10px;}.foot {font-size: 12px;color: #999;margin-top: 10px;}
}
</style>
九、面经列表-响应拦截器-简化响应
// 添加响应拦截器
instance.interceptors.response.use(function (response) {// 对响应数据做点什么return response.data
}, function (error) {// console.log(error)// 有错误响应,后台正常返回了错误信息if (error.response) {if (error.response.status === 401) {// 清除掉无效的tokendelToken()// 拦截到登录router.push('/login')} else {// 有错误响应,提示错误消息// this.$toast(error.response.data.message)Toast(error.response.data.message)}}// 对响应错误做点什么return Promise.reject(error)
})
Login.vue
setToken(data.token)Article.vue
async created () {// 获取推荐的,第1页的10条数据const res = await getArticles({current: this.current,sorter: this.sorter})this.list = res.data.rows
},
十、面经列表-分页加载更多
https://vant-contrib.gitee.io/vant/v2/#/zh-CN/list
<van-listv-model="loading":finished="finished"finished-text="没有更多了"@load="onLoad"
><ArticleItem v-for="(item,i) in list" :key="i" :item="item"></ArticleItem>
</van-list>
data () {return {list: [],current: 1,sorter: 'weight_desc',loading: false,finished: false}
},methods: {async onLoad () {const { data } = await getArticles({current: this.current,sorter: this.sorter})this.list = data.rows}
}
加载完成,重置 loading, 累加数据,处理 finished
async onLoad () {const { data } = await getArticles({current: this.current,sorter: this.sorter})this.list.push(...data.rows)this.loading = falsethis.current++if (this.current > data.pageTotal) {this.finished = true}
}
十一、面经列表-推荐和更新
1.切换推荐和最新 获取不同的数据
2.切换推荐和最新 点击的tab页签应该高亮
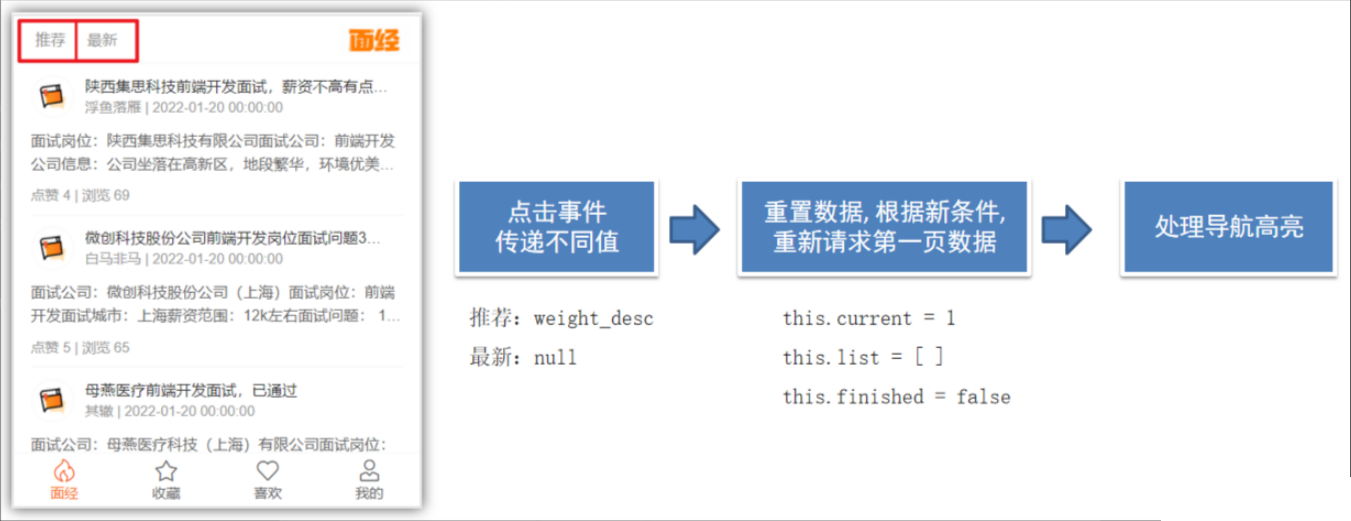
article.vue
<a@click="changeSorter('weight_desc')":class="{ active: sorter === 'weight_desc' }"href="javascript:;">推荐</a
>
<a@click="changeSorter(null)":class="{ active: sorter === null }"href="javascript:;">最新</a
>
提供methods
changeSorter (value) {this.sorter = value// 重置所有条件this.current = 1 // 排序条件变化,重新从第一页开始加载this.list = []this.finished = false // finished重置,重新有数据可以加载了// this.loading = false// 手动加载更多// 手动调用了加载更多,也需要手动将loading改成true,表示正在加载中(避免重复触发)this.loading = truethis.onLoad()
}
十二、面经详情-动态路由传参-请求渲染
1.跳转路由传参
核心知识点:跳转路由传参
准备动态路由 (已准备)
const router = new VueRouter({routes: [...,{ path: '/article/:id', component: Detail },{path: '/',component: Layout,redirect: '/article',children: [...]}]
})
点击跳转 article.vue
<template><!-- 文章区域 --><van-cell class="article-item" @click="$router.push(`/detail/${item.id}`)"><template #title>...</template><template #label>...</template></van-cell>
</template>
页面中获取参数
this.$route.params.id2.动态渲染 (页面代码准备)
准备代码:
导入图标组件:
Vue.use(Icon)静态结构:
<template><div class="detail-page"><van-nav-barleft-text="返回"@click-left="$router.back()"fixedtitle="面经详情"/><header class="header"><h1>大标题</h1><p>2050-04-06 | 300 浏览量 | 222 点赞数</p><p><img src="头像" alt="" /><span>作者</span></p></header><main class="body"><p>我是内容</p><p>我是内容</p><p>我是内容</p><p>我是内容</p></main><div class="opt"><van-icon class="active" name="like-o"/><van-icon name="star-o"/></div></div>
</template>
<script>
export default {name: 'detail-page',data () {return {article: {}}},async created () {},methods: {}
}
</script>
<style lang="less" scoped>
.detail-page {margin-top: 44px;overflow: hidden;padding: 0 15px;.header {h1 {font-size: 24px;}p {color: #999;font-size: 12px;display: flex;align-items: center;}img {width: 40px;height: 40px;border-radius: 50%;overflow: hidden;}}.opt {position: fixed;bottom: 100px;right: 0;> .van-icon {margin-right: 20px;background: #fff;width: 40px;height: 40px;line-height: 40px;text-align: center;border-radius: 50%;box-shadow: 2px 2px 10px #ccc;font-size: 18px;&.active {background: #FEC635;color: #fff;}}}
}
</style>
3.代码实现
3.1封装api接口函数
api/article.js
export const getArticleDetail = (id) => {return request.get('interview/show', {params: {id}})
}
3.2动态渲染
Detail.vue
<template><div class="detail-page"><van-nav-barleft-text="返回"@click-left="$router.back()"fixedtitle="面经详细"/><header class="header"><h1>{{ article.stem }}</h1><p>{{ article.createdAt }} | {{ article.views }} 浏览量 |{{ article.likeCount }} 点赞数</p><p><img :src="article.avatar" alt="" /><span>{{ article.creator }}</span></p></header><main class="body" v-html="article.content"></main><div class="opt"><van-icon :class="{active:article.likeFlag}" name="like-o"/><van-icon :class="{active:article.collectFlag}" name="star-o"/></div></div>
</template>
<script>
import { getArticleDetail } from '@/api/article'export default {name: 'detail-page',data () {return {article: {}}},async created () {this.article = {}const { data } = await getArticleDetail(this.$route.params.id)this.article = data},methods: {}
}
</script>
十三、面经详情-点赞收藏
封装准备接口
api/article.js
export const updateLike = (id) => {return request.post('interview/opt', {id,optType: 1 // 喜欢})
}export const updateCollect = (id) => {return request.post('interview/opt', {id,optType: 2 // 收藏})
}
Detail.vue
调用接口实现点赞收藏
<template><div class="detail-page"><van-nav-barleft-text="返回"@click-left="$router.back()"fixedtitle="面经详细"/><header class="header"><h1>{{ article.stem }}</h1><p>{{ article.createdAt }} | {{ article.views }} 浏览量 |{{ article.likeCount }} 点赞数</p><p><img :src="article.avatar" alt="" /><span>{{ article.creator }}</span></p></header><main class="body" v-html="article.content"></main><div class="opt"><van-icon @click="toggleLike" :class="{active:article.likeFlag}" name="like-o"/><van-icon @click="toggleCollect" :class="{active:article.collectFlag}" name="star-o"/></div></div>
</template>
<script>
import { getArticleDetail, updateCollect, updateLike } from '@/api/article';export default {name: 'detail-page',data() {return {article: {}};},async created() {this.article = {}const { data } = await getArticleDetail(this.$route.params.id)this.article = data;},methods: {async toggleLike () {await updateLike(this.article.id)this.article.likeFlag = !this.article.likeFlagif ( this.article.likeFlag ) {this.article.likeCount ++this.$toast.success('点赞成功')} else {this.article.likeCount --this.$toast.success('取消点赞')}},async toggleCollect () {await updateCollect(this.article.id)this.article.collectFlag = !this.article.collectFlagif ( this.article.collectFlag ) {this.$toast.success('收藏成功')} else {this.$toast.success('取消收藏')}}}
};
</script>
<style lang="less" scoped>
.detail-page {margin-top: 44px;overflow: hidden;padding: 0 15px;.header {h1 {font-size: 24px;}p {color: #999;font-size: 12px;display: flex;align-items: center;}img {width: 40px;height: 40px;border-radius: 50%;overflow: hidden;}}.opt {position: fixed;bottom: 100px;right: 0;> .van-icon {margin-right: 20px;background: #fff;width: 40px;height: 40px;line-height: 40px;text-align: center;border-radius: 50%;box-shadow: 2px 2px 10px #ccc;font-size: 18px;&.active {background: #FEC635;color: #fff;}}}
}
</style>
十四、我的收藏 (实战)
提供api方法
- page: 表示当前页
- optType:2 表示获取我的收藏数据
api/article.js
// 获取我的收藏
export const getArticlesCollect = (obj) => {return request.get('/interview/opt/list', {params: {page: obj.page, // 当前页pageSize: 5, // 可选optType: 2 // 表示收藏}})
}collect.vue准备结构
<template><div class="collect-page"><van-nav-bar fixed title="我的收藏" /><van-listv-model="loading":finished="finished"finished-text="没有更多了"@load="onLoad"><ArticleItem v-for="(item, i) in list" :key="i" :item="item" /></van-list></div>
</template>
<script>
import { getArticlesCollect } from '@/api/article'
export default {name: 'collect-page',data () {return {list: [],loading: false,finished: false,page: 1}},methods: {async onLoad () {// 异步更新数据const { data } = await getArticlesCollect({ page: this.page })this.list.push(...data.rows)this.loading = falsethis.page++if (this.page > data.pageTotal) {this.finished = true}}}
}
</script>
<style lang="less" scoped>
.collect-page {margin-bottom: 50px;margin-top: 44px;
}
</style>
十五、我的喜欢 (快速实现)
准备api函数
- page: 表示当前页
- optType:1 表示获取我的喜欢数据
api/article.js
// 获取我的喜欢
export const getArticlesLike = (obj) => {return request.get('/interview/opt/list', {params: {page: obj.page, // 当前页pageSize: 5, // 可选optType: 1 // 表示喜欢}})
}Like.vue请求渲染
<template><div class="like-page"><van-nav-bar fixed title="我的点赞" /><van-listv-model="loading":finished="finished"finished-text="没有更多了"@load="onLoad"><ArticleItem v-for="(item,i) in list" :key="i" :item="item" /></van-list></div>
</template>
<script>
import { getArticlesLike } from '@/api/article'
export default {name: 'like-page',data () {return {list: [],loading: false,finished: false,page: 1}},methods: {async onLoad () {// 异步更新数据const { data } = await getArticlesLike({ page: this.page })this.list.push(...data.rows)this.loading = falsethis.page++if (this.page > data.pageTotal) {this.finished = true}}}
}
</script>
<style lang="less" scoped>
.like-page {margin-bottom: 50px;margin-top: 44px;
}
</style>
十六、个人中心 (快速实现)
准备代码:
1 注册组件
import {Grid,GridItem,CellGroup
} from 'vant'Vue.use(Grid)
Vue.use(GridItem)
Vue.use(CellGroup)
2 准备api
api/user.js
// 获取用户信息
export const getUserInfo = () => {return request('/user/currentUser')
}
3 页面调用渲染
<template><div class="user-page"><div class="user"><img :src="avatar" alt="" /><h3>{{ username }}</h3></div><van-grid clickable :column-num="3" :border="false"><van-grid-item icon="clock-o" text="历史记录" to="/" /><van-grid-item icon="bookmark-o" text="我的收藏" to="/collect" /><van-grid-item icon="thumb-circle-o" text="我的点赞" to="/like" /></van-grid><van-cell-group class="mt20"><van-cell title="推荐分享" is-link /><van-cell title="意见反馈" is-link /><van-cell title="关于我们" is-link /><van-cell @click="logout" title="退出登录" is-link /></van-cell-group></div>
</template>
<script>
import { getUserInfo } from '@/api/user'
import { delToken } from '@/utils/storage'
export default {name: 'user-page',data () {return {username: '',avatar: ''}},async created () {const { data } = await getUserInfo()this.username = data.usernamethis.avatar = data.avatar},methods: {logout () {delToken()this.$router.push('/login')}}
}
</script>
<style lang="less" scoped>
.user-page {padding: 0 10px;background: #f5f5f5;height: 100vh;.mt20 {margin-top: 20px;}.user {display: flex;padding: 20px 0;align-items: center;img {width: 80px;height: 80px;border-radius: 50%;overflow: hidden;}h3 {margin: 0;padding-left: 20px;font-size: 18px;}}
}
</style>
十七、打包发布
vue脚手架只是开发过程中,协助开发的工具,当真正开发完了 => 脚手架不参与上线
参与上线的是 => 打包后的源代码
打包:
- 将多个文件压缩合并成一个文件
- 语法降级
- less sass ts 语法解析, 解析成css
- …
打包后,可以生成,浏览器能够直接运行的网页 => 就是需要上线的源码!
打包命令
vue脚手架工具已经提供了打包命令,直接使用即可。
yarn build在项目的根目录会自动创建一个文件夹dist,dist中的文件就是打包后的文件,只需要放到服务器中即可。
配置publicPath
module.exports = {// 设置获取.js,.css文件时,是以相对地址为基准的。// https://cli.vuejs.org/zh/config/#publicpathpublicPath: './'
}
十八、路由懒加载
路由懒加载 & 异步组件, 不会一上来就将所有的组件都加载,而是访问到对应的路由了,才加载解析这个路由对应的所有组件
官网链接:路由懒加载 | Vue Router
当打包构建应用时,JavaScript 包会变得非常大,影响页面加载。如果我们能把不同路由对应的组件分割成不同的代码块,然后当路由被访问的时候才加载对应组件,这样就更加高效了。
const Detail = () => import('@/views/detail')
const Register = () => import('@/views/register')
const Login = () => import('@/views/login')
const Article = () => import('@/views/article')
const Collect = () => import('@/views/collect')
const Like = () => import('@/views/like')
const User = () => import('@/views/user')
PS: 如果想要手机上看到效果,可以将打包后的代码,上传到 gitee,利用 git pages 进行展示
Vue 核心技术与实战 智慧商城
接口文档:wiki - 智慧商城-实战项目
演示地址:http://cba.itlike.com/public/mweb/#/
01. 项目功能演示
1.明确功能模块
启动准备好的代码,演示移动端面经内容,明确功能模块
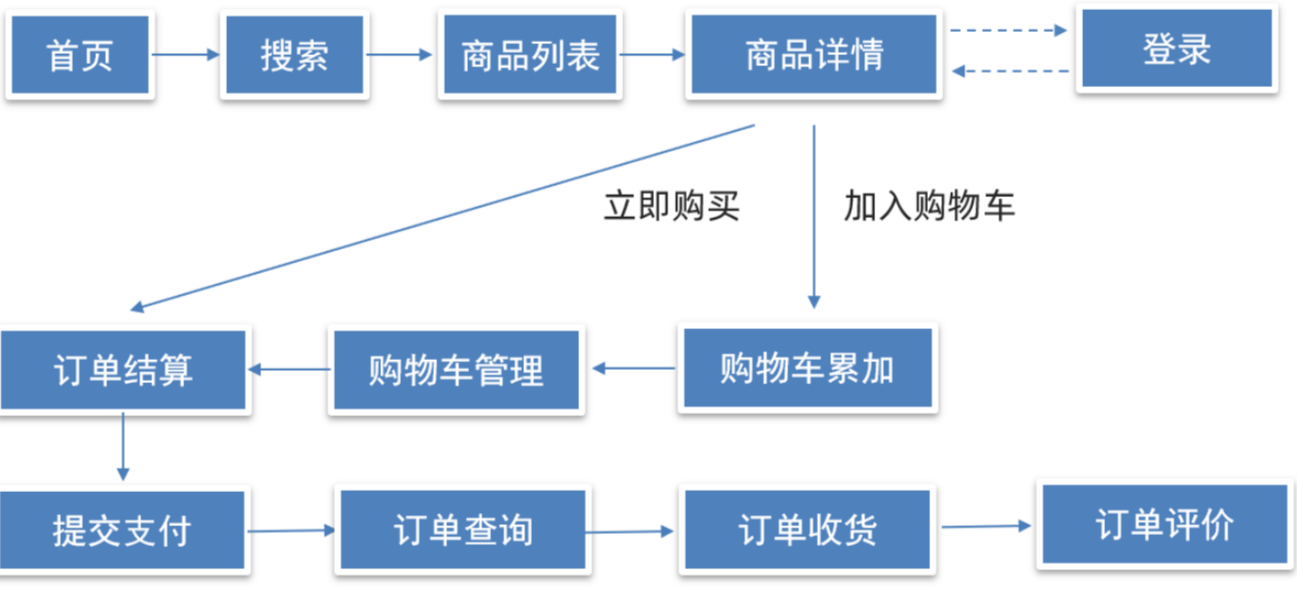
2.项目收获
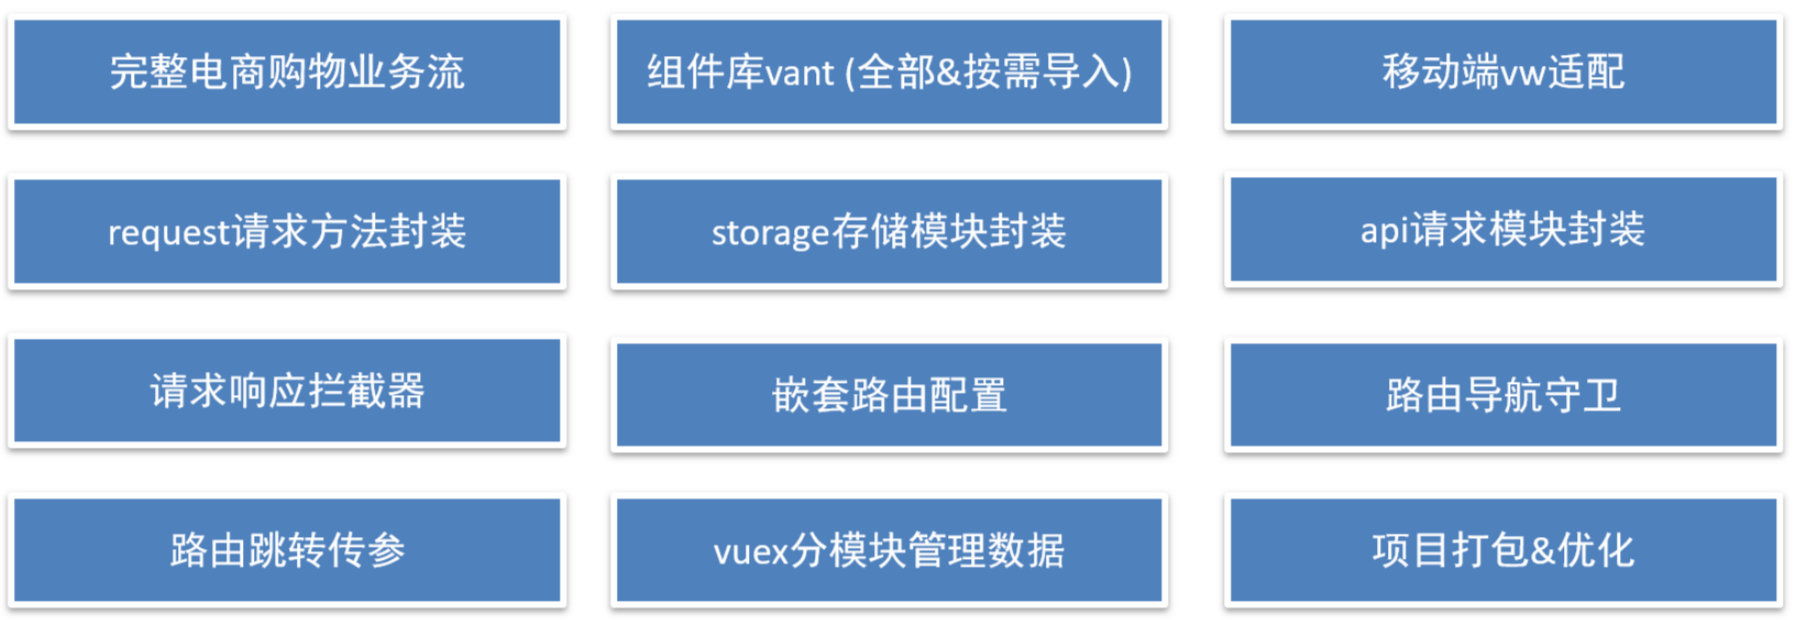
02. 项目创建目录初始化
vue-cli 建项目
1.安装脚手架 (已安装)
npm i @vue/cli -g2.创建项目
vue create hm-shopping- 选项
Vue CLI v5.0.8
? Please pick a preset:Default ([Vue 3] babel, eslint)Default ([Vue 2] babel, eslint)
> Manually select features 选自定义- 手动选择功能
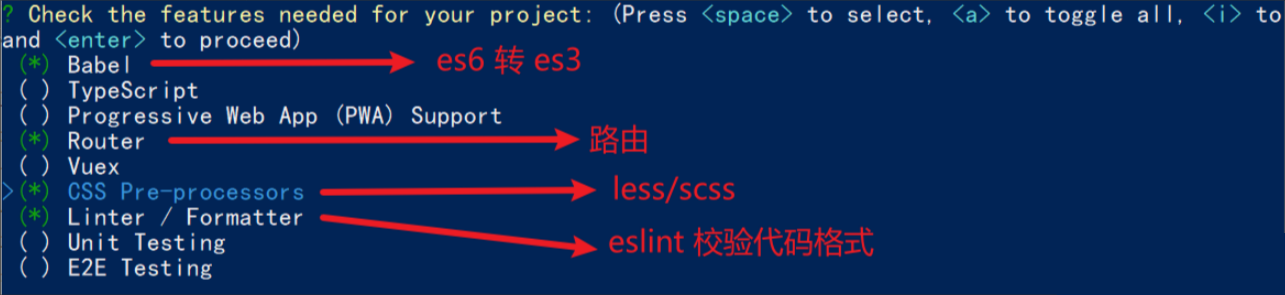
- 选择vue的版本
  3.x
> 2.x- 是否使用history模式

- 选择css预处理

- 选择eslint的风格 (eslint 代码规范的检验工具,检验代码是否符合规范)
- 比如:const age = 18; => 报错!多加了分号!后面有工具,一保存,全部格式化成最规范的样子
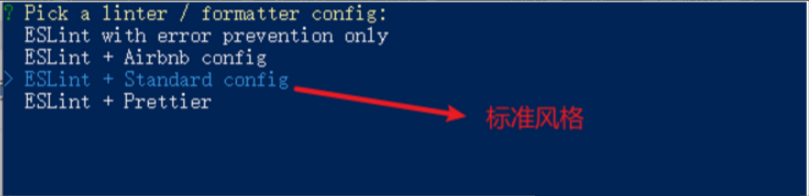
- 选择校验的时机 (直接回车)

- 选择配置文件的生成方式 (直接回车)

- 是否保存预设,下次直接使用? => 不保存,输入 N
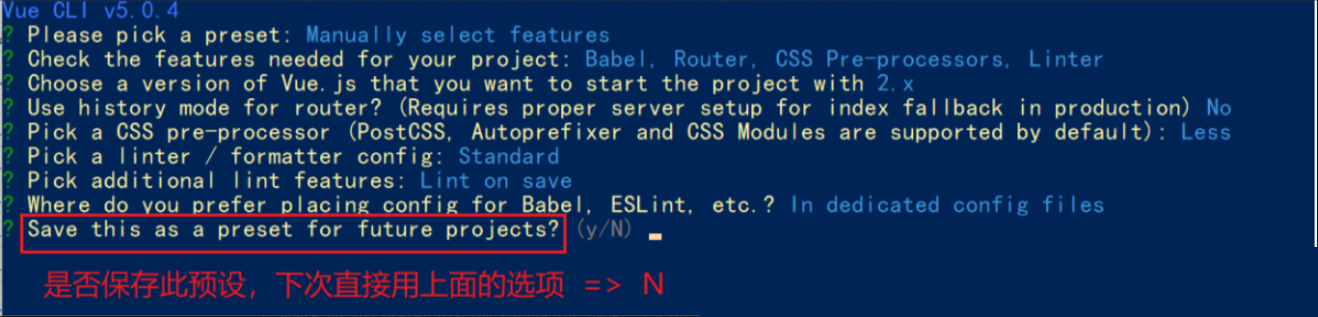
- 等待安装,项目初始化完成

- 启动项目
npm run serve03. 调整初始化目录结构
强烈建议大家严格按照老师的步骤进行调整,为了符合企业规范
为了更好的实现后面的操作,我们把整体的目录结构做一些调整。
目标:
- 删除初始化的一些默认文件
- 修改没删除的文件
- 新增我们需要的目录结构
1.删除文件
- src/assets/logo.png
- src/components/HelloWorld.vue
- src/views/AboutView.vue
- src/views/HomeView.vue
2.修改文件
main.js 不需要修改
router/index.js
删除默认的路由配置
import Vue from 'vue'
import VueRouter from 'vue-router'Vue.use(VueRouter)const routes = [
]const router = new VueRouter({routes
})export default router
App.vue
<template><div id="app"><router-view/></div>
</template>
3.新增目录
- src/api 目录
-
- 存储接口模块 (发送ajax请求接口的模块)
- src/utils 目录
-
- 存储一些工具模块 (自己封装的方法)
目录效果如下:

04. vant组件库及Vue周边的其他组件库
组件库:第三方封装好了很多很多的组件,整合到一起就是一个组件库。
https://vant-contrib.gitee.io/vant/v2/#/zh-CN/
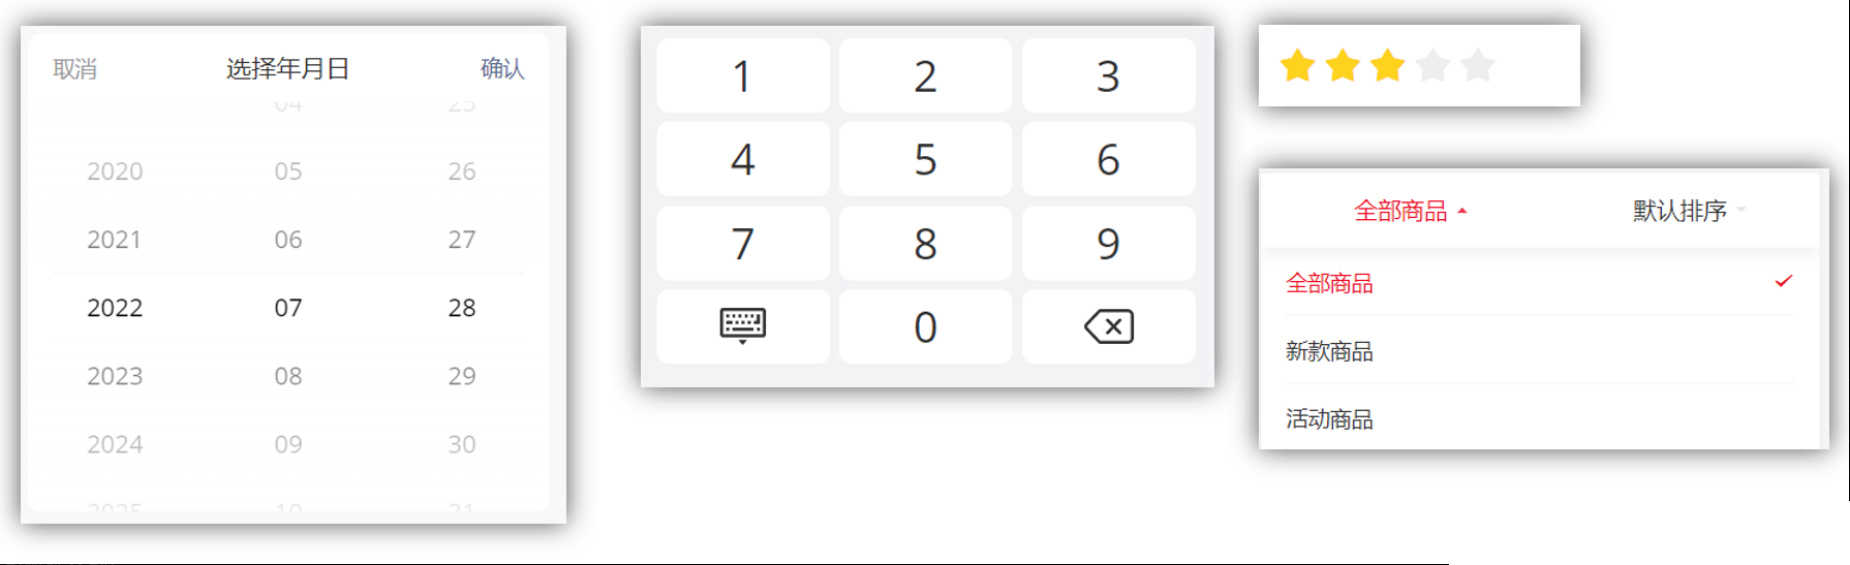
比如日历组件、键盘组件、打分组件、下拉筛选组件等
组件库并不是唯一的,常用的组件库还有以下几种:
pc: element-ui element-plus iview ant-design
移动:vant-ui Mint UI (饿了么) Cube UI (滴滴)
05. 全部导入和按需导入的区别
目标:明确 全部导入 和 按需导入 的区别
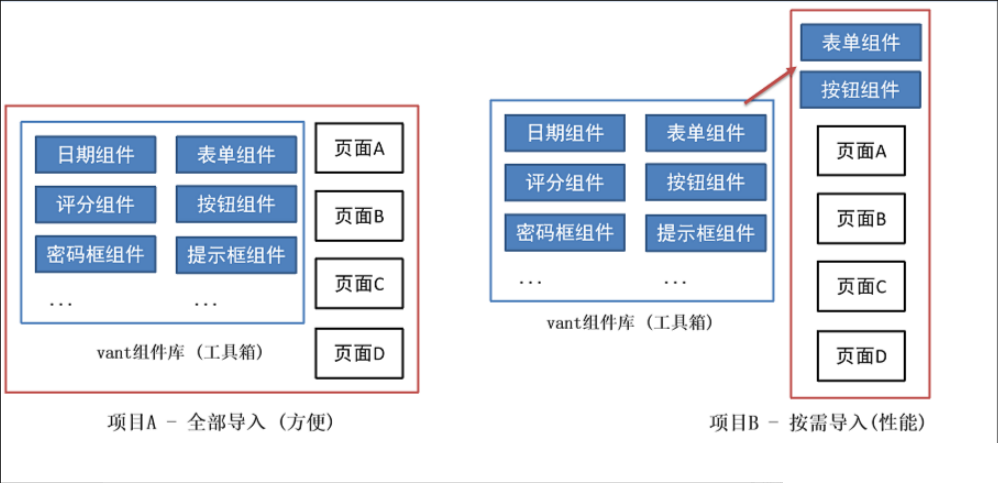
区别:
1.全部导入会引起项目打包后的体积变大,进而影响用户访问网站的性能
2.按需导入只会导入你使用的组件,进而节约了资源
06. 全部导入
- 安装vant-ui
yarn add vant@latest-v2- 在main.js中
import Vant from 'vant';
import 'vant/lib/index.css';
// 把vant中所有的组件都导入了
Vue.use(Vant)- 即可使用
<van-button type="primary">主要按钮</van-button>
<van-button type="info">信息按钮</van-button>
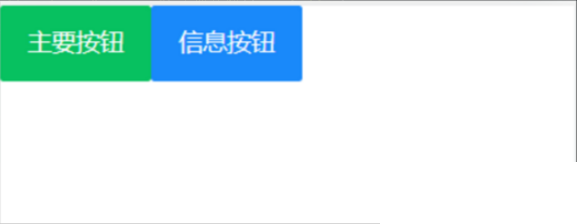
vant-ui提供了很多的组件,全部导入,会导致项目打包变得很大。
07. 按需导入
- 安装vant-ui
yarn add vant@latest-v2- 安装一个插件
yarn add babel-plugin-import -D- 在
babel.config.js中配置
module.exports = {presets: ['@vue/cli-plugin-babel/preset'],plugins: [['import', {libraryName: 'vant',libraryDirectory: 'es',style: true}, 'vant']]
}- 按需加载,在
main.js
import {Button, Icon } from 'vant'Vue.use(Button)
Vue.use(Icon)app.vue中进行测试
<van-button type="primary">主要按钮</van-button>
<van-button type="info">信息按钮</van-button>
<van-button type="default">默认按钮</van-button>
<van-button type="warning">警告按钮</van-button>
<van-button type="danger">危险按钮</van-button>
- 把引入组件的步骤抽离到单独的js文件中比如
utils/vant-ui.js
import {Button, Icon } from 'vant'Vue.use(Button)
Vue.use(Icon)
main.js中进行导入
// 导入按需导入的配置文件
import '@/utils/vant-ui'
08. 项目中的vw适配
官方说明:https://vant-contrib.gitee.io/vant/v2/#/zh-CN/advanced-usage
yarn add postcss-px-to-viewport@1.1.1 -D- 项目根目录, 新建postcss的配置文件
postcss.config.js
// postcss.config.js
module.exports = {plugins: {'postcss-px-to-viewport': {viewportWidth: 375,},},
};
viewportWidth:设计稿的视口宽度
- vant-ui中的组件就是按照375的视口宽度设计的
- 恰好面经项目中的设计稿也是按照375的视口宽度设计的,所以此时 我们只需要配置375就可以了
- 如果设计稿不是按照375而是按照750的宽度设计,那此时这个值该怎么填呢?
09. 路由配置 - 一级路由
但凡是单个页面,独立展示的,都是一级路由
路由设计:
- 登录页
- 首页架子
-
- 首页 - 二级
- 分类页 - 二级
- 购物车 - 二级
- 我的 - 二级
- 搜索页
- 搜索列表页
- 商品详情页
- 结算支付页
- 我的订单页
router/index.js 配置一级路由,新建对应的页面文件
import Vue from 'vue'
import VueRouter from 'vue-router'
import Layout from '@/views/layout'
import Search from '@/views/search'
import SearchList from '@/views/search/list'
import ProDetail from '@/views/prodetail'
import Login from '@/views/login'
import Pay from '@/views/pay'
import MyOrder from '@/views/myorder'Vue.use(VueRouter)const router = new VueRouter({routes: [{path: '/login',component: Login},{path: '/',component: Layout},{path: '/search',component: Search},{path: '/searchlist',component: SearchList},{path: '/prodetail/:id',component: ProDetail},{path: '/pay',component: Pay},{path: '/myorder',component: MyOrder}]
})export default router
10. 路由配置-tabbar标签页

https://vant-contrib.gitee.io/vant/v2/#/zh-CN/tabbar
vant-ui.js 引入组件
import { Tabbar, TabbarItem } from 'vant'
Vue.use(Tabbar)
Vue.use(TabbarItem)
layout.vue
- 复制官方代码
- 修改显示文本及显示的图标
- 配置高亮颜色
<template><div><!-- 二级路由出口 --><van-tabbar active-color="#ee0a24" inactive-color="#000"><van-tabbar-item icon="wap-home-o">首页</van-tabbar-item><van-tabbar-item icon="apps-o">分类页</van-tabbar-item><van-tabbar-item icon="shopping-cart-o">购物车</van-tabbar-item><van-tabbar-item icon="user-o">我的</van-tabbar-item></van-tabbar></div>
</template>
11. 路由配置 - 二级路由
router/index.js配置二级路由
import Vue from 'vue'
import VueRouter from 'vue-router'
import Layout from '@/views/layout'
import Search from '@/views/search'
import SearchList from '@/views/search/list'
import ProDetail from '@/views/prodetail'
import Login from '@/views/login'
import Pay from '@/views/pay'
import MyOrder from '@/views/myorder'import Home from '@/views/layout/home'
import Category from '@/views/layout/category'
import Cart from '@/views/layout/cart'
import User from '@/views/layout/user'Vue.use(VueRouter)const router = new VueRouter({routes: [{path: '/login',component: Login},{path: '/',component: Layout,redirect: '/home',children: [{path: 'home',component: Home},{path: 'category',component: Category},{path: 'cart',component: Cart},{path: 'user',component: User}]},{path: '/search',component: Search},{path: '/searchlist',component: SearchList},{path: '/prodetail/:id',component: ProDetail},{path: '/pay',component: Pay},{path: '/myorder',component: MyOrder}]
})export default router- 准备对应的组件文件
-
layout/home.vuelayout/category.vuelayout/cart.vuelayout/user.vue
layout.vue配置路由出口, 配置 tabbar
<template><div><router-view></router-view><van-tabbar route active-color="#ee0a24" inactive-color="#000"><van-tabbar-item to="/home" icon="wap-home-o">首页</van-tabbar-item><van-tabbar-item to="/category" icon="apps-o">分类页</van-tabbar-item><van-tabbar-item to="/cart" icon="shopping-cart-o">购物车</van-tabbar-item><van-tabbar-item to="/user" icon="user-o">我的</van-tabbar-item></van-tabbar></div>
</template>
12. 登录页静态布局
(1) 准备工作
- 新建
styles/common.less重置默认样式
// 重置默认样式
* {margin: 0;padding: 0;box-sizing: border-box;
}// 文字溢出省略号
.text-ellipsis-2 {overflow: hidden;-webkit-line-clamp: 2;text-overflow: ellipsis;display: -webkit-box;-webkit-box-orient: vertical;
}- main.js 中导入应用
import '@/styles/common.less'- 将准备好的一些图片素材拷贝到 assets 目录【备用】

(2) 登录静态布局
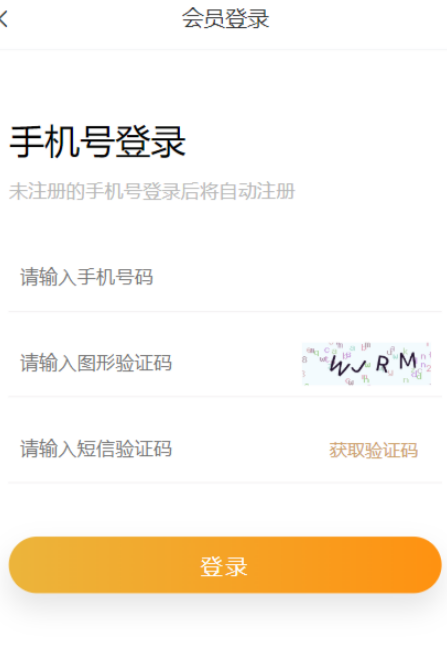
使用组件
- van-nav-bar
vant-ui.js 注册
import { NavBar } from 'vant'
Vue.use(NavBar)
Login.vue 使用
<template><div class="login"><van-nav-bar title="会员登录" left-arrow @click-left="$router.go(-1)" /><div class="container"><div class="title"><h3>手机号登录</h3><p>未注册的手机号登录后将自动注册</p></div><div class="form"><div class="form-item"><input class="inp" maxlength="11" placeholder="请输入手机号码" type="text"></div><div class="form-item"><input class="inp" maxlength="5" placeholder="请输入图形验证码" type="text"><img src="@/assets/code.png" alt=""></div><div class="form-item"><input class="inp" placeholder="请输入短信验证码" type="text"><button>获取验证码</button></div></div><div class="login-btn">登录</div></div></div>
</template>
<script>
export default {name: 'LoginPage'
}
</script>
<style lang="less" scoped>
.container {padding: 49px 29px;.title {margin-bottom: 20px;h3 {font-size: 26px;font-weight: normal;}p {line-height: 40px;font-size: 14px;color: #b8b8b8;}}.form-item {border-bottom: 1px solid #f3f1f2;padding: 8px;margin-bottom: 14px;display: flex;align-items: center;.inp {display: block;border: none;outline: none;height: 32px;font-size: 14px;flex: 1;}img {width: 94px;height: 31px;}button {height: 31px;border: none;font-size: 13px;color: #cea26a;background-color: transparent;padding-right: 9px;}}.login-btn {width: 100%;height: 42px;margin-top: 39px;background: linear-gradient(90deg,#ecb53c,#ff9211);color: #fff;border-radius: 39px;box-shadow: 0 10px 20px 0 rgba(0,0,0,.1);letter-spacing: 2px;display: flex;justify-content: center;align-items: center;}
}
</style>
添加通用样式
styles/common.less 设置导航条,返回箭头颜色
// 设置导航条 返回箭头 颜色
.van-nav-bar {.van-icon-arrow-left {color: #333;}
}
13. request模块 - axios封装
接口文档:wiki - 智慧商城-实战项目
演示地址:http://cba.itlike.com/public/mweb/#/
基地址:http://cba.itlike.com/public/index.php?s=/api/
我们会使用 axios 来请求后端接口, 一般都会对 axios 进行一些配置 (比如: 配置基础地址,请求响应拦截器等等)
一般项目开发中, 都会对 axios 进行基本的二次封装, 单独封装到一个模块中, 便于使用
目标:将 axios 请求方法,封装到 request 模块
- 安装 axios
npm i axios- 新建
utils/request.js封装 axios 模块利用 axios.create 创建一个自定义的 axios 来使用axios中文文档|axios中文网 | axios
/* 封装axios用于发送请求 */
import axios from 'axios'// 创建一个新的axios实例
const request = axios.create({baseURL: 'http://cba.itlike.com/public/index.php?s=/api/',timeout: 5000
})// 添加请求拦截器
request.interceptors.request.use(function (config) {// 在发送请求之前做些什么return config
}, function (error) {// 对请求错误做些什么return Promise.reject(error)
})// 添加响应拦截器
request.interceptors.response.use(function (response) {// 对响应数据做点什么return response.data
}, function (error) {// 对响应错误做点什么return Promise.reject(error)
})export default request- 获取图形验证码,请求测试
import request from '@/utils/request'
export default {name: 'LoginPage',async created () {const res = await request.get('/captcha/image')console.log(res)}
}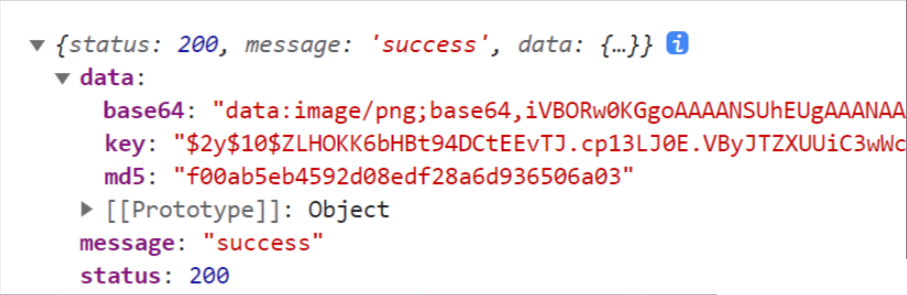
14. 图形验证码功能完成

- 准备数据,获取图形验证码后存储图片路径,存储图片唯一标识
async created () {this.getPicCode()
},
data () {return {picUrl: '',picKey: ''}
},
methods: {// 获取图形验证码async getPicCode () {const { data: { base64, key } } = await request.get('/captcha/image')this.picUrl = base64this.picKey = key}
}- 动态渲染图形验证码,并且点击时要重新刷新验证码
<img v-if="picUrl" :src="picUrl" @click="getPicCode">15. 封装api接口 - 图片验证码接口
**1.目标:**将请求封装成方法,统一存放到 api 模块,与页面分离
2.原因:以前的模式
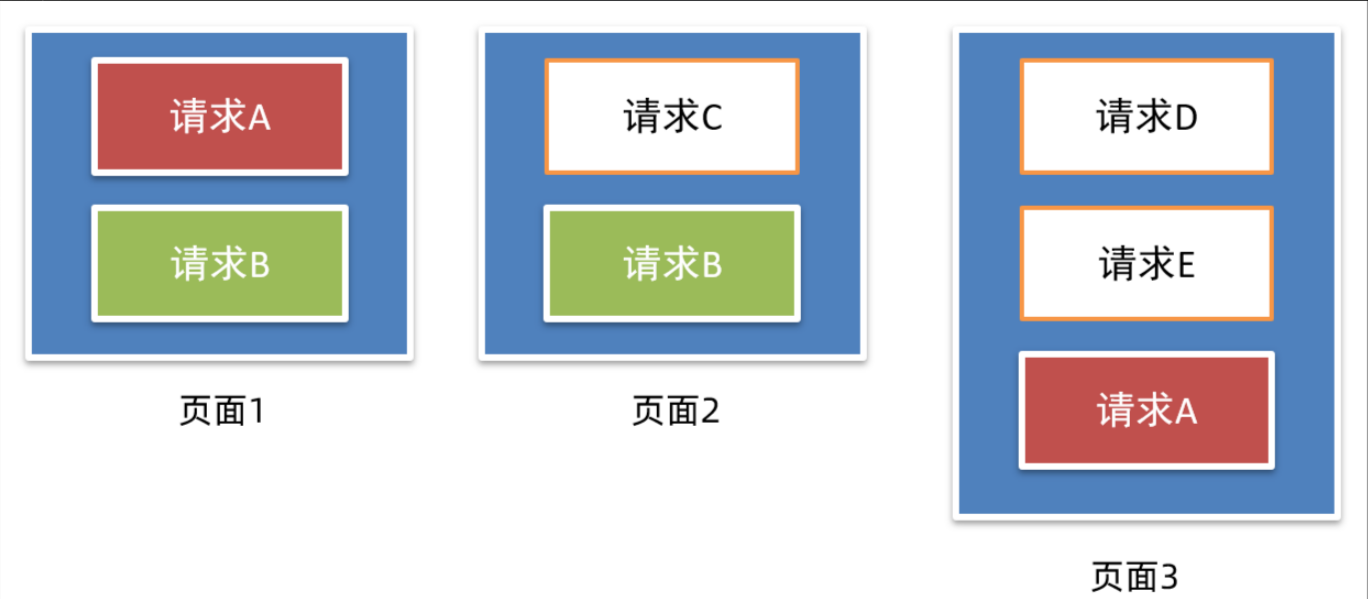
- 页面中充斥着请求代码
- 可阅读性不高
- 相同的请求没有复用请求没有统一管理
3.期望:
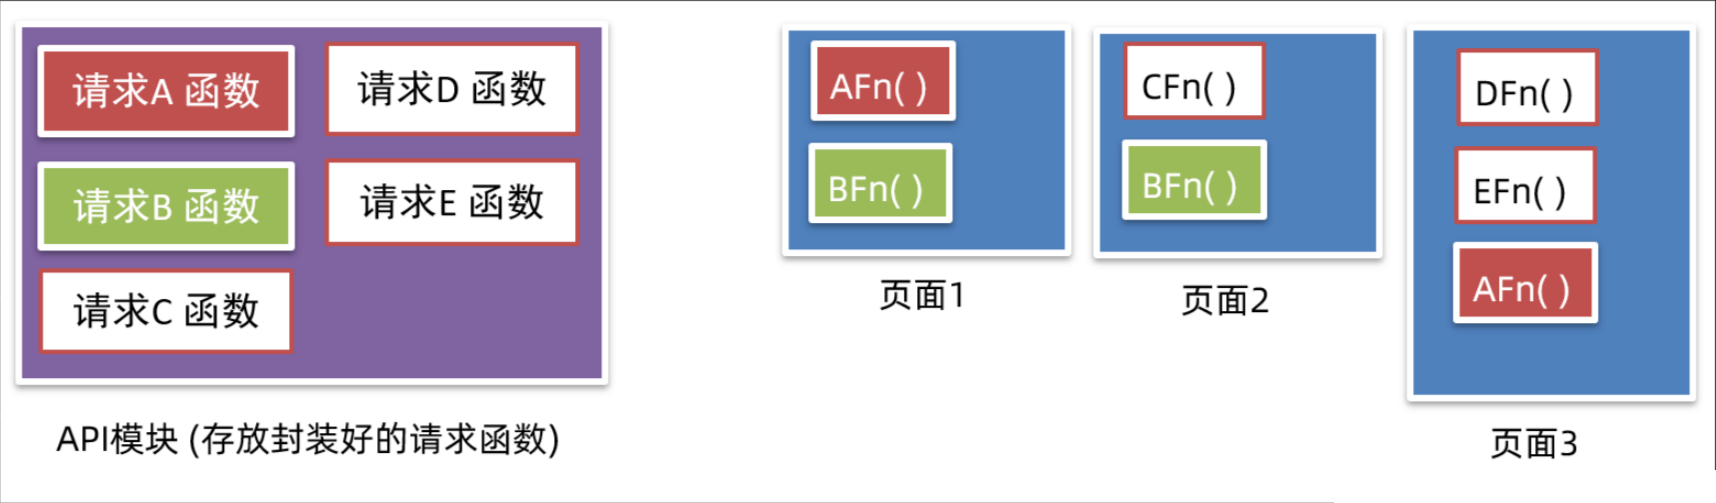
- 请求与页面逻辑分离
- 相同的请求可以直接复用请求
- 进行了统一管理
4.具体实现
新建 api/login.js 提供获取图形验证码 Api 函数
import request from '@/utils/request'// 获取图形验证码
export const getPicCode = () => {return request.get('/captcha/image')
}login/index.vue页面中调用测试
async getPicCode () {const { data: { base64, key } } = await getPicCode()this.picUrl = base64this.picKey = key
},
16. toast 轻提示
https://vant-contrib.gitee.io/vant/v2/#/zh-CN/toast
两种使用方式
- 导入调用 ( 组件内 或 非组件中均可 )
import { Toast } from 'vant';
Toast('提示内容');- 通过this直接调用 ( **组件内 **)
main.js 注册绑定到原型
import {Toast } from 'vant';
Vue.use(Toast)this.$toast('提示内容')17. 短信验证倒计时功能


只要是计时器,一定要记得销毁
(1) 倒计时基础效果
- 准备 data 数据
data () {return {totalSecond: 60, // 总秒数second: 60, // 倒计时的秒数timer: null // 定时器 id}
},- 给按钮注册点击事件
<button @click="getCode">{{ second === totalSecond ? '获取验证码' : second + `秒后重新发送`}}
</button>
- 开启倒计时时
timer赋予id表示已经启用一个定时器了,避免重复启动,设置判断,避免计数器出现负数
async getCode () {if (!this.timer && this.second === this.totalSecond) {// 开启倒计时this.timer = setInterval(() => {this.second--if (this.second < 1) {clearInterval(this.timer)this.timer = nullthis.second = this.totalSecond}}, 1000)// 发送请求,获取验证码this.$toast('发送成功,请注意查收')}
}- 离开页面销毁定时器
destroyed () {clearInterval(this.timer)
}
(2) 验证码请求校验处理
- 输入框 v-model 绑定变量
data () {return {mobile: '', // 手机号picCode: '' // 图形验证码}
},<input v-model="mobile" class="inp" maxlength="11" placeholder="请输入手机号码" type="text">
<input v-model="picCode" class="inp" maxlength="5" placeholder="请输入图形验证码" type="text">- methods中封装校验方法
// 校验输入框内容
validFn () {if (!/^1[3-9]\d{9}$/.test(this.mobile)) {this.$toast('请输入正确的手机号')return false}if (!/^\w{4}$/.test(this.picCode)) {this.$toast('请输入正确的图形验证码')return false}return true
},- 请求倒计时前进行校验
// 获取短信验证码
async getCode () {if (!this.validFn()) {return}...
}
(3) 封装接口,请求获取验证码
- 封装接口
api/login.js
// 获取短信验证码
export const getMsgCode = (captchaCode, captchaKey, mobile) => {return request.post('/captcha/sendSmsCaptcha', {form: {captchaCode,captchaKey,mobile}})
}- 调用接口,添加提示
// 获取短信验证码
async getCode () {if (!this.validFn()) {return}if (!this.timer && this.second === this.totalSecond) {// 发送请求,获取验证码await getMsgCode(this.picCode, this.picKey, this.mobile)this.$toast('发送成功,请注意查收')// 开启倒计时...}
}
18. 封装api接口 - 登录功能
api/login.js 提供登录 Api 函数
// 验证码登录
export const codeLogin = (mobile, smsCode) => {return request.post('/passport/login', {form: {isParty: false,mobile,partyData: {},smsCode}})
}
login/index.vue 登录功能
<input class="inp" v-model="msgCode" maxlength="6" placeholder="请输入短信验证码" type="text">
<div class="login-btn" @click="login">登录</div>
data () {return {msgCode: '',}
},
methods: {async login () {if (!this.validFn()) {return}if (!/^\d{6}$/.test(this.msgCode)) {this.$toast('请输入正确的手机验证码')return}await codeLogin(this.mobile, this.msgCode)this.$router.push('/')this.$toast('登录成功')}
}
19. 响应拦截器统一处理错误提示
响应拦截器是咱们拿到数据的 第一个 “数据流转站”,可以在里面统一处理错误,只要不是 200 默认给提示,抛出错误
utils/request.js
import { Toast } from 'vant'...// 添加响应拦截器
instance.interceptors.response.use(function (response) {// 2xx 范围内的状态码都会触发该函数。// 对响应数据做点什么 (默认axios会多包装一层data,需要响应拦截器中处理一下)const res = response.dataif (res.status !== 200) {// 给错误提示, Toast 默认是单例模式,后面的 Toast调用了,会将前一个 Toast 效果覆盖// 同时只能存在一个 ToastToast(res.message)// 抛出一个错误的promisereturn Promise.reject(res.message)} else {// 正确情况,直接走业务核心逻辑,清除loading效果Toast.clear()}return res
}, function (error) {// 超出 2xx 范围的状态码都会触发该函数。// 对响应错误做点什么return Promise.reject(error)
})
20. 将登录权证信息存入 vuex
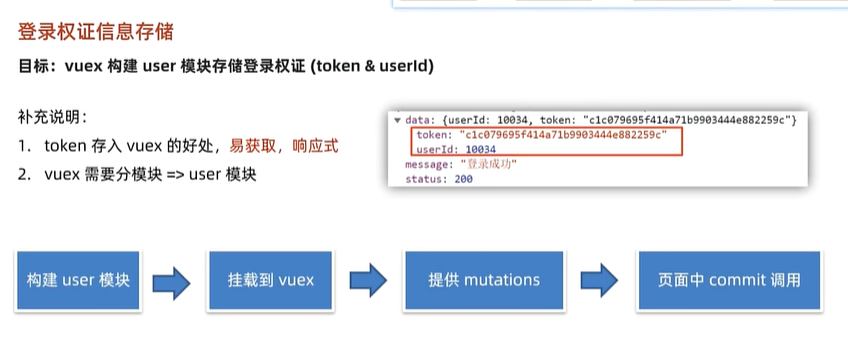
- 新建 vuex user 模块 store/modules/user.js
export default {namespaced: true,state () {return {userInfo: {token: '',userId: ''},}},mutations: {},actions: {}
}- 挂载到 vuex 上
import Vue from 'vue'
import Vuex from 'vuex'
import user from './modules/user'Vue.use(Vuex)export default new Vuex.Store({modules: {user,}
})- 提供 mutations
| 术语 | 用途 | 触发方式 | 是否异步 |
| mutation | 直接修改 state |
| ❌ 必须同步 |
| action | 做异步操作,再提交 mutation |
| ✅ 可以异步 |
mutations: {// 所有mutations的第一个参数,都是statesetUserInfo (state, obj) {state.userInfo = objsetInfo(obj)}},- 页面中 commit 调用
// 登录按钮(校验 & 提交)
async login () {if (!this.validFn()) {return}...const res = await codeLogin(this.mobile, this.msgCode)this.$store.commit('user/setUserInfo', res.data)this.$router.push('/')this.$toast('登录成功')
}
21. vuex持久化处理
- 新建
utils/storage.js封装方法
// 约定一个通用的键名
const INFO_KEY = 'hm_shopping_info'// 获取个人信息
export const getInfo = () => {const result = localStorage.getItem(INFO_KEY)return result ? JSON.parse(result) : {token: '',userId: ''}
}// 设置个人信息
export const setInfo = (info) => {localStorage.setItem(INFO_KEY, JSON.stringify(info))
}// 移除个人信息
export const removeInfo = () => {localStorage.removeItem(INFO_KEY)
}- vuex user 模块持久化处理
import { getInfo, setInfo } from '@/utils/storage'
export default {namespaced: true,state () {return {userInfo: getInfo()}},mutations: {setUserInfo (state, obj) {state.userInfo = objsetInfo(obj)}},actions: {}
}
22. 优化:添加请求 loading 效果
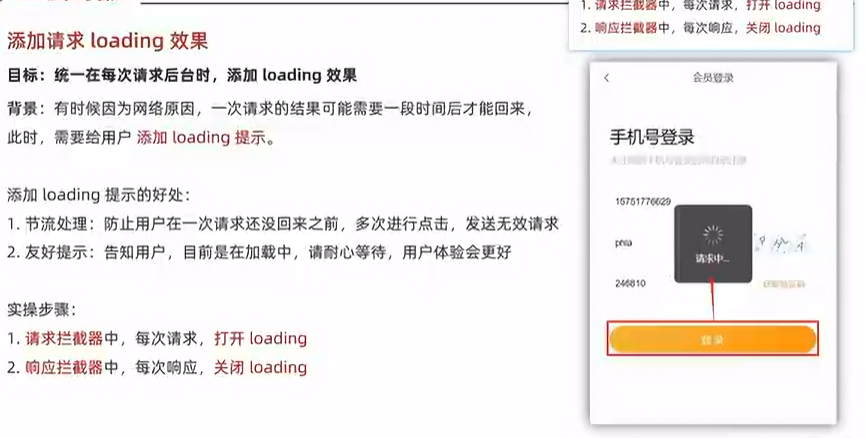
- 请求时,打开 loading
// 添加请求拦截器
request.interceptors.request.use(function (config) {// 在发送请求之前做些什么Toast.loading({message: '加载中...',forbidClick: true, // 禁止背景点击loadingType: 'spinner', // 配置loading图标duration: 0 // 不会自动消失})return config
}, function (error) {// 对请求错误做些什么return Promise.reject(error)
})- 响应时,关闭 loading
// 添加响应拦截器
request.interceptors.response.use(function (response) {const res = response.dataif (res.status !== 200) {Toast(res.message)return Promise.reject(res.message)} else {// 对响应数据做点什么// 正确情况,直接走业务核心逻辑,清除loading效果Toast.clear();}return res
}, function (error) {// 对响应错误做点什么return Promise.reject(error)
})
23. 登录访问拦截 - 路由前置守卫
目标:基于全局前置守卫,进行页面访问拦截处理
说明:智慧商城项目,大部分页面,游客都可以直接访问, 如遇到需要登录才能进行的操作,提示并跳转到登录
但是:对于支付页,订单页等,必须是登录的用户才能访问的,游客不能进入该页面,需要做拦截处理
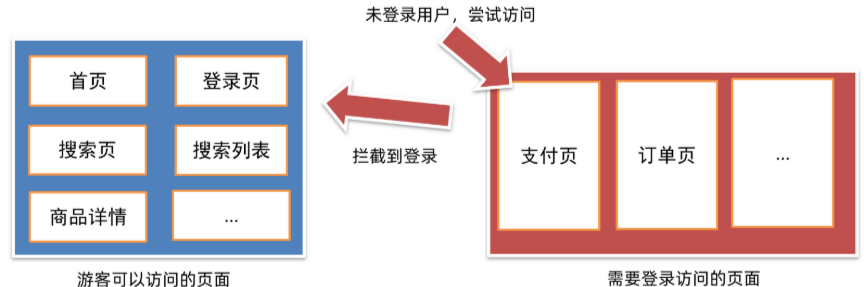
路由导航守卫 - 全局前置守卫
1.所有的路由一旦被匹配到,都会先经过全局前置守卫
2.只有全局前置守卫放行,才会真正解析渲染组件,才能看到页面内容
router.beforeEach((to, from, next) => {// 1. to   往哪里去, 到哪去的路由信息对象  // 2. from 从哪里来, 从哪来的路由信息对象// 3. next() 是否放行//    如果next()调用,就是放行//    next(路径) 拦截到某个路径页面
})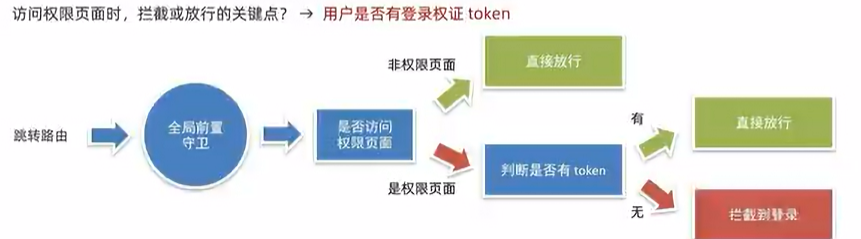
getter 就是 Vuex 的“计算属性”,用来 简化、封装、复用 对 state 的访问
getters: {token (state) {return state.user.userInfo.token}},const authUrl = ['/pay', '/myorder']
router.beforeEach((to, from, next) => {const token = store.getters.token// 看 to.path 是否在 authUrls 中出现过if (!authUrl.includes(to.path)) {// 非权限页面,直接放行next()return}
// 是权限页面,需要判断tokenconst token = store.getters.tokenif (token) {//next()} else {next('/login')}
})24. 首页 - 静态结构准备
- 静态结构和样式
layout/home.vue
<template><div class="home"><!-- 导航条 --><van-nav-bar title="智慧商城" fixed /><!-- 搜索框 --><van-searchreadonlyshape="round"background="#f1f1f2"placeholder="请在此输入搜索关键词"@click="$router.push('/search')"/><!-- 轮播图 --><van-swipe class="my-swipe" :autoplay="3000" indicator-color="white"><van-swipe-item><img src="@/assets/banner1.jpg" alt=""></van-swipe-item><van-swipe-item><img src="@/assets/banner2.jpg" alt=""></van-swipe-item><van-swipe-item><img src="@/assets/banner3.jpg" alt=""></van-swipe-item></van-swipe><!-- 导航 --><van-grid column-num="5" icon-size="40"><van-grid-itemv-for="item in 10" :key="item"icon="http://cba.itlike.com/public/uploads/10001/20230320/58a7c1f62df4cb1eb47fe83ff0e566e6.png"text="新品首发"@click="$router.push('/category')"/></van-grid><!-- 主会场 --><div class="main"><img src="@/assets/main.png" alt=""></div><!-- 猜你喜欢 --><div class="guess"><p class="guess-title">—— 猜你喜欢 ——</p><div class="goods-list"><GoodsItem v-for="item in 10" :key="item"></GoodsItem></div></div></div>
</template>
<script>
import GoodsItem from '@/components/GoodsItem.vue'
export default {name: 'HomePage',components: {GoodsItem}
}
</script>
<style lang="less" scoped>
// 主题 padding
.home {padding-top: 100px;padding-bottom: 50px;
}// 导航条样式定制
.van-nav-bar {z-index: 999;background-color: #c21401;::v-deep .van-nav-bar__title {color: #fff;}
}// 搜索框样式定制
.van-search {position: fixed;width: 100%;top: 46px;z-index: 999;
}// 分类导航部分
.my-swipe .van-swipe-item {height: 185px;color: #fff;font-size: 20px;text-align: center;background-color: #39a9ed;
}
.my-swipe .van-swipe-item img {width: 100%;height: 185px;
}// 主会场
.main img {display: block;width: 100%;
}// 猜你喜欢
.guess .guess-title {height: 40px;line-height: 40px;text-align: center;
}// 商品样式
.goods-list {background-color: #f6f6f6;
}
</style>
- 新建
components/GoodsItem.vue
<template><div class="goods-item" @click="$router.push('/prodetail')"><div class="left"><img src="@/assets/product.jpg" alt="" /></div><div class="right"><p class="tit text-ellipsis-2">三星手机 SAMSUNG Galaxy S23 8GB+256GB 超视觉夜拍系统 超清夜景 悠雾紫5G手机 游戏拍照旗舰机s23</p><p class="count">已售104件</p><p class="price"><span class="new">¥3999.00</span><span class="old">¥6699.00</span></p></div></div>
</template>
<script>
export default {}
</script>
<style lang="less" scoped>
.goods-item {height: 148px;margin-bottom: 6px;padding: 10px;background-color: #fff;display: flex;.left {width: 127px;img {display: block;width: 100%;}}.right {flex: 1;font-size: 14px;line-height: 1.3;padding: 10px;display: flex;flex-direction: column;justify-content: space-evenly;.count {color: #999;font-size: 12px;}.price {color: #999;font-size: 16px;.new {color: #f03c3c;margin-right: 10px;}.old {text-decoration: line-through;font-size: 12px;}}}
}
</style>
- 组件按需引入
import { Search, Swipe, SwipeItem, Grid, GridItem } from 'vant'Vue.use(GridItem)
Vue.use(Search)
Vue.use(Swipe)
Vue.use(SwipeItem)
Vue.use(Grid)
25. 首页 - 动态渲染
- 封装准备接口
api/home.js
import request from '@/utils/request'// 获取首页数据
export const getHomeData = () => {return request.get('/page/detail', {params: {pageId: 0}})
}- 页面中请求调用
import GoodsItem from '@/components/GoodsItem.vue'
import { getHomeData } from '@/api/home'
export default {name: 'HomePage',components: {GoodsItem},data () {return {bannerList: [],navList: [],proList: []}},async created () {const { data: { pageData } } = await getHomeData()this.bannerList = pageData.items[1].datathis.navList = pageData.items[3].datathis.proList = pageData.items[6].data}
}- 轮播图、导航、猜你喜欢渲染
grid-宫格可以在水平方向上把页面分隔成等宽度的区块,用于展示内容或进行页面导航。
<!-- 轮播图 -->
<van-swipe class="my-swipe" :autoplay="3000" indicator-color="white"><van-swipe-item v-for="item in bannerList" :key="item.imgUrl"><img :src="item.imgUrl" alt=""></van-swipe-item>
</van-swipe>
<!-- 导航 -->
<van-grid column-num="5" icon-size="40"><van-grid-itemv-for="item in navList" :key="item.imgUrl":icon="item.imgUrl":text="item.text"@click="$router.push('/category')"/>
</van-grid><!-- 猜你喜欢 -->
<div class="guess"><p class="guess-title">—— 猜你喜欢 ——</p><div class="goods-list"><GoodsItem v-for="item in proList" :item="item" :key="item.goods_id"></GoodsItem></div>
</div>
- 商品组件内,动态渲染
<template><div v-if="item.goods_name" class="goods-item" @click="$router.push(`/prodetail/${item.goods_id}`)"><div class="left"><img :src="item.goods_image" alt="" /></div><div class="right"><p class="tit text-ellipsis-2">{{ item.goods_name }}</p><p class="count">已售 {{ item.goods_sales }}件</p><p class="price"><span class="new">¥{{ item.goods_price_min }}</span><span class="old">¥{{ item.goods_price_max }}</span></p></div></div>
</template>
<script>
export default {props: {item: {type: Object,default: () => {return {}}}}
}
</script>
26. 搜索 - 静态布局准备
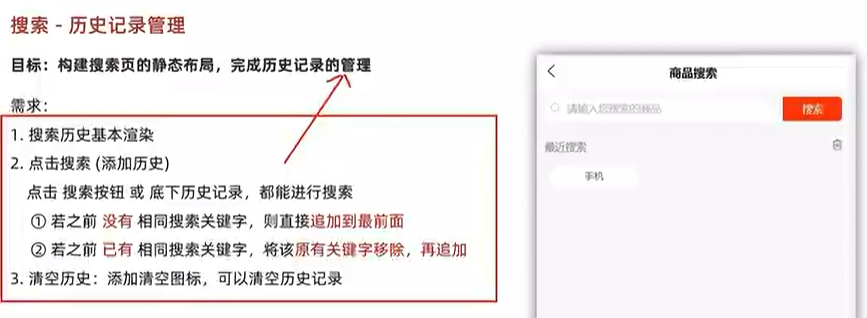
- 静态结构和代码
<template><div class="search"><van-nav-bar title="商品搜索" left-arrow @click-left="$router.go(-1)" /><van-search show-action placeholder="请输入搜索关键词" clearable><template #action> //vant的搜索框原生默认enter进行搜索,自带一个取消,可以自定义加一个搜索按钮<div>搜索</div></template></van-search><!-- 搜索历史 --><div class="search-history"><div class="title"><span>最近搜索</span><van-icon name="delete-o" size="16" /></div><div class="list"><div class="list-item" @click="$router.push('/searchlist')">炒锅</div><div class="list-item" @click="$router.push('/searchlist')">电视</div><div class="list-item" @click="$router.push('/searchlist')">冰箱</div><div class="list-item" @click="$router.push('/searchlist')">手机</div></div></div></div>
</template>
<script>
export default {name: 'SearchIndex'
}
</script>
<style lang="less" scoped>
.search {.searchBtn {background-color: #fa2209;color: #fff;}::v-deep .van-search__action {background-color: #c21401;color: #fff;padding: 0 20px;border-radius: 0 5px 5px 0;margin-right: 10px;}::v-deep .van-icon-arrow-left {color: #333;}.title {height: 40px;line-height: 40px;font-size: 14px;display: flex;justify-content: space-between;align-items: center;padding: 0 15px;}.list {display: flex;justify-content: flex-start;flex-wrap: wrap;padding: 0 10px;gap: 5%;}.list-item {width: 30%;text-align: center;padding: 7px;line-height: 15px;border-radius: 50px;background: #fff;font-size: 13px;border: 1px solid #efefef;overflow: hidden;white-space: nowrap;text-overflow: ellipsis;margin-bottom: 10px;}
}
</style>
- 组件按需导入
import { Icon } from 'vant'
Vue.use(Icon)27. 搜索 - 历史记录 - 基本管理
- data 中提供数据,和搜索框双向绑定 (实时获取用户内容)
data () {return {search: ''}
}<van-search v-model="search" show-action placeholder="请输入搜索关键词" clearable><template #action><div>搜索</div></template>
</van-search>
- 准备假数据,进行基本的历史纪录渲染
data () {return {...history: ['手机', '空调', '白酒', '电视']}
},<div class="search-history" v-if="history.length > 0">...<div class="list"><div v-for="item in history" :key="item" @click="goSearch(item)" class="list-item">{{ item }}</div></div>
</div>
- 点击搜索,或者下面搜索历史按钮,都要进行搜索历史记录更新 (去重,新搜索的内容置顶)
<div @click="goSearch(search)">搜索</div>
<div class="list"><div v-for="item in history" :key="item" @click="goSearch(item)" class="list-item">{{ item }}</div>
</div>
goSearch (key) {const index = this.history.indexOf(key)if (index !== -1) {this.history.splice(index, 1)}this.history.unshift(key)this.$router.push(`/searchlist?search=${key}`)
}去重还有一个办法 new Set 会自动去重
goSearch(key) {this.history.unshift(key); // 1. 把新关键词插到最前this.history = [...new Set(this.history)]; // 2. Set 去重,保持新顺序,把set对象通过...运算符重新转换为数组this.$router.push(`/searchlist?search=${key}`);
}- 清空历史
<van-icon @click="clear" name="delete-o" size="16" />clear () {this.history = []
}28. 搜索 - 历史记录 - 持久化
🎯 常见使用场景
| 场景 | 示例 |
| 保存到 localStorage |
|
| 从 localStorage 读取 |
|
| 发送请求 |
|
| 接收后端 JSON |
|
⚠️ 注意点
- 只能处理 可被 JSON 表示的数据(函数、
undefined、Symbol会自动丢失)。 - 字符串必须是 标准 JSON 格式,否则会抛异常。
✅ 一句话总结
JSON.stringify 把 JS 变成字符串(保存/发送)
JSON.parse 把字符串变回 JS(读取/使用)
- 持久化到本地 - 封装方法
const HISTORY_KEY = 'hm_history_list'// 获取搜索历史
export const getHistoryList = () => {const result = localStorage.getItem(HISTORY_KEY)return result ? JSON.parse(result) : []
}// 设置搜索历史
export const setHistoryList = (arr) => {localStorage.setItem(HISTORY_KEY, JSON.stringify(arr))
}- 页面中调用 - 实现持久化
data () {return {search: '',history: getHistoryList()}
},
methods: {goSearch (key) {...setHistoryList(this.history)this.$router.push(`/searchlist?search=${key}`)},clear () {this.history = []setHistoryList([])this.$toast.success('清空历史成功')}
}29. 搜索列表 - 静态布局
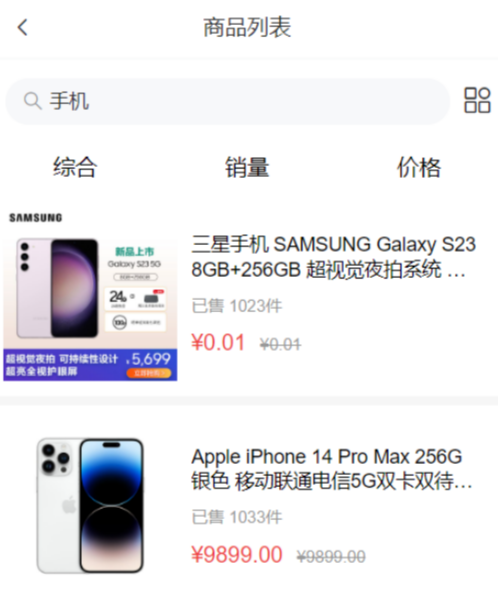
<template><div class="search"><van-nav-bar fixed title="商品列表" left-arrow @click-left="$router.go(-1)" /><van-searchreadonlyshape="round"background="#ffffff":value="querySearch || '搜索商品'"show-action@click="$router.push('/search')"><template #action><van-icon class="tool" name="apps-o" /></template></van-search><!-- 排序选项按钮 --><div class="sort-btns"><div class="sort-item">综合</div><div class="sort-item">销量</div><div class="sort-item">价格 </div></div><div class="goods-list"><GoodsItem v-for="item in proList" :key="item.goods_id" :item="item"></GoodsItem></div></div>
</template><script>
import GoodsItem from '@/components/GoodsItem.vue'
import { getProList } from '@/api/product'
export default {name: 'SearchIndex',components: {GoodsItem},computed: {// 获取地址栏的搜索关键字querySearch () {return this.$route.query.search}},data () {return {page: 1,proList: []}},async created () {const { data: { list } } = await getProList({categoryId: this.$route.query.categoryId,goodsName: this.querySearch,page: this.page})this.proList = list.data}
}
</script><style lang="less" scoped>
.search {padding-top: 46px;::v-deep .van-icon-arrow-left {color: #333;}.tool {font-size: 24px;height: 40px;line-height: 40px;}.sort-btns {display: flex;height: 36px;line-height: 36px;.sort-item {text-align: center;flex: 1;font-size: 16px;}}
}// 商品样式
.goods-list {background-color: #f6f6f6;
}
</style>
30. 搜索列表 - 动态渲染
(1) 搜索关键字搜索
- 计算属性,基于query 解析路由参数
computed: {querySearch () {return this.$route.query.search}
}- 根据不同的情况,设置输入框的值
<van-search...:value="querySearch || '搜索商品'"
></van-search>
api/product.js封装接口,获取搜索商品
import request from '@/utils/request'// 获取搜索商品列表数据
export const getProList = (paramsObj) => {const { categoryId, goodsName, page } = paramsObjreturn request.get('/goods/list', {params: {categoryId,goodsName,page}})
}- 页面中基于 goodsName 发送请求,动态渲染
data () {return {page: 1,proList: []}
},
async created () {const { data: { list } } = await getProList({goodsName: this.querySearch,page: this.page})this.proList = list.data
}<div class="goods-list"><GoodsItem v-for="item in proList" :key="item.goods_id" :item="item"></GoodsItem>
</div>
(2) 分类id搜索
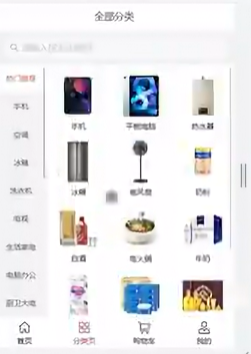
1 封装接口 api/category.js
import request from '@/utils/request'// 获取分类数据
export const getCategoryData = () => {return request.get('/category/list')
}2 分类页静态结构
<template><div class="category"><!-- 分类 --><van-nav-bar title="全部分类" fixed /><!-- 搜索框 --><van-searchreadonlyshape="round"background="#f1f1f2"placeholder="请输入搜索关键词"@click="$router.push('/search')"/><!-- 分类列表 --><div class="list-box"><div class="left"><ul><li v-for="(item, index) in list" :key="item.category_id"><a :class="{ active: index === activeIndex }" @click="activeIndex = index" href="javascript:;">{{ item.name }}</a></li></ul></div><div class="right"><div @click="$router.push(`/searchlist?categoryId=${item.category_id}`)" v-for="item in list[activeIndex]?.children" :key="item.category_id" class="cate-goods"><img :src="item.image?.external_url" alt=""><p>{{ item.name }}</p></div></div></div></div>
</template>
<script>
import { getCategoryData } from '@/api/category'
export default {name: 'CategoryPage',created () {this.getCategoryList()},data () {return {list: [],activeIndex: 0}},methods: {async getCategoryList () {const { data: { list } } = await getCategoryData()this.list = list}}
}
</script>
<style lang="less" scoped>
// 主题 padding
.category {padding-top: 100px;padding-bottom: 50px;height: 100vh;.list-box {height: 100%;display: flex;.left {width: 85px;height: 100%;background-color: #f3f3f3;overflow: auto;a {display: block;height: 45px;line-height: 45px;text-align: center;color: #444444;font-size: 12px;&.active {color: #fb442f;background-color: #fff;}}}.right {flex: 1;height: 100%;background-color: #ffffff;display: flex;flex-wrap: wrap;justify-content: flex-start;align-content: flex-start;padding: 10px 0;overflow: auto;.cate-goods {width: 33.3%;margin-bottom: 10px;img {width: 70px;height: 70px;display: block;margin: 5px auto;}p {text-align: center;font-size: 12px;}}}}
}// 导航条样式定制
.van-nav-bar {z-index: 999;
}// 搜索框样式定制
.van-search {position: fixed;width: 100%;top: 46px;z-index: 999;
}
</style>
3 搜索页,基于分类 ID 请求
async created () {const { data: { list } } = await getProList({categoryId: this.$route.query.categoryId,goodsName: this.querySearch,page: this.page})this.proList = list.data
}31. 商品详情 - 静态布局
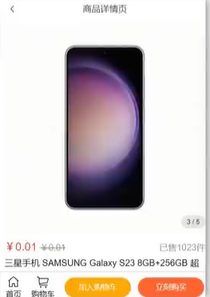
静态结构 和 样式
评分(五星好评)-rate-支持半星
<template><div class="prodetail"><van-nav-bar fixed title="商品详情页" left-arrow @click-left="$router.go(-1)" /><van-swipe :autoplay="3000" @change="onChange"><van-swipe-item v-for="(image, index) in images" :key="index"><img :src="image" /></van-swipe-item><template #indicator><div class="custom-indicator">{{ current + 1 }} / {{ images.length }}</div></template></van-swipe><!-- 商品说明 --><div class="info"><div class="title"><div class="price"><span class="now">¥0.01</span><span class="oldprice">¥6699.00</span></div><div class="sellcount">已售1001件</div></div><div class="msg text-ellipsis-2">三星手机 SAMSUNG Galaxy S23 8GB+256GB 超视觉夜拍系统 超清夜景 悠雾紫 5G手机 游戏拍照旗舰机s23</div><div class="service"><div class="left-words"><span><van-icon name="passed" />七天无理由退货</span><span><van-icon name="passed" />48小时发货</span></div><div class="right-icon"><van-icon name="arrow" /></div></div></div><!-- 商品评价 --><div class="comment"><div class="comment-title"><div class="left">商品评价 (5条)</div><div class="right">查看更多 <van-icon name="arrow" /> </div></div><div class="comment-list"><div class="comment-item" v-for="item in 3" :key="item"><div class="top"><img src="http://cba.itlike.com/public/uploads/10001/20230321/a0db9adb2e666a65bc8dd133fbed7834.png" alt=""><div class="name">神雕大侠</div><van-rate :size="16" :value="5" color="#ffd21e" void-icon="star" void-color="#eee"/></div><div class="content">质量很不错 挺喜欢的</div><div class="time">2023-03-21 15:01:35</div></div></div></div><!-- 商品描述 --><div class="desc"><img src="https://uimgproxy.suning.cn/uimg1/sop/commodity/kHgx21fZMWwqirkMhawkAw.jpg" alt=""><img src="https://uimgproxy.suning.cn/uimg1/sop/commodity/0rRMmncfF0kGjuK5cvLolg.jpg" alt=""><img src="https://uimgproxy.suning.cn/uimg1/sop/commodity/2P04A4Jn0HKxbKYSHc17kw.jpg" alt=""><img src="https://uimgproxy.suning.cn/uimg1/sop/commodity/MT4k-mPd0veQXWPPO5yTIw.jpg" alt=""></div><!-- 底部 --><div class="footer"><div class="icon-home"><van-icon name="wap-home-o" /><span>首页</span></div><div class="icon-cart"><van-icon name="shopping-cart-o" /><span>购物车</span></div><div class="btn-add">加入购物车</div><div class="btn-buy">立刻购买</div></div></div>
</template>
<script>
export default {name: 'ProDetail',data () {return {images: ['https://img01.yzcdn.cn/vant/apple-1.jpg','https://img01.yzcdn.cn/vant/apple-2.jpg'],current: 0}},methods: {onChange (index) {this.current = index}}
}
</script>
<style lang="less" scoped>
.prodetail {padding-top: 46px;::v-deep .van-icon-arrow-left {color: #333;}img {display: block;width: 100%;}.custom-indicator {position: absolute;right: 10px;bottom: 10px;padding: 5px 10px;font-size: 12px;background: rgba(0, 0, 0, 0.1);border-radius: 15px;}.desc {width: 100%;overflow: scroll;::v-deep img {display: block;width: 100%!important;}}.info {padding: 10px;}.title {display: flex;justify-content: space-between;.now {color: #fa2209;font-size: 20px;}.oldprice {color: #959595;font-size: 16px;text-decoration: line-through;margin-left: 5px;}.sellcount {color: #959595;font-size: 16px;position: relative;top: 4px;}}.msg {font-size: 16px;line-height: 24px;margin-top: 5px;}.service {display: flex;justify-content: space-between;line-height: 40px;margin-top: 10px;font-size: 16px;background-color: #fafafa;.left-words {span {margin-right: 10px;}.van-icon {margin-right: 4px;color: #fa2209;}}}.comment {padding: 10px;}.comment-title {display: flex;justify-content: space-between;.right {color: #959595;}}.comment-item {font-size: 16px;line-height: 30px;.top {height: 30px;display: flex;align-items: center;margin-top: 20px;img {width: 20px;height: 20px;}.name {margin: 0 10px;}}.time {color: #999;}}.footer {position: fixed;left: 0;bottom: 0;width: 100%;height: 55px;background-color: #fff;border-top: 1px solid #ccc;display: flex;justify-content: space-evenly;align-items: center;.icon-home, .icon-cart {display: flex;flex-direction: column;align-items: center;justify-content: center;font-size: 14px;.van-icon {font-size: 24px;}}.btn-add,.btn-buy {height: 36px;line-height: 36px;width: 120px;border-radius: 18px;background-color: #ffa900;text-align: center;color: #fff;font-size: 14px;}.btn-buy {background-color: #fe5630;}}
}.tips {padding: 10px;
}
</style>
Lazyload 是 Vue 指令,使用前需要对指令进行注册。
import { Lazyload } from 'vant'
Vue.use(Lazyload)32. 商品详情 - 动态渲染介绍
- 动态路由参数,获取商品 id
computed: {goodsId () {return this.$route.params.id}
},- 封装 api 接口
api/product.js
// 获取商品详情数据
export const getProDetail = (goodsId) => {return request.get('/goods/detail', {params: {goodsId}})
}- 一进入页面发送请求,获取商品详情数据
data () {return {images: ['https://img01.yzcdn.cn/vant/apple-1.jpg','https://img01.yzcdn.cn/vant/apple-2.jpg'],current: 0,detail: {},}
},async created () {this.getDetail()
},methods: {...async getDetail () {const { data: { detail } } = await getProDetail(this.goodsId)this.detail = detailthis.images = detail.goods_images}
}- 动态渲染
<div class="prodetail" v-if="detail.goods_name"><van-swipe :autoplay="3000" @change="onChange"><van-swipe-item v-for="(image, index) in images" :key="index"><img v-lazy="image.external_url" /></van-swipe-item><template #indicator><div class="custom-indicator">{{ current + 1 }} / {{ images.length }}</div></template>
</van-swipe>
<!-- 商品说明 -->
<div class="info"><div class="title"><div class="price"><span class="now">¥{{ detail.goods_price_min }}</span><span class="oldprice">¥{{ detail.goods_price_max }}</span></div><div class="sellcount">已售{{ detail.goods_sales }}件</div></div><div class="msg text-ellipsis-2">{{ detail.goods_name }}</div><div class="service"><div class="left-words"><span><van-icon name="passed" />七天无理由退货</span><span><van-icon name="passed" />48小时发货</span></div><div class="right-icon"><van-icon name="arrow" /></div></div>
</div>
<!-- 商品描述 -->
<div class="tips">商品描述</div>
<div class="desc" v-html="detail.content"></div>
33. 商品详情 - 动态渲染评价
- 封装接口
api/product.js
// 获取商品评价
export const getProComments = (goodsId, limit) => {return request.get('/comment/listRows', {params: {goodsId,limit}})
}- 页面调用获取数据
import defaultImg from '@/assets/default-avatar.png'data () {return {...total: 0,commentList: [],defaultImg
},async created () {...this.getComments()
},async getComments () {const { data: { list, total } } = await getProComments(this.goodsId, 3)this.commentList = listthis.total = total
},- 动态渲染评价
<!-- 商品评价 -->
<div class="comment" v-if="total > 0"><div class="comment-title"><div class="left">商品评价 ({{ total }}条)</div><div class="right">查看更多 <van-icon name="arrow" /> </div></div><div class="comment-list"><div class="comment-item" v-for="item in commentList" :key="item.comment_id"><div class="top"><img :src="item.user.avatar_url || defaultImg" alt=""><div class="name">{{ item.user.nick_name }}</div><van-rate :size="16" :value="item.score / 2" color="#ffd21e" void-icon="star" void-color="#eee"/></div><div class="content">{{ item.content }}</div><div class="time">{{ item.create_time }}</div></div> </div>
</div>
34. 加入购物车 - 唤起弹窗
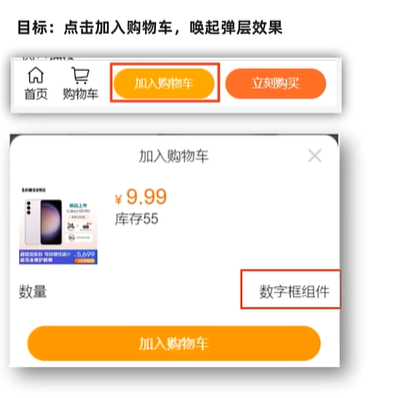
- 按需导入 van-action-sheet-实现弹层效果
import { ActionSheet } from 'vant'
Vue.use(ActionSheet)- 准备 van-action-sheet 基本结构
<van-action-sheet v-model="showPannel" :title="mode === 'cart' ? '加入购物车' : '立刻购买'">111
</van-action-sheet>data () {return {...mode: 'cart'showPannel: false}
},- 注册点击事件,点击时唤起弹窗
<div class="btn-add" @click="addFn">加入购物车</div>
<div class="btn-buy" @click="buyFn">立刻购买</div>
addFn () {this.mode = 'cart'this.showPannel = true
},
buyFn () {this.mode = 'buyNow'this.showPannel = true
}- 完善结构
<van-action-sheet v-model="showPannel" :title="mode === 'cart' ? '加入购物车' : '立刻购买'"><div class="product"><div class="product-title"><div class="left"><img src="http://cba.itlike.com/public/uploads/10001/20230321/8f505c6c437fc3d4b4310b57b1567544.jpg" alt=""></div><div class="right"><div class="price"><span>¥</span><span class="nowprice">9.99</span></div><div class="count"><span>库存</span><span>55</span></div></div></div><div class="num-box"><span>数量</span>数字框占位</div><div class="showbtn" v-if="true"><div class="btn" v-if="true">加入购物车</div><div class="btn now" v-else>立刻购买</div></div><div class="btn-none" v-else>该商品已抢完</div></div>
</van-action-sheet>
.product {.product-title {display: flex;.left {img {width: 90px;height: 90px;}margin: 10px;}.right {flex: 1;padding: 10px;.price {font-size: 14px;color: #fe560a;.nowprice {font-size: 24px;margin: 0 5px;}}}}.num-box {display: flex;justify-content: space-between;padding: 10px;align-items: center;}.btn, .btn-none {height: 40px;line-height: 40px;margin: 20px;border-radius: 20px;text-align: center;color: rgb(255, 255, 255);background-color: rgb(255, 148, 2);}.btn.now {background-color: #fe5630;}.btn-none {background-color: #cccccc;}
}- 动态渲染
<van-action-sheet v-model="showPannel" :title="mode === 'cart' ? '加入购物车' : '立刻购买'"><div class="product"><div class="product-title"><div class="left"><img :src="detail.goods_image" alt=""></div><div class="right"><div class="price"><span>¥</span><span class="nowprice">{{ detail.goods_price_min }}</span></div><div class="count"><span>库存</span><span>{{ detail.stock_total }}</span></div></div></div><div class="num-box"><span>数量</span>数字框组件</div><div class="showbtn" v-if="detail.stock_total > 0"><div class="btn" v-if="mode === 'cart'">加入购物车</div><div class="btn now" v-if="mode === 'buyNow'">立刻购买</div></div><div class="btn-none" v-else>该商品已抢完</div></div>
</van-action-sheet>
35. 加入购物车 - 封装数字框组件
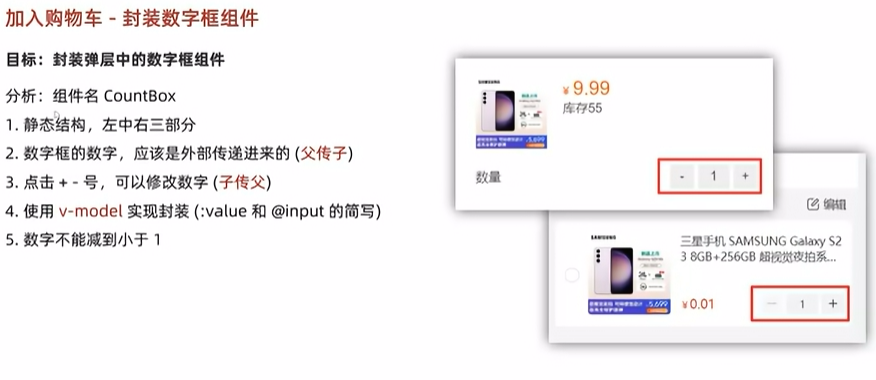
只要遇到父组件传递数值给子组件,但是子组件有需要更改这个数值的,第一反应想到v-model
- 封装组件
components/CountBox.vue
<template><div class="count-box"><button @click="handleSub" class="minus">-</button><input :value="value" @change="handleChange" class="inp" type="text"><button @click="handleAdd" class="add">+</button></div>
</template><script>
export default {props: {value: {type: Number,default: 1}},methods: {handleSub () {if (this.value <= 1) {return}this.$emit('input', this.value - 1)},handleAdd () {this.$emit('input', this.value + 1)},handleChange (e) {// console.log(e.target.value)const num = +e.target.value // 转数字处理 (1) 数字 (2) NaN// 输入了不合法的文本 或 输入了负值,回退成原来的 value 值if (isNaN(num) || num < 1) {e.target.value = this.valuereturn}this.$emit('input', num)}}
}
</script><style lang="less" scoped>
.count-box {width: 110px;display: flex;.add, .minus {width: 30px;height: 30px;outline: none;border: none;background-color: #efefef;}.inp {width: 40px;height: 30px;outline: none;border: none;margin: 0 5px;background-color: #efefef;text-align: center;}
}
</style>
- 使用组件
import CountBox from '@/components/CountBox.vue'export default {name: 'ProDetail',components: {CountBox},data () {return {addCount: 1...}},
}<div class="num-box"><span>数量</span><CountBox v-model="addCount"></CountBox>
</div>
36. 加入购物车 - 判断 token 登录提示
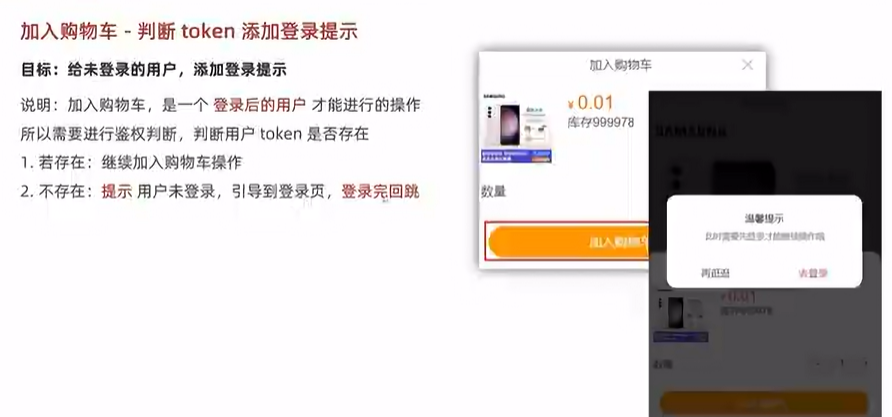
说明:加入购物车,是一个登录后的用户才能进行的操作,所以需要进行鉴权判断,判断用户 token 是否存在
- 若存在:继续加入购物车操作
- 不存在:提示用户未登录,引导到登录页
- 按需注册 dialog 组件
import { Dialog } from 'vant'
Vue.use(Dialog)- 按钮注册点击事件
<div class="btn" v-if="mode === 'cart'" @click="addCart">加入购物车</div>
- 添加 token 鉴权判断,跳转携带回跳地址
点击确认按钮进入then函数,取消进入catch函数
async addCart () {// 判断用户是否有登录if (!this.$store.getters.token) {this.$dialog.confirm({title: '温馨提示',message: '此时需要先登录才能继续操作哦',confirmButtonText: '去登录',cancelButtonText: '再逛逛'}).then(() => {//这里不要用push,因为会保留之前的页面,所以要用replacethis.$router.replace({path: '/login',//把当前完整路径 this.$route.fullPath 作为 backUrl 传过去。这样登录成功后就能直接回到刚才想加购的商品页面。query: {backUrl: this.$route.fullPath}})}).catch(() => {})return}console.log('进行加入购物车操作')
}- 登录后,若有回跳地址,则回跳页面
// 判断有无回跳地址
// 1. 如果有 => 说明是其他页面,拦截到登录来的,需要回跳
// 2. 如果没有 => 正常去首页
const url = this.$route.query.backUrl || '/'
//这里不要用push,因为会保留之前的页面,所以要用replace
this.$router.replace(url)37. 加入购物车 - 封装接口进行请求

- 封装接口
api/cart.js
// 加入购物车
export const addCart = (goodsId, goodsNum, goodsSkuId) => {return request.post('/cart/add', {goodsId,goodsNum,goodsSkuId})
}- 页面中调用请求
data () {return {cartTotal: 0}
},async addCart () {...const { data } = await addCart(this.goodsId, this.addCount, this.detail.skuList[0].goods_sku_id)this.cartTotal = data.cartTotalthis.$toast('加入购物车成功')this.showPannel = false
},
- 请求拦截器中,统一携带 token
// 自定义配置 - 请求/响应 拦截器
// 添加请求拦截器
instance.interceptors.request.use(function (config) {...const token = store.getters.tokenif (token) {config.headers['Access-Token'] = tokenconfig.headers.platform = 'H5'}return config
}, function (error) {// 对请求错误做些什么return Promise.reject(error)
})- 准备小图标
<div class="icon-cart"><span v-if="cartTotal > 0" class="num">{{ cartTotal }}</span><van-icon name="shopping-cart-o" /><span>购物车</span>
</div>
- 定制样式
.footer .icon-cart {position: relative;padding: 0 6px;.num {z-index: 999;position: absolute;top: -2px;right: 0;min-width: 16px;padding: 0 4px;color: #fff;text-align: center;background-color: #ee0a24;border-radius: 50%;}
}38. 购物车 - 静态布局
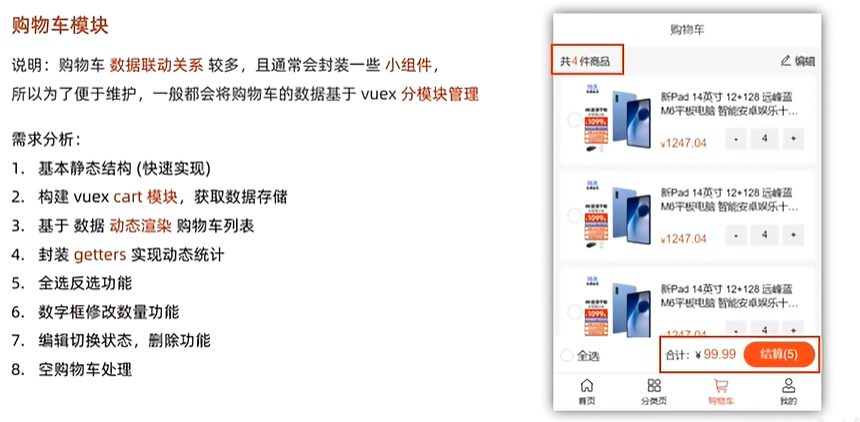
- 基本结构
<template><div class="cart"><van-nav-bar title="购物车" fixed /><!-- 购物车开头 --><div class="cart-title"><span class="all">共<i>4</i>件商品</span><span class="edit"><van-icon name="edit" />编辑</span></div><!-- 购物车列表 --><div class="cart-list"><div class="cart-item" v-for="item in 10" :key="item"><van-checkbox></van-checkbox><div class="show"><img src="http://cba.itlike.com/public/uploads/10001/20230321/a072ef0eef1648a5c4eae81fad1b7583.jpg" alt=""></div><div class="info"><span class="tit text-ellipsis-2">新Pad 14英寸 12+128 远峰蓝 M6平板电脑 智能安卓娱乐十核游戏学习二合一 低蓝光护眼超清4K全面三星屏5GWIFI全网通 蓝魔快本平板</span><span class="bottom"><div class="price">¥ <span>1247.04</span></div><div class="count-box"><button class="minus">-</button><input class="inp" :value="4" type="text" readonly><button class="add">+</button></div></span></div></div></div><div class="footer-fixed"><div class="all-check"><van-checkbox icon-size="18"></van-checkbox>全选</div><div class="all-total"><div class="price"><span>合计:</span><span>¥ <i class="totalPrice">99.99</i></span></div><div v-if="true" class="goPay">结算(5)</div><div v-else class="delete">删除</div></div></div></div>
</template>
<script>
export default {name: 'CartPage'
}
</script>
<style lang="less" scoped>
// 主题 padding
.cart {padding-top: 46px;padding-bottom: 100px;background-color: #f5f5f5;min-height: 100vh;.cart-title {height: 40px;display: flex;justify-content: space-between;align-items: center;padding: 0 10px;font-size: 14px;.all {i {font-style: normal;margin: 0 2px;color: #fa2209;font-size: 16px;}}.edit {.van-icon {font-size: 18px;}}}.cart-item {margin: 0 10px 10px 10px;padding: 10px;display: flex;justify-content: space-between;background-color: #ffffff;border-radius: 5px;.show img {width: 100px;height: 100px;}.info {width: 210px;padding: 10px 5px;font-size: 14px;display: flex;flex-direction: column;justify-content: space-between;.bottom {display: flex;justify-content: space-between;.price {display: flex;align-items: flex-end;color: #fa2209;font-size: 12px;span {font-size: 16px;}}.count-box {display: flex;width: 110px;.add,.minus {width: 30px;height: 30px;outline: none;border: none;}.inp {width: 40px;height: 30px;outline: none;border: none;background-color: #efefef;text-align: center;margin: 0 5px;}}}}}
}.footer-fixed {position: fixed;left: 0;bottom: 50px;height: 50px;width: 100%;border-bottom: 1px solid #ccc;background-color: #fff;display: flex;justify-content: space-between;align-items: center;padding: 0 10px;.all-check {display: flex;align-items: center;.van-checkbox {margin-right: 5px;}}.all-total {display: flex;line-height: 36px;.price {font-size: 14px;margin-right: 10px;.totalPrice {color: #fa2209;font-size: 18px;font-style: normal;}}.goPay, .delete {min-width: 100px;height: 36px;line-height: 36px;text-align: center;background-color: #fa2f21;color: #fff;border-radius: 18px;&.disabled {background-color: #ff9779;}}}}
</style>
- 按需导入组件
import { Checkbox } from 'vant'
Vue.use(Checkbox)39. 购物车 - 构建 vuex 模块 - 获取数据存储
- 新建
modules/cart.js模块
export default {namespaced: true,state () {return {cartList: []}},mutations: {},actions: {},getters: {}
}- 挂载到 store 上面
import Vue from 'vue'
import Vuex from 'vuex'
import user from './modules/user'
import cart from './modules/cart'Vue.use(Vuex)export default new Vuex.Store({getters: {token: state => state.user.userInfo.token},modules: {user,cart}
})- 封装 API 接口
api/cart.js
// 获取购物车列表数据
export const getCartList = () => {return request.get('/cart/list')
}- 封装 action 和 mutation
mutation支持同步,一定不要记错
mutations: {setCartList (state, newList) {state.cartList = newList},
},
actions: {async getCartAction (context) {const { data } = await getCartList()data.list.forEach(item => {item.isChecked = true})context.commit('setCartList', data.list)}
},- 页面中 dispatch 调用
computed: {isLogin () {return this.$store.getters.token}
},
created () {if (this.isLogin) {this.$store.dispatch('cart/getCartAction')}
},40. 购物车 - mapState - 渲染购物车列表
- 将数据映射到页面
import { mapState } from 'vuex'computed: {...mapState('cart', ['cartList'])
}- 动态渲染
记住不能和vuex进行双向绑定,所以不能用v-model,只能用:value
<!-- 购物车列表 -->
<div class="cart-list"><div class="cart-item" v-for="item in cartList" :key="item.goods_id"><van-checkbox icon-size="18" :value="item.isChecked"></van-checkbox><div class="show" @click="$router.push(`/prodetail/${item.goods_id}`)"><img :src="item.goods.goods_image" alt=""></div><div class="info"><span class="tit text-ellipsis-2">{{ item.goods.goods_name }}</span><span class="bottom"><div class="price">¥ <span>{{ item.goods.goods_price_min }}</span></div><CountBox :value="item.goods_num"></CountBox></span></div></div>
</div>
41. 购物车 - 封装 getters - 动态计算展示
- 封装 getters:商品总数 / 选中的商品列表 / 选中的商品总数 / 选中的商品总价
getters: {cartTotal (state) {return state.cartList.reduce((sum, item, index) => sum + item.goods_num, 0)},selCartList (state) {return state.cartList.filter(item => item.isChecked)},//支持第二个参数设为getters,来达到getters使用其他getters的目的selCount (state, getters) {return getters.selCartList.reduce((sum, item, index) => sum + item.goods_num, 0)},selPrice (state, getters) {return getters.selCartList.reduce((sum, item, index) => {return sum + item.goods_num * item.goods.goods_price_min}, 0).toFixed(2) //保留两位小数}
}- 页面中 mapGetters 映射使用
computed: {...mapGetters('cart', ['cartTotal', 'selCount', 'selPrice']),
},<!-- 购物车开头 -->
<div class="cart-title"><span class="all">共<i>{{ cartTotal || 0 }}</i>件商品</span><span class="edit"><van-icon name="edit" />编辑</span>
</div><div class="footer-fixed"><div class="all-check"><van-checkbox icon-size="18"></van-checkbox>全选</div><div class="all-total"><div class="price"><span>合计:</span><span>¥ <i class="totalPrice">{{ selPrice }}</i></span></div><div v-if="true" :class="{ disabled: selCount === 0 }" class="goPay">结算({{ selCount }})</div><div v-else :class="{ disabled: selCount === 0 }" class="delete">删除({{ selCount }})</div></div>
</div>
42. 购物车 - 全选反选功能
- 全选 getters
getters: {isAllChecked (state) {return state.cartList.every(item => item.isChecked)}
}...mapGetters('cart', ['isAllChecked']),<div class="all-check"><van-checkbox :value="isAllChecked" icon-size="18"></van-checkbox>全选
</div>
- 点击小选,修改状态
<van-checkbox @click="toggleCheck(item.goods_id)" ...></van-checkbox>toggleCheck (goodsId) {this.$store.commit('cart/toggleCheck', goodsId)
},mutations: {toggleCheck (state, goodsId) {//找到要更改的状态的元素const goods = state.cartList.find(item => item.goods_id === goodsId)goods.isChecked = !goods.isChecked},
}- 点击全选,重置状态
every是 JavaScript 数组的一个方法,它会检查数组中的每个元素是否都满足指定的条件。- 如果数组中的每个元素都满足条件,
every方法返回true;否则返回false。
<div @click="toggleAllCheck" class="all-check"><van-checkbox :value="isAllChecked" icon-size="18"></van-checkbox>全选
</div>
toggleAllCheck () {this.$store.commit('cart/toggleAllCheck', !this.isAllChecked)
},mutations: {toggleAllCheck (state, flag) {// 让所有的小选框,同步设置state.cartList.forEach(item => {item.isChecked = flag})},
},getters: {// 是否全选isAllChecked (state) {return state.cartList.every(item => item.isChecked)}43. 购物车 - 数字框修改数量
- 封装 api 接口
// 更新购物车商品数量
export const changeCount = (goodsId, goodsNum, goodsSkuId) => {return request.post('/cart/update', {goodsId,goodsNum,goodsSkuId})
}- 页面中注册点击事件,传递数据
<CountBox :value="item.goods_num" @input="value => changeCount(value, item.goods_id, item.goods_sku_id)"></CountBox>
changeCount (value, goodsId, skuId) {this.$store.dispatch('cart/changeCountAction', {value,goodsId,skuId})
},- 提供 action 发送请求, commit mutation
mutations: {changeCount (state, { goodsId, value }) {const obj = state.cartList.find(item => item.goods_id === goodsId)obj.goods_num = value}
},
actions: {async changeCountAction (context, obj) {const { goodsId, value, skuId } = objcontext.commit('changeCount', {goodsId,value})await changeCount(goodsId, value, skuId)},
}44. 购物车 - 编辑切换状态
- data 提供数据, 定义是否在编辑删除的状态
data () {return {isEdit: false}
},- 注册点击事件,修改状态
<span class="edit" @click="isEdit = !isEdit"><van-icon name="edit" />编辑
</span>
- 底下按钮根据状态变化,用 v-if v-else来变化
<div v-if="!isEdit" :class="{ disabled: selCount === 0 }" class="goPay">去结算({{ selCount }})
</div>
<div v-else :class="{ disabled: selCount === 0 }" class="delete">删除</div>
- 监视编辑状态,动态控制复选框状态(结算默认全选,删除默认全不选)
watch: {//value是isEdit变化的值isEdit (value) {if (value) {this.$store.commit('cart/toggleAllCheck', false)} else {this.$store.commit('cart/toggleAllCheck', true)}}
}45. 购物车 - 删除功能完成
- 查看接口,封装 API ( 注意:此处 id 为获取回来的购物车数据的 id )
// 删除购物车
export const delSelect = (cartIds) => {return request.post('/cart/clear', {cartIds})
}- 注册删除点击事件
<div v-else :class="{ disabled: selCount === 0 }" @click="handleDel" class="delete">删除({{ selCount }})
</div>
async handleDel () {if (this.selCount === 0) returnawait this.$store.dispatch('cart/delSelect')this.isEdit = false
},- 提供 actions
actions: {// 删除购物车数据async delSelect (context) {//这里再次强调,content代表的就是当前文件的上下文,所以直接 context.getters就可以访问到当前文件的gettersconst selCartList = context.getters.selCartListconst cartIds = selCartList.map(item => item.id)await delSelect(cartIds)Toast('删除成功')// 重新拉取最新的购物车数据 (重新渲染)context.dispatch('getCartAction')}
},46. 购物车 - 空购物车处理
- 外面包个大盒子,添加 v-if 判断
<div class="cart-box" v-if="isLogin && cartList.length > 0"><!-- 购物车开头 --><div class="cart-title">...</div><!-- 购物车列表 --><div class="cart-list">...</div><div class="footer-fixed">...</div>
</div>
<div class="empty-cart" v-else><img src="@/assets/empty.png" alt=""><div class="tips">您的购物车是空的, 快去逛逛吧</div><div class="btn" @click="$router.push('/')">去逛逛</div>
</div>
- 相关样式
.empty-cart {padding: 80px 30px;img {width: 140px;height: 92px;display: block;margin: 0 auto;}.tips {text-align: center;color: #666;margin: 30px;}.btn {width: 110px;height: 32px;line-height: 32px;text-align: center;background-color: #fa2c20;border-radius: 16px;color: #fff;display: block;margin: 0 auto;}
}47. 订单结算台
所谓的 “立即结算”,本质就是跳转到订单结算台,并且跳转的同时,需要携带上对应的订单参数。
而具体需要哪些参数,就需要基于 【订单结算台】 的需求来定。
(1) 静态布局
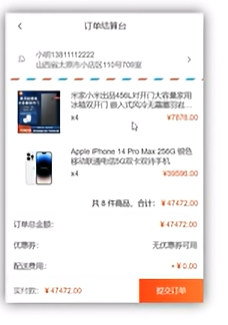
准备静态页面
<template><div class="pay"><van-nav-bar fixed title="订单结算台" left-arrow @click-left="$router.go(-1)" /><!-- 地址相关 --><div class="address"><div class="left-icon"><van-icon name="logistics" /></div><div class="info" v-if="true"><div class="info-content"><span class="name">小红</span><span class="mobile">13811112222</span></div><div class="info-address">江苏省 无锡市 南长街 110号 504</div></div><div class="info" v-else>请选择配送地址</div><div class="right-icon"><van-icon name="arrow" /></div></div><!-- 订单明细 --><div class="pay-list"><div class="list"><div class="goods-item"><div class="left"><img src="http://cba.itlike.com/public/uploads/10001/20230321/8f505c6c437fc3d4b4310b57b1567544.jpg" alt="" /></div><div class="right"><p class="tit text-ellipsis-2">三星手机 SAMSUNG Galaxy S23 8GB+256GB 超视觉夜拍系统 超清夜景 悠雾紫 5G手机 游戏拍照旗舰机s23</p><p class="info"><span class="count">x3</span><span class="price">¥9.99</span></p></div></div></div><div class="flow-num-box"><span>共 12 件商品,合计:</span><span class="money">¥1219.00</span></div><div class="pay-detail"><div class="pay-cell"><span>订单总金额:</span><span class="red">¥1219.00</span></div><div class="pay-cell"><span>优惠券:</span><span>无优惠券可用</span></div><div class="pay-cell"><span>配送费用:</span><span v-if="false">请先选择配送地址</span><span v-else class="red">+¥0.00</span></div></div><!-- 支付方式 --><div class="pay-way"><span class="tit">支付方式</span><div class="pay-cell"><span><van-icon name="balance-o" />余额支付(可用 ¥ 999919.00 元)</span><!-- <span>请先选择配送地址</span> --><span class="red"><van-icon name="passed" /></span></div></div><!-- 买家留言 --><div class="buytips"><textarea placeholder="选填:买家留言(50字内)" name="" id="" cols="30" rows="10"></textarea></div></div><!-- 底部提交 --><div class="footer-fixed"><div class="left">实付款:<span>¥999919</span></div><div class="tipsbtn">提交订单</div></div></div>
</template>
<script>
export default {name: 'PayIndex',data () {return {}},methods: {}
}
</script>
<style lang="less" scoped>
.pay {padding-top: 46px;padding-bottom: 46px;::v-deep {.van-nav-bar__arrow {color: #333;}}
}
.address {display: flex;align-items: center;justify-content: flex-start;padding: 20px;font-size: 14px;color: #666;position: relative;background: url(@/assets/border-line.png) bottom repeat-x;background-size: 60px auto;.left-icon {margin-right: 20px;}.right-icon {position: absolute;right: 20px;top: 50%;transform: translateY(-7px);}
}
.goods-item {height: 100px;margin-bottom: 6px;padding: 10px;background-color: #fff;display: flex;.left {width: 100px;img {display: block;width: 80px;margin: 10px auto;}}.right {flex: 1;font-size: 14px;line-height: 1.3;padding: 10px;padding-right: 0px;display: flex;flex-direction: column;justify-content: space-evenly;color: #333;.info {margin-top: 5px;display: flex;justify-content: space-between;.price {color: #fa2209;}}}
}.flow-num-box {display: flex;justify-content: flex-end;padding: 10px 10px;font-size: 14px;border-bottom: 1px solid #efefef;.money {color: #fa2209;}
}.pay-cell {font-size: 14px;padding: 10px 12px;color: #333;display: flex;justify-content: space-between;.red {color: #fa2209;}
}
.pay-detail {border-bottom: 1px solid #efefef;
}.pay-way {font-size: 14px;padding: 10px 12px;border-bottom: 1px solid #efefef;color: #333;.tit {line-height: 30px;}.pay-cell {padding: 10px 0;}.van-icon {font-size: 20px;margin-right: 5px;}
}.buytips {display: block;textarea {display: block;width: 100%;border: none;font-size: 14px;padding: 12px;height: 100px;}
}.footer-fixed {position: fixed;background-color: #fff;left: 0;bottom: 0;width: 100%;height: 46px;line-height: 46px;border-top: 1px solid #efefef;font-size: 14px;display: flex;.left {flex: 1;padding-left: 12px;color: #666;span {color:#fa2209;}}.tipsbtn {width: 121px;background: linear-gradient(90deg,#f9211c,#ff6335);color: #fff;text-align: center;line-height: 46px;display: block;font-size: 14px;}
}
</style>
(2) 获取收货地址列表
1 封装获取地址的接口
import request from '@/utils/request'// 获取地址列表
export const getAddressList = () => {return request.get('/address/list')
}2 页面中 - 调用获取地址
data () {return {addressList: []}
},
computed: {selectAddress () {// 这里地址管理不是主线业务,直接获取默认第一条地址return this.addressList[0] }
},
async created () {this.getAddressList()
},
methods: {async getAddressList () {const { data: { list } } = await getAddressList()this.addressList = list}
}3 页面中 - 进行渲染
?.(可选链操作符):用于安全地访问嵌套属性,避免因中间属性为null或undefined而抛出错误。!(非空断言操作符):用于告诉编译器某个变量或属性在运行时不会是null或undefined,主要用于 TypeScript 中。
computed: {longAddress () {const region = this.selectAddress.regionreturn region.province + region.city + region.region + this.selectAddress.detail}
},<div class="info" v-if="selectAddress?.address_id"><div class="info-content"><span class="name">{{ selectAddress.name }}</span><span class="mobile">{{ selectAddress.phone }}</span></div><div class="info-address">{{ longAddress }}</div>
</div>
(3) 订单结算 - 封装通用接口
**思路分析:**这里的订单结算,有两种情况:
- 购物车结算,需要两个参数① mode=“cart”② cartIds=“cartId, cartId”
- 页面上的立即购买 结算,需要三个参数① mode=“buyNow”② goodsId=“商品id”③ goodsSkuId=“商品skuId”
都需要跳转时将参数传递过来
封装通用 API 接口 api/order
import request from '@/utils/request'export const checkOrder = (mode, obj) => {return request.get('/checkout/order', {params: {mode,delivery: 0,couponId: 0,isUsePoints: 0,...obj}})
}(4) 订单结算 - 购物车结算
1 跳转时,传递查询参数
layout/cart.vue
<div @click="goPay">结算({{ selCount }})</div>
goPay () {if (this.selCount > 0) {this.$router.push({path: '/pay',query: {mode: 'cart',cartIds: this.selCartList.map(item => item.id).join(',')}})}
}2 页面中接收参数, 调用接口,获取数据
data () {return {order: {},personal: {}}
},computed: {mode () {return this.$route.query.mode},cartIds () {return this.$route.query.cartIds}
}async created () {this.getOrderList()
},async getOrderList () {if (this.mode === 'cart') {const { data: { order, personal } } = await checkOrder(this.mode, { cartIds: this.cartIds })this.order = orderthis.personal = personal}
}3 基于数据进行渲染
<!-- 订单明细 -->
<div class="pay-list" v-if="order.goodsList"><div class="list"><div class="goods-item" v-for="item in order.goodsList" :key="item.goods_id"><div class="left"><img :src="item.goods_image" alt="" /></div><div class="right"><p class="tit text-ellipsis-2">{{ item.goods_name }}</p><p class="info"><span class="count">x{{ item.total_num }}</span><span class="price">¥{{ item.total_pay_price }}</span></p></div></div></div><div class="flow-num-box"><span>共 {{ order.orderTotalNum }} 件商品,合计:</span><span class="money">¥{{ order.orderTotalPrice }}</span></div><div class="pay-detail"><div class="pay-cell"><span>订单总金额:</span><span class="red">¥{{ order.orderTotalPrice }}</span></div><div class="pay-cell"><span>优惠券:</span><span>无优惠券可用</span></div><div class="pay-cell"><span>配送费用:</span><span v-if="!selectAddress">请先选择配送地址</span><span v-else class="red">+¥0.00</span></div></div><!-- 支付方式 --><div class="pay-way"><span class="tit">支付方式</span><div class="pay-cell"><span><van-icon name="balance-o" />余额支付(可用 ¥ {{ personal.balance }} 元)</span><!-- <span>请先选择配送地址</span> --><span class="red"><van-icon name="passed" /></span></div></div><!-- 买家留言 --><div class="buytips"><textarea placeholder="选填:买家留言(50字内)" name="" id="" cols="30" rows="10"></textarea></div>
</div>
<!-- 底部提交 -->
<div class="footer-fixed"><div class="left">实付款:<span>¥{{ order.orderTotalPrice }}</span></div><div class="tipsbtn">提交订单</div>
</div>
(5) 订单结算 - 立即购买结算
1 点击跳转传参
prodetail/index.vue
<div class="btn" v-if="mode === 'buyNow'" @click="goBuyNow">立刻购买</div>
goBuyNow () {this.$router.push({path: '/pay',query: {mode: 'buyNow',goodsId: this.goodsId,goodsSkuId: this.detail.skuList[0].goods_sku_id,goodsNum: this.addCount}})
}2 计算属性处理参数
computed: {...goodsId () {return this.$route.query.goodsId},goodsSkuId () {return this.$route.query.goodsSkuId},goodsNum () {return this.$route.query.goodsNum}
}3 基于请求时携带参数发请求渲染
async getOrderList () {...if (this.mode === 'buyNow') {const { data: { order, personal } } = await checkOrder(this.mode, {goodsId: this.goodsId,goodsSkuId: this.goodsSkuId,goodsNum: this.goodsNum})this.order = orderthis.personal = personal}
}(6) mixins 复用 - 处理登录确认框的弹出
1 新建一个 mixin 文件 mixins/loginConfirm.js
这里面不止可以写methods,data什么的都可以写,生命周期函数也能写
export default {methods: {// 是否需要弹登录确认框// (1) 需要,返回 true,并直接弹出登录确认框// (2) 不需要,返回 false//这里返回true or false 是为了方便在页面中来判断当前是否已经登录过loginConfirm () {if (!this.$store.getters.token) {this.$dialog.confirm({title: '温馨提示',message: '此时需要先登录才能继续操作哦',confirmButtonText: '去登陆',cancelButtonText: '再逛逛'}).then(() => {// 如果希望,跳转到登录 => 登录后能回跳回来,需要在跳转去携带参数 (当前的路径地址)// this.$route.fullPath (会包含查询参数)this.$router.replace({path: '/login',query: {backUrl: this.$route.fullPath}})}).catch(() => {})return true}return false}}
}
2 页面中导入,混入方法
import loginConfirm from '@/mixins/loginConfirm'export default {name: 'ProDetail',mixins: [loginConfirm],...
}3 页面中调用 混入的方法
async addCart () {//如果已经登录过,就是true,这样就不会出现弹窗if (this.loginConfirm()) {return}const { data } = await addCart(this.goodsId, this.addCount, this.detail.skuList[0].goods_sku_id)this.cartTotal = data.cartTotalthis.$toast('加入购物车成功')this.showPannel = falseconsole.log(this.cartTotal)
},goBuyNow () {if (this.loginConfirm()) {return}this.$router.push({path: '/pay',query: {mode: 'buyNow',goodsId: this.goodsId,goodsSkuId: this.detail.skuList[0].goods_sku_id,goodsNum: this.addCount}})
}48. 提交订单并支付
1 封装 API 通用方法(统一余额支付)
// 提交订单
export const submitOrder = (mode, params) => {return request.post('/checkout/submit', {mode,delivery: 10, // 物流方式 配送方式 (10快递配送 20门店自提)couponId: 0, // 优惠券 idpayType: 10, // 余额支付isUsePoints: 0, // 是否使用积分...params})
}2 买家留言绑定
data () {return {remark: ''}
},
<div class="buytips"><textarea v-model="remark" placeholder="选填:买家留言(50字内)" name="" id="" cols="30" rows="10"></textarea>
</div>
3 注册点击事件,提交订单并支付
<div class="tipsbtn" @click="submitOrder">提交订单</div>
// 提交订单
async submitOrder () {if (this.mode === 'cart') {await submitOrder(this.mode, {remark: this.remark,cartIds: this.cartIds})}if (this.mode === 'buyNow') {await submitOrder(this.mode, {remark: this.remark,goodsId: this.goodsId,goodsSkuId: this.goodsSkuId,goodsNum: this.goodsNum})}this.$toast.success('支付成功')this.$router.replace('/myorder')
}49. 订单管理
(1) 静态布局
1 基础静态结构
<template><div class="order"><van-nav-bar title="我的订单" left-arrow @click-left="$router.go(-1)" /><van-tabs v-model="active"><van-tab title="全部"></van-tab><van-tab title="待支付"></van-tab><van-tab title="待发货"></van-tab><van-tab title="待收货"></van-tab><van-tab title="待评价"></van-tab></van-tabs><OrderListItem></OrderListItem></div>
</template>
<script>
import OrderListItem from '@/components/OrderListItem.vue'
export default {name: 'OrderPage',components: {OrderListItem},data () {return {active: 0}}
}
</script>
<style lang="less" scoped>
.order {background-color: #fafafa;
}
.van-tabs {position: sticky;top: 0;
}
</style>
2 components/OrderListItem
<template><div class="order-list-item"><div class="tit"><div class="time">2023-07-01 12:02:13</div><div class="status"><span>待支付</span></div></div><div class="list"><div class="list-item"><div class="goods-img"><img src="http://cba.itlike.com/public/uploads/10001/20230321/c4b5c61e46489bb9b9c0630002fbd69e.jpg" alt=""></div><div class="goods-content text-ellipsis-2">Apple iPhone 14 Pro Max 256G 银色 移动联通电信5G双卡双待手机</div><div class="goods-trade"><p>¥ 1299.00</p><p>x 3</p></div></div><div class="list-item"><div class="goods-img"><img src="http://cba.itlike.com/public/uploads/10001/20230321/c4b5c61e46489bb9b9c0630002fbd69e.jpg" alt=""></div><div class="goods-content text-ellipsis-2">Apple iPhone 14 Pro Max 256G 银色 移动联通电信5G双卡双待手机</div><div class="goods-trade"><p>¥ 1299.00</p><p>x 3</p></div></div><div class="list-item"><div class="goods-img"><img src="http://cba.itlike.com/public/uploads/10001/20230321/c4b5c61e46489bb9b9c0630002fbd69e.jpg" alt=""></div><div class="goods-content text-ellipsis-2">Apple iPhone 14 Pro Max 256G 银色 移动联通电信5G双卡双待手机</div><div class="goods-trade"><p>¥ 1299.00</p><p>x 3</p></div></div></div><div class="total">共12件商品,总金额 ¥29888.00</div><div class="actions"><span v-if="false">立刻付款</span><span v-if="true">申请取消</span><span v-if="false">确认收货</span><span v-if="false">评价</span></div></div>
</template>
<script>
export default {}
</script>
<style lang="less" scoped>
.order-list-item {margin: 10px auto;width: 94%;padding: 15px;background-color: #ffffff;box-shadow: 0 0.5px 2px 0 rgba(0,0,0,.05);border-radius: 8px;color: #333;font-size: 13px;.tit {height: 24px;line-height: 24px;display: flex;justify-content: space-between;margin-bottom: 20px;.status {color: #fa2209;}}.list-item {display: flex;.goods-img {width: 90px;height: 90px;margin: 0px 10px 10px 0;img {width: 100%;height: 100%;}}.goods-content {flex: 2;line-height: 18px;max-height: 36px;margin-top: 8px;}.goods-trade {flex: 1;line-height: 18px;text-align: right;color: #b39999;margin-top: 8px;}}.total {text-align: right;}.actions {text-align: right;span {display: inline-block;height: 28px;line-height: 28px;color: #383838;border: 0.5px solid #a8a8a8;font-size: 14px;padding: 0 15px;border-radius: 5px;margin: 10px 0;}}
}
</style>
3 导入注册
import { Tab, Tabs } from 'vant'Vue.use(Tab)Vue.use(Tabs)(2) 点击 tab 切换渲染
1 封装获取订单列表的 API 接口
// 订单列表export const getMyOrderList = (dataType, page) => {return request.get('/order/list', {params: {dataType,page}})}2 给 tab 绑定 name 属性
<van-tabs v-model="active" sticky><van-tab name="all" title="全部"></van-tab><van-tab name="payment" title="待支付"></van-tab><van-tab name="delivery" title="待发货"></van-tab><van-tab name="received" title="待收货"></van-tab><van-tab name="comment" title="待评价"></van-tab>
</van-tabs>data () {return {active: this.$route.query.dataType || 'all',page: 1,list: []}},3 封装调用接口获取数据
methods: {async getOrderList () {const { data: { list } } = await getMyOrderList(this.active, this.page)list.data.forEach((item) => {item.total_num = 0item.goods.forEach(goods => {item.total_num += goods.total_num})})this.list = list.data}
},watch: {active: {immediate: true,handler () {this.getOrderList()}}}4 动态渲染
<OrderListItem v-for="item in list" :key="item.order_id" :item="item"></OrderListItem>
<template><div class="order-list-item" v-if="item.order_id"><div class="tit"><div class="time">{{ item.create_time }}</div><div class="status"><span>{{ item.state_text }}</span></div></div><div class="list" ><div class="list-item" v-for="(goods, index) in item.goods" :key="index"><div class="goods-img"><img :src="goods.goods_image" alt=""></div><div class="goods-content text-ellipsis-2">{{ goods.goods_name }}</div><div class="goods-trade"><p>¥ {{ goods.total_pay_price }}</p><p>x {{ goods.total_num }}</p></div></div></div><div class="total">共 {{ item.total_num }} 件商品,总金额 ¥{{ item.total_price }}</div><div class="actions"><div v-if="item.order_status === 10"><span v-if="item.pay_status === 10">立刻付款</span><span v-else-if="item.delivery_status === 10">申请取消</span><span v-else-if="item.delivery_status === 20 || item.delivery_status === 30">确认收货</span></div><div v-if="item.order_status === 30"><span>评价</span></div></div></div>
</template>
<script>export default {props: {item: {type: Object,default: () => {return {}}}}}
</script>
50. 个人中心 - 基本渲染
1 封装获取个人信息 - API接口
import request from '@/utils/request'// 获取个人信息export const getUserInfoDetail = () => {return request.get('/user/info')}2 调用接口,获取数据进行渲染
<template><div class="user"><div class="head-page" v-if="isLogin"><div class="head-img"><img src="@/assets/default-avatar.png" alt="" /></div><div class="info"><div class="mobile">{{ detail.mobile }}</div><div class="vip"><van-icon name="diamond-o" />普通会员</div></div></div><div v-else class="head-page" @click="$router.push('/login')"><div class="head-img"><img src="@/assets/default-avatar.png" alt="" /></div><div class="info"><div class="mobile">未登录</div><div class="words">点击登录账号</div></div></div><div class="my-asset"><div class="asset-left"><div class="asset-left-item"><span>{{ detail.pay_money || 0 }}</span><span>账户余额</span></div><div class="asset-left-item"><span>0</span><span>积分</span></div><div class="asset-left-item"><span>0</span><span>优惠券</span></div></div><div class="asset-right"><div class="asset-right-item"><van-icon name="balance-pay" /><span>我的钱包</span></div></div></div><div class="order-navbar"><div class="order-navbar-item" @click="$router.push('/myorder?dataType=all')"><van-icon name="balance-list-o" /><span>全部订单</span></div><div class="order-navbar-item" @click="$router.push('/myorder?dataType=payment')"><van-icon name="clock-o" /><span>待支付</span></div><div class="order-navbar-item" @click="$router.push('/myorder?dataType=delivery')"><van-icon name="logistics" /><span>待发货</span></div><div class="order-navbar-item" @click="$router.push('/myorder?dataType=received')"><van-icon name="send-gift-o" /><span>待收货</span></div></div><div class="service"><div class="title">我的服务</div><div class="content"><div class="content-item"><van-icon name="records" /><span>收货地址</span></div><div class="content-item"><van-icon name="gift-o" /><span>领券中心</span></div><div class="content-item"><van-icon name="gift-card-o" /><span>优惠券</span></div><div class="content-item"><van-icon name="question-o" /><span>我的帮助</span></div><div class="content-item"><van-icon name="balance-o" /><span>我的积分</span></div><div class="content-item"><van-icon name="refund-o" /><span>退换/售后</span></div></div></div><div class="logout-btn"><button>退出登录</button></div></div>
</template>
<script>import { getUserInfoDetail } from '@/api/user.js'export default {name: 'UserPage',data () {return {detail: {}}},created () {if (this.isLogin) {this.getUserInfoDetail()}},computed: {isLogin () {return this.$store.getters.token}},methods: {async getUserInfoDetail () {const { data: { userInfo } } = await getUserInfoDetail()this.detail = userInfoconsole.log(this.detail)}}
}
</script>
<style lang="less" scoped>
.user {min-height: 100vh;background-color: #f7f7f7;padding-bottom: 50px;
}.head-page {height: 130px;background: url("http://cba.itlike.com/public/mweb/static/background/user-header2.png");background-size: cover;display: flex;align-items: center;.head-img {width: 50px;height: 50px;border-radius: 50%;overflow: hidden;margin: 0 10px;img {width: 100%;height: 100%;object-fit: cover;}}
}
.info {.mobile {margin-bottom: 5px;color: #c59a46;font-size: 18px;font-weight: bold;}.vip {display: inline-block;background-color: #3c3c3c;padding: 3px 5px;border-radius: 5px;color: #e0d3b6;font-size: 14px;.van-icon {font-weight: bold;color: #ffb632;}}
}.my-asset {display: flex;padding: 20px 0;font-size: 14px;background-color: #fff;.asset-left {display: flex;justify-content: space-evenly;flex: 3;.asset-left-item {display: flex;flex-direction: column;justify-content: center;align-items: center;span:first-child {margin-bottom: 5px;color: #ff0000;font-size: 16px;}}}.asset-right {flex: 1;.asset-right-item {display: flex;flex-direction: column;justify-content: center;align-items: center;.van-icon {font-size: 24px;margin-bottom: 5px;}}}
}.order-navbar {display: flex;padding: 15px 0;margin: 10px;font-size: 14px;background-color: #fff;border-radius: 5px;.order-navbar-item {display: flex;flex-direction: column;justify-content: center;align-items: center;width: 25%;.van-icon {font-size: 24px;margin-bottom: 5px;}}
}.service {font-size: 14px;background-color: #fff;border-radius: 5px;margin: 10px;.title {height: 50px;line-height: 50px;padding: 0 15px;font-size: 16px;}.content {display: flex;justify-content: flex-start;flex-wrap: wrap;font-size: 14px;background-color: #fff;border-radius: 5px;.content-item {display: flex;flex-direction: column;justify-content: center;align-items: center;width: 25%;margin-bottom: 20px;.van-icon {font-size: 24px;margin-bottom: 5px;color: #ff3800;}}}
}.logout-btn {button {width: 60%;margin: 10px auto;display: block;font-size: 13px;color: #616161;border-radius: 9px;border: 1px solid #dcdcdc;padding: 7px 0;text-align: center;background-color: #fafafa;}
}
</style>
51. 个人中心 - 退出功能
1 注册点击事件
<button @click="logout">退出登录</button>
2 提供方法
methods: {logout () {this.$dialog.confirm({title: '温馨提示',message: '你确认要退出么?'}).then(() => {this.$store.dispatch('user/logout')}).catch(() => {})}
}actions: {logout (context) {// 个人信息要重置context.commit('setUserInfo', {})// 购物车信息要重置 (跨模块调用 mutation) cart/setCartListcontext.commit('cart/setCartList', [], { root: true }) //root开启全局模式}},一旦移除信息,那么islogin为false,那么所有v-if=islogin的div都不会被渲染,顺利实现登出
52. 项目打包优化
vue脚手架只是开发过程中,协助开发的工具,当真正开发完了 => 脚手架不参与上线
参与上线的是 => 打包后的源代码
打包:
- 将多个文件压缩合并成一个文件
- 语法降级
- less sass ts 语法解析, 解析成css
- …
打包后,可以生成,浏览器能够直接运行的网页 => 就是需要上线的源码!
(1) 打包命令
vue脚手架工具已经提供了打包命令,直接使用即可。
yarn build在项目的根目录会自动创建一个文件夹dist,dist中的文件就是打包后的文件,只需要放到服务器中即可。
(2) 配置publicPath
因为打包默认的是根路径,需要自己配置一下publicPath这样就可以实现在任何目录下都能运行打包后的index.html,直接双击打开也行
如果不设置 publicPath,它会用默认值 '/',表示“所有资源都从网站根目录开始找”。假设你打包后直接把 dist/ 文件夹丢到服务器根目录(比如 https://example.com/),那完全没问题,浏览器会正确请求:
但如果你把 dist/ 放到子目录(比如 https://example.com/my-app/),又不改 publicPath,浏览器就会傻乎乎地去根目录找资源。如果你把 publicPath 设置为 './',那就表示这些静态文件和 index.html 放在同一个目录下,浏览器会从相对路径去找,所以你这里的 publicPath: './' 就是告诉浏览器:“这些文件就在当前目录下,别跑远啦!”
module.exports = {// 设置获取.js,.css文件时,是以相对地址为基准的。// https://cli.vuejs.org/zh/config/#publicpathpublicPath: './'
}(3) 路由懒加载
路由懒加载 & 异步组件, 不会一上来就将所有的组件都加载,而是访问到对应的路由了,才加载解析这个路由对应的所有组件
官网链接:路由懒加载 | Vue Router
当打包构建应用时,JavaScript 包会变得非常大,影响页面加载。如果我们能把不同路由对应的组件分割成不同的代码块,然后当路由被访问的时候才加载对应组件,这样就更加高效了。
const ProDetail = () => import('@/views/prodetail')const Pay = () => import('@/views/pay')const MyOrder = () => import('@/views/myorder')1. 默认情况(不懒加载)
所有页面组件会打包成一个巨大的 app.js,用户第一次进网站就要一次性下载全部代码,即使当前页面只需要一点点。
// 不懒加载:一次性全打包import Home from '@/views/Home.vue'import About from '@/views/About.vue'const routes = [{ path: '/', component: Home },{ path: '/about', component: About }]2. 懒加载(按需加载)
把每个页面组件拆成独立的小文件,只有访问对应路由时才下载对应的 js 文件:
// 懒加载:用箭头函数+import()const routes = [{ path: '/', component: () => import('@/views/Home.vue') // 访问“/”时才加载},{ path: '/about', component: () => import('@/views/About.vue') // 访问“/about”时才加载}]认识Vue3
1. Vue2 选项式 API vs Vue3 组合式API
<script>
export default {data(){return {count:0}},methods:{addCount(){this.count++}}
}
</script>
<script setup>
import { ref } from 'vue'
const count = ref(0)
const addCount = ()=> count.value++
</script>
特点:
- 代码量变少
- 分散式维护变成集中式维护
使用create-vue搭建Vue3项目
1. 认识create-vue
create-vue是Vue官方新的脚手架工具,底层切换到了 vite (下一代前端工具链),为开发提供极速响应
2. 使用create-vue创建项目
前置条件 - 已安装16.0或更高版本的Node.js
执行如下命令,这一指令将会安装并执行 create-vue
npm init vue@latest熟悉项目和关键文件

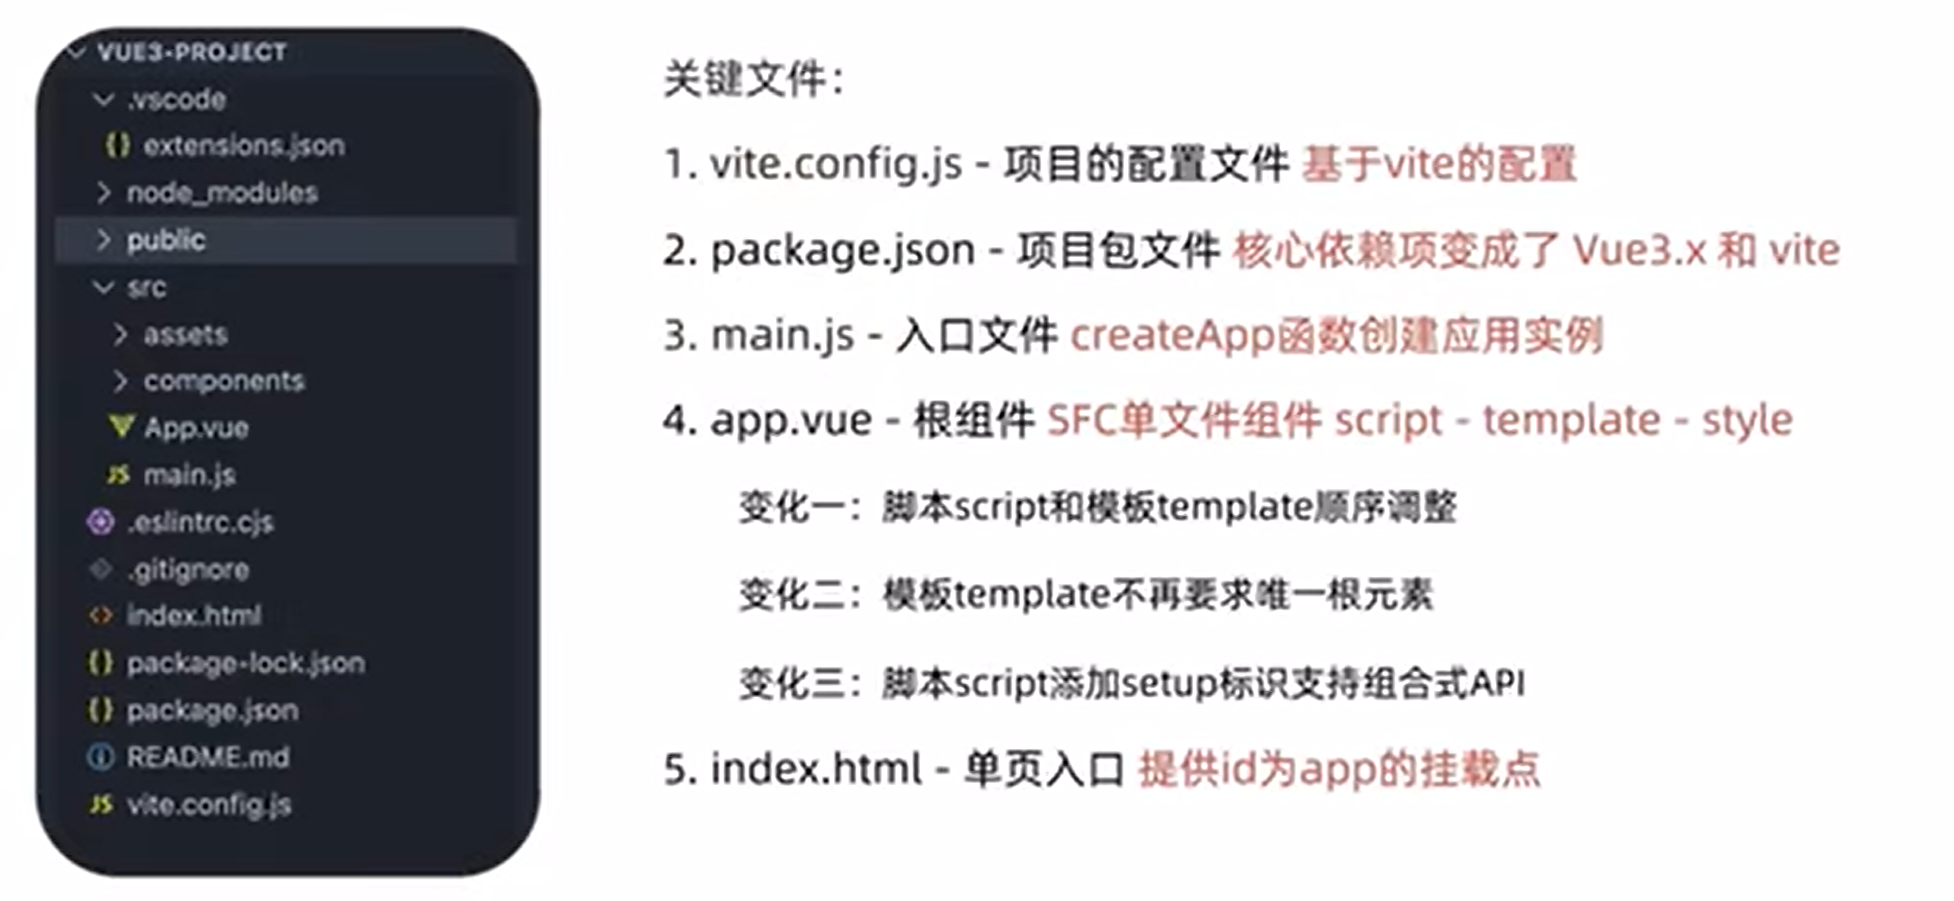
组合式API - setup选项
1. setup选项的写法和执行时机
<script>export default {setup(){},beforeCreate(){}}
</script>
执行时机
在beforeCreate钩子之前执行
2. setup中写代码的特点
在setup函数中写的数据和方法需要在末尾以对象的方式return,才能给模版使用,不常用
<script>export default {setup(){const message = 'this is message'const logMessage = ()=>{console.log(message)}// 必须return才可以return {message,logMessage}}}
</script>
3. 如何使用setup
最常用,因为这样很方便,只需要添加一下setup标记就行
script标签添加 setup标记,不需要再写导出语句,默认会添加导出语句
<script setup>const message = 'this is message'const logMessage = ()=>{console.log(message)}
</script>
组合式API - reactive和ref函数
1. reactive
接受对象类型数据的参数传入并返回一个响应式的对象
<script setup>// 导入import { reactive } from 'vue'// 执行函数 传入参数 变量接收const state = reactive({msg:'this is msg'})const setSate = ()=>{// 修改数据更新视图state.msg = 'this is new msg'}
</script><template>{{ state.msg }}<button @click="setState">change msg</button></template>
2. ref
接收简单类型或者对象类型的数据传入并返回一个响应式的对象
<script setup>// 导入import { ref } from 'vue'// 执行函数 传入参数 变量接收const count = ref(0)const setCount = ()=>{// 修改数据更新视图必须加上.valuecount.value++}
</script><template><button @click="setCount">{{count}}</button></template>
3. reactive 对比 ref
- 都是用来生成响应式数据
- 不同点
-
- reactive不能处理简单类型的数据
- ref参数类型支持更好,但是必须通过.value做访问修改
- ref函数内部的实现依赖于reactive函数
- 在实际工作中的推荐
-
- 推荐使用ref函数,减少记忆负担,小兔鲜项目都使用ref
组合式API - computed
计算属性基本思想和Vue2保持一致,组合式API下的计算属性只是修改了API写法
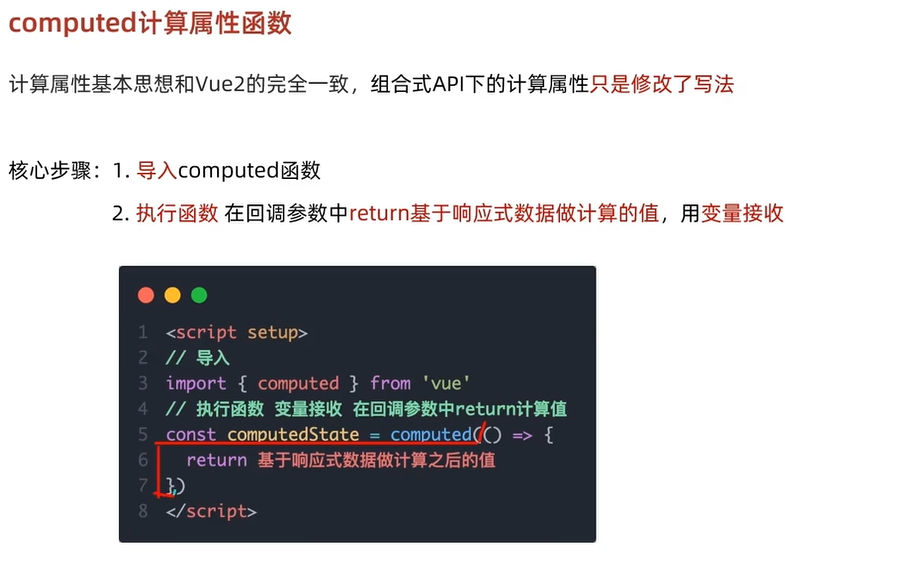
只读计算属性,不能修改,通常建议用只读的,不建议修改计算属性,如果要修改,用set
<script setup>
// 导入
import {ref, computed } from 'vue'
const list = ref([1, 2, 3, 4, 5])
const clist = computed(() => {return list.value.filter((item) => item > 2)
})
</script>
可写计算属性,可以修改
🧸 什么是“可写的计算属性”?
你可以把它想象成一个**“智能盒子”**:
- 每次你打开盒子看(
get),它会自动从别的地方算出一个值。 - 每次你往盒子里放新东西(
set),它会自动把新东西拆开来,存到别的地方去。
✅ 场景:摄氏度 ↔ 华氏度 双向绑定
用户在输入框里既可以输入摄氏度,也可以输入华氏度,两个输入框之间实时互相同步,并且都能修改。
✅ 代码示例(Vue 3)
<template><div><label>摄氏度:<input type="number" v-model.number="celsius" /></label><br /><label>华氏度:<input type="number" v-model.number="fahrenheit" /></label></div>
</template><script setup>
import { ref, computed } from 'vue'const celsius = ref(0)const fahrenheit = computed({get: () => (celsius.value * 9) / 5 + 32, //get获取当前计算属性的值触发set: (f) => (celsius.value = ((f - 32) * 5) / 9) // set修改当前计算属性的值时候触发
})
</script>✅ 效果
- 输入任意一个温度,另一个会自动同步。
- 两个输入框都可以改,完全双向绑定。
- 底层只维护了一个真实数据源(
celsius),避免数据不一致。
组合式API - watch
侦听一个或者多个数据的变化,数据变化时执行回调函数,俩个额外参数 immediate控制立刻执行,deep开启深度侦听
1. 侦听单个数据
<script setup>// 1. 导入watchimport { ref, watch } from 'vue'const count = ref(0)// 2. 调用watch 侦听变化watch(count, (newValue, oldValue)=>{console.log(`count发生了变化,老值为${oldValue},新值为${newValue}`)})
</script>
2. 侦听多个数据
侦听多个数据,第一个参数可以改写成数组的写法
<script setup>// 1. 导入watchimport { ref, watch } from 'vue'const count = ref(0)const name = ref('cp')// 2. 调用watch 侦听变化watch([count, name], ([newCount, newName],[oldCount,oldName])=>{console.log(`count或者name变化了,[newCount, newName],[oldCount,oldName])})
</script>
3. immediate
在侦听器创建时立即出发回调,响应式数据变化之后继续执行回调
<script setup>// 1. 导入watchimport { ref, watch } from 'vue'const count = ref(0)// 2. 调用watch 侦听变化watch(count, (newValue, oldValue)=>{console.log(`count发生了变化,老值为${oldValue},新值为${newValue}`)},{immediate: true})
</script>
4. deep
通过watch监听的ref对象默认是浅层侦听的,直接修改嵌套的对象属性不会触发回调执行,需要开启deep
<script setup>// 1. 导入watchimport { ref, watch } from 'vue'const state = ref({ count: 0 })// 2. 监听对象statewatch(state, ()=>{console.log('数据变化了')})const changeStateByCount = ()=>{// 直接修改不会引发回调执行state.value.count++}
</script><script setup>// 1. 导入watchimport { ref, watch } from 'vue'const state = ref({ count: 0 })// 2. 监听对象state 并开启deepwatch(state, ()=>{console.log('数据变化了')},{deep:true})const changeStateByCount = ()=>{// 此时修改可以触发回调state.value.count++}
</script>
组合式API - 生命周期函数
1. 选项式对比组合式

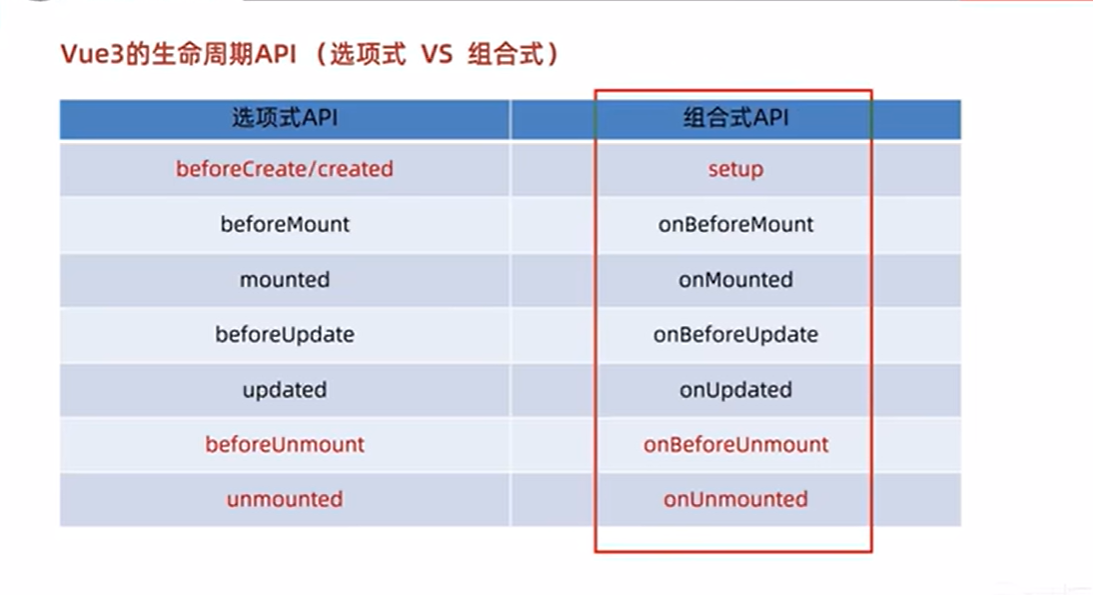
2. 生命周期函数基本使用
- 导入生命周期函数
- 执行生命周期函数,传入回调
<scirpt setup>
import { onMounted } from 'vue'
onMounted(()=>{// 自定义逻辑
})
</script>
3. 执行多次
生命周期函数执行多次的时候,会按照顺序依次执行
<scirpt setup>
import { onMounted } from 'vue'
onMounted(()=>{// 自定义逻辑
})onMounted(()=>{// 自定义逻辑
})
</script>
组合式API - 父子通信
1. 父传子
基本思想
- 父组件中给子组件绑定属性
- 子组件内部通过props选项接收数据 props通过defineProps来实现
2. 子传父
基本思想
- 父组件中给子组件标签通过@绑定事件
- 子组件内部通过 emit 方法触发事件 emit通过const emit = defineEmits来实现,emit定义父组件的函数操作,子组件通过emit来触发父组件的函数操作
<template><oneWeed :msg="msg" @fu="fuDouble"></oneWeed>
</template>
<script setup>
import { ref, computed, watch } from 'vue'
import oneWeed from './components/oneWeed.vue'const msg = ref('hello')const fuDouble = (a) => {msg.value = a
}
</script>
<style scoped>
header {line-height: 1.5;
}.logo {display: block;margin: 0 auto 2rem;
}@media (min-width: 1024px) {header {display: flex;place-items: center;padding-right: calc(var(--section-gap) / 2);}.logo {margin: 0 2rem 0 0;}header .wrapper {display: flex;place-items: flex-start;flex-wrap: wrap;}
}
</style>
<template><div @click="handleClick">我是子组件-{{ msg }}</div>
</template><script setup>
const emit = defineEmits(['fu'])
const props = defineProps({msg: {type: String,required: true,},
})function handleClick() {emit('fu', 'eeee')
}
</script><style lang="scss" scoped></style>
组合式API - 模版引用
概念:通过 ref标识 获取真实的 dom对象或者组件实例对象
1. 基本使用
实现步骤:
- 调用ref函数生成一个ref对象
- 通过ref标识绑定ref对象到标签

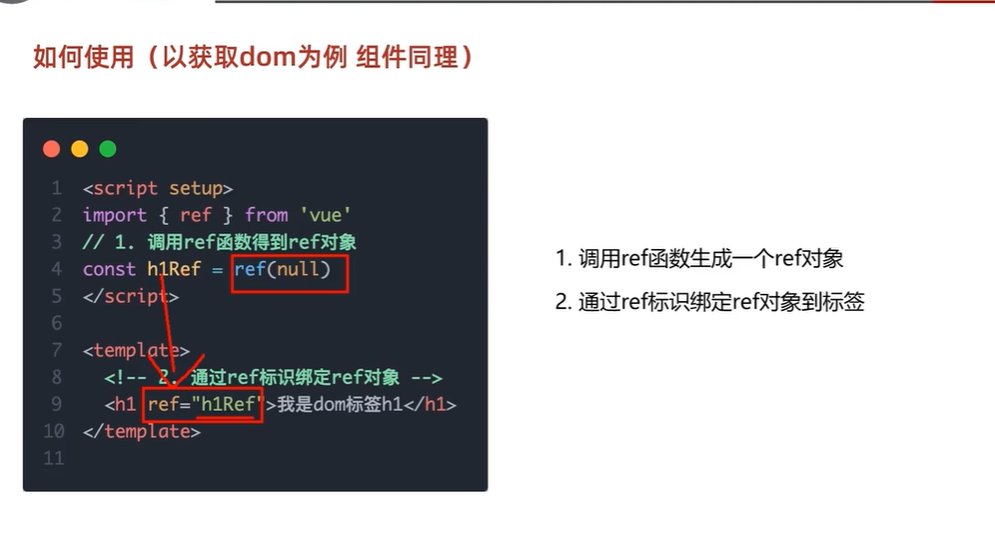
2. defineExpose

父组件
<oneWeed :msg="msg" @fu="fuDouble" ref="oneWeedInstance"></oneWeed>....onMounted(() => {console.log(oneWeedInstance.value.a, 'sssss')
})
子组件
const a = ref(1)
defineExpose({a,
}) 组合式API - provide和inject
1. 作用和场景
顶层组件向任意的底层组件传递数据和方法,实现跨层组件通信
2. 跨层传递普通数据
实现步骤
- 顶层组件通过
provide函数提供数据 - 底层组件通过
inject函数提供数据

顶层组件
const msg = ref('hello')
provide('aa', msg)底层组件
import {inject } from 'vue'
const sunzi = inject('aa')
console.log(sunzi) //hello3. 跨层传递方法
顶层组件可以向底层组件传递方法,底层组件调用方法修改顶层组件的数据
顶层组件
provide('functiona', (q) => {msg.value = q
})底层组件
import {inject } from 'vue'
const functiona = inject('functiona')
const handleClick = () => {functiona(sunzi.value)
}Vue3.3 新特性-defineOptions
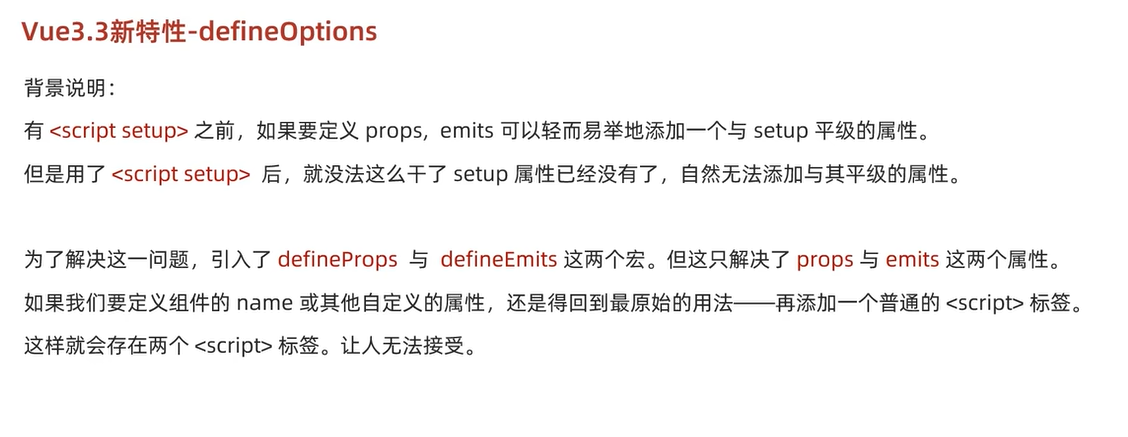
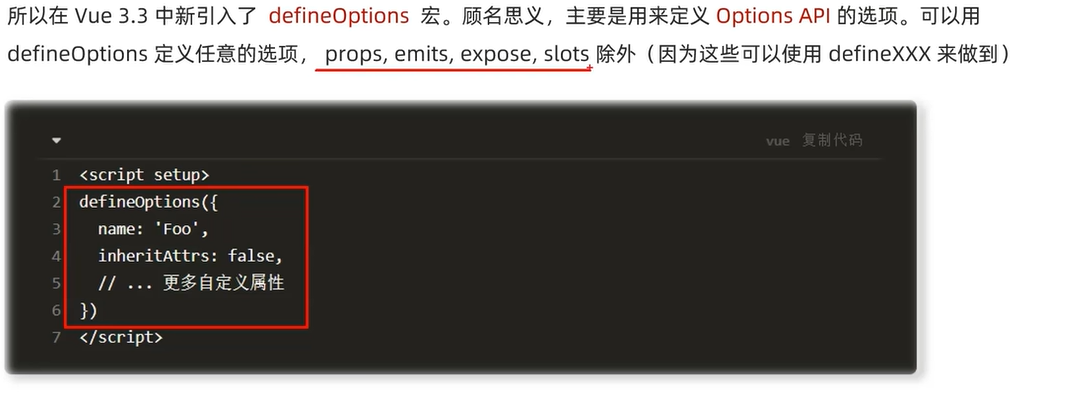
Vue3.3新特性-defineModel
在Vue3中,自定义组件上使用v-model, 相当于传递一个modelValue属性,同时触发 update:modelValue 事件。我们需要先定义 props,再定义 emits 。其中有许多重复的代码。如果需要修改此值,还需要手动调用 emit 函数。
于是乎 defineModel 诞生了。
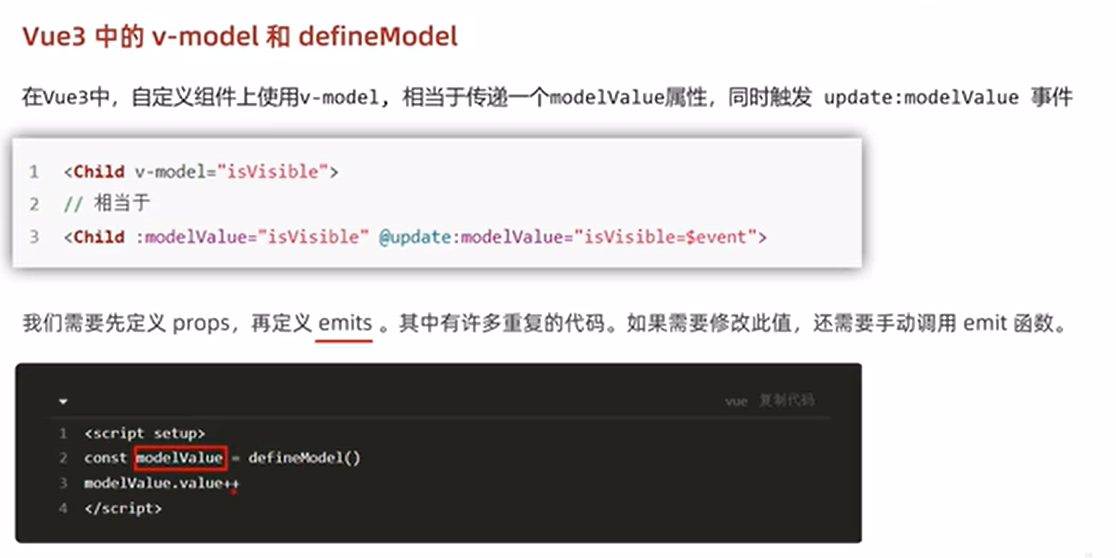
生效需要配置 vite.config.js
import { fileURLToPath, URL } from 'node:url'import { defineConfig } from 'vite'import vue from '@vitejs/plugin-vue'// https://vitejs.dev/config/export default defineConfig({plugins: [vue({script: {defineModel: true}}),],resolve: {alias: {'@': fileURLToPath(new URL('./src', import.meta.url))}}})父组件
<oneWeed v-model="msg" @fu="fuDouble" ref="oneWeedInstance"></oneWeed>子组件
<template><input type="text" :value="modelValue" @input="modelValue = $event.target.value" /><twoWeded></twoWeded>
</template><script setup>
import { ref, computed, watch, onMounted, defineModel } from 'vue'
import twoWeded from './twoWeded.vue'
const emit = defineEmits(['fu'])
const modelValue = defineModel()
const props = defineProps({msg: {type: String,required: true,},
})const a = ref(1)
defineExpose({a,
})
function handleClick() {emit('fu', 'eeee')
}
</script><style lang="scss" scoped></style>
这样就可以实现子组件改变父组件传过来的值,只要在input框修改数据,父组件中的msg也会发生变化
Vue3 状态管理 - Pinia
1. 什么是Pinia

2. 手动添加Pinia到Vue项目
后面在实际开发项目的时候,Pinia可以在项目创建时自动添加,现在我们初次学习,从零开始:
- 使用 Vite 创建一个空的 Vue3项目
npm create vue@latest- 按照官方文档安装 pinia 到项目中
import { createApp } from 'vue'import { createPinia } from 'pinia'import App from './App.vue'const pinia = createPinia()const app = createApp(App)app.use(pinia)app.mount('#app')3. Pinia基础使用
- 定义store--在store文件夹新建js文件即可
- 组件使用store
在深入研究核心概念之前,我们得知道 Store 是用 defineStore() 定义的,它的第一个参数要求是一个独一无二的名字:
import { defineStore } from 'pinia'// `defineStore()` 的返回值的命名是自由的// 但最好含有 store 的名字,且以 `use` 开头,以 `Store` 结尾。// (比如 `useUserStore`,`useCartStore`,`useProductStore`)// 第一个参数是你的应用中 Store 的唯一 ID。export const useAlertsStore = defineStore('alerts', ()=>{// 其他配置...})这个名字 ,也被用作 id ,是必须传入的, Pinia 将用它来连接 store 和 devtools。为了养成习惯性的用法,将返回的函数命名为 use... 是一个符合组合式函数风格的约定。
defineStore() 的第二个参数可接受两类值:Setup 函数或 Option 对象。
import { defineStore } from "pinia";import { ref, computed } from "vue";export const useCountStore = defineStore("counter", () => {const count = ref(4);const double = computed(() => count.value * 2);const increment = () => {count.value++;};const decrement = () => {count.value--;};return { count, double, increment, decrement };});
<script setup>import HelloWorld from "./components/HelloWorld.vue";import TheWelcome from "./components/TheWelcome.vue";import { ref } from "vue";import { useCountStore } from "@/store/count";const countStore = useCountStore();
</script><template><div>我是APP-{{ countStore.count }}<HelloWorld /><TheWelcome /></div>
</template><style scoped></style>
<script setup>import { useCountStore } from "@/store/count";const countStore = useCountStore();function handleClick() {countStore.increment();}
</script><template><div>我是儿子一号-{{ countStore.count }}-<button @click="handleClick">+</button></div>
</template><style scoped></style>
4. action异步实现
方式:异步action函数的写法和组件中获取异步数据的写法完全一致
正好回顾一下axios封装-建立utils文件夹,自此文件夹下新建request.js
// 原来
const code = response.data.code
const data = response.data.data
const message = response.data.message// 现在一行顶三行
const { code, data, message } = response.dataimport axios from "axios";// 可以根据环境变量切换 baseURL
const baseURL = import.meta.env.VITE_API_BASE || "http://geek.itheima.net/v1_0";// 1️⃣ 创建实例
const service = axios.create({baseURL,timeout: 10_000,
});// 2️⃣ 请求拦截器:携带 token
service.interceptors.request.use((config) => {const token = localStorage.getItem("token");if (token && config.headers) {config.headers.Authorization = `Bearer ${token}`;}return config;},(error) => Promise.reject(error)
);// 3️⃣ 响应拦截器:统一处理错误 & 剥离数据
service.interceptors.response.use((response) => {// 假设后端返回格式:{ code: 0, data: ..., message: '' }const { data } = response.data;return data;},(error) => {// 网络错误、超时、状态码 4xx/5xx 等console.error(error.message || "Network Error");return Promise.reject(error);}
);export default service; // ← 默认导出 axios 实例
import { defineStore } from "pinia";
import { ref, computed } from "vue";
import axios from "axios";
import request from "@/utils/request";
export const useCountStore = defineStore("counter", () => {const count = ref(4);const list = ref([]);const double = computed(() => count.value * 2);const increment = () => {count.value++;};const decrement = () => {count.value--;};const getCount = async () => {const res = await request.get("/channels");list.value = res.channels;console.log(res.channels);};return { count, list, double, increment, decrement, getCount };
});
<button @click="countStore.getCount">获取列表</button>
<div v-for="item in countStore.list">{{ item.name }}</div>6. storeToRefs工具函数

应该
![]()
然后
![]()
7. Pinia持久化插件
官方文档:Pinia Plugin Persistedstate
- 安装插件 pinia-plugin-persistedstate
npm i pinia-plugin-persistedstate- 使用 main.js
import { createApp } from 'vue'
import { createPinia } from 'pinia'
import persist from 'pinia-plugin-persistedstate'
import App from './App.vue'
import './assets/main.css'// 1️⃣ 先创建 pinia 实例
const pinia = createPinia()
// 2️⃣ 再把 persist 插件注册进去
pinia.use(persist)// 3️⃣ 最后挂载
createApp(App).use(pinia) // pinia 已经带插件了.mount('#app')- 配置 store/counter.js
import { defineStore } from 'pinia'import { computed, ref } from 'vue'export const useCounterStore = defineStore('counter', () => {...return {count,doubleCount,increment}}, {persist: true //开启当前模块的持久化})配置好之后点击加数字数字加上之后就算刷新也不会回到之前的值,persist负责存储变化的值到本地并且优先从本地取值读值
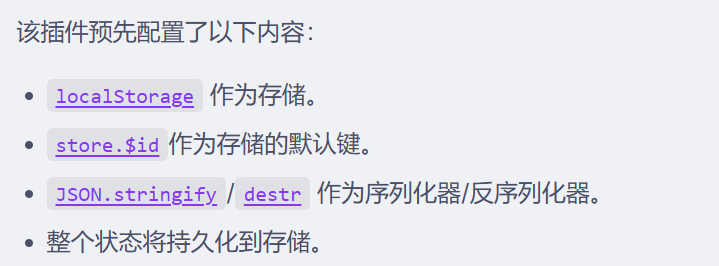
可以自己配置persist对象
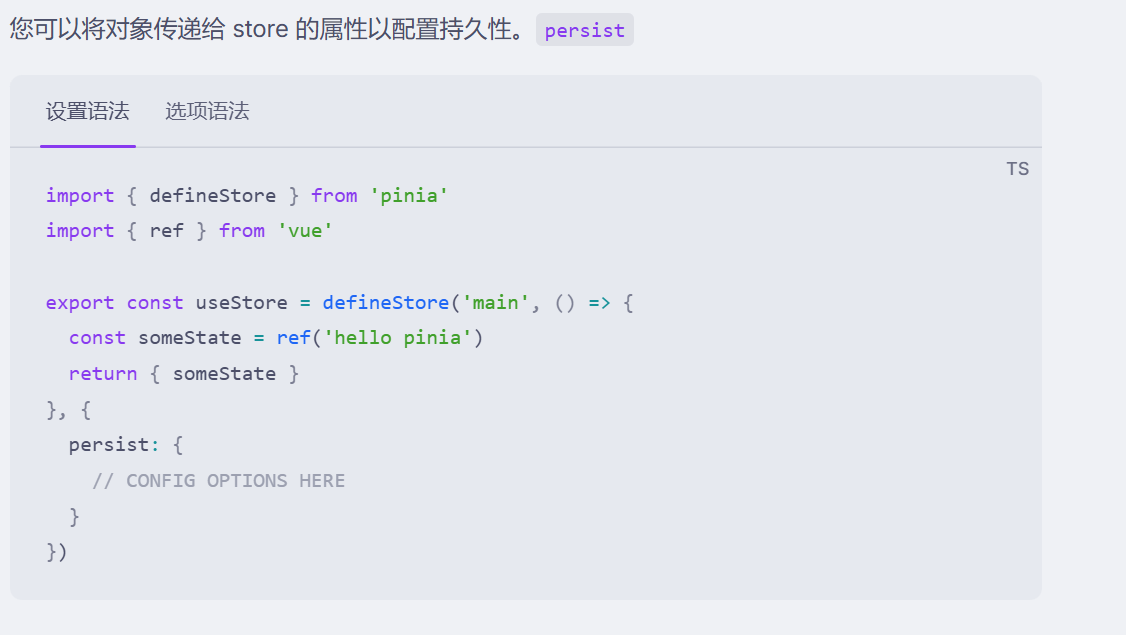
{persist: {key: "countww", // 存储的key值storage: sessionStorage, // 持久化存储位置paths: ["count"],//指定某几项可以持久化},}- 其他配置,看官网文档即可
还有一个大事记项目,可以在csdn的资源里面看
至此,完结撒花啦