微信原生小程序 Timeline 组件实现
目录
组件分析设计
Timeline 属性
Timeline-item 属性
Timeline-item 插槽 (Slot)
组件实现
timeline
timeline-item
排序:父子组件间关系
注意
完整代码
timeline-item
timeline
styleToCssString.js
以时间轴组件为例简单聊一下小程序的组件开发。
时间线组件
https://developers.weixin.qq.com/s/2MIXvgmr8N2x![]() https://developers.weixin.qq.com/s/2MIXvgmr8N2x
https://developers.weixin.qq.com/s/2MIXvgmr8N2x

组件分析设计
在着手写代码之前,还是先做一翻分析设计。
分析什么?我们需要分析业务方对组件的详细需求、交互以及设计稿效果,弄清楚有没有什么特别的地方,需求是否适合使用时间轴组件来呈现等,对于不合理的需求,作为开发我们有责任提出问题和建议来。
设计什么?我们需要设计组件的目录结构、API 以及对使用者友好的示例文档,通常除了 API 外,目录结构、命名和文档我们都会现有一个规范,按给定的规范做即可,但是如何设计一组好的 API 就需要开发者具有一定的经验。
当然,对于常用的组件,我们也许用不着这么认真,直接参考市面上已有的组件库找着样子抄就行了,事实上我们除了少数几个组件别具特色外别家没有外,其他组件我们也是直接参考别的组件库是怎么做的,但我这里抛砖引玉吧,不仅仅是开发组件,任何需求的迭代开发都是一样的,特别是复杂的需求,我们更需要设计。
对于组件开发来说,最好的设计文档就是示例文档,文档先行。看一下 Timeline 组件的文档吧:
Timeline 属性
| 参数 | 说明 | 类型 | 默认值 |
|---|---|---|---|
| reverse | 是否倒序排列 | boolean | true |
Timeline-item 属性
| 参数 | 说明 | 类型 | 默认值 |
|---|---|---|---|
| timestamp | 时间戳 | string | - |
| customDot | 是否自定义时间轴点 | boolean | false |
| dotStyle | 时间轴点样式 | string, object | - |
| color | 时间轴点和时间戳应用的颜色 | string | #888 |
Timeline-item 插槽 (Slot)
| 插槽名 | 说明 |
|---|---|
| (默认) | 内容区域 |
| dot | 自定义时间轴点(仅当 customDot=true 时生效) |
| operation | 显示在时间右侧的内容 |
外部样式类 (externalClasses)
| 类名 | 说明 |
|---|---|
| custom-class | Timeline 信号点样式表 |
| timestamp-class | Timeline-item 时间节点样式表 |
| content-class | Timeline-item 内容节点样式表 |
什么不支持自定义 slot,什么地方支持自定义,这就很清晰了,事件轴点可以自定义样式,时间轴的内容体可以自定义,以及一些外部样式 class。
当然这是最终完善的文档,我们首先应该定义好组件的 Attributes(Props)、Slot ,命名、类型这些都事先定义好,这是最基础的,分析出来我们的组件应该提供什么样的能力,定义什么样的接口。其次,我们应该写好代码示例,先想好我们的组件是如何使用的,然后我们再支持这样的实现。这里可以看出,组件使用了父子嵌套组件模式:
<pps-timeline reverse="{{false}}"><pps-timeline-itemwx:for="{{activity}}"wx:key="{{index}}"timestamp="{{item.timestamp}}"dotStyle="border-color: #33cd5f; color: #33cd5f">{{item.content}}</pps-timeline-item>
</pps-timeline>
为什么这里要使用父子组件模式呢,其实不这样也是可以很好的完整组件。做好了这些工作后我们开始写代码吧。
组件实现
timeline
因为我们是使用父子组件嵌套模式,所以在创建目录时就可以这样体现
timeline
--index.wxml
----timeline-item
------index.wxml
当然,在小程序中要实现父子组件关联关系并不是非要这样,事实上没有层级规定限制,父子组件平级放置也是可以的,但我推荐这样,阅读起来更清晰名了。
父组件内部其实很简单,就是一个 slot,以便能够放入子组件
<view class="pps-timeline custom-class {{reverse?'desc':'asc'}}"><slot />
</view>
custom-class 是定义组件的根外部样式,以便在外部传入样式,为什么要这样呢,小程序的组件技术采用的 WebCompontent 技术,不了解的同学可以搜索一下,这里我写了demo
<!DOCTYPE html>
<html lang="en">
<head><meta charset="UTF-8"><meta name="viewport" content="width=device-width, initial-scale=1.0"><meta http-equiv="X-UA-Compatible" content="ie=edge"><title>Document</title>
</head>
<body><template id="geekbang-t"><style>p {background-color: brown;color: cornsilk;}div {width: 200px;background-color: bisque;border: 3px solid red;border-radius: 10px;}</style><div><p>time.geekbang.org</p><p>time1.geekbang.org</p></div><script>function foo() {console.log('foo')}</script></template><script>class Geekbang extends HTMLElement {constructor() {super();// 获取组件模板const content = document.getElementById('geekbang-t').content// 创建影子DOM节点const shadowDOM = this.attachShadow({ mode: 'open' })// 将模板添加到影子DOM上shadowDOM.appendChild(content.cloneNode(true))}}customElements.define('geek-bang', Geekbang)</script><geek-bang></geek-bang><geek-bang></geek-bang><div><p>time.geekbang.org</p><p>time1.geekbang.org</p></div>
</body>
reverse 是个 prop ,控制时间轴是顺序展示还是倒序展示,这个在父组件来控制是最好不过的(当然,你也可以把传入的数组排序好也是一样的)。
timeline-item
核心都在这个里面,我们先来分析一下 DOM 结构,以便确定怎么构建 HTML 结构
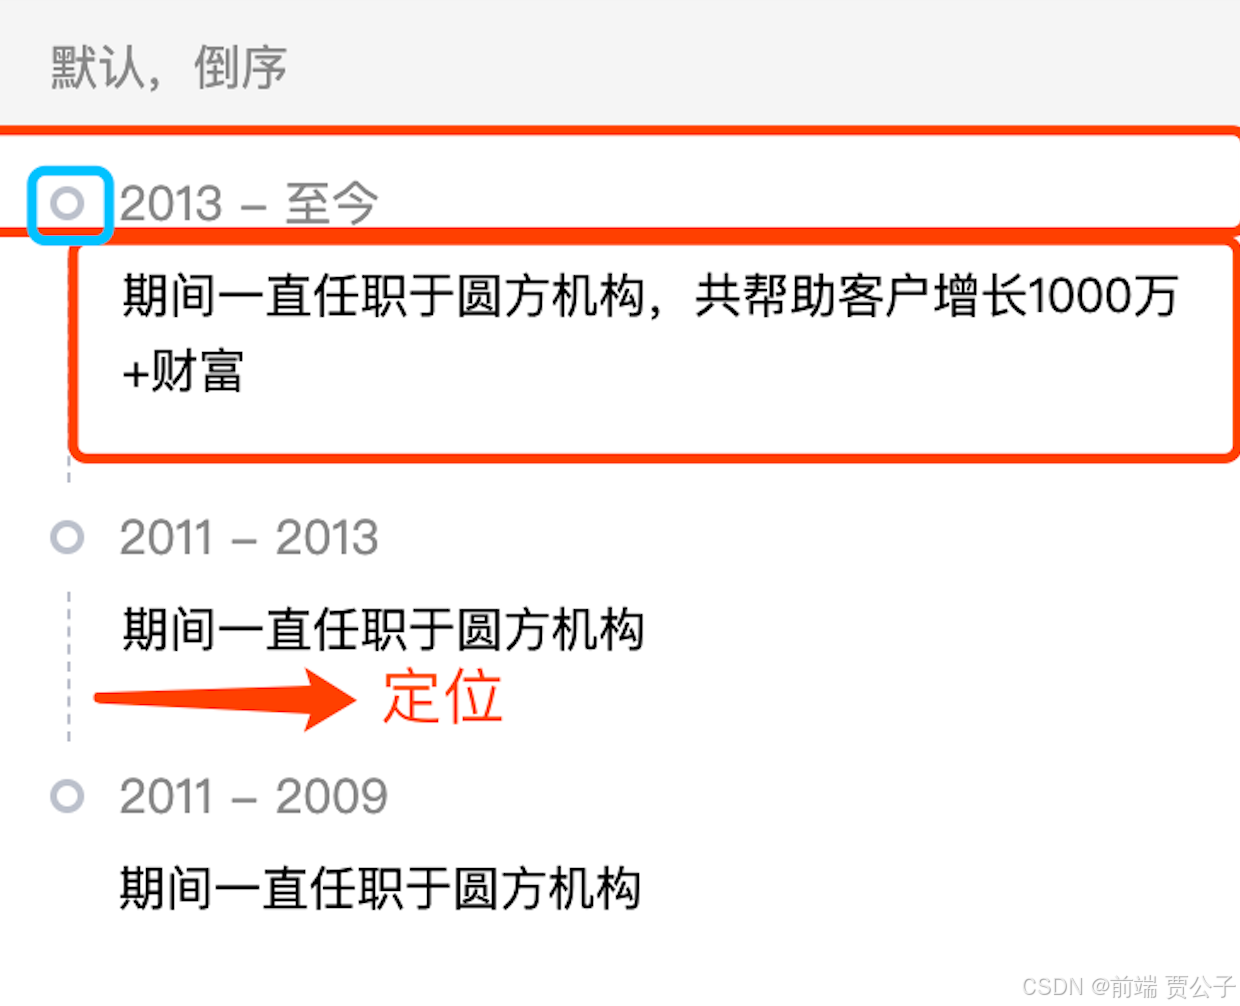
排序:父子组件间关系
组件间关系这是这个组件最关键的地方,不同于 Vue.js 组件方案,只有实现这个才能实现在 timeline 上实现 reverse。关于组件的关联关系详细可以看文档。
在 timeline/index.js 和 timeline-item/index.js 中分别定义 timeline 是 timeline-item 的父级,timeline-item 是 timeline 的子级,由 relations 选项来定义。关键是确定最后一个节点,因为最后一个节点是没有连接线的,这个需要处理
(其实数据不复杂的情况下更建议对传入的数组进行排序,这样就不需要处理 DOM 结构了)。
timeline/index.js
relations: {'./timeline-item/index': {type: 'child',linked: function (target) {// 每次有custom-li被插入时执行,target是该节点实例对象,触发在该节点attached生命周期之后this._getAllChildren()},unlinked: function (target) {this._getAllChildren()}}},
timeline-item/index.js
relations: {'../../timeline/index': {type: 'parent'}},
有了关联关系,我们可以调用 this.getRelationNodes 方法获取所有的子节点,这个写在 timeline-item/index.js 中
methods: {_getAllChildren() {const nodes = this.getRelationNodes('./timeline-item/index')if (nodes.length) {const lastIndex = nodes.length - 1const { reverse } = this.datanodes.forEach((element, index) => {const isLast = index === lastIndexelement.updateIsLastElement({index,isLast,reverse})})}}
}
然后遍历每一个子节点,调用子节点 methods 中的 updateIsLastElement 处理方法。这里需要特别注意的是 在 unlinked 中也要再次调用 _getAllChildren ,因为当使用 setData 删除一个子项时需要重新计算子节点个数。
所谓的排序,就是 Flex CSS 操作而已
.pps-timeline.desc {display: flex;flex-direction: column;
}
.pps-timeline.asc {display: flex;flex-direction: column-reverse;
}
这个组件还有很多可以改进的地方,这里作为一种思路吧。
注意
在引用小程序端的时候,父子组件都需要在 json 中引入,如果你的项目是用 npm 进行管理的,那么不要在全局的 app.json 中引入,要在使用的页面中引入,否则引用不到。
完整代码
timeline-item
js
import styleToCssString from '../utils/styleToCssString.js'
Component({options: {addGlobalClass: true,multipleSlots: true,},externalClasses: ["timestamp-class", "content-class"],relations: {"../../timeline/index": {type: "parent",},},properties: {timestamp: String,customDot: Boolean,dotStyle: {optionalTypes: [String, Object],value: "",observer(newVal) {console.log("styleToCssString", styleToCssString(newVal));this.setData({extStyle: styleToCssString(newVal),});},},color: {type: String,value: "currentColor",observer(newVal) {if (newVal) {let extStyle = this.data.extStyle;if (extStyle) {extStyle = extStyle + ";";}this.setData({extStyle: extStyle + `color:${newVal}`,});}},},},data: {index: 0,isLast: false,reverse: true,extStyle: "",},methods: {updateIsLastElement({ index, isLast, reverse }) {this.setData({ index, isLast, reverse });},},
});
wxml
<view class="pps-timeline-item"><view class="item-wrapper"> <view class="item-timestamp"><view class="timestamp-class"><!-- 自定义点 --><slot wx:if="{{customDot}}" name="dot"></slot><!-- 默认点 --><text wx:else class="dot" style="{{ extStyle }}"></text><text class="timestamp" style="color:{{color}}">{{timestamp}}</text></view><!--  操作 --><slot name="operation" /></view><!-- 内容  如果是倒序 则隐藏最后一个 --><view wx:if="{{reverse}}" class="item-desc content-class {{isLast?'hiddenBorder':''}}"><slot /></view><!-- 内容  如果是正序 则隐藏第一个 --><view wx:else class="item-desc content-class {{index == 0?'hiddenBorder':''}}"><slot /></view></view>
</view>
css
.pps-timeline-item {font-size: 28rpx;
}.item-wrapper .item-timestamp {display: flex;justify-content: space-between;font-family: PingFangSC-Regular;color: #888;
}
.item-wrapper .dot {display: inline-block;width: 14rpx;height: 14rpx;background: #fff;border: 2px solid #bcc1cc;border-radius: 50%;
}
.item-wrapper .timestamp {margin-left: 20rpx;
}
.item-wrapper .item-desc {/* border-left: 2rpx dashed #BCC0CC; */position: relative;line-height: 44rpx;padding-bottom: 44rpx;margin-left: 5px;margin-top: 6px;margin-bottom: 6px;padding-left: 30rpx;word-wrap:break-word;
}
.item-wrapper .item-desc::after{content: "";position: absolute;left: 0;top: 0;bottom: 0;width: 2rpx;border-left: 2rpx dashed #BCC0CC;/* transform: translateX(-50%); */
}
.item-wrapper .item-desc.hiddenBorder::after {border-left: 0rpx;
}
json
{"component": true,"usingComponents": {}
}
timeline
js
Component({options: {// 开启全局样式支持addGlobalClass: true,// 开启多Slot支持multipleSlots: false,},//  外部样式类 externalClasses: ["custom-class"],//  relations 关系组件relations: {"./timeline-item/index": {type: "child",linked: function (target) {// 每次有custom-li被插入时执行,target是该节点实例对象,触发在该节点attached生命周期之后this._getAllChildren();},unlinked: function (target) {// 每次有custom-li被移除时执行,target是该节点实例对象,触发在该节点detached生命周期之后this._getAllChildren();},},},properties: {// 是否倒叙reverse: {type: Boolean,value: true,},},methods: {_getAllChildren() {// 获取所有子节点const nodes = this.getRelationNodes("./timeline-item/index");if (nodes.length) {// 最后一个节点索引const lastIndex = nodes.length - 1;// 倒叙const { reverse } = this.data;nodes.forEach((element, index) => {// 最后一个节点const isLast = index === lastIndex;element.updateIsLastElement({index,isLast,reverse,});});}},},
});
wxml
<view class="pps-timeline custom-class {{reverse?'desc':'asc'}}"><slot />
</view>
wxss
.pps-timeline.desc{display: flex;flex-direction: column;
}
.pps-timeline.asc{display: flex;flex-direction: column-reverse;
}
json
{"component": true,"usingComponents": {"pps-timeline-item": "./timeline-item/index"}
}
styleToCssString.js
'use strict';/*** CSS properties which accept numbers but are not in units of "px".*/
var isUnitlessNumber = {boxFlex: true,boxFlexGroup: true,columnCount: true,flex: true,flexGrow: true,flexPositive: true,flexShrink: true,flexNegative: true,fontWeight: true,lineClamp: true,lineHeight: true,opacity: true,order: true,orphans: true,widows: true,zIndex: true,zoom: true,// SVG-related propertiesfillOpacity: true,strokeDashoffset: true,strokeOpacity: true,strokeWidth: true
};/*** @param {string} prefix vendor-specific prefix, eg: Webkit* @param {string} key style name, eg: transitionDuration* @return {string} style name prefixed with `prefix`, properly camelCased, eg:* WebkitTransitionDuration*/
function prefixKey(prefix, key) {return prefix + key.charAt(0).toUpperCase() + key.substring(1);
}/*** Support style names that may come passed in prefixed by adding permutations* of vendor prefixes.*/
var prefixes = ['Webkit', 'ms', 'Moz', 'O'];// Using Object.keys here, or else the vanilla for-in loop makes IE8 go into an
// infinite loop, because it iterates over the newly added props too.
Object.keys(isUnitlessNumber).forEach(function (prop) {prefixes.forEach(function (prefix) {isUnitlessNumber[prefixKey(prefix, prop)] = isUnitlessNumber[prop];});
});var msPattern = /^ms-/;var _uppercasePattern = /([A-Z])/g;/*** Hyphenates a camelcased string, for example:**   > hyphenate('backgroundColor')*   < "background-color"** For CSS style names, use `hyphenateStyleName` instead which works properly* with all vendor prefixes, including `ms`.** @param {string} string* @return {string}*/
function hyphenate(string) {return string.replace(_uppercasePattern, '-$1').toLowerCase();
}/*** Hyphenates a camelcased CSS property name, for example:**   > hyphenateStyleName('backgroundColor')*   < "background-color"*   > hyphenateStyleName('MozTransition')*   < "-moz-transition"*   > hyphenateStyleName('msTransition')*   < "-ms-transition"** As Modernizr suggests (http://modernizr.com/docs/#prefixed), an `ms` prefix* is converted to `-ms-`.** @param {string} string* @return {string}*/
function hyphenateStyleName(string) {return hyphenate(string).replace(msPattern, '-ms-');
}var isArray = Array.isArray;
var keys = Object.keys;var counter = 1;
// Follows syntax at https://developer.mozilla.org/en-US/docs/Web/CSS/content,
// including multiple space separated values.
var unquotedContentValueRegex = /^(normal|none|(\b(url\([^)]*\)|chapter_counter|attr\([^)]*\)|(no-)?(open|close)-quote|inherit)((\b\s*)|$|\s+))+)$/;function buildRule(key, value) {if (!isUnitlessNumber[key] && typeof value === 'number') {value = '' + value + 'px';} else if (key === 'content' && !unquotedContentValueRegex.test(value)) {value = "'" + value.replace(/'/g, "\\'") + "'";}return hyphenateStyleName(key) + ': ' + value + ';  ';
}function styleToCssString(rules) {var result = ''if (typeof rules === 'string') {return rules}if (!rules || keys(rules).length === 0) {return result;}var styleKeys = keys(rules);for (var j = 0, l = styleKeys.length; j < l; j++) {var styleKey = styleKeys[j];var value = rules[styleKey];if (isArray(value)) {for (var i = 0, len = value.length; i < len; i++) {result += buildRule(styleKey, value[i]);}} else {result += buildRule(styleKey, value);}}return result;
}export default styleToCssString