Vue3 计算属性与监听器
文章目录
- 计算属性配置项 computed
- HTML 结构
- Vue 实例
- 数据
- 方法
- 计算属性
- 绑定数据和方法
- 完整代码
- vue3商品加减案例
- 监听器配置项 watch
- 简单类型写法
- 深度监听写法
计算属性配置项 computed
使用 Vue 实现一个商品价格计算器,设置一个初始单价,初始数量为 1,用户可以通过加减按钮修改数量,并实时计算出总价。
下面将一步步详细解释上述代码的实现过程
HTML 结构
首先,我们需要在 HTML 文件中添加一个 div 元素作为 Vue 应用的根元素,并给其一个 id 值作为挂载点:
<div id="app"><!-- 在这里添加商品价格计算器的 HTML 结构 -->
</div>
在这个 div 元素中,我们可以添加一个标题标签、三个段落标签,前两个段落标签显示单价和数量,第三个段落标签用于显示计算出来的总价,其中加减按钮用于增加或减少数量:
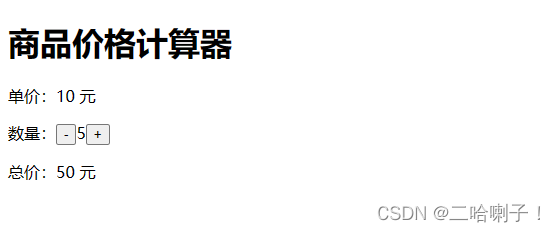
<h1>商品价格计算器</h1>
<p>单价:{{ price }}</p>
<p>数量: <button v-show="num>0" @click="minus">-</button>{{num}}<button @click="plus">+</button></p>
<p>总价:{{ total }}</p>
这里我们使用了 Vue 的模板语法,通过 {{ }} 将数据绑定到 HTML 中。
Vue 实例
接下来,在 JavaScript 文件中创建一个 Vue 实例,将其挂载到 HTML 页面中的 div#app 元素上:
<script src="../js/vue3.js"></script>
<script>let vm = Vue.createApp({data() {return {price: 998,num: 1}},methods: {minus(){this.num--},plus(){this.num++}},// 计算属性配置项 实际应用中 某个数据是需要使用data中其他数据计算得到computed:{// 计算属性的具体配置是函数形式total(){// 必须返回一个数据return this.num*this.price}}})vm.mount('#app')
</script>
在 Vue 实例的选项中,我们需要先定义一些数据和方法。
数据
首先,我们需要设置一个初始单价、初始数量和总价的值,这里我们设置单价为 998 元,数量为 1,总价为 998 元:
data() {return {price: 998,num: 1}
},
这里使用了 Vue 实例的 data 选项,用于定义数据和变量。
方法
接着,我们需要定义两个方法 plus 和 minus,用于增加或减少商品数量,并且实时计算出总价:
methods: {minus(){this.num--},plus(){this.num++}
}
这里我们使用了 Vue 实例的 methods 选项,用于定义方法。
计算属性
使用 computed 选项定义一个计算属性 total,用于计算商品的总价,其中计算方法是将 num 值乘以 price 值:
computed:{// 计算属性的具体配置是函数形式total(){// 必须返回一个数据return this.num*this.price}
}
绑定数据和方法
最后,我们需要将定义好的数据和方法绑定到 HTML 页面中的模板语法中:
<p>单价:{{ price }}</p>
<p>数量: <button v-show="num>0" @click="minus">-</button>{{num}}<button @click="plus">+</button></p>
<p>总价:{{ total }}</p>
这里使用了 Vue 的模板语法,通过 {{ }} 将数据绑定到 HTML 中,通过 v-show 和 @click 将方法绑定到按钮的点击事件上。
完整代码
综上,以下是完整的商品价格计算器代码:
<!DOCTYPE html>
<html lang="en">
<head><meta charset="UTF-8"><title>商品价格计算器</title>
</head>
<body><div id="app"><h1>商品价格计算器</h1><p>单价:{{ price }}</p><p>数量: <button v-show="num>0" @click="minus">-</button>{{num}}<button @click="plus">+</button></p><p>总价:{{ total }}</p><!-- 计算属性的使用直接通过插值语法使用 --></div><script src="../js/vue3.js"></script><script>let vm = Vue.createApp({data() {return {price: 998,num: 1}},methods: {minus(){this.num--},plus(){this.num++}},// 计算属性配置项 实际应用中 某个数据是需要使用data中其他数据计算得到computed:{// 计算属性的具体配置是函数形式total(){// 必须返回一个数据return this.num*this.price}}})vm.mount('#app')</script>
</body>
</html>
输出效果:
vue3商品加减案例
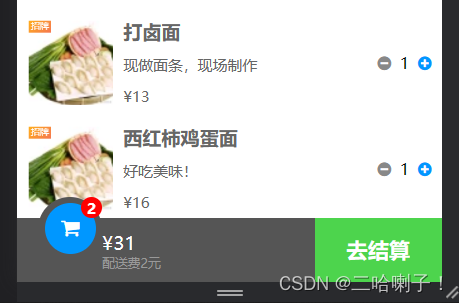
这段代码是商家信息页面的 Vue 组件,主要作用是展示商家的基本信息和食品列表,并实现选择食品和结算功能。
它通过发送请求获取商家信息和食品列表数据,并在页面中展示出来。
用户可以通过点击加号和减号来选择需要购买的食品,同时底部购物车栏会实时更新已选择的食品的数量和总价格。
当用户点击去结算按钮时,会跳转到订单页面并将已选择的食品和总价格存储到 sessionStorage 中。
在页面加载前,组件会从 sessionStorage 中获取商家信息。
详细代码:
template 页面布局部分
<!-- 食品列表 --><ul class="choese"><li class="choese-img" v-for="(food, index) in foods" :key="index"><div><img src="../assets/img/sp01.png" alt=""><div><p>{{ food.foodName }}</p><p>{{ food.foodExplain }}</p><p>¥{{ food.foodPrice }}</p></div></div><div><i class="fa fa-minus-circle" @click="minus(index)"></i><span id="num">{{ food.num }}</span><i class="fa fa-plus-circle" @click="add(index)"></i></div></li></ul><!-- 底部购物车栏 --><div class="bottom-tab"><div><div><p>¥{{ allmoney }}</p><p>配送费{{ this.business.deliveryPrice }}元</p></div><div><div><i class="fa fa-shopping-cart fa-lg"></i></div></div><div>{{ allnum }}</div></div><div id="pay" @click="gotoOrders">去结算</div></div></div>
script 部分主要定义了数据和方法,computed 部分定义了计算属性,watch 部分监听总价格变化,beforeMount 和 mounted 部分则分别在挂载前和挂载后发送请求获取数据。
<script>
import router from '@/router';
import axios from 'axios';export default {data () {return {// 商家信息business: {},// 食品列表foods: [],// 已选择的食品buyfoods: [],// 底部购物车栏样式paystyle: {pointerEvents: 'none',backgroundColor: 'gray'}}},methods: {// 去结算gotoOrders() {let login = sessionStorage.getItem('login')if (login == null) {router.push('/login')} else {// 跳转到订单页面router.push('/orders')// 筛选已选择的食品this.buyfoods = this.foods.filter((food) => {return food.num > 0})// 将已选择的食品和总价格存储到 sessionStoragesessionStorage.setItem('buyfoods',JSON.stringify(this.buyfoods))sessionStorage.setItem('allmoney',this.allmoney)}},// 增加已选择的食品数量add(index) {this.foods[index].num++},// 减少已选择的食品数量minus(index) {if (this.foods[index].num>0) {this.foods[index].num--}}},components: {},computed: {// 所有已选择食品的数量allnum() {let allnum = 0this.foods.forEach(food => {allnum += food.num});return allnum},// 所有已选择食品的总价格allmoney() {let allmoney = 0this.foods.forEach(food => {allmoney += food.foodPrice*food.num});allmoney += this.business.deliveryPricereturn allmoney}},watch: {// 监控总价格变化,根据商家的起送价格调整底部购物车栏样式allmoney(newVal,oldVal) {if (newVal > this.business.startPrice) {this.paystyle.pointerEvents = 'auto'this.paystyle.backgroundColor = 'rgb(77, 212, 77)'} else {this.paystyle.pointerEvents = 'none'this.paystyle.backgroundColor = 'gray'}}},// 生命周期钩子,在挂载前从 sessionStorage 中获取商家信息,并发送请求获取食品列表beforeMount(){this.business = JSON.parse(sessionStorage.getItem('business'))},mounted () {axios.get(`http://localhost:8888/elmjavaweb/food?businessId=${this.business.businessId}&action=query&foodName=&foodExplain=`).then((resp) => {this.foods = resp.data// 定义已选择的食品数量为 0this.foods.forEach(food => {food['num'] = 0});})},
}
</script>
样式部分定义了页面样式。
<style scoped>
/* 定义页面元素的样式 */
.wrapper{margin-bottom: 14vw;  /* 下边距为14vw */width: 100vw;  /* 宽度为100vw */
}
.location{width: 100vw;  /* 宽度为100vw */height: 12vw;  /* 高度为12vw */background-color: #0097ff;  /* 背景颜色为#0097ff */font-size: 3.5vw;  /* 字体大小为3.5vw */color: white;  /* 字体颜色为白色 */display: flex;  /* 设置为弹性盒子布局 */justify-content: center;  /* 主轴居中对齐 */align-items: center;  /* 交叉轴居中对齐 */font-size: 5vw;  /* 字体大小为5vw */
}
.business-img{width: 100vw;  /* 宽度为100vw */height: 60vw;  /* 高度为60vw */display: flex;  /* 设置为弹性盒子布局 */flex-direction: column;  /* 垂直方向排列 */align-items: center;  /* 交叉轴居中对齐 */
}
.business-img img{width: 40vw;  /* 宽度为40vw */height: 30vw;  /* 高度为30vw */margin-top: 3vw;  /* 上边距为3vw */margin-bottom: 3vw;  /* 下边距为3vw */
}
.business-img p:first-of-type{font-size: 5vw;  /* 字体大小为5vw */font-weight: bold;  /* 字体加粗 */
}
.business-img p:nth-of-type(2),p:last-of-type{color: #666;  /* 字体颜色为#666 */margin-top: 2vw;  /* 上边距为2vw */
}
.choese{width: 100vw;  /* 宽度为100vw */display: flex;  /* 设置为弹性盒子布局 */flex-direction: column;  /* 垂直方向排列 */margin-top: 0;  /* 上边距为0 */
}
.choese-img{height: 25vw;  /* 高度为25vw */display: flex;  /* 设置为弹性盒子布局 */justify-content: space-between;  /* 主轴空间平均分配 */align-content: center;  /* 交叉轴居中对齐 */margin-top: 0;  /* 上边距为0 */
}
.choese-img div:first-of-type{display: flex;  /* 设置为弹性盒子布局 */
}
.choese-img div:first-of-type img{width: 20vw;  /* 宽度为20vw */height: 20vw;  /* 高度为20vw */margin: 2.5vw;  /* 上下左右边距均为2.5vw */
}
.choese-img div:first-of-type div{display: flex;  /* 设置为弹性盒子布局 */flex-direction: column;  /* 垂直方向排列 */align-items: start;  /* 交叉轴起始对齐 */justify-content: space-around;  /* 主轴空间平均分配 */
}
.choese-img div:first-of-type div p{color: #666;  /* 字体颜色为#666 */font-size: 3.5vw;  /* 字体大小为3.5vw */
}
.choese-img div:first-of-type div p:first-of-type{font-weight: bold;  /* 字体加粗 */font-size: 4.5vw;  /* 字体大小为4.5vw */margin: 2vw 0;  /* 上边距为2vw,下边距为0 */
}
.choese-img div:first-of-type div p:last-of-type{margin-bottom: 2vw;  /* 下边距为2vw */
}
.choese-img div:last-of-type{display: flex;  /* 设置为弹性盒子布局 */justify-content: center;  /* 主轴居中对齐 */align-items: center;  /* 交叉轴居中对齐 */margin-top: 0;  /* 上边距为0 */margin-right: 2.5vw;  /* 右边距为2.5vw */
}
.fa-plus-circle{margin-top: 0;  /* 上边距为0 */color: #0097ff;  /* 字体颜色为#0097ff */
}
.fa-minus-circle{color: #888;  /* 字体颜色为#888 */
}
.bottom-tab{width: 100vw;  /* 宽度为100vw */height: 15vw;  /* 高度为15vw */position: fixed;  /* 定位方式为fixed */left: 0;  /* 左边距为0 */bottom: 0;  /* 下边距为0 */display: flex;  /* 设置为弹性盒子布局 */margin-top: 0;  /* 上边距为0 */
}
.bottom-tab div:first-of-type{background-color: #555;  /* 背景颜色为#555 */flex: 7;  /* 弹性盒子占据7份空间 */display: flex;  /* 设置为弹性盒子布局 */justify-content: center;  /* 主轴居中对齐 */
}
.bottom-tab div:first-of-type div:first-of-type{display: flex;  /* 设置为弹性盒子布局 */flex-direction: column;  /* 垂直方向排列 */align-items: start;  /* 交叉轴起始对齐 */color: #fff;  /* 字体颜色为白色 */font-size: 4.5vw;  /* 字体大小为4.5vw */margin-left: 20vw;  /* 左边距为20vw */
}
.bottom-tab div:first-of-type div:nth-of-type(2){position: fixed;  /* 定位方式为fixed */background-color: #555;  /* 背景颜色为#555 */width: 15vw;  /* 宽度为15vw */height: 15vw;  /* 高度为15vw */border-radius: 10vw;  /* 边框半径为10vw */left: 5vw;  /* 左边距为5vw */bottom: 5vw;  /* 下边距为5vw */
}
.bottom-tab div:first-of-type div:nth-of-type(2) div{width: 12vw;  /* 宽度为12vw */height: 12vw;  /* 高度为12vw */border-radius: 10vw;  /* 边框半径为10vw */background-color: #0097ff;  /* 背景颜色为#0097ff */display: flex;  /* 设置为弹性盒子布局 */justify-content: center;  /* 主轴居中对齐 */align-items: center;  /* 交叉轴居中对齐 */position: fixed;  /* 定位方式为fixed */margin: 0;  /* 边距为0 */left: 6.5vw;  /* 左边距为6.5vw */bottom: 6.5vw;  /* 下边距为6.5vw */
}
.bottom-tab div:first-of-type div:last-of-type{background-color: red;  /* 背景颜色为红色 */position: fixed;  /* 定位方式为fixed */width: 5vw;  /* 宽度为5vw */height: 5vw;  /* 高度为5vw */border-radius: 5vw;  /* 边框半径为5vw */font-size: 3.5vw;  /* 字体大小为3.5vw */left: 15vw;  /* 左边距为15vw */bottom: 15vw;  /* 离页面底部距离15vw */
}
.bottom-tab div:first-of-type div:first-of-type p:last-of-type{margin-top: 0; /* 上边距0 */font-size: 3vw; /* 字体大小3vw */color: #999; /* 字体颜色#999 */
}
.bottom-tab div:last-of-type{flex: 3;  /* flex子项占比3 */background-color: rgb(77, 212, 77);  /* 背景色rgb(77, 212, 77) */margin-top: 0;  /* 上边距0 */color: #fff;  /* 字体颜色白色 */display: flex;  /* 布局方式:flex */justify-content: center;  /* 在flex容器里居中显示 */align-items: center;  /* 在flex容器里居中显示 */font-size: 5vw;  /* 字体大小5vw */font-weight: bold; /* 字体加粗 */
}
#num{margin: 0 2vw;  /* 左右边距2vw */
}
</style>
监听器配置项 watch
提示:这里可以添加本文要记录的大概内容:
监听器配置项:监听某个数据的变化
定义函数:函数名必须是监听的数据名
Vue 调用此函数时会传入两个参:新值、旧值
Vue3 的监听器可以监听 Vue 实例中某个数据的变化,当这个数据变化时,就会自动执行相应的函数,这样可以实现一些自动更新页面、数据校验等功能。
具体来说,监听器主要有以下作用:
-
自动更新页面:当 Vue 实例的某个数据变化时,监听器可以自动更新相关的页面内容,而不需要手动修改 DOM。
-
数据校验:当 Vue 实例中的某个数据变化时,可通过监听器对输入的数据进行校验,保证数据的有效性。
-
数据同步:当 Vue 实例中的某个数据绑定到多个组件中时,可通过监听器实现数据的同步,保证数据的一致性。
-
监控数据变化:当 Vue 实例中的某个数据发生变化时,通过监听器可以获取到新旧值,从而实现数据的监控和统计。
Vue3 监听器是 Vue3 中非常重要的一个特性,它可以让我们的开发变得更加高效和灵活,使得我们能够更好地处理和管理数据。
简单类型写法
【示例代码】:
让数据减到零不再往下减
<!DOCTYPE html>
<html lang="en">
<head><meta charset="UTF-8"><meta name="viewport" content="width=device-width, initial-scale=1.0"><title>Document</title>
</head>
<body><div id="app"><button @click="minus">-</button>{{num}}</div>
</body>
<script src="../js/vue3.js"></script>
<script>let vm = Vue.createApp({data() {return {num: 1}},methods: {minus(){this.num--}},})vm.mount('#app')
</script>
</html>
这段代码使用了 Vue3 的 createApp 方法创建了一个 Vue 实例 vm,实现了一个简单的计数器功能,点击按钮可以将 num 值递减。具体解释如下:
-
首先,使用 createApp 方法创建了一个 Vue 实例 vm,这个实例包含了 data、methods 等选项。
-
在 data 中定义了 num 属性,初始值为 1。
-
在 methods 中定义了一个 minus 方法,当按钮被点击时,会将 num 的值减 1。
-
最后,使用 vm.mount 方法将 Vue 实例挂载到页面上的 #app 元素上,使其生效。
但是现在可以减到负数
接下来加上监听器,用这种方式控制num的数量,到零就不在让他往下减
// 监听器配置项:监听某个数据的变化watch: {// 定义函数 函数名必须是监听的数据名// Vue 调用此函数时会传入两个参 新值 旧值num(a,b){this.num = a<0?0:a// a<0吗?如果小于0正常赋值}}
深度监听写法
如果监听的事件在对象中,那么监听器的写法必须是深度监听写法
<!DOCTYPE html>
<html lang="en">
<head><meta charset="UTF-8"><meta name="viewport" content="width=device-width, initial-scale=1.0"><title>Document</title>
</head>
<body><div id="app"><button @click="minus">-</button>{{goods.num}}</div>
</body>
<script src="../js/vue3.js"></script>
<script>let vm = Vue.createApp({data() {return {goods: {num: 1}}},methods: {minus(){this.goods.num--}},// 监听器配置项:监听某个数据的变化watch: {// 如果监听的事件在对象中,那么监听器的写法必须是深度监听写法goods:{deep:true,handler(a,b){this.goods.num = a.num<0?0:a.num}}}})vm.mount('#app')
</script>
</html>