vue3入门-概览讲解
- 创建项目
- 基本结构
- vue2/3风格对比
- setup
- 生命周期
- Hooks函数
创建项目
前提条件:已安装 18.3 或更高版本的 Node.js。创建的项目将使用基于 Vite 的构建设置。
npm create vue@latest
这一指令将会安装并执行 create-vue,它是 Vue 官方的项目脚手架工具。
推荐的 IDE 配置是 Visual Studio Code + Vue - Official 扩展。
这里我们讨论下为什么使用 Vite 进行项目的构建,而不是 vue2 所用的 webpack。
我们回忆下 webpack 的启动方式,就能理解为什么这里用 vite 来替代。
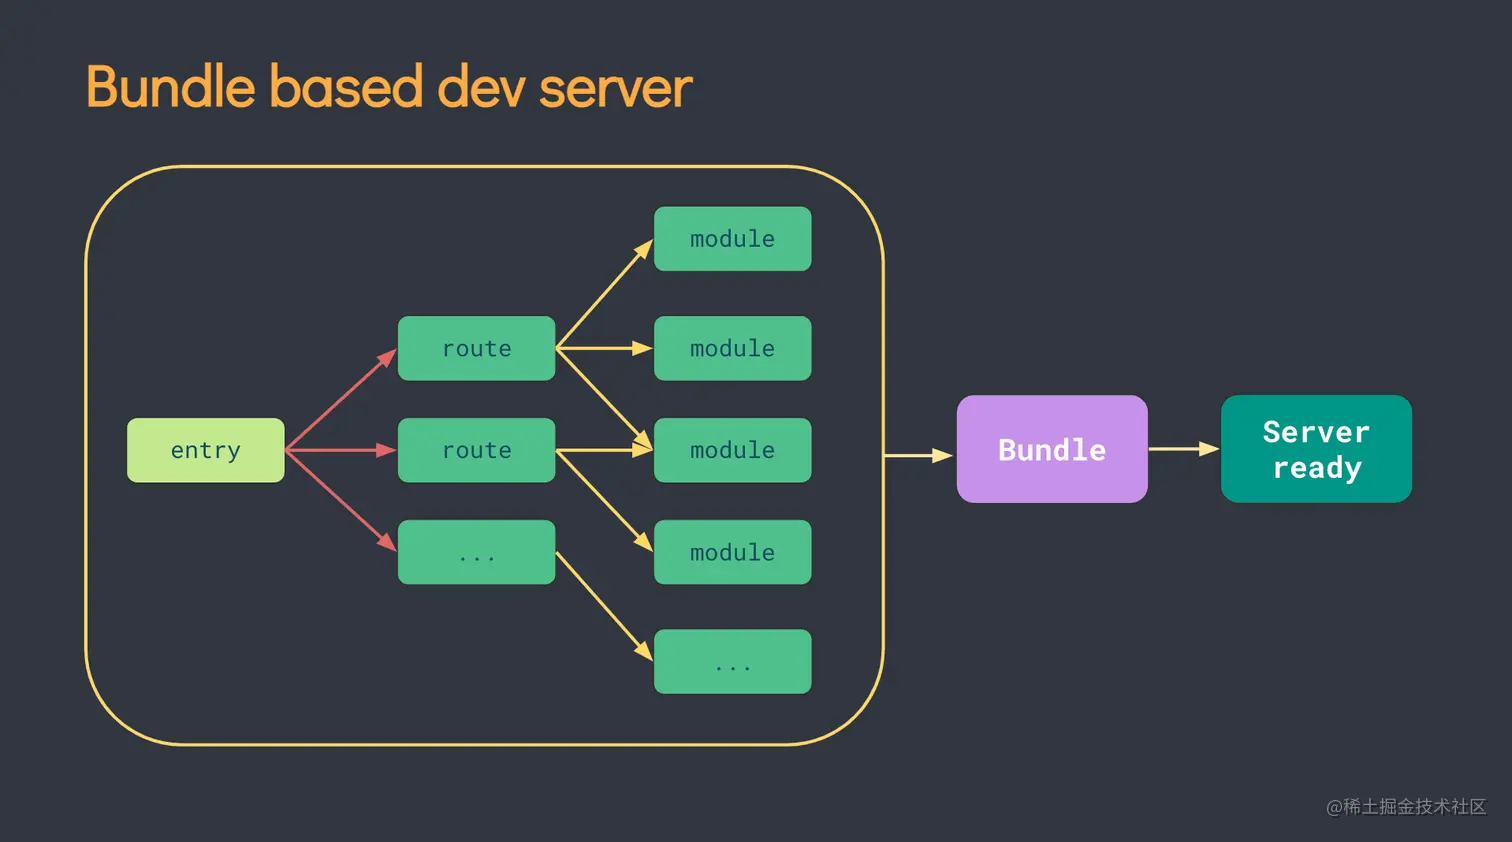
webpack 是一开始是入口文件,然后分析路由,然后模块,然后对整个应用进行构建打包,最后才能提供服务。这种机制,启动及更新速度会随着应用体积增长而直线下降。
Vite 描述为下一代前端开发与构建工具。

它一开始并没有进行打包,而是快速的进行服务器启动,等待接收浏览器 HTTP 资源请求,请求进入入口文件,入口文件进行 Dynamic import(动态导入)和 code split point(代码分割),真正的按需编译,并即时进行模块热更新(HMR),原生 ESModule 通过 script 标签动态导入。
在打包方面,Vite 是用 rollup 进行打包的。
基本结构
入口文件 main.js:
import { createApp } from 'vue'
import './style.css'
import App from './App.vue'createApp(App).mount('#app')
引入的不是 new vue({ ... }) 构造函数,而是 createApp 工厂函数。
vue2.x示例
new Vue({el: '#app',render: h => h(App)
})
现在我们进入App组件,你会发现什么不一样的地方,他没有了根标签,在vue2 的时候,我们都是在根标签里面写东西,而在 vue3 里面可以没有根标签。
<template><div>......</div><HelloWorld msg="Vite + Vue" />
</template>
index.html
<body><div id="app"></div><script type="module" src="/src/main.js"></script>
</body>
Vite 项目中,index.html 是项目的入口文件,在项目最外层。加载 index.html 后,Vite 解析 <script type="module" src="xxx"></script> 指向的JavaScript
vue2/3风格对比
通过对比 vue2 选项式 Api 和 vue3 组合式 Api 实现同一个需求,理解 vue3 核心 Composition Api 带来的好处。
需求设计:
- 一个按钮控制div元素显示
- 一个按钮控制显示的div背景色为红色
vue2 选项式 Api 实现如下:
<template><div><button @click="showDiv">展示div</button><button v-if="isShow" @click="changeColor">切换背景色</button><div v-if="isShow" style="width: 100px;height:100px;" :style="{ background: divColor }"></div></div>
</template>
<script>export default {data() {return {isShow: false,divColor: '#eee',}},methods: {showDiv() {this.isShow  = true},changeColor() {this.divColor = 'red'}}}
</script>
那么我们再实现 vue3 组合式 Api 如下:
<template><button @click="showDiv">展示div</button><button v-if="isShow" @click="changeColor">切换背景色</button><div v-if="isShow" style="width: 100px;height:100px;" :style="{ background: divColor }"></div>
</template>
<script>
import { ref } from 'vue'export default {setup() {// 展示div相关逻辑const isShow = ref(false)const showDiv = function() {isShow.value = true}// 切换背景色相关逻辑const divColor = ref('#eee')const changeColor = function() {divColor.value = 'red'}return { isShow, showDiv, divColor, changeColor }}}
</script>
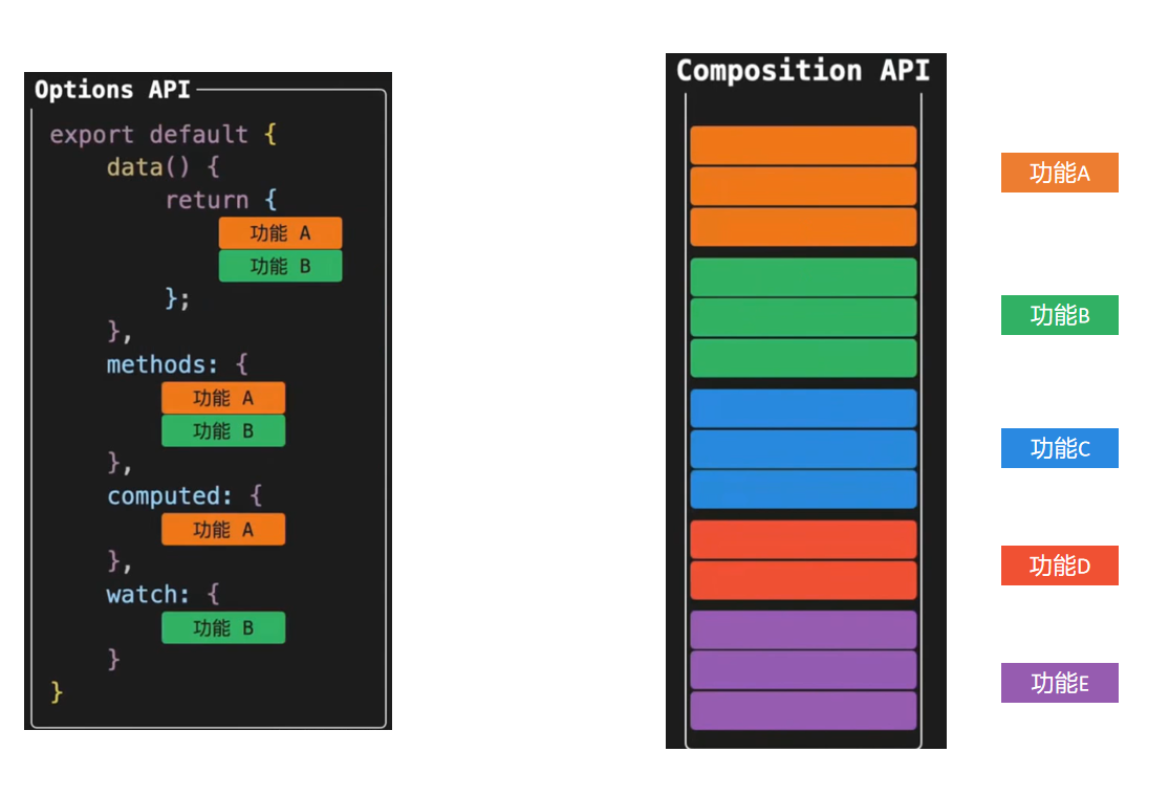
可以看到 vue3 组合式 Api 将同一段业务逻辑写在一块。而 vue2 选项式api则将同一段业务逻辑分散到vue已定义好的各个选项中。
大家可能会有疑惑,那我们现在是把功能相关的所有数据和行为放到一起维护了,如果应用很大功能很多的情况下,setup 函数不会变得很大吗?岂不是又会变得比较难维护,接下来我们就来拆解一下 setup 函数。
changeColor.js文件
import { ref } from 'vue'
export const isShow = ref(false)
export const showDiv = function() {isShow.value = true
}
showDiv.js文件
import { ref } from 'vue'
export const divColor = ref('#eee')
export const changeColor = function() {divColor.value = 'red'
}
<template><button @click="showDiv">展示div</button><button v-if="isShow" @click="changeColor">切换背景色</button><div v-if="isShow" style="width: 100px;height:100px;" :style="{ background: divColor }"></div>
</template>
<script>
import { isShow, showDiv } from './changeColor' // 展示div相关逻辑
import { divColor, changeColor } from './showDiv' // 切换背景色相关逻辑
export default {setup() {return { isShow, showDiv, divColor, changeColor }}
}
</script>
以上,我们把俩个功能相关的代码各自抽离到一个独立的文件中,然后通过在setup函数中再组合起来,这样一来,我们既可以把setup函数变得清爽,又可以方便维护快速定位功能位置。
在项目中,不同页面我们已经做到了共用组件,但当组件多到一定数量,就需要共用代码了。而组合式API可以做到。
如果能够将同一个逻辑关注点相关代码收集在一起会更好。而这正是组合式 API 使我们能够做到的。
选项式和组合式API的关系
- 组合式API的目的是增强,不是取代选项式API,vue3.x对俩种API都支持
- 简单的场景使用选项式API更加简单方便
- 需要强烈支持TS的项目首选组合式API
- 需要大量逻辑复用的场景首选组合式API
vue2.x 中 option API 特点是清晰明了,虽然配置项清晰,也导致了页面里的各种功能的data,methods等配置会写在一起,假如某个功能逻辑需要改动,则需要改变data,methods…项的相关内容,滚动翻看查找要改动的地方,一旦页面逻辑复杂就会混乱。实际不够清晰明了。
setup
setup 函数是一个新的组件选项,作为组件内使用Composition API(组合API)的入口。setup 函数只会在组件初始化的时候执行一次。
创建组件实例,props 被解析之后,接着调用 setup函数,在 beforeCreate 钩子之前调用,即组件被创建之前执行。
// 父组件
<template><myComponent msg="parent msg" @getMsg="getMsg" title="子组件"><div>默认slot填充内容</div></myComponent>
</template>
<script>
import myComponent from './components/myComponent.vue'
export default {components: { myComponent },setup() {const getMsg = function(msg) {console.log('get child msg ', msg)}return { getMsg }}
}
</script>
// 子组件
<template><button @click="sendMsgTopParent">{{ buttonText }}</button><slot></slot>
</template>
<script>
import { ref } from 'vue'
export default {props: {msg: {type: String}},computed:{buttonText(){return '发送消息到父组件'}},data() {return {sameName: 'data中的同名属性',}},emits: ['getMsg'],setup(props, { emit, attrs, slots }) {console.log('setup start', props, attrs, slots)const msgContent = ref('这是一条来自子组件的消息')const sameName = ref('setup中的同名属性')const sendMsgTopParent = () => {emit('getMsg', msgContent.value)}console.log('setup this', this) // setup this undefinedreturn { sendMsgTopParent , msgContent, sameName}},beforeCreate() {console.log('beforeCreate get this.msgContent', this.msgContent) // beforeCreate get this.msgContent 这是一条来自子组件的消息console.log('beforeCreate get sameName', this.sameName) // beforeCreate get sameName setup中的同名属性},created() {console.log('created get this.msgContent', this.msgContent)// created get this.msgContent 这是一条来自子组件的消息},
}
</script>
setup 返回一个对象,不然无法在模板中使用。对象的所有属性都可以直接在模板中使用。
setup 在 beforeCreate 之前执行,实例还没生成,this 拿不到,是 undefined。也就是不能通过 this 去调用 data methods props computed 里的变量或方法等相关内容了。我们要想一想之前为什么要用 this,还不是作用域的问题,然而这次我们都在 setup 里面,所以不会用到 this。
选项式Api(data、methods、computed…)中可以访问到 setup 中的属性、方法,但 setup 中不能访问 data、methos、computed…
如果有重名,setup 优先级更高(同名属性,data 中的数据优先级低于 setup 中的数据)
setup 不能是一个 async 函数,因为返回值不再是 return 的对象, 而是 promise, 模板看不到 return 对象中的属性
注意:尽量不要与选项式Api混用
setup 函数提供俩个参数,第一个参数为 props,第二个参数为一个对象 context。
props 为一个对象,内部包含了父组件传递过来的所有 prop 数据,context 对象包含了 attrs,slots,emit 属性,其中的 emit 可以触发自定义事件的执行从而完成子传父。
参数:
- props
- 值为对象 包含:组件外部传递过来,且组件内部声明接收了的属性
- context
- attrs:值为对象,包含:从组件外部传递过来,但没有在props配置中声明的属性,相当于this.$attrs
- slots:收到的插槽内容,相当于this.$slots
- emit:分发自定义事件的函数,相当于this.$emit
如果大家不喜欢 return 这样的写法的话,可以用 vue3 语法糖 <script setup>。 相当于在编译运行时把代码放到了 setup 函数中运行,然后把导出的变量定义到上下文中,并包含在返回的对象中。这样写,在标签内部声明的顶层变量方法包括 import 引入的内容都可以直接在模版里使用。
<script setup> 中可以使用顶层 await。结果代码会被编译成 async setup()。
上面示例代码按照 vue3 语法糖 <script setup> 修改后如下:
// 父组件
<template> <myComponent msg="parent msg" @getMsg="getMsg" title="子组件"><div>默认slot填充内容</div></myComponent>
</template>
<script setup>
import myComponent from './components/myComponent.vue'
const getMsg = function(msg) {console.log('get child msg ', msg)
}
</script>
// 子组件
<template><button @click="sendMsgTopParent">{{ buttonText }}</button><slot></slot>
</template>
<script setup>
import { useSlots, useAttrs, computed, ref, onBeforeMount, onMounted } from 'vue'
const props = defineProps({ msg: { type: String } })
const emit = defineEmits(['getMsg'])const slots = useSlots()
const attrs = useAttrs()const buttonText = computed(() => '发送消息到父组件')const msgContent = ref('这是一条来自子组件的消息')
const sameName = ref('setup中的属性名')console.log('setup start', props, attrs, slots)
const sendMsgTopParent = () => {emit('getMsg', msgContent.value)
}
console.log('setup this', this) // setup this undefined
onBeforeMount(() => {console.log('onBeforeMount get msgContent', msgContent.value) // onBeforeMount get msgContent 这是一条来自子组件的消息console.log('onBeforeMount get sameName', sameName.value) // onBeforeMount get sameName setup中的属性名
})
onMounted(() => {console.log('onMounted get msgContent', msgContent.value) // onMounted get msgContent 这是一条来自子组件的消息
})
</script>
生命周期
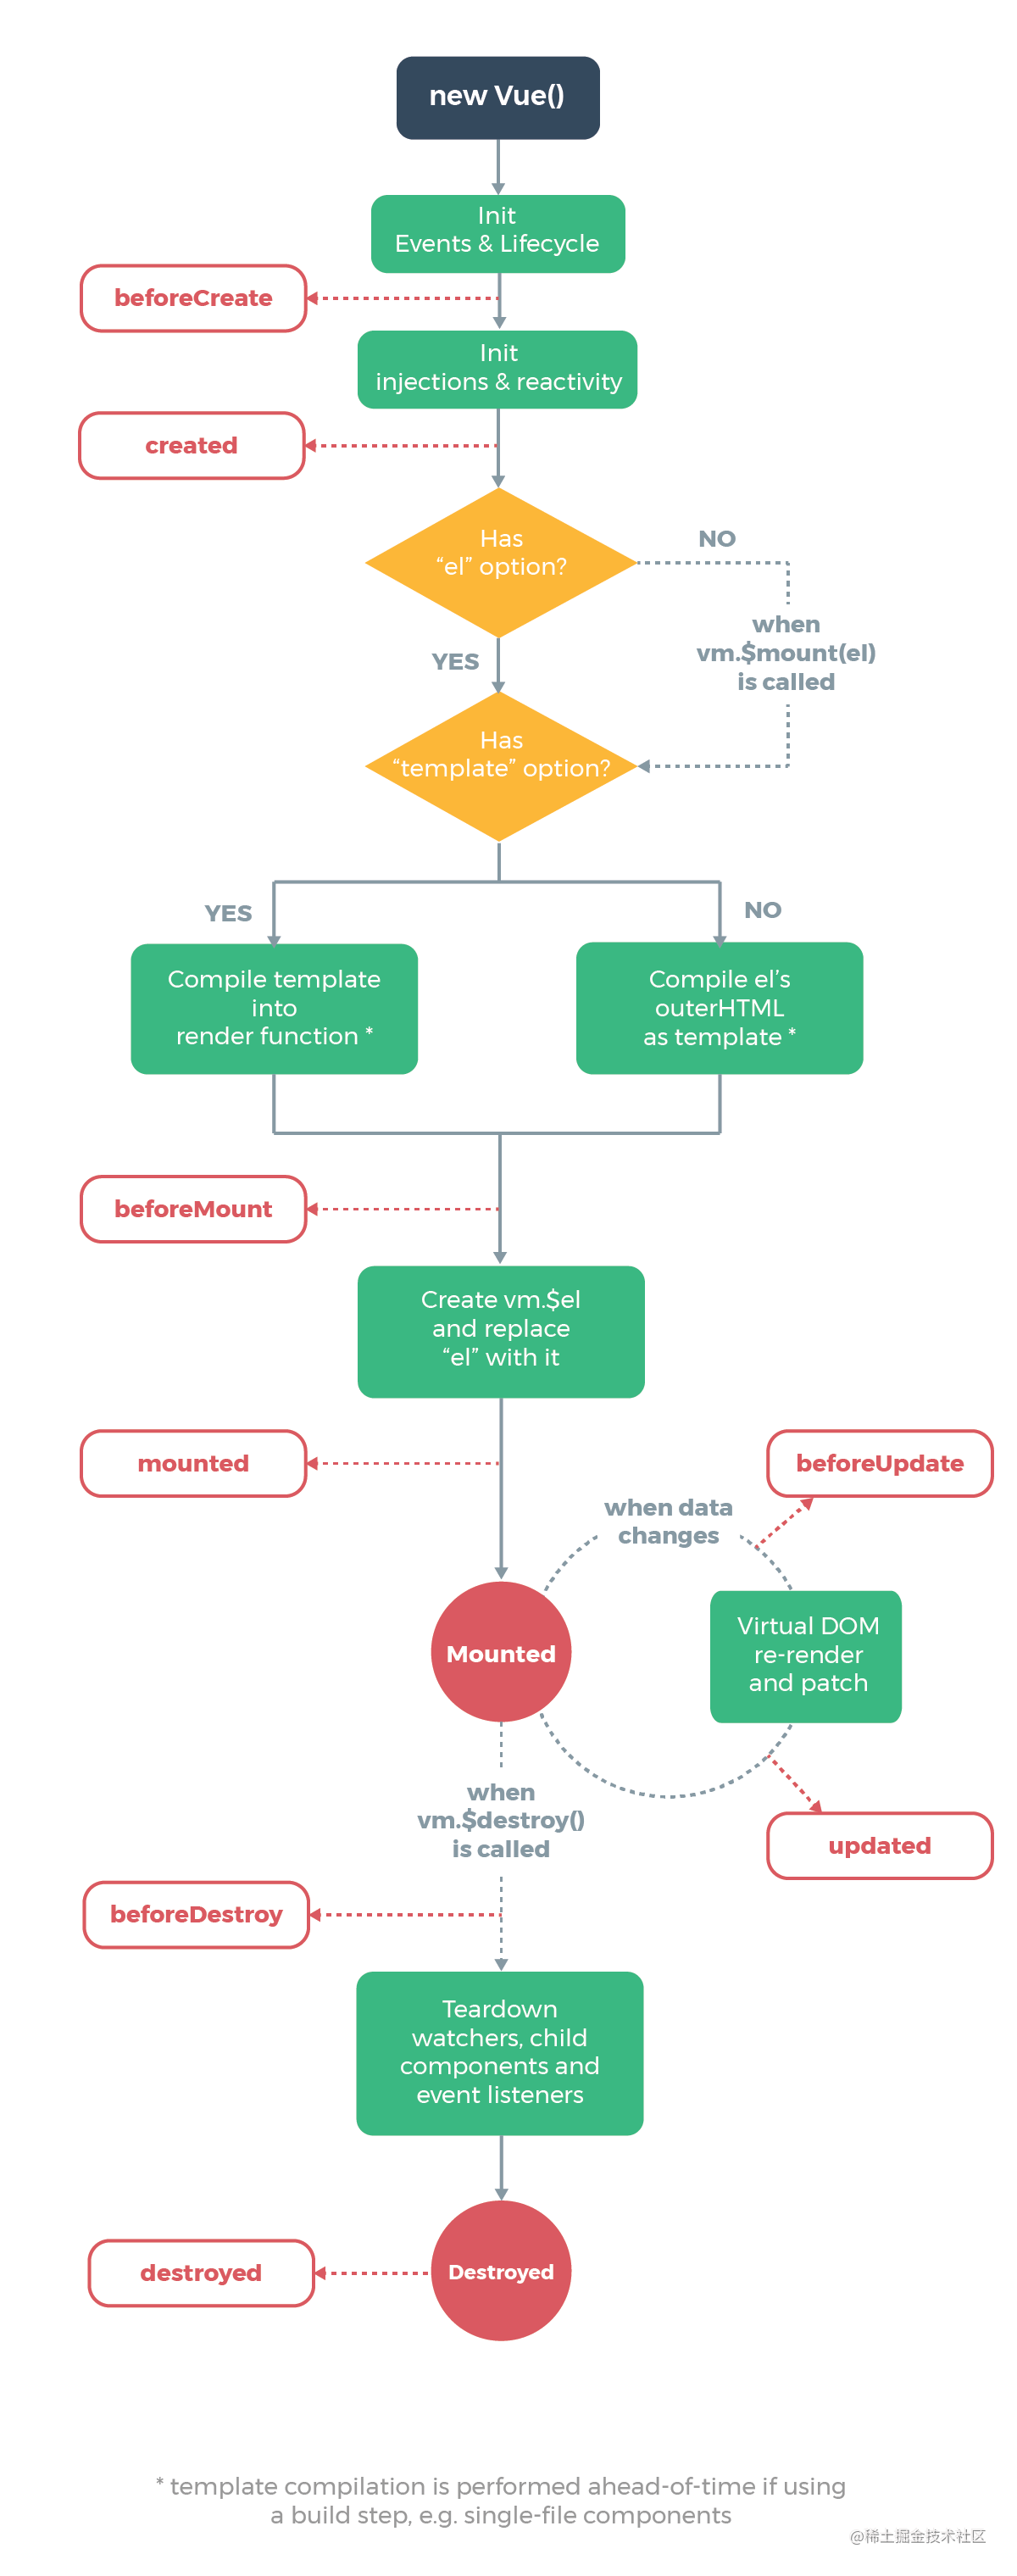
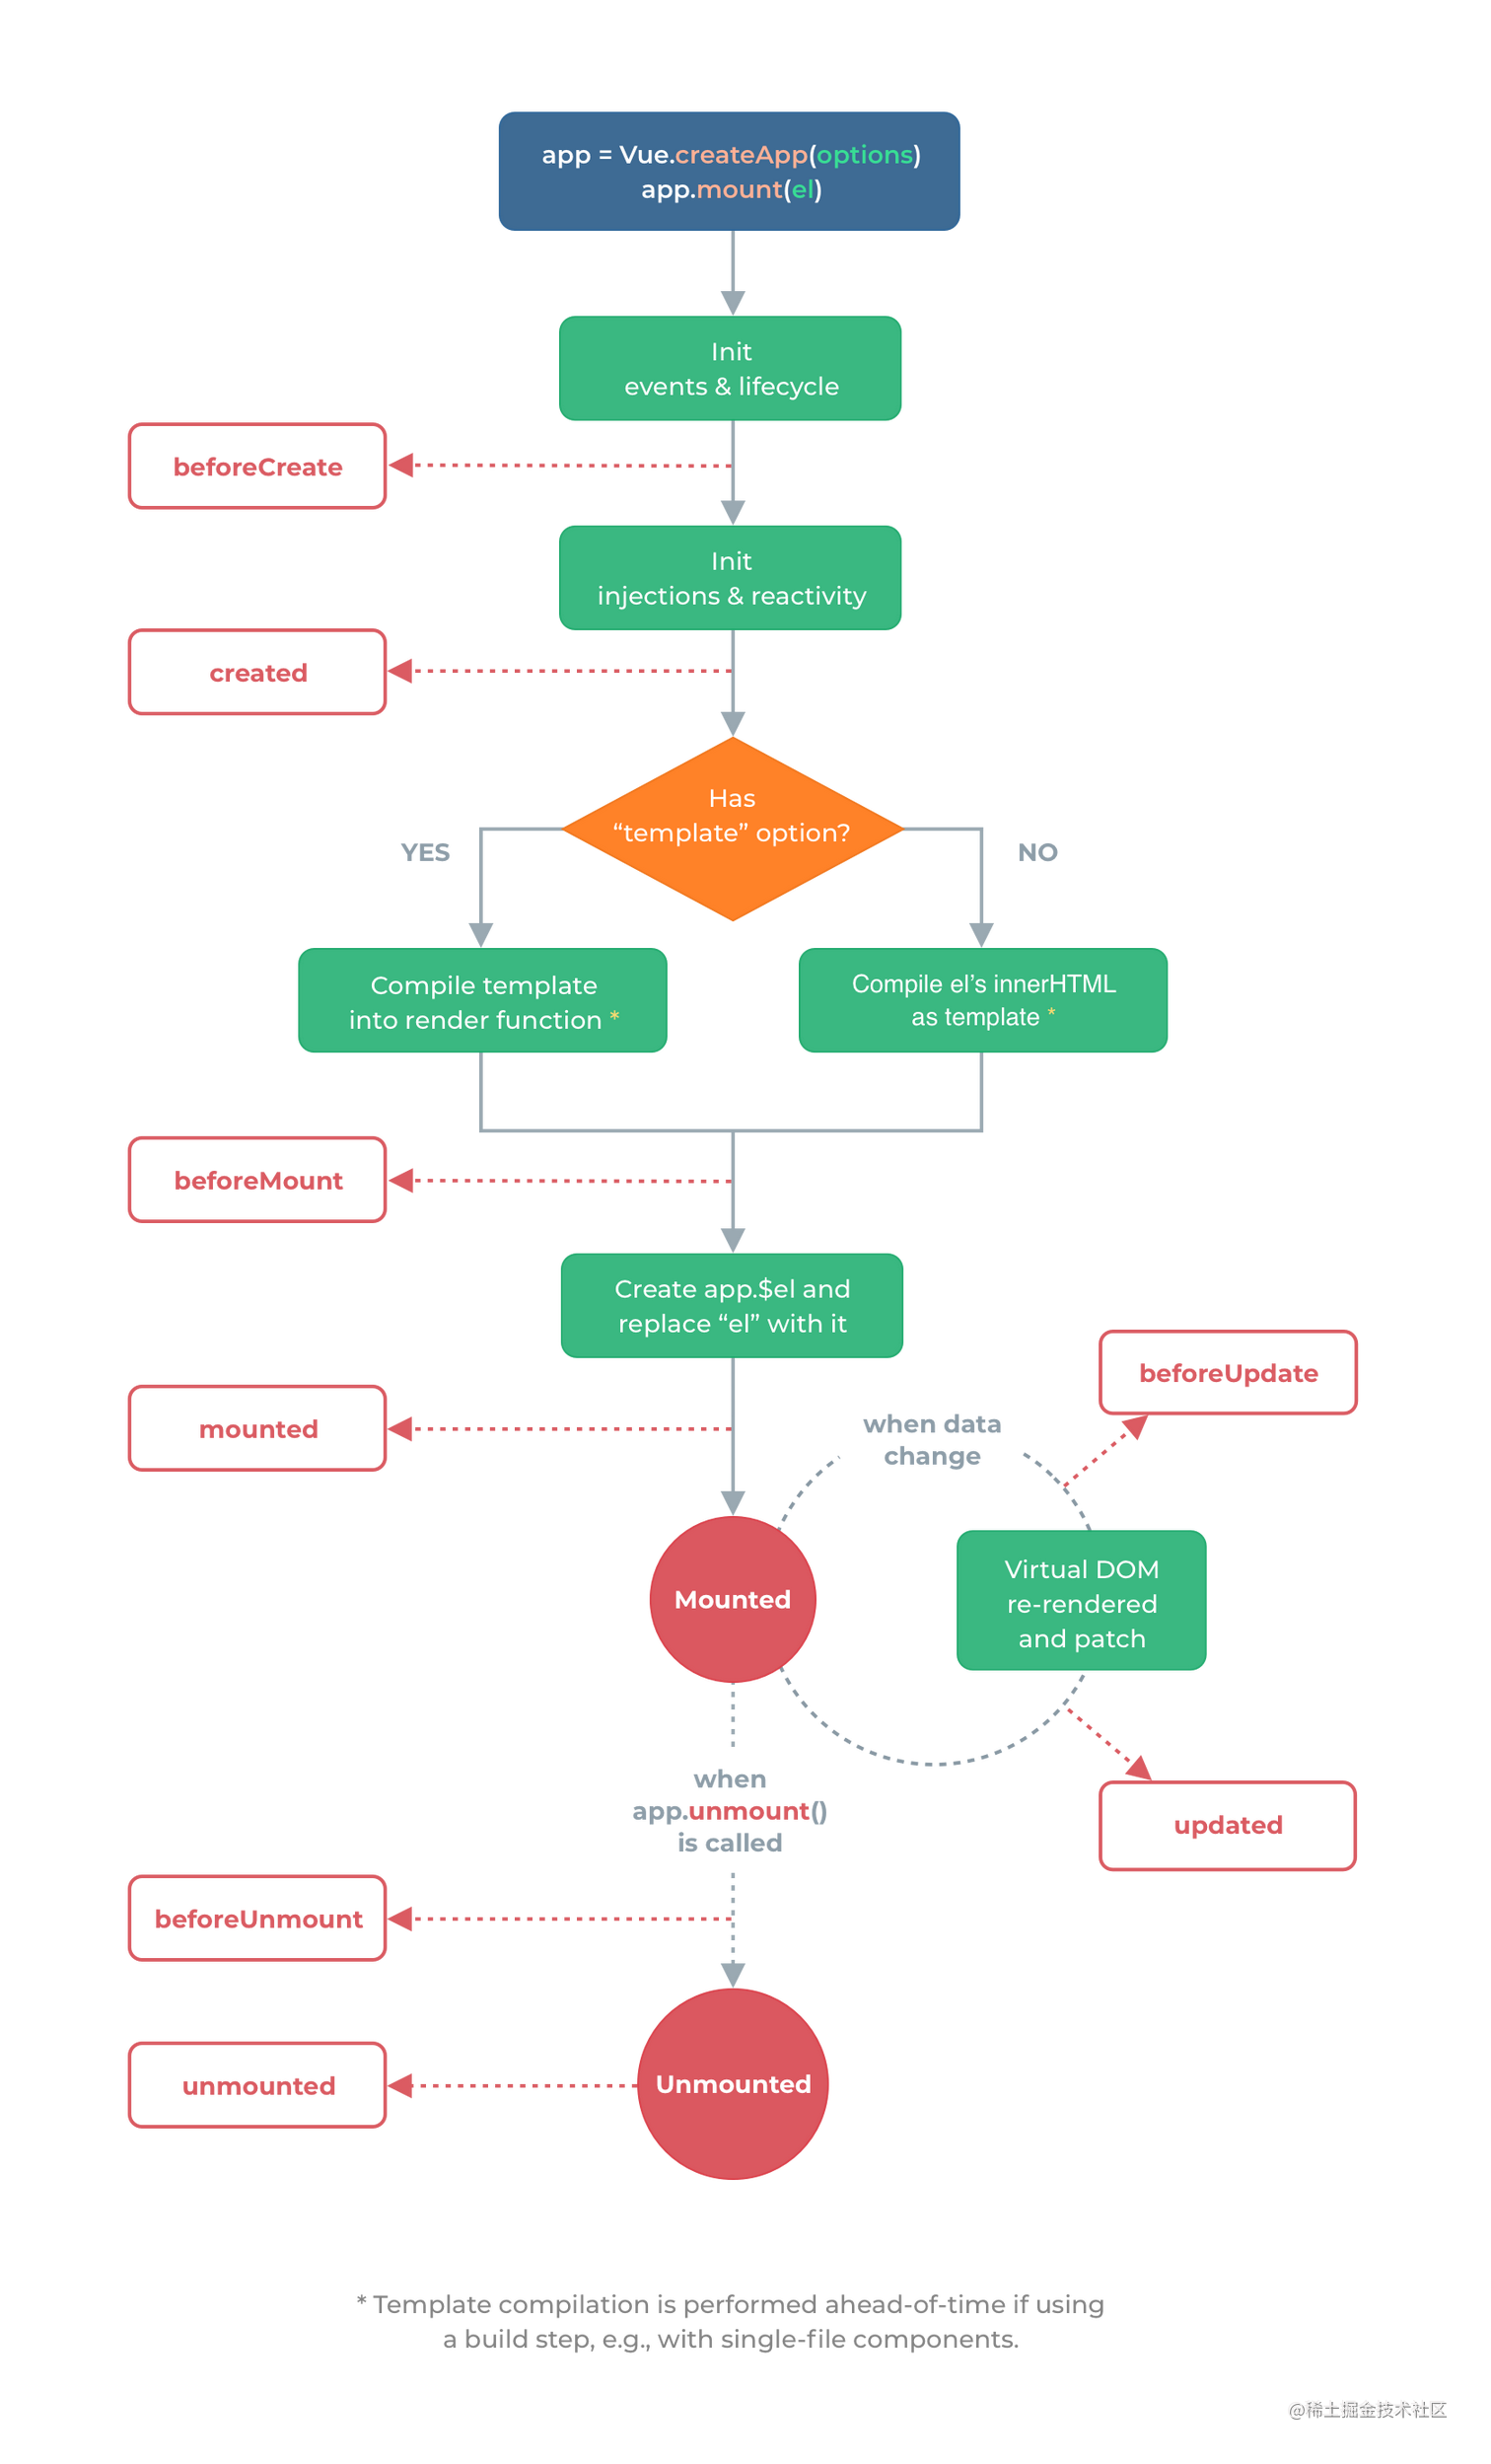
其实在 vue3 中生命周期没有多大的改变,只是改变了销毁前和销毁,让它更加语义化了 beforeDestroy 改名为 beforeUnmount, destroyed 改名为unmounted
在vue3中也可以按照之前的生命周期函数那样写,只是要记得有些函数名称发生了改变,是 onX 类型的函数,在使用之前需要在Vue里引入。
| 选项式API下的生命周期函数使用 | 组合式API下的生命周期函数使用 |
|---|---|
| beforeCreate | 不需要(直接写到setup函数中) |
| created | 不需要(直接写到setup函数中) |
| beforeMount | onBeforeMount |
| mounted | onMounted |
| beforeUpdate | onBeforeUpdate |
| updated | onUpdated |
| beforeDestroy Vue3: beforeUnmount | onBeforeUnmount |
| destroyed Vue3: unmounted | onUnmounted |
<template><button @click="changevalue">切换值</button><p id="valDom">{{ initialValue }}</p>
</template>
<script setup>
import { ref, onBeforeMount, onMounted, onBeforeUpdate, onUpdated } from 'vue'const initialValue = ref('初始值')
const changevalue = () => {initialValue.value = '修改值'
}
onBeforeMount(() => {console.log('onBeforeMount: 组件挂载前')
})
onMounted(() => {console.log('onMounted: 组件挂载后')
})
onBeforeUpdate(() => {console.log('onBeforeUpdate: 组件更新前', document.querySelector('#valDom').innerHTML)
})
onUpdated(() => {console.log('onUpdated: 组件更新后', document.querySelector('#valDom').innerHTML)
})
</script>
生命周期钩子函数可以调用多次
<template></template>
<script setup>
import { onBeforeMount } from 'vue'onBeforeMount(() => {console.log('onBeforeMount executed one times')
})
onBeforeMount(() => {console.log('onBeforeMount executed two times')
})
</script>
Hooks函数
在 Vue3 中,Hooks 函数(组合式 API)对大型项目的代码拆分和组织提供了极大帮助,主要体现在以下几个方面:
- 按功能维度拆分代码,而非选项类型
- 实现逻辑复用和共享
- 提高代码可维护性和可读性
- 便于单元测试
下面通过一个电商项目中的商品详情页为例,展示如何使用 Hooks 拆分代码:
实例:电商商品详情页的代码拆分
假设我们有一个复杂的商品详情页,包含以下功能:
- 商品基本信息加载与展示
- 加入购物车功能
- 收藏商品功能
- 商品图片预览功能
- 规格选择功能
使用 Hooks 可以将这些功能拆分为独立的逻辑单元:
代码示例:
<!-- ProductDetail.vue -->
<template><div class="product-detail"><!-- 加载状态 --><div v-if="loading" class="loading">Loading...</div><!-- 错误状态 --><div v-if="error" class="error">{{ error }}</div><!-- 商品内容 --><div v-else-if="product" class="product-content"><!-- 商品图片区域 --><div class="product-images"><div v-for="img in imagePreview.images" :key="img.id"class="thumbnail"@click="imagePreview.openPreview(img)"><img :src="img.thumbnailUrl" :alt="product.name"></div></div><!-- 图片预览弹窗 --><image-preview-dialogv-if="imagePreview.previewVisible":active-image="imagePreview.activeImage":images="imagePreview.images"@close="imagePreview.closePreview()"@next="imagePreview.nextImage()"@prev="imagePreview.prevImage()"/><!-- 商品信息 --><div class="product-info"><h1>{{ product.name }}</h1><p class="price">${{ product.price.toFixed(2) }}</p><!-- 规格选择 --><div class="sku-selector"><h3>Select Specification:</h3><div v-for="sku in product.skus" :key="sku.id"class="sku-option":class="{ selected: skuSelector.selectedSku?.id === sku.id }"@click="skuSelector.selectSku(sku)">{{ sku.name }} - ${{ sku.price.toFixed(2) }}</div></div><!-- 操作按钮 --><div class="action-buttons"><button class="add-to-cart"@click="addToCart(product, 1, skuSelector.selectedSku)":disabled="shoppingCart.adding">{{ shoppingCart.adding ? 'Adding...' : 'Add to Cart' }}</button><button class="favorite-btn"@click="favorite.toggleFavorite()":disabled="favorite.loading"><i :class="favorite.isFavorite ? 'icon-favorited' : 'icon-favorite'"></i>{{ favorite.isFavorite ? 'Favorited' : 'Favorite' }}</button></div></div><!-- 商品描述 --><div class="product-description"><h2>Description</h2><div v-html="product.description"></div></div></div></div>
</template><script setup>
import { onMounted, watch } from 'vue';
import { useRoute } from 'vue-router';
import { useProductDetail } from './hooks/useProductDetail';
import { useShoppingCart } from './hooks/useShoppingCart';
import { useFavorite } from './hooks/useFavorite';
import { useImagePreview } from './hooks/useImagePreview';
import { useSkuSelector } from './hooks/useSkuSelector';
import ImagePreviewDialog from './components/ImagePreviewDialog.vue';// 获取路由参数
const route = useRoute();
const productId = route.params.id;// 组合各个hooks
const { product, loading, error, refreshProduct } = useProductDetail(productId);
const shoppingCart = useShoppingCart();
const favorite = useFavorite(productId);
const imagePreview = useImagePreview();
const skuSelector = useSkuSelector();// 当商品数据加载完成后设置图片
watch(product, (newProduct) => {if (newProduct?.images) {imagePreview.setImages(newProduct.images);}if (newProduct?.skus) {skuSelector.setSkus(newProduct.skus);}
});
</script>
// useProductDetail.js
import { ref, onMounted } from 'vue';
import { getProductDetail } from '@/api/product';export function useProductDetail(productId) {const product = ref(null);const loading = ref(true);const error = ref(null);const fetchProductDetail = async () => {try {loading.value = true;const data = await getProductDetail(productId);product.value = data;error.value = null;} catch (err) {err.value = 'Failed to load product details';console.error(err);} finally {loading.value = false;}};onMounted(fetchProductDetail);return {product,loading,error,refreshProduct: fetchProductDetail};
}
// useShoppingCart.js
import { ref } from 'vue';
import { addToCart } from '@/api/cart';
import { useToast } from './useToast';export function useShoppingCart() {const { showToast } = useToast();const adding = ref(false);const handleAddToCart = async (product, quantity = 1, selectedSku = null) => {if (!product) return;try {adding.value = true;await addToCart({productId: product.id,quantity,skuId: selectedSku?.id});showToast('Added to cart successfully');} catch (err) {showToast('Failed to add to cart', 'error');console.error(err);} finally {adding.value = false;}};return {adding,addToCart: handleAddToCart};
}
// useFavorite.js
import { ref, watch } from 'vue';
import { addFavorite, removeFavorite, checkIsFavorite } from '@/api/favorite';export function useFavorite(productId) {const isFavorite = ref(false);const loading = ref(false);const checkFavoriteStatus = async () => {if (!productId) return;try {loading.value = true;isFavorite.value = await checkIsFavorite(productId);} catch (err) {console.error('Failed to check favorite status', err);} finally {loading.value = false;}};const toggleFavorite = async () => {if (!productId || loading.value) return;try {loading.value = true;if (isFavorite.value) {await removeFavorite(productId);} else {await addFavorite(productId);}isFavorite.value = !isFavorite.value;} catch (err) {console.error('Failed to toggle favorite', err);} finally {loading.value = false;}};// 当productId变化时重新检查收藏状态watch(productId, checkFavoriteStatus, { immediate: true });return {isFavorite,loading,toggleFavorite};
}
// useImagePreview.js
import { ref } from 'vue';export function useImagePreview(initialImages = []) {const images = ref(initialImages);const activeImage = ref(initialImages[0] || null);const previewVisible = ref(false);const setActiveImage = (image) => {activeImage.value = image;};const openPreview = (image) => {if (image) {activeImage.value = image;}previewVisible.value = true;};const closePreview = () => {previewVisible.value = false;};const nextImage = () => {const currentIndex = images.value.findIndex(img => img.url === activeImage.value.url);const nextIndex = (currentIndex + 1) % images.value.length;activeImage.value = images.value[nextIndex];};const prevImage = () => {const currentIndex = images.value.findIndex(img => img.url === activeImage.value.url);const prevIndex = (currentIndex - 1 + images.value.length) % images.value.length;activeImage.value = images.value[prevIndex];};return {images,activeImage,previewVisible,setActiveImage,openPreview,closePreview,nextImage,prevImage,setImages: (newImages) => { images.value = newImages; }};
}
这种拆分方式的优势
- 关注点分离: 每个 Hook 只负责一个特定功能,代码逻辑清晰
- 复用性高: 比如 useShoppingCart 可以在商品列表、搜索结果等多个地方复用
- 可维护性强: 修改某个功能只需找到对应的 Hook 文件,不会影响其他功能
- 测试友好: 每个 Hook 可以独立进行单元测试
- 团队协作高效: 不同开发者可以同时开发不同的 Hook,减少代码冲突
- 逻辑清晰: 在组件中可以清晰看到使用了哪些功能模块
在大型项目中,这种拆分方式可以有效避免传统 Vue2 选项式 API 中代码分散在不同选项(data、methods、computed 等)中导致的 “面条代码” 问题,使代码结构更加清晰,维护成本显著降低。