【大模型入门】3.从头实现GPT模型以生成文本
every blog every motto: You can do more than you think.
https://blog.csdn.net/weixin_39190382?type=blog
0. 前言
从头实现 GPT 模型以生成文本
1. 正文
(Implementing a GPT model from Scratch To Generate Text )
from importlib.metadata import versionimport matplotlib
import tiktoken
import torchprint("matplotlib version:", version("matplotlib"))
print("torch version:", version("torch"))
print("tiktoken version:", version("tiktoken"))
matplotlib version: 3.9.0
torch version: 2.4.0
tiktoken version: 0.7.0
- 在本章中,我们实现了一个类似 GPT 的大语言模型(LLM)架构;下一章将专注于训练这个 LLM。
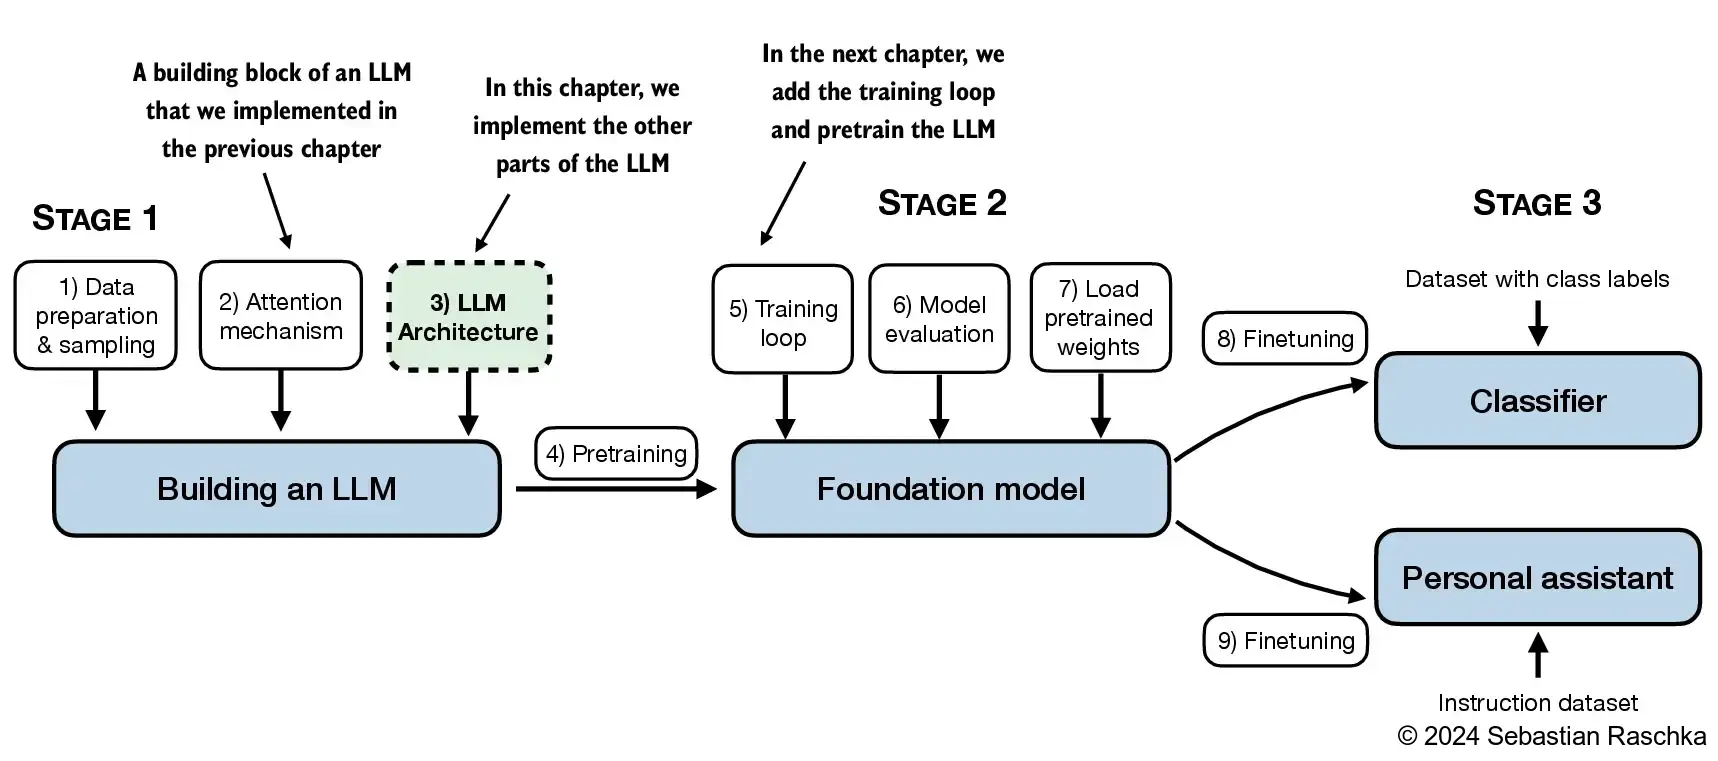
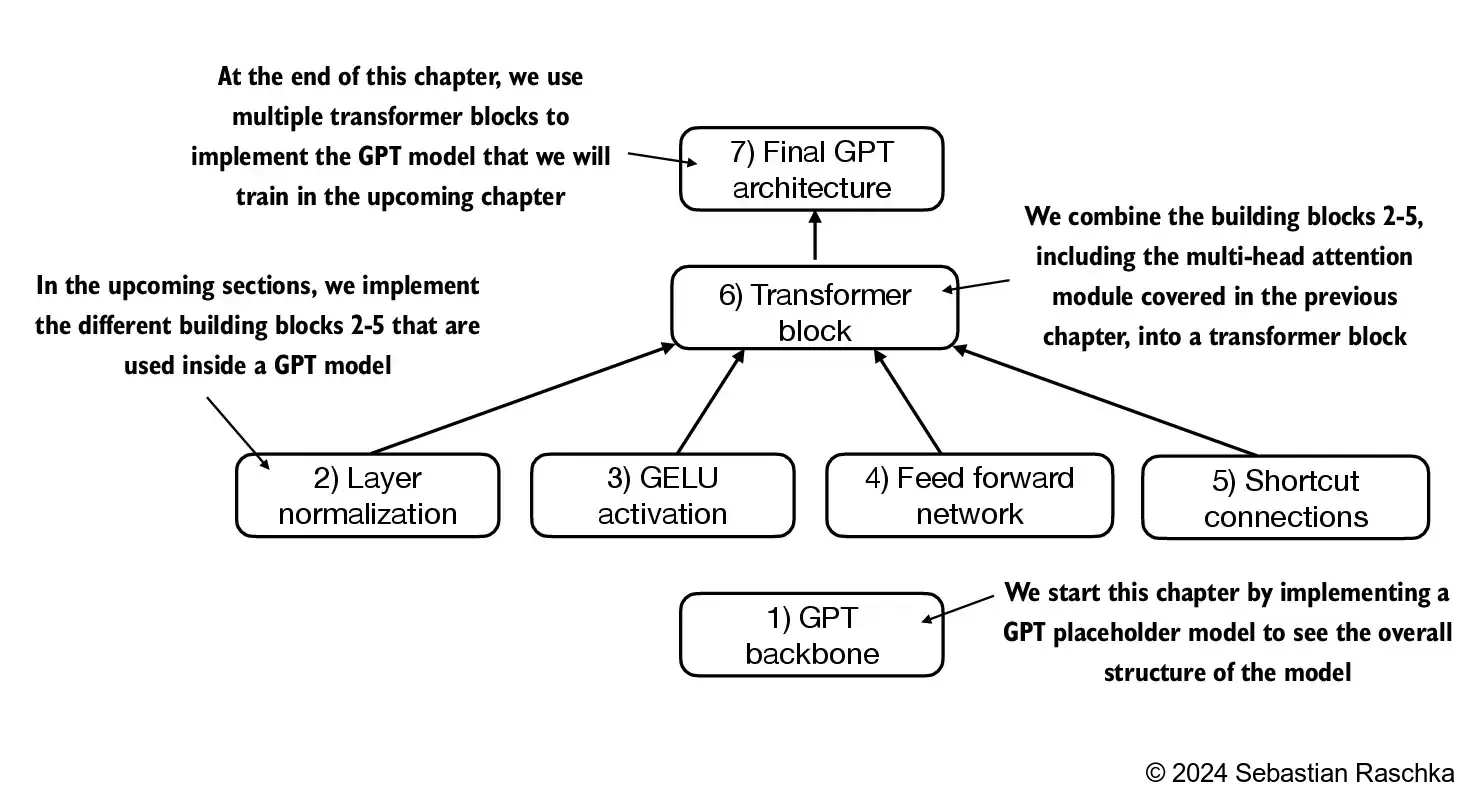
4.1 编码一个大语言模型(LLM)架构
(Coding an LLM architecture)
- 第一章讨论了像 GPT 和 Llama 这样的模型,这些模型按顺序生成单词,并且基于原始 Transformer 架构的解码器部分。
- 因此,这些大语言模型通常被称为“解码器式”大语言模型。
- 与传统的深度学习模型相比,大语言模型通常更大,主要是由于它们巨大的参数量,而不是代码的多少。
- 我们将看到,大语言模型的架构中有许多元素是重复的。

-
在前几章中,我们使用了较小的嵌入维度来简化令牌输入和输出,以便于说明,确保它们适合在一页纸上显示。
-
在本章中,我们考虑类似于小型 GPT-2 模型的嵌入和模型大小。
-
我们将特别编写最小 GPT-2 模型的架构(1.24 亿个参数),如 Radford 等人的 Language Models are Unsupervised Multitask Learners 中所述(请注意,初始报告将其列为 1.17 亿参数,但后来在模型权重库中进行了更正)。
-
第 6 章将展示如何将预训练的权重加载到我们的实现中,这将与 3.45 亿、7.62 亿和 15.42 亿参数的模型大小兼容。
-
124 亿参数的 GPT-2 模型的配置细节包括:
GPT_CONFIG_124M = {"vocab_size": 50257,    # Vocabulary size"context_length": 1024, # Context length"emb_dim": 768,         # Embedding dimension"n_heads": 12,          # Number of attention heads"n_layers": 12,         # Number of layers"drop_rate": 0.1,       # Dropout rate"qkv_bias": False       # Query-Key-Value bias
}
- 我们使用简短的变量名,以避免后续代码行过长
"vocab_size"表示词汇表大小为 50,257 个词,这由第 2 章讨论的 BPE 分词器支持"context_length"表示模型的最大输入标记数,这是由第 2 章讨论的位置嵌入所支持的"emb_dim"是令牌输入的嵌入大小,将每个输入令牌转换为一个 768 维的向量"n_heads"是多头注意力机制中的注意力头数量,参见第 3 章的实现"n_layers"是模型中 transformer 块的数量,我们将在后续章节中实现"drop_rate"是 dropout 机制的强度,参见第 3 章;0.1 意味着在训练过程中丢弃 10% 的隐藏单元,以缓解过拟合"qkv_bias"决定多头注意力机制中的Linear层在计算查询(Q)、键(K)和值(V)张量时,是否包含偏置向量;我们将禁用此选项,这是现代 LLM 的标准做法;不过,在第 5 章加载 OpenAI 预训练 GPT-2 权重到我们的重实现时,我们会再次回顾这一点
import torch
import torch.nn as nnclass DummyGPTModel(nn.Module):def __init__(self, cfg):super().__init__()self.tok_emb = nn.Embedding(cfg["vocab_size"], cfg["emb_dim"])self.pos_emb = nn.Embedding(cfg["context_length"], cfg["emb_dim"])self.drop_emb = nn.Dropout(cfg["drop_rate"])# Use a placeholder for TransformerBlockself.trf_blocks = nn.Sequential(*[DummyTransformerBlock(cfg) for _ in range(cfg["n_layers"])])# Use a placeholder for LayerNormself.final_norm = DummyLayerNorm(cfg["emb_dim"])self.out_head = nn.Linear(cfg["emb_dim"], cfg["vocab_size"], bias=False)def forward(self, in_idx):batch_size, seq_len = in_idx.shapetok_embeds = self.tok_emb(in_idx)pos_embeds = self.pos_emb(torch.arange(seq_len, device=in_idx.device))x = tok_embeds + pos_embedsx = self.drop_emb(x)x = self.trf_blocks(x)x = self.final_norm(x)logits = self.out_head(x)return logitsclass DummyTransformerBlock(nn.Module):def __init__(self, cfg):super().__init__()# A simple placeholderdef forward(self, x):# This block does nothing and just returns its input.return xclass DummyLayerNorm(nn.Module):def __init__(self, normalized_shape, eps=1e-5):super().__init__()# The parameters here are just to mimic the LayerNorm interface.def forward(self, x):# This layer does nothing and just returns its input.return x

import tiktokentokenizer = tiktoken.get_encoding("gpt2")batch = []txt1 = "Every effort moves you"
txt2 = "Every day holds a"batch.append(torch.tensor(tokenizer.encode(txt1)))
batch.append(torch.tensor(tokenizer.encode(txt2)))
batch = torch.stack(batch, dim=0)
print(batch)
tensor([[6109, 3626, 6100, 345],[6109, 1110, 6622, 257]])
torch.manual_seed(123)
model = DummyGPTModel(GPT_CONFIG_124M)logits = model(batch)
print("Output shape:", logits.shape)
print(logits)
Output shape: torch.Size([2, 4, 50257])
tensor([[[-1.2034,  0.3201, -0.7130,  ..., -1.5548, -0.2390, -0.4667],[-0.1192,  0.4539, -0.4432,  ...,  0.2392,  1.3469,  1.2430],[ 0.5307,  1.6720, -0.4695,  ...,  1.1966,  0.0111,  0.5835],[ 0.0139,  1.6754, -0.3388,  ...,  1.1586, -0.0435, -1.0400]],[[-1.0908,  0.1798, -0.9484,  ..., -1.6047,  0.2439, -0.4530],[-0.7860,  0.5581, -0.0610,  ...,  0.4835, -0.0077,  1.6621],[ 0.3567,  1.2698, -0.6398,  ..., -0.0162, -0.1296,  0.3717],[-0.2407, -0.7349, -0.5102,  ...,  2.0057, -0.3694,  0.1814]]],grad_fn=<UnsafeViewBackward0>)
Note
- If you are running this code on Windows or Linux, the resulting values above may look like as follows:
Output shape: torch.Size([2, 4, 50257])
tensor([[[-0.9289,  0.2748, -0.7557,  ..., -1.6070,  0.2702, -0.5888],[-0.4476,  0.1726,  0.5354,  ..., -0.3932,  1.5285,  0.8557],[ 0.5680,  1.6053, -0.2155,  ...,  1.1624,  0.1380,  0.7425],[ 0.0447,  2.4787, -0.8843,  ...,  1.3219, -0.0864, -0.5856]],[[-1.5474, -0.0542, -1.0571,  ..., -1.8061, -0.4494, -0.6747],[-0.8422,  0.8243, -0.1098,  ..., -0.1434,  0.2079,  1.2046],[ 0.1355,  1.1858, -0.1453,  ...,  0.0869, -0.1590,  0.1552],[ 0.1666, -0.8138,  0.2307,  ...,  2.5035, -0.3055, -0.3083]]],grad_fn=<UnsafeViewBackward0>)
- Since these are just random numbers, this is not a reason for concern, and you can proceed with the remainder of the chapter without issues
4.2 通过层归一化来规范化激活值
(Normalizing activations with layer normalization)
- 层归一化(也称为 LayerNorm,Ba 等人,2016)会将神经网络层的激活值归一化,使其均值为 0,方差为 1
- 这能够稳定训练过程,并加速收敛到有效权重
- 在 Transformer 块中,层归一化会在多头注意力模块的前后进行应用,我们将在后面实现;它还会应用在最终输出层之前
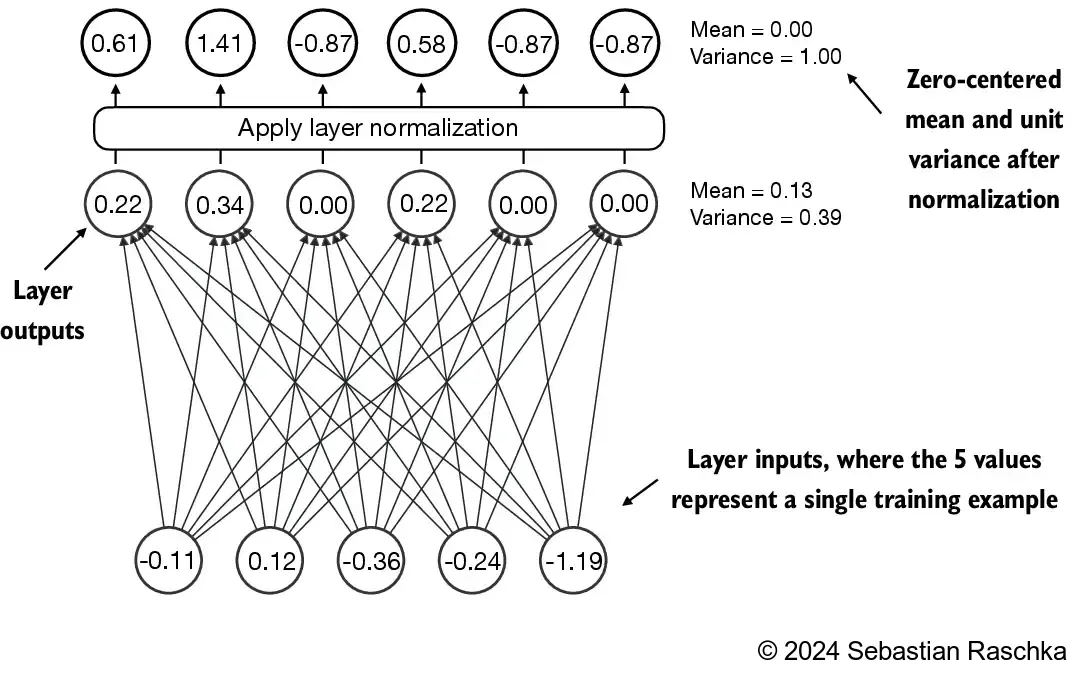
- 让我们通过一个简单的神经网络层传递一个小的输入样本,来看看层归一化是如何工作的:
torch.manual_seed(123)# create 2 training examples with 5 dimensions (features) each
batch_example