RHCA - CL260 | Day03:配置 RHCS 集群
一、集群配置概述
Red Hat Ceph存储集群配置包含以下必要的定义:
- Cluster network configuration(网络配置)
- Cluster monitor(MON) configuration and bootstrap options(MON和bootstrap配置)
- Cluster authentication configuration(认证配置)
- Daemon configuration options(进程配置选项)
注意:Ceph配置文件中参数可能包含横线(-)、空格( )或者下划线(_),但是我们推荐使用统一的下划线(_)做为最佳实践的标准。
所有ceph进程或库都可以从如下这些源读取配置参数:
- The complied-in default value(程序编译时默认值)
- The centralized configuration database(中心数据库)
- A configuration file that is stored on the local host(本地配置文件)
- Envirionment variables(环境变量)
- Command-line arguments(命令行参数)
- Runtime overrides(运行时覆盖参数)
以上配置源是按优先级排序(从低到高),例如:本地配置文件的参数会覆盖中心数据库的参数设置。
The monitor(MON) nodes manage a centralized configuration database.
MON节点管理一个中心配置数据库。
Ceph daemons contact the MON cluster to retrieve configuration settings that are stored in the centralized configuration database.
Ceph进程联系MON获取中心数据库中的配置。
RedHat Ceph Storage 5 deprecates/deprəkeɪts/ the ceph.conf cluster configuration file, making the centralized configuration database the preferred way to store configuration settings.
RHCS5不推荐使用 ceph.conf 配置文件,而是推荐使用中心数据库的方式存储集群配置。
1、修改配置文件中的设置
每个Ceph节点都在本次存储一个集群配置文件,该配置文件默认为 /etc/ceph/ceph.conf,cephadm工具默认会创建一个最小化的配置文件。
配置文件使用INI格式,包含多个集群进程和客户端的配置段,每个配置段都使用 [name] 标识开始,后面包含一个或多个 K-V对 的参数。
[name]
parameter1 = value1
parameter2 = value2
使用井号(#)或者分号(;)禁用参数设置或者添加注释。
通过使用集群配置文件引导具有自定义设置的集群。使用带 --config 选项的cephadm bootstrap命令来传递配置文件。
$ cat initial-ceph.conf
[global]
osd crush chooseleaf type = 0$./cephadm bootstrap --config initial-ceph.conf ...
常用的配置参数段:
[global] | 全局设置段,设置对所有进程都有效的参数,任何进程都可以读取这些配置,包括客户端进程 | 这里的设置可以被其他特定的设置段参数覆盖 |
[mon] | 存储和Monitor(MON)相关的配置。 | |
[osd] | 存储和OSD进程相关的配置。 | |
[mgr] | 存储和Manager(MGR)相关的配置。 | |
[mds] | 存储和Metadata Servers(MDS)相关的配置。 | |
[client] | 存储和客户端相关的配置。 |
[global]
auth cluster required = cephx     ## 集群守护进程(如 ceph-mon 、 ceph-osd 和 ceph-mds )间必须相互认证,设置为none则为禁用。
auth service required = cephx     ## 客户端要访问 Ceph 服务的话,集群守护进程会要求它和集群认证。设置为none则为禁用。
auth client required = cephx      ## 客户端会要求 Ceph 集群和它认证。设置为none则为禁用。## 认证用的密钥默认在/etc/ceph/目录。
mon_host = [v2:172.25.250.12:3300/0,v1:172.25.250.12:6789/0]
cluster network = 172.25.250.0/24
public network = 172.25.250.0/24
管理员还可以将特定进程的配置设置在特定的配置段.
- 格式:daemon-type.instance-ID
例如:
# 针对所有mon进程的设置参数
[mon]
...# 仅针对运行在serverc主机上面的mon进程做的相关配置参数
[mon.serverc]
...- 对于 OSD进程 而言,instance-ID通常是数字,例如:[osd.0],[osd.1]
- 对于 client 而言,instance-ID使用client的用户名,例如:[client.operator3]
提示:所有ceph主机都可以找到配置文件的模板文件
/var/lib/containers/storage/overlay/{ID}/merged/usr/share/doc/ceph/sample.ceph.conf
Meta Variables是Ceph软件定义的变量,我们可以在配置文件中直接使用这些变量。
$cluster:The name of the RedHat Ceph Storage cluster. The default name is ceph.
RedHat Ceph存储集群的名称。默认名称为:ceph
$type: The daemon type. For a Monitor, this is set to mon, OSDs use osd, Metadata Servers use mds, Manager use mgr, and client applications use client.
守护进程类型。对于Monitor设置为:mon, 对于OSD使用osd,元数据服务器使用mds,管理器使用mgr,客户端应用程序使用client。
$id: The daemon instance ID. For the Monitor on serverc, this is set to serverc. For osd.1 it is 1. For a client application, it is the user name.
守护进程实例ID。对于serverc上的Monitor设置为:serverc。osd.1是osd.1。对于客户机应用程序是它的用户名。
$name: The daemon name and instance ID. This is a shortcut for $type.$id.
守护进程名称和实例ID。这是$type.$id的快捷方式。
$host: The host name on which the daemon is running.
运行守护进程的主机名。
2、数据库文件被ceph-mon进程管理和维护
[root@serverc ~]# ls -lh /var/lib/ceph/$fsid/mon.serverc.lab.example.com/store.db/
Using the Centrialized Configuration Database 使用集中式配置数据库
命令:ceph config ls //列出所有配置选项
- 命令:ceph config help osd_pool_default_size //查看某个配置项的帮助信息
显示集群数据库的配置
- 命令:ceph config dump
查看某个服务进程的配置信息(如osd.0、global、mon.serverc.lab.example.com等)
- 命令:ceph config show <daemon>
显示特定ceph进程的所有参数(该命令需要在容器中执行)
- 命令:ceph daemon osd.0 config show
读取配置文件中的参数,并应用到中心数据库中
- 命令:ceph config assimilate-conf -i ceph.conf
[ceph: root@serverc /]# ceph config assimilate-conf -i ceph.conf
//读取文件,修改配置(这里假设ceph.conf已提前准备好的配置文件)- 命令:ceph tell $type.$id config get //可以获取特定进程的当前运行配置
- 命令:ceph tell $type.$id config set //可以设置某个进程的运行配置,重启进程后无效
- 命令:ceph config set $type.$id 参数 值 //可以设置某个进程的配置,永久有效
- 命令:ceph config get $type.$id 参数 //可以查看某个进程的配置
Lab: 管理集群配置设置
1. 设置某个进程的配置,永久有效
1)导出 Ceph 集群的所有配置信息
- 命令:ceph config dump
[ceph: root@serverc /]# ceph config dump
2)查看特定 OSD(对象存储守护进程)的配置信息
- 命令:ceph config show <daemon>
- 命令:ceph config get <daemon> [debug_ms]
[ceph: root@serverc /]# ceph config show osd.1
[ceph: root@serverc /]# ceph config show osd.1 debug_ms   //查看osd.1的debug_ms配置项的值
0/0
[ceph: root@serverc /]# ceph config get osd.1 debug_ms
0/0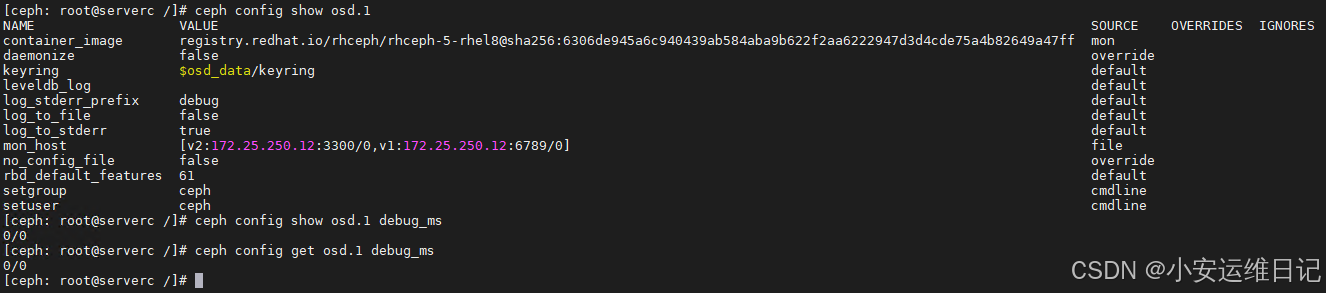
3)修改特定 OSD(对象存储守护进程)的配置信息
- 命令:ceph config set <daemon> [debug_ms] <value>
- 命令:ceph orch daemon restart <daemon>
[ceph: root@serverc /]# ceph config set osd.1 debug_ms 10     //set修改参数信息
[ceph: root@serverc /]# ceph config show osd.1 debug_ms
10/10
[ceph: root@serverc /]# ceph config get osd.1 debug_ms
10/10
4)重启 OSD 守护进程以使配置生效。
[ceph: root@serverc /]# ceph orch daemon restart osd.1
Scheduled to restart osd.1 on host 'servere.lab.example.com'
验证重新启动后这些值是否仍然存在。
[ceph: root@serverc /]# ceph config show osd.1 debug_ms
10/10
[ceph: root@serverc /]# ceph config get osd.1 debug_ms
10/10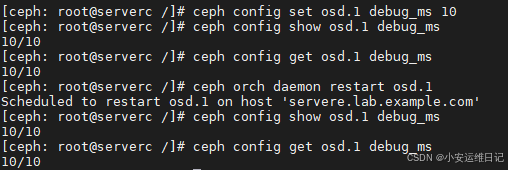
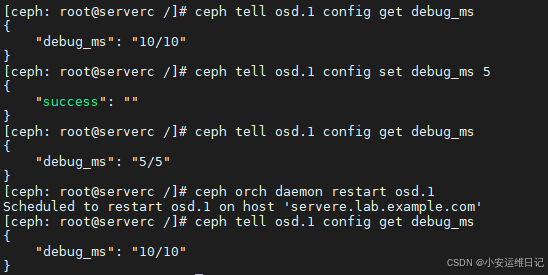
2. 在容器中执行tell命令
注意:临时修改,重启进程后无效
[ceph: root@serverc /]# ceph tell osd.1 config get debug_ms
{"debug_ms": "10/10"
}
[ceph: root@serverc /]# ceph tell osd.1 config set debug_ms 5
{"success": ""
}
[ceph: root@serverc /]# ceph tell osd.1 config get debug_ms
{"debug_ms": "5/5"
}
[ceph: root@serverc /]# ceph orch daemon restart osd.1
Scheduled to restart osd.1 on host 'serverc.lab.example.com'
[ceph: root@serverc /]# ceph tell osd.1 config get debug_ms
{"debug_ms": "10/10"
}
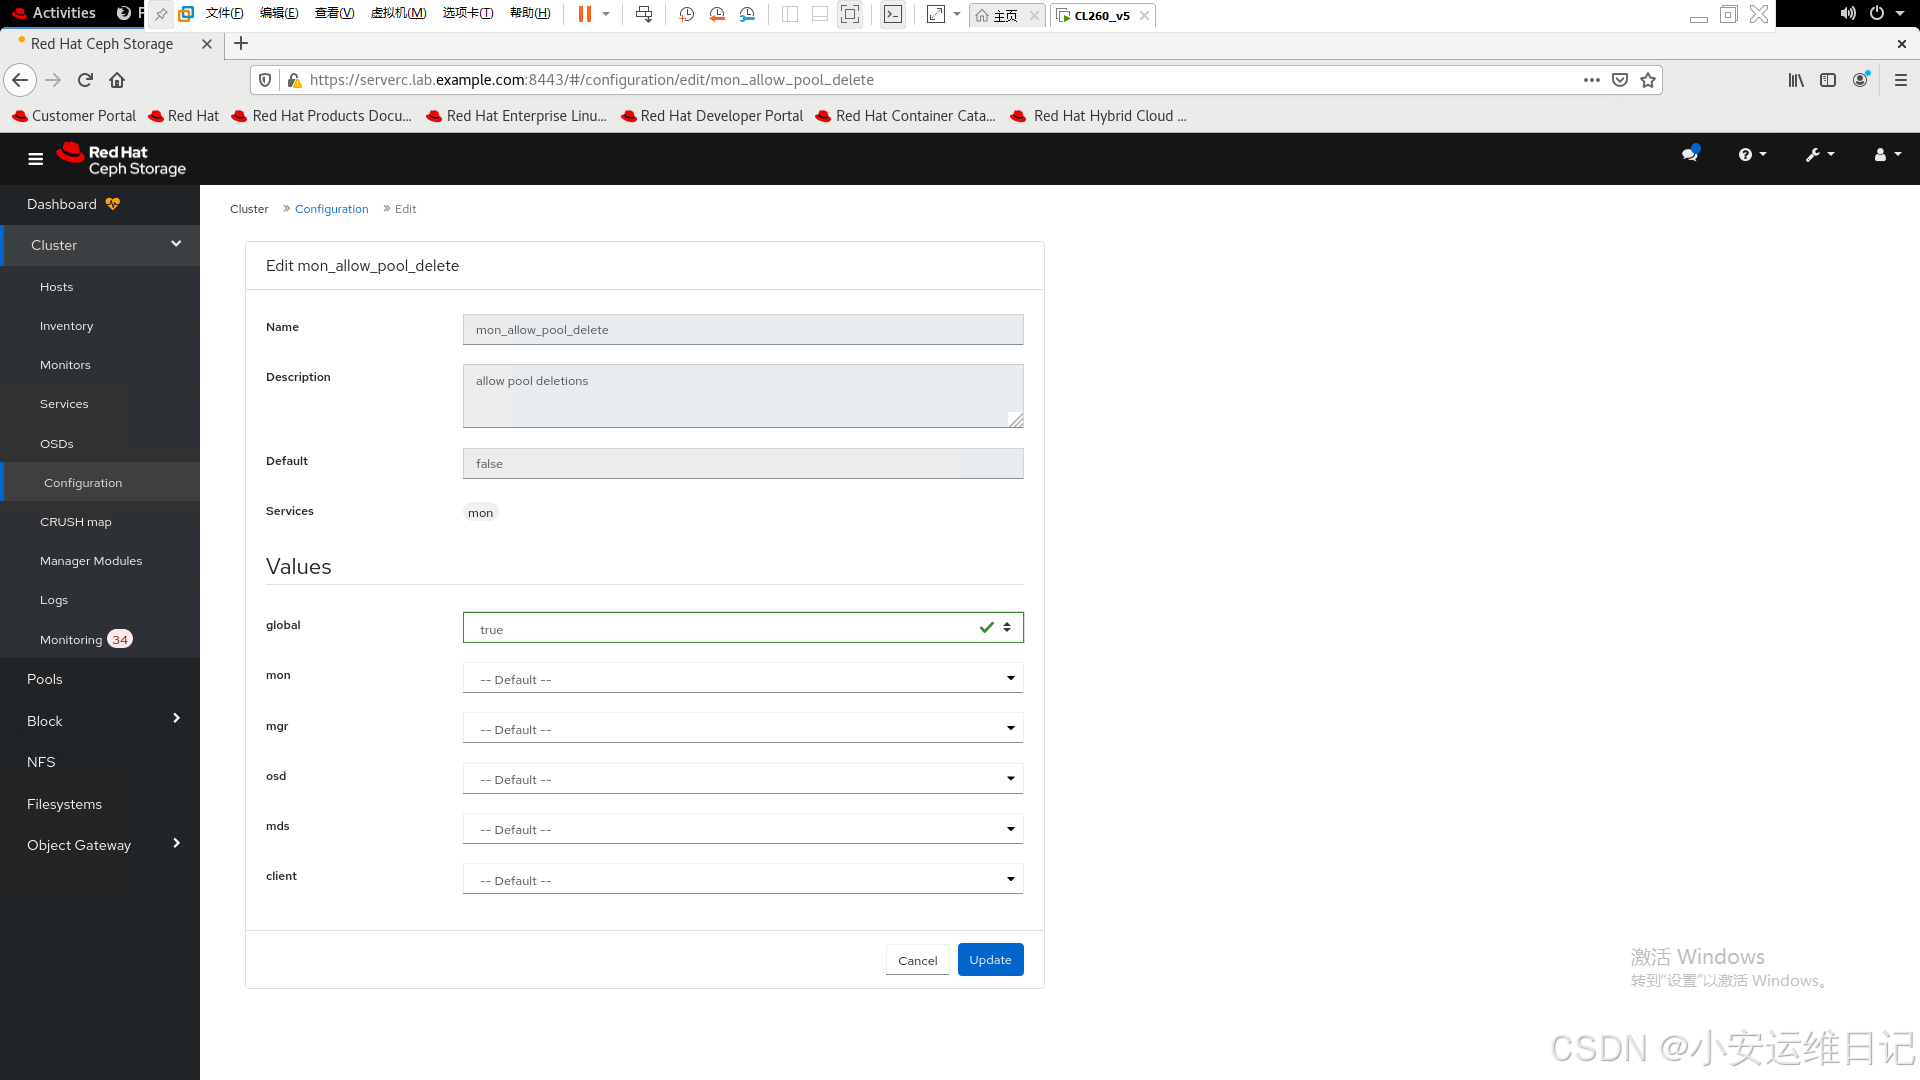
3. 使用GUI修改global全局配置mon_allow_pool_delete为true【考试必考】
firefox https://serverc.lab.example.com:8443- 1)Log in with user name admin and password redhat.
- 2)Cluster-->Configuration to disaplay the Configuration Settings page.
- 3)Select the advanced option from the Level menu to view advanced configuration settings.
- 4)Type mon_allow_pool_delete in the search bar to find the setting.
打开【Cluster】- >【Configuration】进入Configuration Settings页面。从“级别”菜单中选择高级选项以查看“advanced”配置设置。在搜索栏中输入mon_allow_pool_delete来查找设置。
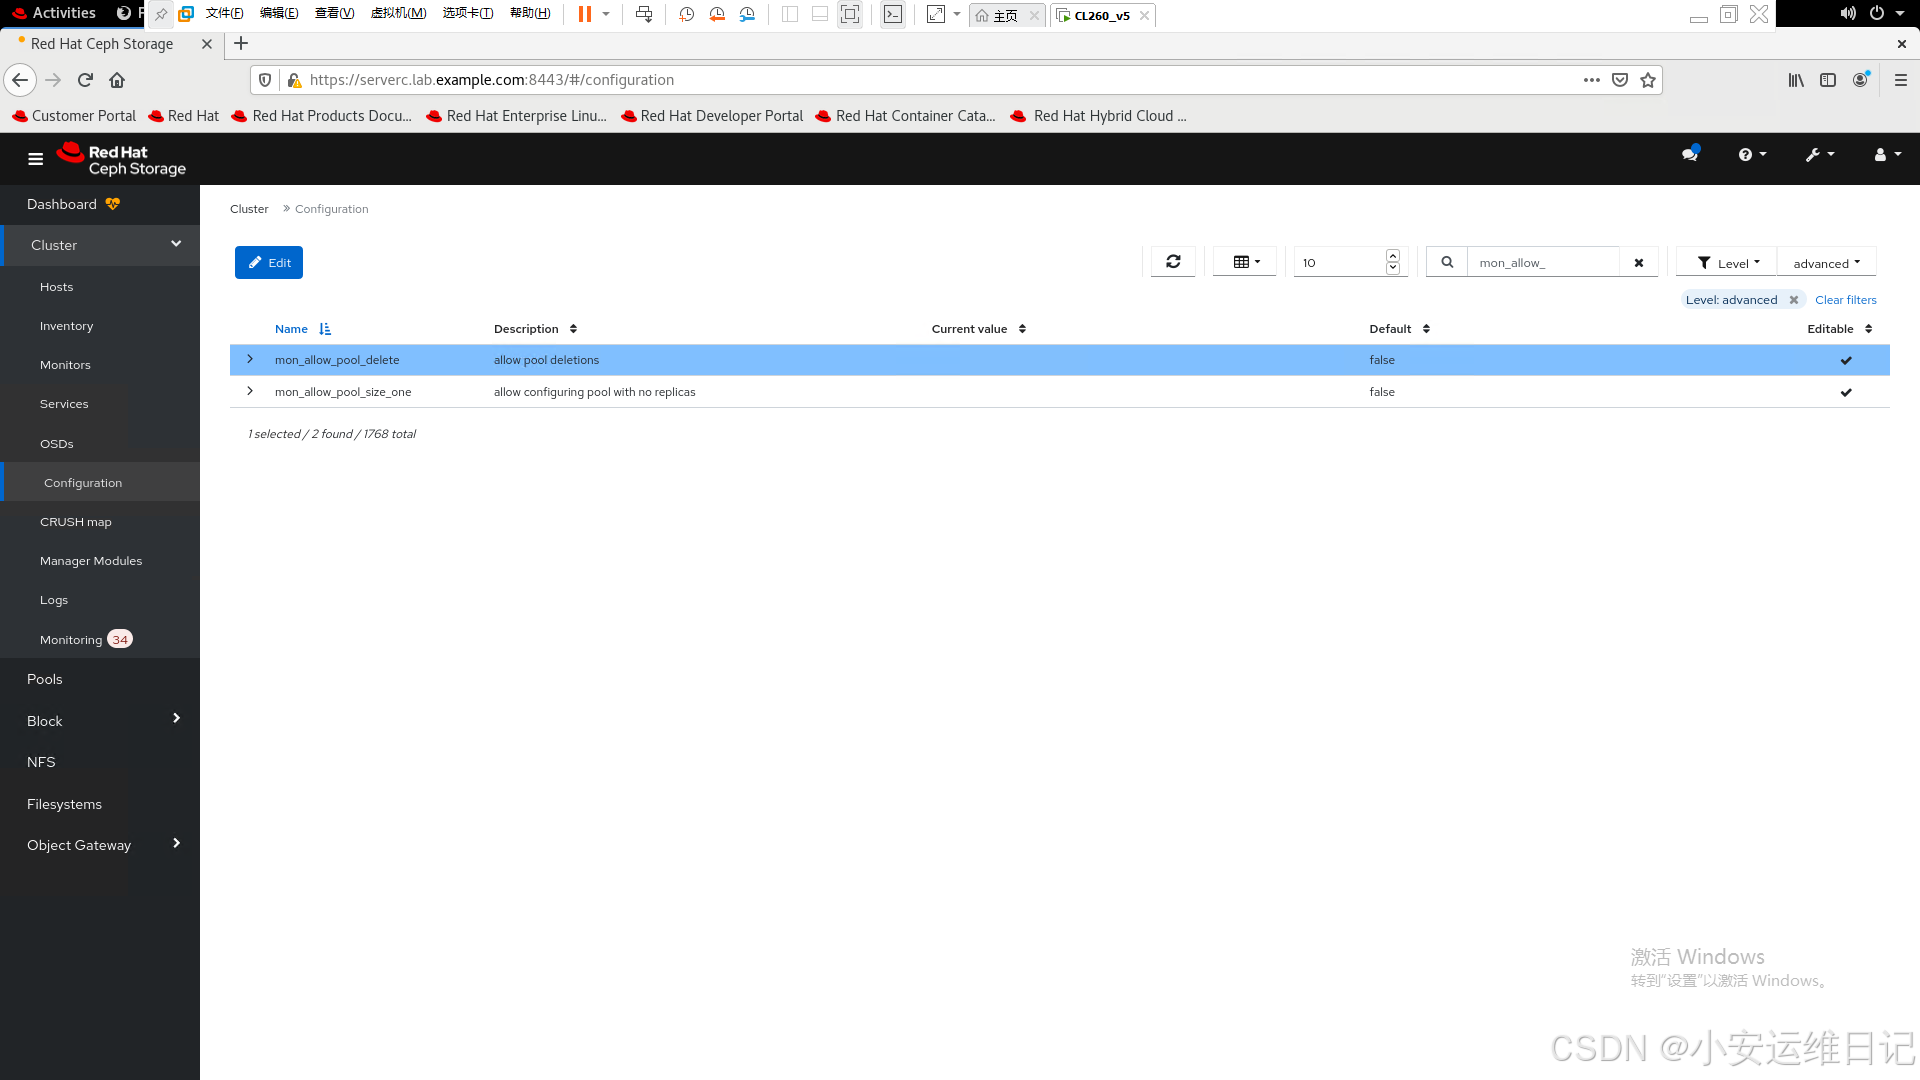
5)Click mon_allow_pool_delete and then click Edit. 单击mon_allow_pool_delete,然后单击【Edit】编辑。
6)Edit the mon_allow_pool_delete setting, set the global value to true, and then click Update to save.编辑mon_allow_pool_delete设置,将全局值设置为【true】,然后单击【Update】保存。
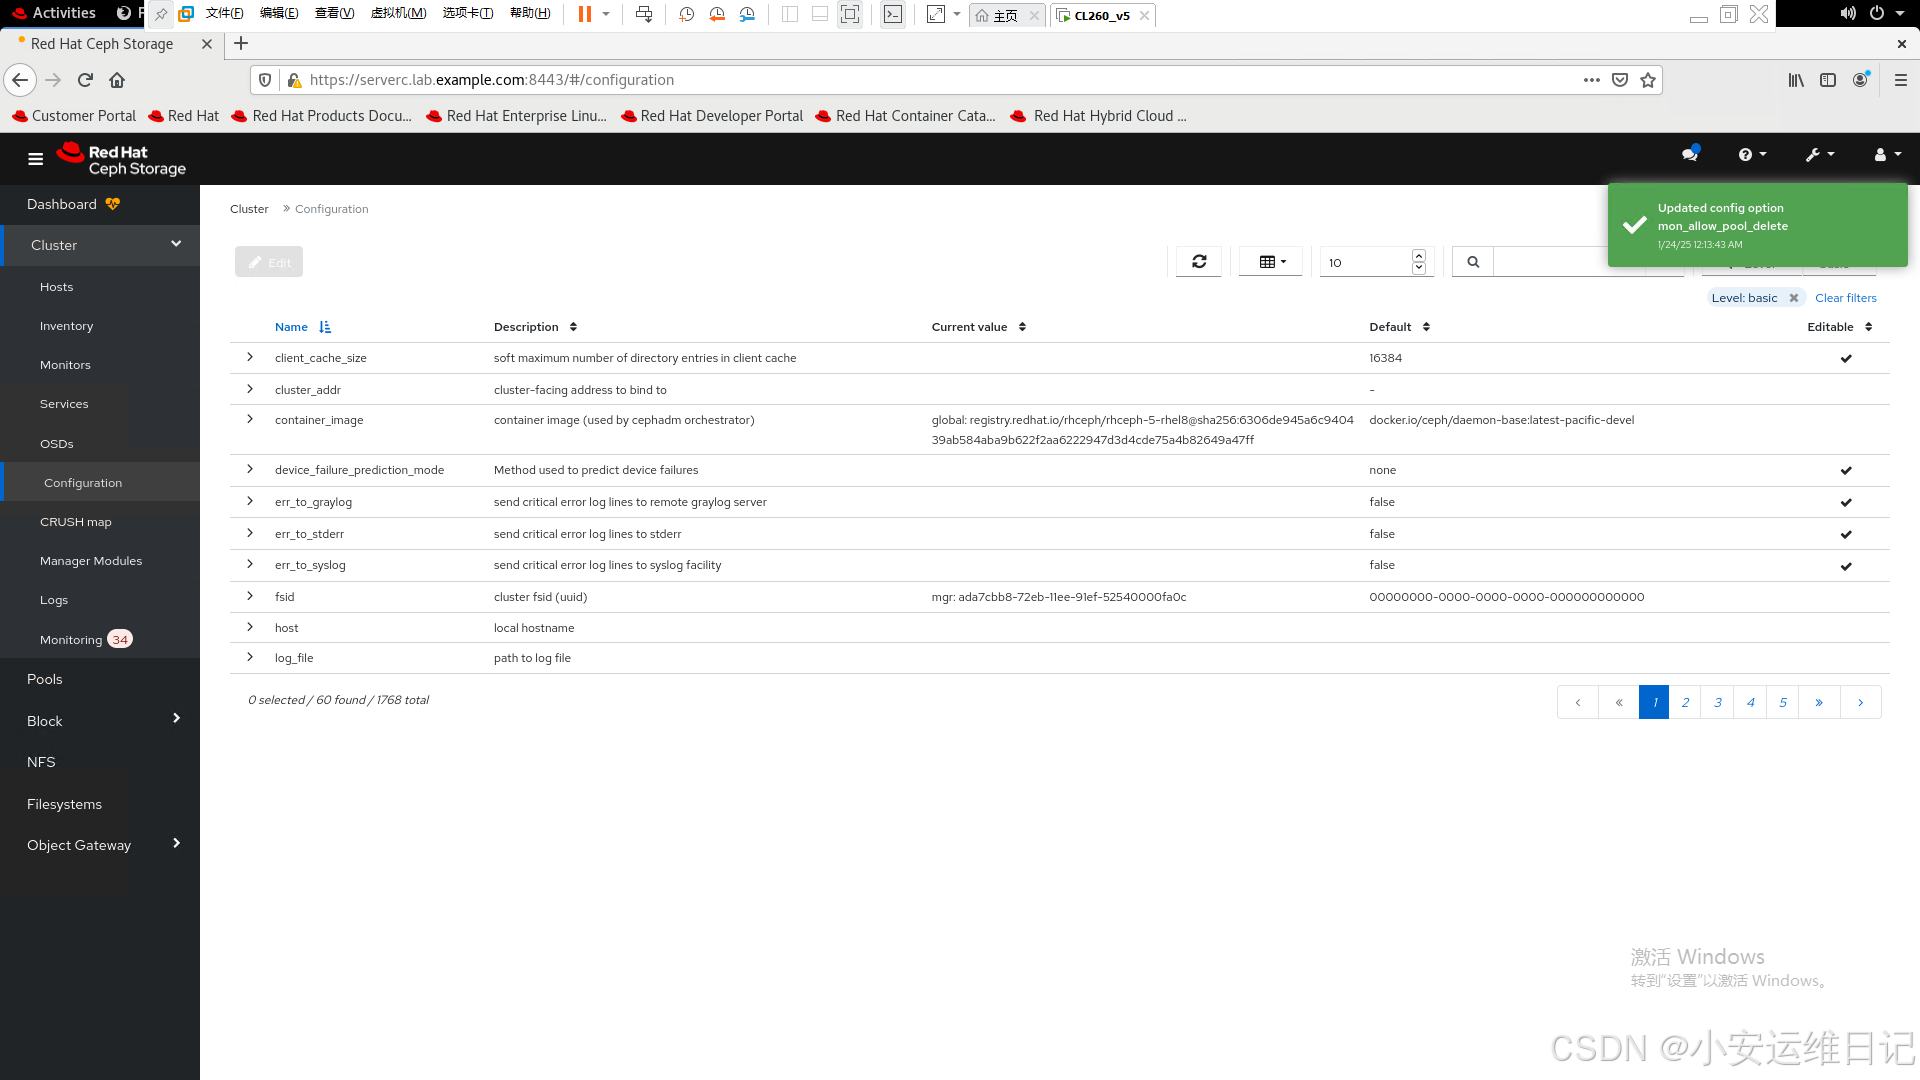
7)The dashboard displays a message to confirm the new setting.仪表板显示一条消息以确认新设置。
## 通过命令行查看效果
命令:ceph config get mon.serverc.lab.example.com mon_allow_pool_delete
命令:ceph tell mon.serverc.lab.example.com config get mon_allow_pool_delete
[ceph: root@serverc /]# ceph config get mon.serverc.lab.example.com mon_allow_pool_delete
true
[ceph: root@serverc /]# ceph tell mon.serverc.lab.example.com config get mon_allow_pool_delete
{"mon_allow_pool_delete": "true"
}
补充:使用命令修改全局配置参数
[ceph: root@serverc /]# ceph config set mon mon_allow_pool_delete true
[ceph: root@serverc /]# ceph config get mon mon_allow_pool_delete
二、配置集群MON
ceph MON保存和维护了整个集群的map,客户端通过这些map找到MON和OSD节点信息。
客户端在读取和写入任何数据到OSDs硬盘之前,必须连接MON主机接受集群map。
当ceph客户端启动时,她会连接MON主机下载集群map,发起其他集群组件的位置,比如OSDs, MDSs或者其他MONs主机。
获取map后,客户端可以直接连接相关进程,存储和接收具体数据。
1、MON基于Paxos算法实现仲裁和选举主服务器(leader)
MONs each have one of the following roles: 每个mon都有以下角色之一:
Leader: the first MON to obtain the most recent version of the cluster map.
第一个获得最新集群map的MON主机
Provider: a MON that has the most recent version of the cluster map, but is not the leader.
除了leader之外,其他具备最新版本集群map的MON主机
Requester: a MON that does not have the most recent version of the cluster map and must synchronize with a provider before it can rejoin the quorum.
没有最新版map的MON主机,必须和其他主机同步map后才能重新加入仲裁。
Synchroniztion always occurs when a new MON joins the cluster.
同步一般发生在有新MON主机加入集群时。
A majority of the MONs in a cluster must be running to establish a quorum.
主MON服务集群必须运行在法定仲裁状态下才可以。
For example, if five MONs are deployed, then three must be running to establish a quorum.
例如,如果部署了5台MON主机,则必须至少有台主机正常运行才可以进入法定仲裁状态。
Deploy at least three MON nodes in your production Ceph cluster to ensure high availability.
生产环境最少要部署3台MON主机,才能确保业务的好可用性。
Important:Changing MON node IP address is not recommended after the cluster is deployed and running.
不建议在集群部署运行后修改MON节点的IP地址。
When a change occurs in the cluster's infrastructure, such as OSDs joining or leaving the cluster, the monitors update the corresponding map accordingly.The monitors maintain a history of map revisions.Ceph identifies each version of each map using ordered set of incremented integers. known as epochs/ˈepək/.
当集群的基础结构发生变化时,例如osd加入或离开集群,MON将相应地更新相应的映射并保存着map修订的历史记录。Ceph使用有序的增量整数集来标识每个映射的每个版本,称为 epochs/ˈepək/.
The Paxos Algorithm(一种分布式一致性协商算法)
一个分布式系统中的各个进程如何就某个值达成一致?
Monitors use the Paxos algorithm as a mechanism to ensure that they agree on the cluster state. MON使用Paxos算法作为一种机制来确保它们在集群状态上达成一致。
Every time a monitor modifies a map, it sends the update to the other monitors through Paxos. 每次MON修改映射时,它都会通过Paxos将更新发送给其他MON。
Ceph only commits the new version of the map after a majority of monitors agrees on the update. Ceph只有在大多数MON同意更新后才会提交新版本的map。
Note: majority means more than half of the available monitors. 注意:多数表示超过一半的可用MON。
Monitor Quorum/ˈkwɔːrəm/
The monitors must agree on leadership and establish a quorum. monitors必须同意leader,并建立法定人数。
One monitor is the leader and all the others are referred to as peons/ˈpiːən/. 一个monitor是leader,其他的都被称为peons。
Any monitor can call for a leader election, something that always happens when one of the monitors boots. 任何MON都可以要求进行leader选举,当其中一个MON启动时,总会发生这样的事情。
选主算法:epoch值最大且rank值最小的monitor成为Leader主服务器。
rank值:是一个ID,代表主机节点在mon map中的位置,跟IP地址有关,如果主机还不在mon map中,此时rank=-1。
After the election completes and a leader is selected, the leader requests the latest map epoch from all the other monitors. This ensures the leader has the most current view of the cluster.If a majority of monitors join, a quorum is established and the cluster can operate.
在选举完成并选出leader后,leader将向所有其他MON请求最新的map。确保leader拥有集群的最新视图。如果大多数MON加入,则建立仲裁,集群可以运行。
Quorum = floor(nodes/2)+1
#floor() means to always round down.
For example:
Quorum= floor(5/2)+1 = floor(2.5)+1 = 2+1 = 3
If an additional monitor fails, there is no longer a quorum, and the cluster fails.
如果其他MON失败,则不再有仲裁,并且集群失败。
## 查看mon信息
命令:ceph mon stat
[ceph: root@node /]# ceph mon stat        //命令在cephadm shell中执行,不同的环境直接结果有所不同
e4: 4 mons at {clienta=[v2:172.25.250.10:3300/0,v1:172.25.250.10:6789/0],serverc.lab.example.com=[v2:172.25.250.12:3300/0,v1:172.25.250.12:6789/0],serverd=[v2:172.25.250.13:3300/0,v1:172.25.250.13:6789/0],
servere=[v2:172.25.250.14:3300/0,v1:172.25.250.14:6789/0]}, election epoch 146, leader 0 serverc.lab.example.com, quorum 0,1,2,3 serverc.lab.example.com,clienta,serverd,servere- 命令:ceph -s -f json-pretty
[ceph: root@node /]# ceph -s -f json-pretty // -f 输出Json文件2、分析Monitor Map
集群map包含:MONmap,OSDmap,PGmap,MDSmap以及CRUSHmap。
MON map包含集群fsid,集群名称,MON之间通信的IP地址以及端口号。
MON map还保存着版本信息,比如epoch和上一次更新的时间信息。
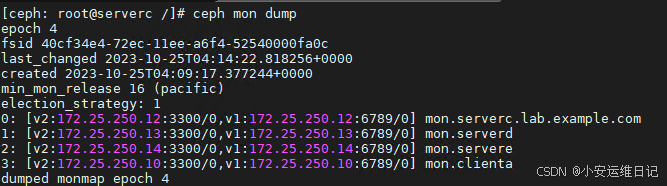
使用 ceph mon dump 命令查看当前mon map。
- 命令:ceph mon dump
[ceph: root@node /]# ceph mon dump
3、管理集中式配置数据库
MON主机保存和维护了一个配置数据库,数据库文件默认位置在/var/lib/ceph/$fsid/mon.$host/store.db/目录,我们不建议修改这个路径。
[root@serverc ~]# ls -lh /var/lib/ceph/$fsid/mon.serverc.lab.example.com/store.db/数据库文件被ceph-mon进程管理和维护
数据库文件有可能比较大!运行 ceph tell mon.$id compact 命令压缩数据库。
命令:ceph tell mon.$id compact
compact作用:要求 Monitor 执行日志压缩操作。
命令:ceph config set mon mon_compact_on_start true
mon_compact_on_start:设置 Monitor 在启动时是否自动执行日志压缩。
[ceph: root@node /]# ceph tell mon.serverc.lab.example.com compact可以通过修改配置,每次进程启动时压缩数据库。
[ceph: root@node /]# ceph config get mon mon_compact_on_start
false
[ceph: root@node /]# ceph config set mon mon_compact_on_start true    //设置为true
另外几个数据库相关的配置参数:
Setting | Default | Description |
mon_data_size_warn | 15 (GB) | 数据库文件多大时,集群报警 |
mon_data_avail_warn | 30 (%) | 存数据库的文件系统剩余30%,集群报警 |
mon_data_avail_crit | 5 (%) | 存数据库的文件系统剩余5%,集群Error |
[root@serverc ~]# ceph config get mon mon_data_size_warn
16106127360
[root@serverc ~]# echo 16106127360/1024/1024/1024 | bc
15
4、管理Ceph身份验证
红帽Ceph集群环境中客户端,应用程序,集群进程之间都使用认证方式通信。
为了确保用户认证的安全性,ceph使用cephx认证协议,该协议基于共享密钥原理。
默认安装程序会开启cephx认证协议,所有客户端和集群之间通信均需要认证。
要启用或禁用ceph协议,可以使用ceph config set命令管理多个设置。
[ceph: root@serverc /]# ceph config get mon auth_service_required
cephx
[ceph: root@serverc /]# ceph config get mon auth_cluster_required
cephx
[ceph: root@serverc /]# ceph config get mon auth_client_required
cephx, none
/etc/ceph目录以及进程的数据库目录均包含有认证的密钥文件(key-ring files)。
[root@serverc ~]# cat /etc/ceph/ceph.client.admin.keyring   //管理员密钥文件
[client.admin]key = AQD0kzhl+K8WIBAAwl7p0jn5ohncbkFsbUm0Lw==
## 每个进程之间的通信密钥
[root@serverc ~]# cat /var/lib/ceph/ada7cbb8-72eb-11ee-91ef-52540000fa0c/mon.serverc.lab.example.com/keyring
[mon.]key = AQDzkzhldpuUORAAVReU3nCwILkpU5CDpLE6GQ==caps mon = "allow *"[root@serverc ~]# cat /var/lib/ceph/ada7cbb8-72eb-11ee-91ef-52540000fa0c/osd.0/keyring
[osd.0]
key = AQCXlDhlRuN7IxAASNcM70sCk+VpVa+baBxxwA==
Ceph uses user accounts for several purposes: Ceph使用用户帐户有以下几个目的:
• For internal communication between Ceph daemons 用于Ceph守护进程之间的内部通信
• For client applications accessing the RHCS cluster through the librados library 用于客户端应用程序通过librados库访问RHCS集群
• For Ceph administrators 用于Ceph管理员
1)The Key-ring File 密钥环文件:
为了进行身份验证,客户端必须配置一个 Ceph 用户名和一个包含用户密钥的密钥环文件。Ceph 用户需要这个密钥环文件才能访问 Red Hat Ceph Storage 集群。
Ceph 会自动为每个创建的用户账户生成密钥环文件。然而,你仍然需要将这个文件复制到需要它的客户端系统或应用程序服务器
Ceph 用户名和密钥环文件
用户名:
每个 Ceph 用户都有一个唯一的用户名(例如 client.admin、client.user1 等)。
用户名用于标识客户端的身份。
密钥环文件:
密钥环文件是一个包含用户密钥的文件,密钥用于加密通信和身份验证。
密钥环文件的格式通常类似于 /etc/ceph/ceph.client.admin.keyring。
Ceph 会为每个创建的用户自动生成密钥环文件。
提示:cephx协议并不会在网络上传递共享密钥。客户端会访问mon请求一个session key,mon会使用共享密钥加密一个session key并传递给客户端,客户端使用正确的共享密钥解密session key,然后使用session key访问存储集群。
2)Authorization with Cephx
当你创建一个新用户账户时,你需要为其授予权限,以控制该用户在 Red Hat Ceph Storage 集群中被授权可以执行的操作。
Cephx 中的权限被称为能力(capabilities),你可以通过守护进程类型(mon、osd、mgr 或 mds)来授予这些权限。
Ceph Capabilities
Within cephx, and for each daemon type, several capabilities are available: 在cephx中,对于每种守护进程类型,有几个功能可用:
r grant read access. Each user account should have at least read access on the Monitors to be able to retrieve the CRUSH map.
r 每个用户都至少要有对mon的读权限,以读取CRUSH map.
w grant write access. Clients need write access to store and modify objects on OSDs.
w 授予写访问权限。客户端需要有写权限来存储和修改osd上的对象数据。
x grant authoriztion to execute extended object classes. This allows clients to perform extra operations on bojects such as setting locks with rados lock get or listing RBD images with rbd list.
x 授予执行扩展对象类的授权。这允许客户端对对象执行额外的操作,例如使用rados lock get设置锁或使用RBD list列出RBD图像。
* grants full access.
* 授予完全访问权限。
使用 ceph auth 命令创建、查看和管理集群密钥。
使用 ceph-authtool 命令创建密钥环文件。
- 命令:ceph-authtool --create-keyring </tmp/ceph.mon.keyring> --gen-key -n <mon.user> --cap <mon 'allow *'>
- 命令:ceph auth get-or-create <client.formyapp1> <mon 'allow r'> <osd 'allow rw' >
- 命令:ceph auth list
- 命令:ceph auth get <client.admin> -o </tmp/filekey>
例如:创建mon.testuser1账户的密钥环文件,并授权它可以对mon所有权限。
[ceph: root@node \]# ceph-authtool --create-keyring /tmp/ceph.mon.keyring --gen-key -n mon.testuser1 --cap mon 'allow *'例如:创建client.formyapp1账户,并授权它可以对任何存储池有读取数据的权限。
[ceph@serverc ~]$ ceph auth get-or-create client.formyapp1 mon 'allow r' osd 'allow rw'
[client.formyapp1]key = AQDHtThl1sc9LxAAzkeXwn0swS8GkXWFyFq0iw==
查看用户信息
[ceph@serverc ~]$ ceph auth list
...
client.formyapp1key: AQDHtThl1sc9LxAAzkeXwn0swS8GkXWFyFq0iw==caps: [mon] allow rcaps: [osd] allow rw
Lab: 配置集群MON
1. 查看集群状态
以root用户登录到serverc并运行cephadm shell。
[root@foundation0 ~]# ssh root@serverc
[root@serverc ~]# cephadm shell
1)查看集群仲裁状态。
命令:ceph status
[ceph:root@serverc /]# ceph status2)查看 mon map
- 命令:ceph mon dump
[ceph:root@serverc /]# ceph mon dump
3)查看serverc MON的“mon_host”设置的值
- 命令:ceph config show mon.serverc.lab.example.com mon_host
[ceph:root@serverc /]# ceph config show mon.serverc.lab.example.com mon_host
[v2:172.25.250.10:3300/0,v1:172.25.250.10:6789/0]
[v2:172.25.250.12:3300/0,v1:172.25.250.12:6789/0]
[v2:172.25.250.13:3300/0,v1:172.25.250.13:6789/0]
[v2:172.25.250.14:3300/0,v1:172.25.250.14:6789/0]![]()
4)查看mon状态
- 命令:ceph mon stat
[ceph: root@serverc /]# ceph mon stat
e4: 4 mons at {clienta=[v2:172.25.250.10:3300/0,v1:172.25.250.10:6789/0],serverc.lab.example.com=[v2:172.25.250.12:3300/0,v1:172.25.250.12:6789/0],serverd=[v2:172.25.250.13:3300/0,v1:172.25.250.13:6789/0],servere=[v2:172.25.250.14:3300/0,v1:172.25.250.14:6789/0]}, election epoch 18, leader 0 serverc.lab.example.com, quorum 0,1,2,3 serverc.lab.example.com,clienta,serverd,servere

5)使用ceph auth ls命令查看集群鉴权设置。
- 命令:ceph auth ls
[ceph: root@serverc /]# ceph auth ls
...
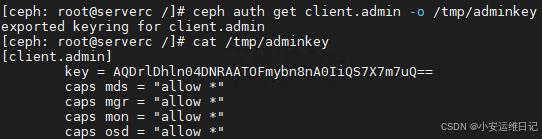
client.adminkey: AQA11VZhyq8VGRAAOus0I5xLWMSdAW/759e32A==caps: [mds] allow *caps: [mgr] allow *caps: [mon] allow *caps: [osd] allow *6)导出管理员秘钥文件。
- 命令:ceph auth get client.admin -o </tmp/filekey>
[ceph: root@serverc /]# ceph auth get client.admin -o /tmp/adminkey
[ceph: root@serverc /]# cat /tmp/adminkey
[client.admin]key = AQD0kzhl+K8WIBAAwl7p0jn5ohncbkFsbUm0Lw==caps mds = "allow *"caps mgr = "allow *"caps mon = "allow *"caps osd = "allow *"
2. 创建秘钥文件及授权
- 命令:ceph auth get-or-create client.<user> mon 'allow r' osd 'allow rw' -o /etc/ceph/ceph.client.app2.keyring
1)创建用户client.app1,该用户对mon有r权限,对osd有rw权限,密钥信息显示在屏幕
[ceph: root@serverc /]# ceph auth get-or-create client.app1 mon 'allow r' osd 'allow rw'
[client.app1]key = AQBNAjll5g6bFxAAIFyySPaMk1NeoxZhy8CuOA==
2)创建用户client.app2,该用户对mon有r权限,对osd有rw权限,密钥信息直接保存到文件
[ceph: root@serverc /]# ceph auth get-or-create client.app2 mon 'allow r' osd 'allow rw' -o /etc/ceph/ceph.client.app2.keyring验证:
[ceph: root@serverc /]# ceph auth ls
3. 在serverc上检查MON数据库占用的空间
1)查看数据库目录大小,$fsid和$host需要根据实际情况变成实际值
- 命令:du -sh /var/lib/ceph/$fsid/mon.$host/store.db
[ceph: root@serverc /]# exit
[root@serverc ~]# du -sh /var/lib/ceph/40cf34e4-72ec-11ee-a6f4-52540000fa0c/mon.serverc.lab.example.com/store.db/
77M     /var/lib/ceph/40cf34e4-72ec-11ee-a6f4-52540000fa0c/mon.serverc.lab.example.com/store.db/
2)设置启动进程时压缩数据库
[root@serverc ~]# cephadm shell
[ceph: root@serverc /]# ceph config set mon mon_compact_on_start true
[ceph: root@serverc /]# ceph config get mon mon_compact_on_start
true
3)重启mon服务,等待一会
[ceph: root@serverc /]# ceph orch restart mon4)查看集群是否重启成功,状态是否为HEALTH_OK
[ceph: root@serverc /]# ceph -s5)再次查看数据库目录大小,$fsid和$host需要根据实际情况变成实际值
[ceph: root@serverc /]# exit
[root@serverc ~]# du -sh /var/lib/ceph/40cf34e4-72ec-11ee-a6f4-52540000fa0c/mon.serverc.lab.example.com/store.db/
75M     /var/lib/ceph/40cf34e4-72ec-11ee-a6f4-52540000fa0c/mon.serverc.lab.example.com/store.db/
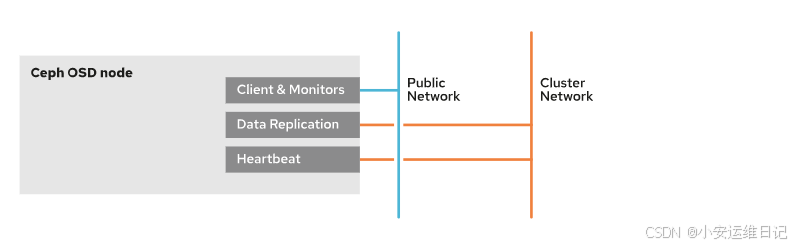
三、配置集群网络
public network 是ceph集群所有组件通信的默认网络。cephadm 假设第一个MON进程的IP地址为默认的 public network。Ceph客户端通过 public network 直接连接OSD,OSD的复制和数据恢复也是使用 public network 流量,除非我们为这些功能配置一个独立的cluster network。
配置独立的cluster network集群网络还可以提升性能,降低public network的工作负载,分离集群网络流量和的客户端网络流量。
Configure the nodes for a separate cluster network by performing the following steps.
配置独立的cluster网络需要如下几个步骤
Configure an additional network interface on each cluster node.(每个节点添加网卡)
Configure the appropriate cluster network IP addresses on the new network interface on each node.(每个节点给网卡配置合适的IP地址)
Use the --cluster-network option of the cephadm bootstrap command to create the cluster network at the cluster bootstrap.(启动集群时使用cephadm命令选项指定网络)
你可以使用集群配置文件设置 public 和 cluster 网络,每个网络都可以配置超过一个子网,多个子网使用逗号分隔。
注意:如果你配置了多个子网,则要求子网之间必须彼此是可路由的!
[global]public_network = 172.25.250.0/24,172.25.251.0/24cluster_network = 172.25.249.0/24我们可以使用 ceph config set 或者 ceph config assimilate-conf 命令修改public和cluster网络。
1、配置单独的进程参数
To set the 172.25.252.0/24 subnet to MON daemons:(下面仅演示语法)
命令:ceph config set mon public_network 172.25.252.0/24
命令:ceph config get mon public_network //查询所有mon节点的全局配置(默认生效范围)
命令:ceph config get mon.serverg public_network //查询指定monitor实例的配置(例如mon.serverg)
[ceph: root@node /]# ceph config set mon public_network 172.25.252.0/24The example command is the equivalent of the following [mon] section in cluster configuration file.上面命令示例等同于在配置文件中[mon]段设置了如下参数.
[mon]
public_network = 172.25.252.0/24
Use the ceph orch daemon add command to manually deploy daemons to a specific subnet or IP address.使用ceph orch命令可以手动指定进程的网络或IP。
## 添加mon主机(仅为命令示例)
[ceph: root@node /]# ceph orch daemon add mon cluster-host02:172.25.251.0/24## 删除mon主机(仅为命令示例)
[ceph: root@node /]# ceph orch daemon rm mon.cluster-host02
提示:不推荐使用ceph orch daemon命令修改集群配置,推荐在部署ceph集群是通过服务的spec文件管理集群。
2、使用IPv6
默认集群参数,ms_bind_ipv4=true,ms_bind_ipv6=false。
Ceph进程使用IPv6地址,需要将 ms_bind_ipv6 设置为true,将 ms_bind_ipv4设置为flase。
[global]
public_network = <ipv6 public-network/netmask>
cluster_network = <ipv6 cluster-network/netmask>
3、启用巨型帧
配置集群网络MTU支持巨帧是推荐的最佳实践,这样可以提升性能。
nmcli con modify ens33 802-3-ethernet.mtu 9000 ##仅为命令示例重要:所有节点的网络设备必须配置相同的MTU值。
巨型帧(Jumbo Frames)是指在以太网上使用的比标准以太网帧更大的帧。标准的以太网帧大小(即MTU,最大传输单元)通常是1500字节,而巨型帧可以承载的数据量更大,通常是9000字节,有时甚至更多。使用巨型帧可以提高网络的效率和性能,因为它减少了每次传输的帧数和因此产生的开销。
场景:
数据中心网络:在数据中心网络中,服务器之间需要高吞吐量和低延迟的通信。使用巨型帧可以减少每次数据传输时的CPU处理次数,因此可以节省处理器资源,提高网络性能。
存储网络:在SAN(存储区域网络)或NAS(网络附加存储)这样的存储网络中,巨型帧可以提升文件传输的效率,尤其是在处理大文件时。
高性能计算:在高性能计算(HPC)和科学研究中,巨型帧可以加快大量数据的传输速度,对于数据密集型的应用非常重要。
视频流和媒体传输:在需要传输高清视频流或大型媒体文件的场景中,巨型帧可以减少网络延迟,改善用户体验。
使用巨型帧的注意事项:
网络设备支持:整个网络路径上的所有设备(如交换机、路由器、网卡等)都必须支持巨型帧,否则可能会导致网络包被丢弃。
配置一致性:网络中的所有设备都需要配置相同大小的MTU,以避免不必要的分片和可能的性能下降。
调试复杂性:巨型帧可能会增加网络问题排查的难度,因为它改变了传统网络流量的行为。
总的来说,巨型帧在需要高带宽和低延迟的网络环境中非常有用。然而,在决定是否使用巨型帧之前,需要仔细考虑网络设备的支持情况、管理和维护的复杂性,以及可能的性能提升是否值得这些额外的努力。
4、配置防火墙规则
默认Ceph OSD和MDS进程使用TCP协议端口 6800-7300。
修改 ms_bind_port_min和 ms_bind_port_max可以修改端口范围。
Service Name | Ports | Description | 翻译 |
MON | 6789/TCP(msgr), 3300/TCP(msgr2) | Communication within the Ceph Cluster | Ceph集群内的通信 |
OSD | 6800-7300/TCP | Each OSD uses three ports in this range: one for communication with clients and monitors over the public network; one for sending data to other OSDs over a cluster network, or over the public network if the former does not exist; And another for exchanging heartbeat packets over a cluster network or over the public network if the former does not exist. | 每个OSD使用该范围内的3个端口: 一个用于通过公共网络与客户端和MON通信; 一个用于通过集群网络或通过公共网络(如果前者不存在)向其他osd发送数据; 另一个用于在集群网络或公共网络(如果前者不存在)上交换心跳数据包。 |
MDS | 6800-7300/TCP | Communication with the Ceph metadata Server | 与Ceph元数据服务器的通信 |
Dashbord/Manager(MGR) | 8443/TCP | Communication with the Ceph Manager Dashboard over SSL. | 通过SSL与Ceph管理器仪表板通信。 |
Manager RESTful Module | 8003/TCP | Communication with the Ceph Manager RESTful module over SSL. | 通过SSL与Ceph Manager RESTful模块通信。 |
Manager Prometheus Module | 9283/TCP | Communication with the Ceph Manager Prometheus plug-in | 与Ceph Manager Prometheus插件通信 |
Prometheus Alertmanager | 9093/TCP | Communication with the Prometheus Alertmanager service | 与Prometheus Alertmanager服务通信 |
Prometheus Node Exporter | 9100/TCP | Communication with the Prometheus Node Exporter daemon | 与Prometheus Node export守护进程的通信 |
Grafana server | 3000/TCP | Communication with the Grafana service | 与Grafana服务的通信 |
Ceph Object Gateway(RGW) | 80/TCP | Communication with Ceph RADOSGW. If the client.rgw configuration section is empty, cephadm uses the default port 80. | 与Ceph RADOSGW通信。如果客户端RGW配置部分为空,cephadm使用默认端口80。 |
Ceph iSCSI Gateway | 9287/TCP | communication with Ceph iSCSI Gateway | 与Ceph iSCSI网关通信 |
You can manually adding the port to the firewall rules. 您可以手动将端口添加到防火墙规则中。
[root@node]# firewall-cmd --zone=public --add-port=6789/tcp
[root@node]# firewall-cmd --zone=public --add-port=6789/tcp --permanent
You can also adding the ceph-mon service to the firewall rules. 您还可以将ceph-mon服务添加到防火墙规则中。
[root@node]# firewall-cmd --zone=public --add-server=ceph-mon
[root@node]# firewall-cmd --zone=public ---add-server=ceph-mon --permanent
To secure OSD nodes for firewall rules: 使用防火墙规则保护OSD:
[root@node]# firewall-cmd --zone=区域 --add-port=6800-7300/tcp
[root@node]# firewall-cmd --zone=区域 --add-port=6800-7300/tcp --permanent
[root@node]# firewall-cmd --zone=区域 --add-service=ceph
[root@node]# firewall-cmd --zone=区域 --add-service=ceph --permanent
补充:使用 iptables 添加防火墙规则
如果你的系统使用的是 iptables,可以按照以下步骤操作:
步骤 1:添加规则
运行以下命令,开放 6789 端口:
[root@node]# iptables -A INPUT -p tcp --dport 6789 -j ACCEPT-A INPUT:将规则添加到 INPUT 链。
-p tcp:指定协议为 TCP。
--dport 6789:指定目标端口为 6789。
-j ACCEPT:允许流量通过。
步骤 2:保存规则
运行以下命令,保存 iptables 规则:
[root@node]# iptables-save > /etc/sysconfig/iptables步骤 3:验证规则
检查 iptables 规则是否已成功添加:
[root@node]# iptables -L -v -n输出应包含允许 6789 端口的规则。
Lab: 配置OSD的cluster-network集群网络
1. 挂载osd-cluster-network.conf 配置cluster_network
以root用户登录到serverc并运行cephadm shell。
[root@foundation0 ~]# ssh root@serverc
[root@serverc ~]# vim osd-cluster-network.conf
[osd]cluster network = 172.25.249.0/24
使用带有 --mount选项的cephadm shell来挂载osd-cluster-network.conf文件,并验证该文件的完整性。
[root@serverc ~]# cephadm shell --mount osd-cluster-network.conf使用ceph status命令查看集群状态。
- 命令:ceph config get <who> public_network
- 命令:ceph config get <who> cluster_network
[ceph:root@serverc /]# ceph -s
[ceph: root@serverc /]# ceph config get mon public_network
172.25.250.0/24[ceph: root@serverc /]# ceph config get osd public_network   //为空
[ceph: root@serverc /]# ceph config get osd cluster_network   //为空
ceph config get osd public_network:这个命令尝试获取特定于 OSD 守护进程的 public_network 配置。如果 OSD 守护进程有独特的、非全局的 public_network 设置,它将返回该设置的值。
在 Ceph 配置中,public_network 通常是一个全局设置,意味着它对所有守护进程都是相同的。如果你没有为 OSDs 或 MONs 设置特定的 public_network,这两个命令应该返回相同的结果,即全局的 public_network 配置。如果你的集群有特定的网络要求,例如某些 OSD 或 MON 守护进程需要不同的网络设置,你可以对它们进行单独的配置。但这种情况比较少见,大多数部署都会使用相同的 public_network 配置来保证集群的简单性和一致性。
简而言之,这两个命令的区别在于它们查询的守护进程类型。如果没有为这些守护进程类型设置特定的配置,则它们应该返回全局配置值。
使用 ceph config assimilate-conf 命令和 osd-cluster-network.conf 文件来应用配置。验证服务是否定义了 cluster_network。
[ceph: root@serverc /]# ceph config assimilate-conf -i /mnt/osd-cluster-network.conf
[ceph: root@serverc /]# ceph config get osd cluster_network
172.25.249.0/24
2. 使用ceph config命令设置MON服务的public_network
使用ceph config 命令将MON服务的 public_network 设置为172.25.250.0/24。验证服务是否具有新设置。
- 命令:ceph config set mon public_network 172.25.250.0/24
[ceph: root@serverc /]# ceph config get mon public_network
[ceph: root@serverc /]# ceph config set mon public_network 172.25.250.0/24
[ceph: root@serverc /]# ceph config get mon public_network
172.25.250.0/24[ceph: root@serverc /]# exit    //退出
3. 在serverc上配置防火墙规则
1)添加ceph-mon到防火墙public的zone
[root@serverc ~]# firewall-cmd --zone=public --add-service=ceph-mon
[root@serverc ~]# firewall-cmd --zone=public --add-service=ceph-mon --permanent   //--permanent永久添加
2)添加ceph到防火墙public的zone
[root@serverc ~]# firewall-cmd --zone=public --add-service=ceph
[root@serverc ~]# firewall-cmd --zone=public --add-service=ceph --permanent   //--permanent永久添加
4. 配置集群网络MTU支持巨帧
[root@serverc ~]# nmcli connection modify 'Wired connection 2' 802-3-ethernet.mtu 9000
[root@serverc ~]# nmcli connection down 'Wired connection 2'
Connection 'Wired connection 2' successfully deactivated (D-Bus active path: /org/freedesktop/NetworkManager/ActiveConnection/3)
[root@serverc ~]# nmcli connection up 'Wired connection 2'
Connection successfully activated (D-Bus active path: /org/freedesktop/NetworkManager/ActiveConnection/4)
[root@serverc ~]# ip link show eth1
3: eth1: <BROADCAST,MULTICAST,UP,LOWER_UP> mtu 9000 qdisc fq_codel state UP mode DEFAULT group default qlen 1000link/ether 52:54:00:01:f9:0c brd ff:ff:ff:ff:ff:ff[root@serverc ~]# nmcli connection modify 'Wired connection 2' 802-3-ethernet.mtu 1500
[root@serverc ~]# nmcli connection down 'Wired connection 2'
Connection 'Wired connection 2' successfully deactivated (D-Bus active path: /org/freedesktop/NetworkManager/ActiveConnection/4)
[root@serverc ~]# nmcli connection up 'Wired connection 2'
Connection successfully activated (D-Bus active path: /org/freedesktop/NetworkManager/ActiveConnection/5)
[root@serverc ~]# ip link show eth1
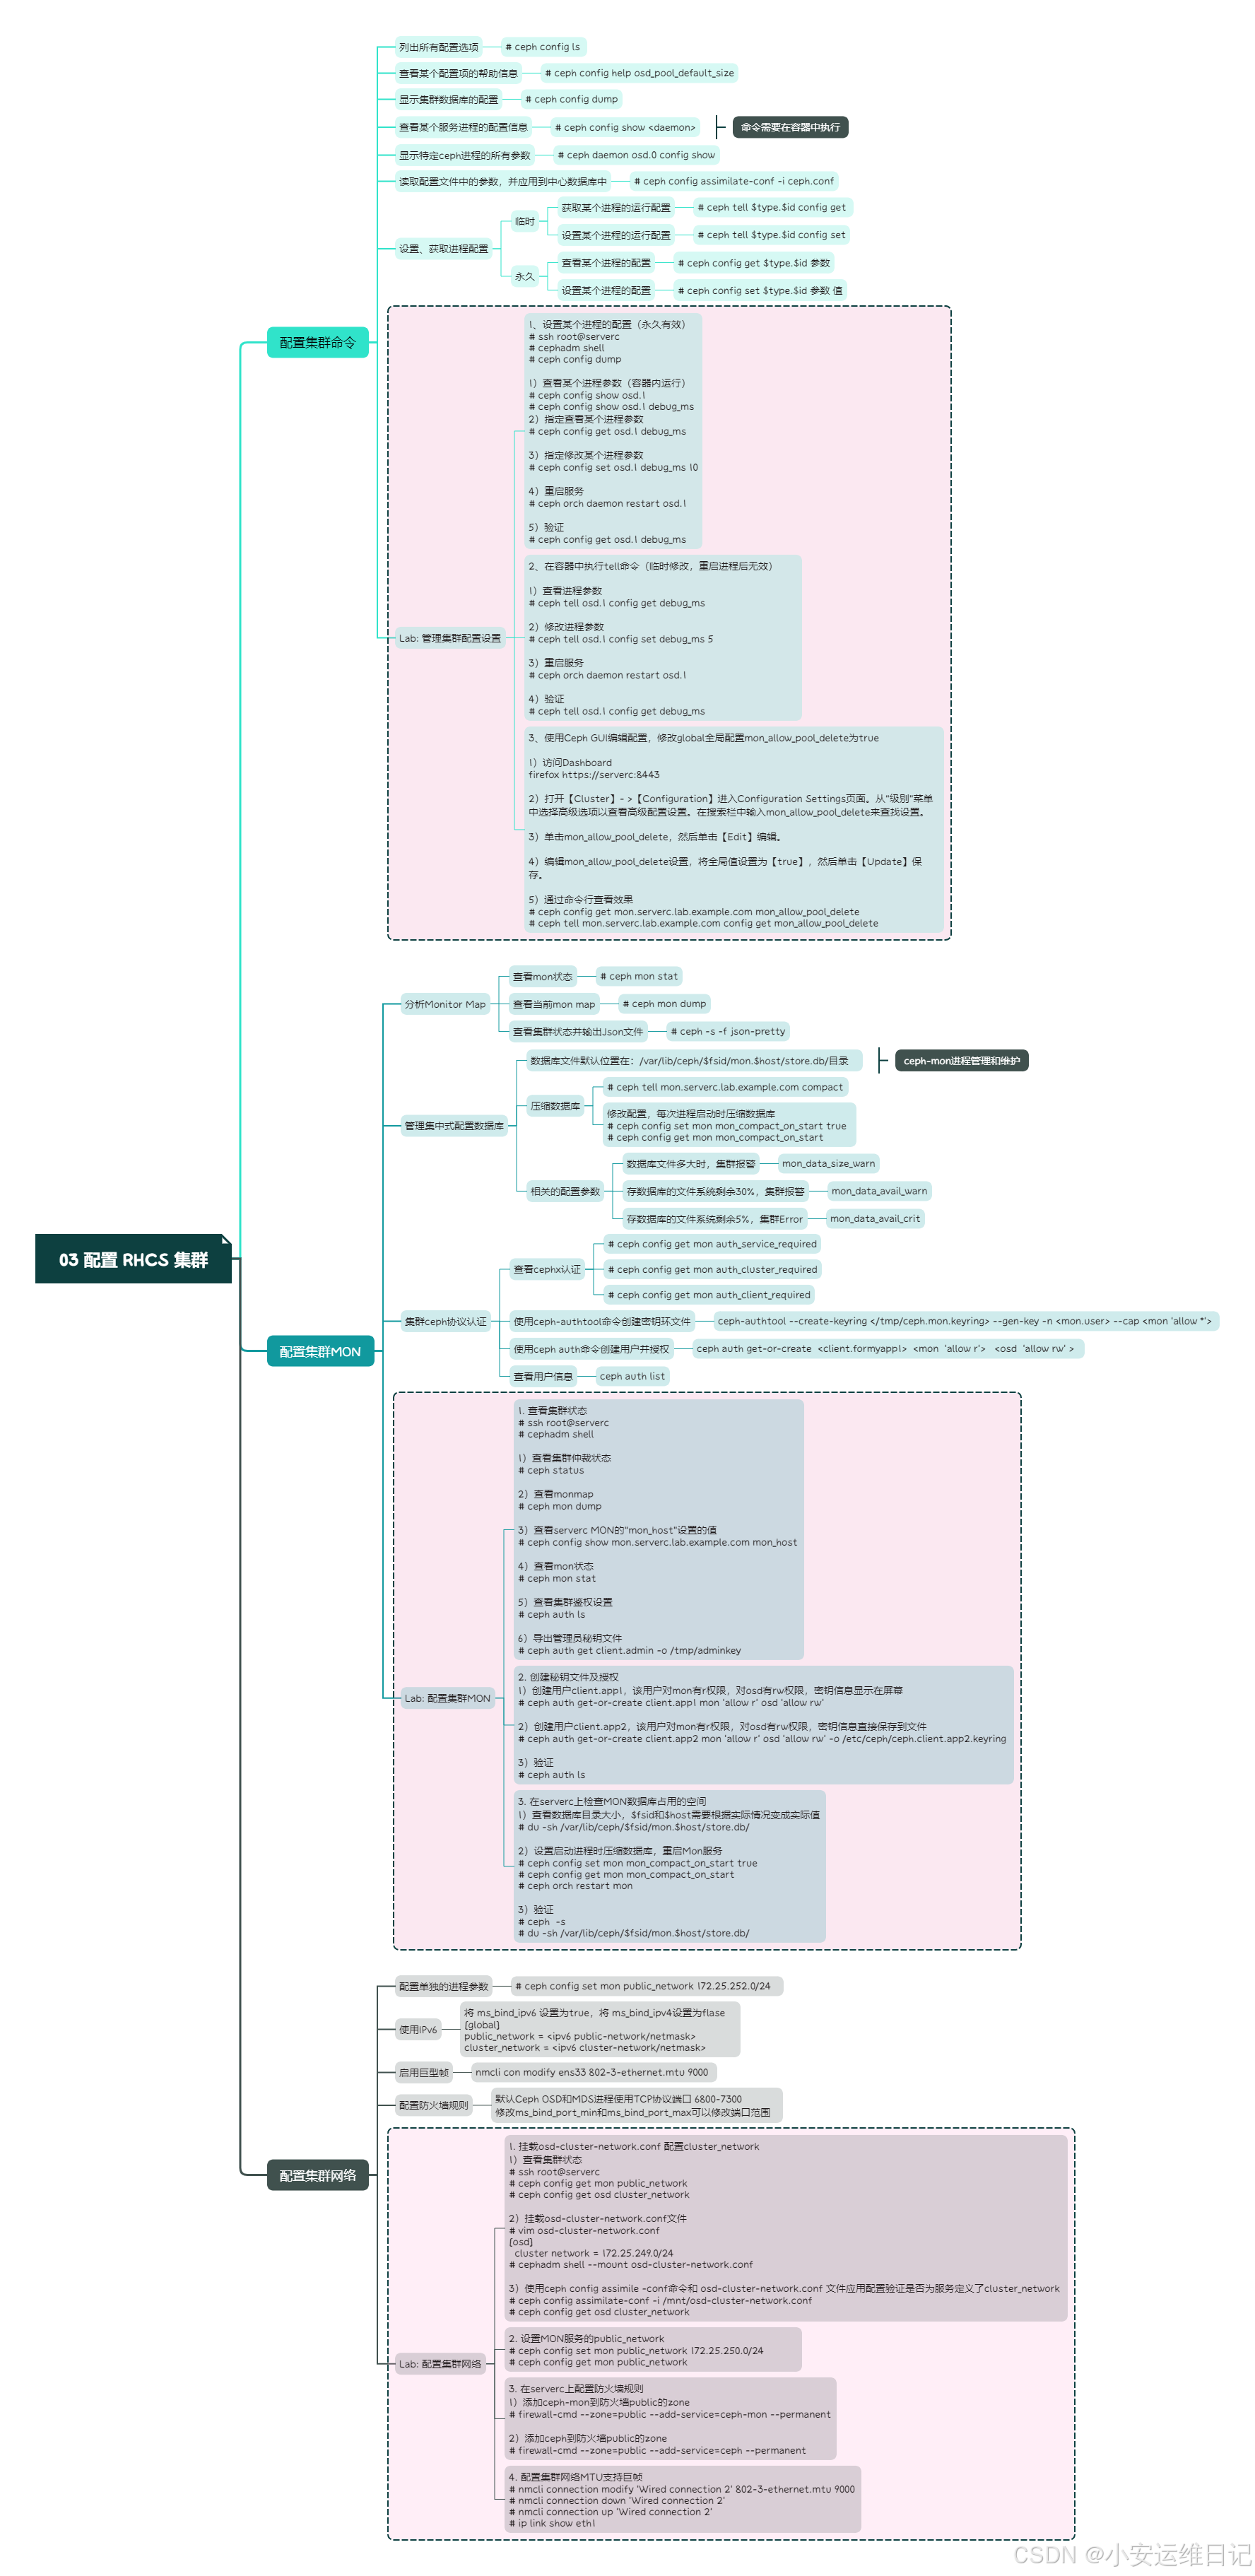
3: eth1: <BROADCAST,MULTICAST,UP,LOWER_UP> mtu 1500 qdisc fq_codel state UP mode DEFAULT group default qlen 1000link/ether 52:54:00:01:f9:0c brd ff:ff:ff:ff:ff:ff思维导图:
小结:
本篇为 【RHCA认证 - CL260 | Day03:配置 RHCS 集群】的开篇学习笔记,希望这篇笔记可以让您初步了解到 如何配置 RedHat Ceph Storage、如何配置集群MON、如何配置集群网络,不妨跟着我的笔记步伐亲自实践一下吧!
Tip:毕竟两个人的智慧大于一个人的智慧,如果你不理解本章节的内容或需要相关环境、视频,可评论666并私信小安,请放下你的羞涩,花点时间直到你真正的理解。