手撕设计模式——智能家居之外观模式
手撕设计模式——智能家居平台之外观模式
1.业务需求
大家好,我是菠菜啊,好久不见,今天给大家带来的是——外观模式。老规矩,在介绍这期内容前,我们先来看看这样的需求:在智能家居平台中,用户怎么样实现场景化操作(如“回家模式”“睡眠模式”)?
2.代码实现
Talk is cheap,show me your code.
初版实现思路:
我们直接调用多个子设备,实现回家模式的场景化需求。
初版代码如下:
//家居设备基础接口
public interface HomeDevice {String getName();String getStatus();}
//灯光设备
public class LightDevice implements HomeDevice{private String name;private int brightness=0;public LightDevice(String name){name = name;}public void dim(int level) {brightness = level;System.out.println("灯光调暗至 " + level + "%");}public void onLight(){System.out.println("打开灯光");brightness = 100;}public void offLight(){System.out.println("关闭灯光");brightness = 0;}@Overridepublic String getName() {return name;}@Overridepublic String getStatus() {return "灯光"+ brightness + "%";}
}
//电视设备
public class TVDevice implements HomeDevice{private String name;private String status;public TVDevice(String name){name = name;}public void onTV(){System.out.println("打开TV");status = "on";}public void offTV(){System.out.println("关闭TV");status = "off";}@Overridepublic String getName() {return name;}@Overridepublic String getStatus() {return status;}
}
//空调设备
public class AirCondition implements HomeDevice{private String name;private String status;public AirCondition(String name){name = name;}public void startCooling(){System.out.println("空调制冷");status = "cooling";}public  void off() {System.out.println("空调关机");status = "off";}@Overridepublic String getName() {return name;}@Overridepublic String getStatus() {return status;}
}
//客户端
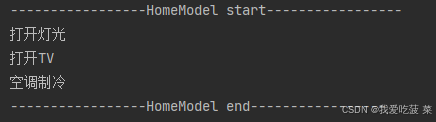
public class Client {public static void main(String[] args) {LightDevice light = new LightDevice("Light");TVDevice tv = new TVDevice("TV");AirCondition ac = new AirCondition("AC");System.out.println("-----------------HomeModel start-----------------");light.onLight();tv.onTV();ac.startCooling();System.out.println("-----------------HomeModel end-----------------");}
}
执行结果:
思考:
上述代码我们也发现一些问题,如客户端(用户)切换到回家模式的时候,需要自行完成三个子设备的调用,用户需要关心这么多细节吗?这样耦合性是不是太强了?于是,我们又经过一系列优化。
3.代码优化
优化代码:
//智能家居外观类
public class SmartHomeFacade {private LightDevice lightDevice;private TVDevice tvDevice;private AirCondition airCondition;public SmartHomeFacade() {lightDevice = new LightDevice("Light");tvDevice = new TVDevice("TV");airCondition = new AirCondition("AirCondition");}public void activeHomeModel() {System.out.println("-----------------activeHomeModel start-----------------");lightDevice.onLight();tvDevice.onTV();airCondition.startCooling();System.out.println("-----------------activeHomeModel end-----------------");System.out.println("deviceName:"+lightDevice.getName()+",status:"+lightDevice.getStatus());System.out.println("deviceName:"+tvDevice.getName()+",status:"+tvDevice.getStatus());System.out.println("deviceName:"+airCondition.getName()+",status:"+airCondition.getStatus());}
}
//客户端
public class Client {public static void main(String[] args) {/*  LightDevice light = new LightDevice("Light");TVDevice tv = new TVDevice("TV");AirCondition ac = new AirCondition("AC");System.out.println("-----------------HomeModel start-----------------");light.onLight();tv.onTV();ac.startCooling();System.out.println("-----------------HomeModel end-----------------");*/SmartHomeFacade smartHomeFacade = new SmartHomeFacade();smartHomeFacade.activeHomeModel();}
}
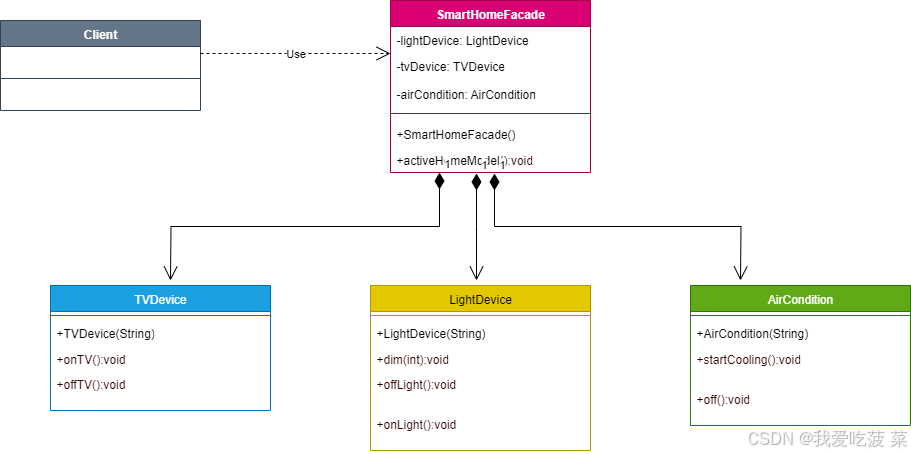
代码结构:
思考:
用户无需要知道所有设备的调用细节,只需简单调用SmartHomeFacade的activeHomeModel方法,实现真正意义上的一键切换回家模式。如果调用逻辑修改或者添加新设备了,客户端无感知,进一步降低耦合,符合迪米特法则。
4.定义与组成

定义:
外观模式(Facade Pattern)是一种结构型设计模式**,它提供了一个统一的接口,用于访问子系统中的一组接口。外观模式定义了一个高层接口,这个接口使得子系统更容易使用。**
组成:
- 外观(Facade):提供统一的调用接口,将客户端请求委派给适当的子系统对象
- 子系统(SubSystem):实现具体功能,被外观类调用
核心思想
封装复杂性,提供简单接口
通过创建一个简化的高层接口,隐藏子系统的实现细节,降低客户端与子系统的耦合度。
5.代码重构(工厂模式+抽象外观模式)
思考:
上述的代码实现依赖外观类,不够抽象,而且新增家居设备需要修改外观类,而且不支持动态扩展场景,所以了解了问题后我们进一步重构了代码。
代码重构:
//抽象智能家居外观接口
public interface ISmartHomeFacade {//切换到回家模式void activeHomeModel();//切换到睡眠模式void activateSleepMode();// 扩展点:动态添加设备void addDevice(String deviceName, HomeDevice device);// 获取设备<T extends HomeDevice> T getDevice(Class<T> deviceClass);
}
//动态智能家居外观类
public class DynamicSmartHomeFacade implements ISmartHomeFacade{private final Map<String, HomeDevice> devices = new HashMap<>();public DynamicSmartHomeFacade() {addDevice("Light",new LightDevice("Light"));addDevice("TV",new TVDevice("TV"));addDevice("AirCondition",new AirCondition("AirCondition"));}@Overridepublic void activeHomeModel() {System.out.println("-----------------activeHomeModel start-----------------");getDevice(LightDevice.class).onLight();getDevice(TVDevice.class).onTV();getDevice(AirCondition.class).startCooling();System.out.println("-----------------activeHomeModel end-----------------");}// 泛型方法获取设备@SuppressWarnings("unchecked")public <T extends HomeDevice> T getDevice(Class<T> deviceClass) {return devices.values().stream().filter(deviceClass::isInstance).map(device -> (T) device).findFirst().orElseThrow(() -> new RuntimeException("Device not found: " + deviceClass.getSimpleName()));}public boolean hasDevice(Class<? extends HomeDevice> deviceClass) {return devices.values().stream().anyMatch(deviceClass::isInstance);}@Overridepublic void activateSleepMode() {System.out.println("-----------------activateSleepMode start-----------------");getDevice(LightDevice.class).dim(10);getDevice(TVDevice.class).offTV();getDevice(AirCondition.class).startCooling();System.out.println("-----------------activateSleepMode end-----------------");}@Overridepublic void addDevice(String deviceName, HomeDevice device) {devices.put(deviceName, device);}
}
//抽象场景工厂接口
public interface ISceneFactory {SmartHomeScene createScene();
}
//离家模式创建工厂
public class AwayHomeISceneFactory implements ISceneFactory {@Overridepublic SmartHomeScene createScene() {return new SmartHomeScene("离家模式",(facade->{System.out.println("-----------------activeAwayHomeModel start-----------------");facade.getDevice(LightDevice.class).offLight();facade.getDevice(TVDevice.class).offTV();facade.getDevice(AirCondition.class).off();System.out.println("-----------------activeAwayHomeModel end-----------------");}));}
}
//场景管理
public class SceneManager {private final Map<String, ISceneFactory> sceneFactories = new HashMap<>();private final ISmartHomeFacade facade;public SceneManager(ISmartHomeFacade facade) {this.facade = facade;}public void registerScene(String name, ISceneFactory factory) {sceneFactories.put(name, factory);}public void activateScene(String name) {ISceneFactory factory = sceneFactories.get(name);if(factory != null) {SmartHomeScene scene = factory.createScene();scene.execute(facade);}}
}
//动态场景类
public class SmartHomeScene {private final String sceneName;private final Consumer<ISmartHomeFacade> sceneExecutor;public SmartHomeScene(String sceneName, Consumer<ISmartHomeFacade> sceneExecutor) {this.sceneName = sceneName;this.sceneExecutor = sceneExecutor;}public void execute(ISmartHomeFacade facade) {sceneExecutor.accept(facade);}
}
//智能床设备
public class SmartBedDevice implements HomeDevice{private String name;private int angle=0;public SmartBedDevice(String name){name = name;}public void adjust(int angle) {angle = angle;System.out.println("智能床调至 " + angle + "角度");}@Overridepublic String getName() {return name;}@Overridepublic String getStatus() {return "智能床"+ angle + "角度";}
}
//客户端
public class Client2 {public static void main(String[] args) {DynamicSmartHomeFacade facade = new DynamicSmartHomeFacade();// 开启回家模式facade.activeHomeModel();// 添加智能床设备facade.addDevice("SmartBed", new SmartBedDevice("SmartBed"));// 开启睡眠模式facade.activateSleepMode();ISceneFactory factory = new AwayHomeISceneFactory();SceneManager sceneManager = new SceneManager(facade);sceneManager.registerScene("离家模式", factory);sceneManager.activateScene("离家模式");}
}
上述代码执行结果:

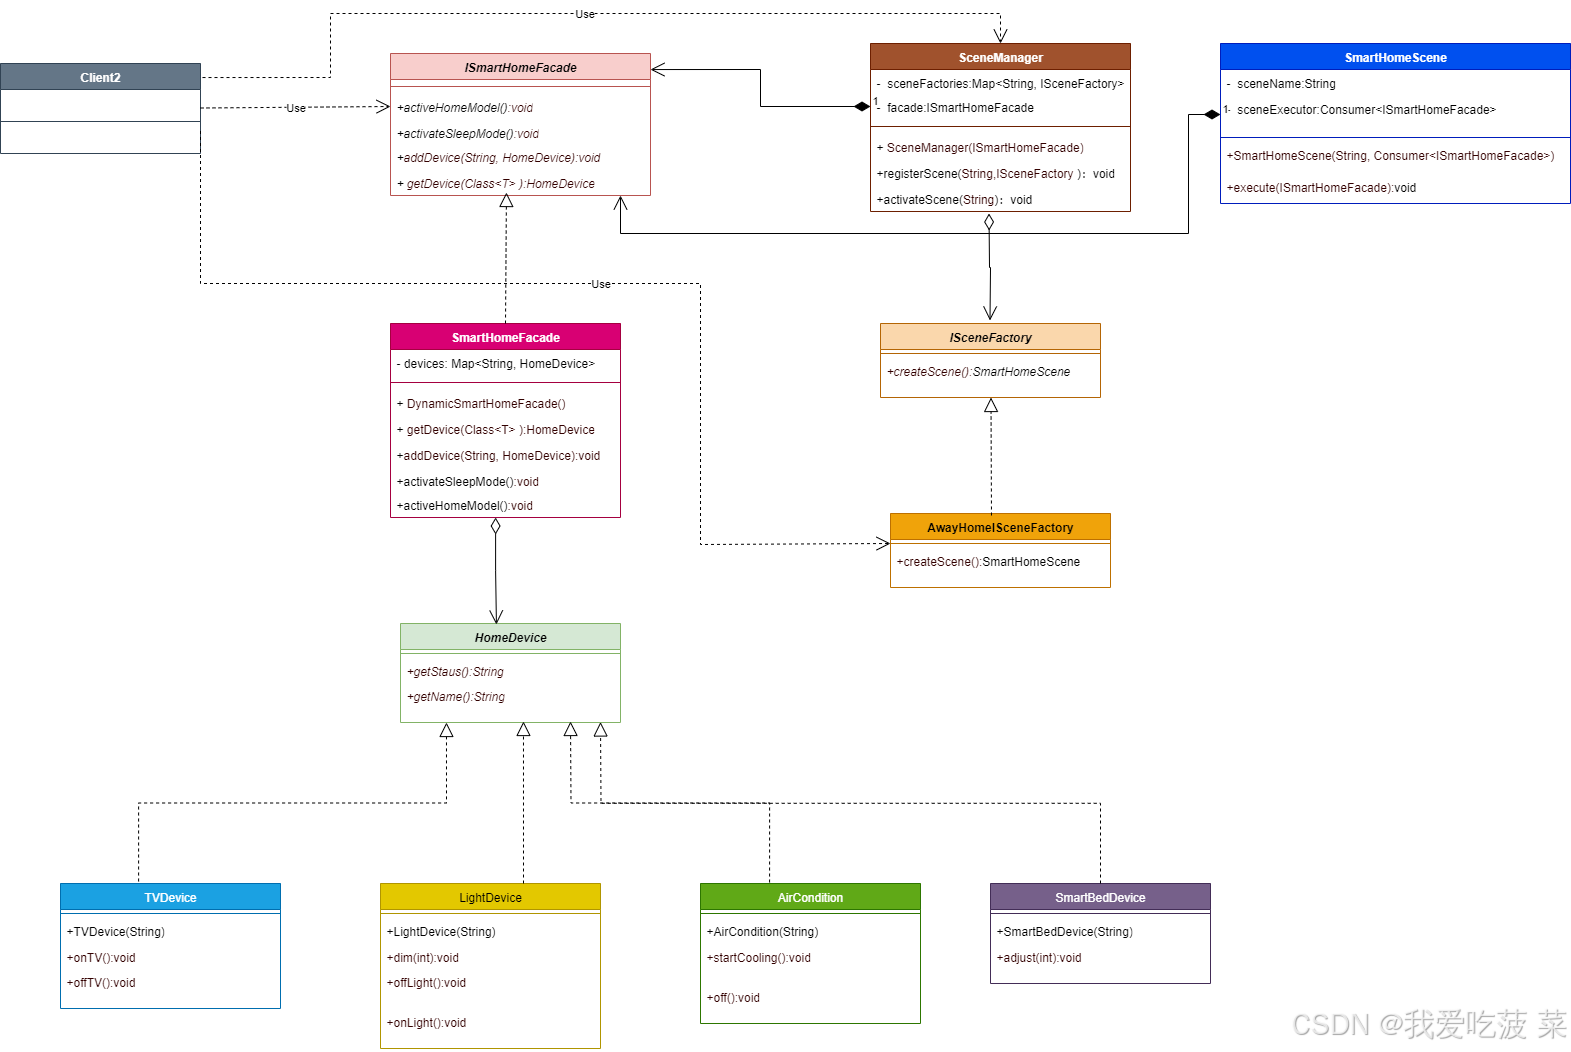
实现代码结构:
总结:
上述代码通过抽象外观接口,通过addDevice()方法添加,无需修改外观类,通过SceneManager动态注册场景工厂新增场景,实现设备热插拔以及场景热部署。这种基于抽象接口的外观模式实现,不仅遵循了开闭原则,还为智能家居系统提供了强大的扩展能力。通过动态设备管理和场景工厂等机制,系统可以在不修改核心代码的情况下持续演进,完美适应快速变化的智能家居生态。
6.应用示例
其实外观模式我们在日常开发的时候应用的很广泛,下面是一些示例:
6.1日志框架:
// SLF4J是典型的外观模式实现
Logger logger = LoggerFactory.getLogger(MyClass.class);
logger.info("This is a log message");
6.2 Spring框架:
// JdbcTemplate封装了JDBC的复杂性
jdbcTemplate.query("SELECT * FROM users", new BeanPropertyRowMapper<>(User.class));
6.3 Files类
// Files类封装了文件操作的复杂性
Files.copy(source, target, StandardCopyOption.REPLACE_EXISTING);
7.适用场景
| 场景类型 | 是否适用 | 原因 |
|---|---|---|
| 系统复杂且模块多 | ✅ 非常适用 | 简化客户端调用 |
| 需要解耦客户端与子系统 | ✅ 推荐使用 | 降低依赖关系 |
| 需要为子系统提供统一入口 | ✅ 理想选择 | 提供简洁接口 |
| 需要逐步重构遗留系统 | ✅ 适用 | 作为中间层 |
技术需要沉淀,同样生活也是~
个人链接:博客,欢迎一起交流