第六章 工具调用
代码仓库地址:https://github.com/Liucc-123/ai-agent
官方文档:https://docs.spring.io/spring-ai/reference/index.html
项目目标:通过项目实战掌握AI 大模型应用开发的常见知识,包括有:掌握AI 应用平台使用、AI 大模型接入、开发框架(Spring AI + LangChain4j)、本地部署、Prompt 工程、多模态特性、RAG 知识库、工具调用、MCP 服务开发、智能体原理和开发、服务化部署等技术。
本章重点
以 SpringAI 框架为例,学习AI 应用开发的核心特性 – 工具调用(函数调用),通过工具大幅增强 AI 的能力,实战主流工具的开发,熟悉工具调用的底层原理和高级特性。
具体内容包括:
- 工具调用介绍
- SpringAI 工具开发
- 主流工具开发
- 文件操作
- 联网搜索
- 网页抓取
- 终端操作
- 资源下载
- PDF 生成
- 工具进阶知识(原理和高级特性)
二、工具调用介绍
什么是工具调用?
工具调用 (也称为函数调用 )是 AI 应用程序中的一种常见模式,允许模型与一组 API 或工具进行交互,从而增强其功能。
工具调用主要用于:
- 信息检索 。此类工具可用于从外部来源(例如数据库、Web 服务、文件系统或 Web 搜索引擎)检索信息。其目标是增强模型的知识,使其能够回答原本无法回答的问题。因此,它们可用于检索增强生成 (RAG) 场景。例如,可以使用工具检索给定位置的当前天气、检索最新新闻文章或查询数据库中的特定记录。
- 采取行动 。此类别中的工具可与软件系统进行交互,例如发送电子邮件、在数据库中创建新记录、提交表单或触发工作流。其目标是自动化原本需要人工干预或明确编程的任务。例如,可以使用工具为与聊天机器人交互的客户预订航班、在网页上填写表单,或在代码生成场景中基于自动化测试 (TDD) 实现 Java 类。
虽然我们一般将工具调用称为是模型的一种功能,但实际上工具调用逻辑是由客户端应用程序提供的。模型只能请求工具调用并提供输入参数,而程序负责根据输入参数执行工具调用并返回结果。模型永远无法访问任何作为工具提供的 API,这是一个至关重要的安全考虑因素。
Spring AI 提供了便捷的 API 来定义工具、解析来自模型的工具调用请求以及执行工具调用。下面的章节中会详细介绍Spring AI 中的工具调用功能。
工具调用的原理
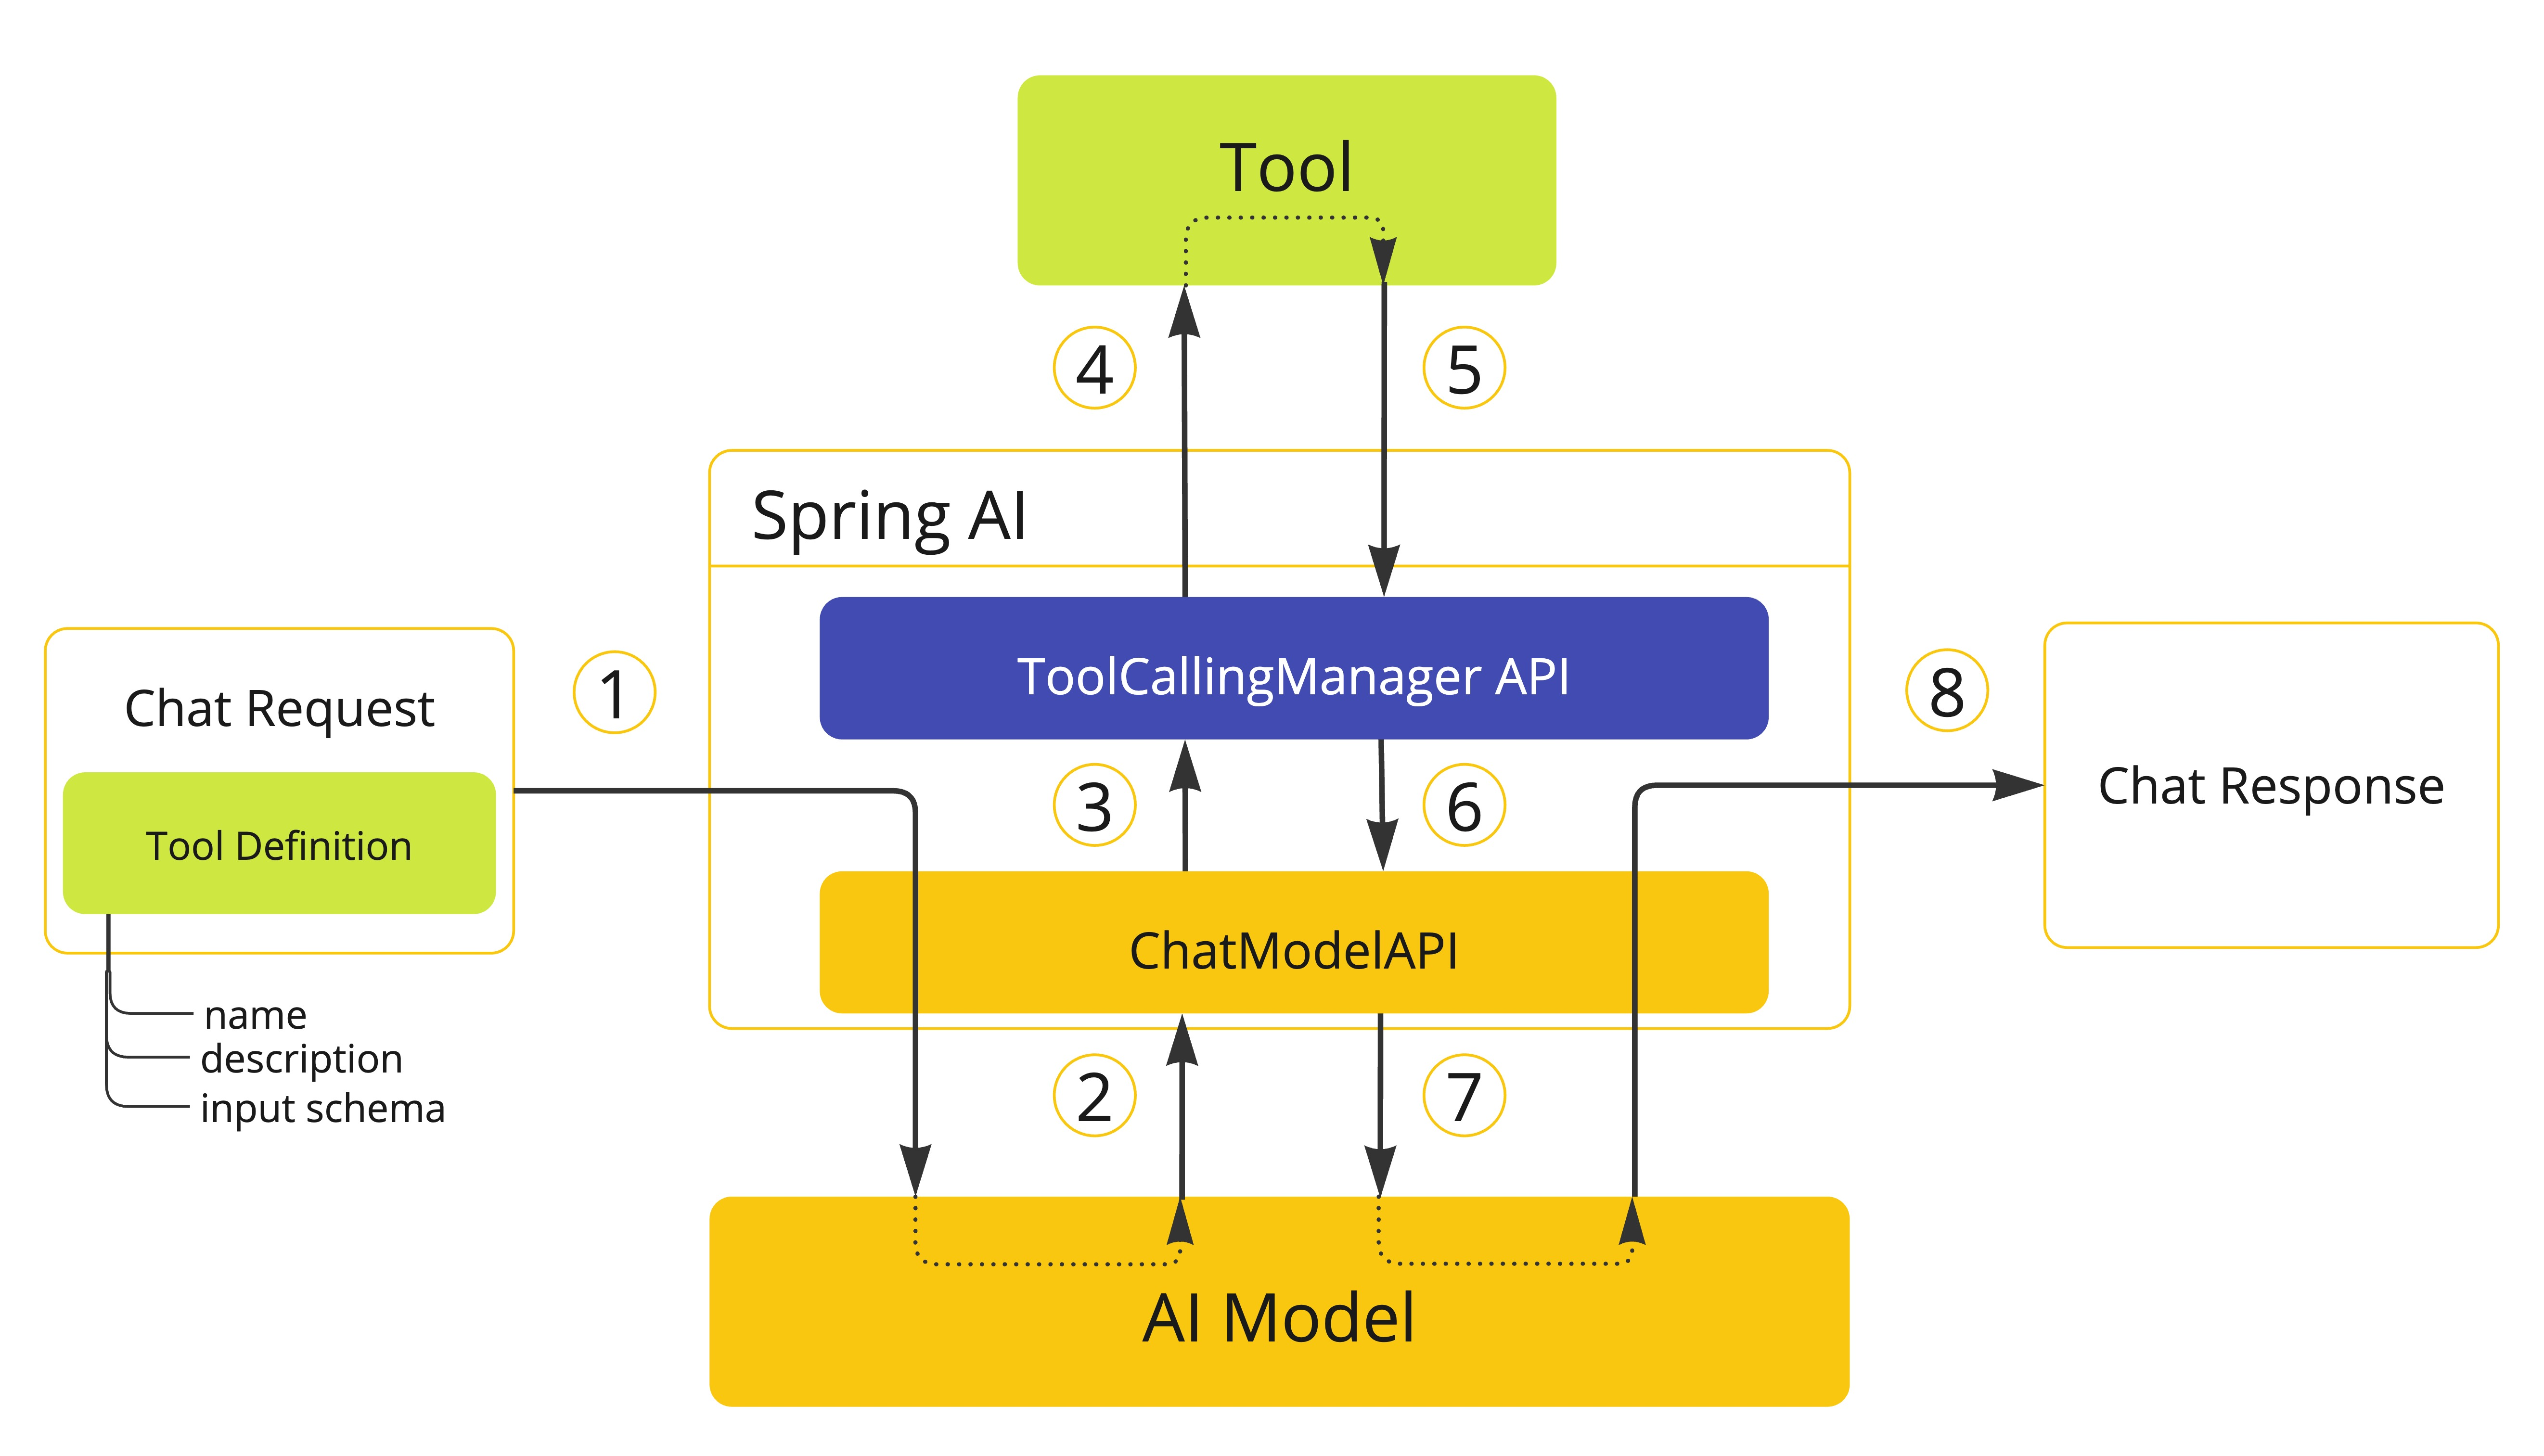
SpringAI通过一组灵活的抽象组件来支持实现工具调用功能,通过这些抽象组件,我们开发者能够以统一的方式定义、解析和执行工具,下面是 SpringAI 工具调用的核心原理流程图:
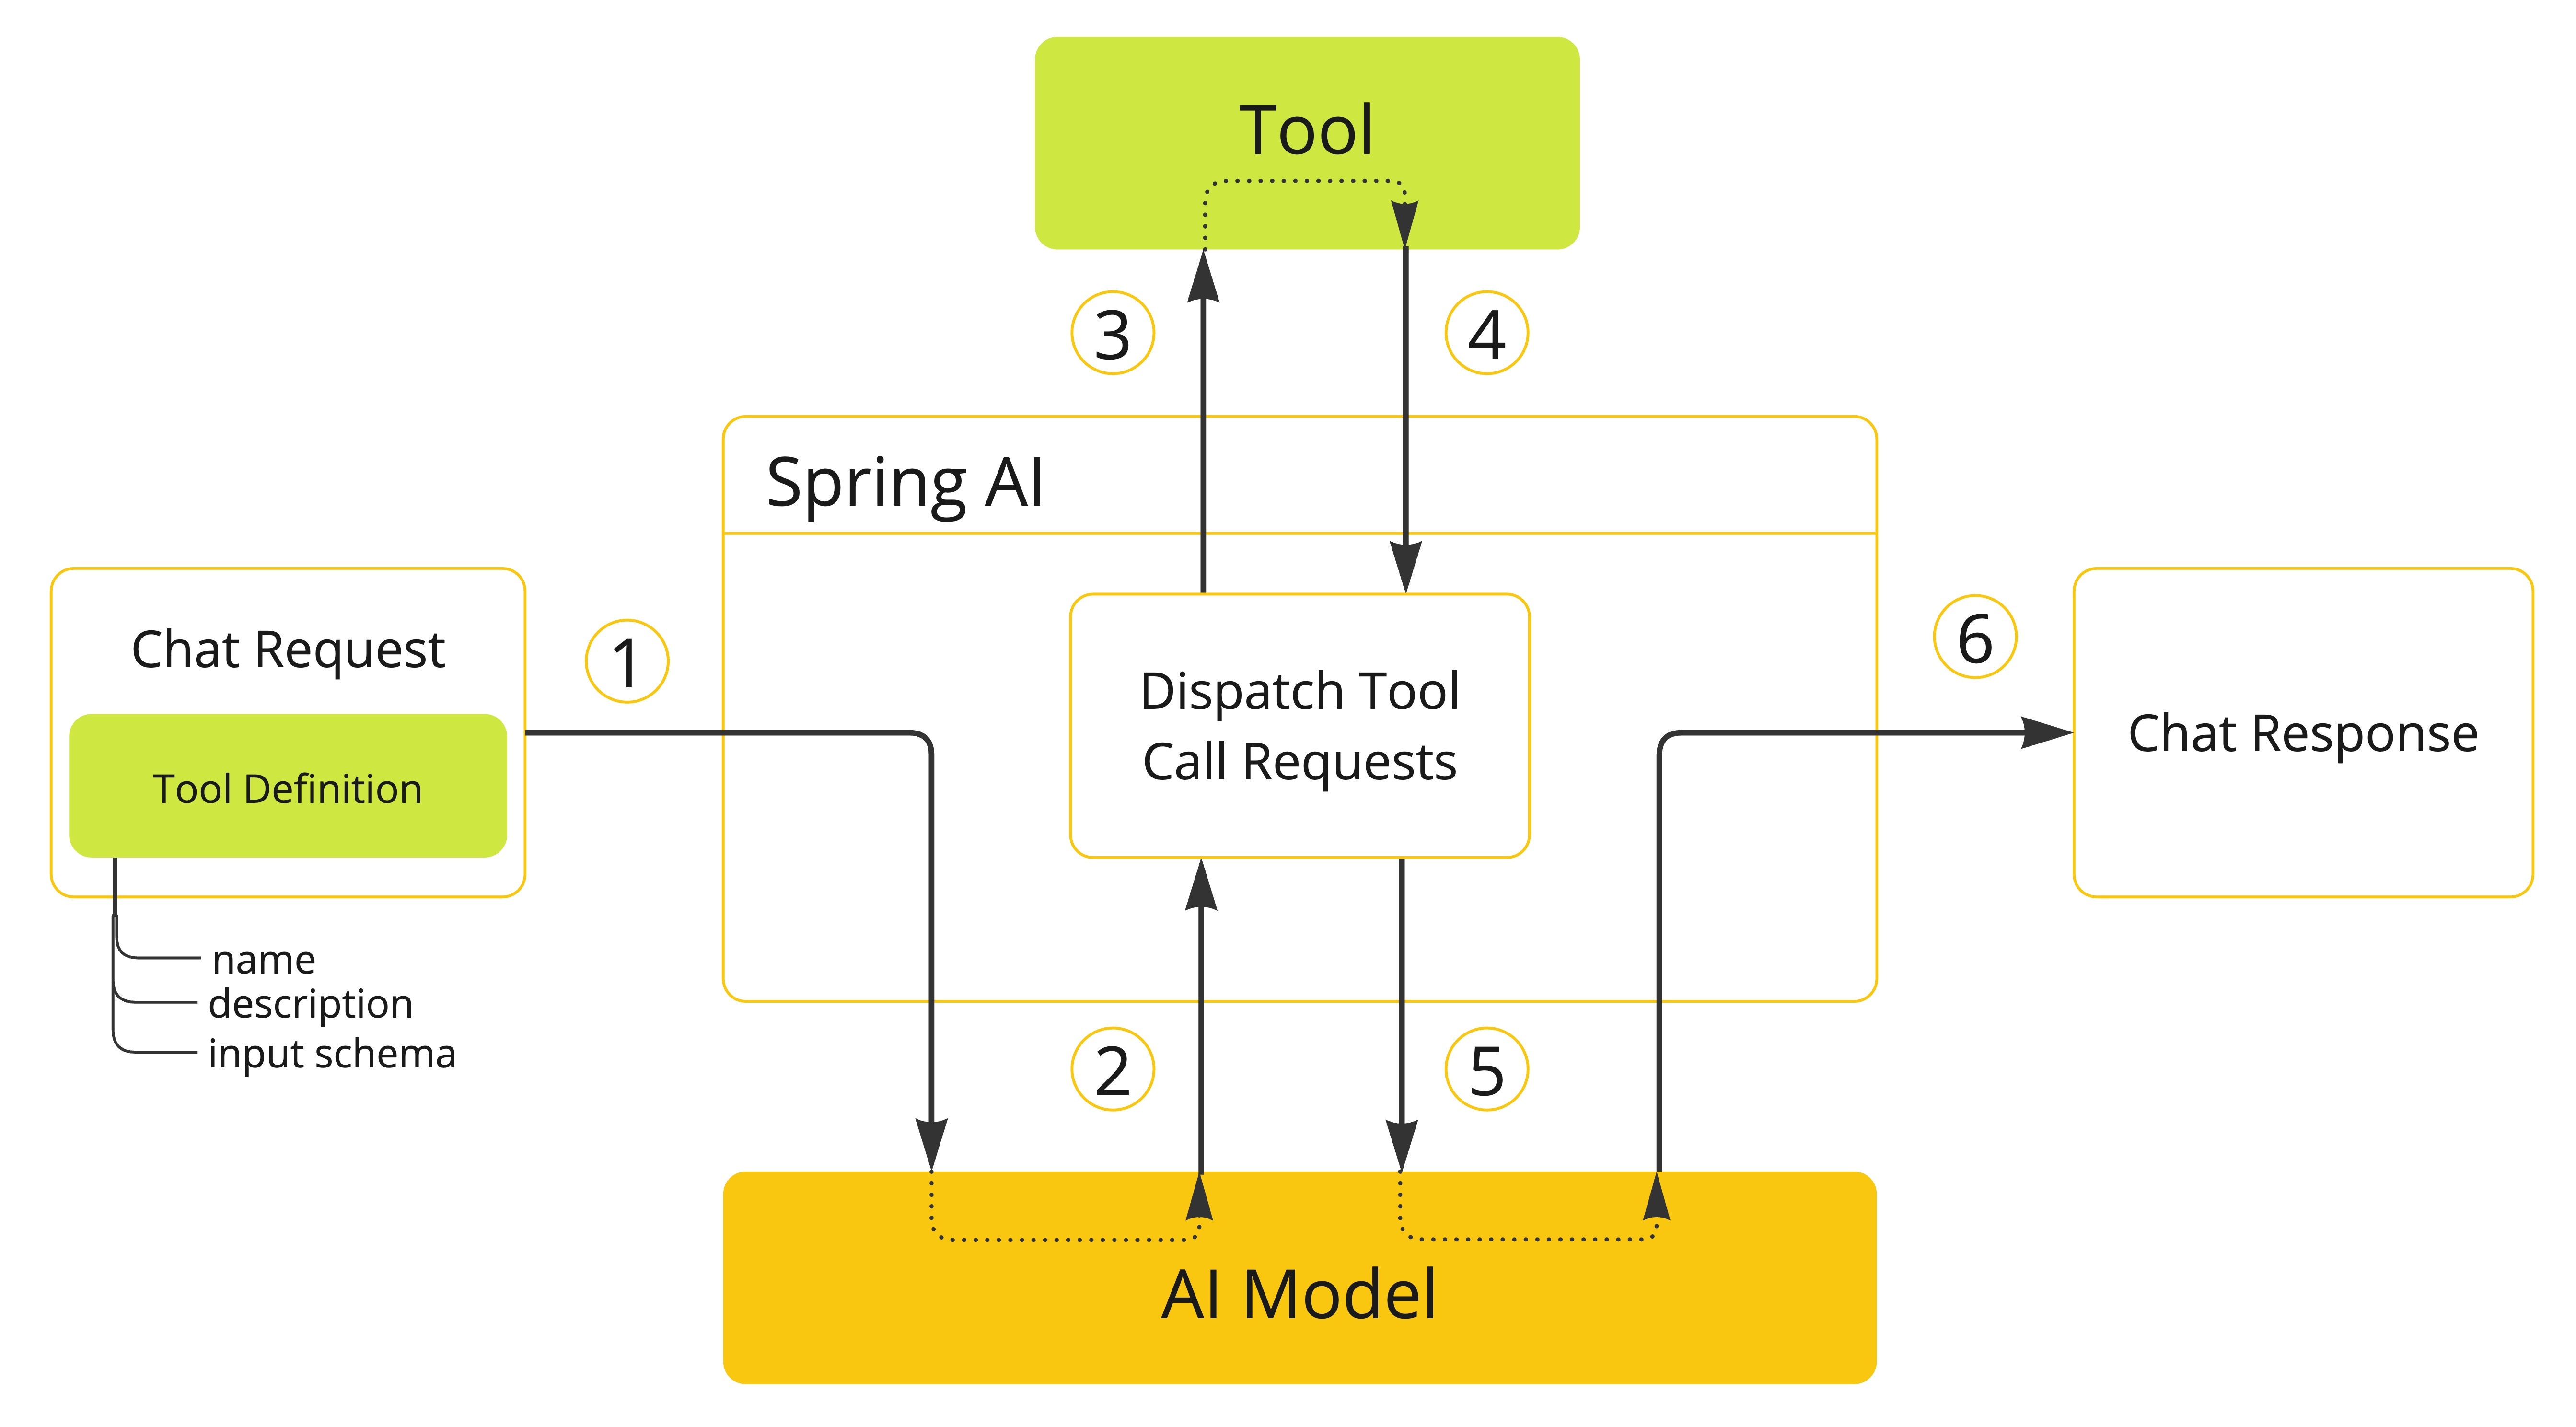
- 当我们想要让模型可以使用某个工具时,我们会将这个工具包含在当前请求对象中。每个工具定义包含工具名称、描述信息、输入模式(入参结构)
- 当模型决定调用哪个工具时,他会发送一个响应,其中包括这个工具的名称和根据输入模式生成的实参数据
- 我们的应用程序根据工具名称找到对应的工具,并基于模型提供的实参来执行工具
- 工具的返回结果由应用程序来解析处理
- 应用程序将工具返回结果发送给模型
- 模型使用工具返回结果作为附加上下文来生成最终的响应
需要注意的是,不是所有大模型都支持工具调用,具体的模型支持情况可以在SpringAI 官方文档中查看
三、SpringAI工具开发
定义工具
工具是工具调用的基石,在 SpringAI 中通过ToolCallback接口来定义工具,可以理解ToolCallback就是一个工具的载体。Spring AI 内置了从方法和函数两种方式来指定 ToolCallback 的支持,也支持自定义实现ToolCallback来支持更多的定制需求。
ChatModel 实现透明地将工具调用请求分发给相应的 ToolCallback 实现,并将工具调用结果返回给模型,最终由模型生成响应。ChatModel 使用 ToolCallingManager 接口来实现上述操作,该接口负责管理工具执行的生命周期。
ChatClient 和 ChatModel 都接受 ToolCallback 对象列表,以使工具可供模型和最终将执行它们的 ToolCallingManager 使用。
除了直接传递 ToolCallback 对象之外,SpringAI还 支持传递工具名称列表,该列表将使用 ToolCallbackResolver 接口动态解析。
下面的章节中会详细介绍刚才提到的这些 API如何使用及原理。
工具定义模式
上面提到过,SpringAI 提供两种方式来定义工具:基于 Methods 方法和 Functions函数式编程。
记住结论:我们只用基于 Methods方法来定义工具,另外一种作为了解即可,因为Methods方式更容易编写和理解、支持的参数和返回类型更多。
下面是二者详细对比:
| 特性 | Methods 方式 | Functions 方式 |
|---|---|---|
| 定义方式 | 使用 @Tool和 @ToolParam注解标记类方法 | 使用函数式接口并通过 Spring Bean 定义 |
| 语法复杂度 | 简单,直观 | 较复杂,需要定义请求/响应对象 |
| 支持的参数类型 | 大多数 Java 类型,包括基本类型、POJO、集合等 | 不支持基本类型、Optional、集合类型 |
| 支持的返回类型 | 几乎所有可序列化类型,包括 void | 不支持基本类型、Optional、集合类型等 |
| 使用场景 | 适合大多数新项目开发 | 适合与现有函数式API集成 |
| 注册方式 | 支持按需注册和全局注册 | 通常在配置类中预先定义 |
| 类型转换 | 自动处理 | 需要更多手动配置 |
| 文档支持 | 通过注解提供描述 | 通过Bean描述和JSON属性注解 |
举个例子来对比这两种定义模式的差异:
1)Methods模式:通过@Tool注解定义工具,通过tools方法绑定工具
class WeatherTools {@Tool(description = "Get current weather for a location")public String getWeather(@ToolParam(description = "The city name") String city) {return "Current weather in " + city + ": Sunny, 25°C";}
}// 使用方式
ChatClient.create(chatModel).prompt("What's the weather in Beijing?").tools(new WeatherTools()).call();
2)Functions模式:通过@Bean注解定义工具,通过functions方法绑定工具
@Configuration
public class ToolConfig {@Bean@Description("Get current weather for a location")public Function<WeatherRequest, WeatherResponse> weatherFunction() {return request -> new WeatherResponse("Weather in " + request.getCity() + ": Sunny, 25°C");}
}// 使用方式
ChatClient.create(chatModel).prompt("What's the weather in Beijing?").functions("weatherFunction").call();
显然Methods模式下的编码量更少,且更易读,后面更推荐使用这种方式来定义和使用工具。
定义工具
SpringAI提供了两种定义工具的方法 – 注解式和编程式。
1)注解式:只需要使用@Tool注解标注普通的Java方法,就可以定义工具了,非常简单直观。
一般建议,最好给每个工具添加描述,每个参数添加参数描述,因为这个工具最后是要交给大模型的,这样方便大模型理解工具的作用及解析参数。对于工具方法的参数,可以使用@ToolParam注解来提供额外的信息,注入描述 和字段是否必填。
示例代码:
class WeatherTools {@Tool(description = "获取指定城市的当前天气情况")String getWeather(@ToolParam(description = "城市名称", required = true) String city) {// 获取天气的实现逻辑return "北京今天晴朗,气温25°C";}
}
2)编程式:如果想在运行时再动态创建对象,可以选择编程式来定义工具,这种方式通过反射来创建工具,也更加灵活。
先定义工具:
class WeatherTools {String getWeather(String city) {// 获取天气的实现逻辑return "北京今天晴朗,气温25°C";}
}
将普通工具方法转换为ToolCallback工具定义类,之后就可以把这个工具类绑定给ChatClient,从而让AI使用工具了。
Method method = ReflectionUtils.findMethod(WeatherTools.class, "getWeather", String.class);
ToolCallback toolCallback = MethodToolCallback.builder().toolDefinition(ToolDefinition.builder(method).description("获取指定城市的当前天气情况").build()).toolMethod(method).toolObject(new WeatherTools()).build();
在定义工具时,需要注意方法参数和返回值类型的选择,SpringAI支持绝大多数常见Java类型,包括有基本类型、对象类型、集合等,并且返回值需要是可序列化的,因为返回值最后是需要转换文本再传递给大模型的。因此以下类型是不支持作为工具方法的参数或返回值类型的:
- Optional
- 异步类型(如 CompletableFuture, Future)
- 响应式类型(如 Flow, Mono, Flux)
- 函数式类型(如 Function, Supplier, Consumer)
使用工具
定义好工具后,SpringAI提供了多种方式将工具绑定给ChatClient,以便AI来使用这些工具。
1)按需使用:这是最简单的方式,直接在构造ChatClient请求时通过tools()方法来绑定工具,这种方式适合只在特定对话才使用特定工具的场景。
String response = ChatClient.create(chatModel).prompt("北京今天天气怎么样?").tools(new WeatherTools()) // 在这次对话中提供天气工具.call().content();
2)全局使用:如果发现某些工具在所有对话中都会用到,那么就可以在构建ChatClient时注册默认工具。这样注册之后,所有使用此ChatClient发起的对话都能用到这些工具。
ChatClient chatClient = ChatClient.builder(chatModel).defaultTools(new WeatherTools(), new TimeTools()) // 注册默认工具.build();
3)模型使用:除了给ChatClient绑定工具这种方式外,SpringAI还支持给更底层的ChatModel来绑定工具(毕竟工具调用是AI大模型支持的能力),这种绑定方式适合需要更精细控制的场景。
// 先得到工具对象
ToolCallback[] weatherTools = ToolCallbacks.from(new WeatherTools());
// 绑定工具到对话
ChatOptions chatOptions = ToolCallingChatOptions.builder().toolCallbacks(weatherTools).build();
// 构造 Prompt 时指定对话选项
Prompt prompt = new Prompt("北京今天天气怎么样?", chatOptions);
chatModel.call(prompt);
4)动态解析:一般情况下,使用前面 3 种方式即可。对于更复杂的应用,Spring AI 还支持通过 ToolCallbackResolver 在运行时动态解析工具。这种方式特别适合工具需要根据上下文动态确定的场景,比如从数据库中根据工具名搜索要调用的工具。在本节的工具进阶知识中会讲到,先了解到有这种方式即可。
总结:我们程序员在使用工具开发时,只需要关注工具的业务逻辑实现,至于工具调用的全过程则全部是由SpringAI自动处理。
工具调用的全流程:AI模型决定要调用哪个模型–>程序执行工具方法–>将工具返回结果交给大模型–>大模型基于工具返回结果生成最终表达。
工具生态
工具的本质就是插件,能用别人现成的就用现成的。可以在网上找一些优秀的工具实现,比如SpringAI Alibaba工具中提到的社区插件。
虽然官方文档中只提到了寥寥无几的工具,但是我们可以通过官方文档里提到的工具依赖在GitHub开源社区中顺藤摸瓜尝试是否能够找到更多的工具实现
1、找到工具依赖名称spring-ai-alibaba-starter-tool-calling-baidutranslate
2、在GitHub搜索栏中直接查询spring-ai-alibaba-starter-tool-calling-baidutranslate
3、我们很快就找到了alibaba的官方代码仓库,我们回退到它tool-calls上层目录进行查看,是不是一下就发现了新大陆,在这里有很多的工具实现,比如百度地图、钉钉集成、谷歌翻译等
这是一种搜集资源的技巧,尤其是在查找新领域的时候,不要官方文档更新不及时就觉得没有相关的资源了,可以拿到关键词后再尝试在开源社区搜集一下,会有意想不到的发现的。
四、主流工具开发
下面介绍如何通过SpringAI来定义和使用工具。
先在项目根包下新建 tools 包,将所有工具类放在该包下;并且工具的返回值尽量使用 String 类型,让结果的含义更加明确。
文件操作
文件操作工具的2大功能是:保存文件、读取文件。
由于会影响系统资源,我们创建一个单独的目录来存放文件操作工具产生的文件,在constant目录下新建文件常量类,约定文件操作的根目录位置。
public interface FileConstant {/*** 文件保存目录*/String FILE_SAVE_DIR = System.getProperty("user.dir") + "/tmp";
}
同时,将这个tmp目录添加到.gitignore忽略文件中,避免提交到代码仓库中。
编写文件操作工具类,通过注解式来定义工具,具体代码如下:
/*** 文件操作工具类*/
public class FileOperationTool {private final static String FILE_SAVE_DIR = FileConstant.FILE_SAVE_DIR + "/file";/*** 读取指定文件内容* @param fileName* @return*/@Toolpublic String readFile(@ToolParam(description = "Name of the file to read") String fileName){String filePath = FILE_SAVE_DIR + "/" + fileName;try {return FileUtil.readUtf8String(filePath);} catch (IORuntimeException e) {return "Error reading file: " + e.getMessage();}}/*** 写入内容到指定文件* @param fileName* @param content* @return*/@Toolpublic String writeFile(@ToolParam(description = "Name of the file to read") String fileName,@ToolParam(description = "Content to write to the file") String content) {String filePath = FILE_SAVE_DIR + "/" + fileName;try {FileUtil.mkdir(FILE_SAVE_DIR);FileUtil.writeUtf8String(content, filePath);return "File written successfully: " + filePath;} catch (IORuntimeException e) {return "Error writing file: " + e.getMessage();}}
}
编写单元测试类:
class FileOperationToolTest {@Testvoid readFile() {FileOperationTool fileOperationTool = new FileOperationTool();String fileName = "文件工具测试.txt";String content = fileOperationTool.readFile(fileName);Assertions.assertNotNull(content);}@Testvoid writeFile() {FileOperationTool fileOperationTool = new FileOperationTool();String fileName = "文件工具测试.txt";String content = "这是一个文件操作工具测试内容。";String s = fileOperationTool.writeFile(fileName, content);Assertions.assertNotNull(s);}
}
联网搜索
联网搜索工具的作用是根据关键词搜索网页列表。
我们可以使用专业的网页搜索 API,如 Search API 来实现从多个网站搜索内容,这类服务通常按量计费。当然也可以直接使用 Google 或 Bing 的搜索 API(甚至是通过爬虫和网页解析从某个搜索引擎获取内容)。
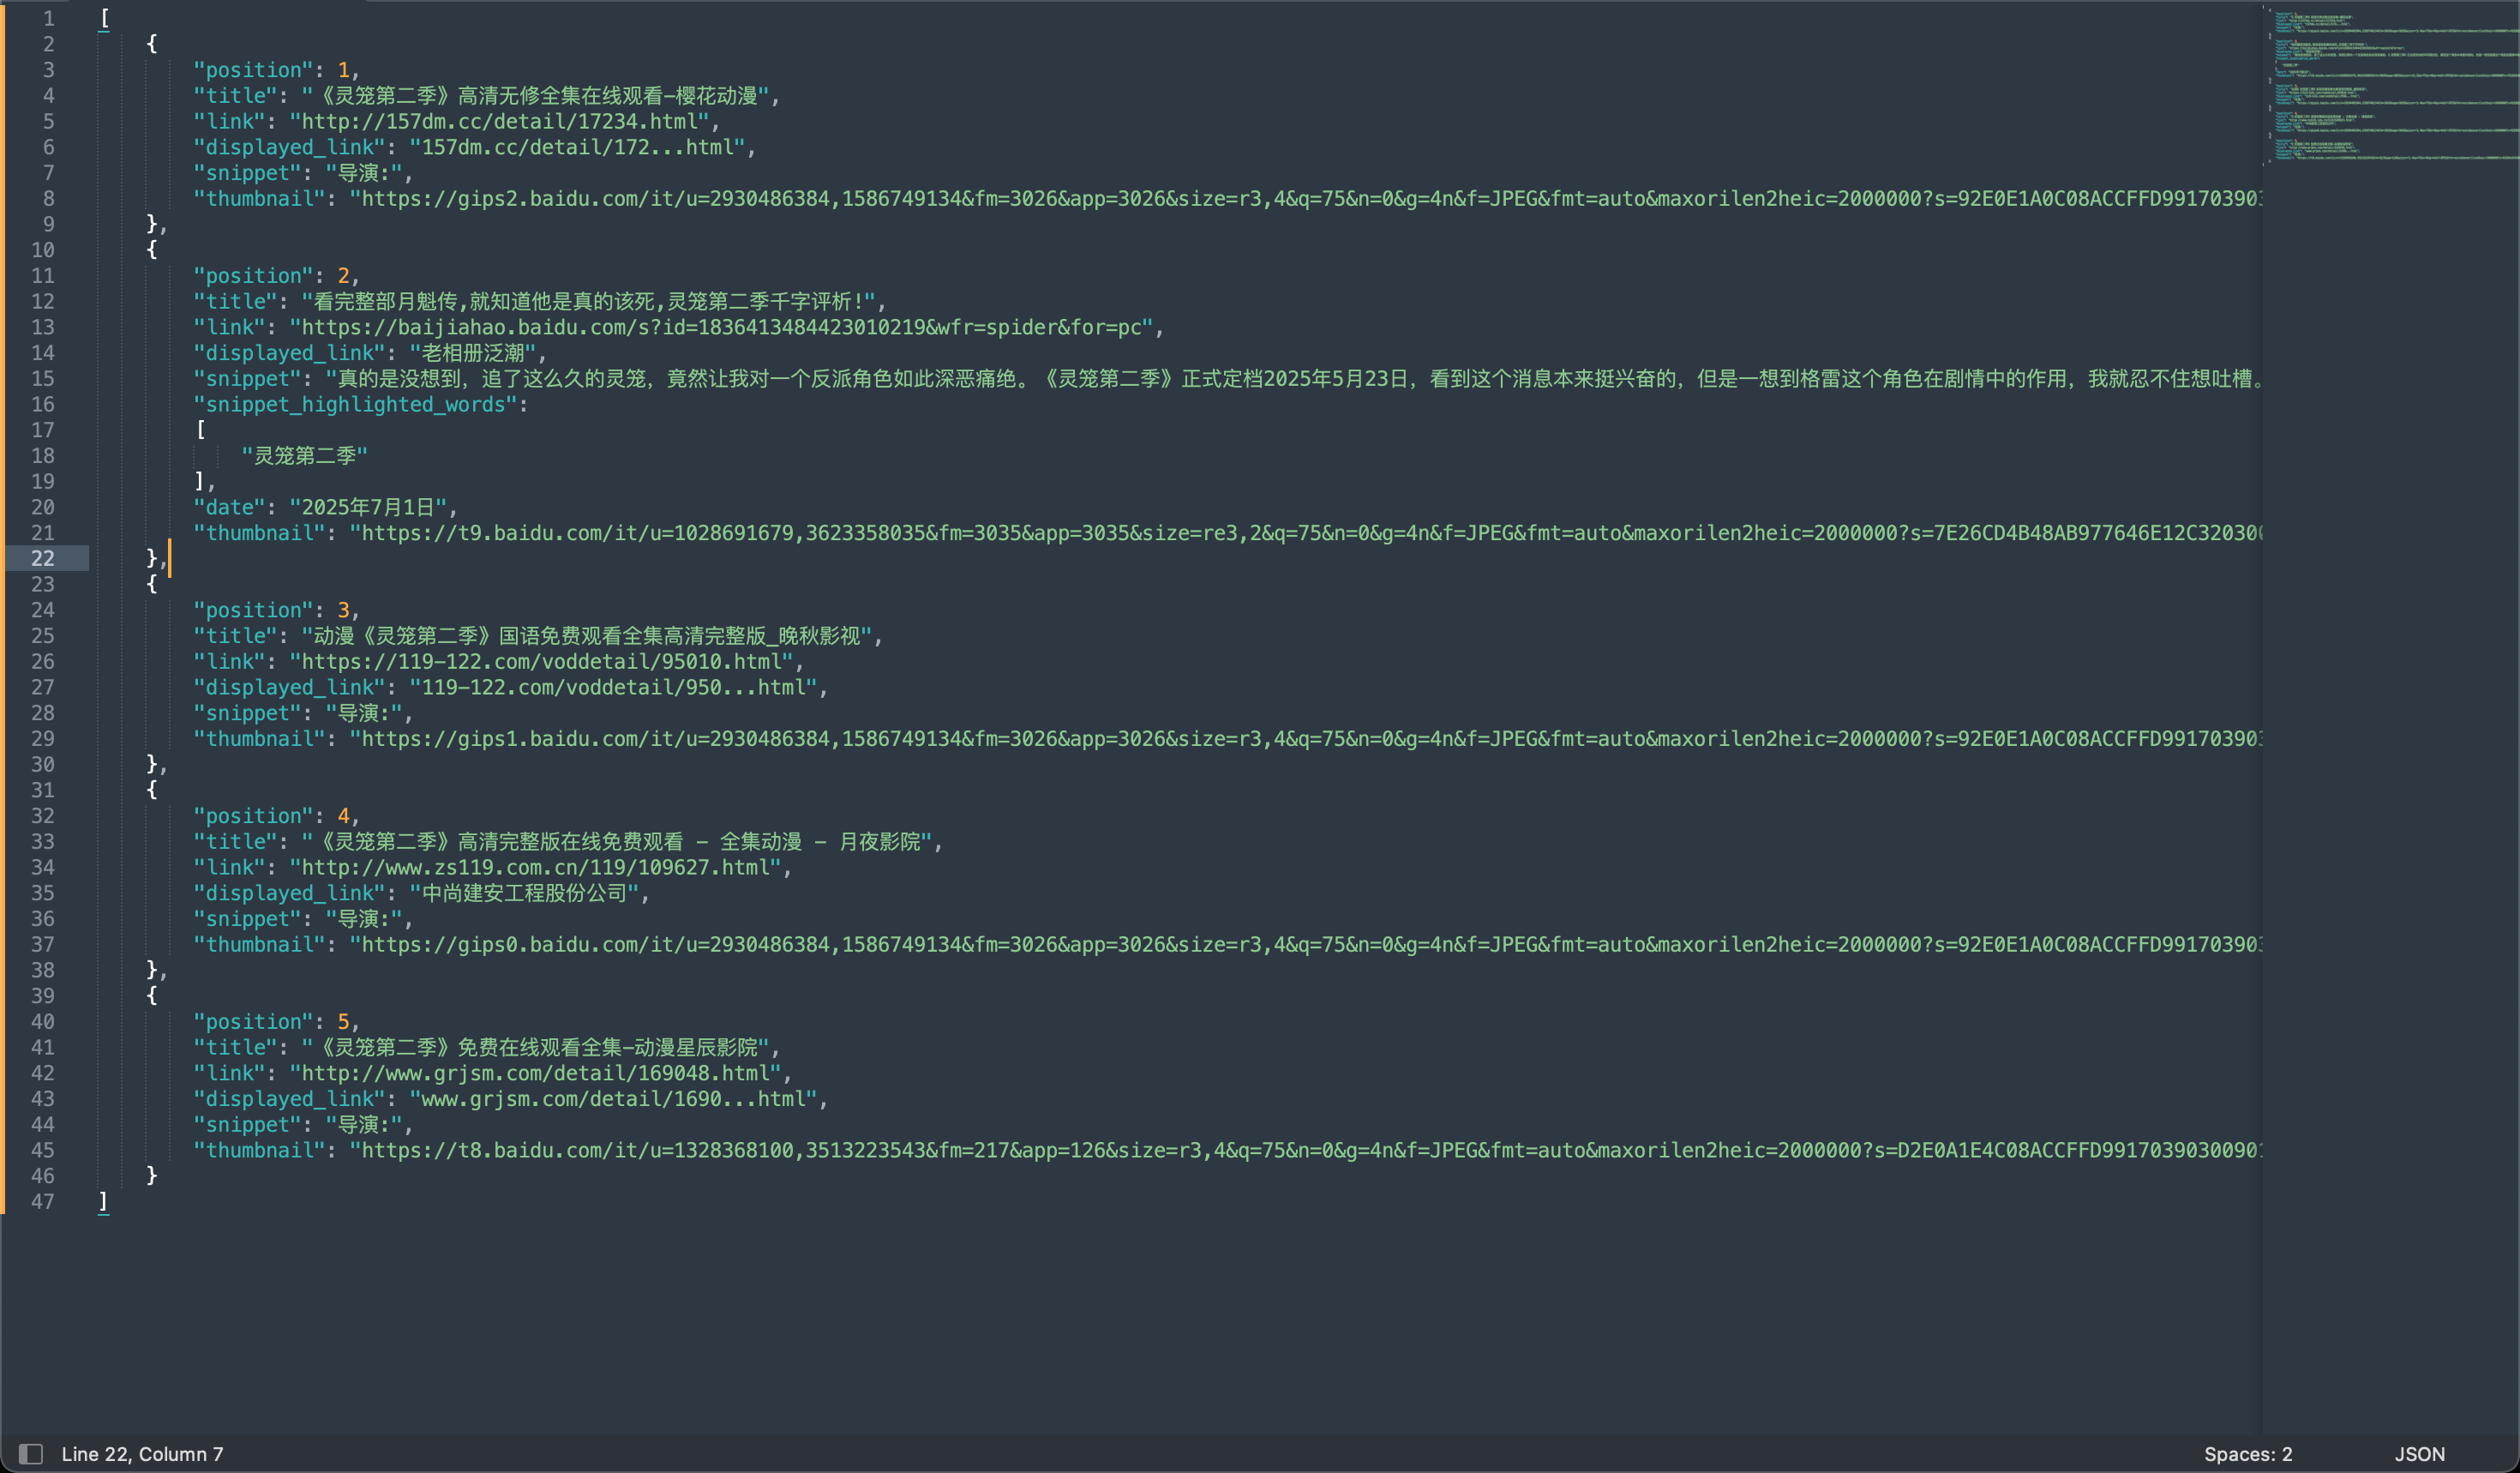
1)阅读 Search API 的 官方文档,重点关注 API 的请求参数和返回结果。从 API 返回的结果中,我们只需要提取关键部分:
{"organic_results": [...{"position": 2,"title": "【动物星球】动物星球商城_Animal Planet是什么牌子","link": "https://pinpai.smzdm.com/59685/","displayed_link": "什么值得买","snippet": "实时推荐动物星球(Animal Planet)商城正品特价。结合动物星球评测与动物星球最新资讯,全方位介绍Animal Planet是什么牌子?什么值得买综合各类动物星球优惠信息,计算最优购买方案,帮您轻松搞定正品...","snippet_highlighted_words": ["Animal", "Planet"],"thumbnail": "https://t8.baidu.com/it/u=1026803159,4238637210&fm=217&app=126&size=f242,150&n=0&f=JPEG&fmt=auto?s=01F65C9344640CAA12FCF17B0300D030&sec=1714842000&t=c3db150577185f3a818a8bbe73ddd2c4"},...]
}
2)可以把SearchAPI 接口文档喂给AI,让 AI 为我们生成网页搜索工具代码,代码如下:
/*** 网页搜索工具*/
public class WebSearchTool {// SearchAPI 的搜索接口地址private static final String SEARCH_API_URL = "https://www.searchapi.io/api/v1/search";private final String apiKey;public WebSearchTool(String apiKey) {this.apiKey = apiKey;}@Tool(description = "Search for information from Baidu Search Engine")public String searchWeb(@ToolParam(description = "Search query keyword") String query) {Map<String, Object> paramMap = new HashMap<>();paramMap.put("q", query);paramMap.put("api_key", apiKey);paramMap.put("engine", "baidu");try {String response = HttpUtil.get(SEARCH_API_URL, paramMap);// 取出返回结果的前 5 条JSONObject jsonObject = JSONUtil.parseObj(response);// 提取 organic_results 部分JSONArray organicResults = jsonObject.getJSONArray("organic_results");List<Object> objects = organicResults.subList(0, 5);// 拼接搜索结果为字符串String result = objects.stream().map(obj -> {JSONObject tmpJSONObject = (JSONObject) obj;return tmpJSONObject.toString();}).collect(Collectors.joining(","));return result;} catch (Exception e) {return "Error searching Baidu: " + e.getMessage();}}
}
3)在 SearchAPI 官方文档中注册账号,获取 API-KEY,注意不要暴露,这里我们放到 local 配置文件中:
search-api:api-key: '你的 api-key'
4)编写单元测试
@SpringBootTest
class WebSearchToolTest {@Value("${search-api.api-key}")private String apikey;@Testvoid searchWeb() {WebSearchTool webSearchTool = new WebSearchTool(apikey);String query = "灵笼第二季";String s = webSearchTool.searchWeb(query);Assertions.assertNotNull(s);}
}
测试效果如下:
网页抓取
网页抓取工具的作用是根据网址解析到网页的内容
1)可以使用 jsoup 库实现网页内容的抓取,添加依赖如下:
<dependency><groupId>org.jsoup</groupId><artifactId>jsoup</artifactId><version>1.19.1</version>
</dependency>
2)编写网页抓取工具类:
public class WebScrapingTool {@Tool(description = "Scrape the content of a web page")public String scrapeWebPage(@ToolParam(description = "URL of the web page to scrape") String url) {try {Document doc = Jsoup.connect(url).get();return doc.html();} catch (IOException e) {return "Error scraping web page: " + e.getMessage();}}
}
3)编写单元测试
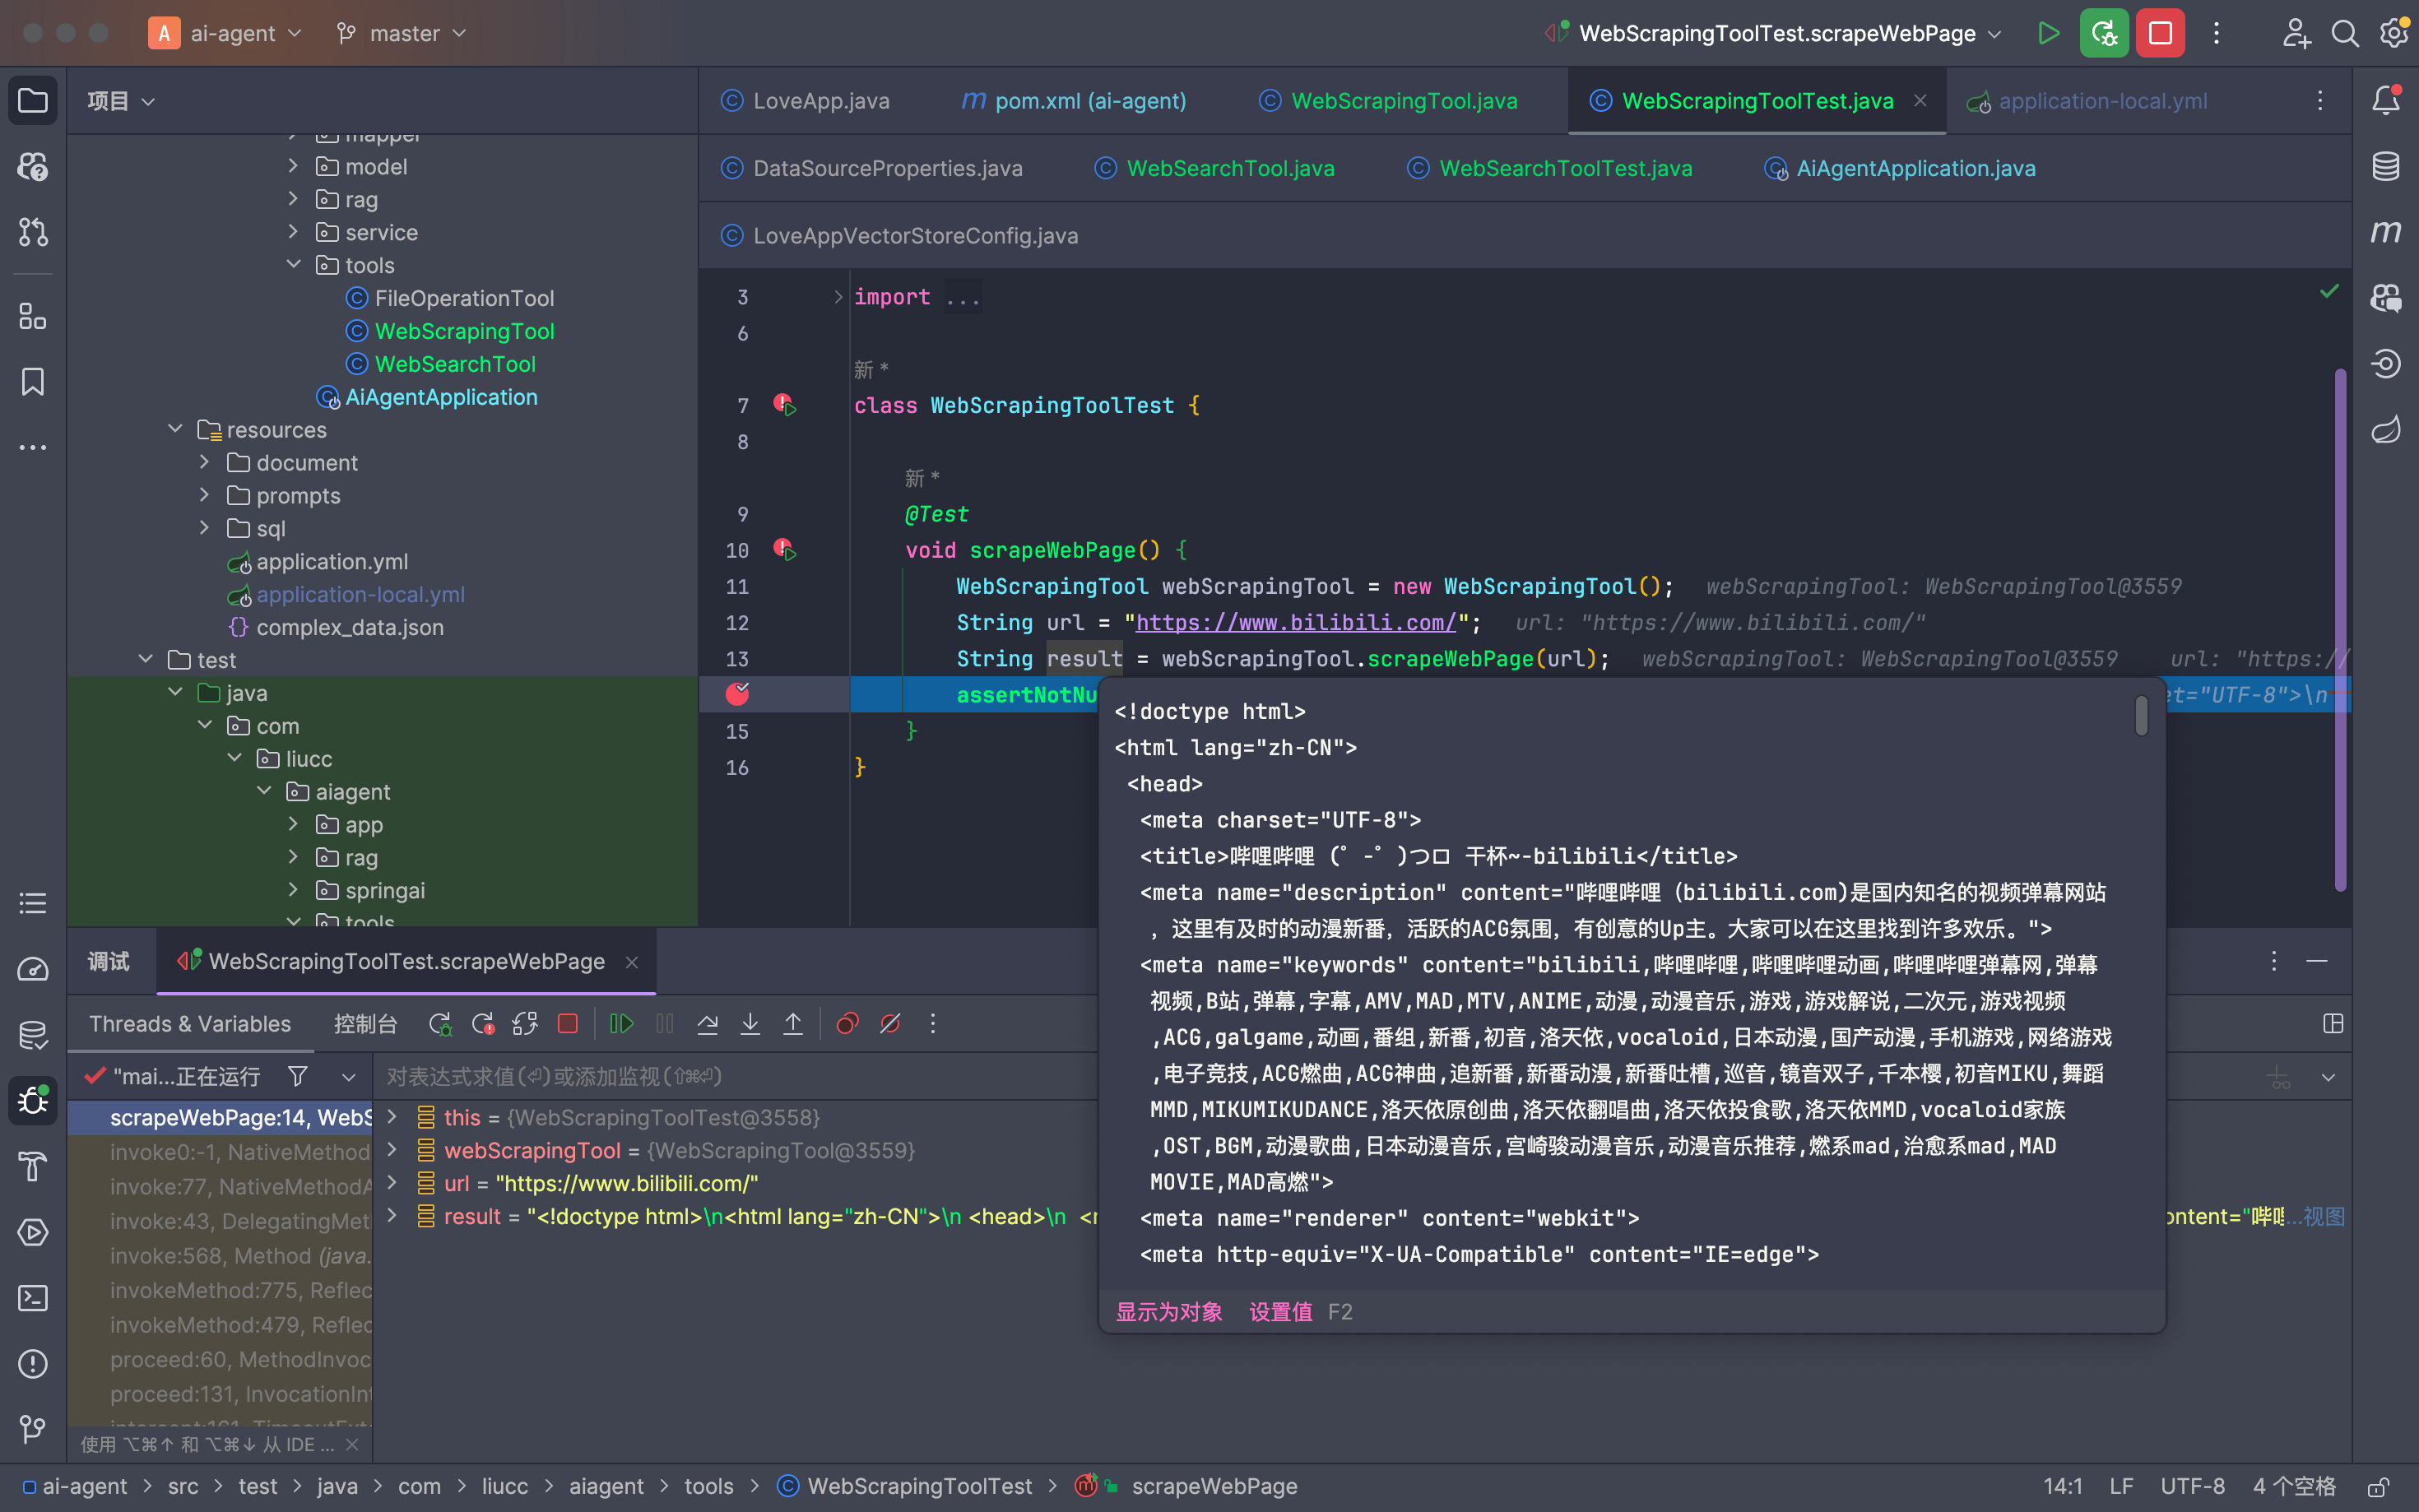
@Test
void scrapeWebPage() {WebScrapingTool webScrapingTool = new WebScrapingTool();String url = "https://www.bilibili.com/";String result = webScrapingTool.scrapeWebPage(url);assertNotNull(result);
}
抓取网页内容如下:
终端操作
终端操作工具的作用是在终端执行命令,比如执行 python 命令来运行脚本。
1)可以通过 Java 的 Process API 实现终端命令执行,注意 Windows 和其他操作系统下的实现略有区别)。工具类代码如下:
public class TerminalOperationTool {@Tool(description = "Execute a command in the terminal")public String executeTerminalCommand(@ToolParam(description = "Command to execute in the terminal") String command) {StringBuilder output = new StringBuilder();try {Process process = Runtime.getRuntime().exec(command);try (BufferedReader reader = new BufferedReader(new InputStreamReader(process.getInputStream()))) {String line;while ((line = reader.readLine()) != null) {output.append(line).append("\n");}}int exitCode = process.waitFor();if (exitCode != 0) {output.append("Command execution failed with exit code: ").append(exitCode);}} catch (IOException | InterruptedException e) {output.append("Error executing command: ").append(e.getMessage());}return output.toString();}
}
如果是 Windows 操作系统,要使用下面这段代码:
public class TerminalOperationTool {@Tool(description = "Execute a command in the terminal")public String executeTerminalCommand(@ToolParam(description = "Command to execute in the terminal") String command) {StringBuilder output = new StringBuilder();try {ProcessBuilder builder = new ProcessBuilder("cmd.exe", "/c", command);
//            Process process = Runtime.getRuntime().exec(command);Process process = builder.start();try (BufferedReader reader = new BufferedReader(new InputStreamReader(process.getInputStream()))) {String line;while ((line = reader.readLine()) != null) {output.append(line).append("\n");}}int exitCode = process.waitFor();if (exitCode != 0) {output.append("Command execution failed with exit code: ").append(exitCode);}} catch (IOException | InterruptedException e) {output.append("Error executing command: ").append(e.getMessage());}return output.toString();}
}
2)编写单元测试:
@Test
void executeTerminalCommand() {TerminalOperationTool terminalOperationTool = new TerminalOperationTool();String command = "echo Hello, World!";String result = terminalOperationTool.executeTerminalCommand(command);assertNotNull(result);assertTrue(result.contains("Hello, World!"), "The command output should contain 'Hello, World!'");
}
资源下载
资源下载工具的作用是将网络资源(图片、音视频等)下载到计算机本地。
1)使用 Hutool 工具类的HttpUtil.downloadFile方法实现资源下载。资源下载工具类的代码如下:
public class ResourceDownloadTool {@Tool(description = "Download a resource from a given URL")public String downloadResource(@ToolParam(description = "URL of the resource to download") String url, @ToolParam(description = "Name of the file to save the downloaded resource") String fileName) {String fileDir = FileConstant.FILE_SAVE_DIR + "/download";String filePath = fileDir + "/" + fileName;try {// 创建目录FileUtil.mkdir(fileDir);// 使用 Hutool 的 downloadFile 方法下载资源HttpUtil.downloadFile(url, new File(filePath));return "Resource downloaded successfully to: " + filePath;} catch (Exception e) {return "Error downloading resource: " + e.getMessage();}}
}
2)编写单元测试:
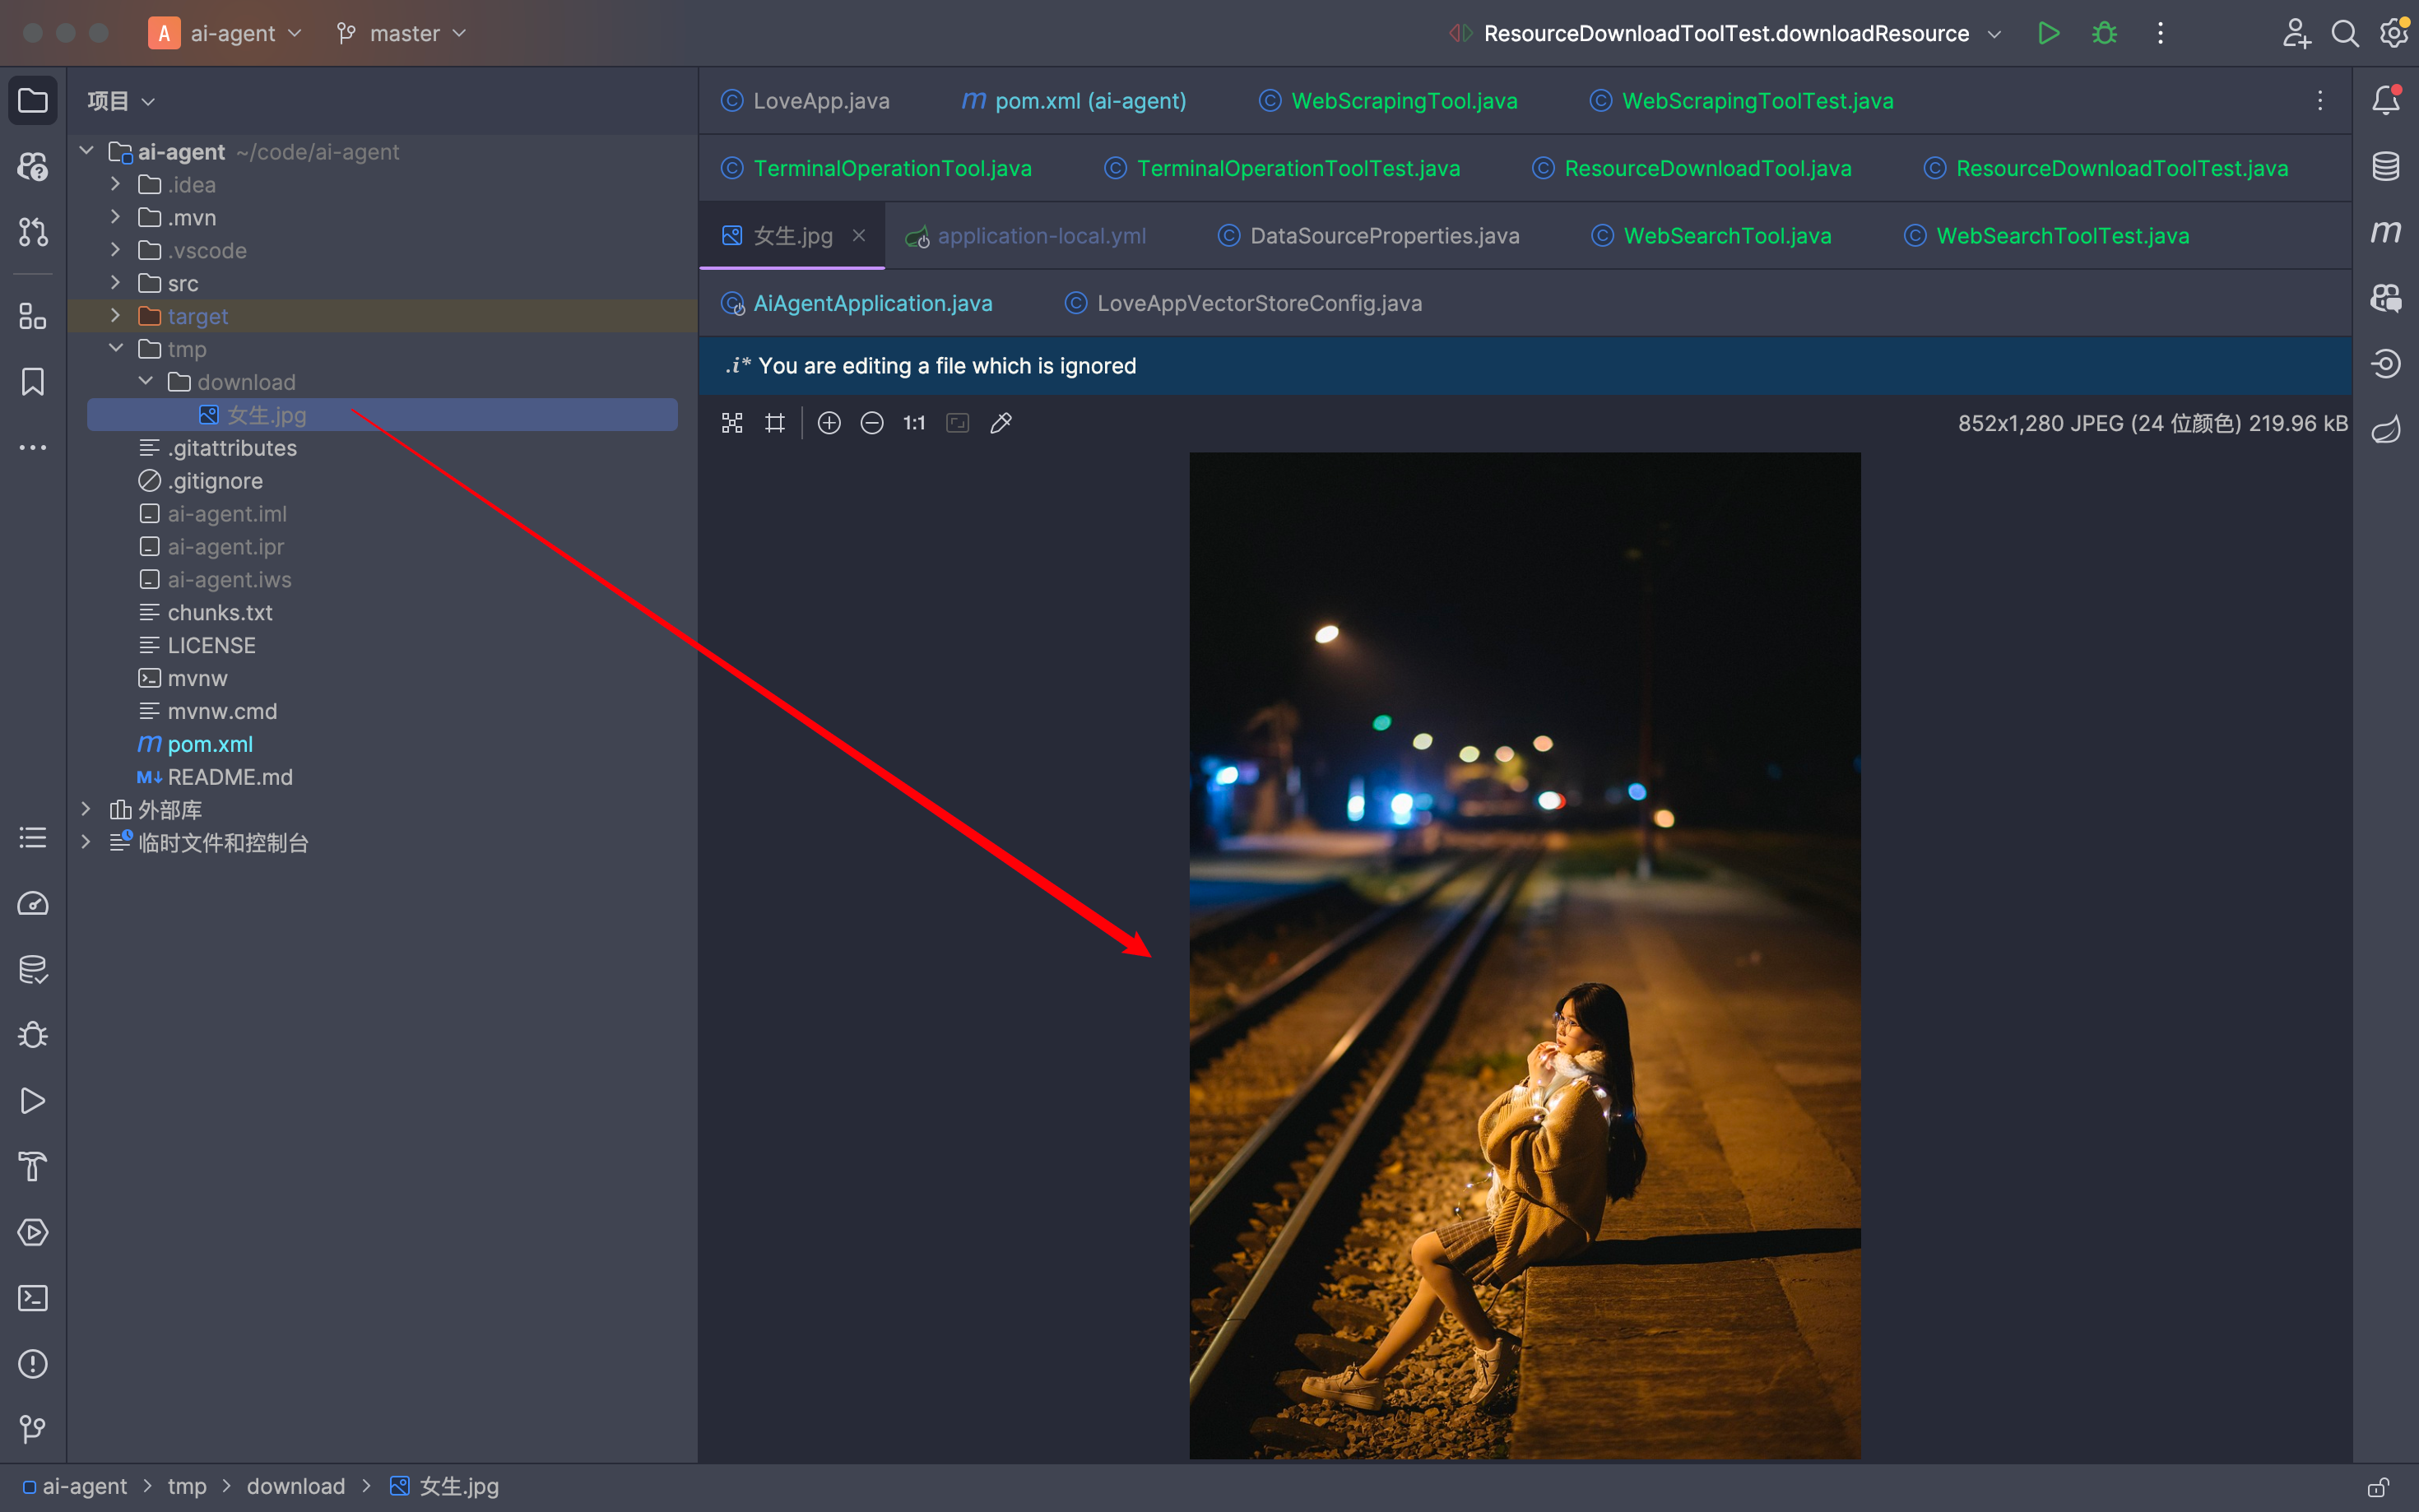
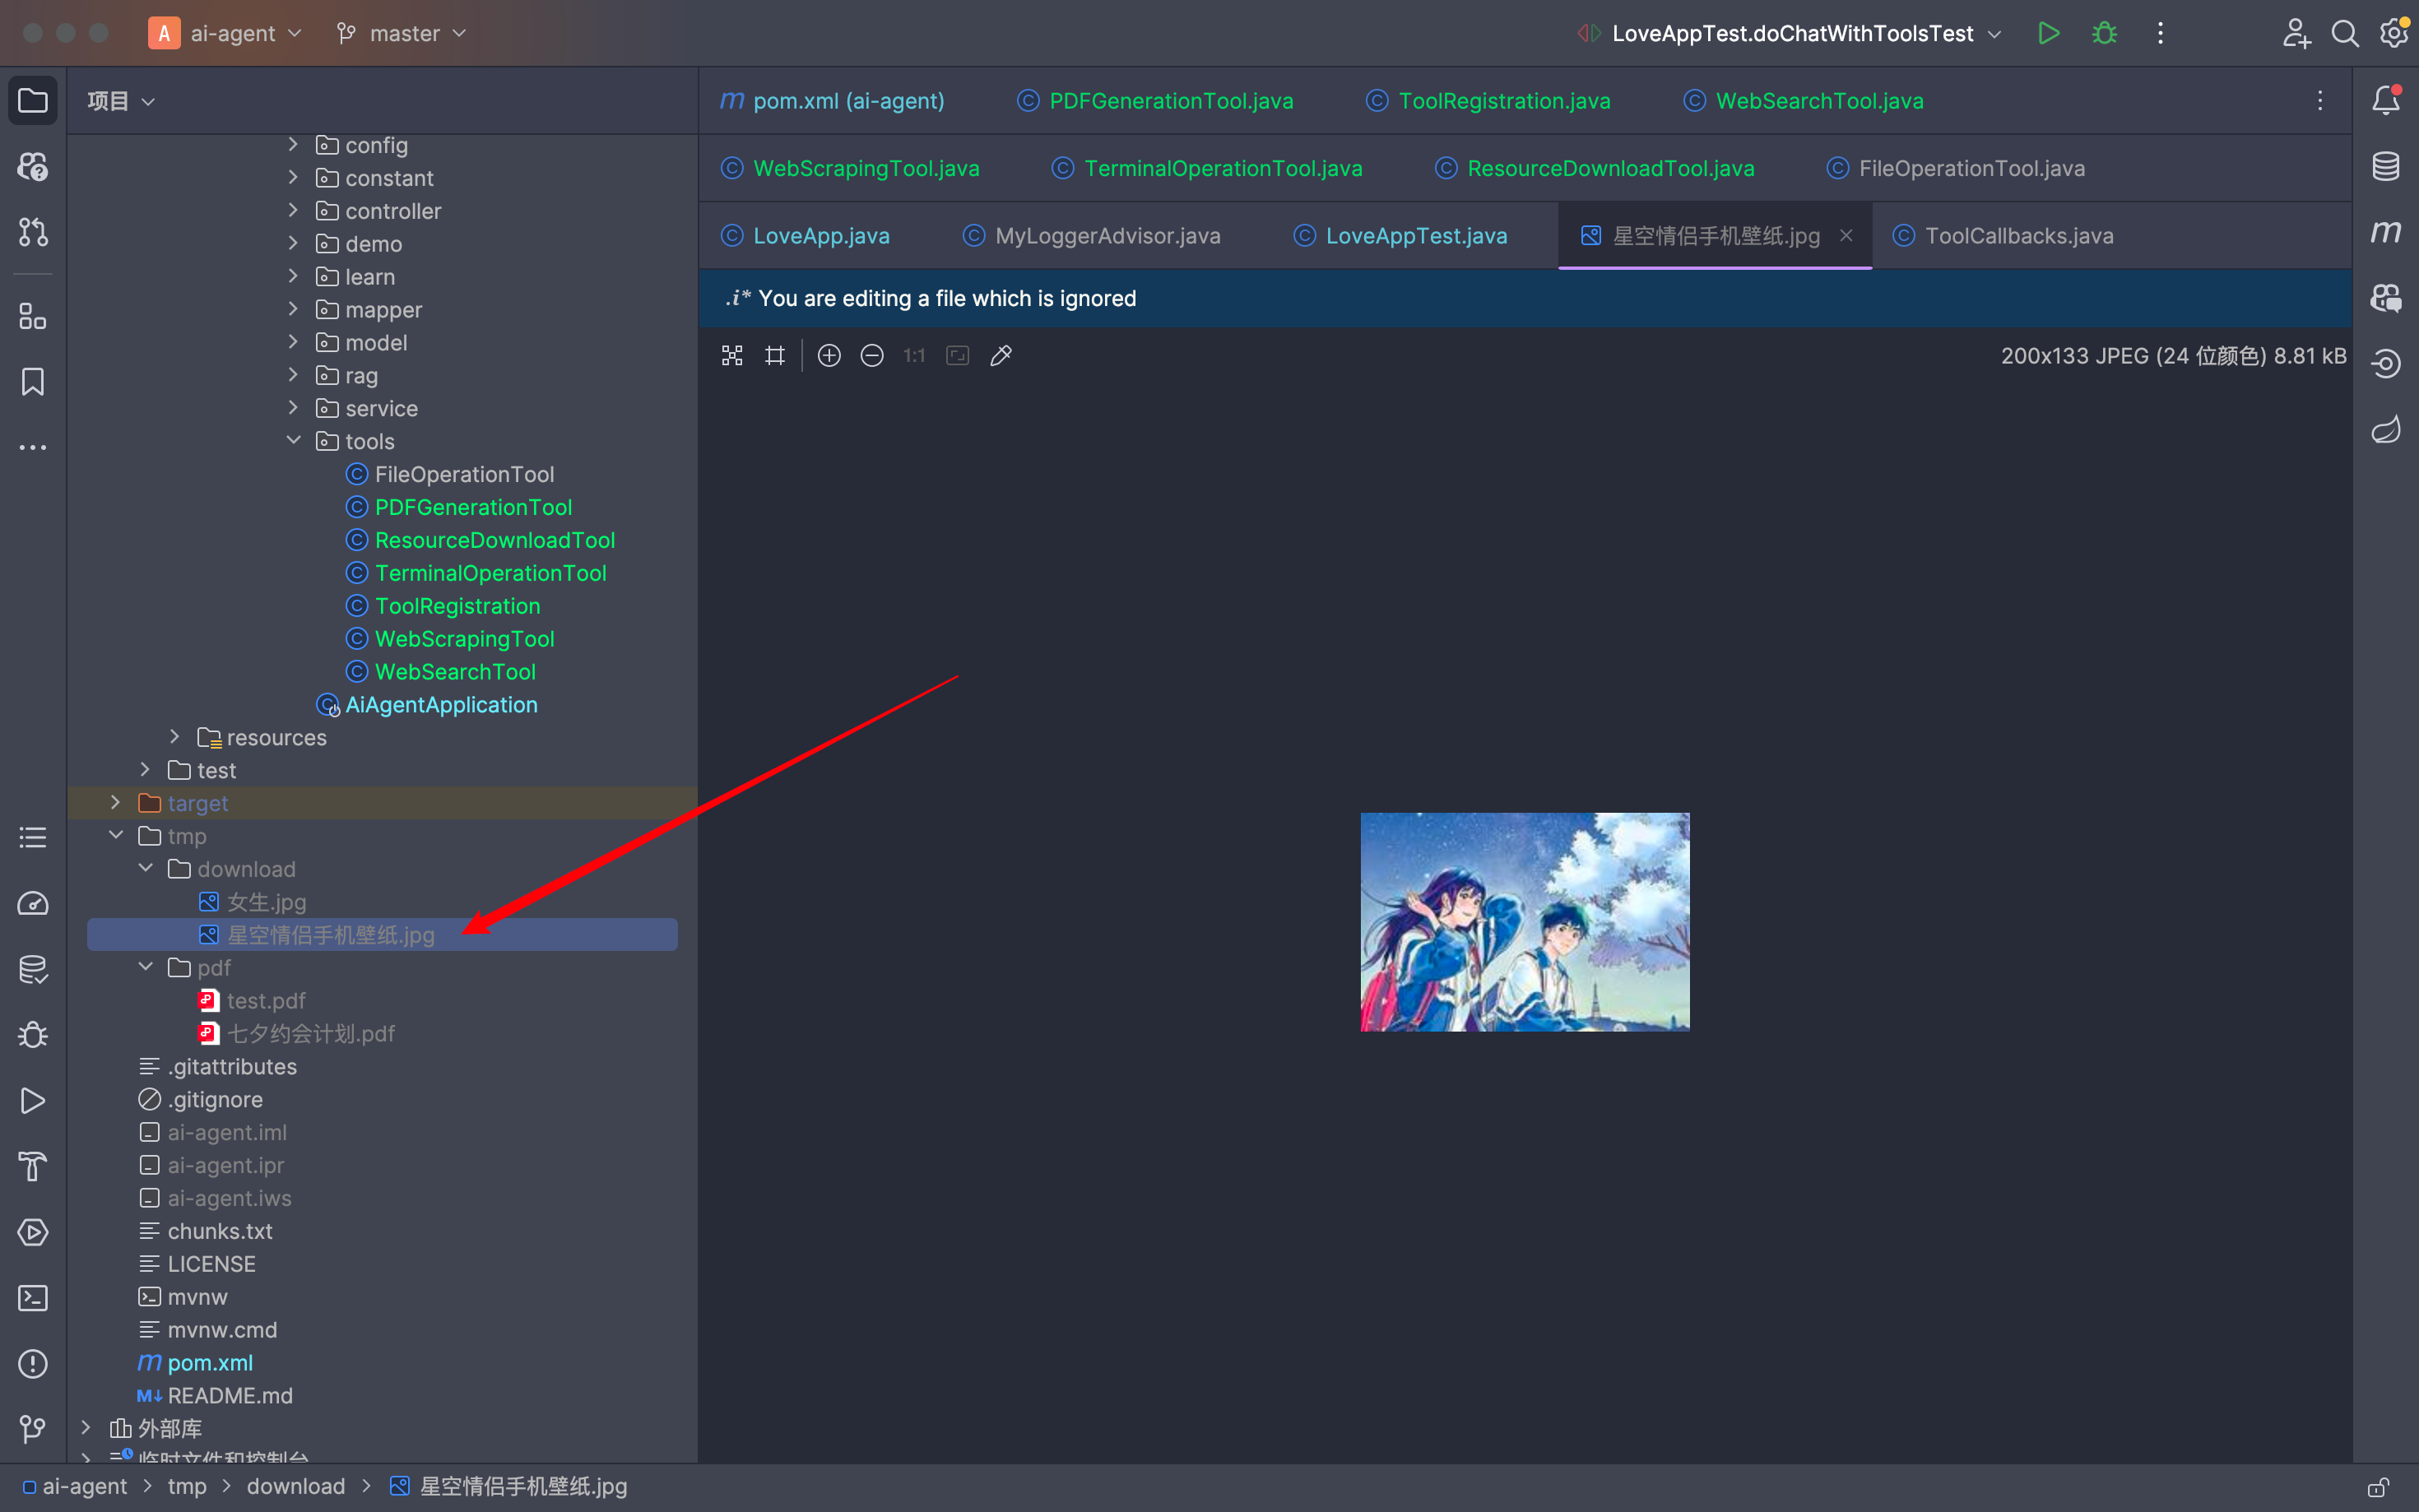
@Test
void downloadResource() {ResourceDownloadTool resourceDownloadTool = new ResourceDownloadTool();String url = "https://cdn.pixabay.com/photo/2024/01/15/04/29/woman-8509279_1280.jpg"; // Replace with a valid URL for testingString fileName = "女生.jpg";String result = resourceDownloadTool.downloadResource(url, fileName);assertNotNull(result, "The download result should not be null");
}
测试效果如下:
PDF生成
PDF 生成工具的作用是根据文件名和内容生成 PDF 文档并保存。
可以使用 itext 库 实现 PDF 生成。需要注意的是,itext 对中文字体的支持需要额外配置,不同操作系统提供的字体也不同,如果真要做生产级应用,建议自行下载所需字体。
不过对于学习来说,不建议在这里浪费太多时间,可以使用内置中文字体就行了。
1)给项目添加依赖:
<!-- https://mvnrepository.com/artifact/com.itextpdf/itext-core -->
<dependency><groupId>com.itextpdf</groupId><artifactId>itext-core</artifactId><version>9.1.0</version><type>pom</type>
</dependency>
<!-- https://mvnrepository.com/artifact/com.itextpdf/font-asian -->
<dependency><groupId>com.itextpdf</groupId><artifactId>font-asian</artifactId><version>9.1.0</version><scope>test</scope>
</dependency>
2)编写工具类实现代码:
public class PDFGenerationTool {@Tool(description = "Generate a PDF file with given content")public String generatePDF(@ToolParam(description = "Name of the file to save the generated PDF") String fileName,@ToolParam(description = "Content to be included in the PDF") String content) {String fileDir = FileConstant.FILE_SAVE_DIR + "/pdf";String filePath = fileDir + "/" + fileName;try {// 创建目录FileUtil.mkdir(fileDir);// 创建 PdfWriter 和 PdfDocument 对象try (PdfWriter writer = new PdfWriter(filePath);PdfDocument pdf = new PdfDocument(writer);Document document = new Document(pdf)) {// 自定义字体(需要人工下载字体文件到特定目录)
//                String fontPath = Paths.get("src/main/resources/static/fonts/simsun.ttf")
//                        .toAbsolutePath().toString();
//                PdfFont font = PdfFontFactory.createFont(fontPath,
//                        PdfFontFactory.EmbeddingStrategy.PREFER_EMBEDDED);// 使用内置中文字体PdfFont font = PdfFontFactory.createFont("STSongStd-Light", "UniGB-UCS2-H");document.setFont(font);// 创建段落Paragraph paragraph = new Paragraph(content);// 添加段落并关闭文档document.add(paragraph);}return "PDF generated successfully to: " + filePath;} catch (IOException e) {return "Error generating PDF: " + e.getMessage();}}
}
3)编写单元测试
@Test
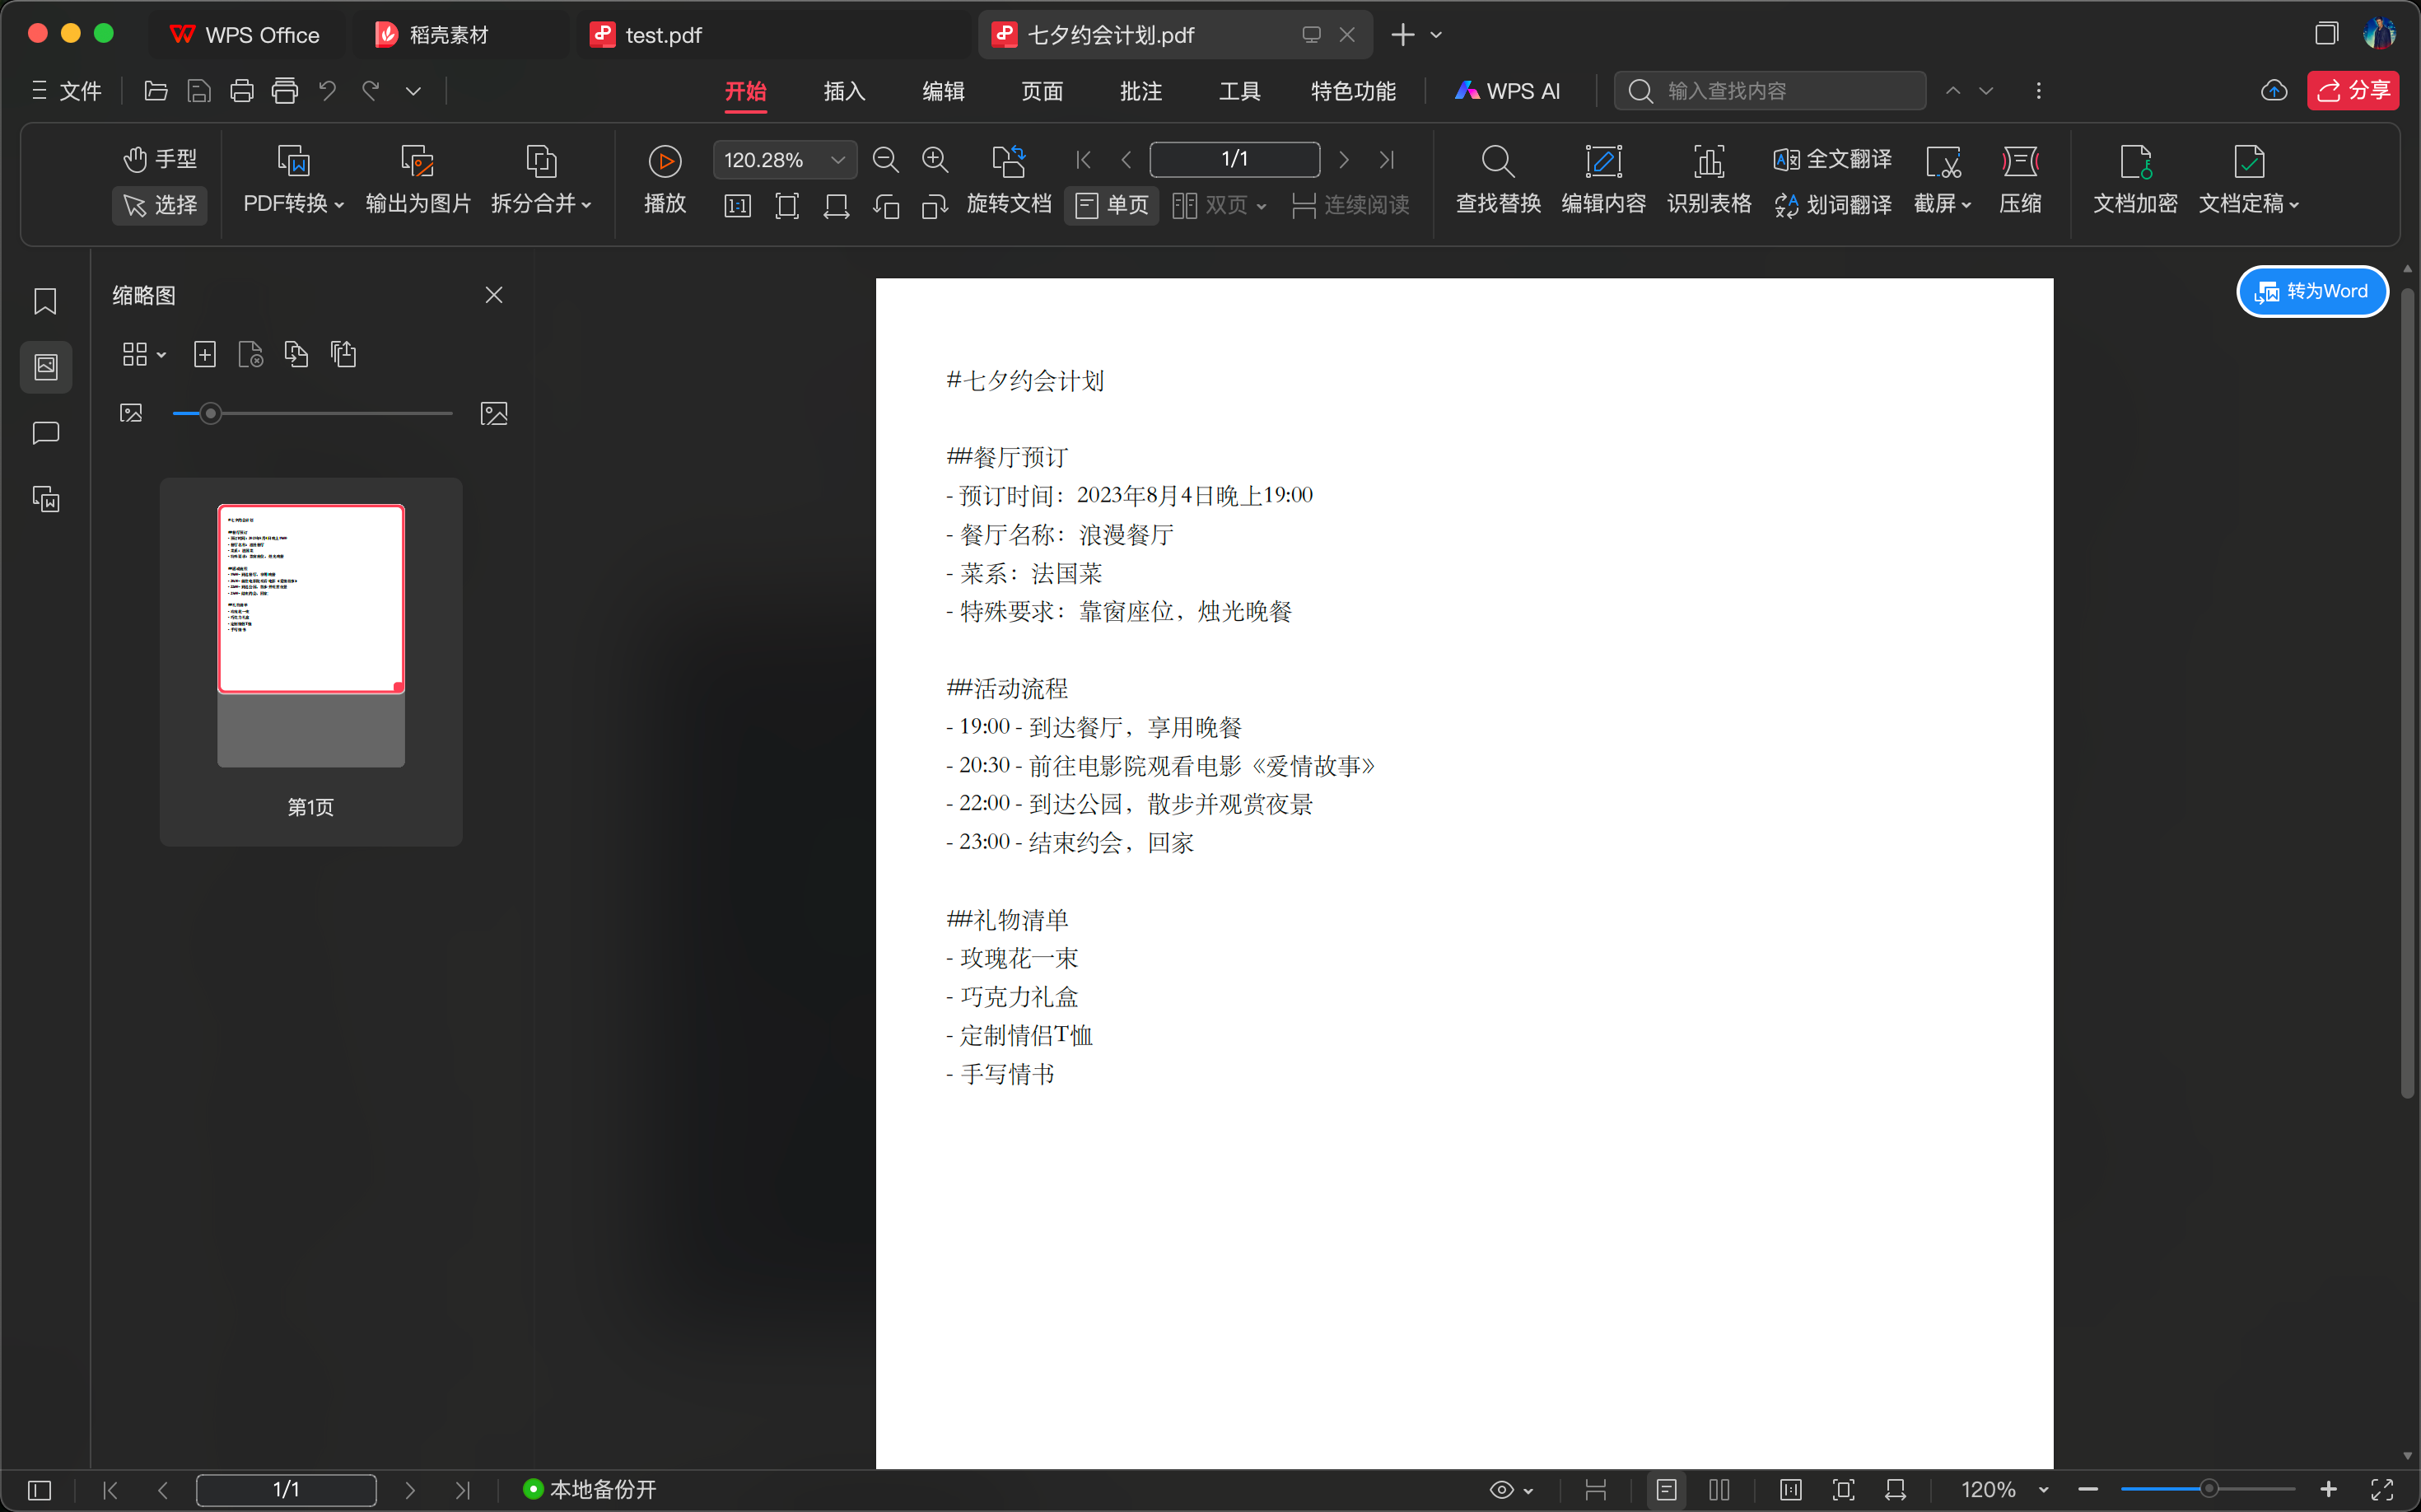
void generatePDF() {PDFGenerationTool tool = new PDFGenerationTool();String fileName = "test.pdf";String content = "This is a test PDF content.";String result = tool.generatePDF(fileName, content);assertNotNull(result);
}
测试效果如下:
集中注册
现在我们已经有了 6 款现成的工具了,可以将这些工具全部交给 AI,让 AI 自己决定什么时候调用。现在创建一个工具注册类,统一管理和绑定所有的工具。
代码如下:
@Configuration
public class ToolRegistration {@Value("${search-api.api-key}")private String searchApiKey;@Beanpublic ToolCallback[] allTools() {FileOperationTool fileOperationTool = new FileOperationTool();WebSearchTool webSearchTool = new WebSearchTool(searchApiKey);WebScrapingTool webScrapingTool = new WebScrapingTool();ResourceDownloadTool resourceDownloadTool = new ResourceDownloadTool();TerminalOperationTool terminalOperationTool = new TerminalOperationTool();PDFGenerationTool pdfGenerationTool = new PDFGenerationTool();return ToolCallbacks.from(fileOperationTool,webSearchTool,webScrapingTool,resourceDownloadTool,terminalOperationTool,pdfGenerationTool);}
}
使用工具:
@Resource
ToolCallback[] allTools;
public String doChatWithTools(String message, String chatId) {// 使用工具ChatResponse chatResponse = chatClient.prompt().user(message).advisors(spec -> spec.param(CHAT_MEMORY_CONVERSATION_ID_KEY, chatId).param(CHAT_MEMORY_RETRIEVE_SIZE_KEY, 10))// 开启日志记录顾问.advisors(new MyLoggerAdvisor())// 使用工具.tools(allTools).call().chatResponse();String content = chatResponse.getResult().getOutput().getText();log.info("doChatWithTools content: {}", content);return content;
}
测试使用工具
编写单元测试
@Test
void doChatWithToolsTest(){// 测试联网搜索问题的答案testMessage("周末想带女朋友去上海约会,推荐几个适合情侣的小众打卡地?");// 测试网页抓取:恋爱案例分析testMessage("最近和对象吵架了,看看编程导航网站(codefather.cn)的其他情侣是怎么解决矛盾的?");// 测试资源下载:图片下载testMessage("直接下载一张适合做手机壁纸的星空情侣图片为文件");// 测试终端操作:执行代码testMessage("执行 Python3 脚本来生成数据分析报告");// 测试文件操作:保存用户档案testMessage("保存我的恋爱档案为文件");// 测试 PDF 生成testMessage("生成一份‘七夕约会计划’PDF,包含餐厅预订、活动流程和礼物清单");
}private void testMessage(String message) {String chatId = UUID.randomUUID().toString();String answer = loveApp.doChatWithTools(message, chatId);Assertions.assertNotNull(answer);
}
注册测试,可以看到 大模型会根据 query 自己选择调用何种工具来完成任务。
五、工具进阶知识
工具底层数据结构
在 SpringAI中,通过 ToolCallback 接口实现建模一个“工具”。在之前的章节中,我们通过了解到了 SpringAI 有两种方式来定义和使用工具:工具两种定义方式。在本章节将继续深入学习 SpringAI 对工具的实现原理。
工具回调
ToolCallback 是 SpringAI 实现工具的核心接口,该接口提供了一种 AI 模型调用工具的方式,包括工具的定义和执行逻辑。下面是ToolCallback 接口的核心代码:
public interface ToolCallback {/*** Definition used by the AI model to determine when and how to call the tool.*/ToolDefinition getToolDefinition();/*** Metadata providing additional information on how to handle the tool.*/ToolMetadata getToolMetadata();/*** Execute tool with the given input and return the result to send back to the AI model.*/String call(String toolInput);/*** Execute tool with the given input and context, and return the result to send back to the AI model.*/String call(String toolInput, ToolContext tooContext);}
在这个接口中:
getToolDefinition()提供了工具的基本定义,包括名称、描述和输入参数,这些信息能够帮助 AI决定什么时候以及如何调用工具。getToolMetadata()提供了处理工具的额外附加信息,比如工具是否立即返回等控制选项- 两个
call()方法是工具的执行入口,基于给定的输入参数(及工具上下文)执行工具,并将结果返回给 AI模型。
工具定义
ToolDefinition接口提供了AI 模型了解工具如何使用的必要信息,包括有工具名称、描述以及输入模式(input shema)。在定义一个工具时,每一个ToolCallback接口的实现都必须要提供一个ToolDefinition接口的实例。
ToolDefinition的核心源码:
public interface ToolDefinition {/*** The tool name. Unique within the tool set provided to a model.*/String name();/*** The tool description, used by the AI model to determine what the tool does.*/String description();/*** The schema of the parameters used to call the tool.*/String inputSchema();}
name()定义了工具的唯一名称,在给 AI 模型使用的工具集中名称必须是唯一的。description()是工具的描述,主要是告诉 AI 模型工具是干啥的inputSchema()定义了这个工具的输入参数的结构是怎样的,比如说参数的类型是什么?有哪些字段?字段类型?字段是否必须传递?
更详细的内容可见JSON Schema
ToolDefinition.Builder允许你通过默认的实现(DefaultToolDefinition)来自定义构建一个ToolDefinition实例。示例代码如下:
ToolDefinition toolDefinition = ToolDefinition.builder().name("currentWeather").description("Get the weather in location").inputSchema("""{"type": "object","properties": {"location": {"type": "string"},"unit": {"type": "string","enum": ["C", "F"]}},"required": ["location", "unit"]}""").build();
方法工具定义
如果是通过Methods 方式构建的工具,SpringAI 会自动地为用户生成ToolDefinition。但如果你的确更喜欢自定义生成ToolDefinition,SpringAI还有一种更方便的 builder:
Method method = ReflectionUtils.findMethod(DateTimeTools.class, "getCurrentDateTime");
ToolDefinition toolDefinition = ToolDefinition.from(method);
默认地,在生成工具ToolDefinition时,工具的名称默认就是方法的名称,工具描述也是方法名,方法的输入参数会解析为JSON Schema。但如果给方法设置了@Tool注解,工具的名称和描述将会从注解里获取。
更多细节见工具定义
补充:ToolDefinition.Builder还提供了一种生成ToolDefinition实例的方式:
Method method = ReflectionUtils.findMethod(DateTimeTools.class, "getCurrentDateTime");
ToolDefinition toolDefinition = ToolDefinition.builder(method).name("currentDateTime").description("Get the current date and time in the user's timezone").inputSchema(JsonSchemaGenerator.generateForMethodInput(method)).build();
函数工具定义
函数方式用得很少,这里不做过多介绍
有兴趣可以自己了解:官方文档
JSON Schema
当 AI 模型调用工具的时候需要知道如何调用工具,这个工具需要我传递哪些参数,类型又是什么,哪些参数是可选的?这些需要传递给模型的信息叫做输入模式(input Schema)。AI 通过输入模式来理解如何调用工具以及准备这个工具请求。SpringAI提供了一种内置的JsonSchemaGenerator类通过工具的参数列表来生成JSON Schema。这个 JSON Schema 也是 ToolDefinition中的一部分。
JSON Schema 提供了一系列使用在方法参数列表上的注解,这些注解可以定制化 Schema 的结果。
下面介绍两个生成 JSON Schema时的关键选项:描述和可选项
描述
除了给工具本身提供描述外,还可以给工具的参数提供描述。参数的描述可以写一些关键的信息,比如说期望参数应该采用什么格式,允许使用哪些值等。这对 AI模型理解输入模式以及如何使用是很有用的。SpringAI 提供了内置支持,使用下面任意一个注解都可以为参数生成描述:
- @ToolParam(description = “…”),这是 SpringAI 提供的
- @JsonClassDescription(description = “…”),这是Jackson 提供的
- @JsonPropertyDescription(description = “…”),还是来自 Jackson
- @Schema(description = “…”),这是 Swagger 提供的
一个示例:
import java.time.LocalDateTime;
import java.time.format.DateTimeFormatter;
import org.springframework.ai.tool.annotation.Tool;
import org.springframework.ai.tool.annotation.ToolParam;
import org.springframework.context.i18n.LocaleContextHolder;class DateTimeTools {@Tool(description = "Set a user alarm for the given time")void setAlarm(@ToolParam(description = "Time in ISO-8601 format") String time) {LocalDateTime alarmTime = LocalDateTime.parse(time, DateTimeFormatter.ISO_DATE_TIME);System.out.println("Alarm set for " + alarmTime);}}
可选项
默认情况下,工具的参数每一个都是必须传递的,这会强迫 AI 模型为每一个参数提供参数值。下面这些注解可以将参数设置为可选项:
- @ToolParam(required = false),来自 SpringAI
- @JsonProperty(required = false),来自 Jackson
- @Schema(required = false),来自 Swagger
- @Nullable,来自Spring 框架提供的
一个示例:
class CustomerTools {@Tool(description = "Update customer information")void updateCustomerInfo(Long id, String name, @ToolParam(required = false) String email) {System.out.println("Updated info for customer with id: " + id);}}
结果转换
SpringAI 使用ToolCallResultConverter组件将工具调用的结果进行序列化并发送回给 AI 模型。
ToolCallResultConverter的核心源码:
@FunctionalInterface
public interface ToolCallResultConverter {/*** Given an Object returned by a tool, convert it to a String compatible with the* given class type.*/String convert(@Nullable Object result, @Nullable Type returnType);}
结果必须是可序列化的类型,默认情况下,返回结果使用Jackson(DefaultToolCallResultConverter),SpringAI 也支持用户自定义结果转换器,只需要实现ToolCallResultConverter接口即可。
当使用声明式方法构建工具的时候,可以通过设置@Tool注解的resultConverter()属性来使用自定义的工具结果转换器。
一个示例:
class CustomerTools {@Tool(description = "Retrieve customer information", resultConverter = CustomToolCallResultConverter.class)Customer getCustomerInfo(Long id) {return customerRepository.findById(id);}}
如果使用编程方式,可以通过设置 MethodToolCallback.Builder 的 resultConverter() 属性来为工具提供自定义的 ToolCallResultConverter 。
工具上下文
SpringAI支持通过ToolContextAPI给工具传递额外的上下文信息。这个特性允许开发者传递额外的、用户自己提供的数据来用于工具执行使用,这些数据是和 AI 模型生成的参数一起传递给工具。具体的流程图如下:
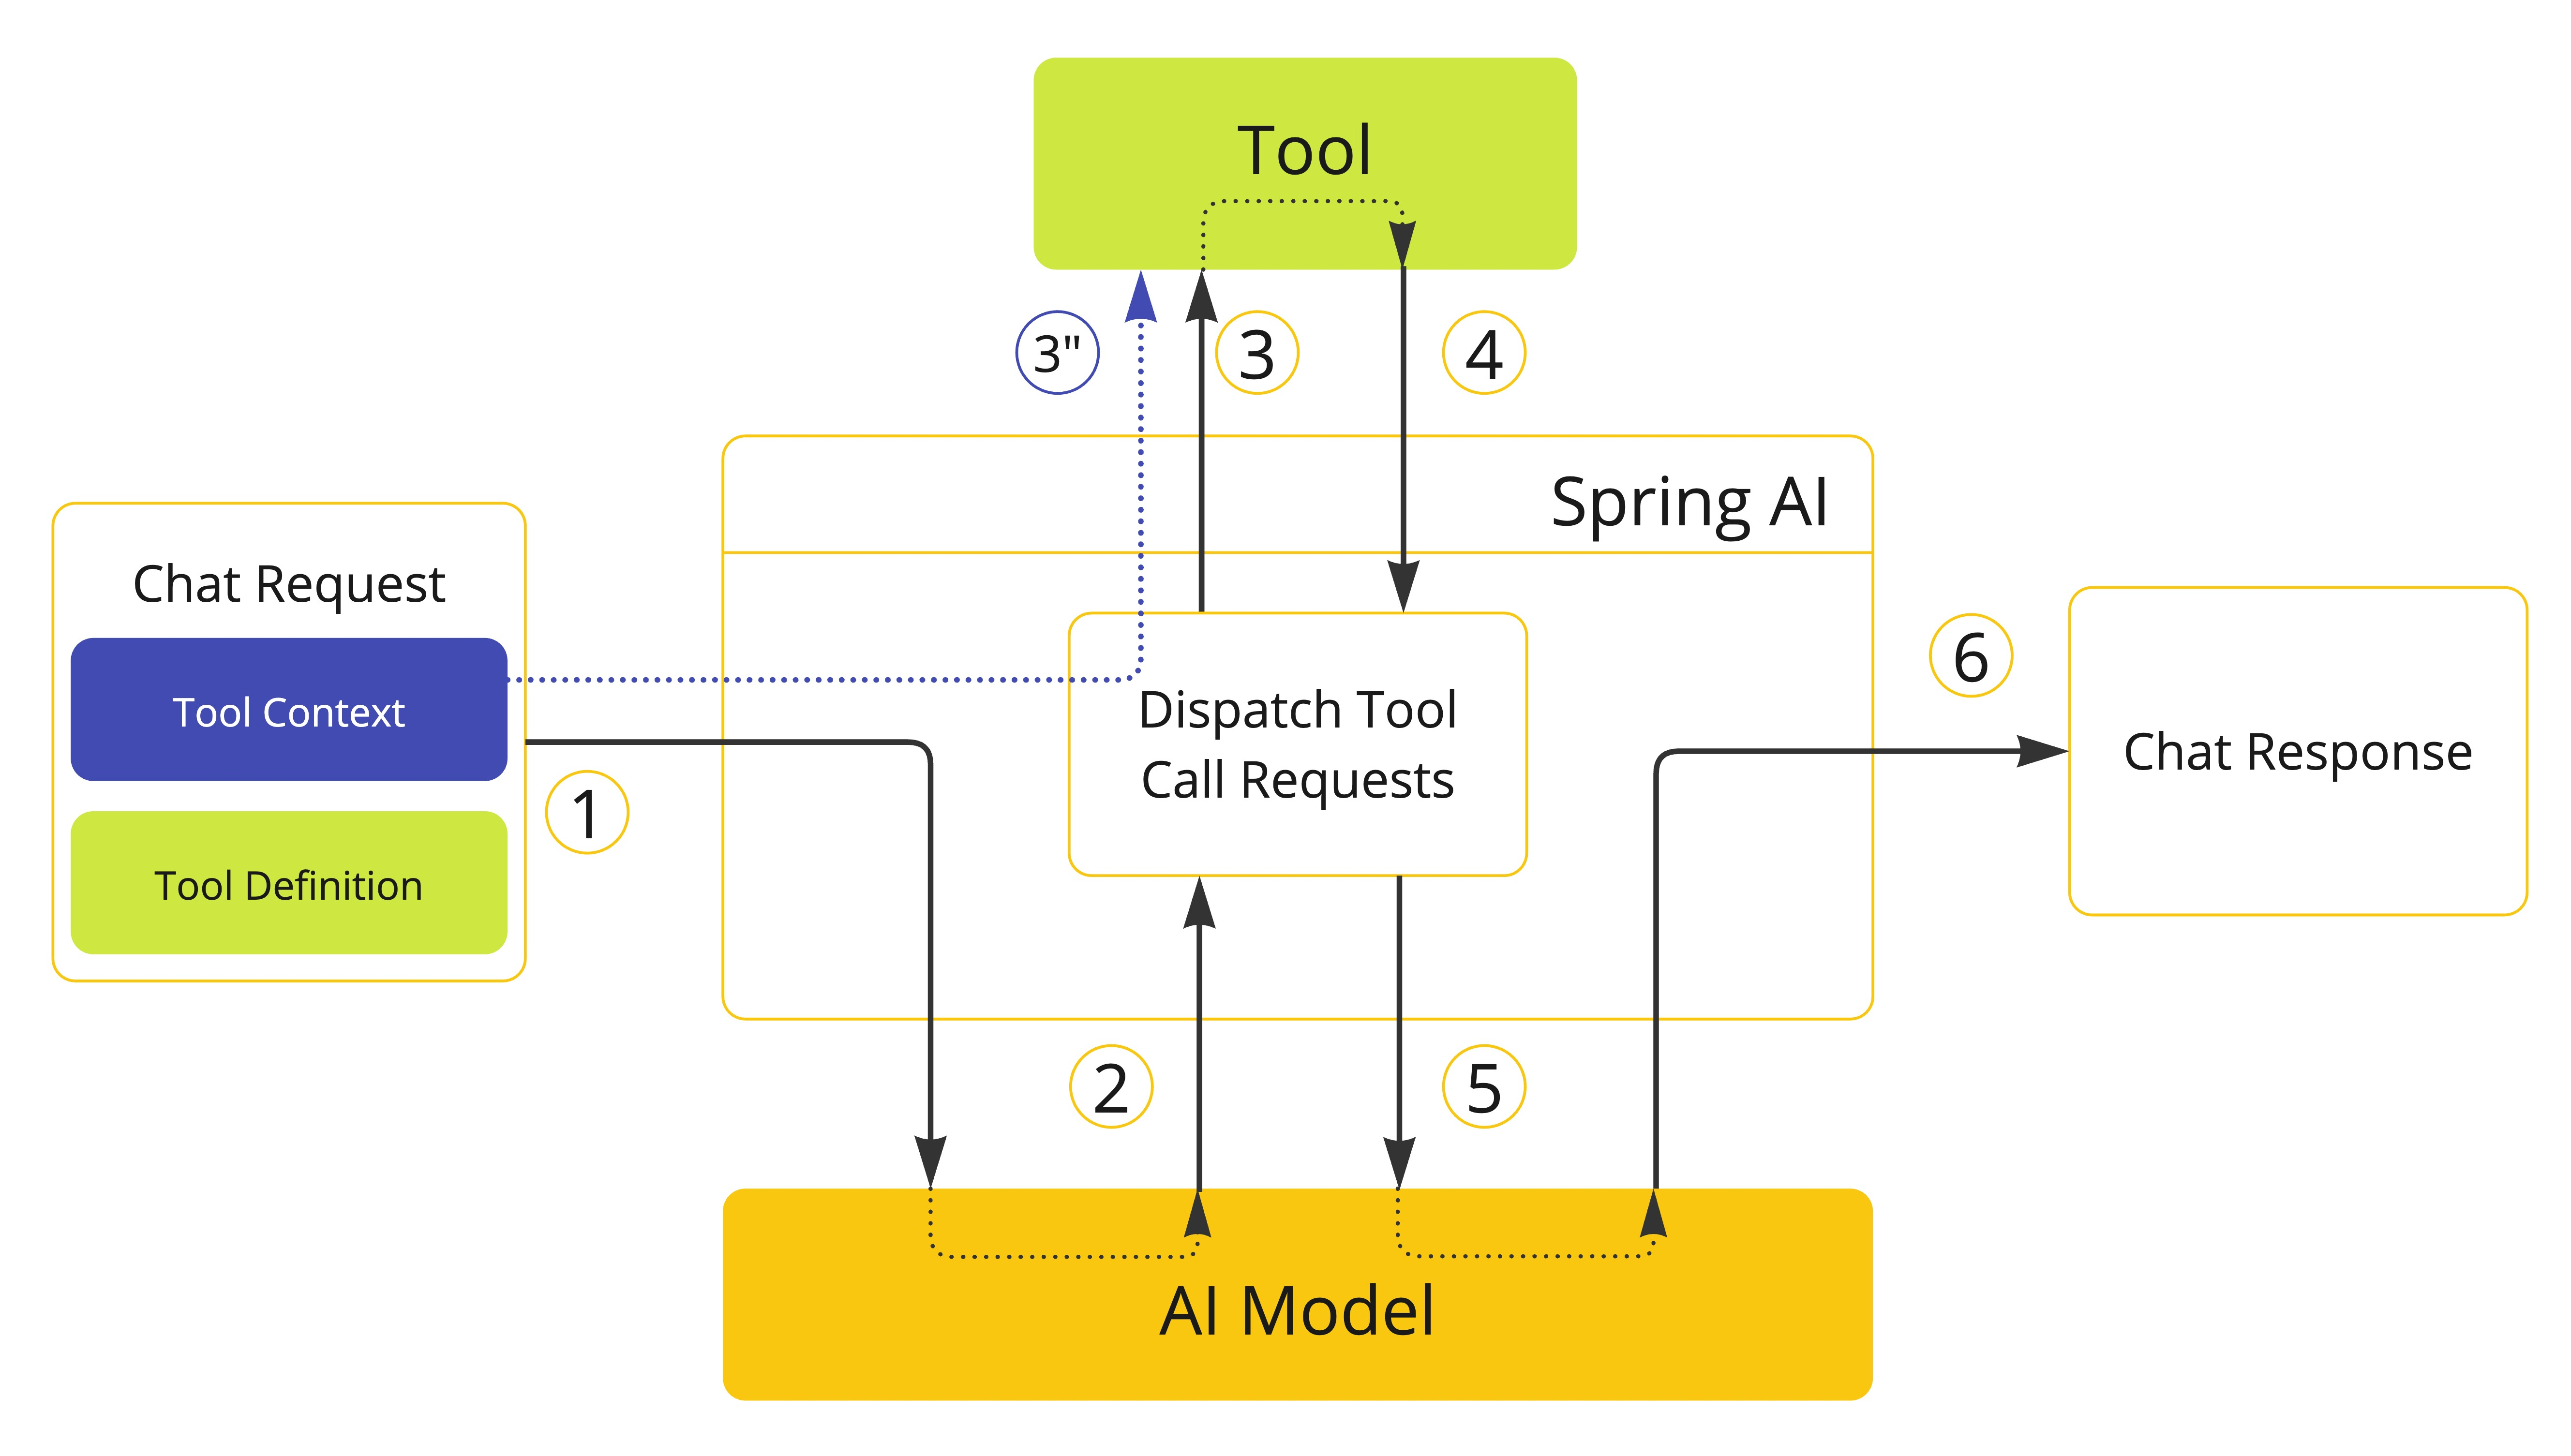
可以看到,ToolContext 中的数据不会发送给 AI 模型,是直接传递给工具的,这也避免一些用户隐私信息暴露给模型的安全问题。
一个使用示例:
class CustomerTools {@Tool(description = "Retrieve customer information")Customer getCustomerInfo(Long id, ToolContext toolContext) {return customerRepository.findById(id, toolContext.get("tenantId"));}}
在调用 chatClient 时,组装工具上下文信息:
ChatModel chatModel = ...String response = ChatClient.create(chatModel).prompt("Tell me more about the customer with ID 42").tools(new CustomerTools()).toolContext(Map.of("tenantId", "acme")).call().content();System.out.println(response);
同样地,在调用 ChatModel 时,也可以组装工具上下文信息:
ChatModel chatModel = ...
ToolCallback[] customerTools = ToolCallbacks.from(new CustomerTools());
ChatOptions chatOptions = ToolCallingChatOptions.builder().toolCallbacks(customerTools).toolContext(Map.of("tenantId", "acme")).build();
Prompt prompt = new Prompt("Tell me more about the customer with ID 42", chatOptions);
chatModel.call(prompt);
设置默认工具上下文:
ChatModel chatModel = ...
ChatClient.Builder builder = ChatClient.builder(chatModel);
ChatClient chatClient = builder.defaultToolContext(Map.of("userId", "xxxx")).build();
如果
ToolContext选项在默认选项和运行选项中都设置了,那么最终的ToolContext将会是两者的合并,然后以运行时选项优先。
直接返回
SpringAI 默认情况下,会将工具调用的结果序列化为字符串再发送给 AI 模型。
但在有些情况下,用户可能希望工具调用完成之后就可以直接结束响应了,不必再有发送给 AI 模型这一过程了(也能省一丢丢token 成本)。当然,SpringAI 也是支持工具调用结果直接返回的。
ToolCallbackAPI 支持设置returnDirect属性来决定工具调用的结果是否直接返回给调用方。
ToolCallingManager负责基于returnDirect属性是否直接返回的具体逻辑实现。
需要注意的是,如果是同时有多个工具调用请求,那么必须全部工具的
returnDirect属性都设为 true,结果才会直接返回给调用方,否则仍会发送给 AI模型。

- 如果期望 AI 模型能够结合工具使用,我们在聊天请求中传递工具定义,如果希望工具调用结果可以直接返回给调用方,需要将
returnDirect属性设置为 true; - 当AI 模型决定调用某个工具时,会生成一个包含工具名称和输入参数 Schema 的响应给到应用程序;
- 应用程序根据工具名称识别到指定工具,并基于传递的输入参数执行工具;
- 应用程序负责处理工具调用的结果;
- 应用程序将工具调用结果直接发送给调用方,而不是给 AI 模型。
工具执行原理
工具执行指的是使用 AI 模型提供的输入参数来执行工具调用并返回调用结果的过程。工具执行由ToolCallingManager接口具体处理,该接口负责工具调用的全生命周期管理。
public interface ToolCallingManager {/*** Resolve the tool definitions from the model's tool calling options.*/List<ToolDefinition> resolveToolDefinitions(ToolCallingChatOptions chatOptions);/*** Execute the tool calls requested by the model.*/ToolExecutionResult executeToolCalls(Prompt prompt, ChatResponse chatResponse);}
如果项目是基于 SpringBoot的,那么 SpringBoot会给ToolCallingManager接口提供一个默认实现DefaultToolCallingManager。然后您也可以通过提供自己的 ToolCallingManagerBean 来重定义工具执行行为。
@Bean
ToolCallingManager toolCallingManager() {return ToolCallingManager.builder().build();
}
默认情况下,SpringAI通过 ChatModel自动地完成工具调用过程。也支持用户自主管理工具调用全生命周期。
下面分别介绍这两种方式:
框架控制的的工具执行
默认情况下,SpringAI 会拦截所有 AI 模型发送的工具调用请求,执行工具并将工具调用结果返回给 AI 模型。所有这些操作由每个 ChatModel实现通过 ToolCallingManager接口透明的完成。
- 组装工具定义到聊天请求中,方便 AI 模型进行识别
- 当 AI 模型决定调用某个工具时,会生成一个包含工具名称和输入参数 Schema 的响应到
ChatModel ChatModel将工具调用请求发送给ToolCallingManagerAPIToolCallingManagerAPI负责识别要调用的工具,并基于输入参数执行此工具- 工具调用结果返回给
ToolCallingManager ToolCallingManager将工具调用结果返回给ChatModelChatModel将工具调用结果返回给AI 模型- AI 模型将工具调用结果作为附加上下文生成最终响应,并通过
ChatClient将响应发送给调用者。
工具是否具备调用执行资格由ToolExecutionEligibilityPredicate接口控制。默认情况下,工具的执行资格检查是通过ToolExecutionEligibilityPredicate接口的isToolExecutionRequired()方法实现的:
public interface ToolExecutionEligibilityPredicate extends BiPredicate<ChatOptions, ChatResponse> {/*** Determines if tool execution should be performed based on the prompt options and* chat response.* @param promptOptions The options from the prompt* @param chatResponse The response from the chat model* @return true if tool execution should be performed, false otherwise*/default boolean isToolExecutionRequired(ChatOptions promptOptions, ChatResponse chatResponse) {Assert.notNull(promptOptions, "promptOptions cannot be null");Assert.notNull(chatResponse, "chatResponse cannot be null");return test(promptOptions, chatResponse);}
}
比如设置某个工具没有执行资格:
@jakarta.annotation.Resource
ToolCallback[] allTools;
public String doChatWithTools(String message, String chatId) {// 使用工具ChatResponse chatResponse = chatClient.prompt().user(message).advisors(spec -> spec.param(CHAT_MEMORY_CONVERSATION_ID_KEY, chatId).param(CHAT_MEMORY_RETRIEVE_SIZE_KEY, 10))// 开启日志记录顾问.advisors(new MyLoggerAdvisor())// 使用工具.tools(allTools)// 设置不执行工具调用.options(ToolCallingChatOptions.builder().internalToolExecutionEnabled(false).build()).call().chatResponse();String content = chatResponse.getResult().getOutput().getText();log.info("doChatWithTools content: {}", content);return content;
}
用户控制的工具执行
SpringAI 支持开发者自己控制工具执行的全生命周期管理,通过将ToolCallingChatOptions的 internalToolExecutionEnabled 属性设置为false 来实现。
这种方式下,需要开发者自己检查AI 模型是否需要工具调用,并自己通过调用 ToolCallingManager来执行工具。
下面是一个简单的用户控制工具执行的示例:
ChatModel chatModel = ...
ToolCallingManager toolCallingManager = ToolCallingManager.builder().build();ChatOptions chatOptions = ToolCallingChatOptions.builder().toolCallbacks(new CustomerTools()).internalToolExecutionEnabled(false).build();
Prompt prompt = new Prompt("Tell me more about the customer with ID 42", chatOptions);ChatResponse chatResponse = chatModel.call(prompt);while (chatResponse.hasToolCalls()) {ToolExecutionResult toolExecutionResult = toolCallingManager.executeToolCalls(prompt, chatResponse);prompt = new Prompt(toolExecutionResult.conversationHistory(), chatOptions);chatResponse = chatModel.call(prompt);
}System.out.println(chatResponse.getResult().getOutput().getText());
异常处理
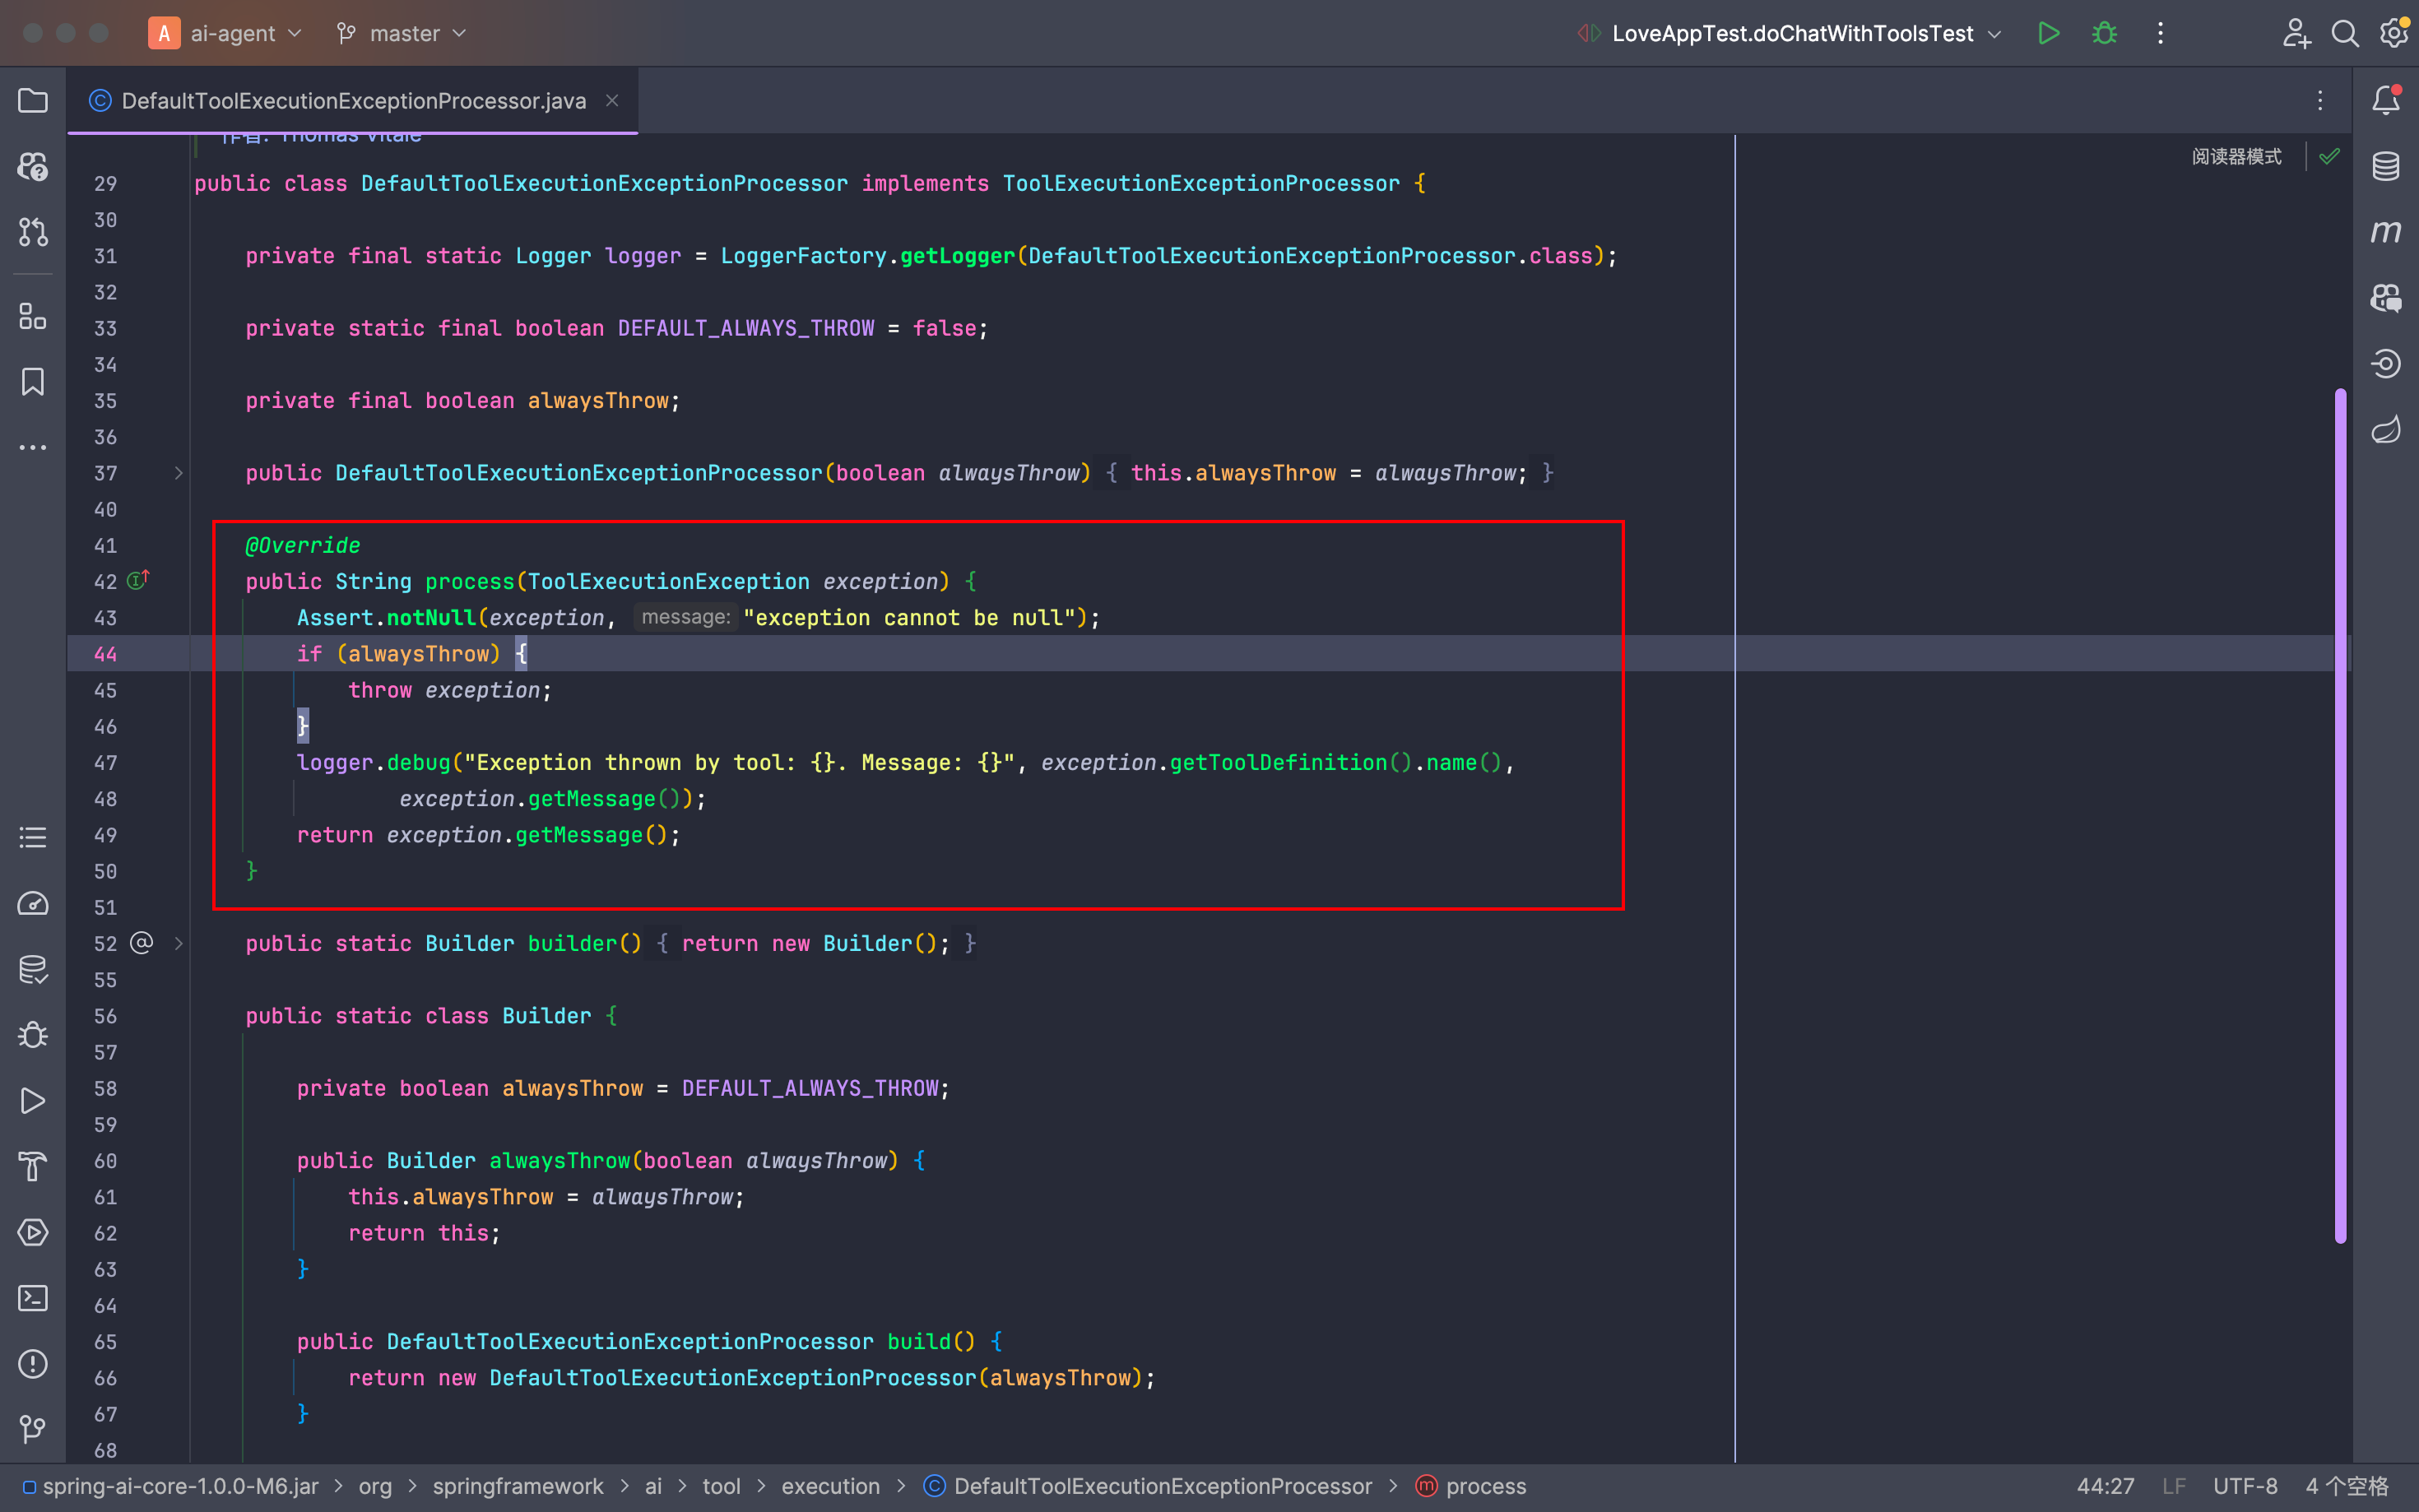
工具调用过程中的异常 SpringAI 有两种处理方式:要么生成错误消息发送给 AI模型,要么抛出一个异常给调用者。工具调用中发生的异常ToolExecutionException通过ToolExecutionExceptionProcessor异常处理器进行处理。
@FunctionalInterface
public interface ToolExecutionExceptionProcessor {/*** Convert an exception thrown by a tool to a String that can be sent back to the AI* model or throw an exception to be handled by the caller.*/String process(ToolExecutionException exception);}
如果使用的是 SpringBoot 项目,默认提供了一个DefaultToolExecutionExceptionProcessor默认实现。DefaultToolExecutionExceptionProcessor的构造器允许开发者将alwaysThrow属性设置为 true来将消息直接抛回给调用者而不是发送给 AI 模型。
工具解析
ToolCallbackResolver接口支持通过解析工具名称来得到工具实例
在这种方式下:
- 在使用 ChatClient 或 ChatModel 时,可以直接传递工具名称字符串
public String doChatWithTools(String message, String chatId) {
// 使用工具
ChatResponse chatResponse = chatClient.prompt().user(message).advisors(spec -> spec.param(CHAT_MEMORY_CONVERSATION_ID_KEY, chatId).param(CHAT_MEMORY_RETRIEVE_SIZE_KEY, 10))// 开启日志记录顾问.advisors(new MyLoggerAdvisor())// 使用工具.tools("工具 1", "工具 2").call().chatResponse();String content = chatResponse.getResult().getOutput().getText();log.info("doChatWithTools content: {}", content);return content;
}
- 在服务器端,
ToolCallbackResolver接口负责解析工具名称为一个ToolCallback实例:
public interface ToolCallbackResolver {/*** Resolve the {@link ToolCallback} for the given tool name.*/@NullableToolCallback resolve(String toolName);}
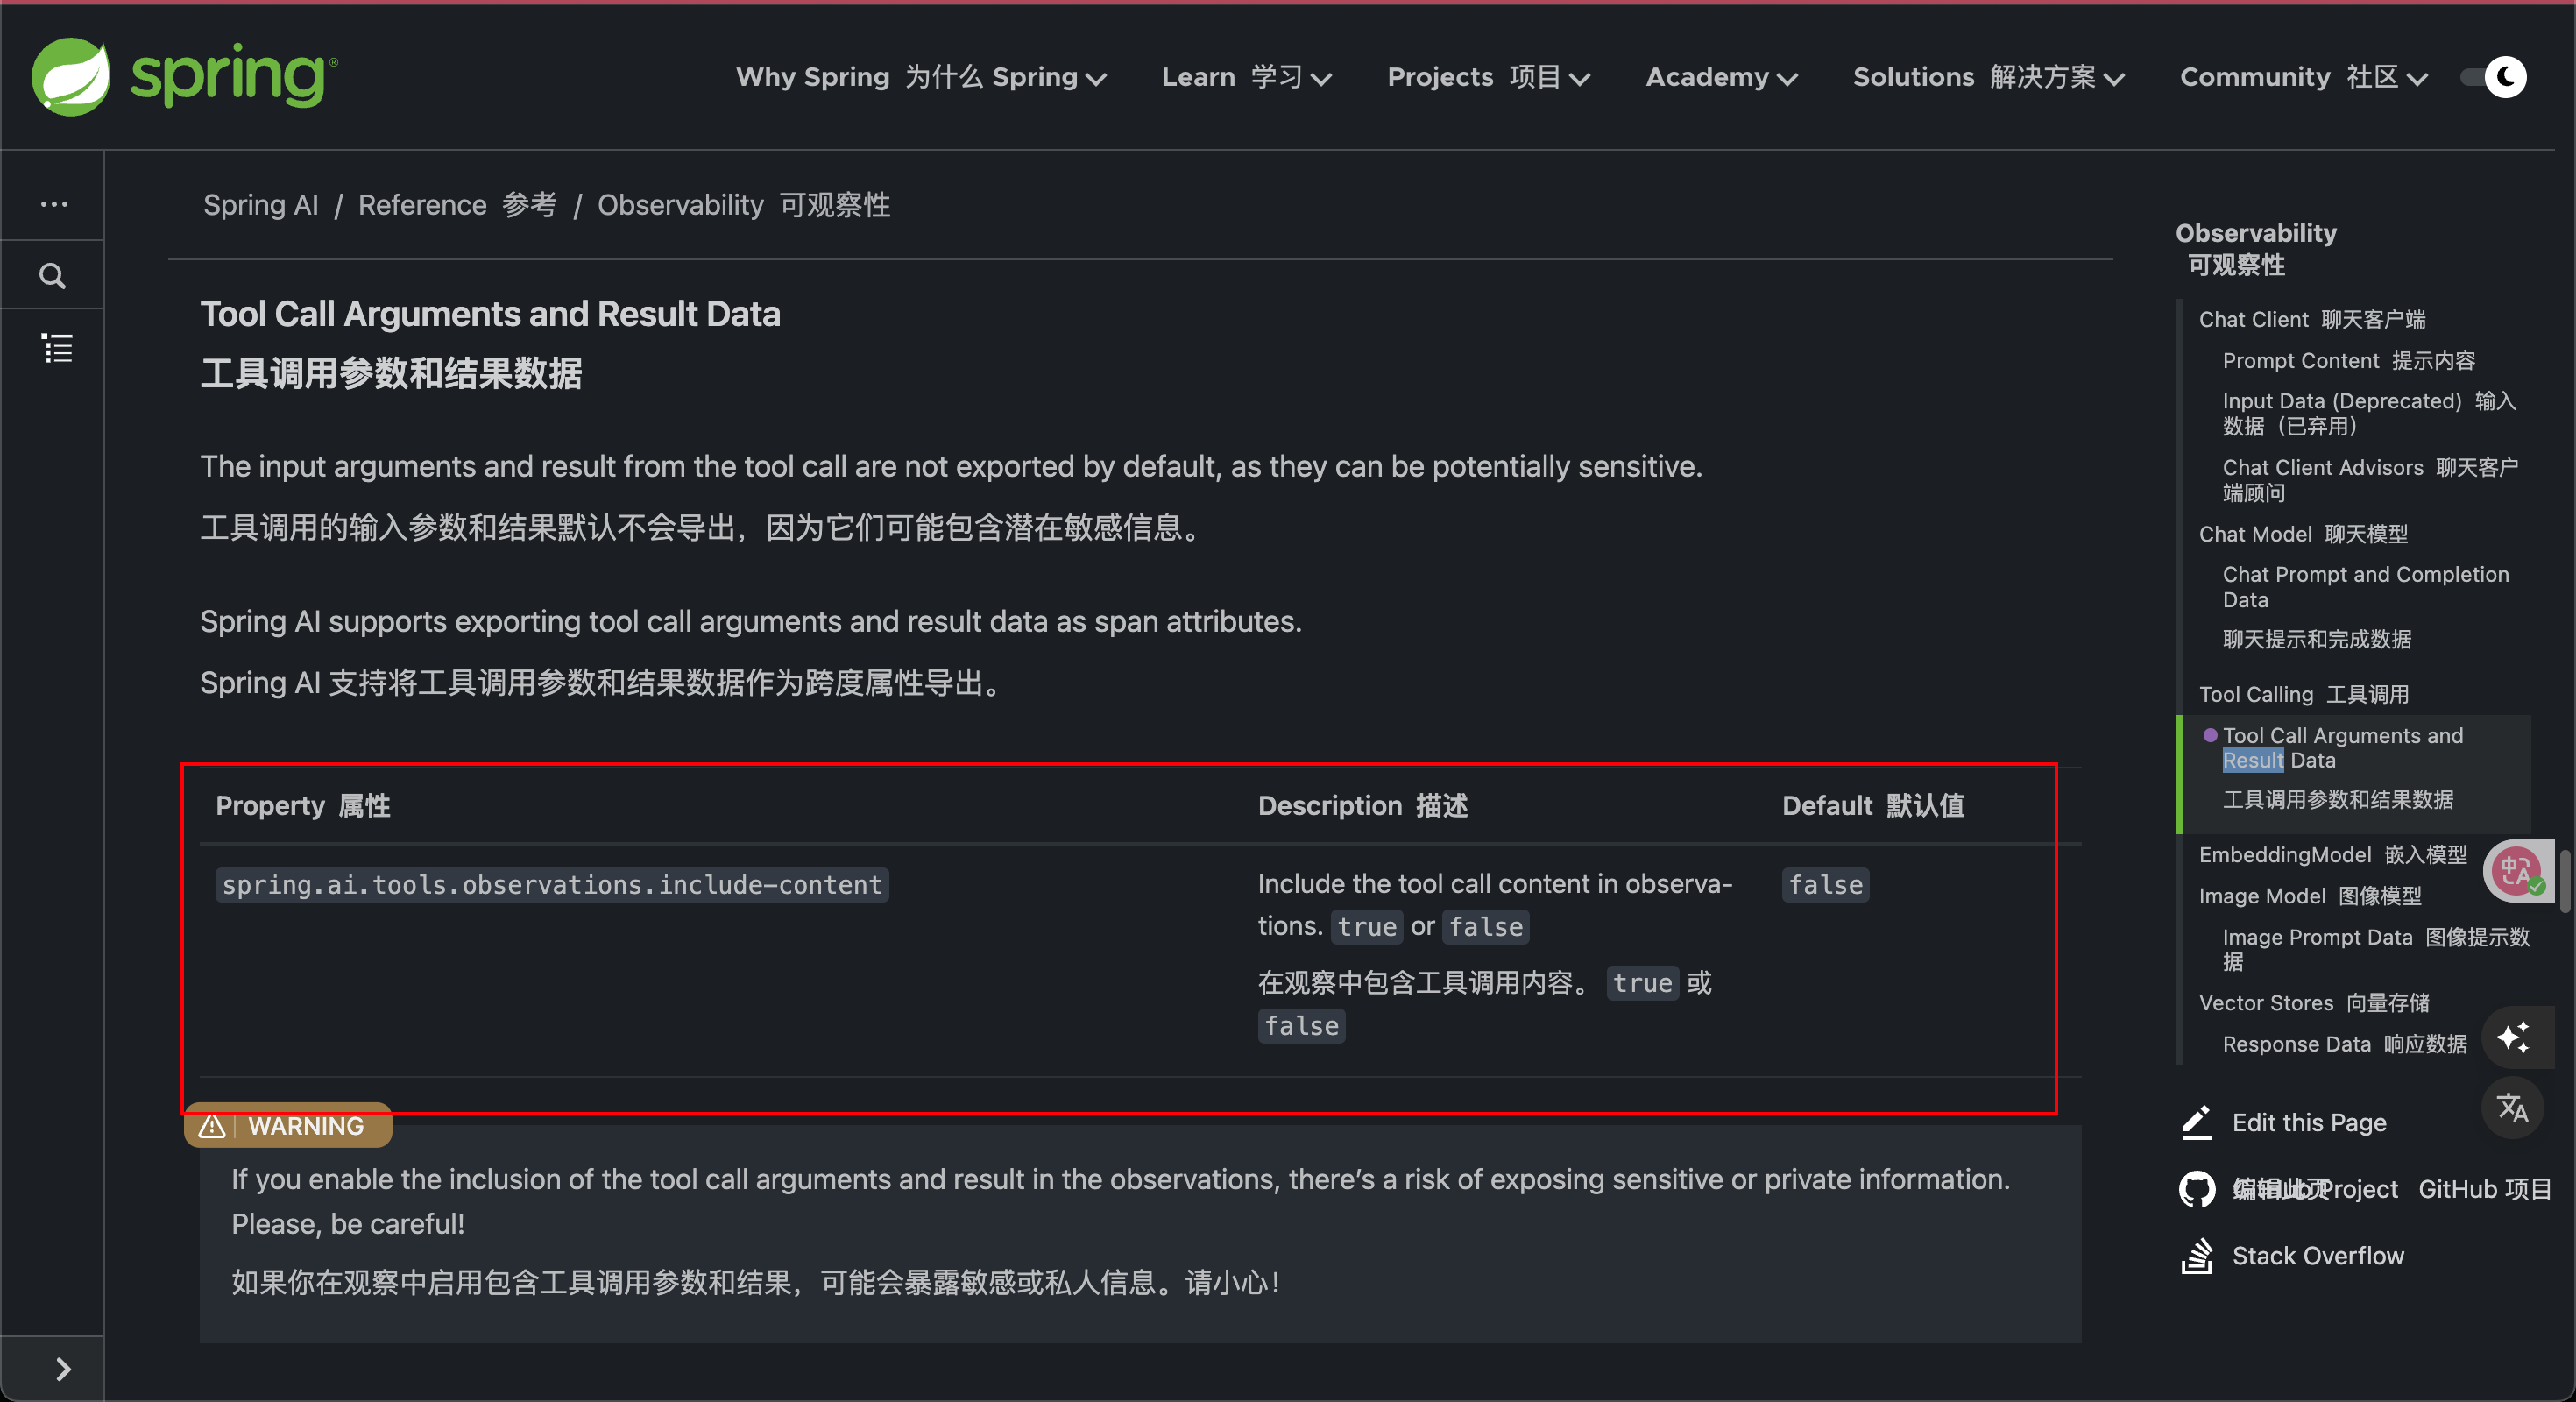
可观测性
工具调用包括通过 spring.ai.tool 观察来支持可观察性,这些观察测量完成时间和传播跟踪信息。更多细节可见官方文档:https://docs.spring.io/spring-ai/reference/observability/index.html#_tool_calling
默认情况下,出于安全考虑,SpringAI将工具调用参数和返回结果设置为禁用
日志记录
工具调用功能的所有主要操作都在 DEBUG 级别进行日志记录。您可以通过将 org.springframework.ai 包的日志级别设置为 DEBUG 来启用日志记录。