vue3实现高性能pdf预览器功能可行性方案及实践(pdfjs-dist5.x插件使用及自定义修改)
vue3实现高性能pdf预览器功能可行性方案及实践(pdfjs-dist5.x插件使用及自定义修改)
1 前言
近日,后端拿着电脑来与我说:“那个代理商反馈这个pdf看图大文件放大还是有些卡,说是放大到200%以上卡顿更明显”;我一想,不可能啊,我上次不是优化过了吗,怎么还卡呢,于是我说:“不会吧,上次不是优化过了吗,怎么还卡呢?我来看看”。 然后经过我的反复测试,在我的电脑上发现,每当我放大到400%以上的时候我的电脑就会异常的卡顿。
于是本着从事多年计算机行业的专业素养加上学习多年计算机专业知识的压舱石,我不假思索的在键盘上按下了ctrl+alt+delete按键,打开了任务管理器,再次测试pdf放大功能,就当我放大到400%以上,然后令人惊讶的事件发生了!我giao,内存怎么彪到100%了?我一想,这pdf放大肯定有问题啊!还好巧不巧,只有当我放大到400%以上才出现这个问题。
经过我数天的排查分析、原理解刨,总结把这个pdf的脉络理解清楚了,之前内存100%的问题也排查找到了,至于是什么问题,暂且不提(可放在下文的彩蛋之中),因为这个不会影响我们“高性能pdf预览功能”的实现。
废话不多说了,下面就让我们穿越到代码世界吧!滴滴 ~ jun(科技的声音)~
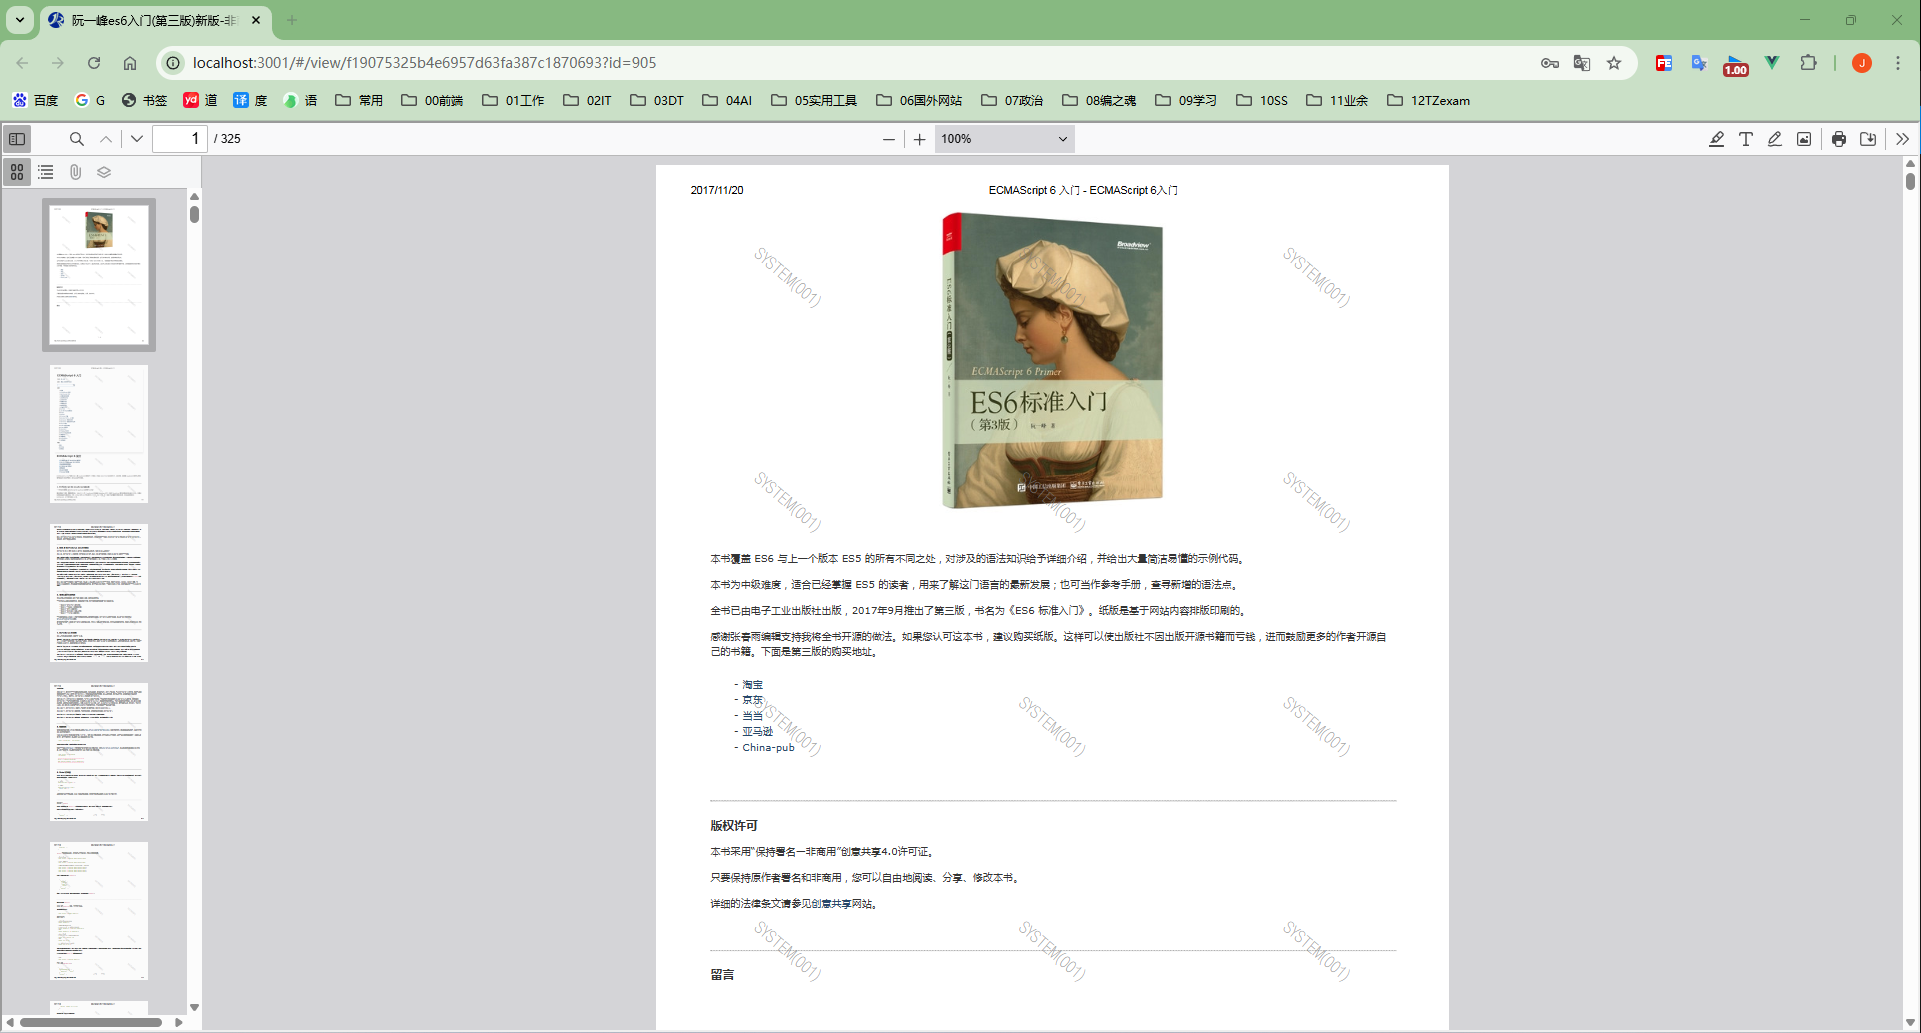
2 实现效果图
在线预览网址:http://116.198.200.217:6005/
git仓库地址:https://github.com/JACK-ZHANG-coming/frontEnd-all-knowledge/tree/master/examples/funnyDemo/a09vue3%E9%AB%98%E6%80%A7%E8%83%BDpdf%E9%A2%84%E8%A7%88%E5%99%A8
由上图可见,我们实现pdf的预览功能,同时具有页面跳转、放大缩小(20%-1000%)、缩略图、下载、打印、编辑等功能,可以说是常规的pdf预览及编辑操作都具备了。这就是pdfjs-dist5.2.133版本的pdf预览插件,同时我也对这个源码进行了自定义修改,兼容了大部分的浏览器,增加了下载、打印的权限校验,同时也修改了部分样式,完成了贴合业务场景的高级pdf预览器的实现!
那么这个pdf预览器是如何从0 -> 初步引入项目 -> 兼容大部分现代浏览器 -> 自定义修改源码样式 -> 自定义增加下载、打印权限校验,完成这一系列的操作,打造成为一个完整的贴合业务的pdf预览器的,请看我下面的“实现过程”章节,为屏幕前的有缘的你细细道来~
3 实现过程
3.1 初步引入项目
首先我们要有一个可以正常启动起来的项目,比如一个vue项目,或者我们跟着
创建一个空的vue项目 npm create vue@latest ,又或者直接拿我的项目来用(一步到位:https://github.com/JACK-ZHANG-coming/frontEnd-all-knowledge/tree/master/examples/funnyDemo/a09vue3%E9%AB%98%E6%80%A7%E8%83%BDpdf%E9%A2%84%E8%A7%88%E5%99%A8)。
3.1.1 下载pdfjs-dist网页离线包
好的,现在我们都有了一个可以启动起来的项目了,那么下面我们来到pdfjs-dist的官网页面:https://mozilla.github.io/pdf.js/getting_started/#download 。
进来以后我们选择 Prebuilt (older browsers) 这个类型版本下载,这种可以适配大部分的新旧浏览器,功能基本也是很齐全的。
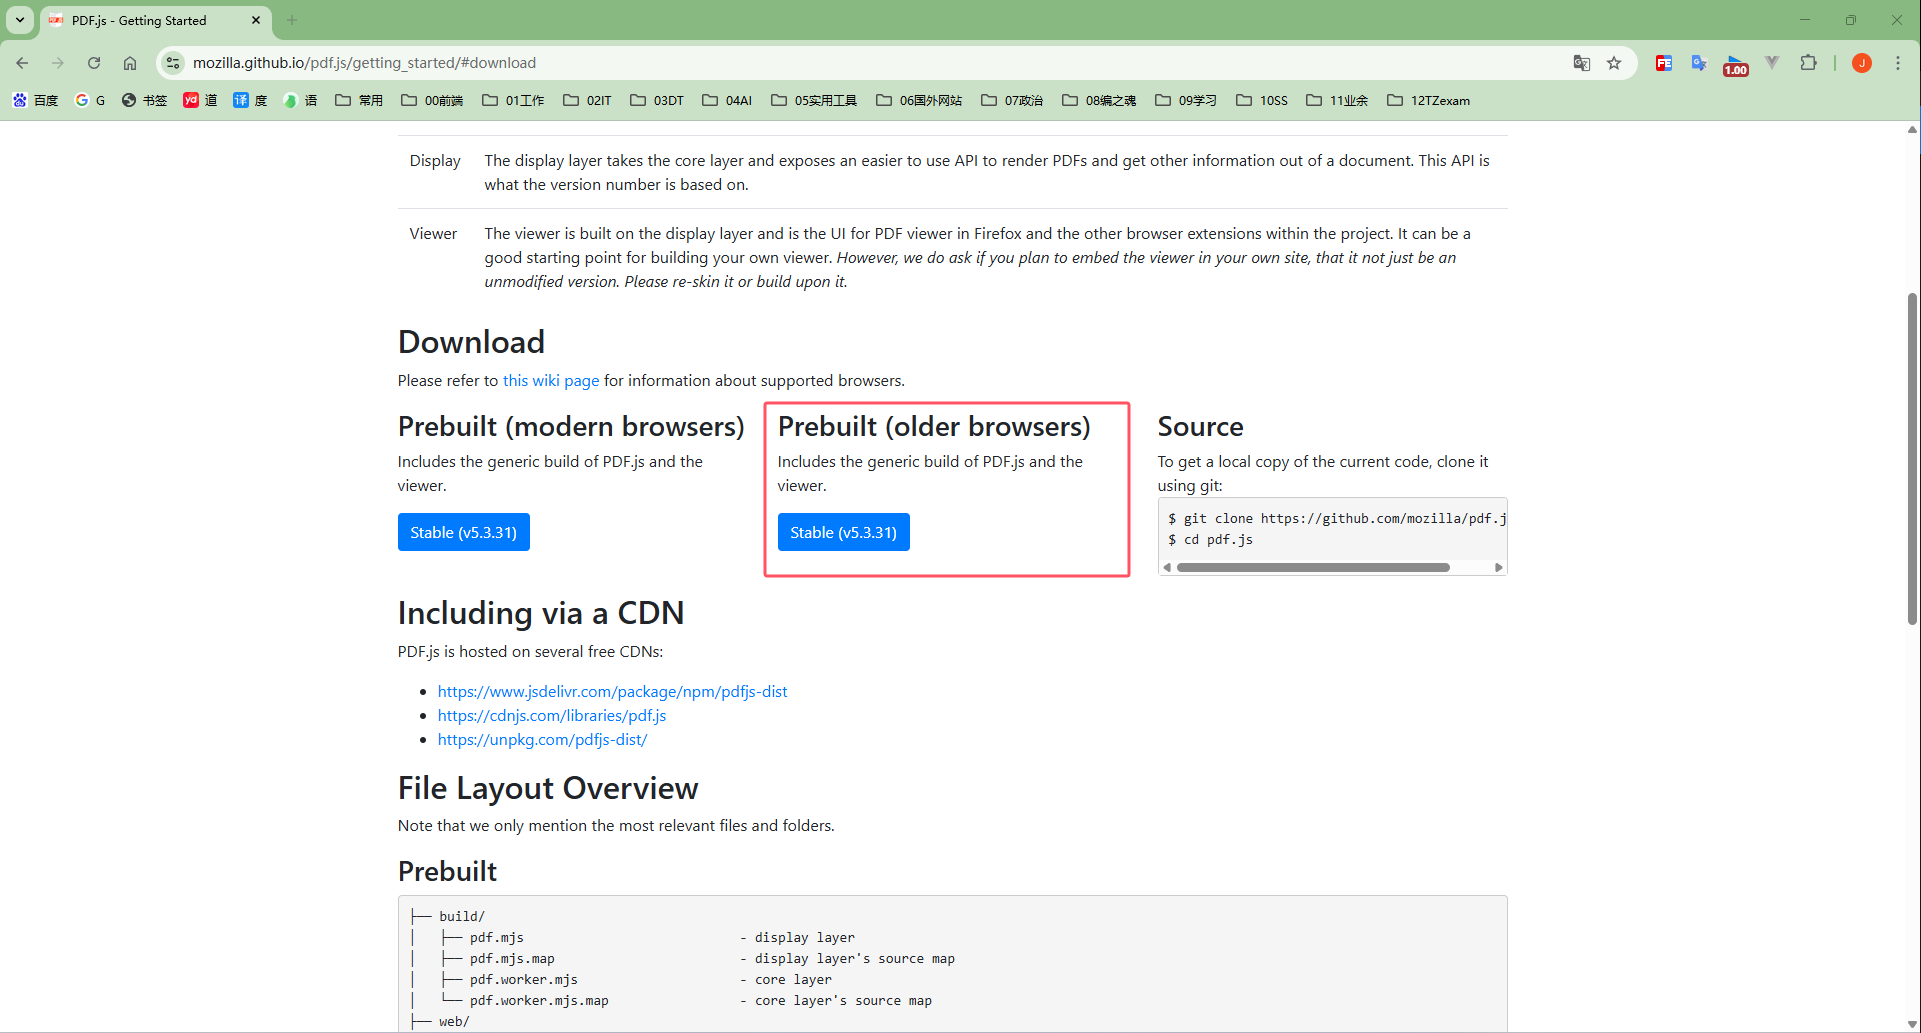
我之前下载的是5.2.133,现在看了一下,才过了一两个月,又更新了一个新的版本(当屏幕的你进入这个链接时估计又更新了几个版本吧)。如果想和我下一个版本的可以到官方的github仓库里面下载:
https://github.com/mozilla/pdf.js/releases

不过这都没啥问题,小的版本更新不会有多大变化,不影响我们的技术落地。干就完了!
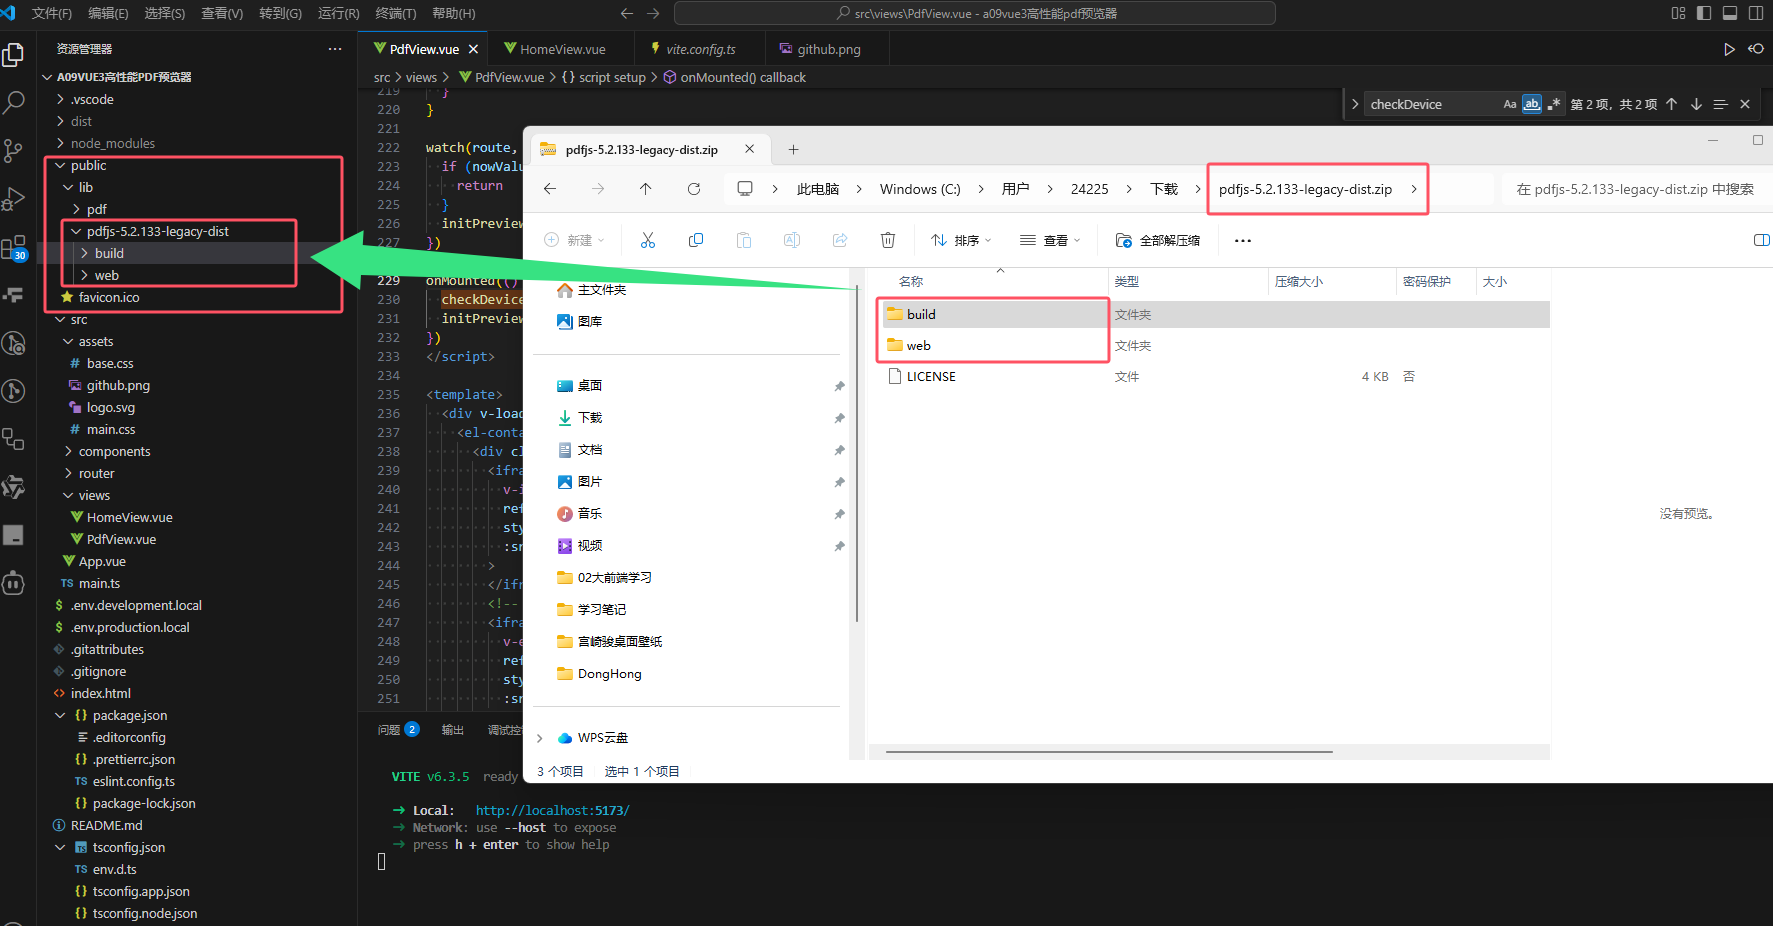
下载完以后,我们把下载好的压缩包解压一下,里面有两个文件夹,放到我们的项目里面,我是放在这里(记住放的位置,后面要根据对应路径引用):
3.1.2 引入项目运行
ok,刚刚我们已经把pdfjs-dist这个网页插件下载下来了并且放入了项目中了,我们需要有一个空白页面用来做pdf展示,我是用的iframe 标签来展示的,同时我们还需要有一个可以直接访问pdf的url链接(大家可以把pdf上传到图床或者服务器,或者让后端直接提供一个链接,访问能够直接下载pdf,如果没有可以暂且用我的: http://116.198.200.217:7501/api/v1/user/getPdfFile?file=%E6%B5%8B%E8%AF%95pdf%E6%96%87%E4%BB%B61.pdf ),下面是我pdf展示的关键代码:
template 标签里面的关键代码:
<iframeref="iframeRef"style="height: 100%; width: 100%":src="`./lib/pdfjs-5.2.133-legacy-dist/web/viewer.html?file=${currentFileUrl}`"
>
</iframe>
script标签里面的关键代码:
currentFileUrl.value = ''
currentFileUrl.value = encodeURIComponent(`http://116.198.200.217:7501/api/v1/user/getPdfFile?file=%E6%B5%8B%E8%AF%95pdf%E6%96%87%E4%BB%B61.pdf`)
好了,经过这两段关键代码,我们就能在界面上面看到pdf的效果了,效果如下:
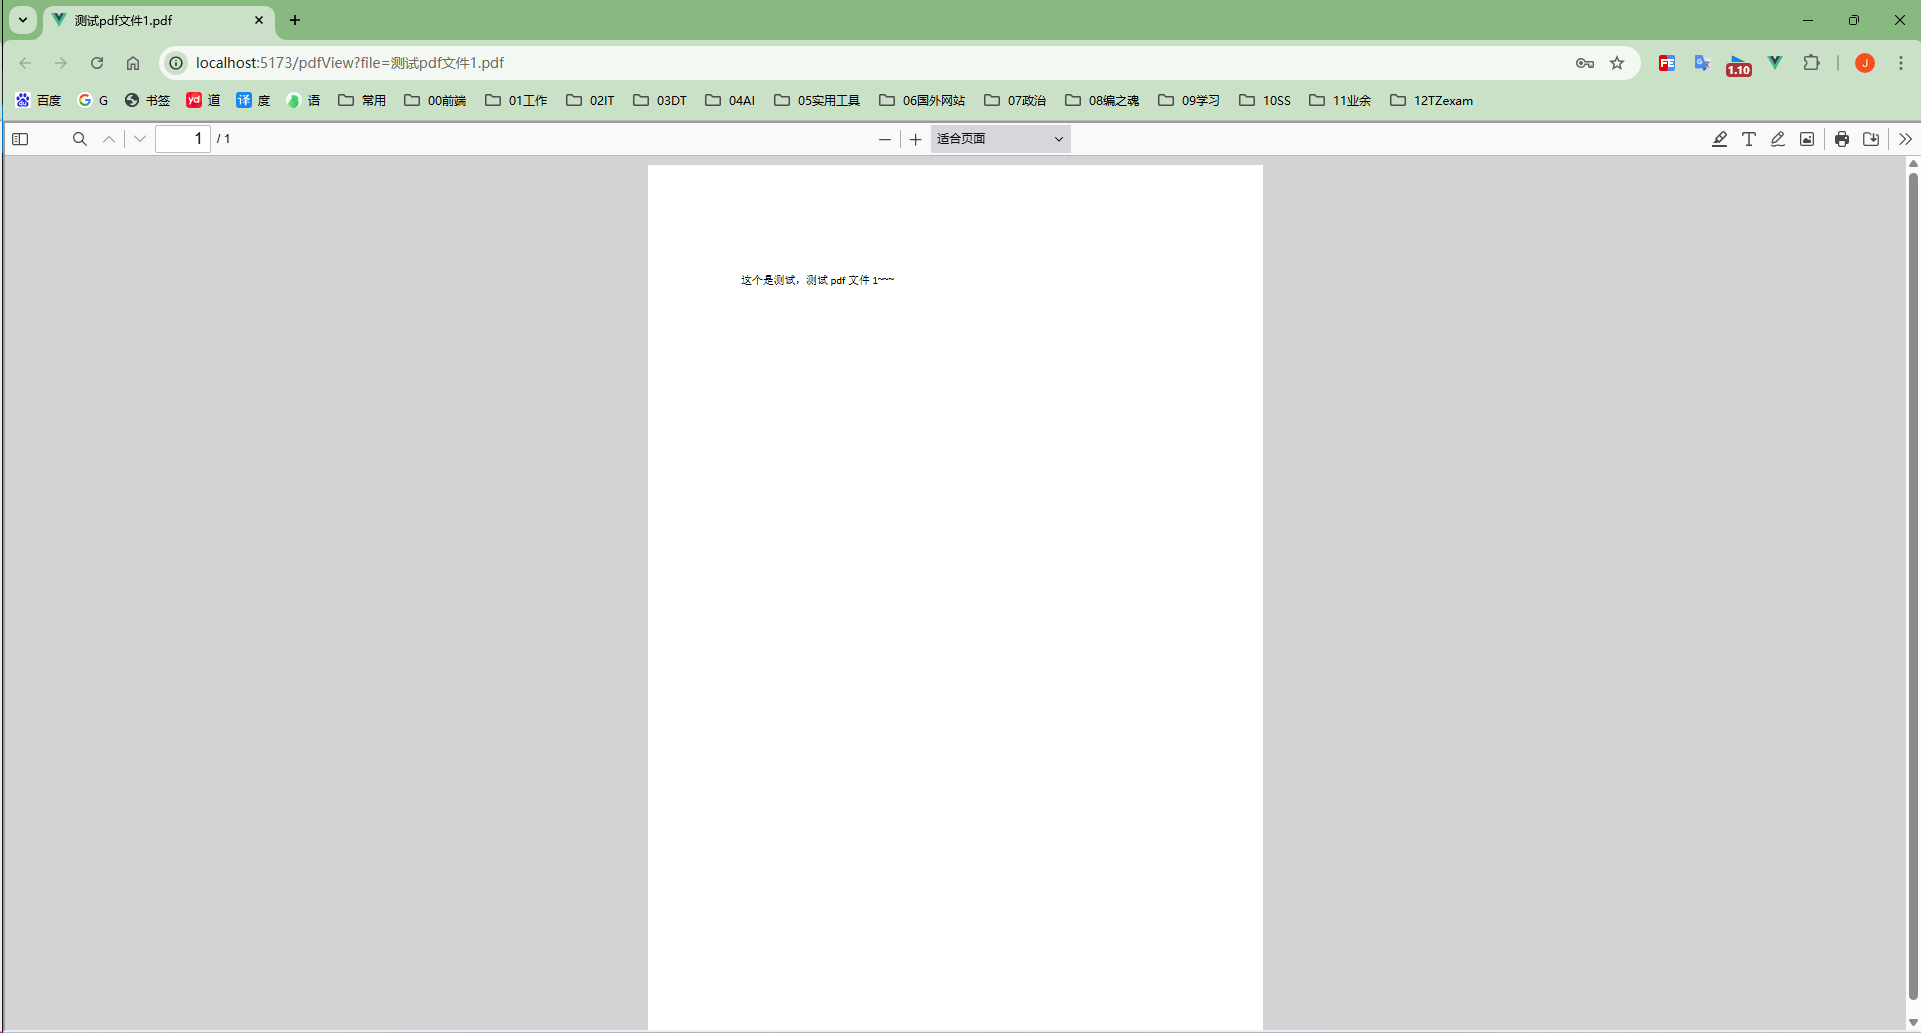
如果不知道咋运行的小伙伴也不要着急,文末有完整代码,如果你能访问github直接访问文章开头的github仓库也能直接下载完整项目代码。
3.2 兼容老版本设备
3.2.1 下载老版本的预览器网页
之前我们已经下载了较新版本的pdfjs-dist插件了,但是呢,根据国内硬件的迭代速度,总有一些用户还在使用老版本的设备(比如安卓7啦、低版本的浏览器啦等,当然这里我们是不考虑IE浏览器的>_<)。
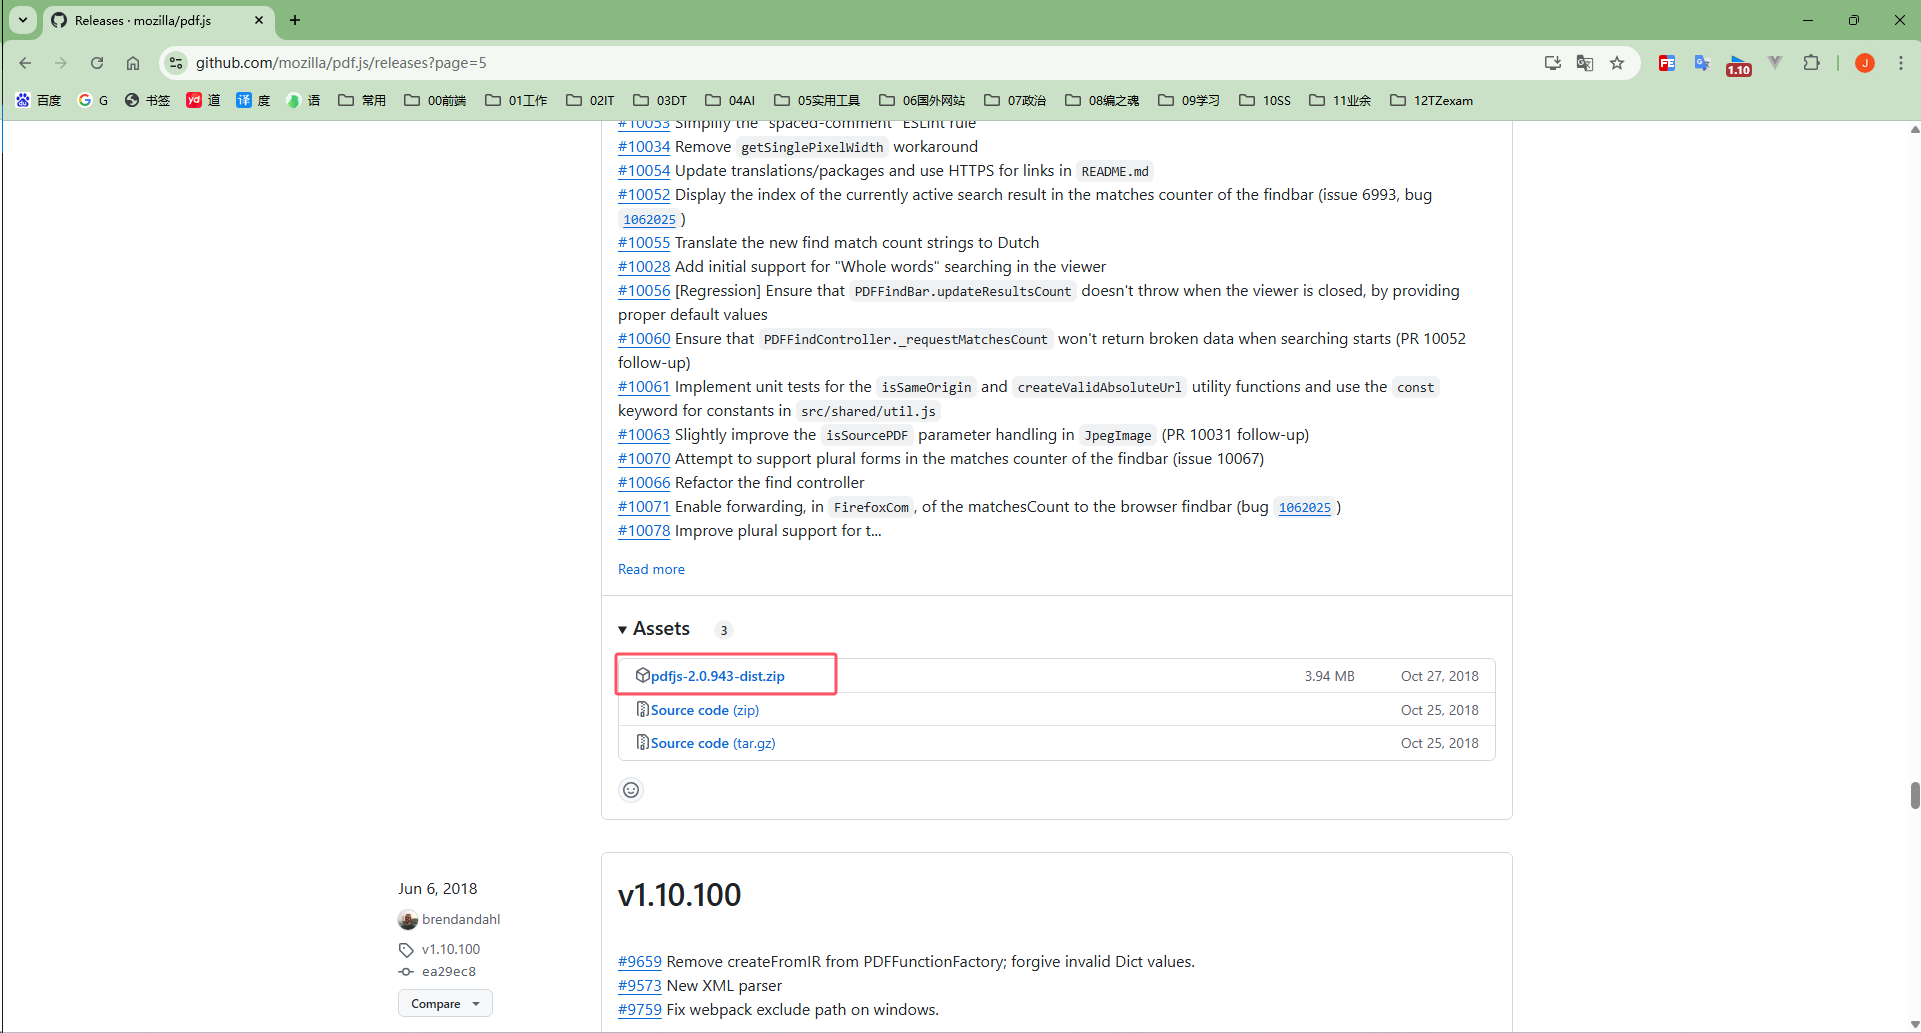
好滴,现在我们还要再下载一个旧一点的pdfjs-dist插件作为备用,我这里又下载了个旧的版本 2.0.943 的这个,下载网址:https://github.com/mozilla/pdf.js/releases?page=5 (这里面有很多个版本,很上面的下载官网是一个地址)
下载完以后,我们可以把压缩好的文件夹放在此处:
由上图可见,我直接创建了个pdf文件夹,然后放在了里面,至于我为啥把旧版本pdf预览器文件夹的名字叫做"pdf"呢,这是因为我之前也是从别的项目里面copy的,图省事(lan)。
3.2.2 进行新老设备判断
直接上关键代码,其原理依旧是通过iframe来渲染,然后通过函数判断新旧设备进行展示不同的iframe。
template 标签里面的关键代码:
<iframev-if="pdfViewVersionType === 'newest'"ref="iframeRef"style="height: 100%; width: 100%":src="`./lib/pdfjs-5.2.133-legacy-dist/web/viewer.html?file=${currentFileUrl}`"
>
</iframe>
<!-- 低版本的 pdfjs 版本 -->
<iframev-else-if="pdfViewVersionType === 'old'"ref="iframeRef"style="height: 100%; width: 100%":src="`./lib/pdf/web/viewer.html?file=${currentFileUrl}`"
>
</iframe>
script标签里面的关键代码:
currentFileUrl.value = ''
currentFileUrl.value = encodeURIComponent(
`http://116.198.200.217:7501/api/v1/user/getPdfFile?file=%E6%B5%8B%E8%AF%95pdf%E6%96%87%E4%BB%B61.pdf`,
)const pdfViewVersionType = ref<'' | 'newest' | 'old'>('')// 检测设备
const checkDevice = () => {if (isMobileDevice(false, 'LowerDevice')) {pdfViewVersionType.value = 'old'} else {pdfViewVersionType.value = 'newest'}
}const isMobileDevice = (excludeIpad: boolean = false,customFlag: 'IOS' | 'ANDROID' | 'PC' | 'LowerDevice' | '' = '',
) => {// @ts-expect-error 忽略报错const userAgent = navigator.userAgent || navigator.vendor || window.operalet flag = false// 检查常见的移动设备的用户代理if (/android/i.test(userAgent)) {flag = true}// @ts-expect-error 忽略报错if (/iPad|iPhone|iPod/.test(userAgent) && !window.MSStream) {flag = true}if (/windows phone/i.test(userAgent)) {flag = true}if (/mobile/i.test(userAgent)) {flag = true}// 排除列表if (excludeIpad && /iPad|iPod/.test(userAgent)) {flag = false}// 自定义标识 单独校验某种设备,其他都不看if (customFlag === 'IOS') {flag = /iPad|iPhone|iPod/.test(userAgent) ? true : false// eslint-disable-next-line @typescript-eslint/no-unused-expressionsnavigator.platform === 'MacIntel' && navigator.maxTouchPoints > 1 && (flag = true) // iPad伪装成Mac的情况} else if (customFlag === 'LowerDevice') {// 目前将iPad|iPhone|iPod 都视为较低的设备flag = /iPad|iPhone|iPod/.test(userAgent) ? true : false// eslint-disable-next-line @typescript-eslint/no-unused-expressionsnavigator.platform === 'MacIntel' && navigator.maxTouchPoints > 1 && (flag = true) // iPad伪装成Mac的情况}// 如果都不匹配,则认为是PC端return flag
}onMounted(() => {checkDevice()
})
通过如上的判断,我们就能根据IOS、安卓、PC来写显示不同的类型,目前我是将 iPad|iPhone|iPod 看作低版本,直接显示低版本的样式(因为用最新的pdf预览器在一些苹果设备上会显示不出来)。
对于低版本设备显示的样式如下:

3.3 自定义修改源码样式
当使用官方的pdf预览器时总会有一些样式我(产)们(品)会觉得需要优化一下,这里以pdfjs-5.2.133-legacy-dist 这个版本来举例,其实每个版本都大差不差,学会一种其他的也就能自得其然的举一反三了。
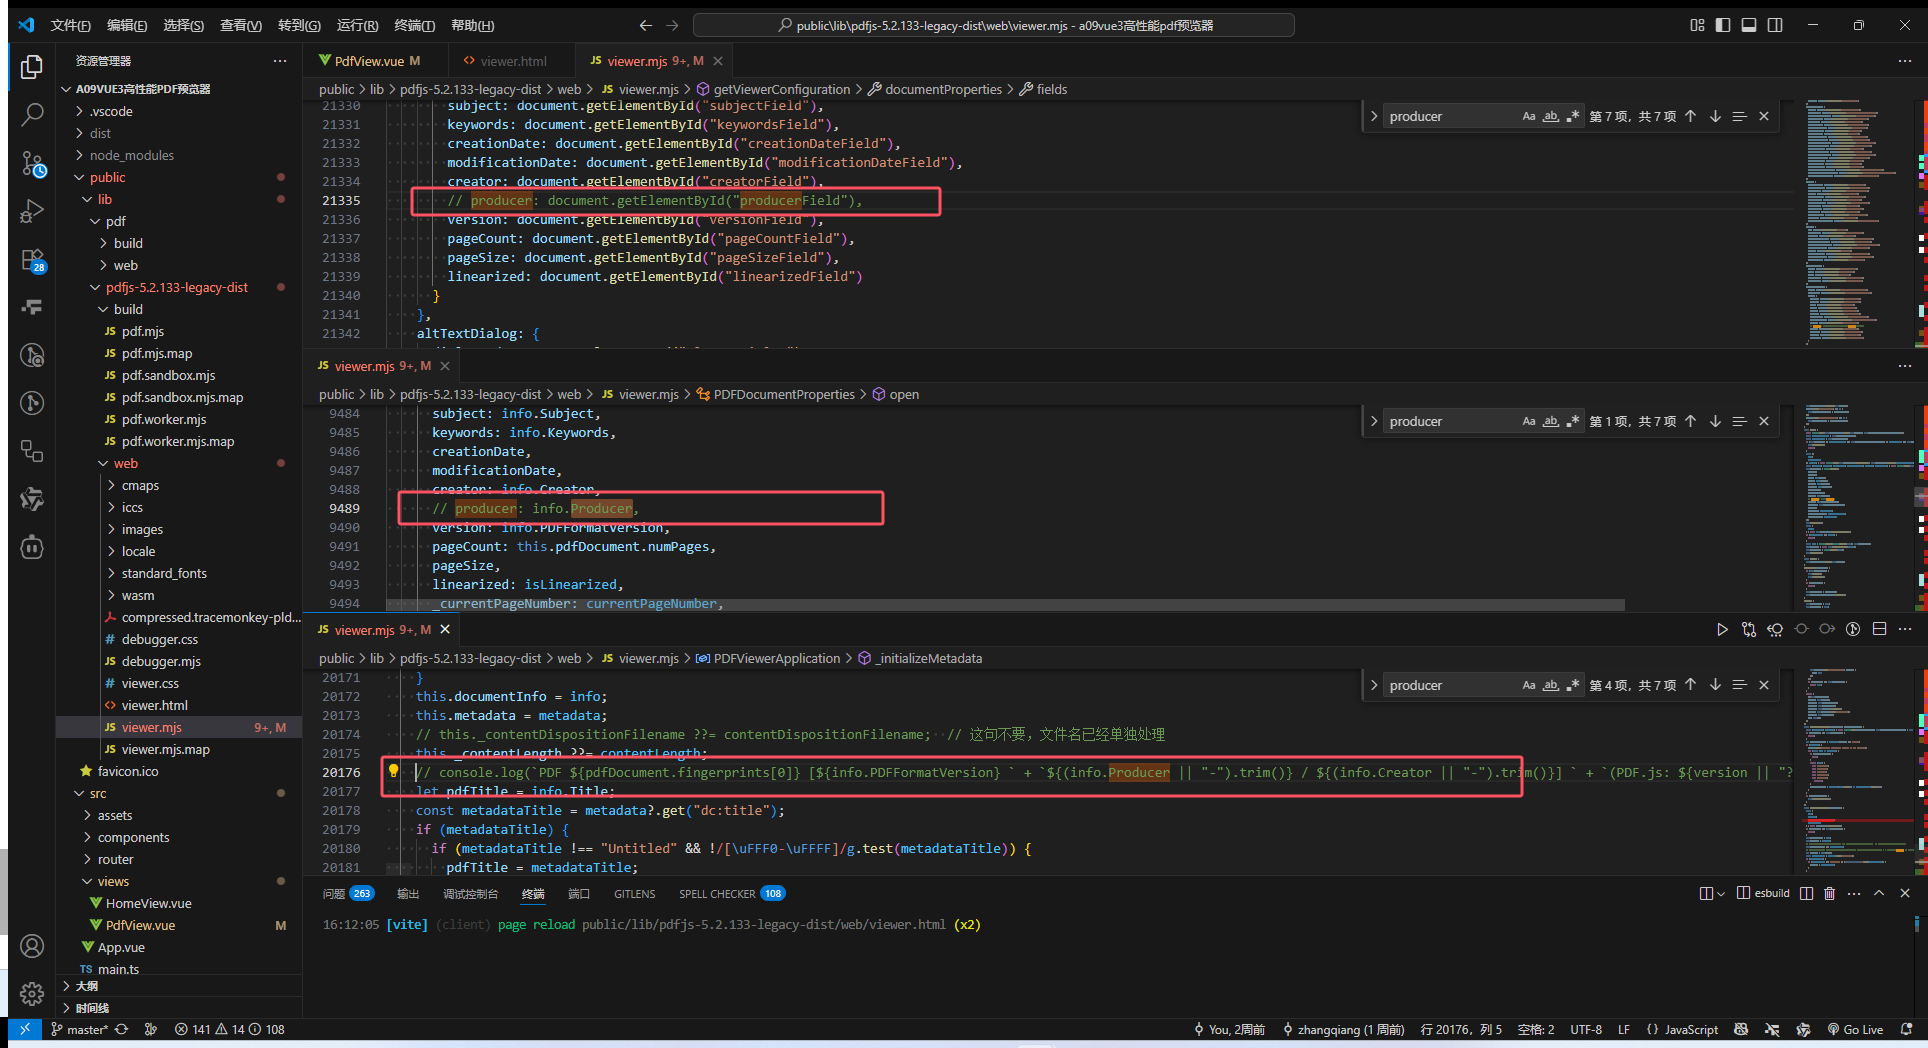
比如说我们想要把下图所示弹框中的"pdf生成器"那行文字去掉:
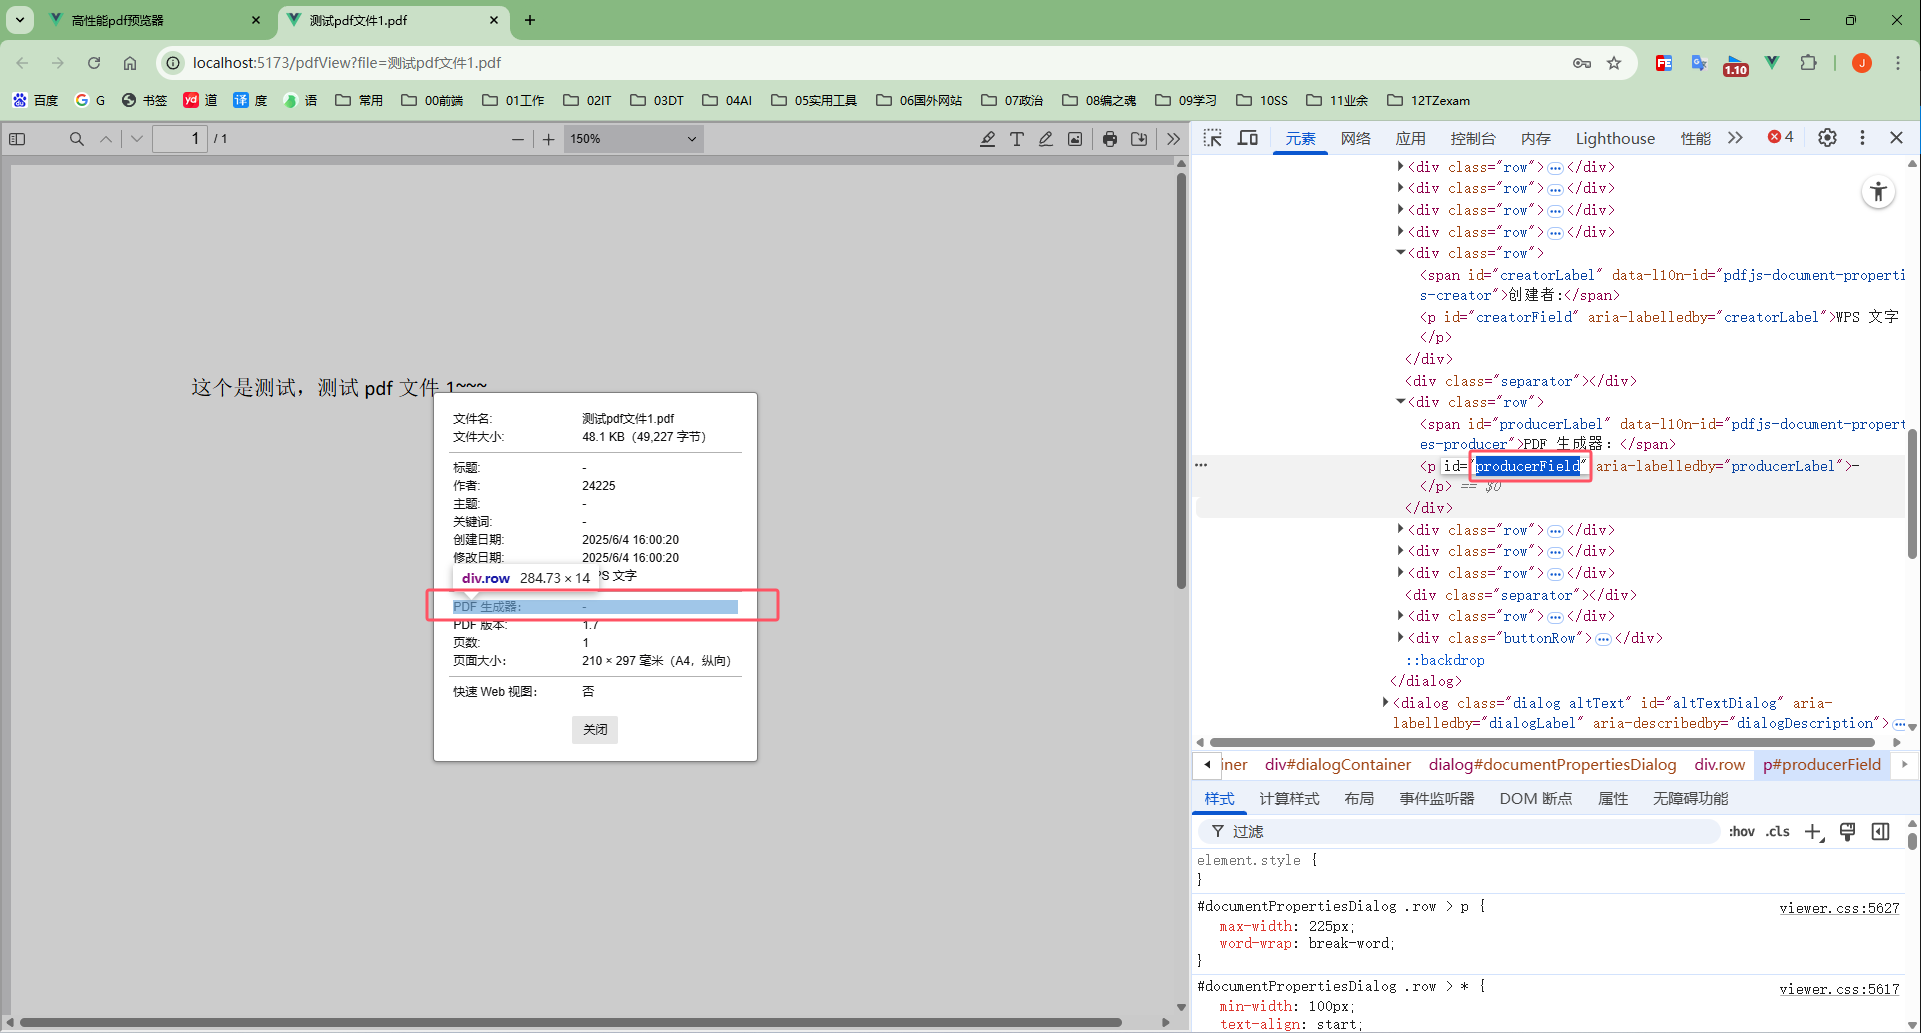
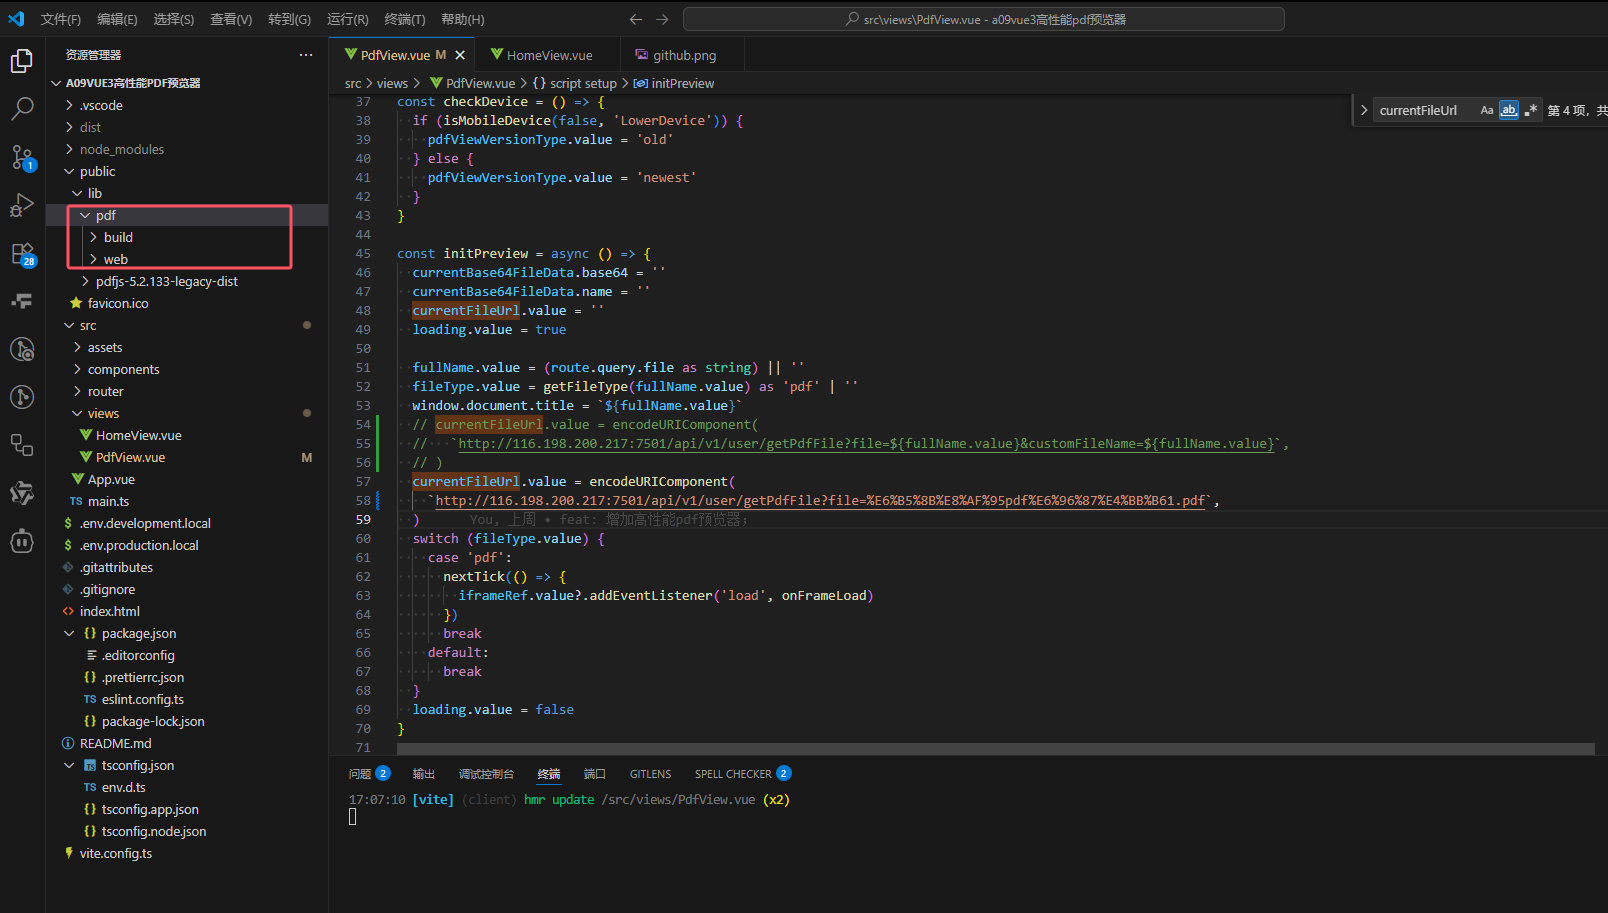
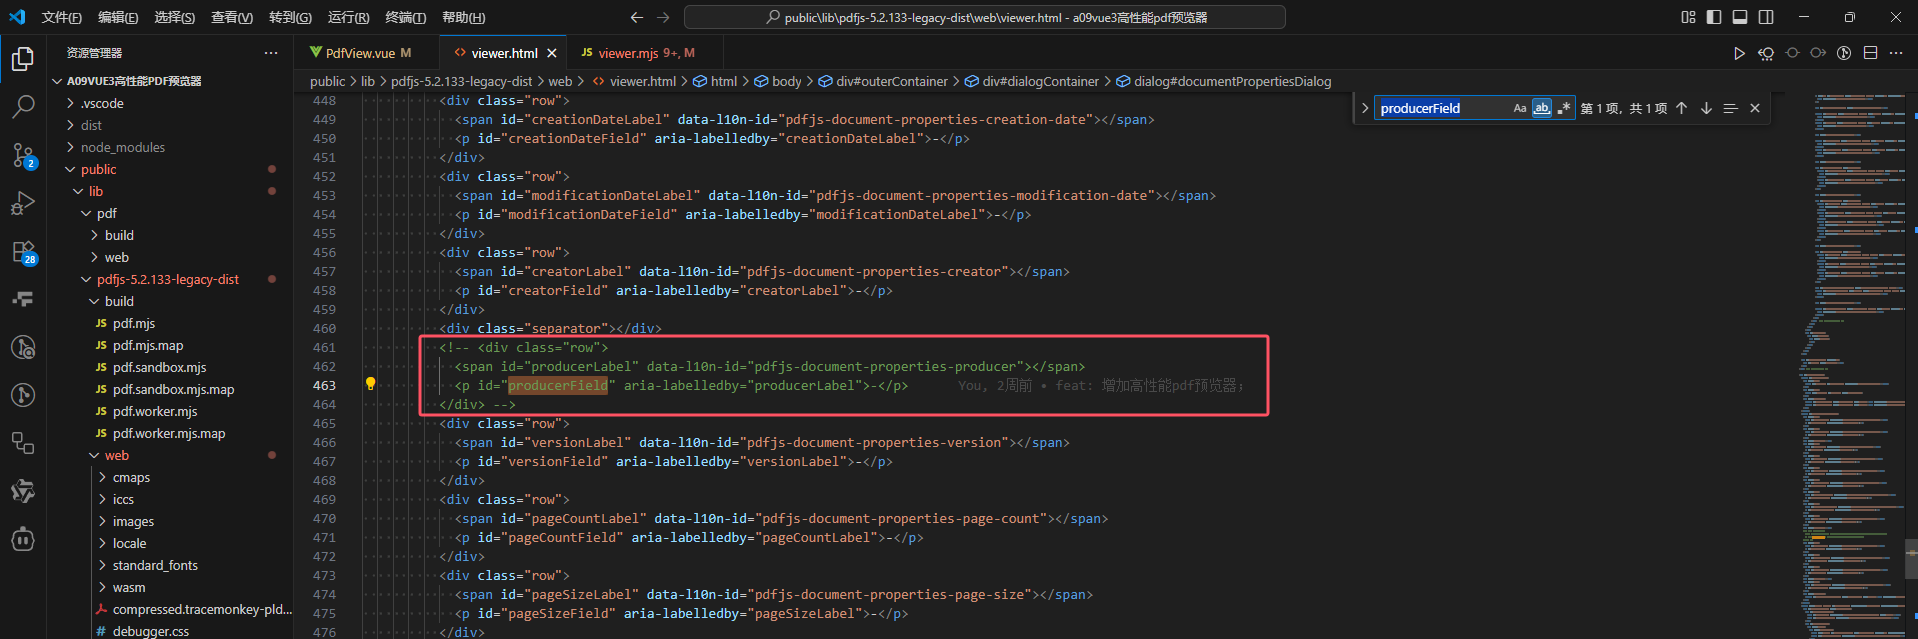
首先我们使用审查元素找到该元素对应的id,然后找到public\lib\pdfjs-5.2.133-legacy-dist\web\viewer.html 和 C:\GitHub\frontEnd-all-knowledge\examples\funnyDemo\a09vue3高性能pdf预览器\public\lib\pdfjs-5.2.133-legacy-dist\web\viewer.mjs 这两个文件(这两个文件是这个pdf预览器核心代码,一个用于写页面样式,一个是js交互事件),然后将和这个producerField dom元素id相关的内容注释或者删掉即可。操作代码截图如下:
viewer.html文件:
viewer.mjs文件:
如此修改完,界面运行效果如下:
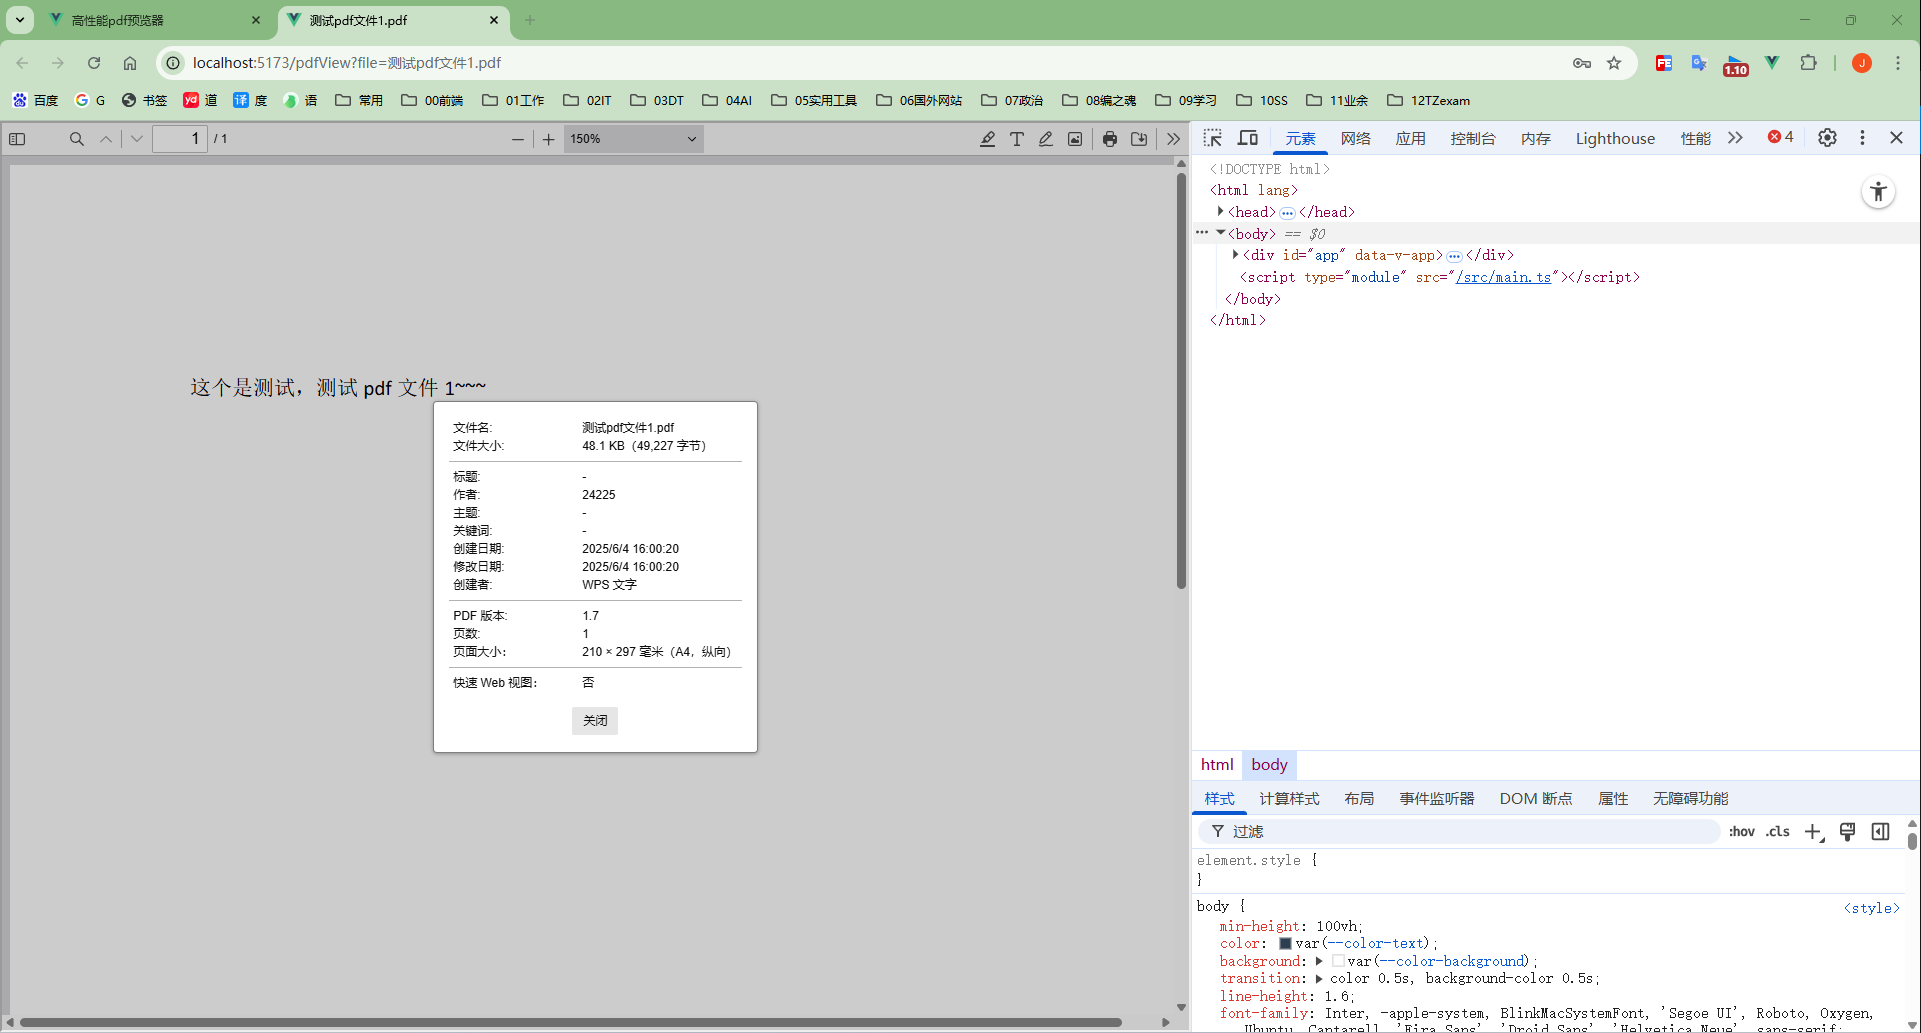
由此可见界面那行文字样式已经被我们去掉了。以此举一反三,我们可以在viewer.html文件和viewer.mjs文件中添加我们自定义的样式以及事件。
3.4 自定义增加下载、打印权限校验
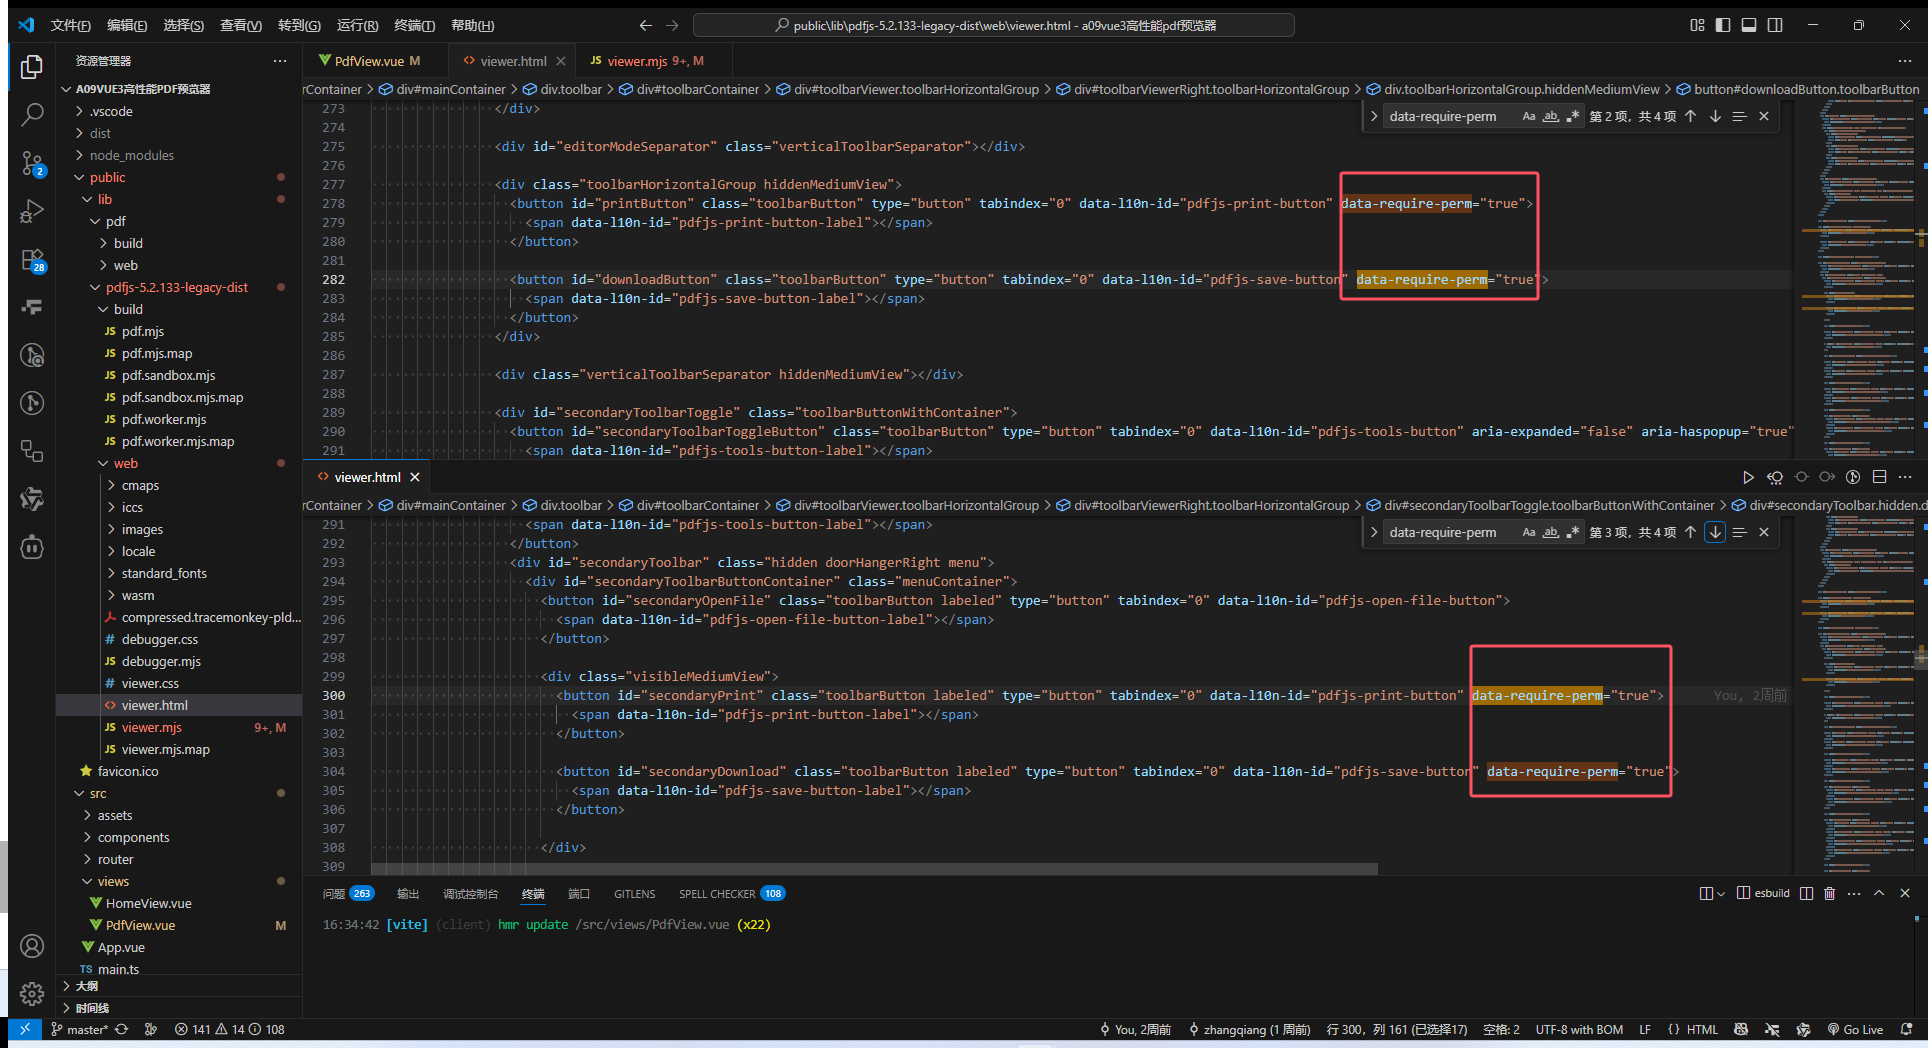
官方提供的pdf预览器网页中为我们提供了下载以及打印的操作,然后在我们实际的项目使用中,下载和打印功能往往是需要加权限控制的。那么下面就将为大家展示一下如何增加权限控制,思路:给pdfjs-dist预览器的源码的下载、打印按钮的元素上增加自定义属性,然后再通过iframe 标签去监听带有这个属性的按钮的点击事件,当用户点击相应按钮时捕捉到用户的点击事件,进行检验判断,如果有权限则触发该按钮的点击事件,反之提示无权限,点击事件的触发终止。
关键代码如下:
在C:\GitHub\frontEnd-all-knowledge\examples\funnyDemo\a09vue3高性能pdf预览器\public\lib\pdfjs-5.2.133-legacy-dist\web\viewer.html 文件中添加data-require-perm="true" 属性
应用层的代码文件 PdfView.vue 中的关键代码如下:
<script setup lang="ts">
import { onMounted, ref, nextTick, onUnmounted } from 'vue'
import { useRoute } from 'vue-router'const currentFileUrl = ref('')const loading = ref(false)
const route = useRoute()
const fullName = ref('未命名文件')
const fileType = ref<'pdf' | ''>('')const verifyPrintRight = async () => {// 打印权限校验let flag = true // 默认有权限loading.value = true/*** ... 权限接口请求**/flag = false // 这里根据接口返回的权限判断结果返回 true 或 false,当前临时赋值为静态数值没有权限loading.value = falsereturn flag
}const verifyDownloadRight = async () => {// 这里进行权限判断接口请求let flag = true // 默认有权限loading.value = true/*** ... 权限接口请求**/flag = true  // 这里根据接口返回的权限判断结果返回 true 或 false,当前临时赋值为静态数值有权限loading.value = falsereturn flag
}const initPreview = async () => {currentFileUrl.value = ''loading.value = truefullName.value = (route.query.file as string) || ''fileType.value = getFileType(fullName.value) as 'pdf' | ''window.document.title = `${fullName.value}`currentFileUrl.value = encodeURIComponent(`http://116.198.200.217:7501/api/v1/user/getPdfFile?file=%E6%B5%8B%E8%AF%95pdf%E6%96%87%E4%BB%B61.pdf`,)switch (fileType.value) {case 'pdf':nextTick(() => {iframeRef.value?.addEventListener('load', onFrameLoad)})breakdefault:break}loading.value = false
}//#region pdf预览相关
const iframeRef = ref<HTMLIFrameElement | null>(null)
// 用来临时存放 iframe 的 document 以便卸载时移除监听
let iframeDoc: Document | null = null
// “放行”标记属性名
const ALLOWED_FLAG = 'data-parent-allowed'
// 事件处理器,注册在 iframeDoc 上
// eslint-disable-next-line @typescript-eslint/no-explicit-any
const interceptor = async (e: any) => {// console.log('点击了按钮')const target = e.target// console.log('target:', target)if (!target.matches('button[data-require-perm]')) return// 如果是我们之前人为触发放行的,就清除标记并放行if (target.hasAttribute(ALLOWED_FLAG)) {target.removeAttribute(ALLOWED_FLAG)return}e.preventDefault()e.stopImmediatePropagation()// 拿到按钮标识:优先 id,否则取 data-actionconst buttonId = target.id || target.getAttribute('data-action') || ''// 在父页面统一做权限判断const allowed = await checkUserPermission(buttonId)if (allowed) {// 如果有权限 打标记再触发一次 click,让它执行原始逻辑target.setAttribute(ALLOWED_FLAG, 'true')target.click()} else {alert('没有权限')}
}// iframe 加载完成后的回调:拿到 iframeDoc 并注册拦截器
const onFrameLoad = () => {const iframeEl = iframeRef.valueif (!iframeEl) returniframeDoc = iframeEl.contentDocumentif (!iframeDoc) return// 捕获阶段拦截 click 和 touchend(兼容移动端)iframeDoc.addEventListener('click', interceptor, true)iframeDoc.addEventListener('touchend', interceptor, true)
}const checkUserPermission = async (buttonId: unknown) => {try {let flag = trueswitch (buttonId) {case 'downloadButton':case 'secondaryDownload':case 'download':flag = await verifyDownloadRight()breakcase 'printButton':case 'secondaryPrint':flag = await verifyPrintRight()breakdefault:break}return flag} catch (err) {console.error('权限校验出错', err)return false}
}// 在 onUnmounted 中移除事件监听
onUnmounted(() => {// 卸载时,先移除 iframe 的 load 监听iframeRef.value?.removeEventListener('load', onFrameLoad)// 再移除在 iframeDoc 上注册的事件if (iframeDoc) {iframeDoc.removeEventListener('click', interceptor, true)iframeDoc.removeEventListener('touchend', interceptor, true)}
})
//#endregion/*** 获取文件的后缀名* e.g: abc.pdf===>pdf* @param fileName 文件名称* @param bigOrSmall 是否大小写 '0' 原样输出 '1'小写(默认) '2'大写* @returns*/
const getFileType = (fileName: string, bigOrSmall: '0' | '1' | '2' = '1') => {let fileType = ''let findIndex = -1for (let i = fileName.length - 1; i >= 0 && fileName; i--) {if (fileName.charAt(i) === '.') {findIndex = ibreak}}if (findIndex >= 0) {fileType = fileName.slice(findIndex + 1)}if (bigOrSmall == '1') {return fileType.toLocaleLowerCase()} else if (bigOrSmall == '2') {return fileType.toLocaleUpperCase()} else {return fileType}
}onMounted(() => {initPreview()
})
</script><template><div v-loading="loading" class="common-layout view-view"><el-container class="el_container"><div className="iframe"><iframeref="iframeRef"style="height: 100%; width: 100%":src="`./lib/pdfjs-5.2.133-legacy-dist/web/viewer.html?file=${currentFileUrl}`"></iframe></div></el-container></div>
</template>
下图所示为打印按钮没有权限的效果:
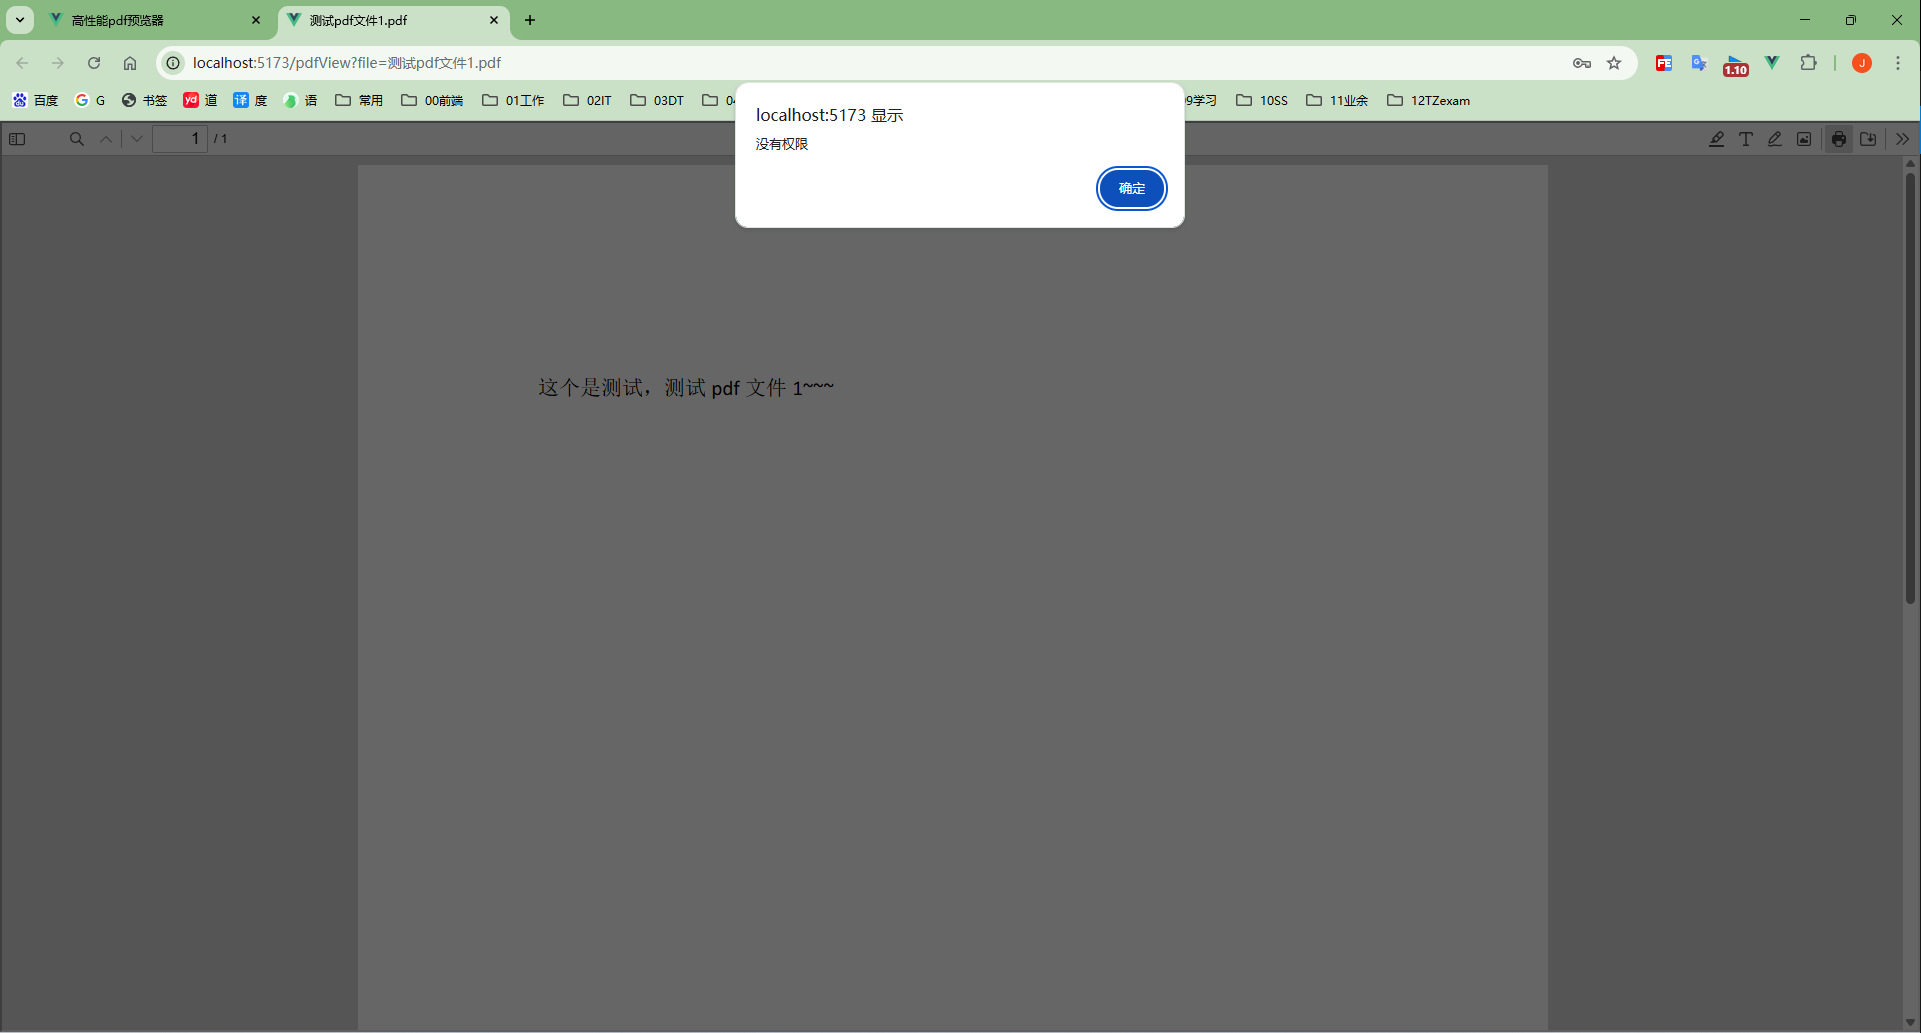
如此,下载及打印的权限校验功能已经实现。
4 项目线上部署bug解决
当我们把pdf预览器开发好以后,肯定是要部署到生产环境(线上/服务器)给别人使用的,但是呢,如果你是首次部署到服务器上面,大概率会出现如下这种情况:
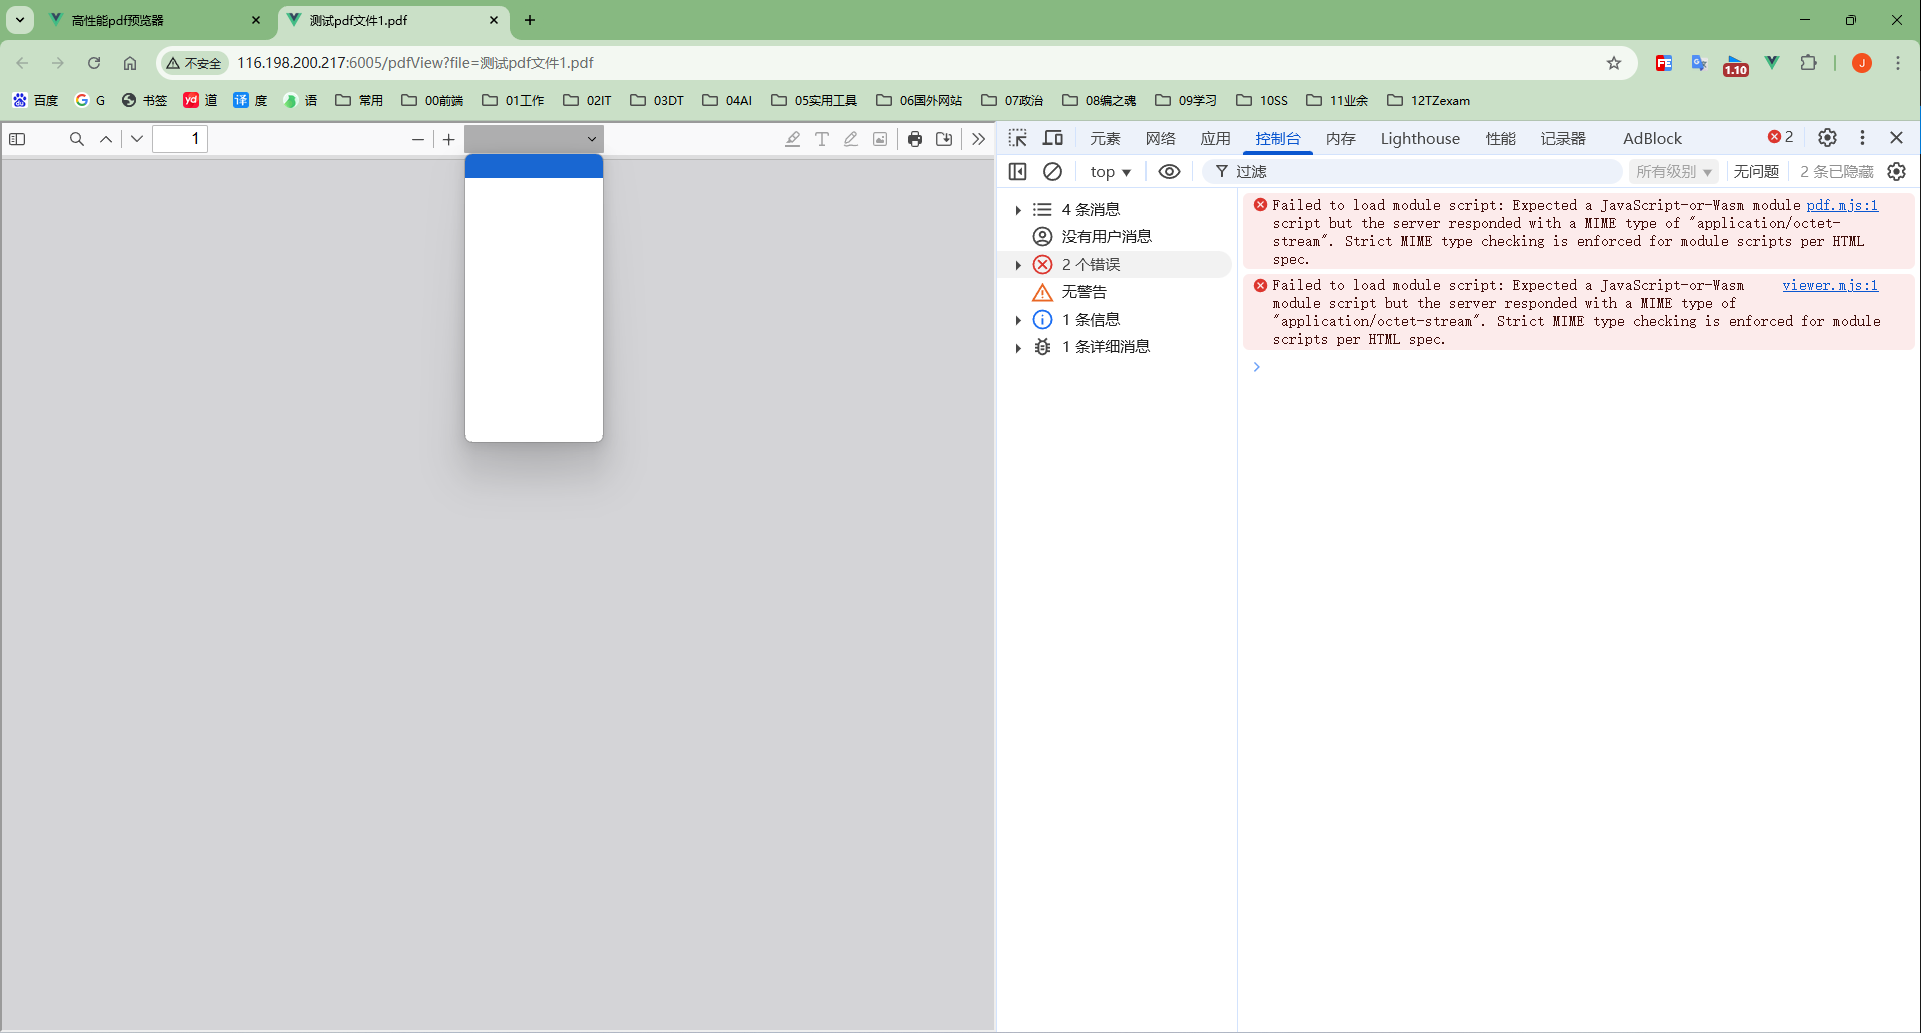
我们看到控制台分别报了Failed to load module script: Expected a JavaScript-or-Wasm module script but the server responded with a MIME type of "application/octet-stream". Strict MIME type checking is enforced for module scripts per HTML spec. 和 Failed to load module script: Expected a JavaScript-or-Wasm module script but the server responded with a MIME type of "application/octet-stream". Strict MIME type checking is enforced for module scripts per HTML spec.
这两个错误,这个问题是我们的服务器对 一些MIME 类型文件不支持的原因,此刻我们修改一些服务器的配置就可以解决。你的服务器可能是IIS或者Nginx或者是其他,我这里就以宝塔为例(我的是宝塔),修改一下宝塔该网站的nginx相关的配置,在nginx加入如下配置:
location ~* \.(?:js|mjs)${default_type application/javascript;expires 12h;add_header Cache-Control "public";}
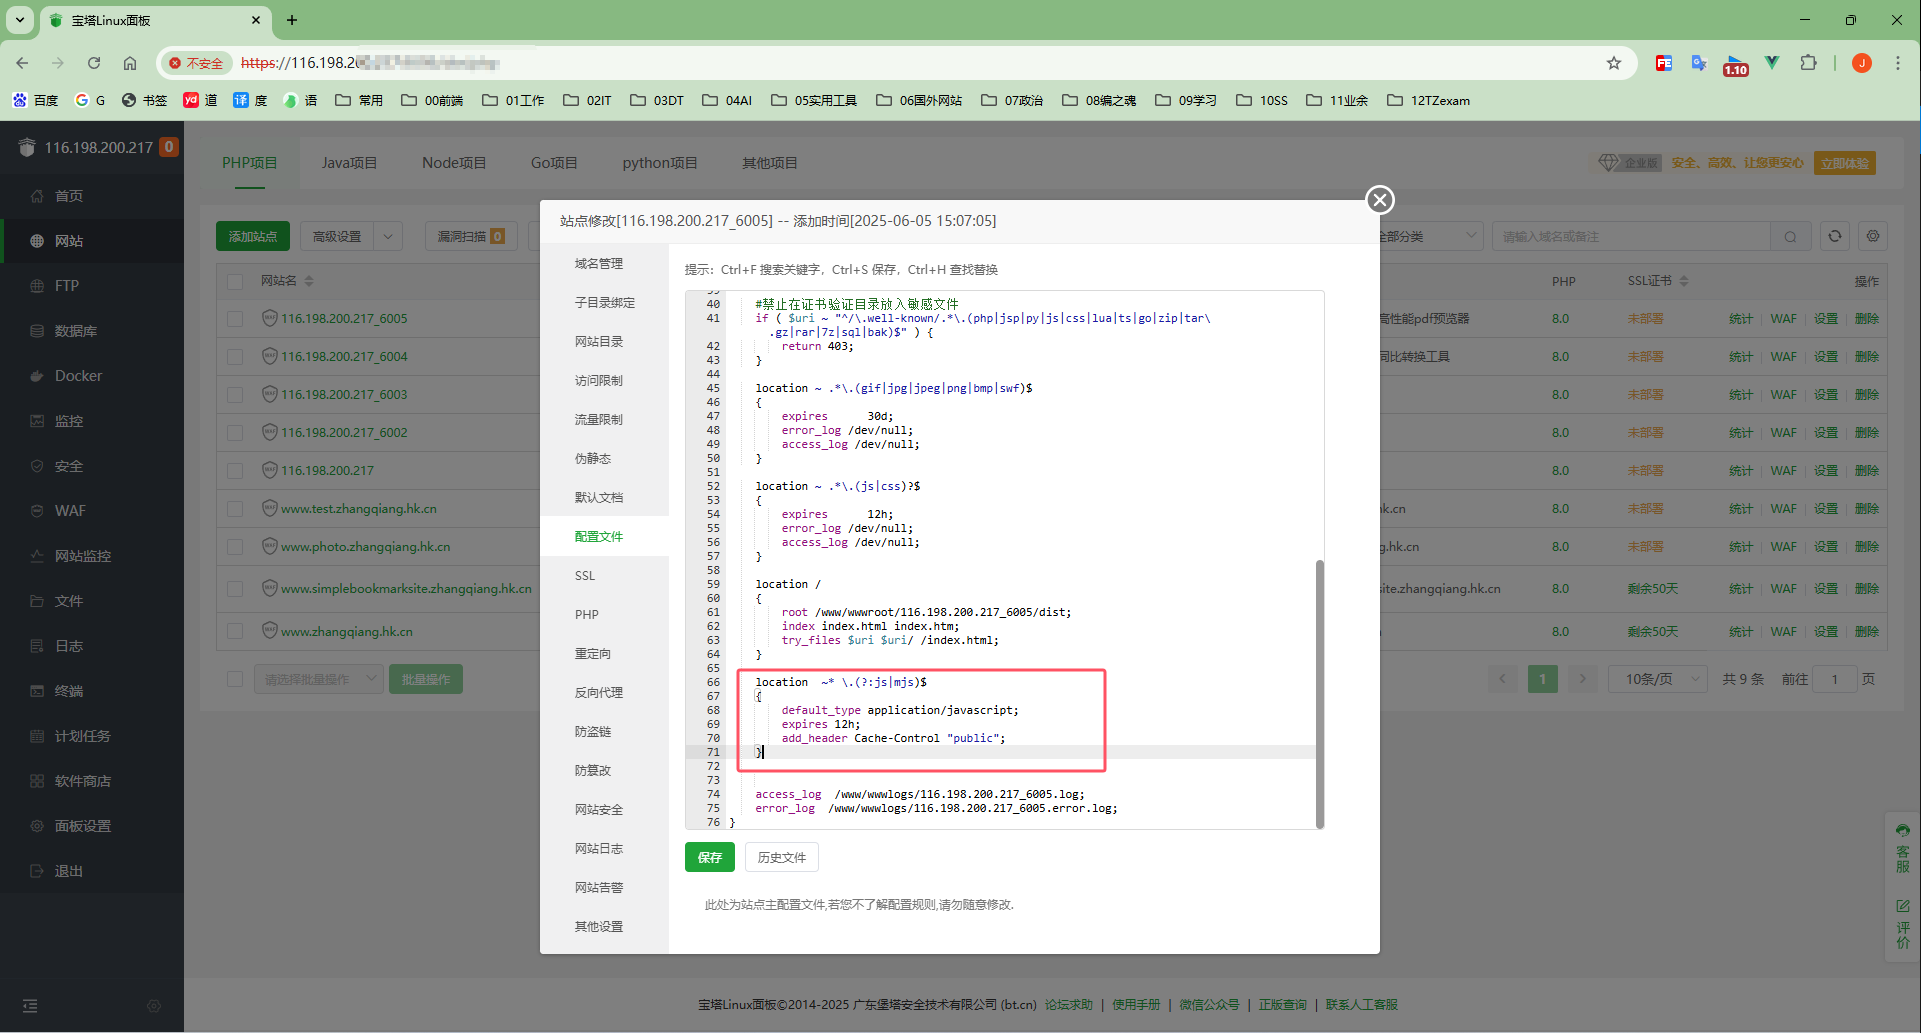
加完这个nginx配置然后保存,重启服务器,pdf就可以正常预览了,效果如下:

5 完整代码
上面我们将pdf预览器的完整实现过程做了一个讲解,并且增加了相应自定义操作,为了防止有小伙伴觉得代码比较零散,下面粘贴出完整代码,或者也可以直接访问我的github仓库(https://github.com/JACK-ZHANG-coming/frontEnd-all-knowledge/tree/master/examples/funnyDemo/a09vue3%E9%AB%98%E6%80%A7%E8%83%BDpdf%E9%A2%84%E8%A7%88%E5%99%A8)获取。
完整代码如下:
<!-- pdf预览器 -->
<script setup lang="ts">
import { onMounted, ref, watch, reactive, nextTick, onUnmounted } from 'vue'
import { useRoute } from 'vue-router'const currentFileUrl = ref('')const loading = ref(false)
const route = useRoute()
const fullName = ref('未命名文件')
const fileType = ref<'pdf' | ''>('')
const currentBase64FileData = reactive({base64: '',name: '',
})const verifyPrintRight = async () => {// 打印权限校验let flag = true // 默认有权限loading.value = true/*** ... 权限接口请求**/flag = false // 这里根据接口返回的权限判断结果返回 true 或 false,当前临时赋值为静态数值没有权限loading.value = falsereturn flag
}const verifyDownloadRight = async () => {// 这里进行权限判断接口请求let flag = true // 默认有权限loading.value = true/*** ... 权限接口请求**/flag = true // 这里根据接口返回的权限判断结果返回 true 或 false,当前临时赋值为静态数值有权限loading.value = falsereturn flag
}// 检测设备
const checkDevice = () => {if (isMobileDevice(false, 'LowerDevice')) {pdfViewVersionType.value = 'old'} else {pdfViewVersionType.value = 'newest'}
}const initPreview = async () => {currentBase64FileData.base64 = ''currentBase64FileData.name = ''currentFileUrl.value = ''loading.value = truefullName.value = (route.query.file as string) || ''fileType.value = getFileType(fullName.value) as 'pdf' | ''window.document.title = `${fullName.value}`currentFileUrl.value = encodeURIComponent(`http://116.198.200.217:7501/api/v1/user/getPdfFile?file=%E6%B5%8B%E8%AF%95pdf%E6%96%87%E4%BB%B61.pdf`,)switch (fileType.value) {case 'pdf':nextTick(() => {iframeRef.value?.addEventListener('load', onFrameLoad)})breakdefault:break}loading.value = false
}//#region pdf预览相关
const pdfViewVersionType = ref<'' | 'newest' | 'old'>('')
const iframeRef = ref<HTMLIFrameElement | null>(null)
// 用来临时存放 iframe 的 document 以便卸载时移除监听
let iframeDoc: Document | null = null
// “放行”标记属性名
const ALLOWED_FLAG = 'data-parent-allowed'
// 事件处理器,注册在 iframeDoc 上
// eslint-disable-next-line @typescript-eslint/no-explicit-any
const interceptor = async (e: any) => {// console.log('点击了按钮')const target = e.target// console.log('target:', target)if (!target.matches('button[data-require-perm]')) return// 如果是我们之前人为触发放行的,就清除标记并放行if (target.hasAttribute(ALLOWED_FLAG)) {target.removeAttribute(ALLOWED_FLAG)return}e.preventDefault()e.stopImmediatePropagation()// 拿到按钮标识:优先 id,否则取 data-actionconst buttonId = target.id || target.getAttribute('data-action') || ''// 在父页面统一做权限判断const allowed = await checkUserPermission(buttonId)if (allowed) {// 如果有权限 打标记再触发一次 click,让它执行原始逻辑target.setAttribute(ALLOWED_FLAG, 'true')target.click()} else {alert('没有权限')}
}// iframe 加载完成后的回调:拿到 iframeDoc 并注册拦截器
const onFrameLoad = () => {const iframeEl = iframeRef.valueif (!iframeEl) returniframeDoc = iframeEl.contentDocumentif (!iframeDoc) return// 捕获阶段拦截 click 和 touchend(兼容移动端)iframeDoc.addEventListener('click', interceptor, true)iframeDoc.addEventListener('touchend', interceptor, true)
}const checkUserPermission = async (buttonId: unknown) => {try {let flag = trueswitch (buttonId) {case 'downloadButton':case 'secondaryDownload':case 'download':flag = await verifyDownloadRight()breakcase 'printButton':case 'secondaryPrint':flag = await verifyPrintRight()breakdefault:break}return flag} catch (err) {console.error('权限校验出错', err)return false}
}// 在 onUnmounted 中移除事件监听
onUnmounted(() => {// 卸载时,先移除 iframe 的 load 监听iframeRef.value?.removeEventListener('load', onFrameLoad)// 再移除在 iframeDoc 上注册的事件if (iframeDoc) {iframeDoc.removeEventListener('click', interceptor, true)iframeDoc.removeEventListener('touchend', interceptor, true)}
})
//#endregionconst isMobileDevice = (excludeIpad: boolean = false,customFlag: 'IOS' | 'ANDROID' | 'PC' | 'LowerDevice' | '' = '',
) => {// @ts-expect-error 忽略报错const userAgent = navigator.userAgent || navigator.vendor || window.operalet flag = false// 检查常见的移动设备的用户代理if (/android/i.test(userAgent)) {flag = true}// @ts-expect-error 忽略报错if (/iPad|iPhone|iPod/.test(userAgent) && !window.MSStream) {flag = true}if (/windows phone/i.test(userAgent)) {flag = true}if (/mobile/i.test(userAgent)) {flag = true}// 排除列表if (excludeIpad && /iPad|iPod/.test(userAgent)) {flag = false}// 自定义标识 单独校验某种设备,其他都不看if (customFlag === 'IOS') {flag = /iPad|iPhone|iPod/.test(userAgent) ? true : false// eslint-disable-next-line @typescript-eslint/no-unused-expressionsnavigator.platform === 'MacIntel' && navigator.maxTouchPoints > 1 && (flag = true) // iPad伪装成Mac的情况} else if (customFlag === 'LowerDevice') {// 目前将iPad|iPhone|iPod 都视为较低的设备flag = /iPad|iPhone|iPod/.test(userAgent) ? true : false// eslint-disable-next-line @typescript-eslint/no-unused-expressionsnavigator.platform === 'MacIntel' && navigator.maxTouchPoints > 1 && (flag = true) // iPad伪装成Mac的情况}// 如果都不匹配,则认为是PC端return flag
}/*** 获取文件的后缀名* e.g: abc.pdf===>pdf* @param fileName 文件名称* @param bigOrSmall 是否大小写 '0' 原样输出 '1'小写(默认) '2'大写* @returns*/
const getFileType = (fileName: string, bigOrSmall: '0' | '1' | '2' = '1') => {let fileType = ''let findIndex = -1for (let i = fileName.length - 1; i >= 0 && fileName; i--) {if (fileName.charAt(i) === '.') {findIndex = ibreak}}if (findIndex >= 0) {fileType = fileName.slice(findIndex + 1)}if (bigOrSmall == '1') {return fileType.toLocaleLowerCase()} else if (bigOrSmall == '2') {return fileType.toLocaleUpperCase()} else {return fileType}
}watch(route, (nowValue) => {if (nowValue.name !== 'view') {return}initPreview()
})onMounted(() => {checkDevice()initPreview()
})
</script><template><div v-loading="loading" class="common-layout view-view"><el-container class="el_container"><div className="iframe"><iframev-if="pdfViewVersionType === 'newest'"ref="iframeRef"style="height: 100%; width: 100%":src="`./lib/pdfjs-5.2.133-legacy-dist/web/viewer.html?file=${currentFileUrl}`"></iframe><!-- 低版本的 pdfjs 版本 --><iframev-else-if="pdfViewVersionType === 'old'"ref="iframeRef"style="height: 100%; width: 100%":src="`./lib/pdf/web/viewer.html?file=${currentFileUrl}`"></iframe></div></el-container></div>
</template><style scoped lang="scss">
.common-layout {width: 100vw;height: 100vh;.el_container {width: 100%;height: 100%;.el_header {display: flex;justify-content: space-between;align-items: center;width: 100%;background-color: #fff;border-bottom: 1px solid #e5e5e5;font-size: 16px;.el-button {--el-button-disabled-border-color: #c4c4c4 !important;--el-button-disabled-bg-color: #c4c4c4 !important;}.tool-div {display: flex;flex-wrap: wrap;}}.el_main {position: relative;width: 100%;height: 100%;--el-main-padding: 0px;overflow: auto;}}.iframe {height: 100%;width: 100%;overflow: hidden;}
}
</style><style lang="scss">
// 禁用当前页面浏览器自带打印
@media print {body {display: none;}
}
</style>
6 总结
这个高性能pdf预览器是基于vue3做的,但是本质上还是使用的pdfjs-dist这个插件,也就是说原生的html、js与react理论上也是都可以实现的,只要我们安装pdfjs-dist这个插件就可以了。
当然,实现高性能的pdf预览器也还有很多种方案,可以选用别的比较流行的插件,或者使用pdfjs-dist内置的方法getDocument ,读取相应的pdf文件流然后手动渲染到canvas标签,最一开始笔者就是采用的这种方案(然后嘞,就出现了大文件渲染卡顿的问题,为什么嘞,因为我在放大pdf的时候把canvas也给放大,当文件过大canvas的尺寸都能达到上万像素以上,严重消耗电脑的性能,卡顿感可想而知。>_< 嘿嘿,恭喜你获取开头前言所说的彩蛋内容~ 后续,但是笔者当时排查到这个问题时候依然还是想 采用原来的读取pdf文件流手动渲染canvas 的方案去解决嘛,然后也尝试了限制设备像素比、分块渲染等方案,但是依然还是存在bug——分块渲染显示不全、放大缩小有错位显示不全现象、滚动有问题等,还学艺不精、学艺不精呀。 故直接采用了pdfjs-dist官方封装的预览器,拿来就能用,真香! 然后再改改源码,增加一些业务上自定义的功能就可以了>_< 真是选对方案简单翻倍啊~)。
由于水平有限,文章难免有所纰漏之处,欢迎大家批评指正,也欢迎大家分享自己的对搭建高性能pdf预览的见解及实践经验 ~ 互相进步 ~