c++找工作(qt)
自学嵌入式
- mfc
- 简介
- QT学习
- 控件
- ComboBox
- QFontComboBox
- QLabel(标签控件)
- QLineEdit
- 出现乱码
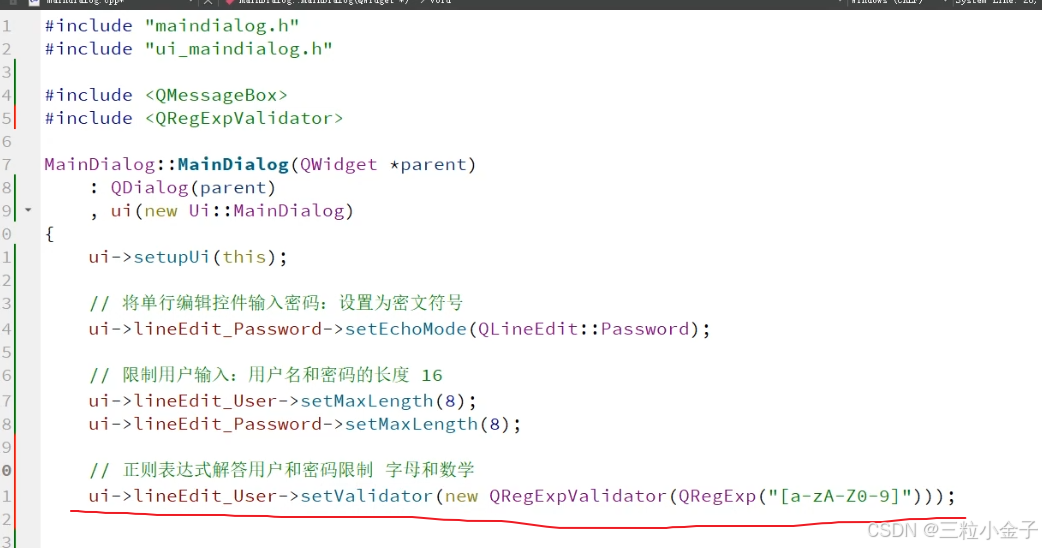
- 正则表达式限制
- TreeView
- 禁止窗口最大化按钮
- 更改左上角图标
- QT基础概念
- qt做一个四则运算计算器
- 定时器(延时 睡眠 )
- mainwindow(多了菜单栏)
- 键盘事件(没成功)
- tcp连接
- 客户端
- 服务器端
- 结果图
- qt启动新窗口(客户端和服务器互发消息)
- tepserver
- tcpclient
- 多线程实现(服务器)
- tcpserver
- mythread
- 自定义信号
- 工作:工具的练手
- 将T16协议按正确格式,输出到文件中
- 单片机学习
- 环境配置
- 单片机介绍
- 什么是51单片机
- 点亮一个led灯
- led介绍
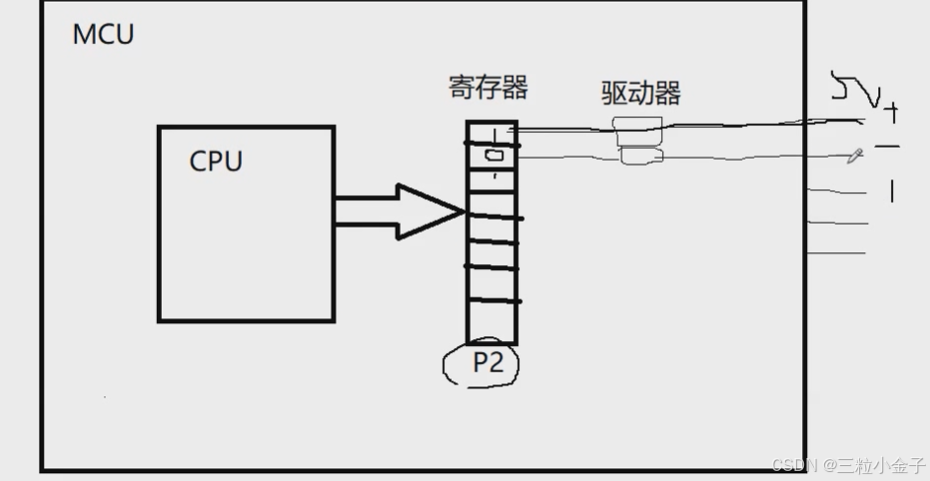
- 单片机如何控制硬件
- 单片机led亮灯
- 流水线led
- 独立按键控制led
- 硬件知识
- 比较杂的小知识
- 基础元器件
- 电阻
- 电容器(法拉)
- 滤波
- 电感器(通直流阻交流)
- 保险(熔断器)
- 二极管
- 算法复习
- 二分
- 前缀和
- 差分
- 子矩阵的和
- 差分
- 差分矩阵
mfc
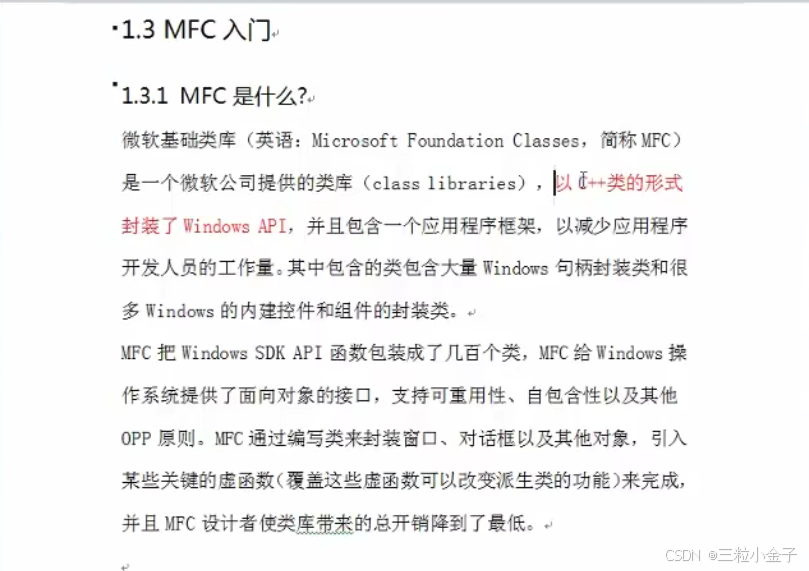
简介
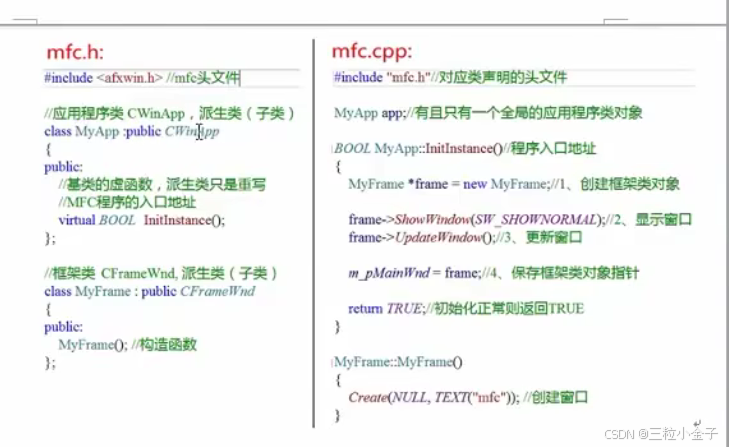
#include"mfc.h"MyApp app; //全局应用程序对象,有且仅有一个BOOL MyApp::InitInstance()
{//创建窗口MyFrame* frame = new MyFrame;//显示和更新frame->ShowWindow(SW_SHOWNORMAL);frame->UpdateData();m_pMainWnd = frame;//保存指向应用程序的主窗口的指针return TRUE;//返回正常的初始化}
MyFrame::MyFrame()
{Create(NULL, TEXT("mfc"));
}
#include<afxwin.h> //mfc头文件class MyApp :public CWinApp// 应用程序类
{
public://程序入口virtual BOOL InitInstance();};//窗口框架类
class MyFrame :public CFrameWnd {
public:MyFrame();
};
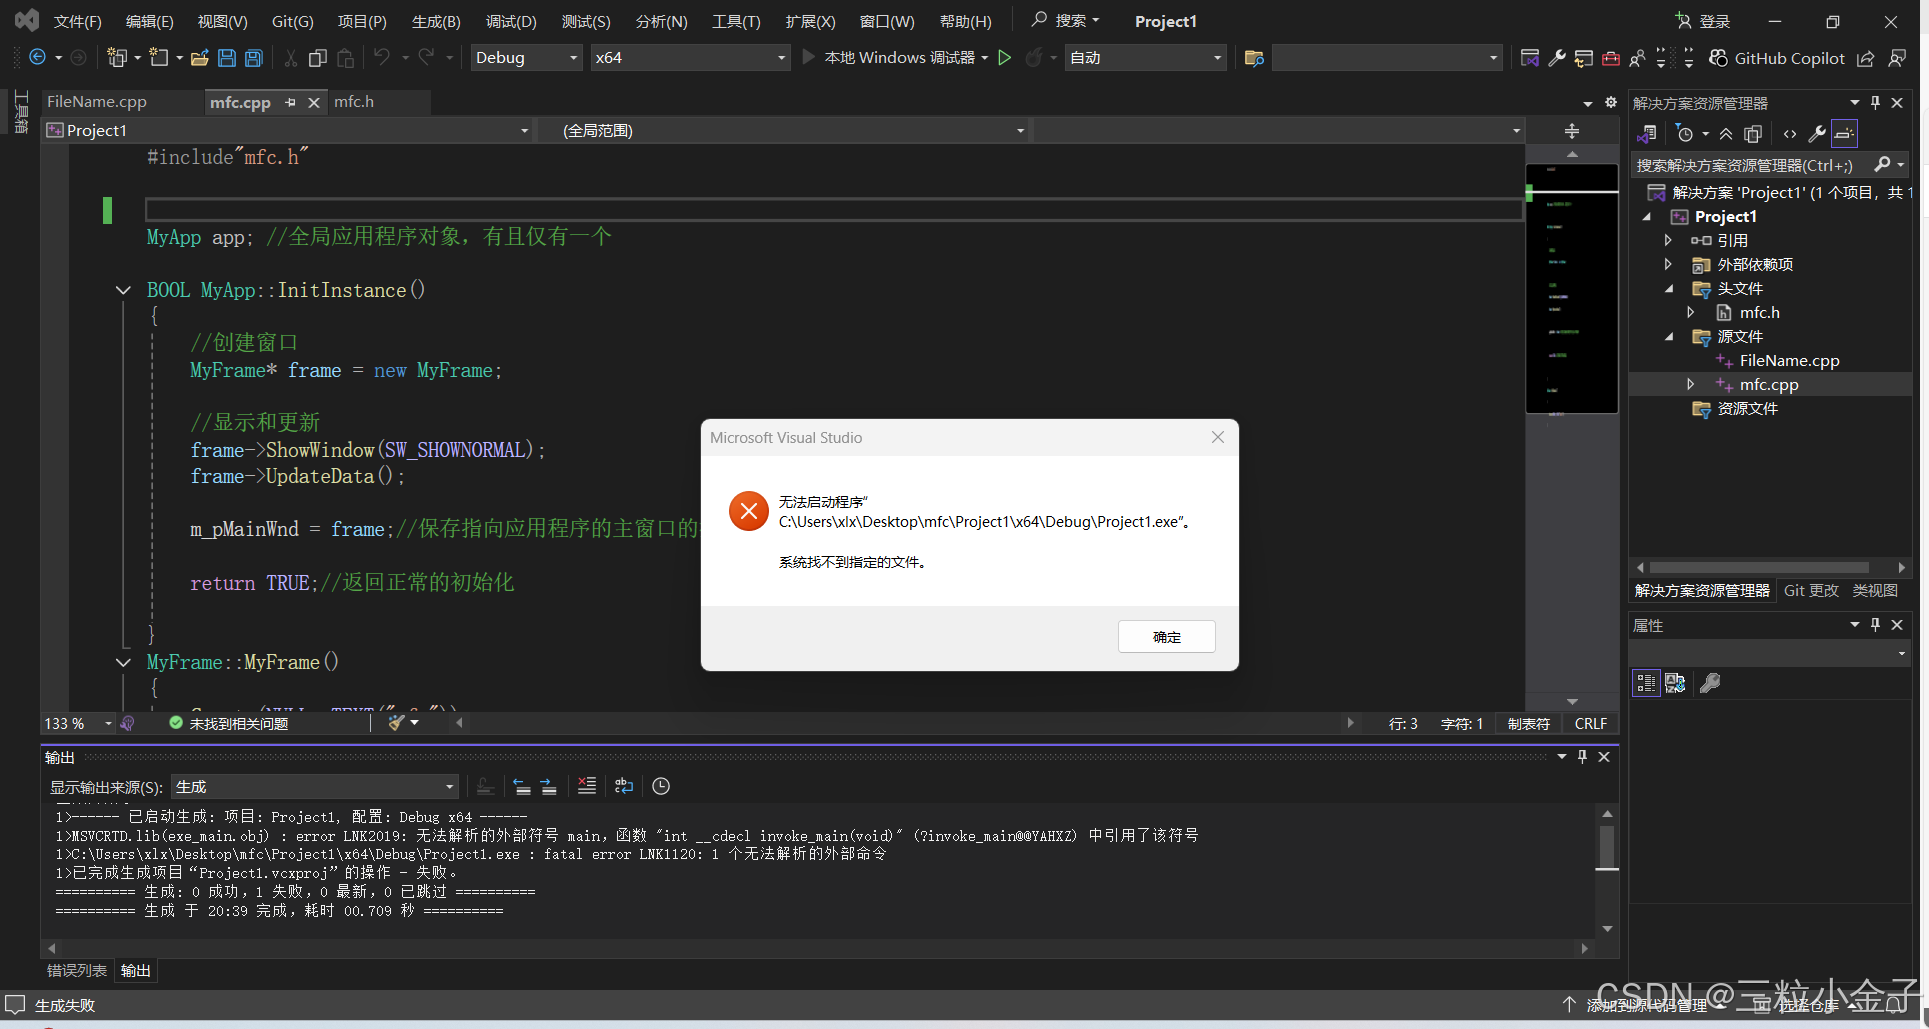
不幸的是,生不成可执行文件Project1.exe,甚至我自己创建一个,它运行的时候会给我删喽~
QT学习
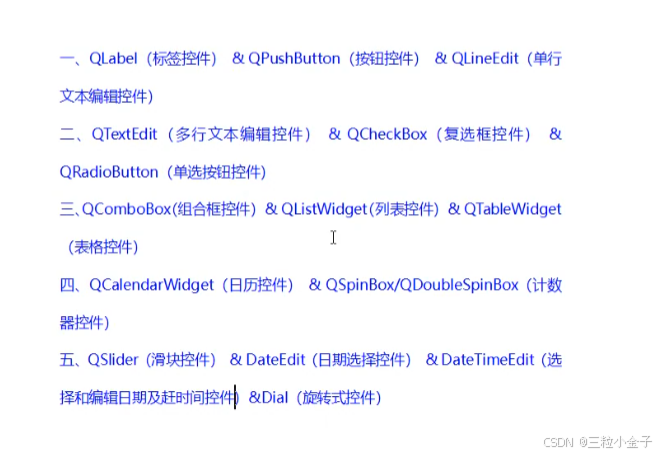
控件
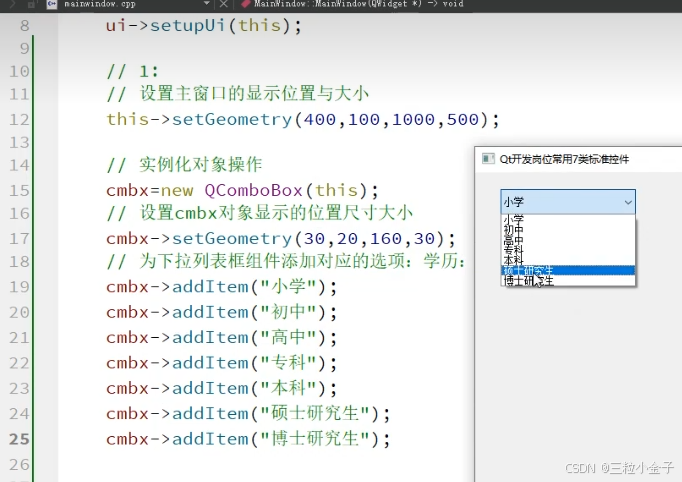
ComboBox
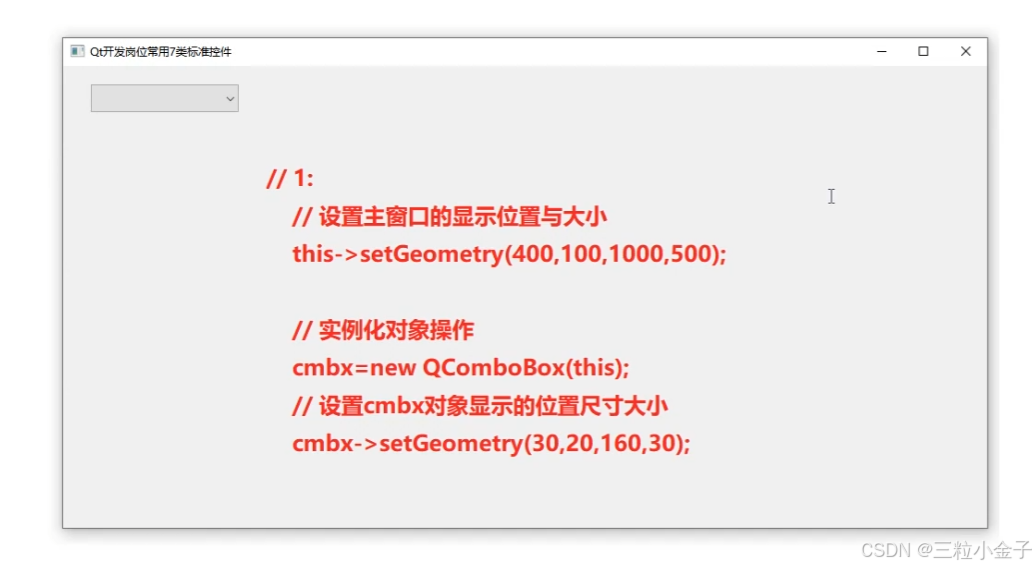

QFontComboBox
QLabel(标签控件)
QLineEdit

出现乱码

正则表达式限制
TreeView


禁止窗口最大化按钮

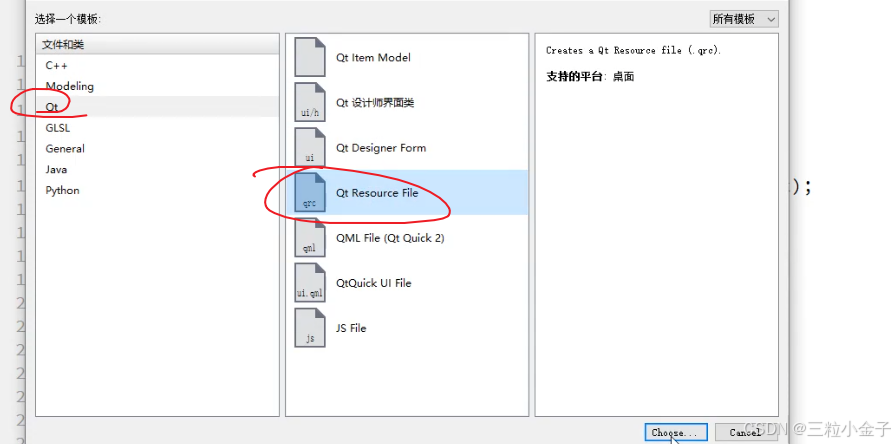
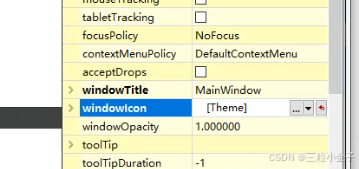
更改左上角图标
QT基础概念

QT和STL都是c++里面的库,QtCreater是用于qt开发的跨平台集成开发环境。
#include<QApplication> // Qt应用程序核心模块
#include<QLabel> // 文本/图像标签控件
#include<QLineEdit> // 单行文本输入框控件
#include<QPushButton> // 按钮控件
#include<QHBoxLayout> // 水平布局管理器
#include<QVBoxLayout> // 垂直布局管理器
#include<QWidget> // 基础窗口容器
int main(int argc, char *argv[])
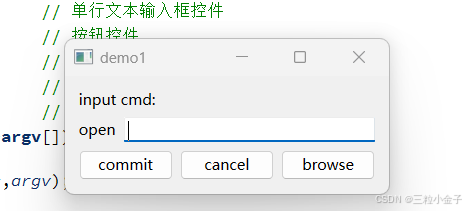
{QApplication app(argc, argv);QLabel *infoLabel = new QLabel;QLabel *openLabel = new QLabel;QLineEdit *cmdLineEdit = new QLineEdit;QPushButton *commitButton = new QPushButton;QPushButton *cancelButton = new QPushButton;QPushButton *browseButton = new QPushButton;infoLabel->setText("input cmd:");openLabel->setText("open");commitButton->setText("commit");cancelButton->setText("cancel");browseButton->setText("browse");QHBoxLayout *cmdLayout = new QHBoxLayout; //水平布局对象cmdLayout ->addWidget(openLabel);cmdLayout ->addWidget(cmdLineEdit);QHBoxLayout *buttonLayout = new QHBoxLayout; //水平布局对象buttonLayout ->addWidget(commitButton);buttonLayout ->addWidget(cancelButton);buttonLayout ->addWidget(browseButton);QVBoxLayout *mainLayout = new QVBoxLayout;mainLayout -> addWidget(infoLabel);mainLayout -> addLayout(cmdLayout);mainLayout -> addLayout(buttonLayout);QWidget w;w.setLayout(mainLayout);w.show();return app.exec();
}
运行结果:
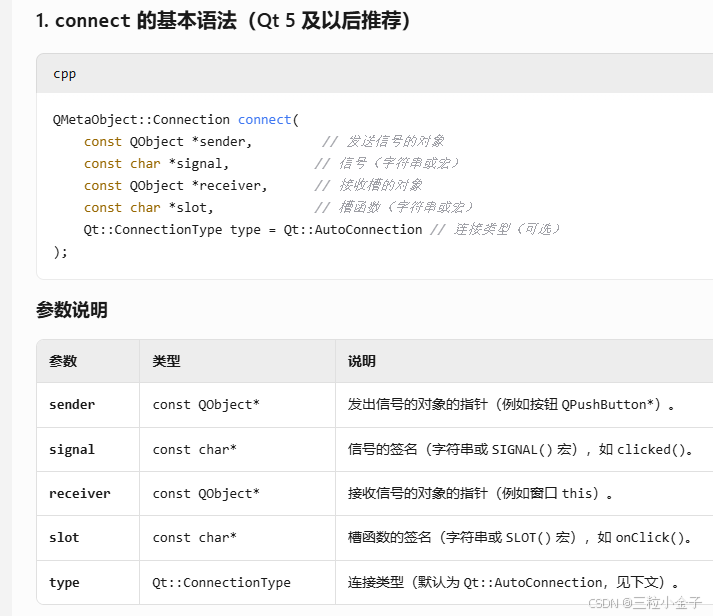
信号与槽: 点击按钮发送信号,执行槽函数
Slot(槽)是用于响应特定事件的可调用函数,属于信号与槽机制的核心组成部分。
#include "widget.h"
#include "./ui_widget.h"Widget::Widget(QWidget *parent): QWidget(parent), ui(new Ui::Widget)
{ui->setupUi(this);//连接信号与槽 谁发出信号 发出什么信号 谁处理信号 怎么处理connect(ui->cmdLineEdit,SIGNAL(returnPressed()),this,SLOT(on_commitButton_clicked())); //实现了信号与槽的绑定功能connect(ui->cancelButton, &QPushButton::clicked,this, &Widget::on_cancelButton_clicked);connect(ui->browseButton,&QPushButton::clicked,[this](){QMessageBox::information(this,"信息","点击浏览");});
}Widget::~Widget()
{delete ui;
}void Widget::on_commitButton_clicked()
{QString program = ui->cmdLineEdit->text();//创建process对象QProcess *myProcess = new QProcess(this);myProcess->start(program);
}
void Widget::on_cancelButton_clicked()
{this ->close();
}void Widget::on_browseButton_clicked()
{}
qt做一个四则运算计算器
ui图展示
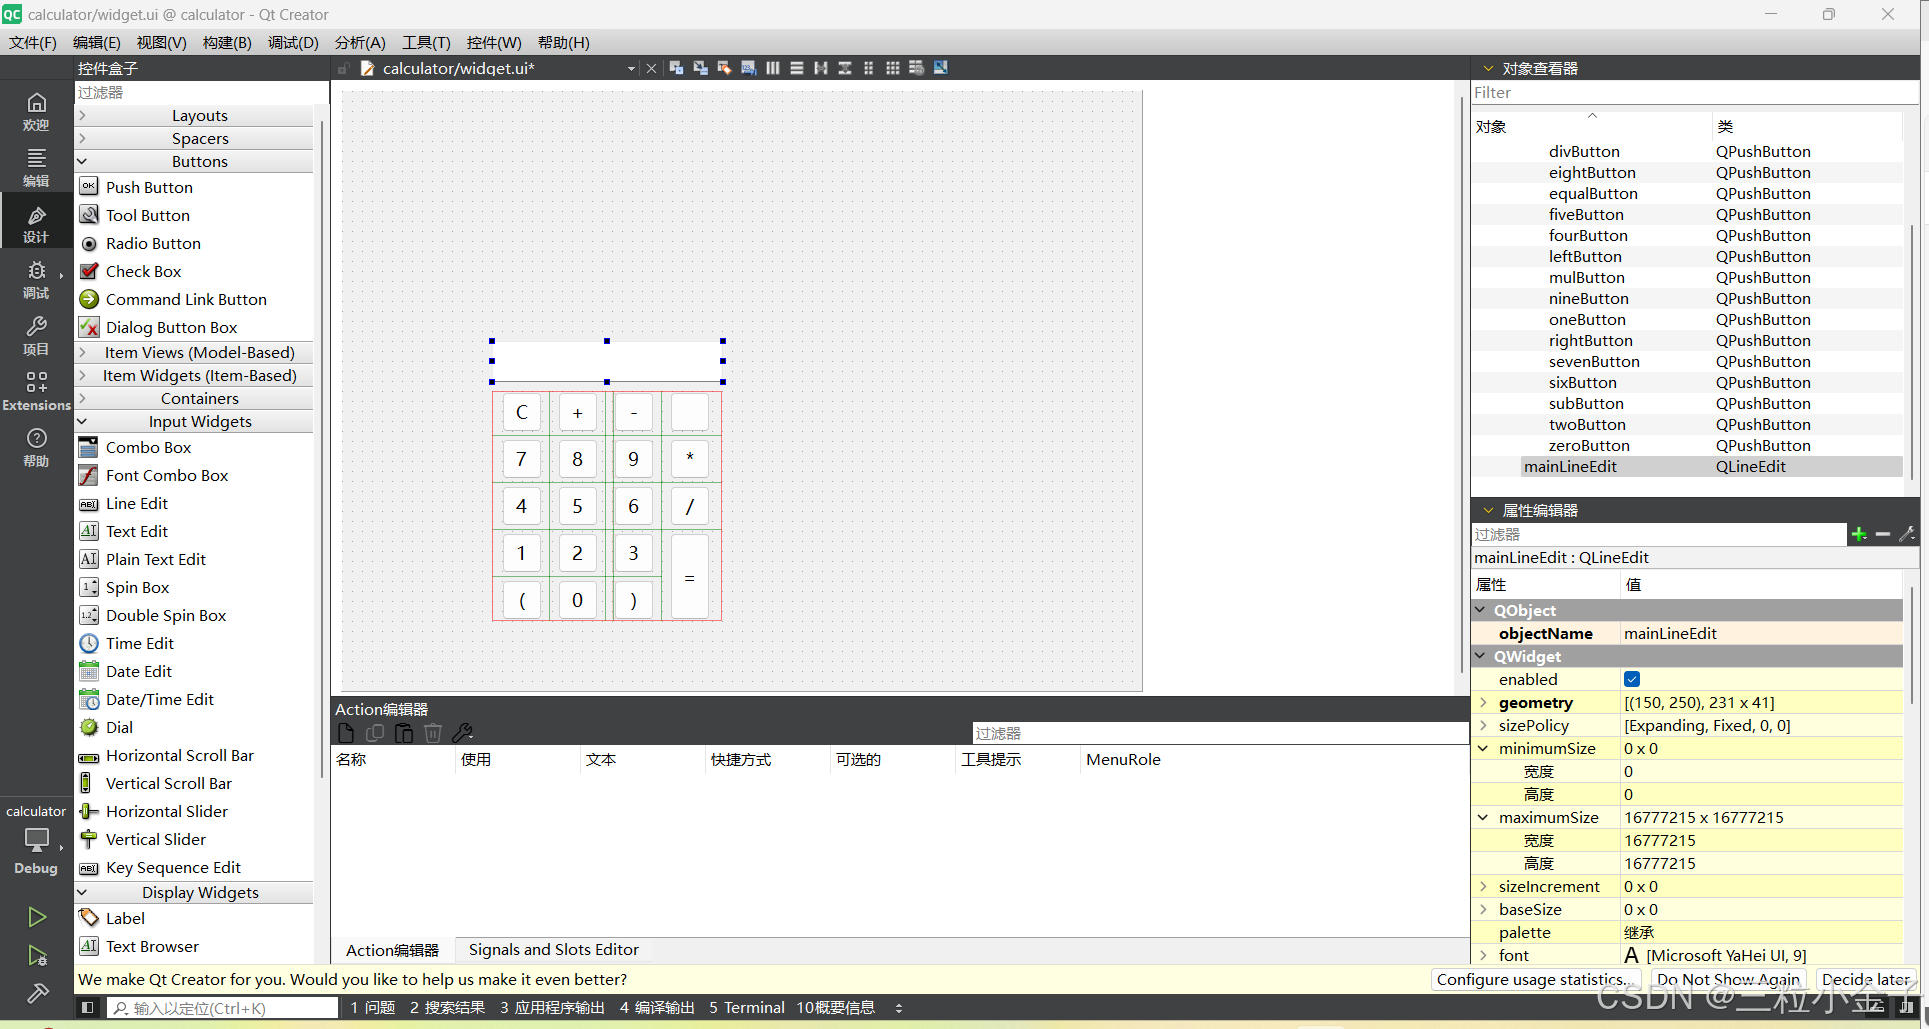
由于等于号,视频直接粘贴了他之前用过的代码没有详细介绍,我就没实现,继续学下面的了。
#include "widget.h"
#include "./ui_widget.h"Widget::Widget(QWidget *parent): QWidget(parent), ui(new Ui::Widget)
{ui->setupUi(this);this->setWindowTitle("计算器");QFont f("仿宋",14); //字体对象ui->mainLineEdit->setFont(f);//按钮上放图片QIcon con("D:\\qt\\project\\calculator\\del.png");ui->delButton->setIcon(con);//改变按钮背景色ui->equalButton->setStyleSheet("background:blue");
}Widget::~Widget()
{delete ui;
}void Widget::on_oneButton_clicked()
{expression += "1";ui->mainLineEdit->setText(expression);
}
void Widget::on_clearButton_clicked()
{expression.clear();ui->mainLineEdit->clear();
}void Widget::on_delButton_clicked()
{expression.chop(1);ui->mainLineEdit->setText(expression);
}
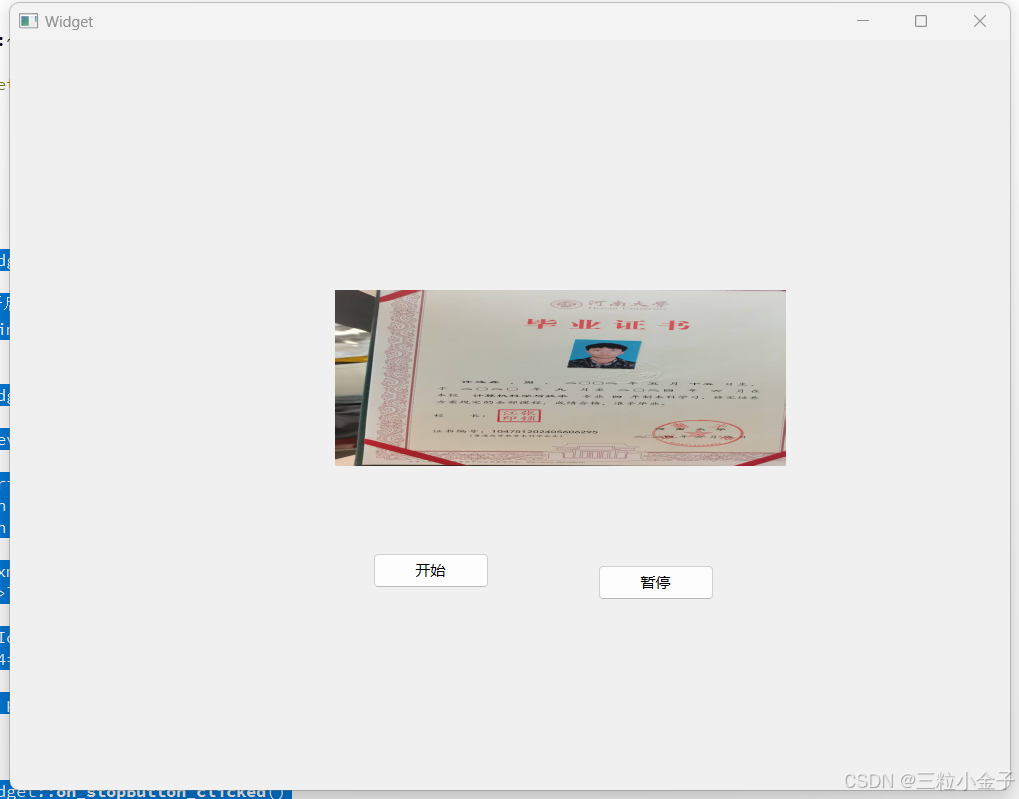
定时器(延时 睡眠 )
void Widget::on_startButton_clicked()
{//开启定时器,返回定时器编号myTimerId = this->startTimer(TIMEOUT);
}void Widget::timerEvent(QTimerEvent *event)
{if(event -> timerId() != myTimerId) return ;QString path("D:\\qt\\");path += QString::number(picId);path += ".jpg" ;QPixmap pix(path);ui->label->setPixmap(pix);picId++;if(4==picId){picId = 1;}
}void Widget::on_stopButton_clicked()
{this->killTimer(myTimerId);
}
#include "widget.h"
#include "./ui_widget.h"Widget::Widget(QWidget *parent): QWidget(parent), ui(new Ui::Widget)
{ui->setupUi(this);timer = new QTimer;QImage img;img.load("D:\\qt\\1.jpg");picId = 2;QPixmap pix("D:\\qt\\1.jpg");ui->label->setPixmap(QPixmap::fromImage(img));//定时器时间到,发出timeout信号,在计时器结束时,自动调用timeoutSlot函数connect(timer,&QTimer::timeout,this,&Widget::timeoutSlot);
}Widget::~Widget()
{delete ui;
}void Widget::on_startButton_clicked()
{//开启定时器,返回定时器编号//myTimerId = this->startTimer(TIMEOUT);timer->start(TIMEOUT);
}void Widget::timerEvent(QTimerEvent *event)
{//if(event -> timerId() != myTimerId) return;
}void Widget::on_stopButton_clicked()
{//this->killTimer(myTimerId);timer->stop();
}
void Widget::timeoutSlot()
{QString path("D:\\qt\\");path += QString::number(picId);path += ".jpg" ;QImage img;img.load(path);ui->label->setPixmap(QPixmap::fromImage(img));picId++;if(4==picId){picId = 1;}
}void Widget::on_singleButton_clicked()
{QTimer::singleShot(1000,this,SLOT(timeoutSlot()));
}
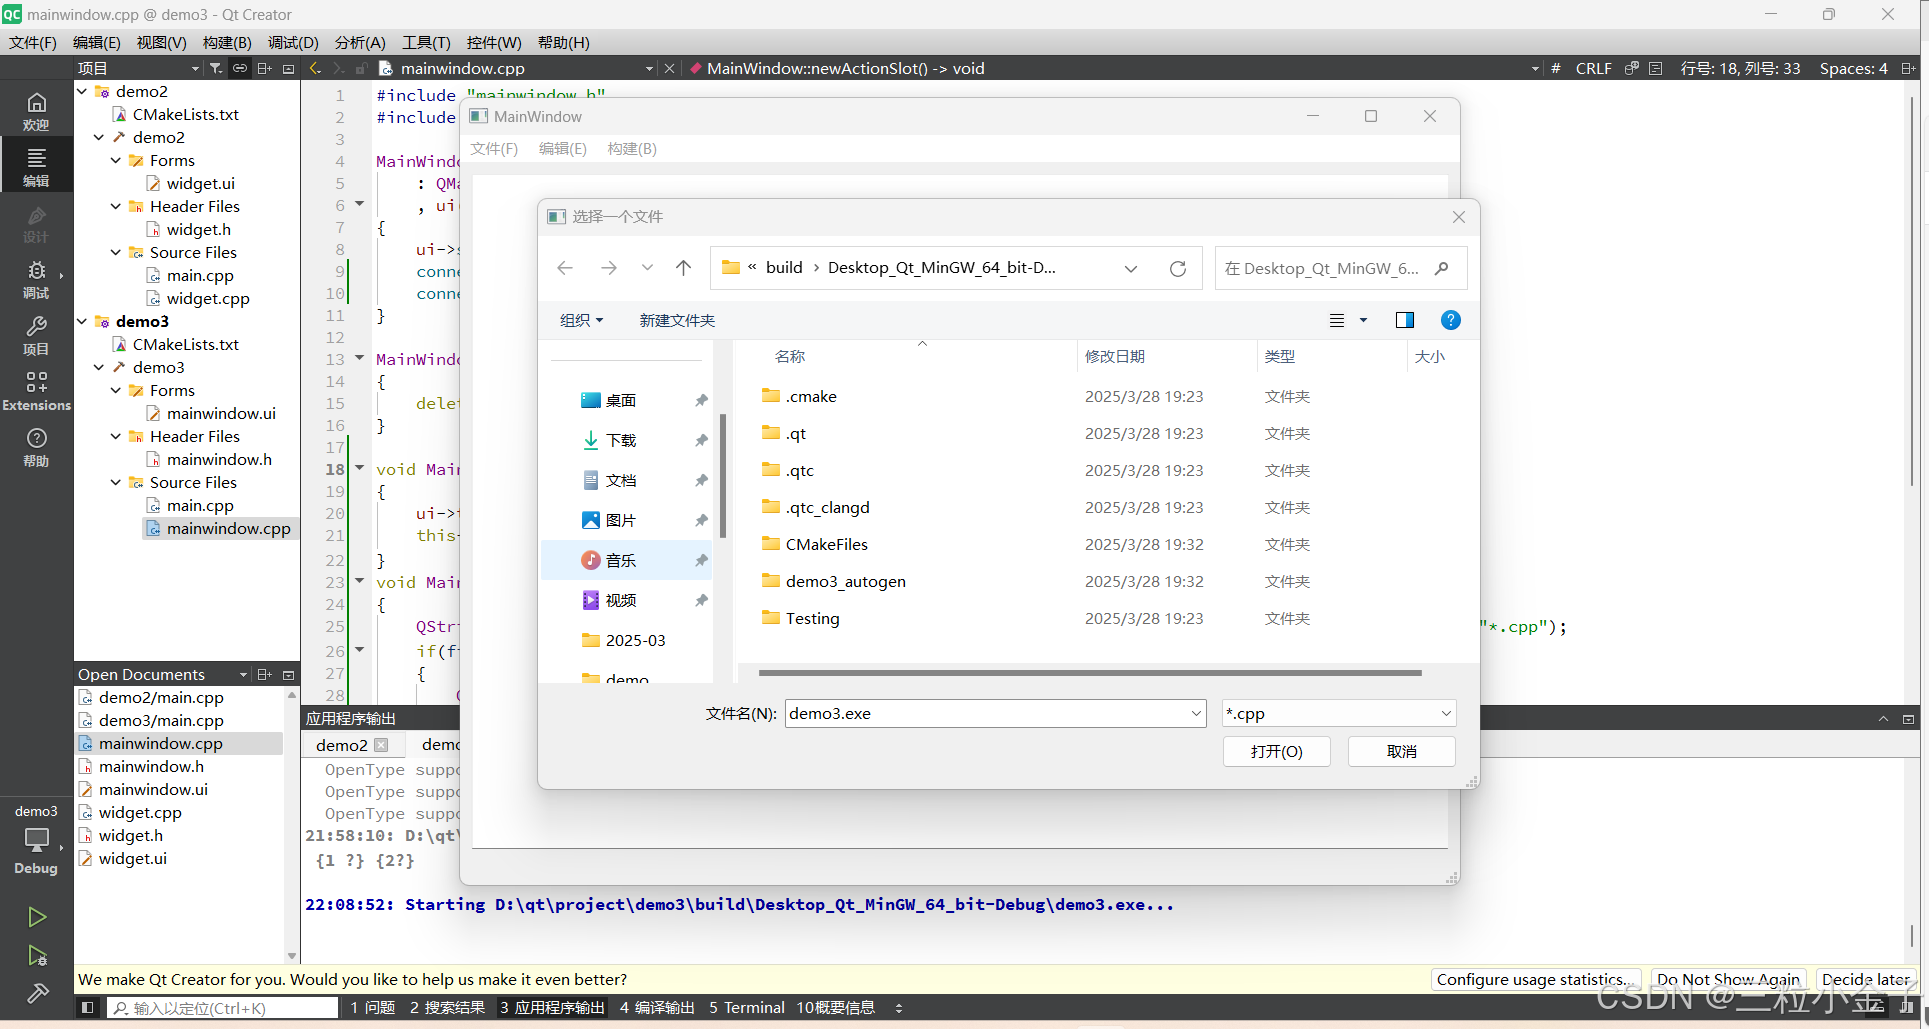
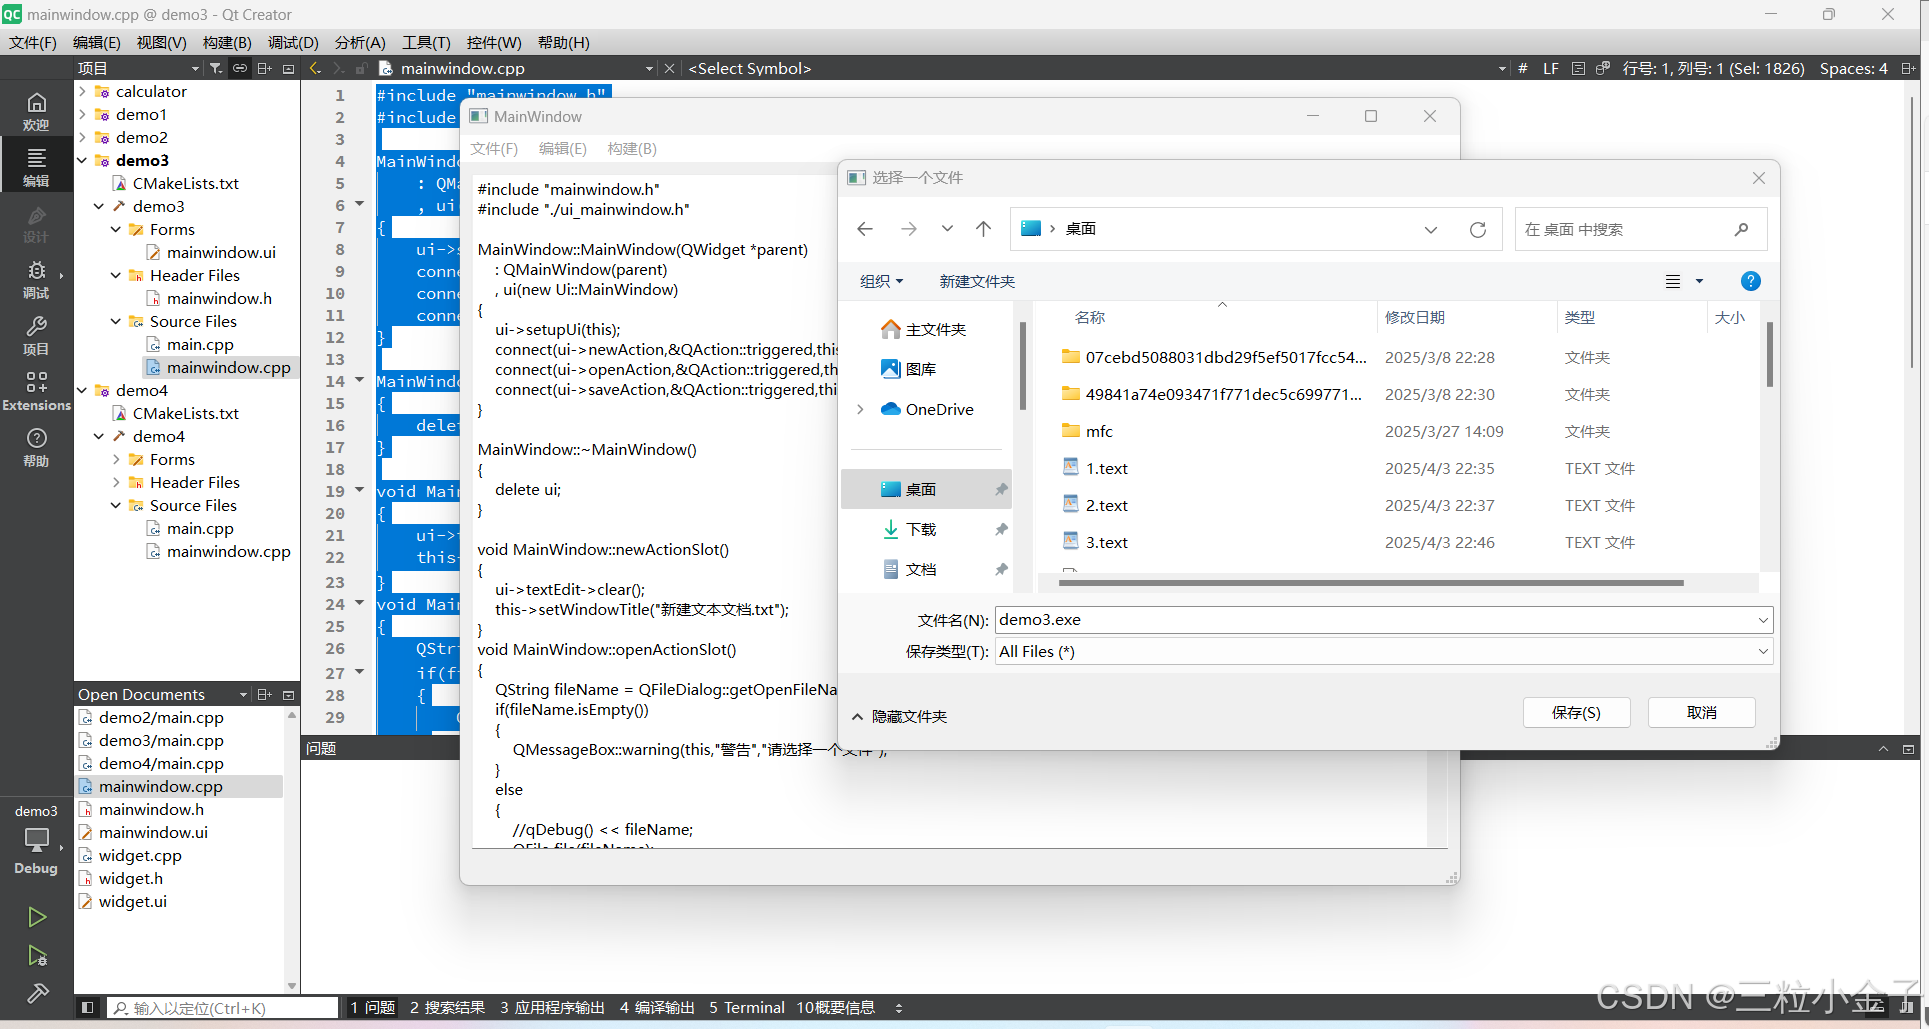
mainwindow(多了菜单栏)
#include "mainwindow.h"
#include "./ui_mainwindow.h"MainWindow::MainWindow(QWidget *parent): QMainWindow(parent), ui(new Ui::MainWindow)
{ui->setupUi(this);connect(ui->newAction,&QAction::triggered,this, &MainWindow::newActionSlot);connect(ui->openAction,&QAction::triggered,this, &MainWindow::openActionSlot);connect(ui->saveAction,&QAction::triggered,this, &MainWindow::saveActionSlot);
}MainWindow::~MainWindow()
{delete ui;
}void MainWindow::newActionSlot()
{ui->textEdit->clear();this->setWindowTitle("新建文本文档.txt");
}
void MainWindow::openActionSlot()
{QString fileName = QFileDialog::getOpenFileName(this,"选择一个文件",QCoreApplication::applicationFilePath(),"*.cpp");if(fileName.isEmpty()){QMessageBox::warning(this,"警告","请选择一个文件");}else{//qDebug() << fileName;QFile file(fileName);file.open(QIODevice::ReadOnly);QByteArray ba = file.readAll();ui->textEdit->setText(QString(ba));//QString的一个构造函数,就是用QByteArray构造的file.close();}
}
void MainWindow::saveActionSlot()
{QString fileName = QFileDialog::getSaveFileName(this,"选择一个文件",QCoreApplication::applicationFilePath());if(fileName.isEmpty()){QMessageBox::warning(this,"警告","请选择一个文件");}else{QFile file(fileName);file.open(QIODevice::WriteOnly);QByteArray ba;//ba.append() 将转换后的 QByteArray 数据追加到 ba 这个字节数组中。//ba.append() 是 QByteArray 类中的一个成员函数,它的功能是将指定的数据追加到 QByteArray 对象 ba 的末尾。//在这段代码中,ui->textEdit->toPlainText().toUtf8() 获取的是 QTextEdit 控件中的文本内容,并将其转换为 UTF-8 编码的 QByteArray 对象。ba.append(ui->textEdit->toPlainText().toUtf8()); // 将 QString 转换为 UTF-8 编码的 QByteArray    file.write(ba);file.close();}}
键盘事件(没成功)
void MainWindow::KeyPressEvent(QKeyEvent *k)
{qDebug() << "Key pressed:" << k->key();  // 输出按下的键if (k->modifiers() == Qt::ControlModifier && k->key() == Qt::Key_S){qDebug() << "Ctrl+S pressed";saveActionSlot();}else{qDebug() << "Other key pressed";}
}
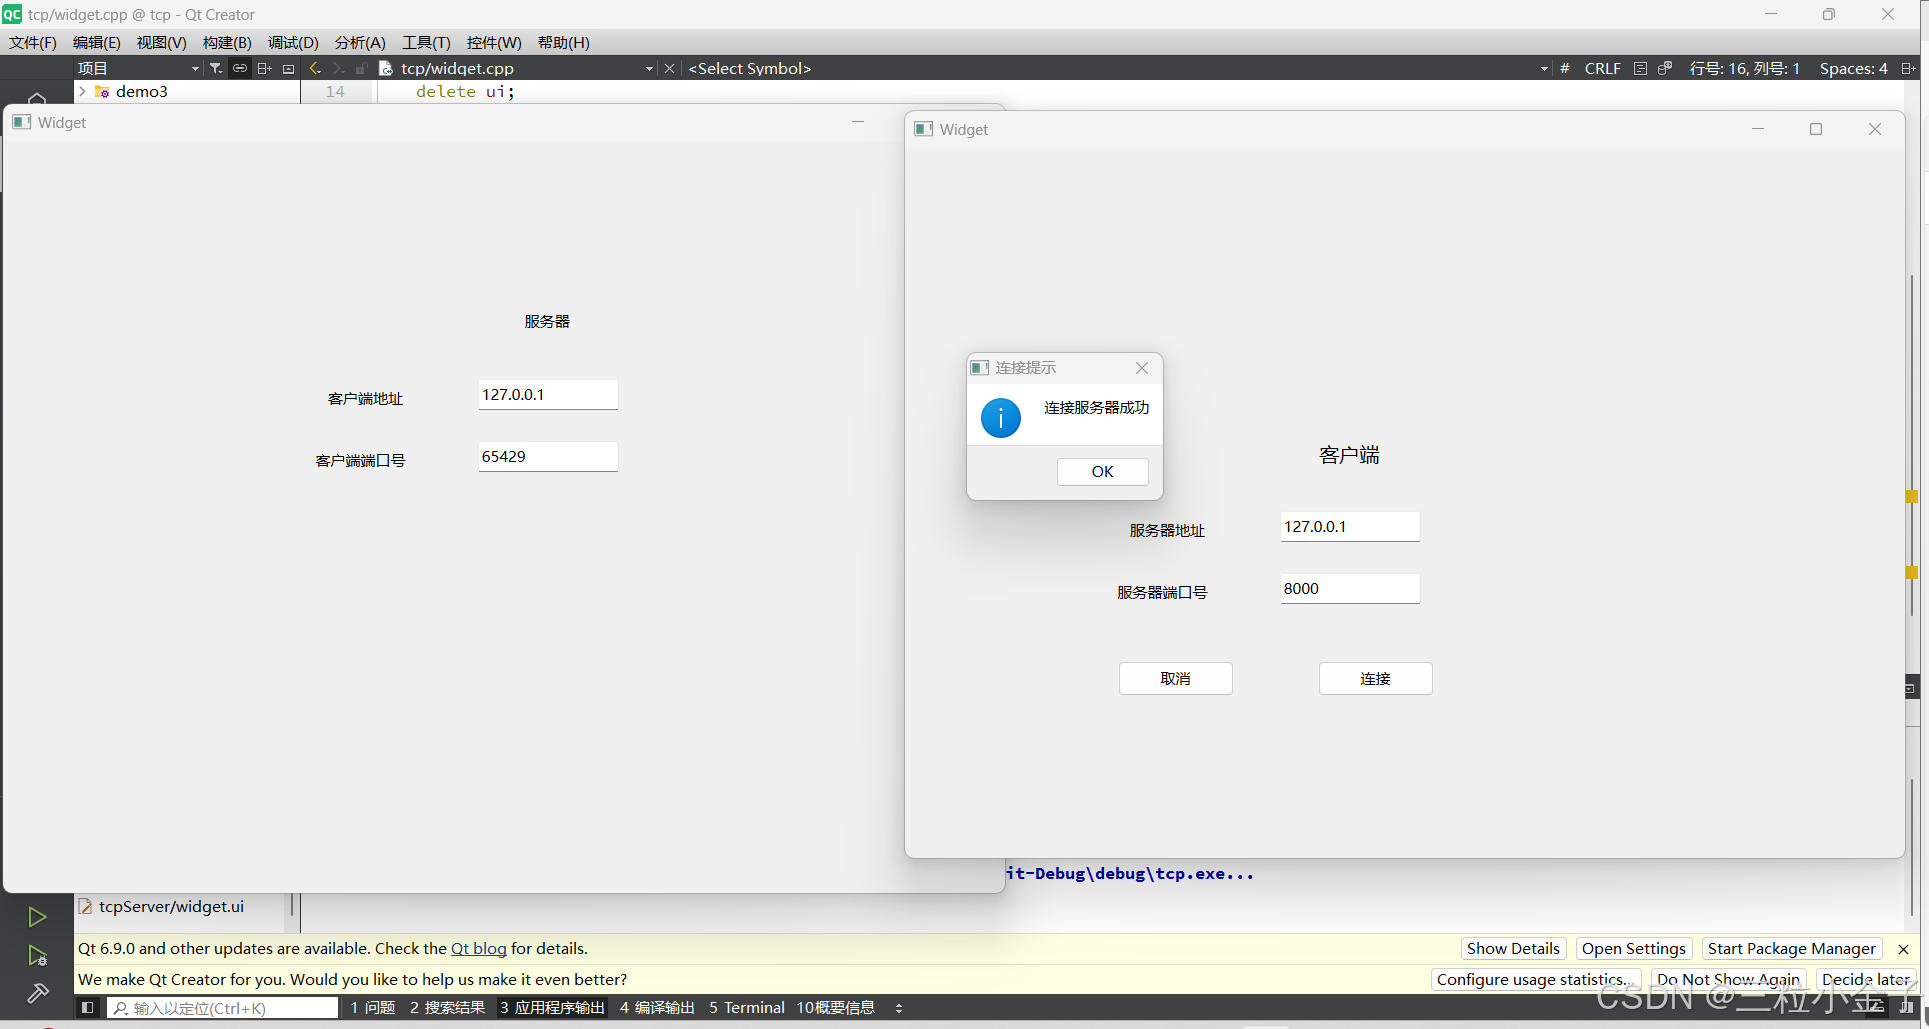
tcp连接
客户端
#include "widget.h"
#include "ui_widget.h"Widget::Widget(QWidget *parent): QWidget(parent), ui(new Ui::Widget)
{ui->setupUi(this);socket = new QTcpSocket;
}Widget::~Widget()
{delete ui;
}void Widget::on_cancelButton_clicked()
{this->close();//this指的是窗口
}void Widget::on_connectButton_clicked()
{//获取IP地址和端口号QString IP = ui->ipLineEdit->text();QString port = ui->portLineEdit->text();//连接服务器socket->connectToHost(QHostAddress(IP),port.toShort());//quint 短整型//连接服务器成功,socket对象会发出信号connect(socket,&QTcpSocket::connected,[this](){QMessageBox::information(this,"连接提示","连接服务器成功");});//连接断开,socket会发出信号connect(socket,&QTcpSocket::disconnected,[this]{QMessageBox::warning(this,"连接提示","连接异常,网络断开");});
}
服务器端
#include "widget.h"
#include "ui_widget.h"Widget::Widget(QWidget *parent): QWidget(parent), ui(new Ui::Widget)
{ui->setupUi(this);server = new QTcpServer;server->listen(QHostAddress::AnyIPv4,PORT);//客户端发起连接,server发出信号connect(server,&QTcpServer::newConnection,this,&Widget::newClientHandler);
}Widget::~Widget()
{delete ui;
}void Widget::newClientHandler()
{//建立tcp连接QTcpSocket *socket = server->nextPendingConnection();socket->peerAddress();//获取客户端的地址socket->peerPort();//获取客户端的端口号ui->ipLineEdit->setText(socket->peerAddress().toString());ui->portLineEdit->setText(QString::number(socket->peerPort()));
}
结果图
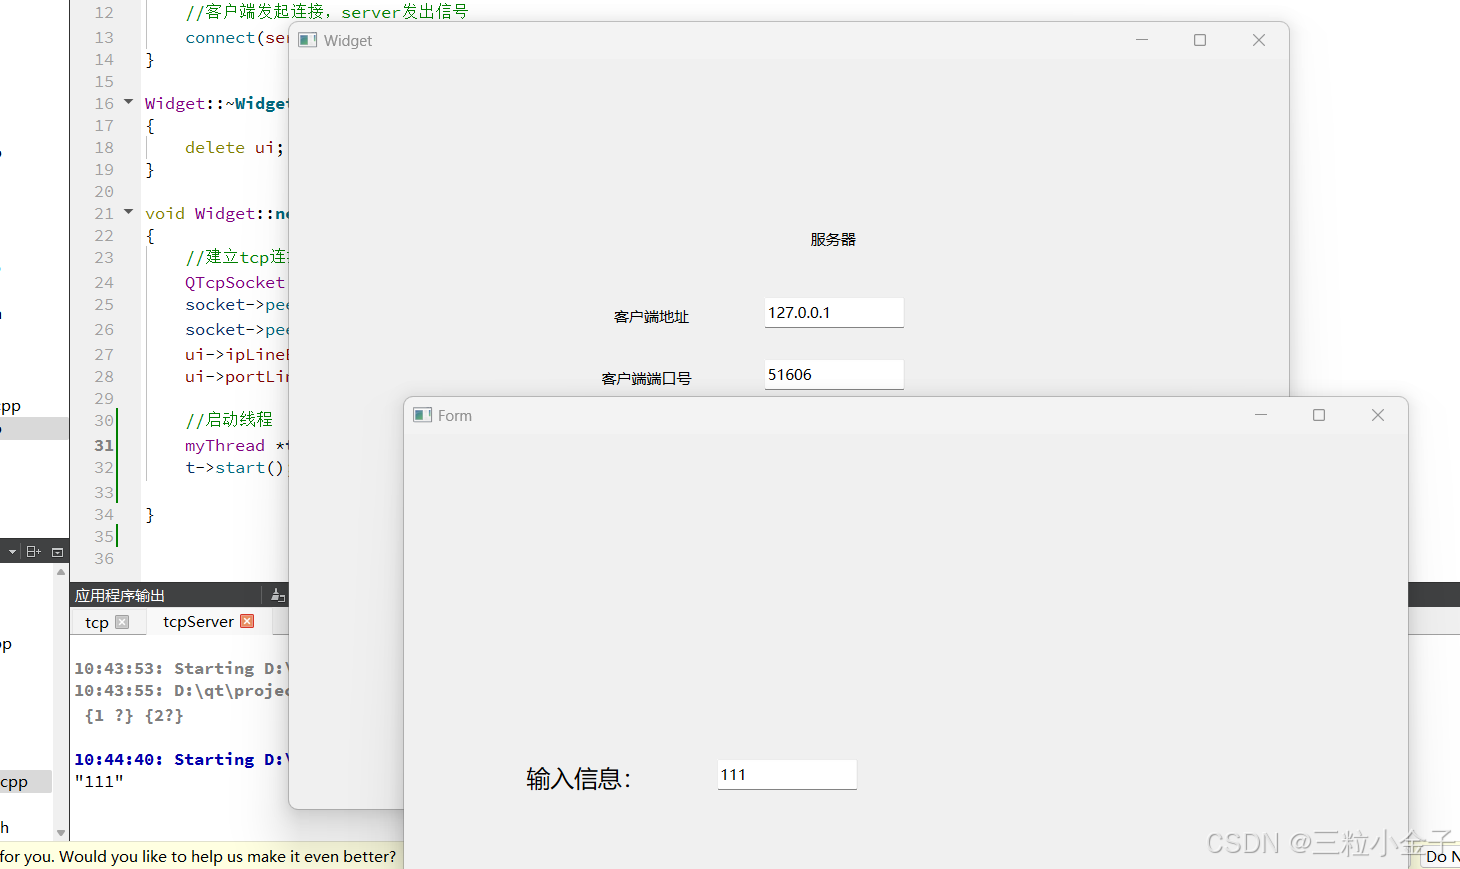
qt启动新窗口(客户端和服务器互发消息)
- 首先客户端先提交ip和port,连接服务器
- 服务器接到连接信号,转到newClientHandler槽函数
- nextPendingConnection(): 这个函数用于从服务器的等待队列中取出下一个等待连接。如果有新的客户端连接请求,它会返回一个 QTcpSocket 指针,代表与该客户端的通信连接。如果没有待处理的连接,它会返回 nullptr。
- 服务器通过nextPendingConnection函数获取客户端的ip和port,并由操作系统分配给客户端连接端口号
- 隐藏客户端窗口
- 客户端将lineEdit的内容通过socket->write(),发送给服务器
- 服务器收到信号,转到clientInfoSlot槽函数
- 服务器获取信号发出者,并把收到的信息显示
tepserver
#include "widget.h"
#include "ui_widget.h"Widget::Widget(QWidget *parent): QWidget(parent), ui(new Ui::Widget)
{ui->setupUi(this);server = new QTcpServer;server->listen(QHostAddress::AnyIPv4,PORT);//客户端发起连接,server发出信号connect(server,&QTcpServer::newConnection,this,&Widget::newClientHandler);
}Widget::~Widget()
{delete ui;
}void Widget::newClientHandler()
{//建立tcp连接QTcpSocket *socket = server->nextPendingConnection();socket->peerAddress();//获取客户端的地址socket->peerPort();//获取客户端的端口号ui->ipLineEdit->setText(socket->peerAddress().toString());ui->portLineEdit->setText(QString::number(socket->peerPort()));//服务端收到客户端发送的信息,socket发出readyread信号connect(socket,&QTcpSocket::readyRead,this,&Widget::clientInfoSlot);}
void Widget::clientInfoSlot()
{//获取信号的发出者QTcpSocket *s = (QTcpSocket *)sender();ui->mainLineEdit->setText( QString(s->readAll()));//s->readAll 返回的类型是QByteArray
}
tcpclient
#include "widget.h"
#include "ui_widget.h"Widget::Widget(QWidget *parent): QWidget(parent), ui(new Ui::Widget)
{ui->setupUi(this);socket = new QTcpSocket;
}Widget::~Widget()
{delete ui;
}void Widget::on_cancelButton_clicked()
{this->close();//this指的是窗口
}void Widget::on_connectButton_clicked()
{//获取IP地址和端口号QString IP = ui->ipLineEdit->text();QString port = ui->portLineEdit->text();//连接服务器socket->connectToHost(QHostAddress(IP),port.toShort());//quint 短整型//连接服务器成功,socket对象会发出信号connect(socket,&QTcpSocket::connected,[this](){QMessageBox::information(this,"连接提示","连接服务器成功");this->hide();Chat *c = new Chat(socket); //堆控件创建对象c->show();});//连接断开,socket会发出信号connect(socket,&QTcpSocket::disconnected,[this]{QMessageBox::warning(this,"连接提示","连接异常,网络断开");});
}#include "chat.h"
#include "ui_chat.h"Chat::Chat(QTcpSocket *s, QWidget *parent): QWidget(parent), ui(new Ui::Chat)
{ui->setupUi(this);socket = s ;
}Chat::~Chat()
{delete ui;
}void Chat::on_clearButton_clicked()
{ui->lineEdit->clear();
}void Chat::on_sendButton_clicked()
{QByteArray ba;ba.append(ui->lineEdit->text().toUtf8());socket->write(ba);
}
多线程实现(服务器)
tcpserver
#include "widget.h"
#include "mythread.h"
#include "ui_widget.h"Widget::Widget(QWidget *parent): QWidget(parent), ui(new Ui::Widget)
{ui->setupUi(this);server = new QTcpServer;server->listen(QHostAddress::AnyIPv4,PORT);//客户端发起连接,server发出信号connect(server,&QTcpServer::newConnection,this,&Widget::newClientHandler);
}Widget::~Widget()
{delete ui;
}void Widget::newClientHandler()
{//建立tcp连接QTcpSocket *socket = server->nextPendingConnection();socket->peerAddress();//获取客户端的地址socket->peerPort();//获取客户端的端口号ui->ipLineEdit->setText(socket->peerAddress().toString());ui->portLineEdit->setText(QString::number(socket->peerPort()));//启动线程myThread *t = new myThread(socket);t->start(); //开始线程
}
mythread
#include "mythread.h"myThread::myThread(QTcpSocket*s)
{socket = s;
}void myThread::run()
{connect(socket,&QTcpSocket::readyRead,this,&myThread::clientInfoSlot);
}void myThread::clientInfoSlot()
{qDebug()<<socket->readAll();
}
自定义信号
当你使用 connect 函数将信号和槽连接起来时,Qt 会检查信号和槽的签名(即它们的函数签名,包括参数类型)。如果信号和槽的参数类型一致,Qt 会自动将信号传递的参数传递给槽函数。
#include "widget.h"
#include "mythread.h"
#include "ui_widget.h"Widget::Widget(QWidget *parent): QWidget(parent), ui(new Ui::Widget)
{ui->setupUi(this);server = new QTcpServer;server->listen(QHostAddress::AnyIPv4,PORT);//客户端发起连接,server发出信号connect(server,&QTcpServer::newConnection,this,&Widget::newClientHandler);
}Widget::~Widget()
{delete ui;
}void Widget::newClientHandler()
{//建立tcp连接QTcpSocket *socket = server->nextPendingConnection();socket->peerAddress();//获取客户端的地址socket->peerPort();//获取客户端的端口号ui->ipLineEdit->setText(socket->peerAddress().toString());ui->portLineEdit->setText(QString::number(socket->peerPort()));//启动线程myThread *t = new myThread(socket);t->start(); //开始线程connect(t,&myThread::sendToWdiget,this,&Widget::threadSlot);}void Widget::threadSlot(QByteArray b)
{ui->mainLineEdit->setText(QString(b));
}
工作:工具的练手
将T16协议按正确格式,输出到文件中
#include "mainwindow.h"
#include "./ui_mainwindow.h"
#include <QFileDialog>
#include <QMessageBox>
#include <QRegularExpression>
#include <QDir>
#include <QFile>
#include <QTextStream>
#include <QDebug>
#include <QList>MainWindow::MainWindow(QWidget *parent): QMainWindow(parent), ui(new Ui::MainWindow)
{ui->setupUi(this);
}MainWindow::~MainWindow()
{delete ui;
}void MainWindow::on_get_Button_clicked()
{QString path = QFileDialog::getOpenFileName(this, "选择Menu文件", "", "Menu Files (*.txt)");if(!path.isEmpty()) ui->FilePath->setText(path);
}void MainWindow::on_text_Button_clicked()
{QString filePath = ui->FilePath->text();if (filePath.isEmpty()) {qDebug() << "文件选择失败";return;}// 2. 打开文件进行读取QFile file(filePath);if (!file.open(QIODevice::ReadOnly | QIODevice::Text)) {qDebug() << "无法打开文件";return;}QTextStream in(&file);QString line;QString currentRecvData;  // 当前接收到的 RECV 数据bool insideTP16 = false;  // 标记是否处于 TP16 协议块内// 2. 输出到当前文件夹的 output.txtQString outputFilePath = "output.txt";  // 输出文件的路径为当前文件夹中的 output.txtQFile outputFile(outputFilePath);if (!outputFile.open(QIODevice::WriteOnly | QIODevice::Text)) {qDebug() << "无法打开输出文件";return;}QTextStream out(&outputFile);// 3. 按行读取文件内容并处理while (!in.atEnd()) {line = in.readLine().trimmed();// 检查协议类型并提取数据if (line.contains("LT_LINK_PROTOCOL = \"TP16\"")) {insideTP16 = true;  // 开始进入 TP16 协议块}else if (insideTP16 && line.contains("LT_CMD_SEND")) {// 提取命令发送的数据(FrmData)QRegularExpression regexSend("FrmData\\((.*)\\)");QRegularExpressionMatch matchSend = regexSend.match(line);if (matchSend.hasMatch()) {QString sendData = matchSend.captured(1);  // 提取 SEND 数据QStringList bytes = sendData.split(" ", Qt::SkipEmptyParts);if (bytes.size() >5){// 2. 按空格分割QString format = sendData.mid(15).trimmed();// (0C 03 → 0x030C)QString byteHigh = bytes[2]; // "03"(高字节)QString byteLow = bytes[1];  // "0C"(低字节)QString combinedHex = byteHigh + byteLow; // "030C"// 3. 转换为整数bool ok;uint value = combinedHex.toUInt(&ok, 16); // 0x030C = 780// 4. 计算 0x030C * 0x20uint result = value * 0x20; // 780 * 32 = 24960 (0x6180)QString hexStr = QString::number(result, 16).toUpper().rightJustified(4, '0');QString formattedHex = hexStr.left(2) + " " + hexStr.right(2);QString formatted;uint remainingByteCount = bytes.size() - 5;if(remainingByteCount <= 9){formatted = QString::number(remainingByteCount).rightJustified(2, '0');}else if(remainingByteCount > 9 && remainingByteCount <= 15){// 10-15的数字转为0A-0F格式formatted =QString::number(remainingByteCount, 16).toUpper().rightJustified(2, '0');}else{formatted =QString::number(remainingByteCount, 16);}QString final = formatted + " " + formattedHex + " " + format;out << "Req:   " << final << "\n";  // 输出 SEND 数据到文件}else{out << "Req:   " << sendData << "\n";  // 输出 SEND 数据到文件}}}else if (insideTP16 && line.contains("LT_CMD_RECV")) {// 提取命令接收的数据(FrmData)QRegularExpression regexRecv("FrmData\\((.*)\\)");QRegularExpressionMatch matchRecv = regexRecv.match(line);if (matchRecv.hasMatch()) {currentRecvData = matchRecv.captured(1);  // 提取 RECV 数据QStringList bytes = currentRecvData.split(" ", Qt::SkipEmptyParts);if (bytes.size() >5){// 2. 按空格分割QString format =currentRecvData.mid(15).trimmed();// (0C 03 → 0x030C)QString byteHigh = bytes[2]; // "03"(高字节)QString byteLow = bytes[1];  // "0C"(低字节)QString combinedHex = byteHigh + byteLow; // "030C"// 3. 转换为整数bool ok;uint value = combinedHex.toUInt(&ok, 16); // 0x030C = 780// 4. 计算 0x030C * 0x20uint result = value * 0x20; // 780 * 32 = 24960 (0x6180)QString hexStr = QString::number(result, 16).toUpper().rightJustified(4, '0');QString formattedHex = hexStr.left(2) + " " + hexStr.right(2);QString formatted;uint remainingByteCount = bytes.size() - 5;if(remainingByteCount <= 8){formatted = QString::number(remainingByteCount).rightJustified(2, '0');QString final = formatted + " " + formattedHex + " " + format;out << "Ans:   " << final << "\n" << "\n";  // 输出 RECV 数据到文件}else if (remainingByteCount > 8) {int number = 20;QString temp = format.mid(0,21);format.remove(0,21);QString final ="08 " + formattedHex + " " +QString::number(number)+ " " + temp;out << "Ans:1N " << final << "\n";remainingByteCount = remainingByteCount - 7;number++;while(remainingByteCount > 8){temp = format.mid(0,21);format.remove(0,21);final ="08 " + formattedHex + " "+ QString::number(number)+ " " + temp;number++;out << "Ans:1N " << final << "\n";remainingByteCount -= 7;}formatted = QString::number(remainingByteCount).rightJustified(2, '0');final = formatted + " " + formattedHex + " " + format;out << "Ans:   " << final << "\n" << "\n" ;}}else{out << "Ans:   " << currentRecvData << "\n" << "\n" ;  // 输出 SEND 数据到文件}}}else if (line.isEmpty() && insideTP16) {// 结束当前 TP16 协议块insideTP16 = false;}}file.close();outputFile.close();  // 关闭输出文件qDebug() << "数据已成功写入文件:" << outputFilePath;
}
单片机学习
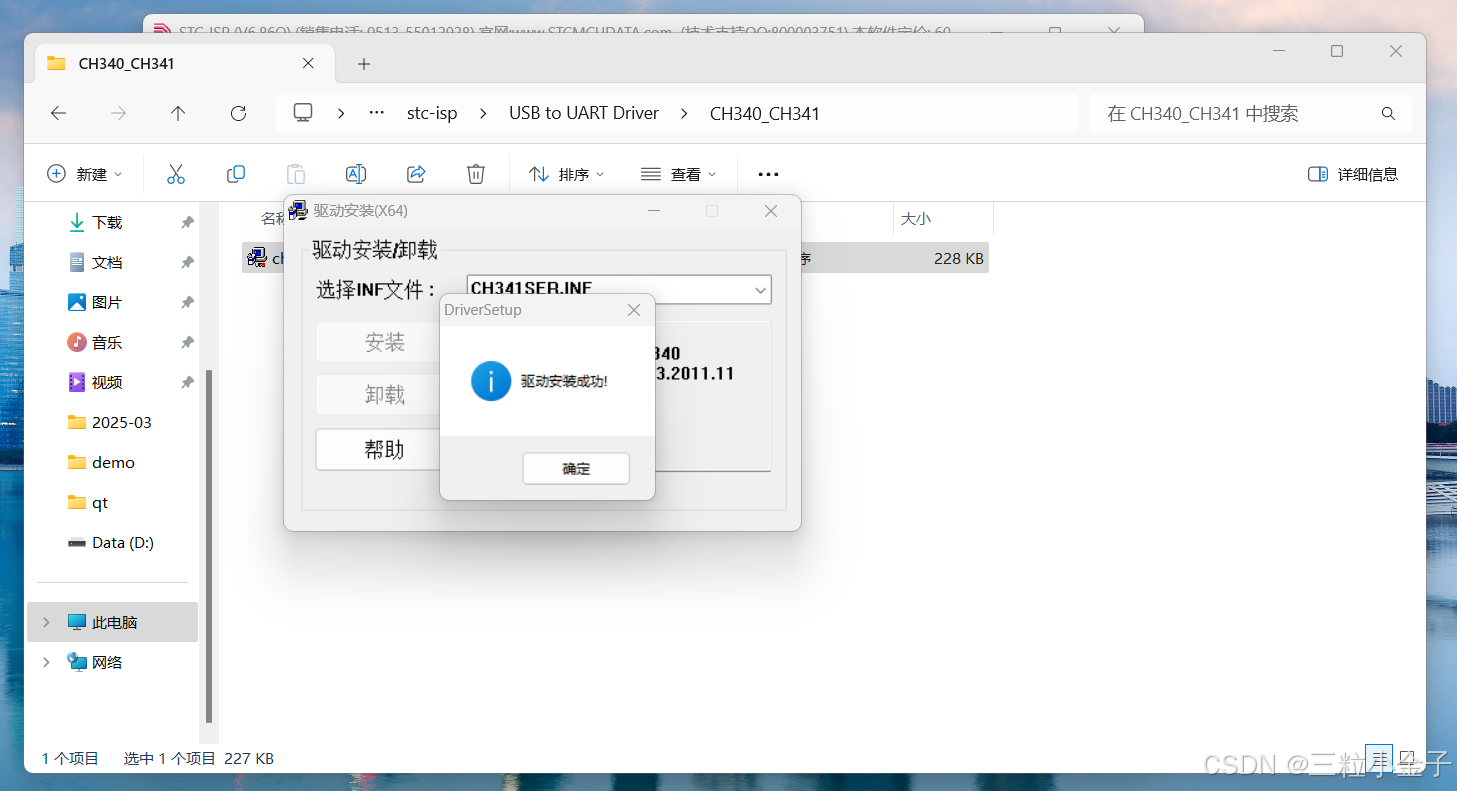
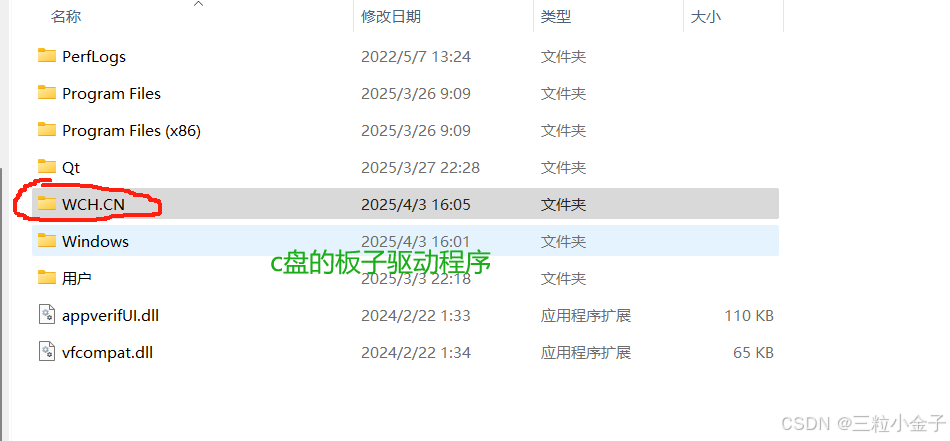
环境配置
keil5 江科大b站视频
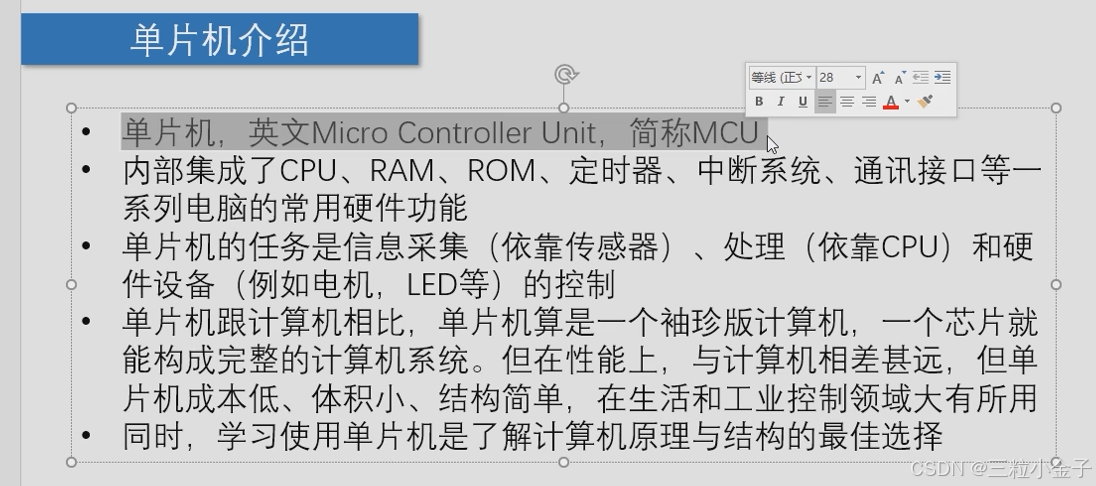
单片机介绍
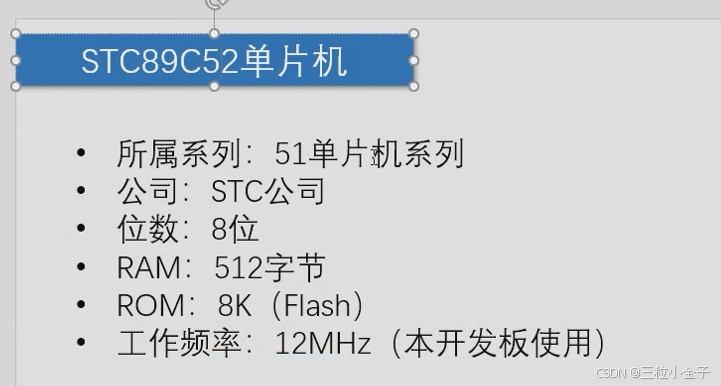
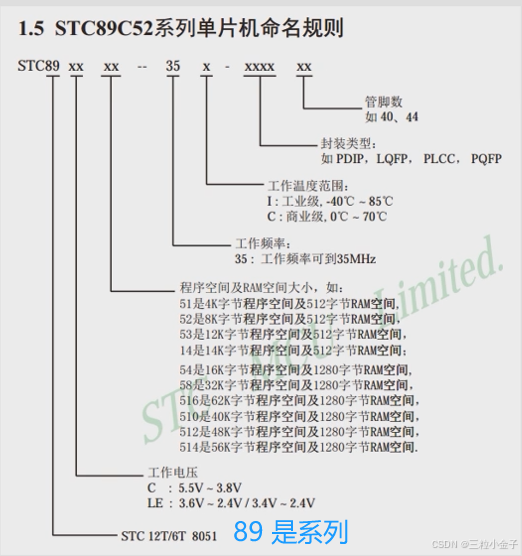
什么是51单片机

插个电,弄个金振,单片机就能运行了
点亮一个led灯
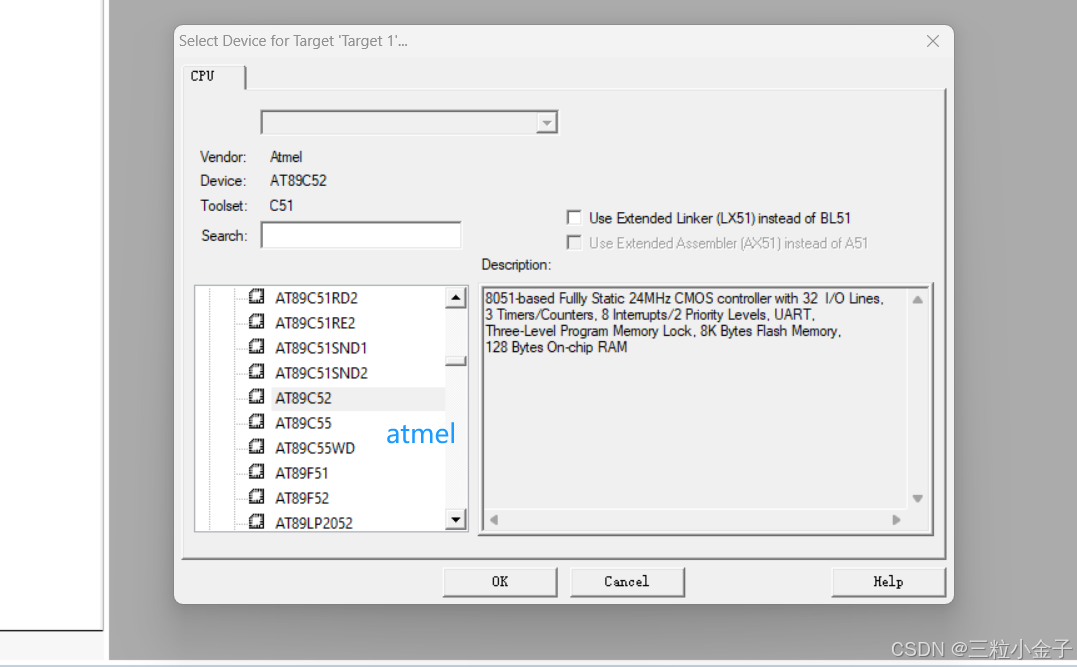
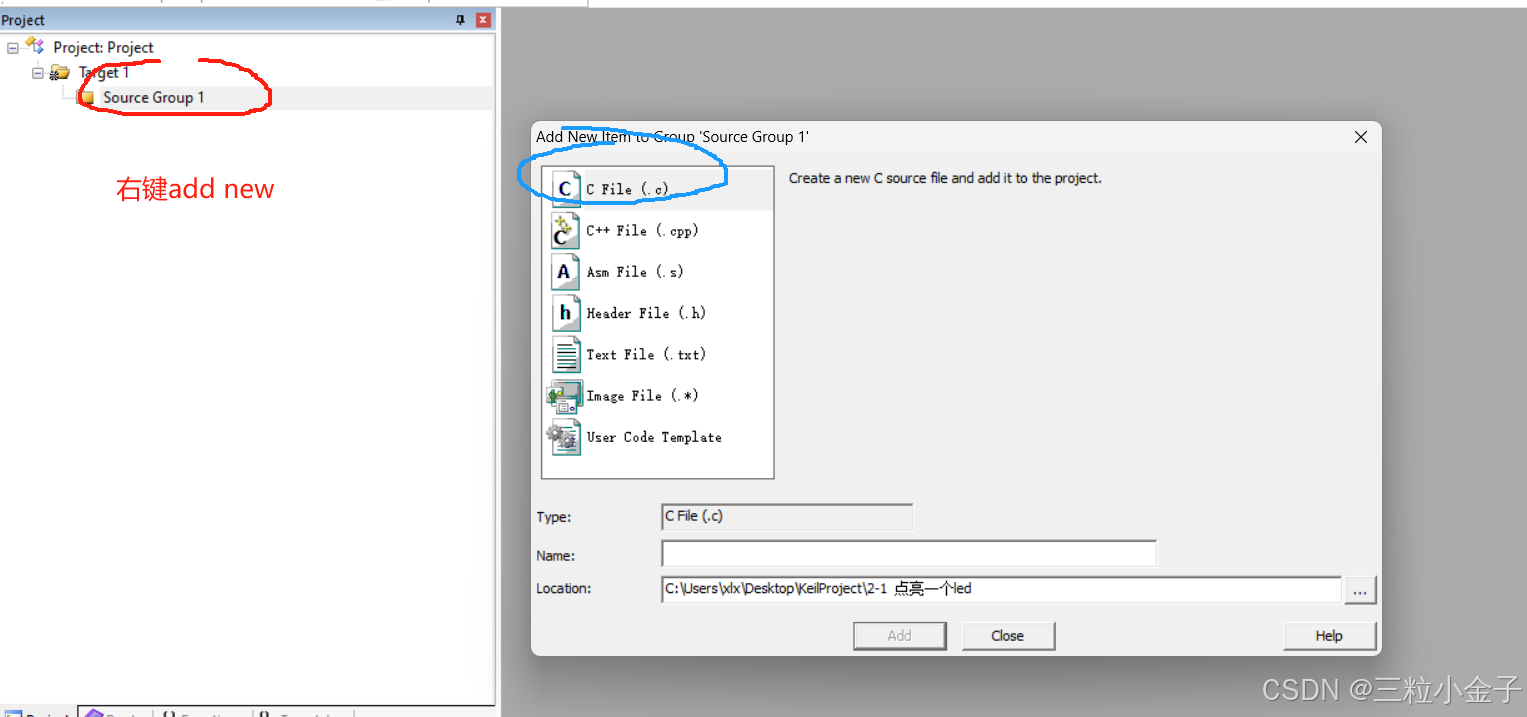
进入keil,新建项目
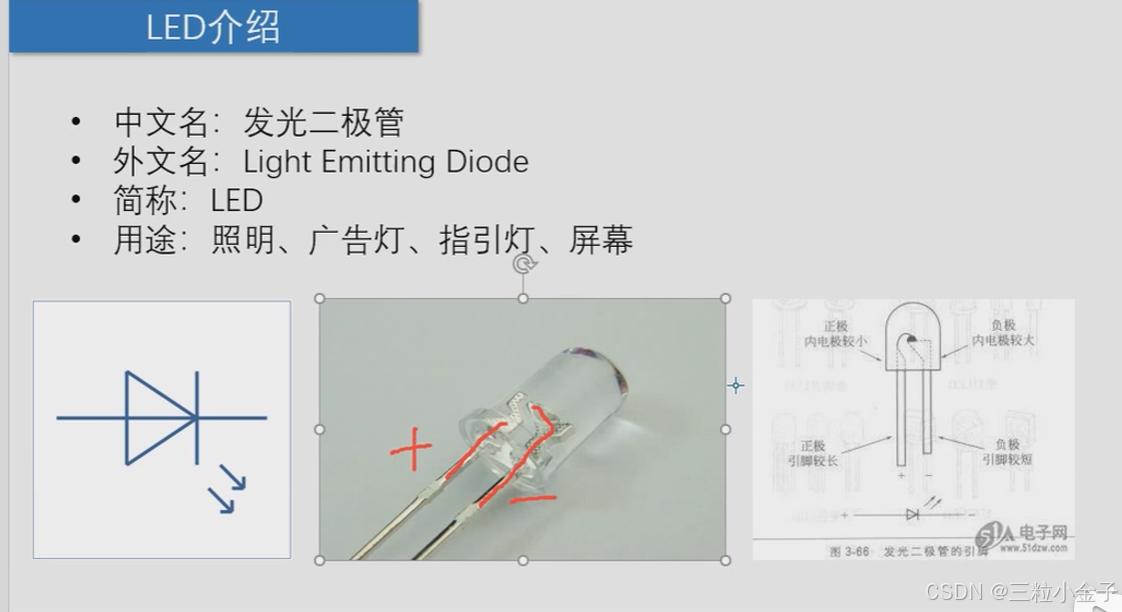
led介绍
小的是正极,四个电阻,1000欧
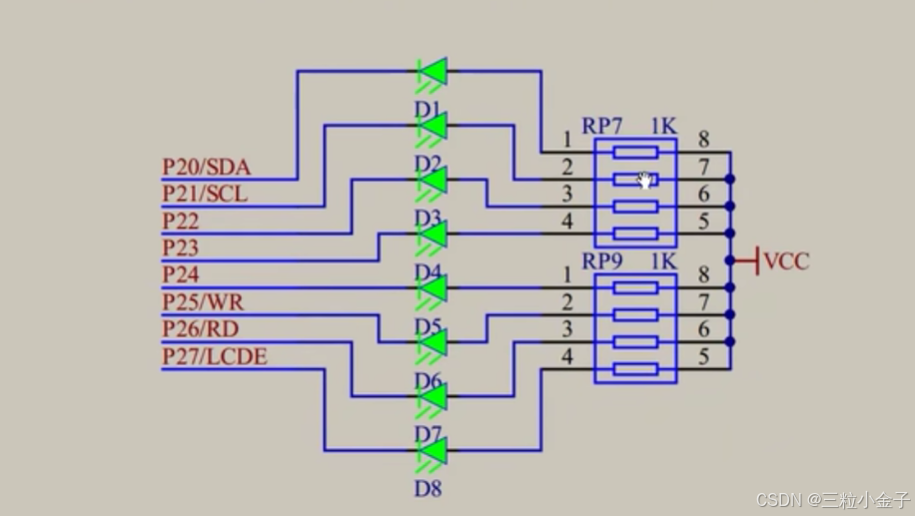

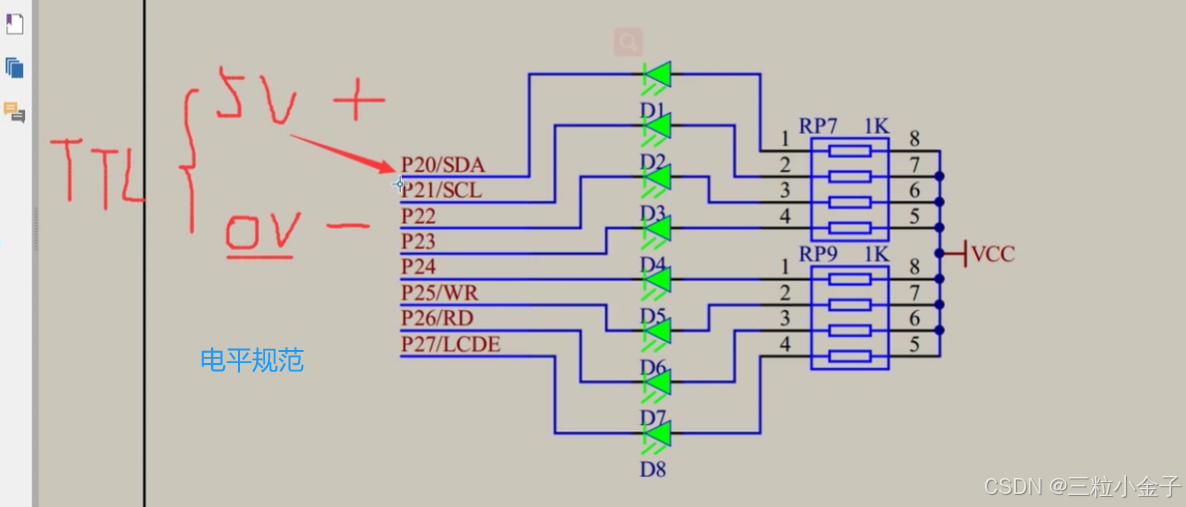
单片机如何控制硬件
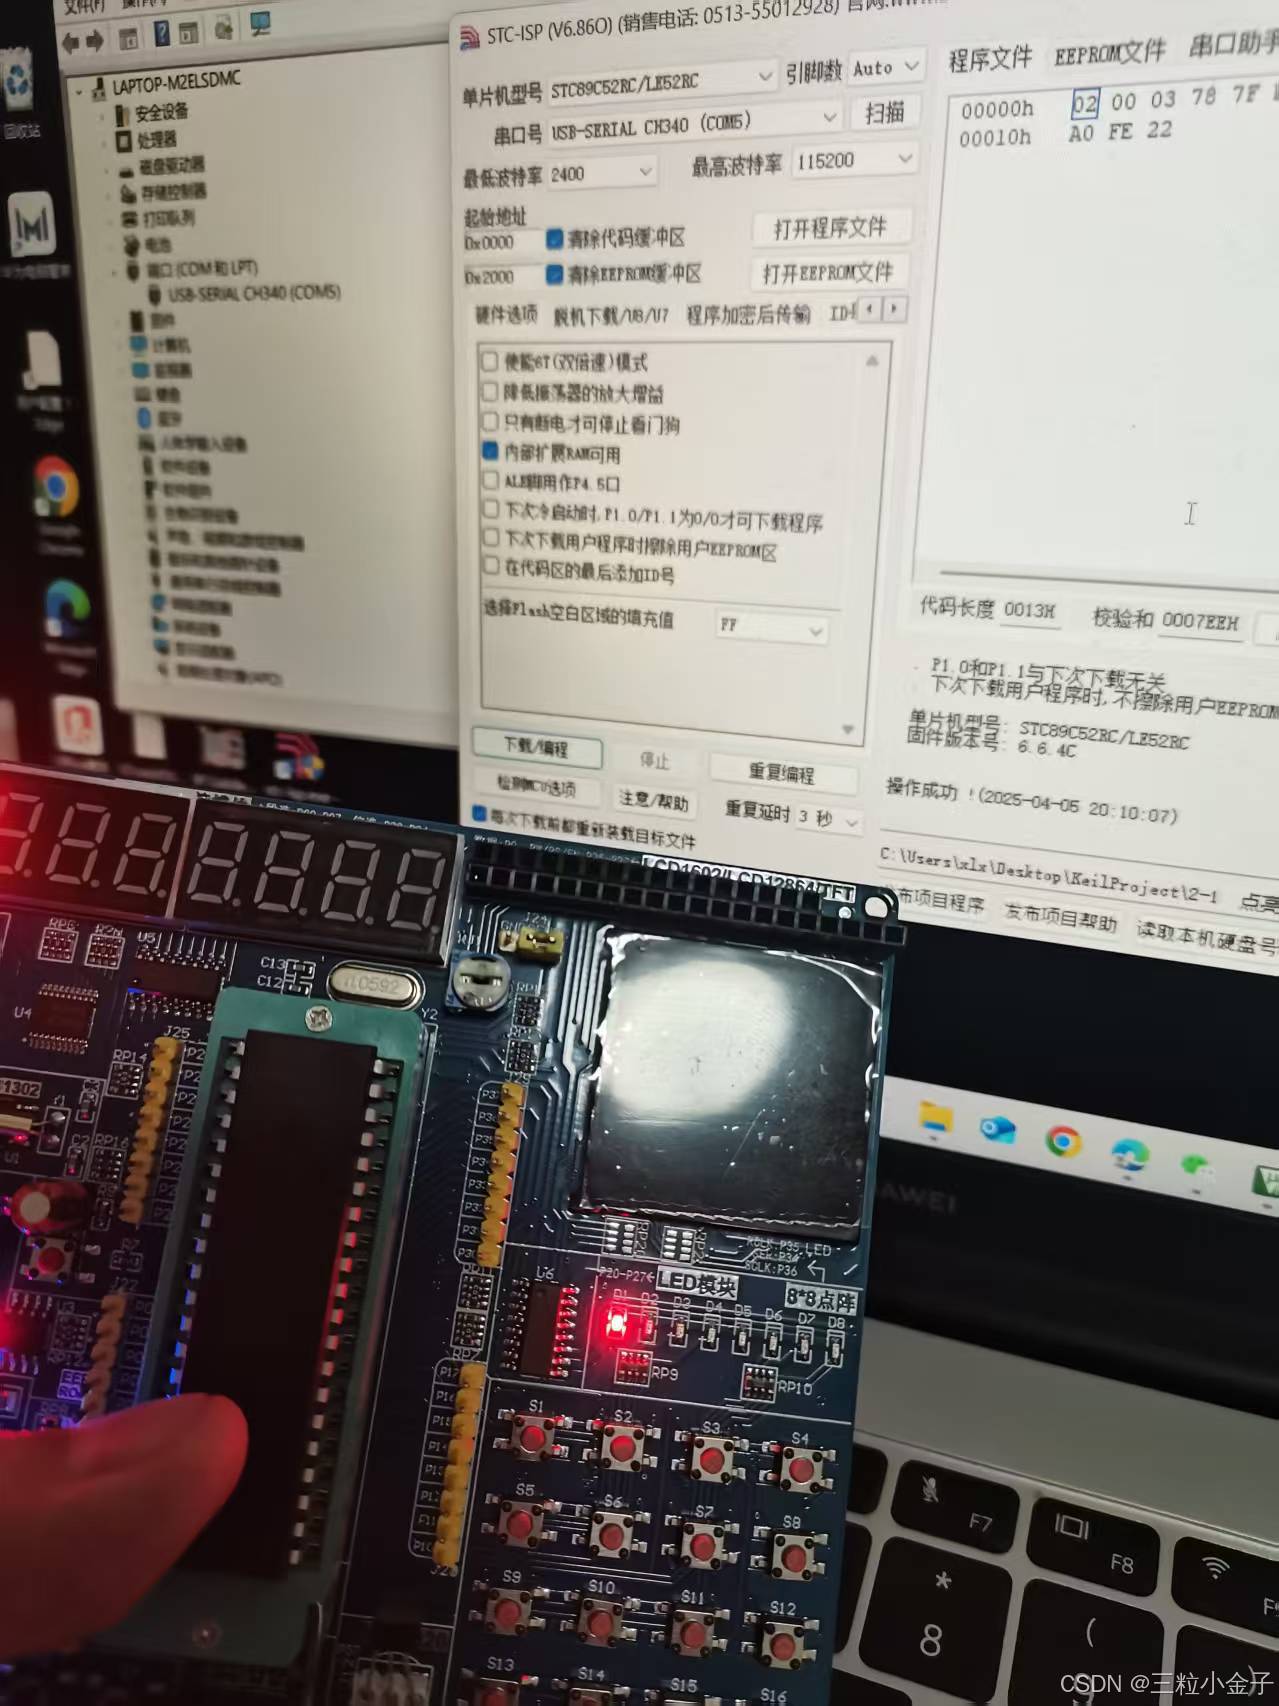
单片机led亮灯
#include <REGX52.H>void main()
{P2=0xFE;//1111 1110
}
流水线led
#include <REGX52.H>void Delay1ms(unsigned int xms)		//@11.0592MHz
{unsigned char i, j, k;while(xms){xms = xms -1 ;i = 2;j = 239;do{while (--j); } while (--i);}
}void main()
{while(1){P2=0xFE;//11111110Delay1ms(100);P2=0xFD;//11111101Delay1ms(100);P2=0xFB;//11111011Delay1ms(100);P2=0xF7;//11110111Delay1ms(100);P2=0xEF;//11101111Delay1ms(100);P2=0xDE;//11011111Delay1ms(100);P2=0xBE;//10111111Delay1ms(100);P2=0x7E;//01111111Delay1ms(100);}
}
独立按键控制led
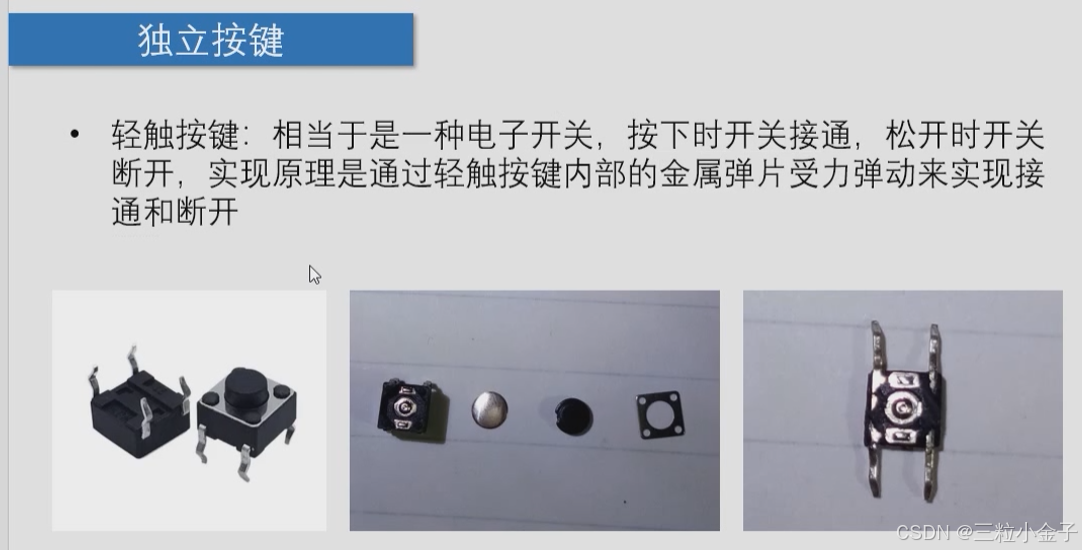
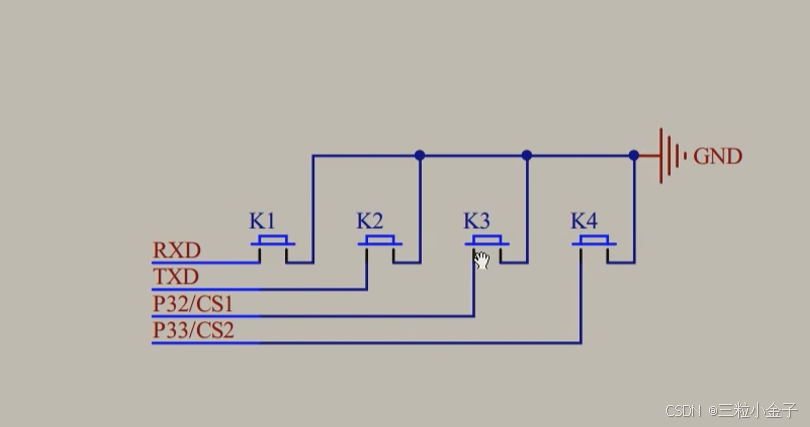
#include <REGX52.H>void main()
{
//	P2=0xFE;while(1){if(P3_1==0){P2_0=0;}else P2_0=1;}
}
#include <REGX52.H>void Delay(unsigned int xms)		//@12.000MHz
{unsigned char i, j;while(xms){i = 2;j = 239;do{while (--j);} while (--i);xms--;}}
void main()
{while(1){if(P3_1==0){Delay(20);while(P3_1==0);Delay(20);P2_0=~P2_0;}}
}
硬件知识
比较杂的小知识
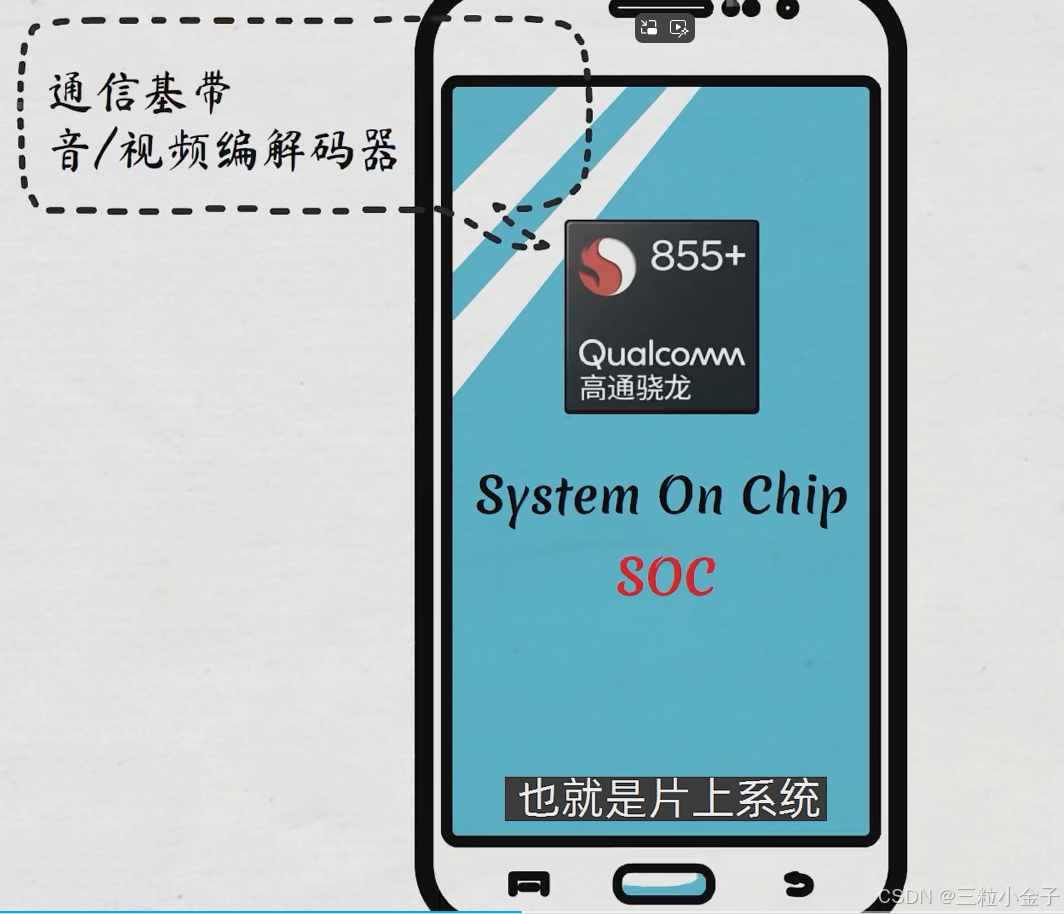
soc又可分为
1.基于微处理器构建 Micro-Processor Unit(MPU) 重处理
路由器~智能音箱等 运行linux操作系统
2.基于微控制器构建Mrcro-Controller Unit(MCU) 重控制
也叫Single-Chip microcomputer 单片机
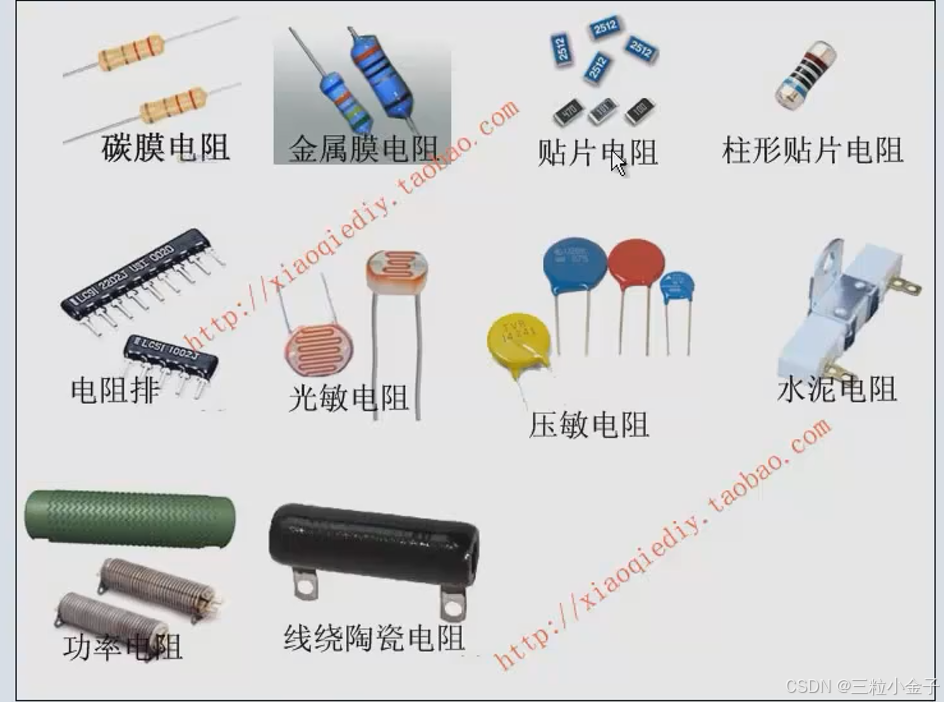
基础元器件
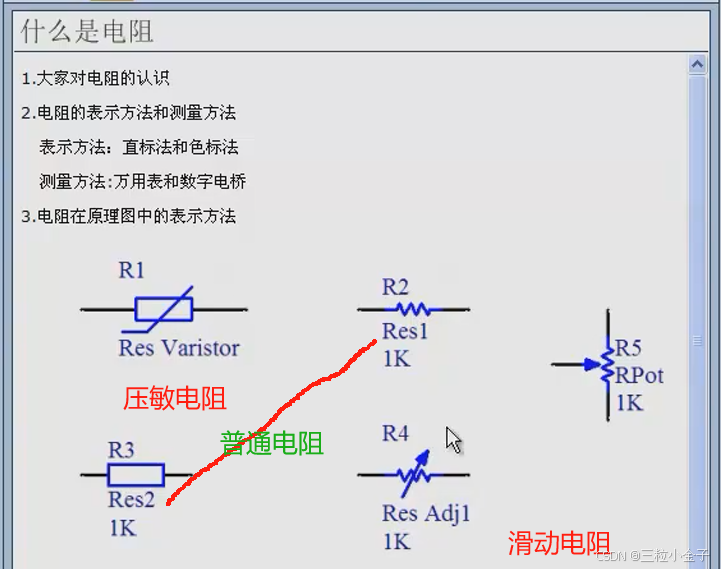
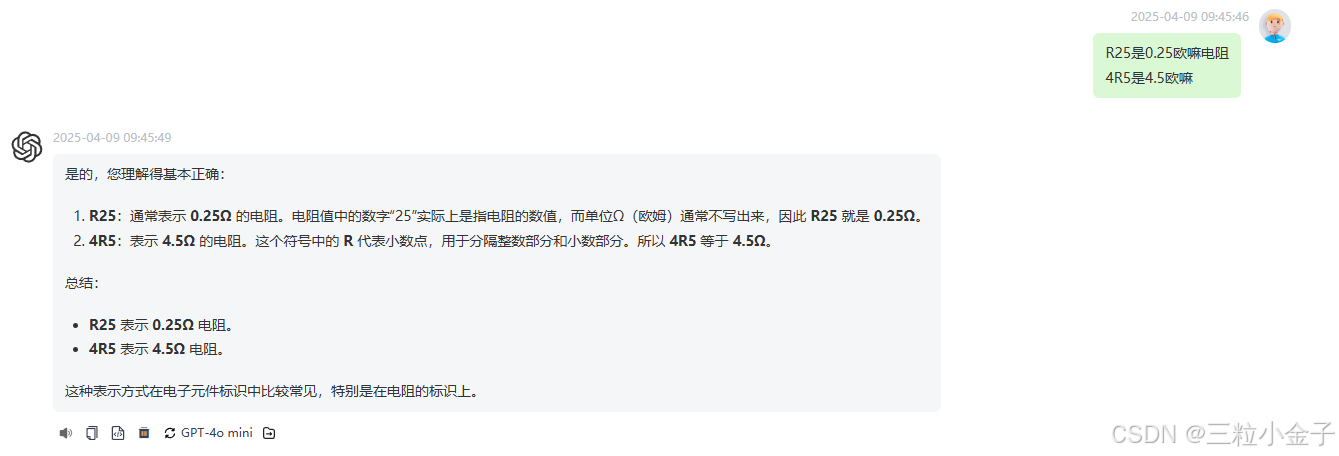
电阻
贴片电阻是最常用的 功率=I方×R P= I^2*R
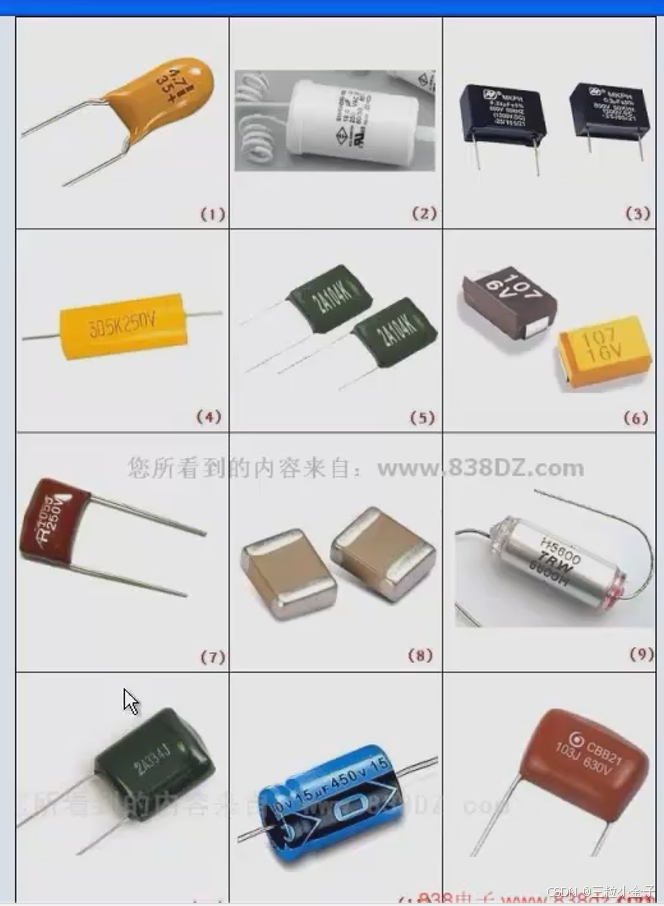
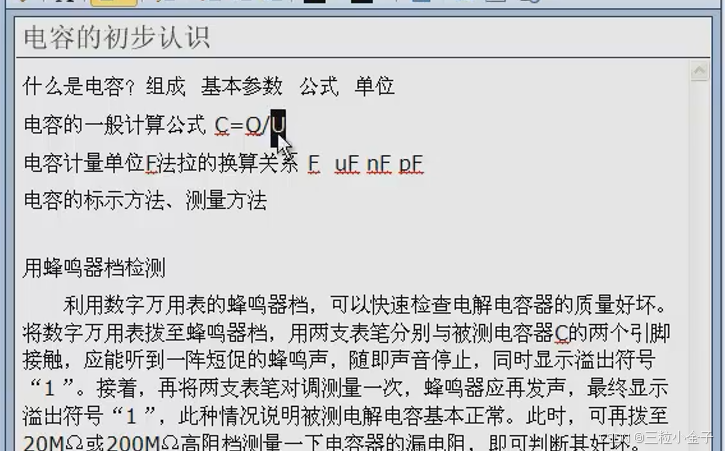
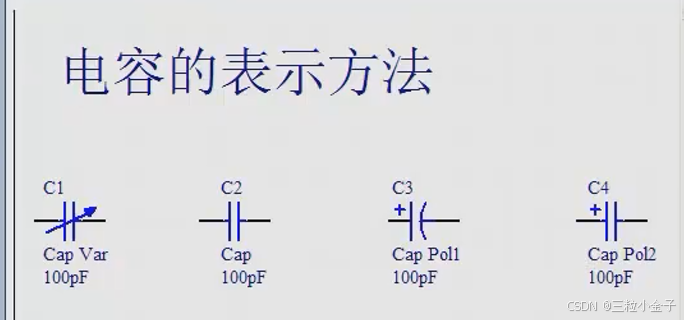
电容器(法拉)
1. 隔直流电,通交流电
2. 电容器上的电压不能突变
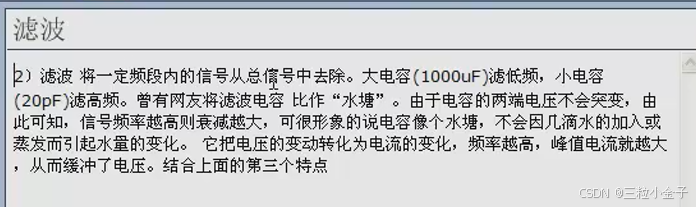
滤波
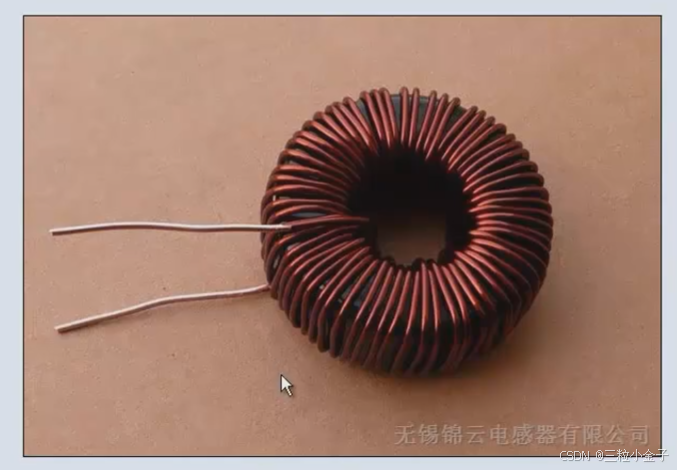
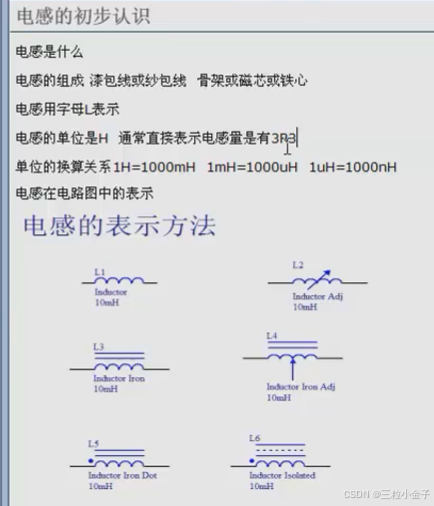
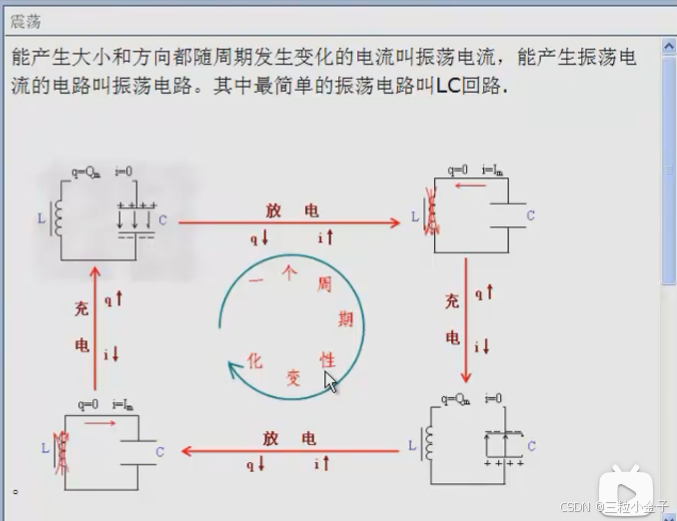
电感器(通直流阻交流)
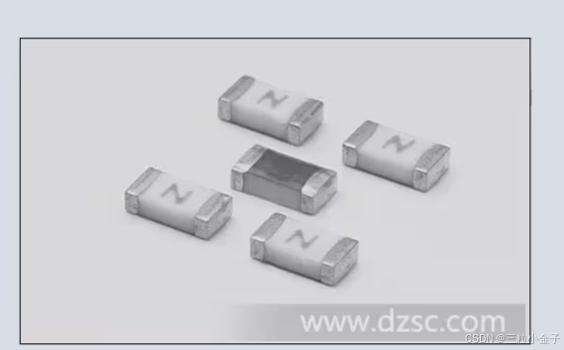
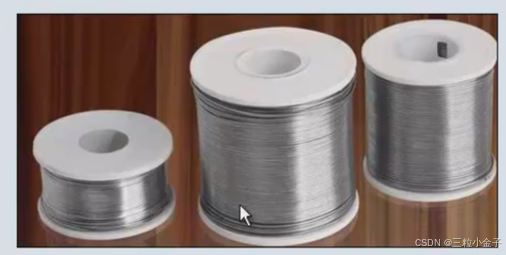
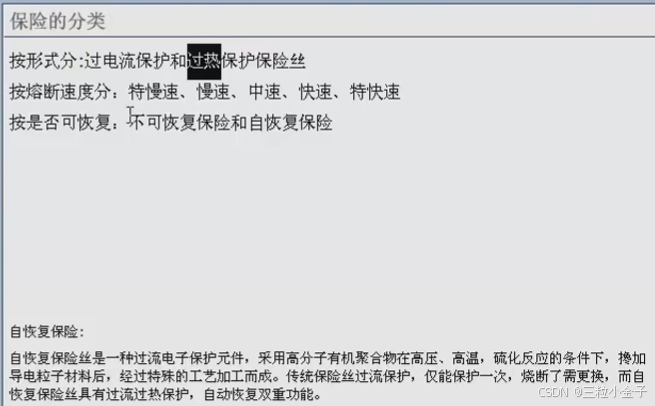
保险(熔断器)
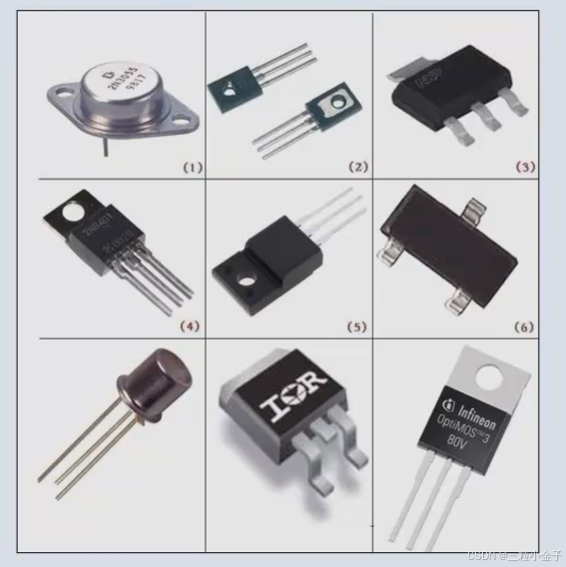
二极管
算法复习
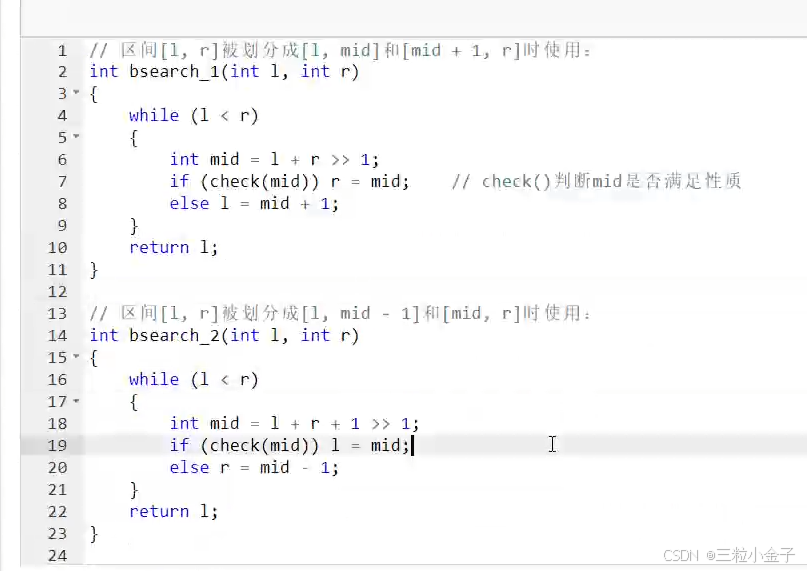
二分
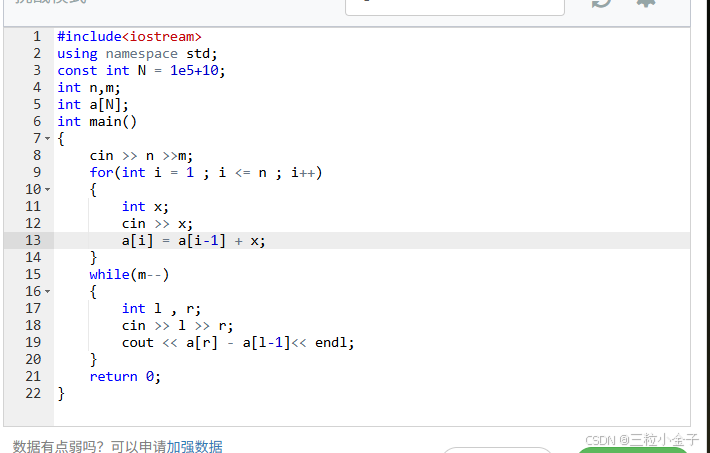
前缀和
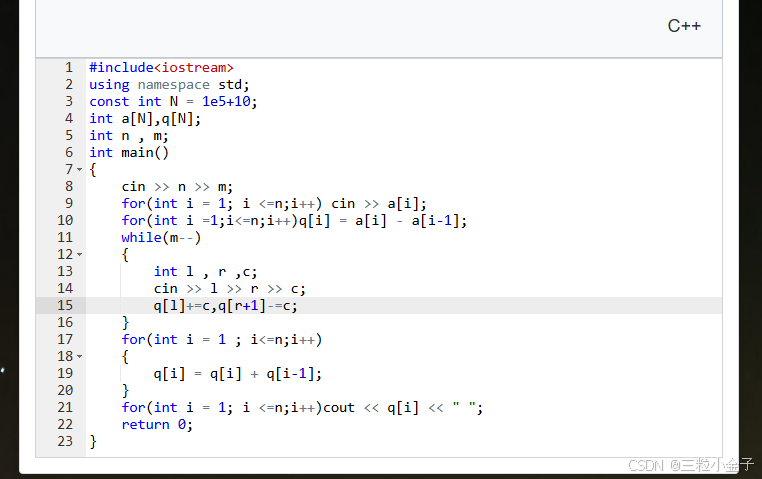
差分
子矩阵的和
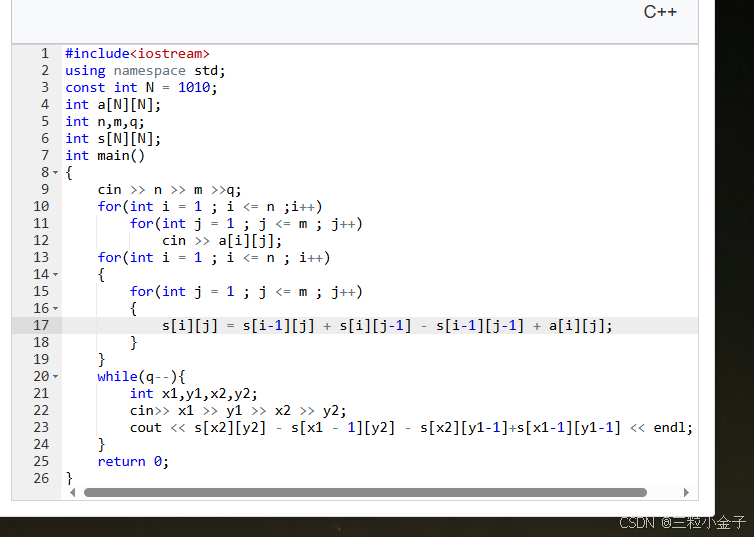
差分
差分矩阵
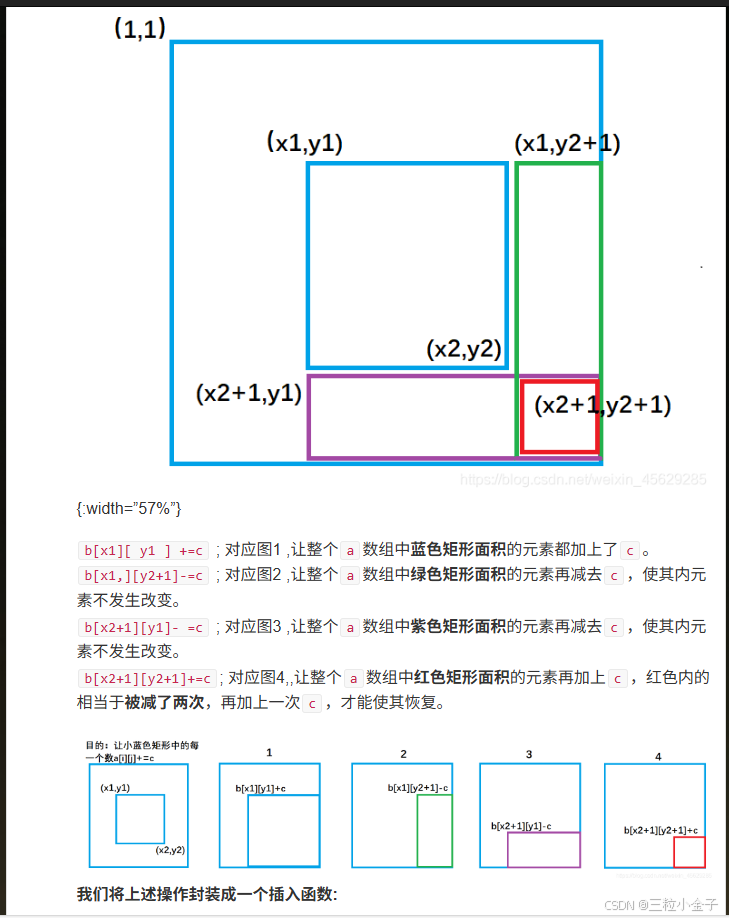
不需要考虑如何构造,考虑如何进行更新。