The FastMCP Client
目录
- 基本知识(Essentials)
- 创建客户端(Creating a Client)
- 客户端-传输架构(Client-Transport Architecture)
- 传输机制自动推断(Transport Inference)
- 基于配置的客户端(Configuration-Based Clients)
- 配置格式(Configuration Format)
- 多服务器示例(Multi-Server Example)
- 连接生命周期(Connection Lifecycle)
- 操作(Operations)
- 🛠 工具(Tools)
- 📁 资源(Resources)
- ✉️ 提示模板(Prompts)
- 🌐 服务器连接性(Server Connectivity)
- 客户端配置(Client Configuration)
- 回调处理器(Callback Handlers)
- 传输配置(Transport Configuration)
- STDIO 传输(STDIO Transport)
- 客户端负责启动服务器(The Client Runs the Server)
- 环境隔离(Environment Isolation)
- 基本用法(Basic Usage)
- 环境变量管理(Environment Variables)
- 会话保持(Session Persistence)
- 特殊 STDIO 传输类型(Specialized STDIO Transports)
- 🌐 远程传输(Remote Transports)
- 🚀 可流式的 HTTP 传输(Streamable HTTP Transport)
- 🕊️ SSE 传输(SSE Transport,旧版)
- 🧠 内存传输(In-Memory Transport)
- ⚙️ MCP JSON 配置传输(MCP JSON Configuration Transport)
- 🔧 FastMCP 与 MCPConfig 的工具转换(Tool Transformation)
- ✅ 工具白名单与黑名单(Allowlisting & Blocklisting Tools)
- 核心操作
- 工具操作(Tool Operations)
- 发现工具(Discovering Tools)
- 执行工具(Executing Tools)
- 基本执行(Basic Execution)
- 高级执行选项(Advanced Execution Options)
- 处理结果(Handling Results)
- CallToolResult 属性
- 结构化数据访问
- 回退机制(Fallback Behavior)
- 原始类型自动解包(Primitive Type Unwrapping)
- 错误处理(Error Handling)
- 基于异常的错误处理(Exception-Based Error Handling)
- 手动错误检查(Manual Error Checking)
- 原始 MCP 协议访问(Raw MCP Protocol Access)
- 参数处理(Argument Handling)
- 资源操作(Resource Operations)
- 资源类型(Types of Resources)
- 列出资源(Listing Resources)
- 读取资源(Reading Resources)
- 内容类型(Content Types)
- 多服务器客户端支持(Working with Multi-Server Clients)
- 原始 MCP 协议访问(Raw MCP Protocol Access)
- 常见资源 URI 格式(Common Resource URI Patterns)
- 提示(Prompts)
- 列出提示(Listing Prompts)
- 使用提示(Using Prompts)
- 基本用法
- 带参数的提示
- 自动参数序列化(Automatic Argument Serialization)
- 使用提示结果(Working with Prompt Results)
- 原始 MCP 协议访问(Raw MCP Protocol Access)
- 多服务器客户端(Multi-Server Clients)
- 常见提示模式(Common Prompt Patterns)
- 系统消息(System Messages)
- 对话模板(Conversation Templates)
- 高级功能
- 用户引导输入(User Elicitation)
- FastMCP 如何简化引导输入?
- 引导输入处理器(Elicitation Handler)
- 服务器日志(Server Logging)
- 日志处理器(Log Handler)
- LogMessage 对象属性:
- 默认日志处理方式
- 进度监控(Progress Monitoring)
- LLM 采样(LLM Sampling)
- 消息处理(Message Handling)
- 函数式处理器(Function-Based Handler)
- 类式处理器(Message Handler Class)
- 请求处理说明
- 客户端根目录(Client Roots)
- 设置静态 Roots
- 认证
- OAuth 认证
- 客户端使用
- 默认配置
- OAuth 辅助类
- OAuth 流程
- 令牌管理
- Bearer Token 认证
- 客户端使用
- BearerAuth 辅助类
- 自定义请求头
- 结合langChian/langGrpah使用
基本知识(Essentials)
新增版本:2.0.0
FastMCP 客户端应用的核心是 fastmcp.Client 类。该类提供了一个编程接口,用于与任何 MCP(Model Context Protocol)服务器交互,自动处理协议细节和连接管理。
FastMCP 客户端专为确定性、可控的交互而设计,而非自主行为,适用于以下场景:
- 开发过程中测试 MCP 服务器
- 构建需要可靠 MCP 交互的确定性应用
- 为基于 Agent 或 LLM 的客户端打下基础,支持结构化、类型安全的操作
所有客户端操作都需要通过 async with 上下文管理器来正确管理连接生命周期。
⚠️ 注意:这不是一个具备 agent 能力的客户端,它需要显式调用函数,并提供对所有 MCP 操作的直接控制。建议将其作为构建高级系统的基础模块使用。
创建客户端(Creating a Client)
创建一个客户端非常简单。你只需提供一个服务器来源,客户端就会自动推断合适的传输机制。
import asyncio
from fastmcp import Client, FastMCP# 内存中的服务器(适用于测试)
server = FastMCP("TestServer")
client = Client(server)# HTTP 服务器
client = Client("https://example.com/mcp")# 本地 Python 脚本服务器
client = Client("my_mcp_server.py")async def main():async with client:# 基本服务器交互await client.ping()# 列出可用操作tools = await client.list_tools()resources = await client.list_resources()prompts = await client.list_prompts()# 执行操作result = await client.call_tool("example_tool", {"param": "value"})print(result)asyncio.run(main())
客户端-传输架构(Client-Transport Architecture)
FastMCP 客户端将协议操作与连接机制进行了职责分离:
- Client:处理 MCP 协议操作(如 tools、resources、prompts)并管理回调
- Transport:负责建立和维护连接(支持 WebSockets、HTTP、Stdio、本地内存等)
传输机制自动推断(Transport Inference)
客户端会根据输入类型自动推断出合适的传输方式:
| 输入类型 | 推断结果 |
|---|---|
FastMCP 实例 | → 内存传输(适合测试) |
.py 结尾的文件路径 | → Python Stdio 传输 |
.js 结尾的文件路径 | → Node.js Stdio 传输 |
以 http:// 或 https:// 开头的 URL | → HTTP 传输 |
MCPConfig 字典 | → 多服务器客户端 |
from fastmcp import Client, FastMCP# 示例:不同传输机制的推断
client_memory = Client(FastMCP("TestServer"))
client_script = Client("./server.py")
client_http = Client("https://api.example.com/mcp")
建议:在测试和开发阶段,始终优先使用内存传输方式,即直接将 FastMCP 服务器实例传给客户端。这样可以避免网络复杂性和进程间通信。
基于配置的客户端(Configuration-Based Clients)
新增版本:2.4.0
可以通过 MCP 配置字典创建客户端,这些配置可以包含多个服务器。虽然 MCP 配置格式目前还没有官方标准,但 FastMCP 遵循了类似 Claude Desktop 等工具中使用的通用约定。
配置格式(Configuration Format)
config = {"mcpServers": {"server_name": {# 远程 HTTP 或 SSE 服务器"transport": "http",  # 或 "sse""url": "https://api.example.com/mcp","headers": {"Authorization": "Bearer token"},"auth": "oauth"  # 或者直接填写 Bearer token 字符串},"local_server": {# 本地 Stdio 服务器"transport": "stdio","command": "python","args": ["./server.py", "--verbose"],"env": {"DEBUG": "true"},"cwd": "/path/to/server",}}
}
多服务器示例(Multi-Server Example)
config = {"mcpServers": {"weather": {"url": "https://weather-api.example.com/mcp"},"assistant": {"command": "python", "args": ["./assistant_server.py"]}}
}client = Client(config)async with client:# 工具名称前缀为服务器名weather_data = await client.call_tool("weather_get_forecast", {"city": "London"})response = await client.call_tool("assistant_answer_question", {"question": "法国的首都是哪里?"})# 资源 URI 也使用前缀icons = await client.read_resource("weather://weather/icons/sunny")templates = await client.read_resource("resource://assistant/templates/list")
连接生命周期(Connection Lifecycle)
客户端采用异步方式工作,并使用上下文管理器来管理连接生命周期:
async def example():client = Client("my_mcp_server.py")# 在此建立连接async with client:print(f"已连接: {client.is_connected()}")# 在同一会话中发起多个调用tools = await client.list_tools()result = await client.call_tool("greet", {"name": "World"})# 在此自动关闭连接print(f"已连接: {client.is_connected()}")
操作(Operations)
FastMCP 客户端可以与多种类型的服务器组件进行交互:
🛠 工具(Tools)
工具是服务器端定义的函数,客户端可以通过传入参数来调用它们。
async with client:# 列出可用的工具tools = await client.list_tools()# 执行某个工具result = await client.call_tool("multiply", {"a": 5, "b": 3})print(result.data) # 输出:15
📁 资源(Resources)
资源是客户端可以读取的数据源,可能是静态的,也可能是可渲染的模板。
async with client:# 列出可用资源resources = await client.list_resources()# 读取一个资源content = await client.read_resource("file:///config/settings.json")print(content[0].text)
✉️ 提示模板(Prompts)
提示是可复用的消息模板,可以接受参数并生成结构化消息。
async with client:# 列出可用提示prompts = await client.list_prompts()# 获取渲染后的提示内容messages = await client.get_prompt("analyze_data", {"data": [1, 2, 3]})print(messages.messages)
🌐 服务器连接性(Server Connectivity)
使用 ping() 方法可以检查服务器是否可达:
async with client:await client.ping()print("服务器可达")
客户端配置(Client Configuration)
FastMCP 客户端支持通过附加的处理器(handlers)和配置项进行个性化定制,以满足特定的使用场景。
回调处理器(Callback Handlers)
客户端支持多个回调处理器,用于实现更高级的服务器交互功能:
from fastmcp import Client
from fastmcp.client.logging import LogMessageasync def log_handler(message: LogMessage):print(f"服务器日志: {message.data}")async def progress_handler(progress: float, total: float | None, message: str | None):print(f"进度: {progress}/{total} - {message}")async def sampling_handler(messages, params, context):# 这里可以接入你的 LLM 服务return "生成的回复"client = Client("my_mcp_server.py",log_handler=log_handler,progress_handler=progress_handler,sampling_handler=sampling_handler,timeout=30.0
)
Client 构造函数支持以下配置选项:
| 参数名 | 说明 |
|---|---|
transport | 传输实例或自动推断的来源 |
log_handler | 处理服务器日志消息 |
progress_handler | 监控耗时较长的操作进度 |
sampling_handler | 响应服务器端的 LLM 请求 |
roots | 向服务器提供本地上下文目录 |
timeout | 请求的默认超时时间(单位:秒) |
传输配置(Transport Configuration)
新增版本:2.0.0
FastMCP 客户端通过 传输对象(transport objects) 与 MCP 服务器通信,这些对象负责底层连接机制的实现。
虽然客户端可以根据你传入的参数自动选择合适的传输方式,但显式创建传输对象可以让你完全控制配置,包括环境变量、身份认证、会话管理等。
可以将“传输”理解为你客户端代码与 MCP 服务器之间的可配置适配器。不同的传输类型对应不同的通信模式,如:
- 使用子进程和管道
- 通过 HTTP 连接
- 或者直接进行内存调用
如何选择合适的传输方式(Choosing the Right Transport)
- ✅ 使用 STDIO 传输:当你需要在本地运行 MCP 服务器,并希望完全控制其运行环境和生命周期时。
- 🌐 使用远程传输(Remote Transports):用于连接生产环境服务,或独立运行的共享 MCP 服务器。
- 🧪 使用内存传输(In-Memory Transport):用于测试 MCP 服务器,避免使用子进程或网络带来的开销。
- 📦 使用 MCP JSON 配置文件:当你需要连接多个在配置文件中定义的服务器时。
STDIO 传输(STDIO Transport)
STDIO(标准输入/输出)传输通过子进程的管道与 MCP 服务器通信。这是类似 Claude Desktop 等桌面客户端所使用的标准机制,也是本地运行 MCP 服务器的主要方式。
客户端负责启动服务器(The Client Runs the Server)
📌 核心概念:使用 STDIO 传输时,客户端实际上负责启动并管理服务器进程。这与通过网络连接到已运行的服务器的方式有根本区别。理解这一点对于有效使用 STDIO 至关重要。
使用 STDIO 传输时,客户端将:
- 在连接时以子进程方式启动服务器
- 管理服务器的生命周期(启动、停止、重启)
- 控制服务器的运行环境和配置
- 通过 stdin/stdout 管道与服务器通信
这种架构适用于强大的本地集成,但需要对环境隔离和进程管理有一定理解。
环境隔离(Environment Isolation)
STDIO 服务器默认在隔离环境中运行,这是 MCP 协议为避免敏感信息泄露而实施的安全机制。
当客户端启动 MCP 服务器时:
- 服务器不会继承你 Shell 中的环境变量
- 所有 API 密钥、路径、配置等必须显式传入
- 工作目录和系统路径可能与你当前 Shell 不同
👉 你可以通过 env 参数显式传递环境变量:
from fastmcp import Clientclient = Client("my_server.py",env={"API_KEY": "secret", "DEBUG": "true"}
)# ❌ 以下方式无效:服务器无法访问 shell 中设置的变量
# export API_KEY="secret"  # 在 shell 中设置
# client = Client("my_server.py")  # 服务器无法看到 API_KEY
基本用法(Basic Usage)
使用 STDIO 传输时,你需要使用命令和参数构建一个传输实例:
from fastmcp.client.transports import StdioTransporttransport = StdioTransport(command="python",args=["my_server.py"]
)
client = Client(transport)
你也可以进一步配置环境变量、工作目录、命令参数等:
transport = StdioTransport(command="python",args=["my_server.py", "--verbose"],env={"LOG_LEVEL": "DEBUG"},cwd="/path/to/server"
)
client = Client(transport)
📝 简便起见,客户端也支持从文件路径自动推断 STDIO 传输,但这种方式无法配置:
from fastmcp import Clientclient = Client("my_server.py") # 简写方式,功能有限
环境变量管理(Environment Variables)
由于 STDIO 服务器不会继承你的环境,推荐以下两种方式传递配置:
✅ 有选择地传递环境变量:
import os
from fastmcp.client.transports import StdioTransportrequired_vars = ["API_KEY", "DATABASE_URL", "REDIS_HOST"]
env = {var: os.environ[var] for var in required_vars if var in os.environ
}transport = StdioTransport(command="python",args=["server.py"],env=env
)
client = Client(transport)
✅ 从 .env 文件加载配置:
from dotenv import dotenv_values
from fastmcp.client.transports import StdioTransportenv = dotenv_values(".env")
transport = StdioTransport(command="python",args=["server.py"],env=env
)
client = Client(transport)
会话保持(Session Persistence)
STDIO 传输默认在多个客户端上下文之间保持会话(keep_alive=True)。这通过复用同一个子进程来提升性能,但在需要隔离时可以进行控制。
默认情况下,子进程会在连接之间持续存在:
from fastmcp.client.transports import StdioTransporttransport = StdioTransport(command="python",args=["server.py"]
)
client = Client(transport)async def efficient_multiple_operations():async with client:await client.ping()async with client:  # 复用同一个子进程await client.call_tool("process_data", {"file": "data.csv"})
如需在每次连接间实现完全隔离,可设置 keep_alive=False:
transport = StdioTransport(command="python",args=["server.py"],keep_alive=False
)
client = Client(transport)
🔒 使用 keep_alive=False 适用于测试场景或服务器状态可能干扰后续连接的情况。
特殊 STDIO 传输类型(Specialized STDIO Transports)
FastMCP 还提供了一些便捷封装的传输类型,它们是 StdioTransport 的简化版本,预设了常用命令:
| 类型 | 说明 |
|---|---|
PythonStdioTransport | 针对 .py 文件,使用 python 命令 |
NodeStdioTransport | 针对 .js 文件,使用 node 命令 |
UvxStdioTransport | 使用 uvx 运行 Python 包,支持 env_vars 参数 |
NpxStdioTransport | 使用 npx 运行 Node 包,支持 env_vars 参数 |
⚠️ 对于大多数场景,推荐直接使用
StdioTransport并手动指定命令。这些特殊类型主要用于客户端的自动推断。
🌐 远程传输(Remote Transports)
远程传输用于连接以 Web 服务形式运行的 MCP 服务器。这种模式与 STDIO 传输有本质上的不同——你的客户端不再负责启动和管理服务器进程,而是连接到已在运行中的服务,这些服务自身管理其运行环境和生命周期。
🚀 可流式的 HTTP 传输(Streamable HTTP Transport)
新增版本:2.3.0
流式 HTTP 是推荐用于生产部署的传输方式,它通过 HTTP 连接提供高效的双向流式通信。
- 类名:
StreamableHttpTransport - 服务器兼容性:FastMCP 使用命令
mcp run --transport http启动的服务器
该传输方式需要一个 URL,并可选支持自定义请求头,用于身份认证与配置:
from fastmcp.client.transports import StreamableHttpTransport# 基础连接
transport = StreamableHttpTransport(url="https://api.example.com/mcp")
client = Client(transport)# 添加自定义请求头(用于身份认证)
transport = StreamableHttpTransport(url="https://api.example.com/mcp",headers={"Authorization": "Bearer your-token-here","X-Custom-Header": "value"}
)
client = Client(transport)
为了方便身份认证,FastMCP 提供了专用认证工具:
from fastmcp.client.auth import BearerAuthclient = Client("https://api.example.com/mcp",auth=BearerAuth("your-token-here")
)
🕊️ SSE 传输(SSE Transport,旧版)
SSE(Server-Sent Events)传输仍被保留用于向后兼容,但对于新部署场景,推荐改用 Streamable HTTP。
- 类名:
SSETransport - 服务器兼容性:FastMCP 使用命令
mcp run --transport sse启动的服务器
SSE 传输支持与 Streamable HTTP 相同的配置方式:
from fastmcp.client.transports import SSETransporttransport = SSETransport(url="https://api.example.com/sse",headers={"Authorization": "Bearer token"}
)
client = Client(transport)
⚠️ 建议:除非你的基础设施明确要求使用 SSE,否则新项目应使用 Streamable HTTP。
🧠 内存传输(In-Memory Transport)
内存传输直接连接到同一 Python 进程中的 FastMCP 服务器实例。
这省去了子进程管理和网络通信的开销,因此非常适合测试和开发环境。
- 类名:
FastMCPTransport
与 STDIO 传输不同,内存服务器拥有完整访问当前 Python 环境的权限。
它们与客户端代码共享内存空间和环境变量,无需环境隔离或显式传递变量。
from fastmcp import FastMCP, Client
import osmcp = FastMCP("TestServer")@mcp.tool
def greet(name: str) -> str:prefix = os.environ.get("GREETING_PREFIX", "Hello")return f"{prefix}, {name}!"client = Client(mcp)async with client:result = await client.call_tool("greet", {"name": "World"})
⚙️ MCP JSON 配置传输(MCP JSON Configuration Transport)
新增版本:2.4.0
该传输方式支持新兴的 MCP JSON 配置标准,用于定义多个 MCP 服务器。
- 类名:
MCPConfigTransport
config = {"mcpServers": {"weather": {"url": "https://weather.example.com/mcp","transport": "http"},"assistant": {"command": "python","args": ["./assistant.py"],"env": {"LOG_LEVEL": "INFO"}}}
}client = Client(config)async with client:# 工具以服务器命名空间为前缀weather = await client.call_tool("weather_get_forecast", {"city": "NYC"})answer = await client.call_tool("assistant_ask", {"question": "What?"})
🔧 FastMCP 与 MCPConfig 的工具转换(Tool Transformation)
FastMCP 支持在 MCPConfig 配置中定义基础的工具转换,以便修改工具的定义或行为。
config = {"mcpServers": {"weather": {"url": "https://weather.example.com/mcp","transport": "http","tools": { }   # <--- 工具转换部分}}
}
通过这种方式,你可以修改工具的:
- 名称(name)
- 标题(title)
- 描述(description)
- 标签(tags)
- 是否启用(enabled)
- 参数定义(arguments)
对于每个参数,你可以变更其:
- 名称(name)
- 描述(description)
- 默认值(default)
- 是否隐藏(hide)
- 是否必填(required)
- 示例值(examples)
🔽 示例:将 weather_get_forecast 工具限定为仅查询迈阿密天气,并隐藏 city 参数:
tool_transformations = {"weather_get_forecast": {"name": "miami_weather","description": "Get the weather for Miami","arguments": {"city": {"name": "city","default": "Miami","hide": True,}}}
}config = {"mcpServers": {"weather": {"url": "https://weather.example.com/mcp","transport": "http","tools": tool_transformations}}
}
✅ 工具白名单与黑名单(Allowlisting & Blocklisting Tools)
你可以使用标签机制在客户端对工具进行白名单或黑名单过滤。
🔽 示例:只允许客户端访问带有 forecast 标签的工具,其他工具将不可用:
tool_transformations = {"weather_get_forecast": {"enabled": True,"tags": ["forecast"]}
}config = {"mcpServers": {"weather": {"url": "https://weather.example.com/mcp","transport": "http","tools": tool_transformations,"include_tags": ["forecast"]}}
}
核心操作
工具操作(Tool Operations)
使用 FastMCP 客户端发现并执行服务器端工具。
新增版本:2.0.0
工具是 MCP 服务器暴露的可执行函数。FastMCP 客户端提供了方法来发现可用工具并使用参数执行它们。
发现工具(Discovering Tools)
使用 list_tools() 获取服务器上所有可用的工具:
async with client:tools = await client.list_tools()# tools -> list[mcp.types.Tool]for tool in tools:print(f"工具名称: {tool.name}")print(f"描述: {tool.description}")if tool.inputSchema:print(f"参数: {tool.inputSchema}")
执行工具(Executing Tools)
基本执行(Basic Execution)
使用 call_tool(),传入工具名称和参数,执行工具:
async with client:# 简单调用示例result = await client.call_tool("add", {"a": 5, "b": 3})# result -> CallToolResult,包含结构化和非结构化数据# 访问结构化数据(自动反序列化)print(result.data) # 8(整数),或针对原始类型返回 {"result": 8}# 访问传统内容块 print(result.content[0].text) # "8" (TextContent 类型)
高级执行选项(Advanced Execution Options)
call_tool() 支持额外参数,用于控制超时和进度监控:
async with client:# 设置超时时间(执行超过 2 秒则中止)result = await client.call_tool("long_running_task", {"param": "value"}, timeout=2.0)# 设置进度回调(监控执行进度)result = await client.call_tool("long_running_task",{"param": "value"},progress_handler=my_progress_handler)
参数说明:
name:工具名称(字符串)arguments:传递给工具的参数字典(可选)timeout:最大执行时间,单位秒(可选,会覆盖客户端层级超时)progress_handler:进度回调函数(可选,会覆盖客户端层级回调)
处理结果(Handling Results)
新增版本:2.10.0
工具执行会返回一个 CallToolResult 对象,包含结构化数据和传统内容。FastMCP 的亮点在于 .data 属性,它不仅提供原始 JSON,还会“还原”成完整的 Python 对象,包括复杂类型如 datetime、UUID 和自定义类。
CallToolResult 属性
-
.data
类型:Any
✅ FastMCP 独有功能:返回已完整反序列化的 Python 对象,支持复杂类型(如datetime、UUID、自定义类)。超越普通 JSON,实现输出模式的完整对象重建。 -
.content
类型:list[mcp.types.ContentBlock]
所有 MCP 服务器通用的标准内容块(如TextContent、ImageContent、AudioContent等)。 -
.structured_content
类型:dict[str, Any] | None
服务器返回的结构化 JSON 数据(标准 MCP 输出格式),仅在服务器支持结构化输出时可用。 -
.is_error
类型:bool
表示工具执行是否失败的布尔值。
结构化数据访问
FastMCP 的 .data 属性返回的是完整还原的 Python 对象,而不仅仅是 JSON 字典。这意味着复杂类型也会被自动识别和还原,例如:
from datetime import datetime
from uuid import UUIDasync with client:result = await client.call_tool("get_weather", {"city": "London"})# FastMCP 会根据服务端定义的输出模式重建 Python 对象weather = result.data  # 例如 WeatherReport 类的实例print(f"气温:{weather.temperature}°C,时间:{weather.timestamp}")print(f"气象站 ID:{weather.station_id}")print(f"湿度:{weather.humidity}%")# 时间戳是 datetime 对象,不是字符串assert isinstance(weather.timestamp, datetime)assert isinstance(weather.station_id, UUID)# 与原始结构化 JSON 比较(标准 MCP 格式)print(f"原始 JSON:{result.structured_content}")# {"temperature": 20, "timestamp": "2024-01-15T14:30:00Z", "station_id": "123e4567-..."}# 传统内容块(如纯文本)print(f"文本内容:{result.content[0].text}")
回退机制(Fallback Behavior)
如果工具没有定义输出模式,或者反序列化失败,则 .data 将为 None:
async with client:result = await client.call_tool("legacy_tool", {"param": "value"})if result.data is not None:print(f"结构化输出:{result.data}")else:# 使用内容块获取结果(回退方案)for content in result.content:if hasattr(content, 'text'):print(f"文本结果:{content.text}")elif hasattr(content, 'data'):print(f"二进制数据:{len(content.data)} 字节")
原始类型自动解包(Primitive Type Unwrapping)
FastMCP 服务器会自动将非对象返回值(如 int、str、bool)包装成 {"result": value} 的形式以符合结构化输出规范。FastMCP 客户端会自动将 .data 中的这种结构“解包”,方便你直接获取原始值:
async with client:result = await client.call_tool("calculate_sum", {"a": 5, "b": 3})# FastMCP 客户端自动解包print(result.data) # 输出:8(int)# 查看结构化内容的原始形式print(result.structured_content) # 输出:{"result": 8}# 其他 MCP 客户端可能需要手动提取 ["result"]# value = result.structured_content["result"] # 在 FastMCP 中无需这样做!
错误处理(Error Handling)
基于异常的错误处理(Exception-Based Error Handling)
默认情况下,如果工具执行失败,call_tool() 会抛出 ToolError 异常:
from fastmcp.exceptions import ToolErrorasync with client:try:result = await client.call_tool("potentially_failing_tool", {"param": "value"})print("工具执行成功:", result.data)except ToolError as e:print(f"工具执行失败: {e}")
手动错误检查(Manual Error Checking)
你也可以关闭自动异常抛出,通过返回结果手动检查错误:
async with client:result = await client.call_tool("potentially_failing_tool", {"param": "value"}, raise_on_error=False)if result.is_error:print(f"工具执行失败: {result.content[0].text}")else:print(f"工具执行成功: {result.data}")
原始 MCP 协议访问(Raw MCP Protocol Access)
若你需要完全控制响应内容,可使用 call_tool_mcp(),它返回原始的 MCP 协议对象:
async with client:result = await client.call_tool_mcp("potentially_failing_tool", {"param": "value"})# result -> mcp.types.CallToolResultif result.isError:print(f"工具执行失败: {result.content}")else:print(f"工具执行成功: {result.content}")# 注意:call_tool_mcp() 不会自动进行反序列化
参数处理(Argument Handling)
传入工具的参数以字典形式传递:
async with client:# 简单参数result = await client.call_tool("greet", {"name": "World"})# 复杂参数result = await client.call_tool("process_data", {"config": {"format": "json", "validate": True},"items": [1, 2, 3, 4, 5],"metadata": {"source": "api", "version": "1.0"}})
对于多服务器客户端,工具名会自动加上服务器前缀,例如:weather 服务器中的 get_forecast 工具,工具名将变为:weather_get_forecast。
资源操作(Resource Operations)
从 MCP 服务器访问静态和模板资源。
新增于版本:2.0.0
资源是 MCP 服务器公开的数据源,可以是静态文件,也可以是基于参数生成内容的动态模板。
资源类型(Types of Resources)
MCP 服务器公开两种类型的资源:
- 静态资源(Static Resources):固定内容,可通过 URI 访问(例如配置文件、文档)。
- 资源模板(Resource Templates):动态资源,接受参数并生成内容(例如 API 接口、数据库查询)。
列出资源(Listing Resources)
使用 list_resources() 获取服务器上所有可用的静态资源:
async with client:resources = await client.list_resources()# resources -> list[mcp.types.Resource]for resource in resources:print(f"资源 URI: {resource.uri}")print(f"名称: {resource.name}")print(f"描述: {resource.description}")print(f"MIME 类型: {resource.mimeType}")
使用 list_resource_templates() 获取可用的资源模板:
async with client:templates = await client.list_resource_templates()# templates -> list[mcp.types.ResourceTemplate]for template in templates:print(f"模板 URI: {template.uriTemplate}")print(f"名称: {template.name}")print(f"描述: {template.description}")
读取资源(Reading Resources)
通过 URI 读取静态资源:
async with client:# 读取静态资源content = await client.read_resource("file:///path/to/README.md")# content -> list[mcp.types.TextResourceContents | mcp.types.BlobResourceContents]# 访问文本内容if hasattr(content[0], 'text'):print(content[0].text)# 访问二进制内容if hasattr(content[0], 'blob'):print(f"二进制数据大小: {len(content[0].blob)} 字节")
通过传参的 URI 从资源模板中读取内容:
async with client:# 读取模板生成的资源# 例如模板为 "weather://{{city}}/current"weather_content = await client.read_resource("weather://london/current")# 访问生成的内容print(weather_content[0].text) # 假设返回文本 JSON 响应
内容类型(Content Types)
资源可以返回不同类型的内容:
文本资源(Text Resources)
async with client:content = await client.read_resource("resource://config/settings.json")for item in content:if hasattr(item, 'text'):print(f"文本内容: {item.text}")print(f"MIME 类型: {item.mimeType}")
二进制资源(Binary Resources)
async with client:content = await client.read_resource("resource://images/logo.png")for item in content:if hasattr(item, 'blob'):print(f"二进制内容大小: {len(item.blob)} 字节")print(f"MIME 类型: {item.mimeType}")# 保存到文件with open("downloaded_logo.png", "wb") as f:f.write(item.blob)
多服务器客户端支持(Working with Multi-Server Clients)
使用多服务器客户端时,资源 URI 会自动添加服务器名前缀:
async with client: # 多服务器客户端# 从不同服务器访问资源weather_icons = await client.read_resource("weather://weather/icons/sunny")templates = await client.read_resource("resource://assistant/templates/list")print(f"天气图标内容: {weather_icons[0].blob}")print(f"模板内容: {templates[0].text}")
原始 MCP 协议访问(Raw MCP Protocol Access)
如需访问完整的 MCP 协议对象,可使用 *_mcp 方法:
async with client:# 原始 MCP 方法返回完整协议对象resources_result = await client.list_resources_mcp()# resources_result -> mcp.types.ListResourcesResulttemplates_result = await client.list_resource_templates_mcp()# templates_result -> mcp.types.ListResourceTemplatesResultcontent_result = await client.read_resource_mcp("resource://example")# content_result -> mcp.types.ReadResourceResult
常见资源 URI 格式(Common Resource URI Patterns)
不同 MCP 服务器可能使用不同的 URI 协议格式:
# 文件系统资源
"file:///path/to/file.txt"# 自定义协议资源
"weather://london/current"
"database://users/123"# 通用资源协议
"resource://config/settings"
"resource://templates/email"
资源 URI 的格式取决于 MCP 服务器的实现。请查阅服务器文档了解其支持的资源及 URI 格式。
提示(Prompts)
使用服务器端提示模板,并支持自动参数序列化。
新增于版本:2.0.0
提示是 MCP 服务器提供的可复用消息模板,可接受参数以生成用于大语言模型(LLM)交互的个性化消息序列。
列出提示(Listing Prompts)
使用 list_prompts() 获取所有可用的提示模板:
async with client:prompts = await client.list_prompts()# prompts -> list[mcp.types.Prompt]for prompt in prompts:print(f"提示名称: {prompt.name}")print(f"描述: {prompt.description}")if prompt.arguments:print(f"参数: {[arg.name for arg in prompt.arguments]}")
使用提示(Using Prompts)
基本用法
使用 get_prompt() 方法,通过提示名称和参数请求渲染后的提示内容:
async with client:# 无参数的简单提示result = await client.get_prompt("welcome_message")# result -> mcp.types.GetPromptResult# 访问生成的消息for message in result.messages:print(f"角色: {message.role}")print(f"内容: {message.content}")
带参数的提示
以字典形式传入参数来自定义提示内容:
async with client:# 带简单参数的提示result = await client.get_prompt("user_greeting", {"name": "Alice","role": "administrator"})# 访问个性化生成的消息for message in result.messages:print(f"生成的消息: {message.content}")
自动参数序列化(Automatic Argument Serialization)
新增于版本:2.9.0
FastMCP 会根据 MCP 规范自动将复杂参数序列化为 JSON 字符串。这意味着你可以直接传入带类型的对象:
from dataclasses import dataclass@dataclass
class UserData:name: strage: intasync with client:# 复杂参数会自动序列化result = await client.get_prompt("analyze_user", {"user": UserData(name="Alice", age=30),     # 自动转为 JSON"preferences": {"theme": "dark"},           # dict -> JSON 字符串"scores": [85, 92, 78],                     # list -> JSON 字符串"simple_name": "Bob"                        # 字符串不变})
客户端使用 pydantic_core.to_json() 进行序列化,保证格式一致。FastMCP 服务器会自动将这些 JSON 字符串反序列化为所需类型。
序列化示例(Serialization Examples)
async with client:result = await client.get_prompt("data_analysis", {# 以下会自动转为 JSON 字符串:"config": {"format": "csv","include_headers": True,"delimiter": ","},"filters": [{"field": "age", "operator": ">", "value": 18},{"field": "status", "operator": "==", "value": "active"}],# 以下保持原始字符串:"report_title": "Monthly Analytics Report"})
使用提示结果(Working with Prompt Results)
get_prompt() 返回一个 GetPromptResult 对象,包含一组消息:
async with client:result = await client.get_prompt("conversation_starter", {"topic": "climate"})# 访问每条消息for i, message in enumerate(result.messages):print(f"消息 {i + 1}:")print(f" 角色: {message.role}")print(f" 内容: {message.content.text if hasattr(message.content, 'text') else message.content}")
原始 MCP 协议访问(Raw MCP Protocol Access)
如需访问完整的 MCP 协议对象,请使用 *_mcp 方法:
async with client:# 原始 MCP 方法返回完整协议对象prompts_result = await client.list_prompts_mcp()# prompts_result -> mcp.types.ListPromptsResultprompt_result = await client.get_prompt_mcp("example_prompt", {"arg": "value"})# prompt_result -> mcp.types.GetPromptResult
多服务器客户端(Multi-Server Clients)
使用多服务器客户端时,可以直接访问提示,无需添加前缀(不同于工具的访问方式):
async with client: # 多服务器客户端# 可直接访问任意服务器上的提示result1 = await client.get_prompt("weather_prompt", {"city": "London"})result2 = await client.get_prompt("assistant_prompt", {"query": "help"})
常见提示模式(Common Prompt Patterns)
系统消息(System Messages)
许多提示用于生成系统消息,以配置 LLM:
async with client:result = await client.get_prompt("system_configuration", {"role": "helpful assistant","expertise": "python programming"})# 通常返回角色为 "system" 的消息system_message = result.messages[0]print(f"系统提示: {system_message.content}")
对话模板(Conversation Templates)
提示可以生成多轮对话的模板:
async with client:result = await client.get_prompt("interview_template", {"candidate_name": "Alice","position": "Senior Developer"})# 多条消息组成对话流程for message in result.messages:print(f"{message.role}: {message.content}")
提示的参数及其预期类型取决于具体的提示实现。
高级功能
用户引导输入(User Elicitation)
Elicitation(引导输入)允许 MCP 服务器在工具执行过程中动态请求用户提供结构化输入。这意味着,不需要一开始就提供所有参数,服务器可以在运行过程中交互式地向用户询问信息,例如:
- “你希望在哪个目录下创建文件?”
- “你想分析哪个日期范围的数据?”
FastMCP 如何简化引导输入?
FastMCP 客户端提供了便捷的抽象层,简化了引导输入的处理流程:
- 自动将 JSON Schema 转换为 Python 类型:MCP 使用 JSON Schema 描述输入结构,FastMCP 会自动生成对应的 Python 数据类。
- 提供结构化构造器:你不再需要手动构造匹配结构的字典,而是通过 IDE 支持的数据类构造器创建响应对象。
- 处理类型转换:FastMCP 自动处理 JSON 与 Python 之间的数据格式转换。
- 运行时结构查看:你可以查看生成的数据类字段,以了解预期的数据结构。
只需实现一个引导输入处理函数(elicitation handler),FastMCP 会为你提供匹配 Schema 的 Python 类型,使你可以轻松构造符合要求的响应,而不必手动解析 JSON Schema。
引导输入处理器(Elicitation Handler)
在创建客户端时,传入一个 elicitation_handler 函数。FastMCP 会自动将服务器的 JSON Schema 转换为 Python 数据类类型,使你能够轻松构造响应数据:
from fastmcp import Client
from fastmcp.client.elicitation import ElicitResultasync def elicitation_handler(message: str, response_type: type, params, context):user_input = input(f"{message}: ")# 使用由 FastMCP 提供的数据类类型构造响应数据response_data = response_type(value=user_input)# 返回数据即可,FastMCP 会自动接受引导请求return response_data# 若需更多控制,也可显式返回 ElicitResult# return ElicitResult(action="accept", content=response_data)client = Client("my_mcp_server.py",elicitation_handler=elicitation_handler,
)
Handler 参数说明
引导输入处理器会接收以下 4 个参数:
| 参数名 | 类型 | 说明 |
|---|---|---|
message | str | 要展示给用户的提示信息 |
response_type | type | FastMCP 自动生成的数据类类型。用于构造用户响应。如果请求为空结构,可能为 None。 |
params | ElicitRequestParams | 原始的引导请求参数,包含原始 JSON Schema(可通过 params.requestedSchema 获取) |
context | RequestContext | 请求上下文,包含此次引导请求的元数据 |
响应行为
处理器可以直接返回数据(表示接受请求),或返回 ElicitResult 对象以获得更精细的控制:
ElicitResult 结构:
| 字段名 | 类型 | 说明 | ||
|---|---|---|---|---|
action | `‘accept’ | ‘decline’ | ‘cancel’` | 用户的响应操作 |
content | `dataclass 实例 | dict | None` | 用户提供的数据(accept 时必须提供,decline 和 cancel 时省略) |
响应类型说明:
accept:用户提供了有效输入,数据放入contentdecline:用户选择不提供信息,省略contentcancel:用户取消整个操作,省略content
示例:基础引导输入处理器
from fastmcp import Client
from fastmcp.client.elicitation import ElicitResultasync def basic_elicitation_handler(message: str, response_type: type, params, context):print(f"Server asks: {message}")user_response = input("Your response: ")if not user_response:return ElicitResult(action="decline")return response_type(value=user_response)client = Client("my_mcp_server.py", elicitation_handler=basic_elicitation_handler
)
服务器日志(Server Logging)
接收并处理来自 MCP 服务器的日志消息。
MCP 服务器可以向客户端发送日志消息,客户端可以通过设置日志处理回调函数(log_handler)来处理这些日志。
日志处理器(Log Handler)
你可以在创建客户端时提供一个 log_handler 函数,用于处理服务器发送的日志:
from fastmcp import Client
from fastmcp.client.logging import LogMessageasync def log_handler(message: LogMessage):level = message.level.upper()logger = message.logger or 'server'data = message.dataprint(f"[{level}] {logger}: {data}")client = Client("my_mcp_server.py",log_handler=log_handler,
)
处理器参数说明
每当客户端接收到一条日志消息时,log_handler 函数都会被调用,并接收一个 LogMessage 对象。
LogMessage 对象属性:
| 属性名 | 类型 | 说明 |
|---|---|---|
level | "debug" | "info" | "notice" | "warning" | "error" | "critical" | "alert" | "emergency" | 日志级别 |
logger | str 或 None | 日志来源名称(可选) |
data | 任意类型 | 实际日志内容 |
示例:更详细的日志处理器
async def detailed_log_handler(message: LogMessage):if message.level == "error":print(f"ERROR: {message.data}")elif message.level == "warning":print(f"WARNING: {message.data}")else:print(f"{message.level.upper()}: {message.data}")
默认日志处理方式
如果你未提供自定义的 log_handler,FastMCP 会使用默认处理器,自动将服务器日志以 DEBUG 级别输出为 FastMCP 客户端日志。这对于调试非常有用,同时不会干扰你自己的日志系统。
client = Client("my_mcp_server.py")async with client:# 调用工具时,服务器日志会以 DEBUG 级别自动打印await client.call_tool("some_tool")
进度监控(Progress Monitoring)
处理服务器长时间运行任务的进度通知。
版本新增:2.3.5
当 MCP 服务器执行耗时操作时,可以周期性地向客户端报告进度。客户端可通过设置进度处理器(progress_handler)来接收这些更新。
在创建客户端时设置一个进度处理器函数:
from fastmcp import Clientasync def my_progress_handler(progress: float, total: float | None, message: str | None
) -> None:if total is not None:percentage = (progress / total) * 100print(f"进度:{percentage:.1f}% - {message or ''}")else:print(f"进度:{progress} - {message or ''}")client = Client("my_mcp_server.py",progress_handler=my_progress_handler
)
进度处理器函数会接收以下三个参数:
| 参数名 | 类型 | 说明 |
|---|---|---|
progress | float | 当前进度值 |
total | float 或 None | 预期的总值(如果未知则为 None) |
message | str 或 None | 可选的状态消息(如果没有则为 None) |
你还可以为某次具体的工具调用单独指定进度处理器,覆盖全局设置:
async with client:# 为本次调用单独设置进度处理器result = await client.call_tool("long_running_task", {"param": "value"}, progress_handler=my_progress_handler)
LLM 采样(LLM Sampling)
处理服务器发起的大语言模型(LLM)采样请求。
新增于版本:2.0.0
MCP 服务器可以请求客户端进行大语言模型补全。客户端通过一个 采样处理器(sampling handler) 回调函数来处理这些请求。
在创建客户端时提供一个 sampling_handler 函数:
from fastmcp import Client
from fastmcp.client.sampling import (SamplingMessage,SamplingParams,RequestContext,
)async def sampling_handler(messages: list[SamplingMessage],params: SamplingParams,context: RequestContext
) -> str:# 此处实现你与 LLM 的集成逻辑# 从消息中提取文本并生成回复return "根据消息生成的回复"client = Client("my_mcp_server.py",sampling_handler=sampling_handler,
)
采样处理器会接收以下三个参数:
✅ messages: list[SamplingMessage]
服务器提供的对话历史。
-
role:"user"或"assistant",表示消息角色(用户/助手)。 -
content:支持文本、图片、音频内容(TextContent | ImageContent | AudioContent)- 最常见为
TextContent,具有.text属性。
- 最常见为
✅ params: SamplingParams
采样参数对象,用于控制生成行为和模型偏好。
| 字段名 | 类型 | 说明 | |
|---|---|---|---|
messages | list[SamplingMessage] | 与当前请求相关的消息列表。 | |
modelPreferences | `ModelPreferences | None` | 服务器建议使用的模型配置(客户端可忽略)。 |
hints | `list[ModelHint] | None` | 模型选择的提示(例如使用 GPT-4 或 Claude)。 |
costPriority | `float | None` | 对成本的优先级权重。 |
speedPriority | `float | None` | 对响应速度的优先级权重。 |
intelligencePriority | `float | None` | 对智能水平的优先级权重。 |
systemPrompt | `str | None` | 可选的系统提示词,用于指导生成行为。 |
includeContext | `IncludeContext | None` | 是否包含来自其他 MCP 服务的上下文信息。 |
temperature | `float | None` | 采样温度。 |
maxTokens | int | 最多生成的 token 数。 | |
stopSequences | `list[str] | None` | 遇到这些字符串时终止采样。 |
metadata | `dict[str, Any] | None` | 可选的附加元数据,传递给 LLM 提供商。 |
✅ context: RequestContext
请求上下文对象。
| 字段名 | 类型 | 说明 |
|---|---|---|
request_id | RequestId | 当前请求的唯一标识符。 |
示例:基本采样处理器
from fastmcp import Client
from fastmcp.client.sampling import SamplingMessage, SamplingParams, RequestContextasync def basic_sampling_handler(messages: list[SamplingMessage],params: SamplingParams,context: RequestContext
) -> str:# 提取消息内容conversation = []for message in messages:content = message.content.text if hasattr(message.content, 'text') else str(message.content)conversation.append(f"{message.role}: {content}")# 使用系统提示词(如果有)system_prompt = params.systemPrompt or "你是一个乐于助人的助手。"# 此处应接入你使用的 LLM 服务# 示例返回为占位符return f"基于对话生成的回复:{' | '.join(conversation)}"client = Client("my_mcp_server.py",sampling_handler=basic_sampling_handler
)
消息处理(Message Handling)
通过自定义消息处理器处理 MCP 消息、请求和通知。
新增于版本:2.9.1
MCP 客户端可以从服务器接收多种类型的消息,包括需要响应的请求和不需要响应的通知。
消息处理器提供了统一的方式来处理这些消息。
函数式处理器(Function-Based Handler)
最简单的方式是通过一个函数来接收和处理所有消息:
from fastmcp import Clientasync def message_handler(message):"""处理来自服务器的所有 MCP 消息。"""if hasattr(message, 'root'):method = message.root.methodprint(f"收到消息:{method}")# 针对特定通知处理if method == "notifications/tools/list_changed":print("工具列表已变更 —— 可能需要刷新工具缓存")elif method == "notifications/resources/list_changed":print("资源列表已变更")client = Client("my_mcp_server.py",message_handler=message_handler,
)
类式处理器(Message Handler Class)
如果你想要更细粒度的处理方式,FastMCP 提供了一个 MessageHandler 类,你可以继承它并覆盖特定的钩子方法:
from fastmcp import Client
from fastmcp.client.messages import MessageHandler
import mcp.typesclass MyMessageHandler(MessageHandler):async def on_tool_list_changed(self, notification: mcp.types.ToolListChangedNotification) -> None:"""专门处理工具列表变更。"""print("工具列表已变更 —— 正在刷新可用工具")client = Client("my_mcp_server.py",message_handler=MyMessageHandler(),
)
可用的处理器方法(Handler 方法)
所有的处理器方法都接收一个参数:对应的消息类型。
| 方法名 | 参数类型 | 说明 |
|---|---|---|
on_message(message) | 任意 MCP 消息 | 接收所有消息(请求和通知) |
on_request(request) | mcp.types.ClientRequest | 接收需要客户端响应的请求 |
on_notification(notification) | mcp.types.ServerNotification | 接收无需响应的通知 |
on_tool_list_changed(notification) | mcp.types.ToolListChangedNotification | 工具列表发生变更 |
on_resource_list_changed(notification) | mcp.types.ResourceListChangedNotification | 资源列表发生变更 |
on_prompt_list_changed(notification) | mcp.types.PromptListChangedNotification | 提示词列表发生变更 |
on_progress(notification) | mcp.types.ProgressNotification | 长时间运行任务的进度通知 |
on_logging_message(notification) | mcp.types.LoggingMessageNotification | 来自服务器的日志消息 |
这是一个处理工具变更通知的实际示例:
from fastmcp.client.messages import MessageHandler
import mcp.typesclass ToolCacheHandler(MessageHandler):def __init__(self):self.cached_tools = []async def on_tool_list_changed(self, notification: mcp.types.ToolListChangedNotification) -> None:"""当工具发生变更时清除缓存。"""print("工具列表发生变更 —— 清除缓存")self.cached_tools = []  # 强制下次访问时重新加载client = Client("server.py", message_handler=ToolCacheHandler())
请求处理说明
虽然消息处理器也能接收服务器发起的请求,但对于大多数场景,推荐使用专用的回调参数:
- 采样请求(LLM 补全):使用
sampling_handler - 进度请求:使用
progress_handler - 日志请求:使用
log_handler
消息处理器的主要用途是监听和处理通知,而不是处理需要响应的请求。
客户端根目录(Client Roots)
向 MCP 服务器提供本地上下文和资源边界信息。
新增于版本:2.0.0
Roots 是客户端告知服务器其可访问资源范围的一种方式。服务器可以利用这些信息调整行为,或提供更相关的响应。
设置静态 Roots
创建客户端时,直接提供一个根目录列表:
from fastmcp import Clientclient = Client("my_mcp_server.py",roots=["/path/to/root1", "/path/to/root2"]
)
Dynamic Roots Callback:
from fastmcp import Client
from fastmcp.client.roots import RequestContextasync def roots_callback(context: RequestContext) -> list[str]:print(f"Server requested roots (Request ID: {context.request_id})")return ["/path/to/root1", "/path/to/root2"]client = Client("my_mcp_server.py", roots=roots_callback
)
在 MCP(模型上下文协议)中,根路径(Roots) 是客户端向服务器声明其所能访问的资源范围的机制。通过定义这些根路径,客户端可以明确告知服务器其操作的边界和上下文,从而帮助服务器提供更相关和安全的响应。
根路径是一个 URI(统一资源标识符),通常指向文件系统中的目录或网络上的资源位置。例如:
file:///home/user/projects/myapphttps://api.example.com/v1
这些根路径告诉服务器,客户端希望其操作仅限于这些指定的资源范围内。
🎯 为什么使用根路径?
根路径的主要作用包括:
- 指导性:告知服务器哪些资源是客户端关心的。
- 清晰性:明确哪些资源属于工作空间的一部分。
- 组织性:允许客户端同时处理多个资源,保持逻辑上的分离。
在 FastMCP 中,可以在创建客户端时通过 roots 参数设置静态根路径:
from fastmcp import Clientclient = Client("my_mcp_server.py",roots=["/path/to/root1", "/path/to/root2"]
)
这将告诉服务器,客户端希望其操作仅限于 /path/to/root1 和 /path/to/root2 目录下的资源。
认证
OAuth 认证
通过 OAuth 2.1 认证您的 FastMCP 客户端。
版本更新:2.6.0
OAuth 认证仅适用于基于 HTTP 的传输,并且需要通过网页浏览器进行用户交互。
当您的 FastMCP 客户端需要访问受 OAuth 2.1 保护的 MCP 服务器,且流程需要用户交互(如登录和授权)时,应使用授权码流程(Authorization Code Flow)。FastMCP 提供了 fastmcp.client.auth.OAuth 辅助类来简化整个过程。
该流程适用于用户端应用程序,应用代表用户执行操作。
客户端使用
默认配置
最简单的方式是将字符串 "oauth" 传递给 Client 或传输实例的 auth 参数,FastMCP 会自动使用默认配置启用 OAuth:
from fastmcp import Client# 使用默认 OAuth 设置
async with Client("https://fastmcp.cloud/mcp", auth="oauth") as client:await client.ping()
OAuth 辅助类
要完整配置 OAuth 流程,可以使用 OAuth 辅助类,并将其实例传入 Client 或传输实例的 auth 参数。OAuth 实现了 OAuth 2.1 授权码授权(Authorization Code Grant)带 PKCE(Proof Key for Code Exchange)以增强安全性,且实现了完整的 httpx.Auth 接口。
from fastmcp import Client
from fastmcp.client.auth import OAuthoauth = OAuth(mcp_url="https://fastmcp.cloud/mcp")async with Client("https://fastmcp.cloud/mcp", auth=oauth) as client:await client.ping()
OAuth 参数
mcp_url(str):目标 MCP 服务器的完整 URL,用于发现 OAuth 服务器元数据。scopes(str 或 list[str],可选):请求的 OAuth 授权范围,可以是空格分隔字符串或字符串列表。client_name(str,可选):客户端名称,用于动态注册,默认为 “FastMCP Client”。token_storage_cache_dir(Path,可选):令牌缓存目录,默认是~/.fastmcp/oauth-mcp-client-cache/。additional_client_metadata(dict,可选):客户端注册时的额外元数据。
OAuth 流程
当您使用配置了 OAuth 的 FastMCP Client 时,流程如下:
-
令牌检查
客户端先检查缓存目录中是否已有有效令牌,若有则使用该令牌进行认证。 -
OAuth 服务器发现
若无有效令牌,客户端尝试通过已知 URI(例如/.well-known/oauth-authorization-server)根据mcp_url发现 OAuth 服务器的端点。 -
动态客户端注册
如果服务器支持且客户端尚未注册(或凭据未缓存),客户端会根据 RFC 7591 动态注册自身。 -
本地回调服务器
客户端启动一个本地 HTTP 服务器监听可用端口,作为 OAuth 流程中的重定向 URI(例如http://127.0.0.1:<port>/callback)。 -
浏览器交互
自动打开用户默认浏览器,跳转到 OAuth 服务器授权页面,用户登录并授予权限(或拒绝)。 -
授权码与令牌交换
用户同意后,OAuth 服务器将授权码重定向回本地回调服务器,客户端用该授权码与服务器的令牌端点交换访问令牌(access_token)及刷新令牌(refresh_token),采用 PKCE 机制增强安全。 -
令牌缓存
获得的令牌被缓存到指定目录,便于后续使用,避免重复浏览器交互。 -
认证请求
访问 MCP 服务器的请求中,自动在请求头中携带访问令牌。 -
刷新令牌
访问令牌过期时,客户端自动使用刷新令牌获取新的访问令牌。
令牌管理
OAuth 访问令牌自动缓存在 ~/.fastmcp/oauth-mcp-client-cache/ 目录,且在应用重启间保持有效。文件以 OAuth 服务器基础 URL 为键。
清理缓存
-
清除指定服务器的令牌:
from fastmcp.client.auth.oauth import FileTokenStoragestorage = FileTokenStorage(server_url="https://fastmcp.cloud/mcp") await storage.clear() -
清除所有服务器的令牌缓存:
from fastmcp.client.auth.oauth import FileTokenStorageFileTokenStorage.clear_all()
Bearer Token 认证
使用 Bearer Token 认证您的 FastMCP 客户端。
版本更新:2.6.0
Bearer Token 认证仅适用于基于 HTTP 的传输。
您可以通过提供有效的访问令牌(access token)来配置 FastMCP 客户端使用 Bearer 认证。这种方式最适合服务账号、长期有效的 API Key、CI/CD 环境、单独管理认证的应用,或其他非交互式认证方法。
Bearer Token 是一种 JSON Web Token(JWT),通常用在 HTTP 请求的 Authorization 头部,采用 Bearer 方案:
Authorization: Bearer <token>
客户端使用
最简单的使用方式是将已有的 Bearer token 字符串直接传入 fastmcp.Client 或传输实例的 auth 参数。FastMCP 会自动帮您正确格式化 Authorization 头和 Bearer 方案。
如果您直接传字符串,请不要加 “Bearer ” 前缀,FastMCP 会自动添加。
from fastmcp import Clientasync with Client("https://fastmcp.cloud/mcp", auth="<your-token>",
) as client:await client.ping()
您也可以将 Bearer token 传给传输实例,比如 StreamableHttpTransport 或 SSETransport:
from fastmcp import Client
from fastmcp.client.transports import StreamableHttpTransporttransport = StreamableHttpTransport("http://fastmcp.cloud/mcp", auth="<your-token>",
)async with Client(transport) as client:await client.ping()
BearerAuth 辅助类
如果您想更明确地控制,而不依赖 FastMCP 自动转换字符串 token,可以使用 BearerAuth 类,它实现了 httpx.Auth 接口:
from fastmcp import Client
from fastmcp.client.auth import BearerAuthasync with Client("https://fastmcp.cloud/mcp", auth=BearerAuth(token="<your-token>"),
) as client:await client.ping()
自定义请求头
如果 MCP 服务器期望使用自定义头或令牌方案,您可以不使用 auth 参数,而是直接通过传输实例的 headers 参数自定义请求头:
from fastmcp import Client
from fastmcp.client.transports import StreamableHttpTransportasync with Client(transport=StreamableHttpTransport("https://fastmcp.cloud/mcp", headers={"X-API-Key": "<your-token>"},),
) as client:await client.ping()
在 FastMCP 中,Client 是用于与 MCP 服务器交互的主要组件。它并非全局唯一,而是一个普通的类实例,可以根据需要创建多个。每次创建 Client 实例时,您可以为其配置不同的认证方式、传输协议、请求头等。
结合langChian/langGrpah使用
LangChain 提供了一个名为 langchain-mcp-adapters 的官方扩展库,用于将 MCP 工具以 LangChain 工具的形式引入,实现无缝集成:
-
安装方式:
pip install langchain-mcp-adapters -
该适配器能:
- 自动将 MCP 工具转换为可在 LangChain 或 LangGraph 中使用的工具;
- 支持从多个 MCP 服务器加载工具;
- 在 LangChain agent 中使用这些工具时,无需手工 glue 代码,可以直接调用 MCP 工具(LangChain 更新日志, GitHub, Medium)。
示例:
from langchain_mcp_adapters.client import MultiServerMCPClient
from langchain_mcp_adapters.tools import load_mcp_tools
from langchain.chat_models import ChatOpenAI
from langchain.agents import Tool, initialize_agent# 设置 MCP 客户端连接多个服务器
client = MultiServerMCPClient({"math": {"command": "python", "args": ["math_server.py"], "transport": "stdio"},"weather": {"url": "http://localhost:8000/mcp", "transport": "streamable_http"}
})
tools = await client.get_tools()# 初始化 LLM
llm = ChatOpenAI(temperature=0)
agent = initialize_agent(tools, llm, agent="zero-shot-react-description")
response = agent.run("What's (3+5)*12 and what's the weather in NYC?")
这种方式让 LangChain agent 能够:
- 从服务器自动获取工具定义;
- 根据 MCP schema 自动识别参数和输出结构;
- 支持跨多个 MCP 服务器的工具调用(LangChain AI, Medium)。
这里我们继续使用硅基流动的模型去调用MCP:
import asyncio
import os
from langgraph.prebuilt import create_react_agent
from langchain_mcp_adapters.client import MultiServerMCPClientos.environ.setdefault("OPENAI_API_KEY","your api key")
os.environ.setdefault("OPENAI_BASE_URL","https://api.siliconflow.cn")async def main():client = MultiServerMCPClient({"math": {"command": "python", "args": ["./math_server.py"], "transport": "stdio"},})tools = await client.get_tools()print(tools)agent = create_react_agent("openai:Qwen/Qwen3-8B",tools,)r = await agent.ainvoke({"messages": [{"role": "user", "content": "3+2等于几"}]})print(r)if __name__ == '__main__':asyncio.run(main())
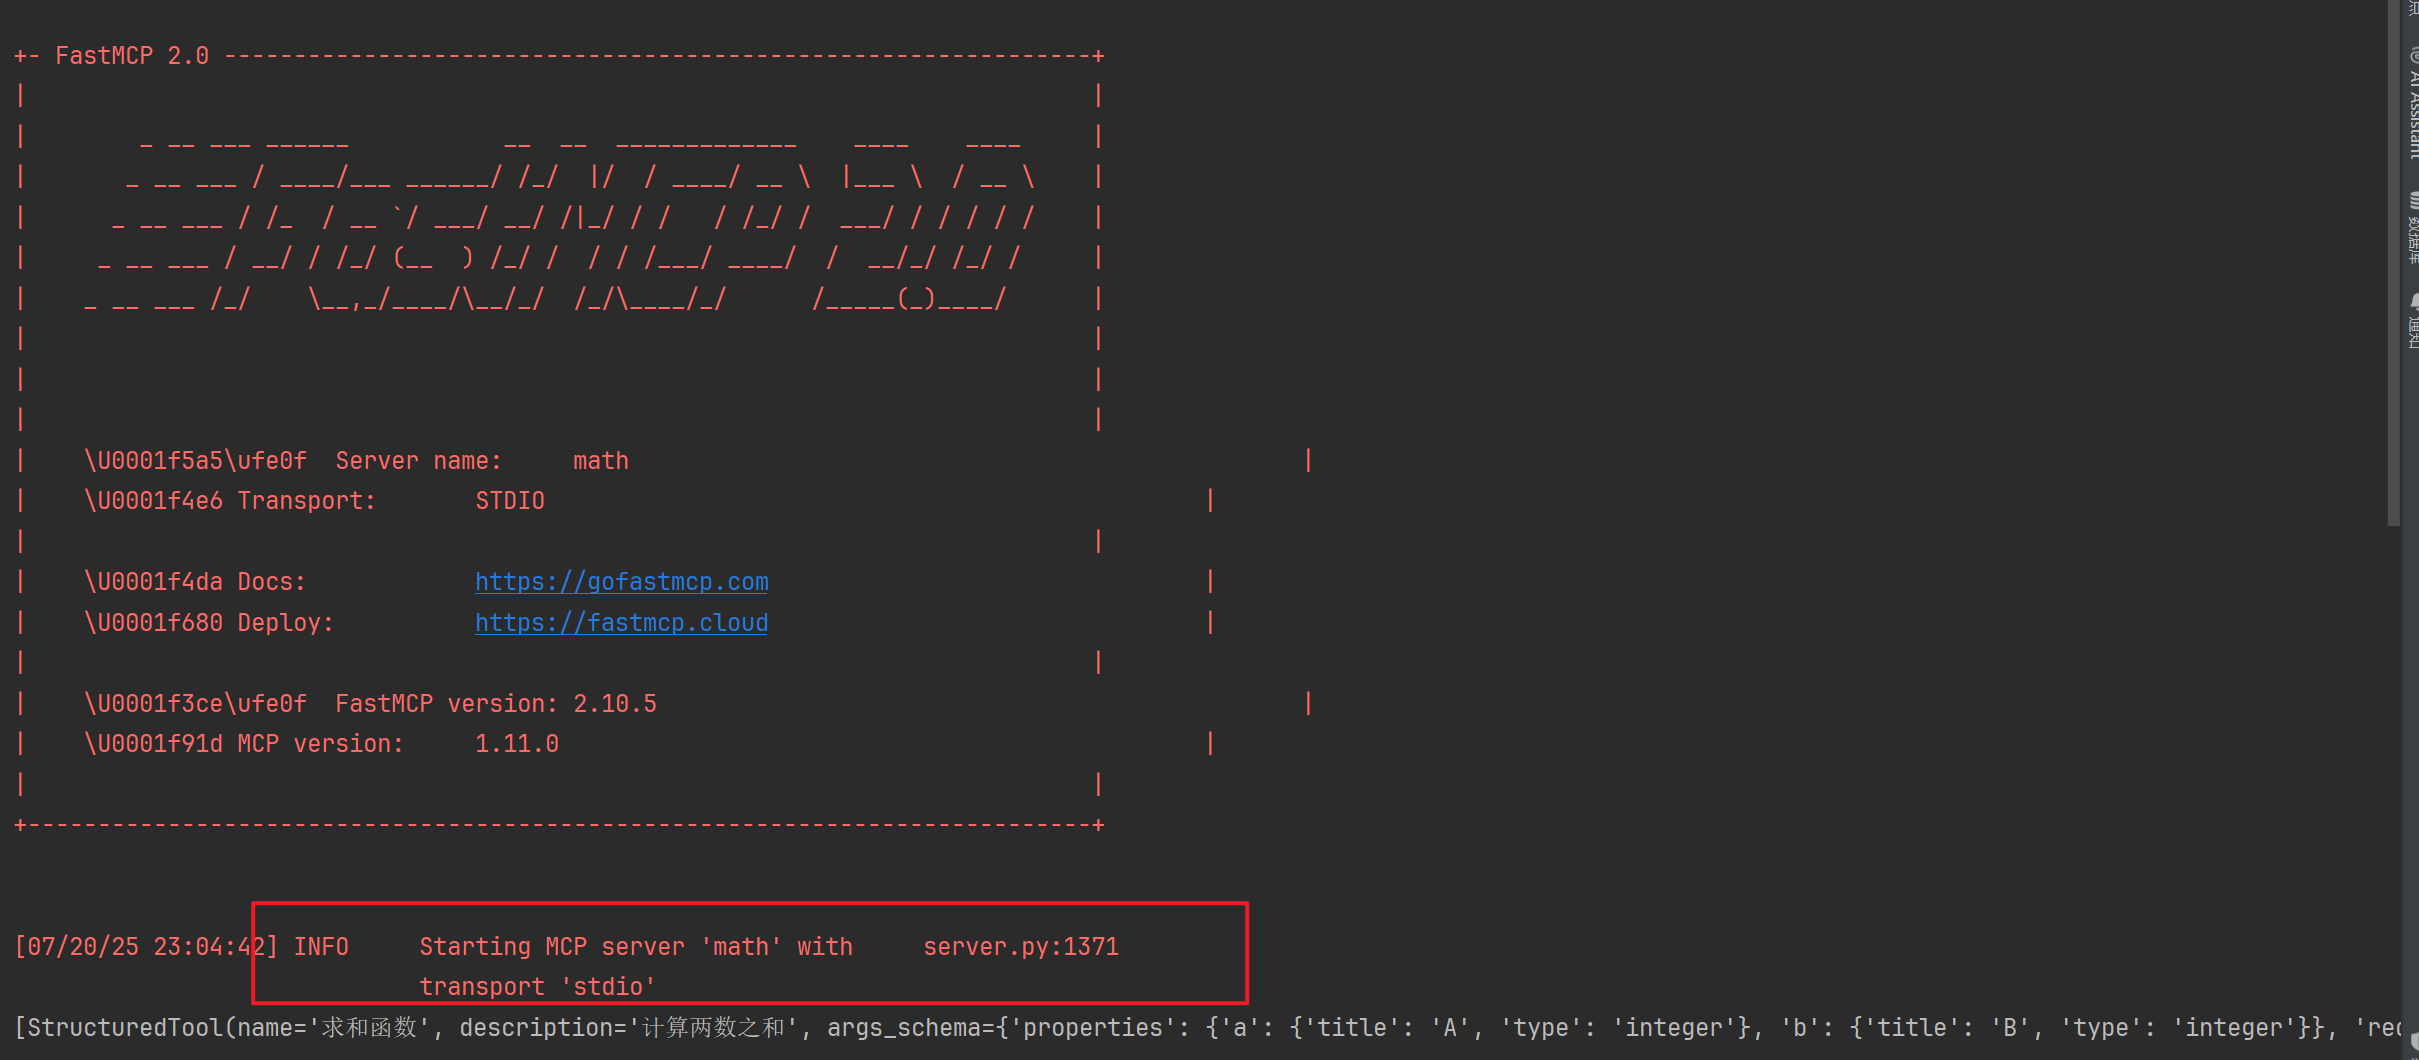
同时创建一个简单MCP服务:
from fastmcp import FastMCPmcp = FastMCP("math")@mcp.tool(name="求和函数",description="计算两数之和"
)
async def add(a:int,b:int)->int:return a+bif __name__ == '__main__':mcp.run()
当agent运行时,会自动启动一个mcp server的线程:
响应结果如下:
{'messages': [HumanMessage(content='3+2等于几', additional_kwargs={}, response_metadata={}, id='3098792c-53e1-4530-bbbe-40d782e0033d'), AIMessage(content='\n\n', additional_kwargs={'tool_calls': [{'id': '0198285dbf3d1aed36515df327b05459', 'function': {'arguments': ' {"a": 3, "b": 2}', 'name': '求和函数'}, 'type': 'function', 'index': 0}], 'refusal': None}, response_metadata={'token_usage': {'completion_tokens': 139, 'prompt_tokens': 167, 'total_tokens': 306, 'completion_tokens_details': {'accepted_prediction_tokens': None, 'audio_tokens': None, 'reasoning_tokens': 125, 'rejected_prediction_tokens': None}, 'prompt_tokens_details': None}, 'model_name': 'Qwen/Qwen3-8B', 'system_fingerprint': '', 'id': '0198285da74ae0038873b0178bb874f3', 'service_tier': None, 'finish_reason': 'tool_calls', 'logprobs': None}, id='run--a029f63b-38a5-4daa-a268-3b0e881e34bc-0', tool_calls=[{'name': '求和函数', 'args': {'a': 3, 'b': 2}, 'id': '0198285dbf3d1aed36515df327b05459', 'type': 'tool_call'}], usage_metadata={'input_tokens': 167, 'output_tokens': 139, 'total_tokens': 306, 'input_token_details': {}, 'output_token_details': {'reasoning': 125}}), ToolMessage(content='5', name='求和函数', id='d23dbe96-d9c0-46c1-9812-c1e01a23ee40', tool_call_id='0198285dbf3d1aed36515df327b05459'), AIMessage(content='\n\n3加2等于5。', additional_kwargs={'refusal': None}, response_metadata={'token_usage': {'completion_tokens': 201, 'prompt_tokens': 208, 'total_tokens': 409, 'completion_tokens_details': {'accepted_prediction_tokens': None, 'audio_tokens': None, 'reasoning_tokens': 194, 'rejected_prediction_tokens': None}, 'prompt_tokens_details': None}, 'model_name': 'Qwen/Qwen3-8B', 'system_fingerprint': '', 'id': '0198285dc67d3f15d00b807074e4f130', 'service_tier': None, 'finish_reason': 'stop', 'logprobs': None}, id='run--71a1f92b-50d5-4353-bb5f-a8f3faf4743a-0', usage_metadata={'input_tokens': 208, 'output_tokens': 201, 'total_tokens': 409, 'input_token_details': {}, 'output_token_details': {'reasoning': 194}})]}