需要保存至服务器的:常见编辑、发布文章页面基础技巧
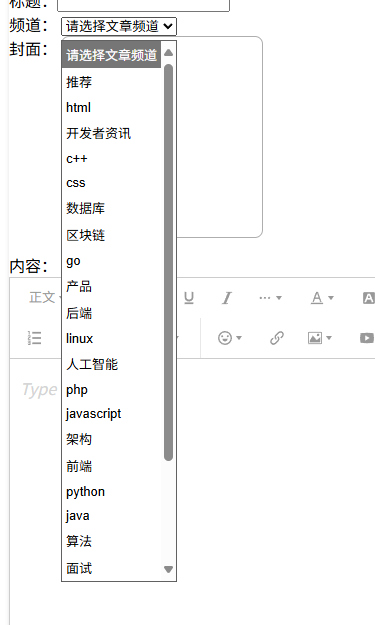
渲染下拉表单
css与html样式就是最普通的那一种,我们来了解如何从服务器获取信息渲染表单,要注意的点为如何遍历。
演示:
<select name="channel_id" id="channels" class="channels"><option value="" selected>请选择文章频道</option><option id="" value="1" class=""></option><option id="" value="2" class=""></option><option id="" value="3" class=""></option><option id="" value="4" class=""></option><option id="" value="5" class=""></option><option id="" value="6" class=""></option><option id="" value="7" class=""></option><option id="" value="8" class=""></option><option id="" value="9" class=""></option><option id="" value="10" class=""></option><option id="" value="11" class=""></option><option id="" value="12" class=""></option><option id="" value="13" class=""></option><option id="" value="14" class=""></option><option id="" value="15" class=""></option><option id="" value="16" class=""></option><option id="" value="17" class=""></option><option id="" value="18" class=""></option><option id="" value="19" class=""></option><option id="" value="20" class=""></option><option id="" value="21" class=""></option><option id="" value="22" class=""></option><option id="" value="23" class=""></option><option id="" value="24" class=""></option><option id="" value="25" class=""></option></select>
result为服务器返回结果,我们可以通过控制台打印知道我们需要的内容在哪里,这里我们需要的channels数组存储在result.data.data中。
function setchannellist() {axios({url: '/v1_0/channels'}).then(result => {//检查返回值console.log(result);console.log(result.data);console.log(result.data.data.channels);const channels = result.data.data.channelsconst options = document.querySelectorAll('.channels option')//item为数组中的每一个对象channels.forEach((item, index) => {//跳过第一个选项options[index + 1].id = item.idoptions[index + 1].innerHTML = item.name})})}setchannellist()
可以说十分有十一分的简单。
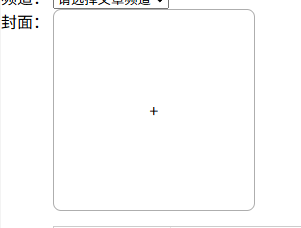
图片框选择效果
演示:
方法:
上传图片需要用到input:file,但在这种情况下,我们当然不能直接更改input的样式达到这种效果。我们需要将input隐藏,再使用label标签为input代理,给label标签设置样式,就OK啦!
代码:
<style>
label {display: inline-block;height: 200px;width: 200px;text-align: center;line-height: 200px;border: 1px #aeaeae solid;vertical-align: top;border-radius: 8px;
}
</style>
<body><div style="display: inline-block;" class="put-your-pic"><img src="" alt="" class="rounded"><label for="img" class="getpic">+</label><input type="file" class="img getpic" name="images" id="img" hidden></div>
</body>
img标签是为上传图片后渲染到页面而准备的,可以说十分有十分的简单。
上传图片后渲染到页面
操作流程:
由于我们需要将图片发送至服务器并从服务器将信息渲染到页面,所以我们不能从本地获取图片地址,而要从服务器获取:
向服务器发送POST请求->获得result->从result取出图片地址->渲染至页面
因此,我们需要给上传图片文件的input添加事件为'change'的监听器,以查看是否有文件上传。html样式参看上一段落。
//封面选择//获得input对象const getpic_lis = document.querySelector('.img')//添加事件监听getpic_lis.addEventListener('change', (e) => {//获取点击对象的文件:e.target.files[0]为收集到的文件const image = e.target.files[0]//创建表单对象const fd = new FormData()fd.append('image', image)//向服务器发送请求axios({url: '/v1_0/upload',method: 'POST',data: fd}).then(result => {console.log(result);//若响应码(result.status)正确->执行if (result.status >= 200 || result.status < 300) {//要渲染的图片对象const rounded = document.querySelector('.rounded')//放入图片,result.data.data.url存放的是服务器返回的图片存储地址rounded.src = result.data.data.url//隐藏输入并显示图片rounded.style.display = 'inline-block'document.querySelectorAll('.getpic').forEach(item => {item.style.display = 'none'})}})})//监听图片对象,允许用户复选图片document.querySelector('img').addEventListener('click', () => {getpic_lis.click()})
可以说十分有九分的简单。
总结
经过实践我们可以发现,在前端渲染页面时要注意的要点有:
- 获取的标签属性(尤其在使用serialize之类方法快速获取表单数据时要注意,如插入富文本编辑器时,serialize无法直接获取编辑器内容,需要使用textarea标签同步编辑器内容,serialize再从textarea获取)
- 要提交的对象内容
- 取得的对象内容
这三个要点掌握后,处理数据的方法层出不穷,基础的遍历就不只有一两种,如for in,forEach,甚至最基础的for循环等。因此在处理页面时,一定要确保这几个对象的正确,而处理方法则可以通过对象属性自行调整。
以上的几种方法在其他应用方面也同样适用,如登陆后,从服务器获取用户信息,可以参考这里的获取图片地址,渲染商品列表则可以将二者结合