Vue Router4
Vue Router 是 Vue.js 官方的路由管理器。Vue Router 基于路由和组件的映射关系,监听页面路径的变化,渲染对应的组件。
安装:
npm install vue-router。
基本使用:
// src/router/index.js
import {createRouter, createWebHashHistory} from 'vue-router'import Home from '../components/Home.vue'
import About from '../components/About.vue'// 1. 创建路由对象
const router = createRouter({// 配置路由映射关系,一个路径对应一个组件routes: [{path: '/', redirect: '/home'}, // 如果路径是 /,重定向到 /home {path: '/home', component: Home},{path: '/about', component: About}],// 配置采用的模式。createWebHashHistory 是 hash 模式,createWebHistory 是 history 模式history: createWebHashHistory(),
})export default router
// src/main.js
import { createApp } from 'vue'
import App from './App.vue'
import router from './router'const app = createApp(App)
// 2. 注册路由对象
app.use(router)
app.mount('#app')
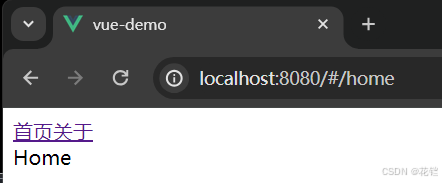
可以使用 Vue Router 提供的 <router-link> 组件实现路径跳转。
// src/App.vue。
<template><!-- 3. 使用 Vue Router 提供的 <router-link> 组件实现路径跳转 --><router-link to="/home">首页</router-link><router-link to="/about">关于</router-link><!-- 4. 路径匹配到的组件将会显示在 <router-view> 这个占位组件处 --><router-view></router-view>
</template><script setup>
</script><style scoped>
</style>
也可以通过代码逻辑实现路径跳转。
// src/App.vue
<template><div><span @click="handleHomeNav">首页</span><span @click="handleAboutNav">关于</span></div><!-- 4. 路径匹配到的组件将会显示在 <router-view> 这个占位组件处 --><router-view></router-view>
</template><script setup>
// 3. 通过代码逻辑实现路径跳转
import { useRouter } from 'vue-router'
const router = useRouter()
const handleHomeNav = () => {router.push('/home')
}
const handleAboutNav = () => {router.push({path: '/about'}) // router 对象还有 replace、forward、back、go 等方法
}
</script><style scoped>
</style>
<router-link> 组件:
<router-link>:用于创建导航链接。属性有:
- to:用于指定要跳转的路径。属性值是一个字符串或者对象。
<router-link to="/home">首页</router-link> <router-link to="{path: '/home'}">首页</router-link> - replace:设置 replace 属性的化,路径跳转时将会直接替换掉旧路径,旧路径不会进入历史列表,回退页面的话无法回退到旧页面。
active-class:设置激活 a 元素后应用的 class 属性名称。默认是router-link-active。exact-active-class:链接精准激活时,应用于 a 元素的 class 属性名称。默认是router-link-exact-active。
嵌套路由:
通过 children 配置嵌套路由。
// src/router/index.js
import {createRouter, createWebHashHistory} from 'vue-router'import User from '../components/User.vue'
import UserProfile from '../components/UserProfile.vue'
import UserPosts from '@/components/UserPosts.vue'const router = createRouter({routes: [{path: '/user/:id', // 以 / 开头的嵌套路径将被视为根路径component: User,// 1. 通过 children 配置嵌套路由children: [{// 当路径匹配到 /user/:id/profile,就会渲染 UserProfile 组件到 User 组件的 <router-view> 内部path: 'profile',component: UserProfile,},{// 当路径匹配到 /user/:id/posts,就会渲染 UserPosts 组件到 User 组件的 <router-view> 内部path: 'posts',component: UserPosts,},]},],history: createWebHashHistory(),
})export default router
// src/App.vue
<template><!-- 2. 顶层的 <router-view> 渲染顶层路由匹配的组件。User 组件将会被渲染到这个位置 --><router-view></router-view>
</template><script setup>
</script><style scoped>
</style>
// src/components/User.vue
<template><div>User:{{ $route.params.id }}</div><!-- 3. 一个被渲染的组件也可以包含自己嵌套的 <router-view>。UserProfile 和 UserPosts 组件将会被渲染到这个位置 --><router-view></router-view>
</template><script setup>
</script><style scoped>
</style>
动态路由:
通过 :名称 的路径参数来配置动态路由。路径是动态的,路径参数的部分在进行路由匹配时可以变化。
// src/router/index.js
import {createRouter, createWebHashHistory} from 'vue-router'import User from '@/components/User.vue'const router = createRouter({routes: [// 1. 通过 :名称 配置动态路由。路径是动态的,路径参数的部分在进行路由匹配时是可以变化的{path: '/user/:id', component: User}],history: createWebHashHistory(),
})export default router
// src/App.vue
<template><!-- 2. 无论是 user/123 还是 user/456,都可以匹配得上 --><router-link to="/user/123">用户123</router-link><router-link to="/user/456">用户456</router-link><router-view></router-view>
</template><script setup>
</script><style scoped>
</style>
//src/components/User.vue
<template><!-- 3. 在 template 模板中获取动态路由的值 --><div>User:{{ $route.params.id }}</div>
</template><script setup>
// 3. 在 Options API 中获取动态路由的值
// this.$route.params.id// 3. 在 Composition API 中获取动态路由的值。通过 useRoute() Hook 函数获取
import { useRoute } from 'vue-router'
const route = useRoute()
console.log(route.params.id)
</script><style scoped>
</style>
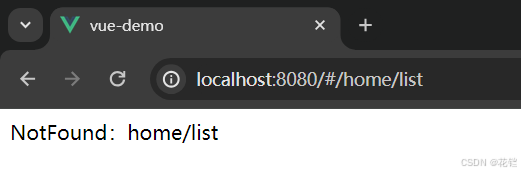
通过动态路由实现 NotFound:
对于没有匹配到的路由,通常会匹配到某个固定的页面,例如 NotFound 页面。可以编写一个动态路由用于匹配所有的页面。
// // src/router/index.js
import {createRouter, createWebHashHistory} from 'vue-router'import NotFound from '@/components/NotFound .vue'const router = createRouter({routes: [// 1. 如果匹配到任何一个不存在的路径,那么就匹配 NotFound 组件。{path:'/:pathMatch(.*)', component: NotFound }],history: createWebHashHistory(),
})export default router
//src/components/NotFound .vue
<template><!-- 2. 获取当前的路径参数 --><div>NotFound:{{ $route.params.pathMatch }}</div>
</template><script setup>
</script><style scoped>
</style>
如果配置路由时,在 /:pathMatch(.*) 后面再加一个 *,变成 {path:'/:pathMatch(.*)*', component: NotFound },那么在获取路径参数时,会以 / 为分隔符将路径参数解析为数组。

动态管理路由:
路由传参:
- 可以通过动态路由的方式传递简单参数;在组件中通过
$route.params的方法获取。 - 也可以在通过代码逻辑实现路径跳转时,通过 query 传递参数;在组件中通过
$route.query获取。const handleAboutNav = () => {router.push({path: '/about',// 1. 传递参数query: {name: 'Lee',age: 18,}}) }// 获取参数 import { useRoute } from 'vue-router' const route = useRoute() console.log(route.query.name)
路由懒加载:
// src/router/index.js
import {createRouter, createWebHashHistory} from 'vue-router'// 通过使用 import() 函数进行路由懒加载。打包时会进行分包处理,就可以在需要的时候再根据路径下载对应的组件代码
const Home = () => import('../components/Home.vue')
const About = () => import('../components/About.vue')const router = createRouter({routes: [{path: '/', redirect: '/home'}, {path: '/home', component: Home},{path: '/about', component: About}],history: createWebHashHistory(),
})export default router