QT实战-qt各种菜单样式实现
本文主要介绍了qt普通菜单样式、带选中样式、带子菜单样式、超过一屏幕菜单样式、自定义带有滚动条的菜单样式,
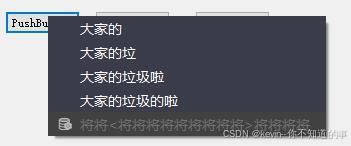
先上图如下:


1.普通菜单样式
代码:
m_pmenu = new QMenu(this);m_pmenu->setObjectName("quoteListMenu");qss文件:
QMenu {background-color: #3b3c49;margin:0px;padding:0px;
}QMenu::indicator {width: 31px;height:30px;background-color: #3b3c49;margin: 2px
}QMenu::indicator:selected {background-color: #144675;margin: 2px
}QMenu::indicator:disabled {background-color: #414141;margin: 2px
}QMenu::item {color: #ffffff;height:24px;font:normal 14px;margin:0px;padding-left:12px;padding-right:41px;
}QMenu::item:selected {color: #ffffff;background-color:#545563;
}QMenu::item:disabled {
color: #707070;
background-color: #414141;
}QMenu::indicator:checked {image:url(:/pic/tick.png);
}/********/
QMenu#quoteListMenu
{background: #3b3c49;margin-top: 8px;margin-bottom: 8px;padding: 0px;
}QMenu#quoteListMenu::item
{color: #ffffff;height: 24px;font-size: 14px;padding-left:12px;padding-right:50px;background-color: transparent;
}QMenu#quoteListMenu::item:selected
{color: #ffffff;background-color: #545563;
}QMenu#quoteListMenu::item:disabled {color: #707070;background-color:#414141;
}QMenu#quoteListMenu::icon
{padding-left: 20px;
}QMenu#quoteListMenu::indicator:selected
{background-color: #144675;margin: 2px;
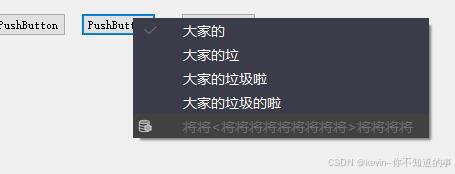
}2.带选中样式的菜单
代码:
m_pmenu2 = new QMenu(this);m_pmenu2->setObjectName("quoteListMenu2");qss文件:
QMenu {background-color: #3b3c49;margin:0px;padding:0px;
}QMenu::indicator {width: 31px;height:30px;background-color: #3b3c49;margin: 2px
}QMenu::indicator:selected {background-color: #144675;margin: 2px
}QMenu::indicator:disabled {background-color: #414141;margin: 2px
}QMenu::item {color: #ffffff;height:24px;font:normal 14px;margin:0px;padding-left:12px;padding-right:41px;
}QMenu::item:selected {color: #ffffff;background-color:#545563;
}QMenu::item:disabled {
color: #707070;
background-color: #414141;
}QMenu::indicator:checked {image:url(:/pic/tick.png);
}/*--------------------*/
QMenu#quoteListMenu2
{background: #3b3c49;margin-top: 8px;margin-bottom: 8px;padding: 0px;
}QMenu#quoteListMenu2::item
{color: #ffffff;height: 24px;font-size: 14px;padding-left:30px;padding-right:50px;background-color: transparent;
}QMenu#quoteListMenu2::item:selected
{color: #ffffff;background-color: #545563;
}QMenu#quoteListMenu2::item:disabled {color: #707070;background-color:#414141;
}QMenu#quoteListMenu2::icon
{padding-left: 10px;
}QMenu#quoteListMenu2::indicator {width: 31px;height:30px;background-color: #3b3c49;margin: 2px
}QMenu#quoteListMenu2::indicator:selected {background-color: #545563;margin: 2px
}QMenu#quoteListMenu2::indicator:checked {image:url(:/pic/tick.png);
}QMenu#quoteListMenu2::indicator:disabled {background-color: #414141;margin: 2px
}
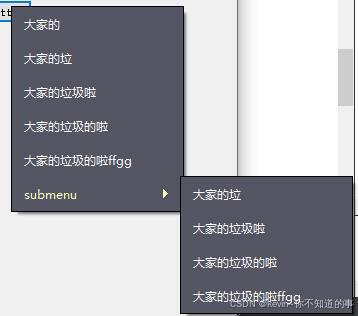
3.带子菜单样式(可以调整下拉按钮到边框的距离)
代码:
m_pmenu3 = new QMenu(this);m_pmenu3->setObjectName("myArrowGap");qss文件:
QMenu {background-color: #3b3c49;margin:0px;padding:0px;
}QMenu::indicator {width: 31px;height:30px;background-color: #3b3c49;margin: 2px
}QMenu::indicator:selected {background-color: #144675;margin: 2px
}QMenu::indicator:disabled {background-color: #414141;margin: 2px
}QMenu::item {color: #ffffff;height:24px;font:normal 14px;margin:0px;padding-left:12px;padding-right:41px;
}QMenu::item:selected {color: #ffffff;background-color:#545563;
}QMenu::item:disabled {
color: #707070;
background-color: #414141;
}QMenu::indicator:checked {image:url(:/pic/tick.png);
}/****************/
QMenu#myArrowGap {background-color: #545563;border: 1px solid #000000;margin:0px;padding:0px;
}QMenu#myArrowGap::item {color: #ffffff;font:normal 12px;margin-left:0px;margin-right:10px;margin-top: 0px;margin-bottom: 0px;padding-top:5;padding-bottom:5;padding-left:12px;padding-right:41px;
}QMenu#myArrowGap::item:hover {color: #FFFFBB;background-color:#545563;
}QMenu#myArrowGap::item:selected {color: #FFFFBB;background-color:#545563;
}QMenu#myArrowGap::item:disabled {
color: #707070;
background-color: #414141;
}
说明:下拉按钮距离右边距离通过设置margin-right:10px;实现
4.超过一屏幕菜单样式

代码1:头文件添加
#include <QtWidgets>
#include <QStyle>class UProxyStyle : public QProxyStyle
{Q_OBJECT
int styleHint(StyleHint h, const QStyleOption *op = Q_NULLPTR,const QWidget *w = Q_NULLPTR, QStyleHintReturn *rd = Q_NULLPTR) const{printf("UMenu::styleHint  %d\n",h);switch(h){  case QStyle::SH_ScrollBar_LeftClickAbsolutePosition: return true;case QStyle::SH_ScrollBar_MiddleClickAbsolutePosition:return true;case QStyle::SH_ScrollBar_ScrollWhenPointerLeavesControl: return false;case QStyle::SH_Menu_Scrollable: return true;/*这一句是关键,返回true,表明支持*/ }return QProxyStyle::styleHint(h,op,w);	}
};
代码2:cpp中使用
m_pmenu = new QMenu(this);//m_pmenu->setObjectName("myMenu");m_pmenu->setStyle(new UProxyStyle());connect(m_pmenu,&QMenu::triggered,this,&Dialog::slotTriggered);说明:当超过屏幕时,会自动出现箭头
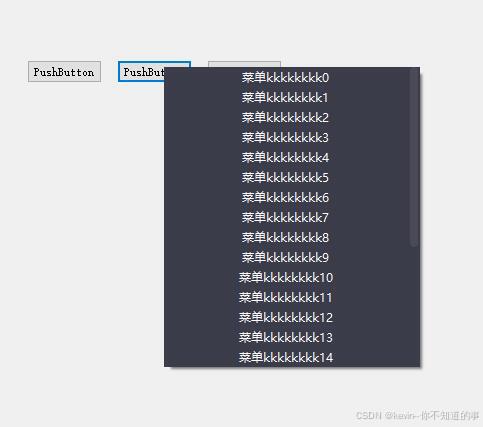
5.自定义带有滚动条的菜单样式(用QWidgetAction实现)
代码1:listwidgetaction.h文件
#ifndef LISTWIDGETACTION_H
#define LISTWIDGETACTION_H#include <QWidgetAction>
#include <QListWidget>
#include <QObject>class ListWidgetAction : public QWidgetAction
{Q_OBJECTpublic:explicit ListWidgetAction(QWidget *parent);virtual ~ListWidgetAction();void AddString(QString strText, int id);void Clear();void SetRowHeight(int nHeight);void SetMaxHeight(int nMaxHeight);signals:void sigClickItem(int id);private slots:void slotListItemClicked(QListWidgetItem *item);private:QListWidget* m_pListWidget;int m_nRowHeight = 20;int m_nMaxHeight = -1;};#endif // LISTWIDGETACTION_H
代码2:listwidgetaction.cpp文件
#include "listwidgetaction.h"
#include <QScrollBar>ListWidgetAction::ListWidgetAction(QWidget *parent):QWidgetAction(parent)
{m_pListWidget = new QListWidget(parent);m_pListWidget->setSpacing(0);m_pListWidget->setContentsMargins(0,0,0,0);m_pListWidget->setFocusPolicy(Qt::NoFocus);m_pListWidget->setVerticalScrollMode(QListWidget::ScrollPerPixel);//设置为像素滚动m_pListWidget->verticalScrollBar()->setEnabled(false);m_pListWidget->setObjectName("ListWidgetAction");m_pListWidget->setSelectionMode(QAbstractItemView::SingleSelection);m_pListWidget->setHorizontalScrollBarPolicy(Qt::ScrollBarAlwaysOff);m_pListWidget->setVerticalScrollBarPolicy(Qt::ScrollBarAlwaysOff);connect(m_pListWidget, &QListWidget::itemClicked, this, &ListWidgetAction::slotListItemClicked);setDefaultWidget(m_pListWidget);
}ListWidgetAction::~ListWidgetAction()
{}void ListWidgetAction::AddString(QString strText, int id)
{QListWidgetItem *item = new QListWidgetItem(strText);item->setData(Qt::UserRole, id);item->setSizeHint(QSize(-1, m_nRowHeight));item->setTextAlignment(Qt::AlignCenter);m_pListWidget->addItem(item);//int nCount = m_pListWidget->count();int nRowHeight = m_nRowHeight;int nTotalHeight = nCount * nRowHeight + 4;if(m_nMaxHeight != -1){if(nTotalHeight > m_nMaxHeight){nTotalHeight = m_nMaxHeight;m_pListWidget->verticalScrollBar()->setEnabled(true);m_pListWidget->setVerticalScrollBarPolicy(Qt::ScrollBarAlwaysOn);}else{m_pListWidget->verticalScrollBar()->setEnabled(false);m_pListWidget->setVerticalScrollBarPolicy(Qt::ScrollBarAlwaysOff);}}m_pListWidget->setFixedHeight(nTotalHeight);}void ListWidgetAction::Clear()
{m_pListWidget->clear();}void ListWidgetAction::SetRowHeight(int nHeight)
{m_nRowHeight = nHeight;}void ListWidgetAction::SetMaxHeight(int nMaxHeight)
{m_nMaxHeight = nMaxHeight;}void ListWidgetAction::slotListItemClicked(QListWidgetItem *item)
{int id = item->data(Qt::UserRole).toInt();emit sigClickItem(id);}
代码3:使用
 //菜单m_pmenu2 = new QMenu(this);m_pmenu2->setObjectName("myMenulist");//
void Dialog::on_pushButton_2_clicked()
{m_pmenu2->clear();ListWidgetAction * actionList = new ListWidgetAction(this);actionList->SetRowHeight(20);actionList->SetMaxHeight(300);connect(actionList , &ListWidgetAction::sigClickItem, this, &Dialog::slotMenuClickItem);for(int i=0; i<25;i++){QString ss;ss = QString("菜单kkkkkkkk%1").arg(i);actionList->AddString(ss, i);}m_pmenu2->addAction(actionList);m_pmenu2->exec(QCursor::pos());}void Dialog::slotMenuClickItem(int id)
{m_pmenu2->hide();int aa = 0;aa++;
}
说明:这一种样式,因为是QWidgetAction实现,所以只支持这种最简单的文字样式
demo源码:QT实战-qt菜单样式实现、自定义带滚动条的菜单实现